

Page 1

AC ADAPTOR
AC-DN2B
電気製品は、安全のための注意事項を守らないと、
火災や人身事故になることがあります。
この取扱説明書には、事故を防ぐための重要な注意事項と製品の
取り扱いかたを示してあります。この取扱説明書をよくお読みの
うえ、製品を安全にお使いください。お読みになったあとは、
いつでも見られるところに必ず保管してください。
OPERATION MANUAL
1st Edition (Revised 1)
[Japanese/English/French/German]
Page 2
日本語
安全のために
ソニー製品は安全に十分に配慮 して設計されています。しか
し、電気製品はまちが った使いかたをす ると 、火災や感電など
により 死亡や大けがなど人身事故につながることがあり、危険
です。
事故を防 ぐために次の こと を必ずお守りください。
安全のための注意事項を守る
2(J)〜4(J)ページの注意事項をよくお読みください。
定期点検を実施する
長期間安全に 使用していただくために、定期点検を実施するこ
とをおすすめします。点検の内容や費用については、ソニーの
サービス担当者または営業担当者にご相談ください。
故障したら使用を中止する
ソニーのサービス担当者、または営業担当者にご連絡ください。
万一、異常が起きたら
1 AC電 源コードや DC
異常な音、にお
•
い、煙が出たら
落下させたら
•
,
ケーブルを抜く。
2 ソニーのサービス担当
者、または営業担当者
に修理を依頼する。
警告表示の意味
このオペレーションマ
ニュアルおよび製品で
は、次のような表示を
しています。表示の内
容をよく理解してから
本文をお読みくださ
い。
この表示の注意事項を
守らないと、火災や感
電などにより死亡や大
けがなど人身事故につ
ながることがありま
す。
この表示の注意事項を
守らないと、感電やそ
の他の事故によりけが
をしたり周辺の物品に
損害を与えたりするこ
とがあります。
炎が出たら
•
3 すぐにAC電源コー ドや
,
DCケーブルを抜き、消
火する。
注意を促す記号
行為を禁止する記号
行為を指示する記号
Page 3

目次
..........................................................................
.........................................................................
概要 ..............................................................................
各部の名称と働き ........................................................
接続 ..............................................................................
接続できる主な機器 ....................................................... 8(J)
電源コードの接続 ............................................................ 9(J)
ポータブルエディ ターへの取り付け ..............................10(J)
ベータカム SX、デジタルベータカムカムコーダーへの取り
付け ............................................................................ 12(J)
ベータカムSPカムコーダーへの取り付け..................... 12(J)
充電のしかた..............................................................
仕様 ............................................................................
2(J)
4(J)
5(J)
6(J)
8(J)
13(J)
14(J)
日
本
語
1(J)
Page 4

下記の注意を守らないと、火災や感電により
死亡や大けがにつながることがあります。
下記の注意を守らないと、
火災や感電により死亡や大けが
につながることがあります。
分解しない、改造しない
電源 部を分解したり、改造したりすると、感電の原因となります。
内部に水や異物を入れない
水や異物が入ると火災や感電の原因となります。
万一、水や異物が入ったときは、すぐに電源を切り 、AC電源コードやケー
ブルを抜いて、ソニーのサービス担当者または営業担当者にご相談くだ
さい。
電源コードやDCケーブルを傷つけない
AC
AC電源コードやDCケーブルを傷つけると、火災や感電の原因となりま
す。
• コー ドやケーブルを加工した り、傷つけた りしない。
• 重いものをのせたり 、引っ張ったりしない。
• 熱器具に近づけたり、加熱したりしない。
• コー ドやケーブルを抜くときは、 必ずプラ グを持っ て抜く。
万一、コードやケーブルが傷んだら、ソニーのサー ビス 担当者に交換を ご
依頼ください。
2(J)
油煙、湯気、湿気、ほこりの多い場所では設置・使
用しない
上記のような場所で設置・使用すると、火災や感電の原因となります。
直射日光のあたるところでは使用しない
本機が発熱し、火災の原因となります。
本機を複数個取り付けて使用しない
本機を複数個取り付けて使用すると発熱し、火災の原因となります。
Page 5

指定のバッテリーパックを使用する
このマニュアルに記されているバッテ リーパックをお使いください。指定以
外 のバッテリーパックを 使 用すると、火 災 の原因となります 。
表示された電源電圧で使用する
機器に表示されたものと異なる電源電圧で使用すると、火災や感電の原
因とな り ます。
3(J)
Page 6
下記の注意を守らないと、火災や感電により
死亡や大けがにつながることがあります。
下記の注意を守らないとけがをしたり周辺の
物品に
損害を与えることがあります。
定格出力を越えないよう、接続する機器の消費電力
を確認する
出力電力を越えて使用すると高温になり、故障の原因となることがあります。
付属の電源コードを使用する
付属以外の電源コードを使用すると、火災や感電の原因となります。
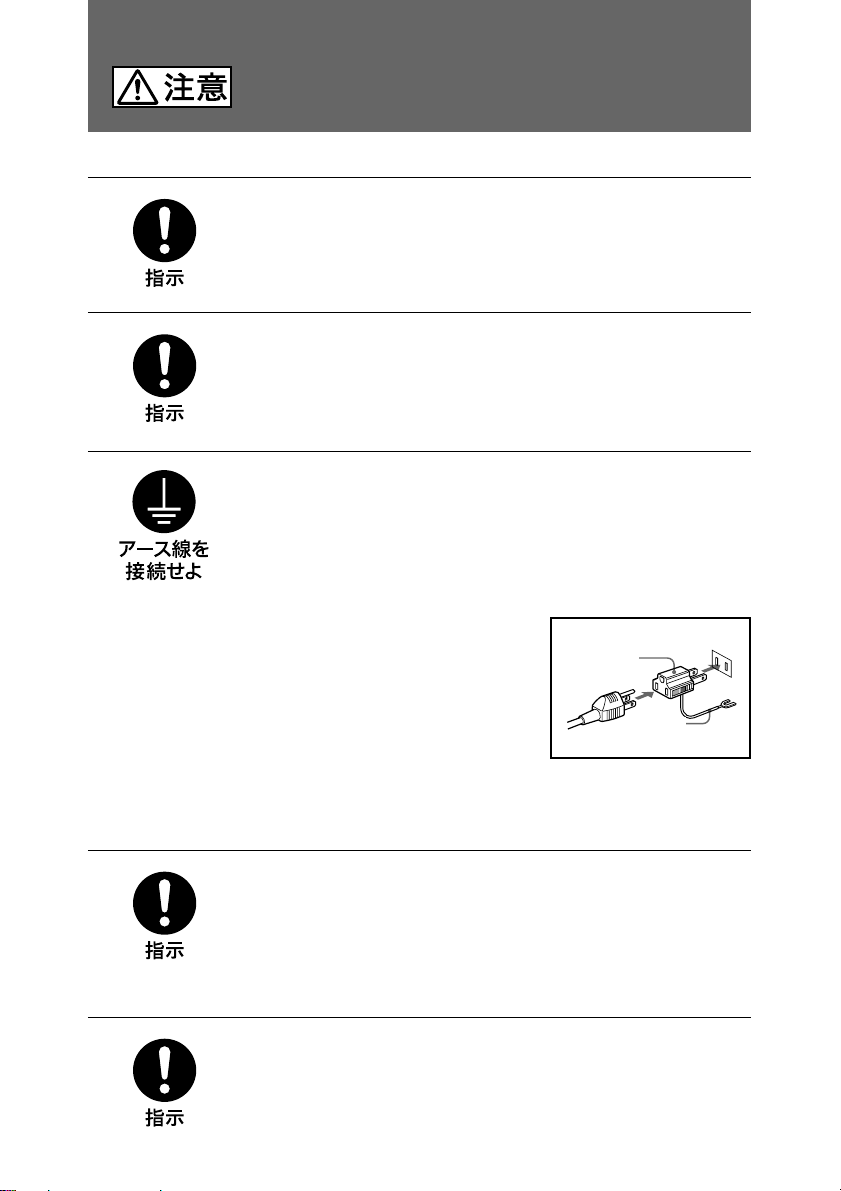
安全アースを接続する
安全アースを接続しないと、感電の原因となることがあります。次の方法
でアースを接続してく ださい。
• 電源コンセントが
付属の電源コードを使用することで安全アースが接続されます。
• 電源コンセントが
付属の3極t2極変換プラグを使用し、
変換プラグから出ている緑色のアース線
を建物に備えられているアース 端子に接
続してく ださい。
安全アースを接続できない場合は、ソニーのサービス担当者または営業担
当者にご相談ください。
極の場合
3
極の場合
2
変換プラグ
アース線
4(J)
機器への取り付けを正しく行う
本機をポータブルエディ ターなどに取り付ける ときは、オペレ ーションマニュ
アル をよく読んだうえ、 確実に取り付けてください。取り付け方 法を誤ると
本機が落下し、けがの原因となることがあります。
ファンモーター開口を塞がない
ファンモーターおよび両側の開口部を塞ぐと高温になり、故障の原因とな
ることがあります 。
Page 7

概要
AC-DN2Bは、ソニーのポータブ ルエ ディ
ターDNW-A220やベータカムカムコーダーな
どに接続するACアダプター兼簡易バッテ
リ ーチャージャーです。
本機の主な特長は次のとおりです。
最大出力
リチウムイオンバッテリーパックBP-L60A/
L-90Aを使用できる機器へは、最大出力150
Wの電力を供給します。
までのDC電力供給
150W
約85%の簡易充電機能
本機にリチウムイオンバッテリ ーパック
BP-L60A/L90Aを取り付け、約85%の簡易
充電を行うことが できます 。
ご注意
バッテリーパックを本機に取り付けたままで
DNW-A220など消費電力が100W以上の機
器を使用すると、定格出力をオーバーし、発
熱の原因になることがあります。消費電力が
100W以上の機器に電源を供給しながら同
時に充電をしないでください。
バッテリーバックアップ機能
充電済みのリチウムバッテリーパックBPL60A/L90Aを取り付けた状態で誤ってAC
電源コードを抜いた場合、 バッテリー電源に
切り換わり、 接続した機器の動作を保持しま
す。保持時間は接続された機器の消費電力
によ り 異な ります。
ファンモーター動作
接続する機器の負荷によって、内部冷却用
ファンモーターの回転数が変化します。
5(J)
Page 8

各部の名称と働き
1
POWER
スイッチ
2
POWER
インジケーター
3
入力コネクター
AC
4
出力コネクター(4ピン)
DC
6(J)
5 バッテリー充電用コネクター(5ピン)
6
出力コネクター(5ピン)
DC
Page 9

1
POWER
電源を入/切します。
2
POWER
電源が入ると点灯します。
バッテリーパックによるバックアップ 時には 点
灯しません。
3
AC
別売りの電源コードでAC電源に接続します。
4
DC
付属のDCケーブルを使って、DNW-A220な
どのポータブル機器へ電源を供給します。
ピンの極性は、4番がプラス(+)、1番がマイ
ナス(−)です。
5
バッテリー充電用コネクター(5ピン)
リチウムイオンバッテリーパックBP-L60A/
L90Aを充電するとき、電源を供給します。
両端のピンは、バッテ リーセ ンサーです。誤っ
てリ チウムイオンバッテリ ー以外を充電しよう
とした場合、セ ンサーが働き通電しま せん。
スイッチ
インジケーター
入力コネクター
出力コネクター(4ピン)
6
出力コネクター(5ピン)
DC
ポータ ブルエディター、フィールドエディターな
どにダイレクトに 接 続し 、DC電源を供給しま
す。
BVW-300/BVW-400などのベータカムSPカ
ムコーダーに接続する場合は、別売りのバッ
テリーアダプターBKW-L601または BKW-
L601/2を使って取り付け、DC電源を供給し
ます。
7(J)
Page 10
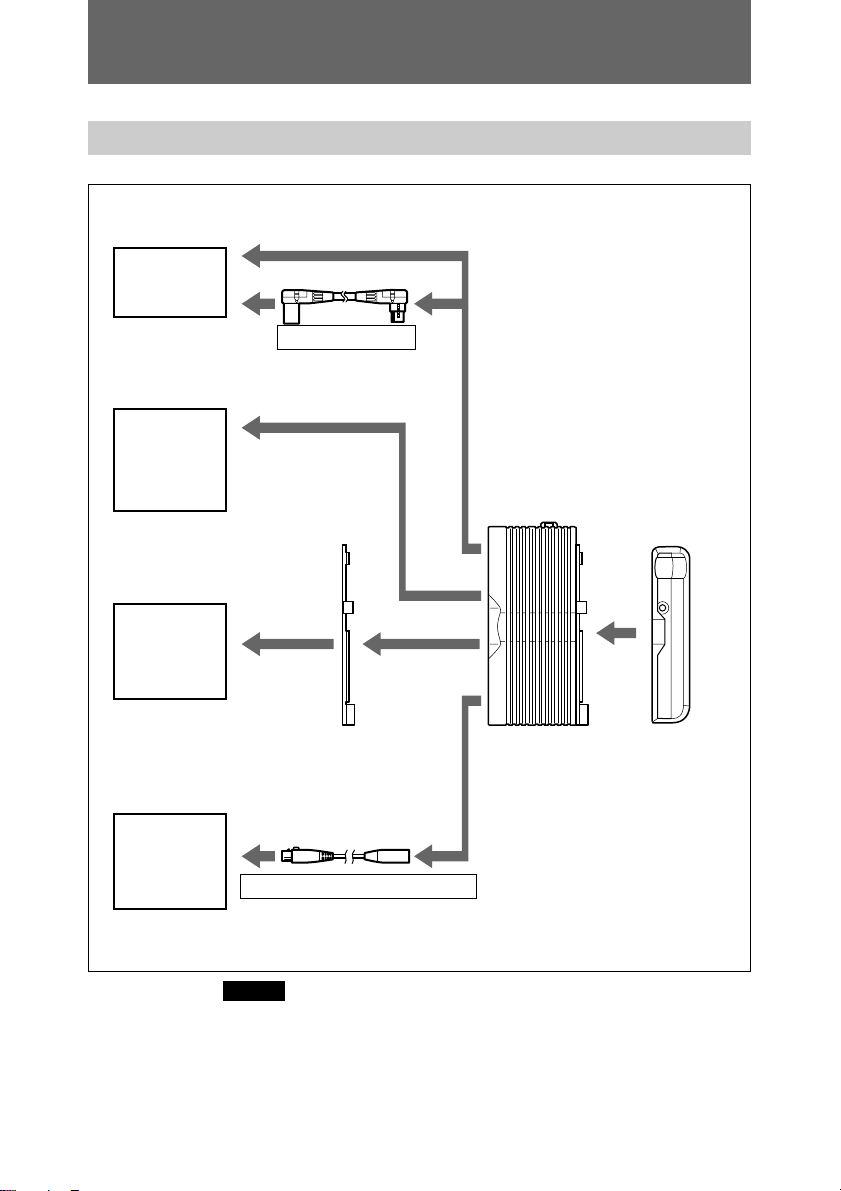
接続
接続できる主な機器
ポータブル
エディター
DNW-A220
など
ベータカムSX、
デジタルベータカム
カムコーダー
DNW-7
DNW-90
DVW-709WS
DC
ケーブル(付属)
AC-DN2B
(本機)
ベータカム
カムコーダー
SP
BVW-300
BVW-400
その他の
ポータブル機器
BVW-50
DNV-5
DVW-250
バッテリーアダプター
BKW-L601
または
BKW-L601/2
ケーブル
DC
CCDD-X2
(別売り)
(別売り)
リチウムイオン
バッテリーパック
BP-L60A/L90A
ご注意
ベータカム SPカムコーダーに本機を取り付ける場 合は、別 売りの
BKW-L601またはBKW-L601/2を追加購入してください。
8(J)
Page 11
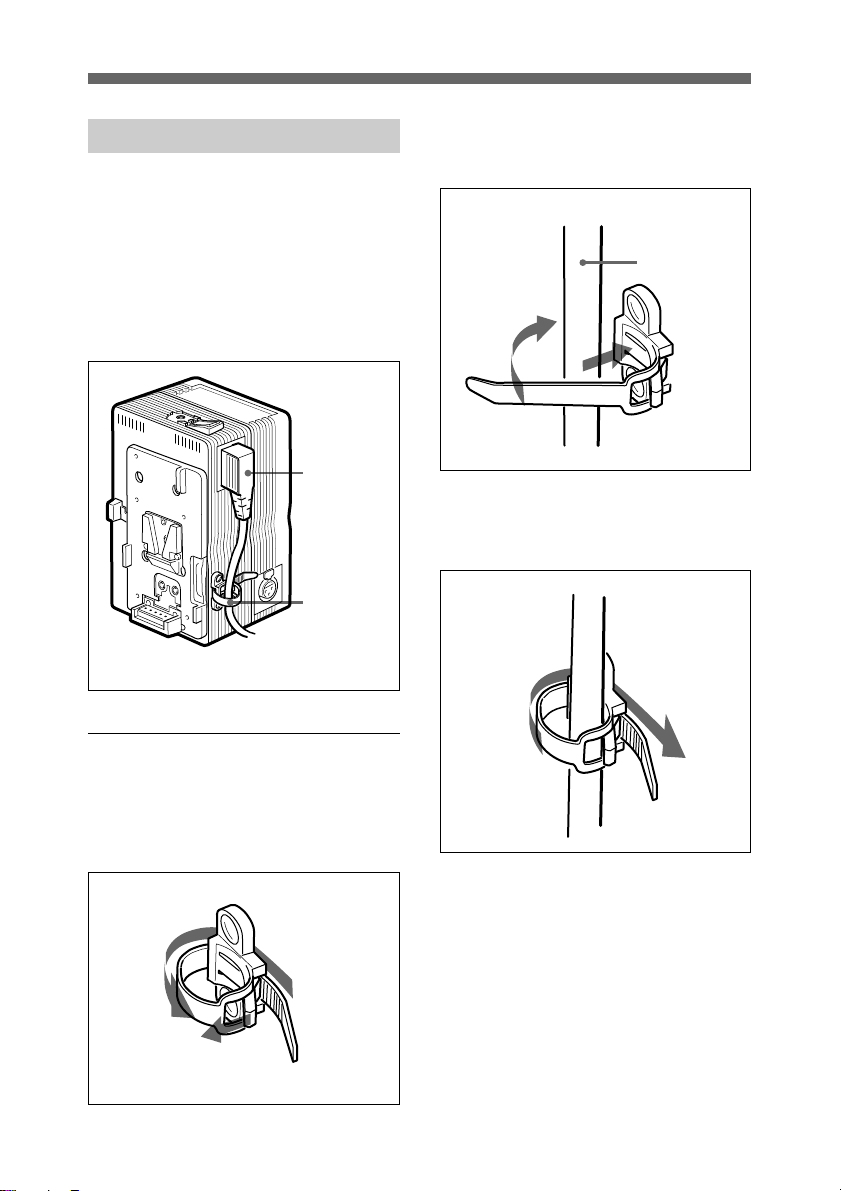
電源コードの接続
付属のAC電源コード(アングルタイプ)また
は別売りの電源コード(ストレートタイプ)を接
続し、下図のようにコードを クラ ンパーで固定
してください。カムコーダーで使用する場合
は、別売りの 電源コー ド(ストレートタイプ)を
おすすめします。
付属の
電源
AC
コード
コード
クランパー
2 本機に電源コードを接続し、クラン パー
に絡ませる。
電源コード
3 矢印の方向にクランパーを押して、コー
ドを固定する。
コードクランパーの使いかた
1 つまみ部分を上に上げて、クランパーを
ゆるめる(または外す)。
9(J)
Page 12
接続
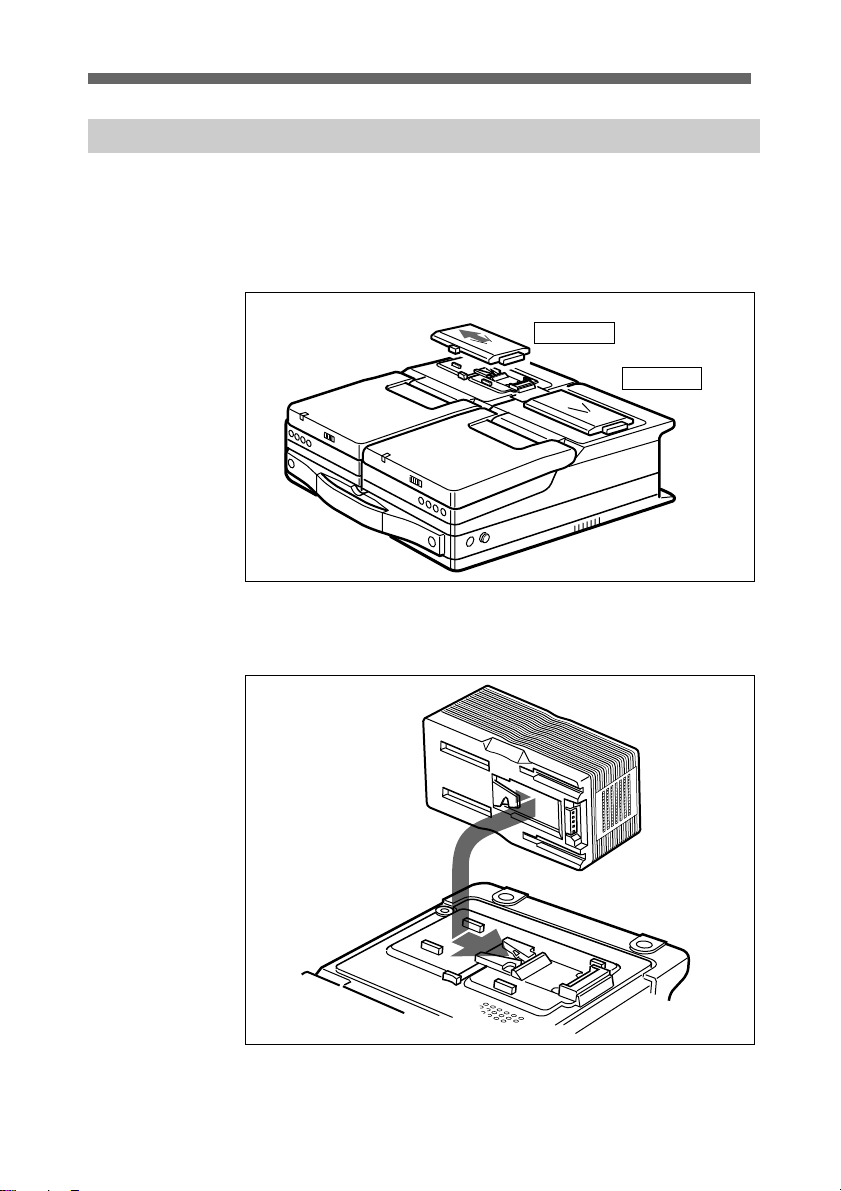
ポータブルエディターへの取り付け
ポータブルエディターDNW-A220と本機を以下の手順で接続します。
1 DNW-A220上面のバッテリー端子カバーを外す。
◆詳しくは、DNW-A220のマニュアルをご覧ください。
2 本機の突起とDNW-A220の溝を合わせ、バッテリ ーコネクタ ー同士が
接続する よ うに本機をスラ イドさせる。
プレーヤー
レコーダー
10(J)
Page 13
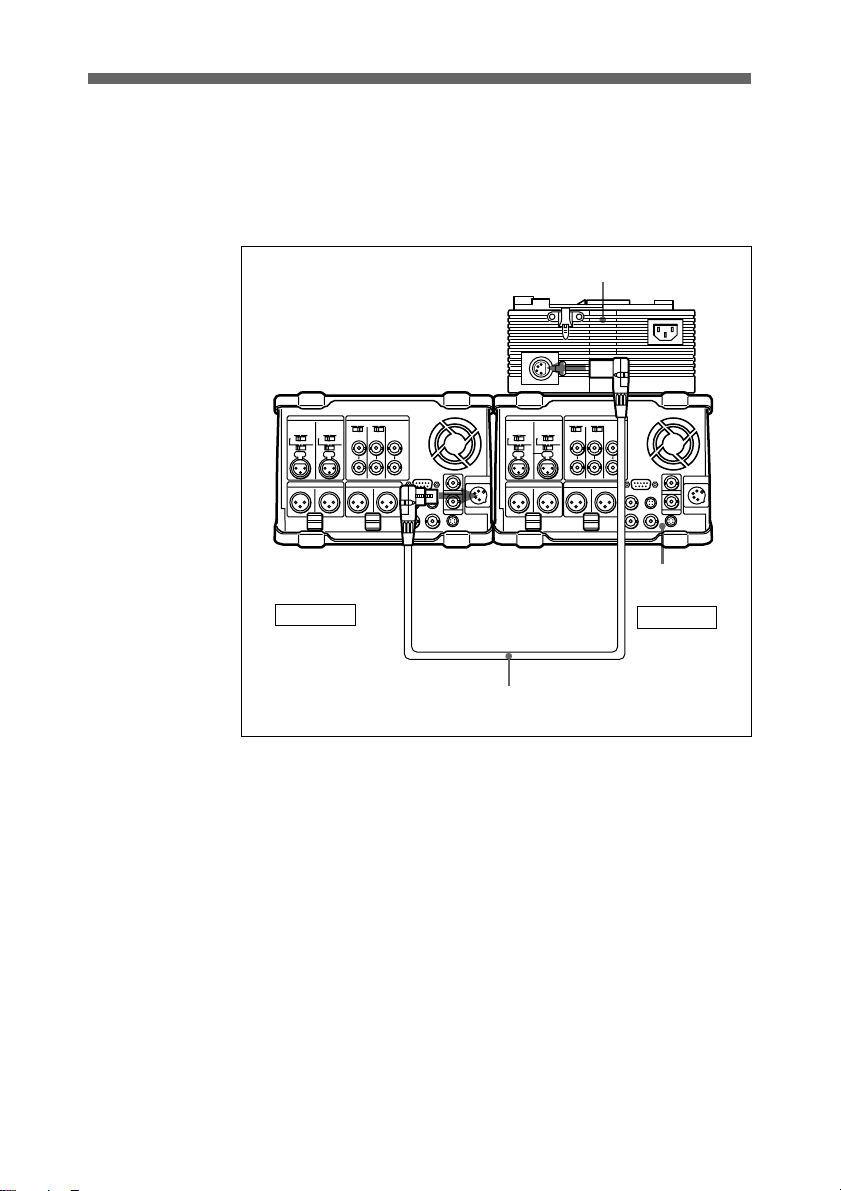
3 本機のDC出力コネクターとレコーダー側のDCINコネクターを付属
のDCケーブルでつなぐ。
なお、レコーダー側に本機を直接取り 付け、 プレーヤー側へ DC ケー
ブルをつなぐこ と もでき ます。
AC-DN2B
出力コネクターへ
DC
コネクターへ
DC IN
DNW-A220
後面
レコーダー
DC
プレーヤー
ケーブル
11(J)
Page 14
接続
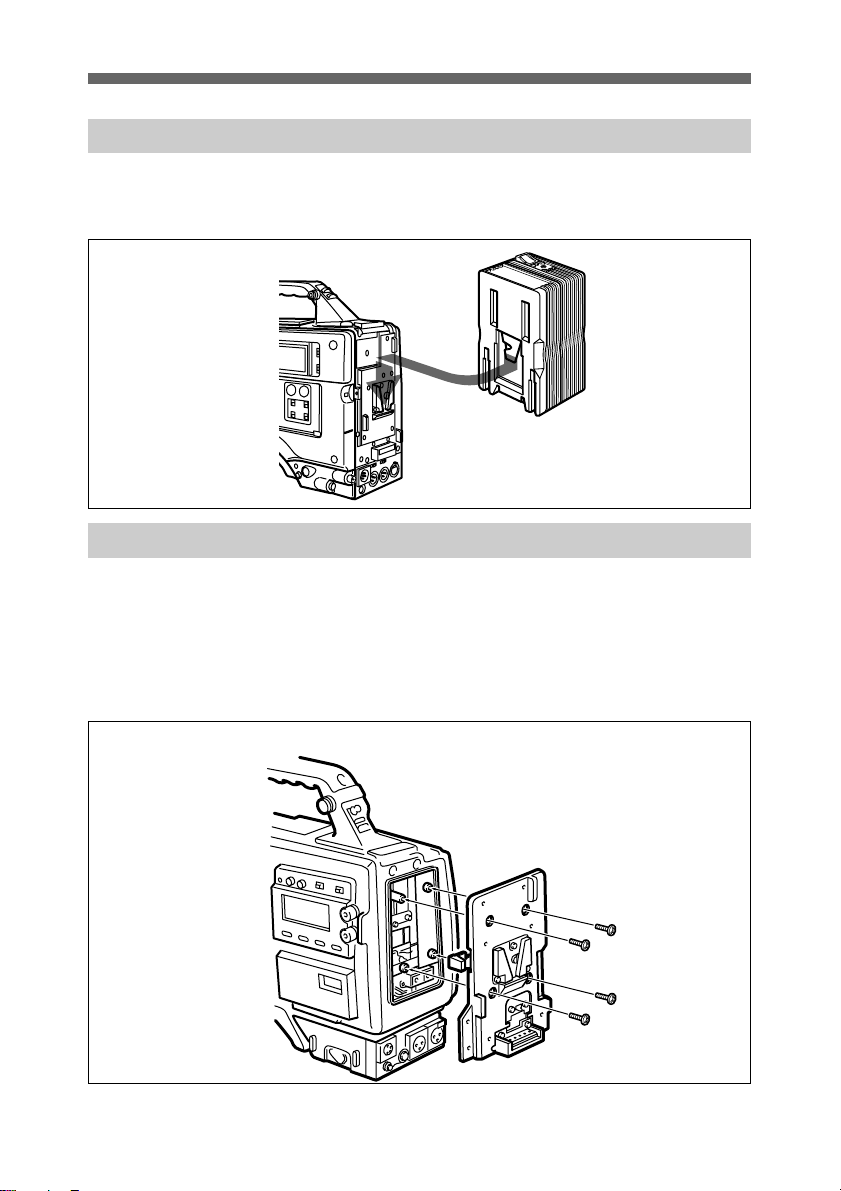
ベータカムSX、デジタルベータカムカムコーダーへの取り付け
下図のよう に取り付けると、 カムコーダーと本機のバッテリ ーコネク ター同
士が接続されます。
ベータカムSPカムコーダーへの取り付け
別売りのバッテ リーアダプターBKW-L601またはBKW-L601/2を下図のよ
うに取り付け、 上記の「ベータカムS X、 デ ジ タ ルベー タカム カムコ ー ダーへ
の取り付け」 と同様に取り 付けます。
◆ ベータカムSPカムコーダーからバッテ リ ーケースを取り外す手順について
は、BKW-L601または BKW-L601/2のマニュアルをご覧ください。
12(J)
Page 15
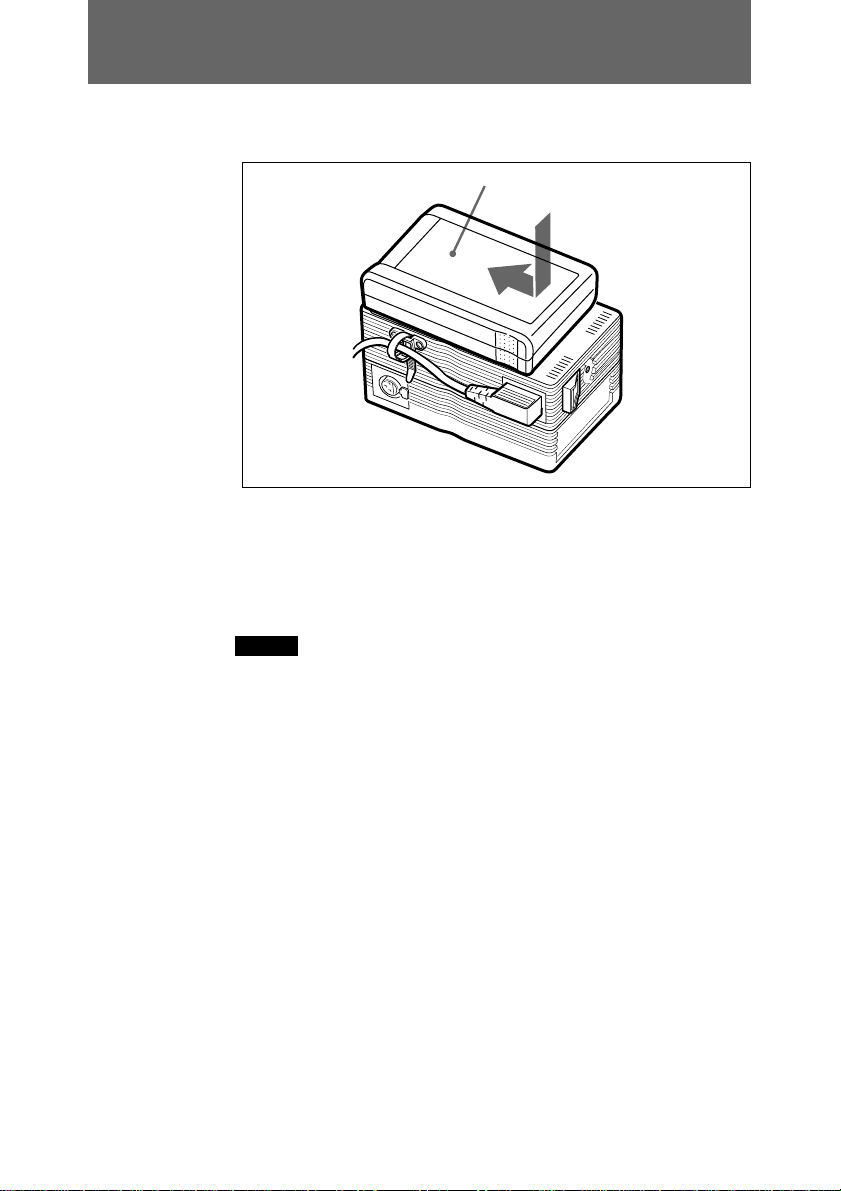
充電のしかた
1
本機にリチウムイオンバッテリーパックBP-L60A/L90Aを取り付ける。
2 本機に接続した電源 コードをAC電源に接続する。
約85%の充電までにBP-L60Aで約4時間、BP-L90(A)で約6時間
かかります(気温が25°Cの場合)。
BP-L60A/L90A
ご注意
•本機で行う充電は、簡易充電です 。バッテ リーの充 電イ ンジケータ ーがフ
ル点灯しても、本機で充電した場合は約
す。
•充電量の確認はバッテリー を本機からはずしてから行って ください。バッ
テリーを本機に取り付けた状態では、バッテリーの充電インジケーターは
充電量を 正確に表示しません。
•本機を消費電力が100W以上の機器に接続し、電源を供給しながら同
時にバッテリーの充電を行うことは できません 。 電源 を供給しながら充電
を行 うと、本機の定格出力がオーバーして発熱したり、ビデオカメラ等の
動作に影響を与えることがあります。ただし、消費電力が100W以下の
機器ならば、電源を供給しながら充電を行うことが できます。
%の充電状態になっていま
85
13(J)
Page 16

仕様
一般
電源電圧 AC100V、50/60Hz
消費電力 190VA
動作温度 0℃〜40℃
質量 約950g
外形寸法(突起部含まず)
101×169×70mm
(幅×高さ×奥行き)
入出力
入力電力(AC) 200W以下
(定格出力時)
定格出力電力(DC)
150W
出力電圧(DC) 16.7V
出力電流(DC) 9A(定格出力時)
出力端子(DC) 5ピン端子/4ピン端子:
9A(トータル )
充電端子(DC) 5ピン端子:
2.2A
(電流リミッター
付き)
別売りアクセサリー
AC電源コード (ストレートタイプ)
DCケーブル CCDD-X2(2m)
バッ テリ ーアダプター
BKW-L601/2
本機は「高調波ガイドライ ン適合品」です。
仕様および外観は、改良のため予告なく変
更することがありますが、ご了承ください。
付属品
DCケーブル(45cm)(1)
オペ レーションマニュアル (1)
AC電源コード(ア ングルタイプ)(1)
変換プラグ(1)
......................................................................................................................................................................
この説明書は再生紙を使用しています。
14(J)
Page 17

Important Safety
Instructions
• Read these instructions.
• Keep these instructions.
• Heed all warnings.
• Follow all instructions.
• Do not use this apparatus near water.
• Clean only with dry cloth.
• Do not block any ventilation
openings. Install in accordance with
the manufacturer’s instructions.
• Do not install near any heat sources
such as radiators, heat registers,
stoves, or other apparatus (including
amplifiers) that produce heat.
• Do not defeat the safety purpose of
the polarized or grounding-type plug.
A polarized plug has two blades with
one wider than the other. A
grounding-type plug has two blades
and a third grounding prong. The
wide blade or the third prong is
provided for your safety. If the
provided plug does not fit into your
outlet, consult an electrician for
replacement of the obsolete outlet.
• Protect the power cord from being
walked on or pinched particularly at
plugs, convenience receptacles, and
the point where they exit from the
apparatus.
• Only use attachments/accessories
specified by the manufacturer.
• Use only with the cart, stand, tripod,
bracket, or table specified by the
manufacturer, or sold with the
apparatus.
When a cart is used, use
caution when moving the
cart/apparatus combination
to avoid injury from tip-over.
English
• Unplug this apparatus during
lightning storms or when unused for
long periods of time.
• Refer all servicing to qualified
service personnel. Servicing is
required when the apparatus has been
damaged in any way, such as powersupply cord or plug is damaged,
liquid has been spilled or objects
have fallen into the apparatus, the
apparatus has been exposed to rain or
moisture, does not operate normally,
or has been dropped.
WARNING
To reduce the risk of fire or
electrical shock, do not
expose this apparatus to
rain or moisture.
To avoid electrical shock,
do not open the cabinet.
Refer servicing to qualified
personnel only.
WARNING
THIS APPARATUS MUST BE EARTHED.
Use only the battery packs
specified in this operation
manual. Using the battery
packs other than those
specified could result in
fire.
1 (E)
Page 18

For customers in the USA
For customers in Europe
You are cautioned that any changes or
modifications not expressly approved in
this manual could void your authority to
operate this equipment.
WARNING: THIS WARNING IS
APPLICABLE FOR USA ONLY.
If used in USA, use the UL LISTED power
cord specified below.
DO NOT USE ANY OTHER POWER
CORD.
Plug Cap Parallel blade with ground pin
(NEMA 5-15P Configuration)
Cord Type SJT, three 16 or 18 AWG
wires
Length Less than 2.5 m (8 ft 3 in)
Rating Minimum 10 A, 125 V
Using this unit at a voltage other than
120V may require the use of a different
line cord or attachment plug, or both.
To reduce the risk of fire or electric shock,
refer servicing to qualified service
personnel.
WARNING: THIS WARNING IS
APPLICABLE FOR OTHER
COUNTRIES.
This product with the CE marking
complies with the EMC Directive (89/
336/EEC) issued by the Commission
of the European Community.
Compliance with this directive implies
conformity to the following European
standards:
• EN60065: Product Safety
• EN55103-1: Electromagnetic
Interference (Emission)
• EN55103-2: Electromagnetic
Susceptibility (Immunity)
This product is intended for use in the
following Electromagnetic
Environment(s): E1 (residential), E2
(commercial and light industrial), E3
(urban outdoors), and E4 (controlled
EMC environment, ex. TV studio).
1 Use the approved Power Cord/Plug
with earthing-contacts that conforms
to the safety regulations of each
country if applicable.
2 Use the Power Code/Plug
conforming to the proper ratings
(Voltage, Ampere).
2 (E)
Page 19

Table of Contents
Overview.......................................................................4(E)
Locations and Functions of Parts and Controls ......5(E)
Connections .................................................................7(E)
Major Connectable Devices.......................................7(E)
Connecting the AC Power Cord ................................8(E)
Attaching to a Portable Editor ...................................9(E)
Attaching to Betacam SX/Digital Betacam
Camcorders ........................................................11(E)
Attaching to Betacam SP Camcorders.....................11(E)
Charging Batteries ....................................................12(E)
Specifications ............................................................13(E)
3 (E)
Page 20

Overview
Overview
The AC-DN2B functions as an AC
adaptor and battery charger when
attached to portable devices, such as a
DNW-A220/A220P digital portable
editor or digital Betacam camcorders.
The AC-DN2B has the following
features:
Maximum power supply of
150W DC
The AC-DN2B supplies a maximum
of 150W to devices that use the BPL60A/L90A Lithium-Ion Battery
Pack.
Battery charging of about
85% capacity
The AC-DN2B can be used to charge
a BP-L60A/L90A Lithium-Ion Battery
Pack to about 85% capacity.
Note
Operating the DNW-A220/A220P (or
another device with a power rating of
100W or more) while charging the
battery with the AC-DN2B may cause
excessive power consumption and
overheating in the AC-DN2B.
Therefore, you should never charge a
battery while operating the device.
Battery backup
Should the AC power cord be
accidentally unplugged from the AC
power source, a charged BP-L60A/
L90A Lithium-Ion Battery Pack
attached to the AC-DN2B provides an
alternate back-up power to the
connected device. The operating time
when running off the battery pack
depends on the power consumption of
the connected device.
Automatic changing of fan
speed
The rotation speed of the cooling fan
in the AC-DN2B changes
automatically according to the power
consumption of the connected device.
4 (E)
Page 21

Locations and Functions of Parts and Controls
1 POWER switch
2 POWER indicator
3 AC input connector
4 DC output connector
(4-pin)
5 Battery charging connector (5-pin)
6 DC output connector (5-pin)
5 (E)
Page 22

Locations and Functions of Parts and Controls
1 POWER switch
Turns the power on or off.
2 POWER indicator
The indicator lights up when the
power is turned on. This indicator
does not light up, however, when the
BP-L60A/L90A Lithium-Ion Battery
Pack is used as the back-up power
supply.
3 AC input connector
Connects to an AC power source
through an optional AC power cord.
4 DC output connector (4-pin)
Supplies DC power through the
supplied DC cable to the DNW-A220/
A220P or other portable device. The
No.4 pin is the plus connector and the
No.1 the minus.
5 Battery charging connector
(5-pin)
Supplies power for charging a BPL60A/L90A Lithium-Ion Battery
Pack.
The two outside pins are sensors
which block the charging current
when a battery other than a LithiumIon Battery has been mistakenly
attached.
6 DC output connector (5-pin)
Supplies DC power to portable editors
and field editors, connected directly to
the AC-DN2B.
When the AC-DN2B is attached to a
Betacam SP camcorder, such as the
BVW-300/300P/BVW-400/400P,
through the optional BKW-L601 or
BKW-L601/2 Battery Adaptor, DC
power is supplied to the camcorder.
6 (E)
Page 23

Connections
Major Connectable Devices
Portable editors
DNW-A220/P,
etc.
DC cable (supplied)
Betacam SX/
Digital Betacam
camcorders
DNW-7/P
DNW-90/P
DVW-709WS/P
Betacam SP
camcorders
BVW-300/P
BVW-400/P
AC-DN2B
(This unit)
BP-L60A/L90A
Lithium-Ion
Battery Pack
Other portable
devices
BVW-50/P
DNV-5
DVW-250/P
BKW-L601 or BKWL601/2 Battery Adaptor
(not supplied)
CCDD-X2 DC cable (not supplied)
Note
To attach the AC-DN2B to a Betacam SP camcorder, it is
recommended that the optional BKW-L601 or BKW-L601/2
Battery Adaptor be purchased.
7 (E)
Page 24

Connections
Connecting the AC Power Cord
When connecting the supplied AC
power cord (angle type) or an optional
AC power cord (straight type) to the
AC-DN2B, secure the cord with the
cord strap as shown below.
When operating a camcorder, using an
optional straight type AC power cord
is recommended.
AC power
cord
(supplied)
Cord strap
2 Connect the AC power cord and
wrap the strap around it.
AC power cord
3 Insert the strap through the buckle
and push it in the direction of the
arrow until the cord is firmly
secured.
Using the Cord Strap
1 Pull back the clasp to release the
strap, or pull the strap out.
8 (E)
Page 25

Attaching to a Portable Editor
Do the following procedure to attach the AC-DN2B to a
DNW-A220/A220P digital portable editor.
1 Remove the battery connector cover on top of the DNW-
A220/A220P.
For details, refer to the operation manual for the DNWA220/A220P.
2 Align the battery connector on the AC-DN2B with the
groove on the DNW-A220/A220P and slide the AC-DN2B
in until it is firmly attached.
Player
Recorder
9 (E)
Page 26

Connections
3 Use the supplied DC cable to connect the DC output
connector on the AC-DN2B to the DC IN connector on the
recorder of the DNW-A220/A220P.
You may also attach the AC-DN2B directly to the
recorder, and then connect the adaptor to the player using
the DC cable.
AC-DN2B
to the DC output
connector
10 (E)
to the DC IN
connector
Recorder Player
DC cable
Rear panel of
the DNWA220/A220P
Page 27

Attaching to Betacam SX/Digital Betacam Camcorders
Attach the AC-DN2B to the devices as shown in the illustration
below.
Attaching to Betacam SP Camcorders
Attach the optional BKW-L601 or BKW-L601/2 Battery
Adaptor to the Betacam SP camcorder as shown in the
illustration below, then attach the AC-DN2B as you would to a
Betacam SX camcorder or digital Betacam camcorder.
For details on detaching the battery case from a Betacam SP
camcorder, refer to the operation manual for the BKW-L601 or
BKW-L601/2.
11 (E)
Page 28

Charging Batteries
Charging Batteries
1 Attach the BP-L60A/L90A Lithium-Ion Battery Pack.
2 Plug in the AC power cord connected to the AC-DN2B
into an AC power outlet.
At a room temperature of 25 °C (77 °F), the AC-DN2B
will provide an 85% charge to a BP-L60A in about four
hours, and to a BP-L90A in about six hours.
Notes
•When the AC-DN2B has charged the BP-L60A/L90A to
about 85% capacity, all four indicators on the BP-L60A/
L90A will light up.
•The actual charge level will not be shown on the indicators
while the AC-DN2B is still attached to the battery. To check
the charge level, you must first disconnect the battery from
the AC-DN2B.
•Never charge a battery with the AC-DN2B while the battery
is being used to operate a device with a power rating of more
than 100W. Doing so may cause excessive power
consumption and overheating in the AC-DN2B, or a
malfunction in the device. This warning does not apply to
devices rated at 100W or less.
BP-L60A/L90A
12 (E)
Page 29

Specifications
General
Voltage source
100-240V AC, 50/60 Hz
Current drain
2.0 A
Peak inrush current
(1) Power ON, current
probe method: 80 A
(240 V)/15 A (100 V)
(2) Hot switching inrush
current, measured in
accordance with European
standard EN55103-1:
18 A (230 V)
Operating temperature
0°C to 40°C
(32°F to 104°F)
Mass Approx. 950 g (2 lb 2 oz)
Dimensions
101 × 169 × 70 mm
(4 × 63/4 × 27/8 inches)
(w/h/d) (excluding
projecting parts)
DC output connector
5-pin/4-pin connector
9 A (total)
Battery charging connector
5-pin connector (with
current limiter) 2.2 A
Supplied accessories
DC cable (45 cm) (1)
Operation Manual (1)
AC power cord (angle type) (1)
Optional accessory
AC power cord (straight type)
DC cable CCDD-X2 (2.0 m)
Battery Adaptor
BKW-L601/2
Design and specifications are subject
to change without notice.
Input/output
Power in (AC)
200 W or less (on
regulation)
Rated power output (DC)
150 W
Voltage output (DC)
16.7 V
Current output (DC)
9 A (on regulation)
......................................................................................................................................................................
13 (E)
Page 30

Page 31

AVERTISSEMENT
Afin d’éviter tout risque
d’incendie ou
d’électrocution, ne pas
exposer cet appareil à la
pluie ku à l’humidité.
Afin d’écarter tout risque
d’électrocution, garder le
coffret fermé. Ne confier
l’entretien l’appareil qu’à
un technicien qualifié.
AVERTISSEMENT
CET APPAREIL DOIT ÊTRE RELIÉ À LA
TERRE.
AVERTISSEMENT:
CET AVERTISSEMENT
CONCERNE LE CORDON/
LA FICHE D’ALIMENTATION.
Français
Pour les clients européens
Ce produit portant la marque CE est
conforme à la fois à la Directive sur la
compatibilité électromagnétique
(EMC) (89/336/CEE) et à la Directive
sur les basses tensions (73/23/CEE)
émises par la Commission de la
Communauté européenne.
La conformité à ces directives
implique la conformité aux normes
européennes suivantes:
• EN60065: Sécurité des produits
• EN55103-1: Interférences
électromagnétiques (émission)
• EN55103-2: Sensibilité
électromagnétique (immunité)
Ce produit est prévu pour être utilisé
dans les environnements
électromagnétiques suivants:
E1 (résidentiel), E2 (commerciel et
industrie légère), E3 (urbein
extérieur) et E4 (environnement EMC
contrôlé, ex. studio de télévision).
1 Utilisez le cordon et la fiche
d’alimentation avec prise de terre,
approuvés et conformes à la
réglementation relative à la sécurité,
adoptée par chaque pays.
2 Utilisez le cordon et la fiche
d’alimentation conformes aux
caractéristiques appropriées
(tension, ampérage).
1 (F)
Page 32

Table des matières
Table des matières
Vue générale ................................................................3(F)
Emplacements et fonctions des pièces et des
commandes............................................................. 4(F)
Connexions .................................................................. 6(F)
Principaux dispositifs connectables ...........................6(F)
Raccordement d’un cordon d’alimentation secteur ... 7(F)
Fixation à un éditeur portable .................................... 8(F)
Fixation aux camescopes Betacam SX/
Digital Betacam.................................................. 10(F)
Fixation aux camescopes Betacam SP..................... 10(F)
Recharge d’un accumulateur ...................................11(F)
Fiche technique .........................................................12(F)
2 (F)
Page 33

Vue générale
Le AC-DN2B fonctionne comme un
adaptateur secteur et un chargeur
d’accumulateur lorsque fixé à des
dispositifs portables, tels que des
éditeurs portables DNW-A220P ou
des camescopes numériques Betacam.
Le AC-DN2B possède les fonctions
suivantes:
Alimentation maximum de
150 W CC
Le AC-DN2B fournit un maximum de
150 W aux dispositifs utilisant
l’accumulateur aux ions lithium BPL60A/L90A.
Charge d’accumulateur avec
rendement d’environ 85%
Le AC-DN2B peut être utilisé pour
charger un accumulateur aux ions
lithium BP-L60A/L90A à environ
85% de sa capacité.
Changement automatique de
la vitesse du ventilateur
La vitesse de rotation du ventilateur de
refroidissement du AC-DN2B change
automatiquement selon la puissance
consommée par le dispositif raccordé.
Accumulateur alimentation
de secours
Si le cordon d’alimentation secteur est
accidentellement débranché de la prise
secteur, un accumulateur aux ions
lithium BP-L60A/L90A chargé fixé au
AC-DN2B assure une alimentation de
secours alternative du dispositif
connecté. Le temps de fonctionnement
sur l’accumulateur dépend de la
consommation du dispositif connecté.
Remarque
Faire fonctionner le DNW-A220P (ou
un autre dispositif à une puissance de
100 W ou plus) pendant la charge d’un
accumulateur avec le AC-DN2B peut
provoquer une consommation
excessive et la surchauffe dans le ACDN2B. Ne jamais charger un
accumulateur pendant le
fonctionnement du dispositif.
3 (F)
Page 34

Emplacements et fonctions des
Locations and Functions of Parts and Controls
pièces et des commandes
1 Interrupteur d’alimentation (POWER)
2 Témoin d’alimentation (POWER)
3 Connecteur d’entrée
secteur
4 Connecteur de sortie CC
(4 broches)
4 (F)
5 Connecteur de charge d’accumulateur (5 broches)
6 Connecteur de sortie CC (5 broches)
Page 35

1 Interrupteur d’alimentation
(POWER)
Met l’appareil sous/hors tension.
2 Témoin d’alimentation
(POWER)
S’allume lorsque l’alimentation est
enclenchée. Cependant, il ne s’allume
pas lorsque l’accumulateur aux ions
lithium BP-L60A/L90A est utilisé
comme alimentation de secours.
3 Connecteur d’entrée secteur
Connecte à une alimentation secteur
par l’intermédiaire d’un cordon de
raccordement secteur en option.
4 Connecteur de sortie CC
(4 broches)
Fournit l’alimentation CC au DNWA220P ou à un autre dispositif
portable par l’intermédiaire du câble
CC fourni. La broche 4 est le
connecteur plus et la broche 1 le
connecteur moins.
6 Connecteur de sortie CC
(5 broches)
Fournit l’alimentation CC aux éditeurs
portables et de terrain, connectés
directement au AC-DN2B.
Lorsque le AC-DN2B est fixé à un
camescope Betacam SP, tel que le
BVW-300P/BVW-400P, par
l’intermédiaire de l’adaptateur
d’accumulateur BKW-L601 ou BKWL601/2 en option, l’alimentation CC
est fournie au camescope.
5 Connecteur de charge
d’accumulateur (5 broches)
Fournit l’alimentation pour la charge
d’un accumulateur aux ions lithium
BP-L60A/L90A.
Les deux broches extérieures sont des
capteurs qui bloquent le courant de
charge lorsqu’un accumulateur autre
qu’un accumulateur aux ions lithium
est fixé par erreur.
5 (F)
Page 36

Connexions
Connexions
Principaux dispositifs connectables
Editeurs
portables
DNW-A220/P,
etc.
Camescopes
Betacam SX/
Digital Betacam
DNW-7/P
DNW-90/P
DVW-709WS/P
Camescopes
Betacam SP
BVW-300/P
BVW-400/P
Autres
dispositifs
portables
BVW-50/P
DNV-5
DVW-250/P
Câble CC (fourni)
Adaptateur
d’accumulateur
BKW-L601 ou BKWL601/2 (non fourni)
Câble CC CCDD-X2 (non fourni)
AC-DN2B
(Cet
appareil)
Accumulateur aux
ions lithium BPL60A/L90A
6 (F)
Remarque
L’achat de l’adaptateur d’accumulateur BKW-L601 ou BKWL601/2 en option est recommandé pour fixer le AC-DN2B à un
camescope Betacam SP.
Page 37

Raccordement d’un
cordon d’alimentation
secteur
Au raccordement du cordon
d’alimentation secteur fourni (type
angulaire) ou d’un cordon
d’alimentation secteur en option (type
droit) au AC-DN2B, immobiliser le
cordon avec une courroie comme
indiqué ci-dessous.
Avec un camescope, l’emploi d’un
cordon d’alimentation secteur droit en
option est recommandé.
Cordon
d’alimentation
secteur
(fourni)
2 Raccorder le cordon
d’alimentation secteur et
l’entourer de la courroie.
Cordon
d’alimentation
secteur
3 Passer la courroie dans la boucle
et la tirer dans le sens de la flèche
jusqu’à ce que le cordon soit bien
immobilisé.
Courroie
Utilisation de la courroie
1 Repousser l’agrafe pour desserrer
la courroie, ou retirer la courroie.
7 (F)
Page 38

Connexions
Fixation à un éditeur portable
Procéder comme suit pour fixer le AC-DN2B à un éditeur
numérique portable DNW-A220P.
1 Retirer le capuchon du connecteur d’accumulateur du
dessus du DNW-A220P.
Voir le mode d’emploi du DNW-A220P pour les détails.
Lecteur
Enregistreur
8 (F)
2 Mettre en regard le connecteur d’accumulateur du AC-
DN2B et la cannelure sur le DNW-A220P, et insérer le
AC-DN2B en le faisant glisser jusqu’à ce qu’il soit
fermement assis.
Page 39

3 Utiliser le câble CC fourni pour raccorder le connecteur de
sortie CC du AC-DN2B au connecteur DC IN de
l’enregistreur sur le DNW-A220P.
Il est aussi possible de connecter le AC-DN2B directement
à l’enregistreur, puis l’adaptateur au lecteur avec le câble
CC.
AC-DN2B
au connecteur
de sortie CC
au
connecteur
DC IN
Enregistreur Lecteur
Câble CC
Panneau
arrière du
DNW-A220P
9 (F)
Page 40

Connexions
Fixation aux camescopes Betacam SX/Digital Betacam
Fixer le AC-DN2B aux dispositifs de la manière indiquée dans
l’illustration ci-dessous.
Fixation aux camescopes Betacam SP
Fixer l’adaptateur d’accumulateur BKW-L601 ou BKW-L601/
2 en option au camescope Betacam SP de la manière indiquée
dans l’illustration ci-dessous, puis fixer le AC-DN2B comme
avec un camescope Betacam SX ou un camescope Digital
Betacam.
Pour les détails sur le retrait du boîtier d’accumulateur d’un
camescope Betacam SP, se reporter au mode d’emploi du
BKW-L601 ou BKW-L601/2.
10 (F)
Page 41

Recharge d’un accumulateur
1
Fixer l’accumulateur aux ions lithium BP-L60A/L90A.
BP-L60A/L90A
2 Brancher le cordon d’alimentation secteur du AC-DN2B
dans une prise d’alimentation secteur.
A température ambiante de 25 °C (77 °F), le AC-DN2B
chargera un accumulateur BP-L60A à 85% de sa capacité
en environ quatre heures, et un BP-L90A en environ six
heures.
Remarques
•Quand le AC-DN2B a chargé le BP-L60A/L90A à environ
85% de sa capacité, les quatre indicateurs du BP-L60A/
L90A s’allument.
•Le niveau de charge réel n’est pas indiqué par les indicateurs
quand le AC-DN2B est attaché à l’accumulateur.
Décconnecter le AC-DN2B de l’accumulateur pour vérifier le
niveau de charge.
•Ne jamais charger un accumulateur avec le AC-DN2B alors
que l’accumulateur est utilisé pour opérer un dispositif de
100 W ou plus. Cela pourrait provoquer une consommation
excessive et surchauffer le AC-DN2B, ou causer un mauvais
fonctionnement du dispositif. Cet avertissement ne concerne
pas les dispositifs de 100 W ou moins.
11 (F)
Page 42

Specifications
Fiche technique
Généralités
Tension
Secteur 100-240 V,
50/60 Hz
Consommation
2,0 A
Appel de courant de crête
(1) Mise sous tension (ON),
méthode de sondage du
courant: 80 A (240 V)/
15 A (100 V)
(2) Mesuré conformément à
la norme européenne
EN55103-1: 18 A
(230 V)
Température de service
0°C à 40°C
(32°F à 104°F )
Poids env. 950 g (2 livres 2
onces)
Dimensions
101 × 169 × 70 mm
(4 × 63/4 × 27/8 pouces)
(l/h/p) (pièces en saillie
exclues)
Connecteur de sortie CC
Connecteur 5/4 broches
9 A (total)
Connecteur de charge d’accumulateur
Connecteur 5 broches (avec
limiteur de courant) 2,2 A
Accessoires fournis
Câble CC (45 cm) (1)
Mode d’emploi (1)
Cordon d’alimentation secteur
(type coudé) (1)
Accessoires en option
Cordon d’alimentation secteur
(type droit)
Câble CC CCDD-X2 (2,0 m)
Adaptateur d’accumulateur
BKW-L601/2
Conception et spécifications sont
sujettes à modifications sans préavis.
Entrée/sortie
Entrée d’alimentation (secteur)
200 W ou moins (au
réglage)
Puissance nominale (CC)
150 W
Sortie de tension (CC)
16,7 V
Sortie de courant (CC)
9 A (au réglage)
......................................................................................................................................................................
12 (F)
Page 43

WARNUNG
Um Feuergefahr und die
Gefahr eines elektrischen
Schlages zu vermeiden,
darf das Gerät weder
Regen noch Feuchtigkeit
ausgesetzt werden.
Um einen elektrischen
Schlag zu vermeiden, darf
das Gehäuse nicht geöffnet
werden. Überlassen Sie
Wartungsarbeiten stets nur
qualifiziertem
Fachpersonal.
WARNUNG
DIESES GERÄT MUSS GEERDET
WERDEN.
Deutsch
Für Kunden in Europa
Dieses Produkt besitzt die CEKennzeichnung und erfüllt sowohl die
EMV-Direktive (89/336/EEC) als auch
die Direktive Niederspannung (73/23/
EEC) der EG-Kommission.
Die Erfüllung dieser Direktiven
bedeutet Konformität für die folgenden
Europäischen Normen:
• EN60065: Produktsicherheit
• EN55103-1: Elektromagnetische
Interferenz (Emission)
• EN55103-2: Elektromagnetische
Empfindlichkeit (Immunität)
Dieses Produkt ist für den Einsatz
unter folgenden elektromagnetischen
Bedingungen ausgelegt:
E1 (Wohnbereich), E2 (kommerzieller
und in beschränidem Maße
industrieller Bereich), E3 (Stadtbereich
im Frefen) und E4 (kontrollierter
EMV-Bereich, z.B. Fernsehstudio)
WARNUNG: Die folgenden
Warnungsangaben gelten
für das Netzkabel/den
Netzstecker.
1 Das Netzkabel/der Netzstecker muß
einen Erdungskontakt besitzen und
den Sicherheitsbestimmungen ihres
Landes genügen.
2 Das Netzkabel muß ausreichende
Spannungslestigkeit besitzen und für
die erforderliche Stromstärke
ausgelegt sein.
1 (G)
Page 44

Inhaltsverzeichnis
Inhaltsverzeichnis
Überblick ..................................................................... 3(G)
Lage und Funktion der Teile...................................... 4(G)
Anschlüsse ................................................................. 6(G)
Geeignete Geräte ...................................................... 6(G)
Anschließen des Netzkabels ..................................... 7(G)
Anbringen an portablen Schnittgeräten .................... 8(G)
Anbringen an Betacam SX-/digitale
Betacam-Camcorder.......................................... 10(G)
Anbringen an Betacam SP-Camcorder ................... 10(G)
Aufladen von Akkus ................................................. 11(G)
Technische Daten ..................................................... 12(G)
2 (G)
Page 45

Überblick
Der AC-DN2B dient als Netzadapter
und Akku-Ladegerät zur
Stromversorgung portabler Geräte wie
z.B. eines digitalen portablen
Schnittsteuergeräts DNW-A220P oder
digitaler Betacam-Camcorder.
Der AC-DN2B hat die folgenden
Merkmale:
Maximale Ausgangsleistung
von 150 W (Gleichstrom)
Der AC-DN2B liefert eine Leistung
von maximal 150 W für Geräte mit
einem Lithium-Ionenakku BP-L60A/
L90A.
Akkuaufladung bis ca. 85%
der Kapazität
Der AC-DN2B kann einen LithiumIonenakku BP-L60A/L90A bis ca.
85% der Kapazität aufladen.
Hinweis
Der Betrieb des DNW-A220P oder
eines anderen Geräts mit einer
Nennleistung von 100 W oder mehr
während der Aufladung eines Akkus
mit dem AC-DN2B führt zu
überhöhtem Stromverbrauch und einer
Überhitzung des AC-DN2B. Deshalb
darf während der Stromversorgung
eines Geräts mit dem AC-DN2B kein
Akku aufgeladen werden.
Automatische Änderung der
Lüfterdrehzahl
Der Lüfter im AC-DN2B dreht sich
automatisch entsprechend der
Leistungsaufnahme des
angeschlossenen Geräts schneller oder
langsamer.
Sicherungsbatterie
Bei versehentlichem Trennen des
Netzkabels von der
Wechselspannungsquelle (Stromnetz)
fungiert ein aufgeladener und am ACDN2B angebrachter LithiumIonenakku BP-L60A/L90A als
Sicherungsbatterie für das
angeschlossene Gerät. Die
Betriebszeit bei der Stromversorung
über den Akku richtet sich nach der
Leistungsaufnahme des
angeschlossenen Geräts.
3 (G)
Page 46

Lage und Funktion der Teile
Lage und Funktion der Teile
1 POWER-Schalter
2 POWER-Anzeige
3 AC Eingangsbuchse
4 Gleichstromausgang
(4pol)
4 (G)
5 Batterieladekontakte (5pol)
6 Gleichstromausgang (5pol)
Page 47

1 POWER-Schalter
Zum Ein- und Ausschalten des
Netzadapters.
2 POWER-Anzeige
Die Anzeige leuchtet, wenn die
Stromversorgung eingeschaltet ist.
Erfolgt jedoch Notstromversorgung
über den Lithium-Ionenakku BPL60A/L90A, so bleibt diese Anzeige
dunkel.
3 AC Eingangsbuchse
Für den Anschluß an eine
Wechselspannungsquelle (Stromnetz)
über ein optionales Netzkabel.
4 Gleichstromausgang (4pol)
Über das mitglieferte
Gleichstromkabel erfolgt die
Gleichstromversorgung von DNWA220P oder anderen portablen
Geräten. Dem Kontakt Nr.4 ist der
Pluspol zugeordnet, und dem Kontakt
Nr.1 der Minuspol.
6 Gleichstromausgang (5pol)
Zur Gleichstromversorgung von
portablen Schnittgeräten und
Schnittgeräten für den Einsatz vor Ort,
die direkt an den AC-DN2B
angeschlossen sind.
Ist der AC-DN2B mit einem BetacamSP-Camcorder (z.B. BVW-300P/
BVW-400P) über einen optionalen
Akku-Adapter BKW-L601 oder
BKW-L601/2 verbunden, so wird der
Camcorder mit Gleichstrom versorgt.
5 Batterieladekontakte (5pol)
Liefern den Strom zur Aufladung
eines Lithium-Ionenakkus BP-L60A/
L90A.
Die beiden äußeren Stifte sind
Sensoren die den Ladestrom
unterbren, falls versehentlich eine
andere Batterie als ein LithiumIonenakku eingesetzt worden ist.
5 (G)
Page 48

Anschlüsse
Anschlüsse
Geeignete Geräte
Portable
Schnittgeräte
DNW-A220P
usw.
Gleichstrumkable (mitgellefert)
Betacam SX-/
Digitale BetacamCamcorder
DNW-7P
DNW-90P
DVW-709WSP
Betacam SPCamcorder
AC-DN2B
(Dieses Gerät)
BP-L60A/L90A
LithiumIonenakku
BVW-300P
BVW-400P
Andere portable
Geräte
BVW-50P
DNV-5
DVW-250P
6 (G)
BKW-L601 oder BKWL601/2 Akkuadapter
(nicht mitgeliefert)
Gleichstromkable CCDD-X2 (nicht mitgeliefert)
Hinweis
Zum Anbringen des AC-DN2B an einen Betacam SPCamcorder wird der Kauf eines optionalen Akku-Adapters
BKW-L601 oder BKW-L601/2 empfohlen.
Page 49

Anschließen des
Netzkabels
Beim Anschluß eines mitgelieferten
Netzkabels (Winkeltyp) oder
optionalen Netzkabels (gerader Typ)
an den AC-DN2B, sichern Sie das
Kabel wie gezeigt mit der
Kabelschelle.
Für den Betrieb eines Camcorders
wird das optionale Netzkabel des
geraden Typs empfohlen.
Netzkabel
(mitgeliefert)
Kabelschelle
2 Schließen umschließen Sie das
Netzkabel an, und Sie es mit der
Kabelschell.
Netzkabel
3 Ziehen Sie das Ende der Schelle
in Pfeilrichtung durch die
Öffnung, bis das Kabel
einwandfrei gesichert ist.
Verwendung der Kabelschelle
1 Ziehen Sie das Schellenende, um
die Schelle zu öffnen.
7 (G)
Page 50

Anschlüsse
Anbringen an portablen Schnittgeräten
Bringen Sie den AC-DN2B gemäß dem nachstehend
beschriebenen Verfahren an einem portablen Schnittgerät
DNW-A220P an.
1 Nehmen Sie die Abdeckung des Akkuanschlußkontakts
oben auf dem DNW-A220P ab.
Einzelheiten hierzu entnehmen Sie bitte der
Bedienungsanleitung des DNW-A220P.
Wiedergabeteil
Aufnahmeteil
8 (G)
2 Fluchten Sie den Anschlußkontakt am AC-DN2B mit der
Nut am DNW-A220P, und schieben Sie den AC-DN2B bis
zum Anschlag auf, damit er festen Sitz hat.
Page 51

3 Verbinden Sie den Gleichspannungsausgang am AC-
DN2B über das mitgelieferte Gleichspannungskabel mit
dem Gleichspannungseingang (DC IN) am Aufnahmeteil
des DNW-A220P.
Sie können den AC-DN2B auch zunächst direkt am
Wiedergabeteil anbringen und dann den Adapter über das
Gleichstromkabel mit dem Wiedergabeteil verbinden.
AC-DN2B
An Gleichstromausgang
An DC
IN-Buchse
Aufnahmeteil
Rückseite des
DNW-A220P
Wiedergabeteil
Gleichstromkabel
9 (G)
Page 52

Anschlüsse
Anbringen an Betacam SX-/digitale BetacamCamcorder
Verbinden Sie den AC-DN2B gemäß der folgenden Abbildung.
Anbringen an Betacam SP-Camcorder
Befestigen Sie zunächst den optionalen Akku-Adapter BKWL601 oder BKW-L601/2 gemäß der folgenden Abbildung am
Betacam SP-Camcorder; anschließend bringen Sie dann den
AC-DN2B in der selben Weise an wie bei einem Betacam SXCamcorder oder digitalen Camcorder.
Einzelheiten õber das Abtrennen des Akku-Behälters vom
Betacam SP-Camcorder entnehmen Sie bitte der
Gebrauchsanleitung des BKW-L601 oder BKW-L601/2.
10 (G)
Page 53

Aufladen von Akkus
1
Bringen Sie den Lithium-Ionenakku BP-L60A/L90A am
Gerät an.
BP-L60A/L90A
2 Schließen Sie das Netzkabel des AC-DN2B an eine
Netzsteckdose an.
Bei Zimmertemperatur von 25 °C werden für die
Aufladung eines BP-L60A auf ca. 85% ca. vier Stunden
benötigt, für die eines BP-L90A ca. sechs Stunden.
Hinweise
•Wenn der AC-DN2B den BP-L60A/L90A zu 85%
aufgeladen hat, leuchten am Akku alle vier Anzeigen auf.
•Solange der AC-DN2B mit dem Akku verbunden ist, erfolgt
keine Anzeige der Ladekapazität. Zur Überprüfung des
Ladezustands muß vorher der AC-DN2B vom Akku getrennt
werden.
•Niemals einen Akku aufladen, während gleichzeitig ein
Camcorder oder ein anderes Gerät mit einer Nennleistung von
100 W oder mehr über den AC-DN2B mit Strom versorgt
wird. Andernfalls sind überhöhter Stromverbrauch und eine
Überhitzung des AC-DN2B oder Funktionsstörungen die
Folge. Diese Wartung gilt nicht für Geräte mit einer
Nennleistung bis 100 W.
11 (G)
Page 54

Technische Daten
Technische Daten
Allgemeines
Anschlußwerte
100-240 V
Wechselspannung,
50/60 Hz
Stromentnahme
2,0 A
Spitzenstrom
(1) Einschaltstrom,
Stromsonde: 80 A (240
V)/15 A (230 V)
(2) Gemessen in EN55103-
1: 18 A (230 V)
Betriebstemperatur
0 °C bis 40 °C
Gewicht ca. 950 g
Abmessungen (B/H/T)
101 × 169 × 70 mm (außer
hervorstehende Teile)
Ein-/Ausgangsleistungen
Eingangsleistung (Wechselstrom)
min. 200 W (geregelt)
Nennausgangsleistung (Gleichstrom)
150 W
Ausgangsgleichspannung
max. 16,7 V
Ausgangsgleichstrom
9 A (geregelt)
Gleichstrom-Buchsen
5pol/4pol Buchse für
9 A (insgesamt)
Akkulade-Buchse
5pol Buchse (mit
Strombegrenzer) für
2,2 A
Im Lieferumfang
Gleichstromkabel (45 cm) (1)
Gebrauchsanleitung (1)
Netzkabel (gewinkelter Typ) (1)
Sonderzubehör
Netzkabel (gerader Typ)
Gleichstromkabel
CCDD-X2 (2 m)
Akku-Adapter
BKW-L601/2
Änderungen, die dem technischen
Fortschritt dienen, bleiben vorbehalten.
......................................................................................................................................................................
12 (G)
Page 55

The material contained in this manual consists of
information that is the property of Sony Corporation and is
intended solely for use by the purchasers of the equipment
described in this manual.
Sony Corporation expressly prohibits the duplication of any
portion of this manual or the use thereof for any purpose
other than the operation or maintenance of the equipment
described in this manual without the express written
permission of Sony Corporation.
Le matériel contenu dans ce manuel consiste en
informations qui sont la propriété de Sony Corporation et
sont destinées exclusivement à l’usage des acquéreurs de
l’équipement décrit dans ce manuel.
Sony Corporation interdit formellement la copie de quelque
partie que ce soit de ce manuel ou son emploi pour tout
autre but que des opérations ou entretiens de l’équipement
à moins d’une permission écrite de Sony Corporation.
Das in dieser Anleitung enthaltene Material besteht aus
Informationen, die Eigentum der Sony Corporation sind,
und ausschließlich zum Gebrauch durch den Käufer der in
dieser Anleitung beschriebenen Ausrüstung bestimmt sind.
Die Sony Corporation untersagt ausdrücklich die
Vervielfältigung jeglicher Teile dieser Anleitung kder den
Gebrauch derselben für irgendeinen anderen Zweck als die
Bedienung oder Wartung der in dieser Anleitung
beschriebenen Ausrüstung ohne ausdrückliche schriftliche
Erlaubnis der Sony Corporation.
Page 56

AC-DN2B (WW)
3-204-884-02(1)
Sony Corporation
B & P Company
Printed in Japan
2002.06.13
2000
 Loading...