

Page 1
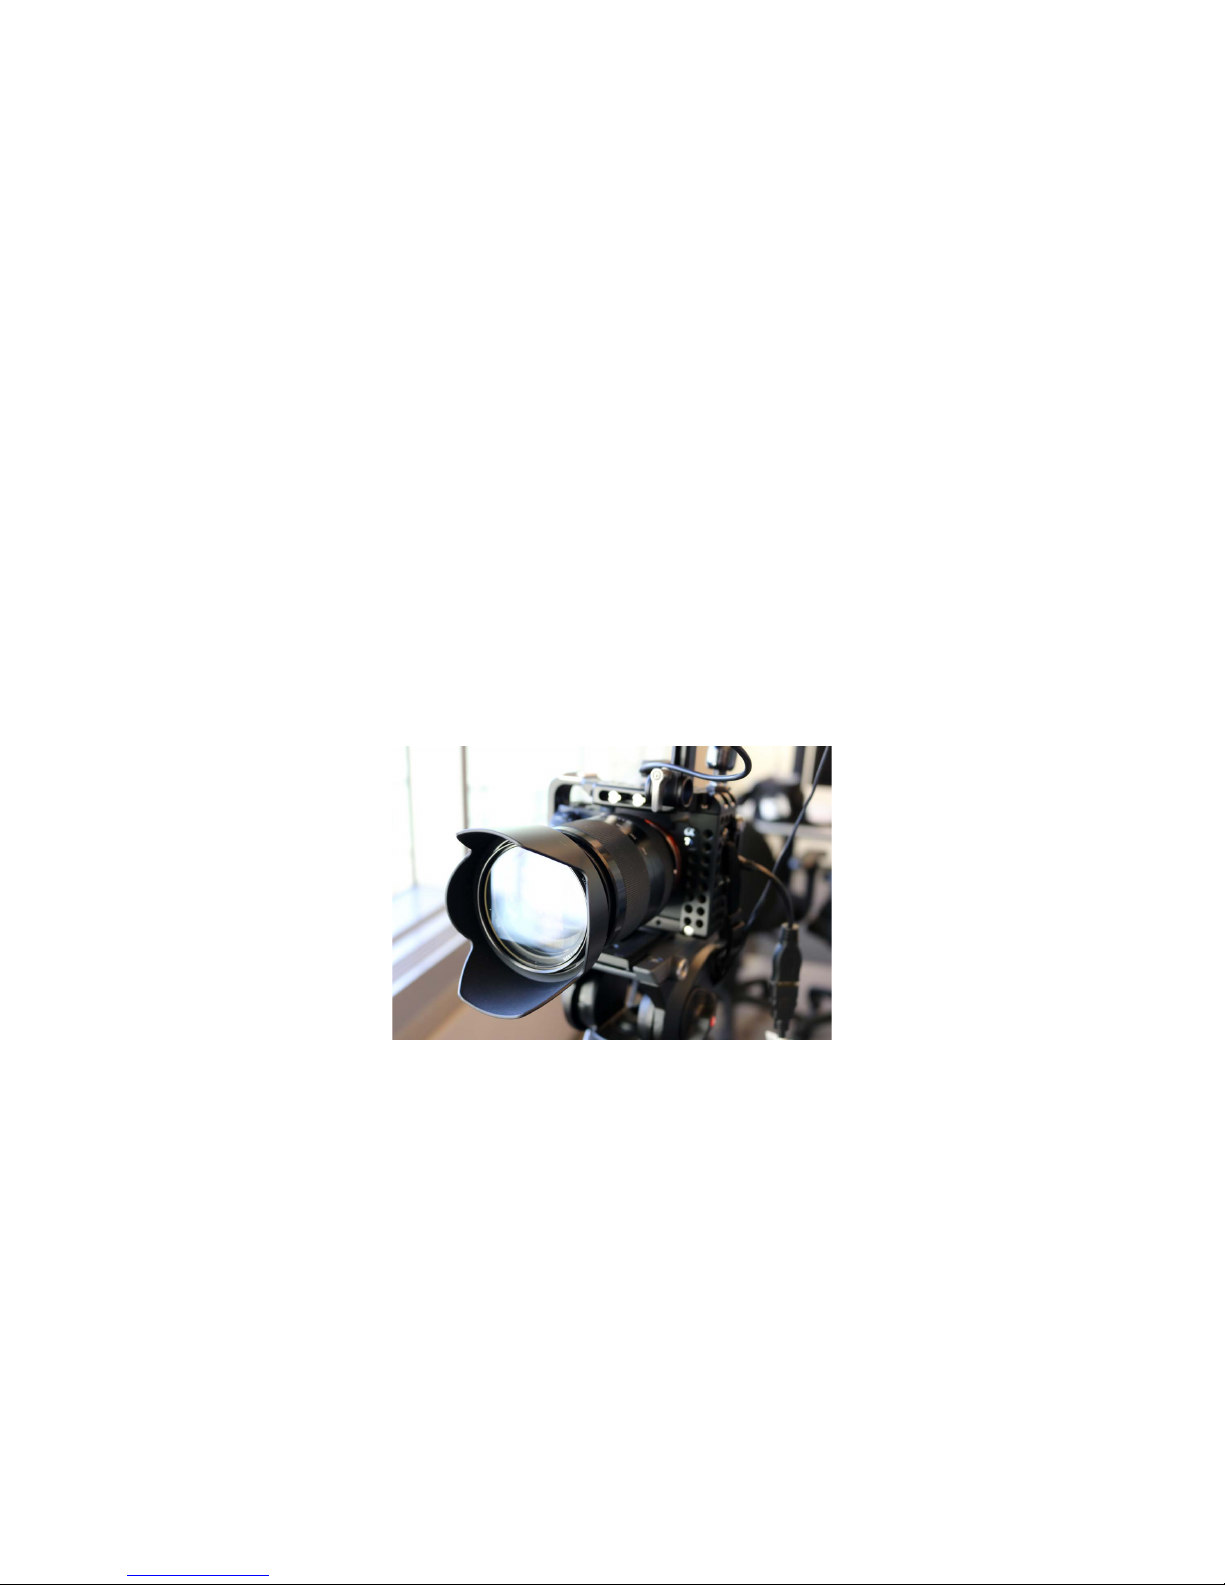
Sony%α7S%II
Quick%Start%Guide%for
Video%Documentation
Page 2

Contents
• Part%One:%Assembling%the%Camera%– page%3
• Part%Two:%Essential%Menu%Settings- page%15
• Part%Three:%Camera%Controls- page%37
• Part%Four:%External%Recorder%Settings- page%45
• Part%Five:%Backing%up%Video%Clips- page%52
Page 3

Part%One:%Assembling%the%Camera
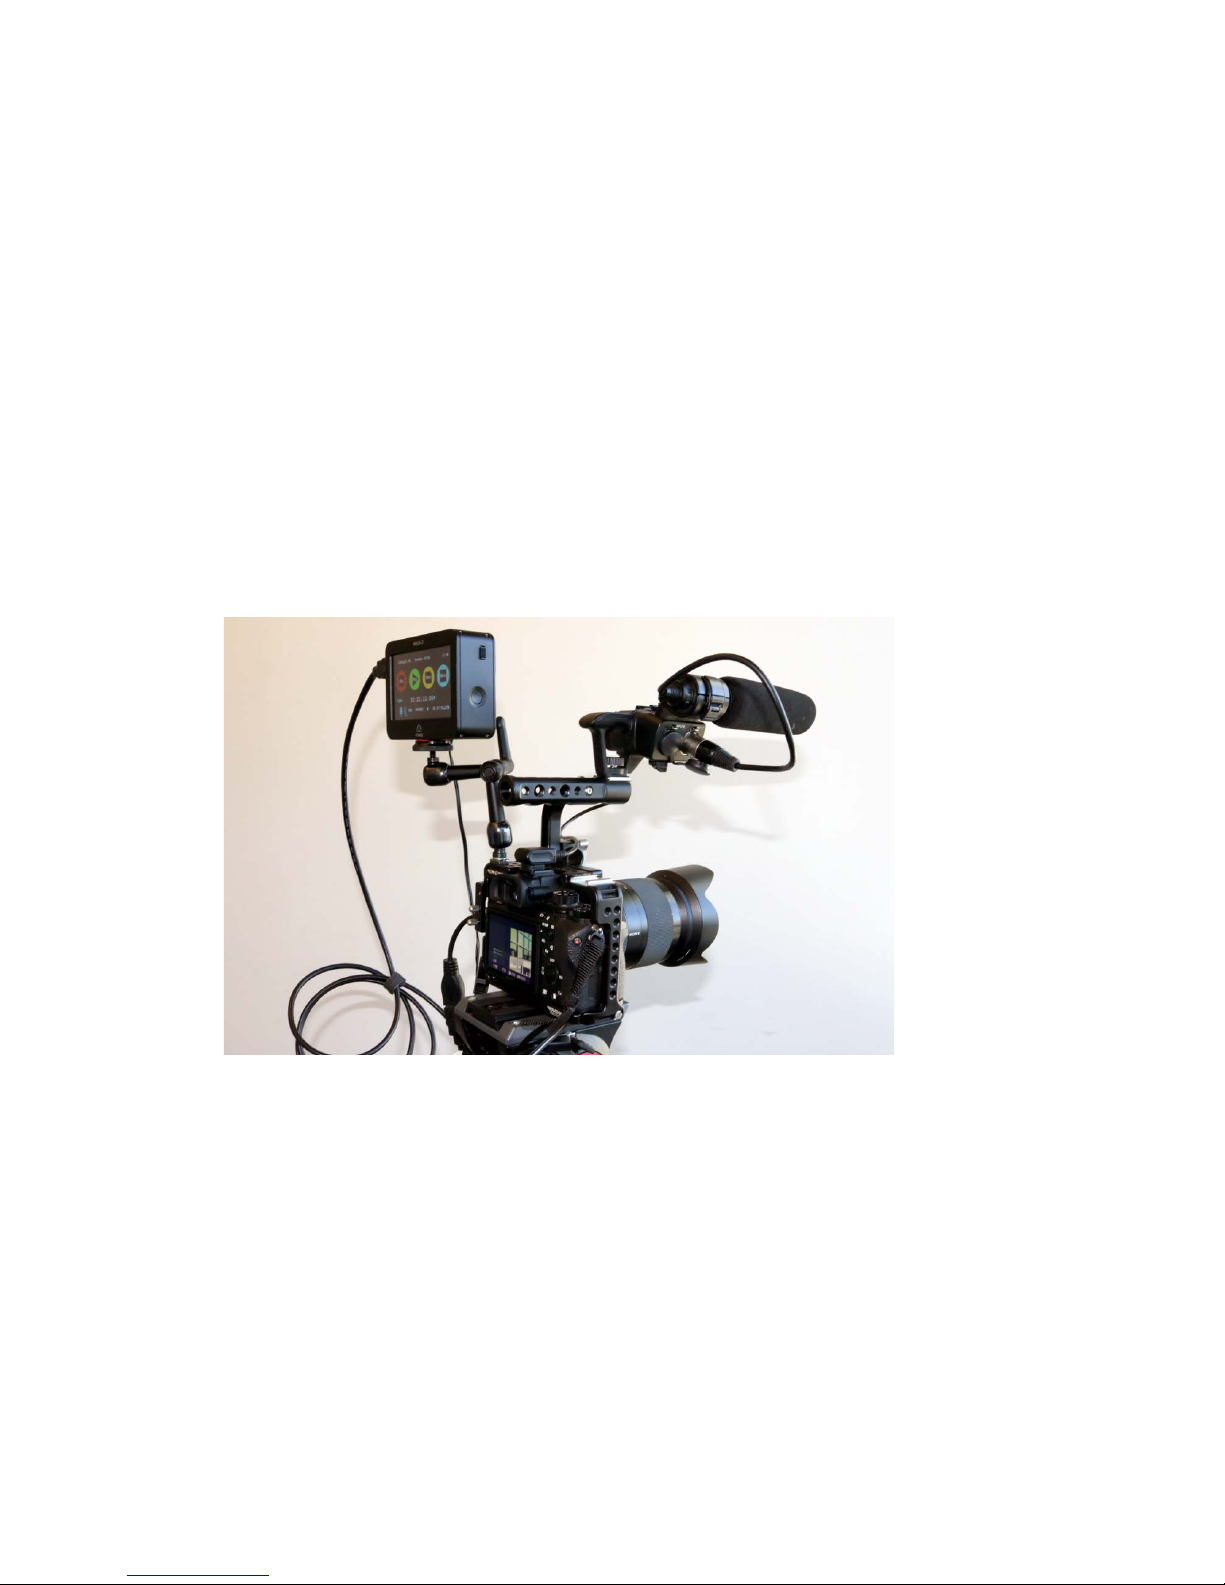
• The%α7S%(alpha%7%S)%was%chosen%as%a%versatile%documentation%camera%
that%could%take%stills%and%video%in%low%light.
• When%using%the%camera%for%video%documentation%you%need%to%
overcome%two%inherent%weaknesses:%the%poor%built-in%microphone%
and%the%short%video%recording%times%to%SD%cards.%The%approximate%
maximum%length%of%a%video%recorded%to%SD%card%is%29%minutes.
• To%address%those%issues,%the%kit%includes%a%Sony%external%microp h one%
with%an%audio%input%adapter%and%an%external%video%recorder%(the%
Atomos “Ninja”)%The%camera%is%mounted%in%a%”cage”%that%provides%
mounting%points%for%these%devices.
Page 4
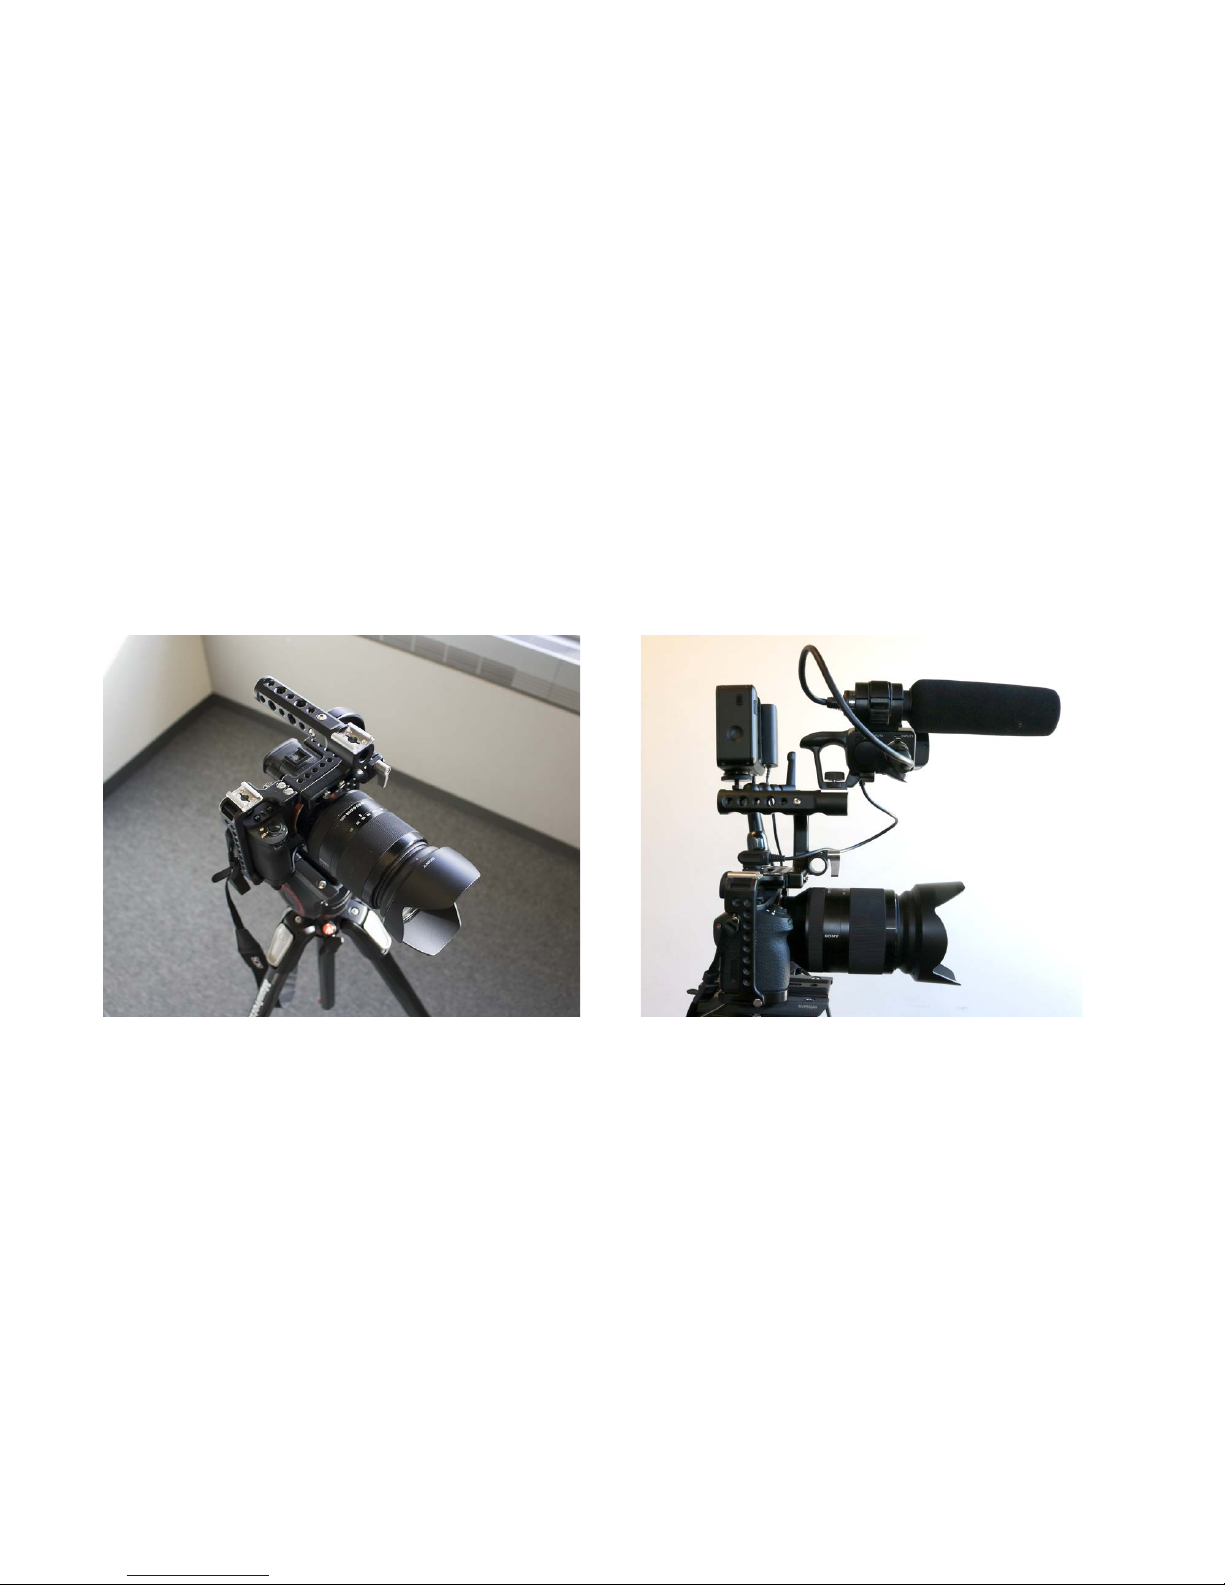
Before%%%%%%%%%%%%%%%%%%%%%%%%%%%%%% After
Page 5
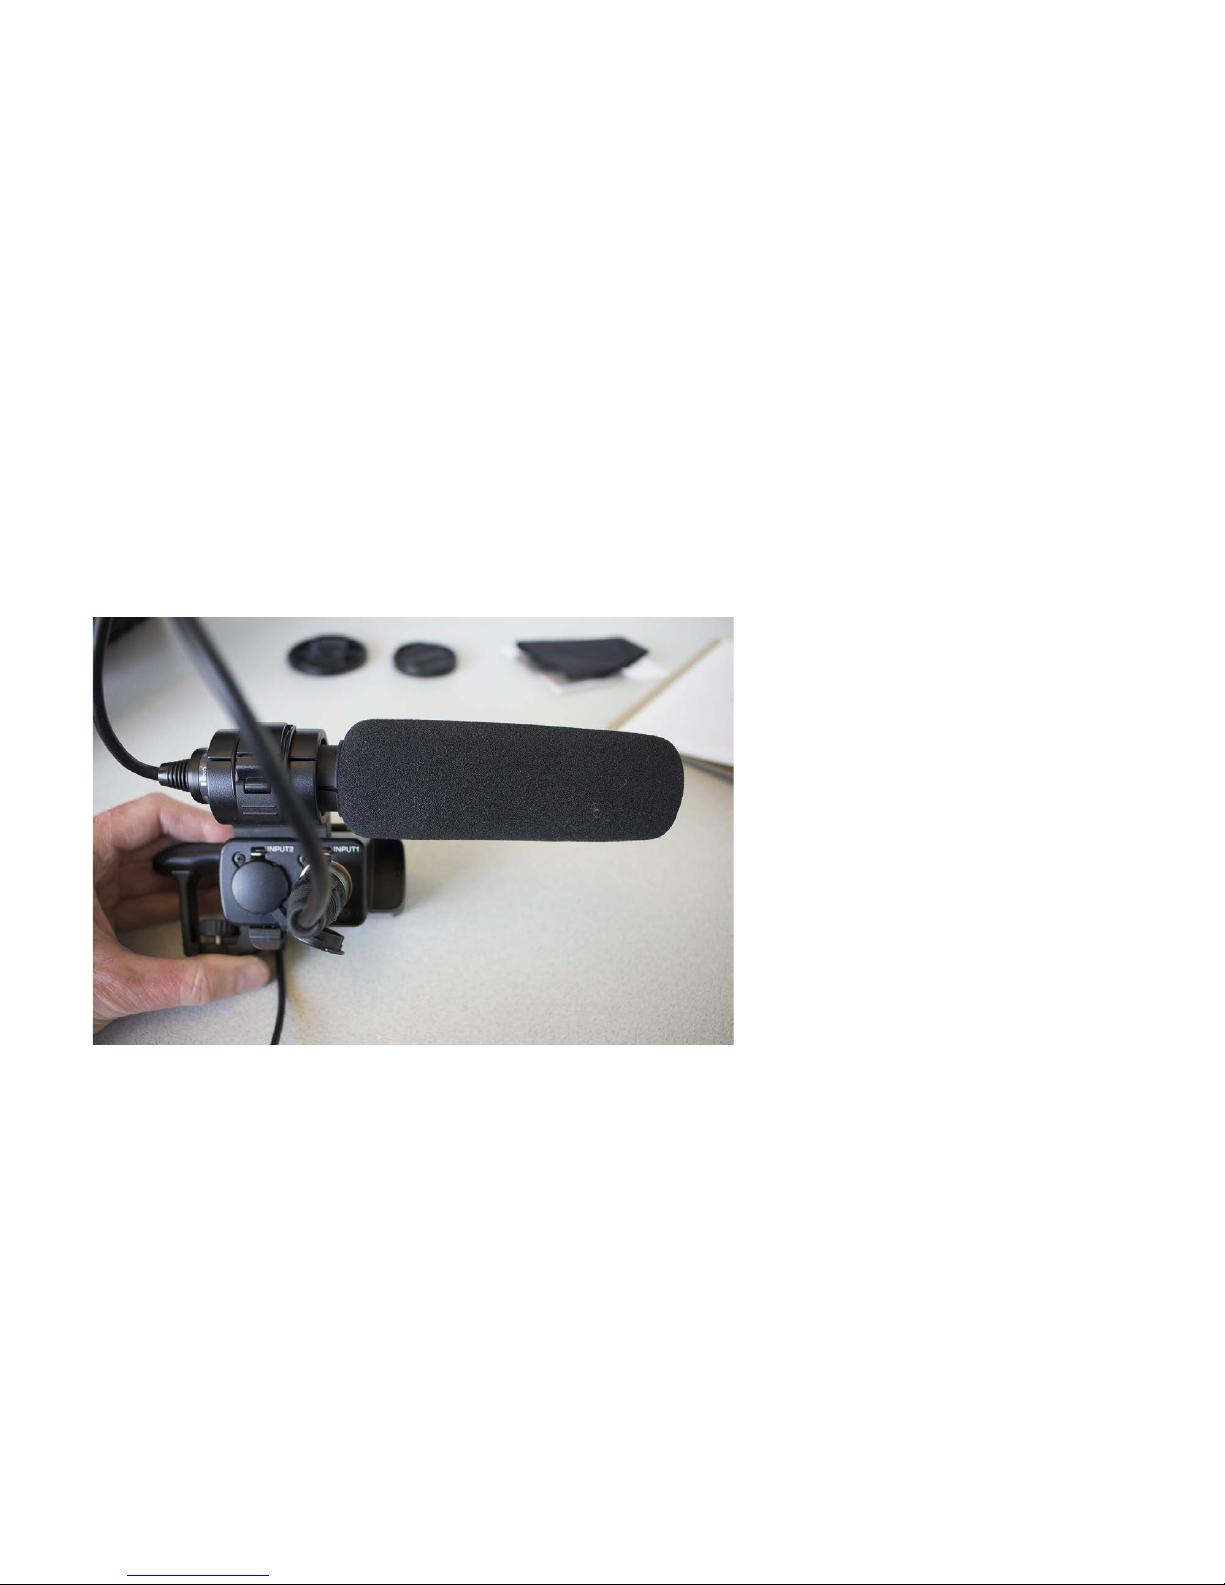
The%External%Microphone%should%be%plugged%into%Input%1%of%the%Audio%
Adapter.
Page 6
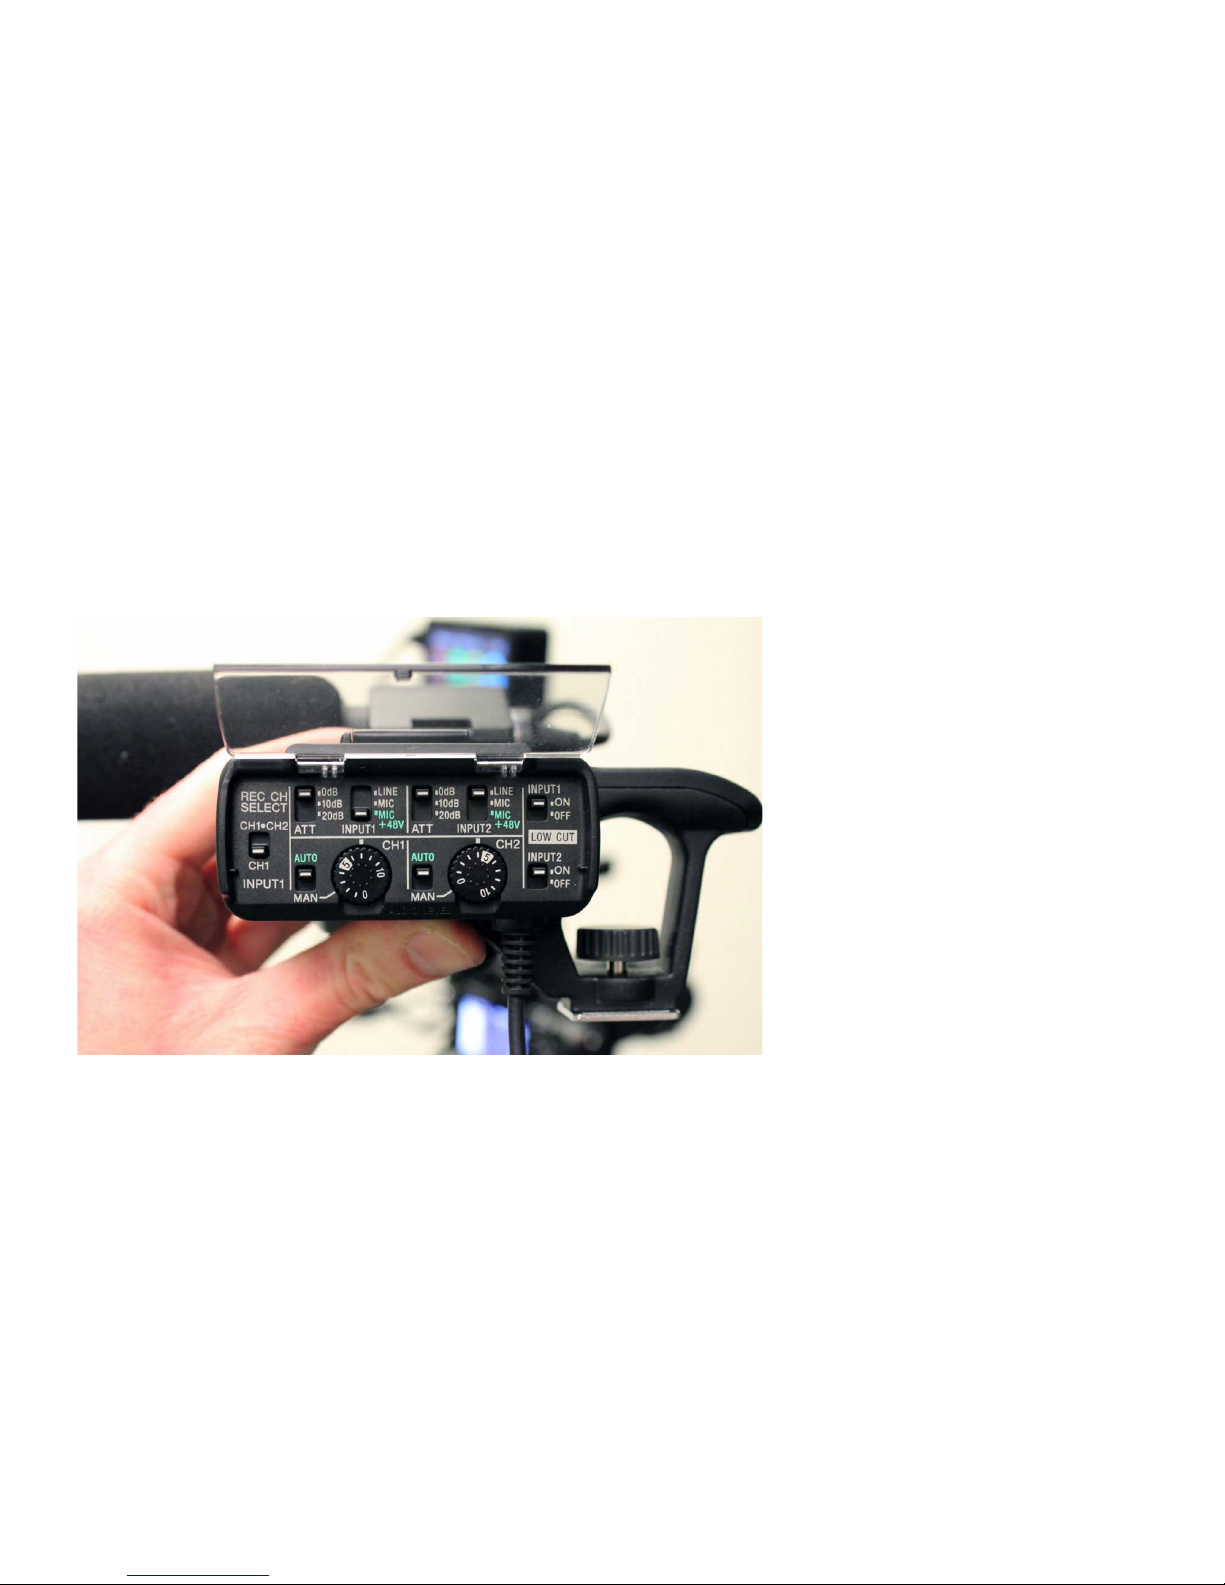
Look%at%the%audio%input%controls%before%attaching%the%Audio%Adapter.
Page 7
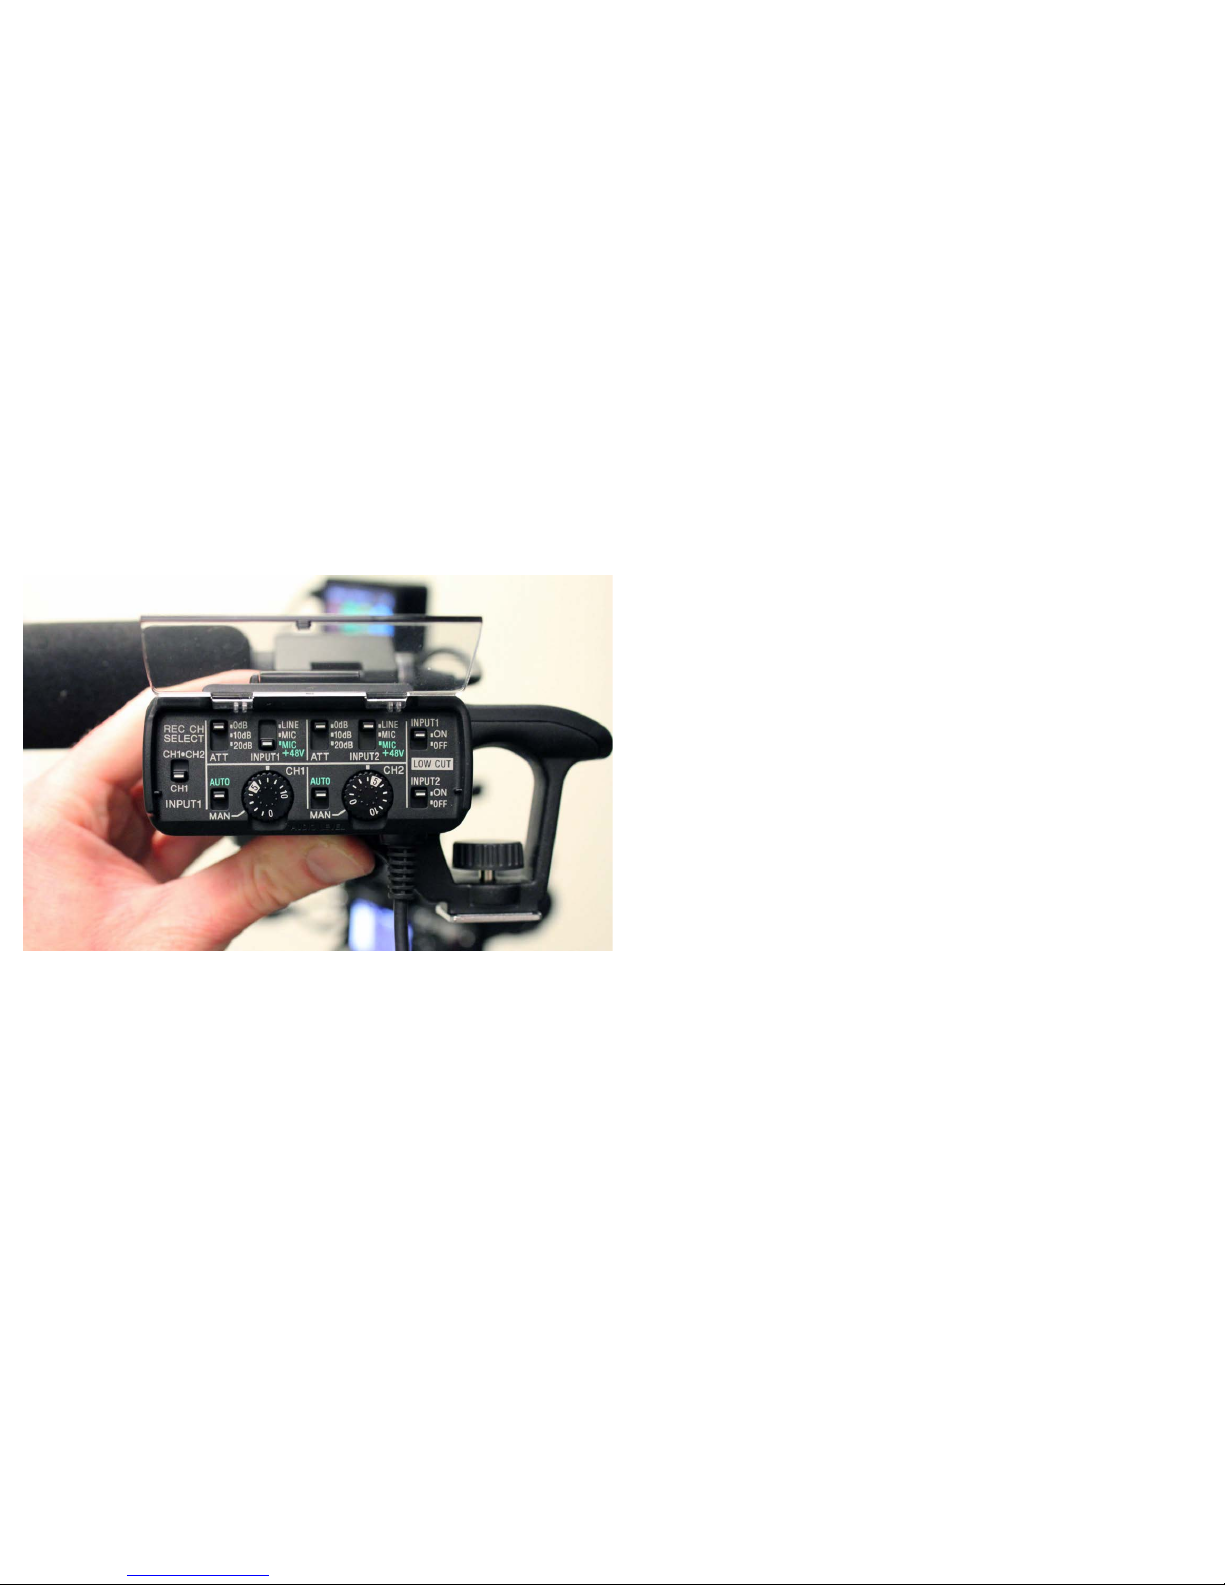
You% h ave%t w o%in puts% goin g%to% two%a udio %cha n nel s %(ste r e o).
In%this%image%the%external%microphone%is%plugged%into%Input&1.
Input%1%is%going%to%Channel&1&only,%the%LEFT%side%of%the%
stereo%signal%and%the%input%attenuation%(ATN)%is%set%to%
MIC&+48V&to%supply%power%to%the%microphone.
The%Channel%2%input attenuation%is%set%to%LINE.
A%Line%level%input%could%be%from%a%wireless
microphone%(that%already%has%power)%or%the%output%
from%a%mixing%board.
If%you%only%used%the%external%microphone%on%the%camera
and%wanted%a%dual%mono%signal%on%both%Channel%1%and%2,%
(left%and%right)%then%the%Input%1%selector%would%be%
switched%up%to%CH1&CH2.
Audio%Input%Controls
Page 8
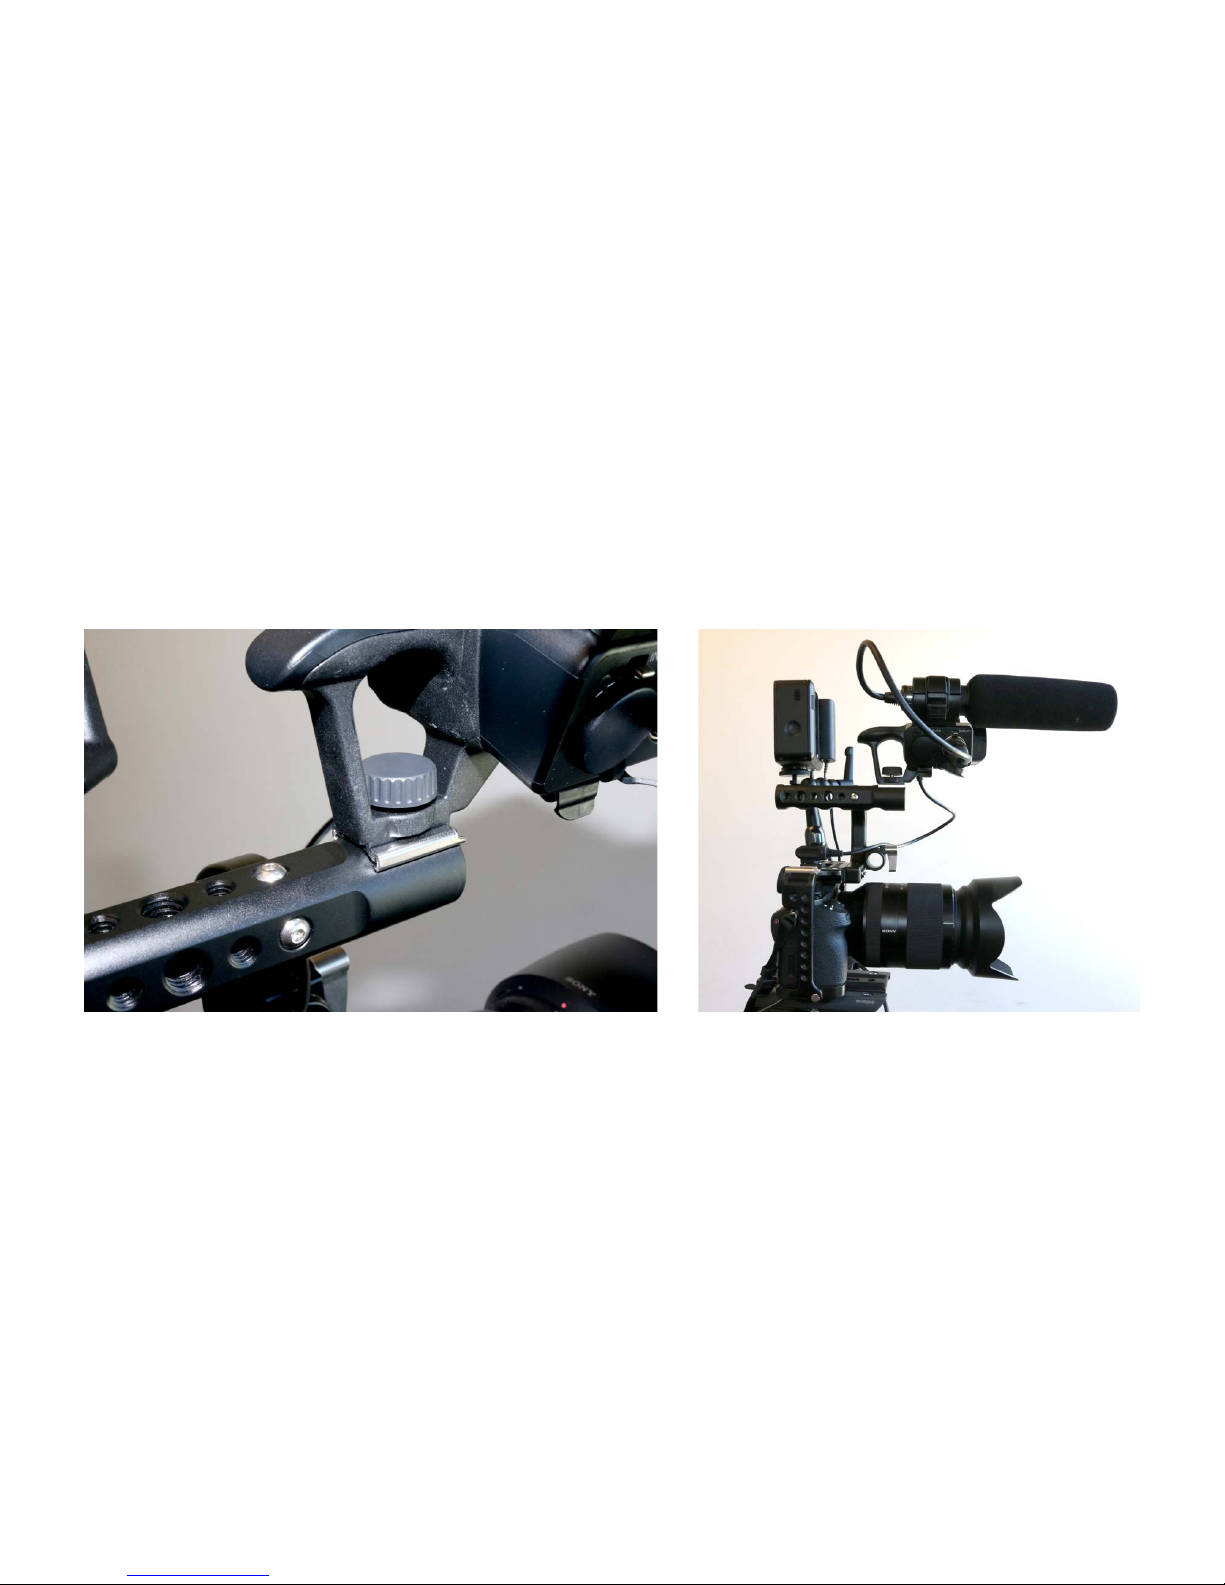
Mount%the%audio%input%adapter%to%the%cold%shoe%on%the%handle.
Page 9
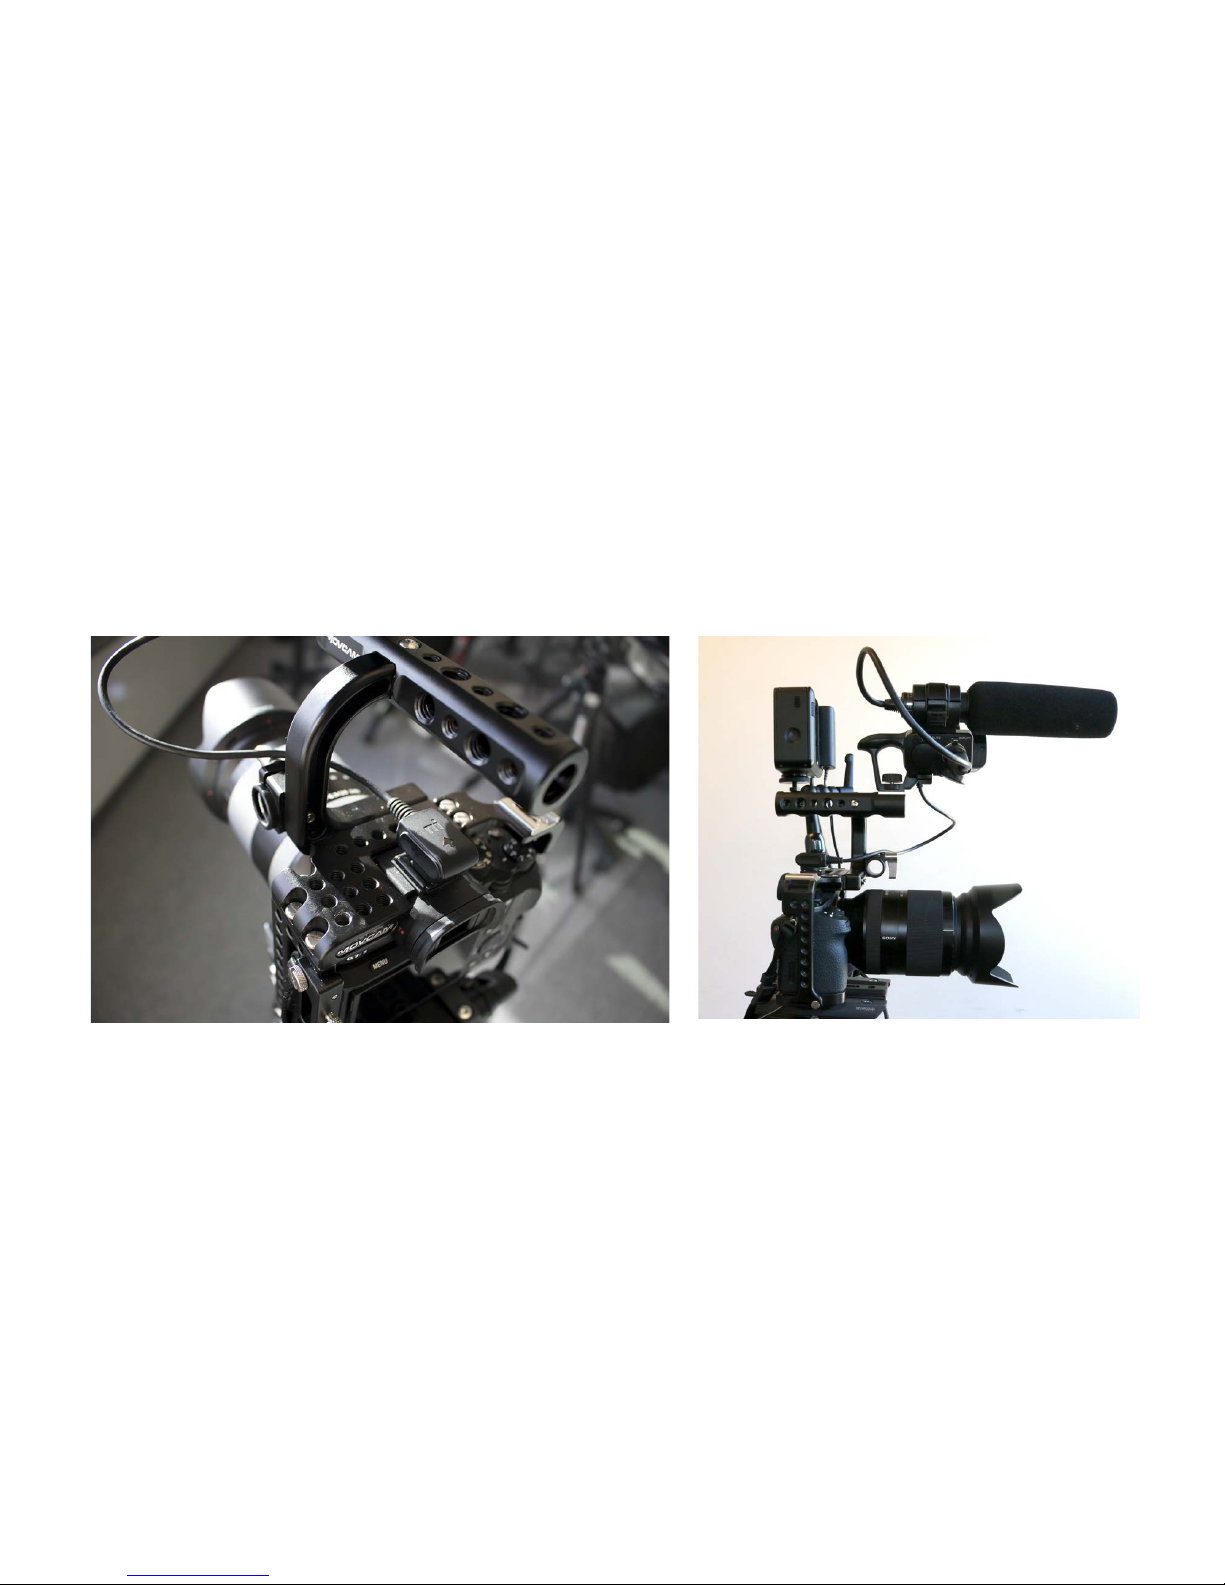
The%hot%shoe%on%the%camera%is%for%the%input%from%the%audio%adapter.%
This%will%automatically%turn%off%the%camera’s%built-in%microphone.
Page 10
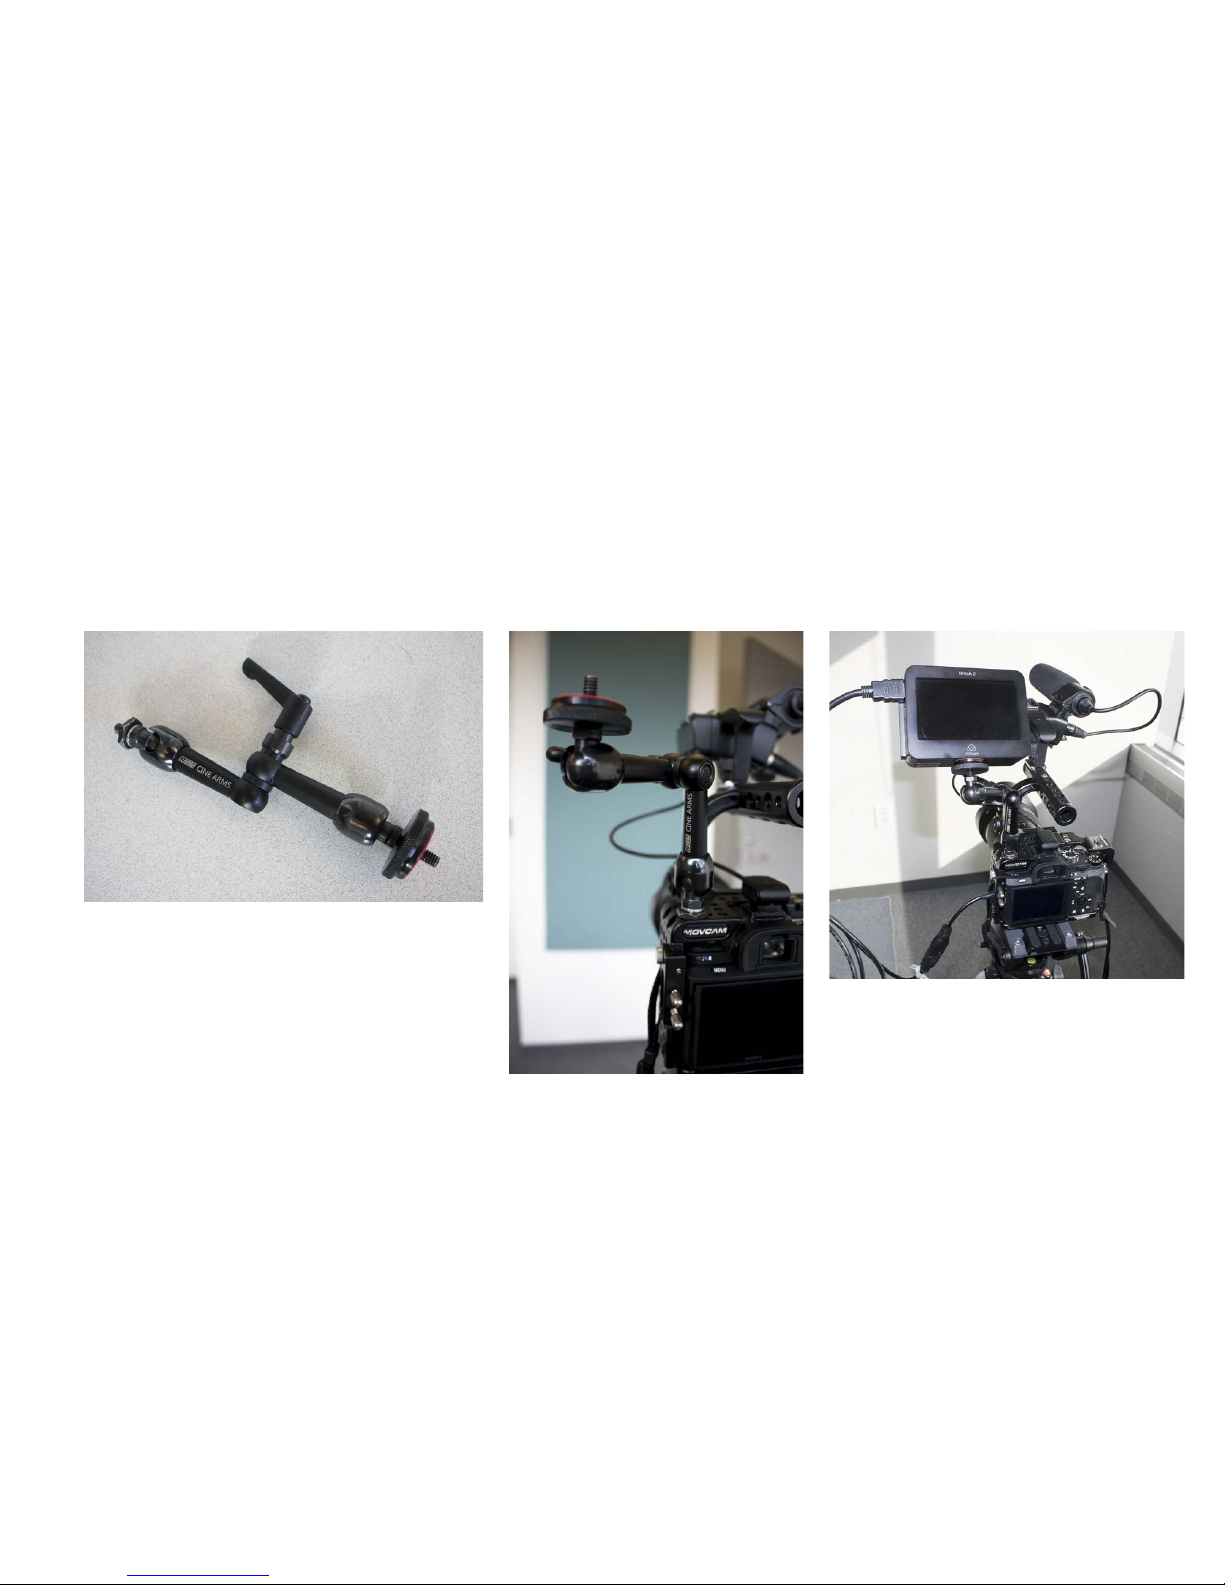
Attach%the%little%arm%for%the%external%recorder.
I%recommend%the%following%location.
Page 11
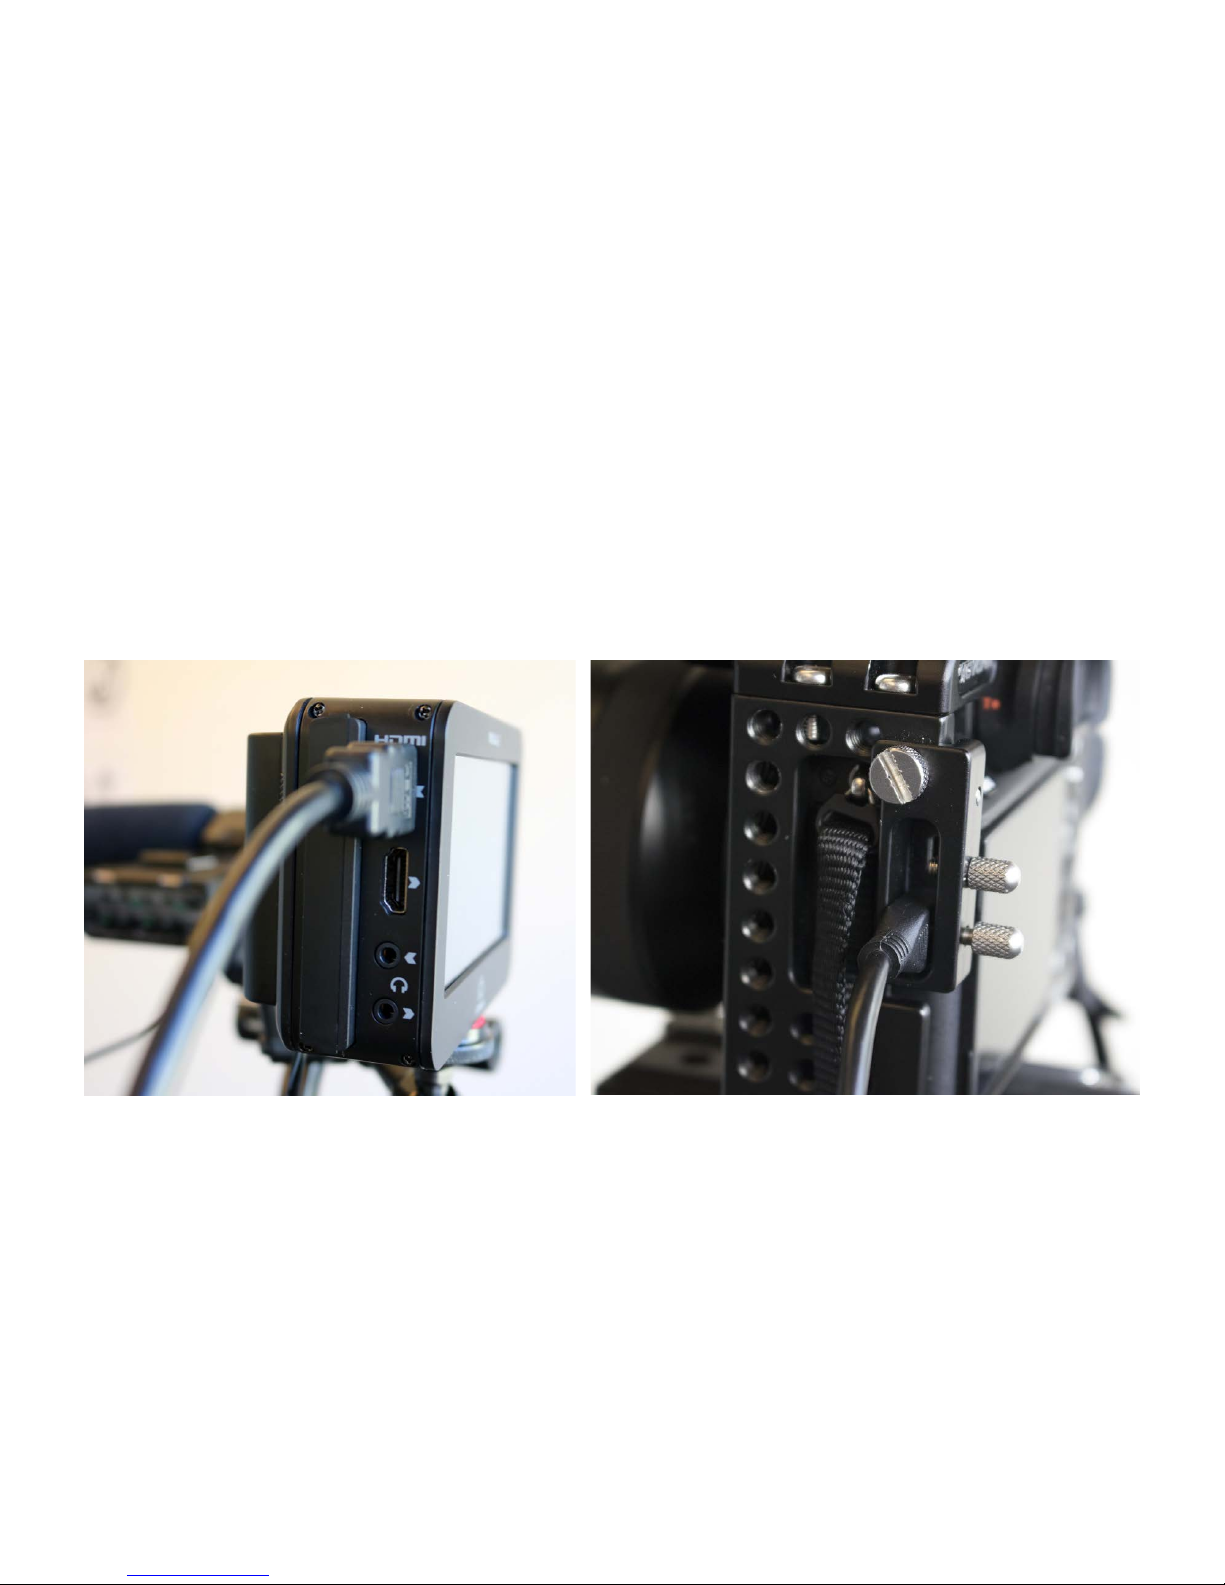
HDMI%to%Micro%HDMI%connection:
The%Recorder%Input%is%the%top%HDMI%port.
The%Micro%HDMI%connection%on%the%camera%can%be%secured%by%the%
pressure screw.
Page 12
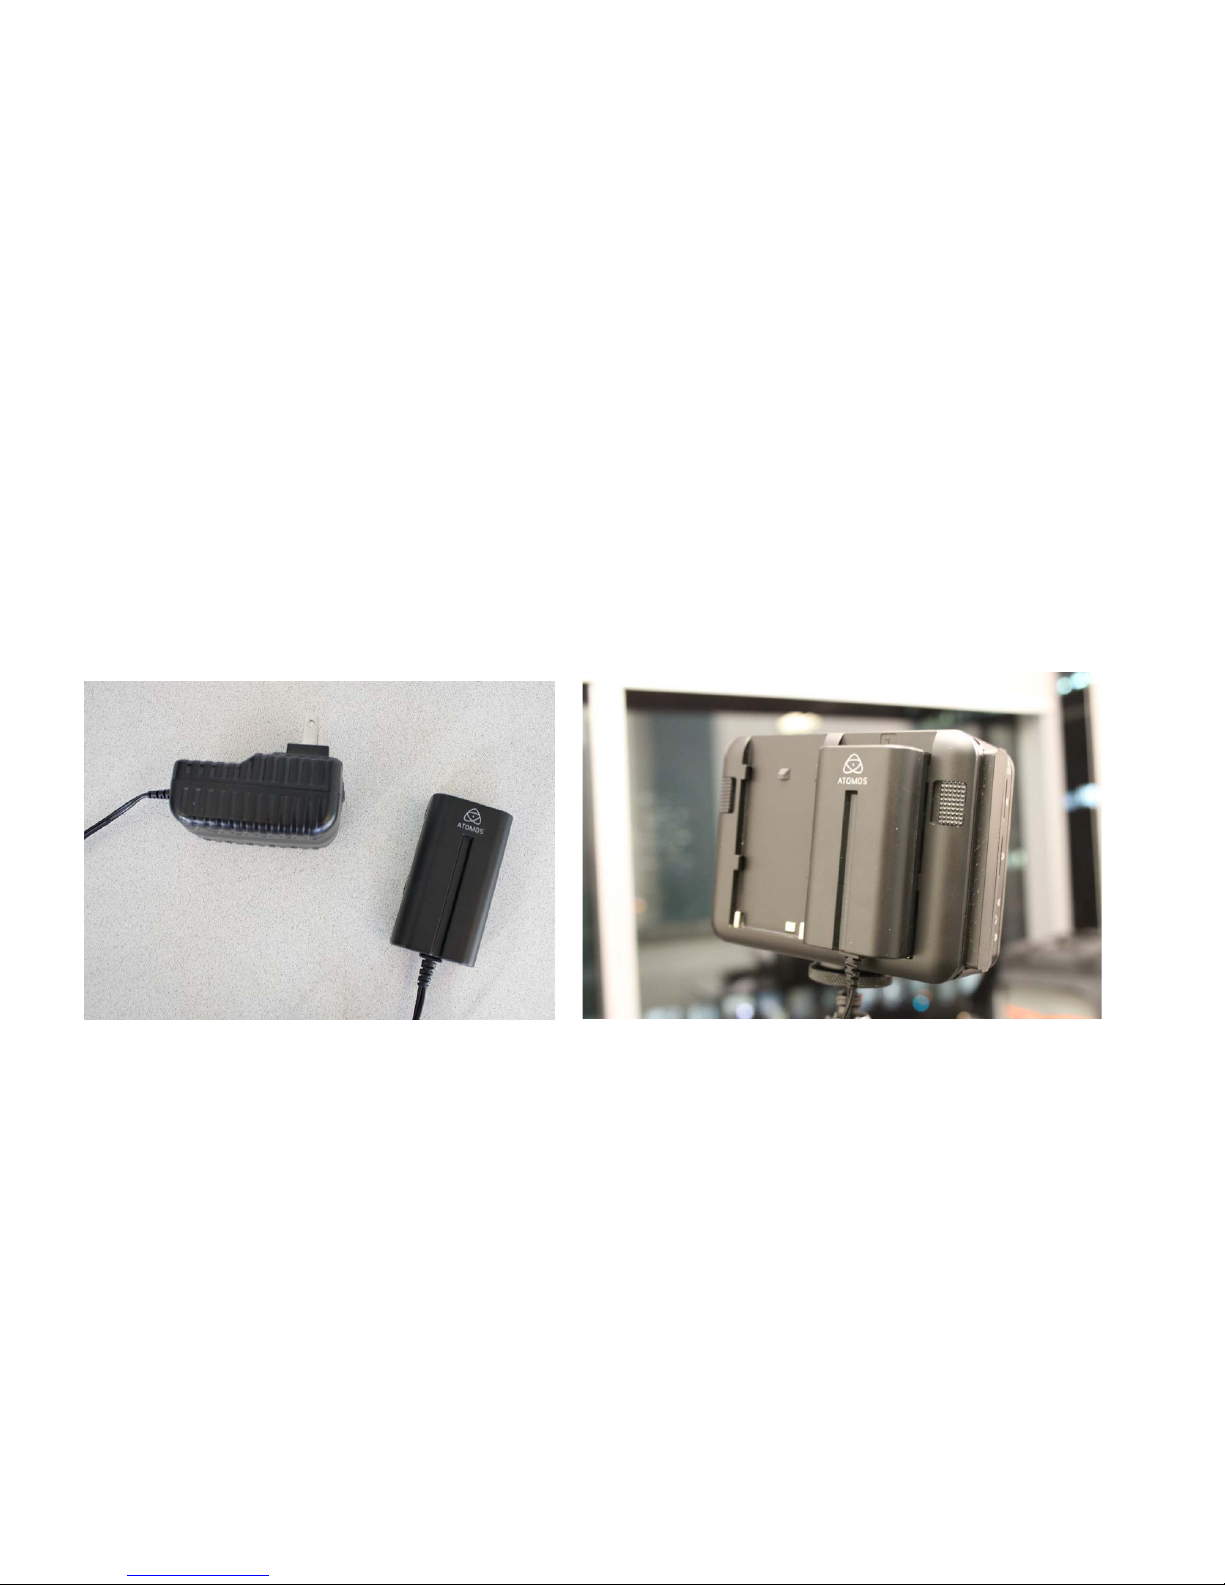
If%possible%use%the%external%AC%adapter%to%power%the%recorder.%
Page 13
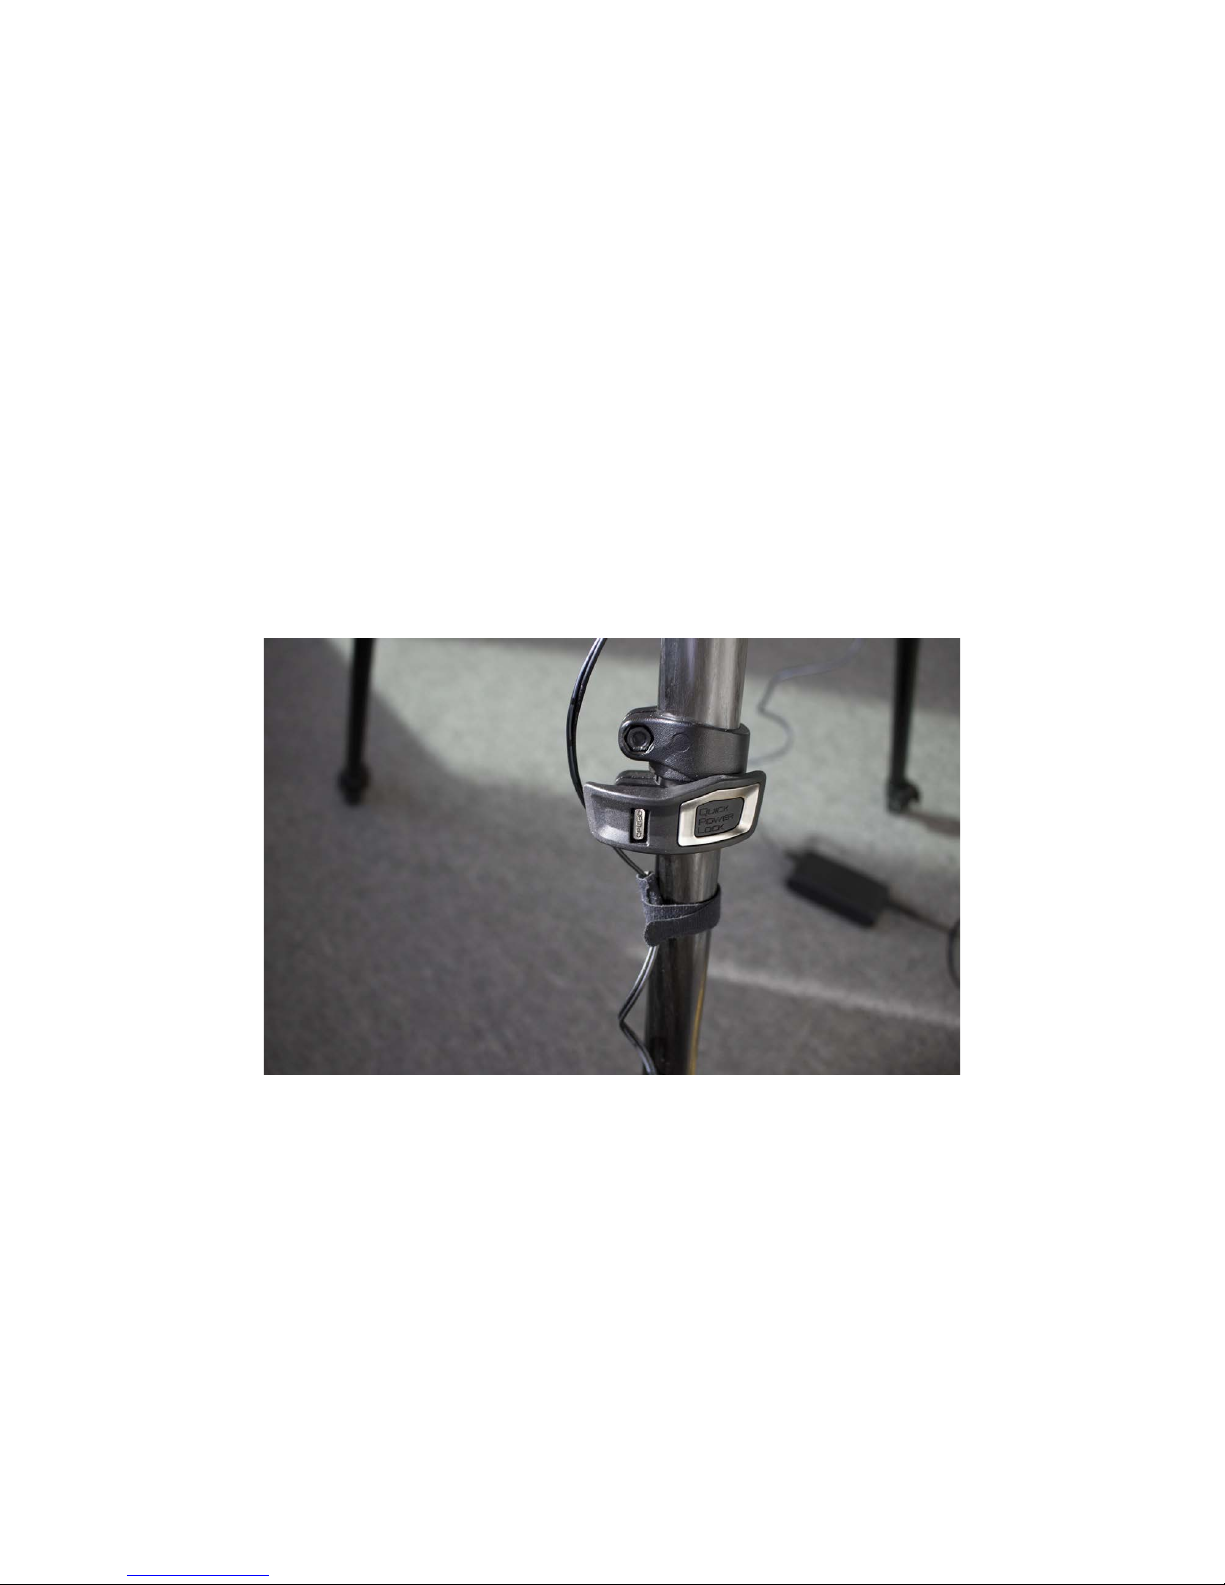
It ’s%convenient%to%attach%AC%cables%to%the%tripod%legs%using%the%ties.%
Page 14
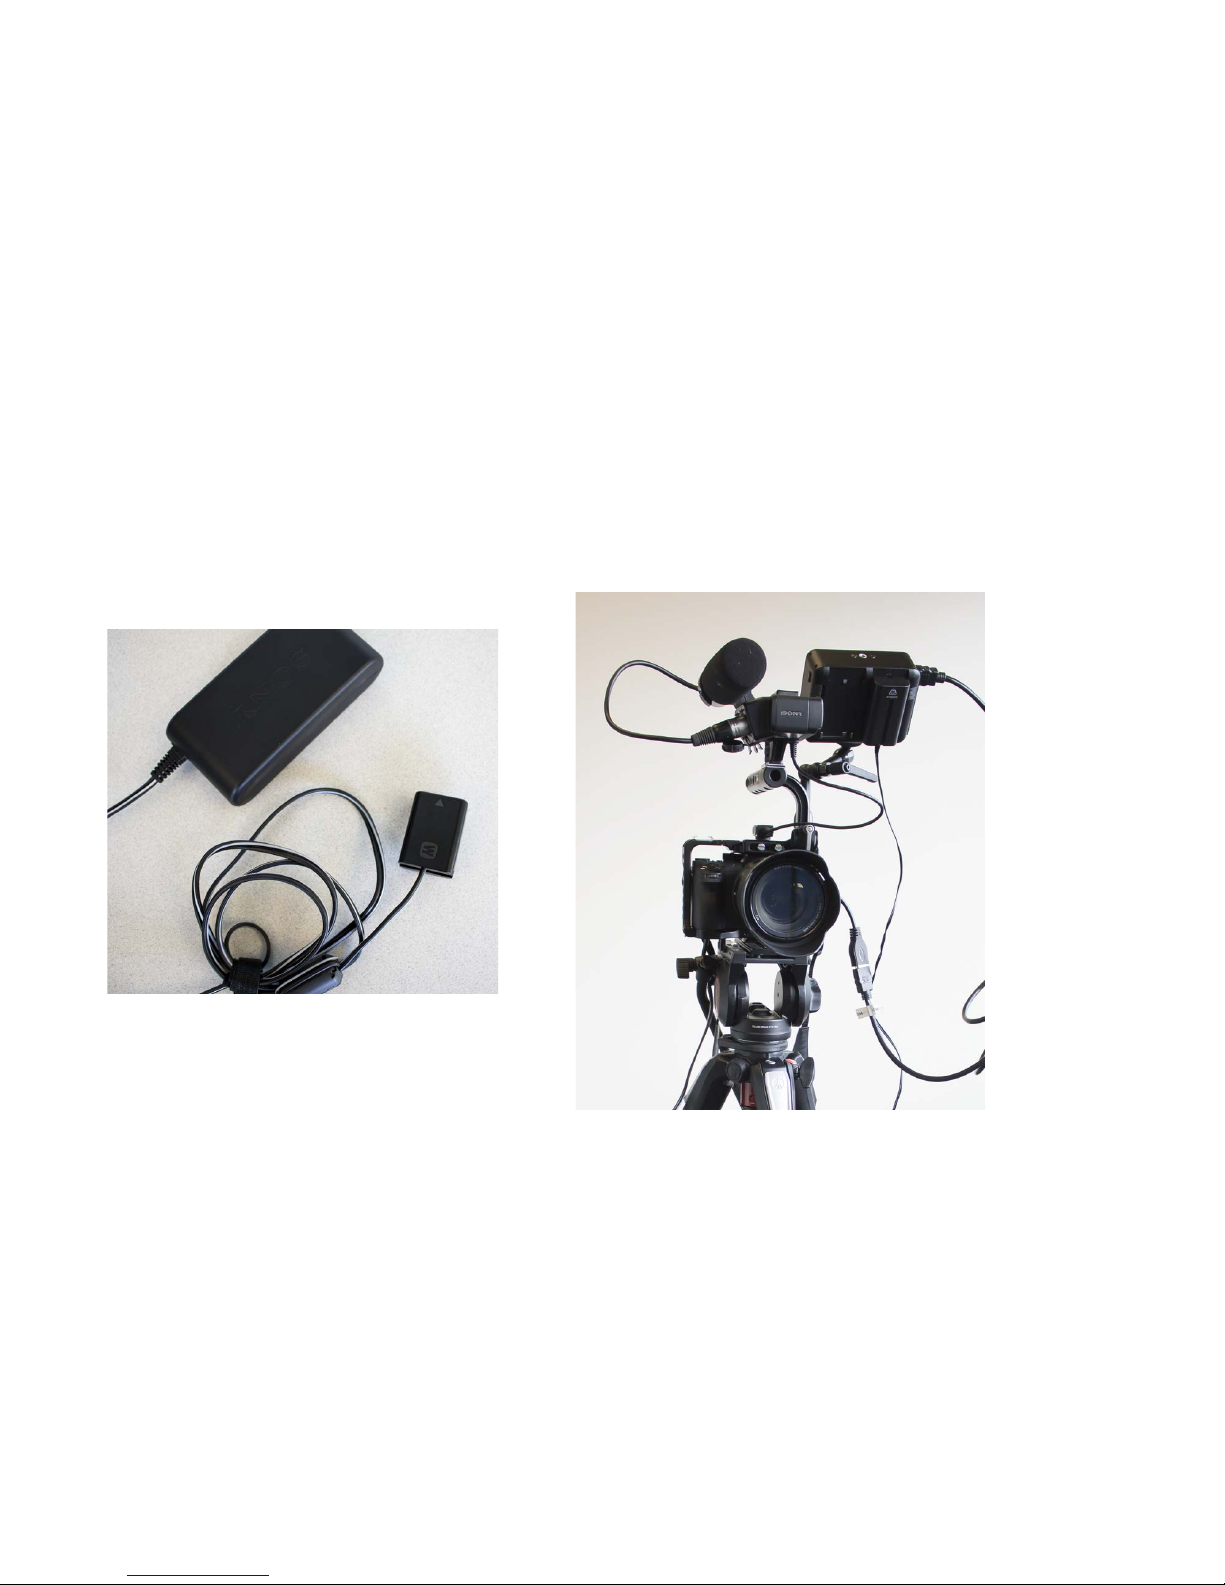
The%α7S%also%has%an%AC%adapter.%
Page 15

Part%Two:%Essential%Menu%Settings
• In%order%for%external%video%recording%to%work%the%following%three%
things%must%correspond:%the%video%recording%format%on%the%camera,%
the%HDMI%video%output%format%on%the%camera,%the%video%recording%
format%on%the%external%recorder.
• The%external%video%recorder%is%HD%or%SD%only.%It%is%not%a% 4K%recorder.
• Please%set-up%the%camera%according%to%the%following%slides.
Page 16
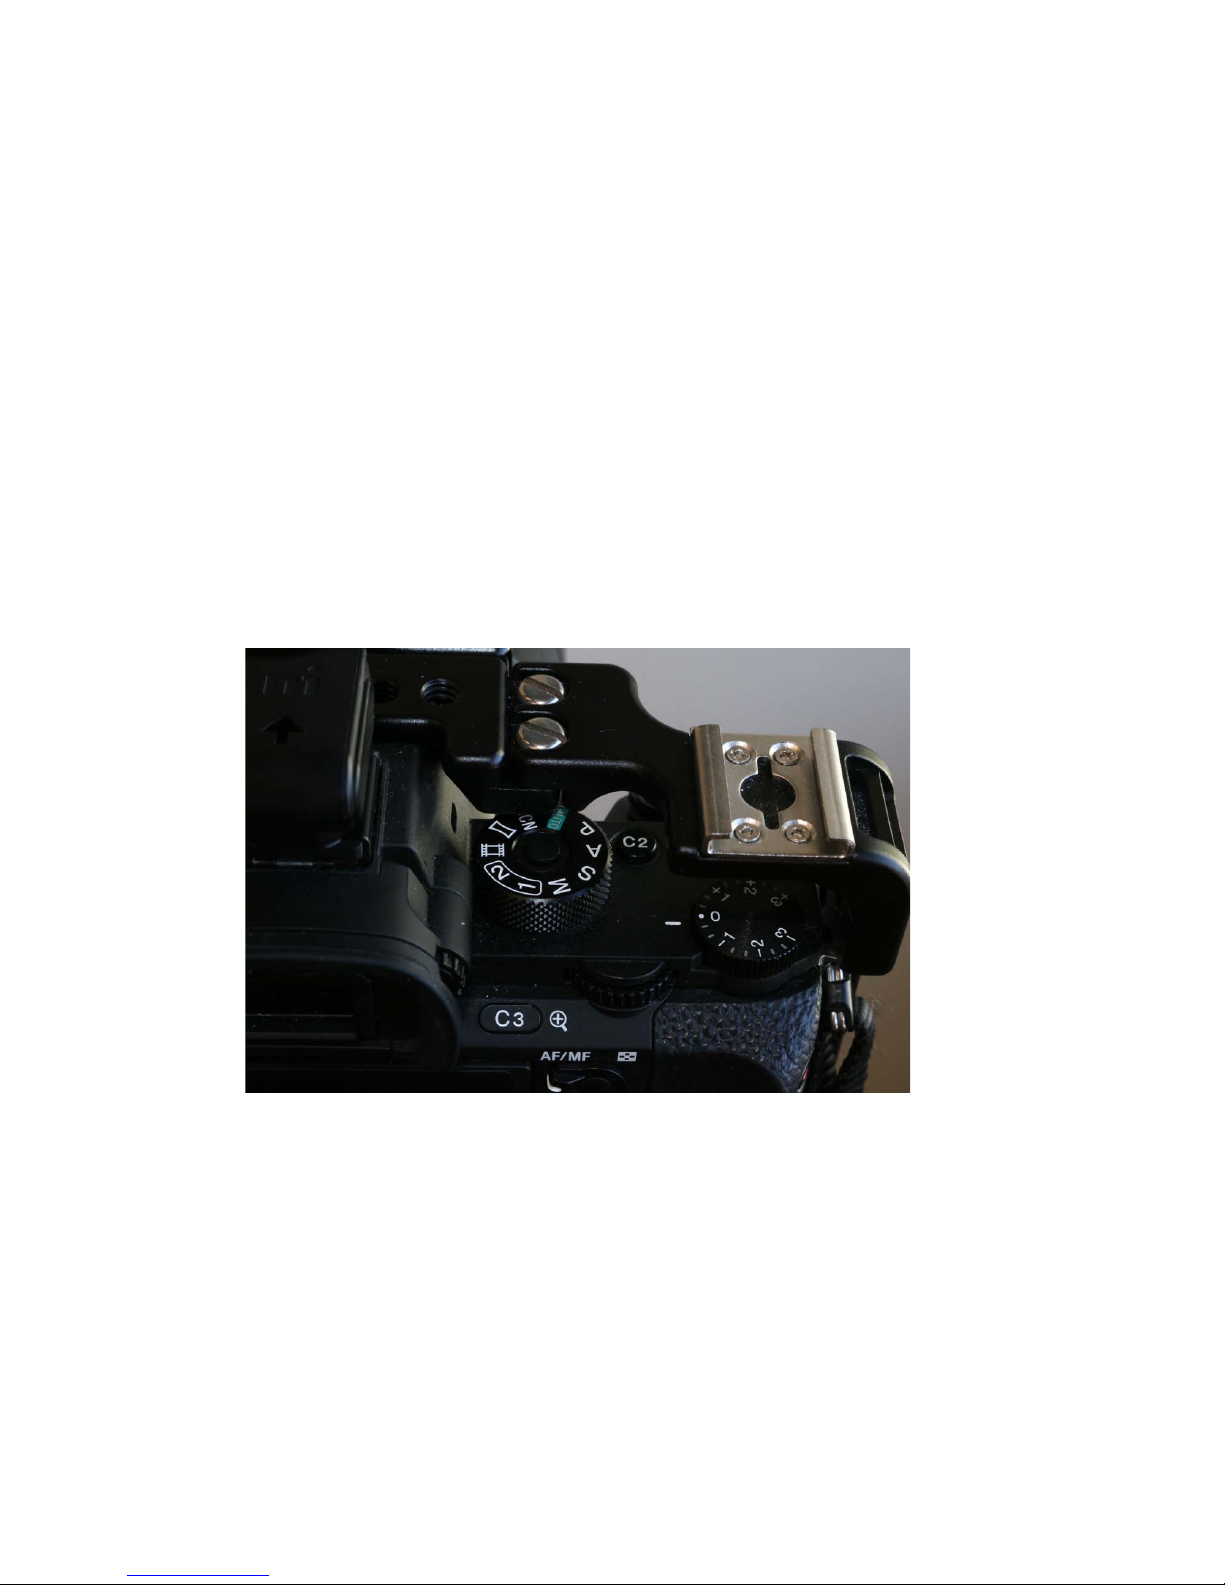
To%acc e s s%the % correct%m e n u s%make%sure%t h e %camera%is % i n%MOVIE % m ode.%
(Press%the%button%in%the%center%of%the%dial%to%turn%it).
Page 17
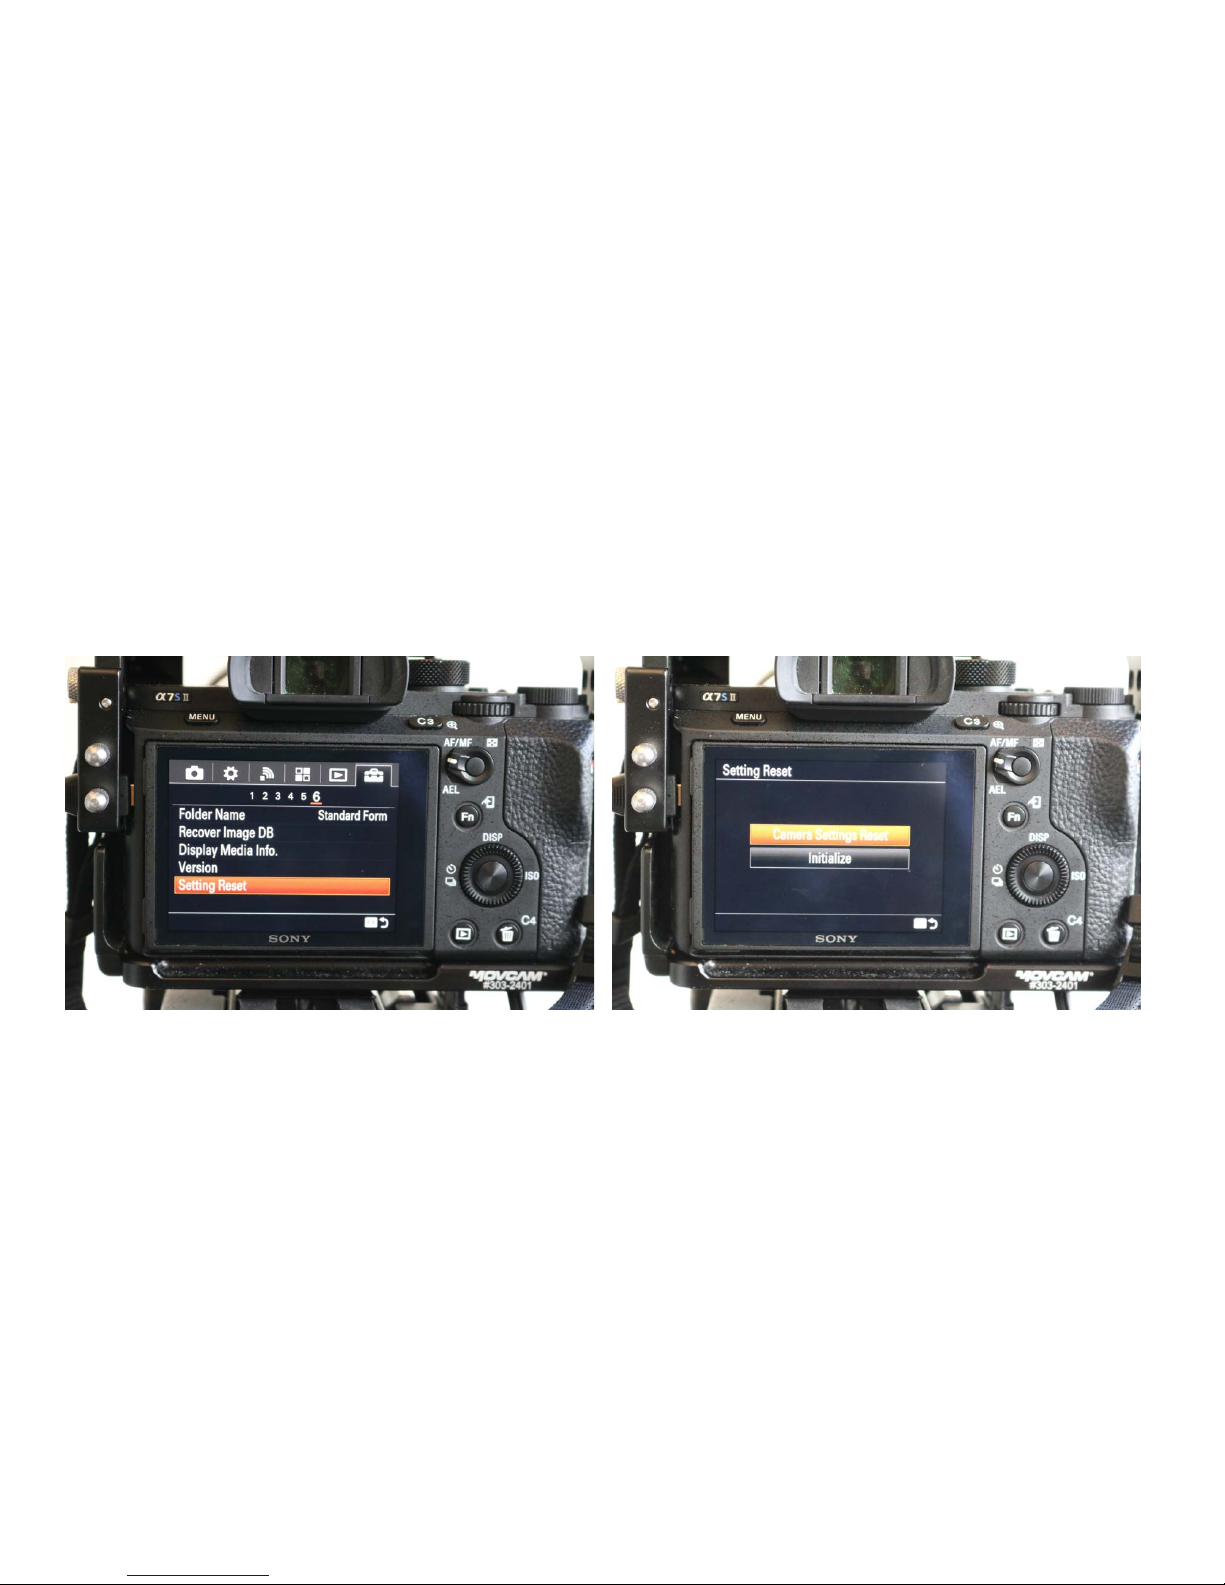
Setup%(toolbox)%Menu%Page%6%–
Setting%Reset
Reset%the%camera%to%erase%the%previous%user’ s%settings.%
Choose%
Camera%Settings%Reset.
Page 18
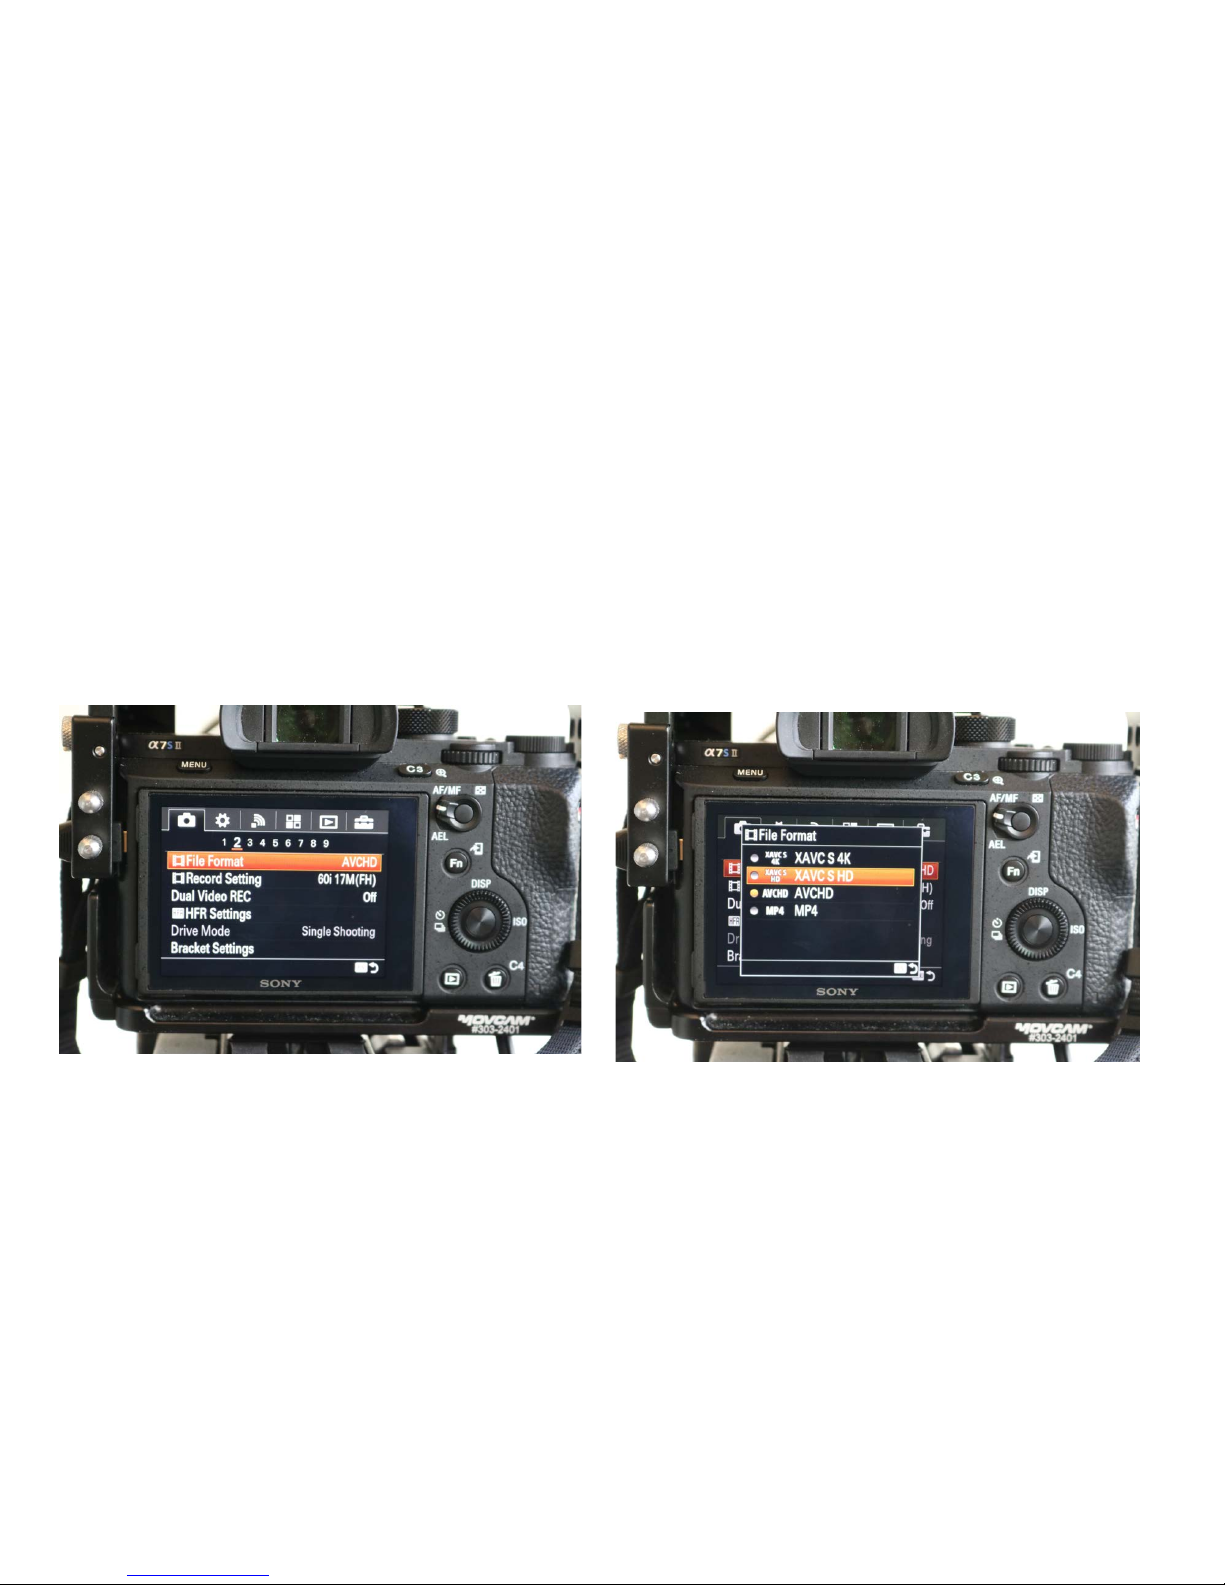
Camera%Menu%Page%2:%
File%Format
This%is%the%format%recorded%to%the%internal%SD%card%(that%you%are%probably%
not%using),%but%by%selecting%the%high%quality%
XAVC%S%HD
you%will%have%the%
access%to%the%correct%record%settings.
Page 19
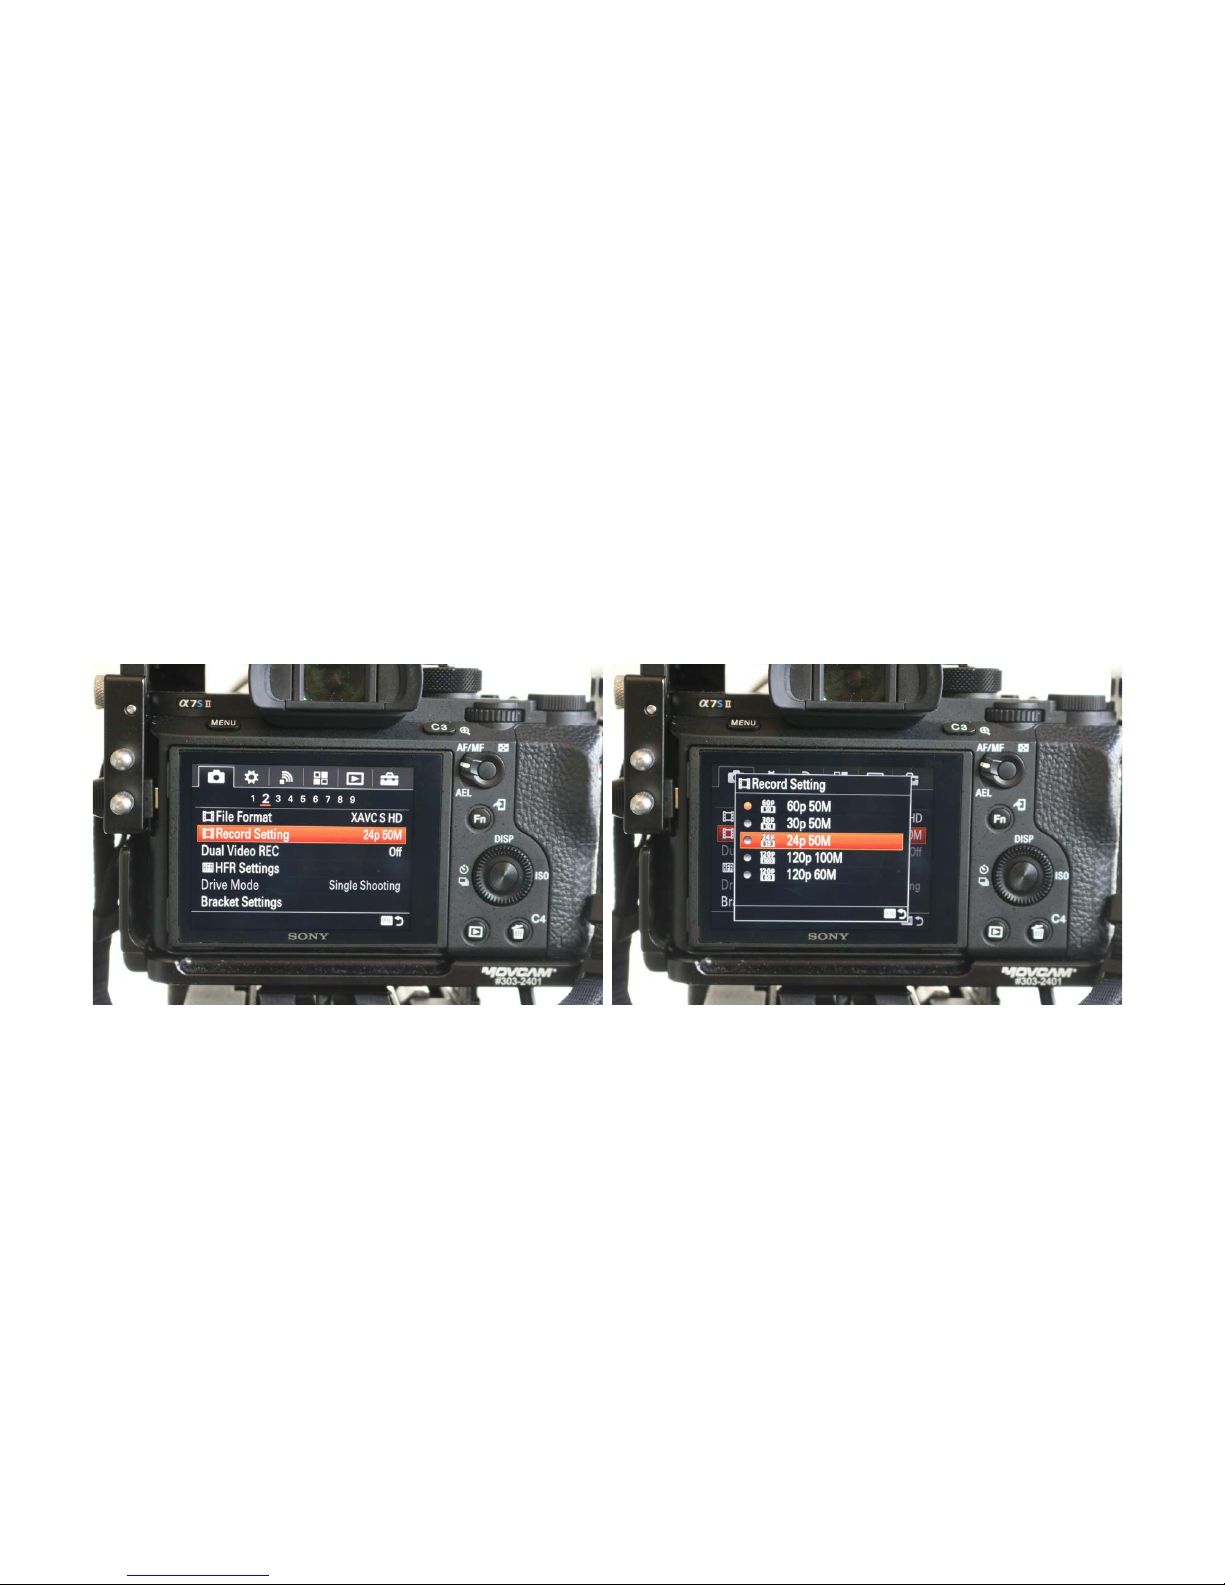
Camera%Menu%Page%2:%
Record%Setting
Choose%
24p%50M:%
the%most%common%frame%rate.
50M%is%the%data%rate:%50%Megabits.
Page 20
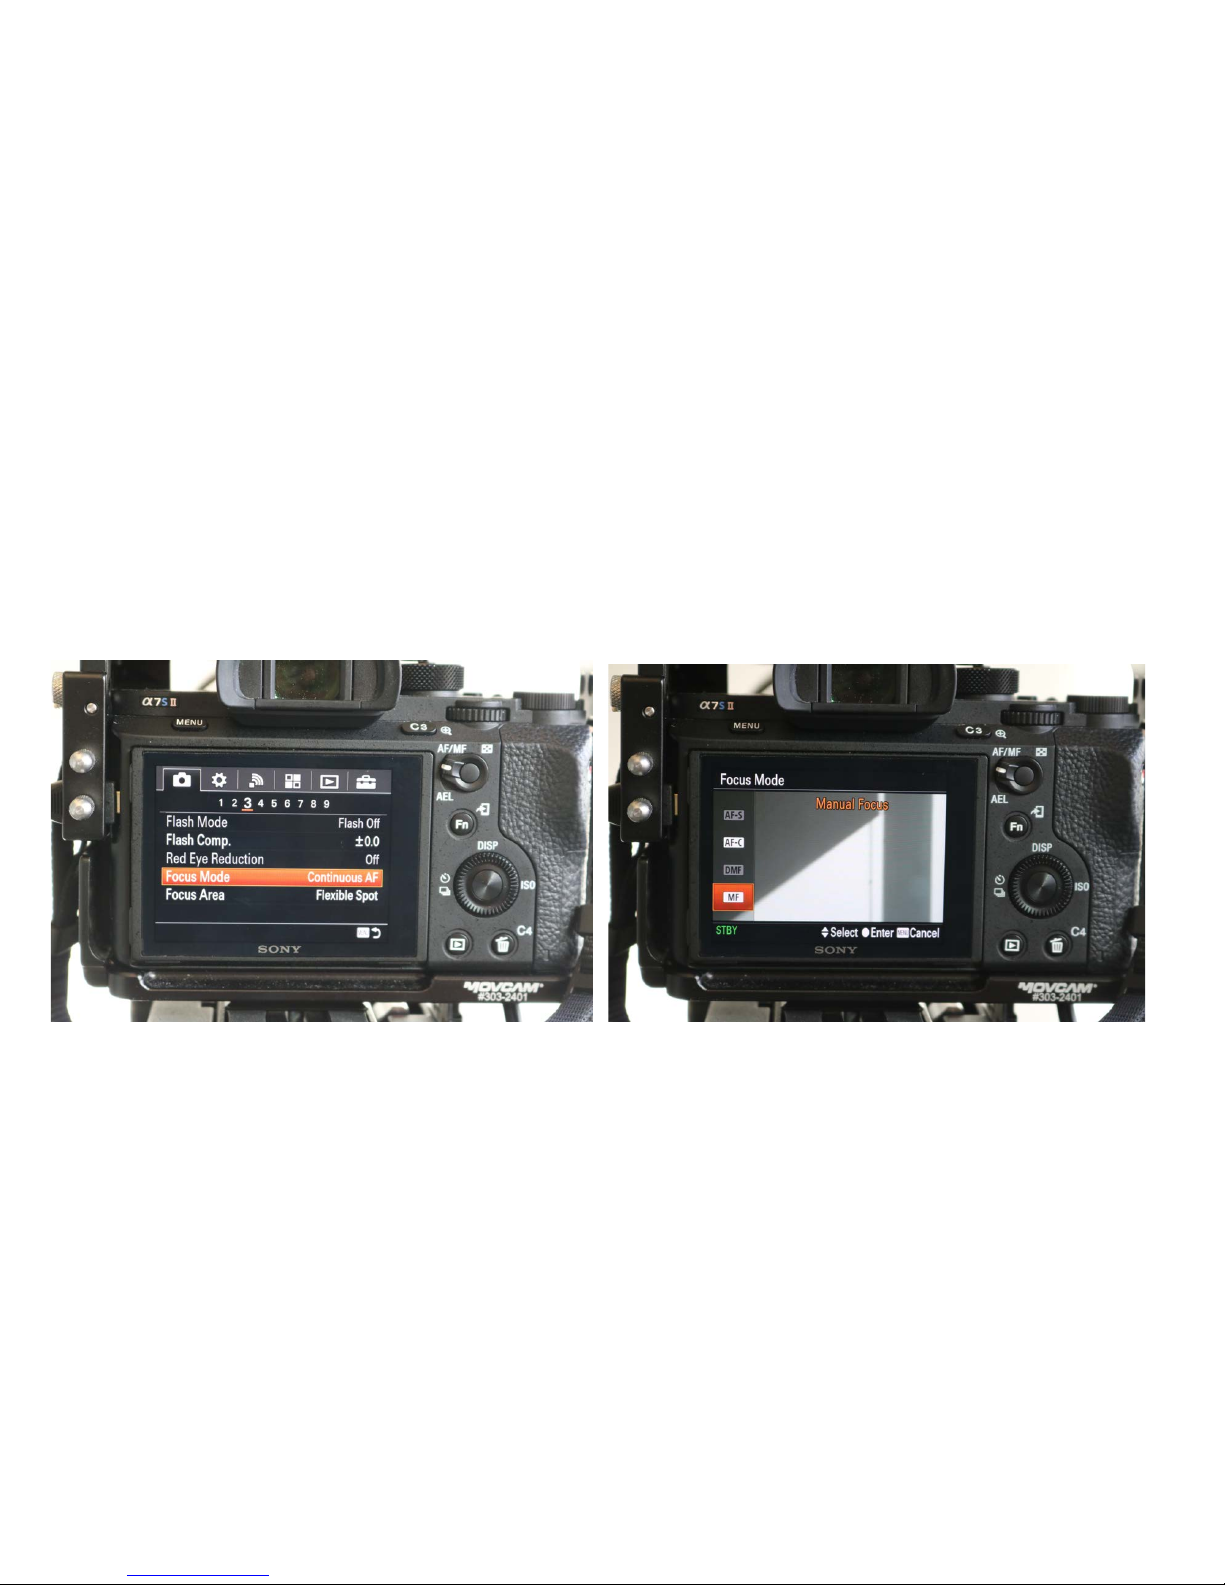
Camera%Menu%Page%3:%
Focus%Mode
Pick%
Continuous%AF%
or%
Manual
as%you%wish.%
Manual%focus%is%useful%if%you%want%to%avoid%focus%shifts.
Page 21
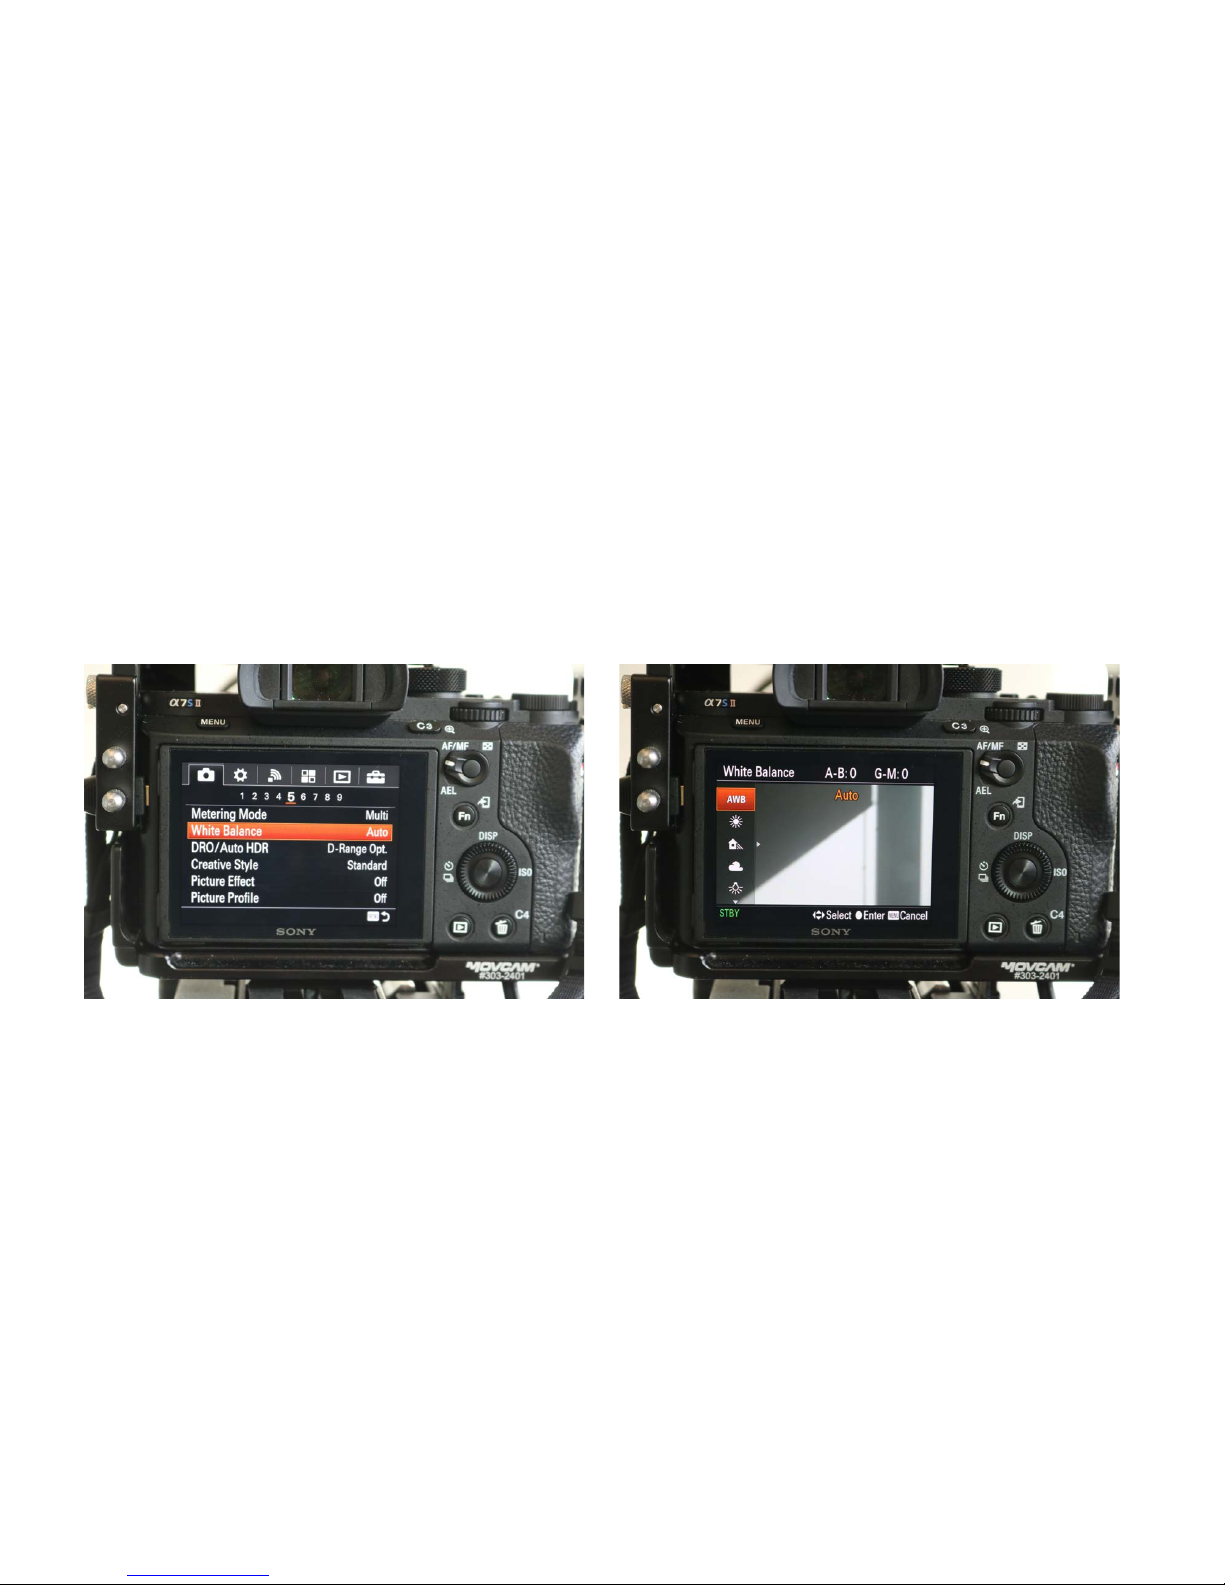
Camera%Menu%Page%5:%
White%Balance
Auto%
generally%works%well.
Page 22
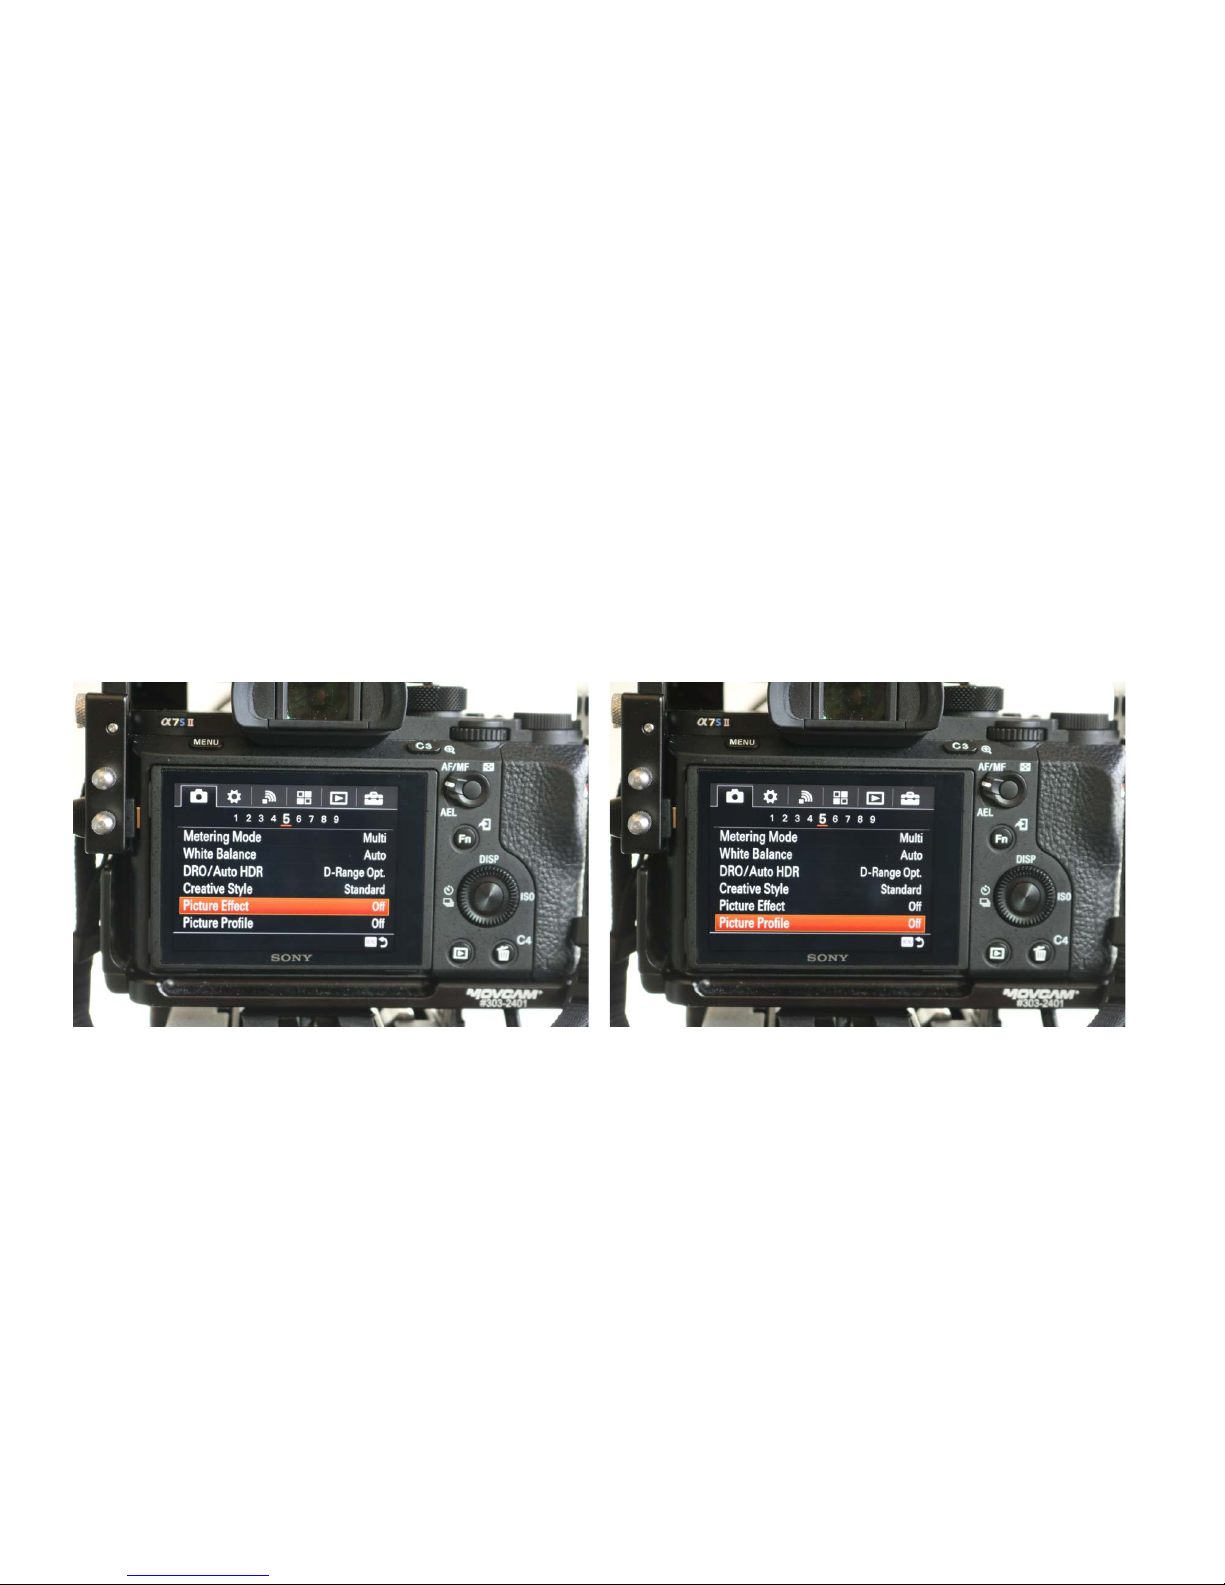
Camera%Menu%Page%5:%Picture%Effect%and%Picture%Profile%
OFF%
– this%will%
ensure%a%neutral image.%
Page 23

A%note%about%Picture%Profiles
• Sony’s% Picture%Profiles%are%the%most%interesting%aspects%of%their%video%
cameras.
• The%α7S%has%SLOG%2%and%SLOG%3%picture%profiles%that%enable%you%to%
shoot%high%dynamic%range%video,%exposing%video%in%high%contrast%
lighting%situations.
• SLOG%profiles%must%be%exposed%differently%than%regular%HD%video%
profiles%and%they%also%require%normalizing%after%the%shoot.
• Don’t%use%SLOG%profiles%in%a%low%light%situation.%For%this%reason,%they%
are%generally%not%useful%when%filming%conferences.
Page 24
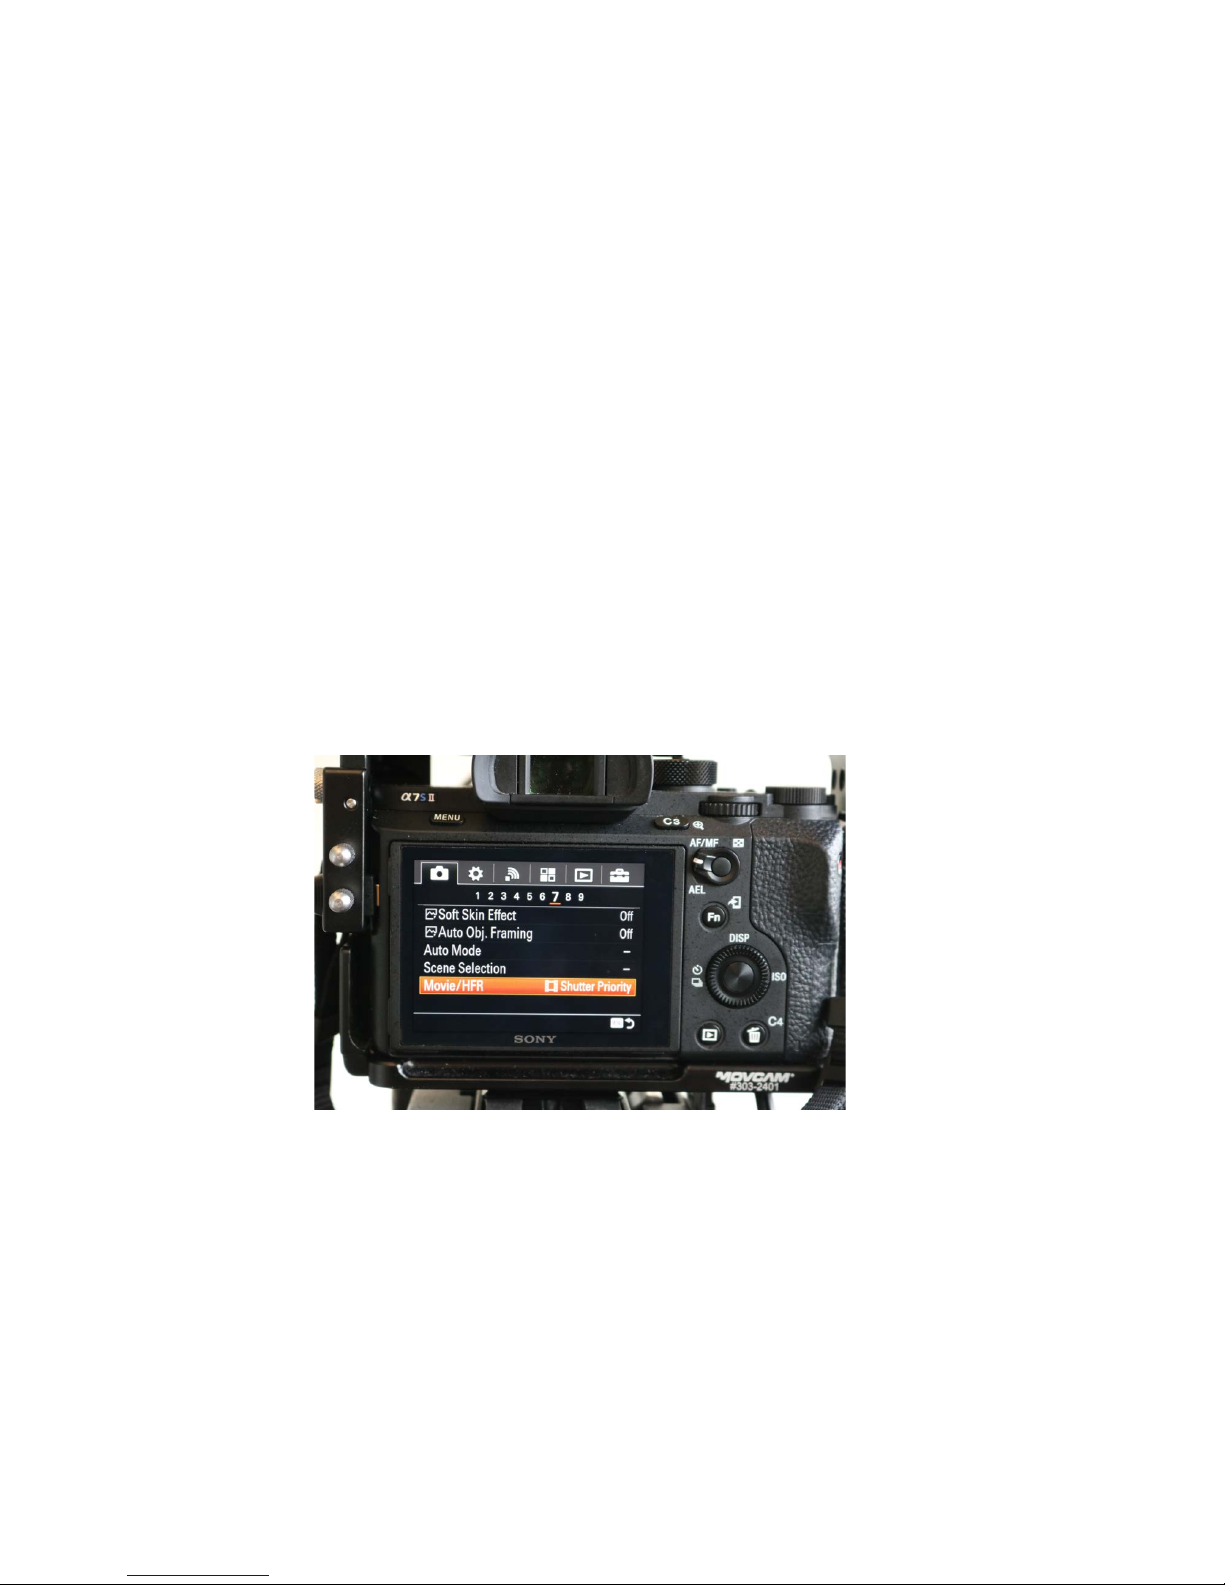
Camera%Menu%Page%7:%Movie%/HFR
This%setting%determines%how%you%control%exposure.%You%have%a%choice%of%
Manual,%Shutter%Priority,%Aperture%Priority%or%Program%(Aut o).%
Do%not%
choose%Program%or%Aperture%Priority%for%video%shooting.%Choose%Manual%
or%Shutter%Priority.%See%the%next%section%on%Camera%Operation/Exposure%
Controls%for%more%detail.
Page 25
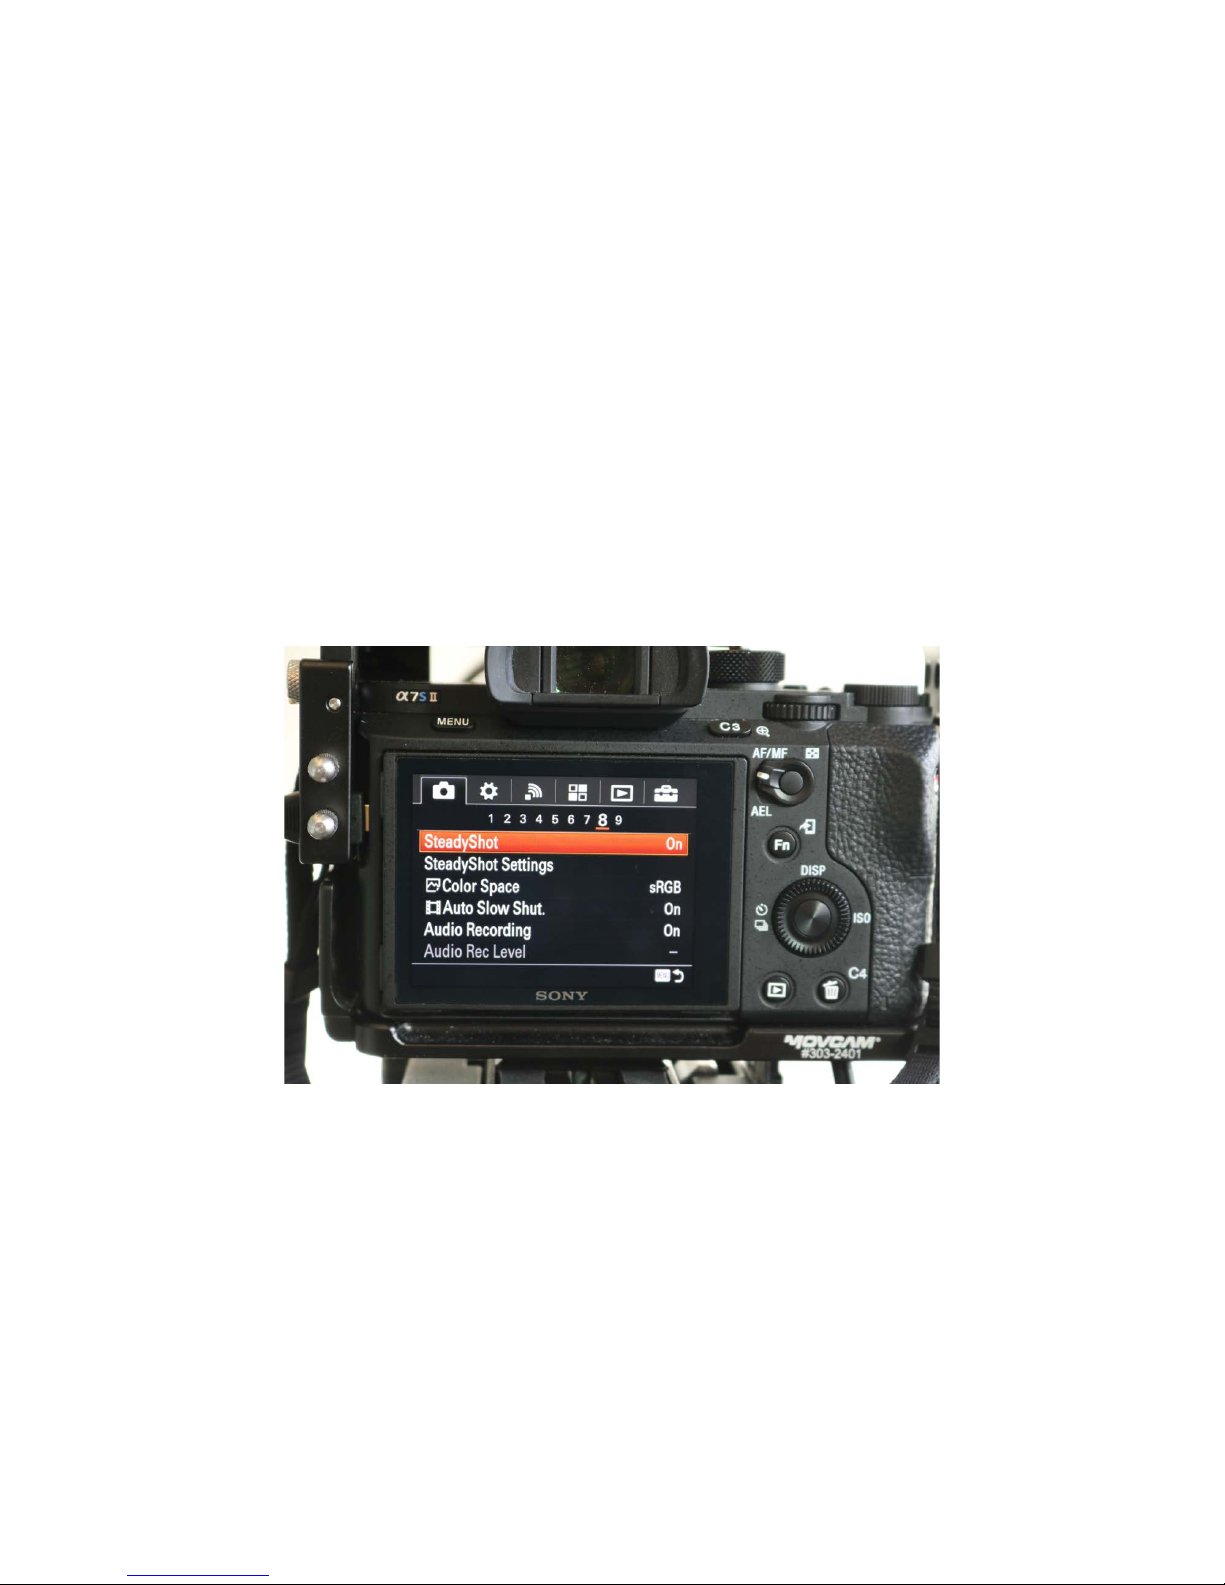
Camera%Menu%Page%8:%Steady%Shot
Stabiliza tion%(Steady%Shot)%is%
OFF%
when%the%camera%is%on%a%tripod.
Page 26
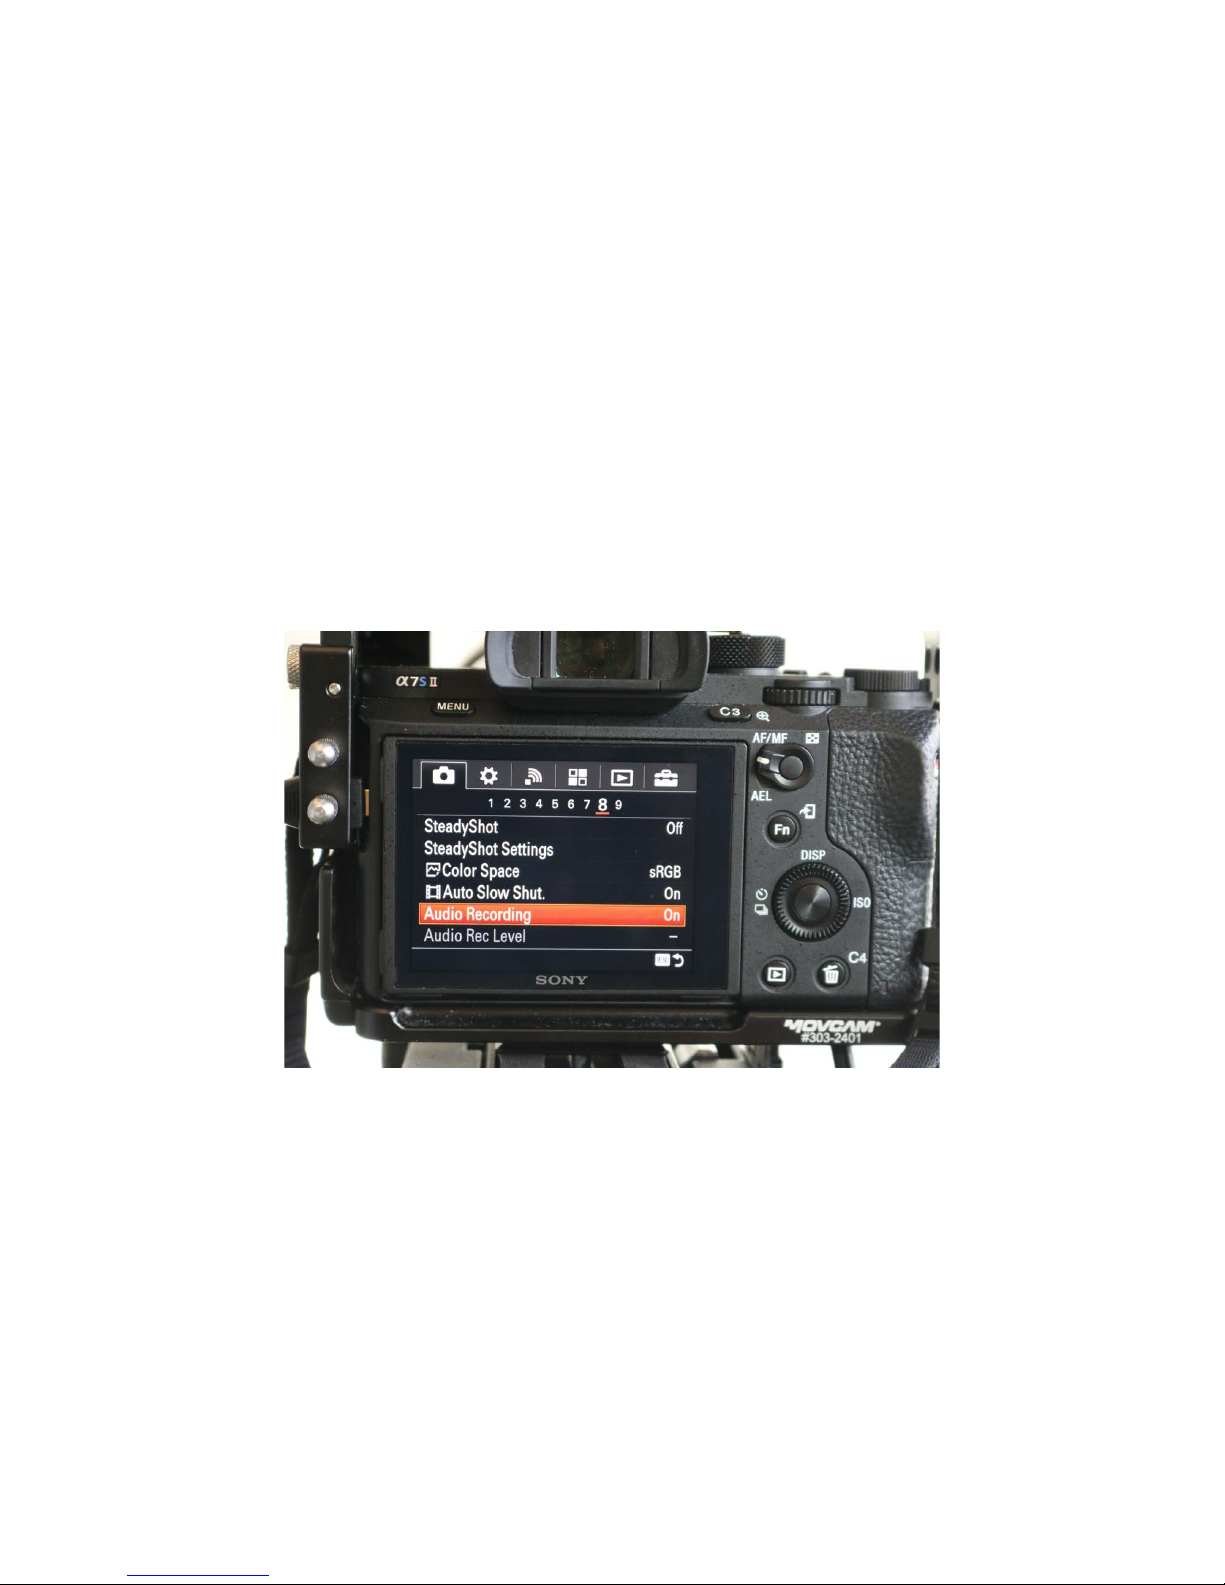
Camera%Menu%Page%8:%Audio%Recording%
ON
Page 27
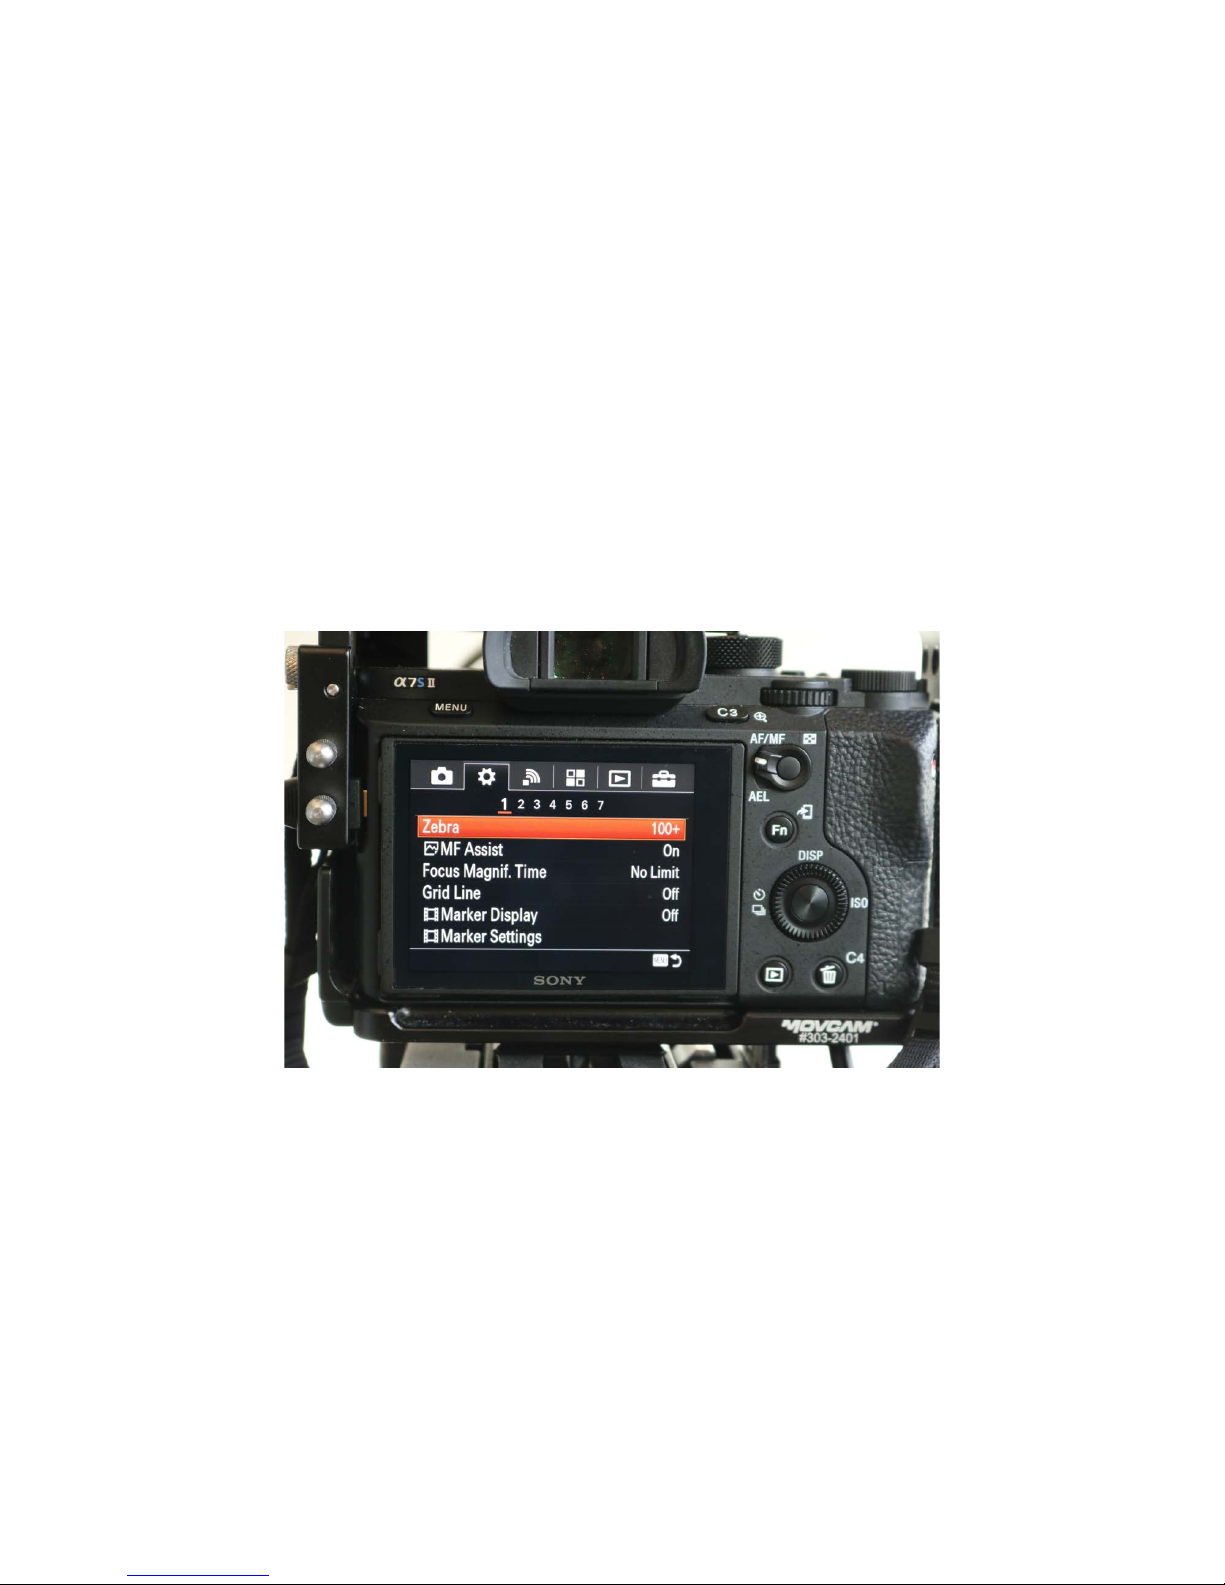
Custom%Menu%Page%1:%Zebra
Pick%
100+%
to%verify%overexposure.%
Page 28
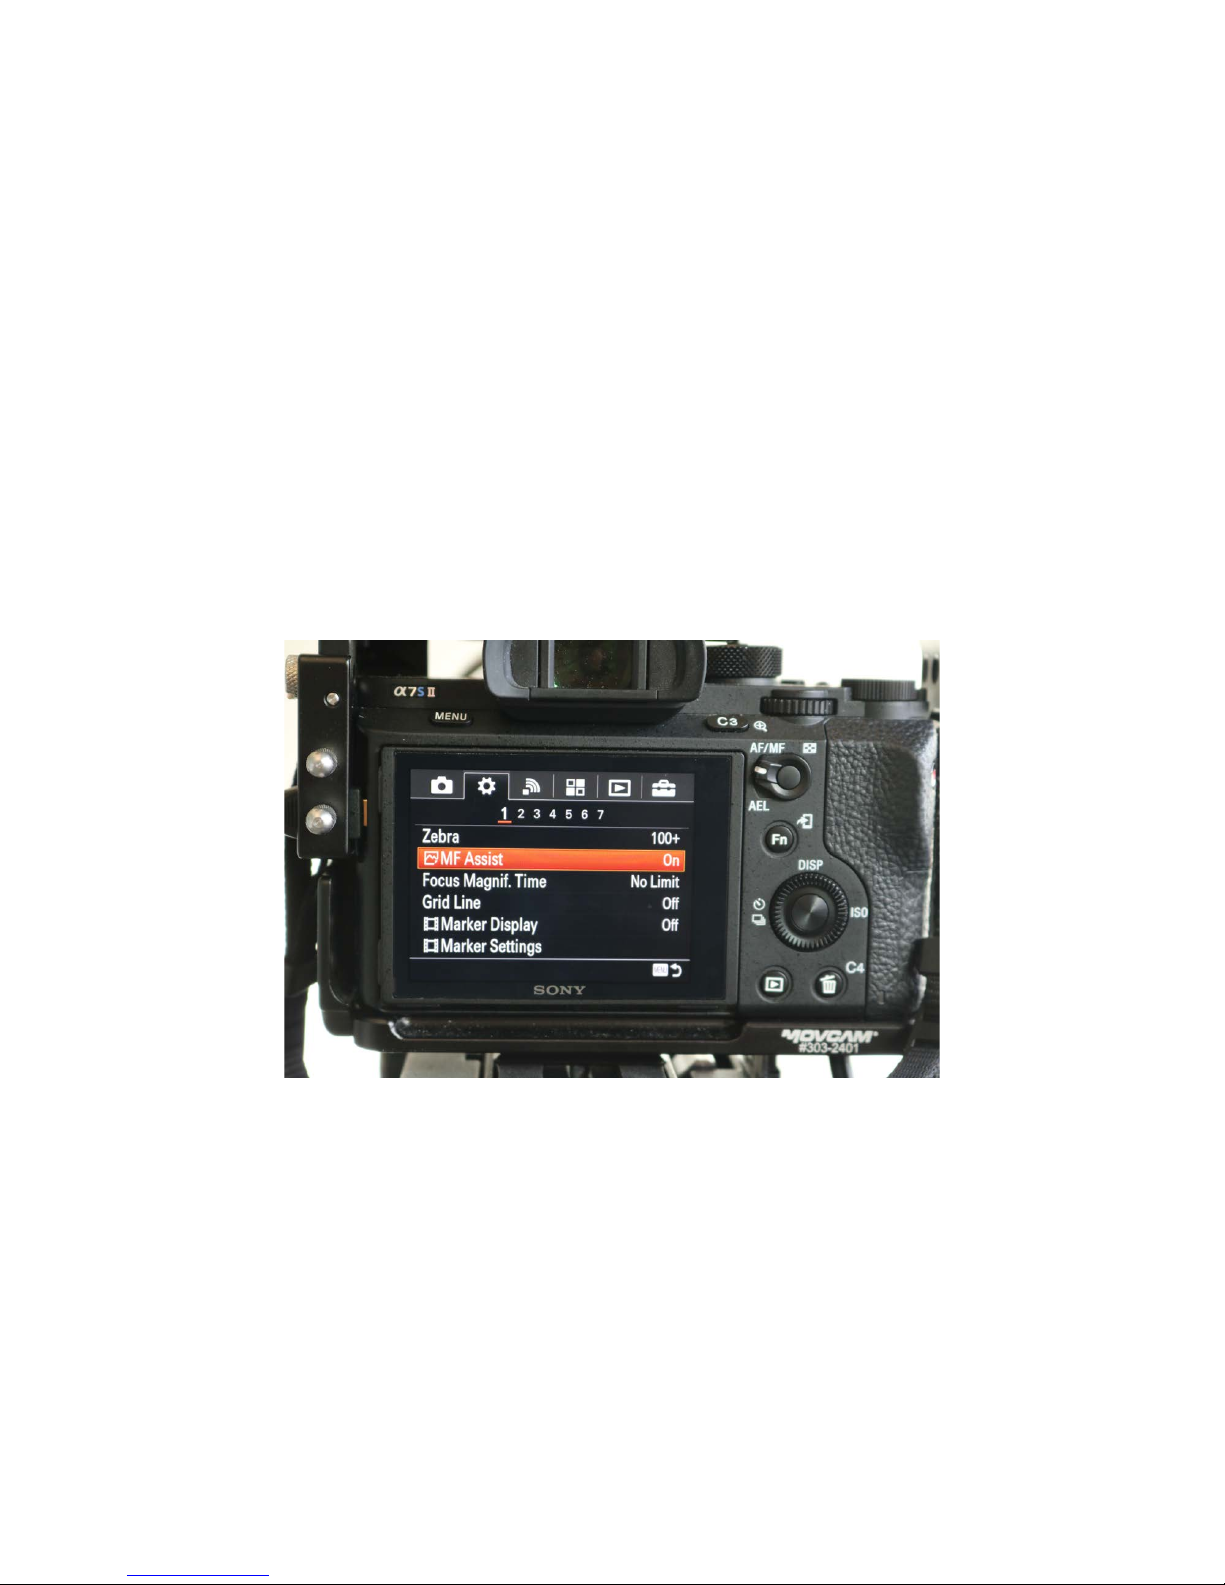
Custom%Menu%Page%1:%MF%Assist
ON
displays%a%magnified%image%when%focusing%manually%(when%button%
C2%is%pressed).
Page 29
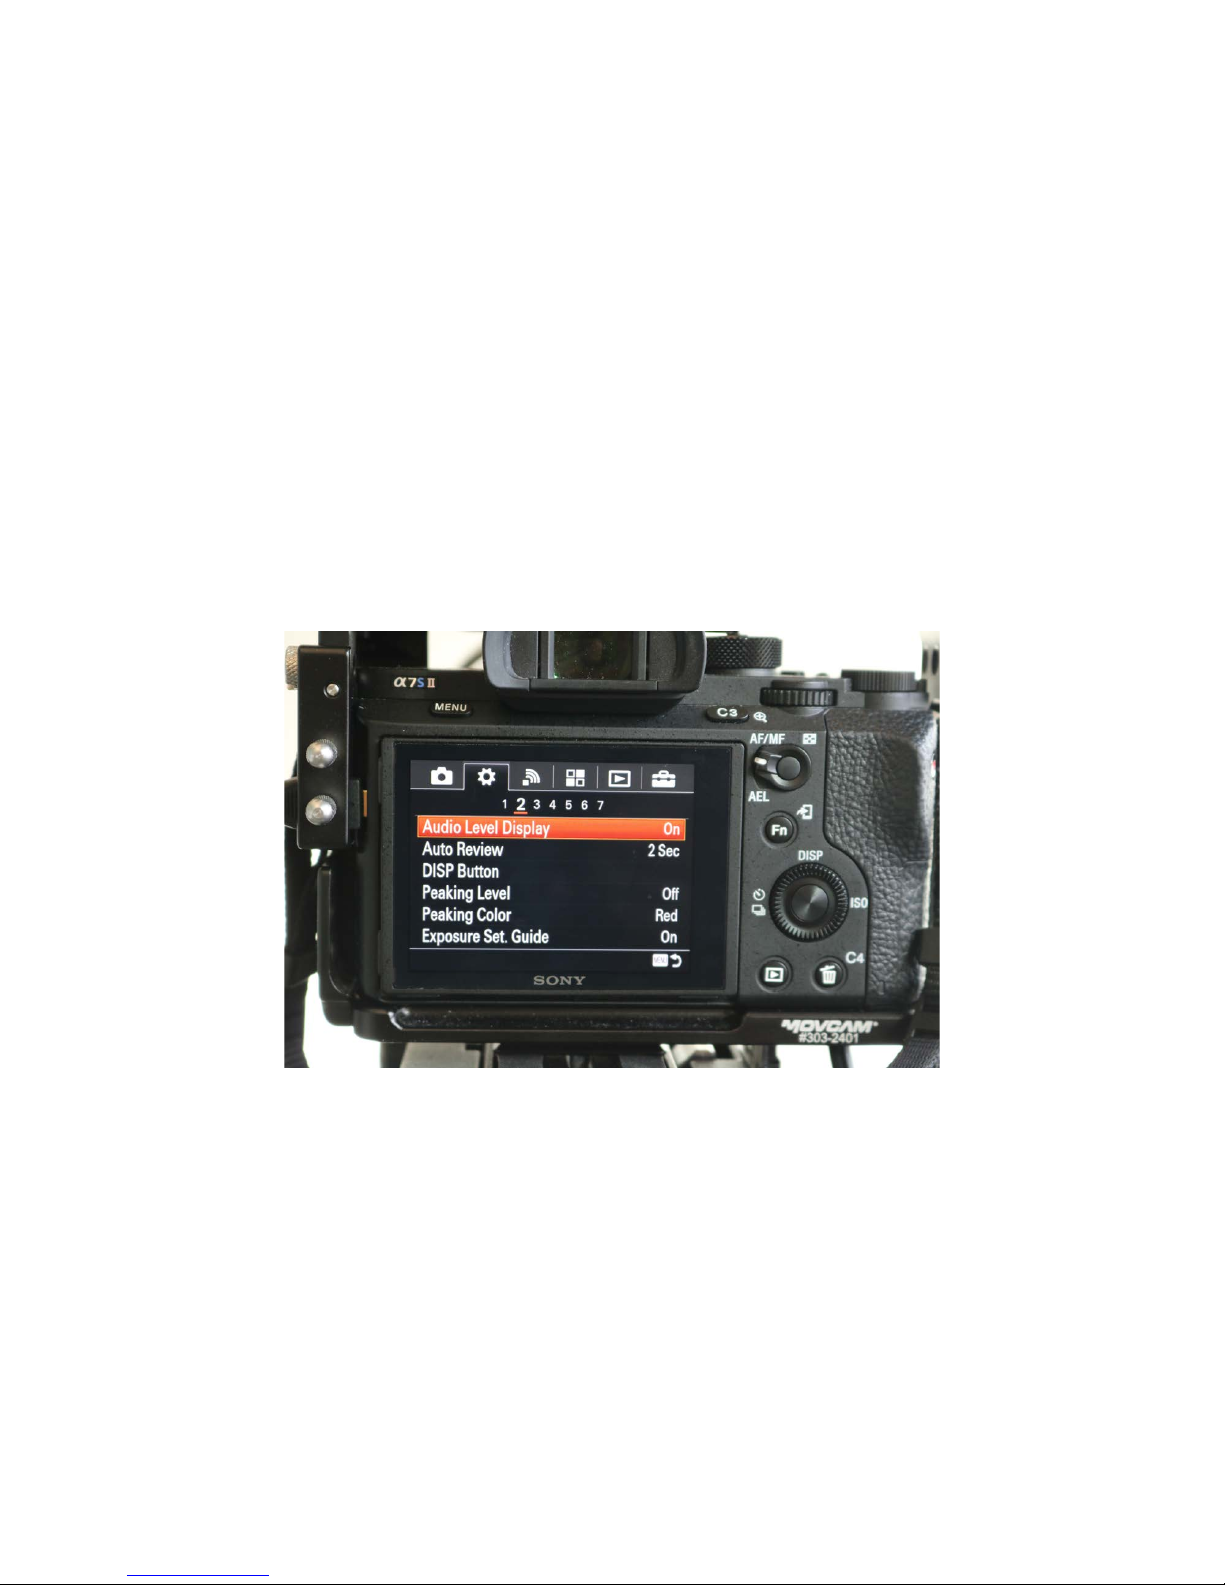
Custom%Menu%Page%2:%Audio%Level%Display%
ON
Page 30
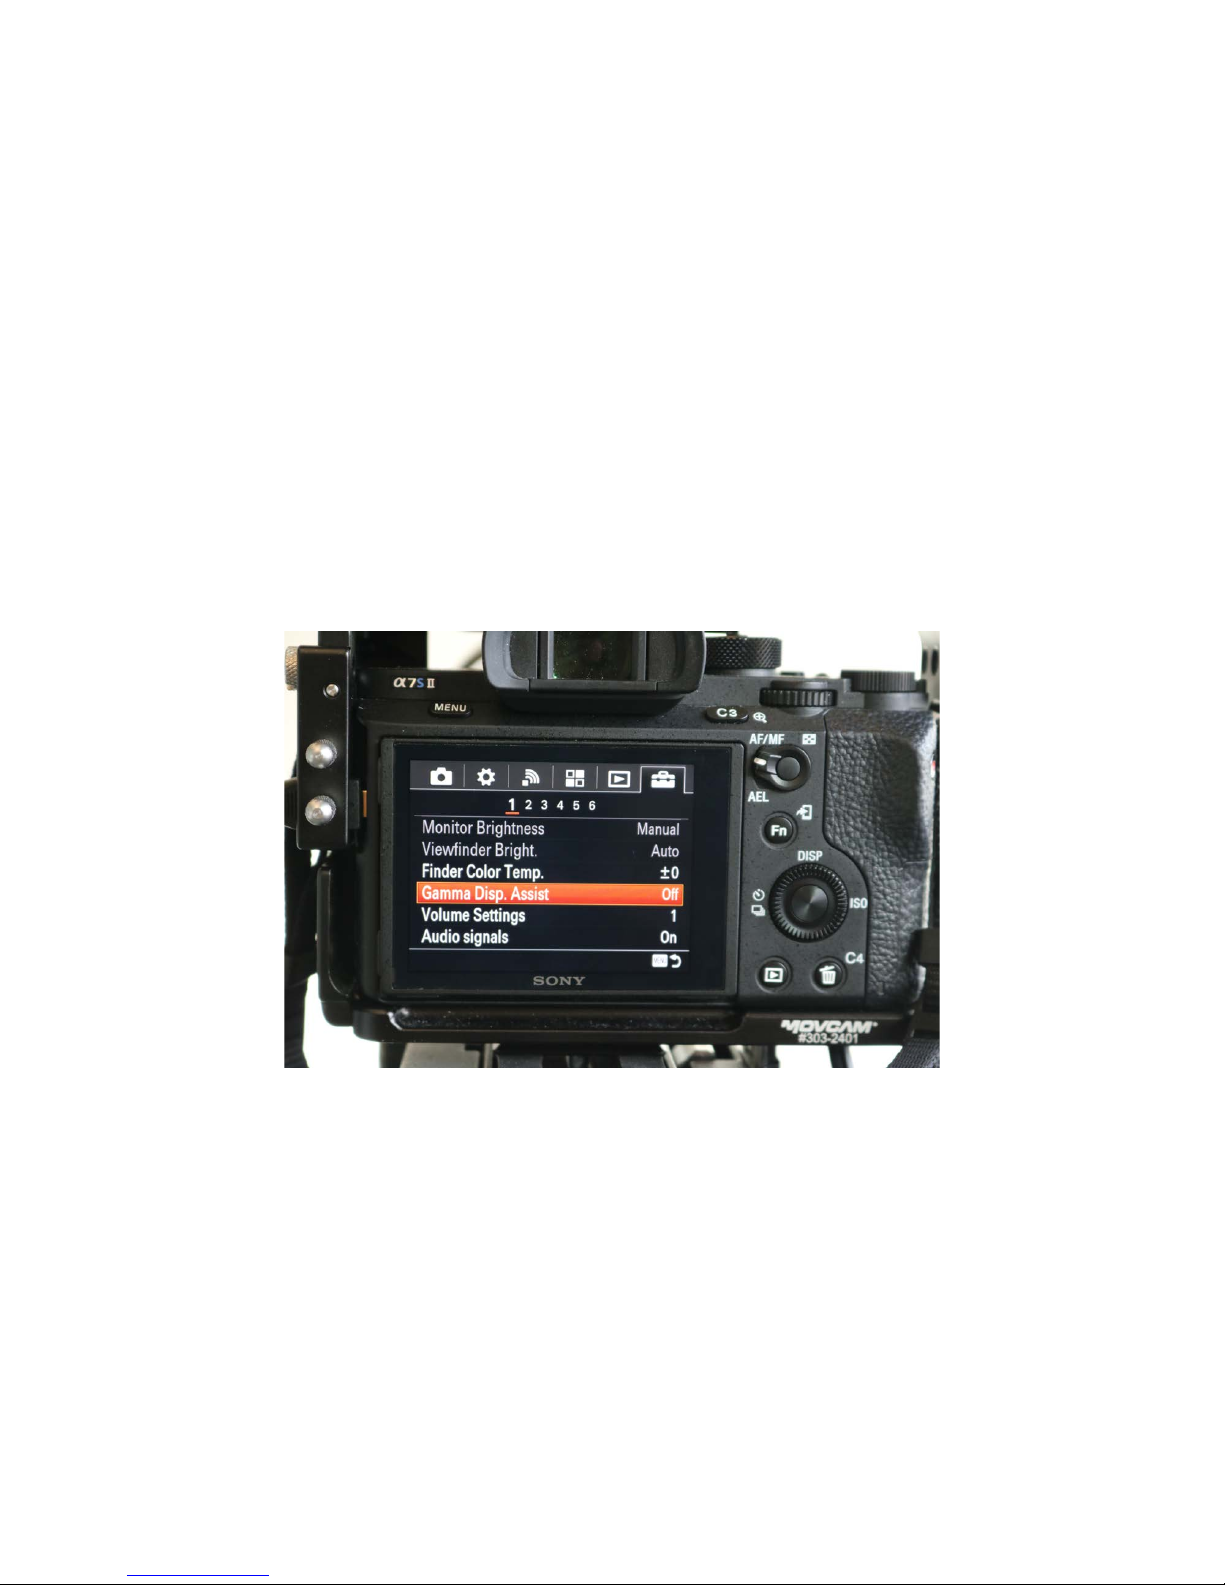
Setup%Menu%Page%1:%Gamma%Disp.%Assist
This%should%be%
OFF
by%default.
Page 31
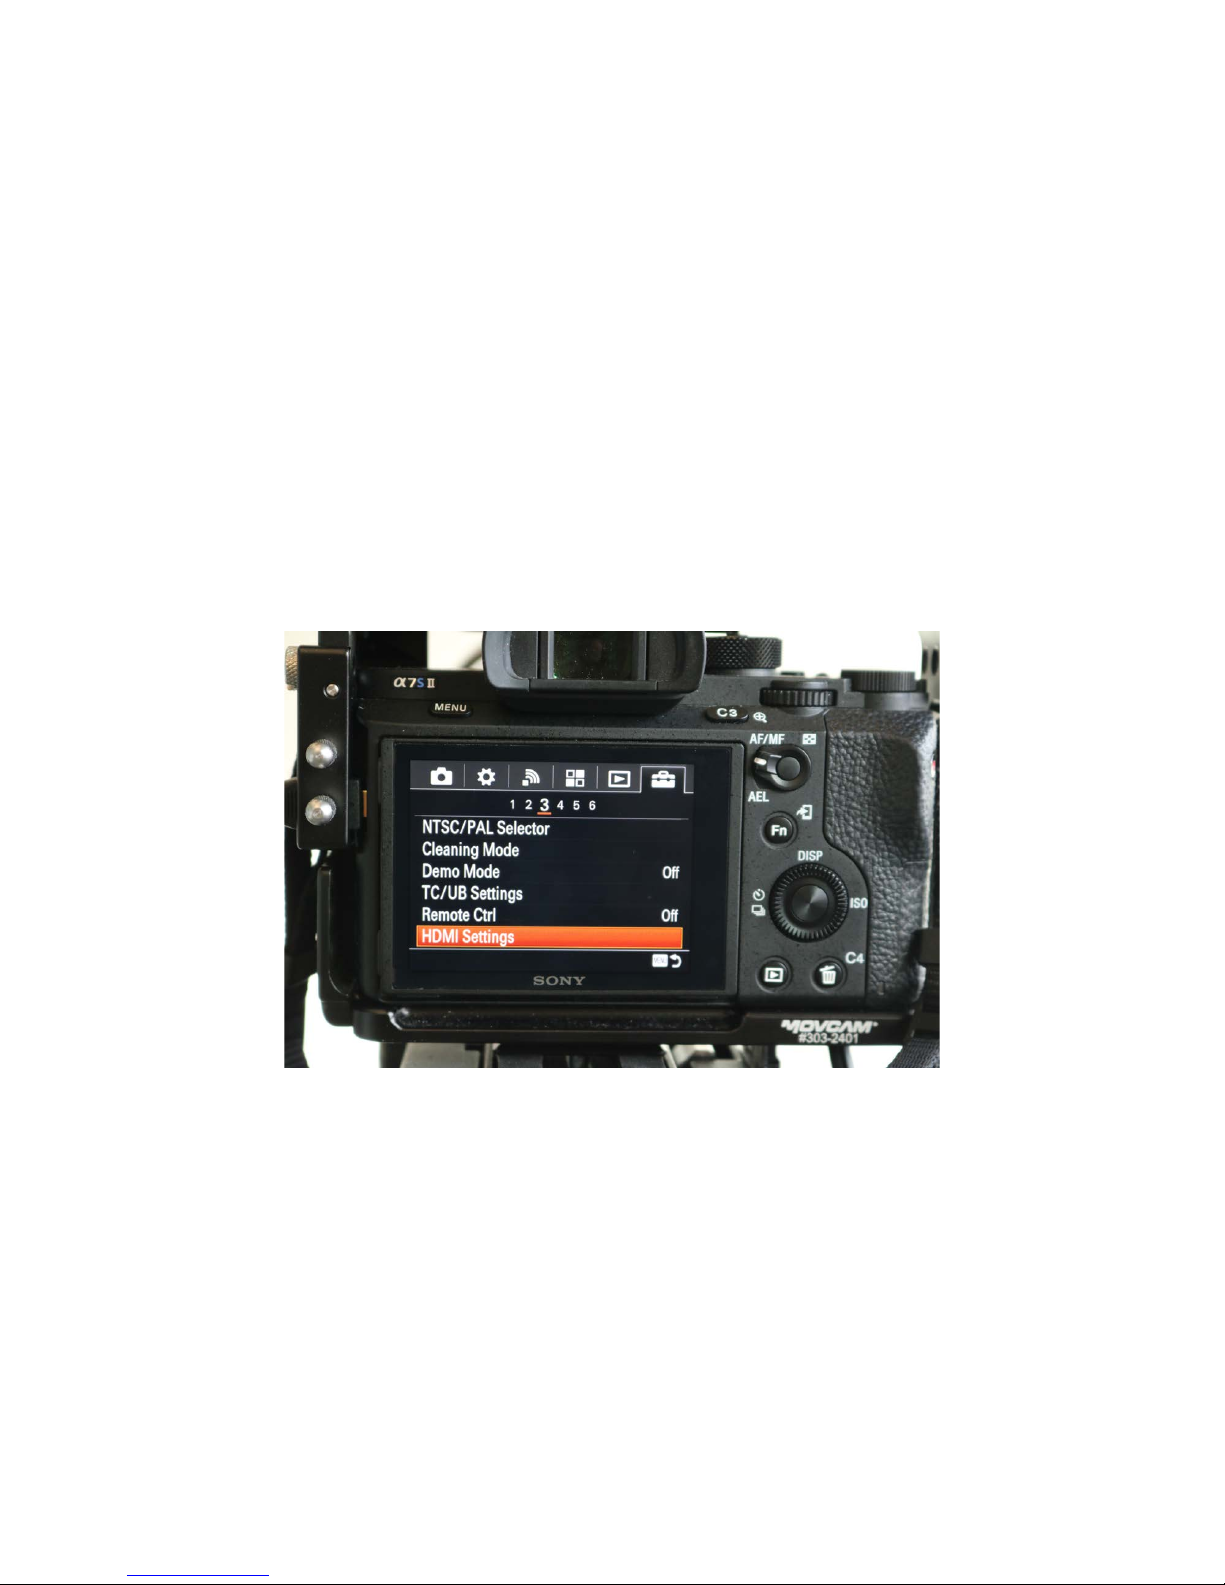
Setup%Menu%Page%3:%HDMI%Settings
This%leads%to%an%important%submenu.
Page 32
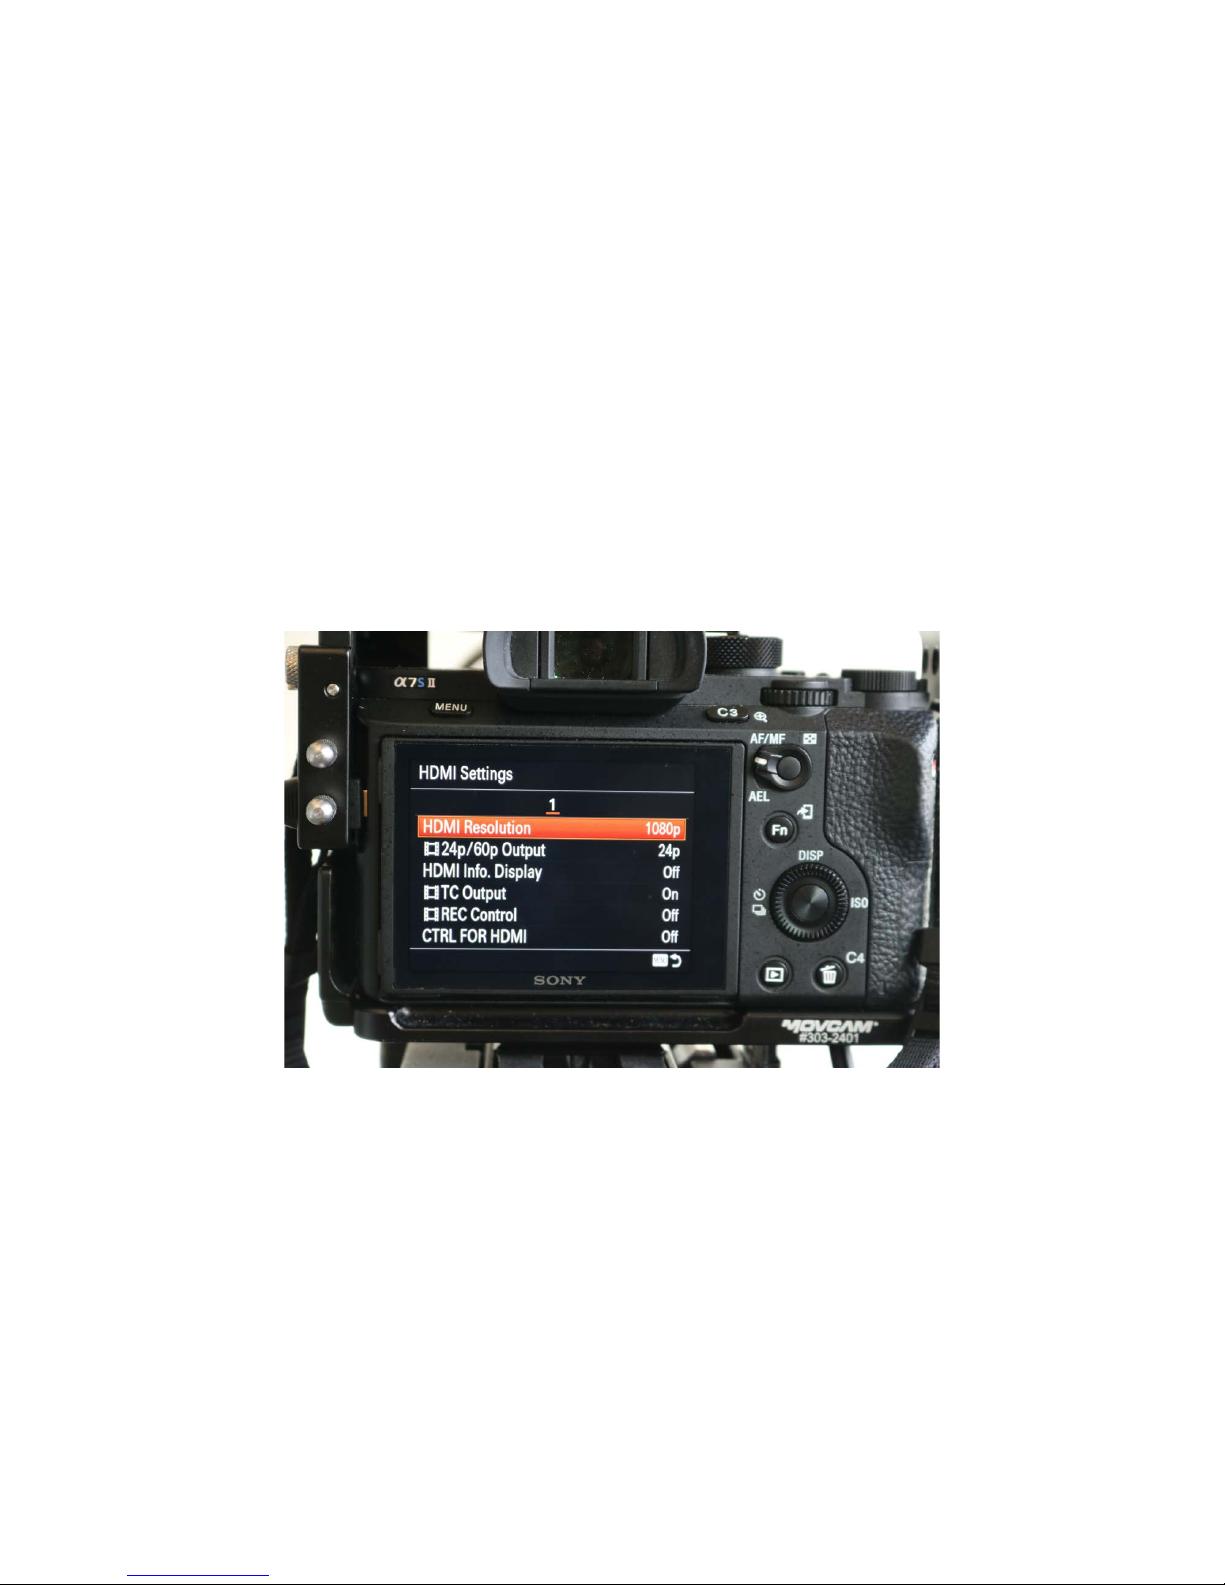
HDMI%Settings:%HDMI%Resolution%
1080p
Page 33
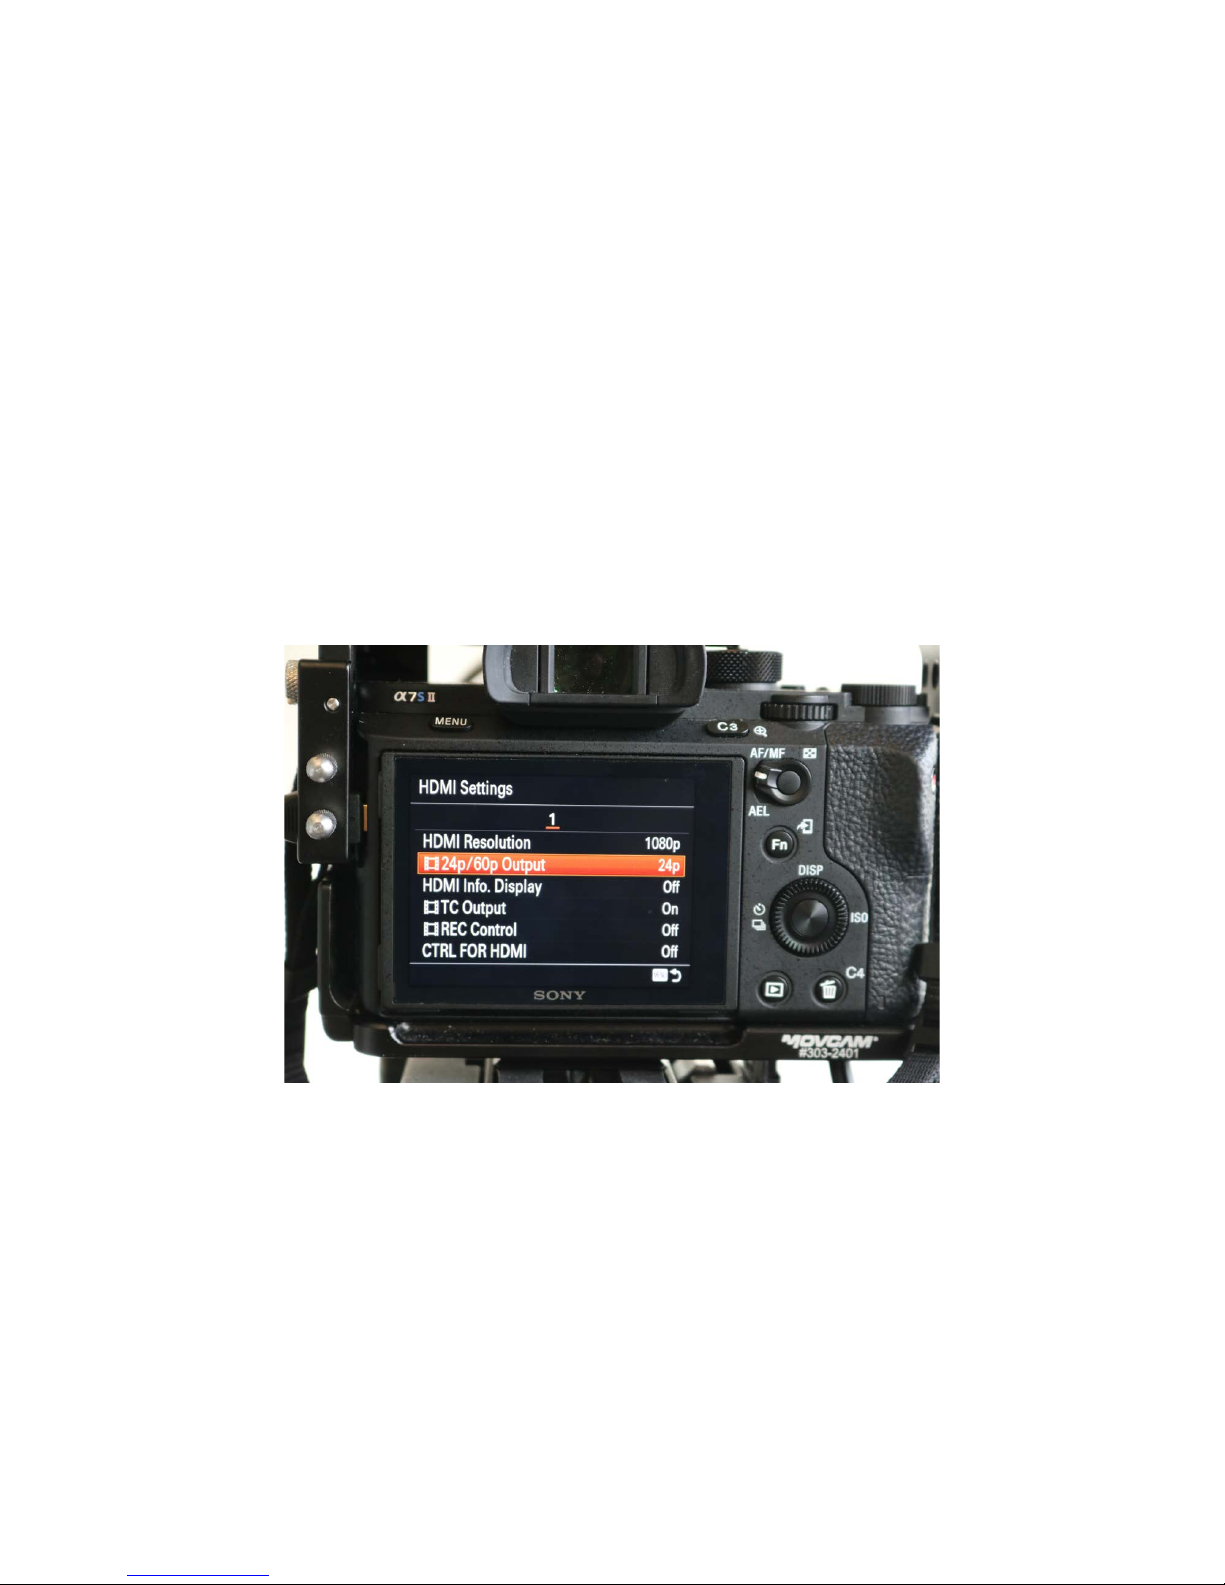
HDMI%Settings:%24p/60p%Output%
Choose%
24p%
to%match%the%cameras%video%recording%format%of%1080%24p.
Page 34
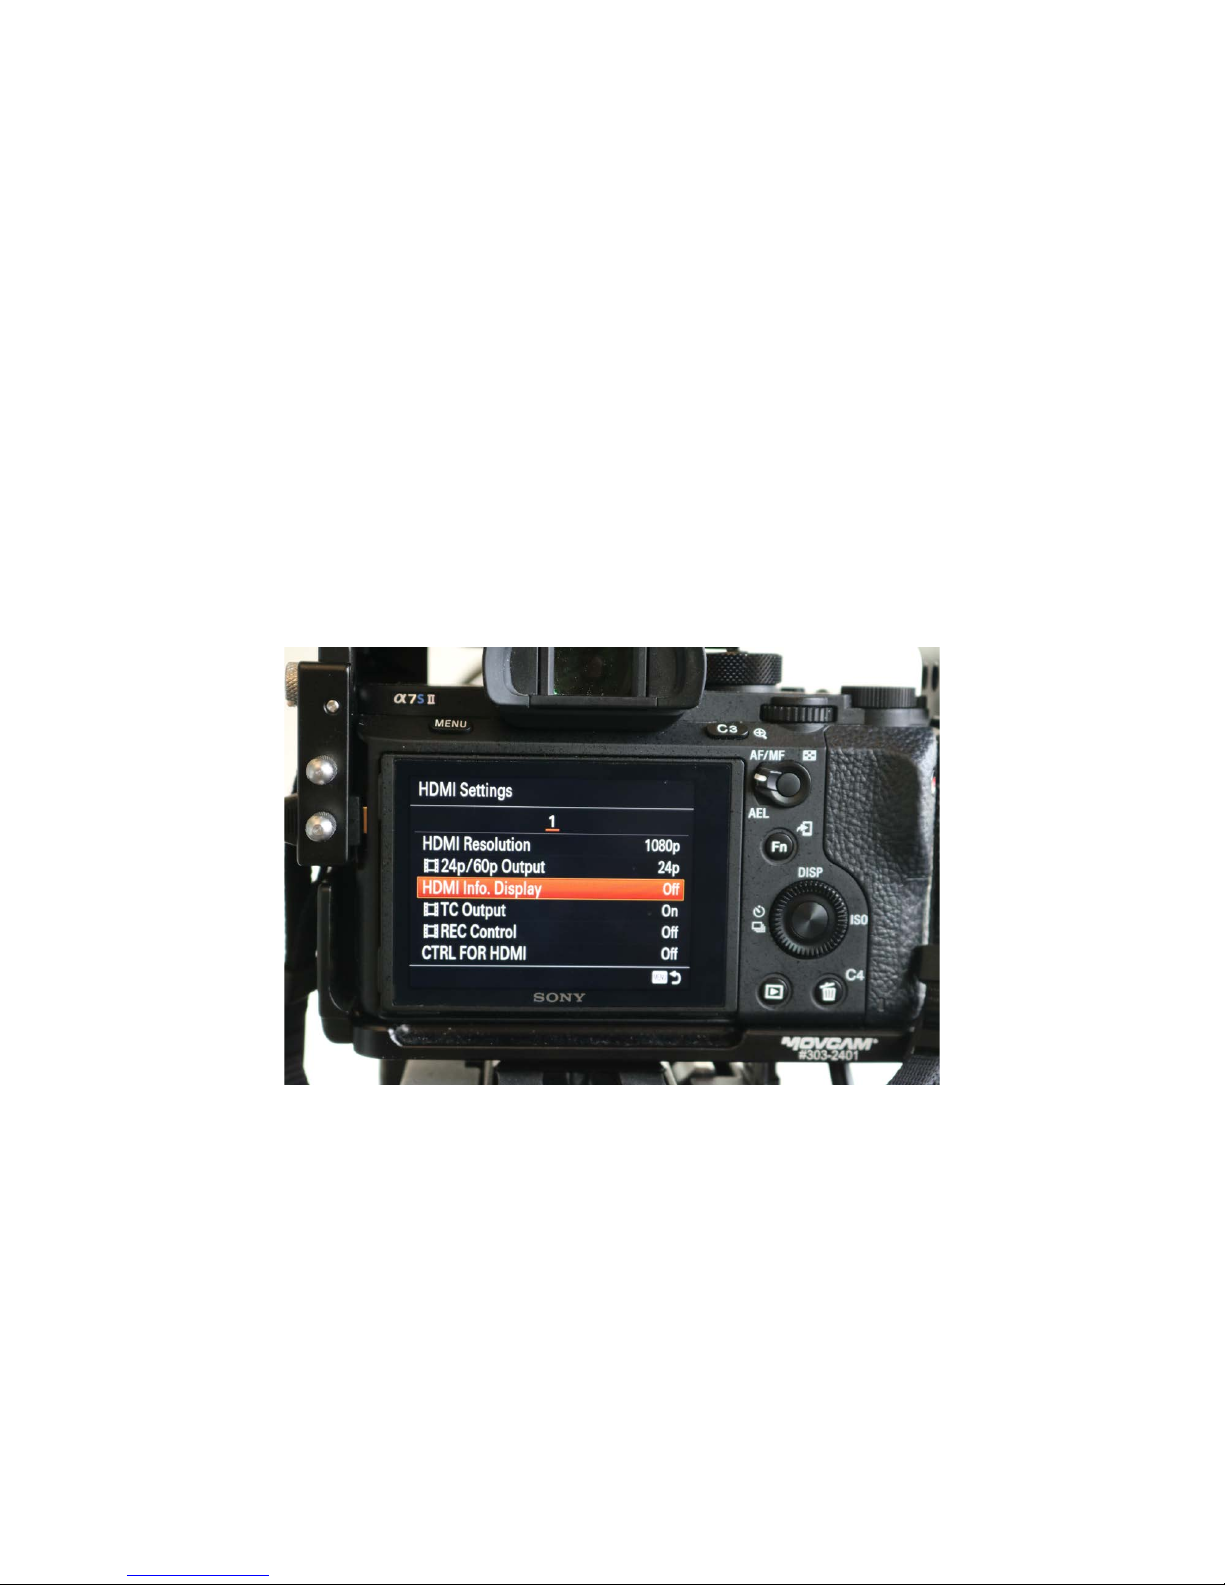
HDMI%Settings:%HDMI%Info%Display%
OFF
This%ensures%that%none%of%the%extra%display%information%is%sent%over%
HDMI,%just%the%image.
Page 35
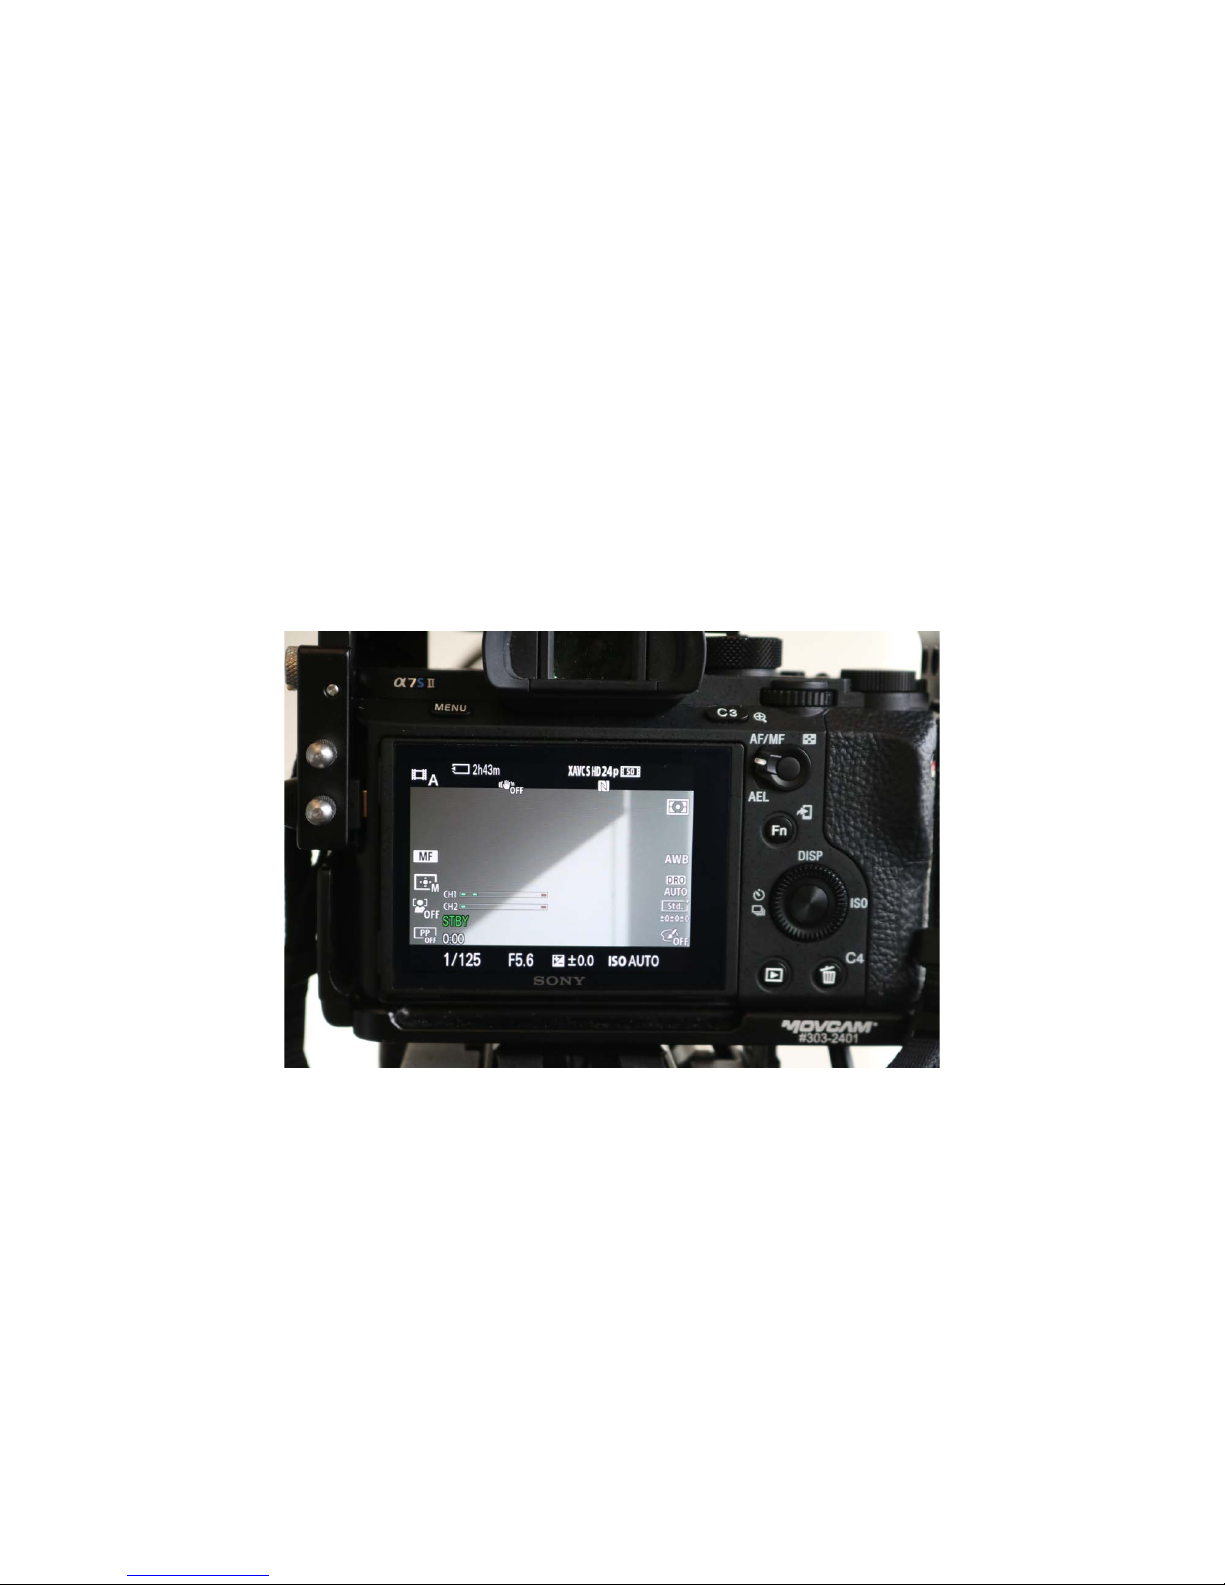
When%you%are%finished,%exit%the%menu,%and%the%display%will%look%like%this.
Page 36
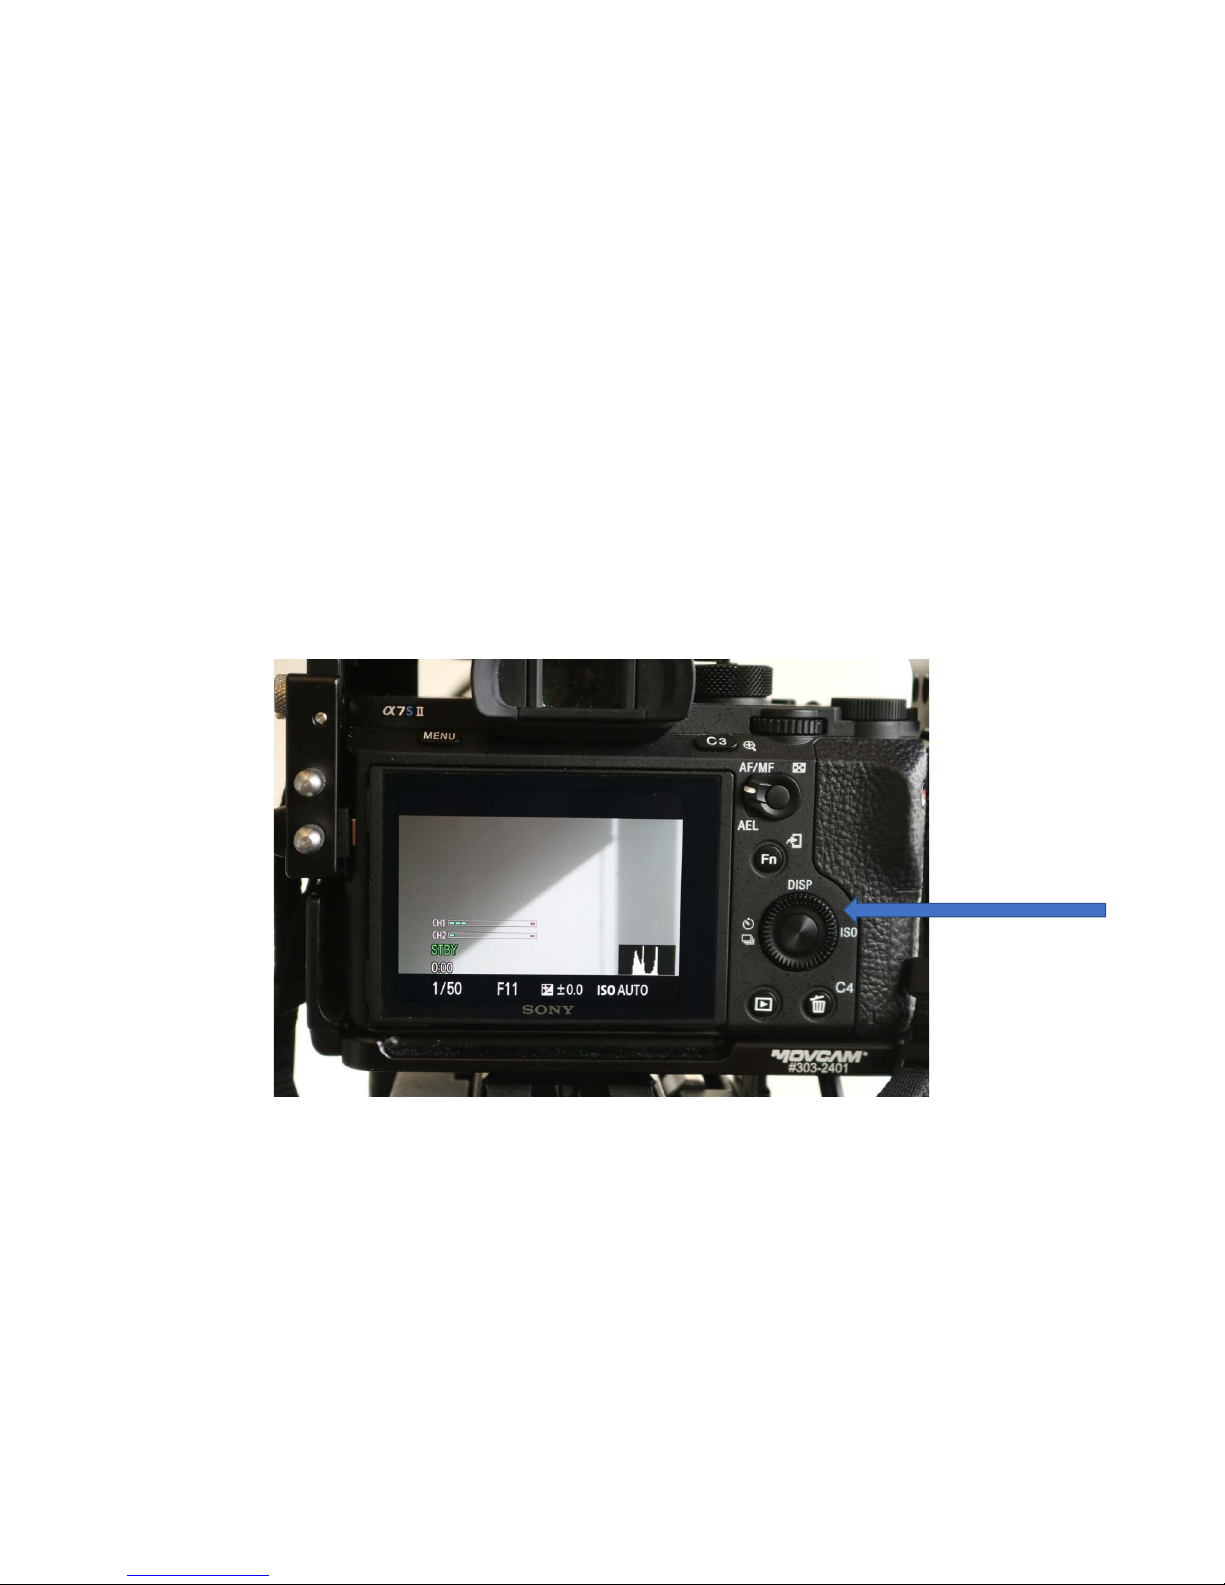
You%can%simplify%the%display%information%by%clicking%on%
DISP%
on%the%wheel%to%
the%right%of%the%LCD.
The%most%useful%view%displays%the%audio%meters%and%the%histogram.
Page 37
Part%Three:%Camera%Controls
Page 38

Camera%Operations:%Exposure
• In%the%Camera%Menu/Movie/HFR%setting%you%have%four%choices%
for%how%to%determine%exposure:%Program,%Manual,%Aperture%
Priority%and%Shutter%Priority.%As%indicated%before, do¬&choose%
Program%or%Aperture%Priority.
• Three%things%determine%exposure:%Shutter%speed%(length%of%time%
the%shutter%is%open),%aperture%(measured%in%f-stops—the%size%of%
the%opening%in%the%lens%that%lets%in%light),%and%ISO%(the%sensitivity%
of%the%camera%to%light).
• Don’t%let%the%camera%automatically%determine%the%shutter%speed.%
Don’t%shoot%video%in%Program%mode%or%Aperture%Priority.
Page 39

Camera%Operations:%Exposure
• In%Program mode,%shutter%speed%and%aperture%are%set%
automatically.%You%only%have%control%over%ISO.%In%Aperture&
Priority,%the%shutter%speed%is%set%automatically%as%you%adjust%
aperture.%Both%Program%and%Aperture%Priority%are%a%problem%for%
video%where%you%generally%want%to%keep%the%shutter%speed%at&
exactly&twice&the&frame&rate.%If%you%are%shooting%at%30%fps,%then%
the%shutter%speed%should%be%1/60
th
of%a%second.%If%you%are%
shooting%at%24%fps%then%the%shutter%speed%should%be%1/50
th
of%a%
second%(1/48
th
on%a%proper%video%camera).%
• If%the%shutter%speed%drops%below%twice%the%frame%rate,%motion%
will%be%blurry.%If%it%goes%too%far%above%this%point,%the%motion%can%
have%a%”clockwork”%appearance.
Page 40
Camera%Operations:%Exposure
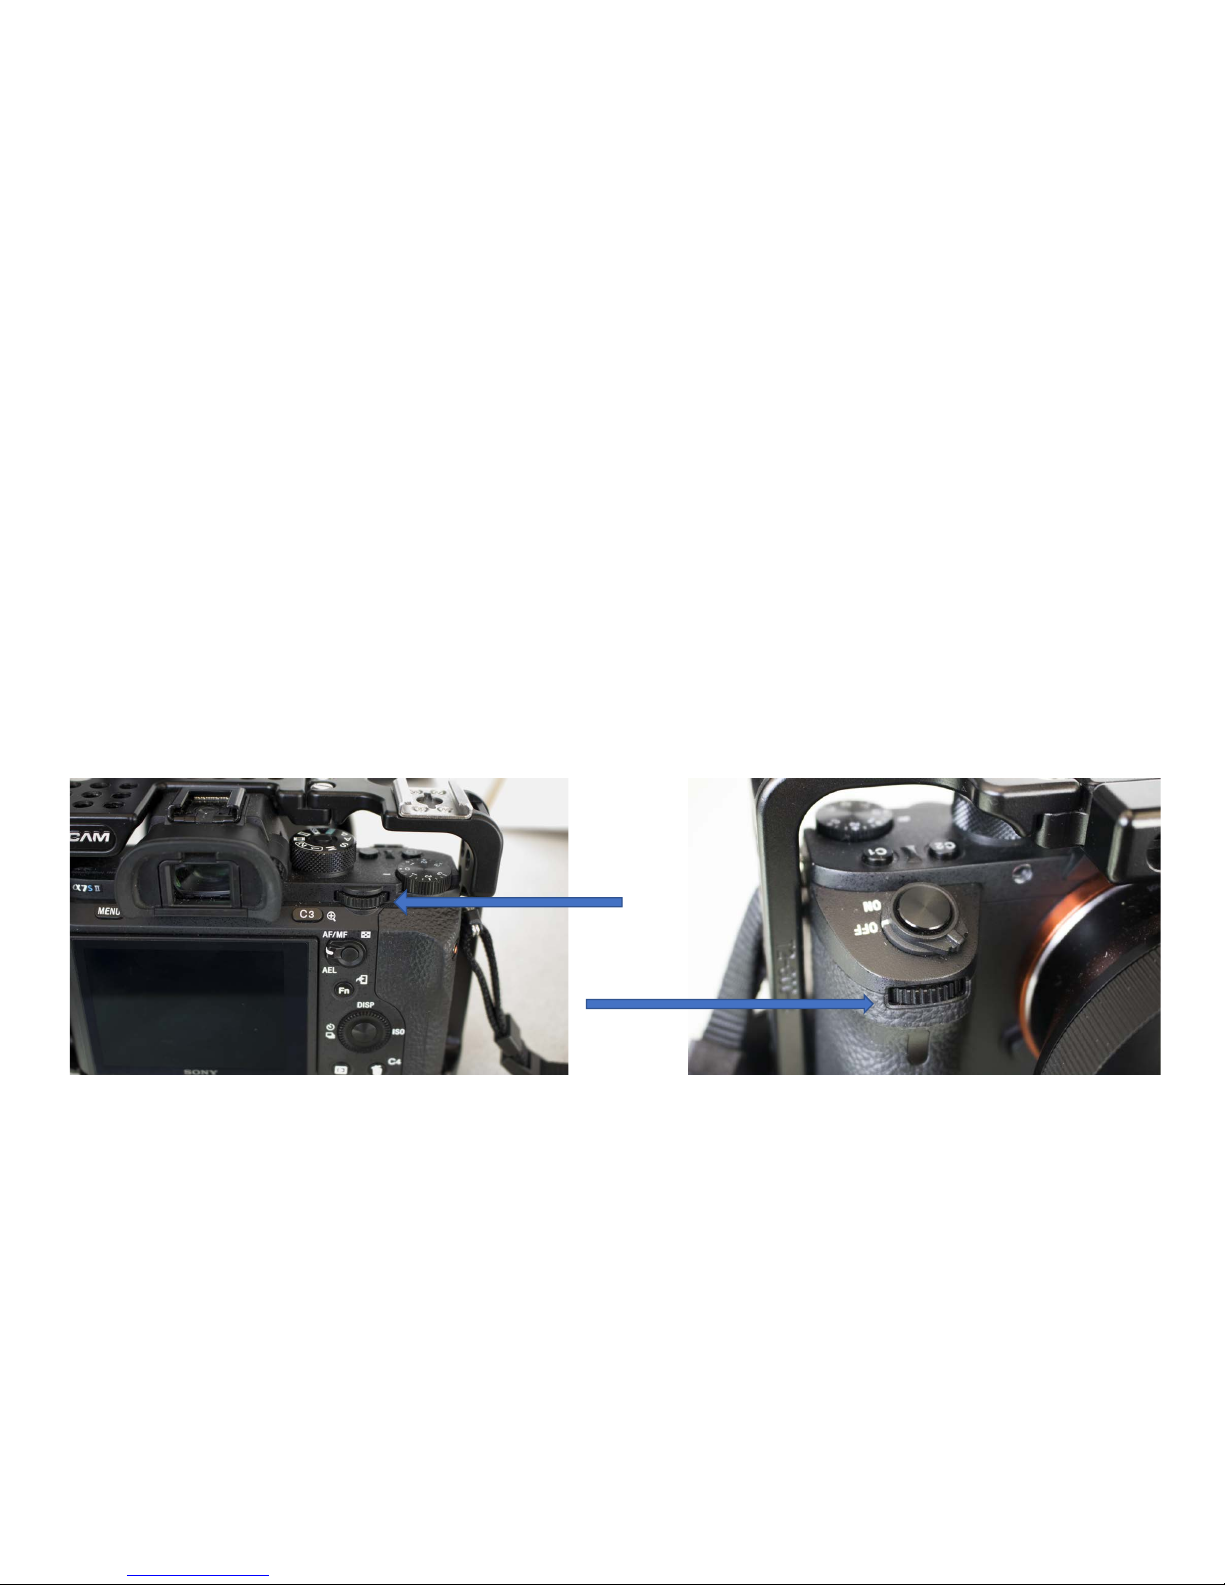
• In%Manual&mode,%the%front%wheel%determines%aperture,%the%back%wheel%determines%
shutter%speed.%Look%at%the%Histogram%in%the%display%to%judge%exposure.%
• In%Shutter&Priority,%both%the%front%and%back%wheels%determine%shutter%speed.%Adjust%the%
shutter%speed%until%you%have%reached%twice%the%frame%rate%and%then%don’t%touch%these%
wheels%again.%Aperture%will%be%selected%automatically%by%the%camera.%You%can%still%adjust%
ISO%(see%next%page).
Back%wheel
Front%wheel
Page 41
Camera%Operations:%Exposure%Control
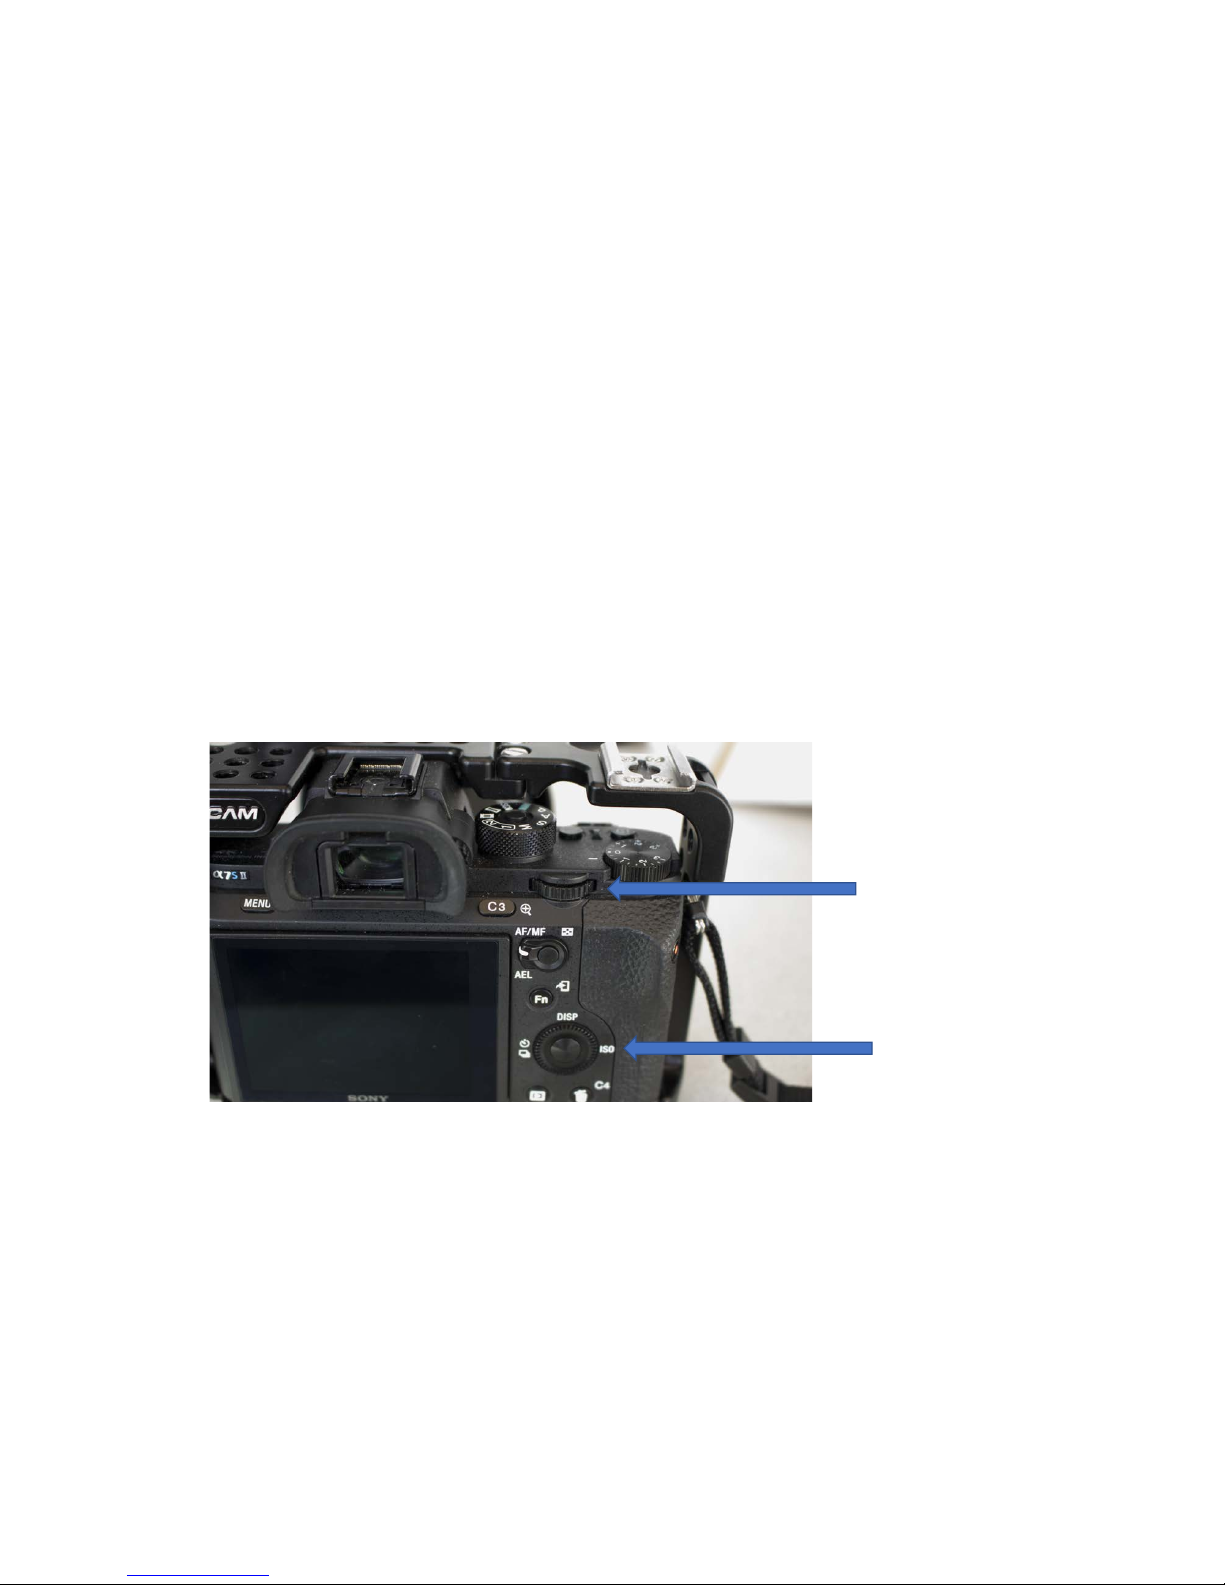
• In%both%Manual% and%Shutter%Priority,%ISO%can%be%adjusted%manually.%Press%the%ISO%side%of%the%back%dial%
and%then%use%the%back%scroll%wheel%to%choose%the%ISO.%Press%the%button%in%the%center%of%the%dial%to%
set%the%ISO.
• This%camera%has%no%image%noise%at%1600%ISO%and%below,%and%almost%no%image%noise%at%3200%ISO.%
Noise%begins%at%6400%ISO.
2.%Use%wheel%to%adjust%ISO
1.%Press%ISO%side%of%dial
Page 42

Camera%Operations:%Depth%of%Field
• Be%aware%of%how%your%depth%of%field%changes.
• Larger%f-stops%openings%(the%greater%numbers)%have%a%greater%depth%of%
field%than%the%smaller%f-stop%openings%(smaller%numbers).
• F4%will%have%a%much%shallower%depth%of%field%than%f22.%You%may%only%
have%a%few%centimeters%in%focus%with%f4,%but%30%meters%in%focus%at%f22.
Page 43
Other%Controls%- C1,%C2,%C3%buttons
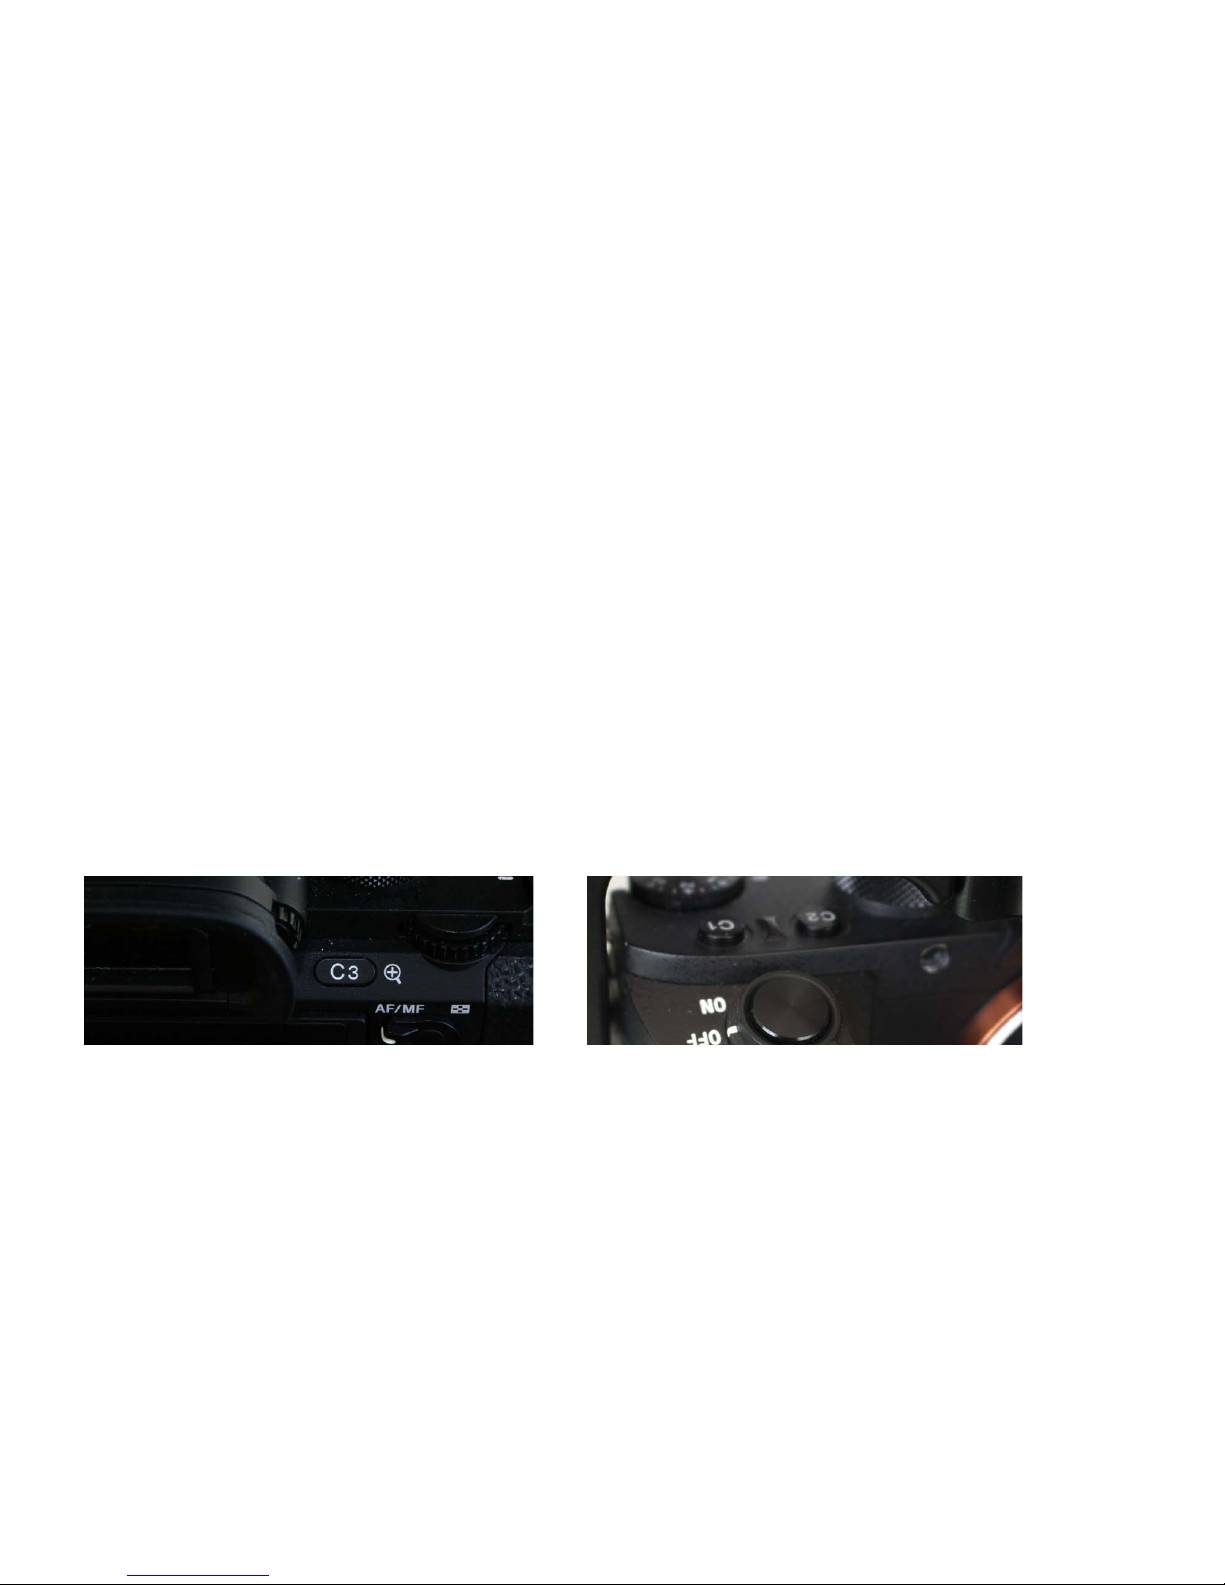
The%Custom%buttons%are%not%as%easily%reached%when%the%camera%
is%in%the%cage%but%they%are%useful.
By%default,%button%C1 is%a%shortcut%to%changing%the%White%Balance%setting.
Button%C2 magnifies%the%image%in%the%OLED%viewfinder%for%manual%focusing.
Button%C3 changes%the%focus%setting,%from%manual%to%auto.
Page 44

Camera%Operations:%Focus
• Pressing%Button%C3%changes%the%focus%mode%from%Manual%to%Auto%
Focus
• I%recommend%continuous%auto%focus%for%shooting%video%unless%you%
want%to%avoid%focus%shifts.
• In%manual%focus,%use%the%ring%on%the%lens%closest%to%the%camera%to%
change%focus.%This%ring%is%inactive%during%auto-focus.
Page 45
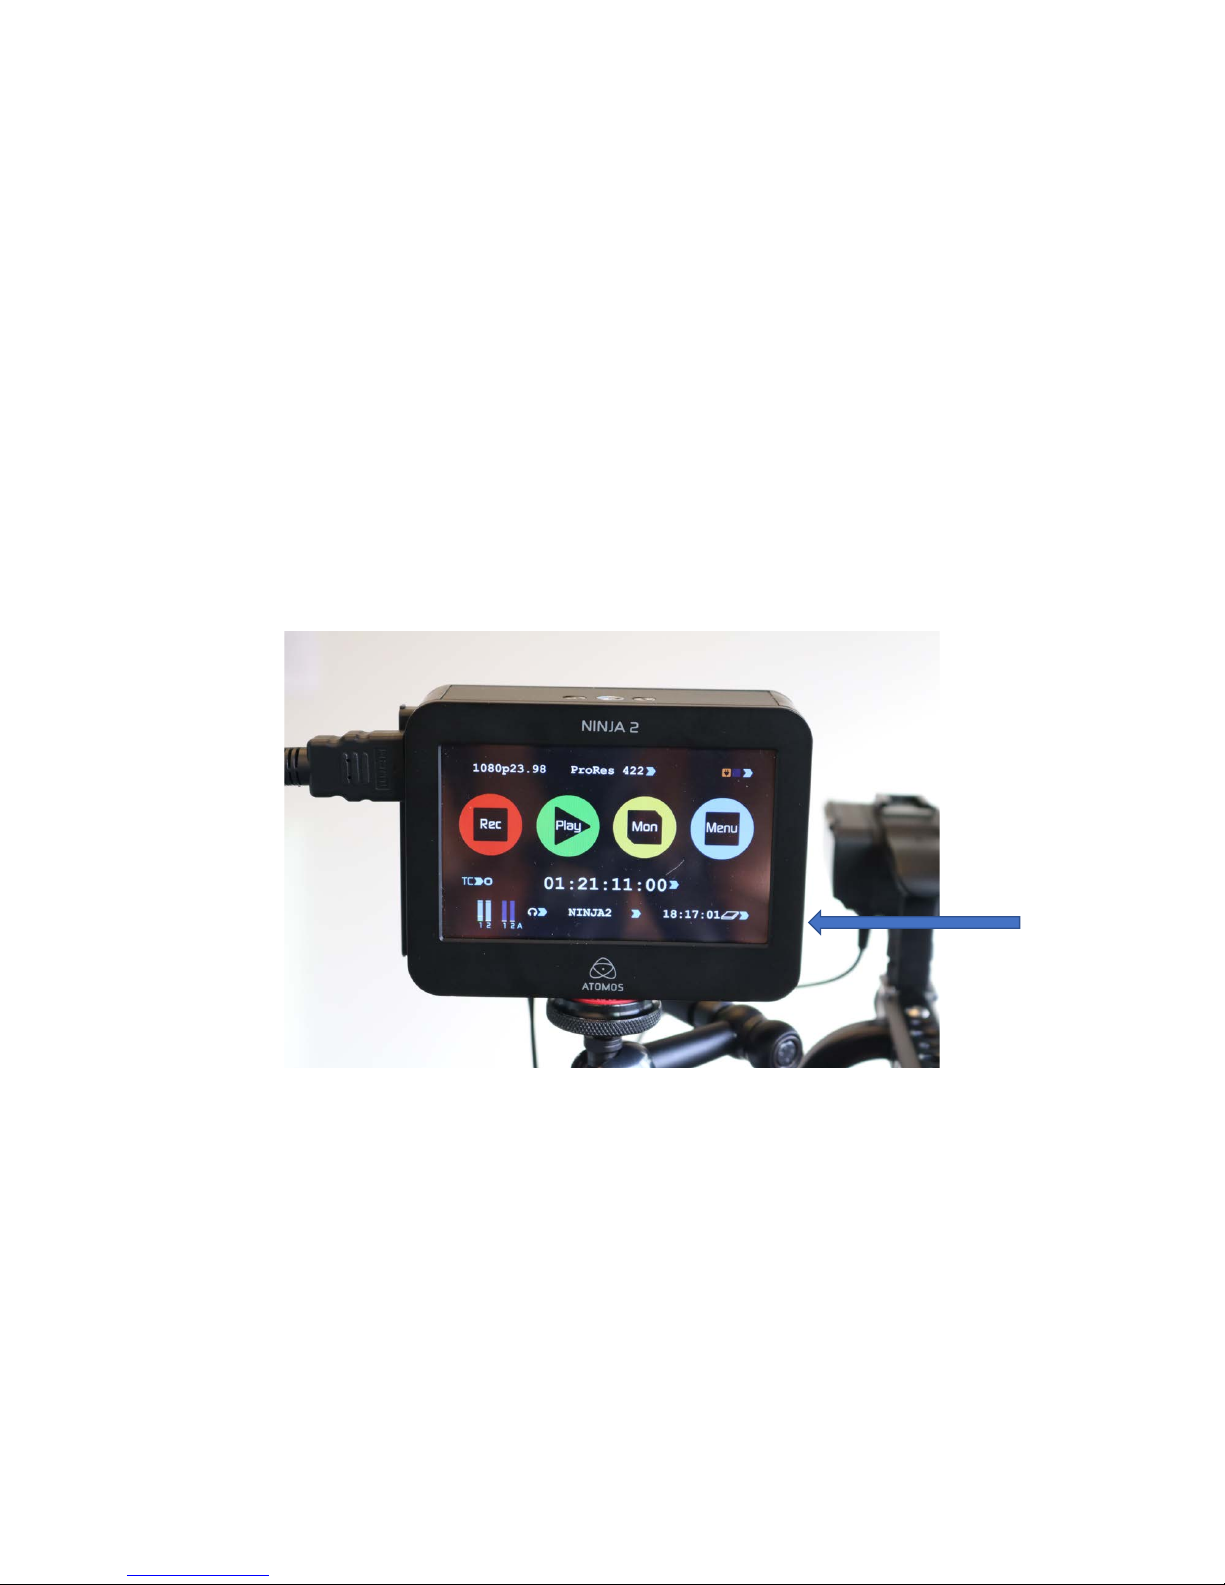
Part%Four:%External%Recorder%Settings
Turn%on%the%external%recorder%by%pressing%an%holding%the%power%button%on%
the%side%until%the%screen%powers%up.
Page 46
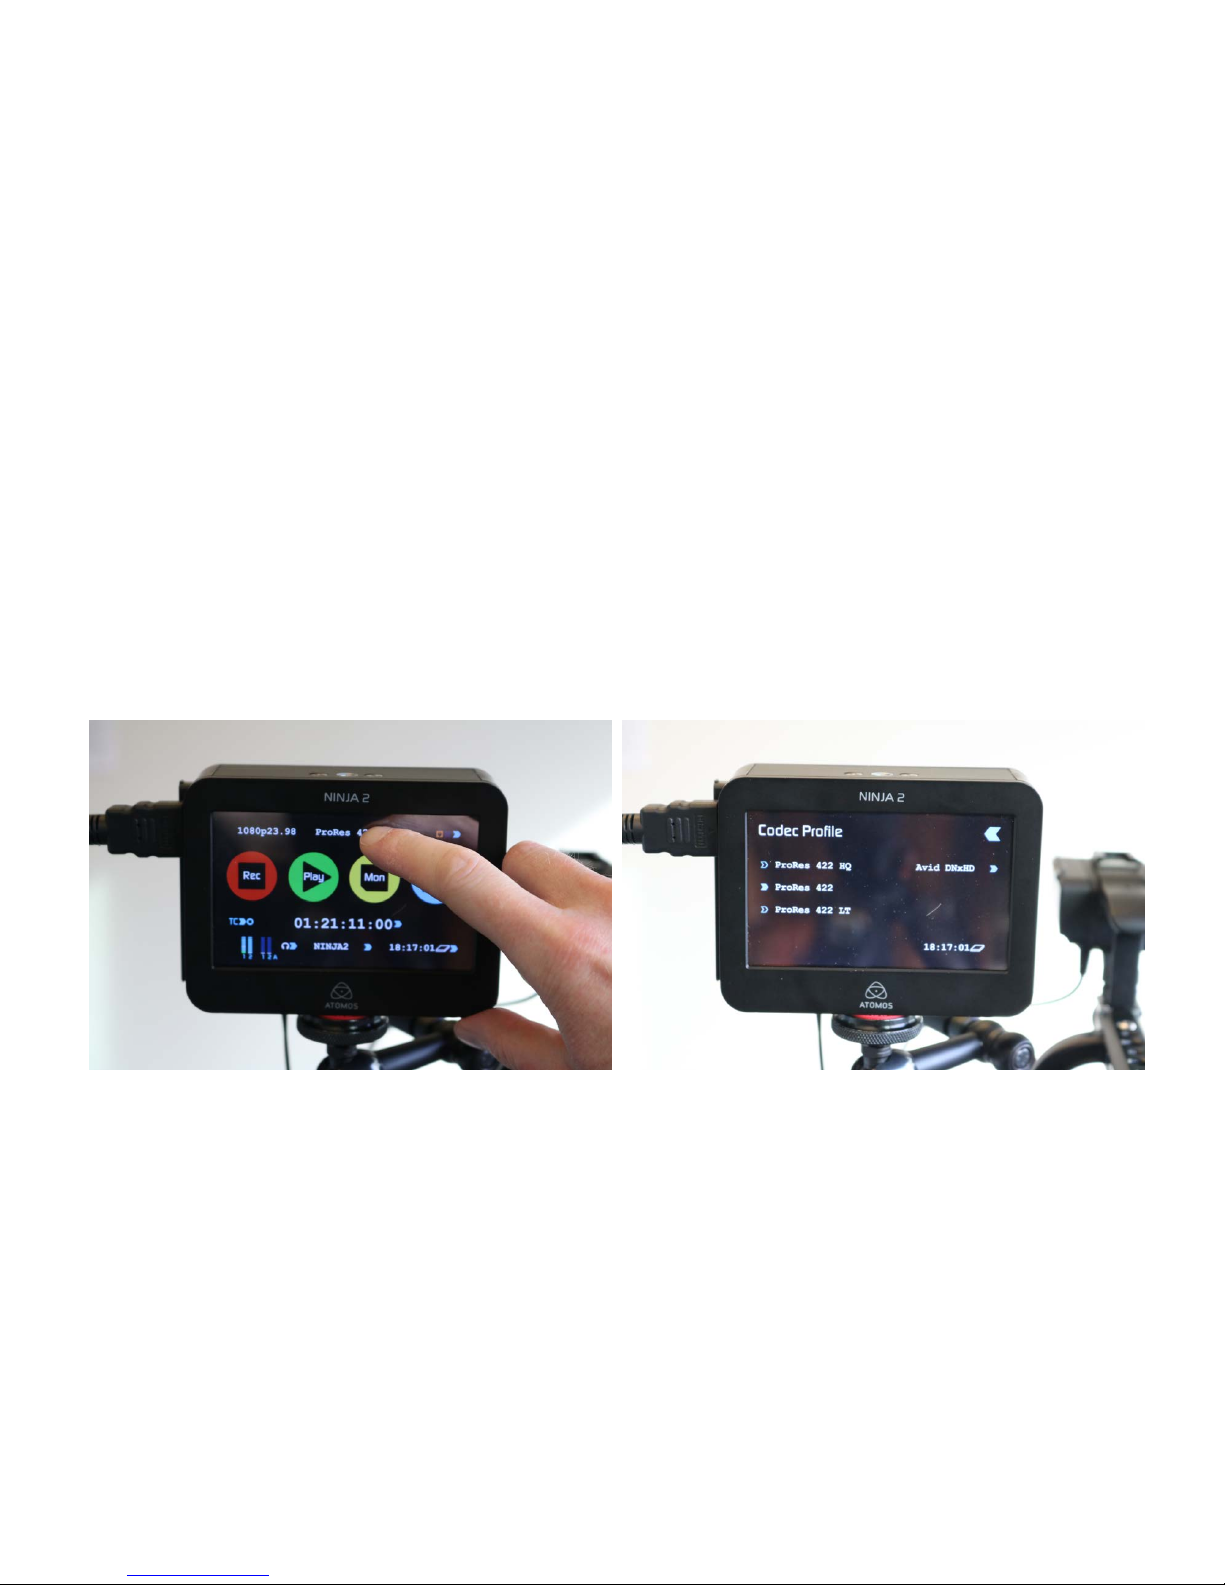
Change%the%settings%by%touching%the%screen.
For%best%quality%choose%ProRes 422%or%ProRes 422%HQ%as%the%recording%
codec.%Files%sizes%are%for%PR%422%are%1%GB%per%minute%and%1.5%GB%per%
minute%for%PR%422%HQ.%The%%recorder%has%an%SSD%internal%1%TB%drive.
Page 47
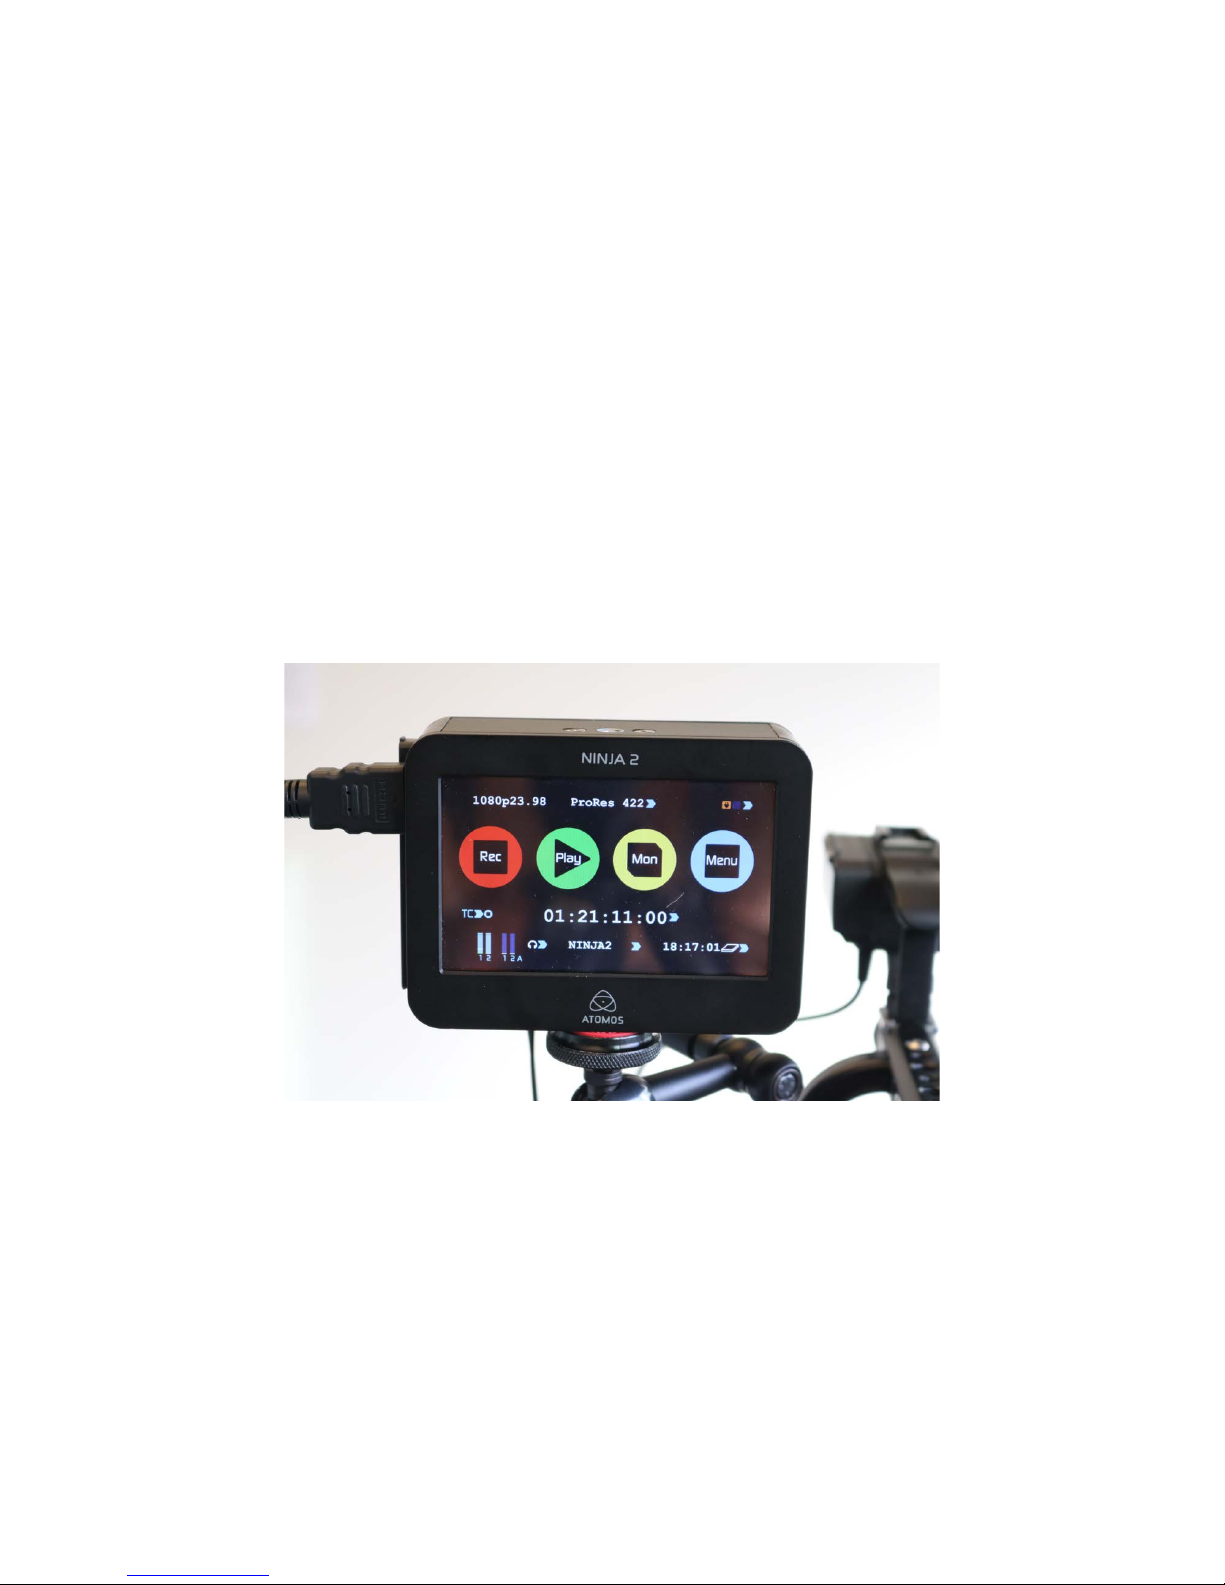
The%recording%format%in%the%upper%left%should%match%the%HDMI%output%
from%the%camera.%It%should%be%1080p23.98%(this%means%1080%24p%NTSC).%
If%you%do%not%see%an%image%when%you%press%the%yellow%
MON%
button,%the%
frame%rates%do%not%correspond.
Page 48
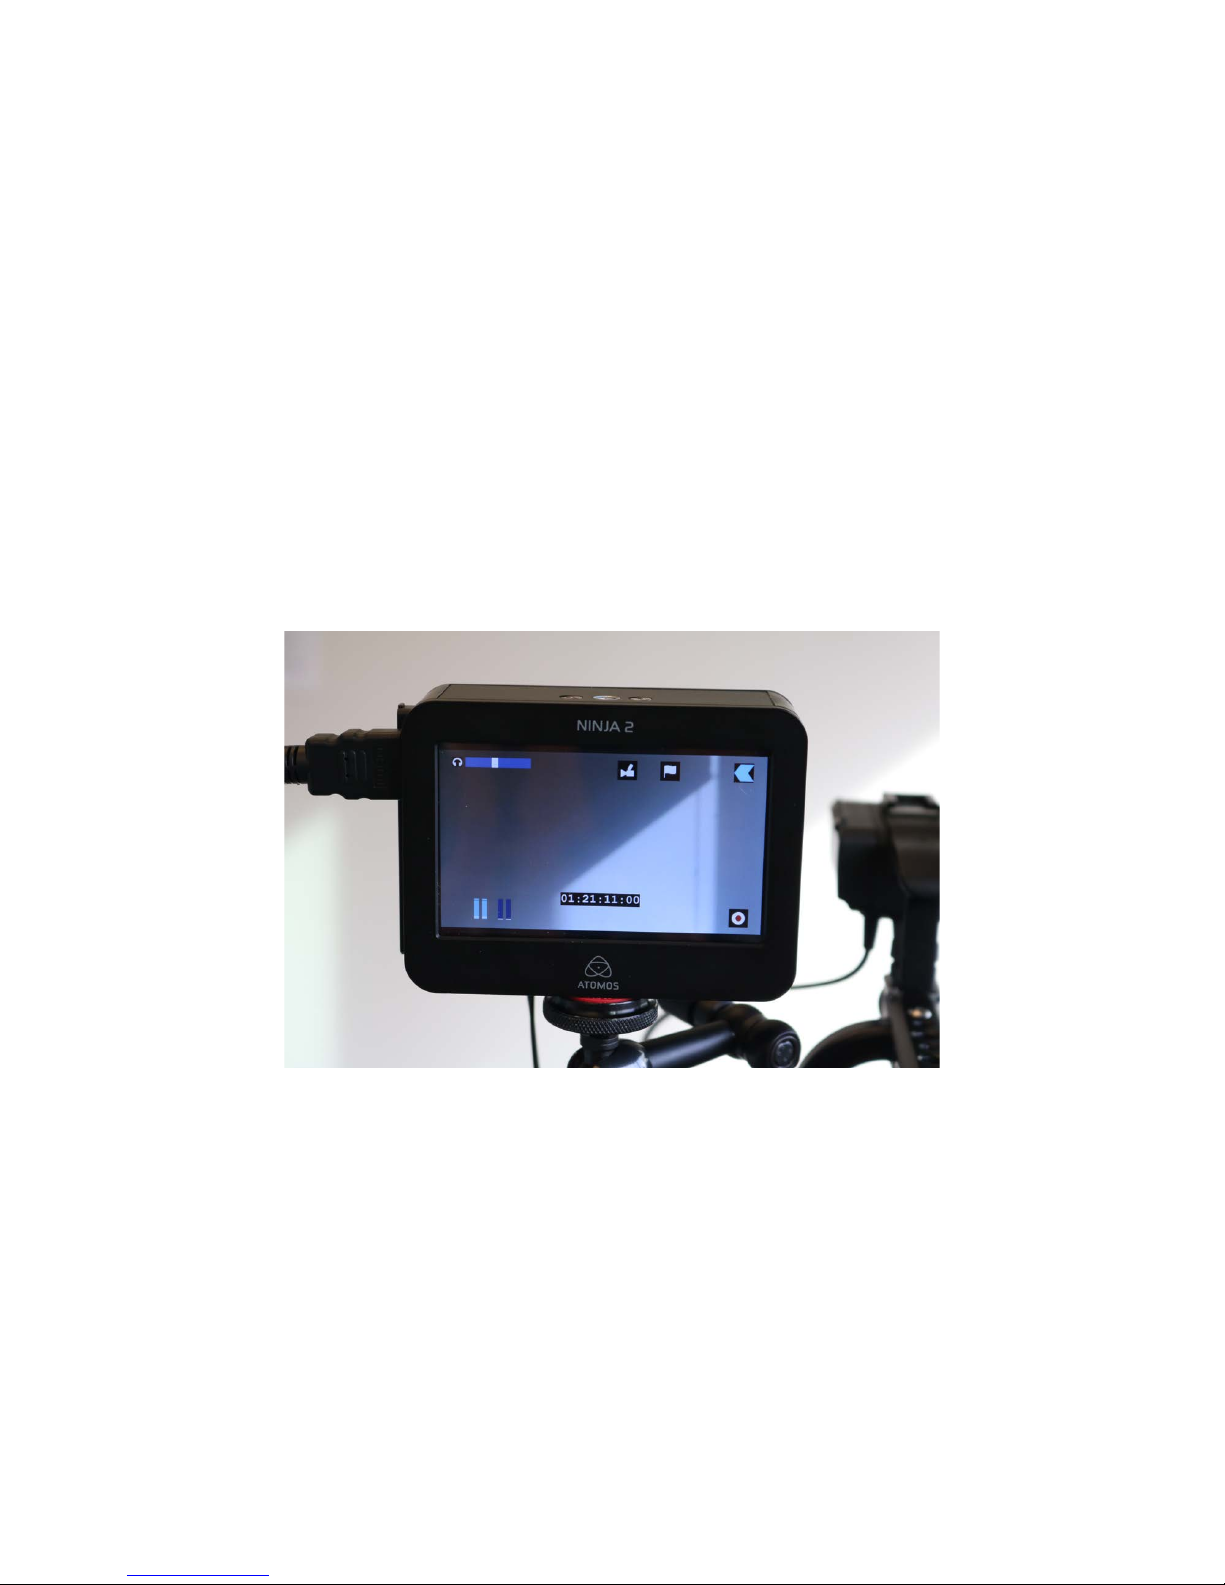
Once%
MON%
is%pressed%the%image%should%look%like%this.%If%you%see%any%
other%display%information%from%the%camera,%it%will%be%recorded!%
Page 49
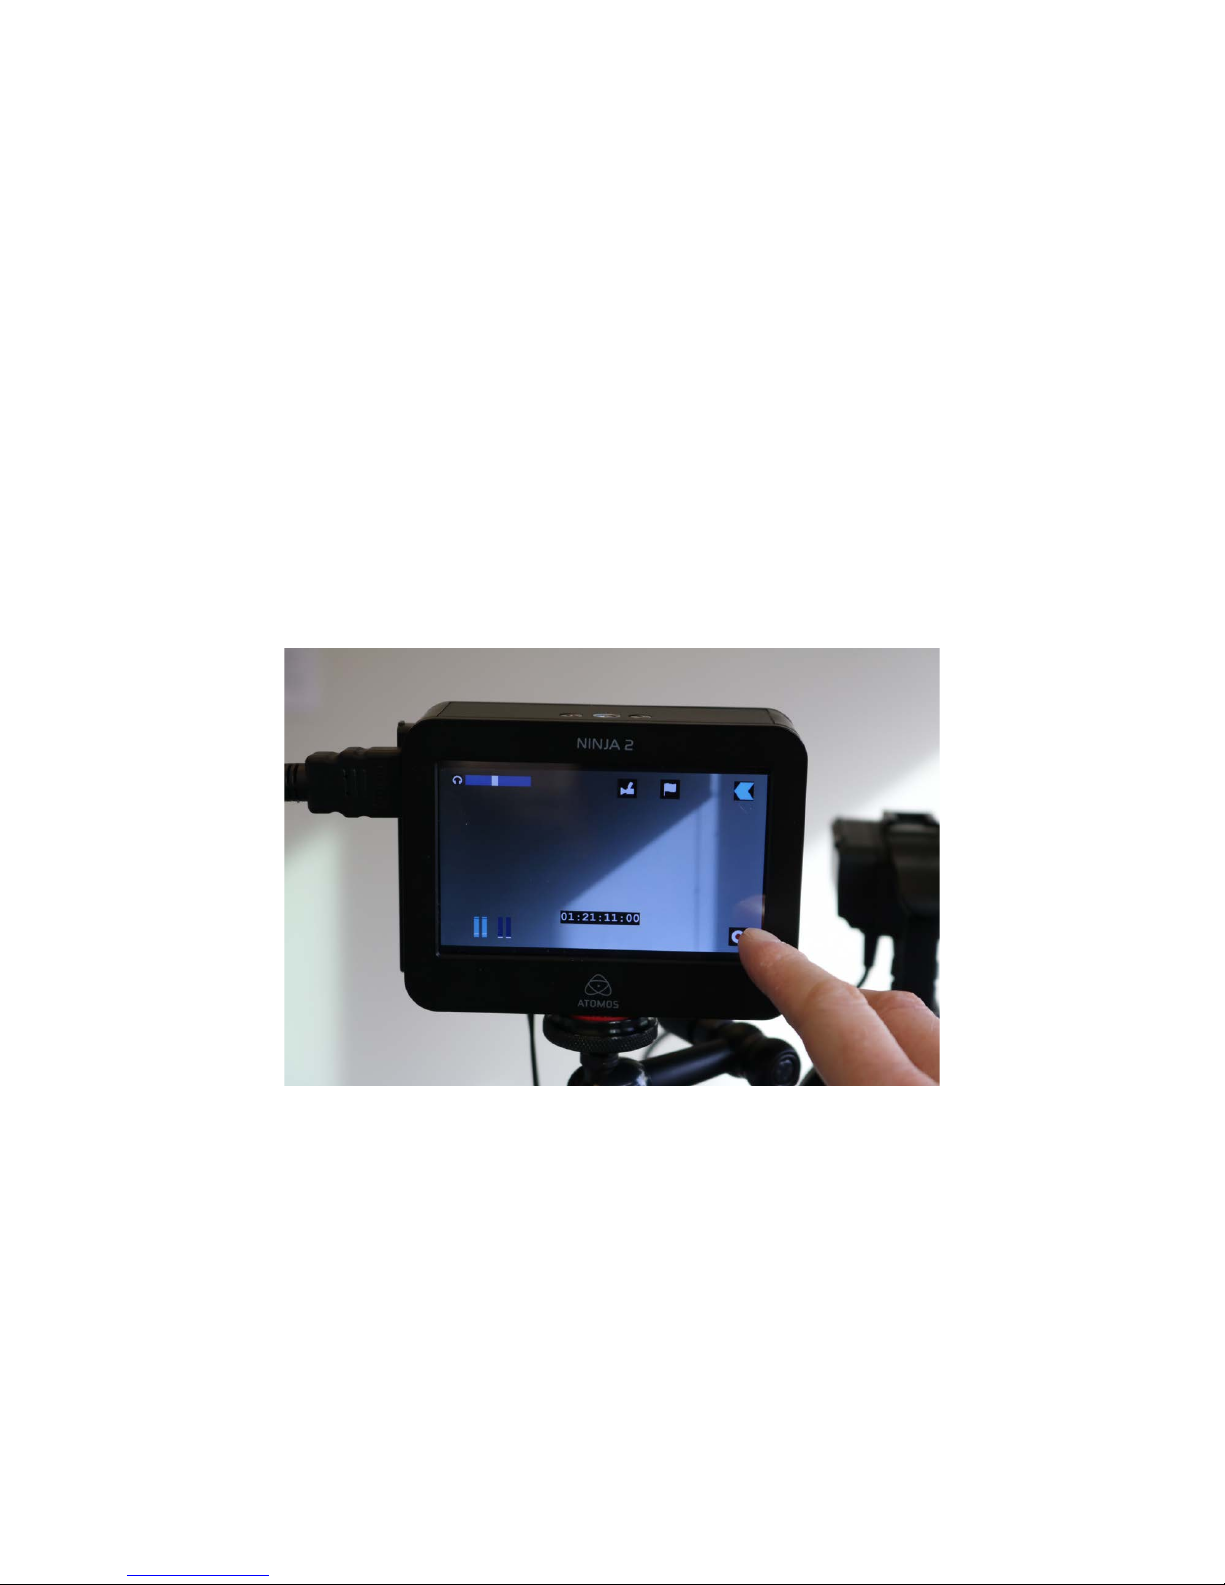
The%
record%button%
is%on%the%bottom%right.
You%are%only%recording%with%this%device.%There%is%no%need%to%press%the%
video%record%button%on%the%camera.%There%is%no%recording%time%limitation%
other%than%the%space%on%the%hard%drive.
Page 50
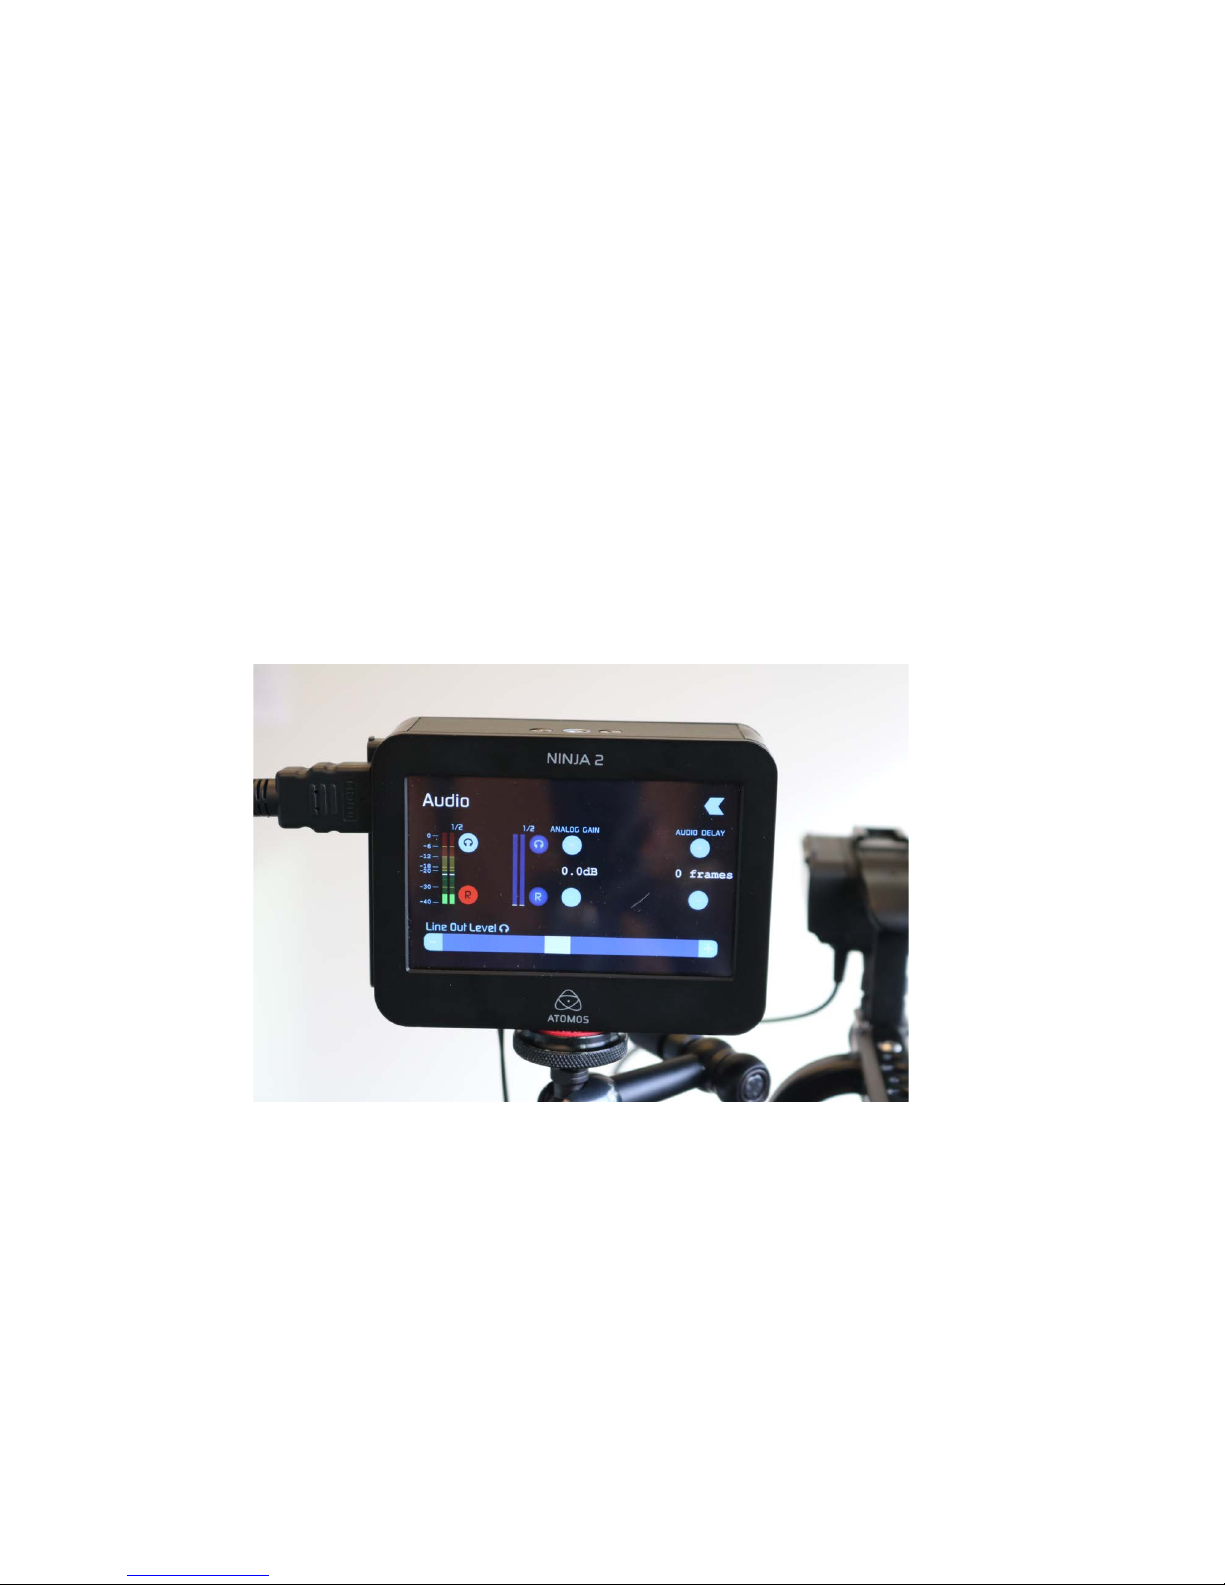
The%audio%level%meter%is%not%very%detailed%on%the%monitor%but%you%can%
double%check%the%audio%recording%level%by%going%into%the%audio%menu%
and%by%monitoring%on%headphones.%Headphones%are%not%supplied%in%the%
kit%but%I%strongly%recommend%using%them.
Page 51
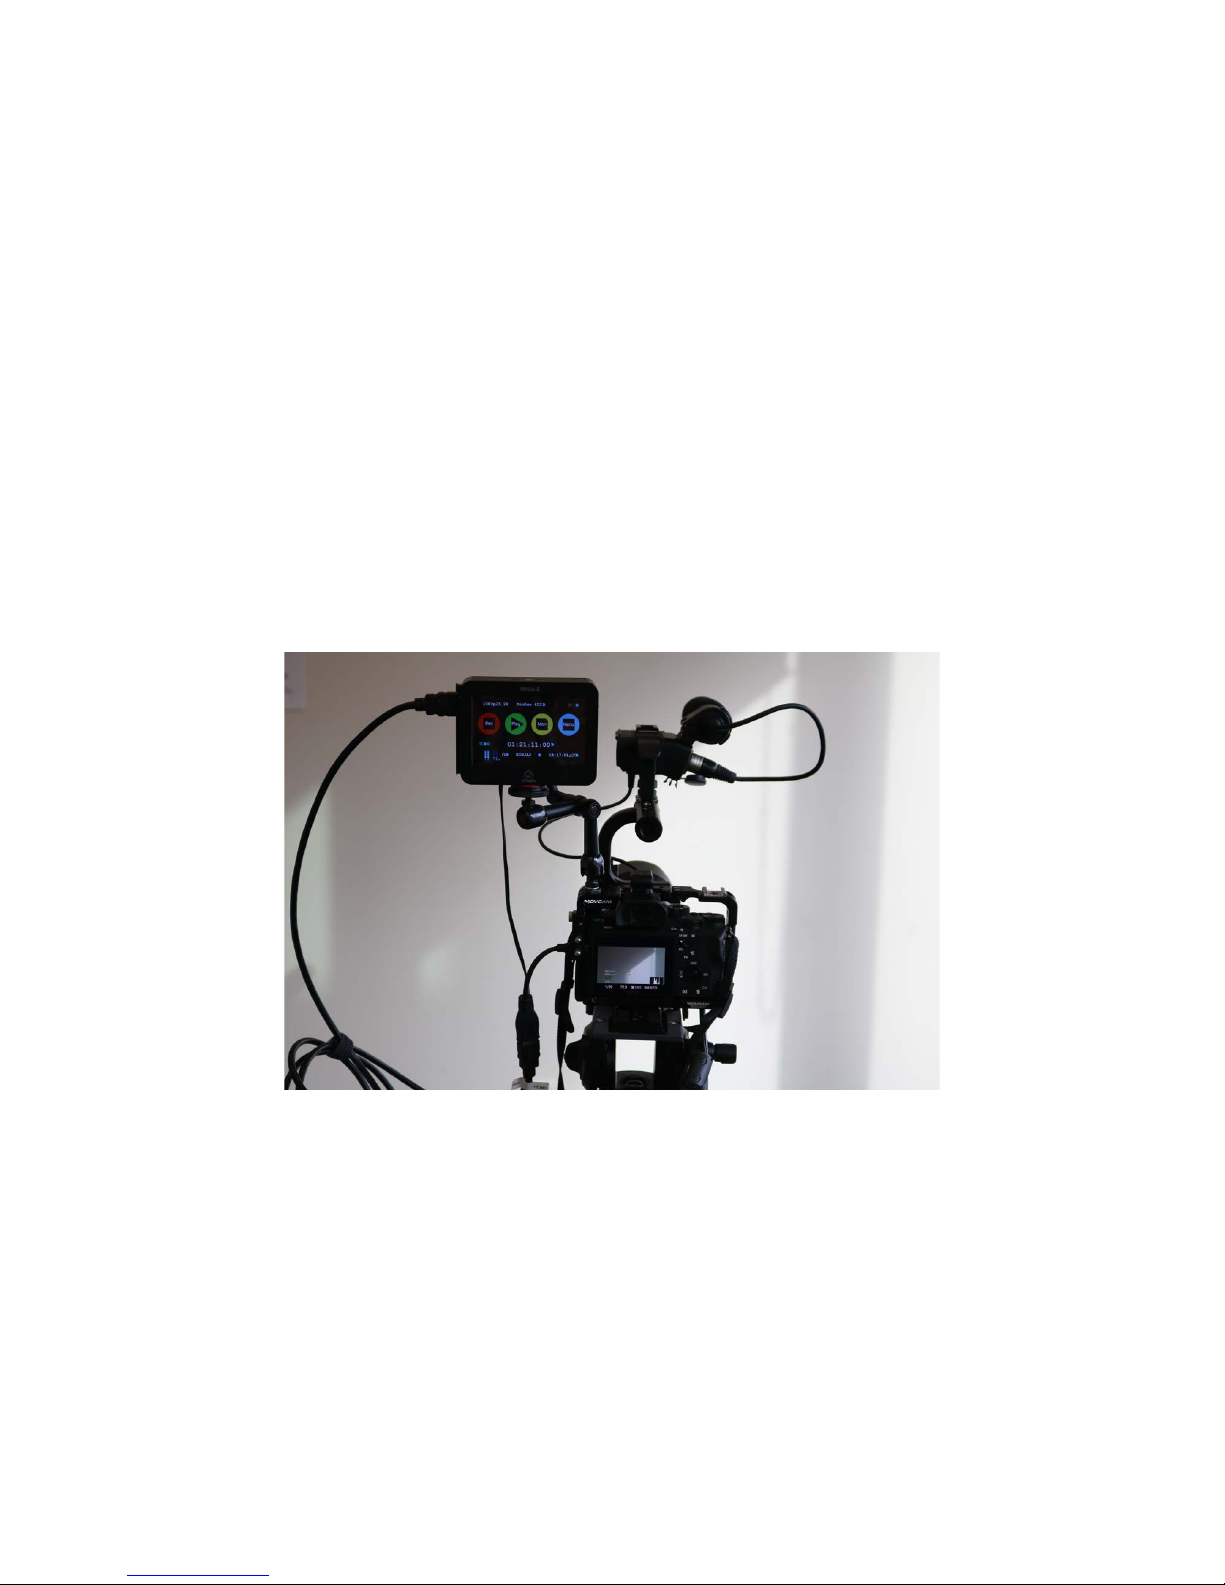
The%camera’s%OLED%monitor%is%superior%to%the%LCD%panel%on%the%external%recorder.%
It%is%best%to%judge%your%image%with%the%camera%monitor%and%the%histogram.
Page 52
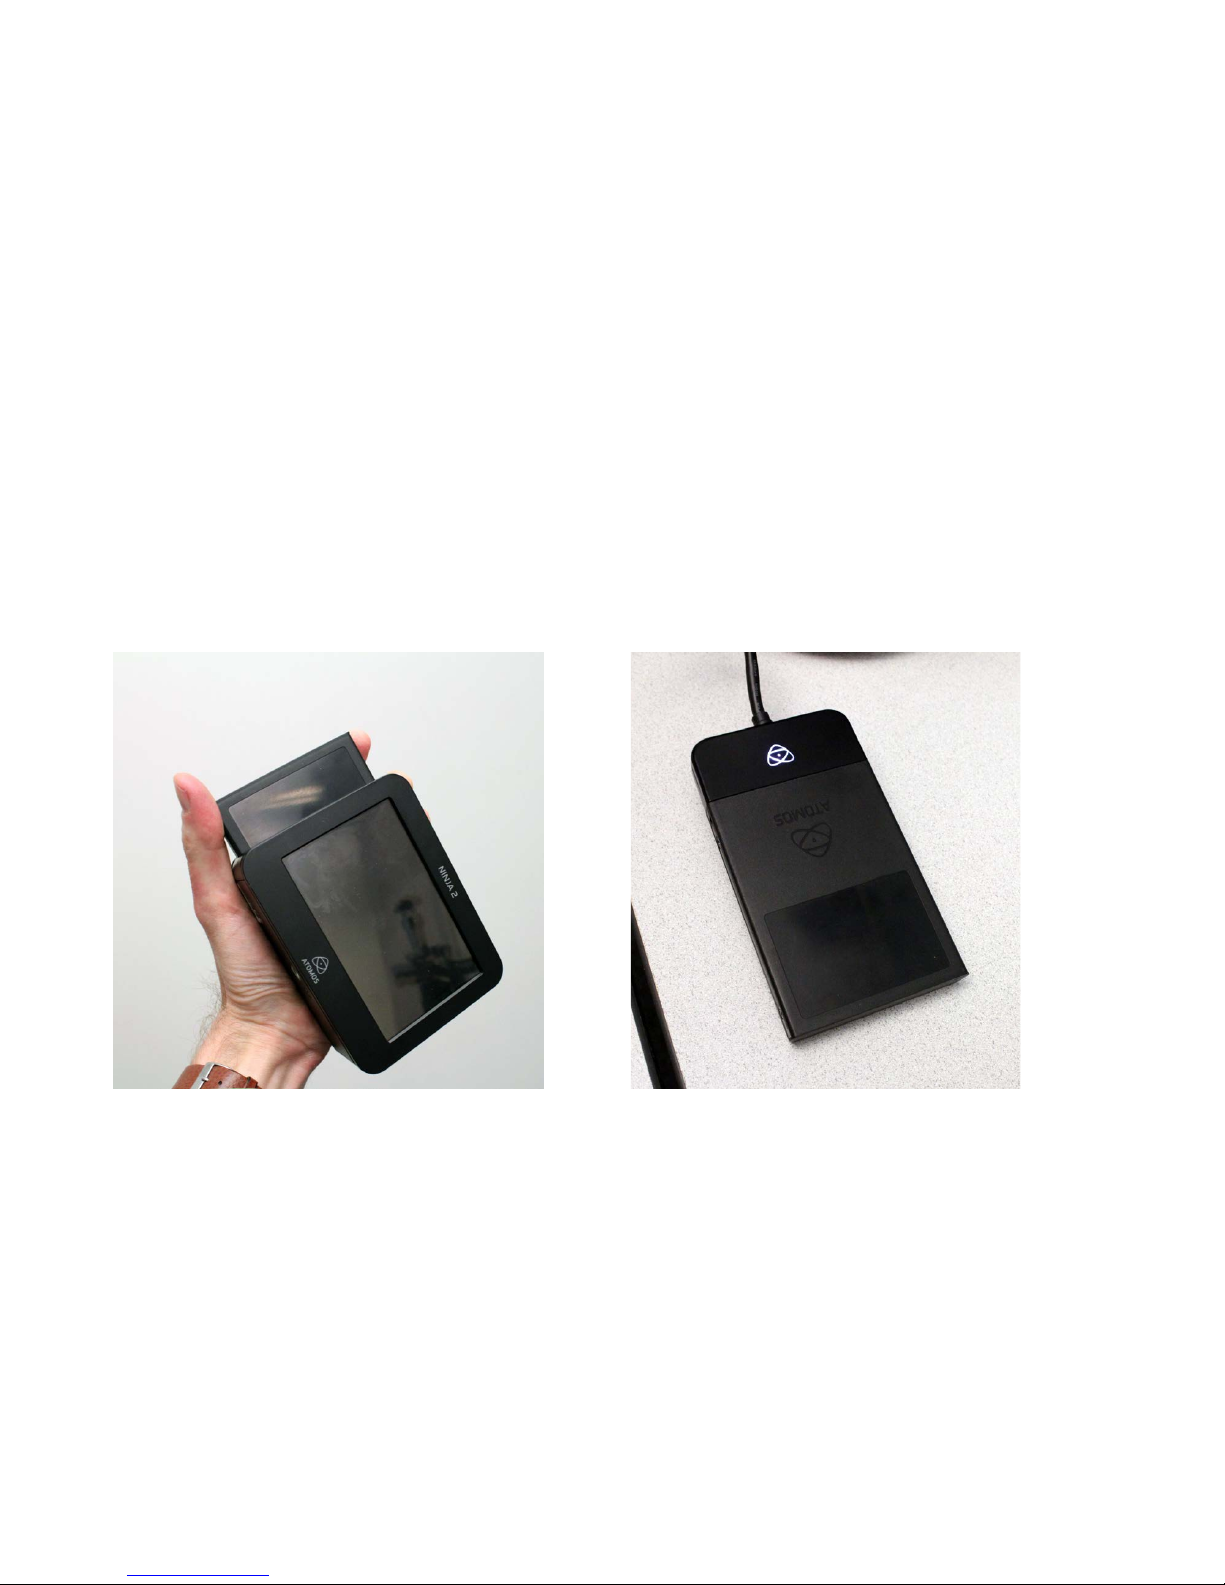
Part%Five:%Backing%up%the%files.%
Take%the%SSD%drive%o ut%of%the%recorde r%by%pressing%on%bot h%sides% and%
pulling%up.%Put%the%SSD%drive%in%the%USB%dock.
Page 53
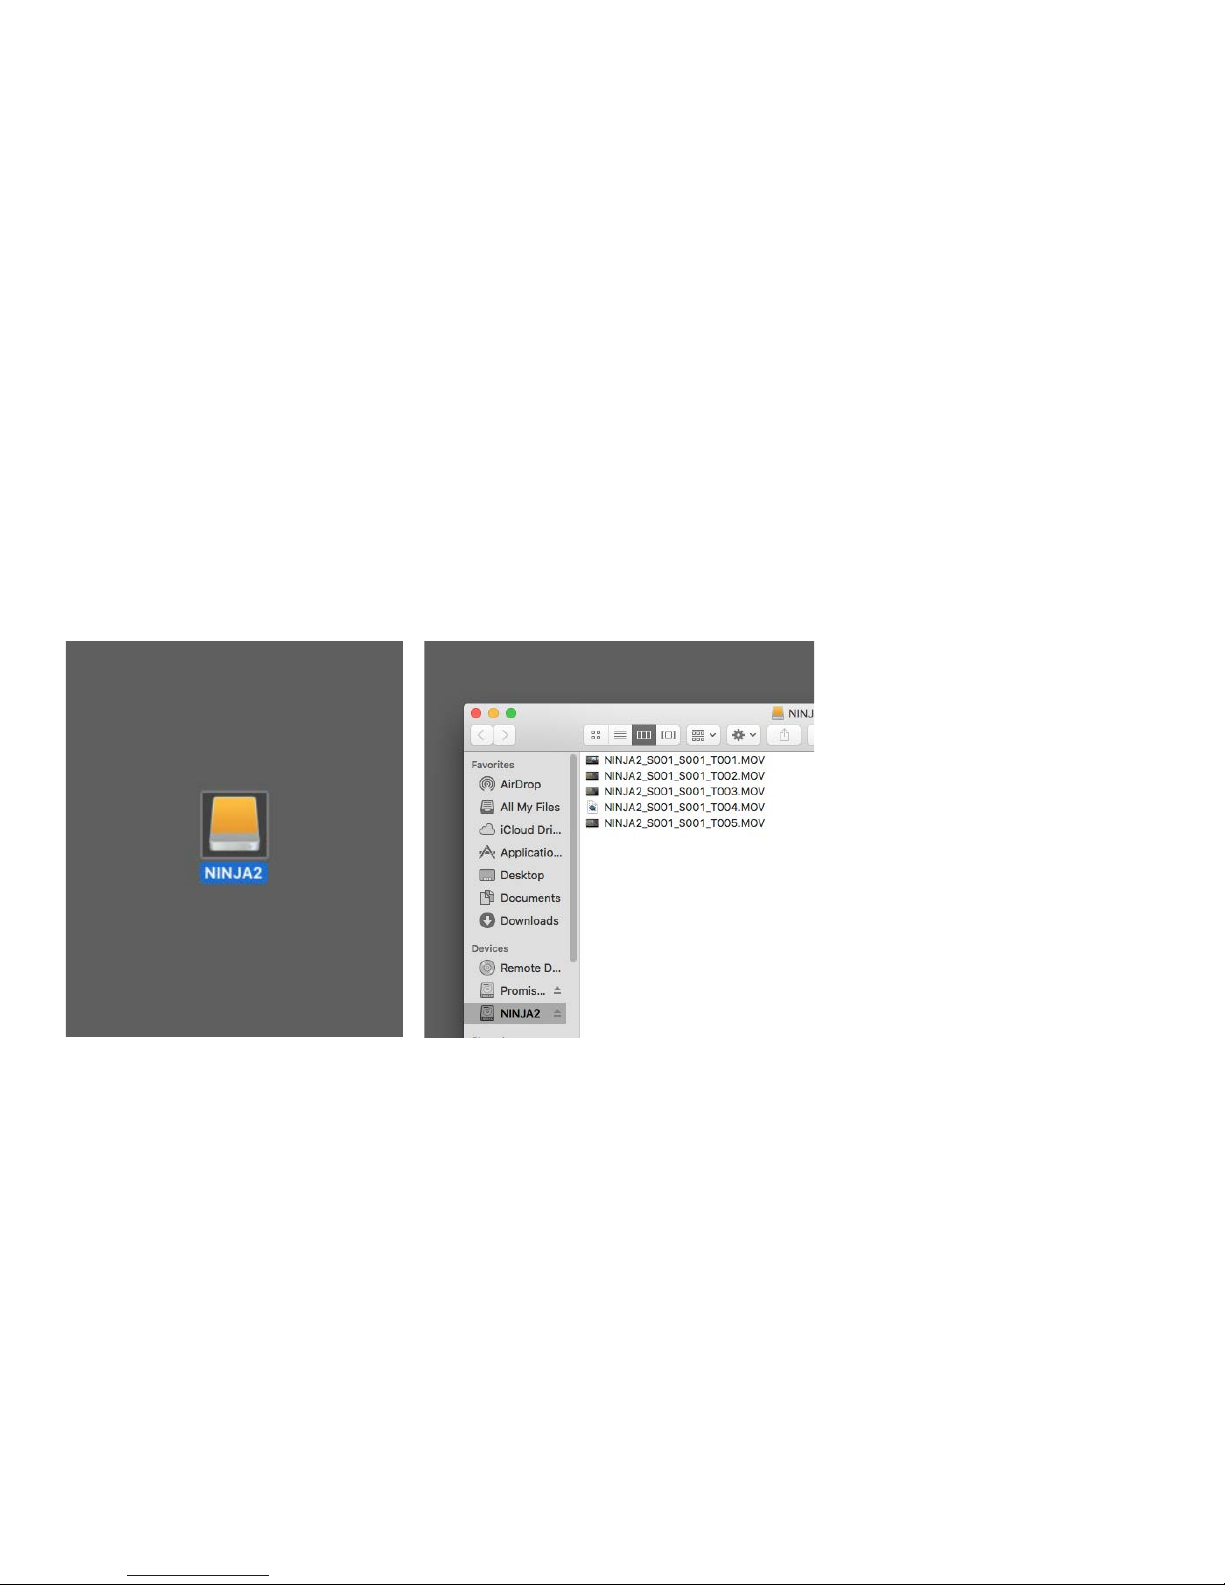
The%hard%drive%will%appear%on%the%desktop.%The%video%files%are%in%
QuickTime%format and%ready%for%use%in%Adobe%Premiere.
Please%erase%the%files%fro m% t he% SSD%when%you%are%finished%backing%up.
Page 54
That’s%all.%Good%luck!
 Loading...