

Page 1
4-537-940-41(1)
ILCE-7S
E-mount
Interchangeable Lens Digital Camera/Instruction Manual GB
Appareil photo à objectif interchangeable/Mode d’emploi FR
Digitalkamera mit Wechselobjektiv/Gebrauchsanleitung DE
Cámara Digital de Lentes Intercambiables/Manual de instrucciones ES
Fotocamera digitale con obiettivo intercambiabile/Istruzioni per l’uso IT
Câmara Digital de Objetivas intercambiáveis/Manual de instruções PT
Digitale camera met verwisselbare lens/Gebruiksaanwijzing NL
PL
Цифровой фотоаппарат со сменным объективом/Инструкция по эксплуатации
RU
Цифровий фотоапарат зі змінним об'єктивом/Посібник з експлуатації
UA
Digitalkamera med utbytbart objektiv/Handledning SE
Digitaalinen kamera vaihdettavalla objektiivilla/Käyttöopas FI
Digitalkamera med utskiftbart objektiv/Bruksanvisning NO
Digitalkamera med udskifteligt objektiv/Betjeningsvejledning DK
“Help Guide” (Web manual)
Refer to “Help Guide” for in-depth
instructions on the many functions of the
camera.
« Manuel d’aide » (Manuel en ligne)
Consultez le « Manuel d’aide » pour obtenir
des instructions détaillées au sujet des
nombreuses fonctions de l'appareil.
http://rd1.sony.net/help/ilc/1420/h_zz/
© 2014 Sony Corporation Printed in Thailand
Page 2
English
E-mount
Learning more about the
camera (“Help Guide”)
“Help Guide” is an on-line manual.
You can read the “Help Guide” on
your computer or smartphone.
Refer to it for in-depth instructions
on the many functions of the
camera.
URL:
http://rd1.sony.net/help/ilc/1420/
h_zz/
Owner’s Record
The model and serial numbers are located
on the bottom. Record the serial number in
the space provided below. Refer to these
numbers whenever you call your Sony
dealer regarding this product.
Model No. WW328274 (ILCE-7S)
Serial No.
Model No. AC-UD10/AC-UUD11
Serial No.
WARNING
To reduce fire or shock hazard, do
not expose the unit to rain or
moisture.
IMPORTANT SAFETY
INSTRUCTIONS
-SAVE THESE
INSTRUCTIONS
DANGER
TO REDUCE THE
RISK OF FIRE OR
ELECTRIC SHOCK,
CAREFULLY FOLLOW
THESE
INSTRUCTIONS
If the shape of the plug does not fit the
power outlet, use an attachment plug
adaptor of the proper configuration for the
power outlet.
GB
2
Page 3

CAUTION
Battery pack
If the battery pack is mishandled, the
battery pack can burst, cause a fire or even
chemical burns. Observe the following
cautions.
• Do not disassemble.
• Do not crush and do not expose the
battery pack to any shock or force such as
hammering, dropping or stepping on it.
• Do not short circuit and do not allow
metal objects to come into contact with
the battery terminals.
• Do not expose to high temperature above
60°C (140°F) such as in direct sunlight or
in a car parked in the sun.
• Do not incinerate or dispose of in fire.
• Do not handle damaged or leaking
lithium ion batteries.
• Be sure to charge the battery pack using a
genuine Sony battery charger or a device
that can charge the battery pack.
• Keep the battery pack out of the reach of
small children.
• Keep the battery pack dry.
• Replace only with the same or equivalent
type recommended by Sony.
• Dispose of used battery packs promptly
as described in the instructions.
AC Adaptor
Use the nearby wall outlet (wall socket)
when using the AC Adaptor. Disconnect
the AC Adaptor from the wall outlet (wall
socket) immediately if any malfunction
occurs while using the apparatus.
Battery charger
Even when the CHARGE lamp of this
battery charger is off, the power is not
disconnected. If any trouble occurs while
this unit is in use, unplug it from the wall
outlet (wall socket) to disconnect the
power.
The power cord (mains lead), if supplied, is
designed specifically for use with this
camera only, and should not be used with
other electrical equipment.
For Customers in the U.S.A.
and Canada
RECYCLING LITHIUM-ION
BATTERIES
Lithium-Ion batteries are
recyclable.
You can help preserve
our environment by
returning your used
rechargeable batteries to
the collection and recycling location
nearest you.
For more information regarding recycling
of rechargeable batteries, call toll free
1-800-822-8837, or visit
http://www.call2recycle.org/
Caution: Do not handle damaged or
leaking Lithium-Ion batteries.
Battery pack and lens (if lens
supplied)
This device complies with Part 15 of the
FCC Rules. Operation is subject to the
following two conditions:
(1) This device may not cause harmful
interference, and (2) this device must
accept any interference received, including
interference that may cause undesired
operation.
GB
GB
3
Page 4

CAN ICES-3 B/NMB-3 B
This equipment complies with FCC/IC
radiation exposure limits set forth for an
uncontrolled environment and meets the
FCC radio frequency (RF) Exposure
Guidelines and RSS-102 of the IC radio
frequency (RF) Exposure rules. This
equipment has very low levels of RF
energy that are deemed to comply without
testing of specific absorption ratio (SAR).
For Customers in the U.S.A.
If you have any questions about this
product, you may call:
Sony Customer Information Center
1-800-222-SONY (7669).
The number below is for the FCC related
matters only.
Regulatory Information
Declaration of Conformity
Trade Name: SONY
Model No.: WW328274
Responsible Party: Sony Electronics Inc.
Address: 16530 Via Esprillo,
San Diego, CA 92127 U.S.A.
Telephone No.: 858-942-2230
This device complies with Part15 of the
FCC Rules. Operation is subject to the
following two conditions: (1) This
device may not cause harmful
interference, and (2) this device must
accept any interference received,
including interference that may cause
undesired operation.
This equipment must not be co-located or
operated in conjunction with any other
antenna or transmitter.
CAUTION
You are cautioned that any changes or
modifications not expressly approved in
this manual could void your authority to
operate this equipment.
Note:
This equipment has been tested and found
to comply with the limits for a Class B
digital device, pursuant to Part 15 of the
FCC Rules.
These limits are designed to provide
reasonable protection against harmful
interference in a residential installation.
This equipment generates, uses, and can
radiate radio frequency energy and, if not
installed and used in accordance with the
instructions, may cause harmful
interference to radio communications.
However, there is no guarantee that
interference will not occur in a particular
installation. If this equipment does cause
harmful interference to radio or television
reception, which can be determined by
turning the equipment off and on, the user
is encouraged to try to correct the
interference by one or more of the
following measures:
– Reorient or relocate the receiving
antenna.
– Increase the separation between the
equipment and receiver.
– Connect the equipment into an outlet on a
circuit different from that to which the
receiver is connected.
– Consult the dealer or an experienced
radio/TV technician for help.
The supplied interface cable must be used
with the equipment in order to comply with
the limits for a digital device pursuant to
Subpart B of Part 15 of FCC Rules.
GB
4
Page 5
For Customers in Canada
This device complies with Industry Canada
licence-exempt RSS standard(s).
Operation is subject to the following two
conditions: (1) this device may not cause
interference, and (2) this device must
accept any interference, including
interference that may cause undesired
operation of the device.
For Customers in Europe
Notice for the customers in the
countries applying EU Directives
Manufacturer: Sony Corporation, 1-7-1
Konan Minato-ku Tokyo, 108-0075 Japan
For EU product compliance: Sony
Deutschland GmbH, Hedelfinger Strasse
61, 70327 Stuttgart, Germany
Hereby, Sony Corporation, declares that
this equipment is in compliance with the
essential requirements and other relevant
provisions of Directive 1999/5/EC. For
details, please access the following URL:
http://www.compliance.sony.de/
Notice
If static electricity or electromagnetism
causes data transfer to discontinue midway
(fail), restart the application or disconnect
and connect the communication cable
(USB, etc.) again.
This product has been tested and found
compliant with the limits set out in the
EMC regulation for using connection
cables shorter than 3 meters (9.8 feet).
The electromagnetic fields at the specific
frequencies may influence the picture and
sound of this unit.
Disposal of waste batteries and
electrical and electronic equipment
(applicable in the European Union
and other European countries with
separate collection systems)
certain batteries this symbol might be used
in combination with a chemical symbol.
The chemical symbols for mercury (Hg) or
lead (Pb) are added if the battery contains
more than 0.0005% mercury or 0.004%
lead. By ensuring these products and
batteries are disposed of correctly, you will
help prevent potentially negative
consequences for the environment and
human health which could otherwise be
caused by inappropriate waste handling.
The recycling of the materials will help to
conserve natural resources.
In case of products that for safety,
performance or data integrity reasons
require a permanent connection with an
incorporated battery, this battery should be
replaced by qualified service staff only. To
ensure that the battery and the electrical and
electronic equipment will be treated
properly, hand over these products at endof-life to the applicable collection point for
the recycling of electrical and electronic
equipment. For all other batteries, please
view the section on how to remove the
battery from the product safely. Hand the
battery over to the applicable collection
point for the recycling of waste batteries.
This symbol on the
product, the battery or
on the packaging
indicates that the
product and the battery
shall not be treated as
household waste. On
GB
GB
5
Page 6
For more detailed information about
recycling of this product or battery, please
contact your local Civic Office, your
household waste disposal service or the
shop where you purchased the product or
battery.
For Customers in Singapore
For customers who
purchased their camera
from a store in Japan that
caters to tourists
Note
Some certification marks for standards
supported by the camera can be confirmed
on the screen of the camera.
Select MENU t (Setup) 6 t
[Certification Logo].
If display is not possible due to problems
such as camera failure, contact your Sony
dealer or local authorized Sony service
facility.
For details on Wi-Fi functions, see the flyer “Wi-Fi Connection/One-touch
(NFC) Guide.”
GB
6
Page 7

Before use
Notes on using your camera
Screen language
You can select the language displayed
on the screen using the menu.
Shooting procedure
This camera has 2 modes for monitoring
subjects: the monitor mode using the
monitor, and the viewfinder mode using the
viewfinder.
Functions built into this camera
• This manual describes 1080 60icompatible devices and 1080 50icompatible devices.
To check whether your camera is a 1080
60i-compatible device or 1080 50icompatible device, check for the
following marks on the bottom of the
camera.
1080 60i-compatible device: 60i
1080 50i-compatible device: 50i
• This camera is compatible with 1080 60p
or 50p-format movies. Unlike standard
recording modes up to now, which record
in an interlacing method, this camera
records using a progressive method. This
increases the resolution, and provides a
smoother, more realistic image.
Creating an image database file
If you insert a memory card that does not
contain an image database file into the
camera and turn on the power, the camera
automatically creates an image database
file using some of the memory card’s
capacity.
The process may take a long time and you
cannot operate the camera until the process
is completed. If a database file error occurs,
export all images to your computer using
PlayMemories Home™, and then format
the memory card using the camera.
Shooting with an E-mount lens
compatible APS-C size
This camera is equipped with a 35 mm,
full-frame CMOS sensor. However, the
image size is automatically set to that of the
APS-C size setting and the image size is
smaller when an E-mount lens compatible
APS-C size is used (default settings).
No compensation for damaged
content or recording failure
Sony cannot compensate for failure to
record or loss or damage of recorded
content due to a malfunction of the camera
or recording media, etc.
Back up recommendation
To avoid the data loss, always copy (back
up) data to other media.
Notes on the monitor, electronic
viewfinder, lens, and image sensor
• The monitor and electronic viewfinder
are manufactured using extremely highprecision technology, and over 99.99%
of the pixels are operational for effective
use. However, there may be some small
black dots and/or bright dots (white, red,
blue or green in color) that constantly
appear on the monitor and electronic
viewfinder. These dots are normal due to
the manufacturing process and do not
affect the images in any way.
• Do not hold the camera by the monitor.
• When using the power zoom lens, be
careful not to draw your fingers or any
other objects caught in the lens.
• Do not expose the camera to sunlight or
shoot sunward for a long time. The
internal mechanism may be damaged. If
sunlight is focused on a nearby object, it
may cause a fire.
GB
GB
7
Page 8

• Images may trail across on the screen in a
cold location. This is not a malfunction.
When turning on the camera in a cold
location, the screen may become
temporarily dark. When the camera
warms up, the screen will function
normally.
• The recorded image may be different
from the image you monitored before
recording.
Notes on shooting with the
viewfinder
This camera is equipped with an Organic
Electro-Luminescence viewfinder with
high resolution and high contrast. This
viewfinder achieves a wide viewing angle
and a long eye relief. This camera is
designed to provide an easily viewable
viewfinder by appropriately balancing
various elements.
• The image may be slightly distorted near
the corners of the viewfinder. This is not
a malfunction. When you want to see the
full composition with all its details, you
can also use the monitor.
• If you pan the camera while looking into
the viewfinder or move your eyes around,
the image in the viewfinder may be
distorted or the color of the image may
change. This is a characteristic of the lens
or display device and is not a
malfunction. When you shoot an image,
we recommend that you look at the
center area of the viewfinder.
Notes on using your camera
• When shooting with the viewfinder, you
may experience symptoms such as
eyestrain, fatigue, travel sickness, or
nausea. We recommend that you take a
break at regular intervals when you are
shooting with the viewfinder.
The required length or frequency of the
break may differ depending on the
individuals, so you are advised to decide
at your own discretion. In case you may
feel uncomfortable, refrain from using
the viewfinder until your condition
recovers, and consult your doctor as
necessary.
Notes on recording for long periods
of time
• Depending on the camera and battery
temperature, you may be unable to record
movies or the power may turn off
automatically to protect the camera.
A message will be displayed on the
screen before the power turns off or you
can no longer record movies. In this case,
leave the power off and wait until the
camera and battery temperature goes
down. If you turn on the power without
letting the camera and battery cool
enough, the power may turn off again or
you may be unable to record movies.
• Under high ambient temperatures, the
temperature of the camera rises quickly.
• When the temperature of the camera
rises, the image quality may deteriorate.
It is recommended that you wait until the
temperature of the camera drops before
continuing to shoot.
• The surface of the camera may get warm.
This is not a malfunction.
GB
8
Page 9

Notes on importing XAVC S movies
and AVCHD movies to a computer
When importing XAVC S movies or
AVCHD movies to a computer, download
and use the software PlayMemories Home
from the following website:
www.sony.net/pm/
Notes when playing movies on other
devices
• This camera uses MPEG-4 AVC/H.264
High Profile for AVCHD format
recording. Movies recorded in AVCHD
format with this camera cannot be played
with the following devices.
– Other devices compatible with
AVCHD format that do not support
High Profile
– Devices incompatible with the
AVCHD format
This camera also uses MPEG-4 AVC/
H.264 Main Profile for MP4 format
recording. For this reason, movies
recorded in MP4 format with this camera
cannot be played on devices other than
those that support MPEG-4 AVC/H.264.
• Discs recorded with HD (high definition)
image quality can be played back only on
AVCHD format-compatible devices.
DVD-based players or recorders cannot
play back HD image quality discs, as
they are incompatible with the AVCHD
format. Also, DVD-based players or
recorders may fail to eject HD image
quality discs.
• Movies recorded in 1080 60p/1080 50p
format can be played back only on 1080
60p/1080 50p-supported devices.
Warning on copyright
Television programs, films, videotapes, and
other materials may be copyrighted.
Unauthorized recording of such materials
may be contrary to the provisions of the
copyright laws.
Notes on using your camera
The pictures used in this manual
The photographs used as examples of
pictures in this manual are reproduced
images, and are not actual images shot
using this camera.
On the data specifications described
in this manual
The data on performance and specifications
are defined under the following conditions,
except as described in this manual: at an
ordinary ambient temperature of 25ºC
(77°F), and using a battery pack that has
been fully charged until the charge lamp
has turned off.
How to turn off wireless network
functions (Wi-Fi and NFC, etc.)
temporarily
When you board an airplane, etc., you can
turn off all wireless network functions
temporarily.
Select MENU button t (Wireless) 1
t [Airplane Mode] t [On].
If you set [Airplane Mode] to [On], an
(airplane) mark will be displayed on the
screen.
Notes on wireless LAN
If your camera is lost or stolen, Sony bears
no responsibility for the loss or damage
caused by illegal access or use of the
registered access point on the camera.
GB
9
GB
Page 10
Before use
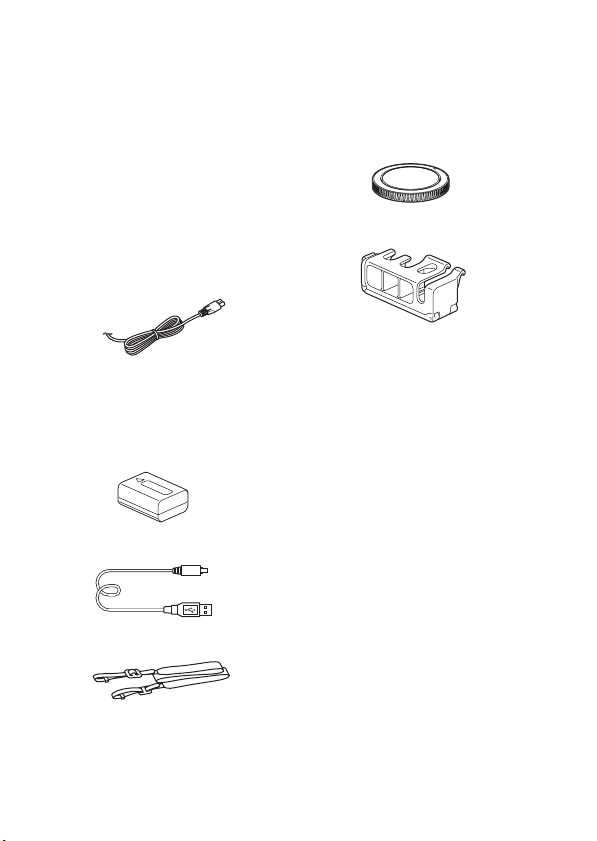
Checking the supplied items
The number in parentheses indicates the number of pieces.
• Camera (1)
• AC Adaptor AC-UD10/ACUUD11 (1)
The shape of the AC Adaptor may differ
depending on the country/region.
• Battery charger BC-TRW (1)
• Power cord (mains lead) (1)* (not
supplied in the U.S.A. and
Canada)
* Multiple power cords may be supplied
with your camera. Use the appropriate
one that matches your country/region.
• Rechargeable battery pack NPFW50 (2)
• Micro USB cable (1)
• Body cap (1) (Attached on the
camera)
• Cable Protector (1)
For how to attach the cable protector to
the camera, refer to page 15.
• Shoe cap (1) (Attached on the
camera)
• Eyepiece Cup (1) (Attached on
the camera)
• Instruction Manual (1) (this
manual)
• Wi-Fi Connection/One-touch
(NFC) Guide (1)
This guide explains the functions
that require a Wi-Fi connection.
• Shoulder strap (1)
For how to attach the shoulder strap to
the camera, refer to page 15.
GB
10
Page 11
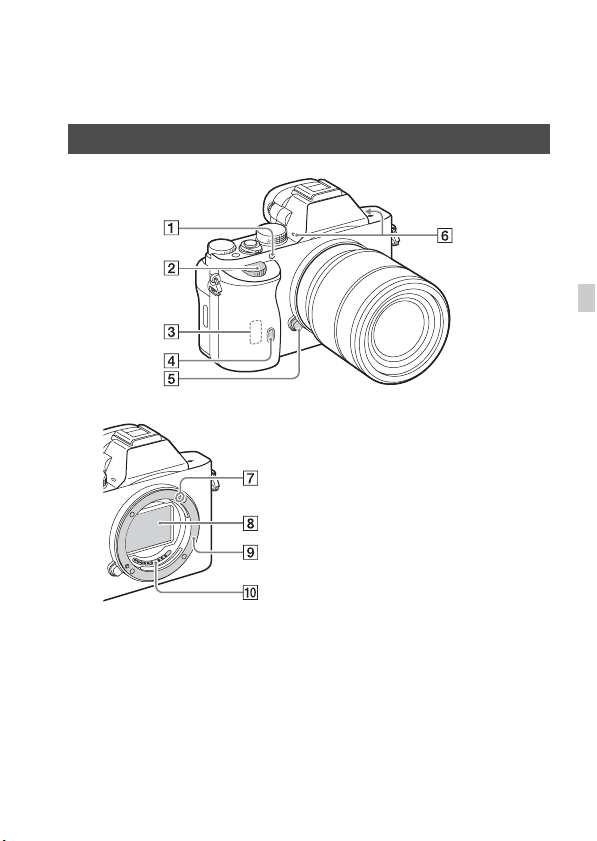
Identifying parts
See the pages in parentheses for details on operation for the parts.
Front side
GB
When the lens is removed
A AF illuminator/Self-timer lamp
B Front dial
C Wi-Fi sensor (built-in)
D Remote sensor
E Lens release button
F Built-in microphone*
1
G Mount index
H Image sensor*
I Mount
J Contacts*
*1 Do not cover this part during movie
recording.
Doing so may cause noise or lower
the volume.
*2 Do not directly touch these parts.
2
2
11
GB
Page 12
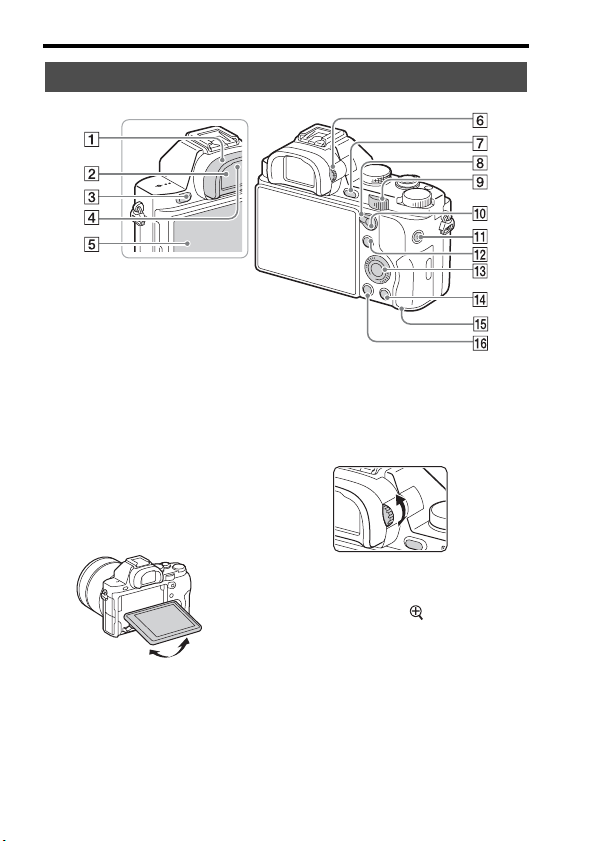
Rear side
Identifying parts
A Eyepiece cup
B Viewfinder
C MENU button (20)
D Eye sensor
E Monitor
• You can adjust the monitor to
an easily viewable angle and
shoot from any position.
GB
12
F Diopter-adjustment dial
• Adjust the diopter-adjustment
dial according to your eyesight
until the display appears clearly
in the viewfinder.
G For shooting: C2 (Custom2)
button
For viewing: (Enlarge)
button
H AF/MF/AEL switch lever
I Rear dial
Page 13

J For shooting: AF/MF (Auto
focus/manual focus) button/
AEL button
For viewing: (Image
index) button
K MOVIE button (36)
L For shooting: Fn button (19)
For viewing: (Send to
Smartphone) button
• You can display the screen for
[Send to Smartphone] by
pressing this button.
M Control wheel
N For shooting: C3 (Custom3)
button
For viewing: (Delete) button
(38)
O Access lamp
P (Playback) button
Identifying parts
GB
13
GB
Page 14
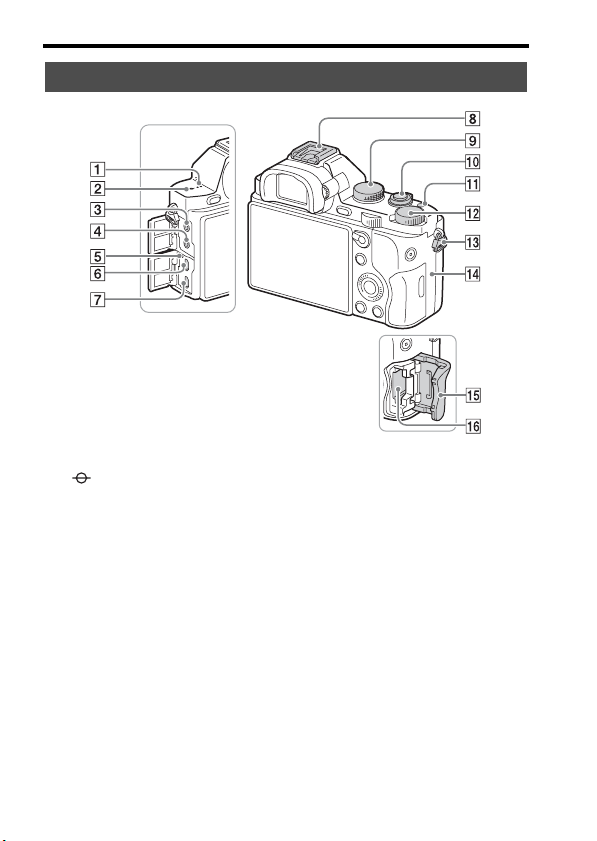
Top side/Side view
Identifying parts
A Speaker
B Image sensor position
mark
C m (Microphone) jack
• When an external microphone
is connected, the microphone is
turned on automatically. If the
external microphone is a plugin-power type, the power of the
microphone is supplied by the
camera.
D i (Headphones) jack
E Charge lamp
F Multi/Micro USB Terminal*
• Supports Micro USB
compatible device.
GB
14
G HDMI micro jack
H Multi interface shoe*
• Some of the accessories may
not be inserted fully and
protrude backward from the
Multi interface shoe. However,
when the accessory reaches the
front end of the shoe, the
connection is completed.
I Mode dial (39)
J Power switch/Shutter button
K C1 (Custom 1) button
L Exposure compensation dial
Page 15
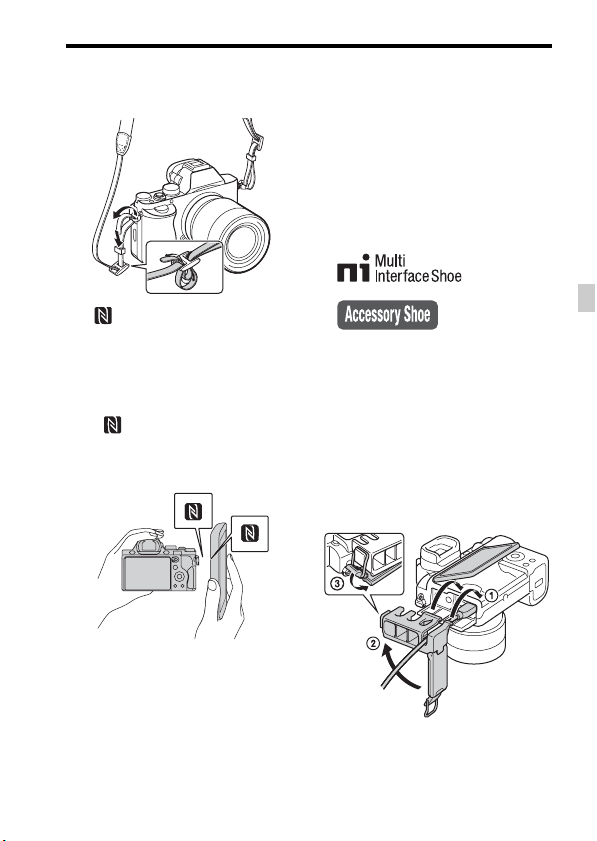
M Hooks for shoulder strap
• Attach both ends of the strap
onto the camera.
N (N mark)
• This mark indicates the touch
point for connecting the camera
and an NFC-enabled
Smartphone.
For details on the location of the
(N mark) on your
Smartphone, refer to the
operating instructions of the
Smartphone.
Identifying parts
* For details on compatible accessories
for the multi interface shoe and the
Multi/Micro USB Terminal, visit the
Sony website, or consult your Sony
dealer or local authorized Sony service
facility.
You can also use accessories that are
compatible with the accessory shoe.
Operations with other manufactures’
accessories are not guaranteed.
GB
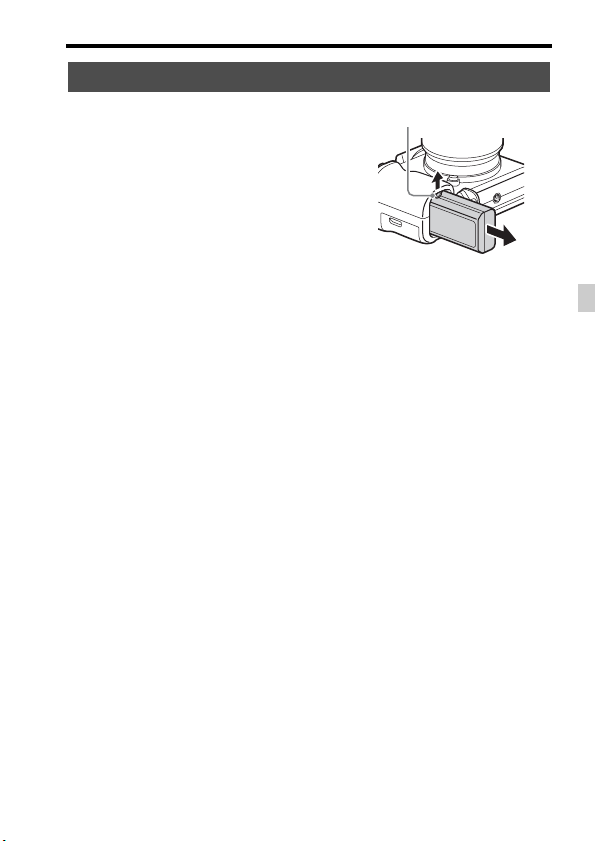
Attaching a cable protector
Use the cable protector to prevent
the HDMI cable from being
disconnected when shooting
images connected by the HDMI
cable. Raise the monitor and insert
the HDMI cable, and then attach
the cable protector as shown
below.
• NFC (Near Field
Communication) is an
international standard of shortrange wireless communication
technology.
O Memory card cover
P Memory card slot
• Make sure the connector cover is
outside the cable protector when
you attach the cable protector.
GB
15
Page 16
Bottom view
Identifying parts
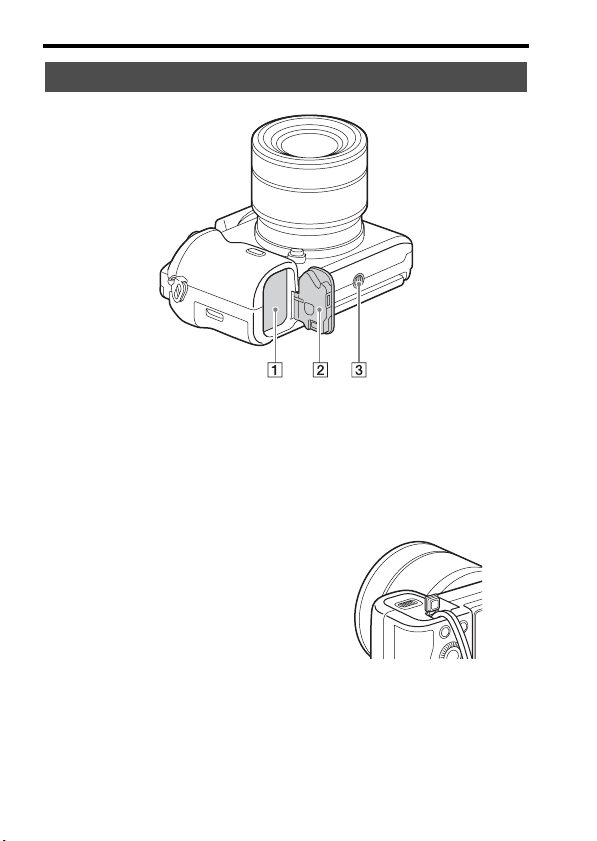
A Battery insertion slot (22)
B Battery cover (22)
C Tripod socket hole
• Use a tripod with a screw less
than 5.5 mm (7/32 inches) long.
Otherwise, you cannot firmly
secure the camera, and damage
to the camera may occur.
GB
16
Connection plate cover
Use this when using an AC-PW20
AC Adaptor (sold separately).
Insert the connection plate into the
battery compartment, and then pass
the cord through the connection
plate cover as shown below.
• Make sure that the cord is not
pinched when you close the
cover.
Page 17
Functions list
Operating the camera
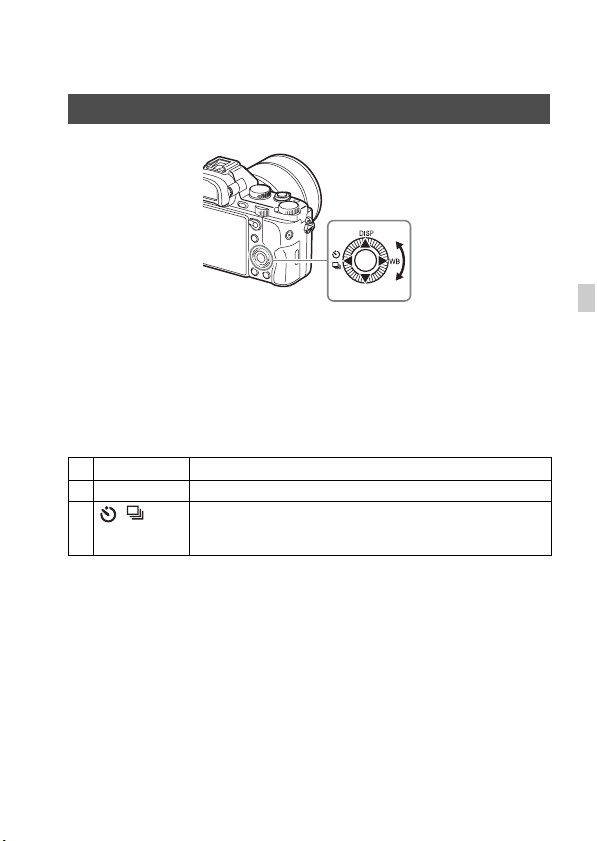
How to use the control wheel
• You can turn the control wheel or press up/down/left/right on the control
wheel to move the selection frame. Press z in the center of the control
wheel to set the selected item. In this manual, the action of pressing the
up/down/left/right side of the control wheel is indicated by v/V/b/B.
• The following functions are assigned to v/b/B on the control wheel. You
can also change the ISO sensitivity immediately by turning the control
wheel.
v DISP Changes the screen display.
B WB White Balance
b / Drive Mode
• You can assign a desired function to the V/b/B/z buttons and to the
control wheel turning position in shooting mode.
• When you turn the control wheel or press b/B on the control wheel in
playback mode, you can display the previous or next image.
GB
• Cont. Shooting/Bracket
• Self-timer
17
GB
Page 18
Operating the camera
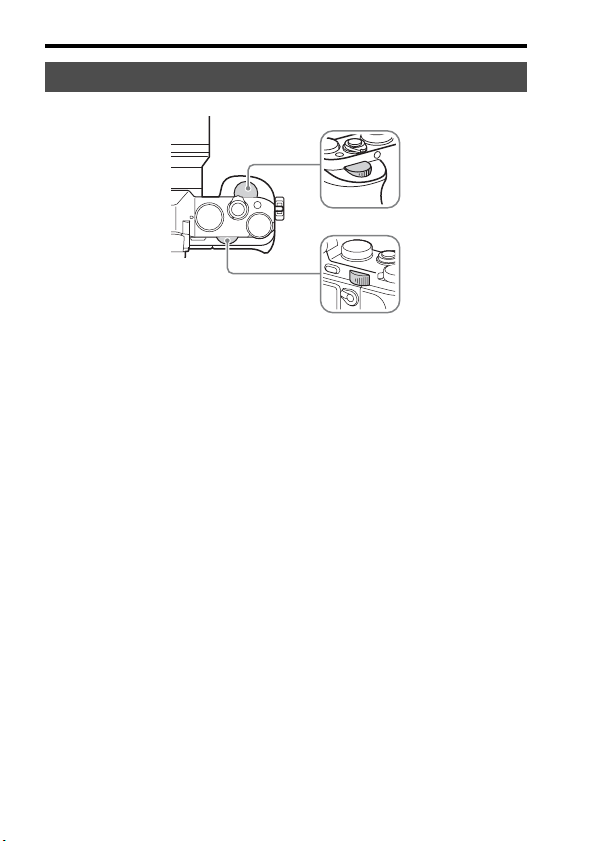
How to use the front dial/rear dial
You can turn the front dial or rear dial to change the settings required for
each shooting mode with immediate effect.
GB
18
Page 19
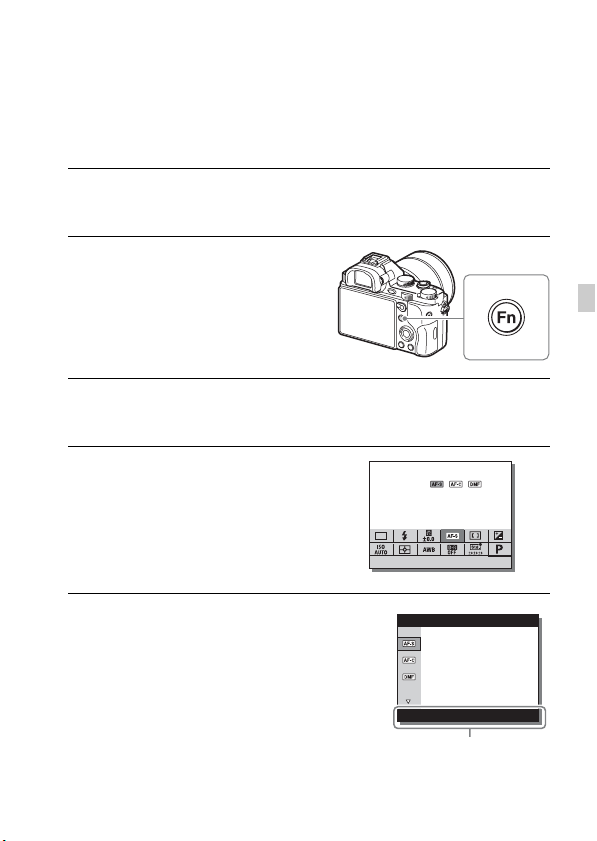
Selecting a function using the Fn (Function) button
This button is used for setting up or executing functions used frequently in
shooting, except for functions from the Quick Navi screen.
1 Press the DISP on the control wheel to set the screen mode to
other than [For viewfinder].
2 Press the Fn button.
3 Select the desired item using v/V/b/B on the control wheel.
The setting screen appears.
4 Select the desired setting by
turning the front dial, then press
z on the control wheel.
• Some setting values can be finely
adjusted by turning the rear dial.
To set the individual settings in the
dedicated screen
In step 3, select a setting item and press z on
the control wheel to switch to the dedicated
screen for the setting item. Set the items
according to the Operation guide.
Operation guide
GB
19
GB
Page 20
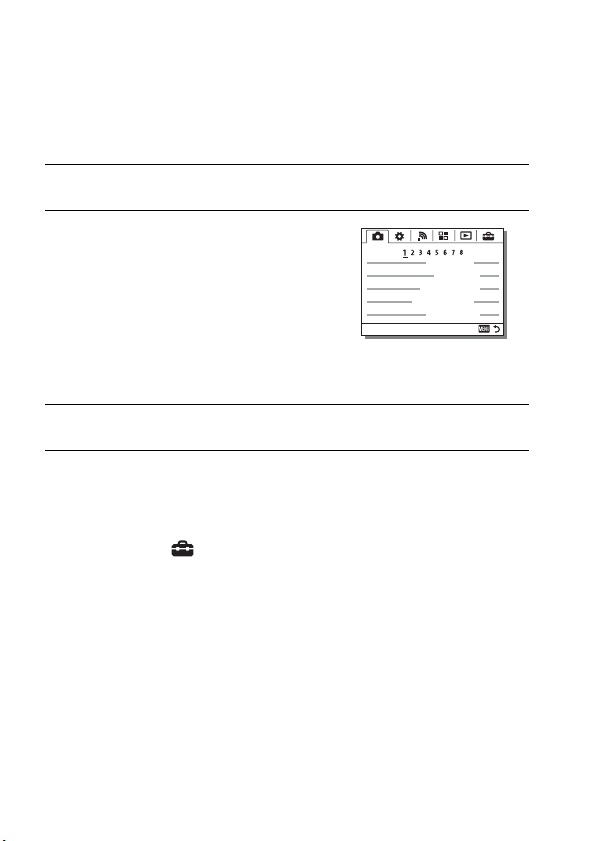
Functions that can be selected using the MENU button
You can set up the basic settings for the camera as a whole, or execute
functions such as shooting, playback, or other operations.
1 Press MENU button to display the menu screen.
2 Select the desired setting item using
v/V/b/B on the control wheel or by
turning the control wheel, and then
press z on the center of the control
wheel.
• Select an icon at the top of the screen and
press the b/B on the control wheel to
move to another MENU item.
3 Select the setting value, then press z to confirm.
To display the Tile Menu
Allows you to select whether to always display the first screen of the menu
when you press the MENU button.
MENU button t (Setup) 2 t [Tile Menu] t [On]
GB
20
Page 21

Using the In-Camera Guide
You can use [Custom Key Settings] to assign In-Camera Guide to the
desired button.
The In-Camera Guide displays explanations for the currently selected menu
function or setting.
Select MENU button t (Custom Settings) 6 t [Custom Key
Settings] t desired functions assigned to the button t [InCamera Guide].
Press the MENU button and use the control wheel to select a MENU item whose
explanation you want to read, and then press the button to which [In-Camera
Guide] is assigned.
GB
21
GB
Page 22

Preparing the camera
Charging the battery pack
When using the camera for the first time, be sure to charge the NP-FW50
battery pack (supplied).
The InfoLITHIUM™ battery pack can be charged even when it has not
been fully depleted.
It can also be used when it has not been fully charged.
The charged battery pack is discharged little by little, even when you do not
use it. To avoid missing an opportunity to shoot, charge the battery pack
again before shooting.
Charging the battery pack using the battery charger
1 Attach the battery pack.
• Push in the battery pack as the arrow
shows, until the battery pack is set in
parallel to the battery charger.
2 Connect the battery charger to the
wall outlet (wall socket).
• The CHARGE lamp lights orange
when charging is started.
• The CHARGE lamp turns off when
charging is finished.
• For countries/regions other than the
USA and Canada, connect the power
cord to the battery charger, and connect
the battery charger to the wall outlet
(wall socket).
CHARGE lamp
GB
22
Page 23
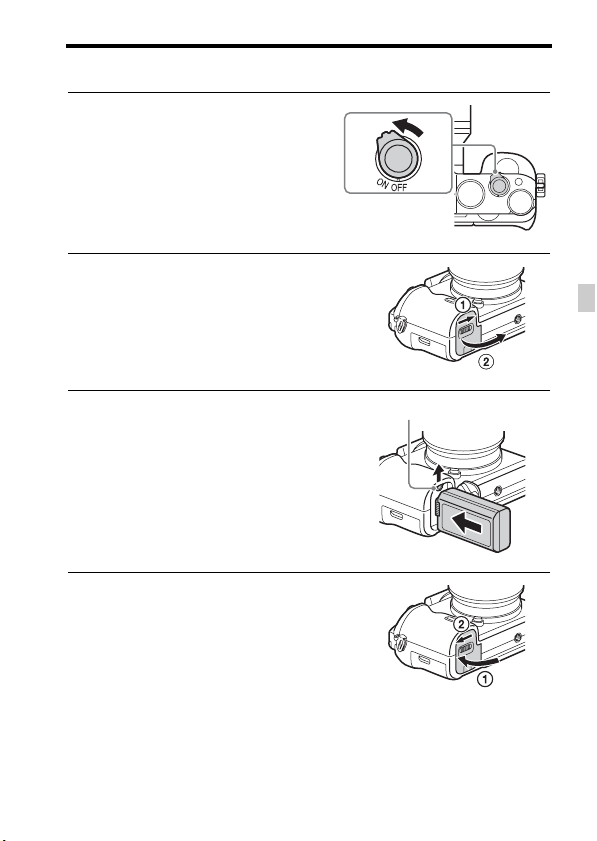
Charging the battery pack using the AC Adaptor
1 Set the ON/OFF (Power) switch to
OFF.
2 Slide the lever to open the cover.
Charging the battery pack
GB
3 Insert the battery pack
completely, using the tip of the
battery to press the lock lever.
4 Close the cover.
Lock lever
GB
23
Page 24
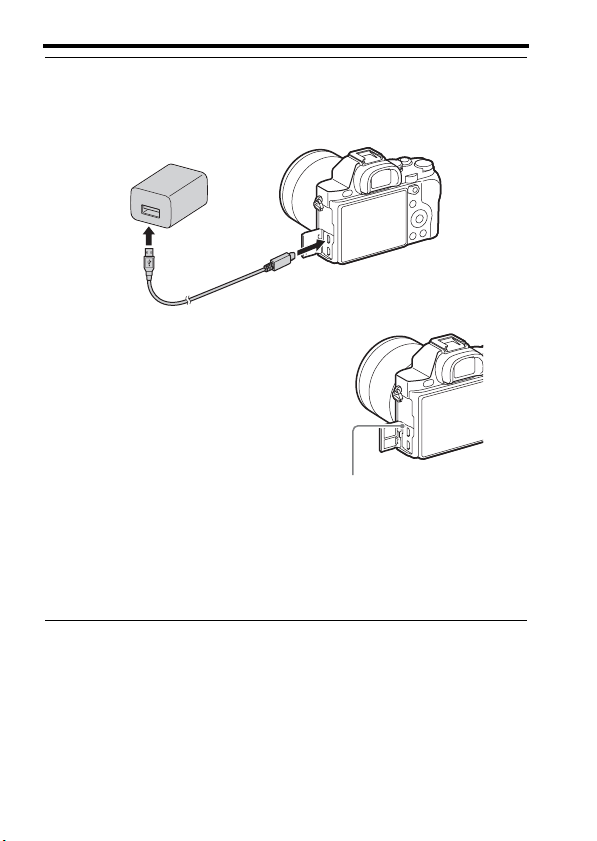
Charging the battery pack
5 Connect the camera to the AC Adaptor (supplied) using the
micro USB cable (supplied), and connect the AC Adaptor to the
wall outlet (wall socket).
The charge lamp lights orange, and
charging starts.
• Turn off the camera while charging the
battery.
• When the charge lamp flashes and
charging is not finished, remove and reinsert the battery pack.
• For countries/regions other than the
USA and Canada, connect the power
cord to the AC Adaptor, and connect
the AC Adaptor to the wall outlet (wall
socket).
Charge lamp
Lit: Charging
Off: Charging finished
Flashing:
Charging error or charging paused
temporarily because the camera is
not within the proper temperature
range
GB
24
Page 25

Charging the battery pack
Notes
• The charging time differs depending on the remaining capacity of the battery pack or
charging conditions.
• If the charge lamp on the camera flashes when the AC Adaptor is connected to the
wall outlet (wall socket), this indicates that charging is temporarily stopped because
the temperature is outside the recommended range. When the temperature gets back
within the appropriate range, the charging resumes. We recommend charging the
battery pack in an ambient temperature of between 10°C to 30°C (50ºF to 86ºF).
• Connect the AC Adaptor (supplied) or the battery charger (supplied) to the nearest
wall outlet (wall socket). If malfunctions occur while using the AC Adaptor or the
battery charger, disconnect the plug from the wall outlet (wall socket) immediately
to disconnect from the power source.
• When the camera is being used for the first time or when you use a battery pack that
has not been used for a long time, the charge lamp/CHARGE lamp may flash
quickly when the battery is charged for the first time. If that happens, remove the
battery pack from the camera and then re-insert it to recharge.
• Do not continuously or repeatedly charge the battery without using it if it is already
fully charged or close to fully charged. Doing so may cause a deterioration in battery
performance.
• When charging is finished, disconnect the AC Adaptor from the wall outlet (wall
socket).
• Be sure to use only genuine Sony brand battery packs, micro USB cable (supplied)
and AC Adaptor (supplied).
Charging time (Full charge)
The charging time is approximately 150 min. using the AC Adaptor
(supplied), and approximately 220 min. using the battery charger
(supplied).
Notes
• The above charging time applies when charging a fully depleted battery pack at a
temperature of 25°C (77°F). Charging may take longer depending on conditions of
use and circumstances.
GB
25
GB
Page 26
Charging the battery pack
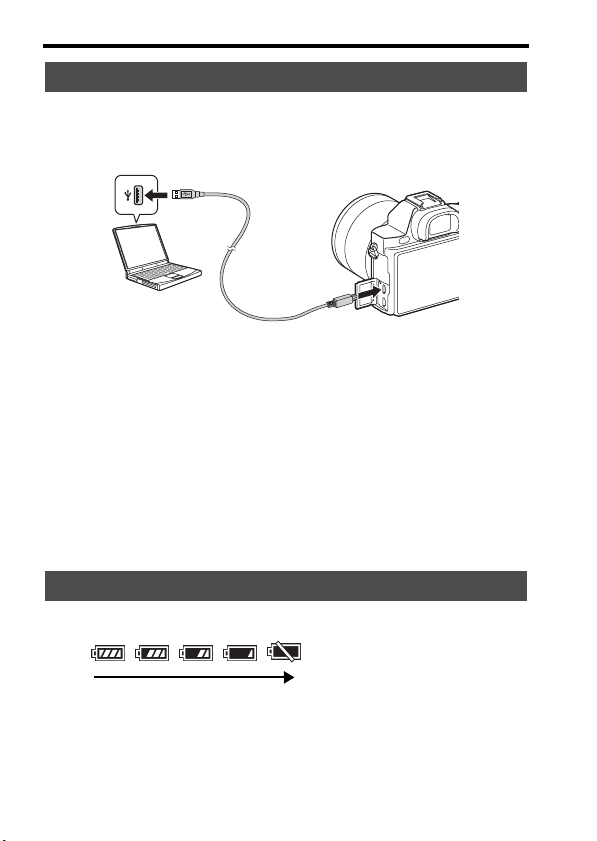
Charging by connecting to a computer
The battery pack can be charged by connecting the camera to a computer
using a micro USB cable. Connect the camera to the computer with the
camera turned off.
Notes
• Note the following points when charging via a computer:
– If the camera is connected to a laptop computer that is not connected to a power
source, the laptop battery level decreases. Do not charge for an extended period of
time.
– Do not turn on/off or restart the computer, or wake the computer to resume from
sleep mode when a USB connection has been established between the computer
and the camera. The camera may cause a malfunction. Before turning on/off, or
restarting the computer or waking the computer from sleep mode, disconnect the
camera and the computer.
– No guarantees are made for charging using a custom-built computer or a modified
computer.
Checking the remaining battery charge
A remaining charge indicator appears on the screen.
High Low
Notes
• The remaining charge indicator may not be correct under certain circumstances.
GB
26
Page 27
To remove the battery pack
Charging the battery pack
Turn off the camera. Slide the lock lever
after confirming that the access lamp
(page 13) is off, and remove the battery
pack.
Be sure not to drop the battery pack.
Lock lever
GB
27
GB
Page 28
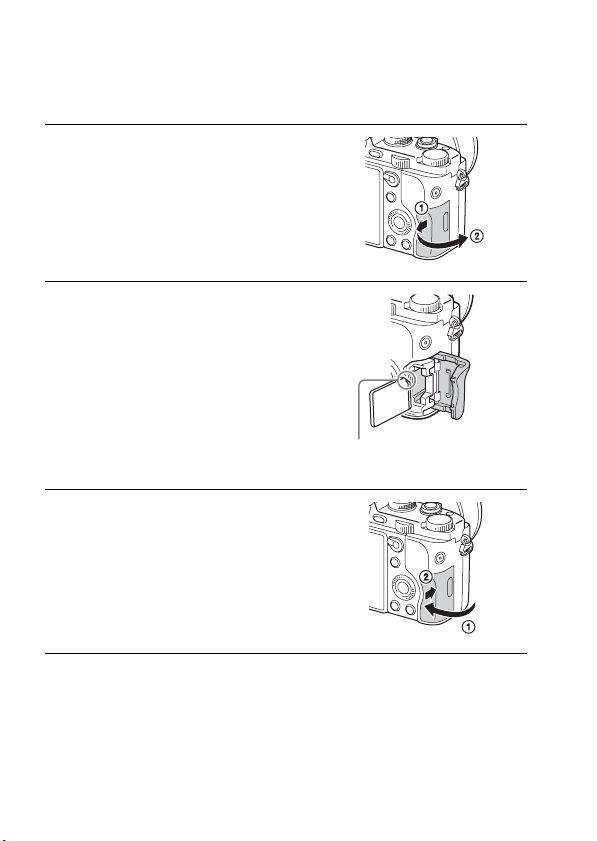
Inserting a memory card (sold separately)
1 Slide the lever to open the cover.
2 Insert the memory card (sold
separately).
• With the notched corner facing as
illustrated, insert the memory card until
it clicks into place.
Ensure the notched corner faces
correctly.
3 Close the cover.
To remove the memory card
Make sure that the access lamp (page 13) is not lit, then push the memory
card in once.
GB
28
Page 29
Inserting a memory card (sold separately)
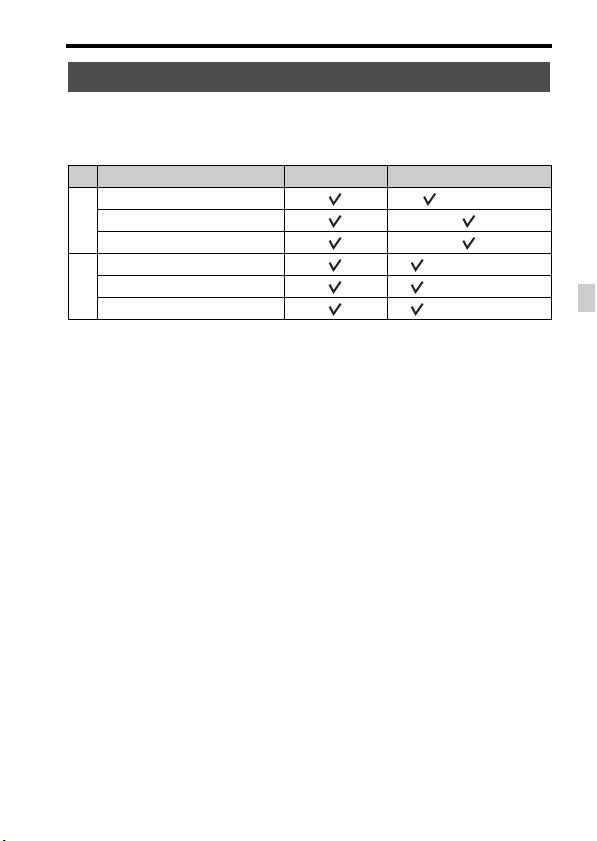
Memory cards that can be used
You can use the following types of memory cards with this camera.
However, proper operation cannot be guaranteed for all types of memory
cards.
Memory card For still images For movies
Memory Stick PRO Duo™ (Mark2 only)
A
Memory Stick PRO-HG Duo™
Memory Stick XC-HG Duo™
SD memory card (Class 4 or faster)
B
SDHC memory card (Class 4 or faster)
SDXC memory card (Class 4 or faster)
• In this manual, the products in the table are collectively referred to as follows:
A: Memory Stick PRO Duo media
B: SD card
When recording XAVC S format movies
Use the following memory cards:
– SDXC memory card (64 GB or more and Class 10 or faster)
– SDXC memory card (64 GB or more and UHS-I-compatible)
– Memory Stick XC-HG Duo media
Notes
• Images recorded on a Memory Stick XC-HG Duo media or an SDXC memory card
cannot be imported to or played on computers or AV devices that are not compatible
with exFAT*. Make sure that the device is compatible with exFAT before
connecting it to the camera. If you connect your camera to an incompatible device,
you may be prompted to format the card.
Never format the card in response to this prompt, as doing so will erase all data on
the card.
* exFAT is the file system used on Memory Stick XC-HG Duo media and SDXC
memory cards.
GB
29
GB
Page 30
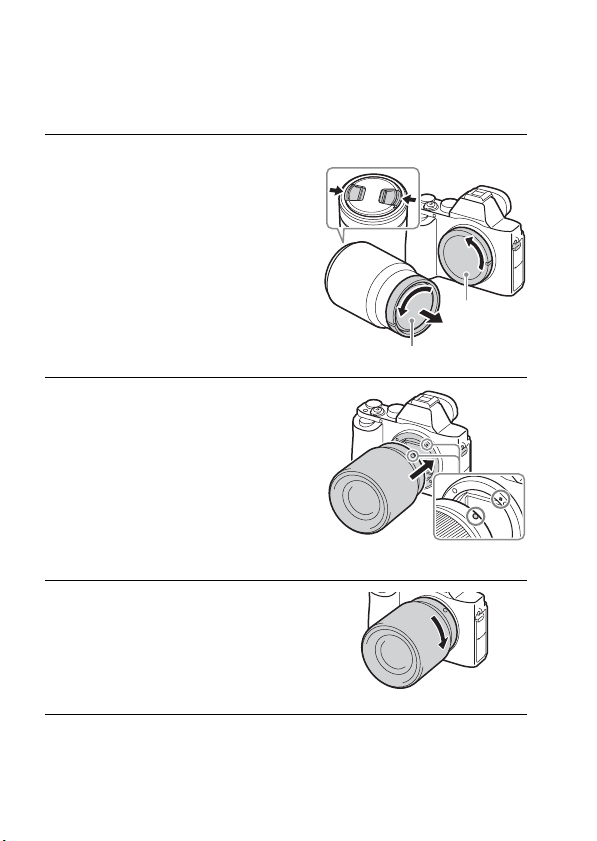
Attaching a lens
Set the power switch of the camera to OFF before you attach or remove the
lens.
1 Remove the body cap from the
camera and the rear lens cap
from the rear of the lens.
• When changing the lens, quickly
change the lens away from dusty
locations to keep dust or debris from
getting inside the camera.
• When shooting, remove the front lens
cap from the front of the lens.
2 Mount the lens by aligning the
white index marks (mounting
indexes) on the lens and camera.
• Hold the camera with the lens facing
down to prevent dust from entering into
the camera.
3 While pushing the lens lightly
toward the camera, turn the lens
clockwise until it clicks into the
locked position.
• Be sure to put the lens on straight.
Front lens cap
Body cap
Rear lens cap
White index marks
GB
30
Page 31

Attaching a lens
Notes
• When attaching a lens, do not press the lens release button.
• Do not use force when attaching a lens.
• The Mount Adaptor (sold separately) is required to use an A-mount lens (sold
separately). To use the Mount Adaptor, refer to the operating manual supplied with
the Mount Adaptor.
• When you want to shoot full-frame images, use a lens designed for a full-frame
camera.
• When carrying the camera with a lens attached, hold both the camera and the lens
firmly.
• Do not hold the part of the lens that is extended for the zoom or focus adjustment.
To remove the lens
1 Press the lens release button all
the way in and turn the lens
counterclockwise until it stops.
Lens release button
2 Attach the caps to the front and
rear of the lens and the body cap
to the camera.
• Before you attach them, remove any
dust from them.
Notes on changing the lens
When changing the lens, if dust or debris gets inside the camera and
adheres to the surface of the image sensor (the part that converts the light to
an electric signal), it may appear as dark spots on the image, depending on
the shooting environment.
The camera is equipped with an anti-dust function to prevent dust from
landing on the image sensor. However, always make sure to quickly change
the lens away from dusty locations when attaching/removing a lens.
31
GB
GB
Page 32

Setting the date and time
When you turn on the camera for the first time or after you initialize the
functions, the screen to set the date and time appears.
1 Set the power switch to ON to turn
on the camera.
The screen to set the date and time
appears.
• To turn the camera off, set the power
switch to OFF.
2 Check that [Enter] is selected on
the screen, then press z on the
control wheel.
3 Select a desired geographic location, and then press z.
4 Press v/V on the control wheel, or select a setting item by
turning the control wheel, then press z.
5 Press v/V/b/B, or select a desired setting by turning the
control wheel, then press z.
6 Repeat steps 4 and 5 to set other items, then select [Enter] and
press z on the control wheel.
To cancel the date and time setting operation
Press the MENU button.
GB
32
Page 33

Setting the date and time
Setting the date/time and area again
The date and time setup screen appears automatically when the power is
turned on for the first time or when the internal rechargeable backup battery
has been discharged. To reset the date and time, use the menu.
MENU button t (Setup) 4 t
[Date/Time Setup] or [Area Setting]
MENU button
Notes
• This camera does not have a function to insert the date on an image. You can insert
the date and save or print the image by using PlayMemories Home (page 46).
Maintaining the date and time setting
This camera has an internal rechargeable battery for maintaining the date
and time and other settings regardless of whether the power is on or off, or
the battery is installed or not.
33
GB
GB
Page 34

Shooting and viewing images
Shooting still images
In [Auto Mode], the camera analyzes the subject and allows you to shoot
with the appropriate settings.
1 Set the power switch to ON to turn on the camera.
2 Set the mode dial to (Auto
Mode).
3 Look into the viewfinder and hold the camera.
4 Determine the size of a subject.
When using a lens with a zoom lever:
Move the zoom lever.
When using a lens with a zoom ring:
Turn the zoom ring.
• The optical zoom is not available when
a fixed focal length lens is mounted.
• If the zoom range of the optical zoom is
exceeded when a Power zoom lens is
mounted, the camera automatically
switches over to the zoom other than
the optical zoom.
Zoom ring
5 Press the shutter button halfway
down to focus.
• When the image is in focus, a beep
sounds and the z or indicator
lights.
GB
34
Page 35

Shooting still images
6 Press the shutter button fully down to shoot an image.
• If [Auto Obj. Framing] is set to [Auto], when shooting faces, close-up
(macro) subjects, or subjects tracked by Lock-on AF, the camera analyzes
the scene and automatically trims the captured image into a suitable
composition. Both the original and the trimmed images will be saved.
GB
35
GB
Page 36

Recording movies
1 Press the MOVIE button to start
recording.
• Since the [MOVIE Button] is set to
[Always] in the default setting, movie
recording can be started from any
shooting mode.
MOVIE button
2 Press the MOVIE button again to stop recording.
Notes
• The sound of the camera in operation may be recorded while recording a movie. You
can disable the sound recording by setting [Audio Recording] to [Off].
• To prevent the operating sound of the zoom ring from being recorded during movie
recording when a Power zoom lens is used, we recommend recording movies using
the zoom lever. When you move the zoom lever, place your finger lightly on the
lever and operate it without flicking.
• The continuous recording time of a movie depends on the ambient temperature or
the condition of the camera. See “Notes on continuous movie recording” (page 52).
• When the icon appears, the temperature of the camera is too high. Turn the
camera off and wait until the temperature of the camera decreases.
• When you are recording continuously for a long time, you may feel that the camera
is warm. This is normal. Also, [Internal temp. high. Allow it to cool.] may appear. In
such cases, turn the camera off and wait until the camera is ready to shoot again.
• When shooting, the sound of the shoulder strap hooks (triangular hook) could be
recorded, depending on the situation used.
GB
36
Page 37

Playing back images
1 Press the button.
button
2 Select an image by pressing the b/B on the control wheel.
• To play back movies, press z on the control wheel.
• If you press V on the control wheel while playing back a movie, the
control panel will be displayed.
Control panel Action during movie playback
N Playback
X Pause
M Fast forward
m Fast rewind
T Forward slow playback
t Rewind slow playback
> Next movie
. Previous movie
C Frame advance
c Frame rewind
Volume settings
Closes the control panel
Notes
• Movies recorded using other devices may not play back on this camera.
GB
GB
37
Page 38

Deleting images
Once you have deleted an image, you cannot restore it. Be sure that you
want to delete the image before proceeding.
1 While displaying the image you
want to delete, press the
(Delete) button.
(Delete) button
2 Select [Delete] with v/V on the control wheel, then press z.
• To delete several images at a time, select MENU button t
(Playback) 1 t [Delete].
Notes
• Protected images cannot be deleted.
GB
38
Page 39

Selecting a shooting mode
Selecting a shooting mode
Turn the mode dial and set to the
desired shooting mode.
The following shooting modes are available.
(Auto Mode) Allows you to shoot still images with the settings adjusted
(Program Auto) Allows you to shoot with the exposure (the shutter speed and
(Aperture
Priority)
(Shutter Priority) Adjusts the shutter speed to show the movement of the
(Manual
Exposure)
1/2 (Memory recall) Calls up settings pre-registered in [Memory] in the
(Scene
Selection)
(Sweep
Panorama)
(Movie) Allows you to change shooting settings and shoot a movie.
automatically.
the aperture value) adjusted automatically. The other settings
can be adjusted manually.
Shoots by adjusting the aperture and changing the focus
range, or by defocus the background.
subject.
Allows you to shoot after manually adjusting the exposure
(the shutter speed and the aperture value) using the front or
rear dial.
Allows you to shoot with preset settings according to the
scene.
Allows you to shoot panoramic images by combining
multiple images.
GB
(Camera Settings).
39
GB
Page 40

Using Wi-Fi functions
Using the Wi-Fi and NFC one-touch functions
You can perform the following operations using the camera’s Wi-Fi and
NFC One-touch functions.
Saving images to a computer.
Using the smartphone as a remote
control for the camera.
For details on the Wi-Fi and NFC One-touch functions, refer to the attached
document “Wi-Fi Connection/One-touch (NFC) Guide” or to the “Help
Guide” (page 2).
Transferring images from the
camera to a smartphone.
Viewing still images on a TV.
GB
40
Page 41

Using the Wi-Fi and NFC one-touch functions
Connecting the camera to a wireless access point
Connect the camera to your wireless access point. Before starting the
procedure, make sure you have the SSID (name of the access point) and
password of your wireless access point with you.
1 MENU button t (Wireless) 2 t [Access Point Set.].
2 Use v/V on the control wheel to select the access point you
want to connect to. Press z in the center of the control wheel
and enter the password if a key icon is displayed with a
wireless access point, then select [OK].
Notes
• If a connection is not established, see the wireless access point operating instructions
or contact the administrator of the access point.
• To save images to a computer, install the following dedicated software on your
computer.
When using Windows: PlayMemories Home
www.sony.net/pm/
When using Mac: Wireless Auto Import
http://www.sony.co.jp/imsoft/Mac/
GB
41
GB
Page 42

Using applications
Adding applications to the camera (Application downloading)
You can add the desired functions to your camera by connecting to the
application downloading website (PlayMemories Camera Apps) via
the Internet. For example, the following functions are available:
• You can use various effects for shooting images.
• You can upload images to network services directly from the camera.
Downloading applications
1 Access the application downloading website.
http://www.sony.net/pmca/
2 Follow the instructions on the screen and acquire a service
account.
• If you have an account, sign in to the application download site.
3 Select the desired application and
download the application to the
1 To a USB terminal of the
computer
camera following the instructions
on the screen.
Notes
• The application downloading function may not be available in some countries and
regions. For details, refer to the application downloading website above.
GB
2 Micro USB cable
(supplied)
3 Multi/Micro USB Terminal
42
Page 43

Adding applications to the camera (Application downloading)
How to download applications directly using the Wi-Fi function of
the camera
You can download applications using the Wi-Fi function without
connecting to a computer.
Select MENU button t (Application) t [Application List] t
(PlayMemories Camera Apps), then follow the instructions on the
screen to download applications.
Acquire a service account in advance.
Select MENU button t (Wireless) 2 t [Access Point Set.] t access
point to be connected t change [IP Address Setting] to [Auto] if it is set to
[Manual].
Launching the application
1 Select MENU button t (Application) t [Application List]
t desired application to launch.
• You can use the [One-touch (NFC)] menu to install NFC one-touch
functions and call up the applications by simply touching the smartphone to
the mark on the camera.
Before using the NFC One-touch functions, set the applications that you
want to call up using the following procedure:
• MENU button t (Wireless) 1 t [One-touch (NFC)] t desired
application
• After displaying the shooting screen on the camera, touch the smartphone to
the camera.
• “Smart Remote Embedded” is assigned to [One-touch (NFC)] in the default
setting.
GB
43
GB
Page 44

Viewing images on a computer
Using the software
Use the following applications to optimize use of the images shot with your
camera.
• Image Data Converter
• PlayMemories Home
• Remote Camera Control
For details on installation, see pages 45 to 48.
System requirements
You can find the system requirements for the software at the following
URL:
www.sony.net/pcenv/
GB
44
Page 45

Using the software
Using Image Data Converter
With Image Data Converter, you can do the following:
• You can play back and edit images recorded in RAW format with various
corrections, such as tone curve and sharpness.
• You can adjust images with white balance, exposure, and [Creative
Style], etc.
• You can save the images displayed and edited on a computer.
You can either save the image as RAW format or save it in a general file
format.
• You can display and compare the RAW images and JPEG images
recorded by this camera.
• You can rank images in 5 grades.
• You can apply color labels.
To use Image Data Converter, refer to Help.
Click [Start]
[Image Data Converter Ver.4].
Image Data Converter support page (English only)
t [All Programs] t [Image Data Converter] t [Help] t
http://www.sony.co.jp/ids-se/
Installing Image Data Converter
1 Download the software from the following URL and install it on
your computer.
Windows:
http://www.sony.co.jp/imsoft/Win/
Mac:
http://www.sony.co.jp/imsoft/Mac/
GB
Notes
• Log on as Administrator.
GB
45
Page 46

Using the software
Using PlayMemories Home
The software PlayMemories Home allows you to import still images and
movies to your computer and use them. PlayMemories Home is required
for importing XAVC S movies or AVCHD movies to your computer.
Playing back imported
images
Importing images from your camera
For Windows, the following functions are also
available:
Viewing images
on a calendar
Creating
movie
discs
Uploading
images to
network services
Sharing images on
PlayMemories
Online™
• You can download Image Data Converter or Remote Camera Control,
etc. by performing the following procedure:
Connect the camera to your computer
t launch PlayMemories Home t
click [Notifications].
GB
46
Page 47

Using the software
Notes
• An Internet connection is required to install PlayMemories Home.
• An Internet connection is required to use PlayMemories Home or other network
services. PlayMemories Home or other network services may not be available in
some countries or regions.
• Refer to the following URL for Mac software:
http://www.sony.co.jp/imsoft/Mac/
• If the software PMB (Picture Motion Browser), supplied with models released
before 2011, has already been installed on your computer, it will be overwritten by
PlayMemories Home during the installation. Use PlayMemories Home, the
successor software of PMB.
• Movies recorded using the [60p 28M(PS)]/[50p 28M(PS)], [60i 24M(FX)]/[50i
24M(FX)] or [24p 24M(FX)]/[25p 24M(FX)] setting in [ Record Setting] are
converted by PlayMemories Home to create an AVCHD recording disc. This
conversion can take a long time. Also, you cannot create a disc with the original
image quality. If you want to keep the original image quality, store your movies on a
Blu-ray Disc.
Installing PlayMemories Home
1 Using the Internet browser on your computer, go to the
following URL, then click [Install] t [Run].
www.sony.net/pm/
2 Follow the instructions on the screen to complete the
installation.
GB
47
GB
Page 48

Using the software
Using Remote Camera Control
Connect the camera to your computer. With Remote Camera Control you
can:
• Set up the camera or record an image from the computer.
• Record an image directly to the computer.
• Perform an Interval Timer Shooting.
Set up the following before use: MENU button
Connection]
t [PC Remote]
t (Setup) 4 t [USB
Installing Remote Camera Control
1 Using the Internet browser on your computer, go to the
following URL.
Windows:
http://www.sony.co.jp/imsoft/Win/
Mac:
http://www.sony.co.jp/imsoft/Mac/
2 Follow the instructions on the screen to download and install
Remote Camera Control.
Notes
• An Internet connection is required to install Remote Camera Control.
GB
48
Page 49

Others
Checking the number of images and recordable time of movies
When you insert a memory card into the
camera and set the power switch to ON,
the number of images that can be
recorded (should you continue to shoot
using the current settings) is displayed on
the screen.
Notes
• When “0” (the number of recordable images) flashes in yellow, the memory card is
full. Replace the memory card with another one, or delete images from the current
memory card (page 38).
• When “NO CARD” (the number of recordable images) flashes in yellow, it means
no memory card has been inserted. Insert a memory card.
The number of images that can be recorded on a memory
card
The table below shows the approximate number of images that can be
recorded on a memory card formatted with this camera. The values are
defined using Sony standard memory cards for testing. The values may
vary depending on the shooting conditions and the type of memory card
used.
Image Size: L: 12M
Aspect Ratio: 3:2*
Memory card formatted with this camera (Units: Images)
Capacity
Size
Standard 445 890 1800 3600 7200 14000
Fine 325 650 1300 2650 5300 10500
Extra fine 180 370 750 1500 3000 6000
RAW & JPEG 99 195 395 800 1600 3200
RAW 140 280 570 1100 2300 4600
* When [ Aspect Ratio] is set to [16:9], you can record more images than the
numbers shown in the table above (except when [RAW] is selected).
2GB 4GB 8GB 16 GB 32 GB 64 GB
49
GB
GB
Page 50

Checking the number of images and recordable time of movies
The number of images that can be recorded using a
battery pack
Note that the actual numbers may differ depending on the conditions of use.
Battery life Number of images
Shooting (still
images)
Actual shooting
(movies)
Continuous
shooting (movies)
Viewing (still images) Approx. 280 min. Approx. 5600 images
Notes
• The above number of images applies when the battery pack is fully charged. The
number of images may decrease depending on the conditions of use.
• The number of images that can be recorded is for shooting under the following
conditions:
– The battery pack is used at an ambient temperature of 25°C (77°F).
– Using the lens FE 28-70 mm F3.5-5.6 OSS (sold separately)
– Using Sony Memory Stick PRO Duo (Mark2) media (sold separately)
– [Viewfinder Bright.] is set to [Manual] [±0].
– [Monitor Brightness] is set to [Manual] [±0].
– [Display Quality] is set to [Standard].
• The number for “Shooting (still images)” is based on the CIPA standard, and is for
shooting under the following conditions:
(CIPA: Camera & Imaging Products Association)
– [Focus Mode] is set to [Single-shot AF].
– Shooting once every 30 seconds.
– The power turns on and off once every ten times.
• The number of minutes for movie shooting is based on the CIPA standard, and are
for shooting under the following conditions:
– [ Record Setting] is set to [60i 17M(FH)]/[50i 17M(FH)].
– Typical movie shooting: Battery life based on repeatedly shooting, zooming,
shooting stand-by, turning on/off, etc.
– Continuous movie shooting: Battery life based on non-stop shooting until the limit
(29 minutes) has been reached, and then continued by pressing the MOVIE button
again. Other functions, such as zooming, are not operated.
GB
Screen Approx. 190 min. Approx. 380 images
Viewfinder Approx. 160 min. Approx. 320 images
Screen Approx. 60 min. —
Viewfinder Approx. 55 min. —
Screen Approx. 90 min. —
Viewfinder Approx. 90 min. —
50
Page 51

Checking the number of images and recordable time of movies
Available recording time for a movie
The table below shows the approximate total recording times using a
memory card formatted with this camera. The recording time for XAVC S
and AVCHD movies is when [Dual Video REC] set to [Off].
Memory card formatted with this camera (h (hour), m (minute))
Record
Setting
60p 50M/50p 50M — — — — — 2 h 35 m
30p 50M/25p 50M — — — — — 2 h 35 m
24p 50M* — — — — — 2 h 35 m
120p 50M/100p 50M — — — — — 2 h 35 m
60i 24M(FX)/
50i 24M(FX)
60i 17M(FH)/
50i 17M(FH)
60p 28M(PS)/
50p 28M(PS)
24p 24M(FX)/
25p 24M(FX)
24p 17M(FH)/
25p 17M(FH)
1440×1080 12M 20 m 40 m 1 h 20 m 2 h 45 m 5 h 30 m 11 h
VGA 3M 1 h 10 m 2 h 45 m 4 h 55 m 10 h 20 h 40 h
* Only for 1080 60i compatible models.
Capacity
2GB 4GB 8GB 16 GB 32 GB 64 GB
10 m 20 m 40 m 1 h 30 m 3 h 6 h
10 m 30 m 1 h 2 h 4 h 5 m 8 h 15 m
9 m 15 m 35 m 1 h 15 m 2 h 30 m 5 h 5 m
10 m 20 m 40 m 1 h 30 m 3 h 6 h
10 m 30 m 1 h 2 h 4 h 8 h
• Continuous shooting is possible for approximately 29 minutes (a product
specification limit). The maximum continuous recording time of an MP4
(12M) format movie is about 20 minutes (limited by the 2 GB file size
restriction).
Notes
• The recordable time of movies varies because the camera is equipped with VBR
(Variable Bit-Rate), which automatically adjusts image quality depending on the
shooting scene. When you record a fast-moving subject, the image is clearer but the
recordable time is shorter because more memory is required for recording.
The recordable time also varies depending on the shooting conditions, the subject or
the image quality/size settings.
51
GB
GB
Page 52

Checking the number of images and recordable time of movies
• The values shown are not for continuous recording time.
• The recording time may differ depending on shooting conditions and the memory
card used.
• When is indicated, stop recording the movie. The temperature inside the camera
has increased to an unacceptable level.
• For details on movie playback, see page 37.
Notes on continuous movie recording
• It requires a lot of power to perform high quality movie recording or continuous
shooting using the image sensor. Therefore, if you continue to shoot, the temperature
inside the camera will rise, especially that of the image sensor. In such cases, the
camera turns off automatically since higher temperatures affect the quality of the
images or affect the internal mechanism of the camera.
• The duration of time available for movie recording is as follows when the camera
starts recording after the power of the camera has been turned off for a while. (The
following values indicate the continuous time from when the camera starts recording
until the camera stops recording.)
Ambient temperature Continuous recording time for movies
20°C (68°F) About 29 minutes
30°C (86°F) About 29 minutes
40°C (104°F) About 29 minutes
• The duration of time available for movie recording varies with the temperature or
condition of the camera before you start recording. If you frequently recompose or
shoot images after the power is turned on, the temperature inside the camera will rise
and the recording time available will be shorter.
• If the camera stops recording due to the temperature, leave it for several minutes
with the power turned off. Start recording after the temperature inside the camera
drops fully.
• If you observe the following points, the recording time will be longer.
– Keep the camera out of direct sunlight.
– Turn the camera off when it is not being used.
• The maximum size of a movie file is about 2 GB. When the file size is about 2 GB,
recording stops automatically when [ File Format] is set to [MP4], and a new
movie file is created automatically when [ File Format] is set to [AVCHD].
• The maximum continuous recording time is 29 minutes.
GB
52
Page 53

Specifications
Camera
[System]
Camera Type: Interchangeable Lens
Digital Camera
Lens: Sony E-mount lens
[Image sensor]
Image format:
35 mm full size (35.6 mm ×
23.8 mm), CMOS image sensor
Total pixel number of camera:
Approx. 12 430 000 pixels
Effective pixel number of camera:
Approx. 12 200 000 pixels
[Anti-Dust]
System: Charge protection coating on
image sensor and image sensor
shift mechanism
[Auto focus system]
System:
Contrast detection system,
25 points
Sensitivity Range: –4 EV to +20 EV
(at ISO 100 equivalent with F2.0
lens)
AF illuminator: Approx. 0.3 m to 3 m
(0.99 ft. to 9.8 ft.) (When using an
FE 28-70 mm F3.5-5.6 OSS)
[Electronic viewfinder]
Type: Electronic viewfinder
Total number of dots: 2 359 296 dots
Frame coverage: 100%
Magnification: 0.71 × with 50 mm
lens at infinity, –1 m
–1
Eye Point: Approximately 27 mm
from the eyepiece, 22 mm from
the eyepiece frame at –1 m
(CIPA standard compliant)
Diopter Adjustment: –4.0 m
+3.0 m
–1
–1
–1
to
[LCD monitor]
LCD panel: 7.5 cm (3.0 type) TFT
drive
Total number of dots: 921 600 dots
[Exposure control]
Metering method: 1 200-zone
evaluative metering
Metering Range: –3 EV to +20 EV
(at ISO 100 equivalent with F2.0
lens)
ISO sensitivity (Recommended
exposure index):
Still images: ISO 100 to 409 600
(Extended ISO 50), [ISO AUTO]
(ISO 100 to 12 800)
Movies: ISO 200 to 409 600
equivalent, [ISO AUTO]
(ISO 200 to 25 600 equivalent)
Exposure compensation: ±5.0 EV
(switchable between 1/3 EV and
1/2 EV steps)
When using exposure
compensation dial: ±3.0 EV
(1/3 EV step)
GB
53
GB
Page 54

[Shutter]
Type: Electronically-controlled,
vertical-traverse, focal-plane type
Speed range:
Still images: 1/8 000 second to
30 seconds, BULB
Movies: 1/8 000 second to
1/4 second (1/3 step)
1080 60i-compatible device
up to 1/60 second in AUTO mode
(up to 1/30 second in Auto slow
shutter mode)
1080 50i-compatible device
up to 1/50 second in AUTO mode
(up to 1/25 second in Auto slow
shutter mode)
Flash sync speed: 1/250 second
[Continuous shooting]
Continuous shooting speed:
Maximum 2.5 images per
second*
When shooting in [Spd Priority
Cont.] mode: Maximum 5 images
per second
* Based on our measurement conditions.
The speed of continuous shooting can
be slower, depending on the shooting
conditions.
The number of continuous shots:
When shooting in [Spd Priority
Cont.] mode:
Extra fine 65 images
During continuous shooting:
Extra fine 88 images
Specifications
[Recording format]
File format: JPEG (DCF Ver. 2.0,
Exif Ver. 2.3, MPF Baseline)
compliant, RAW (Sony ARW 2.3
format)
Movie (XAVC S format): MPEG-4
AVC/H.264 XAVC S ver.1.0
format compliant
Video: MPEG-4 AVC/H.264
Audio: LPCM 2ch (48 kHz
16 bit)
Movie (AVCHD format): AVCHD
format Ver. 2.0 compatible
Video: MPEG-4 AVC/H.264
Audio: Dolby Digital 2ch,
equipped with Dolby Digital
Stereo Creator
• Manufactured under license
from Dolby Laboratories.
Movie (MP4 format):
Video: MPEG-4 AVC/H.264
Audio: MPEG-4 AAC-LC 2ch
[Recording media]
Memory Stick PRO Duo media,
SD card
[Input/output terminals]
Multi/Micro USB Terminal*:
Hi-Speed USB (USB 2.0)
HDMI: HDMI type D micro jack
m (Microphone) Terminal:
3.5 mm Stereo mini jack
i (Headphones) Terminal:
3.5 mm Stereo mini jack
* Supports Micro USB compatible
devices.
GB
54
Page 55

[Power, general]
Battery pack: Rechargeable battery
pack NP-FW50
[Power consumption]
When using an FE 28-70 mm F3.5-
5.6 OSS
When using the viewfinder:
Approx. 3.0 W
When using the monitor:
Approx. 2.4 W
[Others]
Exif Print: Compatible
DPOF: Compatible
PRINT Image Matching III:
Compatible
Dimensions: 126.9 mm × 94.4 mm ×
48.2 mm (5 inches ×
3 3/4 inches × 1 15/16 inches)
(W/H/D, excluding protrusions)
Mass:
Approx. 489 g (1 lb 1.2 oz) (with
battery and Memory Stick PRO
Duo media)
Approx. 446 g (15.7 oz) (body
only)
Operating temperature: 0°C to 40°C
(32°F to 104°F)
[Wireless LAN]
Supported format: IEEE 802.11 b/g/n
Frequency band: 2.4 GHz bandwidth
Security: WEP/WPA-PSK/WPA2-
PSK
Connection method: WPS (Wi-Fi
Protected Setup)/Manual
Access method: Infrastructure mode
NFC: NFC Forum Type 3 Tag
compliant
Model No. WW328274
Specifications
Battery charger BC-TRW
Input rating: AC 100 V to 240 V,
50Hz/60Hz, 6W
Output rating: 8.4 V DC, 0.4 A
Operating temperature range:
0°C to 40°C (32°F to 104°F)
Storage temperature range:
–20°C to +60°C (–4°F to +140°F)
AC Adaptor
AC-UD10/AC-UUD11
Power requirements: AC 100 V to
240 V, 50 Hz/60 Hz, 70 mA
Output voltage: DC 5 V, 0.5 A
Rechargeable battery pack
NP-FW50
Battery type: Lithium-ion battery
Maximum voltage: DC 8.4 V
Nominal voltage: DC 7.2 V
Maximum charge voltage: DC 8.4 V
Maximum charge current: 1.02 A
Capacity: Typical 7.7 Wh
(1 080 mAh)
Minimum: 7.3 Wh (1 020 mAh)
Design and specifications are subject
to change without notice.
55
GB
GB
Page 56

On image data compatibility
• This camera conforms with DCF
(Design rule for Camera File
system) universal standard
established by JEITA (Japan
Electronics and Information
Technology Industries
Association).
• Playback of images recorded
with your camera on other
equipment and playback of
images recorded or edited with
other equipment on your camera
are not guaranteed.
GB
56
Specifications
Trademarks
• Memory Stick and are
trademarks or registered trademarks of
Sony Corporation.
• XAVC S and are registered
trademarks of Sony Corporation.
• “AVCHD Progressive” and the
“AVCHD Progressive” logotype are
trademarks of Panasonic Corporation
and Sony Corporation.
• Dolby and the double-D symbol are
trademarks of Dolby Laboratories.
• The terms HDMI and HDMI HighDefinition Multimedia Interface, and
the HDMI Logo are trademarks or
registered trademarks of HDMI
Licensing LLC in the United States
and other countries.
• Windows is a registered trademark of
Microsoft Corporation in the United
States and/or other countries.
• Mac is a registered trademark of Apple
Inc. in the United States and other
countries.
• iOS is a registered trademark or
trademark of Cisco Systems, Inc.
• iPhone and iPad are registered
trademarks of Apple Inc. in the United
States and other countries.
• SDXC logo is a trademark of SD-3C,
LLC.
• Android, Google Play are trademarks
of Google Inc.
• Wi-Fi, the Wi-Fi logo and Wi-Fi
PROTECTED SET-UP are registered
trademarks of the Wi-Fi Alliance.
• The N Mark is a trademark or
registered trademark of NFC Forum,
Inc. in the United States and in other
countries.
Page 57

• DLNA and DLNA CERTIFIED are
trademarks of Digital Living Network
Alliance.
• Facebook and the “f” logo are
trademarks or registered trademarks of
Facebook, Inc.
• YouTube and the YouTube logo are
trademarks or registered trademarks of
Google Inc.
• Eye-Fi is a trademark of Eye-Fi, Inc.
• In addition, system and product names
used in this manual are, in general,
trademarks or registered trademarks of
their respective developers or
manufacturers. However, the ™ or ®
marks may not be used in all cases in
this manual.
Additional information on this product
and answers to frequently asked
questions can be found at our
Customer Support Website.
Specifications
GB
57
GB
Page 58

Français
Monture E
En savoir plus sur l’appareil
photo (« Manuel d'aide »)
« Manuel d'aide » est un manuel en
ligne. Vous pouvez lire le
« Manuel d'aide » sur votre
ordinateur ou sur votre
smartphone. Consultez-le pour
obtenir des instructions détaillées
au sujet des nombreuses fonctions
de l’appareil.
URL :
http://rd1.sony.net/help/ilc/1420/
h_zz/
Aide-mémoire
Les numéros de modèle et de série se
situent sous l’appareil. Prendre en note le
numéro de série dans l’espace prévu cidessous. Se reporter à ces numéros lors des
communications avec le détaillant Sony au
sujet de ce produit.
Modèle no WW328274 (ILCE-7S)
No de série
Modèle no AC-UD10/AC-UUD11
No de série
AVERTISSEMENT
Afin de réduire les risques
d’incendie ou de décharge
électrique, n’exposez pas cet
appareil à la pluie ou à l’humidité.
IMPORTANTES
INSTRUCTIONS DE
SÉCURITÉ
- CONSERVEZ CES
INSTRUCTIONS
DANGER
AFIN DE RÉDUIRE LE
RISQUE D’INCENDIE
OU DE DÉCHARGE
ÉLECTRIQUE, SUIVEZ
EXACTEMENT CES
INSTRUCTIONS
Si la forme de la fiche ne correspond pas à
la prise secteur, utilisez un adaptateur de
fiche accessoire de configuration correcte
pour la prise secteur.
FR
2
Page 59

ATTENTION
Batterie
Toute erreur de manipulation de la batterie
peut provoquer son explosion, entraîner un
incendie, voire même des brûlures de
substances chimiques. Respectez les
précautions suivantes :
• Ne démontez pas la batterie.
• N’écrasez et n’exposez pas la batterie à
des chocs ou à une force extérieure. Vous
ne devez pas la frapper avec un marteau,
la laisser tomber ou marcher dessus.
• Ne court-circuitez pas les bornes de la
batterie et maintenez-les à l’écart de tout
contact avec des objets métalliques.
• N’exposez pas la batterie à des
températures supérieures à 60 °C
(140 °F), notamment les rayons directs
du soleil ou l’habitacle d’un véhicule
garé au soleil.
• N’incinérez pas la batterie et ne la jetez
pas au feu.
• Ne manipulez jamais des batteries
lithium ion qui sont endommagées ou
présentent une fuite.
• Veillez à recharger la batterie à l’aide
d’un chargeur Sony authentique ou d’un
appareil capable de la recharger.
• Tenez la batterie hors de la portée des
petits enfants.
• Gardez la batterie au sec.
• Remplacez-la uniquement par une
batterie de même type ou d’un type
équivalent recommandé par Sony.
• Mettez les batteries au rebut sans
attendre, de la manière décrite dans les
instructions.
Adaptateur secteur
Lorsque vous utilisez l’adaptateur secteur,
branchez-le à une prise murale se trouvant à
proximité. En cas de dysfonctionnement
lors de l’utilisation de l’appareil,
débranchez immédiatement l’adaptateur
secteur de la prise murale.
Chargeur de batterie
L’alimentation n’est pas coupée même
lorsque le témoin CHARGE du chargeur de
batterie est éteint. En cas de problème
pendant l’utilisation de ce dispositif,
débranchez-le de la prise murale pour
couper l’alimentation.
Le cordon d’alimentation, s’il est fourni, est
conçu spécifiquement pour une utilisation
exclusive avec cet appareil et il ne doit pas
être utilisé avec un autre appareil
électrique.
Pour les clients aux ÉtatsUnis et au Canada
RECYCLAGE DES
ACCUMULATEURS AUX IONS DE
LITHIUM
Les accumulateurs aux
ions de lithium sont
recyclables.
Vous pouvez
contribuer à préserver
l’environnement en
rapportant les piles
usagées dans un point
de collecte et de recyclage le plus proche.
Pour plus d’informations sur le recyclage
des accumulateurs, téléphonez au numéro
gratuit 1-800-822-8837 (États-Unis et
Canada uniquement), ou visitez
http://www.call2recycle.org/
FR
FR
3
Page 60

Avertissement : Ne pas utiliser des
accumulateurs aux ions de lithium qui sont
endommagés ou qui fuient.
Batterie et objectif (dans le cas où
l’objectif est fourni)
Cet appareil est conforme à la section 15
des règlements FCC. Son fonctionnement
est soumis aux deux conditions suivantes :
(1) cet appareil ne doit pas provoquer
d’interférences nuisibles, (2) cet appareil
doit accepter toute interférence, y compris
celles susceptibles de provoquer son
fonctionnement indésirable.
CAN ICES-3 B/NMB-3 B
Cet appareil est conforme aux exigences de
la FCC (Commission américaine des
communications) et d’IC (Industrie
Canada) relatives aux limites d’exposition
aux radiations énoncées pour un
environnement non contrôlé. Il est
également conforme aux directives de la
FCC en matière d’exposition aux
fréquences radioélectriques (RF) énoncées,
ainsi qu’aux normes d’IC relatives à
l’exposition aux fréquences
radioélectriques énoncées au CNR-102
(Cahier des charges sur les normes
radioélectriques).
Cet appareil présente des niveaux très peu
élevés d’énergie RF, réputés conformes
sans test du débit d’absorption spécifique
(SAR).
À l’intention des clients aux
É.-U.
Pour toute question au sujet de cet appareil,
appeler :
Sony Centre d’information à la clientèle
1-800-222-SONY (7669).
Le numéro ci-dessous concerne seulement
les questions relevant de la Commission
fédérale des communications des ÉtatsUnis (FCC).
Information réglementaire
Déclaration de conformité
Nom commercial : SONY
No de modèle : WW328274
Responsable : Sony Electronics Inc.
Adresse : 16530 Via Esprillo, San
Diego, CA 92127 É.-U.
No de téléphone : 858-942-2230
Cet appareil est conforme à la Partie 15
de la réglementation de la FCC des
États-Unis. Son utilisation est sujette
aux deux conditions suivantes : (1) Cet
appareil ne doit pas générer
d’interférences nuisibles et (2) il doit
être en mesure d’accepter toute
interférence reçue, y compris les
interférences pouvant générer un
fonctionnement indésirable.
Cet équipement ne doit pas être co-situé ou
utilisé en conjonction avec une autre
antenne ou émetteur.
AVERTISSEMENT
Par la présente, vous êtes avisé du fait que
tout changement ou toute modification ne
faisant pas l’objet d’une autorisation
expresse dans le présent manuel pourrait
annuler votre droit d’utiliser l’appareil.
FR
4
Page 61

Note :
L’appareil a été testé et est conforme aux
exigences d’un appareil numérique de
Classe B, conformément à la Partie 15 de la
réglementation de la FCC.
Ces critères sont conçus pour fournir une
protection raisonnable contre les
interférences nuisibles dans un
environnement résidentiel. L’appareil
génère, utilise et peut émettre des
fréquences radio ; s’il n’est pas installé et
utilisé conformément aux instructions, il
pourrait provoquer des interférences
nuisibles aux communications radio.
Cependant, il n’est pas possible de garantir
que des interférences ne seront pas
provoquées dans certaines conditions
particulières. Si l’appareil devait provoquer
des interférences nuisibles à la réception
radio ou à la télévision, ce qui peut être
démontré en allumant et éteignant
l’appareil, il est recommandé à l’utilisateur
d’essayer de corriger cette situation par
l’une ou l’autre des mesures suivantes :
– Réorienter ou déplacer l’antenne
réceptrice.
– Augmenter la distance entre l’appareil et
le récepteur.
– Brancher l’appareil dans une prise ou sur
un circuit différent de celui sur lequel le
récepteur est branché.
– Consulter le détaillant ou un technicien
expérimenté en radio/téléviseurs.
Le câble d’interface fourni doit être utilisé
avec l’appareil pour que celui-ci soit
conforme aux critères régissant les
appareils numériques, conformément à la
sous-partie B de la Partie 15 de la
réglementation de la FCC.
Pour les utilisateurs au
Canada
Le présent appareil est conforme aux CNR
d’Industrie Canada applicables aux
appareils radio exempts de licence.
L’exploitation est autorisée aux deux
conditions suivantes : (1) l’appareil ne doit
pas produire de brouillage, et (2) cet
appareil doit accepter tout brouillage, y
compris un brouillage qui pourrait
provoquer un fonctionnement inopportun
de l’appareil.
Note pour les clients
européens
Avis aux consommateurs des pays
appliquant les Directives UE
Fabricant : Sony Corporation, 1-7-1 Konan
Minato-ku Tokyo, 108-0075 Japon
Pour toute question relative à la conformité
des produits dans l’UE : Sony Deutschland
GmbH, Hedelfinger Strasse 61, 70327
Stuttgart, Allemagne
Par la présente, Sony Corporation déclare
que cet appareil est conforme aux
exigences essentielles et aux autres
dispositions pertinentes de la
directive 1999/5/CE. Pour toute
information complémentaire, veuillez
consulter l’URL suivante :
http://www.compliance.sony.de/
FR
FR
5
Page 62

Avis
Si l’électricité statique ou les champs
électrostatiques entraînent une interruption
lors du transfert des données (échec),
redémarrez l’application ou débranchez,
puis rebranchez le câble de connexion
(USB, etc.).
Cet appareil a été testé et jugé conforme
aux limites établies par la réglementation
EMC visant l’utilisation de câbles de
connexion de moins de 3 mètres (9,8 pi.).
Le champ électromagnétique à des
fréquences particulières peut avoir une
incidence sur l’image et le son de cet
appareil.
Élimination des piles et
accumulateurs et des Équipements
Électriques et Électroniques usagés
(Applicable dans les pays de l’Union
Européenne et aux autres pays
européens disposant de systèmes
de collecte sélective)
doivent pas être traités comme de simples
déchets ménagers.
Sur certains types de piles, ce symbole
apparaît parfois combiné avec un symbole
chimique. Les symboles pour le mercure
(Hg) ou le plomb (Pb) sont rajoutés lorsque
ces piles contiennent plus de 0,0005% de
mercure ou 0,004% de plomb.
Ce symbole apposé sur
le produit, la pile ou
l’accumulateur ou sur
l’emballage, indique que
le produit et les piles et
accumulateurs fournis
avec ce produit ne
En vous assurant que les produits, piles et
accumulateurs sont mis au rebut de façon
appropriée, vous participez activement à la
prévention des conséquences négatives que
leur mauvais traitement pourrait provoquer
sur l’environnement et sur la santé
humaine. Le recyclage des matériaux
contribue par ailleurs à la préservation des
ressources naturelles.
Pour les produits qui pour des raisons de
sécurité, de performance ou d’intégrité de
données nécessitent une connexion
permanente à une pile ou à un
accumulateur, il conviendra de vous
rapprocher d’un Service Technique qualifié
pour effectuer son remplacement.
En rapportant votre appareil électrique, les
piles et accumulateurs en fin de vie à un
point de collecte approprié vous vous
assurez que le produit, la pile ou
l’accumulateur incorporé sera traité
correctement.
Pour tous les autres cas de figure et afin
d’enlever les piles ou accumulateurs en
toute sécurité de votre appareil, reportezvous au manuel d’utilisation.
Rapportez les piles et accumulateurs, et les
équipements électriques et électroniques
usagés au point de collecte approprié pour
le recyclage.
Pour toute information complémentaire au
sujet du recyclage de ce produit ou des piles
et accumulateurs, vous pouvez contacter
votre municipalité, votre déchetterie locale
ou le point de vente où vous avez acheté ce
produit.
Pour les clients à Singapour
FR
6
Page 63

Clients ayant acheté leur
appareil au Japon dans un
magasin commercialisant
des articles auprès des
visiteurs étrangers
Remarque
Certains symboles de certification
correspondant à des normes prises en
charge par l’appareil photo peuvent être
vérifiés sur son écran.
Sélectionnez MENU t (Réglage) 6
t [Logo de certification].
Si l’affichage est impossible en raison de
problèmes tels qu’une défaillance de
l’appareil photo, contactez votre revendeur
Sony ou un centre de service après-vente
Sony agréé.
FR
Pour plus d’informations sur les fonctions Wi-Fi, voir la brochure « Wi-Fi
Connection/One-touch (NFC) Guide ».
FR
7
Page 64

Avant utilisation
Remarques sur l’utilisation de votre appareil
Langue à l’écran
Vous pouvez sélectionner la langue
affichée à l’écran au moyen du menu.
Prise de vue
Cet appareil offre 2 modes pour le contrôle
des sujets : le mode écran vous permet
d’utiliser l’écran et le mode viseur vous
permet d’utiliser le viseur.
Fonctions intégrées à cet appareil
• Le présent manuel décrit les fonctions
des périphériques compatibles 1080 60i
et 1080 50i.
Pour savoir si votre appareil est
compatible 1080 60i ou 1080 50i,
recherchez les références suivantes sur le
dessous de l’appareil.
appareil compatible 1080 60i : 60i
appareil compatible 1080 50i : 50i
• Cet appareil est compatible avec les films
en format 1080 60p ou 50p. À la
différence des modes d’enregistrement
standard jusqu’à présent, qui enregistrent
en méthode entrelacée, cet appareil
enregistre en utilisant une méthode
progressive. Cela augmente la résolution
et donne une image plus régulière, plus
réaliste.
Création d’un fichier de base de
données d’images
Si vous insérez dans l’appareil une carte
mémoire qui ne contient pas de fichier de
base de données d’images, l’appareil crée
automatiquement lors de sa mise en route
un fichier de base de données d’images en
utilisant une partie de la capacité de la carte
mémoire.
Ce processus peut prendre un certain temps
et vous ne pourrez pas utiliser l’appareil
tant qu’il n’est pas terminé. En cas d’erreur
de fichier de base de données, exportez
toutes les images vers votre ordinateur en
utilisant PlayMemories Home™, puis
formatez la carte mémoire au moyen de
l’appareil.
Prise de vue avec un objectif à
monture E compatible avec le format
APS-C
Cet appareil est équipé d’un capteur CMOS
plein format 35 mm. Toutefois, la taille
d’image est automatiquement réglée sur
celle du réglage du format APS-C et la
taille d’image est plus petite lorsqu’un
objectif à monture E compatible avec le
format APS-C est utilisé (réglages par
défaut).
Pas d’indemnisation en cas de
contenu endommagé ou
d’enregistrement manqué
Sony ne saurait offrir d’indemnisation dans
le cas où l’enregistrement serait impossible
ou que le contenu enregistré serait perdu ou
endommagé, en raison d’un
dysfonctionnement de l’appareil ou d’une
anomalie du support d’enregistrement, etc.
Recommandation de copie de
sauvegarde
Pour éviter de perdre des données, faites
toujours une copie de sauvegarde sur un
support différent.
FR
8
Page 65

Remarques relatives à l’écran, au
viseur électronique, à l’objectif et au
capteur d’image
• La fabrication de l’écran et du viseur
électronique fait appel à une technologie
de très haute précision, et plus de
99,99 % des pixels sont opérationnels
pour une utilisation effective. Quelques
petits points noirs et/ou lumineux (de
couleur blanche, rouge, bleue ou verte)
peuvent toutefois être visibles en
permanence sur l’écran et le viseur
électronique. Ces points sont inhérents au
procédé de fabrication et n’affectent
aucunement les images.
• Ne saisissez pas l’appareil par l’écran.
• Lorsque vous utilisez l’objectif zoom de
grande puissance, prenez soin de ne pas
coincer vos doigts ou tout autre objet
dans l’objectif.
• N’exposez pas l’appareil à la lumière du
soleil ou ne photographiez pas en
direction du soleil pendant une période
prolongée. Cela risquerait d’abîmer le
mécanisme interne. Si la lumière du
soleil converge sur un objet proche, un
incendie peut en résulter.
• Il se peut que les images laissent une
traînée sur l’écran dans un endroit froid.
Ce n’est pas une anomalie.
Lorsque vous allumez l’appareil dans un
endroit froid, l’écran peut devenir
momentanément sombre. Une fois
l’appareil réchauffé, l’écran fonctionnera
normalement.
• L’image enregistrée peut être différente
de l’image contrôlée avant
l’enregistrement.
Remarques sur l’utilisation de votre appareil
Remarques sur la prise de vue avec
le viseur
Cet appareil est équipé d’un viseur
organique électroluminescent à haute
résolution et contraste élevé. Ce viseur
permet d’obtenir un grand angle de vue et
un ample dégagement oculaire. L’équilibre
de différents éléments apporté par la
conception de cet appareil fait qu’il est
facile de regarder dans le viseur.
• L’image peut être légèrement déformée
près des coins du viseur. Ce n’est pas une
anomalie. Vous pouvez aussi utiliser
l’écran pour observer en détail la totalité
de la composition.
• Si vous faites un panorama avec
l’appareil tout en regardant dans le viseur
ou bougez vos yeux tout autour, l’image
dans le viseur peut être déformée ou les
couleurs de l’image peuvent changer. Il
s’agit d’une caractéristique de l’objectif
ou du dispositif d’affichage et pas d’une
anomalie. Lorsque vous photographiez
une image, nous vous recommandons de
regarder au centre du viseur.
• Lorsque vous effectuez des prises de vue
en utilisant le viseur, il se peut que vous
présentiez les symptômes suivants :
fatigue visuelle, fatigue, mal des
transports ou nausée. Nous vous
recommandons de faire des pauses
régulières lorsque vous effectuez des
prises de vue en utilisant le viseur.
La durée et la fréquence des pauses
peuvent varier selon les personnes, il
vous revient donc d’apprécier ce qui vous
convient le mieux. Si vous ressentez une
gêne, évitez d’utiliser le viseur jusqu’à ce
que vous alliez mieux, et consultez votre
médecin si nécessaire.
FR
FR
9
Page 66

Remarques sur l’enregistrement
pendant des périodes prolongées
• Selon la température de l’appareil et de la
batterie, il se peut que vous n’arriviez pas
à enregistrer des films ou que
l’alimentation se coupe automatiquement
afin de protéger l’appareil.
Un message s’affiche sur l’écran avant
que l’appareil se mette hors tension ou
que vous ne puissiez plus enregistrer de
film. Dans ce cas, laissez l’appareil hors
tension et attendez que la température de
l’appareil et de la batterie diminue. Si
vous mettez l’appareil sous tension sans
laisser l’appareil et la batterie se refroidir
assez, il se peut que l’alimentation se
coupe à nouveau ou que vous ne puissiez
pas enregistrer des films.
• À une température ambiante élevée, la
température de l’appareil augmente
rapidement.
• Lorsque la température de l’appareil
augmente, la qualité de l’image peut se
détériorer. Nous vous recommandons de
patienter jusqu’à ce que la température de
l’appareil diminue avant de poursuivre la
prise de vue.
• La surface de l’appareil peut chauffer. Ce
n’est pas une anomalie.
Remarques relatives à l’importation
de films XAVC S et AVCHD vers un
ordinateur
Lors de l’importation de films XAVC S ou
AVCHD vers un ordinateur, téléchargez et
utilisez le logiciel PlayMemories Home
disponible sur le site Internet suivant :
www.sony.net/pm/
Remarques sur l’utilisation de votre appareil
Remarques lors de la lecture de
films sur d’autres dispositifs
• Cet appareil utilise MPEG-4 AVC/H.264
High Profile pour l’enregistrement en
format AVCHD. Les films enregistrés en
format AVCHD avec cet appareil ne
peuvent pas être lus avec les dispositifs
suivants.
– Autres dispositifs compatibles avec le
format AVCHD ne prenant pas en
charge High Profile
– Dispositifs incompatibles avec le
format AVCHD
Cet appareil utilise également MPEG-4
AVC/H.264 Main Profile pour
l’enregistrement au format MP4. Pour
cette raison, les films enregistrés au
format MP4 avec cet appareil ne peuvent
être lus sur des dispositifs ne prenant pas
en charge MPEG-4 AVC/H.264.
• Les disques enregistrés avec une qualité
d’image HD (haute définition) peuvent
être lus uniquement sur des dispositifs
compatibles avec le format AVCHD. Les
lecteurs ou enregistreurs de DVD ne
peuvent pas lire des disques de qualité
d’image HD étant donné qu’ils sont
incompatibles avec le format AVCHD.
De même, les lecteurs et enregistreurs de
DVD peuvent ne pas réussir à éjecter les
disques de qualité d’image HD.
• Les films enregistrés au format 1080 60p/
1080 50p ne peuvent être lus que sur des
dispositifs compatibles 1080 60p/1080
50p.
Avertissement sur les droits d’auteur
Les émissions de télévision, films, cassettes
vidéo et autres œuvres peuvent être
protégés par des droits d’auteur.
L’enregistrement non autorisé de telles
œuvres peut constituer une infraction à la
loi sur les droits d’auteur.
FR
10
Page 67

Images utilisées dans ce manuel
Les photographies utilisées comme
exemples d’image dans ce manuel sont des
images reproduites et non des images
réelles prises avec cet appareil.
À propos des spécifications
techniques décrites dans ce manuel
Les données indiquées pour les
performances et les spécifications sont
définies dans les conditions suivantes, sauf
mention contraire dans ce manuel : à une
température ambiante de 25 ºC (77 °F) et en
utilisant une batterie complètement chargée
(charge poursuivie jusqu’à extinction du
témoin de charge).
Comment désactiver provisoirement
les fonctions réseau sans fil (Wi-Fi et
NFC, etc.)
Lorsque vous montez à bord d’un avion ou
autre, vous pouvez désactiver
provisoirement toutes les fonctions réseau
sans fil.
Sélectionnez le bouton MENU t
(Sans fil) 1 t [Mode avion] t [ON].
Si vous réglez [Mode avion] sur [ON], une
marque (avion) s’affiche sur l’écran.
À propos des réseaux locaux sans fil
Si votre appareil est perdu ou volé, Sony
n’assume aucune responsabilité quant à la
perte ou au préjudice causés par l’accès ou
l’utilisation illicites du point d’accès
enregistré sur l’appareil.
Remarques sur l’utilisation de votre appareil
FR
11
FR
Page 68

Avant utilisation
Vérification des éléments fournis
Le nombre entre parenthèses indique le nombre d’unités.
• Appareil photo (1)
• Adaptateur secteur AC-UD10/
AC-UUD11 (1)
La forme de l’adaptateur secteur peut
varier selon le pays / la région.
• Chargeur de batterie BC-TRW
(1)
• Cordon d’alimentation (1)* (non
fourni aux États-Unis et au
Canada)
* Plusieurs cordons d’alimentation
peuvent être fournis avec l’appareil
photo. Utilisez le cordon approprié qui
correspond à votre pays ou région.
• Batterie rechargeable NP-FW50
(2)
• Câble micro-USB (1)
• Bandoulière (1)
Pour savoir comment fixer la
bandoulière à l’appareil, reportez-vous à
la page 17.
• Capuchon de boîtier (1) (fixé à
l’appareil photo)
• Protège-câble (1)
Pour en savoir plus sur la façon
d’installer le protège-câble sur
l’appareil, référez-vous à la page 18.
• Capuchon de la griffe (1) (fixé à
l’appareil photo)
• Oculaire de visée (1) (fixé à
l’appareil photo)
• Mode d’emploi (1) (Ce manuel)
• Wi-Fi Connection/One-touch
(NFC) Guide (1)
Ce guide décrit les fonctions
nécessitant une connexion Wi-Fi.
FR
12
Page 69

Identification des pièces
Voir les pages entre parenthèses pour en savoir plus sur le fonctionnement
des pièces.
Avant
Lorsque l’objectif est retiré
E Bouton de déverrouillage de
l’objectif
1
2
A Illuminateur AF/Témoin de
retardateur
B Sélecteur avant
C Capteur Wi-Fi (intégré)
D Capteur à distance
F Microphone intégré*
G Repère de montage
H Capteur d’image*
I Monture
J Contacts*
*1 Ne couvrez pas cette pièce pendant
l’enregistrement de films.
Sinon, cela risque de se traduire par
du bruit ou par une baisse du volume
sonore.
*2 Ne touchez pas directement ces
pièces.
2
FR
13
FR
Page 70

Arrière
Identification des pièces
A Oculaire de visée
B Viseur
C Bouton MENU (24)
D Capteur de visée
E Écran
• L’écran peut être ajusté pour
offrir un angle de vue adapté, et
vous permettre d’effectuer des
prises de vue, quelle que soit
votre position.
FR
14
F Molette de réglage dioptrique
• Pour ajuster le viseur à votre
vue, faites tourner la molette de
réglage dioptrique jusqu’à ce
que l’affichage devienne net.
G Pour la prise de vue : Touche
C2 (Perso 2)
Pour la visualisation : Bouton
(Agrandir)
H Sélecteur AF/MF/AEL
I Sélecteur arrière
Page 71

J Pour la prise de vue : Bouton
AF/MF (Mise au point
automatique/manuelle)/Bouton
AEL
Pour la visualisation : Bouton
(Planche Index)
K Bouton MOVIE (41)
L Pour la prise de vue : Bouton
Fn (22)
Pour la visualisation : Bouton
(Env. vers smartphon.)
• Vous pouvez afficher l’écran
[Env. vers smartphon.] en
appuyant sur ce bouton.
M Molette de commande
N Pour la prise de vue : Touche
C3 (Perso 3)
Pour la visualisation : Bouton
(Supprimer) (43)
O Témoin d’accès
P Bouton (Lecture)
Identification des pièces
FR
15
FR
Page 72

Face supérieure/Faces latérales
Identification des pièces
A Haut-parleur
B Indicateur de position du
capteur d’image
C Prise m (Microphone)
• Lorsqu’un microphone externe
est connecté, le microphone est
automatiquement activé. Si le
microphone externe est de type
entrée alimentée, l’alimentation
du microphone est fournie par
l’appareil.
D Prise i (Casque)
E Témoin de charge
F Multi/micro connecteur USB*
• Accepte les appareils
compatibles micro-USB.
FR
16
G Prise micro HDMI
H Griffe multi-interface*
• Il est possible que certains
accessoires ne s’insèrent pas
complètement et dépassent de
l’arrière de la griffe multiinterface. Cependant, tant que
l’accessoire atteint bien l’avant
de la griffe multi-interface,
celui-ci est connecté.
I Sélecteur de mode (44)
J Interrupteur d’alimentation/
Déclencheur
K Touche C1 (Perso 1)
L Molette de correction
d’exposition
Page 73

M Crochets pour bandoulière
• Fixez les deux extrémités de la
bandoulière à l’appareil.
Identification des pièces
* Pour en savoir plus sur les accessoires
compatibles avec la griffe multiinterface et le multi/micro connecteur
USB, visitez le site Internet Sony.
Vous pouvez aussi consulter votre
revendeur Sony ou un centre de
service après-vente Sony agréé.
Vous pouvez également utiliser les
accessoires compatibles avec la griffe
porte-accessoires.
Si vous utilisez des accessoires fournis
par d’autres fabricants, leur bon
fonctionnement n’est pas garanti.
N (Symbole N)
• Ce symbole indique le point de
contact permettant de connecter
l’appareil et un smartphone
équipé de la technologie NFC.
Pour en savoir plus sur la
position du (Symbole N)
sur votre smartphone, consultez
le mode d’emploi de celui-ci.
• NFC (Near Field
Communication) est une norme
internationale de technologie de
communication sans fil à courte
portée.
O Couvercle de la carte mémoire
P Fente de carte mémoire
FR
FR
17
Page 74

Installation d’un protège-câble
Le protège-câble permet d’éviter
que le câble HDMI ne se
déconnecte lorsque vous effectuez
des prises de vue avec connexion
HDMI. Soulevez l’écran et insérez
le câble HDMI, puis installez le
protège-câble comme illustré cidessous.
• Assurez-vous que le capuchon de
protection de connecteur est situé
à l’extérieur du protège-câble
lorsque vous installez celui-ci.
Identification des pièces
FR
18
Page 75

Face inférieure
Identification des pièces
FR
A Fente d’insertion de la batterie
(26)
B Couvercle de batterie (26)
C Écrou de pied
• Utilisez un trépied ayant une
longueur de vis de moins de
5,5 mm (7/32 po). Sinon vous
ne pouvez pas fixer fermement
l’appareil et celui-ci pourrait
être endommagé.
Couvercle de plaque de
connexion
Utilisez-le lorsque vous utilisez un
adaptateur secteur AC-PW20
(vendu séparément).
Insérez la plaque de connexion
dans le compartiment de la batterie,
puis faites passer le cordon dans le
couvercle de plaque de connexion
comme illustré ci-dessous.
• Assurez-vous que le cordon n’est
pas pincé lorsque vous fermez le
couvercle.
FR
19
Page 76

Liste des fonctions
Fonctionnement de l’appareil
Comment utiliser la molette de commande
• Vous pouvez tourner la molette de commande ou appuyer sur le côté
haut/bas/gauche/droit de la molette de commande pour déplacer le cadre
de sélection. Appuyez sur z situé au centre de la molette de commande
pour régler l’élément sélectionné. Dans ce manuel, l’action d’appuyer sur
le côté haut/bas/gauche/droit de la molette de commande est indiquée par
v/V/b/B.
• Les fonctions suivantes sont attribuées à v/b/B sur la molette de
commande. Vous pouvez également changer immédiatement la
sensibilité ISO en tournant la molette de commande.
v DISP Pour modifier l’affichage à l’écran.
B WB Bal. des blancs
b / Entraînement
• Vous pouvez attribuer la fonction souhaitée aux boutons V/b/B/z et à
une position de la molette de commande en mode de prise de vue.
• Tourner la molette de commande ou appuyer sur b/B sur la molette de
commande en mode de lecture vous permet d’afficher l’image précédente
ou suivante.
• Prise d. v. en continu/Bracketing
• Retardateur
FR
20
Page 77

Fonctionnement de l’appareil
Comment utiliser le sélecteur avant/sélecteur arrière
Vous pouvez tourner le sélecteur avant ou le sélecteur arrière pour modifier
les réglages pour chaque mode de prise de vue avec effet immédiat.
21
FR
FR
Page 78

Sélection d’une fonction au moyen du bouton Fn (Fonction)
Cet bouton sert à configurer ou exécuter les fonctions fréquemment
utilisées dans la prise de vue, à l’exception des fonctions de l’écran Quick
Navi.
1 Appuyez sur DISP sur la molette de commande pour régler le
mode d’écran sur un autre mode que [Pour le viseur].
2 Appuyez sur le bouton Fn.
3 Sélectionnez l’élément souhaité à l’aide de v/V/b/B de la
molette de commande.
L’écran des réglages s’affiche.
4 Sélectionnez le réglage
souhaité en tournant le
sélecteur avant, puis appuyez
sur z sur la molette de
commande.
• Vous pouvez ajuster avec précision
certaines valeurs de réglage en
tournant le sélecteur arrière.
FR
22
Page 79

Sélection d’une fonction au moyen du bouton Fn (Fonction)
Configuration de chaque réglage sur
l’écran dédié
À l’étape 3, sélectionnez un élément de
réglage et appuyez sur z sur la molette de
commande pour basculer sur l’écran dédié à
cet élément de réglage. Réglez les éléments
d’après le Guide d’opérations.
Guide d’opérations
FR
23
FR
Page 80

Fonctions pouvant être sélectionnées avec le bouton MENU
Vous pouvez configurer les réglages de base de l’appareil globalement ou
exécuter des fonctions comme la prise de vue, la lecture ou d’autres
opérations.
1 Appuyez sur le bouton MENU pour afficher l’écran de menu.
2 Sélectionnez l’élément de réglage
souhaité avec v/V/b/B de la
molette de commande ou en
tournant cette dernière, puis
appuyez sur z situé au centre de la
molette de commande.
• Sélectionnez une icône en haut de l’écran
et appuyez sur b/B de la molette de
commande pour avancer à un autre
élément MENU.
3 Sélectionnez la valeur de réglage, puis appuyez sur z pour
valider.
Pour afficher le menu mosaïque
Vous permet de spécifier si vous souhaitez toujours afficher le premier
écran du menu lorsque vous appuyez sur le bouton MENU.
Bouton MENU t (Réglage) 2 t [Menu mosaïque] t [ON]
FR
24
Page 81

Utilisation du Guide intégré à l’appareil
Vous pouvez utiliser [Réglag. touche perso] pour attribuer le Guide intégré
à l’appareil au bouton souhaité.
Le Guide intégré à l’appareil affiche les explications pour la fonction de
menu ou le réglage actuellement sélectionné.
Sélectionnez le bouton MENU t (Réglages personnalis.) 6
t [Réglag. touche perso] t fonctions affectées au bouton t
[Guide intégr. à l'app.].
Appuyez sur le bouton MENU et utilisez la molette de commande pour
sélectionner un élément MENU dont vous souhaitez lire l’explication, puis
appuyez sur le bouton auquel [Guide intégr. à l'app.] est attribué.
FR
25
FR
Page 82

Préparation de l’appareil photo
Charge de la batterie
Lors de la première utilisation de l’appareil, veillez à charger la batterie
NP-FW50 (fournie).
La batterie InfoLITHIUM™ peut être chargée même si elle n’est pas
complètement déchargée.
Vous pouvez également l’utiliser même si elle n’est pas complètement
chargée.
La batterie chargée se décharge peu à peu même si vous ne l’utilisez pas.
Pensez à recharger la batterie avant d’utiliser l’appareil : vous éviterez ainsi
d’être à court de batterie au moment où vous souhaitez effectuer des prises
de vue.
Charger la batterie au moyen du chargeur de batterie
1 Insérez la batterie.
• Insérez la batterie comme indiqué par
la flèche, jusqu’à ce qu’elle soit
parallèle au chargeur de batterie.
2 Branchez le chargeur de batterie
sur la prise murale.
• Le témoin CHARGE s’allume en
orange lorsque la charge commence.
• Le témoin CHARGE s’éteint une fois
la charge terminée.
• Pour les pays ou régions autres que les
États-Unis et le Canada : connectez le
cordon d’alimentation au chargeur de
batterie et branchez le chargeur de
batterie sur la prise murale.
Témoin de CHARGE
FR
26
Page 83

Charge de la batterie
Charger la batterie au moyen de l’adaptateur secteur
1 Placez le bouton ON/OFF
(Alimentation) sur OFF.
2 Faites glisser le levier pour ouvrir
le couvercle.
FR
3 Insérez la batterie à fond en
utilisant le bout de la batterie
pour enfoncer le taquet de
verrouillage.
4 Fermez le couvercle.
Taquet de verrouillage
FR
27
Page 84

Charge de la batterie
5 Raccordez l’appareil à l’adaptateur secteur (fourni) au moyen
du câble micro-USB (fourni), puis branchez l’adaptateur
secteur sur la prise murale.
Le témoin de charge s’allume en orange,
et la charge commence.
• Mettez l’appareil photo hors tension
pendant la charge de la batterie.
• Lorsque le témoin de charge clignote
et que la charge n’est pas terminée,
retirez la batterie et insérez-la de
nouveau.
• Pour les pays ou régions autres que
les États-Unis et le Canada :
connectez le cordon d’alimentation à
l’adaptateur secteur et branchez
l’adaptateur secteur sur la prise
murale.
Témoin de charge
Allumé : en charge
Éteint : charge terminée
Clignotant :
Erreur de charge ou interruption
momentanée de la charge parce que
la température de l’appareil est en
dehors de la plage recommandée
FR
28
Page 85

Charge de la batterie
Remarques
• Les temps de charge sont susceptibles de varier en fonction de la capacité restante de
la batterie et des conditions dans lesquelles la charge est effectuée.
• Si le témoin de charge situé sur l’appareil clignote lorsque l’adaptateur secteur est
branché sur la prise murale, cela signifie que la charge est momentanément
interrompue parce que la température est en dehors de la plage recommandée.
Lorsque la température revient dans la plage adaptée, la charge reprend. Nous vous
recommandons de recharger la batterie à une température ambiante comprise entre
10 °C et 30 °C (50 °F et 86 °F).
• Branchez l’adaptateur secteur (fourni) ou chargeur de batterie (fourni) sur la prise
murale la plus proche. En cas de dysfonctionnement pendant l’utilisation de
l’adaptateur secteur ou du chargeur de batterie, débranchez-le immédiatement de la
prise murale pour couper l’alimentation.
• Lorsque la batterie est chargée pour la première fois (juste après avoir acheté votre
appareil photo) ou lorsque vous chargez une batterie qui n’a pas été utilisée depuis
longtemps, le témoin de charge / le témoin CHARGE peut clignoter rapidement.
Dans ce cas, retirez la batterie de l’appareil, puis réinsérez-la pour la recharger.
• Ne chargez pas la batterie de manière continuelle ou répétée sans l’utiliser, si elle est
déjà complètement chargée ou presque complètement chargée. Cela risquerait de
dégrader ses performances.
• Une fois la batterie chargée, débranchez l’adaptateur secteur de la prise murale.
• Assurez-vous de n’utiliser que des batteries, un câble micro-USB (fourni) et un
adaptateur secteur (fourni) de marque Sony garantis d’origine.
Temps de charge (charge complète)
Le temps de charge est d’environ 150 minutes lorsque vous utilisez
l’adaptateur secteur (fourni), et d’environ 220 minutes lorsque vous utilisez
le chargeur de batterie (fourni).
Remarques
• Le temps de charge indiqué ci-dessus correspond à la charge d’une batterie
complètement déchargée, à une température ambiante de 25 °C (77 °F). Le temps de
charge peut être plus long selon les conditions d’utilisation et les circonstances.
FR
29
FR
Page 86

Charge de la batterie
Charge en se raccordant à un ordinateur
La batterie peut être rechargée en raccordant l’appareil photo à un
ordinateur au moyen du câble micro-USB. Connectez l’appareil hors
tension à l’ordinateur.
Remarques
• Tenez compte des points suivants lorsque vous effectuez la charge via un
ordinateur :
– Si l’appareil photo est raccordé à un ordinateur portable qui n’est pas branché sur
une source d’alimentation, le niveau de la batterie de l’ordinateur portable
diminue. Ne chargez pas la batterie pendant une période prolongée.
– N’allumez pas, n’éteignez pas ou ne redémarrez pas l’ordinateur, et ne le réactivez
pas à partir du mode veille lorsqu’une connexion USB a été établie entre
l’ordinateur et l’appareil photo. L’appareil peut provoquer un dysfonctionnement.
Avant d’allumer, d’éteindre ou de redémarrer l’ordinateur, ou de le réactiver à
partir du mode veille, déconnectez l’appareil photo de l’ordinateur.
– Nous ne garantissons pas la charge effectuée en utilisant un ordinateur construit
sur mesure ou un ordinateur modifié.
Vérification de la charge restante de la batterie
Un indicateur de charge restante apparaît sur l’écran.
Pleine Faible
Remarques
• Dans certaines circonstances, l’indicateur de charge restante peut ne pas être correct.
FR
30
Page 87

Pour retirer la batterie
Charge de la batterie
Mettez l’appareil hors tension. Faites glisser
le taquet de verrouillage après avoir
confirmé que le témoin d’accès (page 15)
est éteint, puis retirez la batterie.
Veillez à ne pas faire tomber la batterie.
Taquet de verrouillage
FR
31
FR
Page 88

Insertion d’une carte mémoire (vendue séparément)
1 Faites glisser le levier pour ouvrir
le couvercle.
2 Insérez la carte mémoire (vendue
séparément).
• En positionnant le coin biseauté comme
illustré, insérez la carte mémoire
jusqu’au clic d’enclenchement.
Assurez-vous que le coin entaillé
est correctement orienté.
3 Fermez le couvercle.
Pour retirer la carte mémoire
Assurez-vous que le témoin d’accès (page 15) n’est pas allumé, puis
enfoncez la carte mémoire d’un coup.
FR
32
Page 89

Insertion d’une carte mémoire (vendue séparément)
Cartes mémoires pouvant être utilisées
Vous pouvez utiliser les types suivants de carte mémoire avec cet appareil.
Toutefois, le bon fonctionnement ne peut être garanti pour tous les types de
carte mémoire.
Carte mémoire
Memory Stick PRO Duo™ (Mark2 uniquement)
A
Memory Stick PRO-HG Duo™
Memory Stick XC-HG Duo™
Carte mémoire SD (classe 4 ou supérieure)
B
Carte mémoire SDHC (classe 4 ou supérieure)
Carte mémoire SDXC (classe 4 ou supérieure)
• Dans le présent manuel, les produits mentionnés dans le tableau sont regroupés dans
les catégories suivantes :
A : Memory Stick PRO Duo
B : Carte SD
Pour la prise
d’images fixes
Lors de l’enregistrement de films au format XAVC S
Utilisez les cartes mémoires suivantes :
– Carte mémoire SDXC (64 Go ou plus et classe 10 ou supérieure)
– Carte mémoire SDXC (64 Go ou plus et compatible UHS-I)
– Memory Stick XC-HG Duo
Remarques
• Les images enregistrées sur une carte mémoire SDXC ou Memory Stick XC-HG
Duo ne peuvent pas être importées ou lues sur les ordinateurs ou les appareils AV
non compatibles avec exFAT*. Assurez-vous que le dispositif est compatible avec
exFAT avant de le connecter à l’appareil. Si vous connectez votre appareil à un
dispositif incompatible, vous pourriez être invité à formater la carte.
Ne formatez en aucun cas la carte en réponse à cette invitation sous peine d’effacer
toutes les données présentes sur la carte.
* exFAT correspond au système de fichier utilisé sur les cartes mémoire SDXC et
Memory Stick XC-HG Duo.
Pour l’enregistrement de
films
FR
33
FR
Page 90

Fixation d’un objectif
Placez l’interrupteur d’alimentation de l’appareil photo sur OFF avant
d’installer ou de retirer l’objectif.
1 Retirez le capuchon de boîtier de
l’appareil et le capuchon
d’objectif arrière de l’arrière de
l’objectif.
• Lorsque vous changez d’objectif,
procédez rapidement, à l’écart des
endroits poussiéreux, afin d’empêcher
la poussière ou des débris de pénétrer à
l’intérieur de l’appareil.
• Lors de la prise de vue, retirez le
capuchon d’objectif avant sur le devant
de l’objectif.
2 Montez l’objectif en alignant les
repères blancs (repères de
montage) sur l’objectif et sur
l’appareil.
• Tenez l’appareil avec l’objectif tourné
vers le bas afin d’empêcher la poussière
de pénétrer dans l’appareil.
Capuchon d’objectif avant
Capuchon de
boîtier
Capuchon d’objectif arrière
Repères blancs
FR
34
Page 91

Fixation d’un objectif
3 Tout en poussant doucement
l’objectif vers l’appareil, tournez
l’objectif dans le sens des
aiguilles d’une montre jusqu’à ce
qu’il s’enclenche en position
verrouillée.
• Assurez-vous de ne pas insérer
l’objectif de travers.
Remarques
• Lors de l’installation d’un objectif, n’appuyez pas sur le bouton de déverrouillage de
l’objectif.
• Veillez à ne pas forcer lorsque vous installez un objectif.
• Pour utiliser un objectif à monture A (vendu séparément), l’adaptateur pour monture
d’objectif (vendu séparément) est nécessaire. Pour utiliser l’adaptateur pour monture
d’objectif, consultez le guide d’utilisation l’accompagnant.
• Pour photographier des images plein format, utilisez un objectif conçu pour un
appareil plein format.
• Lorsque vous transportez l’appareil avec l’objectif en place, tenez fermement
l’appareil et l’objectif.
• Ne tenez pas la partie de l’objectif déployée pour le zoom ou les réglages de mise au
point.
FR
35
FR
Page 92

Fixation d’un objectif
Pour retirer l’objectif
1 Enfoncez à fond le bouton de
déverrouillage de l’objectif et
tournez l’objectif dans le sens
inverse des aiguilles d’une
montre jusqu’à ce qu’il s’arrête.
Bouton de déverrouillage de
l’objectif
2 Mettez en place les capuchons
sur l’avant et l’arrière de
l’objectif et le capuchon de boîtier
sur l’appareil.
• Avant de les fixer, retirez toute la
poussière.
Remarques sur le changement d’objectif
Lorsque vous changez d’objectif, si de la poussière ou des débris pénètrent
à l’intérieur de l’appareil et se collent à la surface du capteur d’image (la
partie convertissant la lumière en signal électrique), ils peuvent apparaître
sur l’image sous forme de points sombres, selon les conditions de prise de
vue.
L’appareil est pourvu d’une fonction anti-poussière afin d’empêcher la
poussière d’adhérer au capteur d’image. Toutefois, mieux vaut toujours
changer rapidement d’objectif à l’écart des endroits poussiéreux.
FR
36
Page 93

Réglage de la date et heure
Lorsque vous allumez pour la première fois l’appareil ou après avoir
réinitialisé les fonctions, l’écran de réglage de la date et heure apparaît.
1 Placez le bouton d’alimentation
sur ON pour mettre l’appareil
sous tension.
L’écran de réglage de la date et heure
apparaît.
• Pour éteindre l’appareil, placez le
bouton d’alimentation sur OFF.
2 Vérifiez que [Entrer] est bien
sélectionné sur l’écran, puis
appuyez sur z sur la molette de
commande.
3 Sélectionnez l’emplacement géographique souhaité, puis
appuyez sur z.
4 Appuyez sur v/V sur la molette de commande ou sélectionnez
un élément de réglage en tournant la molette de commande,
puis appuyez sur z.
5 Appuyez sur v/V/b/B, ou sélectionnez le réglage souhaité en
tournant la molette de commande, puis appuyez sur z.
6 Répétez les étapes 4 et 5 pour régler d’autres éléments, puis
sélectionnez [Entrer] et appuyez sur z sur la molette de
commande.
37
FR
FR
Page 94

Réglage de la date et heure
Pour annuler la procédure de réglage de la date et heure
Appuyez sur le bouton MENU.
Nouveau réglage de la date/heure et de la zone
L’écran de configuration de la date et de l’heure apparaît automatiquement
à la première mise sous tension ou lorsque la batterie interne rechargeable
de sauvegarde est déchargée. Pour réinitialiser la date et l’heure, utilisez le
menu.
Bouton MENU t (Réglage) 4
t [Rég. date/heure] ou [Réglage
zone]
Bouton MENU
Remarques
• Cet appareil ne dispose pas de fonction d’insertion de la date sur une image. Vous
pouvez insérer la date et enregistrer ou imprimer l’image à l’aide de PlayMemories
Home (page 51).
Conservation du réglage de la date et de l’heure
Cet appareil comporte une batterie interne rechargeable pour la
conservation de la date, de l’heure et d’autres réglages, que l’appareil soit
allumé ou éteint, ou que la batterie soit insérée ou non.
FR
38
Page 95

Prise de vue et visualisation des images
Prise d’images fixes
En [Mode auto], l’appareil photo analyse le sujet et vous permet d’effectuer
une prise de vue avec les réglages appropriés.
1 Placez le bouton d’alimentation sur ON pour mettre l’appareil
sous tension.
2 Placez le sélecteur de mode sur
(Mode auto).
3 Regardez dans le viseur et tenez l’appareil.
4 Déterminez la taille du sujet.
Lors de l’utilisation d’un objectif équipé
d’un levier de zoom :
Faites glisser le levier de zoom.
Lors de l’utilisation d’un objectif équipé
d’une bague de zoom :
Faites tourner la bague de zoom.
• Le zoom optique n’est pas disponible
lorsqu’un objectif à focale fixe est
monté sur l’appareil.
• Si vous excédez la plage de zoom du
zoom optique lorsque vous utilisez un
objectif zoom motorisé, l’appareil
bascule automatiquement sur une autre
fonction de zoom.
FR
Bague de zoom
39
FR
Page 96

Prise d’images fixes
5 Enfoncez le déclencheur à mi-
course pour effectuer la mise au
point.
• Lorsque l’image est mise au point, un
bip se fait entendre et le témoin z ou
s’allume.
6 Enfoncez complètement le déclencheur pour effectuer la prise
de vue.
• Si [Cadrage automat.] est réglé sur [Auto], l’appareil photo analyse la scène
et recadre automatiquement l’image capturée dans une composition
adéquate lors de la prise de vue de visages et de sujets en gros plan (macro)
ou lors du suivi de sujets avec la fonction Verrouillage AF. L’image
originale et l’image rognées sont toutes deux sauvegardées.
FR
40
Page 97

Enregistrement de films
1 Appuyez sur le bouton MOVIE
pour lancer l’enregistrement.
• Étant donné que [Bouton MOVIE] est
réglé sur [Toujours] par défaut,
l’enregistrement de films peut être
lancé à partir de n’importe quel mode
de prise de vue.
Bouton MOVIE
2 Appuyez une nouvelle fois sur le bouton MOVIE pour arrêter
l’enregistrement.
Remarques
• Le bruit de l’appareil en fonctionnement peut être enregistré pendant
l’enregistrement d’un film. Il est possible de désactiver l’enregistrement du son en
réglant [Enregistrem. audio] sur [OFF].
• Pour prévenir l’enregistrement du bruit de fonctionnement de la bague de zoom
pendant l’enregistrement de films lors de l’utilisation d’un objectif zoom de grande
puissance, il est recommandé d’enregistrer des films au moyen de la commande de
zoom. Lorsque vous déplacez la commande de zoom, placez votre doigt
délicatement sur la commande et utilisez-la sans trembler.
• La durée d’enregistrement continu d’un film dépend de la température ambiante ou
de l’état de l’appareil. Voir « Remarques sur l’enregistrement continu de films »
(page 57).
• Lorsque l’icône apparaît, cela indique que la température de l’appareil est trop
élevée. Éteignez l’appareil et patientez jusqu’à ce que sa température diminue.
• Lorsque vous enregistrez continuellement pendant une période prolongée, vous
pouvez sentir que l’appareil est chaud. C’est normal. Par ailleurs, [Surchauffe de
l'appareil. Laissez-le se refroidir.] peut apparaître. Le cas échéant, éteignez l’appareil
et patientez jusqu’à ce qu’il soit à nouveau prêt à photographier.
• Lors de la prise de vue, le bruit des crochets de la bandoulière (crochets
triangulaires) risque d’être enregistré, en fonction des conditions d’utilisation.
FR
41
FR
Page 98

Lecture des images
1 Appuyez sur le bouton .
Bouton
2 Sélectionnez une image en appuyant sur b/B sur la molette de
commande.
• Pour lire des films, appuyez sur z sur la molette de commande.
• Si vous appuyez sur V sur la molette de commande pendant la lecture
d’un film, le panneau de commande s’affiche.
Panneau de commande Actions possibles lors de la lecture des films
N Lecture
X Pause
M Avance rapide
m Recul rapide
T Avance au ralenti
t Lecture arrière au ralenti
> Film suivant
. Film précédent
C Avance de vue
c Recul de vue
Réglages du volume
Ferme le panneau de commande
Remarques
• Les films enregistrés au moyen d’autres dispositifs risquent de ne pas être lus sur cet
appareil.
FR
42
Page 99

Effacement d’images
Une fois que vous avez supprimé une image, il n’est plus possible de la
récupérer. Soyez certain que vous voulez supprimer l’image avant de
poursuivre.
1 Tout en affichant l’image que
vous souhaitez supprimer,
appuyez sur le bouton
(Supprimer).
Bouton (Supprimer)
2 Sélectionnez [Supprimer] à l’aide de v/V sur la molette de
commande, puis appuyez sur z.
• Pour supprimer plusieurs images à la fois, sélectionnez le bouton MENU
t (Lecture) 1 t [Supprimer].
Remarques
• Il est impossible de supprimer les images protégées.
FR
FR
43
Page 100

Sélection d’un mode de prise de vue
Sélection d’un mode de prise de vue
Tournez le sélecteur de mode et
choisissez le mode de prise de vue
souhaité.
Les modes de prise de vue suivants sont disponibles.
(Mode auto) Vous permet de prendre des images fixes avec les réglages
(Programme Auto) Vous permet une prise de vue avec l’exposition (vitesse
(Priorité ouvert.) Permet de photographier en réglant l’ouverture et en
(Priorité vitesse) Permet de régler la vitesse d’obturation pour montrer le
(Exposition
manuelle)
1/2 (Rappel de
mémoire)
(Sélection
scène)
(Panor. par
balayage)
(Film) Vous permet de modifier les réglages de prise de vue et de
ajustés automatiquement.
d’obturation et valeur d’ouverture) réglée automatiquement.
Les autres réglages peuvent être ajustés manuellement.
modifiant la plage de mise au point ou par floutage de
l’arrière-plan.
mouvement du sujet.
Permet la prise de vue après avoir réglé manuellement
l’exposition (vitesse d’obturation et valeur d’ouverture) avec
le sélecteur avant ou arrière.
Permet de rappeler les réglages préenregistrés dans
[Mémoire] dans le (Réglages de prise de vue).
Vous permet une prise de vue avec des réglages
préprogrammés selon la scène.
Vous permet de prendre des images panoramiques en
combinant plusieurs images.
filmer un film.
FR
44
 Loading...