

Page 1
© 2014 Sony Corporation Printed in Thailand
4-543-701-41(1)
ILCE-5100
E-mount
Interchangeable Lens Digital Camera/Instruction Manual GB
Appareil photo à objectif interchangeable/Mode d’emploi FR
Digitalkamera mit Wechselobjektiv/Gebrauchsanleitung DE
Cámara Digital de Lentes Intercambiables/Manual de instrucciones ES
Fotocamera digitale con obiettivo intercambiabile/Istruzioni per l’uso IT
Câmara Digital de Objetivas intercambiáveis/Manual de instruções PT
Digitale camera met verwisselbare lens/Gebruiksaanwijzing NL
PL
Цифровой фотоаппарат со сменным объективом/Инструкция по эксплуатации
RU
Цифровий фотоапарат зі змінним об'єктивом/Посібник з експлуатації
UA
Digitalkamera med utbytbart objektiv/Handledning SE
Digitaalinen kamera vaihdettavalla objektiivilla/Käyttöopas FI
Digitalkamera med utskiftbart objektiv/Bruksanvisning NO
Digitalkamera med udskifteligt objektiv/Betjeningsvejledning DK
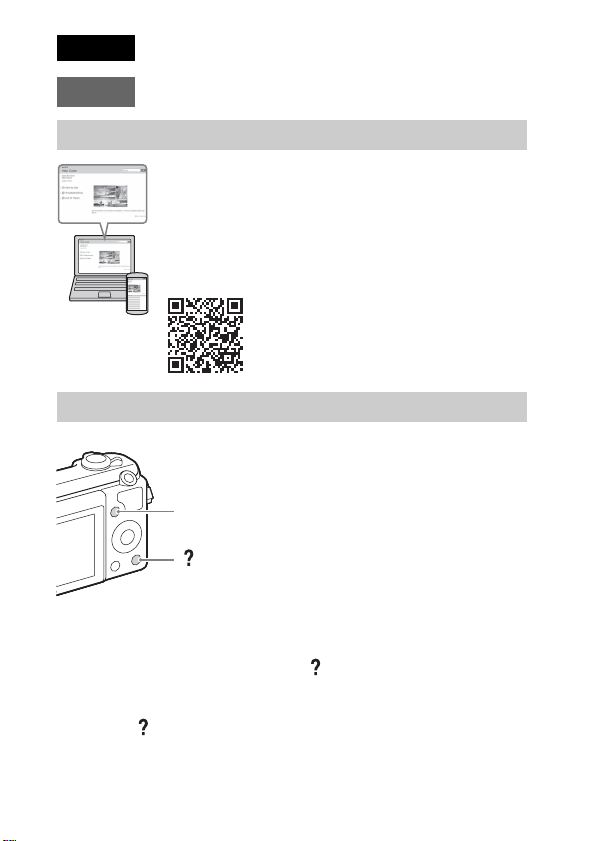
“Help Guide” (Web manual)
Refer to “Help Guide” for in-depth
instructions on the many functions of the
camera.
« Manuel d’aide » (Manuel en ligne)
Consultez le « Manuel d’aide » pour obtenir
des instructions détaillées au sujet des
nombreuses fonctions de l'appareil.
http://rd1.sony.net/help/ilc/1430/h_zz/
Page 2
English
E-mount
Learning more about the camera (“Help Guide”)
“Help Guide” is an on-line manual. You can read the “Help
Guide” on your computer or smartphone.
Refer to it for in-depth instructions on the many functions of
the camera.
URL:
http://rd1.sony.net/help/ilc/1430/h_zz/
Viewing the Guide
This camera is equipped with a built-in instruction guide.
MENU
(In-Camera Guide)
In-Camera Guide
The camera displays explanations for MENU items and the setting values.
1 Press the MENU button.
2 Select the desired item, then press the (In-Camera Guide) button.
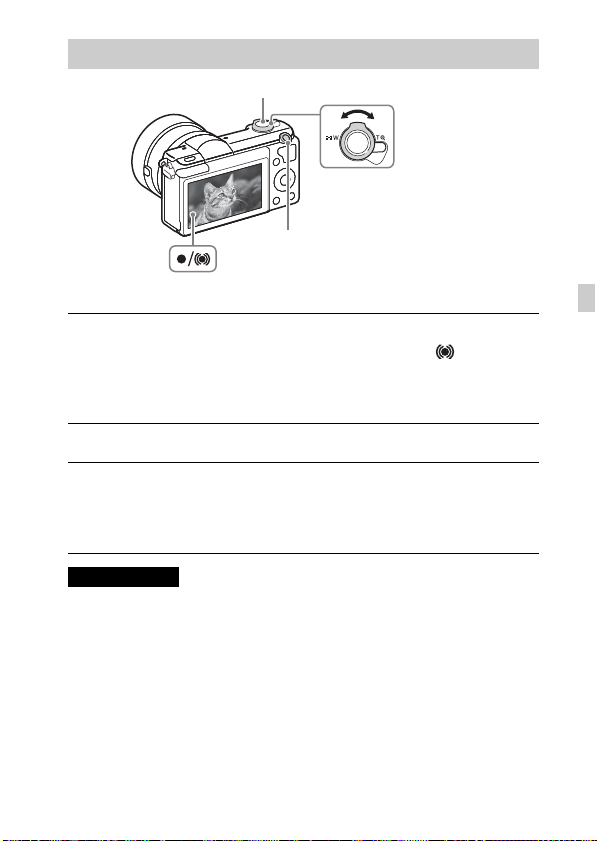
Shooting Tip
The camera displays shooting tips for the shooting mode selected.
1 Press the (In-Camera Guide) button in shooting mode.
2 Select the desired shooting tip, then press z on the control wheel.
The shooting tip is displayed.
GB
• You can scroll the screen using v/V and change shooting tips using b/B.
2
Page 3

Owner’s Record
The model and serial numbers are located on the bottom. Record the serial number in the
space provided below. Refer to these numbers whenever you call your Sony dealer
regarding this product.
Model No. ILCE-5100
Serial No. _____________________________
Model No. AC-UB10C/AC-UB10D
Serial No. _____________________________
WARNING
To reduce fire or shock hazard, do not expose the unit to rain or
moisture.
IMPORTANT SAFETY INSTRUCTIONS
-SAVE THESE INSTRUCTIONS
DANGER
TO REDUCE THE RISK OF FIRE OR ELECTRIC
SHOCK, CAREFULLY FOLLOW THESE
INSTRUCTIONS
If the shape of the plug does not fit the power outlet, use an attachment plug adaptor of the
proper configuration for the power outlet.
CAUTION
[ Battery pack
If the battery pack is mishandled, the battery pack can burst, cause a fire or even chemical
burns. Observe the following cautions.
• Do not disassemble.
• Do not crush and do not expose the battery pack to any shock or force such as
hammering, dropping or stepping on it.
• Do not short circuit and do not allow metal objects to come into contact with the battery
terminals.
• Do not expose to high temperature above 60°C (140°F) such as in direct sunlight or in a
car parked in the sun.
• Do not incinerate or dispose of in fire.
• Do not handle damaged or leaking lithium ion batteries.
• Be sure to charge the battery pack using a genuine Sony battery charger or a device that
can charge the battery pack.
GB
GB
3
Page 4

• Keep the battery pack out of the reach of small children.
• Keep the battery pack dry.
• Replace only with the same or equivalent type recommended by Sony.
• Dispose of used battery packs promptly as described in the instructions.
[ AC Adaptor
Use the nearby wall outlet (wall socket) when using the AC Adaptor. Disconnect the AC
Adaptor from the wall outlet (wall socket) immediately if any malfunction occurs while
using the apparatus.
The power cord (mains lead), if supplied, is designed specifically for use with this camera
only, and should not be used with other electrical equipment.
For Customers in the U.S.A. and Canada
[ RECYCLING LITHIUM-ION BATTERIES
Lithium-Ion batteries are recyclable.
You can help preserve our environment by returning your used
rechargeable batteries to the collection and recycling location nearest
you.
For more information regarding recycling of rechargeable batteries,
call toll free
1-800-822-8837, or visit http://www.call2recycle.org/
Caution: Do not handle damaged or leaking Lithium-Ion batteries.
[ Battery pack and lens (If lens supplied)
This device complies with Part 15 of the FCC Rules. Operation is subject to the following
two conditions:
(1) This device may not cause harmful interference, and (2) this device must accept any
interference received, including interference that may cause undesired operation.
CAN ICES-3 B/NMB-3 B
This equipment complies with FCC/IC radiation exposure limits set forth for an
uncontrolled environment and meets the FCC radio frequency (RF) Exposure Guidelines
and RSS-102 of the IC radio frequency (RF) Exposure rules. This equipment has very low
levels of RF energy that are deemed to comply without testing of specific absorption ratio
(SAR).
GB
4
Page 5

For Customers in the U.S.A.
If you have any questions about this product, you may call:
Sony Customer Information Center
1-800-222-SONY (7669)
The number below is for the FCC related matters only.
[ Regulatory Information
Declaration of Conformity
Trade Name: SONY
Model No.: ILCE-5100
Responsible Party: Sony Electronics Inc.
Address: 16530 Via Esprillo,
Telephone No.: 858-942-2230
This device complies with Part15 of the FCC Rules. Operation is subject to the
following two conditions: (1) This device may not cause harmful interference, and (2)
this device must accept any interference received, including interference that may cause
undesired operation.
This equipment must not be co-located or operated in conjunction with any other antenna
or transmitter.
[ CAUTION
You are cautioned that any changes or modifications not expressly approved in this manual
could void your authority to operate this equipment.
[ Note:
This equipment has been tested and found to comply with the limits for a Class B digital
device, pursuant to Part 15 of the FCC Rules.
These limits are designed to provide reasonable protection against harmful interference in
a residential installation. This equipment generates, uses, and can radiate radio frequency
energy and, if not installed and used in accordance with the instructions, may cause
harmful interference to radio communications. However, there is no guarantee that
interference will not occur in a particular installation. If this equipment does cause harmful
interference to radio or television reception, which can be determined by turning the
equipment off and on, the user is encouraged to try to correct the interference by one or
more of the following measures:
– Reorient or relocate the receiving antenna.
– Increase the separation between the equipment and receiver.
– Connect the equipment into an outlet on a circuit different from that to which the
receiver is connected.
– Consult the dealer or an experienced radio/TV technician for help.
The supplied interface cable must be used with the equipment in order to comply with the
limits for a digital device pursuant to Subpart B of Part 15 of FCC Rules.
San Diego, CA 92127 U.S.A.
GB
GB
5
Page 6

For Customers in Canada
This device complies with Industry Canada licence-exempt RSS standard(s).
Operation is subject to the following two conditions: (1) this device may not cause
interference, and (2) this device must accept any interference, including interference that
may cause undesired operation of the device.
For Customers in Europe
[ Notice for the customers in the countries applying EU Directives
Manufacturer: Sony Corporation, 1-7-1 Konan Minato-ku Tokyo, 108-0075 Japan
For EU product compliance: Sony Deutschland GmbH, Hedelfinger Strasse 61, 70327
Stuttgart, Germany
Hereby, Sony Corporation, declares that this equipment is in compliance with the essential
requirements and other relevant provisions of Directive 1999/5/EC. For details, please
access the following URL:
http://www.compliance.sony.de/
[ Notice
If static electricity or electromagnetism causes data transfer to discontinue midway (fail),
restart the application or disconnect and connect the communication cable (USB, etc.)
again.
This product has been tested and found compliant with the limits set out in the EMC
regulation for using connection cables shorter than 3 meters (9.8 feet).
The electromagnetic fields at the specific frequencies may influence the picture and sound
of this unit.
GB
6
Page 7
[ Disposal of waste batteries and electrical and electronic
equipment (applicable in the European Union and other
European countries with separate collection systems)
This symbol on the product, the battery or on the packaging indicates
that the product and the battery shall not be treated as household waste.
On certain batteries this symbol might be used in combination with a
chemical symbol. The chemical symbols for mercury (Hg) or lead (Pb)
are added if the battery contains more than 0.0005% mercury or
0.004% lead. By ensuring these products and batteries are disposed of
the environment and human health which could otherwise be caused by inappropriate
waste handling. The recycling of the materials will help to conserve natural resources.
In case of products that for safety, performance or data integrity reasons require a
permanent connection with an incorporated battery, this battery should be replaced by
qualified service staff only. To ensure that the battery and the electrical and electronic
equipment will be treated properly, hand over these products at end-of-life to the
applicable collection point for the recycling of electrical and electronic equipment. For all
other batteries, please view the section on how to remove the battery from the product
safely. Hand the battery over to the applicable collection point for the recycling of waste
batteries. For more detailed information about recycling of this product or battery, please
contact your local Civic Office, your household waste disposal service or the shop where
you purchased the product or battery.
correctly, you will help prevent potentially negative consequences for
For Customers in Singapore
For customers who purchased their camera from a store
in Japan that caters to tourists
[ Note
Some certification marks for standards supported by the camera can be confirmed on the
screen of the camera.
Select MENU t (Setup) 5 t [Certification Logo].
If display is not possible due to problems such as camera failure, contact your Sony dealer
or local authorized Sony service facility.
GB
GB
7
Page 8

Table of contents
Preparing the camera Step 1 P. 9
– Checking the supplied items
– Identifying parts
– Inserting the battery pack
– Charging the battery pack
– Attaching/removing the lens
– Inserting a memory card (sold separately)
– Setting the clock
Basic operation Step 2 P. 21
– Shooting still images/movies
Playback function Step 3 P. 22
– Viewing images
Recording function Step 4 P. 23
– Introduction of other functions
Importing images to the computer P. 24
– Features of PlayMemories Home™
Adding functions to the camera P. 26
– Adding functions to the camera
Others P. 26
– Number of still images and recordable time of movies
– Notes on using the camera
– Specifications
This manual covers several models supplied with different lenses.
The model name varies depending on the supplied lens. The available model varies
depending on the countries/regions.
Model name Lens
ILCE-5100 Not supplied
ILCE-5100L E16 – 50 mm
GB
ILCE-5100Y E55 – 210 mm and E16 – 50 mm
8
Page 9
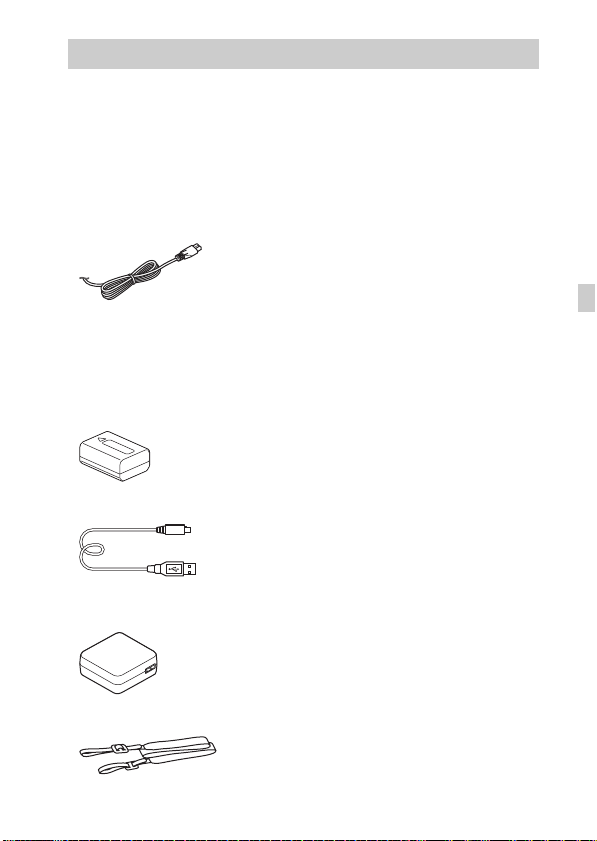
Checking the supplied items
First check the model name of your camera (page 8). The accessories supplied
differ depending on the model.
The number in parentheses indicates the quantity.
x
Supplied with all models
• Camera (1)
• Power cord (mains lead) (1)* (not
supplied in the U.S.A. and Canada)
* Multiple power cords may be
supplied with your camera. Use the
appropriate one that matches your
country/region.
• Rechargeable battery pack
NP-FW50 (1)
• Micro USB cable (1)
• AC Adaptor AC-UB10C/UB10D
(1)
• Shoulder strap (1)
• Instruction Manual (this manual)
(1)
• Wi-Fi Connection/One-touch
(NFC) Guide
This guide explains the functions
that require a Wi-Fi connection.
x
ILCE-5100
• Body cap (1) (attached to the
camera)
x
ILCE-5100L
• E16 – 50 mm zoom lens (1)
(attached to the camera)/Front lens
cap (1) (attached to the lens)
x
ILCE-5100Y
• E16 – 50 mm zoom lens (1)
(attached to the camera)/Front lens
cap (1) (attached to the lens)
• E55 – 210 mm zoom lens (1)/Front
lens cap (1)/Rear lens cap (1)/Lens
hood (1)
GB
GB
9
Page 10
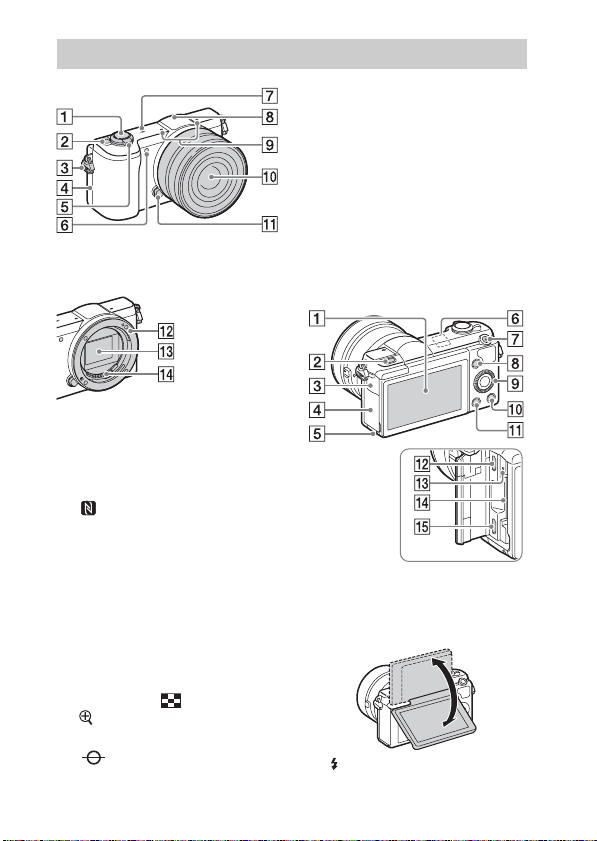
Identifying parts
When the lens is removed
A Shutter button
B ON/OFF (Power) switch
C Hook for shoulder strap
D (N Mark)
• Touch the mark when you
connect the camera to a
smartphone equipped with the
NFC function.
• NFC (Near Field
Communication) is an
international standard of the
short-range wireless
communication technology.
E For shooting: W/T (zoom) lever
For viewing: (Index)/
(Playback zoom) lever
F AF illuminator/Self-timer lamp
G Image sensor position mark
GB
H Flash
10
I Microphone
1)
J Lens
K Lens release button
L Mount
M Image sensor
N Lens contacts
1)
Do not cover this part during movie
recording.
2)
Do not touch this part directly.
2)
2)
A Monitor/Touch panel
• You can adjust the monitor to an
easily viewable angle and shoot
from any position.
B (Flash pop-up) button
Page 11
C Multi/Micro USB Terminal
cover
D Memory card/terminal cover
E Access lamp
F Wi-Fi sensor (built-in)
G MOVIE (Movie) button
H MENU button
I Control wheel
J (In-Camera Guide) /
(Delete) button
K (Playback) button
L Multi/Micro USB Terminal*
• Supports Micro USB compatible
device.
M Charge lamp
N Memory card slot
O HDMI micro jack
* For details on compatible
accessories for the Multi/Micro
USB Terminal, visit the Sony
website, or consult your Sony dealer
or local authorized Sony service
facility.
A Battery cover
B Battery eject lever
C Battery insertion slot
D Connection plate cover
• Use this when using an ACPW20 AC Adaptor (sold
separately). Insert the connection
plate into the battery
compartment, and then pass the
cord through the connection plate
cover as shown below.
• Make sure that the cord is not
pinched when you close the
cover.
E Speaker
F Tripod socket hole
• Use a tripod with a screw less
than 5.5 mm (7/32 inches) long.
Otherwise, you cannot firmly
secure the camera, and damage to
the camera may occur.
GB
GB
11
Page 12
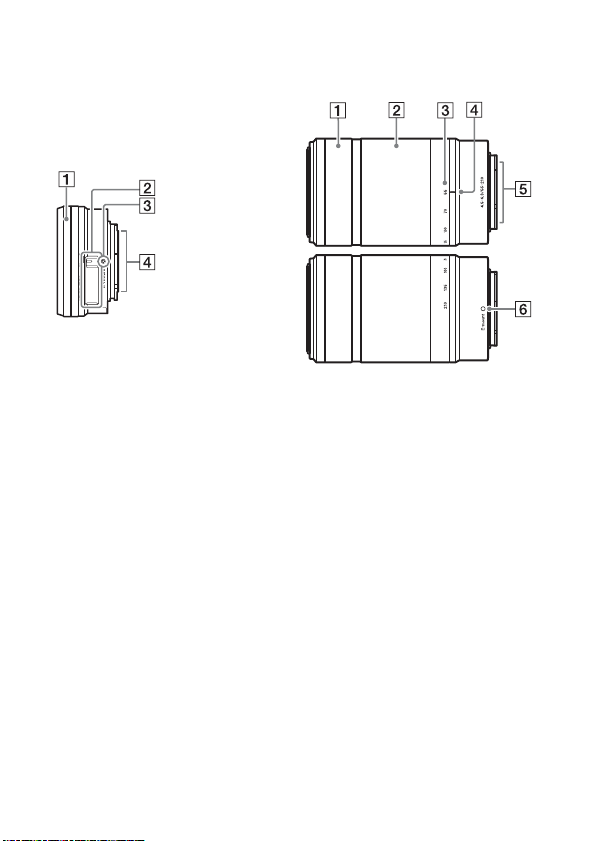
x
Lens
See page 33 on the specifications of
the lenses.
E PZ 16 – 50 mm F3.5 – 5.6
OSS (supplied with
ILCE-5100L/ILCE-5100Y)
A Zooming/Focusing ring
B Zooming lever
C Mounting index
D Lens contacts
1)
Do not touch this part directly.
1)
E55 – 210 mm F4.5 – 6.3
OSS (supplied with
ILCE-5100Y)
A Focusing ring
B Zooming ring
C Focal-length scale
D Focal-length index
E Lens contacts
F Mounting index
1)
Do not touch this part directly.
1)
12
GB
Page 13
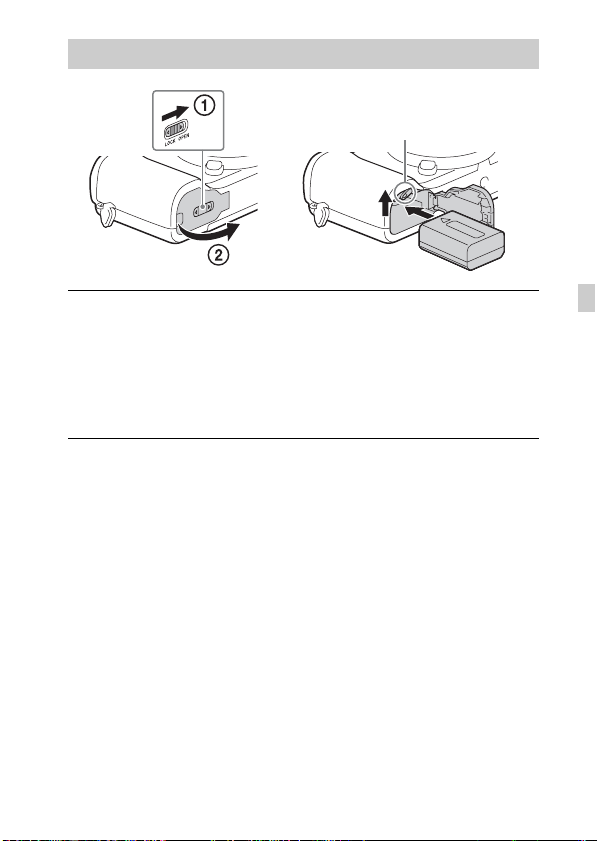
Inserting the battery pack
Battery eject lever
Open the cover.
1
Insert the battery pack.
2
• While pressing the battery eject lever, insert the battery pack as
illustrated. Make sure that the battery eject lever locks after insertion.
• Closing the cover with the battery inserted incorrectly may damage the
camera.
GB
GB
13
Page 14

Charging the battery pack
For customers in the USA and Canada
Power cord
(Mains lead)
For customers in countries/
regions other than the USA
and Canada
Connect the camera to the AC Adaptor (supplied),
1
using the micro USB cable (supplied).
Connect the AC Adaptor to the wall outlet (wall socket).
2
The charge lamp lights orange, and charging starts.
• Turn off the camera while charging the battery.
• You can charge the battery pack even when it is partially charged.
• When the charge lamp flashes and charging is not finished, remove and
re-insert the battery pack.
Charge lamp
Lit: Charging
Off: Charging finished
Flashing:
Charging error or charging paused
temporarily because the camera is not
within the proper temperature range
Notes
• If the charge lamp on the camera flashes when the AC Adaptor is connected to the
wall outlet (wall socket), this indicates that charging is temporarily stopped
because the temperature is outside the recommended range. When the temperature
gets back within the appropriate range, the charging resumes. We recommend
charging the battery pack in an ambient temperature of between 10°C to 30°C
(50ºF to 86ºF).
GB
14
Page 15
• The battery pack may not be effectively charged if the terminal section of the
battery is dirty. In this case, wipe any dust off lightly using a soft cloth or a cotton
swab to clean the terminal section of the battery.
• Connect the AC Adaptor (supplied) to the nearest wall outlet (wall socket). If
malfunctions occur while using the AC Adaptor, disconnect the plug from the wall
outlet (wall socket) immediately to disconnect from the power source.
• When charging is finished, disconnect the AC Adaptor from the wall outlet (wall
socket).
• Be sure to use only genuine Sony brand battery packs, micro USB cable (supplied)
and AC Adaptor (supplied).
• Power is not supplied during shooting/playback if the camera is connected to a
wall outlet (wall socket) with the supplied AC Adaptor. To supply power to the
camera during shooting/playback, use the AC-PW20 AC Adaptor (sold
separately).
x
Charging time (Full charge)
The charging time is approximately 310 minutes using the AC Adaptor
(supplied).
Notes
• The above charging time applies when charging a fully depleted battery pack at a
temperature of 25°C (77°F). Charging may take longer depending on conditions of
use and circumstances.
x
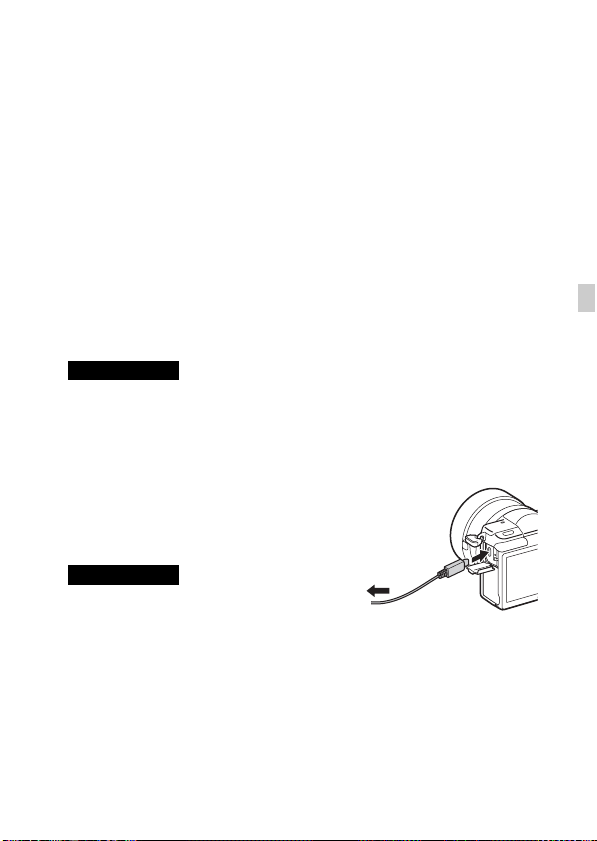
Charging by connecting to a computer
The battery pack can be charged by
connecting the camera to a computer using a
micro USB cable.
To a USB
Notes
• Note the following points when charging via
a computer:
– If the camera is connected to a laptop computer that is not connected to a power
source, the laptop battery level decreases. Do not charge for an extended period
of time.
– Do not turn on/off or restart the computer, or wake the computer to resume from
sleep mode when a USB connection has been established between the computer
and the camera. That may cause the camera to malfunction. Before turning on/
off, or restarting the computer or waking the computer from sleep mode,
disconnect the camera and the computer.
– No guarantees are made for charging using a custom-built computer or a
modified computer.
jack
GB
GB
15
Page 16

x
Battery life and number of images that can be
recorded and played back
Battery life Number of images
Shooting (still images) Approx. 200 min. Approx. 400 images
Typical movie shooting Approx. 75 min. —
Continuous movie shooting Approx. 110 min. —
Viewing (still images) Approx. 340 min. Approx. 6800 images
Notes
• The above number of images applies when the battery pack is fully charged. The
number of images may decrease depending on the conditions of use.
• The number of images that can be recorded is for shooting under the following
conditions:
– Using a Sony Memory Stick PRO Duo™ (Mark2) media (sold separately).
– When an E PZ 16 – 50 mm F3.5 – 5.6 OSS lens is attached.
– The battery pack is used at an ambient temperature of 25°C (77°F).
– [Monitor Brightness]: [Manual] [±0]
• The number for “Shooting (still images)” is based on the CIPA standard, and is for
shooting under the following conditions:
(CIPA: Camera & Imaging Products Association)
– DISP is set to [Display All Info.].
– [Focus Mode]: [Automatic AF]
– Shooting once every 30 seconds.
– The zoom is switched alternately between the W and T ends.
– The flash is used once every two times.
– The power is turned on and off once every ten times.
• The number of minutes for movie shooting is based on the CIPA standard, and is
for shooting under the following conditions:
– [ Record Setting]: 60i 17M(FH)/50i 17M(FH).
– Typical movie shooting: Battery life based on repeatedly starting/stopping
shooting, zooming, turning on/off, etc.
– Continuous movie shooting: Battery life based on non-stop shooting until the
limit (29 minutes) has been reached, and then continued by pressing the MOVIE
button again. Other functions, such as zooming, are not operated.
16
GB
Page 17
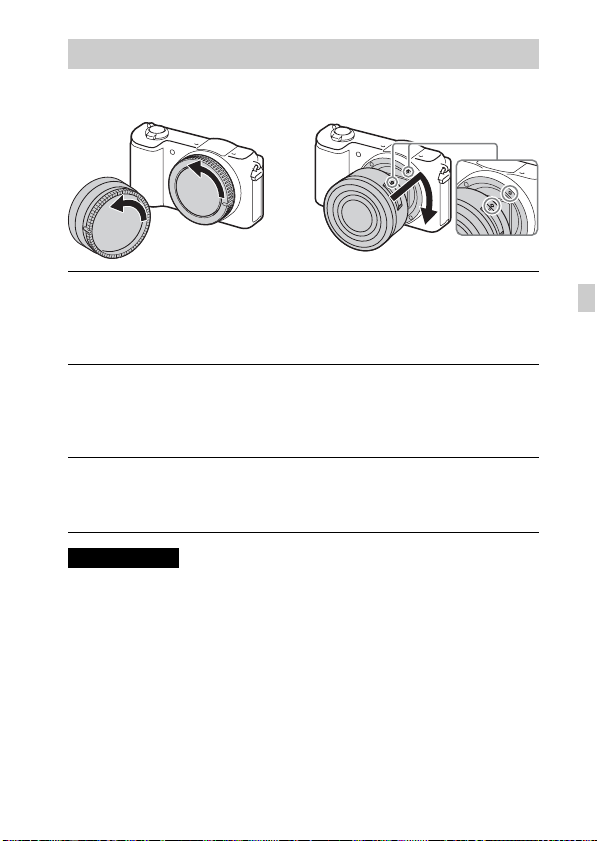
Attaching/removing the lens
Set the power switch of the camera to OFF before you attach or remove the
lens.
If the cap or the packaging lid is attached, remove it from
1
the camera or the lens.
• Quickly change the lens somewhere away from dusty locations to keep
dust or debris from getting inside the camera.
Mount the lens by aligning the white index marks on the
2
lens and the camera.
• Hold the camera facing down to prevent dust from entering into the
camera.
While pushing the lens lightly toward the camera, turn the
3
lens clockwise until it clicks into the locked position.
• Be sure to put the lens on straight.
Notes
• When attaching a lens, do not press the lens release button.
• Do not use excessive force when attaching a lens.
• The Mount Adaptor (sold separately) is required to use an A-mount lens (sold
separately). For details, refer to the operating manual supplied with the Mount
Adaptor.
• When using a lens equipped with a tripod socket, attach the socket on the lens side
to the tripod to maintain balance.
GB
GB
17
Page 18

x
Removing the lens
Lens release button
Press the lens release button all the way in and turn the
1
lens counterclockwise until it stops.
Notes
• If dust or debris gets inside the camera while you are changing the lens and
adheres to the surface of the image sensor (the part that converts the light source to
a digital signal), it may appear as dark spots on the image, depending on the
shooting environment. The camera vibrates slightly when it is turned off, due to
the anti-dust function, to prevent dust from adhering to the image sensor.
However, attach or remove the lens quickly somewhere away from dusty
locations.
• If foreign material attaches to the image sensor, dust it off using a blower.
• Do not leave the camera with the lens removed.
• When you want to use body caps or rear lens caps, please purchase ALC-B1EM
(Body cap) or ALC-R1EM (Rear lens cap) (sold separately).
• When you use a lens with a power zoom, set the power switch of the camera to
OFF and confirm that the lens is completely retracted before switching lenses. If
the lens has not retracted, do not press the lens in by force.
• When attaching the camera to a tripod, be sure not to touch the zooming/focusing
ring by mistake.
18
GB
Page 19
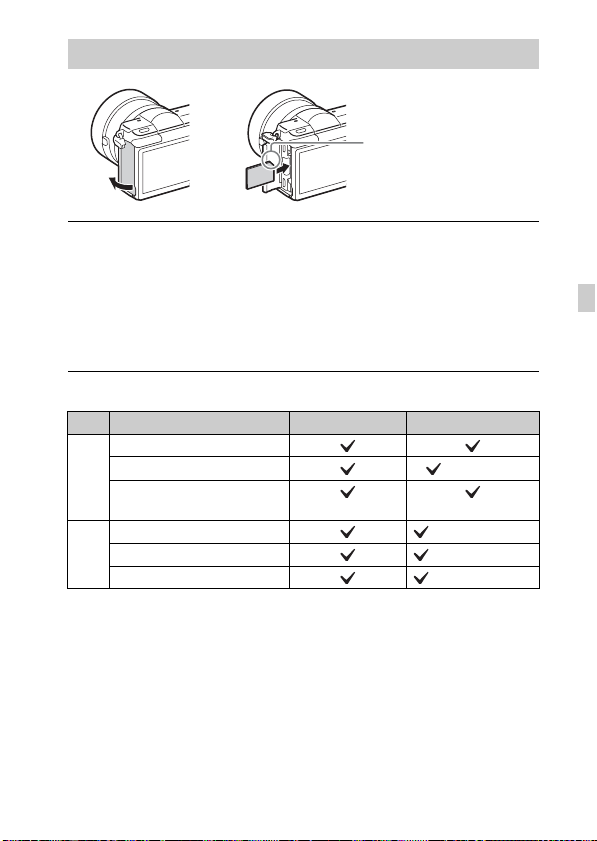
Inserting a memory card (sold separately)
Ensure the notched corner
faces correctly.
Open the memory card/terminal cover.
1
Insert the memory card (sold separately).
2
• With the notched corner facing as illustrated, insert the memory card
until it clicks into place.
Close the memory card/terminal cover.
3
x
Memory cards that can be used
Memory card For still images For movies
Memory Stick XC-HG Duo™
Memory Stick PRO Duo (Mark2 only)
A
Memory Stick PRO-HG
Duo™
SD memory card (Class 4 or faster)
B
SDHC memory card (Class 4 or faster)
SDXC memory card (Class 4 or faster)
• In this manual, the products in the table are collectively referred to as follows:
A: Memory Stick PRO Duo media
B: SD card
• When recording XAVC S format movies, use the following memory cards:
– SDXC memory card (64 GB or more and Class 10 or faster)
– SDXC memory card (64 GB or more and UHS-I-compatible)
– Memory Stick XC-HG Duo media
• This camera supports UHS-I-compatible SD cards.
GB
GB
19
Page 20
x
To remove the memory card/battery pack
Memory card: Push the memory card in once to eject the memory card.
Battery pack: Slide the battery eject lever. Be sure not to drop the battery pack.
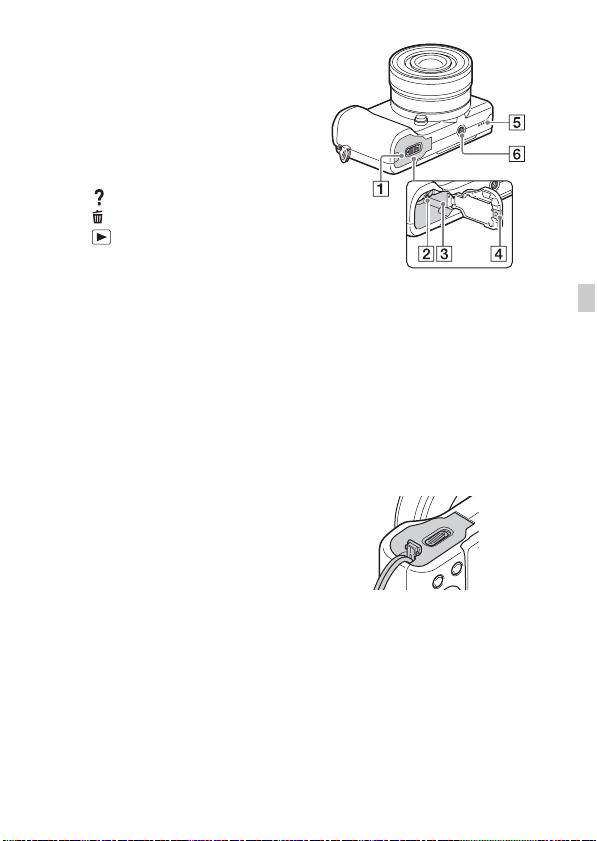
Notes
• Never remove the memory card/battery pack when the access lamp (page 11) is lit.
This may cause damage to data in the memory card.
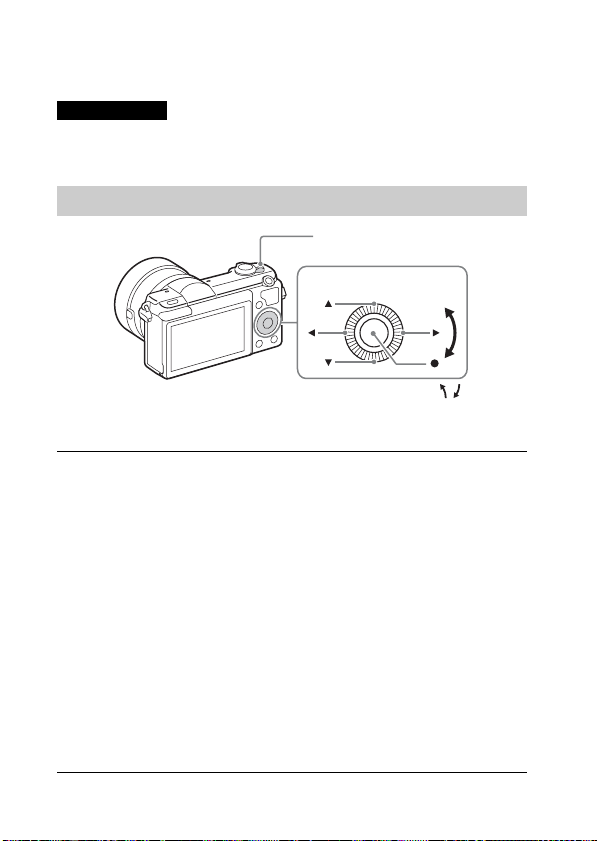
Setting the clock
ON/OFF (Power)
Control wheel
Select items: v/V/b/B//
Set:
z
Set the ON/OFF (Power) switch to ON.
1
The Date & Time setting is displayed when you turn on the camera for the
first time.
• It may take some time for the power to turn on and allow operation.
Check that [Enter] is selected on the screen, then press
2
z on the control wheel.
Select a desired geographic location by following the
3
on-screen instructions, then press z.
Set [Daylight Savings], [Date/Time] and [Date Format],
4
then press z.
• When setting [Date/Time], midnight is 12:00 AM, and noon is
12:00 PM.
Check that [Enter] is selected, then press z.
5
GB
20
Page 21
Shooting still images/movies
Shutter button
MOVIE
W/T (zoom) lever
W: zoom out
T: zoom in
Shooting still images
Press the shutter button halfway down to focus.
1
When the image is in focus, a beep sounds and the z or indicator
lights.
Press the shutter button fully down to shoot an image.
2
Shooting movies
Press the MOVIE (Movie) button to start recording.
1
• Use the W/T (zoom) lever to change the zoom ratio.
Press the MOVIE button again to stop recording.
2
Notes
• Continuous movie shooting is possible for approximately 29 minutes maximum at
one time with the camera’s default settings, and when the ambient temperature is
approximately 25°C (77°F) (the duration of time available for movie recording
varies depending on the temperature environment, the recording format/setting, or
the usage conditions of the camera before you start recording (page 27)). When
movie recording is finished, you can restart recording by pressing the MOVIE
button again. The recording may stop in order to protect the camera depending on
the temperature of the camera or the battery.
• Do not pull up the flash manually. This may cause a malfunction.
• When using the zoom function while shooting a movie, the sound of the camera
operating will be recorded. The sound of the MOVIE button operating may also be
recorded when movie recording is finished.
GB
GB
21
Page 22
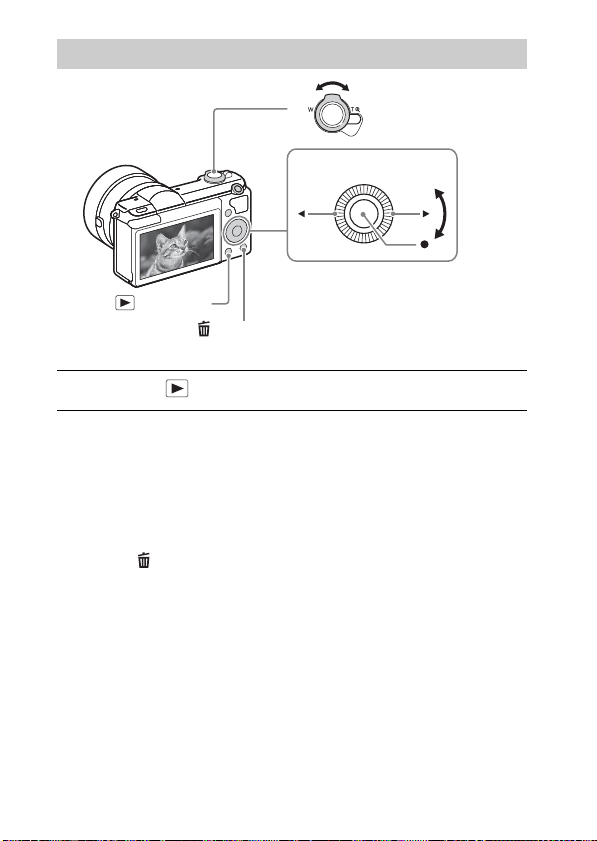
Viewing images
W: zoom out
T: zoom in
Control wheel
Select images:
(Playback)
(Delete)
Press the (Playback) button.
1
x
Selecting next/previous image
Select an image by pressing B (next)/b (previous) on the control wheel or by
turning the control wheel. Press z in the center of the control wheel to view
movies.
x
Deleting an image
1 Press the (Delete) button.
2 Select [Delete] with v on the control wheel, then press z.
x
Returning to shooting images
Press the shutter button halfway down.
B (next)/b (previous) or turn the
control wheel
Set: z
22
GB
Page 23
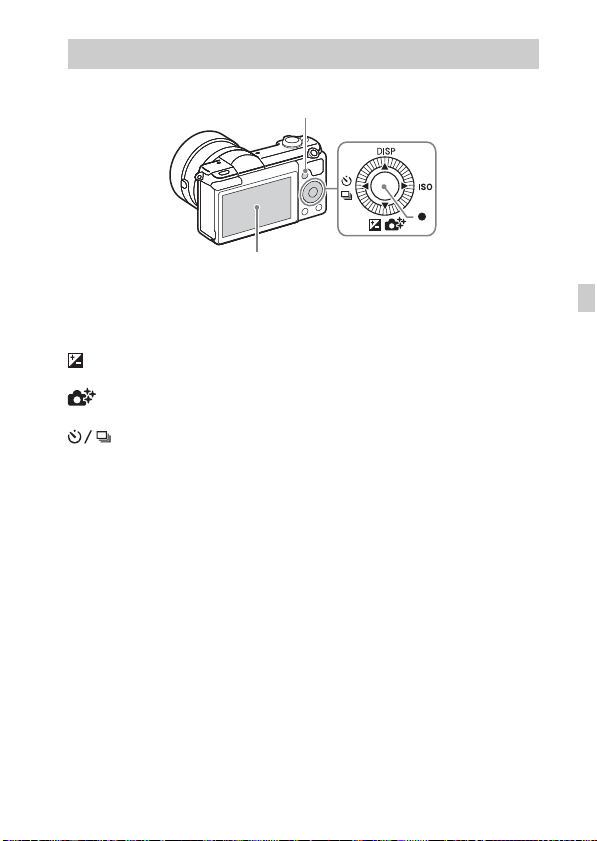
Introduction of other functions
Other functions can be operated using the control wheel, MENU button, etc.
MENU
Touch panel
x
Control wheel
DISP (Display Contents): Allows you to change the screen display.
ISO (ISO): Allows you to set the sensitivity based on the brightness.
(Exposure Comp.): Allows you to compensate the exposure and brightness
for the entire image.
(Photo Creativity): Allows you to operate the camera intuitively and
shoot creative images easily.
(Drive Mode): Allows you to switch between shooting methods, such
as single shooting, continuous shooting or bracket shooting.
z (Shoot Mode): Allows you to change the shooting mode.
x
Shooting using touch operation
This camera is equipped with a touch panel. By touching a subject on the
monitor, you can shoot still images (Touch Shutter) or bring the subject into
focus (Touch Focus). You can also use the [Touch Shutter] function along
with [Self-portrait/ -timer] shooting.
Refer to the “Help Guide” for detailed operations and the features available
with the touch panel.
Control wheel
GB
GB
23
Page 24
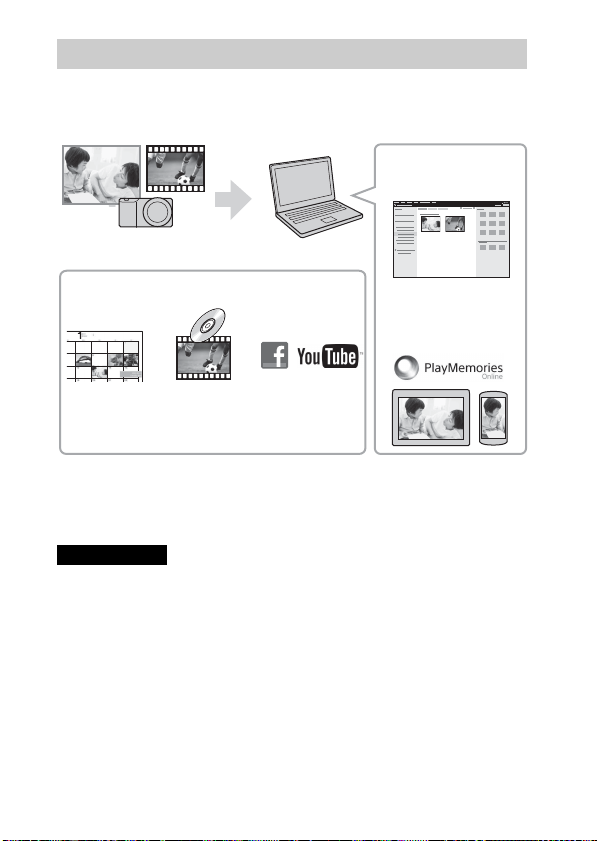
Features of PlayMemories Home™
The software PlayMemories Home allows you to import still images and
movies to your computer and use them. PlayMemories Home is required for
importing XAVC S movies and AVCHD movies to your computer.
Playing back importe d
images
Importing images from your camera
For Windows, the following functions are also
available:
Sharing images on
PlayMemories Online™
Viewing images
on a calendar
Creating
movie
discs
Uploading
images to
network services
• You can download Image Data Converter (RAW image editing software) or
Remote Camera Control, etc. by performing the following procedure:
Connect the camera to your computer t launch PlayMemories Home t
click [Notifications].
Notes
• An Internet connection is required to install PlayMemories Home.
• An Internet connection is required to use PlayMemories Online or other network
services. PlayMemories Online or other network services may not be available in
some countries or regions.
• Use the following URL for Mac applications:
http://www.sony.co.jp/imsoft/Mac/
• If the software PMB (Picture Motion Browser), supplied with models released
before 2011, has already been installed on your computer, PlayMemories Home
will overwrite it during the installation. Use PlayMemories Home, the successor
software of PMB.
GB
24
Page 25

x
System requirements
You can find the system requirements for the software at the following URL:
www.sony.net/pcenv/
x
Installing PlayMemories Home on a computer
Using the Internet browser on your computer, go to the
1
following URL, and then install PlayMemories Home.
www.sony.net/pm/
• For details on PlayMemories Home, refer to the following
PlayMemories Home support page (English only):
http://www.sony.co.jp/pmh-se/
• When installation is complete, PlayMemories Home starts.
Connect the camera to your computer using the micro
2
USB cable (supplied).
• New functions may be installed in PlayMemories Home. Connect the
camera to your computer even if PlayMemories Home is already
installed on your computer.
Notes
• Do not disconnect the micro USB cable (supplied) from the camera while the
operating screen or the accessing screen is displayed. Doing so may damage the
data.
• To disconnect the camera from the computer, click on the tasktray, then click
[Eject PMHOME].
GB
GB
25
Page 26
Adding functions to the camera
You can add the desired functions to your camera by connecting to the
application download website (PlayMemories Camera Apps™) via the
Internet.
http://www.sony.net/pmca/
• After installing an application, you can call up the application by touching an
NFC-enabled Android smartphone to the N mark on the camera, using the
[One-touch(NFC)] function.
Number of still images and recordable time of movies
The number of still images and recordable time may vary depending on the
shooting conditions and the memory card.
x
Still images
[ Image Size]: L: 24M
When [ Aspect Ratio] is set to [3:2]*
Quality
Capacity
Standard 330 images
Fine 200 images
RAW & JPEG 54 images
RAW 74 images
* When the [ Aspect Ratio] is set to other than [3:2], you can record more
pictures than shown above. (Except when [ Quality] is set to [RAW].)
2 GB
26
GB
Page 27
x
Movies
The table below shows the approximate total recording times using a memory
card formatted with this camera. The recording time for XAVC S and AVCHD
movies is the recording time when shooting with [Dual Video REC] set to
[
Off].
(h (hour), m (minute))
Record Setting
60p 50M/50p 50M — 2 h 35 m
30p 50M/25p 50M — 2 h 35 m
*
24p 50M
60i 24M(FX)/50i 24M(FX) 10 m 6 h
60i 17M(FH)/50i 17M(FH) 10 m 8 h 15 m
60p 28M(PS)/50p 28M(PS) 9 m 5 h 5 m
24p 24M(FX)/25p 24M(FX) 10 m 6 h
24p 17M(FH)/25p 17M(FH) 10 m 8 h
1440×1080 12M 20 m 11 h
VGA 3M 1 h 10 m 40 h
* only for 1080 60i compatible models
• Continuous shooting is possible for approximately 29 minutes (a product
specification limit). The maximum continuous recording time of an MP4 (12M)
format movie is about 20 minutes (limited by the 2 GB file size restriction).
• The recordable time of movies varies because the camera is equipped with VBR
(Variable Bit-Rate), which automatically adjusts image quality depending on the
shooting scene. When you record a fast-moving subject, the image is clearer but
the recordable time is shorter because more memory is required for recording.
The recordable time also varies depending on the shooting conditions, the subject
or the image quality/size settings.
Capacity
2 GB 64 GB
— 2 h 35 m
GB
Notes on continuous movie recording
• It requires a lot of power to perform high quality movie recording or continuous
shooting using the image sensor. Therefore, if you continue to shoot, the
temperature inside the camera will rise, especially that of the image sensor. In such
cases, the camera turns off automatically since higher temperatures affect the
quality of the images or affect the internal mechanism of the camera.
GB
27
Page 28

• The duration of time available for movie recording is as follows when the camera
starts recording with the camera’s default settings after the power of the camera
has been turned off for a while. (The following values indicate the continuous time
from when the camera starts recording until the camera stops recording.)
Ambient temperature Continuous recording time for movies
20°C (68°F) About 29 minutes
30°C (86°F) About 29 minutes
40°C (104°F) About 20 minutes
• The duration of time available for movie recording varies with the temperature,
the recording format/setting, or condition of the camera before you start recording.
If you frequently recompose or shoot images after the power is turned on, the
temperature inside the camera will rise and the recording time available will be
shorter.
• When is indicated, stop recording the movie.
• If the camera stops recording due to the temperature, leave it for several minutes
with the power turned off. Start recording after the temperature inside the camera
drops fully.
Notes on using the camera
Functions built into this camera
• This manual describes 1080 60i-compatible devices and 1080 50i-compatible
devices.
To check whether your camera is a 1080 60i-compatible device or 1080 50icompatible device, check for the following marks on the bottom of the camera.
1080 60i-compatible device: 60i
1080 50i-compatible device: 50i
• This camera is compatible with 1080 60p or 50p-format movies. Unlike standard
recording modes up to now, which record in an interlacing method, this camera
records using a progressive method. This increases the resolution, and provides a
smoother, more realistic image.
On use and care
Avoid rough handling, disassembling, modifying, physical shock, or impact such as
hammering, dropping, or stepping on the product. Be particularly careful of the lens.
Notes on recording/playback
• Before you start recording, make a trial recording to make sure that the camera is
working correctly.
• This camera is neither dust-proof, nor splash-proof, nor water-proof.
• Do not look at the sun or a strong light through a removed lens. This may cause
GB
irrecoverable damage to your eyes. Or it may cause a malfunction of the lens.
• If moisture condensation occurs, remove it before using the camera.
28
Page 29

• Do not shake or strike the camera. It may cause a malfunction and you may not be
able to record images. Furthermore, the recording media may become unusable or
image data may be damaged.
Do not use/store the camera in the following places
• In an extremely hot, cold or humid place
In places such as in a car parked in the sun, the camera body may become
deformed and this may cause a malfunction.
• Under direct sunlight or near a heater
The camera body may become discolored or deformed, and this may cause a
malfunction.
• In a location subject to shaking or vibration
• Near a location that generates strong radio waves, emits radiation or is strongly
magnetic
In such locations, the camera may not properly record or play back images.
• In sandy or dusty places
Be careful not to let sand or dust get into the camera. This may cause the camera to
malfunction, and in some cases this malfunction cannot be repaired.
About the grip
The grip is applied with a special coating. The grip may be discolored if it is rubbed
with a dark colored cloth, leather, etc.
On storing
Be sure to attach the front lens cap when not using the camera.
Notes on the screen and lens
• The monitor is manufactured using extremely high-precision technology, and over
99.99% of the pixels are operational for effective use. However, some tiny black
and/or bright dots (white, red, blue or green) may appear on the monitor. These dots
are a normal result of the manufacturing process, and do not affect the recording.
• Do not press against the monitor. The monitor may be discolored and that may
cause a malfunction.
• Do not operate the touch panel using a pointed object. This may cause a
malfunction.
• When the lens is operating, be careful not to let your finger be caught by the lens.
About the magnets
There are magnets attached to the back of the monitor and in the area around the
flash. Do not put objects that are affected by magnetic fields, such as a floppy disk
or a credit card to the monitor or the camera body.
On using the lenses and accessories
It is recommended that you use Sony lenses/accessories designed to suit the
characteristics of this camera.
Using the products of other manufacturers may cause the camera not to operate to its
capability, or result in accidents and malfunctions of the camera.
GB
GB
29
Page 30

Notes on the flash
• Do not carry the camera by the flash unit, or use excessive force on it.
• If water, dust or sand get into the open flash unit, it may cause a malfunction.
• Be sure to keep your fingers out of the way when you press the flash down.
On camera’s temperature
Your camera and battery may get hot due to continuous use, but it is not a
malfunction.
On the overheat protection
Depending on the camera and battery temperature, you may be unable to record
movies or the power may turn off automatically to protect the camera.
A message will be displayed on the monitor before the power turns off or when you
can no longer record movies. In this case, leave the power off and wait until the
camera and battery temperature goes down. If you turn on the power without letting
the camera and battery cool down enough, the power may turn off again or you may
be unable to record movies.
On charging the battery
If you charge a battery that has not been used for a long time, you may be unable to
charge it to the proper capacity.
This is due to the battery characteristics. Charge the battery again.
Warning on copyright
Television programs, films, videotapes, and other materials may be copyrighted.
Unauthorized recording of such materials may be contrary to the provisions of the
copyright laws.
No guarantee in the case of damaged content or recording failures
Sony cannot provide a guarantee in the case of failure to record or loss or damage of
recorded content due to a malfunction of the camera or recording media, etc.
Cleaning the camera surface
Clean the camera surface with a soft cloth slightly moistened with water, then wipe
the surface with a dry cloth. To prevent damage to the finish or casing:
– Do not expose the camera to chemical products such as thinner, benzine, alcohol,
disposable cloths, insect repellent, sunscreen or insecticide.
Maintaining the monitor
• Hand cream or moisturizer left on the monitor may dissolve its coating. If you get
any of these substances on the monitor, wipe it off immediately.
• Wiping forcefully with tissue paper or other materials can damage the coating.
• If fingerprints or debris are stuck to the monitor, we recommend that you gently
remove any debris and then wipe the monitor clean with a soft cloth.
Notes on wireless LAN
We assume no responsibility whatsoever for any damage caused by unauthorized
GB
access to, or unauthorized use of, destinations loaded on the camera, resulting from
loss or theft.
30
Page 31

Specifications
Camera
[System]
Camera type: Interchangeable lens
digital camera
Lens: Sony E-mount lens
[Image sensor]
Image sensor: APS-C format (23.5 mm
× 15.6 mm) CMOS image sensor
Total pixel number of image sensor:
Approx. 24 700 000 pixels
Effective pixel number of camera:
Approx. 24 300 000 pixels
[Auto focus system]
System: Phase detection system/
Contrast detection system
Sensitivity range: EV-1 to EV20 (at
ISO 100 equivalent, with F2.0
lens)
[Exposure control]
Metering method: 1 200-segment
metering by the image sensor
Metering range: EV-1 to EV20 (at
ISO 100 equivalent, with F2.0
lens)
ISO sensitivity (Recommended
exposure index):
Still images: AUTO, ISO 100 –
ISO 25 600
Movies: AUTO, ISO 100 –
ISO 12 800 equivalent
Exposure compensation: ±3.0 EV
(1/3 EV step)
[Shutter]
Type: Electronically-controlled,
vertical-traverse, focal-plane type
Speed range:
Still images: 1/4 000 second to
30 seconds, BULB
Movies: 1/4 000 second to
1/4 second (1/3 EV step),
1080 60i-compatible device up to
1/60 second in AUTO mode (up to
1/30 second in [Auto Slow Shut.]
mode)
1080 50i-compatible device up to
1/50 second in AUTO mode (up to
1/25 second in [Auto Slow Shut.]
mode)
Flash sync speed: 1/160 second
[Recording media]
Memory Stick PRO Duo media,
SD card
[Monitor]
LCD monitor: Wide, 7.5 cm (3.0 type)
TFT drive, touch panel
Total number of dots: 921 600 dots
[Input/output terminals]
Multi/Micro USB Terminal*:
Hi-Speed USB (USB 2.0)
* Supports Micro USB compatible
device.
HDMI: HDMI type D micro jack
[Power]
Battery type: Rechargeable battery
pack NP-FW50
GB
GB
31
Page 32

[Power consumption (while
shooting)]
When using an E PZ 16 – 50 mm F3.5
– 5.6 OSS lens*
Approx. 2.3 W
* supplied with ILCE-5100L/
ILCE-5100Y
[Others]
Exif Print: Compatible
PRINT Image Matching III:
Compatible
DPOF: Compatible
Dimensions (CIPA compliant)
(Approx.):
109.6 mm × 62.8 mm × 35.7 mm
(4 3/8 inches × 2 1/2 inches ×
1 7/16 inches) (W/H/D)
Mass (CIPA compliant) (Approx.):
283 g (10.0 oz)
(including battery and Memory
Stick PRO Duo media)
224 g (7.9 oz) (camera only)
Operating temperature: 0 °C to 40 °C
(32 °F to 104 °F)
File format:
Still image: JPEG compliant (DCF
Ver. 2.0, Exif Ver. 2.3, MPF
Baseline), RAW (Sony ARW 2.3
Format)
Movies (XAVC S format):
MPEG-4 AVC/H.264 XAVC S
ver.1.0 format compliant
Video: MPEG-4 AVC/H.264
Audio: LPCM 2ch (48 kHz 16 bit)
Movie (AVCHD format): AVCHD
format Ver. 2.0 compatible
Video: MPEG-4 AVC/H.264
Audio: Dolby Digital 2ch
Dolby Digital Stereo Creator
• Manufactured under license from
Dolby Laboratories.
GB
32
Movie (MP4 format):
Video: MPEG-4 AVC/H.264
Audio: MPEG-4 AAC-LC 2ch
[Flash]
Flash guide number: 4 (in meters at
ISO 100)
Recycling time: Approx. 3 seconds
Flash coverage: Covering 16 mm lens
(focal length that the lens indicates)
Flash compensation: ±2.0 EV (1/3 EV
step)
[Wireless LAN]
Supported format: IEEE 802.11 b/g/n
Frequency band: 2.4 GHz
Supported security protocols: WEP/
WPA-PSK/WPA2-PSK
Configuration method: WPS (Wi-Fi
Protected Setup)/Manual
Access method: Infrastructure mode
NFC: NFC Forum Type 3 Tag-
compliant
AC Adaptor AC-UB10C/UB10D
Power requirements: AC 100 V to
240 V, 50 Hz/60 Hz, 70 mA
Output voltage: DC 5 V, 0.5 A
Rechargeable battery pack
NP-FW50
Battery type: Lithium-ion battery
Maximum voltage: DC 8.4 V
Nominal voltage: DC 7.2 V
Maximum charge voltage: DC 8.4 V
Maximum charge current: 1.02 A
Capacity: Typical 7.7 Wh (1 080 mAh)
Minimum 7.3 Wh (1 020 mAh)
Page 33

Lens
Lens
Camera
Equivalent 35 mm-format focal
2)
(mm)
length
E16 – 50 mm zoom
1)
lens
ILCE-5100L/
ILCE-5100Y
24 – 75 82.5 – 315
E55 – 210 mm
zoom lens
ILCE-5100Y
Lens groups/elements 8 – 9 9 – 13
Angle of view
Minimum focus
2)
3)
(m (feet)) 0.25 – 0.3
83° – 32° 28.2° – 7.8°
1.0 (3.28)
(0.82 – 1)
Maximum magnification (×) 0.215 0.225
Minimum aperture f/22 – f/36 f/22 – f/32
Filter diameter (mm) 40.5 49
Dimensions (max. diameter ×
height) (Approx. mm (in.))
64.7 × 29.9
(2 5/8 × 1 3/16)
63.8 × 10⁸
(2 5/8 × 4 3/8)
Mass (Approx. g (oz.)) 116 (4.1) 345 (12.2)
SteadyShot Available Available
1)
Power zoom.
2)
The values for equivalent 35 mm-format focal length and angle of view are based
on digital cameras equipped with an APS-C sized image sensor.
3)
Minimum focus is the shortest distance from the image sensor to the subject.
Design and specifications are subject to change without notice.
On focal length
The picture angle of this camera is narrower than that of a 35 mm-format camera.
You can find the approximate equivalent of the focal length of a 35 mm-format
camera, and shoot with the same picture angle, by increasing the focal length of your
lens by half.
For example, by using a 50 mm lens, you can get the approximate equivalent of a
75 mm lens of a 35 mm-format camera.
GB
GB
33
Page 34

Trademarks
• Memory Stick and are
trademarks or registered trademarks
of Sony Corporation.
• XAVC S and are
registered trademarks of Sony
Corporation.
• “AVCHD Progressive” and
“AVCHD Progressive” logotype are
trademarks of Panasonic Corporation
and Sony Corporation.
• Dolby and the double-D symbol are
trademarks of Dolby Laboratories.
• The terms HDMI and HDMI HighDefinition Multimedia Interface, and
the HDMI Logo are trademarks or
registered trademarks of HDMI
Licensing LLC in the United States
and other countries.
• Windows is a registered trademark of
Microsoft Corporation in the United
States and/or other countries.
• Mac is a registered trademark of
Apple Inc. in the United States and
other countries.
• iOS is a registered trademark or
trademark of Cisco Systems, Inc.
• iPhone and iPad are registered
trademarks of Apple Inc. in the
United States and other countries.
• SDXC logo is a trademark of SD-3C,
LLC.
• Android and Google Play are
trademarks of Google Inc.
• Wi-Fi, the Wi-Fi logo, Wi-Fi
PROTECTED SET-UP are registered
trademarks of the Wi-Fi Alliance.
• The N Mark is a trademark or
registered trademark of NFC Forum,
Inc. in the United States and in other
countries.
• DLNA and DLNA CERTIFIED are
trademarks of Digital Living
GB
Network Alliance.
34
• Facebook and the “f” logo are
trademarks or registered trademarks
of Facebook, Inc.
• YouTube and the YouTube logo are
trademarks or registered trademarks
of Google Inc.
• Eye-Fi is a trademark of Eye-Fi, Inc.
• In addition, system and product
names used in this manual are, in
general, trademarks or registered
trademarks of their respective
developers or manufacturers.
However, the ™ or ® marks may not
be used in all cases in this manual.
Additional information on this
product and answers to frequently
asked questions can be found at our
Customer Support Website.
Page 35

GB
35
GB
Page 36

Français
Monture E
En savoir plus sur l’appareil photo (« Manuel d’aide »)
« Manuel d’aide » est un manuel en ligne. Vous pouvez lire
le « Manuel d’aide » sur votre ordinateur ou sur votre
smartphone.
Consultez-le pour obtenir des instructions détaillées au sujet
des nombreuses fonctions de l’appareil.
URL :
http://rd1.sony.net/help/ilc/1430/h_zz/
Afficher le guide
Cet appareil est équipé d’un guide d’instructions intégré.
MENU
(Guide intégr. à l'app.)
Guide intégr. à l'app.
L’appareil affiche des explications sur les éléments de MENU et les valeurs de
réglage.
1 Appuyez sur le bouton MENU.
FR
2 Sélectionnez l'élément souhaité, puis appuyez sur le bouton (Guide
2
intégr. à l'app.).
Page 37

Conseils de prise de vue
L’appareil affiche des conseils de prise de vue en fonction du mode de prise de
vue sélectionné.
1 Appuyez sur le bouton (Guide intégr. à l'app.) en mode prise de vue.
2 Sélectionnez le conseil de prise de vue souhaité puis appuyez sur z sur la
molette de commande.
Le conseil de prise de vue s’affiche.
• Vous pouvez faire défiler l’écran à l’aide de v/V et modifier les conseils
de prise de vue à l’aide de b/B.
Aide-mémoire
Les numéros de modèle et de série se situent sous l’appareil. Prendre en note le numéro de
série dans l’espace prévu ci-dessous. Se reporter à ces numéros lors des communications
avec le détaillant Sony au sujet de ce produit.
Modèle no ILCE-5100
No de série ____________________________
Modèle no AC-UB10C/AC-UB10D
No de série ____________________________
AVERTISSEMENT
Afin de réduire les risques d’incendie ou de décharge électrique,
n’exposez pas cet appareil à la pluie ou à l’humidité.
IMPORTANTES INSTRUCTIONS DE
SÉCURITÉ
- CONSERVEZ CES INSTRUCTIONS
DANGER
AFIN DE RÉDUIRE LE RISQUE D’INCENDIE
OU DE DÉCHARGE ÉLECTRIQUE, SUIVEZ
EXACTEMENT CES INSTRUCTIONS
Si la forme de la fiche ne correspond pas à la prise secteur, utilisez un adaptateur de fiche
accessoire de configuration correcte pour la prise secteur.
FR
FR
3
Page 38

ATTENTION
[ Batterie
Toute erreur de manipulation de la batterie peut provoquer son explosion, entraîner un
incendie, voire même des brûlures de substances chimiques. Respectez les précautions
suivantes :
• Ne démontez pas la batterie.
• N’écrasez et n’exposez pas la batterie à des chocs ou à une force extérieure. Vous ne
devez pas la frapper avec un marteau, la laisser tomber ou marcher dessus.
• Ne court-circuitez pas les bornes de la batterie et maintenez-les à l’écart de tout contact
avec des objets métalliques.
• N’exposez pas la batterie à des températures supérieures à 60 °C (140 °F), notamment les
rayons directs du soleil ou l’habitacle d’un véhicule garé au soleil.
• N’incinérez pas la batterie et ne la jetez pas au feu.
• Ne manipulez jamais des batteries lithium ion qui sont endommagées ou présentent une
fuite.
• Veillez à recharger la batterie à l’aide d’un chargeur Sony authentique ou d’un appareil
capable de la recharger.
• Tenez la batterie hors de la portée des petits enfants.
• Gardez la batterie au sec.
• Remplacez-la uniquement par une batterie de même type ou d’un type équivalent
recommandé par Sony.
• Mettez les batteries au rebut sans attendre, de la manière décrite dans les instructions.
[ Adaptateur secteur
Lorsque vous utilisez l’adaptateur secteur, branchez-le à une prise murale se trouvant à
proximité. En cas de dysfonctionnement lors de l’utilisation de l’appareil, débranchez
immédiatement l’adaptateur secteur de la prise murale.
Le cordon d’alimentation, s’il est fourni, est conçu spécifiquement pour une utilisation
exclusive avec cet appareil et il ne doit pas être utilisé avec un autre appareil électrique.
Pour les clients aux États-Unis et au Canada
[ RECYCLAGE DES ACCUMULATEURS AUX IONS DE LITHIUM
Les accumulateurs aux ions de lithium sont recyclables.
Vous pouvez contribuer à préserver l’environnement en rapportant les
piles usagées dans un point de collecte et de recyclage le plus proche.
Pour plus d’informations sur le recyclage des accumulateurs,
téléphonez au numéro gratuit 1-800-822-8837 (États-Unis et Canada
uniquement), ou visitez
http://www.call2recycle.org/
FR
Avertissement : Ne pas utiliser des accumulateurs aux ions de lithium qui sont
4
endommagés ou qui fuient.
Page 39

[ Batterie et objectif (dans le cas où l’objectif est fourni)
Cet appareil est conforme à la section 15 des règlements FCC. Son fonctionnement est
soumis aux deux conditions suivantes : (1) cet appareil ne doit pas provoquer
d’interférences nuisibles, (2) cet appareil doit accepter toute interférence, y compris celles
susceptibles de provoquer son fonctionnement indésirable.
CAN ICES-3 B/NMB-3 B
Cet appareil est conforme aux exigences de la FCC (Commission américaine des
communications) et d’IC (Industrie Canada) relatives aux limites d’exposition aux
radiations énoncées pour un environnement non contrôlé. Il est également conforme aux
directives de la FCC en matière d’exposition aux fréquences radioélectriques (RF)
énoncées, ainsi qu’aux normes d’IC relatives à l’exposition aux fréquences
radioélectriques énoncées au CNR-102 (Cahier des charges sur les normes
radioélectriques).
Cet appareil présente des niveaux très peu élevés d’énergie RF, réputés conformes sans test
du débit d’absorption spécifique (SAR).
À l’intention des clients aux É.-U.
Pour toute question au sujet de cet appareil, appeler :
Sony Centre d’information à la clientèle
1-800-222-SONY (7669).
Le numéro ci-dessous concerne seulement les questions relevant de la Commission
fédérale des communications des États-Unis (FCC).
[ Information réglementaire
Déclaration de conformité
Nom commercial : SONY
No de modèle : ILCE-5100
Responsable : Sony Electronics Inc.
Adresse : 16530 Via Esprillo, San Diego, CA 92127 É.-U.
No de téléphone : 858-942-2230
Cet appareil est conforme à la Partie 15 de la réglementation de la FCC des États-Unis.
Son utilisation est sujette aux deux conditions suivantes : (1) Cet appareil ne doit pas
générer d’interférences nuisibles et (2) il doit être en mesure d’accepter toute
interférence reçue, y compris les interférences pouvant générer un fonctionnement
indésirable.
Cet équipement ne doit pas être co-situé ou utilisé en conjonction avec une autre antenne
ou émetteur.
[ AVERTISSEMENT
Par la présente, vous êtes avisé du fait que tout changement ou toute modification ne
faisant pas l’objet d’une autorisation expresse dans le présent manuel pourrait annuler
votre droit d’utiliser l’appareil.
FR
FR
5
Page 40

[ Note :
L’appareil a été testé et est conforme aux exigences d’un appareil numérique de Classe B,
conformément à la Partie 15 de la réglementation de la FCC.
Ces critères sont conçus pour fournir une protection raisonnable contre les interférences
nuisibles dans un environnement résidentiel. L’appareil génère, utilise et peut émettre des
fréquences radio ; s’il n’est pas installé et utilisé conformément aux instructions, il pourrait
provoquer des interférences nuisibles aux communications radio. Cependant, il n’est pas
possible de garantir que des interférences ne seront pas provoquées dans certaines
conditions particulières. Si l’appareil devait provoquer des interférences nuisibles à la
réception radio ou à la télévision, ce qui peut être démontré en allumant et éteignant
l’appareil, il est recommandé à l’utilisateur d’essayer de corriger cette situation par l’une
ou l’autre des mesures suivantes :
– Réorienter ou déplacer l’antenne réceptrice.
– Augmenter la distance entre l’appareil et le récepteur.
– Brancher l’appareil dans une prise ou sur un circuit différent de celui sur lequel le
récepteur est branché.
– Consulter le détaillant ou un technicien expérimenté en radio/téléviseurs.
Le câble d’interface fourni doit être utilisé avec l’appareil pour que celui-ci soit conforme
aux critères régissant les appareils numériques, conformément à la sous-partie B de la
Partie 15 de la réglementation de la FCC.
Pour les utilisateurs au Canada
Le présent appareil est conforme aux CNR d’Industrie Canada applicables aux appareils
radio exempts de licence. L’exploitation est autorisée aux deux conditions suivantes : (1)
l’appareil ne doit pas produire de brouillage, et (2) cet appareil doit accepter tout
brouillage, y compris un brouillage qui pourrait provoquer un fonctionnement inopportun
de l’appareil.
Note pour les clients européens
[ Avis aux consommateurs des pays appliquant les Directives UE
Fabricant : Sony Corporation, 1-7-1 Konan Minato-ku Tokyo, 108-0075 Japon
Pour toute question relative à la conformité des produits dans l’UE : Sony Deutschland
GmbH, Hedelfinger Strasse 61, 70327 Stuttgart, Allemagne
Par la présente, Sony Corporation déclare que cet appareil est conforme aux exigences
essentielles et aux autres dispositions pertinentes de la directive 1999/5/CE. Pour toute
information complémentaire, veuillez consulter l’URL suivante :
http://www.compliance.sony.de/
FR
6
Page 41

[ Avis
Si l’électricité statique ou les champs électrostatiques entraînent une interruption lors du
transfert des données (échec), redémarrez l’application ou débranchez, puis rebranchez le
câble de connexion (USB, etc.).
Cet appareil a été testé et jugé conforme aux limites établies par la réglementation EMC
visant l’utilisation de câbles de connexion de moins de 3 mètres (9,8 pi.).
Le champ électromagnétique à des fréquences particulières peut avoir une incidence sur
l’image et le son de cet appareil.
[ Élimination des piles et accumulateurs et des Équipements
Électriques et Électroniques usagés (Applicable dans les pays
de l’Union Européenne et aux autres pays européens disposant
de systèmes de collecte sélective)
Ce symbole apposé sur le produit, la pile ou l’accumulateur ou sur
l’emballage, indique que le produit et les piles et accumulateurs fournis
avec ce produit ne doivent pas être traités comme de simples déchets
ménagers.
Sur certains types de piles, ce symbole apparaît parfois combiné avec
un symbole chimique. Les symboles pour le mercure (Hg) ou le plomb
mercure ou 0,004% de plomb.
En vous assurant que les produits, piles et accumulateurs sont mis au rebut de façon
appropriée, vous participez activement à la prévention des conséquences négatives que leur
mauvais traitement pourrait provoquer sur l’environnement et sur la santé humaine. Le
recyclage des matériaux contribue par ailleurs à la préservation des ressources naturelles.
Pour les produits qui pour des raisons de sécurité, de performance ou d’intégrité de
données nécessitent une connexion permanente à une pile ou à un accumulateur, il
conviendra de vous rapprocher d’un Service Technique qualifié pour effectuer son
remplacement.
En rapportant votre appareil électrique, les piles et accumulateurs en fin de vie à un point
de collecte approprié vous vous assurez que le produit, la pile ou l’accumulateur incorporé
sera traité correctement.
Pour tous les autres cas de figure et afin d’enlever les piles ou accumulateurs en toute
sécurité de votre appareil, reportez-vous au manuel d’utilisation.
Rapportez les piles et accumulateurs, et les équipements électriques et électroniques usagés
au point de collecte approprié pour le recyclage.
Pour toute information complémentaire au sujet du recyclage de ce produit ou des piles et
accumulateurs, vous pouvez contacter votre municipalité, votre déchetterie locale ou le
point de vente où vous avez acheté ce produit.
(Pb) sont rajoutés lorsque ces piles contiennent plus de 0,0005% de
FR
FR
7
Page 42

Pour les clients à Singapour
Clients ayant acheté leur appareil au Japon dans un
magasin commercialisant des articles auprès des
visiteurs étrangers
[ Remarque
Certains symboles de certification correspondant à des normes prises en charge par
l’appareil photo peuvent être vérifiés sur son écran.
Sélectionnez MENU t (Réglage) 5 t [Logo de certification].
Si l’affichage est impossible en raison de problèmes tels qu’une défaillance de l’appareil
photo, contactez votre revendeur Sony ou un centre de service après-vente Sony agréé.
FR
8
Page 43

Table des matières
Préparation de l’appareil photo Étape 1 page 10
– Vérification des éléments fournis
– Identification des pièces
– Insertion de la batterie
– Charge de la batterie
– Installation/retrait de l’objectif
– Insertion d’une carte mémoire (vendue séparément)
– Réglage de l’horloge
Fonctions de base Étape 2 page 23
– Prise de vue d’images fixes/de films
Fonction lecture Étape 3 page 25
– Visualisation d’images
Fonction enregistrement Étape 4 page 26
– Présentation d’autres fonctions
Importation d’images vers un ordinateur page 27
– Fonctions de PlayMemories Home™
Ajouter de nouvelles fonctions à l’appareil page 29
– Ajouter de nouvelles fonctions à l’appareil
Divers page 29
– Nombre d’images fixes et durée enregistrable de films
– Remarques sur l’utilisation de l’appareil photo
– Spécifications
FR
Ce mode d’emploi couvre plusieurs modèles fournis avec différents objectifs.
Le nom du modèle varie selon l’objectif fourni. Le modèle disponible varie selon les
pays/régions.
Nom du modèle Objectif
ILCE-5100 Non fourni
ILCE-5100L E16 – 50 mm
ILCE-5100Y E55 – 210 mm et E16 – 50 mm
FR
9
Page 44

Vérification des éléments fournis
Commencez par vérifier le nom du modèle de votre appareil photo (page 9).
Les accessoires fournis diffèrent selon le modèle.
Le chiffre indiqué entre parenthèses représente le nombre d’éléments fournis.
x
Pour tous les modèles
• Appareil photo (1)
• Cordon d’alimentation (1)* (non
fourni aux États-Unis et au
Canada)
* Plusieurs cordons d’alimentation
peuvent être fournis avec l’appareil
photo. Utilisez le cordon approprié
qui correspond à votre pays ou
région.
• Batterie rechargeable NP-FW50
(1)
• Câble micro-USB (1)
• Adaptateur secteur AC-UB10C/
UB10D (1)
• Bandoulière (1)
• Mode d’emploi (Ce manuel) (1)
• Wi-Fi Connection/One-touch
(NFC) Guide
Ce guide décrit les fonctions
nécessitant une connexion Wi-Fi.
x
ILCE-5100
• Capuchon de boîtier (1) (fixé à
l’appareil photo)
x
ILCE-5100L
• Objectif zoom E16 – 50 mm (1)
(installé sur l’appareil)/Capuchon
d’objectif avant (1) (installé sur
l’objectif)
x
ILCE-5100Y
• Objectif zoom E16 – 50 mm (1)
(installé sur l’appareil)/Capuchon
d’objectif avant (1) (installé sur
l’objectif)
• Objectif zoom E55 – 210 mm (1)/
Capuchon d’objectif avant (1)/
Capuchon d’objectif arrière (1)/
Pare-soleil (1)
10
FR
Page 45

Identification des pièces
Lorsque l’objectif est retiré
A Déclencheur
B Interrupteur ON/OFF
(alimentation)
C Crochet pour bandoulière
D (Marque N)
• Pour connecter l’appareil à un
smartphone équipé de la fonction
NFC, mettez en contact les
marques des deux dispositifs.
• NFC (Near Field
Communication) est une norme
internationale de technologie de
communication sans fil à courte
portée.
E Pour la prise de vue :
Levier W/T (zoom)
Pour la visualisation : Levier
(index)/ (zoom de lecture)
F Illuminateur AF/Témoin de
retardateur
G Indicateur de position du
capteur d’image
H Flash
I Microphone
1)
J Objectif
K Bouton de déverrouillage de
l’objectif
L Monture
M Capteur d’image
N Contacts de l’objectif
1)
Ne couvrez pas cette pièce pendant
l’enregistrement de films.
2)
Ne touchez pas directement cette
pièce.
2)
2)
FR
FR
11
Page 46

A Écran/écran tactile
• L’écran peut être ajusté pour
offrir un angle de vue adapté, et
vous permettre d’effectuer des
prises de vue, quelle que soit
votre position.
B Bouton (éjection du flash)
C Couvercle du compartiment
multi/micro connecteur USB
D Couvercle du compartiment
carte mémoire/bornes
E Témoin d’accès
F Capteur Wi-Fi (intégré)
G Bouton MOVIE (Film)
H Bouton MENU
I Molette de commande
J Bouton (Guide intégr. à
l'app.)/ (Supprimer)
K Bouton (Lecture)
L Multi/micro connecteur USB*
• Accepte les appareils
compatibles micro-USB.
M Témoin de charge
N Fente de carte mémoire
O Prise micro HDMI
* Pour en savoir plus sur les
accessoires compatibles avec le
multi/micro connecteur USB, vis itez
le site Internet Sony. Vous pouvez
aussi consulter votre revendeur
Sony ou un centre de service aprèsvente Sony agréé.
12
FR
Page 47

A Couvercle de batterie
B Levier d’éjection de la batterie
C Fente d’insertion de la batterie
D Couvercle de plaque de
connexion
• Utilisez-le lorsque vous utilisez
un adaptateur secteur AC-PW20
(vendu séparément). Insérez la
plaque de connexion dans le
compartiment de la batterie, puis
faites passer le cordon dans le
couvercle de plaque de
connexion comme illustré cidessous.
F Écrou de pied
• Utilisez un trépied ayant une
longueur de vis de moins de
5,5 mm (7/32 po). Sinon vous ne
pouvez pas fixer fermement
l’appareil et celui-ci pourrait être
endommagé.
FR
• Assurez-vous que le cordon n’est
pas pincé lorsque vous fermez le
couvercle.
E Haut-parleur
FR
13
Page 48

x
Objectif
Pour consulter les spécifications des
objectifs, référez-vous à la page 37.
E PZ 16 – 50 mm F3.5 – 5.6
OSS (fourni avec ILCE5100L/ILCE-5100Y)
A Bague de zoom/mise au point
B Levier du zoom
C Repère de montage
D Contacts de l’objectif
1)
Ne touchez pas directement cette
pièce.
1)
E55 – 210 mm F4.5 – 6.3
OSS (fourni avec
ILCE-5100Y)
A Bague de mise au point
B Bague de zoom
C Échelle de focale
D Repère de focale
E Contacts de l’objectif
F Repère de montage
1)
Ne touchez pas directement cette
pièce.
1)
14
FR
Page 49

Insertion de la batterie
Levier d’éjection de la batterie
Ouvrez le couvercle.
1
Insérez la batterie.
2
• Tout en appuyant sur le levier d’éjection de la batterie, insérez la
batterie comme illustré. Assurez-vous que le levier d’éjection de la
batterie se verrouille après insertion.
• Si vous fermez le couvercle alors que la batterie n’est pas insérée
correctement, vous risquez d’endommager l’appareil.
FR
FR
15
Page 50

Charge de la batterie
É
Pour les clients aux
Pour les clients dans des
pays/régions autres que les
États-Unis et le Canada
Raccordez l’appareil à l’adaptateur secteur (fourni), en
1
utilisant le câble micro-USB (fourni).
Branchez l’adaptateur secteur sur la prise murale.
2
Le témoin de charge s’allume en orange, et la charge commence.
• Mettez l’appareil photo hors tension pendant la charge de la batterie.
• Vous pouvez charger la batterie même si elle n’est encore partiellement
chargée.
• Lorsque le témoin de charge clignote et que la charge n’est pas
terminée, retirez la batterie et insérez-la de nouveau.
tats-Unis et au Canada
Cordon
d’alimentation
Témoin de charge
Allumé : en charge
Éteint : charge terminée
Clignotant :
Erreur de charge ou interruption
momentanée de la charge parce que
la température de l’appareil est en
dehors de la plage recommandée
Remarques
• Si le témoin de charge situé sur l’appareil clignote lorsque l’adaptateur secteur est
branché sur la prise murale, cela signifie que la charge est momentanément
interrompue parce que la température est en dehors de la plage recommandée.
Lorsque la température revient dans la plage adaptée, la charge reprend. Nous
vous recommandons de recharger la batterie à une température ambiante comprise
FR
entre 10 °C et 30 °C (50 °F et 86 °F).
16
Page 51

• L’encrassement des bornes de la batterie risque d’empêcher son chargement
efficace. Dans ce cas, retirez la poussière en frottant doucement à l’aide d’un
chiffon doux ou d’un bâtonnet d’ouate pour nettoyer les bornes de la batterie.
• Branchez l’adaptateur secteur (fourni) sur la prise murale la plus proche. En cas de
dysfonctionnement pendant l’utilisation de l’adaptateur secteur, débranchez-le
immédiatement de la source d’alimentation.
• Une fois la batterie chargée, débranchez l’adaptateur secteur de la prise murale.
• Utilisez exclusivement des batteries, un câble micro-USB (fourni) et un adaptateur
secteur (fourni) de la marque Sony.
• Lorsque l’appareil est raccordé à une prise murale à l’aide de l’adaptateur secteur
fourni, l’alimentation n’est pas assurée pendant la prise de vue/lecture. Pour
assurer l’alimentation pendant la prise de vue/lecture, vous devez utiliser
l’adaptateur secteur AC-PW20 (vendu séparément).
x
Temps de charge (charge complète)
Lorsque vous utilisez l’adaptateur secteur (fourni), le temps de charge est
d’environ 310 minutes.
Remarques
• Le temps de charge indiqué ci-dessus correspond à la charge d’une batterie
complètement déchargée, à une température ambiante de 25 °C (77 °F). Le temps
de charge peut être plus long selon les conditions d’utilisation et les circonstances.
x
Charge en se raccordant à un ordinateur
La batterie peut être rechargée en raccordant
l’appareil photo à un ordinateur au moyen
du câble micro-USB.
Vers une
Remarques
• Tenez compte des points suivants lorsque
vous effectuez la charge via un ordinateur :
– Si l’appareil photo est raccordé à un ordinateur portable qui n’est pas branché sur
une source d’alimentation, le niveau de la batterie de l’ordinateur portable
diminue. Ne chargez pas la batterie pendant une période prolongée.
– N’allumez pas, n’éteignez pas ou ne redémarrez pas l’ordinateur, et ne le
réactivez pas à partir du mode veille lorsqu’une connexion USB a été établie
entre l’ordinateur et l’appareil photo. Cela pourrait entraîner un
dysfonctionnement de l’appareil. Avant d’allumer, d’éteindre ou de redémarrer
l’ordinateur, ou de le réactiver à partir du mode veille, déconnectez l’appareil
photo de l’ordinateur.
– Nous ne garantissons pas la charge effectuée en utilisant un ordinateur construit
sur mesure ou un ordinateur modifié.
prise USB
FR
FR
17
Page 52

x
Durée de service de la batterie et nombre d’images
pouvant être enregistrées et lues
Durée de service de la
batterie
Prise de vue (images fixes) Env. 200 min Env. 400 images
Enregistrement de film
typique
Enregistrement de film en
continu
Visualisation (images fixes) Env. 340 min Env. 6800 images
Remarques
• Le nombre d’images ci-dessus est valable pour une batterie complètement
chargée. Le nombre d’images peut diminuer en fonction des conditions
d’utilisation.
• Le nombre d’images pouvant être enregistrées correspond aux conditions de prise
de vue suivantes :
– Utilisation d’un Memory Stick PRO Duo™ (Mark2) Sony (vendu séparément).
– Avec un objectif E PZ 16 – 50 mm F3.5 – 5.6 OSS.
– Utilisation de la batterie à une température ambiante de 25 °C (77 °F).
– [Luminosité d'écran] : [Manuel] [±0]
• Le nombre de « Prise de vue (images fixes) » est basé sur la norme CIPA et est
valable pour les conditions de prise de vue suivantes :
(CIPA : Camera & Imaging Products Association)
– Lorsque DISP est réglé sur [Afficher ttes infos].
– [Mode mise au point] : [AF automatique]
– Prise de vue toutes les 30 secondes.
– Passage du zoom alternativement de l’extrémité W à l’extrémité T.
– Déclenchement du flash une fois sur deux.
– Mise sous et hors tension toutes les dix prises.
• Le nombre de minutes d’enregistrement de film est basé sur la norme CIPA et est
valable pour les conditions de prise de vue suivantes :
– [ Réglage d'enreg.] : 60i 17M(FH)/50i 17M(FH).
– Enregistrement de film typique : la durée de service de la batterie est basée sur la
répétition d’opérations telles que le démarrage/l’arrêt de la prise de vue,
l’utilisation du zoom, la mise sous et hors tension de l’appareil, etc.
– Enregistrement de film en continu : la durée de service de la batterie est basée
sur une prise de vue en continu jusqu’à la durée limite (29 minutes), et la
poursuite de la prise de vue par un nouvel appui sur le bouton MOVIE. Les
autres fonctions, comme le zoom, ne sont pas utilisées.
FR
Env. 75 min —
Env. 110 min —
Nombre d’images
18
Page 53

Installation/retrait de l’objectif
Placez l’interrupteur d’alimentation de l’appareil photo sur OFF avant
d’installer ou de retirer l’objectif.
Si le capuchon ou le couvercle de protection temporaire
1
est monté, retirez-le de l’appareil ou de l’objectif.
• Procédez rapidement au changement d’objectif, loin des endroits
poussiéreux pour éviter que de la poussière ou des corps étrangers ne
pénètrent dans l’appareil.
Montez l’objectif en alignant les repères blancs de l’objectif
2
et de l’appareil photo.
• Tenez l’appareil incliné vers l’avant afin que la poussière ne puisse pas
pénétrer à l’intérieur.
Tout en poussant doucement l’objectif vers l’appareil,
3
tournez l’objectif dans le sens des aiguilles d’une montre
jusqu’à ce qu’il s’enclenche en position verrouillée.
• Assurez-vous de ne pas insérer l’objectif de travers.
Remarques
• Lors de l’installation d’un objectif, n’appuyez pas sur le bouton de déverrouillage
de l’objectif.
• Veillez à ne pas forcer lorsque vous installez un objectif.
• Pour utiliser un objectif à monture A (vendu séparément), l’adaptateur pour
monture d’objectif (vendu séparément) est nécessaire. Pour en savoir plus,
consultez le guide d’utilisation fourni avec l’adaptateur pour monture d’objectif.
• Si vous utilisez un objectif équipé d’un écrou de pied, installez l’objectif sur le
trépied pour une plus grande stabilité.
FR
FR
19
Page 54

x
Retrait de l’objectif
Bouton de déverrouillage de l’objectif
Enfoncez à fond le bouton de déverrouillage de l’objectif et
1
tournez l’objectif dans le sens inverse des aiguilles d’une
montre jusqu’à ce qu’il s’arrête.
Remarques
• Si des poussières ou des corps étrangers pénètrent dans l’appareil lors du
changement d’objectif et se fixent sur la surface du capteur d’image (qui convertit
la lumière en signal numérique), ceux-ci peuvent apparaître sur l’image sous
forme de points sombres, selon les conditions de prise de vue. Lorsque vous
mettez l’appareil hors tension, la fonction anti-poussières fait vibrer légèrement
l’appareil, afin d’éviter que la poussière n’adhère au capteur d’image. Nous vous
recommandons cependant d’installer ou de retirer l’objectif rapidement, loin des
endroits poussiéreux.
• En cas de présence de corps étrangers sur le capteur d’image, enlevez-les avec un
pinceau soufflant.
• Ne laissez pas l’appareil sans objectif.
• Si vous souhaitez vous procurer un capuchon de boîtier de l’appareil photo ou un
capuchon d’objectif arrière, veuillez acheter les modèles suivants : ALC-B1EM
(capuchon de boîtier de l’appareil photo) ou ALC-R1EM (capuchon d’objectif
arrière) (vendus séparément).
• Si vous utilisez un objectif avec zoom motorisé, mettez l’interrupteur
d’alimentation de l’appareil sur OFF et assurez-vous que l’objectif est
complètement rétracté avant de changer d’objectif. Si l’objectif n’est pas rétracté,
ne forcez pas pour le remettre en place.
• Lorsque vous installez l’appareil sur un trépied, veillez à ne pas toucher la bague
de zoom/mise au point par inadvertance.
20
FR
Page 55

Insertion d’une carte mémoire (vendue séparément)
Assurez-vous que le coin
entaillé est correctement
orienté.
Ouvrez le couvercle du compartiment de la carte
1
mémoire/bornes.
Insérez la carte mémoire (vendue séparément).
2
• En positionnant le coin biseauté comme illustré, insérez la carte
mémoire jusqu’au clic d’enclenchement.
Fermez le couvercle du compartiment de la carte
3
mémoire/bornes.
x
Cartes mémoires pouvant être utilisées
Carte mémoire
Memory Stick XC-HG
Duo™
Memory Stick PRO Duo (Mark2
A
Memory Stick PRO-HG
Duo™
Carte mémoire SD (classe 4 ou
Carte mémoire SDHC (classe 4 ou
B
Carte mémoire SDXC (classe 4 ou
• Dans le présent manuel, les produits mentionnés dans le tableau sont regroupés
dans les catégories suivantes :
A : Memory Stick PRO Duo
B : Carte SD
Pour la prise
d’images fixes
Pour l’enregistrement
de films
uniquement)
supérieure)
supérieure)
supérieure)
FR
FR
21
Page 56

• Lorsque vous enregistrez des films au format XAVC S, utilisez les cartes
mémoires suivantes :
– Carte mémoire SDXC (64 Go min. et classe 10 ou supérieure)
– Carte mémoire SDXC (64 Go min. et compatible UHS-I)
– Memory Stick XC-HG Duo
• Cet appareil prend en charge les cartes SD compatibles UHS-I.
x
Retrait de la carte mémoire/de la batterie
Carte mémoire : Enfoncez la carte mémoire en une seule fois pour l’éjecter.
Batterie d’alimentation : Faites glisser le levier d’éjection de la batterie.
Veillez à ne pas faire tomber la batterie.
Remarques
• N’enlevez jamais la carte mémoire/la batterie lorsque le témoin d’accès (page 12)
est allumé. Vous risqueriez d’endommager les données présentes sur la carte
mémoire.
Réglage de l’horloge
ON/OFF (Alimentation)
Molette de commande
Sélection des éléments : v/V/b/B //
Réglage :
Réglez l’interrupteur ON/OFF (alimentation) sur ON.
1
Le réglage de la date et de l’heure s’affiche lorsque vous mettez l’appareil
sous tension pour la première fois.
• Il se peut que la mise sous tension et l’activation des fonctions prennent
un certain temps.
Vérifiez que [Entrer] est sélectionné à l’écran, puis
2
appuyez sur z sur la molette de commande.
FR
z
22
Page 57

Sélectionnez l’emplacement géographique souhaité en
3
suivant les instructions à l’écran, puis appuyez sur z.
Réglez [Heure d'été], [Date/heure] et [Format de date],
4
puis appuyez sur z.
• Lorsque vous réglez [Date/heure], souvenez-vous que minuit est
12:00 AM, et midi 12:00 PM.
Vérifiez que [Entrer] est sélectionné, puis appuyez sur
5
z.
Prise de vue d’images fixes/de films
Déclencheur
Levier W/T (zoom)
W : zoom arrière
T : zoom avant
MOVIE
Prise d’images fixes
Enfoncez le déclencheur à mi-course pour effectuer la
1
mise au point.
Lorsque l’image est mise au point, un bip se fait entendre et le témoin z
ou s’allume.
Enfoncez complètement le déclencheur pour effectuer
2
la prise de vue.
FR
FR
23
Page 58

Enregistrement de films
Appuyez sur le bouton MOVIE (Film) pour commencer
1
l’enregistrement.
• Utilisez le levier W/T (zoom) pour modifier le facteur de zoom.
Appuyez une nouvelle fois sur le bouton MOVIE pour
2
arrêter l’enregistrement.
Remarques
• Un enregistrement de film en continu est possible pendant environ 29 minutes
maximum par séance avec les réglages par défaut de l’appareil et lorsque la
température est d’environ 25 °C (77 °F). (La durée d’enregistrement disponible
pour les films varie en fonction de la température ambiante, du format/réglage
d’enregistrement et des conditions d’utilisation de l’appareil avant le début de
l’enregistrement (page 31)). Lorsque l’enregistrement d’un film est terminé, vous
pouvez recommencer à enregistrer en appuyant de nouveau sur le bouton MOVIE.
Selon la température de l’appareil et de la batterie, il se peut que l’enregistrement
s’arrête pour protéger l’appareil.
• N’ouvrez pas le flash manuellement. Cela pourrait provoquer un
dysfonctionnement.
• Lorsque vous utilisez la fonction zoom lors de l’enregistrement d’un film, le son
lié au fonctionnement de l’appareil est enregistré. Le son lié au fonctionnement du
bouton MOVIE risque aussi d’être enregistré à la fin de l’enregistrement du film.
24
FR
Page 59

Visualisation d’images
W : zoom arrière
T : zoom avant
Molette de commande
Sélection des images :
(Lecture)
(Supprimer)
Appuyez sur le bouton (lecture).
1
x
Sélection de l’image suivante/précédente
Sélectionnez une image en appuyant sur B (suivant)/b (précédent) sur la
molette de commande ou en la faisant tourner. Appuyez sur z au centre de la
molette de commande pour visualiser les films.
x
Suppression d’une image
1 Appuyez sur le bouton (Supprimer).
2 Sélectionnez [Supprimer] à l’aide de v sur la molette de commande, puis
appuyez sur z.
B (suivant)/b (précédent) ou en
tournant la molette de commande
Réglage : z
FR
x
Retour à la prise de vue d’images
Enfoncez le déclencheur à mi-course.
FR
25
Page 60

Présentation d’autres fonctions
Il est possible d’utiliser d’autres fonctions au moyen de la molette de
commande, du bouton MENU, etc.
MENU
Écran tactile
x
Molette de commande
DISP (Contenus d'affichage) : Vous permet de changer l’affichage sur écran.
ISO (ISO) : Permet de régler la sensibilité en fonction de la luminosité.
(Correct. exposition) : Permet de corriger l’exposition et la luminosité de la
totalité de l’image.
(Créativité photo) : Permet d’utiliser l’appareil de manière intuitive et de
prendre facilement des images créatives.
(Entraînement) : Permet de passer d’une méthode de prise de vue à une
autre, par exemple prise de vue unique, prise de vue en continu ou prise de vue
en bracketing.
z (Mode Pr. vue) : Permet de modifier le mode de prise de vue.
x
Prise de vue avec l’écran tactile
Cet appareil est équipé d’un écran tactile. Il suffit de toucher un sujet sur
l’écran pour prendre une image fixe (Déclencheur tactile) ou effectuer la mise
au point (Mise au point tactile) de celui-ci. Vous pouvez aussi utiliser la
fonction [Déclencheur tactile] avec la prise de vue [Retardat./autoportr.].
Pour les instructions détaillées et les fonctions disponibles avec l’écran tactile,
référez-vous au « Manuel d’aide ».
FR
Molette de commande
26
Page 61

Fonctions de PlayMemories Home™
Le logiciel PlayMemories Home vous permet d’importer des images fixes et
des films sur votre ordinateur et de les utiliser. PlayMemories Home est
nécessaire pour importer des films XAVC S et AVCHD sur votre ordinateur.
Lecture d’images
importées
Importation d’images depuis votre appareil
Sous Windows, les fonctions suivantes sont
disponibles :
Partage d’images sur
PlayMemories Online™
FR
Affichage des
images sur un
calendrier
Création de
disques
vidéo
Téléchargement
d’images sur des
services réseau
• Vous pouvez télécharger Image Data Converter (logiciel d’édition d’images
RAW) ou Remote Camera Control, etc. en suivant la procédure suivante :
Connectez l’appareil à votre ordinateur t lancez PlayMemories Home t
cliquez sur [Notifications].
Remarques
• Une connexion Internet est nécessaire pour installer PlayMemories Home.
• Une connexion Internet est nécessaire pour utiliser PlayMemories Online ou
d’autres services réseau. Il est possible que PlayMemories Online ou d’autres
services réseau ne soient pas disponibles dans certains pays ou régions.
• Utilisez l’URL suivante pour les applications Mac :
http://www.sony.co.jp/imsoft/Mac/
• Si le logiciel PMB (Picture Motion Browser), fourni avec les modèles mis sur le
marché avant 2011, a déjà été installé sur votre ordinateur, PlayMemories Home
l’écrasera pendant son installation. Utilisez le logiciel PlayMemories Home,
successeur de PMB.
FR
27
Page 62

x
Exigences du système
Vous pouvez consulter les exigences du système en matière de logiciels à
l’adresse URL suivante :
www.sony.net/pcenv/
x
Installation de PlayMemories Home sur un ordinateur
Saisissez l’URL ci-dessous dans le navigateur Internet
1
de votre ordinateur pour accéder au site, puis installez
PlayMemories Home.
www.sony.net/pm/
• Pour en savoir plus sur PlayMemories Home, consultez la page
d’assistance PlayMemories Home suivante (en anglais uniquement) :
http://www.sony.co.jp/pmh-se/
• Lorsque l’installation est terminée, PlayMemories Home démarre.
Raccordez l’appareil à votre ordinateur à l’aide du câble
2
micro-USB (fourni).
• Il est possible d’installer de nouvelles fonctions dans PlayMemories
Home. Connectez l’appareil à votre ordinateur même si PlayMemories
Home est déjà installé sur votre ordinateur.
Remarques
• Ne débranchez pas le câble micro-USB (fourni) de l’appareil lorsque l’écran de
fonctionnement ou l’écran d’accès est affiché. Vous risqueriez d’endommager les
données.
• Pour déconnecter l’appareil de l’ordinateur, cliquez sur dans la barre des
tâches, puis cliquez sur [Éjecter PMHOME].
28
FR
Page 63

Ajouter de nouvelles fonctions à l’appareil
Vous pouvez ajouter les fonctions de votre choix à votre appareil en vous
connectant par Internet au site de téléchargement des applications
(PlayMemories Camera Apps™).
http://www.sony.net/pmca/
• Après avoir installé une application, vous pouvez appeler celle-ci en mettant
en contact la marque N de l’appareil avec un smartphone Android équipé de
la technologie NFC, grâce à la fonction [Simple contact(NFC)].
Nombre d’images fixes et durée enregistrable de films
Le nombre d’images fixes enregistrables et la durée d’enregistrement peuvent
varier en fonction des conditions de prise de vue et de la carte mémoire.
x
Images fixes
[ Taille d'image] : L: 24M
Lorsque [ Ratio d'aspect] est réglé sur [3:2]*
Qualité
Capacité
Standard 330 images
Fine 200 images
RAW & JPEG 54 images
RAW 74 images
* Lorsque le [ Ratio d'aspect] est réglé sur une valeur différente de [3:2], vous
pouvez enregistrer davantage d’images qu’indiqué ci-dessus. (Sauf lorsque
[ Qualité] est réglé sur [RAW].)
2 Go
FR
FR
29
Page 64

x
Films
Le tableau ci-dessous indique la durée totale approximative d’enregistrement
disponible pour les films en utilisant une carte mémoire formatée avec cet
appareil. La durée d’enregistrement indiquée pour les films XAVC S et
AVCHD correspond à la condition suivante : [ENREG vidéo double] réglé sur
[
OFF].
(h (heure), m (minute))
Réglage d'enreg.
60p 50M/50p 50M — 2 h 35 m
30p 50M/25p 50M — 2 h 35 m
*
24p 50M
60i 24M(FX)/50i 24M(FX) 10 m 6 h
60i 17M(FH)/50i 17M(FH) 10 m 8 h 15 m
60p 28M(PS)/50p 28M(PS) 9 m 5 h 5 m
24p 24M(FX)/25p 24M(FX) 10 m 6 h
24p 17M(FH)/25p 17M(FH) 10 m 8 h
1440×1080 12M 20 m 11 h
VGA 3M 1 h 10 m 40 h
* seulement pour les modèles compatibles 1080 60i
• Vous pouvez enregistrer en continu pendant environ 29 minutes (limite de
spécification du produit). La durée d’enregistrement maximum en continu d’un
film au format MP4 (12M) est d’environ 20 minutes (taille de fichier maximale :
2 Go).
• La durée enregistrable de films varie, car l’appareil est équipé d’une fonction VBR
(Variable Bit-Rate (débit binaire variable)), qui ajuste automatiquement la qualité
d’image en fonction de la scène de prise de vue. Lorsque vous enregistrez un sujet
se déplaçant rapidement, l’image est plus nette, mais la durée enregistrable est plus
courte, car l’enregistrement nécessite plus de mémoire.
La durée enregistrable varie aussi en fonction des conditions de prise de vue, du
sujet ou des réglages de qualité/taille d’image.
Capacité
2 Go 64 Go
— 2 h 35 m
30
FR
Page 65

Remarques sur l’enregistrement continu de films
• L’enregistrement de films haute qualité ou la prise de vue en continu au moyen du
capteur d’image consomme beaucoup d’énergie. Par conséquent, si vous
continuez à filmer, la température interne de l’appareil augmentera, plus
particulièrement celle du capteur d’image. Le cas échéant, l’appareil s’éteint
automatiquement, étant donné que des températures élevées affectent la qualité
des images ou le mécanisme interne de l’appareil.
• Le tableau ci-dessous indique les durées d’enregistrement disponibles pour les
films. Ces valeurs sont obtenues avec les réglages par défaut de l’appareil, celui-ci
étant resté hors tension pendant un certain temps. (Les durées indiquées
correspondent à des enregistrements en continu.)
Température ambiante Temps d’enregistrement en continu (films)
20 °C (68 °F) Environ 29 minutes
30 °C (86 °F) Environ 29 minutes
40 °C (104 °F) Environ 20 minutes
• La durée d’enregistrement disponible pour les films varie en fonction de la
température, du format/réglage d’enregistrement et de l’état de l’appareil avant le
début de l’enregistrement. Si vous recadrez fréquemment les images ou
photographiez des images après la mise sous tension de l’appareil, la température
interne de l’appareil augmentera et la durée d’enregistrement disponible sera plus
courte.
• Lorsque est indiqué, cessez l’enregistrement du film.
• Si l’appareil cesse l’enregistrement en raison de la température, laissez-le éteint
quelques minutes. Lancez l’enregistrement après que la température interne de
l’appareil redescend complètement.
Remarques sur l’utilisation de l’appareil photo
Fonctions intégrées à cet appareil
• Le présent manuel décrit les fonctions des périphériques compatibles 1080 60i et
1080 50i.
Pour savoir si votre appareil est compatible 1080 60i ou 1080 50i, recherchez les
références suivantes sur le dessous de l’appareil.
appareil compatible 1080 60i : 60i
appareil compatible 1080 50i : 50i
• Cet appareil est compatible avec les films en format 1080 60p ou 50p. À la
différence des modes d’enregistrement standard jusqu’à présent, qui enregistrent
en méthode entrelacée, cet appareil enregistre en utilisant une méthode
progressive. Cela augmente la résolution et donne une image plus régulière, plus
réaliste.
FR
FR
31
Page 66

Précautions d’utilisation
Évitez de manipuler brutalement l’appareil, de le démonter, de le modifier, de le
soumettre à des chocs physiques ou à des impacts (coup de marteau, chute) ou
encore de marcher dessus. Faites particulièrement attention à l’objectif.
À propos de l’enregistrement/de la lecture
• Avant de commencer à enregistrer, effectuez un essai afin de vous assurer que
l’appareil fonctionne correctement.
• Cet appareil n’est étanche ni à la poussière, ni aux projections liquides, ni à l’eau.
• Ne regardez pas le soleil ou une forte lumière à travers un objectif démonté. Vous
risquez de vous abîmer les yeux de manière irréversible. Cela peut également
entraîner un dysfonctionnement de l’objectif.
• Si vous constatez la présence de condensation, remédiez-y avant d’utiliser
l’appareil.
• Ne secouez pas et ne heurtez pas l’appareil. Cela pourrait entraîner un
dysfonctionnement, et vous empêcher d’enregistrer des images. De plus, vous
risquez de rendre le support d’enregistrement inutilisable, ou d’endommager les
données.
N’utilisez/ne rangez pas l’appareil dans les endroits suivants
• Endroits très chauds, très froids ou très humides
Dans des endroits tels qu’un véhicule stationné en plein soleil, le boîtier de
l’appareil peut se déformer et ceci peut provoquer un dysfonctionnement.
• En plein soleil ou près d’une source de chaleur
Le boîtier de l’appareil risque de se décolorer ou se déformer et ceci peut
provoquer un dysfonctionnement.
• Endroits soumis à des secousses ou des vibrations
• À proximité d’une forte source d’ondes radioélectriques, de radiations ou de
champ magnétique élevé
Dans de tels endroits, il se peut que l’appareil ne puisse pas enregistrer ou lire
correctement des images.
• Endroits sablonneux ou poussiéreux
Veillez à ce que du sable ou de la poussière ne pénètrent pas dans l’appareil. Ceci
risque d’entraîner un dysfonctionnement de l’appareil, qui peut dans certains cas
être irréparable.
À propos de la poignée
La poignée est recouverte d’un revêtement spécial. Si vous frottez la poignée à
l’aide d’un tissu ou d’un cuir de couleur foncée, celle-ci risque de se décolorer.
À propos du stockage
Fixez toujours le capuchon avant d’objectif lorsque vous n’utilisez pas l’appareil.
32
FR
Page 67

Remarques sur l’écran et l’objectif
• La fabrication de l’écran fait appel à une technologie de très haute précision, et plus
de 99,99 % des pixels sont opérationnels pour une utilisation effective. Il se peut
toutefois que de minuscules points noirs et/ou brillants (blancs, rouges, bleus ou
verts) apparaissent sur l’écran. Ces points sont inhérents au procédé de fabrication
et n’affectent pas l’enregistrement.
• N’exercez aucune pression sur l’écran. Vous risquez de décolorer l’écran et de
provoquer un dysfonctionnement.
• N’utilisez pas d’objets pointus sur l’écran tactile. Cela pourrait provoquer un
dysfonctionnement.
• Lorsque vous utilisez l’objectif, faites attention à ne pas vous coincer les doigts.
À propos des aimants
Des aimants sont fixés à l’arrière de l’écran et sur la zone autour du flash. Ne placez
pas d’objets sensibles aux champs magnétiques (par ex. cartes de crédit ou
disquettes) sur l’écran ou le boîtier de l’appareil.
À propos de l’utilisation des objectifs et accessoires
Nous vous recommandons d’utiliser des objectifs/accessoires Sony conçus pour
répondre aux caractéristiques de cet appareil photo.
L’utilisation des produits d’autres fabricants peut empêcher l’appareil photo de
fonctionner au maximum de ses capacités, voire provoquer des accidents ou
dysfonctionnements.
Remarques sur le flash
• Ne transportez pas l’appareil en le tenant par le flash, n’exercez pas de force
excessive sur celui-ci.
• Si de l’eau, de la poussière ou du sable pénètre dans le flash ouvert, cela peut
provoquer un dysfonctionnement.
• Veillez à maintenir vos doigts à l’écart lorsque vous rentrez le flash.
Au sujet de la température de l’appareil
En cas d’utilisation continue, votre appareil photo et la batterie peuvent chauffer,
mais il ne s’agit pas d’un dysfonctionnement.
Au sujet de la protection contre la surchauffe
Selon la température de l’appareil et de la batterie, il se peut que vous n’arriviez pas
à enregistrer des films ou que l’alimentation se coupe automatiquement afin de
protéger l’appareil.
Un message s’affiche sur l’écran avant que l’appareil se mette hors tension ou
lorsque vous ne pouvez plus enregistrer de film. Dans ce cas, laissez l’appareil hors
tension et attendez que la température de l’appareil et de la batterie diminue. Si vous
mettez l’appareil sous tension sans laisser l’appareil et la batterie refroidir
suffisamment, il se peut que l’alimentation se coupe de nouveau, ou que vous
n’arriviez pas à enregistrer des films.
FR
FR
33
Page 68

À propos de la charge de la batterie
Si vous chargez une batterie qui n’a pas été utilisée depuis longtemps, il se peut
qu’elle ne se charge pas complètement.
Ceci est dû aux caractéristiques de la batterie. Chargez à nouveau la batterie.
Avertissement sur les droits d’auteur
Les émissions de télévision, films, cassettes vidéo et autres œuvres peuvent être
protégés par des droits d’auteur. L’enregistrement non autorisé de telles œuvres peut
constituer une infraction à la loi sur les droits d’auteur.
Aucune garantie n’est accordée dans le cas de contenu
endommagé ou d’échec d’enregistrement
Sony n’accorde aucune garantie dans le cas d’un échec de l’enregistrement ou de la
perte ou de la détérioration de contenu enregistré dus à un dysfonctionnement de
l’appareil ou du support d’enregistrement, etc.
Nettoyage de l’extérieur de l’appareil
Nettoyez l’extérieur de l’appareil avec un chiffon doux légèrement imbibé d’eau,
puis essuyez-le avec un chiffon sec. Afin d’éviter d’endommager la finition ou le
boîtier :
– N’exposez pas l’appareil à des produits chimiques tels que diluants, benzène,
alcool, lingettes nettoyantes jetables, insectifuges, écrans solaires ou insecticides.
Entretien de l’écran
• Les taches de crème hydratante ou de crème pour les mains laissées sur l’écran
peuvent dissoudre le revêtement. En cas de présence de l’une de ces substances sur
l’écran, essuyez-le immédiatement.
• Frotter vigoureusement avec un mouchoir en papier ou d’autres matériaux peut
endommager le revêtement.
• En cas de traces de doigt ou de présence de corps étrangers sur l’écran, nous vous
recommandons d’enlever ces corps étrangers avec précaution et d’essuyer ensuite
l’écran avec un chiffon doux.
À propos des réseaux locaux sans fil
Nous déclinons toute responsabilité en ce qui concerne les dommages causés par un
accès non autorisé aux destinations chargées sur l’appareil, ou par une utilisation
non autorisée de celles-ci, résultant d’une perte ou d’un vol.
34
FR
Page 69

Spécifications
Appareil photo
[Système]
Type d’appareil : Appareil photo à
objectif interchangeable
Objectif : Sony Objectif à monture E
[Capteur d’image]
Capteur d’image : Capteur d’image
CMOS au format APS-C
(23,5 mm × 15,6 mm)
Nombre total de pixels du capteur
d’image :
Environ 24 700 000 pixels
Nombre de pixels efficaces de
l’appareil :
Environ 24 300 000 pixels
[Système de mise au point
automatique]
Système : Système à détection de
phase/système à détection de
contraste
Plage de sensibilité : EV-1 à EV20
(pour une équivalence 100 ISO,
avec objectif F2,0)
[Contrôle de l’exposition]
Méthode de mesure : 1 200 segments
mesurés par le capteur d’image
Plage de mesure : EV-1 à EV20 (pour
une équivalence 100 ISO, avec
objectif F2,0)
Sensibilité ISO (indice de lumination
recommandé) :
Images fixes : AUTO, 100 ISO –
25 600 ISO
Films : AUTO, équivalence
100 ISO – 12 800 ISO
Correction d’exposition : ±3,0 EV (par
incréments de 1/3 EV)
[Obturateur]
Type : Type plan focal, vertical-
transversal, contrôlé
électroniquement
Plage de vitesse d’obturation :
Images fixes : 1/4 000 seconde à
30 secondes, BULB
Films : 1/4 000 seconde à
1/4 seconde (par incréments de
1/3 EV),
appareil compatible 1080 60i
jusqu’à 1/60 seconde en mode
AUTO (jusqu’à 1/30 seconde en
mode [Obt. vit. lente aut.])
appareil compatible 1080 50i
jusqu’à 1/50 seconde en mode
AUTO (jusqu’à 1/25 seconde en
mode [Obt. vit. lente aut.])
Vitesse de synch. du flash :
1/160 seconde
[Support d’enregistrement]
Memory Stick PRO Duo, carte SD
[Écran]
Écran LCD : écran tactile TFT largeur
7,5 cm (type 3,0)
Nombre total de points : 921 600 points
[Bornes entrée/sortie]
Multi/micro connecteur USB* :
Hi-Speed USB (USB 2.0)
* Accepte les appareils
compatibles micro-USB.
HDMI : Micro-prise HDMI de type D
[Alimentation]
Type de batterie : Batterie rechargeable
NP-FW50
FR
FR
35
Page 70

[Consommation (lors de la prise de
vue)]
Avec un objectif E PZ 16 – 50 mm
F3.5 – 5.6 OSS*
Env. 2,3 W
* fourni avec ILCE-5100L/
ILCE-5100Y
[Divers]
Exif Print : Compatible
PRINT Image Matching III :
Compatible
DPOF : Compatible
Dimensions (norme CIPA) (environ) :
109,6 mm × 62,8 mm × 35,7 mm
(4 3/8 po × 2 1/2 po × 1 7/16 po)
(L/H/P)
Poids (norme CIPA) (environ) :
283 g (10,0 oz) (batterie et
Memory Stick PRO Duo inclus)
224 g (7,9 oz) (appareil seul)
Plage de température de
fonctionnement : 0 °C à 40 °C
(32 °F à 104 °F)
Format de fichier :
Image fixe : Conforme au format
JPEG (DCF Ver. 2.0, Exif Ver. 2.3,
MPF Baseline), RAW (format
Sony ARW 2.3)
Films (format XAVC S) :
Conforme au format MPEG-4
AVC/H.264 XAVC S ver.1.0
Vidéo : MPEG-4 AVC/H.264
Audio : LPCM 2 canaux (48 kHz
16 bits)
Film (Format AVCHD) :
Compatible avec le format
AVCHD Ver. 2.0
Vidéo : MPEG-4 AVC/H.264
Audio : Dolby Digital 2 canaux
Dolby Digital Stereo Creator
• Fabriqué sous licence de Dolby
FR
Laboratories.
36
Film (Format MP4) :
Vidéo : MPEG-4 AVC/H.264
Audio : MPEG-4 AAC-LC
2 canaux
[Flash]
Nombre guide du flash : 4 (en mètres, à
100 ISO)
Temps de rechargement :
environ 3 secondes
Portée du flash : Couverture d’un
objectif 16 mm (longueur focale
indiquée par l’objectif)
Correction du flash : ±2,0 EV (par
incréments de 1/3 EV)
[Réseau local sans fil]
Format pris en charge :
IEEE 802.11 b/g/n
Bande de fréquences : 2,4 GHz
Protocoles de sécurité pris en charge :
WEP/WPA-PSK/WPA2-PSK
Méthode de configuration : WPS
(Wi-Fi Protected Setup)/Manuel
Méthode d’accès : Mode infrastructure
NFC : Conforme NFC Forum Type 3
Tag
Adaptateur secteur
AC-UB10C/UB10D
Caractéristiques d’alimentation :
100 V à 240 V CA, 50 Hz/60 Hz,
70 mA
Tension de sortie : 5 V CC, 0,5 A
Batterie rechargeable NP-FW50
Type de batterie :
Batterie au lithium-ion
Tension maximale : 8,4 V CC
Tension nominale : 7,2 V CC
Tension de charge maximale :
8,4 V CC
Courant de charge maximal : 1,02 A
Capacité : Typique 7,7 Wh (1 080 mAh)
Minimale 7,3 Wh (1 020 mAh)
Page 71

Objectif
Objectif
Appareil photo
Longueur focale équivalente au
format 35 mm
2)
(mm)
Objectif zoom
E16 – 50 mm
ILCE-5100L/
ILCE-5100Y
24 – 75 82,5 – 315
1)
Objectif zoom
E55 – 210 mm
ILCE-5100Y
Éléments/groupes de lentilles 8 – 9 9 – 13
3)
(m (pi))
2)
Angle de champ
Distance de mise au point
minimale
83° – 32° 28,2° – 7,8°
0,25 – 0,3
1,0 (3,28)
(0,82 – 1)
Grossissement maximal (×) 0,215 0,225
Nombre d’ouverture minimale f/22 – f/36 f/22 – f/32
Diamètre de filtre (mm) 40,5 49
Dimensions (diamètre maximal ×
hauteur) (environ mm (po))
64,7 × 29,9
(2 5/8 × 1 3/16)
63,8 × 10⁸
(2 5/8 × 4 3/8)
Poids (environ g (oz)) 116 (4,1) 345 (12,2)
SteadyShot Disponible Disponible
1)
Zoom motorisé
2)
Les valeurs de la longueur focale équivalente au format 35 mm et de l’angle de
champ correspondent à des appareils photo numériques équipés d’un capteur
d’image de format APS-C.
3)
La distance de mise au point minimale correspond à la distance la plus courte
entre le capteur d’image et le sujet pour laquelle il est possible d’obtenir une
image nette.
La conception et les spécifications sont sujettes à modification sans
avertissement.
À propos de la longueur focale
L’angle d’image de cet appareil est moins large que celui d’un appareil 35 mm. En
multipliant la longueur focale de votre objectif par 1,5, vous pouvez calculer la
longueur focale équivalente approximative d’un appareil 35 mm et effectuer des
prises de vue avec le même angle d’image.
Par exemple, en utilisant un objectif 50 mm, vous obtenez l’équivalent approximatif
de l’objectif 75 mm d’un appareil 35 mm.
FR
FR
37
Page 72

Marques commerciales
• Memory Stick et sont des
marques commerciales ou des
marques déposées de Sony
Corporation.
• XAVC S et sont des
marques déposées de Sony
Corporation.
• « AVCHD Progressive » et le
logotype « AVCHD Progressive »
sont des marques commerciales de
Panasonic Corporation et Sony
Corporation.
• Dolby et le symbole « double D »
sont des marques commerciales de
Dolby Laboratories.
• Les termes HDMI et HDMI HighDefinition Multimedia Interface, et le
logo HDMI sont des marques
commerciales ou des marques
déposées de HDMI Licensing LLC
aux États-Unis et dans d’autres pays.
• Windows est une marque déposée de
Microsoft Corporation aux ÉtatsUnis et/ou dans d’autres pays.
• Mac est une marque déposée d’Apple
Inc. aux États-Unis et dans d’autres
pays.
• iOS est une marque déposée ou une
marque commerciale de Cisco
Systems, Inc.
• iPhone et iPad sont des marques
déposées d’Apple Inc. aux États-Unis
et dans d’autres pays.
• Le logo SDXC est une marque
commerciale de SD-3C, LLC.
• Android et Google Play sont des
marques commerciales de Google
Inc.
• Wi-Fi, le logo Wi-Fi, Wi-Fi
PROTECTED SET-UP sont des
marques déposées de Wi-Fi Alliance.
FR
38
• N Mark est une marque commerciale
ou une marque déposée de NFC
Forum, Inc. aux États-Unis et dans
d’autres pays.
• DLNA et DLNA CERTIFIED sont
des marques commerciales de Digital
Living Network Alliance.
• Facebook et le logo « f » sont des
marques commerciales ou des
marques déposées de Facebook, Inc.
• YouTube et le logo « YouTube » sont
des marques commerciales ou des
marques déposées de Google Inc.
• Eye-Fi est une marque commerciale
de Eye-Fi, Inc.
• Les noms de système et de produit
utilisés dans ce manuel sont
généralement des marques
commerciales ou des marques
déposées de leurs créateurs ou
fabricants respectifs. Cependant, les
marques ™ ou ® ne sont pas toujours
utilisées dans ce manuel.
Des informations complémentaires
sur ce produit et des réponses à des
questions fréquemment posées sont
disponibles sur notre site Web
d’assistance client.
Page 73

FR
39
FR
Page 74

Deutsch
E-Bajonett
Weitere Informationen über die Kamera („Hilfe“)
„Hilfe“ ist eine Online-Anleitung. Sie können die „Hilfe“ auf
Ihrem Computer oder Smartphone lesen.
Schlagen Sie darin nach, um detaillierte Anweisungen zu den
zahlreichen Funktionen der Kamera zu erhalten.
URL:
http://rd1.sony.net/help/ilc/1430/h_zz/
Anzeigen des Führers
Diese Kamera ist mit einer eingebauten Bedienungsanleitung ausgestattet.
MENU
(Kameraführer)
Kameraführer
Die Kamera zeigt Erläuterungen für MENU-Posten und die Einstellwerte an.
1 Drücken Sie die Taste MENU.
2 Wählen Sie den gewünschten Posten aus, und drücken Sie dann die Taste
(Kameraführer).
DE
2
Page 75

Aufnahmetipp
Die Kamera zeigt Aufnahmetipps für den gewählten Aufnahmemodus an.
1 Drücken Sie die Taste (Kameraführer) im Aufnahmemodus.
2 Wählen Sie den gewünschten Aufnahmetipp aus, und drücken Sie dann z
am Einstellrad.
Der Aufnahmetipp wird angezeigt.
• Sie können den Bildschirm mit v/V rollen und die Aufnahmetipps mit
b/B wechseln.
WARNUNG
Um Feuergefahr und die Gefahr eines elektrischen Schlags zu
verringern, setzen Sie das Gerät weder Regen noch Feuchtigkeit
aus.
WICHTIGE SICHERHEITSANWEISUNGEN
-BEWAHREN SIE DIESE ANWEISUNGEN AUF
GEFAHR
UM DIE GEFAHR VON BRAND ODER
ELEKTRISCHEN SCHLÄGEN ZU
VERRINGERN, SOLLTEN SIE DIESE
ANWEISUNGEN GENAU BEFOLGEN
ACHTUNG
[ Akku
Bei unsachgemäßem Gebrauch des Akkus kann er explodieren oder es besteht Feuergefahr
oder die Gefahr von Verätzungen. Beachten Sie bitte die folgenden Hinweise.
• Zerlegen Sie den Akku nicht.
• Setzen Sie den Akku keinen Stößen, Schlägen usw. aus, quetschen Sie ihn nicht, lassen
Sie ihn nicht fallen und achten Sie darauf, nicht versehentlich auf den Akku zu treten.
• Halten Sie Gegenstände aus Metall von den Akkuanschlüssen fern. Es kann sonst zu
einem Kurzschluss kommen.
• Setzen Sie den Akku keinen Temperaturen über 60 °C aus, wie sie z. B. bei direkter
Sonneneinstrahlung oder in einem in der Sonne geparkten Auto auftreten können.
• Zünden Sie den Akku nicht an und werfen Sie ihn nicht ins Feuer.
• Berühren Sie beschädigte oder auslaufende Lithium-Ionen-Akkus nicht.
DE
DE
3
Page 76

• Laden Sie den Akku unbedingt mit einem Originalladegerät von Sony oder einem Gerät
mit Ladefunktion.
• Halten Sie den Akku von kleinen Kindern fern.
• Schützen Sie den Akku vor Feuchtigkeit.
• Tauschen Sie den Akku nur gegen den gleichen oder einen vergleichbaren Akkutyp aus,
der von Sony empfohlen wird.
• Entsorgen Sie verbrauchte Akkus unverzüglich wie in den Anweisungen erläutert.
[ Netzgerät
Benutzen Sie eine nahe gelegene Netzsteckdose bei Verwendung des Netzgerätes. Trennen
Sie das Netzgerät unverzüglich von der Netzsteckdose, falls eine Funktionsstörung
während der Benutzung des Apparats auftritt.
Das Netzkabel, falls vorhanden, ist speziell für den Gebrauch nur mit dieser Kamera
ausgelegt und sollte nicht mit anderen Elektrogeräten verwendet werden.
Für Kunden in Europa
[ Hinweis für Kunden in Ländern, in denen EU-Richtlinien gelten
Hersteller: Sony Corporation, 1-7-1 Konan Minato-ku Tokio, 108-0075 Japan
Für EU Produktkonformität: Sony Deutschland GmbH, Hedelfinger Strasse 61, 70327
Stuttgart, Deutschland
Hiermit erklärt Sony Corporation, dass sich dieses Gerät in Übereinstimmung mit den
grundlegenden Anforderungen und den übrigen einschlägigen Bestimmungen der
Richtlinie 1999/5/EG befindet. Weitere Informationen erhältlich unter:
http://www.compliance.sony.de/
[ Hinweis
Wenn eine Datenübertragung aufgrund statischer oder elektromagnetischer Störeinflüsse
abbricht (fehlschlägt), starten Sie die entsprechende Anwendung neu, oder entfernen Sie
das USB-Kabel, und schließen Sie es wieder an.
Dieses Produkt wurde geprüft und erfüllt die Auflagen der EMV-Vorschriften für den
Gebrauch von Verbindungskabeln, die kürzer als 3 m sind.
Die elektromagnetischen Felder bei den speziellen Frequenzen können Bild und Ton
dieses Gerätes beeinflussen.
DE
4
Page 77

[ Entsorgung von gebrauchten Batterien und Akkus und
gebrauchten elektrischen und elektronischen Geräten
(anzuwenden in den Ländern der Europäischen Union und
anderen europäischen Ländern mit einem separaten
Sammelsystem für diese Produkte)
Das Symbol auf der Batterie/dem Akku, dem Produkt oder der
Verpackung weist darauf hin, dass das Produkt oder die Batterie/der
Akku nicht als normaler Haushaltsabfall zu behandeln sind.
Ein zusätzliches chemisches Symbol Pb (Blei) oder Hg (Quecksilber)
unter der durchgestrichenen Mülltonne bedeutet, dass die Batterie/der
Akku einen Anteil von mehr als 0,0005% Quecksilber oder 0,004% Blei
Durch Ihren Beitrag zum korrekten Entsorgen des Produktes und der Batterie schützen Sie
die Umwelt und die Gesundheit Ihrer Mitmenschen. Umwelt und Gesundheit werden
durch falsches Entsorgen gefährdet. Materialrecycling hilft, den Verbrauch von Rohstoffen
zu verringern.
Bei Produkten, die auf Grund ihrer Sicherheit, der Funktionalität oder als Sicherung vor
Datenverlust eine ständige Verbindung zur eingebauten Batterie benötigen, sollte die
Batterie nur durch qualifiziertes Servicepersonal ausgetauscht werden.
Um sicherzustellen, dass das Produkt und die Batterie korrekt entsorgt werden, geben Sie
das Produkt zwecks Entsorgung an einer Annahmestelle für das Recycling von
elektrischen und elektronischen Geräten ab.
Für alle anderen Batterien entnehmen Sie die Batterie bitte entsprechend dem Kapitel über
die sichere Entfernung der Batterie. Geben Sie die Batterie an einer Annahmestelle für das
Recycling von Batterien/Akkus ab.
Weitere Informationen über das Recycling dieses Produkts oder der Batterie erhalten Sie
von Ihrer Gemeinde, den kommunalen Entsorgungsbetrieben oder dem Geschäft, in dem
Sie das Produkt gekauft haben.
Hinweis für Lithiumbatterien: Bitte geben Sie nur entladene Batterien an den
Sammelstellen ab. Wegen Kurzschlussgefahr überkleben Sie bitte die Pole der Batterie mit
Klebestreifen. Sie erkennen Lithiumbatterien an den Abkürzungen Li oder CR.
enthält.
Für Kunden, die ihre Kamera in Japan in einem Laden
gekauft haben, der auf Touristen ausgerichtet ist
[ Hinweis
Einige Zertifizierungszeichen für von der Kamera unterstützte Standards können auf dem
Bildschirm der Kamera angezeigt werden.
Wählen Sie dazu MENU t (Einstellung) 5 t [Zertifizierungslogo].
Wenn die Anzeige aufgrund von Problemen wie Störungen an der Kamera nicht möglich
ist, wenden Sie sich an Ihren Sony-Händler oder einen autorisierten Sony-Kundendienst
vor Ort.
DE
DE
5
Page 78

Inhaltsverzeichnis
Vorbereitung der Kamera Schritt 1 Seite 7
– Überprüfen des mitgelieferten Zubehörs
– Identifizierung der Teile
– Einsetzen des Akkus
– Laden des Akkus
– Anbringen/Abnehmen des Objektivs
– Einsetzen einer Speicherkarte (getrennt erhältlich)
– Einstellen der Uhr
Grundlegende Bedienung Schritt 2 Seite 20
– Aufnehmen von Standbildern/Filmen
Wiedergabefunktion Schritt 3 Seite 21
– Betrachten von Bildern
Aufnahmefunktion Schritt 4 Seite 22
– Einführung zusätzlicher Funktionen
Importieren von Bildern zum Computer Seite 23
– Merkmale von PlayMemories Home™
Hinzufügen von Funktionen zur Kamera Seite 25
– Hinzufügen von Funktionen zur Kamera
Sonstiges Seite 25
– Standbildzahlen und Filmaufnahmezeiten
– Hinweise zur Verwendung der Kamera
– Technische Daten
Diese Gebrauchsanleitung behandelt mehrere Modelle, die mit verschiedenen
Objektiven geliefert werden.
Der Name des Modells unterscheidet sich je nach mitgeliefertem Objektiv. Das
jeweils erhältliche Modell unterscheidet sich je nach Land bzw. Region.
Modellbezeichnung Objektiv
ILCE-5100 Nicht mitgeliefert
ILCE-5100L E16 – 50 mm
DE
ILCE-5100Y E55 – 210 mm und E16 – 50 mm
6
Page 79

Überprüfen des mitgelieferten Zubehörs
Überprüfen Sie zuerst die Modellbezeichnung Ihrer Kamera (Seite 6). Das
mitgelieferte Zubehör unterscheidet sich von Modell zu Modell.
Die Zahl in Klammern gibt die Menge an.
x
Wird mit allen Modellen
geliefert
• Kamera (1)
• Netzkabel (1)* (in USA und
Kanada nicht mitgeliefert)
* Eventuell werden mehrere
Netzkabel mit der Kamera
mitgeliefert. Verwenden Sie das für
Ihr Land bzw. Gebiet geeignete
Netzkabel.
• Akku NP-FW50 (1)
• Micro-USB-Kabel (1)
• Netzteil AC-UB10C/UB10D (1)
• Schulterriemen (1)
• Gebrauchsanleitung (diese
Anleitung) (1)
• Wi-Fi Connection/One-touch
(NFC) Guide
Diese Anleitung erläutert die
Funktionen, die eine Wi-FiVerbindung erfordern.
x
ILCE-5100
• Gehäusekappe (1) (an Kamera
angebracht)
x
ILCE-5100L
• E16 – 50 mm-Zoomobjektiv (1)
(an Kamera angebracht)/Vordere
Objektivkappe (1) (an Objektiv
angebracht)
x
ILCE-5100Y
• E16 – 50 mm-Zoomobjektiv (1)
(an Kamera angebracht)/Vordere
Objektivkappe (1) (an Objektiv
angebracht)
• E55 – 210 mm-Zoomobjektiv (1)/
Vordere Objektivkappe (1)/Hintere
Objektivkappe (1)/
Gegenlichtblende (1)
DE
DE
7
Page 80

Identifizierung der Teile
Ansicht bei
abgenommenem Objektiv
A Auslöser
B Schalter ON/OFF (Ein/Aus)
C Öse für Schulterriemen
D (N-Zeichen)
• Berühren Sie das Zeichen, um die
Kamera mit einem Smartphone
zu verbinden, das mit der NFCFunktion ausgestattet ist.
• NFC (Near Field
Communication) ist ein
internationaler Standard der
drahtlosen Datenübertragung
über kurze Strecken.
E Für Aufnahme: Zoomhebel
(W/T)
Für Wiedergabe: Hebel
(Index)/
(Wiedergabezoom)
F AF-Hilfslicht/
DE
Selbstauslöserlampe
8
G Bildsensor-Positionsmarke
H Blitz
I Mikrofon
1)
J Objektiv
K Objektiventriegelungsknopf
L Anschluss
M Bildsensor
N Objektivkontakte
1)
Diesen Teil während
Filmaufnahmen nicht verdecken.
2)
Vermeiden Sie direkte Berührung
dieses Teils.
2)
2)
A Monitor/Touch-Panel
• Sie können den Monitor auf einen
bequemen Betrachtungswinkel
einstellen und aus jeder Position
aufnehmen.
Page 81

B Taste (Blitz aufklappen)
C Multi/Micro-USB-
Buchsenabdeckung
D Speicherkarten-/
Anschlussklappe
E Zugriffslampe
F Wi-Fi-Sensor (eingebaut)
G Taste MOVIE (Film)
H Taste MENU
I Einstellrad
J Taste (Kameraführer)/
(Löschen)
K Taste (Wiedergabe)
L Multi/Micro-USB-Buchse*
• Unterstützt Micro-USBkompatible Geräte.
M Ladekontrollleuchte
N Speicherkartenschlitz
O HDMI-Mikrobuchse
* Um Näheres zu kompatiblem
Zubehör für die Multi/Micro-USBBuchse zu erfahren, besuchen Sie
die Sony-Website, oder konsultiere n
Sie Ihren Sony-Händler oder eine
lokale autorisierte SonyKundendienststelle.
A Akkudeckel
B Akku-Auswerfhebel
C Akkueinschubfach
D Anschlussplattendeckel
• Verwenden Sie diese bei
Verwendung des Netzteils
AC-PW20 (getrennt erhältlich).
Setzen Sie die Anschlussplatte in
das Akkufach ein, und führen Sie
dann das Kabel durch die
Anschlussplattendeckel, wie
unten abgebildet.
DE
• Achten Sie darauf, dass das
Kabel beim Schließen der Klappe
nicht eingeklemmt wird.
E Lautsprecher
F Stativgewinde
• Verwenden Sie ein Stativ, dessen
Schraube kürzer als 5,5 mm ist.
Anderenfalls wird die Kamera
nicht richtig befestigt und kann
beschädigt werden.
DE
9
Page 82

x
Objektiv
Technische Daten zu den Objektiven
finden Sie auf Seite 33.
E PZ 16 – 50 mm F3.5 – 5.6
OSS (mit ILCE-5100L/
ILCE-5100Y geliefert)
A Zoom-/Fokussierring
B Zoomhebel
C Ansetzindex
D Objektivkontakte
1)
Vermeiden Sie direkte Berührung
dieses Teils.
1)
E55 – 210 mm F4.5 – 6.3
OSS (mit ILCE-5100Y
geliefert)
A Fokussierring
B Zoomring
C Brennweitenskala
D Brennweitenindex
E Objektivkontakte
F Ansetzindex
1)
Vermeiden Sie direkte Berührung
dieses Teils.
1)
10
DE
Page 83

Einsetzen des Akkus
Akku-Auswerfhebel
Öffnen Sie die Klappe.
1
Führen Sie den Akku ein.
2
• Während Sie den Akku-Auswerfhebel drücken, führen Sie den Akku
ein, wie abgebildet. Vergewissern Sie sich, dass der AkkuAuswerfhebel nach dem Einschub einrastet.
• Schließen der Abdeckung bei falsch eingesetztem Akku kann die
Kamera beschädigen.
DE
DE
11
Page 84

Laden des Akkus
Für Kunden in den USA und Kanada
Netzkabel
Für Kunden in Ländern/
Regionen außer den USA
und Kanada
Schließen Sie die Kamera mit dem Micro-USB-Kabel
1
(mitgeliefert) an das Netzteil (mitgeliefert) an.
Schließen Sie das Netzteil an eine Netzsteckdose an.
2
Die Ladekontrollleuchte leuchtet orange, und der Ladevorgang beginnt.
• Schalten Sie die Kamera aus, während Sie den Akku laden.
• Der Akku kann bereits aufgeladen werden, selbst wenn er noch nicht
ganz entladen ist.
• Wenn die Ladekontrollleuchte blinkt und der Ladevorgang nicht
beendet ist, nehmen Sie den Akku heraus, und setzen Sie ihn wieder ein.
Hinweise
• Falls die Ladekontrollleuchte an der Kamera blinkt, wenn das Netzteil an die
Netzsteckdose angeschlossen ist, bedeutet dies, dass der Ladevorgang
vorübergehend unterbrochen wird, weil die Temperatur außerhalb des
empfohlenen Bereichs liegt. Sobald die Temperatur wieder in den entsprechenden
Bereich zurückgekehrt ist, wird der Ladevorgang fortgesetzt. Es wird empfohlen,
DE
den Akku bei einer Umgebungstemperatur zwischen 10°C und 30°C aufzuladen.
12
Ladekontrollleuchte
Leuchtet: Ladevorgang aktiv
Aus: Ladevorgang beendet
Blinkend:
Ladefehler oder Unterbrechung des
Ladevorgangs, weil Kamera außerhalb
des geeigneten Temperaturbereichs
ist
Page 85

• Der Akku wird u. U. nicht effektiv geladen, falls der Kontaktteil des Akkus
verschmutzt ist. Wischen Sie in diesem Fall etwaigen Staub mit einem weichen
Tuch oder Wattestäbchen sachte ab, um den Kontaktteil des Akkus zu reinigen.
• Schließen Sie das Netzteil (mitgeliefert) an die nächstgelegene Netzsteckdose an.
Sollten während der Benutzung des Netzteils irgendwelche Funktionsstörungen
auftreten, ziehen Sie sofort den Stecker von der Netzsteckdose ab, um die
Stromquelle abzutrennen.
• Wenn der Ladevorgang beendet ist, trennen Sie das Netzteil von der Netzsteckdose.
• Verwenden Sie nur Original-Akkus der Marke Sony, das Micro-USB-Kabel
(mitgeliefert) und das Netzteil (mitgeliefert).
• Während Aufnahme/Wiedergabe erfolgt keine Stromversorgung, wenn die
Kamera über das mitgelieferte Netzteil an eine Netzsteckdose angeschlossen ist.
Um die Kamera während Aufnahme/Wiedergabe mit Strom zu versorgen,
verwenden Sie das Netzteil AC-PW20 (getrennt erhältlich).
x
Ladezeit (Vollständige Ladung)
Die Ladezeit beträgt ungefähr 310 Minuten mit dem Netzteil (mitgeliefert).
Hinweise
• Die obige Ladezeit gilt für das Laden eines völlig erschöpften Akkus bei einer
Temperatur von 25°C. Je nach den Nutzungsbedingungen und Umständen kann
das Laden länger dauern.
x
Laden durch Anschluss an einen Computer
Der Akku kann geladen werden, indem die
Kamera über ein Micro-USB-Kabel an
einen Computer angeschlossen wird.
An eine USB-
Hinweise
• Beim Aufladen über einen Computer ist
Folgendes zu beachten:
– Wird die Kamera an einen Laptop angeschlossen, der nicht an eine Stromquelle
angeschlossen ist, wird der Akku im Laptop entladen. Laden Sie nicht über eine
längere Zeitspanne hinweg.
– Unterlassen Sie Ein-/Ausschalten, Neustart oder Wecken des Computers zur
Fortsetzung des Betriebs aus dem Ruhezustand heraus, wenn eine USBVerbindung zwischen dem Computer und der Kamera hergestellt worden ist.
Dies könnte eine Funktionsstörung der Kamera verursachen. Bevor Sie den
Computer ein-/ausschalten, neu starten oder aus dem Ruhemodus heraus
wecken, trennen Sie Kamera und Computer.
– Einwandfreier Ladebetrieb mit einem speziell gebauten oder modifizierten
Computer kann nicht garantiert werden.
Buchse
DE
DE
13
Page 86

x
Akku-Nutzungsdauer und Bilderzahl für Aufnahme
und Wiedergabe
Akku-Nutzungsdauer Anzahl von Bildern
Aufnahme (Standbilder) Ca. 200 Min. Ca. 400 Bilder
Typische Filmaufnahme Ca. 75 Min. —
Kontinuierliche
Filmaufnahme
Wiedergabe (Standbilder) Ca. 340 Min. Ca. 6800 Bilder
Hinweise
• Die obige Bilderzahl gilt für den voll aufgeladenen Akku. Die Bilderzahl kann je
nach den Benutzungsbedingungen abnehmen.
• Die Anzahl der aufnehmbaren Bilder gilt für Aufnahme unter den folgenden
Bedingungen:
– Verwendung eines Sony Memory Stick PRO Duo™ (Mark2) (getrennt
erhältlich).
– Wenn ein E PZ 16 – 50 mm F3.5 – 5.6 OSS-Objektiv angeschlossen ist.
– Der Akku wird bei einer Umgebungstemperatur von 25°C benutzt.
– [Monitor-Helligkeit]: [Manuell] [±0]
• Die Zahl für „Aufnahme (Standbilder)“ basiert auf dem CIPA-Standard und gilt
für Aufnahme unter den folgenden Bedingungen:
(CIPA: Camera & Imaging Products Association)
– DISP ist auf [Alle Infos anz.] eingestellt.
– [Fokusmodus]: [Automatischer AF]
– Eine Aufnahme alle 30 Sekunden.
– Der Zoom wird abwechselnd zwischen den Stellungen W und T umgeschaltet.
– Der Blitz wird bei jeder zweiten Aufnahme ausgelöst.
– Die Kamera wird nach jeweils zehn Aufnahmen ein- und ausgeschaltet.
• Die Minutenzahlen für Filmaufnahme basieren auf dem CIPA-Standard und gelten
für Aufnahme unter den folgenden Bedingungen:
– [ Aufnahmeeinstlg]: 60i 17M(FH)/50i 17M(FH).
– Typische Filmaufnahme: Akku-Nutzungsdauer basierend auf wiederholtem
Starten/Stoppen der Aufnahme, Zoomen, Ein-/Ausschalten usw.
– Kontinuierliche Filmaufnahme: Akku-Nutzungsdauer basierend auf
ununterbrochener Aufnahme bis zum Erreichen der Obergrenze (29 Minuten),
und dann durch erneutes Drücken der Taste MOVIE fortgesetzter Aufnahme.
Andere Funktionen, wie z. B. Zoomen, werden nicht ausgeführt.
Ca. 110 Min. —
14
DE
Page 87

Anbringen/Abnehmen des Objektivs
Stellen Sie den Ein-Aus-Schalter der Kamera auf OFF, bevor Sie das Objektiv
anbringen oder abnehmen.
Entfernen Sie den Gehäusedeckel von der Kamera bzw.
1
den Transportdeckel vom Objektiv, falls diese noch
angebracht sind.
• Wechseln Sie das Objektiv zügig in staubfreier Umgebung, um zu
verhindern, dass Staub oder Schmutz in die Kamera eindringt.
Montieren Sie das Objektiv, indem Sie die weißen
2
Ausrichtmarkierungen an Objektiv und Kamera
aufeinander ausrichten.
• Halten Sie die Kamera mit der Vorderseite nach unten, um das
Eindringen von Staub in die Kamera zu verhindern.
Drehen Sie das Objektiv im Uhrzeigersinn, während Sie es
3
leicht gegen die Kamera drücken, bis es in der
Verriegelungsposition einrastet.
• Setzen Sie das Objektiv gerade auf.
Hinweise
• Drücken Sie beim Anbringen eines Objektivs nicht auf den
Objektiventriegelungsknopf.
• Wenden Sie beim Anbringen eines Objektivs keine Gewalt an.
• Der Mount-Adapter (getrennt erhältlich) wird zur Benutzung eines A-BajonettObjektivs (getrennt erhältlich) benötigt. Einzelheiten entnehmen Sie bitte der
Gebrauchsanleitung des Mount-Adapters.
• Wenn Sie ein Objektiv mit Stativgewinde benutzen, befestigen Sie das Stativ am
Gewinde des Objektivs, um das Gleichgewicht aufrechtzuerhalten.
DE
DE
15
Page 88

x
Abnehmen des Objektivs
Objektiventriegelungsknopf
Drücken Sie den Objektiventriegelungsknopf vollständig
1
hinein, und drehen Sie das Objektiv bis zum Anschlag
entgegen dem Uhrzeigersinn.
Hinweise
• Falls beim Objektivwechsel Staub oder Fremdkörper in die Kamera gelangen und
an der Oberfläche des Bildsensors (der die Lichtquelle in ein Digitalsignal
umwandelt) anhaften, können sie je nach der Aufnahmeumgebung als dunkle
Flecken auf dem Bild erscheinen. Aufgrund der Staubschutzfunktion vibriert die
Kamera leicht, wenn sie ausgeschaltet wird, um ein Anhaften von Staub auf dem
Bildsensor zu verhindern. Dennoch ist das Objektiv zügig in staubfreier
Umgebung anzubringen bzw. abzunehmen.
• Falls Fremdkörper am Bildsensor haften, entfernen Sie diese mit einem
Blasepinsel.
• Lassen Sie die Kamera nicht mit abgenommenem Objektiv liegen.
• Wenn Sie einen Gehäusekappe oder eine hintere Objektivkappe benutzen wollen,
kaufen Sie bitte ALC-B1EM (Gehäusekappe) bzw. ALC-R1EM (Hintere
Objektivkappe) (getrennt erhältlich).
• Wenn Sie ein Objektiv mit Motorzoom benutzen, stellen Sie den Ein-Aus-Schalter
der Kamera auf OFF, und vergewissern Sie sich, dass das Objektiv vollkommen
eingefahren ist, bevor Sie es wechseln. Ist das Objektiv nicht eingefahren, drücken
Sie es nicht gewaltsam hinein.
• Achten Sie beim Befestigen der Kamera an einem Stativ darauf, dass Sie nicht den
Zoom-/Fokussierring versehentlich berühren.
16
DE
Page 89

Einsetzen einer Speicherkarte (getrennt erhältlich)
Auf korrekte Ausrichtung
der abgeschnittenen Ecke
achten.
Öffnen Sie die Speicherkarten-/Anschlussklappe.
1
Setzen Sie die Speicherkarte (getrennt erhältlich) ein.
2
• Richten Sie die eingekerbte Ecke gemäß der Abbildung aus, und führen
Sie die Speicherkarte ein, bis sie einrastet.
Schließen Sie die Speicherkarten-/Anschlussklappe.
3
DE
DE
17
Page 90

x
Verwendbare Speicherkarten
Speicherkarte Für Standbilder Für Filme
Memory Stick XC-HG Duo™
A
Memory Stick PRO Duo (nur Mark2)
Memory Stick PRO-HG Duo™
SD-Speicherkarte (Klasse 4 oder
SDHC-Speicherkarte (Klasse 4 oder
B
SDXC-Speicherkarte (Klasse 4 oder
• In dieser Anleitung werden die Produkte in der Tabelle kollektiv wie folgt
bezeichnet:
A: Memory Stick PRO Duo
B: SD-Speicherkarte
• Wenn Sie Filme des Formats XAVC S aufnehmen wollen, verwenden Sie die
folgenden Speicherkarten:
– SDXC-Speicherkarte (64 GB oder mehr und Klasse 10 oder schneller)
– SDXC-Speicherkarte (64 GB oder mehr und UHS-I-kompatibel)
– Memory Stick XC-HG Duo
• Diese Kamera unterstützt UHS-I-kompatible SD-Karten.
x
So entnehmen Sie die Speicherkarte/den Akku
schneller)
schneller)
schneller)
Speicherkarte: Drücken Sie die Speicherkarte einmal hinein, um sie zu
entnehmen.
Akku: Verschieben Sie den Akku-Auswerfhebel. Lassen Sie den Akku nicht
fallen.
Hinweise
• Nehmen Sie Speicherkarte/Akku niemals heraus, wenn die Zugriffslampe
(Seite 9) leuchtet. Dadurch können die Daten in der Speicherkarte beschädigt
werden.
18
DE
Page 91

Einstellen der Uhr
ON/OFF (Ein/Aus)
Einstellrad
Posten auswählen: v/V/b/B//
Festlegen:
Stellen Sie den Schalter ON/OFF (Ein/Aus) auf ON.
1
Die Datums- und Uhrzeiteinstellung wird angezeigt, wenn Sie die
Kamera zum ersten Mal einschalten.
• Es kann eine Weile dauern, bis sich die Kamera einschaltet und
betriebsbereit ist.
Prüfen Sie, ob [Eingabe] auf dem Bildschirm
2
ausgewählt ist, und drücken Sie dann z am Einstellrad.
Wählen Sie die gewünschte geographische Position
3
gemäß den Anweisungen auf dem Bildschirm aus, und
drücken Sie dann z.
Stellen Sie [Sommerzeit], [Datum/Zeit] und
4
[Datumsformat] ein, und drücken Sie dann z.
• Wenn Sie [Datum/Zeit] einstellen, ist Mitternacht 12:00 AM, und
Mittag ist 12:00 PM.
Prüfen Sie, ob [Eingabe] ausgewählt ist, und drücken
5
Sie dann z.
z
DE
DE
19
Page 92

Aufnehmen von Standbildern/Filmen
Auslöser
Zoomhebel (W/T)
W: Auszoomen
T: Einzoomen
MOVIE
Standbildaufnahme
Drücken Sie den Auslöser halb nieder, um zu
1
fokussieren.
Wenn das Bild scharf ist, ertönt ein Piepton, und die Anzeige z oder
leuchtet auf.
Drücken Sie den Auslöser ganz nieder, um zu
2
fotografieren.
Filmaufnahme
Drücken Sie die Taste MOVIE (Film), um die Aufnahme
1
zu starten.
• Benutzen Sie den Zoomhebel (W/T), um den Zoomfaktor zu ändern.
Drücken Sie die Taste MOVIE erneut, um die
2
Aufnahme zu stoppen.
Hinweise
• Ununterbrochene Filmaufnahme ist jeweils maximal für ca. 29 Minuten mit den
Standardeinstellungen der Kamera und bei einer Umgebungstemperatur von ca.
25 °C möglich (die für Filmaufnahme verfügbare Zeit ist je nach dem
Temperaturmilieu, dem Aufnahmeformat/der Aufnahme-Einstellung oder den
Benutzungsbedingungen der Kamera vor Aufnahmebeginn unterschiedlich
(Seite 27)). Wenn die Filmaufnahme beendet ist, können Sie die Aufnahme durch
erneutes Drücken der Taste MOVIE fortsetzen. Die Aufnahme kann abhängig von
DE
der Temperatur der Kamera oder des Akkus zum Schutz der Kamera abgebrochen
werden.
20
Page 93

• Ziehen Sie den Blitz nicht von Hand hoch. Dies kann eine Funktionsstörung
verursachen.
• Wenn Sie während einer Filmaufnahme die Zoomfunktion benutzen, wird das
Betriebsgeräusch der Kamera aufgenommen. Das Betriebsgeräusch der Taste
MOVIE wird möglicherweise ebenfalls am Ende der Filmaufnahme
aufgenommen.
Betrachten von Bildern
W: Auszoomen
T: Einzoomen
Einstellrad
Bilder auswählen:
(Wiedergabe)
(Löschen)
Drücken Sie die Taste (Wiedergabe).
1
x
Auswählen des nächsten/vorherigen Bilds
Wählen Sie ein Bild aus, indem Sie B (weiter)/b (zurück) am Einstellrad
drücken oder das Einstellrad drehen. Drücken Sie z in der Mitte des
Einstellrads, um Filme wiederzugeben.
B (weiter)/b (zurück) oder
Einstellrad drehen
Festlegen: z
DE
x
Löschen eines Bilds
1 Drücken Sie die Taste (Löschen).
2 Wählen Sie [Löschen] mit v am Einstellrad aus, und drücken Sie dann z.
x
Rückkehr zur Bildaufnahme
Drücken Sie den Auslöser halb nieder.
DE
21
Page 94

Einführung zusätzlicher Funktionen
Andere Funktionen können mit dem Einstellrad, der Taste MENU usw.
ausgeführt werden.
MENU
Touch-Panel
x
Einstellrad
DISP (Inhalt anzeigen): Gestattet eine Änderung der Monitoranzeige.
ISO (ISO): Gestattet die Einstellung der Empfindlichkeit auf der Basis der
Helligkeit.
(Belichtungskorr.): Gestattet eine Korrektur von Belichtung und Helligkeit
für das gesamte Bild.
(Fotogestaltung): Gestattet intuitive Bedienung der Kamera und
einfaches Aufnehmen kreativer Bilder.
(Bildfolgemodus): Gestattet Umschaltung zwischen den
Aufnahmemethoden, wie z. B. Einzelaufnahme, Serienaufnahme oder
Reihenaufnahme.
z (Aufn.-Modus): Gestattet eine Änderung des Aufnahmemodus.
x
Aufnehmen mittels Touch-Bedienung
Diese Kamera ist mit einem Touch-Panel ausgestattet. Durch Berühren eines
Motivs auf dem Monitor können Sie Standbilder aufnehmen (Touch-Auslöser)
oder das Motiv scharf stellen (Touch-Fokus). Sie können auch die Funktion
[Touch-Auslöser] zusammen mit [Selbstportr./-auslös.]-Aufnahme
verwenden.
Ausführliche Angaben zur Bedienung und zu den mit dem Touch-Panel
verfügbaren Funktionen finden Sie in „Hilfe“.
DE
Einstellrad
22
Page 95

Merkmale von PlayMemories Home™
Die Software PlayMemories Home ermöglicht es Ihnen, Standbilder und
Filme zu Ihrem Computer zu importieren und zu benutzen. Sie benötigen
PlayMemories Home, um XAVC S-Filme und AVCHD-Filme zu Ihrem
Computer zu importierten.
Wiedergeben von
importierten Bildern
Importieren von Bildern von Ihrer Kamera
Für Windows sind die folgenden Funktionen
ebenfalls verfügbar:
Austauschen von
Bildern auf
PlayMemories Online™
DE
Betrachten von
Bildern auf
einem Kalender
Erstellen
von
Filmdiscs
Hochladen von
Bildern zu
Netzwerkdiensten
• Sie können Image Data Converter (RAW-Bild-Bearbeitungssoftware) oder
Remote Camera Control usw. nach dem folgenden Verfahren herunterladen:
Schließen Sie die Kamera an Ihren Computer an t Starten Sie
PlayMemories Home t Klicken Sie auf [Benachrichtigungen].
Hinweise
• Zur Installation von PlayMemories Home wird eine Internet-Verbindung benötigt.
• Zur Benutzung von PlayMemories Online oder anderer Netzwerkdienste wird eine
Internet-Verbindung benötigt. PlayMemories Online oder andere Netzwerkdienste
sind in manchen Ländern oder Regionen eventuell nicht verfügbar.
• Verwenden Sie die folgende URL für Mac-Applikationen:
http://www.sony.co.jp/imsoft/Mac/
• Falls die Software PMB (Picture Motion Browser), die mit älteren Modellen vor
2011 geliefert wurde, bereits auf Ihrem Computer installiert ist, wird sie bei der
Installation von PlayMemories Home überschrieben. Verwenden Sie
PlayMemories Home, die Nachfolger-Software von PMB.
DE
23
Page 96

x
Systemanforderungen
Sie finden die Systemanforderungen für die Software unter der folgenden
URL:
www.sony.net/pcenv/
x
Installieren von PlayMemories Home auf einem
Computer
Rufen Sie mit dem Internet-Browser auf Ihrem
1
Computer die folgende URL auf, und installieren Sie
dann PlayMemories Home.
www.sony.net/pm/
• Einzelheiten zu PlayMemories Home finden Sie auf der folgenden
PlayMemories Home-Supportseite (nur in Englisch):
http://www.sony.co.jp/pmh-se/
• Sobald die Installation abgeschlossen ist, wird PlayMemories Home
gestartet.
Schließen Sie die Kamera mit dem Micro-USB-Kabel
2
(mitgeliefert) an Ihren Computer an.
• Neue Funktionen werden u. U. in PlayMemories Home installiert. Wir
empfehlen, die Kamera auch dann an Ihren Computer anzuschließen,
wenn PlayMemories Home bereits auf Ihrem Computer installiert ist.
Hinweise
• Trennen Sie das Micro-USB-Kabel (mitgeliefert) nicht von der Kamera, während
der Bedienungsbildschirm oder der Zugriffsbildschirm angezeigt wird.
Anderenfalls können die Daten beschädigt werden.
• Um die Kamera vom Computer zu trennen, klicken Sie auf in der Taskleiste,
und dann auf [PMHOME auswerfen].
DE
24
Page 97

Hinzufügen von Funktionen zur Kamera
Sie können die gewünschten Funktionen zu Ihrer Kamera hinzufügen, indem
Sie über das Internet eine Verbindung mit der Applikations-DownloadWebsite (PlayMemories Camera Apps™) herstellen.
http://www.sony.net/pmca/
• Nachdem Sie eine Applikation installiert haben, können Sie die Applikation
aufrufen, indem Sie ein NFC-taugliches Android-Smartphone unter
Verwendung der Funktion [One-Touch(NFC)] an das N-Zeichen der Kamera
halten.
Standbildzahlen und Filmaufnahmezeiten
Die Anzahl der Standbilder und die Aufnahmezeit hängen von den
Aufnahmebedingungen und der Speicherkarte ab.
x
Standbilder
[ Bildgröße]: L: 24M
Bei Einstellung von [ Seitenverhält.] auf [3:2]*
Qualität
Kapazität
Standard 330 Bilder
Fein 200 Bilder
RAW & JPEG 54 Bilder
RAW 74 Bilder
* Wenn Sie [ Seitenverhält.] auf eine andere Option als [3:2] einstellen, können
Sie mehr Bilder als oben angegeben aufnehmen. (Außer bei Einstellung von
[ Qualität] auf [RAW].)
2 GB
DE
DE
25
Page 98

x
Filme
Die nachstehende Tabelle zeigt die ungefähren Gesamtaufnahmezeiten bei
Verwendung einer mit dieser Kamera formatierten Speicherkarte. Die
Aufnahmezeit für XAVC S- und AVCHD-Filme entspricht der Aufnahmezeit
bei Einstellung von [Dual-Video-AUFN] auf [
(h (Stunden), m (Minuten))
Aufnahmeeinstlg
60p 50M/50p 50M — 2 h 35 m
30p 50M/25p 50M — 2 h 35 m
*
24p 50M
60i 24M(FX)/50i 24M(FX) 10 m 6 h
60i 17M(FH)/50i 17M(FH) 10 m 8 h 15 m
60p 28M(PS)/50p 28M(PS) 9 m 5 h 5 m
24p 24M(FX)/25p 24M(FX) 10 m 6 h
24p 17M(FH)/25p 17M(FH) 10 m 8 h
1440×1080 12M 20 m 11 h
VGA 3M 1 h 10 m 40 h
* nur für 1080 60i-kompatible Modelle
• Daueraufnahme ist für ungefähr 29 Minuten (eine Produktspezifikationsgrenze)
möglich. Die maximale ununterbrochene Aufnahmezeit eines Films im Format
MP4 (12M) beträgt etwa 20 Minuten (begrenzt durch die 2 GBDateigrößeneinschränkung).
• Die verfügbare Filmaufnahmezeit ist unterschiedlich, weil die Kamera mit VBR
(Variable Bit Rate) aufnimmt. Bei diesem Verfahren wird die Bildqualität
abhängig von der Aufnahmeszene automatisch justiert. Wenn Sie schnell bewegte
Motive aufnehmen, ist das Bild klarer, aber die verfügbare Aufnahmezeit wird
kürzer, weil für die Aufnahme mehr Speicherplatz erforderlich ist.
Die Aufnahmezeit hängt ebenfalls von den Aufnahmebedingungen, dem Motiv
oder der Einstellung von Bildqualität/Bildgröße ab.
Kapazität
Aus].
2 GB 64 GB
— 2 h 35 m
26
DE
Page 99

Hinweise zu fortlaufender Filmaufnahme
• Die Durchführung von Filmaufnahmen in hoher Qualität oder Serienaufnahmen
mit dem Bildsensor fordert einen hohen Strombedarf. Daher steigt bei
fortgesetzter Aufnahme die Innentemperatur der Kamera, besonders die des
Bildsensors. In solchen Fällen schaltet sich die Kamera automatisch aus, da höhere
Temperaturen die Qualität der Bilder beeinträchtigen oder den internen
Mechanismus der Kamera schädigen.
• Die für Filmaufnahme verfügbare Zeitdauer ist wie folgt, wenn die Kamera mit
den Standardeinstellungen mit der Aufnahme beginnt, nachdem sie eine Zeitlang
ausgeschaltet war. (Die folgenden Werte geben die ununterbrochene Zeit vom
Aufnahmestart bis zum Aufnahmestopp an.)
Umgebungstemperatur Daueraufnahmezeit für Filme
20 °C Etwa 29 Minuten
30 °C Etwa 29 Minuten
40 °C Etwa 20 Minuten
• Die für Filmaufnahme verfügbare Zeitdauer hängt von der Temperatur, dem
Aufnahmeformat/der Aufnahme-Einstellung oder dem Zustand der Kamera vor
dem Aufnahmestart ab. Wenn Sie nach dem Einschalten der Kamera den
Bildausschnitt häufig ändern oder viele Bilder aufnehmen, steigt die
Innentemperatur der Kamera, so dass die verfügbare Aufnahmezeit verkürzt wird.
• Wenn angezeigt wird, brechen Sie die Filmaufnahme ab.
• Falls die Kamera die Aufnahme wegen hoher Temperatur abbricht, lassen Sie die
Kamera mehrere Minuten ausgeschaltet liegen. Setzen Sie die Aufnahme fort,
nachdem die Innentemperatur der Kamera vollkommen gesunken ist.
Hinweise zur Verwendung der Kamera
In diese Kamera eingebaute Funktionen
• Diese Anleitung beschreibt mit 1080 60i und 1080 50i kompatible Geräte.
Um festzustellen, ob Ihre Kamera mit 1080 60i oder 1080 50i kompatibel ist,
prüfen Sie nach, ob eines der folgenden Zeichen an der Unterseite der Kamera
vorhanden ist.
1080 60i-kompatibles Gerät: 60i
1080 50i-kompatibles Gerät: 50i
• Diese Kamera ist mit Filmen des Formats 1080 60p oder 50p kompatibel. Im
Gegensatz zu den bislang üblichen Standard-Aufnahmemodi, bei denen nach
einem Zeilensprungverfahren aufgenommen wird, nimmt diese Kamera nach
einem Progressivverfahren auf. Dadurch wird die Auflösung erhöht und ein
geschmeidigeres, realistischeres Bild geliefert.
DE
DE
27
Page 100

Info zu Benutzung und Pflege
Vermeiden Sie grobe Behandlung, Zerlegen, Abändern, Erschütterungen oder
Stöße, z. B. durch Hammerschlag, Fallenlassen oder Drauftreten auf das Produkt.
Behandeln Sie das Objektiv mit besonderer Sorgfalt.
Hinweise zu Aufnahme/Wiedergabe
• Vor der eigentlichen Aufnahme sollten Sie eine Probeaufnahme machen, um sich
zu vergewissern, dass die Kamera einwandfrei funktioniert.
• Diese Kamera ist weder staubdicht noch spritzwassergeschützt oder wasserdicht.
• Blicken Sie nicht durch ein abgenommenes Objektiv in die Sonne oder eine starke
Lichtquelle. Dadurch kann Ihren Augen bleibender Schaden zugefügt werden.
Oder es kann zu einer Funktionsstörung des Objektivs kommen.
• Falls Feuchtigkeitskondensation auftritt, beseitigen Sie diese vor Benutzung der
Kamera.
• Unterlassen Sie Schütteln oder Anstoßen der Kamera. Es kann zu einer
Funktionsstörung kommen, so dass Sie nicht in der Lage sind, Bilder
aufzunehmen. Darüber hinaus kann das Speichermedium unbrauchbar werden,
oder Bilddaten können beschädigt werden.
Benutzen bzw. lagern Sie die Kamera nicht an folgenden Orten
• An sehr heißen, kalten oder feuchten Orten
An sehr heißen Orten, wie z. B. in einem in der Sonne geparkten Auto, kann sich
das Kameragehäuse verformen, was zu einer Funktionsstörung führen kann.
• Unter direktem Sonnenlicht oder in der Nähe eines Heizkörpers
Das Kameragehäuse kann sich verfärben oder verformen, was eine
Funktionsstörung verursachen kann.
• An Orten, die starken Erschütterungen oder Vibrationen ausgesetzt sind
• In der Nähe eines Ortes, der starke Funkwellen erzeugt, Strahlung abgibt oder
stark magnetisch ist
An solchen Orten kann die Kamera Bilder eventuell nicht richtig aufnehmen oder
wiedergeben.
• An sandigen oder staubigen Orten
Achten Sie darauf, dass kein Sand oder Staub in die Kamera gelangt. Es könnte
sonst zu einer Funktionsstörung der Kamera kommen, die in manchen Fällen nicht
reparierbar ist.
Info zum Griff
Der Griff ist mit einer speziellen Beschichtung überzogen. Der Griff kann sich
verfärben, wenn er mit dunkelfarbigem Stoff, Leder usw. gerieben wird.
Info zur Aufbewahrung
Bringen Sie unbedingt die vordere Objektivkappe an, wenn Sie die Kamera nicht
benutzen.
28
DE
 Loading...