

Page 1

Sony Ericsson
Spiro
™
User guide
Page 2

Important information
Please read the Important information leaflet before you
use your mobile phone.
Experience more. Discover
how.
Fill it with pop and let it rock. Share your life in pictures. Or
why not go online for the latest updates? Your new phone is
the key to a wider world. And it's just around the corner.
Get started with this User guide. And join us online to get the
full picture. Music, games, apps, updates, downloads,
support and more. All in one place:
www.sonyericsson.com/spiro
Feedback on the User guide
Do you have any suggestions on how we can improve this
User guide? If so, then email us at
userguides@sonyericsson.com
.
Please make sure to type the User guide name in the email
subject field. We highly value your feedback!
2
Page 3
Getting started
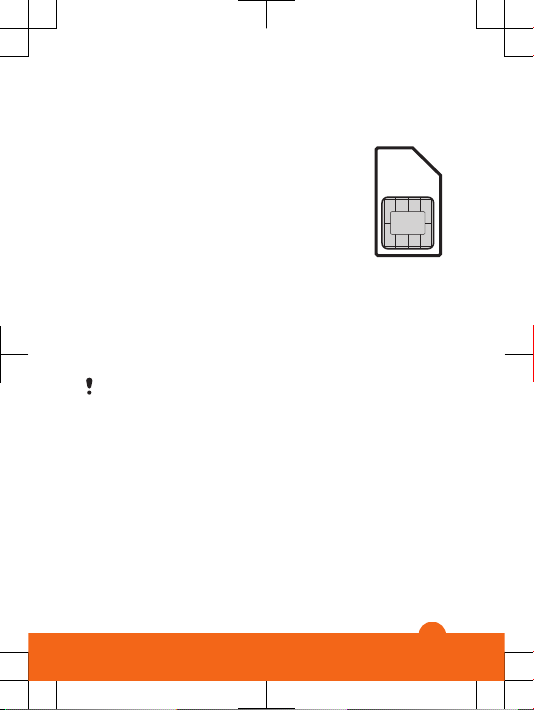
SIM card
The SIM (Subscriber Identity Module) card,
which you get from your network operator,
contains information about your subscription.
Always turn off your phone and detach the
charger and battery (if inserted) before you
insert or remove the SIM card.
PIN
You may need a PIN (Personal Identification Number) to
activate the services and functions in your phone. Your PIN
is supplied by your network operator. Each PIN digit
appears as *, unless it starts with emergency number digits
such as 112 or 911. You can see and call an emergency
number without entering a PIN, if a network is available.
If you enter the wrong PIN three times in a row, the SIM
card is blocked. See SIM card lock on page 33.
3
Page 4
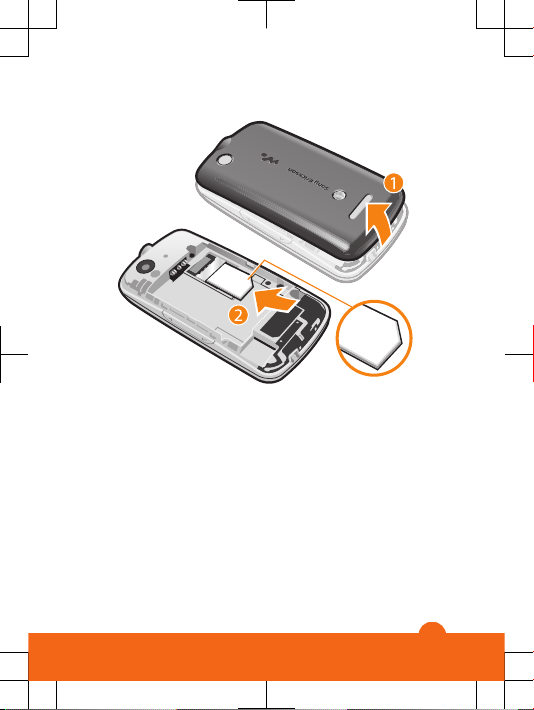
To insert the SIM card
1
Remove the battery cover.
2
Slide the SIM card into its holder with the gold-coloured
contacts facing down.
4
Page 5
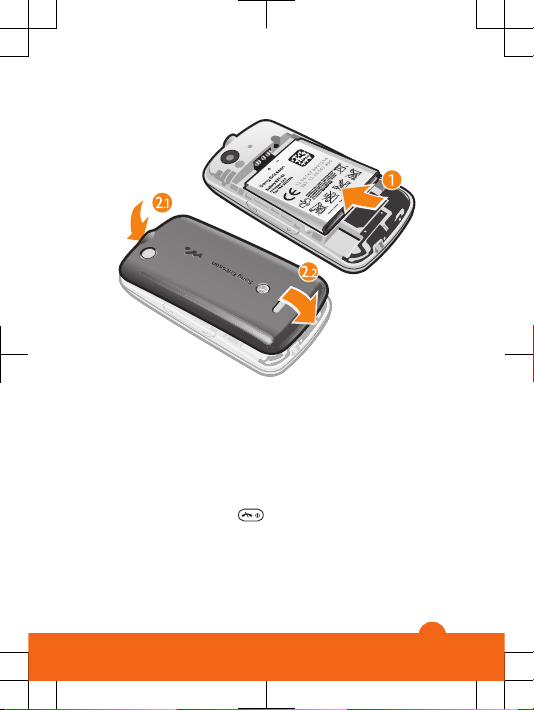
To insert the battery
1
Insert the battery with the label side up and the
connectors facing each other.
2
Slide the battery cover into place and lock it.
Turning on the phone
To turn on the phone
1
Press and hold down
.
2
Open the slider and enter your PIN, if requested.
3
Select OK.
4
Select a language.
5
Page 6
5
Select Yes to use the setup wizard.
If you make a mistake when you enter your PIN, you
can press to delete numbers from the screen.
Standby
After you have turned on the phone and entered your PIN,
the name of the network operator appears. This view is
called standby. You phone is now ready for use.
To turn off the phone
•
Press and hold down .
Before turning off the phone, you must return to
standby.
Memory card
You may have to purchase a memory card separately.
Your phone supports a microSD™ memory card, adding
more storage space to your phone. This type of card can
also be used as a portable memory card with other
compatible devices.
You can move content between a memory card and the
phone memory.
6
Page 7
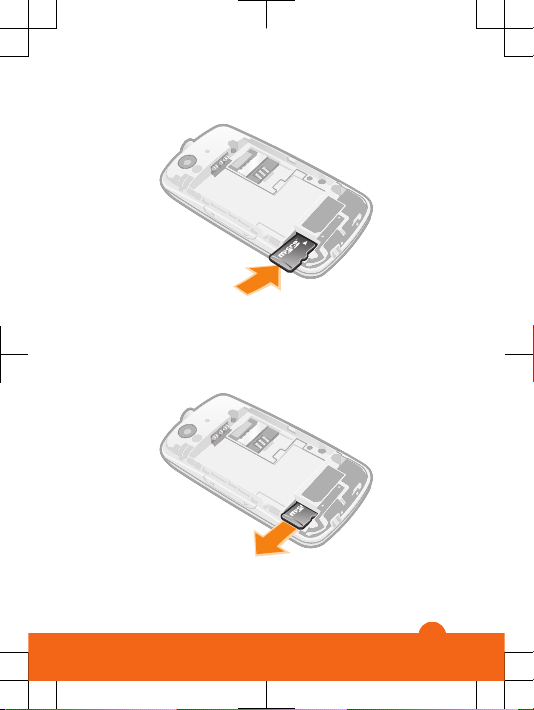
To insert a memory card
•
Remove the battery cover and insert the memory card
with the gold-coloured contacts facing down.
To remove a memory card
•
Remove the battery cover and slide the memory card to
remove it.
7
Page 8
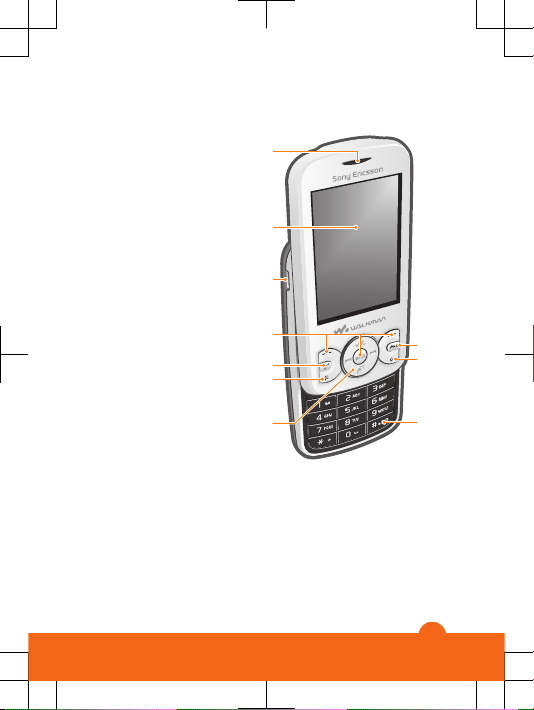
Phone overview
1 Ear speaker
1
2
3
5
6
4
7
8
9
10
2 Screen
3 Connector for
charger and USB
cable
4 Selection keys
5 Call key
6 Shortcut key
7 Navigation key,
Walkman™ player
controls,
TrackID™*
8 End key, On/off key
9 C key (Clear)
10 Silent key
8
Page 9
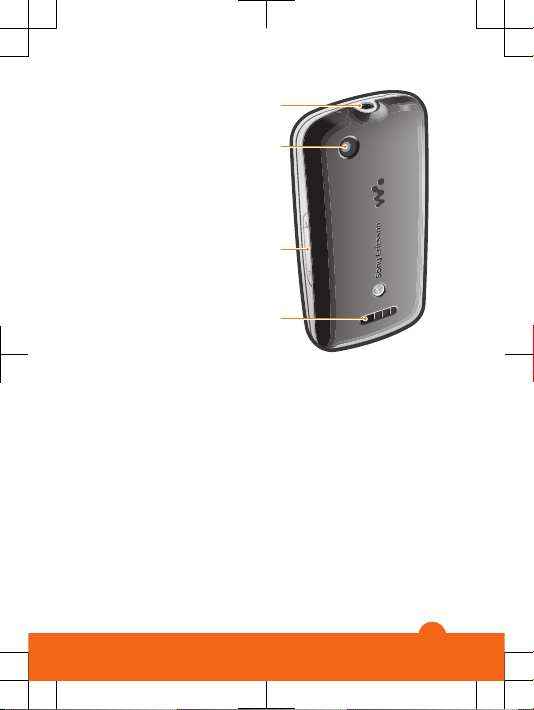
11
12
13
14
11 Connector for
handsfree
12 Camera lens
13 Volume key
14 Loudspeaker
*The TrackID™ shortcut key may not be available in your
phone.
9
Page 10
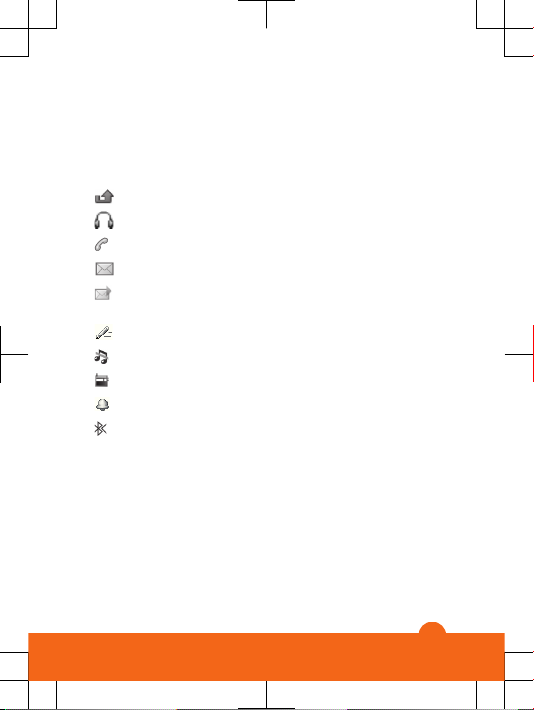
Screen icons
These icons may appear on the screen.
Icon Description
Missed call
Handsfree connected
Ongoing call
Text message received
Multimedia message
received
Predictive text input activated
Phone set to silent
Radio playing
Alarm activated
Bluetooth™ function
activated
10
Page 11
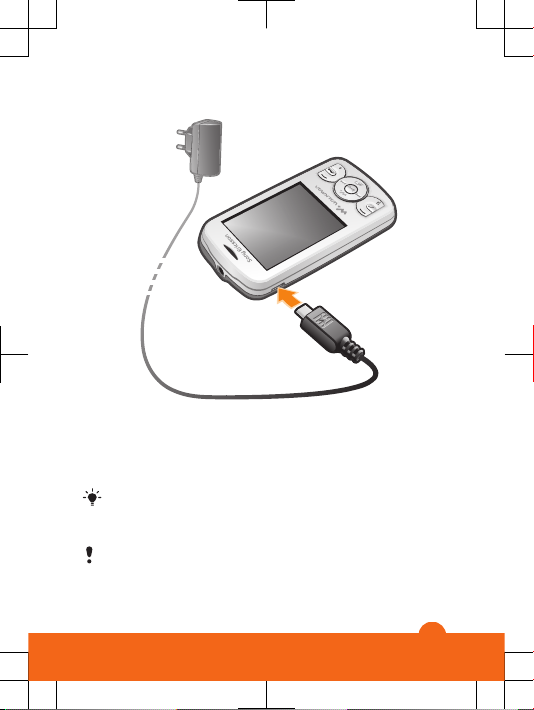
To charge the battery
•
Connect the charger to the phone with the power icon on
the charger facing upwards. It takes approximately 2.5
hours to fully charge the battery. You can still use your
phone while it is charging.
The phone battery is partly charged when you buy it.
It may take a few minutes before the battery icon
appears on the screen.
The battery will start to discharge a little after it is fully
charged and then charges again after a certain time.
This is to extend battery life and may result in the
charge status showing a level below 100 percent.
11
Page 12
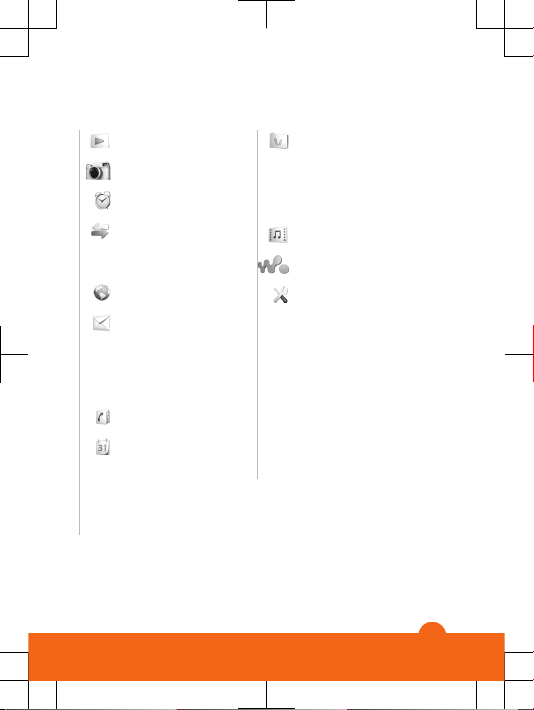
Menu overview
PlayNow™
Camera
Alarms
Calls**
All, Answered, Dialled,
Missed
Internet
Messaging
Write new, Inbox/
Conversations,
Messages, Call
voicemail
Contacts
Organiser
File manager**,
Applications, Torch,
Calendar, Tasks,
Notes, Timer,
Stopwatch, Calculator
Entertainment
Online services*,
PlayNow™, Radio,
Games, TrackID™,
Record sound
Media
WALKMAN
Settings**
General, Sounds &
alerts, Display, Calls,
Connectivity
* Some menus are
operator-, network- and
subscription-dependent.
** You can use the
navigation key to scroll
between tabs in
submenus.
12
Page 13

Navigation
The main menus are shown as icons. Some submenus
include tabs.
To access the main menu
•
When Menu appears on the screen, press the centre
selection key.
•
When Menu does not appear on the screen, press the
End key, then press the centre selection key.
To navigate the phone menus
1
Press the centre selection key to select Menu.
2
Press the navigation key upwards, downwards, left or
right to move through the menus.
To select an item
•
Scroll to the item and press the centre selection key
To scroll between tabs
•
Press the navigation key left or right .
To go back one step in a menu
•
Select Back.
13
Page 14

To end a function
•
Press .
To return to standby
•
Press .
To delete an item
•
Scroll to the item and press .
Shortcuts
You can use the navigation key shortcuts from standby or
use the shortcut menu to get quick access to certain
functions.
To use navigation key shortcuts
•
Press the navigation key upwards, downwards, left or
right to go directly to a function.
To edit a navigation key shortcut
•
Select Menu > Settings > General > Shortcuts.
The WALKMAN shortcut cannot be changed.
To open the shortcut menu
•
Press .
To add a shortcut
1
Press .
2
Scroll to New shortcut and select Add.
To delete or move a shortcut
1
Press
.
2
Scroll to a shortcut and select Options.
3
Select an option.
To turn the sound on or off
•
Press and hold down
.
14
Page 15

Entering text
You can use multitap text input or Zi™ text input to enter
text. The Zi text input method uses a built-in dictionary.
By using Zi text input you only have to press each key
once. Continue writing a word even if it appears to be
wrong.
To enter text using Zi text input
1
For example, to write the word “Jane”, press , ,
, .
2
You now have several options:
•
If the word shown is the one you want, press
to
accept and add a space. To accept a word without
adding a space, press the navigation key right.
•
If the word shown is not the one you want, press the
navigation key upwards or downwards to view
alternative words. To accept a word and add a space,
press
.
•
To enter full stops and commas, press and press
the navigation key to scroll to the punctuation desired.
To enter text using multitap
•
Press
– until the character you want appears.
•
Press to add a space.
•
Press
to enter punctuation marks.
To use shortcuts and keys when entering text
•
To change the text input method, press and hold down
.
•
To change writing language, press and hold down
.
•
To shift between upper-case letters, lower-case letters,
and numbers, press .
15
Page 16

•
To delete characters, press .
•
To delete a whole word, press and hold down .
•
To enter numbers, press and hold down – .
To add a word to the dictionary
1
When you enter text using Zi text input, select Options >
Spell word.
2
Enter the word using multitap and select Save.
Calling
You must turn on the phone and be within range of a
network.
To make a call
1
Enter a phone number (with international country code
and area code, if applicable).
2
Press
.
You can call numbers from Contacts and from the call
list. See Contacts on page 18, and Call list on
page 17.
To end a call
•
Press
.
To answer a call
•
Press .
To reject a call
•
Press
.
To change the ear speaker volume during a call
•
Press the volume key up or down.
16
Page 17

To turn off the ringtone without answering a call
•
Press the volume key up or down.
To turn on the loudspeaker during a call
•
Select Spkr on.
Do not hold the phone to your ear when using the
loudspeaker. This could damage your hearing.
To make an international call
1
Press and hold down until a “+” sign appears.
2
Enter the country code, area code (without the first zero)
and phone number.
3
Press
.
Call list
You can view information about recent calls.
To call a number from the call list
1
Press
.
2
Scroll to a name or a number and press .
To clear the call list
1
Press
.
2
In the All tab, select Options > Delete all.
3
To confirm, select Yes.
Emergency calls
Your phone supports international emergency numbers, for
example, 112 or 911. You can normally use these numbers
to make emergency calls in any country, with or without the
SIM card inserted, if you are within range of a network.
17
Page 18

To make an emergency call
•
Enter 112 (the international emergency number) and
press .
In some countries, other local emergency numbers
may also be promoted. Your network operator may
have saved these numbers on the SIM card.
Contacts
You can save names, phone numbers and personal
information in Contacts. Information can be saved in the
phone memory or on the SIM card.
To add a phone contact
1
Select Menu > Contacts.
2
Scroll to New contact and select Add.
3
Enter the name and select OK.
4
Scroll to New number: and select Add.
5
Enter the number and select OK.
6
Select a number option.
7
Scroll between the tabs and add information to the fields.
8
Select Save.
To edit a phone contact
1
Select Contacts.
2
Scroll to a contact and select Options > Edit contact.
3
Scroll between the tabs, edit information and select
Save.
18
Page 19

Calling contacts
To make a call using Smart search
1
Press – to enter a sequence of (at least two)
digits. All entries that match the sequence of digits or
corresponding letters are shown in a list.
2
Scroll to a contact or a phone number and press the Call
key.
To turn on or off Smart search
1
Select Menu > Settings > Calls > Smart search.
2
Select an option.
Messaging
Text messages
You must have a valid service centre number in your phone.
This is supplied by your service provider and saved on the
SIM card. You may have to enter the number yourself.
To write and send a text message
1
Select Menu > Messaging > Write new > Message.
2
Write the message and select Continue. Select
Contacts look-up or Enter phone number.
3
Select a recipient and select Send.
To view a received text message
•
When From: Text message received Read now?
appears, select Yes.
To view messages from the Inbox
1
Select Menu > Messaging > Inbox.
2
Scroll to a message and select View.
19
Page 20

Multimedia messages
Multimedia messages can contain text, pictures, sound and
attachments. They are sent using MMS (Multimedia
Messaging Service) to a mobile phone. You need the
correct Internet settings in your phone to use multimedia
messaging. See Internet on page 30.
You must set an MMS profile and the address of your
message server. If no MMS profile or message server
exists, you can receive all the settings from your
network operator or at
www.sonyericsson.com/support
.
To send a multimedia message
1
Select Menu > Messaging > Write new > Message.
2
Enter text. To add items to the message, press the
navigation key downwards, then scroll left or right and
select an item.
3
To preview the multimedia message before sending it,
select Options > Preview.
4
When the message is ready, select Continue.
5
Select Contacts look-up and select a recipient.
6
Select Send.
You can only send multimedia messages if both the
sending and receiving phones have subscriptions that
support MMS.
Conversations
You can choose whether to view your messages in
Conversations or the Inbox. A messaging conversation
shows all messaging communication between you and one
of your contacts.
20
Page 21

To send a message from Conversations
1
Select Menu > Messaging.
2
Select Conversations, or select Inbox > the
Conversations tab.
3
Select a conversation.
4
Write a message and select Send.
To view messages in Conversations
•
Select Menu > Messaging > Inbox > the
Conversations tab and select a conversation.
•
Select Menu > Messaging > Conversations and select
a conversation.
Walkman™
To play music
1
Press
and select Options > My music.
2
Browse by artist, album, track or playlist. Scroll to an
option and press Select to open it.
3
Scroll to a track and select Play.
To stop playing music
•
When a track is playing, press
.
Transferring music
You can transfer music from your computer to your phone
memory or memory card. There are two ways to connect
the phone to a computer:
•
using a USB cable
•
using a Bluetooth™ wireless technology connection
You can drag and drop files between your phone or memory
card and a computer in Microsoft® Windows® Explorer. For
21
Page 22

more information about transferring files to your phone go
to
www.sonyericsson.com/support
.
You may have to purchase a USB cable separately.
To connect your phone to a computer using a USB cable
1
Make sure your phone is turned on.
2
Connect the USB cable to your phone and the computer.
3
Phone: select Mass storage.
4
Computer: Wait for the drivers to be installed (this is done
automatically). The first time you connect your phone to
the computer, you may need to identify and name the
phone.
To transfer files in Mass storage mode using a USB cable
Do not remove the USB cable from the phone or
computer during transfer, as this may corrupt the
memory card and the phone memory. You cannot view
the transferred files in your phone until you have
removed the USB cable from the phone.
1
Connect the USB cable to the phone and the computer.
2
Phone: Select Mass storage.
3
Computer: Wait until the phone memory and memory
card appear as external disks in Microsoft®Windows
®
Explorer.
4
Computer: On the computer desktop, double-click the
My Computer icon.
5
Computer: To view the phone memory and memory card
folders, double-click the icon representing your phone.
6
Computer: Copy and paste your file, or drag and drop it,
into a folder on your computer, in your phone memory, or
on your memory card.
22
Page 23

7
To safely disconnect the USB cable, right-click the
Removable Disk icon in Windows Explorer and select
Eject.
Playlists
You can create playlists to organise your music.
To create a playlist
1
Press and select Options > My music > Playlists
> New playlist.
2
Enter a name and select OK.
3
Scroll to a track and select Mark.
4
Select Add to add the track to the playlist. Repeat steps
3 and 4 to add more tracks.
To add tracks to a playlist
1
Press
and select Options > My music > My
Playlists.
2
Open a playlist and select Options > Add media.
3
Mark the desired tracks and select Add.
You can also add all the tracks in a folder to a playlist
by marking the folder and then selecting Options >
Add.
To remove tracks from a playlist
1
Press
and select Options > My music > My
Playlists.
2
Open a playlist and scroll to a track.
3
Press and select Yes.
To control the Walkman™ player
•
Press
to open the Walkman™ player.
•
Press to play or stop the current music file.
•
Press
to go to the next music file.
23
Page 24

•
Press to go to the previous music file.
•
Press and hold down or to fast forward or
rewind.
•
Press the navigation key upwards/downwards to view
and scroll files in the current playlist.
•
Press the volume key up or down to change the volume.
•
Select Back to minimise the Walkman™ player during
playback.
TrackID™
TrackID™ is a music recognition service. You can search
the title, artist and album name for a track you hear playing
through a loudspeaker or on the radio.
You need the correct Java™ software and Internet
settings in your phone to use this function. See
Internet on page 30. For cost information contact
your service provider.
To search for track information
•
When you hear a track through a loudspeaker, select
Menu > Entertainment > TrackID™ > Start.
•
When you hear a track through the radio on your phone,
from the radio view select Options > TrackID™.
PlayNow™
When you open PlayNow™ , you enter PlayNow™, where
you can download music, games, ringtones, themes and
24
Page 25

wallpapers. You can preview or listen to content before you
purchase and download it to your phone.
This service is not available in all countries.
For extended functionality, you can also access the
PlayNow™ web shop on a computer from
www.sonyericsson.com/playnow. For more information, go
to www.sonyericsson.com/support to read the
PlayNow™ Feature guide.
You can access PlayNow™ in two ways:
•
From standby, select Menu > PlayNow™.
•
Go to www.sonyericsson.com/playnow.
Video player
You can view and manage video clips in your phone.
To view a video clip
1
Select Menu > Media > Video.
2
Scroll to a video clip and select Play.
Radio
You can listen to the radio in your phone by connecting the
phone to a handsfree device. The handsfree works as an
antenna.
25
Page 26

In some markets, you may have to purchase the
handsfree separately.
Do not use your phone as a radio in places where this
is prohibited.
To turn on the radio
1
Connect a handsfree to the phone.
2
Select Menu > Entertainment > Radio.
To search for channels automatically
•
When the radio is playing, select Search.
To search for channels manually
•
When the radio is playing, press the navigation key left or
right.
26
Page 27

Imaging
Camera and video recorder
You can take photos and record video clips to view, save
or send. Photos and video clips are automatically saved in
the phone memory.
You can save photos and video clips on a memory
card by selecting Camera > Options > Save to >
Memory card.
To take a photo
1
Select Camera and press the navigation key left to switch
to .
2
Select TakePic. The photo is automatically saved in
JPEG format.
To avoid a blurred photo, use a support or the selftimer.
To change camera settings
1
Select Camera > Options.
2
Select an item and change the relevant settings.
To send a saved photo
1
Select Menu > Organiser > File manager > Camera
album.
2
Scroll to a photo and select Options > Send.
3
Select an option.
See To send an item using the Bluetooth™ function
on page 30. See To send a multimedia message on
page 20.
27
Page 28

To record a video clip
1
Select Camera and press the navigation key right to
switch to .
2
Select Record to start recording.
3
To stop recording, select Stop. The video clip is
automatically saved.
Do not record with a strong light source in the
background.
To view video clips
1
Select Menu > Organiser > File manager > Videos.
2
Scroll to a video clip and select Play.
Transferring photos and video clips
You can use Bluetooth™ wireless technology and the USB
cable to transfer photos and video clips between your
computer and phone. For more information, see
Bluetooth™ wireless technology on page 28 and To
transfer files in Mass storage mode using a USB cable on
page 22.
Bluetooth™ wireless
technology
Bluetooth™ wireless technology facilitates wireless
connections to other Bluetooth™ devices, for example, a
Bluetooth™ headset. You can connect to several devices
at the same time or exchange items.
A range within 10 metres (33 feet), with no solid objects
in between, is recommended for Bluetooth™
communication.
28
Page 29

To turn on the Bluetooth™ function
•
Select Menu > Settings > Connectivity > Bluetooth >
Turn on.
Some countries do not allow you to use Bluetooth™
wireless technology.
To show or hide your phone
•
Select Menu > Settings > Connectivity > Bluetooth >
Visibility > Show phone or Hide phone.
If you select Hide phone, other devices will not be able
to identify your phone using Bluetooth™ wireless
technology.
To pair the phone with a device
1
To search for available devices, select Menu > Settings
> Connectivity > Bluetooth > My devices > New
device.
2
Select a device from the list.
3
Enter a passcode, if required.
Make sure that the device you want to pair your phone
with has the Bluetooth™ function activated and
Bluetooth™ visibility set to Show phone.
To pair the phone with a Bluetooth™ handsfree
1
Select Menu > Settings.
2
Press the navigation key right to scroll to the
Connectivity tab and select Bluetooth > Handsfree >
My handsfree > New handsfree.
To receive an item
1
Turn on the Bluetooth™ function and set the Visibility to
Show phone.
29
Page 30

2
When you receive an item, follow the instructions that
appear.
To send an item using the Bluetooth™ function
1
Select, for example, Menu > Organiser > File
manager > Camera album.
2
Scroll to an item and select Options > Send > Via
Bluetooth.
Internet
You need the correct Internet settings in your phone. If the
settings are not in your phone, you can go to
www.sonyericsson.com/support or ask your service
provider for more information.
Make sure you have a phone subscription that
supports data transmission.
To select an Internet profile
1
Select Menu > Settings > Connectivity > Internet
settings > Internet profiles > Connect using:.
2
Select an account.
To start browsing
1
Select Menu > Internet > Options > Go to.
2
Select an option.
To exit the browser
•
When you are browsing, press
.
30
Page 31

More features
File manager
You can handle files saved in the phone memory or on a
memory card. You can create subfolders where you can
save your files.
To view information about a file
1
Select Menu > Organiser > File manager.
2
Select the file from a folder and select Options >
Information.
To copy or move a file in File manager
1
Select Menu > Organiser > File manager.
2
Find a file in a folder and select Options > Manage file.
3
Select Copy or Move.
To view the memory status
•
Select Menu > Organiser > File manager > Options >
Memory status.
Voicemail
If your subscription includes an answering service, callers
can leave a voicemail message when you cannot answer a
call.
To enter your voicemail number
1
Select Menu > Messaging > Messages > Settings >
Voicemail number.
2
Enter the voicemail number you received from your
service provider and select Save.
To call your voicemail service
•
Press and hold down
.
31
Page 32

Alarms
You can set a sound or the radio as an alarm signal. The
alarm sounds even if the phone is turned off.
To set the alarm
1
Select Menu > Alarms.
2
Scroll to an alarm and select Edit.
3
Switch among the tabs and set the time, the alarm signal
and other information if needed.
4
Select Save.
Keep the handsfree inserted when you select the radio
as your alarm signal. The radio alarm sounds through
the loudspeaker.
To silence the alarm
1
When the alarm sounds, press any key.
2
To repeat the alarm, select Snooze.
Ringtones and wallpapers
Wallpapers are used to change the appearance of the
screen.
To set the ringtone volume
1
Select Menu > Settings > Sounds & alerts > Ring
volume.
2
Press the navigation key left or right to change the
volume.
3
Select Save.
To set a ringtone
1
Select Menu > Settings > Sounds & alerts >
Ringtone.
2
Find and select a ringtone.
32
Page 33

To set the vibrating alert
1
Select Menu > Settings > Sounds & alerts > Vibrating
alert.
2
Select an option.
To use a photo as wallpaper
1
Select Menu > Organiser > File manager > Camera
album.
2
Scroll to a picture and select Options > Use as >
Wallpaper.
Keypad lock
You can use the keypad lock to avoid accidental dialling.
Incoming calls can be answered without unlocking the
keypad.
Calls to the international emergency number 112 can
still be made.
To activate the automatic keylock
1
Select Menu > Settings > General > Security >
Automatic keylock.
2
Select an option.
SIM card lock
This lock only protects your subscription. Your phone will
work with a new SIM card. If the SIM card lock is on, you
have to enter a PIN when the phone starts up. If you enter
your PIN incorrectly three times in a row, the SIM card is
blocked and you need to enter your PUK (Personal
Unblocking Key). Your PIN and PUK are supplied by your
network operator.
33
Page 34

To unblock the SIM card
1
When PIN blocked. To unblock, enter your PUK code
provided by your network operator. is displayed, enter
your PUK and select OK.
2
Enter a new PIN and select OK.
3
To confirm, re-enter the new PIN and select OK.
To activate the SIM card lock
1
Select Menu > Settings > General > Security > SIM
protection > Protection > On.
2
Enter your PIN and select OK.
To edit the PIN
1
Select Menu > Settings > General > Security > SIM
protection > Change PIN.
2
Enter your PIN and select OK.
3
Enter a new PIN and select OK.
4
To confirm, re-enter the new PIN and select OK.
Phone lock
The phone lock protects the phone against unauthorised
use if it is stolen and the SIM card is exchanged. You can
change the phone lock code (which is 0000 by default) to
any four-to-eight-digit personal code. If the phone lock is
set to Automatic, you do not need to enter your phone lock
code until a different SIM card is inserted in the phone.
To set the phone lock
1
Select Menu > Settings > General > Security > Phone
protection > Protection.
2
Select an option.
3
Enter the phone lock code and select OK.
34
Page 35

To change the phone lock code
1
Select Menu > Settings > General > Security > Phone
protection > Change code.
2
Enter the old code and select OK.
3
Enter the new code and select OK.
4
Repeat the new code and select OK.
To turn off phone lock protection
1
Select Menu > Settings > General > Security > Phone
protection > Protection > Off.
2
Enter your phone lock code and select OK.
Troubleshooting
Some problems require you to call your network operator,
but you can correct most problems yourself. Remove the
SIM card before handing your phone in for repair. For more
support, go to www.sonyericsson.com/support.
Restart your phone every day to free memory. Do a
Master reset if you are having problems with memory
capacity or if the phone is working slowly.
Master reset
If you experience problems with your phone, such as screen
flickering, screen freezing or navigation problems, you
should reset the phone.
To reset the phone
•
Select Menu > Settings > General > Master reset and
select an option.
Reset settings resets all changes that you have made
in your phone to default. Reset all deletes all user data
35
Page 36

such as contacts, messages, pictures and sounds in
your phone.
Legal information
Sony Ericsson W100i/W100a
This User guide is published by Sony Ericsson Mobile Communications
AB or its local affiliated company, without any warranty. Improvements
and changes to this User guide necessitated by typographical errors,
inaccuracies of current information, or improvements to programs and/
or equipment, may be made by Sony Ericsson Mobile Communications
AB at any time and without notice. Such changes will, however, be
incorporated into new editions of this User guide.
All rights reserved.
©Sony Ericsson Mobile Communications AB, 2010
Publication number: 1232-5356.1
Your mobile phone has the capability to download, store and forward
additional content, e.g. ringtones. The use of such content may be
restricted or prohibited by rights of third parties, including but not limited
to restriction under applicable copyright laws. You, and not
Sony Ericsson, are entirely responsible for additional content that you
download to or forward from your mobile phone. Prior to your use of any
additional content, please verify that your intended use is properly
licensed or is otherwise authorized. Sony Ericsson does not guarantee
the accuracy, integrity or quality of any additional content or any other
third party content. Under no circumstances will Sony Ericsson be liable
in any way for your improper use of additional content or other third party
content.
Bluetooth is a trademark or a registered trademark of Bluetooth SIG Inc.
and any use of such mark by Sony Ericsson is under license.
The Liquid Identity and Liquid Energy logos, PlayNow and TrackID are
trademarks or registered trademarks of Sony Ericsson Mobile
Communications AB.
Sony, Walkman, the WALKMAN logo, and "make.believe" are trademarks
or registered trademarks of Sony Corporation.
microSD is a trademark or a registered trademark of SanDisk
Corporation.
36
Page 37

Java and all Java based trademarks and logos are trademarks or
registered trademarks of Sun Microsystems, Inc. In the United States and
other countries.
TrackID™ is powered by Gracenote™ Mobile MusicID™. Gracenote and
Mobile MusicID are trademarks or registered trademarks of Gracenote,
Inc.
Zi is a trademark or registered trademark of Zi Corporation of Canada,
Inc.
Ericsson is a trademark or registered trademark of Telefonaktiebolaget
LM Ericsson.
Microsoft and Windows are registered trademarks or trademarks of
Microsoft Corporation in the United States and/or other countries.
This product is protected by certain intellectual property rights of
Microsoft. Use or distribution of such technology outside of this product
is prohibited without a license from Microsoft.
Other product and company names mentioned herein may be the
trademarks of their respective owners.
Any rights not expressly granted herein are reserved.
All illustrations are for illustration only and may not accurately depict the
actual phone.
37
Page 38

www.sonyericsson.com
Sony Ericsson Mobile Communications AB
SE-221 88 Lund, Sweden
1232-5356.1
 Loading...