Sony A1052101 User Guide

: FB'HHQDB8*B(Q &KLQD ERRN 3DJH 7XHVGD\ -XQH $0

Receiving picture messages

You can select how to download your picture messages. Standard options when you download picture messages are:

Always – automatic download.

Ask in roaming – ask to download when not in home network.

Not in roaming – do not download when not in home network.

Always ask – ask to download.

Off – new messages appear in the

Inbox.

To set automatic download

1From standby select Menu > Messaging

> Settings > Picture message > Auto download.

2 Select an option.

Message options

You can set standard options for all messages or choose specific settings each time you send a message.

To set text message options

1From standby select Menu > Messaging

> Settings > Text message.

2 Scroll to an option and select Edit.

To set picture message options

1From standby select Menu > Messaging

> Settings > Picture message.

2 Scroll to an option and select Edit.

To set message options for a specific message

1When the message is ready and

a recipient is selected, select Options

> Advanced.

2 Scroll to an option and select Edit.

Voice messages

You can send and receive a sound recording as a voice message.

The sender and recipient must have a subscription supporting picture messaging.

To record and send a voice message

1From standby select Menu > Messaging

> Write new > Voice message.

2Record the message and select Stop

> Send > Contacts lookup.

3 Select a recipient and select Send.

Messaging 39

: FB'HHQDB8*B(Q &KLQD ERRN 3DJH 7XHVGD\ -XQH $0

Email

You can use standard email functions and your computer email address in your phone.

Before you use email

You can use the setup wizard to check if settings are available for your email account or you can enter them manually. You can also receive settings at www.sonyericsson.com/support.

To create an email account

1From standby select Menu > Messaging

> Email > Accounts.

2 Scroll to New account and select Add.

If you enter settings manually, you can contact your email provider for more information. An email provider could be the company that supplied your email address.

To write and send an email message

1From standby select Menu > Messaging

> Email > Write new.

2Select Add > Enter email address. Enter the email address and select OK.

3To add more recipients, scroll to To: and select Edit.

4Scroll to an option and select Add

> Enter email address. Enter the email address and select OK. When you are ready, select Done.

5Select Edit and enter a subject. Select

OK.

6Select Edit and enter the text. Select

OK.

7 Select Add and choose a file to attach.

8 Select Continue > Send.

To receive and read an email message

1From standby select Menu > Messaging

> Email > Inbox > Options > Check new email.

2 Scroll to the message and select View.

To save an email message

1From standby select Menu > Messaging

> Email > Inbox.

2Scroll to the message and select View

> Options > Save message.

To reply to an email message

1From standby select Menu > Messaging

> Email > Inbox.

2Scroll to the message and select

Options > Reply.

3 Write the reply and select OK.

4 Select Continue > Send.

40 Messaging

: FB'HHQDB8*B(Q &KLQD ERRN 3DJH 7XHVGD\ -XQH $0

To view an attachment in an email message

When you view the message, select

Options > Attachments > Use > View.

To save an attachment in an email message

When you view the message, select

Options > Attachments > Use > Save.

Synchronizing email

Email can be synchronized with a Microsoft Exchange Server (Microsoft® Outlook®). For more information see Synchronizing on page 59.

Active email account

If you have several email accounts, you can change which one is active.

To change the active email account

1From standby select Menu > Messaging

> Email > Accounts.

2Select an account.

Push email

You can receive notification in your phone from your email server that you have new email messages.

To turn on push email notification

From standby select Menu > Messaging

> Email > Settings > Push email.

My friends

You can connect and log in to the My friends server to communicate online with chat messages.

Before you use My friends

If no settings exist in your phone, you need to enter server settings. Your service provider can provide standard settings information such as:

Username

Password

Server address

Internet profile

To enter My friends server settings

1From standby select Menu > Messaging

> My friends > Configure.

2 Scroll to a setting and select Add.

To log in to the My friends server

From standby select Menu > Messaging

> My friends > Log in.

To log out of the My friends server

Select Options > Log out.

To add a chat contact

1From standby select Menu > Messaging

> My friends > the Contacts tab.

2 Select Options > Add contact.

Messaging 41

: FB'HHQDB8*B(Q &KLQD ERRN 3DJH 7XHVGD\ -XQH $0

To send a chat message

1From standby select Menu > Messaging

> My friends > the Contacts tab.

2 Scroll to a contact and select Chat.

3Write the message and select Send.

Status

You can show your status, for example, Happy or Busy, to your contacts only. You can also show your status to all users on the My friends server.

To show my status

1From standby select Menu > Messaging

>My friends > Options > Settings

>Show my status.

2 Select an option.

To update your own status

1From standby select Menu > Messaging

> My friends > the Contacts tab.

2 Edit the information.

3 Select Options > Save.

Chat group

A chat group can be started by your service provider, by an individual My friends user or by yourself. You can save chat groups by saving a chat invitation or by searching for a specific chat group.

To create a chat group

1From standby select Menu > Messaging

> My friends > the Chat groups tab.

2Select Options > Add chat group > New chat group.

3Select who to invite from your contacts list and select Continue.

4Enter a short invitation text and select

Continue > Send.

To add a chat group

1From standby select Menu > Messaging

>My friends > the Chat groups tab

>Options > Add chat group.

2 Select an option.

Conversation history is saved between log out and when you log in again to let you return to chat messages from previous conversations.

42 Messaging

Sony A1052101 User Guide

: FB'HHQDB8*B(Q &KLQD ERRN 3DJH 7XHVGD\ -XQH $0

To save a conversation

1From standby select Menu > Messaging

> My friends > the Conversations tab.

2 Enter a conversation.

3Select Options > Advanced > Save conversation.

Area and cell information

Area and cell information are text messages, for example, local traffic reports that are sent to subscribers within a certain network area.

To turn area information on

1From standby select Menu > Messaging

> Settings > Area info.

2Scroll to Reception and select Edit > On.

Imaging

Camera and video recorder

You can take pictures and record video clips to view, save or send. You find your saved pictures and video clips in

Media > Photo > Cam. album and File manager.

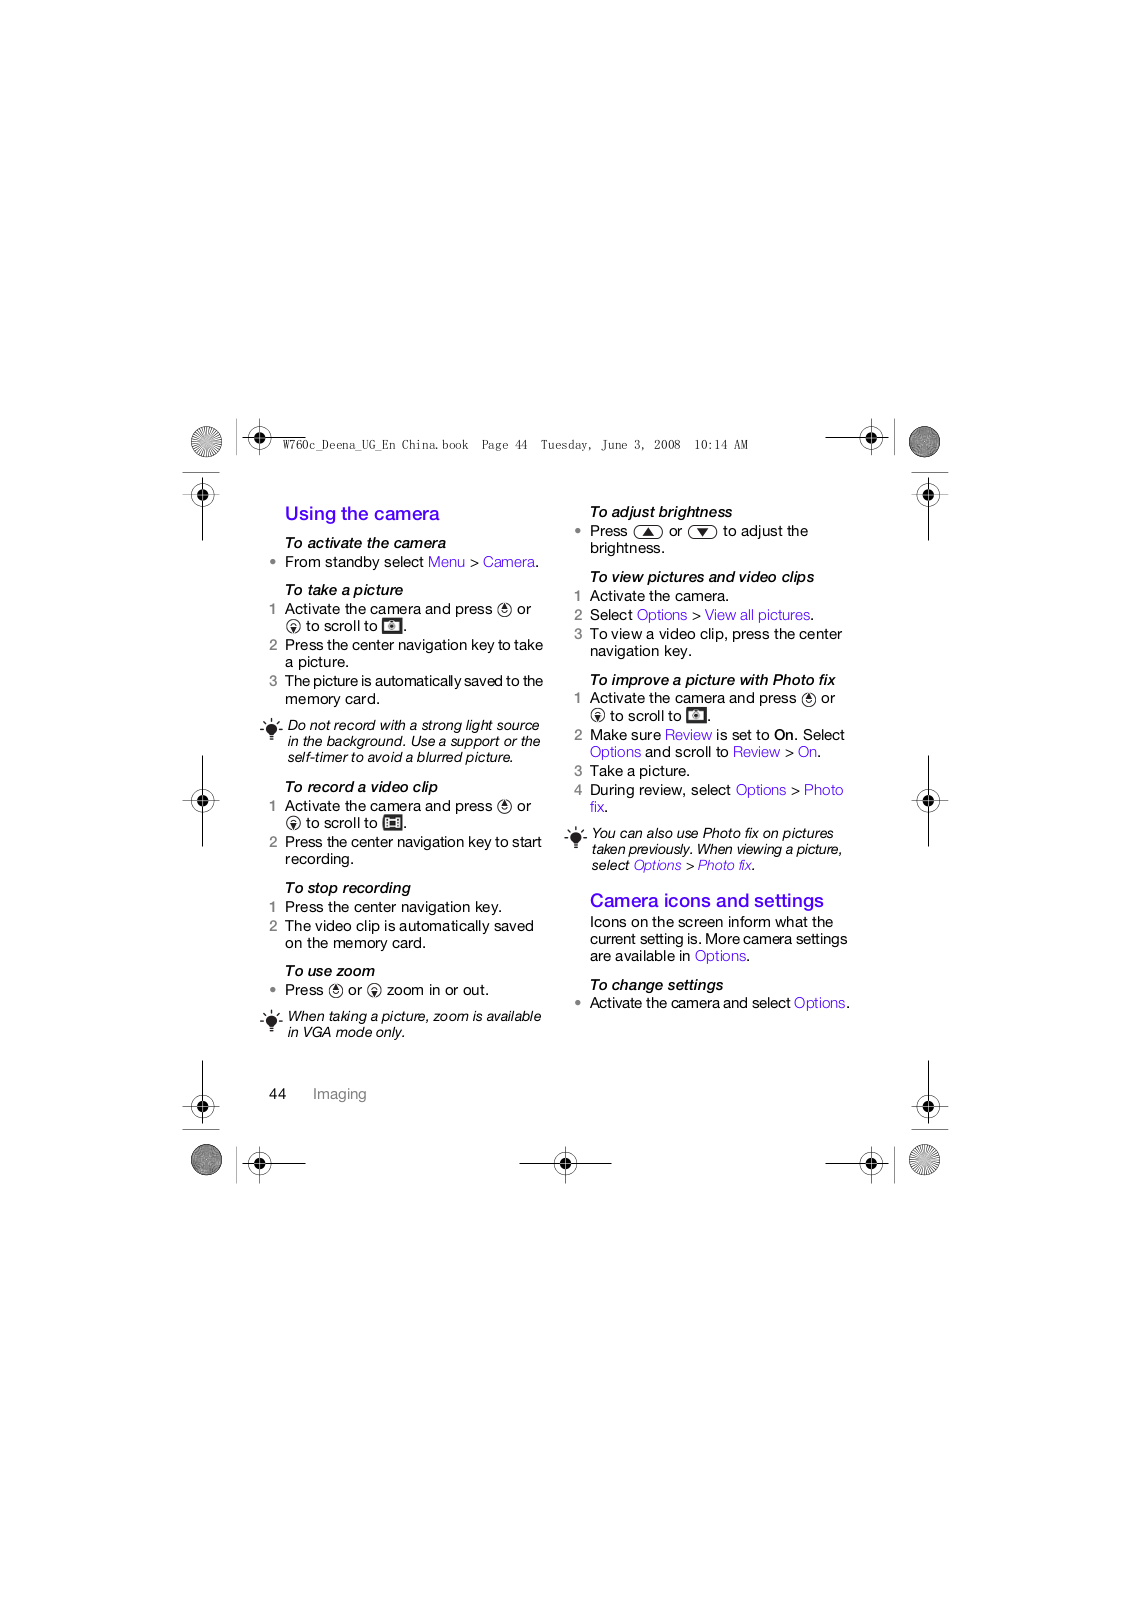
Viewfinder and camera keys

1Brightness

2Take pictures/Record video

1

2

Imaging 43

: FB'HHQDB8*B(Q &KLQD ERRN 3DJH 7XHVGD\ -XQH $0

Using the camera

To activate the camera

From standby select Menu > Camera.

To take a picture

1Activate the camera and press or

to scroll to .

2Press the center navigation key to take a picture.

3The picture is automatically saved to the memory card.

Do not record with a strong light source in the background. Use a support or the self-timer to avoid a blurred picture.

To record a video clip

1Activate the camera and press or

to scroll to .

2Press the center navigation key to start recording.

To stop recording

1 Press the center navigation key.

2The video clip is automatically saved on the memory card.

To use zoom

Press or zoom in or out.

When taking a picture, zoom is available in VGA mode only.

To adjust brightness

Press or to adjust the brightness.

To view pictures and video clips

1 Activate the camera.

2 Select Options > View all pictures.

3To view a video clip, press the center navigation key.

To improve a picture with Photo fix

1Activate the camera and press or

to scroll to .

2Make sure Review is set to On. Select

Options and scroll to Review > On.

3 Take a picture.

4During review, select Options > Photo fix.

You can also use Photo fix on pictures taken previously. When viewing a picture, select Options > Photo fix.

Camera icons and settings

Icons on the screen inform what the current setting is. More camera settings are available in Options.

To change settings

Activate the camera and select Options.

44 Imaging

: FB'HHQDB8*B(Q &KLQD ERRN 3DJH 7XHVGD\ -XQH $0

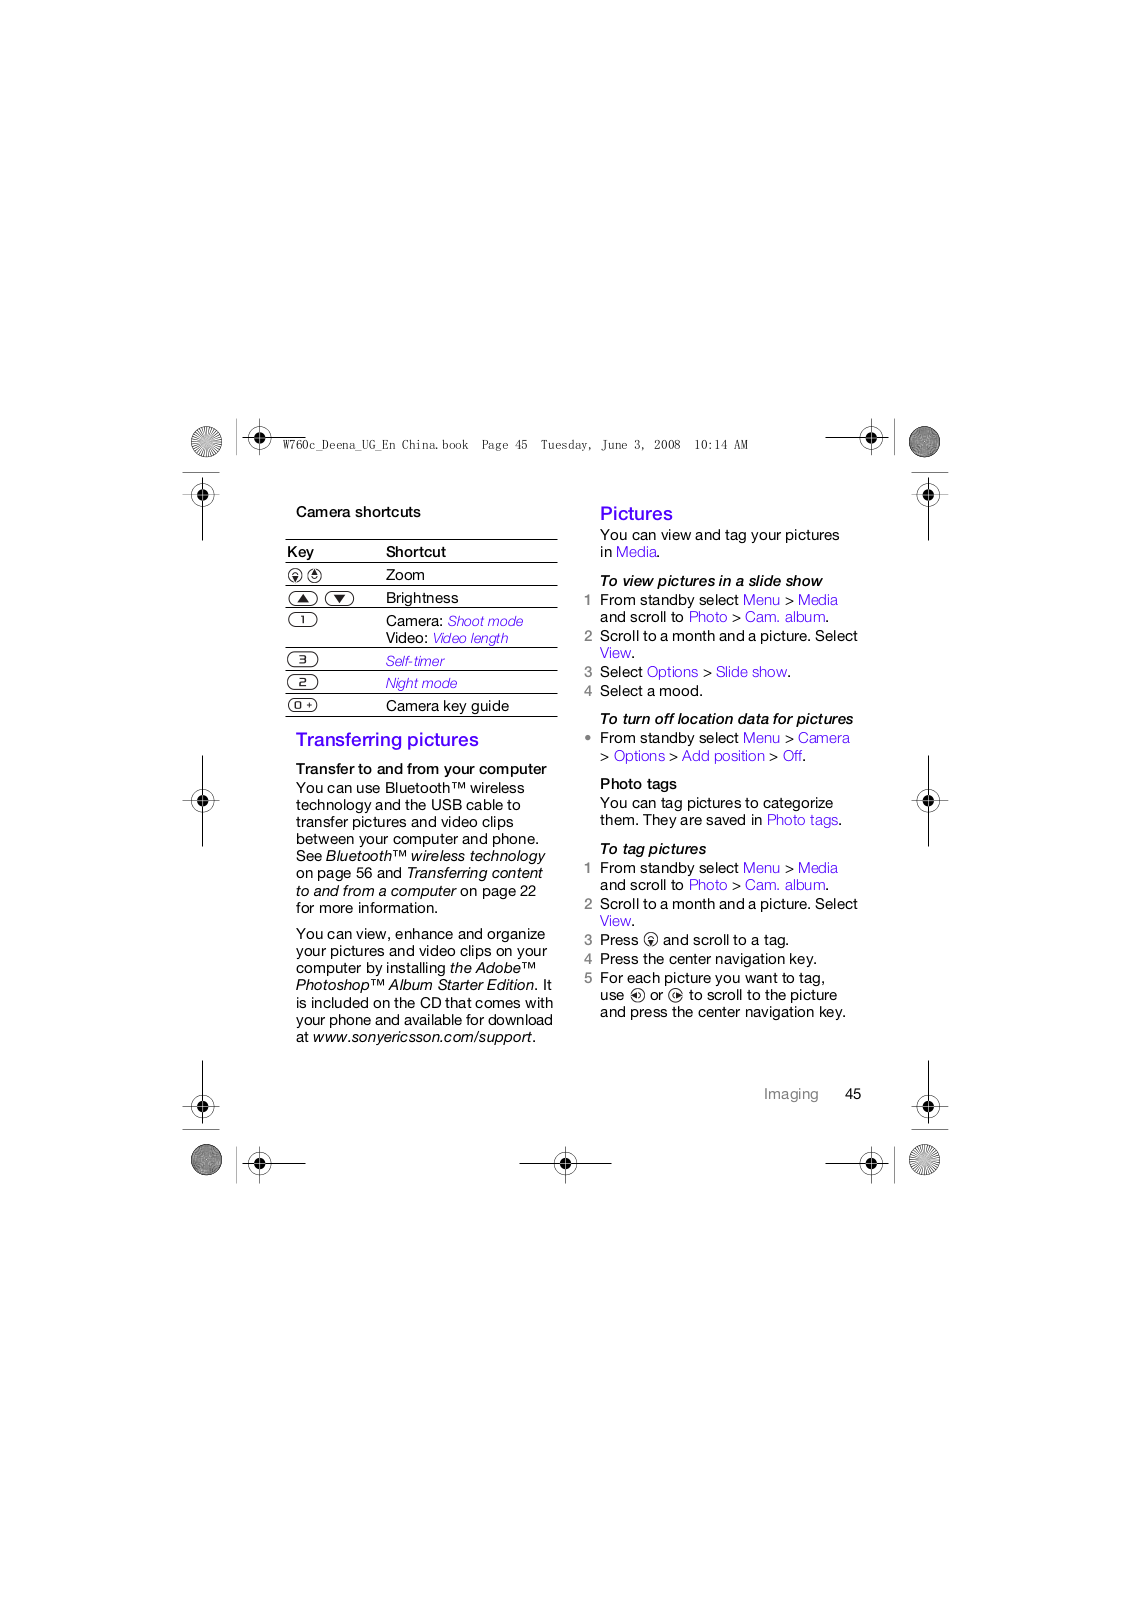
Camera shortcuts

Key Shortcut

Zoom

Brightness

Camera: Shoot mode

Video: Video length

Self-timer

Night mode

Camera key guide

Transferring pictures

Transfer to and from your computer

You can use Bluetooth™ wireless technology and the USB cable to transfer pictures and video clips between your computer and phone. See Bluetooth™ wireless technology on page 56 and Transferring content to and from a computer on page 22 for more information.

You can view, enhance and organize your pictures and video clips on your computer by installing the Adobe™ Photoshop™ Album Starter Edition. It is included on the CD that comes with your phone and available for download at www.sonyericsson.com/support.

Pictures

You can view and tag your pictures in Media.

To view pictures in a slide show

1From standby select Menu > Media and scroll to Photo > Cam. album.

2Scroll to a month and a picture. Select

View.

3 Select Options > Slide show.

4 Select a mood.

To turn off location data for pictures

From standby select Menu > Camera

> Options > Add position > Off.

Photo tags

You can tag pictures to categorize them. They are saved in Photo tags.

To tag pictures

1From standby select Menu > Media and scroll to Photo > Cam. album.

2Scroll to a month and a picture. Select

View.

3

Press

and scroll to a tag.

4

Press the center navigation key.

5For each picture you want to tag, use or to scroll to the picture and press the center navigation key.

Imaging 45

: FB'HHQDB8*B(Q &KLQD ERRN 3DJH 7XHVGD\ -XQH $0

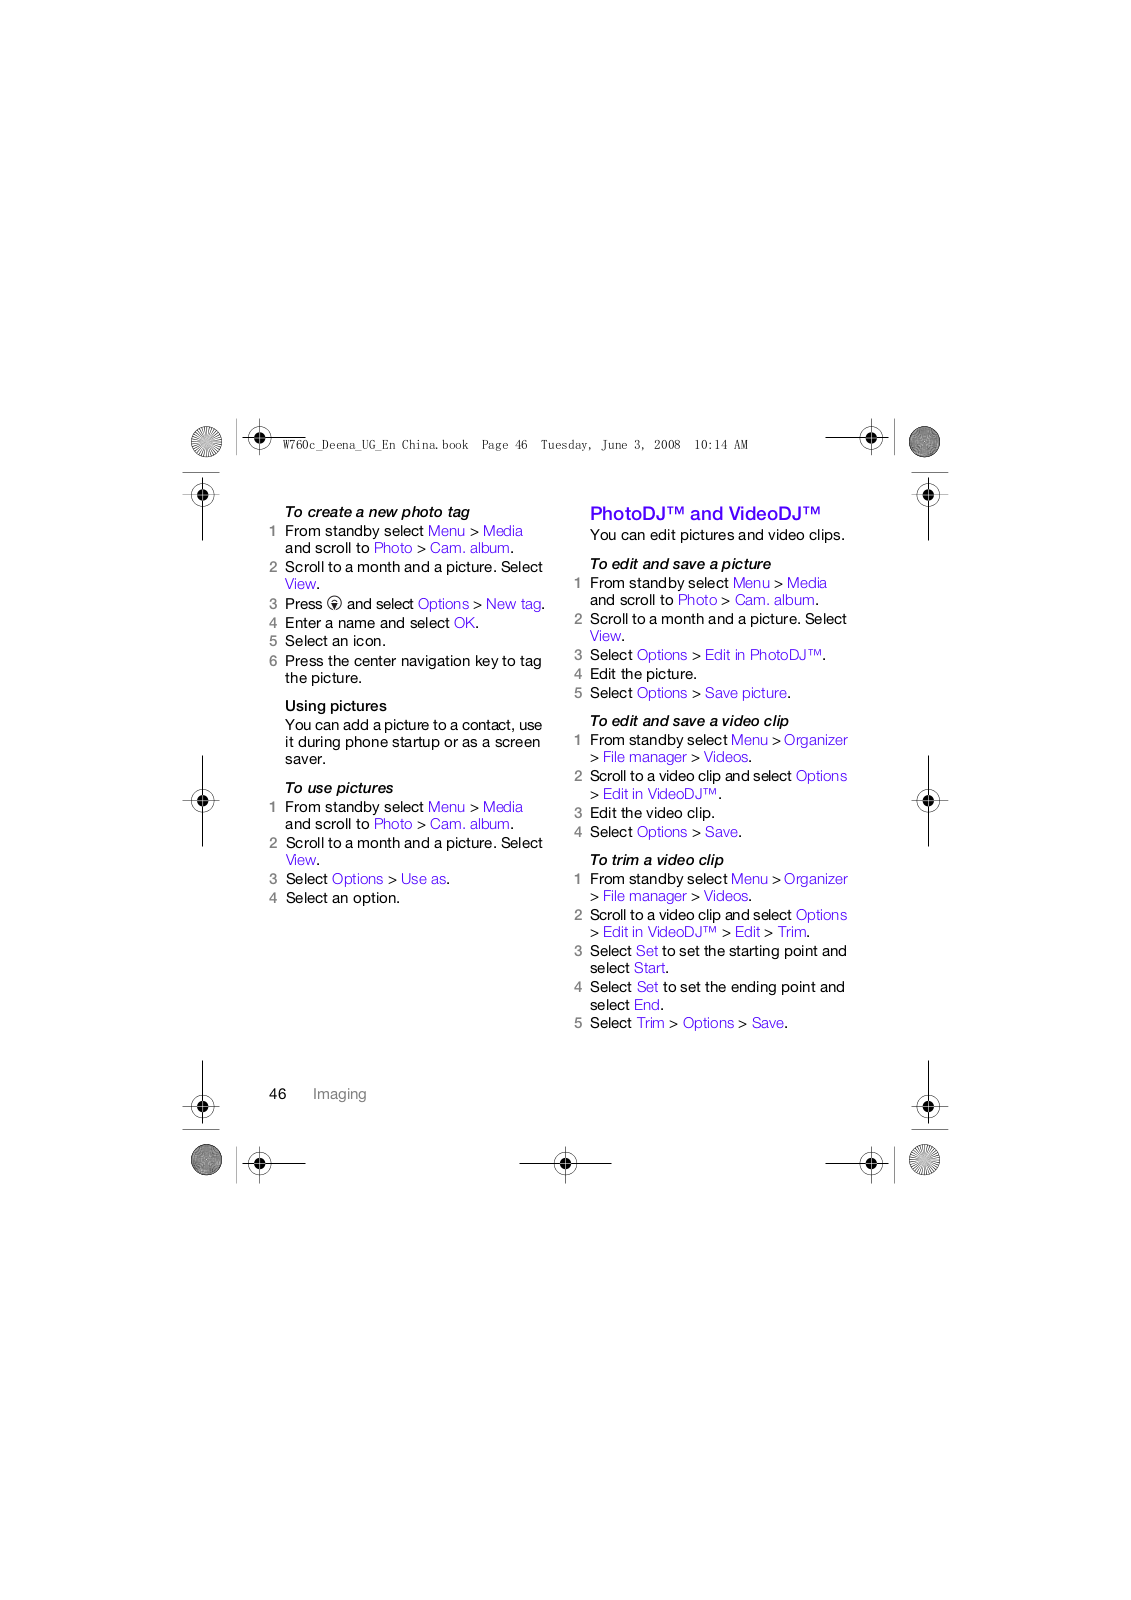
To create a new photo tag

1From standby select Menu > Media and scroll to Photo > Cam. album.

2Scroll to a month and a picture. Select

View.

3 Press and select Options > New tag. 4 Enter a name and select OK.

5 Select an icon.

6Press the center navigation key to tag the picture.

Using pictures

You can add a picture to a contact, use it during phone startup or as a screen saver.

To use pictures

1From standby select Menu > Media and scroll to Photo > Cam. album.

2Scroll to a month and a picture. Select

View.

3 Select Options > Use as.

4 Select an option.

PhotoDJ™ and VideoDJ™

You can edit pictures and video clips.

To edit and save a picture

1From standby select Menu > Media and scroll to Photo > Cam. album.

2Scroll to a month and a picture. Select

View.

3 Select Options > Edit in PhotoDJ™.

4 Edit the picture.

5 Select Options > Save picture.

To edit and save a video clip

1From standby select Menu > Organizer

> File manager > Videos.

2Scroll to a video clip and select Options

> Edit in VideoDJ™.

3 Edit the video clip.

4 Select Options > Save.

To trim a video clip

1From standby select Menu > Organizer

> File manager > Videos.

2Scroll to a video clip and select Options

> Edit in VideoDJ™ > Edit > Trim.

3Select Set to set the starting point and select Start.

4Select Set to set the ending point and select End.

5 Select Trim > Options > Save.

46 Imaging

: FB'HHQDB8*B(Q &KLQD ERRN 3DJH 7XHVGD\ -XQH $0

Internet

To start browsing

1From standby select Menu >

Monternet.

2 Select Options > Go to.

3 Select an option.

If your connection to the Internet does not work, see Settings on page 56 or contact your operator.

To exit the browser

When you browse the Internet, select

Options > Exit browser.

Bookmarks

You can create and edit bookmarks as quick links to your favorite Web pages.

To create a bookmark

1When you browse the Internet, select

Options > Tools > Add bookmark.

2Enter a title and an address. Select

Save.

To select a bookmark

1From standby select Menu >

Monternet.

2 Select Options > Go to > Bookmarks.

3 Scroll to a bookmark and select Go to.

History pages

You can view Web pages you have browsed.

To view history pages

From standby select Menu >

Monternet > Options > Go to > History.

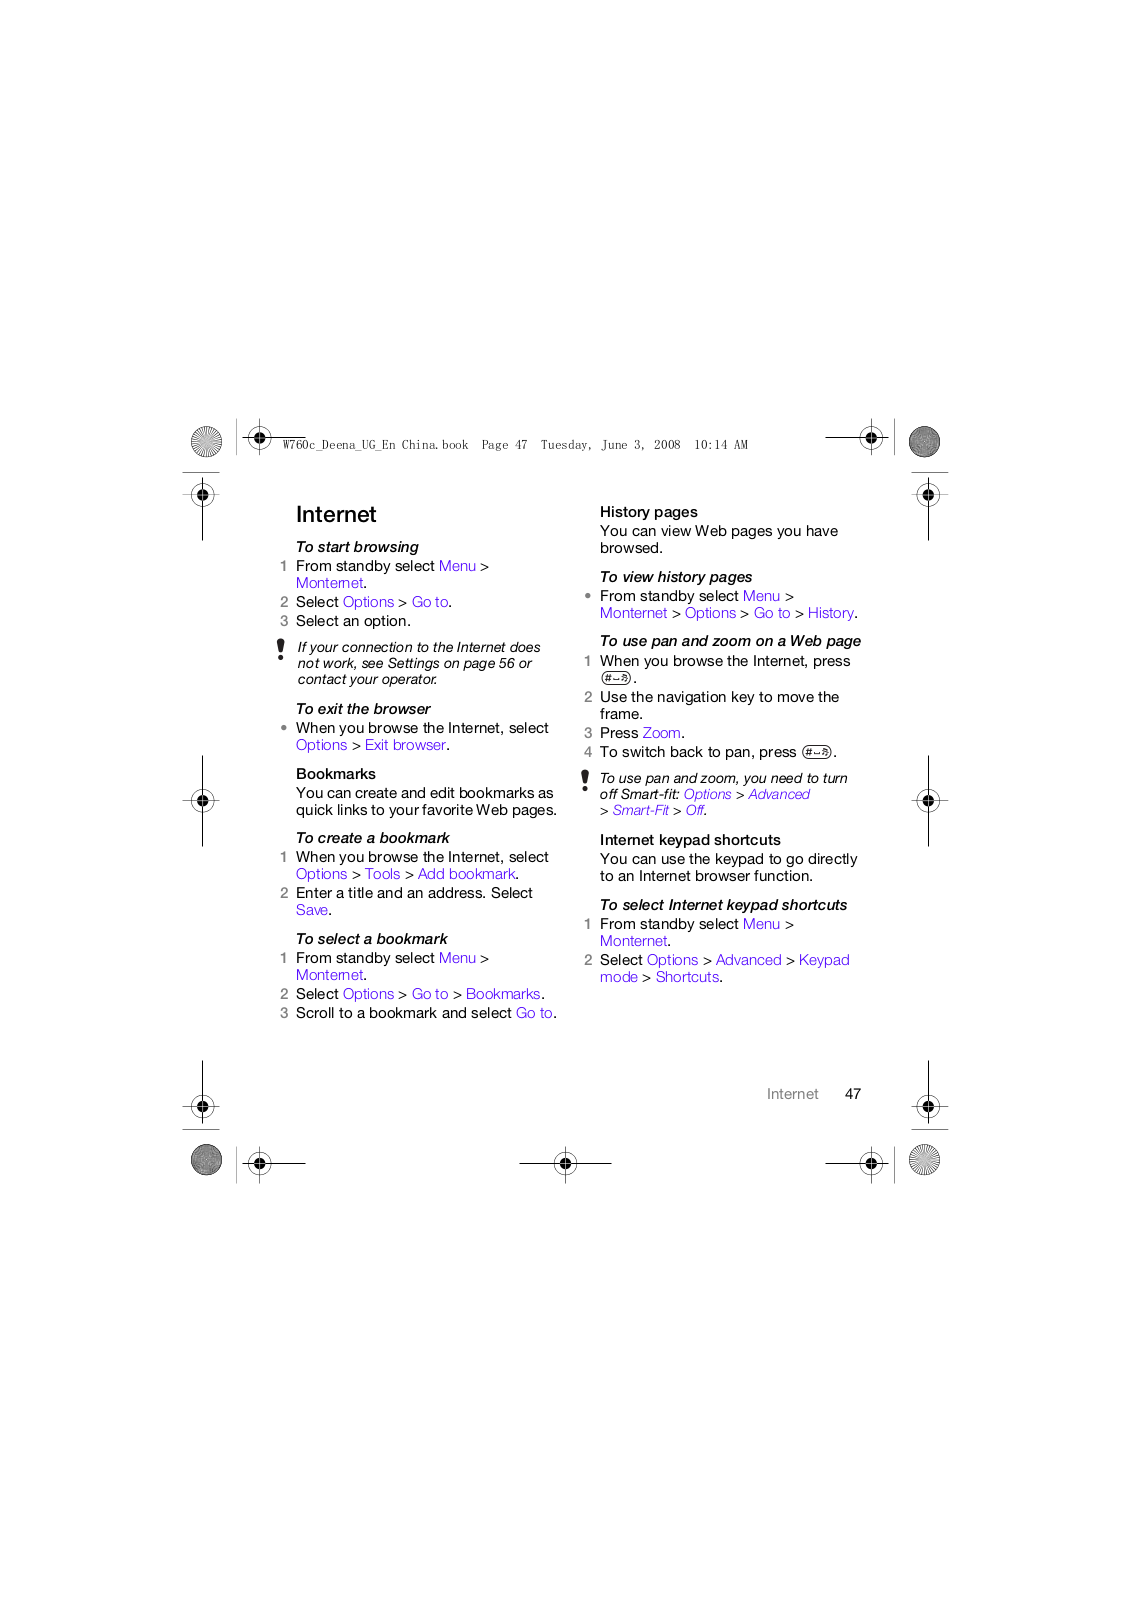
To use pan and zoom on a Web page

1When you browse the Internet, press

.

2Use the navigation key to move the frame.

3

Press Zoom.


4

To switch back to pan, press

.

To use pan and zoom, you need to turn off Smart-fit: Options > Advanced

> Smart-Fit > Off.

Internet keypad shortcuts

You can use the keypad to go directly to an Internet browser function.

To select Internet keypad shortcuts

1From standby select Menu >

Monternet.

2Select Options > Advanced > Keypad mode > Shortcuts.

Internet 47

: FB'HHQDB8*B(Q &KLQD ERRN 3DJH 7XHVGD\ -XQH $0

To make a call while browsing

When you browse the Internet press .

To save a picture from a Web page

1When you browse the Internet, select

Options > Tools > Save picture.

2 Select a picture.

To find text on a Web page

1When you browse the Internet, select

Options > Tools > Find on page.

2 Enter text and press Find.

To send a link

1When you browse the Internet, select

Options > Tools > Send link.

2 Select a transfer method.

Make sure the receiving device supports the transfer method you select.

Internet security and certificates

Your phone supports secure browsing. Certain Internet services, such as banking, require certificates in your phone. Your phone may already contain certificates when you buy it or you can download new certificates.

To view certificates in the phone

From standby select Menu > Settings

>the General tab > Security

>Certificates.

Web feeds

You can subscribe to and download frequently updated content, such as news, podcasts or photos, using Web feeds.

To add new feeds for a Web page

1When you browse a page on the

Internet that has Web feeds (indicated by the icon), select Options > Web feeds.

2For each feed you want to add, scroll to the feed and select Mark.

3 Select Options > Continue.

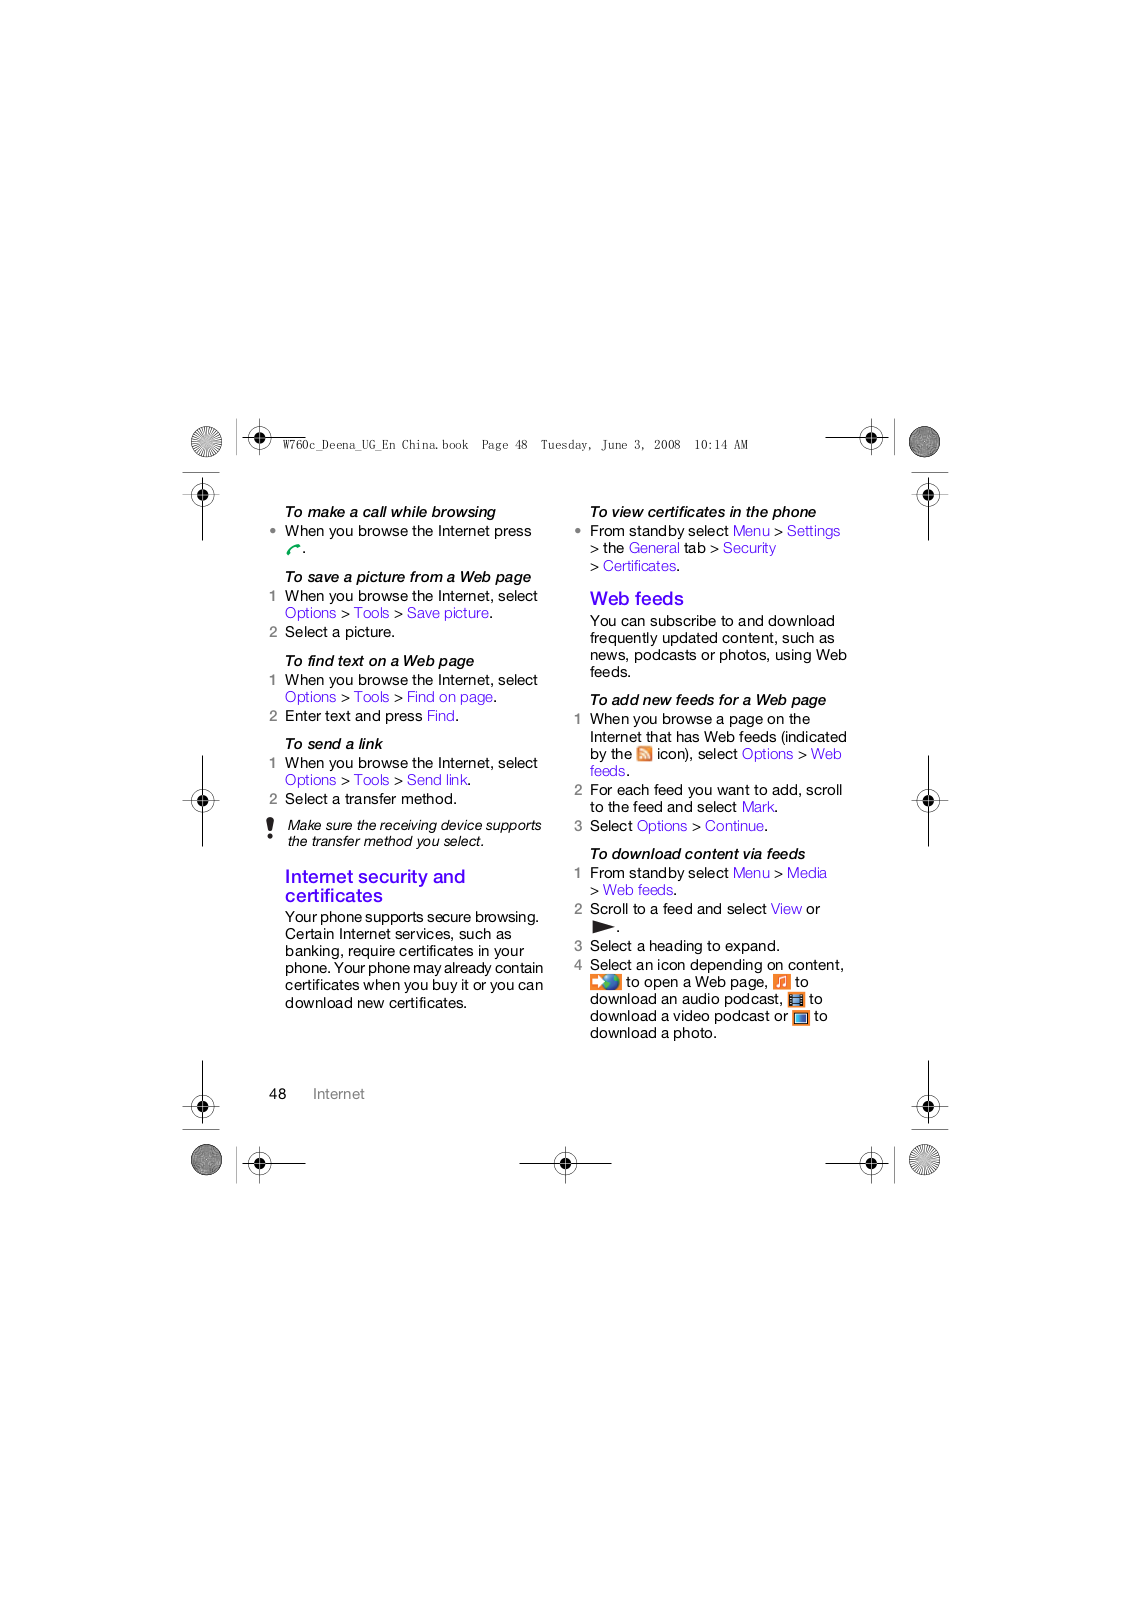
To download content via feeds

1From standby select Menu > Media

> Web feeds.

2Scroll to a feed and select View or

.

3 Select a heading to expand.

4Select an icon depending on content,

to open a Web page, to download an audio podcast, to

download a video podcast or to download a photo.

48 Internet

: FB'HHQDB8*B(Q &KLQD ERRN 3DJH 7XHVGD\ -XQH $0

You can also subscribe to and download content to a computer via feeds using Sony Ericsson Media Manager. You can then transfer the content to your phone. See Transferring content to and from a computer on page 22

Updating Web feeds

You can manually update your feeds. When there are updates, appears on the screen.

To update Web feeds manually

1From standby select Menu > Media

> Web feeds.

2Scroll to a feed and select Options

> Update.

3Select an option.

Podcasts

Podcasts are files, for example, radio programs or video content, that you can download and play. You subscribe to and download podcasts using Web feeds.

To access audio podcasts

From standby select Menu > Media

> Music > Podcasts.

To access video podcasts

From standby select Menu > Media

> Video > Podcasts.

Photo feeds

You can subscribe to Photo feeds and download photos. To start using Photo feeds, see Web feeds on page 48.

To access photo feeds

From standby select Menu > Media

> Photo > Photo feeds.

GPS

Your phone is equipped with a GPS receiver that uses satellite signals to calculate your location.

Some GPS features use the Internet.

Using the GPS

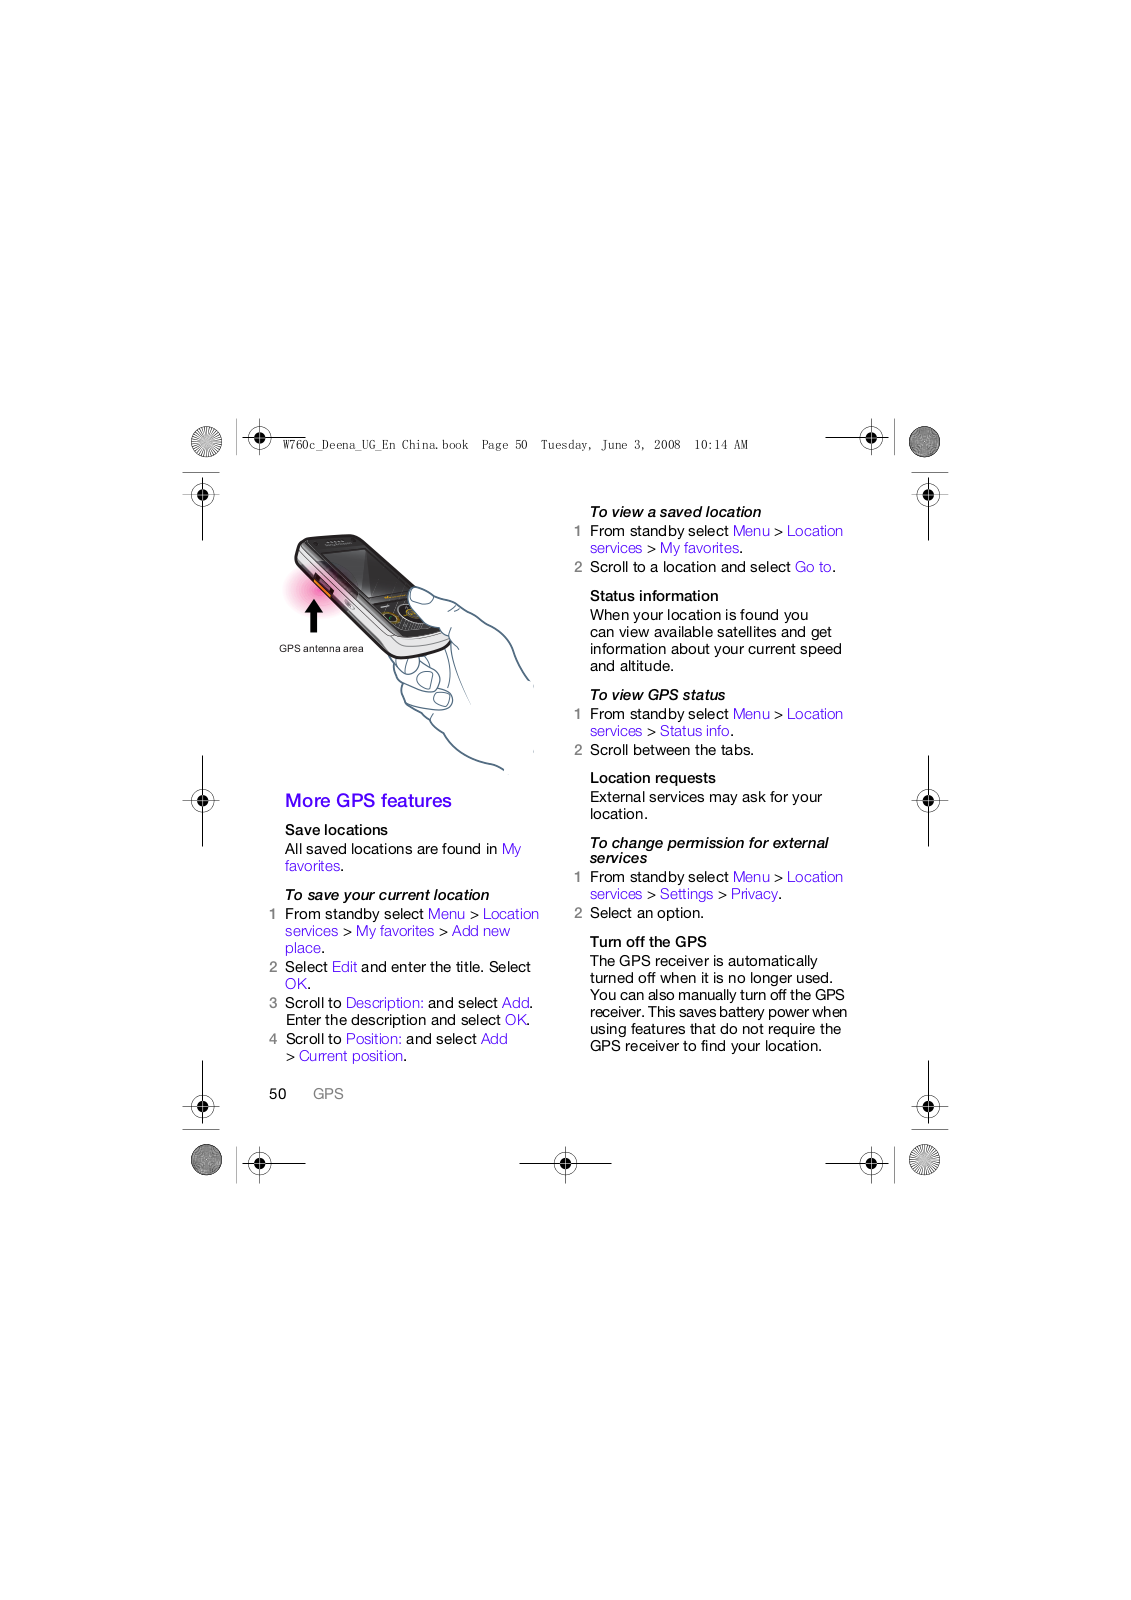
Make sure you have a clear view of the sky when using features that require the GPS receiver to find your location. If your location is not found after a few minutes, move to another location. To facilitate the search, stand still and do not cover the GPS antenna.

GPS 49

: FB'HHQDB8*B(Q &KLQD ERRN 3DJH 7XHVGD\ -XQH $0

GPS antenna area

More GPS features

Save locations

All saved locations are found in My favorites.

To save your current location

1From standby select Menu > Location services > My favorites > Add new place.

2Select Edit and enter the title. Select

OK.

3Scroll to Description: and select Add. Enter the description and select OK.

4Scroll to Position: and select Add

> Current position.

To view a saved location

1From standby select Menu > Location services > My favorites.

2Scroll to a location and select Go to.

Status information

When your location is found you can view available satellites and get

information about your current speed and altitude.

To view GPS status

1From standby select Menu > Location services > Status info.

2Scroll between the tabs.

Location requests

External services may ask for your location.

To change permission for external services

1From standby select Menu > Location services > Settings > Privacy.

2Select an option.

Turn off the GPS

The GPS receiver is automatically turned off when it is no longer used. You can also manually turn off the GPS receiver. This saves battery power when using features that do not require the GPS receiver to find your location.

50 GPS

: FB'HHQDB8*B(Q &KLQD ERRN 3DJH 7XHVGD\ -XQH $0

To turn the GPS on or off manually

1From standby select Menu > Location services > Settings.

2 Select an option.

Tracker

Tracker is a GPS-based sports application which allows you to keep track of your speed, distance, route and energy consumption during training.

Information provided by use of the Tracker application is approximate. Sony Ericsson makes no warranty of any kind with respect to the accuracy of the Tracker application. Any serious health and fitness concerns should be referred to a health care professional.

You can base the training on how long time you want to train or on what distance you want to cover. You can also base it on a previous training route which has GPS data.

To start a training session

1From standby select Menu > Location services > Tracker > Start training.

2 Select a training type.

3Scroll to an item, select Edit and enter the data.

4 Select Done to save.

5 Select Start to start training.

To compare results during training

1From standby select Menu > Location services > Tracker > Start training.

2 Select Route based.

3Scroll to Route:, select Edit and select a route.

4 Scroll to Live compare and select Edit.

5Scroll to the result you want to compare with and select Compare.

6 Select Done and then Start.

You must have previously saved a route for comparison.

To switch between training views

During a training session, press or to view information on training duration, progress and live comparison with a previous session.

To end a training session manually

During a training session, select Pause

> End.

GPS 51

: FB'HHQDB8*B(Q &KLQD ERRN 3DJH 7XHVGD\ -XQH $0

Results

The training result is shown after

a session is ended. You can view past results anytime, and compare them if they have GPS data.

To view a training result

From standby select Menu > Location services > Tracker > Results. If you have used laps, press or to view result per lap.

To compare results

1From standby select Menu > Location services > Tracker > Results.

2Scroll to a result and select Options

> Compare.

3 Select a result to compare with.

You must have previously saved a route for comparison.

Energy consumption

To calculate and view the energy consumption for a session you must first set your personal profile. You view the energy consumption in the result view.

To set the personal profile

1From standby select Menu > Location services > Tracker > Settings

> Personal profile.

2Select an item, enter data and press

OK.

3When finished, select Options > Save profile.

To turn on energy consumption

From standby select Menu > Location services > Tracker > Settings > Energy consumption > On.

52 GPS

Loading...
+ 32 hidden pages