

Sony A1052042 Users Manual

Laura-UG-R1A-AE.book Page 1 Thursday, March 15, 2007 9:26 AM
Congratulations on your purchase of the Sony Ericsson
W580i. For additional phone content, go to
www.sonyericsson.com/fun.
Register now to get free online storage and special
offers at www.sonyericsson.com/myphone.
For product support, go to www.sonyericsson.com/
support.
Laura-UG-R1A-AE.book Page 2 Thursday, March 15, 2007 9:26 AM
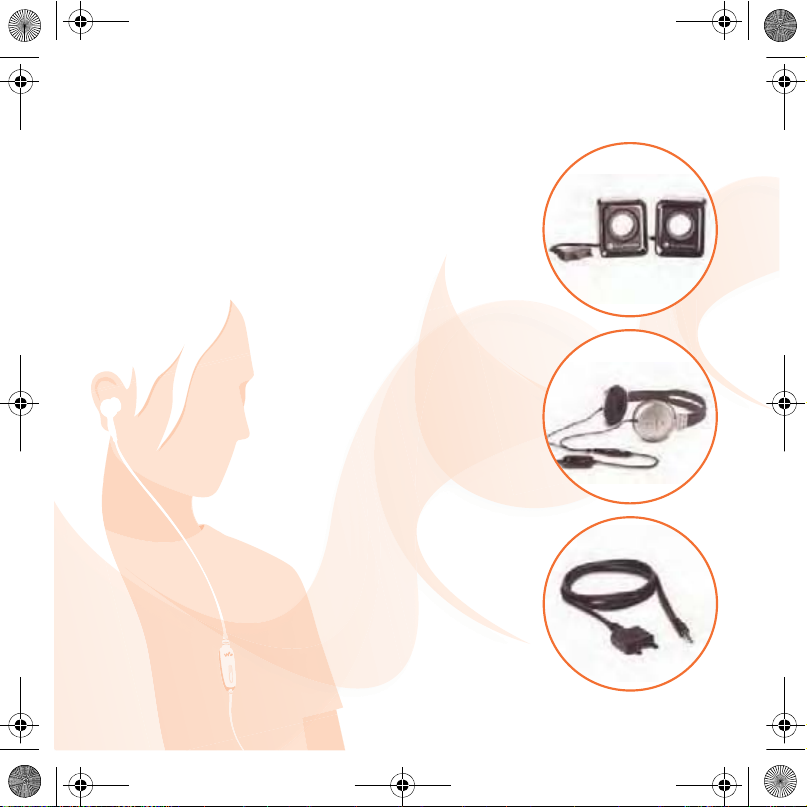
Added dimensions – Accessories
from Sony Ericsson
Portable Speakers MPS-60
Small yet powerful speakers that fit in your
pocket.
Stereo Portable Handsfree HPM-85
Designed for powerful sound
Music Cable MMC-70
Connects your music mobile phone to your
stereo system.
The full range of accessories may not be available in every market.
For more information visit www.sonyericsson.com/accessories.

Laura-UG-R1A-AE.book Page 1 Thursday, March 15, 2007 9:26 AM
Contents
Getting started ................... 4
Assembly, SIM card, battery, turning
on, help, calls
Getting to know the phone 8
Phone overview, icons, menus,
entering letters, activity menu, File
manager, Memory Stick Micro™
(M2™)
Calling ............................... 19
Calls, contacts, voice control, call
options
Messaging ........................ 29
Text messaging, picture messaging,
voice messaging, email, My friends
Imaging ............................. 38
Camera, pictures, PhotoDJ™
Entertainment ................... 41
Handsfree, Walkman®, radio, Track
ID™, PlayNow™, MusicDJ™,
VideoDJ™, themes, games and more
Fitness application .......... 49
Step counter, calorie counter, laps,
speed, advanced calibration, fitness
options
Connectivity ..................... 52
Settings, using Internet, RSS,
synchronizing, Bluetooth™ device,
infrared, USB cable, update service
More features ................... 60
Alarm clock, calendar, tasks, profiles,
time and date, SIM card lock
Troubleshooting ............... 66
Why doesn’t the phone work the way I
want it to?
Important information ...... 69
Sony Ericsson Consumer Web site,
service and support, safe and efficient
use, end user license agreement,
warranty, declaration of conformity.
Index ................................. 79
1Contents

Laura-UG-R1A-AE.book Page 2 Thursday, March 15, 2007 9:26 AM
Sony Ericsson
GSM 850/900/1800/1900
This User guide is published by Sony Ericsson
Mobile Communications AB or its local affiliated
company, without any warranty. Improvements and
changes to this User guide necessitated by
typographical errors, inaccuracies of current
information, or improvements to programs and/or
equipment, may be made by Sony Ericsson Mobile
Communications AB or its local affiliated company
at any time and without notice. Such changes will,
however, be incorporated into new editions of this
User guide.
All rights reserved.
©Sony Ericsson Mobile Communications AB,
2007
Publication number: AE/LZT 108 9304 R1A
Please note:
Some of the services in this User guide are not
supported by all networks. This also applies to the
GSM International Emergency Numbers 112 and
911.
Please contact your network operator or service
provider if you are in doubt whether you can use a
particular service or not.
Please read the Guidelines for safe and efficient use
and the Limited warranty chapters before you use
your mobile phone.
Your mobile phone has the capability to download,
store and forward additional content, e.g.
ringtones. The use of such content may be
restricted or prohibited by rights of third parties,
including but not limited to restriction under
applicable copyright laws. You, and not
Sony Ericsson, are entirely responsible for
additional content that you download to or forward
from your mobile phone. Prior to your use of any
additional content, please verify that your intended
use is properly licensed or is otherwise authorized.
Sony Ericsson does not guarantee the accuracy,
integrity or quality of any additional content or any
other third party content. Under no circumstances
will Sony Ericsson be liable in any way for your
improper use of additional content or other third
party content.
Bluetooth™ is a trademark or registered trademark
of Bluetooth SIG Inc.
The marble logo, PlayNow, TrackID, Music DJ,
PhotoDJ and VideoDJ are trademarks or registered
trademarks of Sony Ericsson Mobile
Communications AB.
The WALKMAN® name and logo, Sony, Memory
Stick Micro ™ and M2™ are trademarks or
registered trademarks of Sony Corporation.
Ericsson is a trademark or registered trademark of
Telefonaktiebolaget LM Ericsson.
Adobe™ and Photoshop™ are trademarks or
registered trademarks of Adobe Systems
incorporated in the United States and/or other
countries.
Microsoft, Windows and PowerPoint are either
registered trademarks or trademarks of Microsoft
Corporation in the U.S and other countries.
Mac OS is a trademark of Apple Computer, Inc.,
registered in the U.S. and other countries.
T9™ Text Input is a trademark or a registered
trademark of Tegic Communications. T9™ Text
Input is licensed under one or more of the
following: U.S. Pat. Nos. 5,818,437, 5,953,541,
5,187,480, 5,945,928, and 6,011,554; Canadian
Pat. No. 1,331,057, United Kingdom Pat. No.
2238414B; Hong Kong Standard Pat. No.
HK0940329; Republic of Singapore Pat. No. 51383;
Euro.Pat. No. 0 842 463(96927260.8) DE/DK, FI,
FR, IT, NL, PT, ES, SE, GB; and additional patents
are pending worldwide.
Smart-Fit Rendering is a trademark or registered
trademark of ACCESS CO., LTD. in Japan and
other countries.
2 Contents
Laura-UG-R1A-AE.book Page 3 Thursday, March 15, 2007 9:26 AM
Java and all Java based trademarks and logos are
trademarks or registered trademarks of Sun
Microsystems, Inc. in the U.S. and other countries.
End-user license agreement for Sun™ Java™
J2ME™.
1 Restrictions: Software is confidential copyrighted
information of Sun and title to all copies is retained
by Sun and/or its licensors. Customer shall not
modify, decompile, disassemble, decrypt, extract,
or otherwise reverse engineer Software. Software
may not be leased, assigned, or sublicensed, in
whole or in part.
2 Export Regulations: Software, including technical
data, is subject to U.S. export control laws,
including the U.S. Export Administration Act and its
associated regulations, and may be subject to
export or import regulations in other countries.
Customer agrees to comply strictly with all such
regulations and acknowledges that it has the
responsibility to obtain licenses to export, reexport, or import Software. Software may not be
downloaded, or otherwise exported or re-exported
(i) into, or to a national or resident of, Cuba, Iraq,
Iran, North Korea, Libya, Sudan, Syria (as such
listing may be revised from time to time) or any
country to which the U.S. has embargoed goods;
or (ii) to anyone on the U.S. Treasury Department's
list of Specially Designated Nations or the U.S.
Commerce Department's Table of Denial Orders.
3 Restricted Rights: Use, duplication or disclosure by
the United States government is subject to the
restrictions as set forth in the Rights in Technical
Data and Computer Software Clauses in DFARS
252.227-7013(c) (1) (ii) and FAR 52.227-19(c) (2) as
applicable.
Other product and company names mentioned
herein may be the trademarks of their respective
owners.
Any rights not expressly granted herein are
reserved.
All illustrations are for illustration only and may not
accurately depict the actual phone.
Instruction symbols
The following appear in the User
guide:
Note
A service or function is networkor subscription-dependent.
Contact your network operator
for details.
% See also page...
} Use a selection or navigation
key to scroll and select
Navigation.
Press the navigation key center.
Press the navigation key up.
Press the navigation key down.
Press the navigation key left.
Press the navigation key right.
% 12
3Contents
Laura-UG-R1A-AE.book Page 4 Thursday, March 15, 2007 9:26 AM
Getting started
Assembly, SIM card, battery, turning
on, help, calls
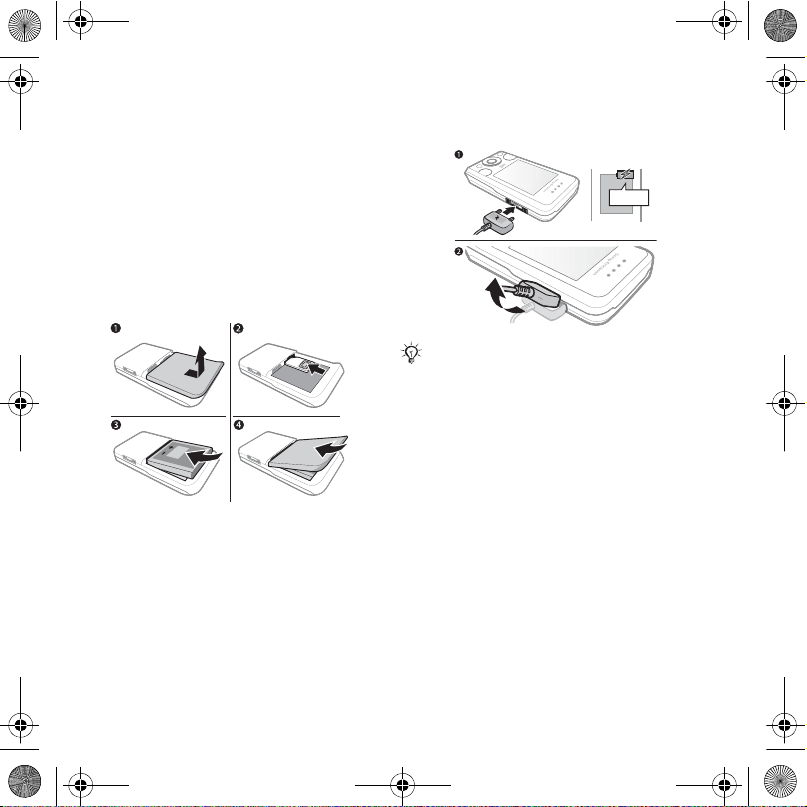
Assembly
Before you start using your phone, you
need to insert a new SIM card and the
battery.
SIM card and battery
To insert SIM card and battery
1 Turn off the phone. Remove the
battery cover by sliding the battery
release latch down.
2 Slide the SIM card into its holder with
the contacts facing up.
3 Insert the battery with the label side up
and the connectors facing each other.
4 Slide the battery cover into place.
Battery
To charge the battery
≈ 2.5
Do not connect the charger unless the
battery is inserted.
1 Connect the charger to the phone.
Wait approximately 2.5 hours or until
the battery icon indicates a full charge
before removing the charger.
2 Remove the charger plug by pulling up
and out.
Some functions use more battery
power than others and may require
more frequent recharging. If talk time
or standby time becomes noticeably
shorter, replace the battery. Only use
approved batteries from
Sony Ericsson % 72 Battery.
4 Getting started

Laura-UG-R1A-AE.book Page 5 Thursday, March 15, 2007 9:26 AM
Turning on the phone
Charge the phone and insert the SIM
card before turning the phone on. Use
the setup wizard to prepare for use.
To turn on the phone
1 Press and hold down . The first
startup may take a few minutes.
2 Select to use the phone in:
• Normal Mode – full functionality.
• Flight Mode – limited functionality
with network, FM radio and
Bluetooth™ transceivers off % 6 Flight
mode.
3 Enter your SIM card PIN, if requested.
4 At first startup, select the language.
5 Select Yes for the setup wizard to help
you.
6 Follow instructions to complete setup.
SIM card
The SIM (Subscriber Identity Module)
card, which you get from your network
operator, contains information about
your subscription. The SIM card keeps
track of information such as your
phone number and names and
numbers in your contacts.
Save contacts on your SIM card before
removing it from the phone.
PIN
You may need the PIN (Personal
Identity Number) for your SIM card to
start phone services. When entering
the PIN, each digit appears as *,
unless it starts with the digits of an
emergency number, like 112 or 911.
Press to correct mistakes.
If you enter the wrong PIN three times in
a row, PIN Blocked appears. To unblock
it, you need to enter your PUK (Personal
Unblocking Key) % 64 SIM card lock.
Standby
After you turn your phone on and enter
your PIN, the name of the network
operator appears on the display. This
is called standby.
5Getting started
Laura-UG-R1A-AE.book Page 6 Thursday, March 15, 2007 9:26 AM
Help in the phone
Help is available in your phone.
To use the setup wizard
• From standby select Menu } Settings
} the General tab } Setup Wizard and
select an option.
Download settings
You can set up functions in your
phone that use the Internet, such as
Internet, picture messaging, email,
and Sony Ericsson Update Service.
You can use Settings Download if
your SIM card supports the service,
your phone is connected to a network,
it is started in normal mode and does
not already have settings.
If settings exist in your phone, you may
not need more settings. If you use
Settings Download, you must agree to
register the phone at
personal data will be transferred to or
processed by Sony Ericsson. Contact
your network operator or service
provider for more information.
To view information about functions
• Scroll to a function and select More }
Information (if available).
Sony Ericsson. No
To view the phone demonstration
• From standby select Menu }
Entertainment } Demo Tour.
Flight mode
You can use your phone in:
• Normal Mode for full functionality.
• Flight Mode with limited functionality.
In Flight Mode, network, radio and
Bluetooth transceivers are turned off
to prevent disturbance to sensitive
equipment. You can, for example, play
music, but not make calls in an
airplane.
Follow onboard regulations and flight
crew instructions for use of electronic
devices.
To view Flight mode menu options
• From standby select Menu } Settings
and scroll to the General tab } Flight
Mode and select an option.
IMEI number
Keep a copy of your IMEI (International
Mobile Equipment Identity) number in
case your phone should be stolen.
To view your IMEI number
From standby press *#06#.
6 Getting started

Laura-UG-R1A-AE.book Page 7 Thursday, March 15, 2007 9:26 AM
Making and receiving calls
The phone must be in normal mode.
To make and receive calls
1 Enter a phone number (with
international prefix and area code if
applicable).
2 Select Call.
To receive a call
• When the phone rings, open the slider
or select Answer.
To end a call
• Select End Call or close the slider.
7Getting started

Laura-UG-R1A-AE.book Page 8 Thursday, March 15, 2007 9:26 AM
Getting to know the phone
Phone overview, icons, menus, entering letters, activity menu, File manager,
Memory Stick Micro™ (M2™)
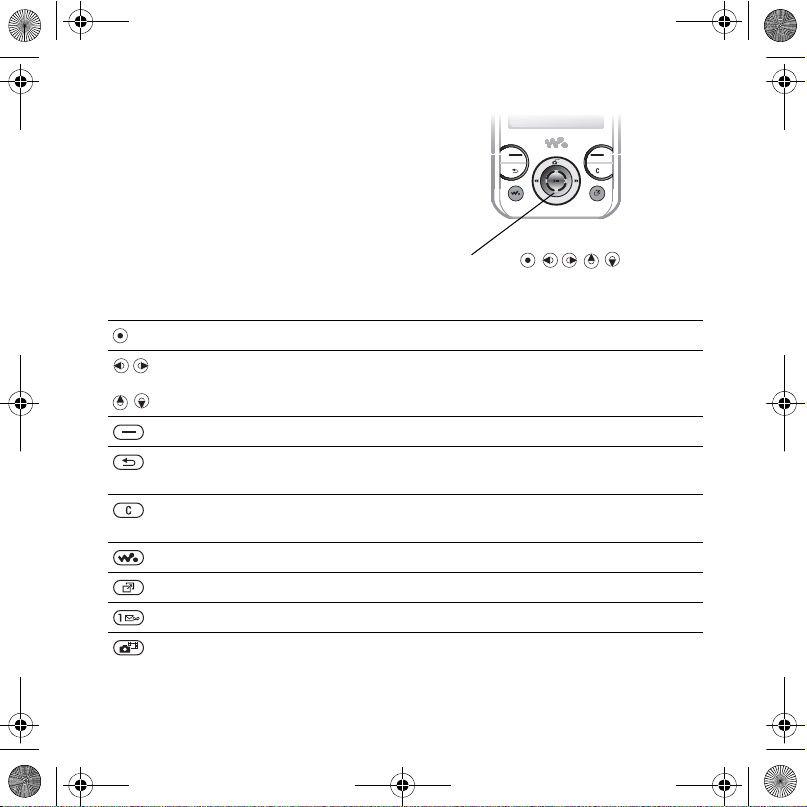
Phone overview
9
10
1
2
3
4
5
6
7
8
11 12
13 14
15
16
Some icons on keys may differ.
8 Getting to know the phone
Laura-UG-R1A-AE.book Page 9 Thursday, March 15, 2007 9:26 AM
1 Selection keys
2 Camera shortcut on navigation key
3 Back key
4 Walkman® key
5 Clear key
6 Navigation key
7 Activity menu key
8 Silent key
9 Volume keys, camera zoom
10 Connector for charger, handsfree and USB cable
11 On/off key
12 Memory Stick Micro™ (M2™) slot
13 Lanyard holder
14 Microphone
15 Camera lens
16 Battery cover
For more information % 12 Navigation
9Getting to know the phone
Laura-UG-R1A-AE.book Page 10 Thursday, March 15, 2007 9:26 AM
Menu overview*
PlayNow™* Internet* Entertainment
Online Services**
Radio
Games
TrackID™**
Video Player
VideoDJ™
PhotoDJ™
MusicDJ™
Remote Control
Fitness Messaging WALKMAN
Record Sound
Running
Walking
Results
Settings
File Manager** Contacts Camera
Camera Album
Music
Pictures
Videos
Themes
Web Pages
Games
Applications
Fitness
10 Getting to know the phone
Write New
Inbox
Email
RSS Reader
Drafts
Outbox
Sent Messages
Saved Messages
My Friends*
Call Voicemail
Templates
Settings
New Contact
Laura-UG-R1A-AE.book Page 11 Thursday, March 15, 2007 9:26 AM
Calls** Organizer
All Answered Dialed Missed
Settings***
Alarms
Applications
Calendar
Tasks
Notes
Synchronization
Timer
Stopwatch
Calculator
Code Memo
General
Profiles
Time & Date
Language
Update Service**
Voice Control
New Events
Shortcuts
Flight Mode
Security
Setup Wizard
Phone Status
Master Reset
* Menus and desktop items may vary by service provider.
**Some menus are operator-, network- and subscription-dependent.
*** Use the navigation key to move across tabs in submenus. For more information % 12 Navigation.
Sounds & Alerts
Ring Volume
Ringtone
Silent Mode
Light Effects
Increasing Ring
Vibrating Alert
Message Alert
Key Sound
Display
Wallpaper
Themes
Startup Screen
Screen Saver
Clock Size
Brightness
Edit Line Names*
Calls
Speed Dial
Forward Calls
Switch to Line 2*
Manage Calls
Time & Cost**
Show/Hide My No.
Handsfree
Open to Answer
Connectivity**
Bluetooth
USB
Synchronization
Device Management
Mobile Networks
Data Communication
Internet Settings
Streaming Settings
Accessories
11Getting to know the phone
Laura-UG-R1A-AE.book Page 12 Thursday, March 15, 2007 9:26 AM
Navigation
The main menus are shown as icons.
Some submenus include tabs. Scroll
to a tab by pressing the navigation key
left or right and selecting an option.
Key
Go to the main menu or select highlighted items
Move through menus and tabs
Select options shown immediately above these keys on the screen
Go back one level in the menus.
Press and hold down to return to standby or to end a function
Delete items such as pictures, sounds and contacts.
During a call, press and hold to mute the microphone
Open the Walkman®
Open the activity menu % 16 Activity menu
Press and hold down to call your voicemail service (if set)
Press to select camera mode.
Press and hold down to take a picture
Navigation keys
Navigation key -
12 Getting to know the phone

Laura-UG-R1A-AE.book Page 13 Thursday, March 15, 2007 9:26 AM
- From standby press and hold down any of these keys to reach a
contact beginning with the matching letter.
From standby press a number key and select Call to speed dial
Turn off the ringtone when receiving a call.
Press and hold down to set the phone to silent. The alarm signals
even if the phone is set to silent.
Press to enter a space when writing a message
Press to change letter case when writing a message
View status information in standby.
Increase the volume during a call, when using the Walkman® or
when using the radio.
Adjust the camera brightness.
Press to go forward one track when using the Walkman®.
Press and hold to advance the radio to the next channel.
Press twice to reject a call.
Press and hold down to voice dial, alternatively say your magic word
(if set) % 23 Voice control
Decrease the volume during a call, or when using the Walkman®.
Adjust the camera brightness.
Press and hold to move the radio backward to the next channel.
Press and hold down to voice dial, alternatively say your magic word
(if set) % 23 Voice control.
} Info Find more information, explanations or tips about selected features,
menus or functions available in your phone % 6 Help in the phone
} More Enter a list of options. There are different alternatives in the list of
options depending on where you are in the menus
13Getting to know the phone
Laura-UG-R1A-AE.book Page 14 Thursday, March 15, 2007 9:26 AM
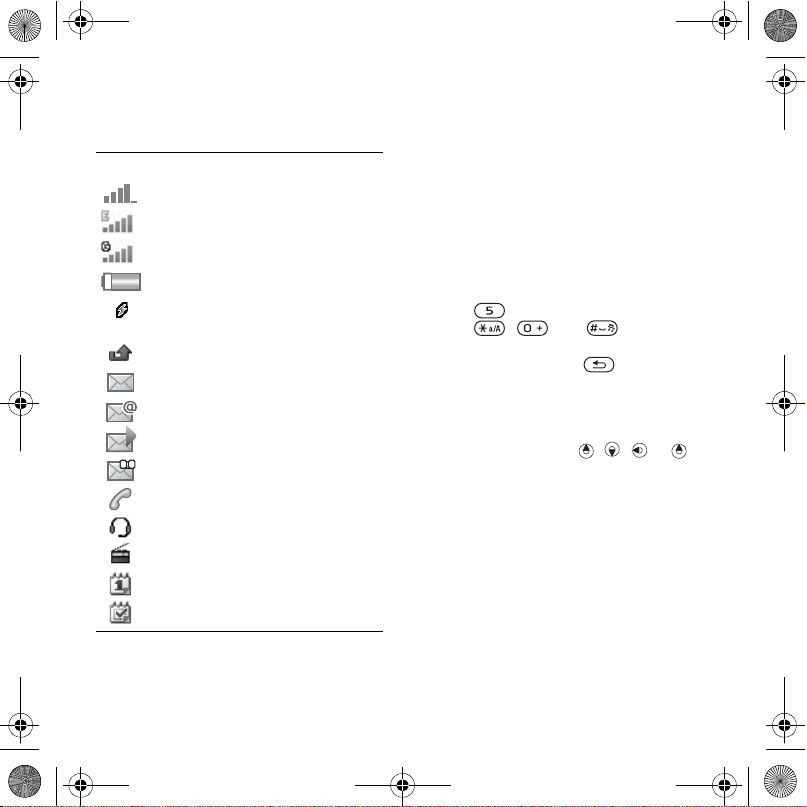
Status bar
Some of the icons that may appear:
Icon Description
GSM network signal strength
EDGE is available
GPRS is available
Battery status
Battery charging, appears with
battery status icon
Missed incoming call
Text message received
Email message received
Picture message received
Voice message received
Ongoing call
Handsfree is connected
Radio playing in the background
Calendar reminder
Task reminder
Shortcuts
You can map shortcuts from the
keypad and navigation key to main
menus and functions in the phone.
Using keypad shortcuts
Keypad shortcuts take you directly to
a menu. Menu numbering starts from
the top left icon and moves across
and then down row by row. For
example:
• Press for the fifth menu item.
• Press , and for the
tenth, eleventh and twelfth items.
• Press and hold down to return to
standby.
Using navigation key shortcuts
From standby go to a shortcut or
function by pressing , , or .
To edit a navigation key shortcut
1 From standby select Menu } Settings
} General tab } Shortcuts.
2 Scroll to an option and select Edit.
3 Scroll to a menu option and select
Shortcut.
Phone language
You can select the language to use in
the phone menus or when writing text.
14 Getting to know the phone
Laura-UG-R1A-AE.book Page 15 Thursday, March 15, 2007 9:26 AM
To change the phone language
1 From standby select Menu } Settings
} General tab } Language } Phone
Language.
2 Select a language.
Most SIM cards automatically set the
menu language to the country where you
bought your SIM card. If not, the
predefined language is English.
Entering letters and
characters
Enter characters using:
• Multitap text input
• T9™ Text Input
To change the text input method
• When you enter letters, press and hold
down .
Options when entering letters
• Select More.
To enter letters using multitap input
• Press - repeatedly until the
desired character appears.
• Press to shift between capital
and lower-case letters.
• Press and hold down - to
enter numbers.
• Press to delete letters or
numbers.
• Press for the most common
punctuation marks.
• Press to add a space.
T9™ Text Input
The T9 Text Input method uses a builtin dictionary.
To use T9™ Text Input
1 From standby select Menu }
Messaging } Write New } Text
Message.
2 Press each key only once, even if the
desired letter is not the first letter on
the key. For example, to write the
word “Jane”, press , , ,
. Enter the full word before
looking at the choices.
• Press or for word choices.
• Press to accept a word and
add a space.
• Press to accept a word without
adding a space.
• Press and then or to
enter a punctuation mark.
• Press to delete the last letter
entered.
To add words to the T9 Text Input
dictionary
1 When entering letters, select More }
Spell Word.
2 Edit the word by using multitap input.
15Getting to know the phone
Laura-UG-R1A-AE.book Page 16 Thursday, March 15, 2007 9:26 AM
3 Select Insert.
Next word prediction
When writing a message, you can use
T9 Text Input to predict the next word,
if previously used in a sentence.
To turn next word prediction on/off
1 When entering letters, select More }
Writing Options } Next Word Pred. }
Select.
To use next word prediction
• When entering letters, press to
accept or continue.
Activity menu
The activity menu provides an
overview of and access to new events,
bookmarks and shortcuts.
To open and close the activity menu
• Press .
Activity menu tabs
• New Events – view missed calls and
new messages. New events can also
be set to appear as pop-up text
instead at Settings } the General tab
} New Events } Popup.
• Running Apps – applications that are
running in the background.
• My Shortcuts – add, delete and
change the order of shortcuts.
• Internet – your Internet bookmarks.
File manager
The File manager contains items such
as pictures, music, themes, Web
pages, games and applications saved
in the phone memory or on the
memory card. If the memory is full,
delete some content to free space.
The phone and memory card are
sometimes sold separately.
Memory Stick Micro™ (M2™)
Add additional memory to your phone
with the Memory Stick Micro™ (M2™)
memory card. The memory card may
be used with other compatible
devices.
16 Getting to know the phone
Laura-UG-R1A-AE.book Page 17 Thursday, March 15, 2007 9:26 AM
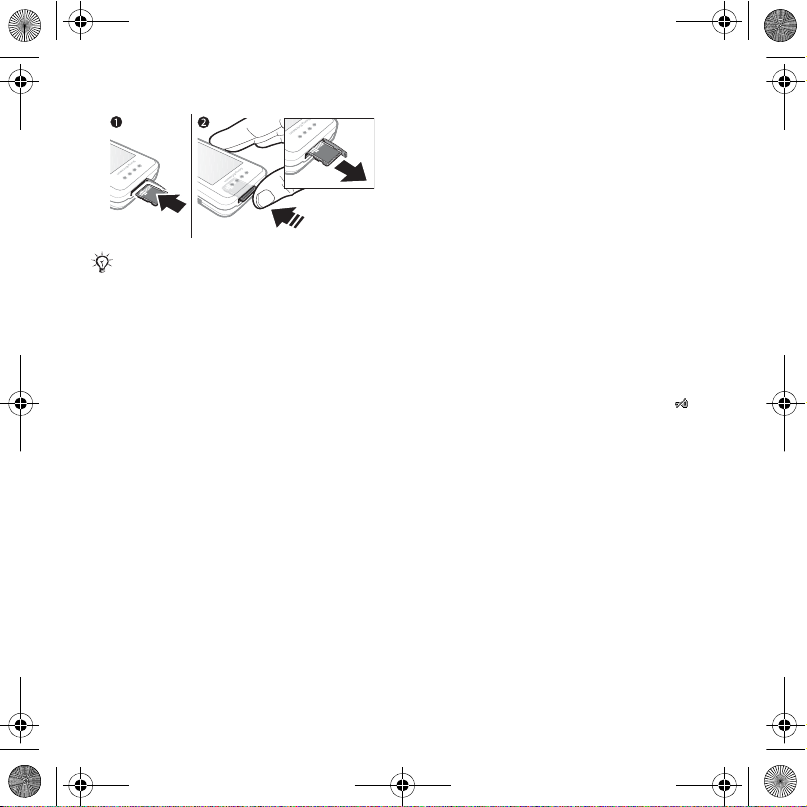
To insert and remove a memory card
Return the phone to standby before
inserting or removing the memory card.
1 Open the memory card cover and
insert the memory card with the
contacts facing up, as shown.
2 Press the edge to release and remove.
Memory card options
You can check memory status or
format a memory card to delete all
information.
To view memory card options
1 From standby select Menu } File
Manager } the On Memory Stick tab.
2 Select More.
File manager menu tabs
The File manager is divided into three
tabs. Icons indicate where the files are
saved.
• All Files – all content in the phone
memory and on a Memory Stick
Micro™ (M2™)
• On Memory Stick – all content on a
Memory Stick Micro™ (M2™)
• In Phone – all content in the phone
memory
File information
You can view file information by
highlighting it and selecting More }
Information. Items that are
downloaded, or received using one of
the available transfer methods, may
be copyright-protected. If a file is
protected, you may not be able to
copy or send that file. A DRMprotected file has a key symbol ( ).
To move a file to memory
1 From standby select Menu } File
Manager.
2 Scroll to a folder and select Open.
3 Scroll to a file and select More }
Manage File } Move.
4 Select to transfer the file to Phone or
Memory Stick.
To copy a file to memory
1 From standby select Menu } File
Manager.
2
Scroll to a folder and select Open.
17Getting to know the phone

Laura-UG-R1A-AE.book Page 18 Thursday, March 15, 2007 9:26 AM
3 Scroll to a file and select More }
Manage File } Copy.
4 Select to transfer the file to Phone or
Memory Stick } Select.
To transfer files to a computer
You can transfer files to your
computer using Bluetooth
technology or a USB cable
™ wireless
% 52
Connectivity.
To create a subfolder
1 From standby select Menu } File
Manager.
2 Scroll to a folder and select More }
New Folder.
3 Enter a name for the folder.
4 Select OK to save the folder.
To select one or more files
1 From standby select Menu } File
Manager.
2 Scroll to a folder and select More }
Mark } Mark Several.
3 Scroll to select files and select Mark or
Unmark.
To delete a file or a subfolder from
the File manager
1 From standby select Menu } File
Manager.
2 Scroll to a folder and select Open.
3 Scroll to a file and select More }
Delete.
18 Getting to know the phone
Laura-UG-R1A-AE.book Page 19 Thursday, March 15, 2007 9:26 AM
Calling
Calls, contacts, voice control, call
options
Making and receiving calls
You must turn on your phone and be
within range of a network. % 6 Help in
the phone.
To make a call
1 From standby enter a phone number.
2 Select Call.
For international calls, press and hold
down until a + appears.
To redial a number
• When Retry? appears, select Yes.
Do not hold the phone to your ear when
waiting. When the call connects, the
phone gives a loud signal, unless muted.
To answer or reject a call
• Select Answer or open the slider to
answer a call.
• Select Busy to end or reject a call.
To mute the microphone
1 Press and hold down .
2 Press and hold down again to
resume.
To set the loudspeaker
• During a call, select More } Turn On
Speaker or Turn Off Speaker.
Do not hold the phone to your ear when
using the loudspeaker. This could
damage your hearing.
To adjust the ear volume
• Press to increase or to
decrease the volume.
Networks
Some network operators allow you to
switch networks manually.
To switch networks
1 From standby select Menu } Settings
} the Connectivity tab } Mobile
Networks } Select Network.
2 Select an option.
Emergency calls
Your phone supports international
emergency numbers, for example, 112
and 911. These numbers can normally
be used to make emergency calls in
19Calling
Laura-UG-R1A-AE.book Page 20 Thursday, March 15, 2007 9:26 AM
any country, with or without a SIM
card inserted, if a GSM network is
within range.
In some countries, other emergency
numbers may also be promoted. Your
network operator may therefore have
saved additional local emergency
numbers on the SIM card.
To make an emergency call
• Enter 112 or 911 (the international
emergency numbers), select Call.
To view the local emergency
numbers
1 From standby select Menu }
Contacts.
2 Select More } Options } Special
Numbers } Emergency Nos..
Contacts
You can save names, numbers and
personal information in Contacts.
The information may be saved in
phone memory or on your SIM card.
For useful information and settings,
select Contacts } More } Options.
Default contact
You can choose the internal
phonebook or the SIM card as the
default contact list.
To select default contacts
1 From standby select Menu }
Contacts.
2 Select More } Options } Advanced }
Default Contacts.
3 Select an option.
Phone contacts
Phone contacts are saved in phone
memory and may contain names,
phone numbers and personal
information.
To add a phone contact
1 From standby select Menu }
Contacts } New Contact } Add.
2 Enter the name and select OK.
3 Enter the number and select OK.
4 Select a number option.
5 Scroll between tabs and select the
fields to add information. To enter
symbols such as @, select More }
Add Symbol, scroll to a symbol and
select Insert.
6 When all information is added, select
Save.
20 Calling
Laura-UG-R1A-AE.book Page 21 Thursday, March 15, 2007 9:26 AM
To delete a contact
1 From standby select Menu }
Contacts and scroll to a contact.
2 Press and select Yes.
To delete all phone contacts
1 From standby select Menu }
Contacts.
2 Select Options } Advanced } Delete
All Contacts } Select } Yes.
To automatically save names and
phone numbers on the SIM card
1 From standby select Menu }
Contacts.
2 Select More } Options } Advanced }
Auto Save on SIM } On.
SIM contacts
You can save contacts on your SIM
card.
To add a SIM contact
With SIM Contacts as the default
contact:
1 From standby select Menu }
Contacts } New Contact } Add.
2 Enter the name and select
3 Enter the number and select OK.
4 Select a number.
5 Add more information, if available and
select Save.
OK.
Memory status
The number of contacts you can save
in the phone or on the SIM card
depends on available memory.
To view memory status
1 From standby select Menu }
Contacts.
2 Select More } Options } Advanced }
Memory Status.
Using contacts
To call a contact
1 From standby select Menu }
Contacts.
2 Scroll to, or enter the first letter or
letters of the contact.
3 When the contact is highlighted press
or to select a number, then
select Call.
To send a contact
1 From standby select Menu }
Contacts.
2 Select a contact.
3 Select More } Send Contact.
4 Select a transfer method.
To send all contacts
1 From standby select Menu }
Contacts.
21Calling
Laura-UG-R1A-AE.book Page 22 Thursday, March 15, 2007 9:26 AM
2 Select More } Options } Advanced }
Send All Contacts.
3 Select a transfer method.
To copy names and numbers to the
SIM card
1 From standby select Menu }
Contacts.
2 Select More } Options } Advanced }
Copy to SIM.
3 Select an option.
When copying all contacts from the
phone to the SIM card, all existing SIM
card information is replaced.
To copy names and numbers to
phone contacts
1 From standby select Menu }
Contacts.
2 Select More } Options } Advanced }
Copy from SIM.
3 Select an option.
To edit a phone contact
1 From standby select Menu }
Contacts.
2 Scroll to a contact and select More }
Edit Contact.
3 Scroll to a tab and field and select
Edit.
4 Edit the information and select Save.
To edit a SIM contact
With SIM contacts as the default
phonebook:
1 From standby select Menu }
Contacts.
2 Scroll to a name and number and
select More } Edit Contact.
3 Edit the name and number.
To save and restore contacts with a
memory card
1 From standby select Menu }
Contacts.
2 Select More } Options } Advanced }
Back Up To M.S. or Restore From
M.S..
To select the sort order for contacts
1 From standby select Menu }
Contacts.
2 Select More } Options } Advanced }
Sort Order.
Call list
Information about recent calls.
To call a number from the call list
1 From standby select Menu } Calls
and scroll to a tab.
2 Scroll to a name or number and select
Call.
22 Calling
Laura-UG-R1A-AE.book Page 23 Thursday, March 15, 2007 9:26 AM
To add a call list number to contacts
1 From standby select Menu } Calls
and select a tab.
2 Scroll to the number and select More
} Save Number.
3 Select New Contact to create a new
contact, or select an existing contact
to add the number to.
To clear the call list
• From standby select Menu } Calls the
All tab } More } Delete All.
Speed dial
You can save numbers in positions 19 in your phone for quick access.
To edit speed dial numbers
1 From standby select Menu }
Contacts } More } Options } Speed
Dial.
2 Scroll to the position and select Add
or More } Replace.
To speed dial
• From standby enter the position
number } Call.
Voicemail
If your subscription includes
voicemail, callers may leave a
message when you cannot answer a
call.
Contact your network operator for more
information.
To call your voicemail service
• From standby press and hold down
.
To edit your voicemail number
1 From standby select Menu }
Messaging } Settings } Voicemail
Number.
2 Enter the number and select OK.
Voice control
By creating voice commands, you
can:
• Voice dial – call someone by saying
their name.
• Magic word – activate voice control
by using an uncommon word or
sentence you choose.
• Voice answer – answer and reject
calls using the Voice Answer feature
and a portable or vehicle handsfree.
23Calling
Laura-UG-R1A-AE.book Page 24 Thursday, March 15, 2007 9:26 AM
To activate voice dialing and record
commands
1 From standby select Menu } Settings
} the General tab } Voice Control }
Voice Dialing } Activate } Yes } New
Voice Cmd. and select a contact.
2 If the contact has more than one
number, use and to view the
numbers. Select the number to add
the voice command to. Record a voice
command such as “John mobile”.
3 Follow the instructions on the screen.
Wait for the tone and say the
command to record. The voice
command is played back to you.
4 If the recording sounds OK, select
Yes. If not, select No and follow the
instructions on the screen.
Caller name
You can hear the recorded contact
name play when receiving a call from
the contact.
To use the caller name
1 From standby select Menu } Settings
} the General tab } Voice Control }
Play Caller Name.
2 Select an option.
To voice dial from the phone
1 From standby press and hold down
or .
2 Wait for the tone and say a recorded
name, for example “John mobile”. The
name is played back to you and the
call is connected.
To voice dial with a handsfree
• From standby press and hold down
the handsfree key.
The magic word
You can record and use a voice
command as to activate voice control
without pressing any keys.
Bluetooth™ devices do not support
magic word.
Choose a long, unusual word or phrase
that can easily be distinguished from
ordinary background speech.
To activate and record the magic
word
1 From standby select Menu
} Settings
} the General tab } Voice Control }
Magic Word } Activate.
2 Follow the instructions on the screen
and select Continue.
3 Wait for the tone and say the magic
word.
4 Select Yes to accept or No to record a
new word.
5 Follow the instructions on the screen
and select Continue.
24 Calling
 Loading...