

Sony A1042052 User Manual
K205a_SHUG_R1A_EN.book Page 1 Friday, August 3, 2007 5:37 PM
K205
PPreflighted byreflighted byPreflighted by
( )( )( )

K205i_portrait_front.fm Page 2 Friday, August 3, 2007 5:43 PM
PPreflighted byreflighted byPreflighted by
( )( )( )

K205a_SHUG_R1A_EN.book Page 1 Friday, August 3, 2007 5:37 PM
Contents
Set up your phone . . . . . . . . . . . . . . . . . . . . . . . . . . 4
Phone overview . . . . . . . . . . . . . . . . . . . . . . . . . . . 7
Key functions . . . . . . . . . . . . . . . . . . . . . . . . . . . . . . 8
Phone language . . . . . . . . . . . . . . . . . . . . . . . . . . . 10
Entering letters and characters . . . . . . . . . . . . . . . 10
Calling . . . . . . . . . . . . . . . . . . . . . . . . . . . . . . . . . . 11
Contacts . . . . . . . . . . . . . . . . . . . . . . . . . . . . . . . . 13
Text messages . . . . . . . . . . . . . . . . . . . . . . . . . . . 14
Picture messages . . . . . . . . . . . . . . . . . . . . . . . . . 15
Camera . . . . . . . . . . . . . . . . . . . . . . . . . . . . . . . . . 15
Infrared port . . . . . . . . . . . . . . . . . . . . . . . . . . . . . 16
Internet . . . . . . . . . . . . . . . . . . . . . . . . . . . . . . . . . 17
Sounds & Alerts . . . . . . . . . . . . . . . . . . . . . . . . . . 18
Alarms . . . . . . . . . . . . . . . . . . . . . . . . . . . . . . . . . . 18
Settings . . . . . . . . . . . . . . . . . . . . . . . . . . . . . . . . . 19
Troubleshooting . . . . . . . . . . . . . . . . . . . . . . . . . . . 21
Important information . . . . . . . . . . . . . . . . . . . . . . 24
Index . . . . . . . . . . . . . . . . . . . . . . . . . . . . . . . . . . . 38
Congratulations on your purchase of this phone! For additional
phone content, go to www.sonyericsson.com. Register
now to get free online storage and special offers at
www.sonyericsson.com/myphone. For product support,
go to www.sonyericsson.com/support.
PPreflighted byreflighted byPreflighted by
1
( )( )( )
K205a_SHUG_R1A_EN.book Page 2 Friday, August 3, 2007 5:37 PM
Sony Ericsson K205a
GSM 850/1900
This User guide is published by Sony Ericsson Mobile Communications
AB or its local affiliated company, without any warranty. Improvements
and changes to this User guide necessitated by typographical errors,
inaccuracies of current information, or improvements to programs
and/or equipment, may be made by Sony Ericsson Mobile
Communications AB or its local affiliated company at any time and
without notice. Such changes will, however, be incorporated into new
editions of this User guide.
All rights reserved.
© Sony Ericsson Mobile Communications AB, 2007
Publication number: EN/LZT 108 9616 R1A
Please note:
Some of the services in this User guide are not supported by all
networks. This also applies to the GSM International Emergency
Number 112.
Please contact your network operator or service provider if you are
in doubt whether you can use a particular service or not.
Please read the Guidelines for safe and efficient use and the Limited
warranty chapters before you use your mobile phone.
Your mobile phone has the capability to download, store and forward
additional content, e.g. ringtones. The use of such content may be
restricted or prohibited by rights of third parties, including but not
limited to restriction under applicable copyright laws. You, and not
Sony Ericsson, are entirely responsible for additional content that
you download to or forward from your mobile phone. Prior to your
use of any additional content, please verify that your intended use is
properly licensed or is otherwise authorized. Sony Ericsson does not
guarantee the accuracy, integrity or quality of any additional content
or any other third party content. Under no circumstances will
Sony Ericsson be liable in any way for your improper use of additional
content or other third party content.
PPreflighted byreflighted byPreflighted by
2
( )( )( )
K205a_SHUG_R1A_EN.book Page 3 Friday, August 3, 2007 5:37 PM
The Liquid Identity logo is a trademark or registered trademark of
Sony Ericsson Mobile Communications AB. Sony is a trademark
or registered trademark of Sony Corporation. Ericsson is a trademark
or registered trademark of Telefonaktiebolaget LM Ericsson.
T9™ Text Input is a trademark or a registered trademark of Tegic
Communications.
T9™ Text Input is licensed under one or more of the following:
U.S. Pat. Nos. 5,818,437, 5,953,541, 5,187,480, 5,945,928, and
6,011,554; Canadian Pat. No. 1,331,057; United Kingdom Pat. No.
2238414B; Hong Kong Standard Pat. No. HK0940329; Republic
of Singapore Pat. No. 51383; Euro. Pat. No. 0 842 463 (96927260.8)
DE/DK, FI, FR, IT, NL, PT, ES, SE, GB; and additional patents are
pending worldwide.
Other product and company names may be the trademarks of their
respective owners.
Sony Ericsson advises users to backup their personal data information.
All illustrations are for illustration only and may not accurately depict
the actual phone.
Any rights not expressly granted herein are reserved.
User guide symbols
The following instruction symbols appear in this User
guide:
% This arrow points you to a page with more information.
Use the navigation key to scroll and the selection
}
key to select.
Note
PPreflighted byreflighted byPreflighted by
3
( )( )( )
K205a_SHUG_R1A_EN.book Page 4 Friday, August 3, 2007 5:37 PM
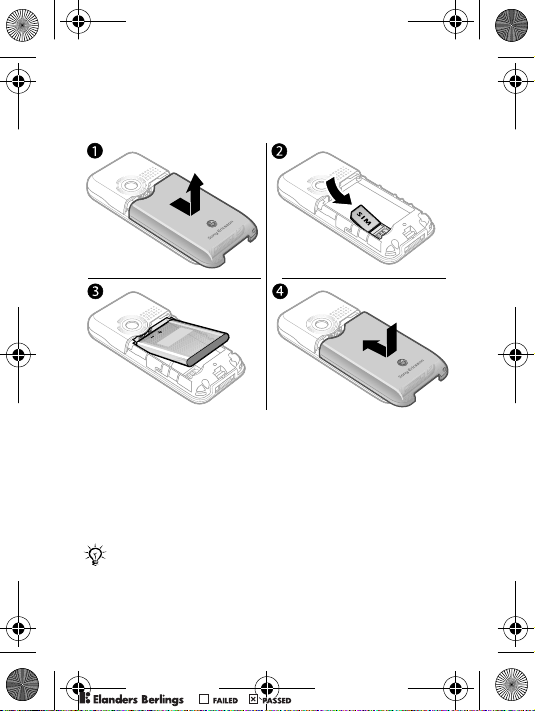
Set up your phone
Insert the SIM card and battery
1 Gently pull the battery cover away from the phone.
2 Insert the SIM card. Make sure the SIM card is placed
under the silver holders and that the contacts of the
SIM card face downwards.
3 Place the battery on the back of the phone with the
label side up and the connectors facing each other.
4 Replace the battery cover.
If you have been using a SIM card in another phone,
make sure that your information is saved to the
SIM card before you remove it from that phone.
PPreflighted byreflighted byPreflighted by
4
( )( )( )
K205a_SHUG_R1A_EN.book Page 5 Friday, August 3, 2007 5:37 PM
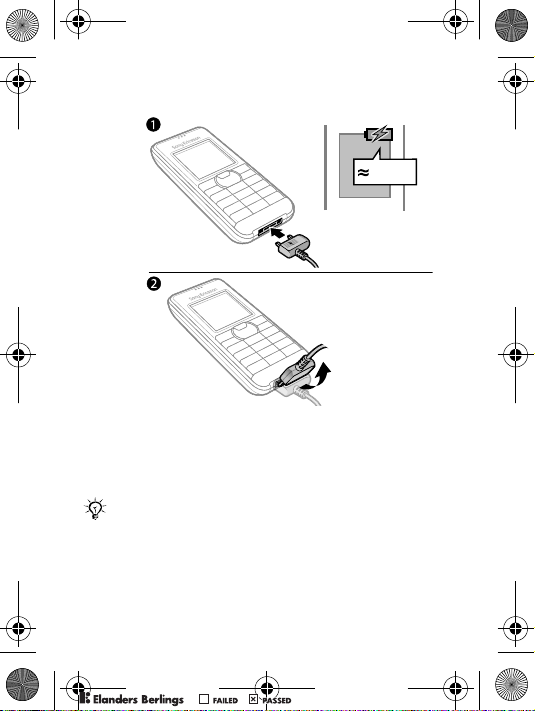
Charge the battery
2.5 h
1 Connect the battery charger to the phone. It takes
approximately 2.5 hours to fully charge the battery.
Press a key to view the screen.
2 Remove the battery charger by tilting it upwards.
The time and date are reset when you remove the
battery.
PPreflighted byreflighted byPreflighted by
5
( )( )( )
K205a_SHUG_R1A_EN.book Page 6 Friday, August 3, 2007 5:37 PM
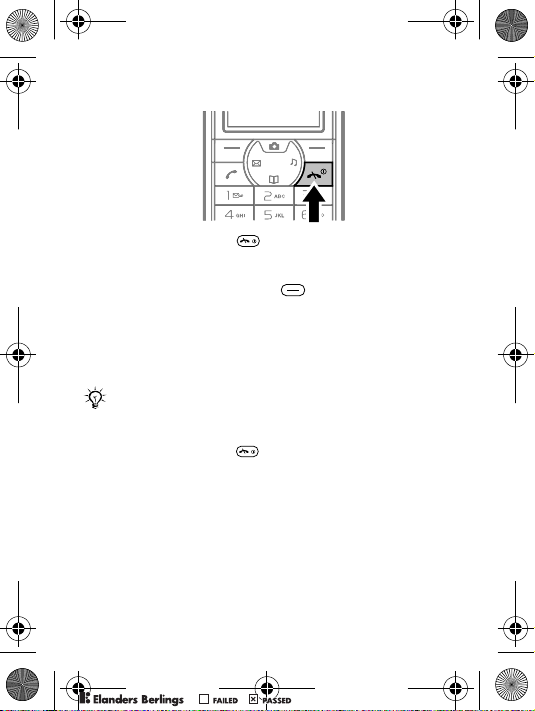
Turn on the phone
1 Press and hold down until the screen lights up.
2 Enter your PIN (Personal Identification Number) code
if requested and select OK. Each digit appears as *.
Press the right selection key to correct mistakes.
If the screen turns dark, press any key to illuminate
the screen.
3 Scroll to a language and select Save.
4 Enter the time and select Save.
5 Enter the date and select Save.
If you enter the wrong PIN three times in a row, the
SIM card is blocked. To unblock it % 23 PIN blocked.
To turn off the phone
• Press and hold down .
Standby
After you have turned the phone on and entered your PIN,
the name of your operator appears on the screen. This
is called standby – you can now make and receive calls.
PPreflighted byreflighted byPreflighted by
6
( )( )( )
K205a_SHUG_R1A_EN.book Page 7 Friday, August 3, 2007 5:37 PM
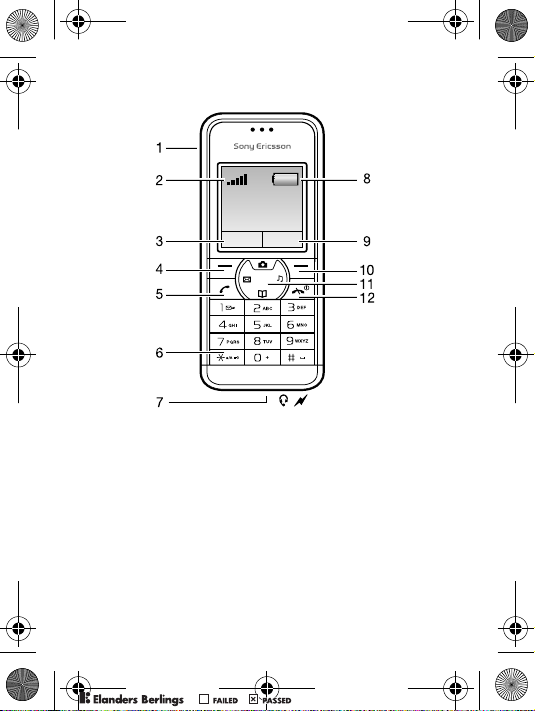
Phone overview
1 Infrared port 6 Keylock
Strength of GSM network
2
(Five bars mean full
network coverage)
3,9 Function of selection key 8
4,10 Selection keys 11
5 Call key 12 End and On/Off key
Headset and battery
7
charger connector
Battery status (a
green battery means
fully charged)
Navigation key with
shortcuts
PPreflighted byreflighted byPreflighted by
7
( )( )( )
K205a_SHUG_R1A_EN.book Page 8 Friday, August 3, 2007 5:37 PM
Key functions
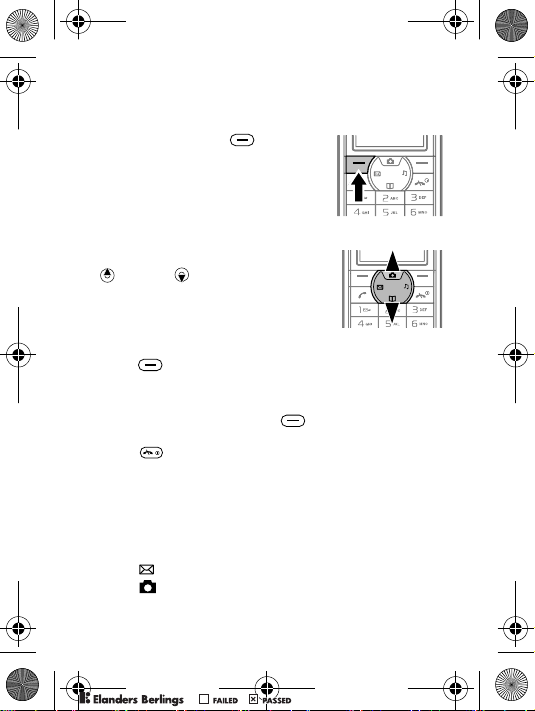
To go to the main menu
• From standby press to
select Menu
you see is Messaging.
To navigate the menus
• Press the navigation key up
or down to scroll.
To use the selection keys
• Press to select the options shown immediately above
these keys on the screen.
To go back one level or end a function
• Press the right selection key to go back one level
in the menus.
• Press to end a function and go to standby.
To turn the screen light on
• Press any key.
Shortcuts
From standby, you can use the navigation key to go directly
to a function:
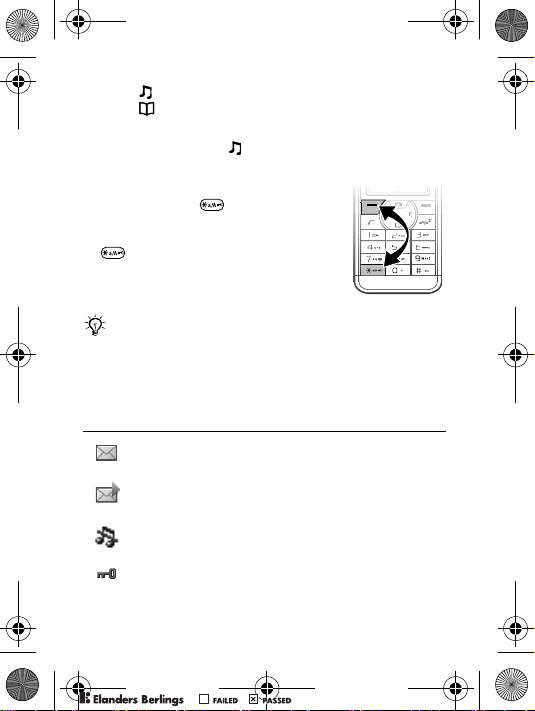
• Press to write a text or picture message.
• Press to go to the camera.
. The first menu
PPreflighted byreflighted byPreflighted by
8
( )( )( )
K205a_SHUG_R1A_EN.book Page 9 Friday, August 3, 2007 5:37 PM
• Press to set the ring volume.
• Press to go to your contacts.
To set the ringtone to silent
• From standby press and select Silent.
To lock or unlock the keypad
• To avoid dialling a number by
accident, press and select
Lock keys.
• To unlock the keypad, press
and select Unlock.
You can still answer a call, and call the international
emergency number 112 when the keypad is locked.
Icons
These icons appear on the screen to show status and
new events.
Icon Description
You have received a new text or voice* message.
% 14 Text messages and % 13 Voice messages
You have received a new picture message.
% 15 Picture messages
The phone is set to silent. % 9 To set the ringtone
to silent
The keypad is locked. % 9 To lock or unlock the
keypad
PPreflighted byreflighted byPreflighted by
9
( )( )( )
K205a_SHUG_R1A_EN.book Page 10 Friday, August 3, 2007 5:37 PM
Icon Description
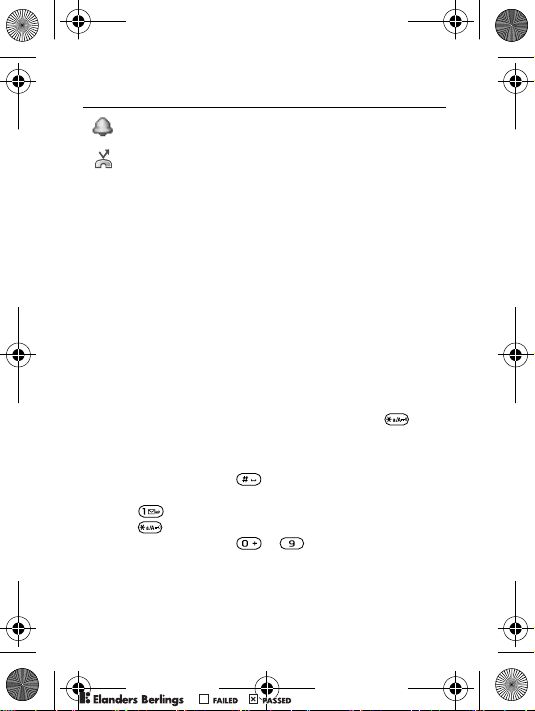
An alarm is activated. % 18 Alarms
Divert calls* is activated. % 13 Diverting calls
For more information, go to www.sonyericsson.com/support.
* Some items may be operator-, network- and
subscription-dependent.
Phone language
To change the phone language
• From standby select Menu } Settings } Language
and select a language.
Entering letters and characters
You can enter letters and characters using either the
Multitap or the T9™ Text Input method. T9 text input
uses a dictionary to recognise words.
To change writing method
• When you enter letters, press and hold down .
Common for both text input methods
• Press the right selection key to delete characters.
• Press and hold down to change the writing
language.
• Press to add a comma, full stop, question mark, etc.
• Press to shift between capitals and lower case letters.
• Press and hold down
– to enter numbers.
PPreflighted byreflighted byPreflighted by
10
( )( )( )
K205a_SHUG_R1A_EN.book Page 11 Friday, August 3, 2007 5:37 PM
To enter letters using multitap text input
1 Press – repeatedly until the desired letter
appears.
2 When a word is finished, press to add a space.
To enter letters using T9 Text Input
1 Press each key only once, even if the letter you want
is not the first letter on the key. For example, to write
the word “Jane”, press .
2 Accept a word and add a space by pressing .
To accept a word without adding a space, press .
If the word shown is not the one you want, press
or repeatedly to view alternative words.
Calling
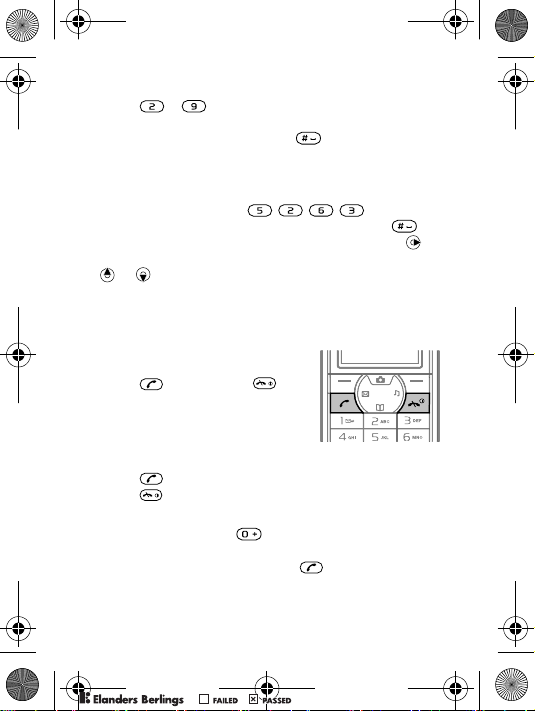
To make a call
1 Enter the area code and
phone number.
2 Press to call. Press
to end the call.
To answer or reject a call
• Press to answer a call.
• Press to reject a call.
To make international calls
1 Press and hold down until a “+” sign appears.
2 Enter the country code, area code (without the leading
zero), phone number and press .
PPreflighted byreflighted byPreflighted by
11
( )( )( )
K205a_SHUG_R1A_EN.book Page 12 Friday, August 3, 2007 5:37 PM
To make an emergency call
• Enter, for example, 112 and press . Press the right
selection key to correct mistakes.
To check your missed calls
1 When Missed calls: is displayed, select Details to display
the missed calls.
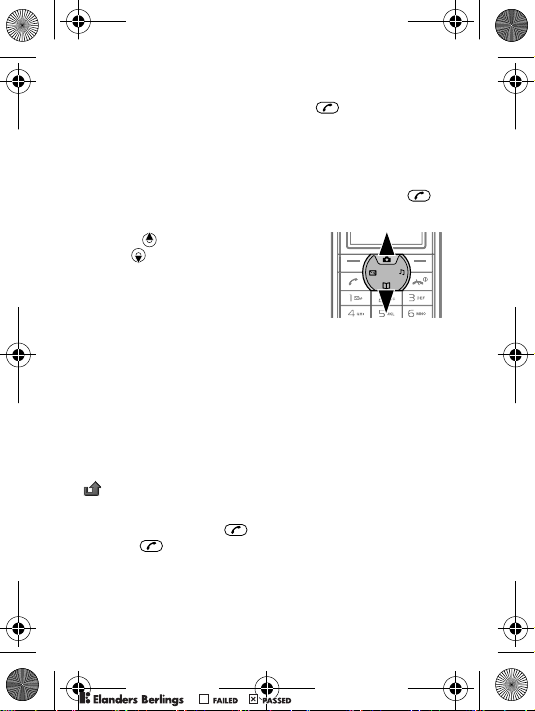
2 To call a number, scroll to the number and press .
To change the ear speaker volume during a call
• Press to increase the volume
and to decrease the volume.
To set the vibrating alert
• From standby select Menu } Settings } Sound & alerts
} Vibration and select an option.
Call options
During a call you can use Options, for example, to turn
off the microphone.
Call list
Information about the last 30 calls is saved in Call list.
indicates that you have missed a call.
To call a number from the call list
1 From standby press and scroll to one of the numbers.
2 Press to call.
PPreflighted byreflighted byPreflighted by
12
( )( )( )
K205a_SHUG_R1A_EN.book Page 13 Friday, August 3, 2007 5:37 PM
Diverting calls
If you cannot answer incoming calls, you can divert them
to another number, for example, your answering service.
To activate a call divert
1 From standby select Menu } Calls } Call settings
} Divert all calls.
2 Scroll to one of the divert options and select Activate.
3 Select an option.
Voice messages
If your subscription includes an answering service, callers
can leave a voice message when you cannot answer a call.
To call your voicemail service
• From standby press and hold down if you have
saved your voicemail number in the phone.
To enter your voicemail number
1 From standby select Menu } Contacts } Voicemail.
2 Add voicemail number? appears. Select Yes.
3 Enter the voicemail number that you get from your
service provider and select Save.
Contacts
You can save names and numbers in Contacts.
To add a contact
1 From standby select Menu } Contacts } Add contact
and select an option.
2 Enter the name and select Options } OK.
3 Scroll to the icon below the name.
4 Enter the number and select OK.
5 Select Save contact.
PPreflighted byreflighted byPreflighted by
13
( )( )( )
 Loading...