

Page 1
4-256-733-F2(1)
LCD
Digital Colour TV
Operating Instructions GB
KDL-22PX300
Page 2
Introduction
Thank you for choosing this Sony product.
Before operating the TV, please read this
manual thoroughly and retain it for future
reference.
The manufacturer of this product is
Sony Corporation, 1-7-1 Konan
Minato-ku Tokyo, 108-0075 Japan.
The Authorized Representative for
EMC and product safety is Sony
Deutschland GmbH, Hedelfinger
Strasse 61, 70327 Stuttgart,
Germany. For any service or
guarantee matters please refer to the
addresses given in separate service
or guarantee documents.
Notes on Digital TV
function
• Any functions related to Digital TV
( ) will only work in countries or
areas where DVB-T (MPEG-2 and
H.264/MPEG-4 AVC) digital terrestrial
signals are broadcast or where you have
access to a compatible DVB-C (MPEG2 and H.264/MPEG-4 AVC) cable
service. Please confirm with your local
dealer if you can receive a DVB-T signal
where you live or ask your cable
provider if their DVB-C cable service is
suitable for integrated operati on with this
TV.
• Your cable provider may charge a fee for
their services, or require you to agree to
its terms and conditions of business.
• This TV set complies with DVB-T and
DVB-C specifications, but compatibility
with future DVB-T digital te rrestrial and
DVB-C digital cable broadcasts are not
guaranteed.
• Some Digital TV functions may not be
available in some countries/areas and
DVB-C cable may not operate correctly
with some providers.
registration code, locate the DivX VOD
section in the device setup menu. Go to
vod.divx.com with this code to complete
the registration process and learn more
about DivX VOD.
Manufactured under license from Dolby
Laboratories. Dolby and the double-D
symbol are trademarks of Dolby
Laboratories.
“BRAVIA” and are
trademarks of Sony Corporation.
“XMB” and “xross media bar” are
trademarks of Sony Corporation and Sony
Computer Entertainment Inc.
“ ”, “PlayStation”, “ ”,
“DUALSHOCK” and “ ” are
registered trademarks of Sony Computer
Entertainment Inc.
Sony Corporation uses DNAS (Dynamic
Network Authentication System), a
proprietary authentication system, to help
protect copyright and security in
connecting the PlayStation
network. DNAS may retrieve information
about a user's hardware and software for
authentication, copy protection, account
blocking, system, rules, or game
management and other purposes. The
information collected does not identify the
user personally. The unauthorised transfer,
exhibition, export, import or transmission
of programs and devices circumventing its
authentication scheme may be prohibited
by law.
is a trademark of DVD Format/Logo
Licensing Corporation.
2 console to a
™
About copy protection
Attempted copying of DVDs played on
this device may be prevented or restricted
by copy protection technology contained
on the DVD. Attempted recording or
copying of DVDs for private use by the
removal or circumvention of copy
protection technology may be prohibited
under applicable law.
Guarantee
Thank you for buying this Product. The
term “Product” means the PlayStation
computer entertainment system together
with the accessories and/or peripherals
with which it is packaged. This Guarantee
does not cover any software whether or not
packaged with the Product.
™
2
For a list of compatible cable providers,
refer to the support web site:
http://support.sony-europe.com/TV/
DVBC/
Trademark information
is a registered trademark of the DVB
Project.
HDMI, the HDMI Logo, and HighDefinition Multimedia Interface are
trademarks or registered trademarks of
HDMI Licensing LLC in the United States
and other countries.
DLNA®, the DLNA Logo and DLNA
CERTIFIED® are trademarks, service
marks, or certification marks of the Digital
Living Network Alliance.
DivX® is a video file compression
technology, developed by DivX, Inc.
DivX®, DivX Certified® and associated
logos are registered trademarks of DivX,
Inc. and are used under license.
ABOUT DIVX VIDEO: DivX® is a
digital video format created by DivX,Inc.
This is an official DivX Certified device
that plays DivX video. Visit
www.divx.com for more information and
software tools to convert your files into
DivX video.
ABOUT DIVX VIDEO-ON-DEMAND:
This DivX Certified® device must be
registered in order to play DivX Video-onDemand (VOD) content. To generate the
GB
2
Page 3

Table of Contents
Start-up Guide 5
Safety Information............................................................................................................................ 8
Precautions....................................................................................................................................... 9
Warning about PlayStation
Precautions about PlayStation™2................................................................................................. 10
Remote and TV Controls/Indicators ............................................................................................. 12
Watching TV
Watching TV.................................................................................................................................... 17
Using the Digital Electronic Programme Guide (EPG) ............................................................... 19
Using the Favourites ..................................................................................................................... 20
Using Optional Equipment
Connecting Optional Equipment ..................................................................................................22
Viewing Pictures from Connected Equipment............................................................................. 24
Playing back Photo/Music/Video via USB.................................................................................... 24
Using BRAVIA Sync with Control for HDMI ................................................................................. 26
2....................................................................................................... 10
™
GB
Using Home Network Features
Connecting to the Network............................................................................................................ 27
Wireless LAN Ready ...................................................................................................................... 28
Enjoying BRAVIA Internet Video................................................................................................... 29
Enjoying Photo/Music/Video Files via the Network .................................................................... 30
Checking the Network Connection............................................................................................... 30
Adjusting the Server Display Settings ......................................................................................... 31
Using PlayStation™2
About Advanced Operations of the PlayStation™2 .................................................................... 32
Part Names ..................................................................................................................................... 32
Setting Up the PlayStation
Playing Content .............................................................................................................................. 35
Playing a Game............................................................................................................................... 35
Using the Analog Controller (DUALSHOCK®2)........................................................................... 36
Using Memory Cards...................................................................................................................... 36
Playing Online Games ................................................................................................................... 37
Creating a Network Configuration................................................................................................37
Watching a DVD.............................................................................................................................. 38
Operating the DVD Player.............................................................................................................. 38
Parental Control Settings .............................................................................................................. 40
Compatible Software...................................................................................................................... 40
2........................................................................................................ 35
™
GB
3
Page 4

Internet Settings of the Built-in PlayStation™2 ........................................................................... 41
Connecting with an Ethernet Cable.............................................................................................. 42
Displaying the Main Menu ............................................................................................................. 43
Using Menu Functions
Navigating through TV Home Menu (XMB™)............................................................................... 46
TV Settings Menu ........................................................................................................................... 47
Additional Information
Specifications ................................................................................................................................. 58
Troubleshooting ............................................................................................................................. 62
Index ................................................................................................................................................ 68
Before operating the TV, please read “Safety Information” (page 8). Retain this manual for future reference.
GB
4
Page 5
Start-up Guide
Before Use
To check the accessories
Remote (1)
Size AAA batteries (R3 type) (2)
Analog controller (DUALSHOCK®2) (1)
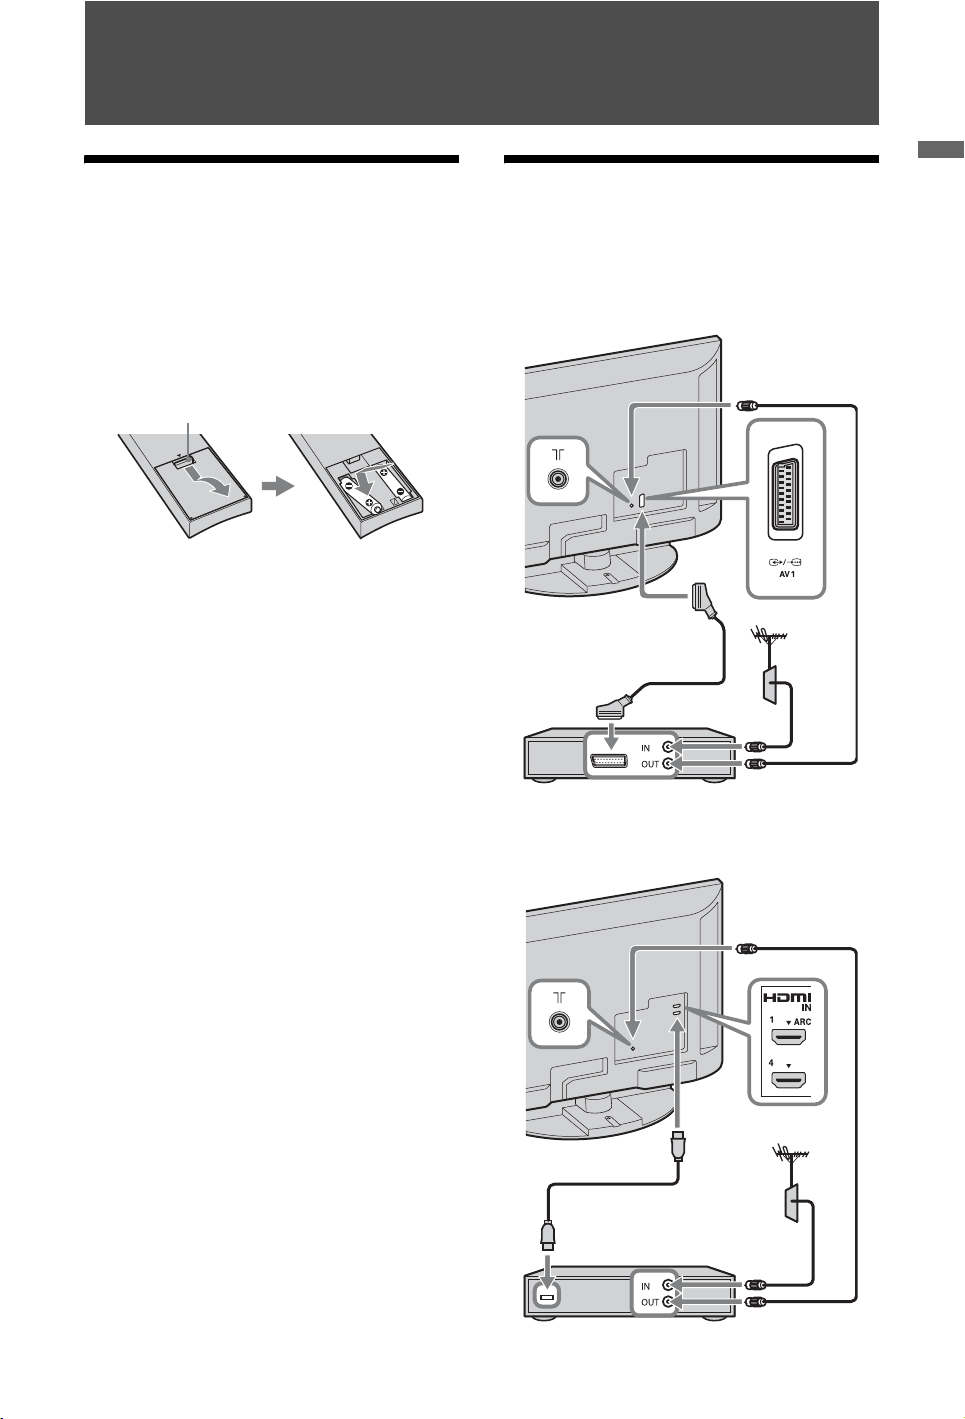
To insert batteries into the remote
Push and lift the
cover to open.
1: Connecting an antenna
Start-up Guide
(aerial)/Set Top Box/
recorder (e.g. DVD recorder)
Connecting a Set Top Box/recorder (e.g.
DVD recorder) with SCART
Set Top Box/recorder (e.g. DVD recorder)
Connecting a Set Top Box/recorder (e.g.
DVD recorder) with HDMI
Set Top Box/recorder (e.g. DVD recorder)
GB
5
Page 6
2: Preventing the TV from
toppling over
3: Organising the AC power
cord (mains lead)
4: Performing the initial setup
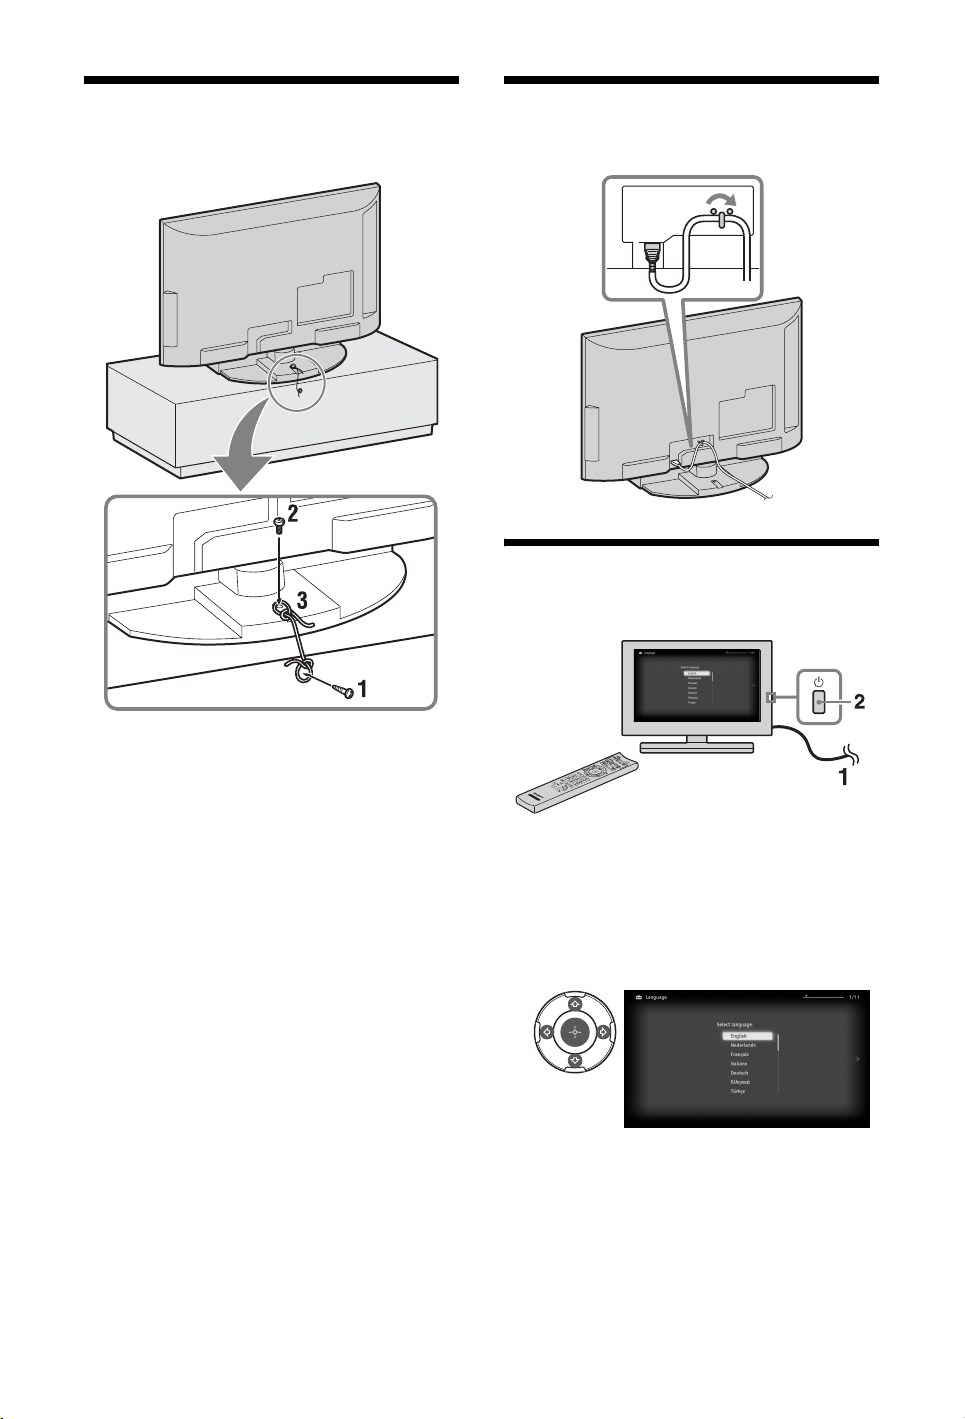
1 Install a wood screw (4 mm in diameter,
not supplied) in the TV stand.
2 Install a machine screw (M4 × 16, not
supplied) into the screw hole of the TV.
3 Tie the wood screw and the machine
screw with a strong cord (not supplied).
1 Connect the TV to your AC power outlet
(mains socket).
2 Press 1 on the TV.
When you switch on the TV for the first
time, the Language menu appears on the
screen.
3
Follow the instructions on the screen.
GB
6
Page 7

Digital Auto Tuning: When you select
“Cable”, we recommend that you select
“Quick Scan” for quick tuning. Set
“Frequency” and “Network ID” according
to the information supplied from your
cable provider. If no channel is found
using “Quick Scan”, try “Full Scan”
(though it may take some time).
~
• “Full Scan” may not be available depending
on your region/country.
For a list of compatible cable providers,
refer to the support web site:
http://support.sony-europe.com/TV/
DVBC/
Programme Sorting: If you want to
change the order of analogue channels,
follow the steps in “Programme Sorting”
(page 53).
~
• You can also tune channels manually (page 54).
• “Language”, “Time Zone” and “Daylight Savings
Time (Summer Time)” of the PlayStation
setting menu cannot be set in the initial set-up.
They can be set in the main menu for PlayStation
settings (page 43).
2
™
Start-up Guide
GB
7
Page 8
Safety Information
Installation/Set-up
Install and use the TV set in accordance
with the instructions below in order to
avoid any risk of fire, electrical shock or
damage and/or injuries.
Installation
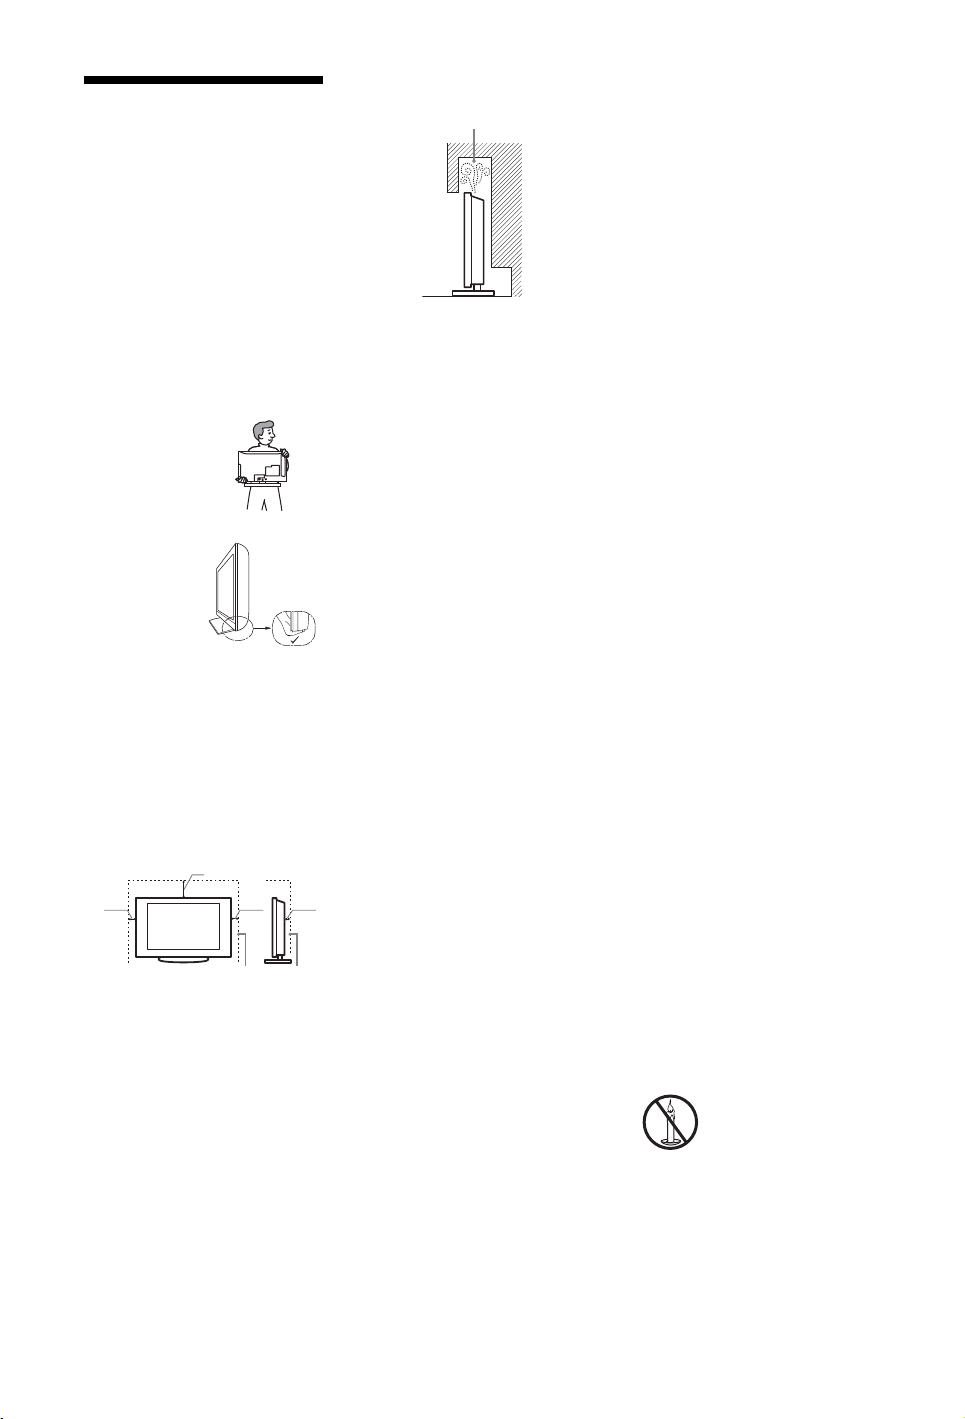
• The TV set should be installed near an
easily accessible mains socket.
• Place the TV set on a stable, level
surface.
• Only qualified service personnel should
carry out wall installations.
Transporting
• Before
transporting the
TV set, disconnect
all cables.
• When transporting
the TV set by
hand, hold it as
shown on the
right. Do not put
stress on the LCD
panel and the
frame around the
screen.
• When lifting or
moving the TV
set, hold it firmly
from the bottom.
• When transporting the TV set, do not
subject it to jolts or excessive vibration.
• When transporting the TV set for repairs
or when moving, pack it using the
original carton and packing material.
Ventilation
• Never cover the ventilation holes or
insert anything in the cabinet.
• Leave space around the TV set as shown
below.
Installed with stand
10 cm
Leave at least this space around
the set.
• To ensure proper ventilation and prevent
the collection of dirt or dust:
– Do not lay the TV set flat, install
upside down, backwards, or
sideways.
– Do not place the TV set on a shelf,
rug, bed or in a closet.
– Do not cover the TV set with a cloth,
such as curtains, or items such as
newspapers, etc.
30 cm
10 cm
6 cm
– Do not install the TV set as shown
below.
Air circulation is blocked.
Wall
Mains lead
Handle the mains lead and socket as
follows in order to avoid any risk of fire,
electrical shock or damage and/or injuries:
– Use only mains leads supplied by
Sony, not other suppliers.
– Insert the plug fully into the mains
socket.
– Operate the TV set on a 220-240 V AC
supply only.
– When wiring cables, be sure to unplug
the mains lead for your safety and take
care not to catch your feet on the
cables.
– Disconnect the mains lead from the
mains socket before working on or
moving the TV set.
– Keep the mains lead away from heat
sources.
– Unplug the mains plug and clean it
regularly. If the plug is covered with
dust and it picks up moisture, its
insulation may deteriorate, which
could result in a fire.
Notes
• Do not use the supplied mains lead on
any other equipment.
• Do not pinch, bend, or twist the mains
lead excessively. The core conductors
may be exposed or broken.
• Do not modify the mains lead.
• Do not put anything heavy on the mains
lead.
• Do not pull on the mains lead itself when
disconnecting the mains lead.
• Do not connect too many appliances to
the same mains socket.
• Do not use a poor fitting mains socket.
Prohibited Usage
Do not install/use the TV set in locations,
environments or situations such as those
listed below, or the TV set may
malfunction and cause a fire, electrical
shock, damage and/or injuries.
Location:
Outdoors (in direct sunlight), at the
seashore, on a ship or other vessel, inside a
vehicle, in medical institutions, unstable
locations, near water, rain, moisture or
smoke.
Environment:
Places that are hot, humid, or excessively
dusty; where insects may enter; where it
might be exposed to mechanical vibration,
near flammable objects (candles, etc). The
TV set shall not be exposed to dripping or
splashing and no objects filled with
liquids, such as vases, shall be placed on
the TV.
Situation:
Do not use when your hands are wet, with
the cabinet removed, or with attachments
not recommended by the manufacturer.
Disconnect the TV set from mains socket
and aerial during lightning storms.
Broken pieces:
• Do not throw anything at the TV set. The
screen glass may break by the impact and
cause serious injury.
• If the surface of the TV set cracks, do not
touch it until you have unplugged the
mains lead. Otherwise electric shock
may result.
When not in use
• If you will not be using the TV set for
several days, the TV set should be
disconnected from the mains for
environmental and safety reasons.
• As the TV set is not disconnected from
the mains when the TV set is just turned
off, pull the plug from the mains to
disconnect the TV set completely.
• However, some TV sets may have
features that require the TV set to be left
in standby to work correctly.
For children
• Do not allow children to climb on the TV
set.
• Keep small accessories out of the reach
of children, so that they are not
mistakenly swallowed.
If the following problems
occur...
Turn off the TV set and unplug the mains
lead immediately if any of the following
problems occur.
Ask your dealer or Sony service centre to
have it checked by qualified service
personnel.
When:
– Mains lead is damaged.
– Poor fitting of mains socket.
– TV set is damaged by being dropped,
hit or having something thrown at it.
– Any liquid or solid object falls through
openings in the cabinet.
Warning
To prevent the spread of fire, keep candles
or other open flames away from this
product at all time.
GB
8
Page 9
Precautions
Viewing the TV
• View the TV in moderate light, as
viewing the TV in poor light or during
long period of time, strains your eyes.
• When using headphones, adjust the
volume so as to avoid excessive levels,
as hearing damage may result.
LCD Screen
• Although the LCD screen is made with
high-precision technology and 99.99%
or more of the pixels are effective, black
dots may appear or bright points of light
(red, blue, or green) may appear
constantly on the LCD screen. This is a
structural property of the LCD screen
and is not a malfunction.
• Do not push or scratch the front filter, or
place objects on top of this TV set. The
image may be uneven or the LCD screen
may be damaged.
• If this TV set is used in a cold place, a
smear may occur in the picture or the
picture may become dark. This does not
indicate a failure. These phenomena
disappear as the temperature rises.
• Ghosting may occur when still pictures
are displayed continuously. It may
disappear after a few moments.
• The screen and cabinet get warm when
this TV set is in use. This is not a
malfunction.
• The LCD screen contains a small amount
of liquid crystal. Some fluorescent tubes
used in this TV set also contain mercury.
Follow your local ordinances and
regulations for disposal.
Handling and cleaning the
screen surface/cabinet of
the TV set
Be sure to unplug the mains lead connected
to the TV set from mains socket before
cleaning.
To avoid material degradation or screen
coating degradation, observe the following
precautions.
• To remove dust from the screen surface/
cabinet, wipe gently with a soft cloth. If
dust is persistent, wipe with a soft cloth
slightly moistened with a diluted mild
detergent solution.
• Do not spray water or detergent directly
on the TV set. It may drip to the bottom
of the screen or exterior parts, and may
cause a malfunction.
• Never use any type of abrasive pad,
alkaline/acid cleaner, scouring powder,
or volatile solvent, such as alcohol,
benzene, thinner or insecticide. Using
such materials or maintaining prolonged
contact with rubber or vinyl materials
may result in damage to the screen
surface and cabinet material.
• Periodic vacuuming of the ventilation
openings is recommended to ensure to
proper ventilation.
• When adjusting the angle of the TV set,
move it slowly so as to prevent the TV
set from moving or slipping off from its
table stand.
Optional Equipment
• Keep optional components or any
equipment emitting electromagnetic
radiation away from the TV set.
Otherwise picture distortion and/or noisy
sound may occur.
• This equipment has been tested and
found to comply with the limits set out in
the EMC Directive using a connection
signal cable shorter than 3 meters.
Batteries
• Observe the correct polarity when
inserting batteries.
• Do not use different types of batteries
together or mix old and new batteries.
• Dispose of batteries in an
environmentally friendly way. Certain
regions may regulate the disposal of
batteries. Please consult your local
authority.
• Handle the remote with care. Do not
drop or step on it, or spill liquid of any
kind onto it.
• Do not place the remote in a location
near a heat source, a place subject to
direct sunlight, or a damp room.
Disposal of the TV set
Disposal of Old
Electrical &
Electronic
Equipment
(Applicable in
the European
Union and other European
countries with separate
collection systems)
This symbol on the product or on its
packaging indicates that this product shall
not be treated as household waste. Instead
it shall be handed over to the applicable
collection point for the recycling of
electrical and electronic equipment. By
ensuring this product is disposed of
correctly, you will help prevent potential
negative consequences for the
environment and human health, which
could otherwise be caused by
inappropriate waste handling of this
product. The recycling of materials will
help to conserve natural resources. For
more detailed information about recycling
of this product, please contact your local
Civic Office, your household waste
disposal service or the shop where you
purchased the product.
Disposal of
waste batteries
(applicable in the
European Union
and other
European
countries with
separate
collection
This symbol on the battery or on the
packaging indicates that the battery
provided with this product shall not be
treated as household waste. On certain
batteries this symbol might be used in
combination with a chemical symbol. The
chemical symbols for mercury (Hg) or lead
(Pb) are added if the battery contains more
than 0.0005% mercury or 0.004% lead. By
systems)
ensuring these batteries are disposed of
correctly, you will help prevent potentially
negative consequences for the
environment and human health which
could otherwise be caused by
inappropriate waste handling of the
battery. The recycling of the materials will
help to conserve natural resources. In case
of products that for safety, performance or
data integrity reasons require a permanent
connection with an incorporated battery,
this battery should be replaced by qualif ied
service staff only. To ensure that the
battery will be treated properly, hand over
the product at end-of-life to the applicable
collection point for the recycling of
electrical and electronic equipment. For all
other batteries, please view the section on
how to remove the battery from the product
safely. Hand the battery over to the
applicable collection point for the
recycling of waste batteries. For more
detailed information about recycling of
this product or battery, please contact your
local Civic Office, your household waste
disposal service or the shop where you
purchased the product.
GB
9
Page 10

Warning about
PlayStation
Caution
Use of controls or adjustments or
performance of procedures other than
those specified herein may result in
hazardous radiation exposure. The use of
optical instruments with this product will
increase eye hazard.
CLASS 1 LASER PRODUCT
LUOKAN 1 LASERLAITE
KLASS 1 LASERAPPARAT
This appliance is classified as a CLASS 1
LASER product under IEC60825-1: 2001.
Read carefully before
operating your
PlayStation
A few people may experience epileptic
seizures when viewing flashing lights or
patterns in our daily environment. These
persons may experience seizures while
watching TV or playing video games,
including DVD-Videos or games played
on the PlayStation
have not had any seizures may nonetheless
have an undetected epileptic condition.
Consult your physician before operating
the PlayStation
epileptic condition or experience any of the
following symptoms while watching TV
programmes or playing video games:
altered vision, muscle twitching, other
involuntary movements, loss of awareness
of your surroundings, mental confusion,
and/or convulsions.
Software title
compatibility
Some PlayStation™ or PlayStation™2
format software titles may perform
differently on this console than they do on
previous PlayStation
consoles, or may not perform properly on
this console. For more information, visit
our Web site at www.eu.playstation.com/
ps2.
™
2 console. Players who
™
2 console if you have an
™
2
™
2 console
2 or PlayStation™
™
Precautions
about
PlayStation
Safety
This product has been designed with the
highest concern for safety. However, any
electrical device, if used improperly, has
the potential for causing fire, electrical
shock or personal injury. To help ensure
accident-free operation, follow these
guidelines:
• Observe all warnings, precautions and
instructions.
• Stop use and unplug the AC power cord
from the electrical outlet immediately if
the device functions in an abnormal
manner or produces unusual sounds or
smells.
• Never connect cables other than those
specified in this manual to the network
connector.
• Contact the appropriate PlayStation
customer service helpline which can be
found within every PlayStation
PlayStation
if the device does not operate properly.
Use and handling
• When operating the unit, play in a well-
lit room and keep a safe distance from
the TV screen.
• Avoid prolonged use of the console. To
help prevent eye strain, take a break of
about 15 minutes during every hour of
play.
• Stop using the console immediately if
you experience any of the following
symptoms. If the condition persists,
consult a doctor.
– Lightheadedness, nausea, or a
– Tired, uncomfortable or aching
– Tired, dry or aching eyes
• Do not use the console near water.
• Do not place the console and connected
accessories on the floor or in a place
where they may cause persons walking
by to trip or stumble.
• Do not place the console or accessories
on surfaces that are unstable, tilted or
subject to vibration.
• Do not expose the console or accessories
to high temperatures, high humidity or
direct sunlight (use in an environment
where temperatures range from 5°C to
35°C/41°F to 95°F).
• Do not place the console in locations of
poor ventilation such as small, enclosed
areas, directly against a wall or on a thick
carpet or bedding.
• Do not expose the console to dust, smoke
or steam.
• Do not allow liquid or small particles to
get into the console.
• Do not put any objects on the console.
• Do not touch or insert foreign objects
into the connectors of the console or
accessories.
• Do not allow dust or foreign matter to
build up around the console vents.
Remove the dust with a low-powered
vacuum cleaner.
2 format software manual
™
sensation similar to motion sickness
hands or arms
™
2
™
and
™
• Do not leave a disc in the console when
moving or changing the position of the
console.
• Do not touch a disc while it is spinning.
• Do not close the disc cover in a way that
could pinch your hand or fingers.
• Adjust the settings of the DVD player
according to the instructions provided
before playing a DVD.
• Keep the console and accessories,
including cable ties and fasteners, out of
the reach of small children.
When using software
that supports the
vibration function of the
analog controller
(DUALSHOCK®2)
Do not use the vibration function if you
have any ailment or injury to the bones,
joints or muscles of your hands or arms. In
most cases, the vibration function can be
set to “Off” in the options menu of the
software.
Network (except Local
Area Networks)
• A broadband Internet connection is
required to connect to a network.
• When you connect your PlayStation
console to a network, the Internet service
provider may charge additional usage
fees. In some cases, usage charges may
be more than anticipated. For details,
refer to the information provided in your
service contract or contact your Internet
service provider.
• Parents are encouraged to monitor
children in online gaming to ensure safe
and responsible Internet usage.
™
Connecting with an
Ethernet cable
Do not connect Ethernet cables or
telephone cords of the following types to
the network connector:
• Ethernet cables not appropriate for use
with a 10Base-T/100Base-TX network
• Standard residential telephone lines
• Any ISDN (digital) compatible phone or
data line
• PBX phone lines
• Other “unknown” types of telephone
lines
Disc handling
• Do not touch the disc surface when
handling a disc; hold it by the edges.
• Do not stick paper or tape onto discs and
do not write on discs.
• Fingerprints, dust, dirt or scratches on
the disc can distort the picture or reduce
sound quality. Always handle carefully
and make sure discs are clean before use.
• Do not leave discs near a heat source, in
direct sunlight or in high humidity.
• Store discs in their cases when not in use.
• Clean discs using a soft cloth, lightly
wiping from the centre outwards. Do not
use solvents such as benzine,
commercially available cleaners not
intended for CDs or anti-static spray
intended for vinyl LPs.
2
10
GB
Page 11

• Do not use irregularly shaped discs (for
example, heart- or star-shaped discs) or
damaged, reshaped or repaired discs.
Never disassemble the
console or supplied
accessories
Use the PlayStation™2 console and
accessories according to the instructions in
the product documentation. No
authorization for the analysis or
modification of the console, or the analysis
and use of its circuit configurations, is
provided. There are no user serviceable
components inside the PlayStation
console. Disassembling the console will
void the warranty. Additionally, there is a
risk of exposure to laser radiation as well
as to electrical shock hazards.
2
™
Note on safety when
playing DVDs or CDs
If you set the volume too high, it may harm
your hearing or damage the speakers.
Exercise care when setting the volume.
Moisture condensation
If the console or disc is brought directly
from a cold location to a warm one,
moisture may condense on the lens inside
the console or on the disc. Should this
occur, the console may not operate
properly. In this case, remove the disc and
turn off and unplug the console. Do not put
the disc back in until the moisture
evaporates (this may take several hours). If
the console still does not operate properly,
contact the appropriate PlayStation
customer service helpline which can be
found within every PlayStation
PlayStation
2 format software manual.
™
™
™
and
• Do not place any rubber or vinyl
materials on the console exterior for an
extended period of time.
Cleaning
• For safety reasons, before cleaning the
console or connected accessories, 1) turn
off the console, 2) disconnect the mains
power plug for the console from the
electrical outlet, and 3) disconnect the
Ethernet cable from the console.
• When cleaning the console, use a soft,
dry cloth. Do not use solvents or other
chemicals or a chemically-treated dust
cloth to clean the product.
• Do not touch the lens located inside the
disc cover. To help protect the lens from
dust, keep the disc cover closed except
when inserting or removing discs.
• The cooling fan maintains low
temperature inside the PlayStation
console. If there is dust around the
ventilation holes, temperature may rise
inside of the PlayStation
result in malfunction. Clean the
ventilation holes on the side and rear of
the PlayStation
(preferably once a month).
™
2 console regularly
™
2
™
2 console and
Exterior protection
To help prevent damage to the painted
parts, follow the precautions below:
• Do not spill liquids such as alcohol,
solvents or other chemicals on the
product.
11
GB
Page 12
Remote and TV Controls/Indicators
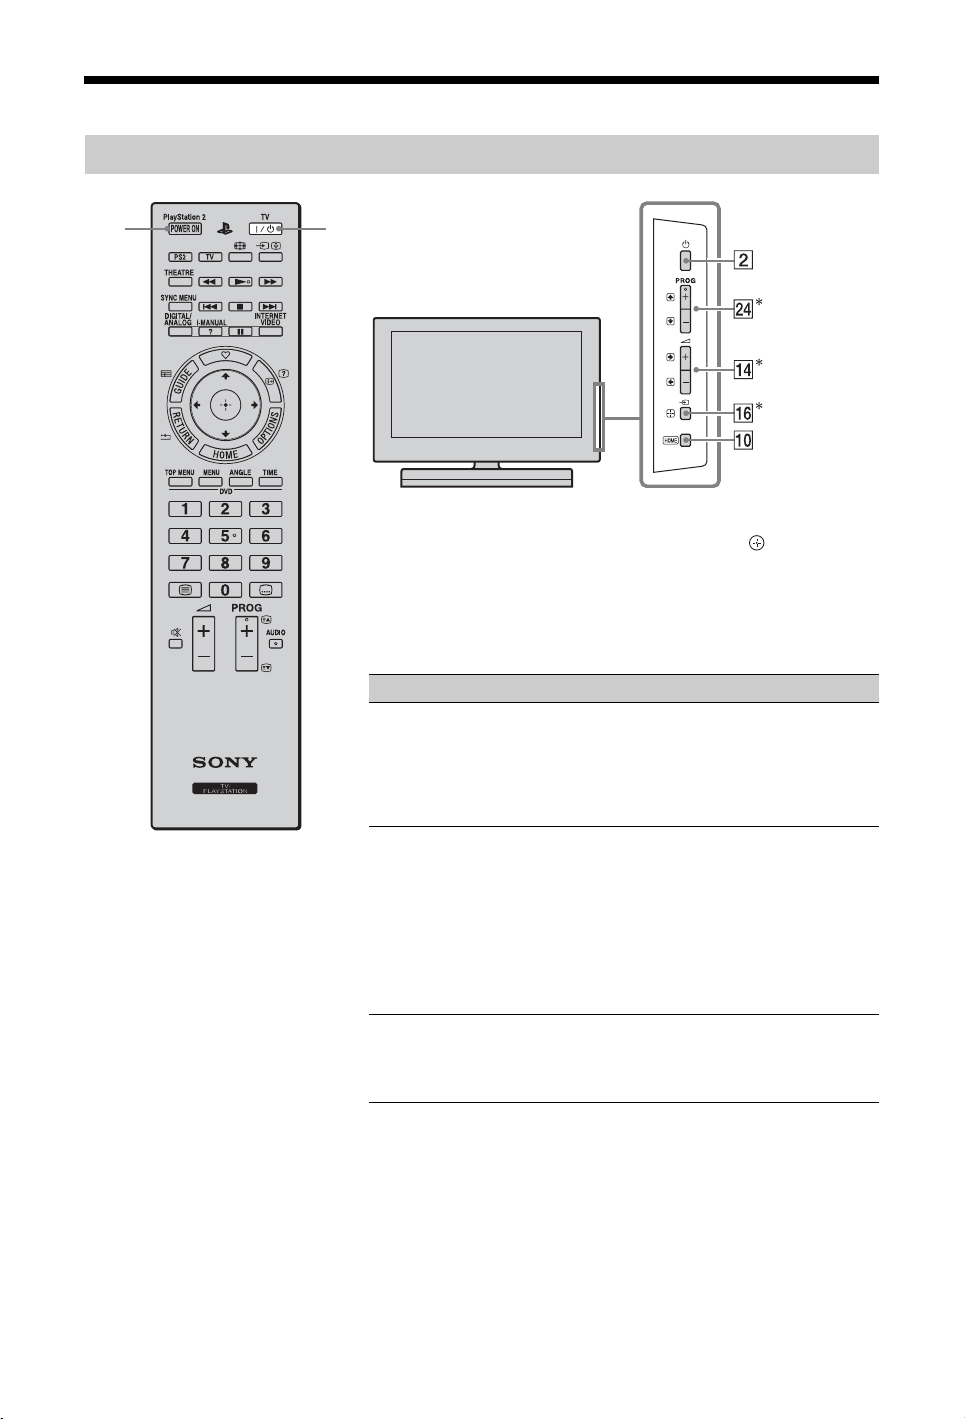
Remote and TV/PlayStation™ 2 controls
13
Buttons on the TV will work the same as those on the remote.
* In the TV menu, these buttons will work as F/f/G/g/.
z
•The number 5, N, PROG + and AUDIO buttons on the remote have
a tactile dot. Use the tactile dots as a reference when operating the
TV.
Button/Switch Description
1 TV "/1 (TV
standby)
Press to turn on the TV or to enter standby
mode.
~
• When you turn the TV off, the TV and the
2 1 (Power) Press to turn on the TV or to enter standby
mode.
~
• To disconnect the TV, turn off the TV, then
• When you turn the TV off, the TV and the
3 PlayStation 2
POWER ON
Press to turn on the built-in PlayStation
The TV and the PlayStation
TV input mode is automatically switched to
PlayStation
built-in PlayStation
unplug the AC power cord (mains lead) from
the AC power (mains).
built-in PlayStation
2 (page 35).
™
2 enter standby mode.
™
2 enter standby mode.
™
2 turn on and the
™
2.
™
12
GB
Page 13
4
5
6
7
8
9
0
Button/Switch Description
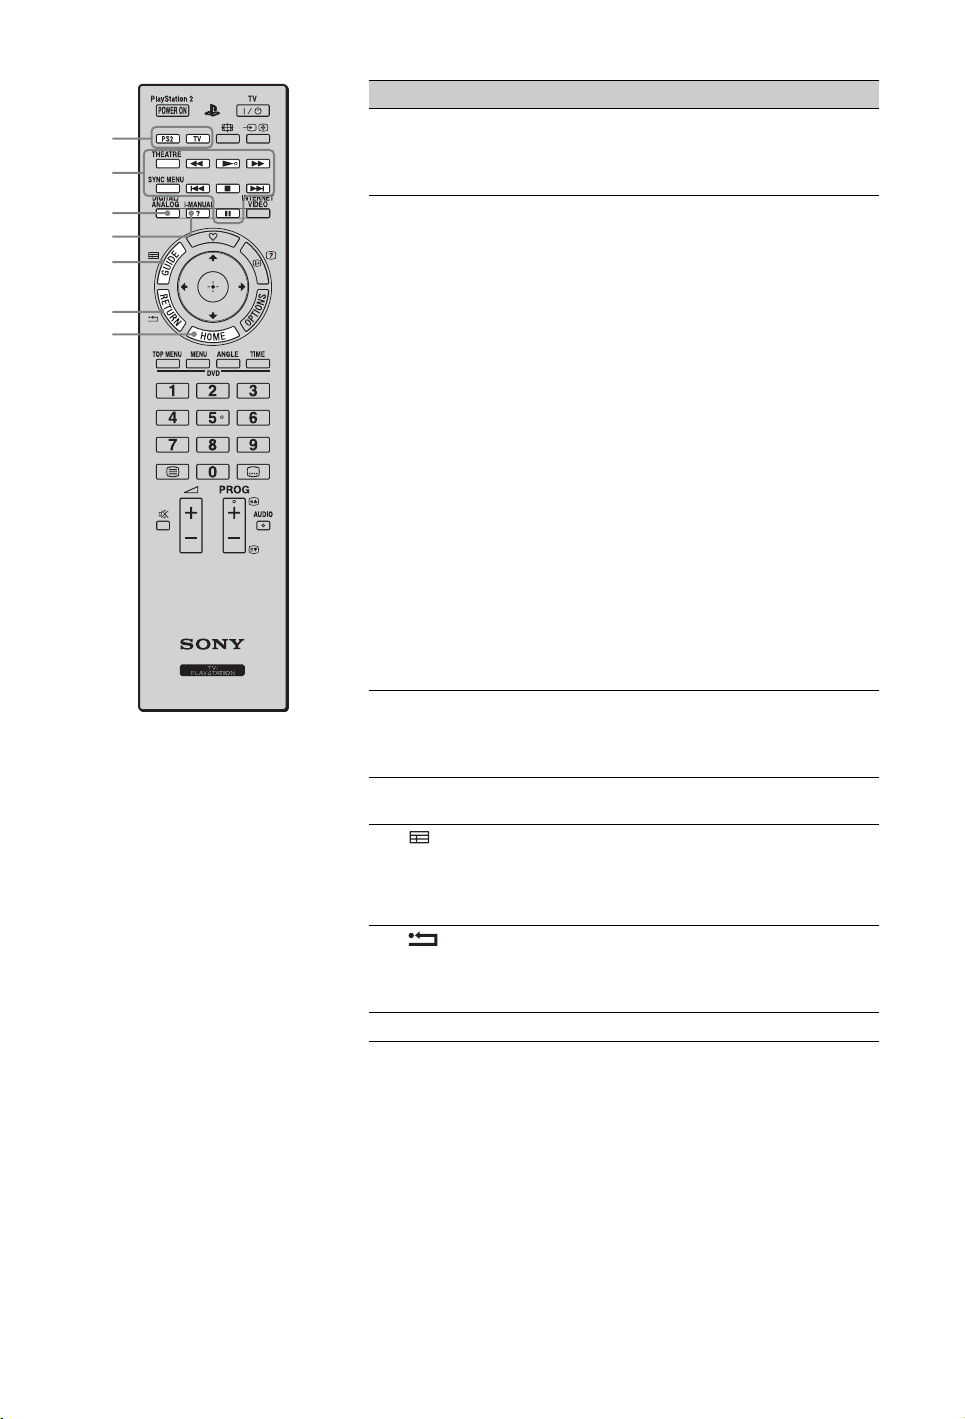
4 Function
buttons
5 Optional
equipment
operating
buttons
Switches the TV function or the built-in
PlayStation™2 function on the remote and
switches the input source between TV and
PlayStation
m/N/M/./x/>/X :
When the BRAVIA Sync-compatible equipment
is connected to the TV, you can operate the
equipment via the TV remote, while viewing
pictures from the equipment. When using the
PlayStation
CD/DVD player.
THEATRE:
Set “Theatre Mode” to on for optimum sound
and picture quality of film-based content.
SYNC MENU:
Press to display the BRAVIA Sync Menu and
then select connected HDMI equipment from
“HDMI Device Selection”.
2 automatically.
™
2 function, you can operate the
™
~
• If you turn the TV off, “Theatre Mode” is also
turned off.
• When you change the “Scene Select” setting,
“Theatre Mode” turns off automatically.
• “Control for HDMI” (BRAVIA Sync) is only
available for the connected Sony equipment
that has the BRAVIA Sync or is compatible
with “Control for HDMI”.
6 DIGITAL/
ANALOG
7 i-MANUAL Press to display the on-screen instruction
8 GUIDE
(EPG)
Press to switch between digital and analogue
mode. When viewing pictures from connected
equipment, press to return to the last viewed TV
mode.
manual.
Press to display the Digital Electronic
Programme Guide (EPG) (page 19).
~
• This button is unavailable for PlayStation™2.
9 RETURN TV function: Press to return to the previous
0 HOME Press to display the TV Home Menu (page 46).
screen or exit from the menu.
PlayStation
the previous screen on DVD menu.
2 function: Press to return to
™
(Continued)
13
GB
Page 14
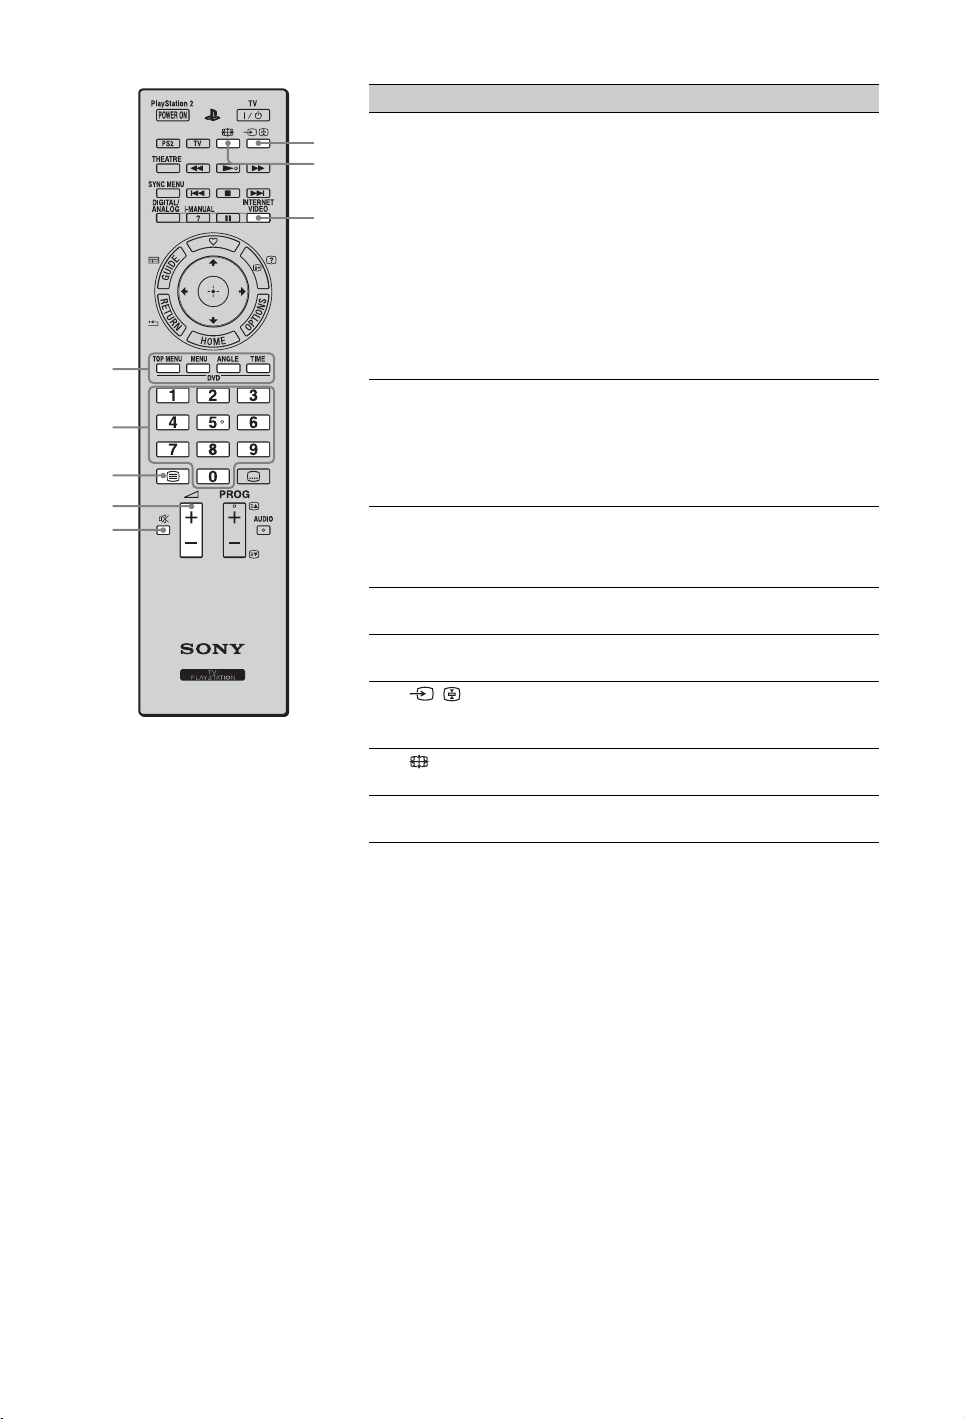
qa
qs
qd
qf
qg
qh
qj
qk
Button/Switch Description
qa Coloured
buttons/DVD
buttons
qs Number
buttons
qd / (Text) Press to display text information (page 17).
TV function: When the coloured buttons are
available, an operation guide appears on the
screen.
PlayStation
DVD TOP MENU:
Press to display the top menu.
DVD MENU:
Press to display the menu.
DVD ANGLE:
Press to change the viewing angle.
DVD TIME:
Press to display the current title or chapter
number, elapsed time.
In TV mode: Press to select channels. For
channel numbers 10 and above, press the next
digit quickly.
PlayStation
chapter number.
In Text mode: Press to enter a page number.
2 function:
™
2 function: Press to enter a
™
~
• This button is unavailable for PlayStation™2.
qf 2 +/–
(Volume)
qg % (Mute) Press to mute the sound. Press again to restore
qh / (Input
select/Text
hold)
qj (Screen
mode)
qk INTERNET
VIDEO
Press to adjust the volume.
the sound.
In TV mode: Press to display a list of inputs.
In Text mode: Press to hold the current page.
Press to change the screen format (page 18).
Press to access Internet content on the “XMB”
(page 29).
14
GB
Page 15
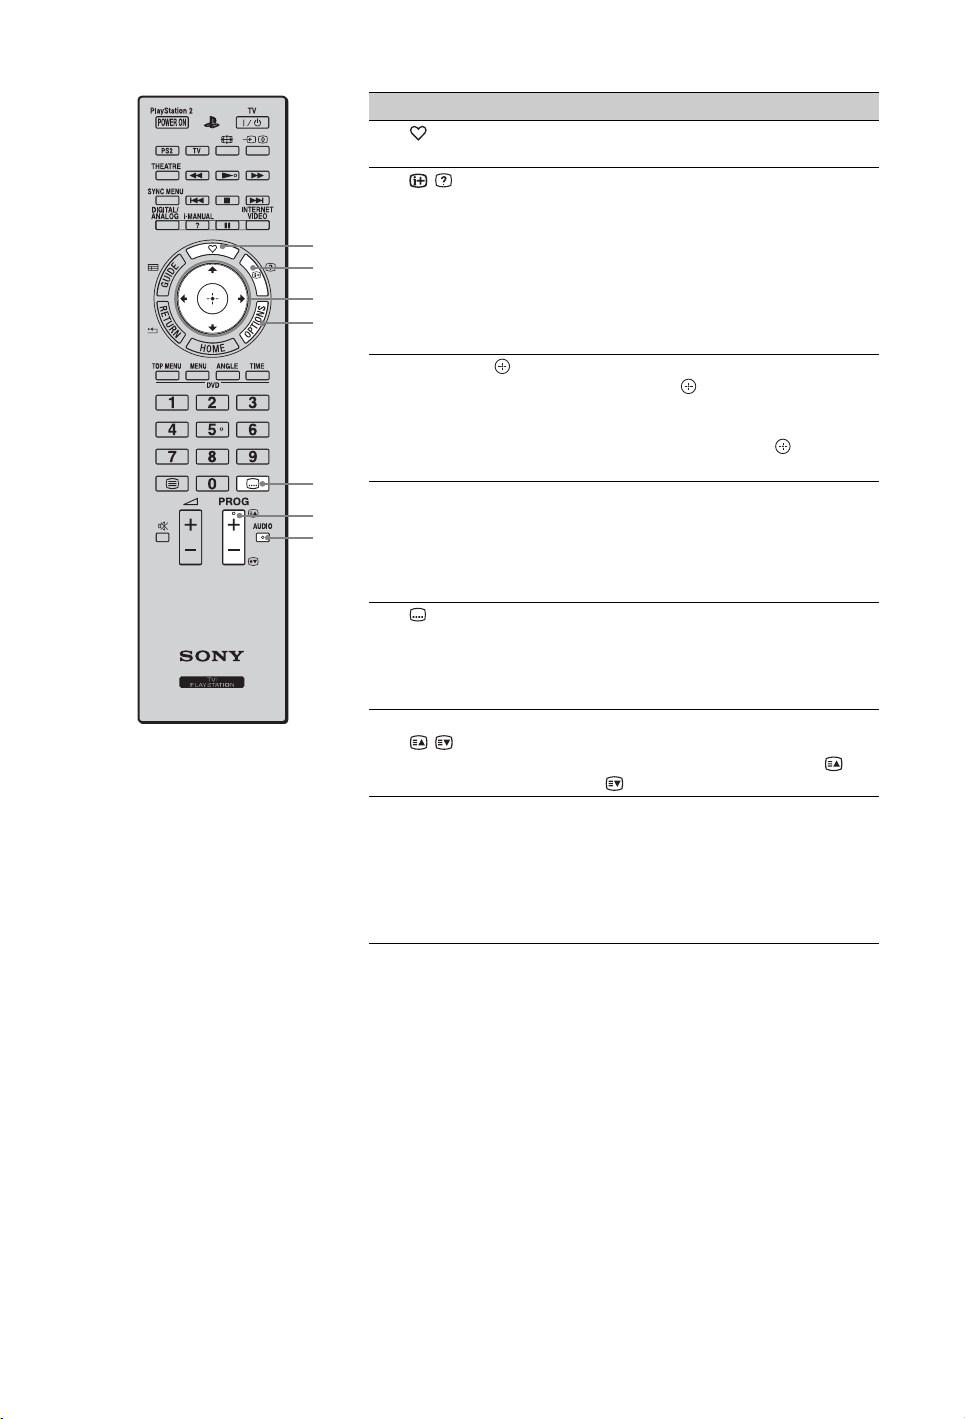
ql
w;
wa
ws
wd
wf
wg
Button/Switch Description
ql
(Favourites)
w; / (Info/
Text reveal)
wa
F/f/G/g/ TV function: Press G/g/F/f to move the on-
ws OPTIONS Press to display a list of convenient functions
Press to display the “Favourites” menu
(page 20).
Each time you press the button, the display
changes as follows:
In digital mode: Details of the current
programme
In analogue mode: Current channel number
and screen mode
In Text mode: Reveals hidden information
(e.g. answers to a quiz) (page 17).
PlayStation
screen cursor. Press to select/confirm the
highlighted item.
PlayStation
move the on-screen cursor. Press to enter/
confirm a highlighted item.
and menu shortcuts. The menu items vary
based on the current input and/or content.
t Details of the next programme
2 function: Control panel
™
2 function: Press G/g/F/f to
™
~
• This button is unavailable for PlayStation™2.
wd (Subtitle
setting)
wf PROG +/–/
/
wg AUDIO TV function: Press to change the dual sound
TV function: Press to turn subtitles on or off
(when the feature is available).
PlayStation
subtitles on or off (when the feature is
available).
In TV mode: Press to select the next (+) or
previous (–) channel.
In Text mode: Press to select the next ( ) or
previous ( ) page.
mode (page 53).
For digital mode, press to change the language
to be used for the programme currently being
viewed (page 55).
PlayStation
the multiple sound mode.
2 function: Press to turn
™
2 function: Press to change
™
(Continued)
15
GB
Page 16
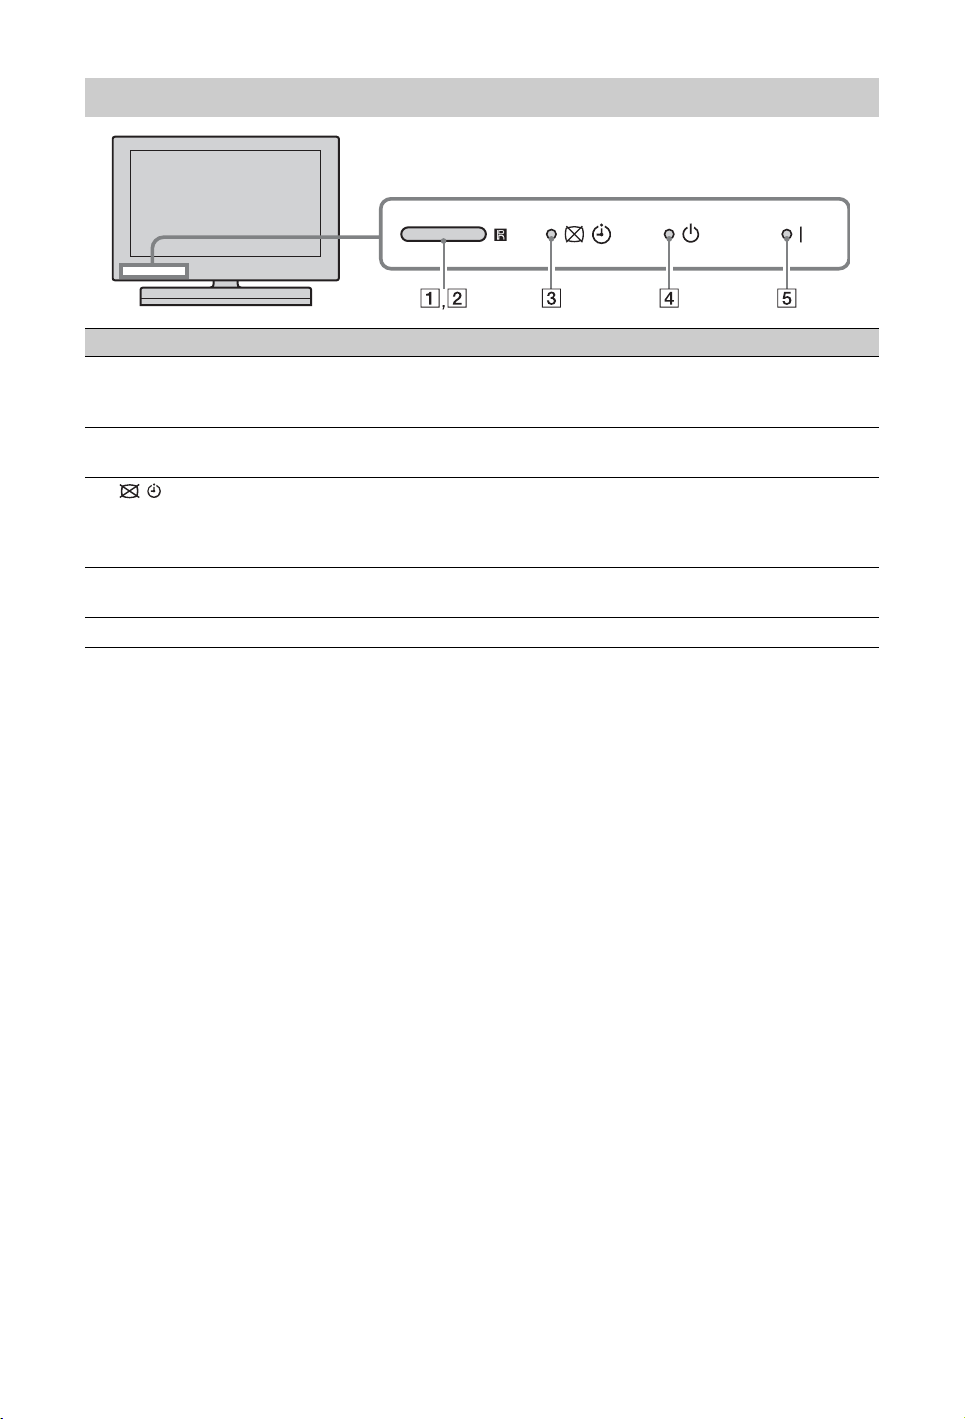
Indicators
Indicator Description
1 Ambient sensor Senses the ambient light level and adjusts the brightness and colour temperature
of the picture accordingly. Do not put anything near the sensor, doing so may
affect its function.
2 Remote control
sensor
3 (Picture Off /
Timer)
4 1 (Standby) Lights up in red when the TV is in standby mode, PC power saving mode or
5 " (Power) Lights up in green when the TV is on.
Receives signals from the remote.
Do not put anything near the sensor, doing so may affect its function.
Lights up in green when you select “Picture Off” in “Power Saving” of “Eco”
(page 48).
Lights up in orange when you set the timer (page 48).
Lights up and/or blinks in orange during a software upgrade.
during a software upgrade.
16
GB
Page 17
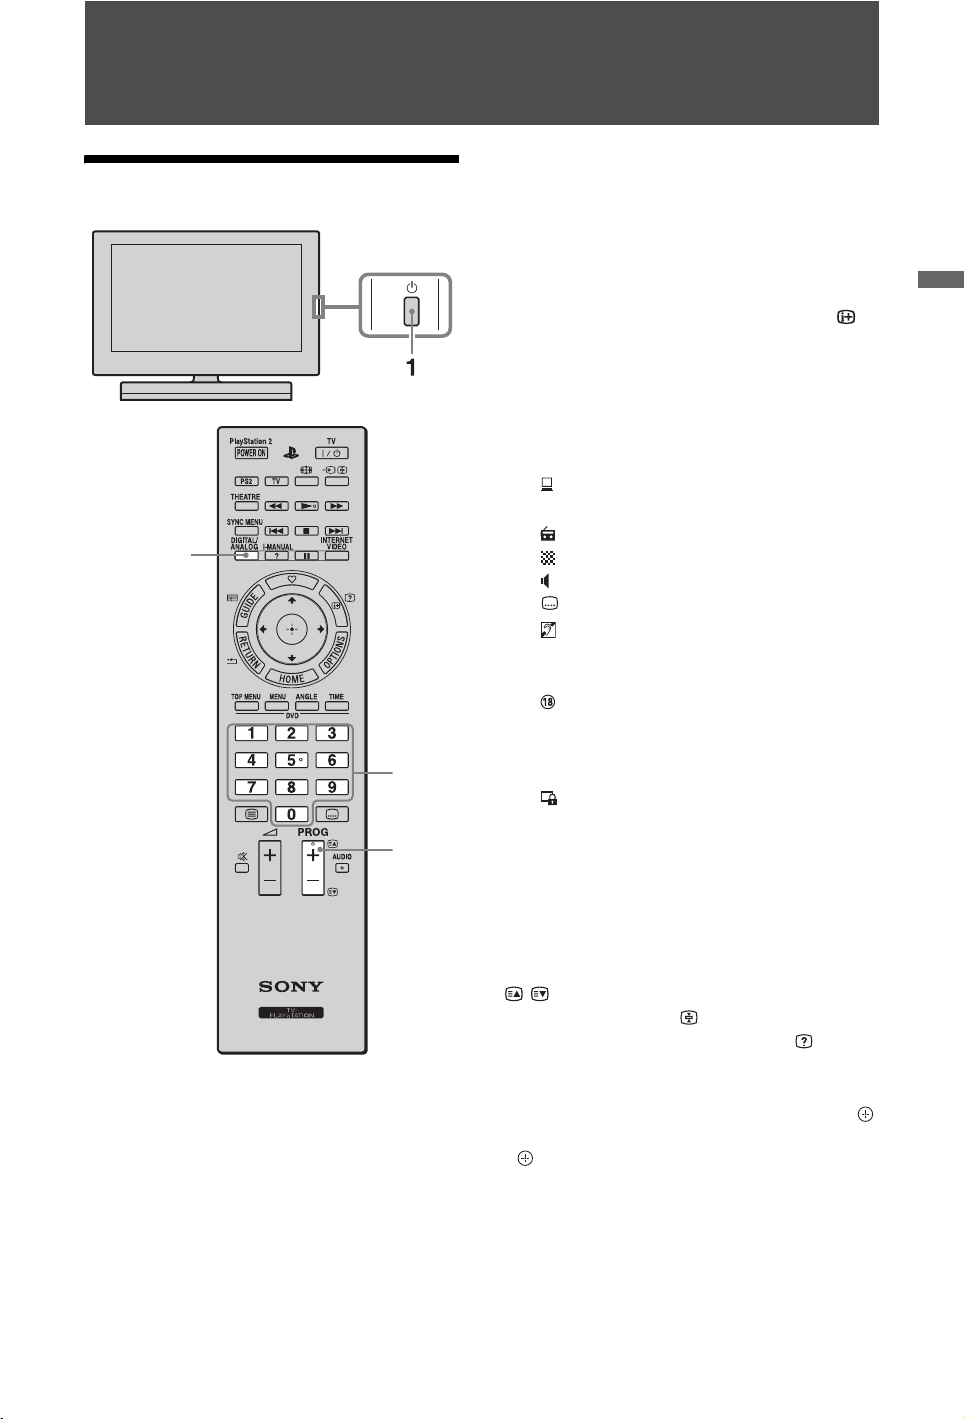
Watching TV
Watching TV
2
3 Press the number buttons or PROG +/– to
select a TV channel.
To select a digital programme using the
Digital Electronic Programme Guide
(EPG), see page 19.
In digital mode, an information banner
appears briefly. Each time you press ,
the banner changes cyclically as follows:
Current programme information t Next
programme information t No banner
The following icons may be indicated on
the banner.
: Interactive service is available
(Digital Text)
:Radio service
: Scrambled/Subscription service
: Multiple audio languages available
: Subtitles available
: Subtitles available for the hearing
impaired
c:Reminder
: Recommended minimum age for
current programme (ages from 4 to
18) (For Spain only: ages from 4 to
3
18 and X)
: Parental lock
Watching TV
3
1 Press 1 on the TV to turn on the TV.
When the TV is in standby mode (the 1
(standby) indicator on the TV front panel
is red), press TV "/1 on the remote to
turn on the TV.
2 Press DIGITAL/ANALOG to switch to
digital or analogue mode.
The available channels vary depending on
the mode.
To access Text
Press /. Each time you press /, the display
changes cyclically as follows:
Text and TV picture t Tex t t No Text (exit
the Text service)
To select a page, press the number buttons or
/.
To hold a page, press .
To reveal hidden information, press .
z
• You can also jump directly to a page by selecting
the page number displayed on the screen. Press
and F/f/G/g to select the page number, then press
.
• When four coloured items appear at the bottom of
the Text page, you can access pages quickly and
easily (Fast Text). Press the corresponding
coloured button to access the page.
• Interactive service may be available if provided by
a broadcaster.
(Continued)
17
GB
Page 18
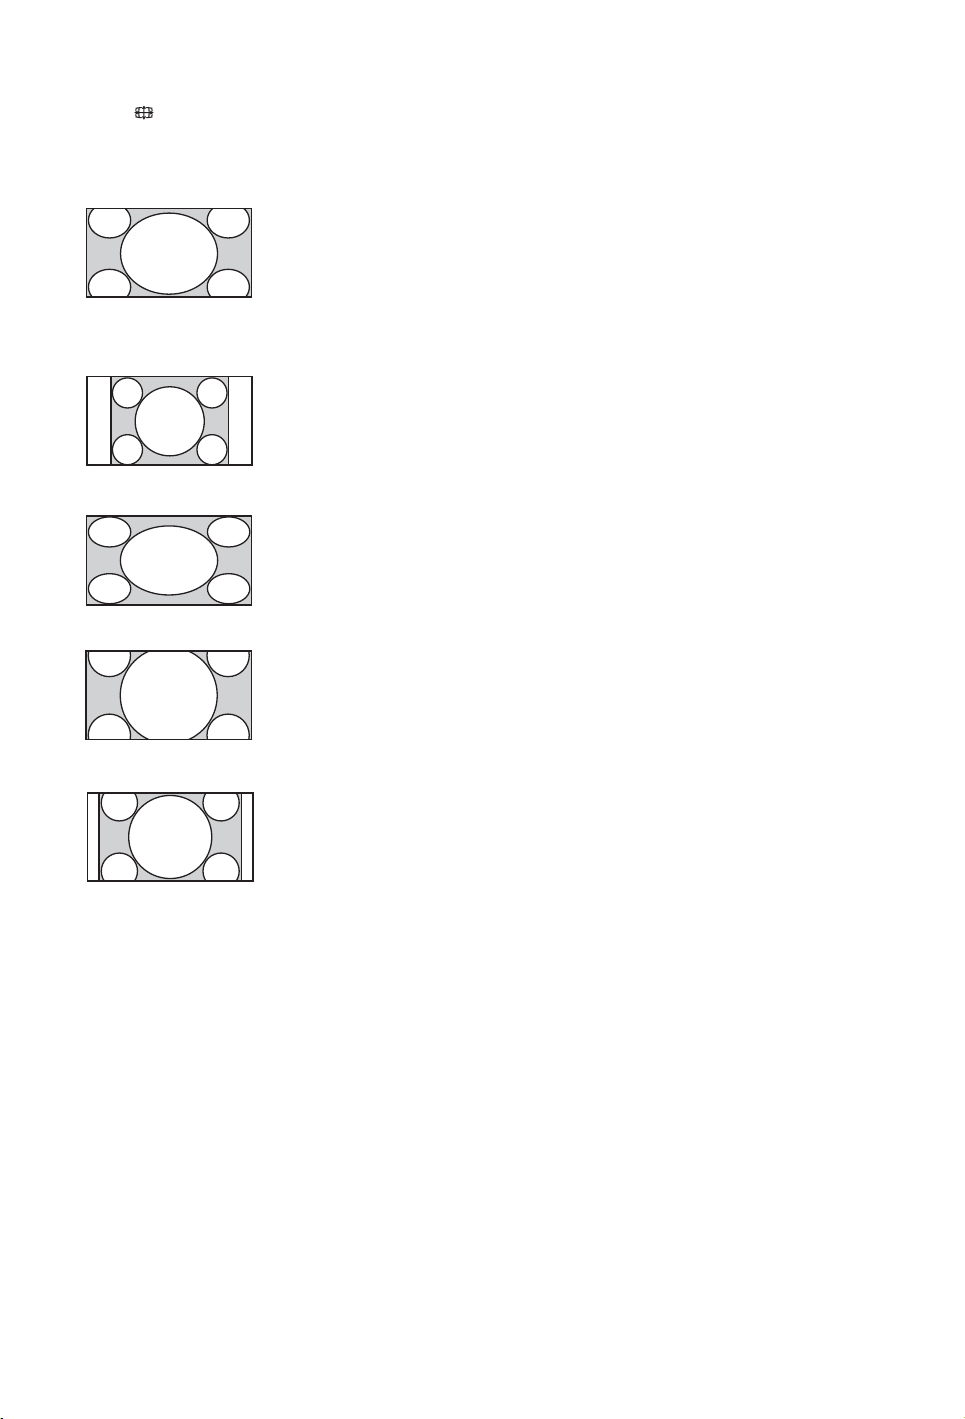
To change the Screen Format manually
Press repeatedly to select the desired
Screen Format.
Smart*
Enlarges the picture to
fill a 16:9 screen,
preserving the original
picture as much as
possible.
4:3
Displays the 4:3 picture
in its original size. Side
bars are shown to fill
the 16:9 screen.
Wide
Stretches the 4:3
picture horizontally, to
fill the 16:9 screen.
Zoom*
Displays the
cinemascopic (letter
box format) picture in
the correct proportion.
14:9*
Displays a 14:9 picture
in its original size. Side
bars are shown to fill
the 16:9 screen.
* Parts of the top and bottom of the picture may be cut off.
~
• When you select “Smart”, some characters and/or
letters at the top and the bottom of the picture may
not be visible. In such a case, adjust “Vertical
Size” in the “Screen” menu (page 51).
z
• When “Auto Format” (page 51) is set to “On”, the
TV automatically selects the best mode to suit the
broadcast.
• If 720p, 1080i or 1080p source pictures are
displayed with black borders on the screen edges,
select “Smart” or “Zoom” to adjust the pictures.
18
GB
Page 19
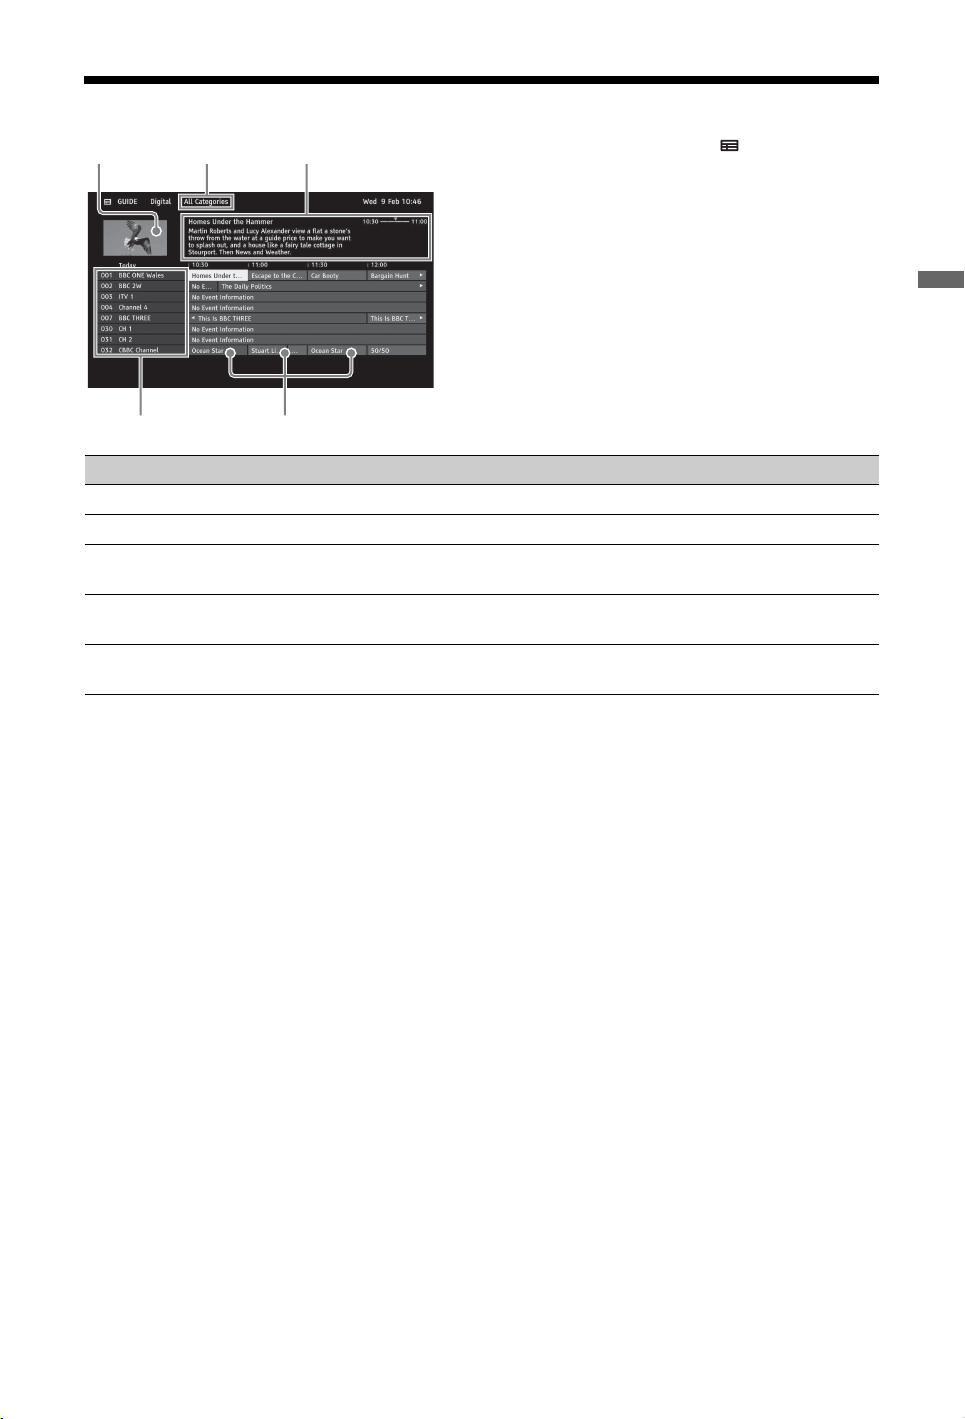
Using the Digital Electronic Programme Guide (EPG)
1 In digital mode, press GUIDE.
2 Perform the desired operation as shown in
the following table or displayed on the
screen.
Item Description
1 Information Box Shows information about the highlighted programme.
2 Video Window Displays the last viewed programme before you entered the guide.
3 Programme
Listing Grid
4 Channel
Information
5 Category Category name (e.g. “Guide Favourites 1”) contains all channels corresponding
z
• The OPTIONS Menu allows you to select the following menu items.
– “Programme Genre List”: Search programmes by genre.
– “Guide Favourites Set-up”: Registers your preferred programmes for any categories.
– “Timer list”: Set a programme to be displayed on the screen when it starts.
Select a programme to watch or to be set as a reminder.
Displays a channel title and number for a broadcaster.
to the category.
Watching TV
19
GB
Page 20
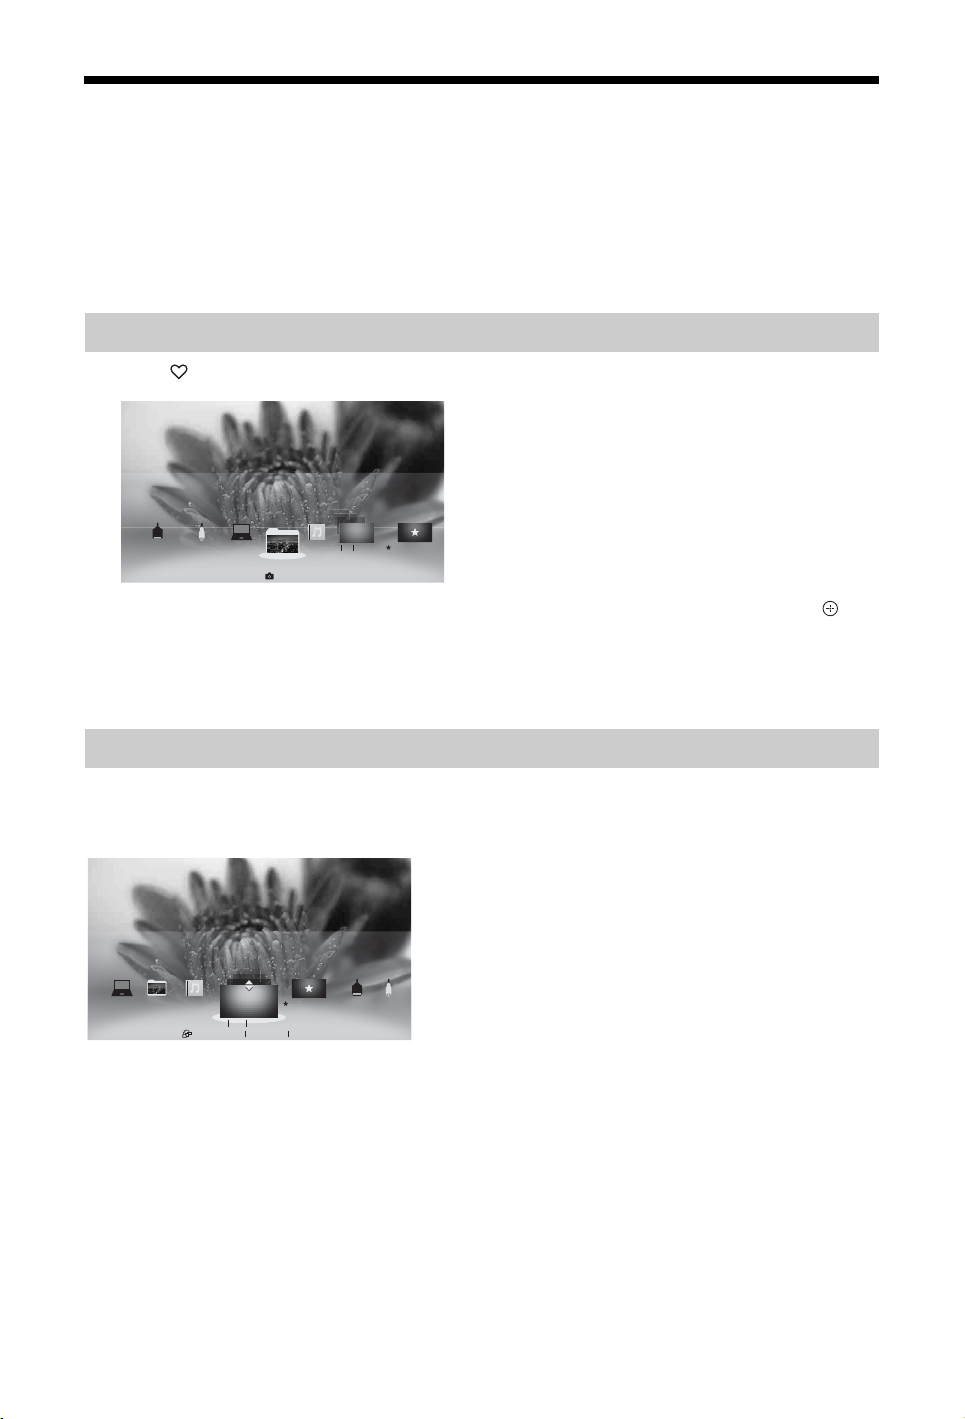
Using the Favourites
The “Favourites” feature provides quick access to your frequently used items, such as preferred TV
channels or external inputs (e.g. game console, DVD player). In addition, your favourite media files
and Internet contents can be shown in the “Favourites” screen.
~
• Internet content (e.g. Internet Video) may not be available in some regions/countries.
Displaying Your Favourites
1 Press .
YI-TV THREE
PC Piano
AV2
0728photo
003 TV FLOWERS
Photos
2 Select the desired icon listed at the bottom of the screen by using the remote, and press to
expand it into a full view.
z
• A slideshow automatically starts when a folder of photos is selected.
RecommendationsHDMI 1
Displaying Your Recently Viewed Items
By selecting the “Recently Viewed” stack of items in the “Favourites” screen, you can display a
history of content you have recently viewed. The “Recently Viewed” list is erased whenever the TV
is powered off.
0728photoPC Piano Recommendations
z
• “Recently Viewed” items are displayed in a stack list. Press F/f to move between the items.
YI-TV THREE
003 TV FLOWERS
Recently Viewed YI-TV THREE 12:00 PM
HDMI 1
AV2
20
GB
Page 21
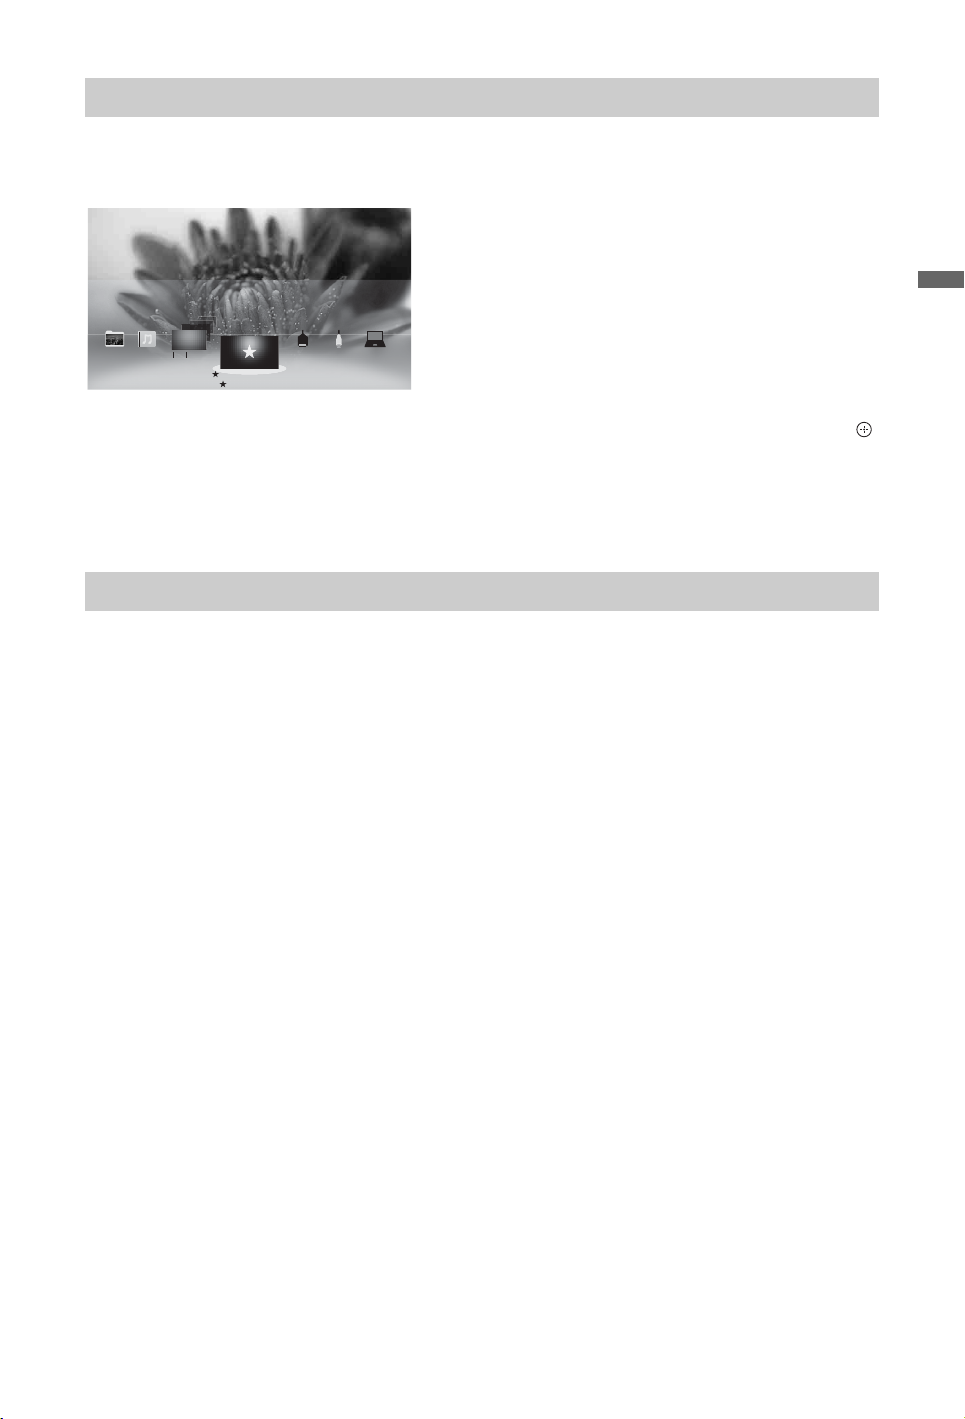
Recommendations
The “Recommendations” feature automatically analyses your interests by referencing your viewing
history to find programmes and items you may like, and presents them in the “Favourites” menu. To
activate this feature, select “On” in “Recommendation” of “General Set-up” (see page 48).
Watching TV
0728photoPCPiano HDMI 1 AV2
YI-TV THREE
003 TV FLOWERS
Recommendations
Recommendations
z
• Recommended programmes that are currently being broadcast are displayed in a stack list of items. Press
to expand the selected item into a full view.
~
• The “Recommendations” feature may not be available depending on your region, country and broadcasting
conditions.
Adding/Removing Favourites
You can add/remove your favourite items through the “XMB” or while you are displaying content
on the screen.
1 Press OPTIONS after selecting the desired item on the “XMB”.
2 Select “Add to Favourites” or “Remove from Favourites”.
21
GB
Page 22
Using Optional Equipment
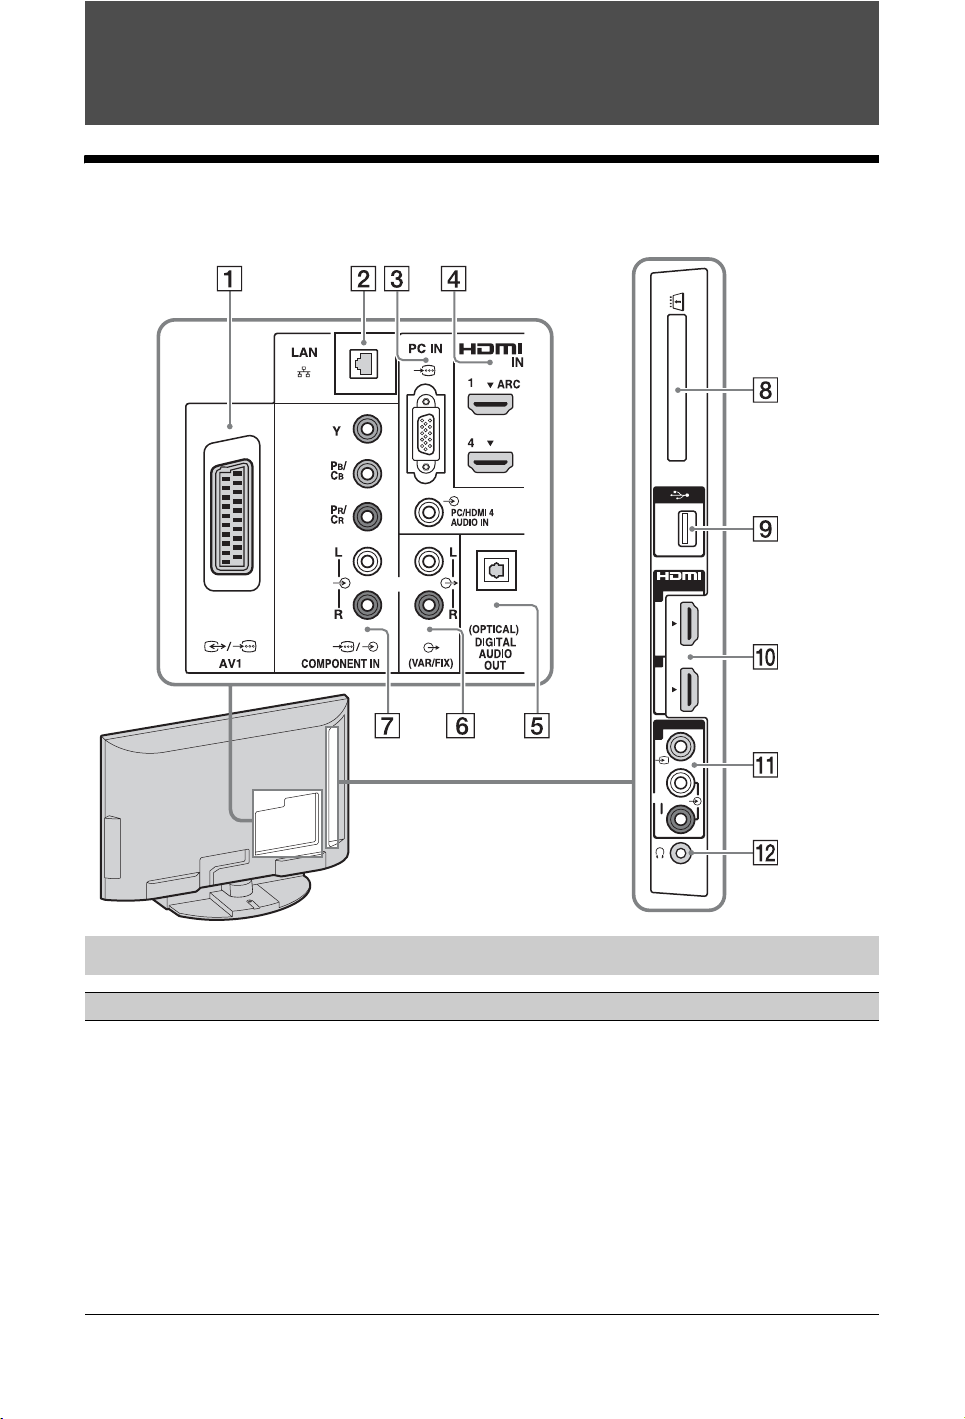
Connecting Optional Equipment
You can connect a wide range of optional equipment to your TV.
IN
2
3
AV
2
L
(MONO)
R
Connecting audio-video equipment (quality order, high to low)
Connect to Connect with Description
4, 0
HDMI IN 1, 2, 3,
or 4
HDMI cable HDMI (High-Definition Multimedia Interface) provides an
uncompressed, all-digital audio/video interface between this
TV and any HDMI-equipped audio/video equipment. In
addition, when you connect the equipment that is compatible
with “Control for HDMI”, communication with the
connected equipment is supported.
~
• Be sure to use only an authorised HDMI cable bearing the
HDMI logo.
• If connecting a digital audio system that is compatible with
Audio Return Channel (ARC) technology, use the HDMI
IN 1. If not, an additional connection with DIGITAL
AUDIO OUT (OPTICAL) is necessary.
22
GB
Page 23
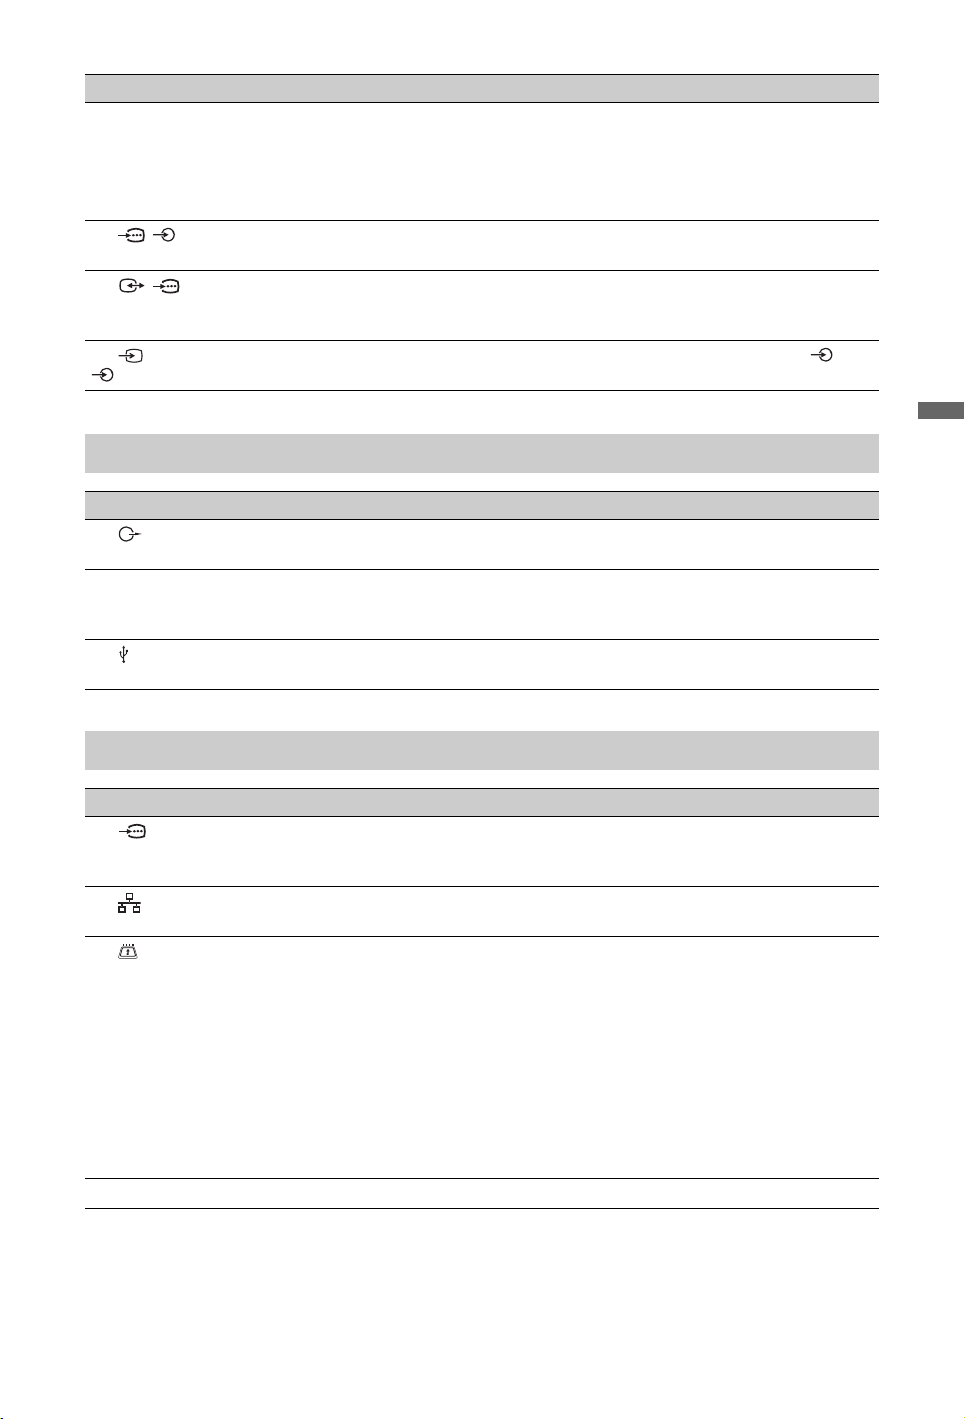
Connect to Connect with Description
• If the equipment has a DVI jack (socket), connect it to the
HDMI IN 4 through a DVI - HDMI adaptor interface (not
supplied), and connect the equipment’s audio out jacks
(sockets) to the PC/HDMI 4 AUDIO IN which is located in
the PC IN.
7 /
COMPONENT IN
1 / AV1 SCART cable When you connect an analogue decoder, the TV tuner outputs
qa AV2, and
AV2
Component video
cable, audio cable
Composite video
cable
—
scrambled signals to the decoder, and the decoder
unscrambles the signals before outputting them.
When connecting a mono equipment, connect to the AV2
L jack (socket).
Connecting audio/portable equipment
Connect to Connect with Description
6 (VAR/FIX) Audio cable You can listen to TV sound on the connected Hi-Fi audio
5 DIGITAL
AUDIO OUT
(OPTICAL)
9 USB USB cable You can enjoy photo/music/video files stored in USB device
Optical audio
cable
equipment.
You can listen to TV sound on the connected Home theatre
system with digital input.
(page 24).
Using Optional Equipment
Connecting other equipment
Connect to Connect with Description
3 PC IN PC cable with
ferrites, audio
cable
2 LAN LAN cable You can enjoy contents stored in DLNA-compatible devices
8 CAM
(Conditional
Access Module)
It is recommended to use a PC cable with ferrites, such as the
“Connector, Mini D-sub 15” (ref. 1-793-504-11, available in
Sony Service Centre), or an equivalent.
via a network (page 27).
Provides access to pay TV services. For details, refer to the
instruction manual supplied with your CAM.
z
• Do not insert the smart card directly into the TV CAM
(Conditional Access Module) slot. It must be fitted into the
Conditional Access Module provided by your authorised
dealer.
~
• CAM is not supported in some countries/areas. Check with
your authorised dealer.
qs i Headphones You can listen to TV sound through headphones.
23
GB
Page 24

Viewing Pictures from Connected Equipment
Playing back Photo/Music/ Video via USB
1 Turn on the
connected
equipment.
2 Press and select
the desired input
source.
To view two pictures simultaneously
– PAP (Picture and Picture)
“PAP” displays two pictures at the same time
from connected equipment and TV
programme/composite video except SCART
connector.
~
• This function is not available with PC input.
1 Press OPTIONS.
2 Select the “PAP” from the OPTIONS
Menu.
3 Press G/g to switch audio output between
the two pictures. The highlighted picture
is audible.
To view two pictures simultaneously
– PIP (Picture in Picture)
“PIP” displays a picture from the connected
PC in the full screen, and a TV programme or
composite video except SCART connector in
an inset window.
1 Press OPTIONS.
2 Select the “PIP” from the OPTIONS
Menu.
3 Use the OPTIONS Menu to switch audio
output between the two pictures.
You can enjoy photo/music/video files stored
in a Sony digital still camera or camcorder
through a USB cable or USB storage device on
your TV.
1 Press HOME and select the listed USB
devices under the “Photo”, “Music” or
“Video” category.
2 Select files or folders to play from the list
on the selected USB device.
Photo Playback Auto Start
Photo playback automatically starts when you
connect a USB storage device after turning on
the TV, and “Slideshow” or “Thumbnail View”
is selected in the “USB Auto Start” settings
(page 48).
~
• When connecting a Sony digital camera to the TV
with a USB cable, USB connection settings on
your camera need to be set to “Auto” or “Mass
Storage” mode.
• Video files are located in the following folder
structure (hierarchal position):
/AVCHD/BDMV/STREAM/00000.MTS
/PRIVATE/AVCHD/BDMV/STREAM/
00000.MTS
/MP_ROOT/100ANV01/MAHA0001.MP4
• Avoid losing your files by backing up all your
media files stored on USB equipment. Sony
cannot accept responsibility for lost or damaged
data stored on USB equipment.
• BRAVIA TV supports DivX®.
• Check the website below for updated information
about compatible USB devices.
http://support.sony-europe.com/TV/compatibility/
• USB Photo Viewer supports FAT12, FAT16 and
FAT32 file systems.
• USB playback of the following photo file formats
is available:
– JPEG (JPEG format files with the extension
“.jpg” and conforming to DCF or Exif)
– RAW (ARW/ARW 2.0 format files with the
extension “.arw”) (preview only)
• USB playback is supported for the following
music file format:
– MP3 (files with the extension “.mp3” that have
not been copyrighted)
24
GB
Page 25

• USB playback is supported for the following
video file format:
– AVCHD (files with the extension “.mts” or
“.m2ts”)
– MP4 (AVC) (files with the extension “.mp4”)
– MPEG1 (files with the extension “.mpg”)
• Avoid losing your files by backing up all your
media files stored on a USB device. Sony cannot
accept responsibility for lost or damaged data
stored on a USB device.
• This feature is not supported with the USB
connector on the front of PlayStation
2.
™
To display a photograph
— Picture Frame
You can display a photograph on the screen for
a selected period of time. After that period, the
TV automatically switches itself into standby
mode.
1 Select a photograph.
2 Press OPTIONS while the selected
photograph is displayed, then press F/f to
select “File Options” and press .
3 Press F/f to select “Picture Frame Image”
and press .
4 Press HOME, then press G/g to select
“Photo”, then select “Picture Frame” and
press .
The TV is switched to Picture Frame
mode, and the selected photograph is
displayed on the screen.
To set the duration of displaying a
photograph
Press OPTIONS, then select “Duration”
and press . Then, select the duration,
and press .
The counter appears on the screen.
To display a photomap
By connecting a digital still camera with GPS
function, you can display a photograph with a
map of the location where the photograph was
taken. To use this feature, the TV has to be
connected to the Internet to download map
information.
1 Select a photograph by using the “XMB”.
2 Press f/F to zoom in/out on the map.
3 Press the far left coloured button
repeatedly to change the display position
of the map.
~
• Only a large-scale map that cannot be zoomed in
or out is displayed if the TV is not connected to
the Internet or the online map service is
terminated.
• The position indicated on the map may differ
depending on the image capture device.
• The Internet online map service is provided by a
third party. For this reason, service may be
changed or terminated without prior notification.
Using Optional Equipment
~
• If the photograph is selected from a USB device, it
must remain connected to the TV.
• If “Sleep Timer” is activated, the TV
automatically will switch into standby mode.
25
GB
Page 26

Using BRAVIA Sync with Control for HDMI
With the “Control for HDMI” function,
BRAVIA Sync helps to communicate with
BRAVIA Sync-compatible equipment using
HDMI CEC (Consumer Electronics Control).
Use the following settings and tips to help
unify control of your connected equipment.
1 Press HOME.
2 Press G/g to select “Settings”.
3 Press F/f to select “External Inputs” and
press .
4 Press F/f to select “Control for HDMI” in
“HDMI Set-up”, then select “On”.
z
• “Control for HDMI” (BRAVIA Sync) is only
available for the connected Sony equipment that
has the BRAVIA Sync or is compatible with
“Control for HDMI”.
• The “Control for HDMI” settings must be set on
both the TV and connected equipment. For
settings on the connected equipment, refer to their
instruction manuals.
• When specific Sony equipment compatible with
“Control for HDMI” (BRAVIA Sync) is
connected, BRAVIA sync is automatically
activated on the equipment.
Controlling BRAVIA Sync-Compatible
Equipment
BRAVIA Sync-compatible equipment is listed
as a new input source under “External Inputs”
in the Home Menu (page 46). To control the
equipment by using the remote, press SYNC
MENU and select the desired equipment from
“HDMI Device Selection”.
Sync Menu
HDMI 1
HDMI Device Selection
Device Control
Speakers
TV Control
Return to TV
BD/DVD Player
• Automatically turns the BRAVIA Synccompatible equipment on and switches the
input to that equipment when you select it
from the Home Menu or Sync Menu.
• Automatically turns the TV on and
switches the input to the connected
equipment when the equipment starts to
play.
• Automatically turns the connected
equipment off when you switch the TV to
standby mode.
AV Amplifier
• Automatically turns the connected AV
amplifier on and switches the sound output
from the TV speaker to the audio system
when you turn the TV on. This function is
only available if you have previously used
the AV amplifier to output TV sound.
• Automatically switches the sound output to
the AV amplifier by turning the AV
amplifier on when the TV is turned on.
• Automatically turns the connected AV
amplifier off when you switch the TV to
standby mode.
• Adjusts the volume (2 +/–) and mutes the
sound (%) of the connected AV amplifier
through the TV’s remote.
• When connecting a digital audio system
that is compatible with Audio Return
Channel (ARC) technology, connect to
HDMI IN 1 with an HDMI cable. If
connecting a system that is incompatible
with “Control for HDMI” or Audio Return
Channel, an additional audio connection
via DIGITAL AUDIO OUT (OPTICAL) is
necessary.
Video Camera
• Automatically turns the TV on and
switches the input to the connected video
camera when the connected video camera
is turned on.
• Automatically turns the connected video
camera off when you switch the TV to
standby mode.
26
GB
Page 27
Using Home Network Features
With this TV, you can enjoy contents stored in
DLNA-compatible devices on the home
network.
Devices that store and provide contents, such
as photo/music/video files, are called “Server”.
The TV receives the photo/music/video files
from the server via the network, and you can
enjoy them on the TV even in other rooms.
To enjoy the home network, a DLNAcompatible device (VAIO, Cyber-shot, etc.) is
necessary as a server.
Make either the wired connection (see the
following “Connecting to the Network”), or
wireless connection (see “Wireless LAN
Ready” on page 28).
In addition, when you connect your TV to the
Internet, you can enjoy displaying a
photograph that shows its location on the map
(page 25), or enjoy Internet video (page 29).
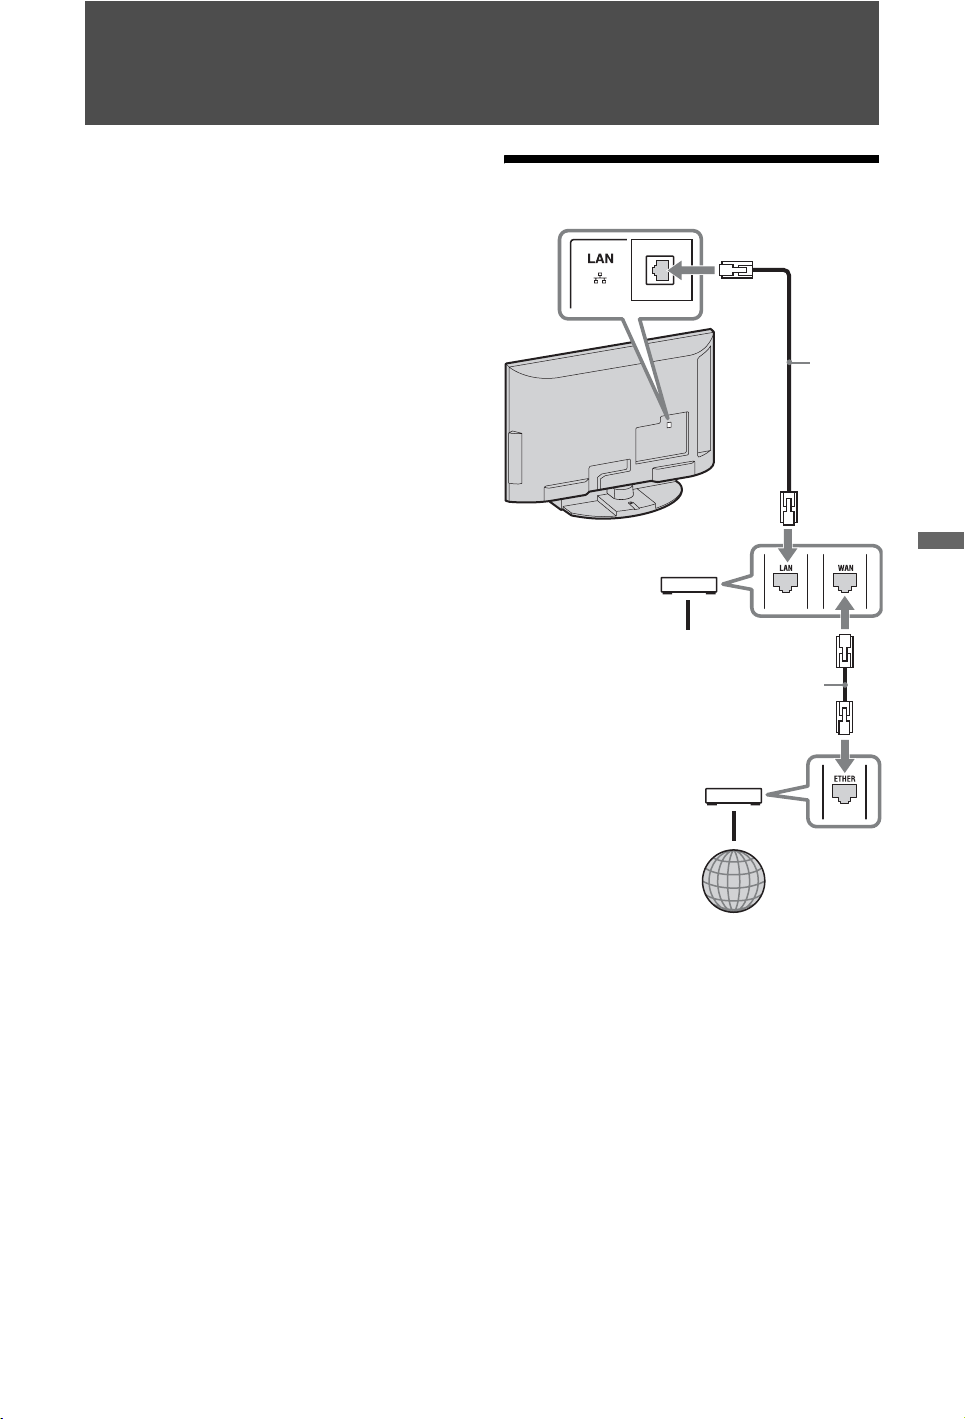
Connecting to the Network
TV
Router
Network
cable
(not
supplied)
Using Home Network Features
~
• You will need to contract with an Internet service
provider to connect to the Internet.
To network devices
Network cable (not supplied)
DSL modem/
Cable modem
Internet
27
GB
Page 28
Wireless LAN Ready
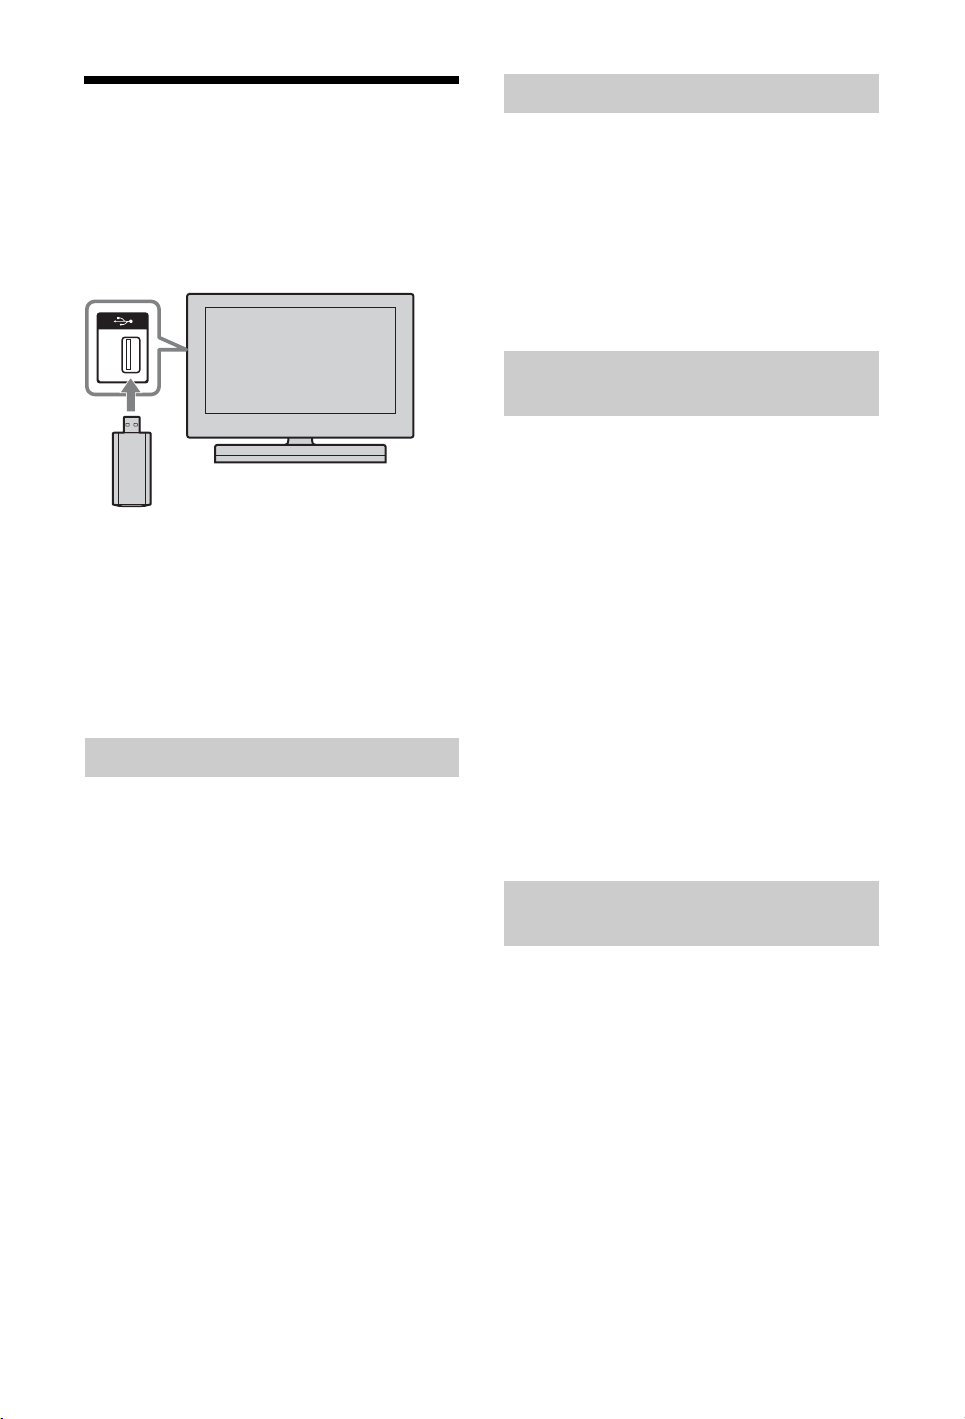
Wireless LAN Ready lets you easily access the
Internet and your home network with the USB
Wireless LAN Adapter UWA-BR100 (as of
January 2010). By inserting the USB Wireless
LAN Adapter into your TV’s USB port, you
can easily create a cable-free network.
~
• Before setting up the wireless LAN function of the
TV, be sure to set up a wireless LAN router.
• The USB Wireless LAN Adapter is supplied or
available as an optional accessory, depending on
your TV model. In some regions/countries, the
USB Wireless LAN Adapter may not be available.
• This feature is not supported with the USB
connector on the front of PlayStation
Connecting to Your Wireless LAN
Using the Wireless LAN Ready feature you
can connect the TV to your wireless LAN. The
set-up procedure differs depending on the type
of wireless LAN and wireless LAN router.
Before setting up a wireless LAN, check your
wireless LAN environment using the
following chart.
1 Secure wireless LAN ?
YES: Go to 2.
NO: Configure the following “Network
Set-up” and “Unsecured Network with
Any Type of Wireless LAN Router”.
2 Do you use a wireless LAN router
compatible with Wi-Fi Protected Setup
(WPS) ?
YES: Configure the following “Network
Set-up” and “Secured Network with Wi-Fi
Protected Setup (WPS)”.
NO: Configure the following “Network
Set-up” and “Secured Network without
Wi-Fi Protected Setup (WPS)”.
2.
™
Network Set-up
The start-up screen of “Network Set-up”
allows you to select a setting procedure
according to your network environment.
“View Network Status”: Select to confirm
your network status.
“Wired Set-up”: Use to connect to a wired
network.
“Wireless Set-up”: Use to connect to a
wireless network.
Secured Network with Wi-Fi
Protected Setup (WPS)
The WPS standard makes security of a
wireless home network as straightforward as
pressing the WPS button on the wireless LAN
router. Before setting up a wireless LAN,
check the position of the WPS button on the
router and verify how to use it.
1 Select “Wireless Set-up” from the
“Network Set-up” start-up screen.
2 Select “WPS (Push Button)” for Push
Button method or “WPS (PIN)” for PIN
method.
3 Follow the instructions appeared on the
set-up screen.
~
• To connect to a wireless LAN with WPS, your
wireless LAN router needs to support the WPS
standard.
Secured Network without Wi-Fi
Protected Setup (WPS)
For setting up a wireless LAN, SSID (wireless
network name) and security key (WEP or
WPA key) will be required. If you do not know
them, consult the instruction manual of your
router.
1 Select “Wireless Set-up” from the
“Network Set-up” start-up screen.
2 Select “Scan”, then select a network from
the list of scanned wireless networks.
3 Follow the instructions that appear on the
set-up screen.
28
GB
Page 29

Unsecured Network with Any Type
of Wireless LAN Router
For setting up a wireless LAN, SSID (wireless
network name) will be required. Security key
(WEP or WPA key) will not be required
because you need to select no security method
in this procedure.
1 Select “Wireless Set-up” from the
“Network Set-up” start-up screen.
2 Select “Scan”, then select a network from
the list of scanned wireless networks.
3 Follow the instructions appeared on the
set-up screen.
Enjoying BRAVIA Internet Video
BRAVIA Internet Video serves as a gateway to
Internet content, delivering a variety of ondemand entertainment straight to your TV. By
making a broadband Internet connection, you
can enjoy video content, including movies and
cartoons.
~
• Be sure to connect your TV to the broadband
Internet and complete the initial set-up and
“Network Set-up” (page 56).
To Use Internet Video
You can seek forward or seek backward in the
video content. (This feature is available
depending on Internet content services.)
1 Press INTERNET VIDEO.
2 Press F/f/G/g to select the desired video
icon to be displayed and press .
To return to single picture mode
Press RETURN.
z
• The interface to Internet content depends on the
Internet content providers.
• Services block video content based on the
“Parental Lock” setting of the TV. Some service
providers do not support this function.
• To update BRAVIA Internet Video content
services, select “Settings” in the Home Menu, then
select “Refresh Internet Content” in “Network”
(page 57).
Using Home Network Features
29
GB
Page 30

Enjoying Photo/Music/ Video Files via the Network
Checking the Network Connection
Enjoy various content, such as photo/music/
video files, stored in DLNA Certified media
server on your home network. With the home
network feature, you can enjoy the Internet
and/or network content on the TV even in
other rooms. To enjoy your home network,
DLNA Certified equipment (e.g. VAIO) is
necessary as a server.
1 Press HOME.
2 Press G/g to select the listed media
servers under the “Photo”, “Music” or
“Video” category.
3 Press F/f to select files or folders to play
from the list on the selected media server.
~
• Files from a network device need to be compatible
with the following file formats.
– Still images: JPEG format
– Music: MP3 format or linear PCM format
– Video: The following file formats stored on the
server: AVCHD or MPEG2 format (not playable
in some cases)
To enjoy photographs, music and
videos on the TV screen by operating
devices
– Renderer
You can play back photo, music and video files
stored in network devices (e.g. digital still
cameras, mobile phones) on the TV screen by
directly operating the target device. The
network device should also be renderercompatible.
1 Press HOME.
2 Press G/g to select “Settings”.
3 Press F/f to select “Network”, and then
set “Renderer Function”, “Renderer
Access Control” and “Renderer Set-up” in
“Renderer” if necessary (page 57).
4 Play back media files by using the
network devices.
Enter the respective alphanumeric values for
your router if necessary. The items that need to
be set (e.g. IP Address, Subnet Mask, DHCP)
may differ depending on the Internet service
provider or router. For details, refer to the
instruction manuals provided by your Internet
service provider, or those supplied with the
router.
1 Press HOME.
2 Press G/g to select “Settings”.
3 Press F/f to select “Network”, then press
.
4 Select “Network Set-up”, then press .
5 Select “Auto” to set the IP Address and
proxy server automatically, or “Custom”
to set them manually.
Follow the instructions appeared on the
set-up screen.
The start-up screen allows you to select a
setting procedure according to your
network environment.
“View Network Status”: Select to confirm
your network status.
“Wired Set-up”: Use to connect to a wired
network.
“Wireless Set-up”: Use to connect to a
wireless network.
30
GB
Page 31

Adjusting the Server Display Settings
You can select home network servers to be
displayed on the Home Menu.
Up to 10 servers can be displayed in the Home
Menu automatically.
1 Press HOME.
2 Press G/g to select “Settings”.
3 Press F/f to select “Network”, then press
.
4 Select “Server Display Settings”, then
press .
5 Select the server you want to display on
the Home Menu, and adjust the settings.
If you cannot connect to your home
network
The TV detects if the server is being correctly
recognised when you cannot connect it to your
home network. If the diagnostic results
indicate a failure, check possible causes, and
network connections and settings.
1 Press HOME.
2 Press G/g to select “Settings”.
3 Press F/f to select “Network”, then press
.
4 Select “Server Diagnostics”, then press .
The server diagnostic starts.
When the server diagnostic is complete,
the diagnostic result list appears.
Using Home Network Features
31
GB
Page 32
Using PlayStation™2
About Advanced Operations of the PlayStation™2
The PlayStation™2 User’s Guide is provided for further operation of the PlayStation™2. The User’s
Guide (in PDF format) is accessible from a PC through the Internet and contains information on
performing advanced operations, technical specifications and other information.
Visit www.sony-europe.com/myproduct/, and enter your model name to search for the
corresponding User’s Guide.
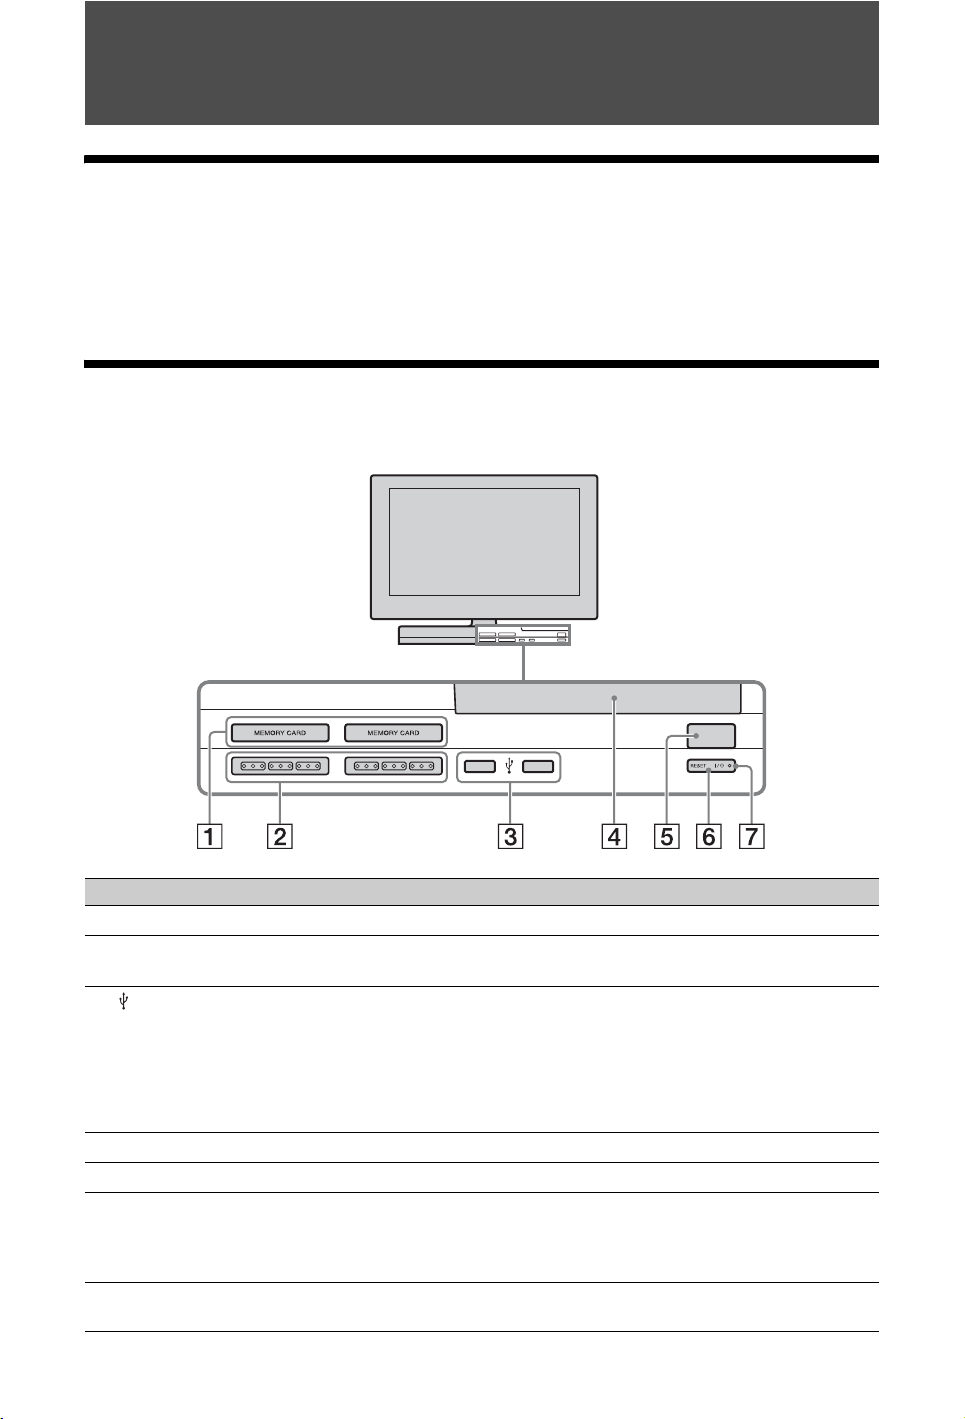
Part Names
Front
OPEN
Connect to Description
1 MEMORY CARD slot 1/2 Insert a memory card (page 36).
2 Controller port 1/2 Insert the Analog Controller (DUALSHOCK®2) into a controller
port of the PlayStation
3 USB connector You can connect various USB devices to the built-in PlayStation
but not all are compatible. Refer to the instructions supplied with the
USB device for more information.
2 (page 35).
™
~
• You cannot play photo, music, video files using the PlayStation’s
USB connector.
4 Disc cover Press the OPEN button, and the cover slides open.
5 OPEN button Press to open the disc cover.
6 "/1 (on/standby)/RESET
button
7 "/1 (on/standby) indicator Lights up in green when the built-in PlayStation
Press to turn on the built-in PlayStation
to reset.
RESET: Press once.
Standby: Press for more than one second.
Lights up in red when the built-in PlayStation™2 is in standby mode.
2, to enter standby mode, or
™
2 is on.
™
2,
™
32
GB
Page 33
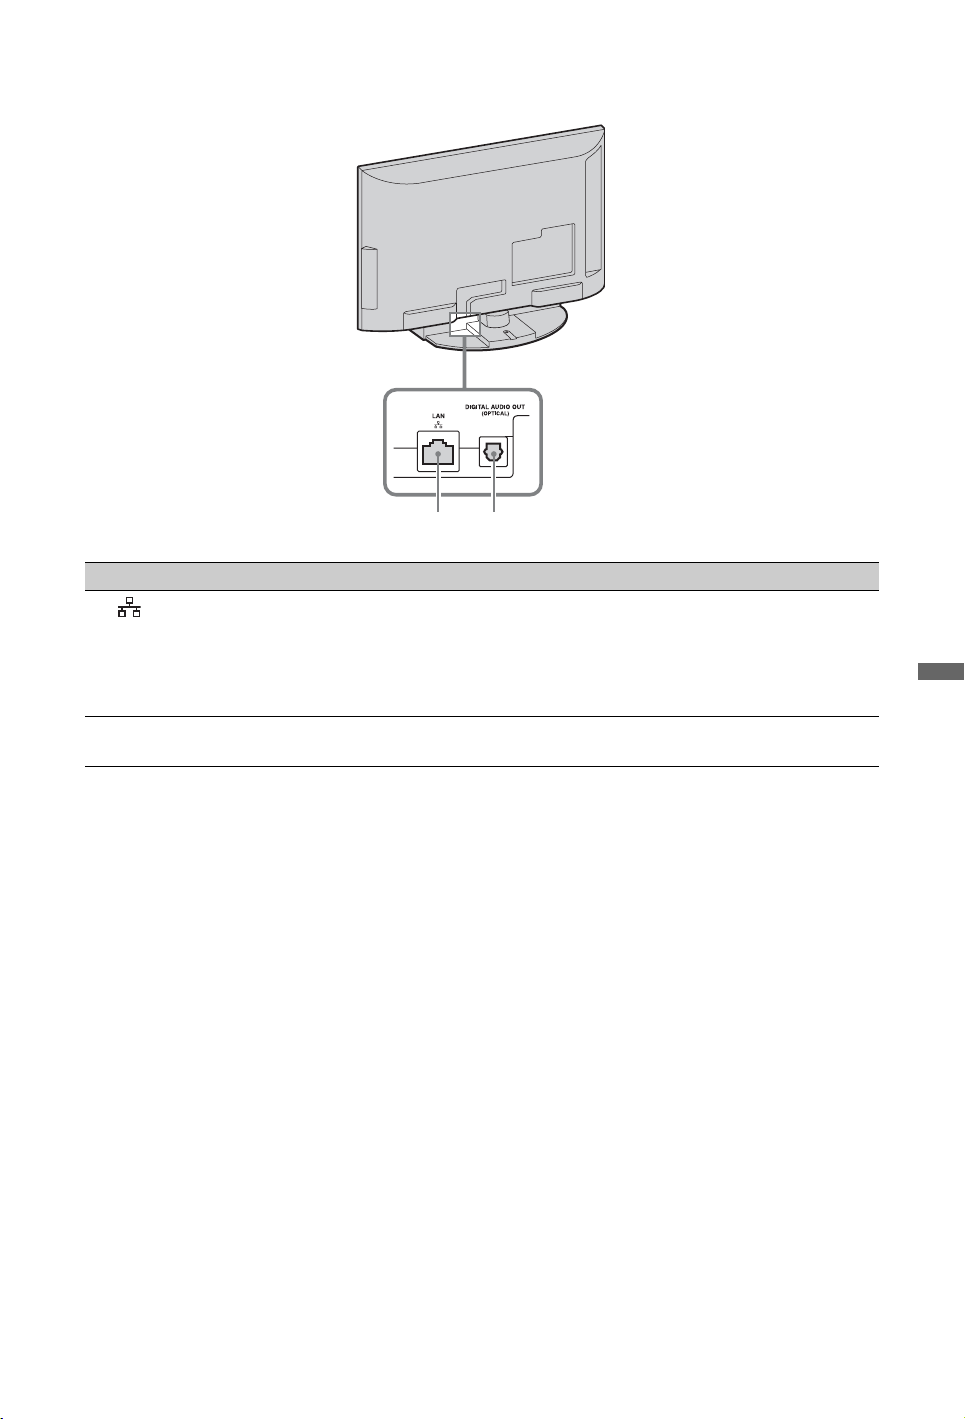
Rear
1 2
Connect to Description
1 LAN You can enjoy online games by connecting the PlayStation™2 to a
broadband network (page 37).
~
• To enjoy “BRAVIA” home network features, connect to LAN of the
TV using an Ethernet cable (page 42).
2 DIGITAL AUDIO OUT
(OPTICAL)
You can listen to the built-in PlayStation
system connected via digital input.
2 sound on a Home theatre
™
Using PlayStation
(Continued)
33
GB
™
2
Page 34
Analog controller (DUALSHOCK®2)
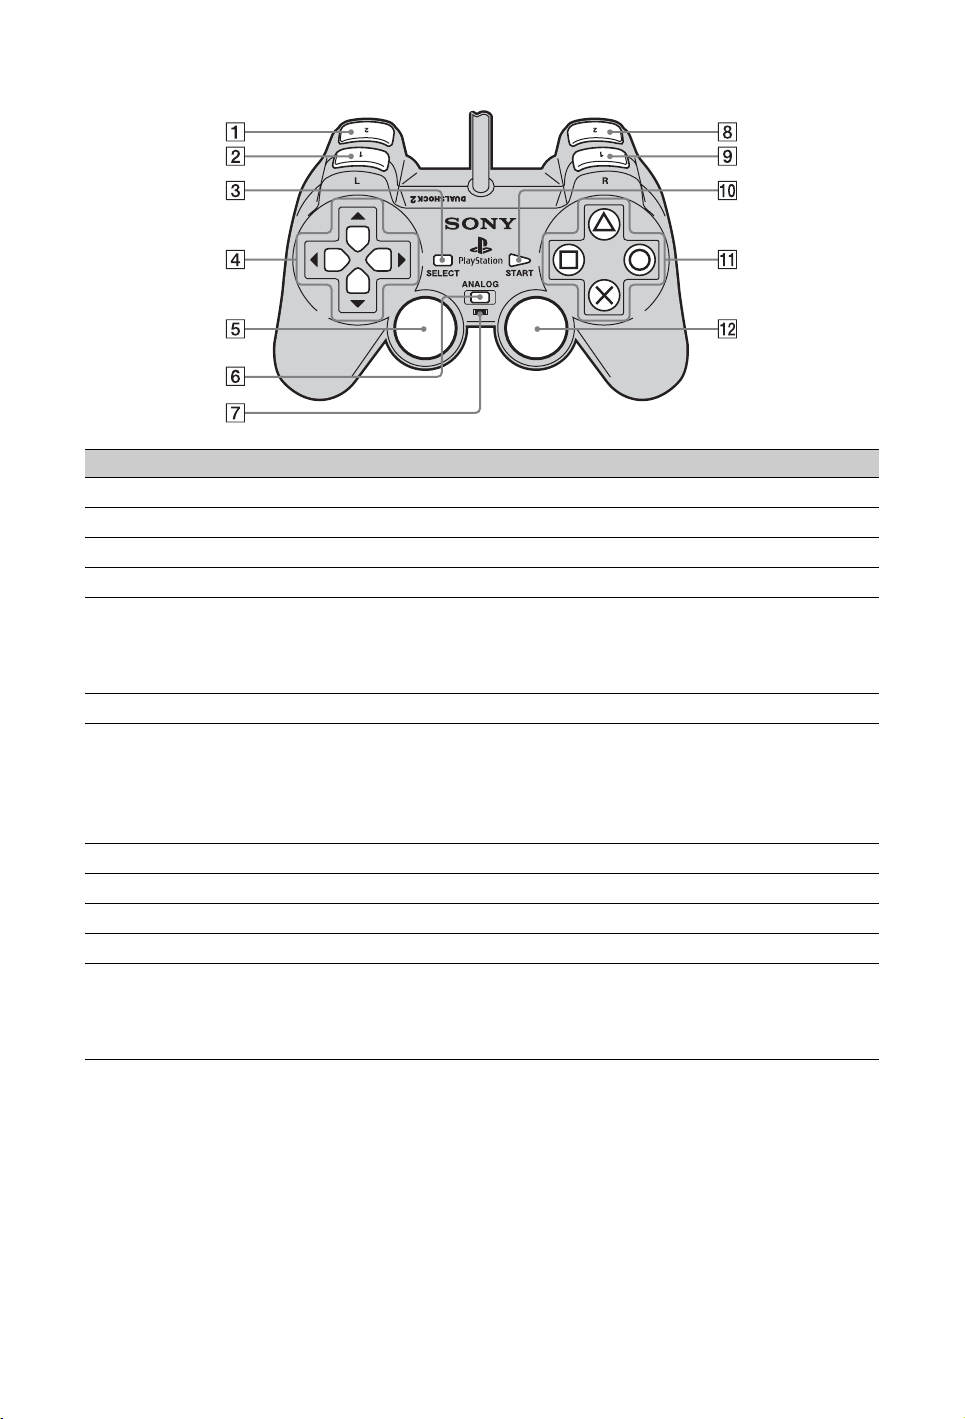
Button/Switch Description
1 L2 button
2 L1 button
3 SELECT button
4 Directional buttons
5 Left analog stick/ L3 button z
• The left analog stick and L3 button, function only in analogue mode
(indicator: red).
•The L3 button function when the analog stick is pressed.
6 ANALOG mode button Switch between digital mode and analogue mode.
7 Mode indicator Digital mode: Lights off.
8 R2 button
9 R1 button
q; START button
qa f/a/×/s buttons
qs Right analog stick/ R3
button
z
• Depending on the software, the buttons for use in analogue mode may be limited. Refer to the instructions
supplied with the software for details.
• The vibration function can be set to on or off in the software options menu. Depending on the software, the
vibration function may be set to on automatically.
Analogue mode: Lights up in red.
z
• Depending on the software, you may not be able to switch modes
even if you press the ANALOG mode button.
z
• The right analog stick and R3 button, function only in analogue
mode (indicator: red).
•The R3 button function when the analog stick is pressed.
34
GB
Page 35
Setting Up the
PlayStation
You can enjoy playing games, watching
movies and listening to music via the built-in
PlayStation
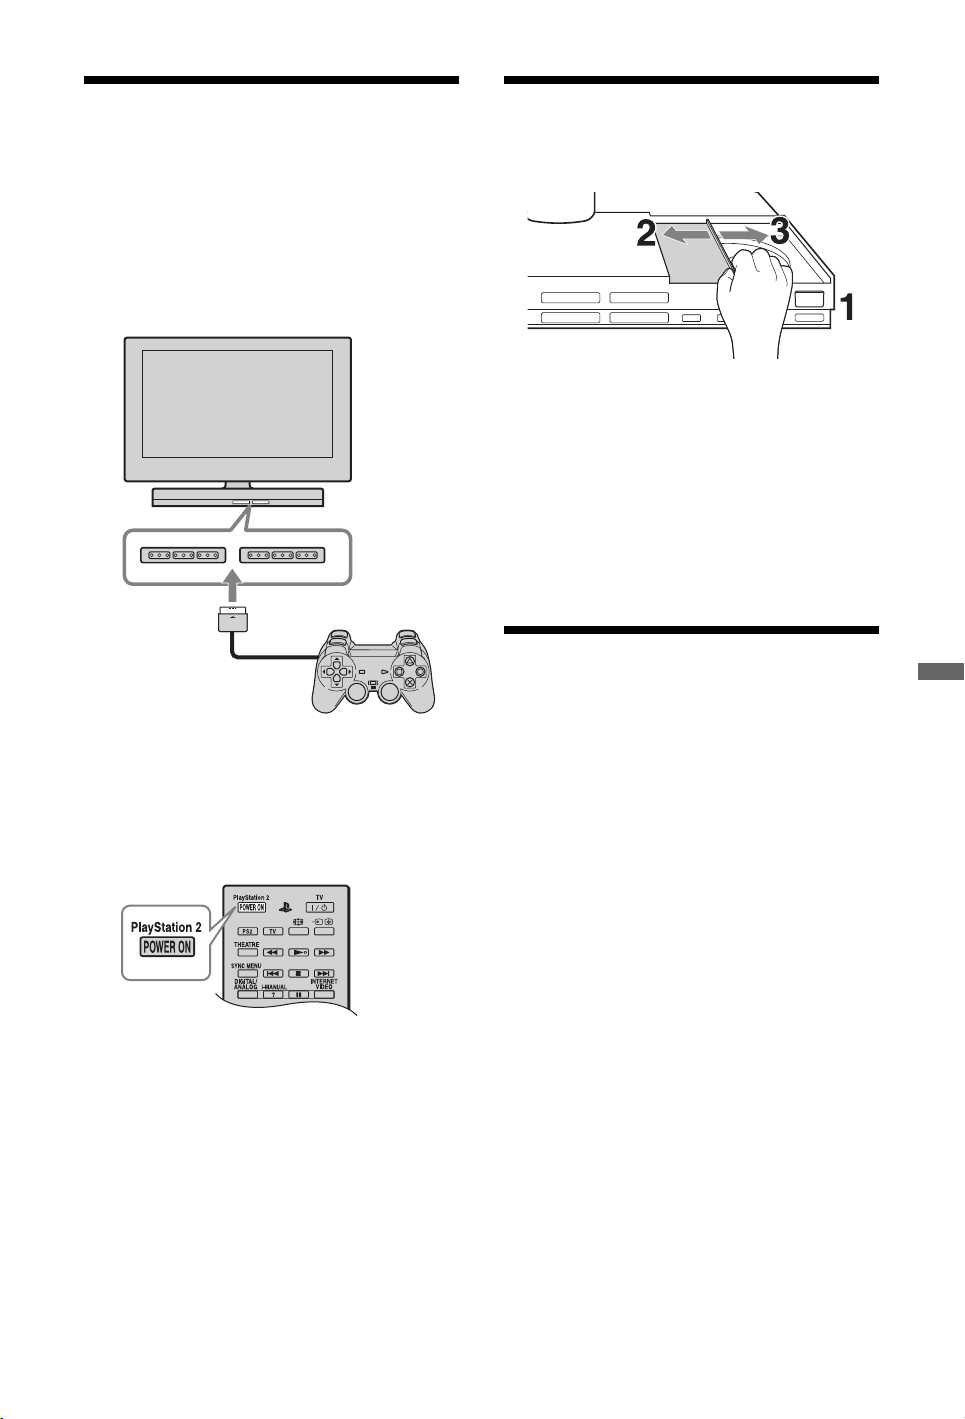
1 Connect the Analog Controller
(DUALSHOCK®2) to a controller port in
the front of the built-in PlayStation
2 Press PlayStation 2 POWER ON on
the remote to turn on the TV and the
PlayStation
automatically switched to
PlayStation
2.
™
2
™
2. (The TV input mode is
™
2.)
™
2.
™
Playing Content
You can play games, DVD-Videos and audio
CDs on the PlayStation
2.
™
OPEN
1 Press the OPEN button to release the disc
cover lock.
2 Slide the disc cover to the left, then place
the disc with the label side facing up.
3 Close the disc cover by sliding it to the
right until it is locked.
~
• Be sure to lock the disc cover to play a disc.
Playing a Game
You can play PlayStation™2 and PlayStation™
format software on the built-in PlayStation
2.
™
To start a game
Insert a disc to start playback.
~
• To end a game, press PlayStation™2 "/1 (on/
standby)/RESET button on the console front
after saving game data, and then remove the disc
(page 32).
Using PlayStation
™
2
~
• When you turn the TV off, the PlayStation™2 is
also turned off. In addition, when functions below
are activated, the PlayStation™2 will also be
turned off in conjunction with the TV.
– Idle TV Standby
– Sleep Timer
– PC Power Management
– Reminder
–On Timer
– Picture Frame
• Do not access the memory card when a warning
message (such as, “the TV will soon turn off...”)
appears.
35
GB
Page 36
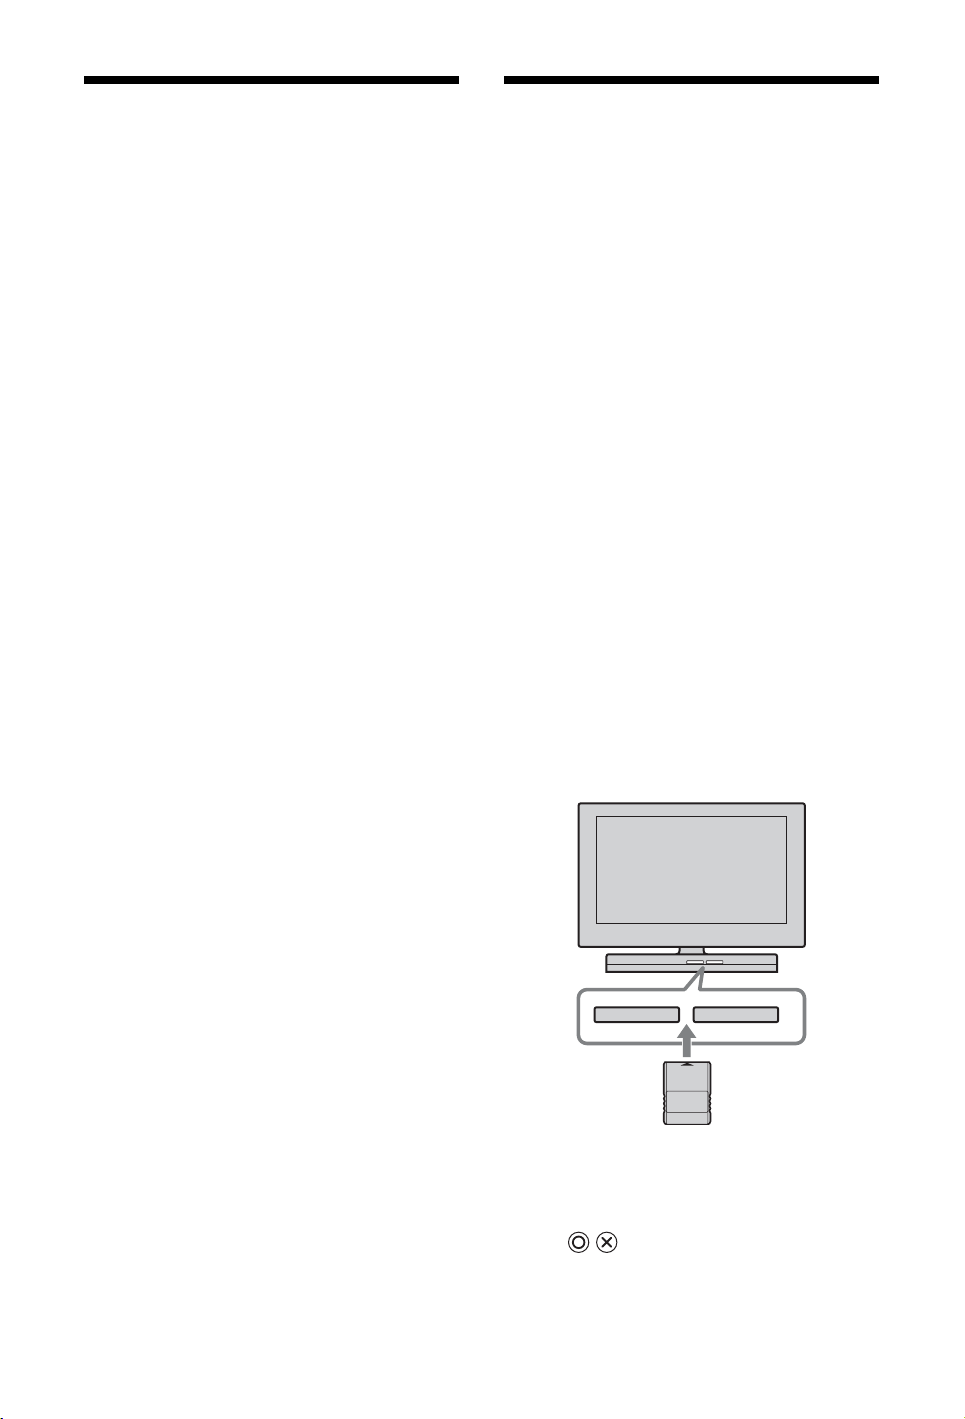
Using the Analog Controller (DUALSHOCK®2)
The Analog Controller (DUALSHOCK®2) is
equipped with pressure-sensitive buttons and
sticks. This enables you to control game action
with enhanced precision based on the force
with which buttons are pressed or the angle at
which the analog stick is tilted. It is also a
force feedback controller with a vibration
function.
~
• Depending on the game, you may need to set the
controller to either digital or analogue mode. Press
the ANALOG mode button of the controller to
switch to the analogue mode. To return to digital
mode, press the ANALOG mode button again.
Some games make this adjustment automatically.
Using Memory Cards
You can save and load game data using a
memory card (sold separately). You can also
delete game data or copy game data from one
memory card to another.
Memory card types
There are two types of memory cards. Select
the memory card type suitable for the software
in use.
Memory card for PlayStation™2; SCPH-10020 E
– Compatible software: PlayStation
software
– Amount of memory: Approximately 8 MB
Memory card; SCPH-1020 E (This product is no
longer manufactured.)
– Compatible software: PlayStation
software
– Amount of memory: 15 memory blocks
(approximately 120 KB)
2 format
™
format
™
~
• MagicGate™ is a term of copyright-protection
technology developed by Sony Corporation.
To insert a memory card
Insert the memory card into a memory card
slot. Some games designate a specific memory
card slot to use.
MEMORY CARDMEMORY CARD
To copy or delete saved data
You can delete saved data or copy data to
another memory card. Use directional buttons
and the button of the controller to select
items.
36
GB
Page 37
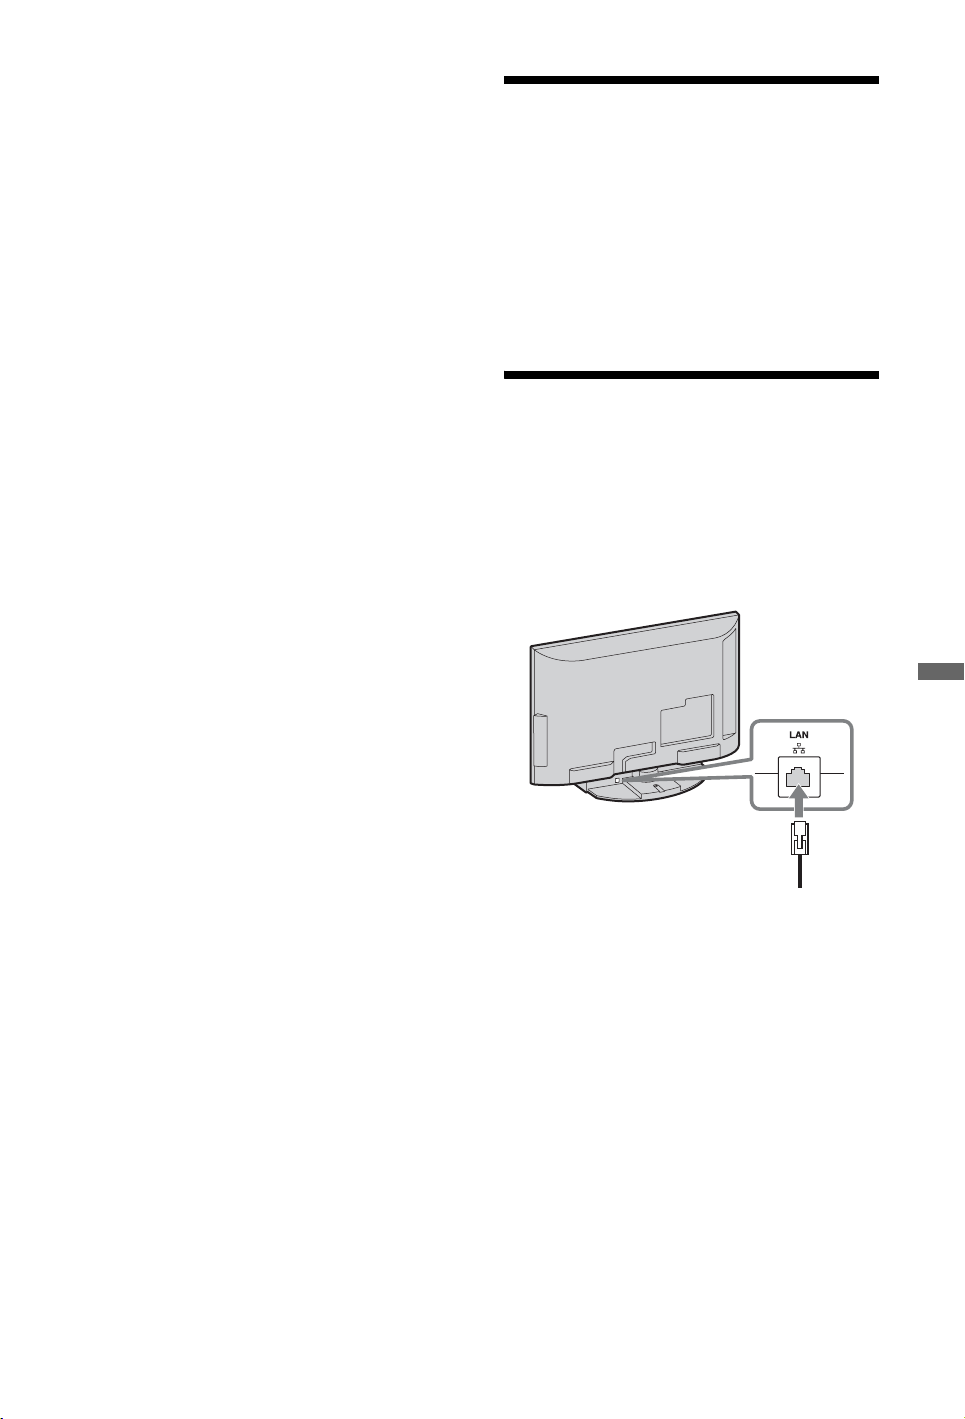
1 Turn on the built-in PlayStation
no disc inserted, and then insert a memory
card.
2 with
™
2 Select “Browser”, and then select the
memory card you want to copy or delete
data from.
3 Select the icon for the data item, and
select “Copy” or “Delete”.
4 Follow the instructions that appear on the
set-up screen.
Playing Online Games
You can play online games by connecting the
built-in PlayStation
Items you will need
• A network compatible PlayStation
• Broadband Internet service
• A commercially available Ethernet cable
• A memory card (8MB) (for PlayStation
(sold separately)
2 to a network.
™
2 game
™
2)
™
Creating a Network Configuration
When playing online games, insert a
commercially available Ethernet cable into the
network connector, and then create a network
configuration. Refer to the instructions
supplied with the online game for creating a
network configuration.
Using PlayStation
™
2
37
GB
Page 38
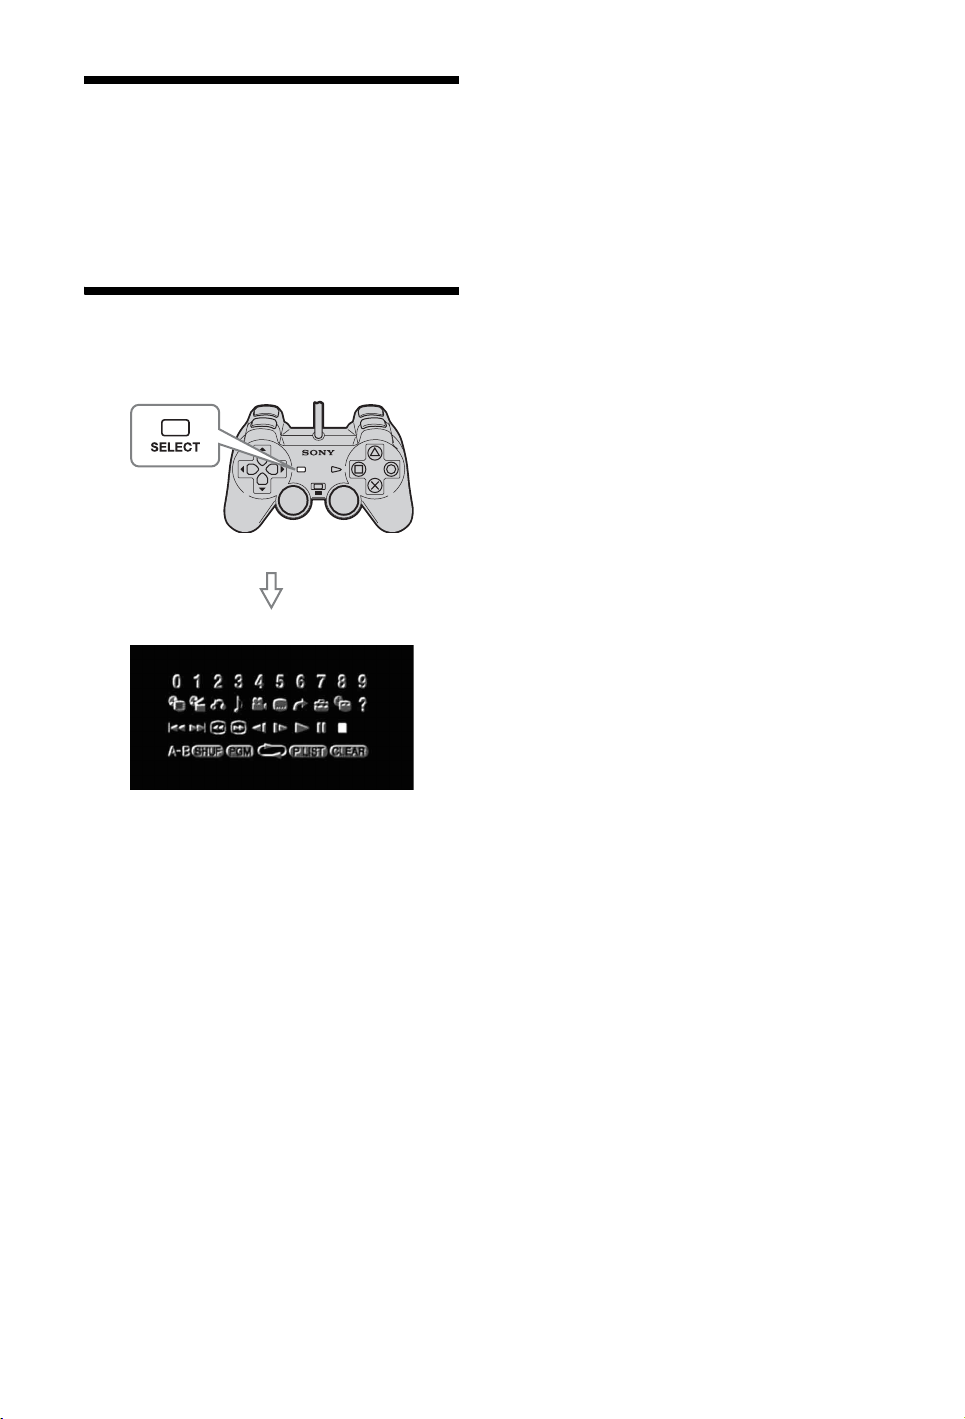
Watching a DVD
You can play DVDs on the built-in
PlayStation
To start a DVD
Insert a disc to start DVD playback.
2.
™
Operating the DVD Player
Press the SELECT button on the Analog
Controller then select an icon.
38
GB
Page 39
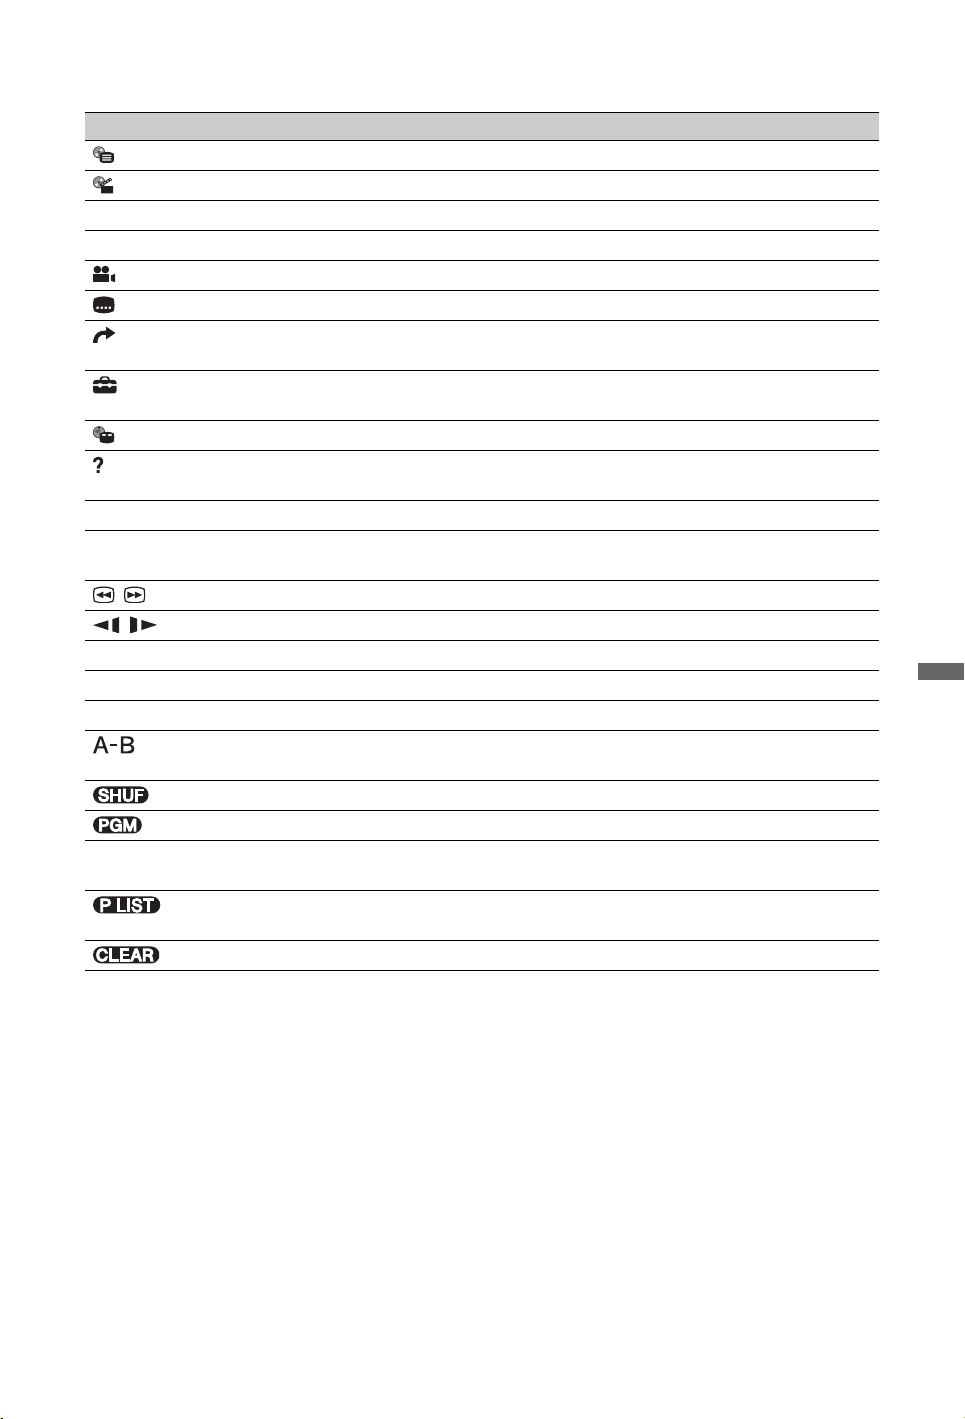
Control panel items
Icon Description
Menu Displays the menu
Top Menu Displays the top menu
O Return Returns to the previously selected screen
9 Audio Options Displays and changes audio options
Angle Options Displays and changes viewing angles
Subtitle Options Displays and changes subtitle options
Go To Skips to the selected title, chapter or the specified time, and starts
playback
Setup Displays and changes options for language, picture quality, Parental
Control level, audio, etc.
Time Display Displays the current title or chapter number, elapsed time, etc.
Help Displays the direct button functions of the Analog Controller
(DUALSHOCK®2)
0-9 Go to Chapter Used to enter the number of a chapter you want to play
./> Previous/Next Returns/skips to the beginning of the current, previous or next
chapter
/ Search Fast reverses/forwards playback
/ Slow Changes to playback/reverse playback in slow-motion
N Play Starts playback
X Pause Pauses playback
x Stop Stops playback
A-B Repeat Specifies a scene for playback, and starts playback of the scene that
has been set
Shuffle Play Begins playback of titles or chapters in a random order
Programme Play Begins playback of titles or chapters in a programmed sequence
S Repeat Play Selects repeated playback of all the titles on the disc, or one title or
one chapter
Original/Play List For DVD-RW discs (VR mode), selects Original or Play List content
to play
Clear Clears selected numbers or playback modes
z
• Selecting x (Stop) again after playback is stopped clears resume play (playback from the last stopping
point).
• Some control panel options cannot be selected during resume play. To select these options, cancel resume
play by selecting x (Stop) on the control panel and then selecting x (Stop) again after playback is stopped.
Using PlayStation
™
2
39
GB
Page 40
Parental Control Settings
Compatible Software
From the control panel, select “Setup”, and
then select “Parental Control” in “Custom
Setup”.
Follow the instructions to register or enter the
password. After the password is registered or
entered, proceed through the various screens to
select a region and parental control level.
z
• If you select “Other” in the region options, see
“About Advanced Operations of the
PlayStation
• For the parental control level, note that the lower
the value, the stricter the restriction.
• To clear the parental control setting, set the option
to “Off”.
• To change your password, select “Change
Password” from the parental control options and
follow the instructions to complete the operation.
2” (page 32).
™
Temporary override of parental control
restrictions
Start DVD playback. When prompted by the
system, select “Yes”, and then enter the
password.
z
• You cannot change the parental control setting
without a password.
• When DVD playback is stopped, the parental
control level will return to its default setting.
• If you forget your password, insert a DVD without
the parental control feature. In the control panel,
select x (Stop) to stop playback, and then select
x (Stop) again to clear resume play. Select
“Setup”, and then select “Parental Control” in
“Custom Setup”, and then press the button.
Press the SELECT button on the Analog
Controller, and then enter the number “7444”.
DVD
– PlayStation
2 format DVD-ROM
™
– DVD-ROM (DVD-Video)
– DVD+R/DVD+RW
– DVD-R/DVD-RW (Video mode / VR
mode)
CD
– PlayStation
– PlayStation
2 format CD-ROM
™
format CD-ROM
™
–CD-DA (Audio CD)
~
• Some discs may not be playable due to scratches,
dust or recording problems.
• The audio CD playback feature of this product is
designed to conform to the Compact Disc (CD)
standard. Recently, some record companies have
started marketing music discs encoded with
copyright protection technologies. Some of these
music discs do not conform to the CD standard
and may not be playable on this product.
• A DualDisc is a two sided disc product that
contains DVD recorded material on one side and
digital audio material on the other side. However,
since the audio material side does not conform to
the Compact Disc (CD) standard, playback on this
product is not guaranteed.
• Do not play illegally copied discs. This may cause
a malfunction or damage to the PlayStation
Region codes
Some discs are assigned region codes for each
geographic sales region. The built-in
PlayStation
2 can play discs with the
™
following region codes.
• DVD : , (Except RU), (RU)
• PlayStation
2 format DVD-ROM/CD-
™
ROM :
• PlayStation
format CD-ROM :
™
2.
™
40
GB
DVD-Videos
The built-in PlayStation
2 can only play discs
™
recorded for the PAL broadcast standard.
DVD-R, DVD-RW, DVD+R and DVD+RW
discs
• Only discs that have been finalised can be
played.
Page 41

• Copy-protected video from a digital
broadcast recorded on Content Protection
for Recordable Media (CPRM) compatible
DVD-RW discs or on CPRM compatible
DVD-R discs cannot be played on the builtin PlayStation
2.
™
Internet Settings of the
Built-in PlayStation
You can enjoy online games by connecting the
PlayStation
play all online games, you will need the
following:
• A network compatible PlayStation
• Broadband Internet service
• A commercially available Ethernet cable
• A memory card (8MB) (for PlayStation
(sold separately)
z
• You cannot play online games using a dial-up or
ISDN connection.
• USB connectivity from the External Network
Device to the USB connector is not supported.
• There are two types of Ethernet cables: straight-
through cable and crossover cable. Ensure that you
use the correct type of cable when connecting the
PlayStation
connection. Refer to the instructions supplied with
the network device, or your Broadband Internet
Service Provider for details.
• Do not connect to the TV LAN using the Ethernet
cable.
2 to a broadband network. To
™
2 to your Broadband Internet
™
™
2
2 game
™
2)
™
Using PlayStation
41
GB
™
2
Page 42
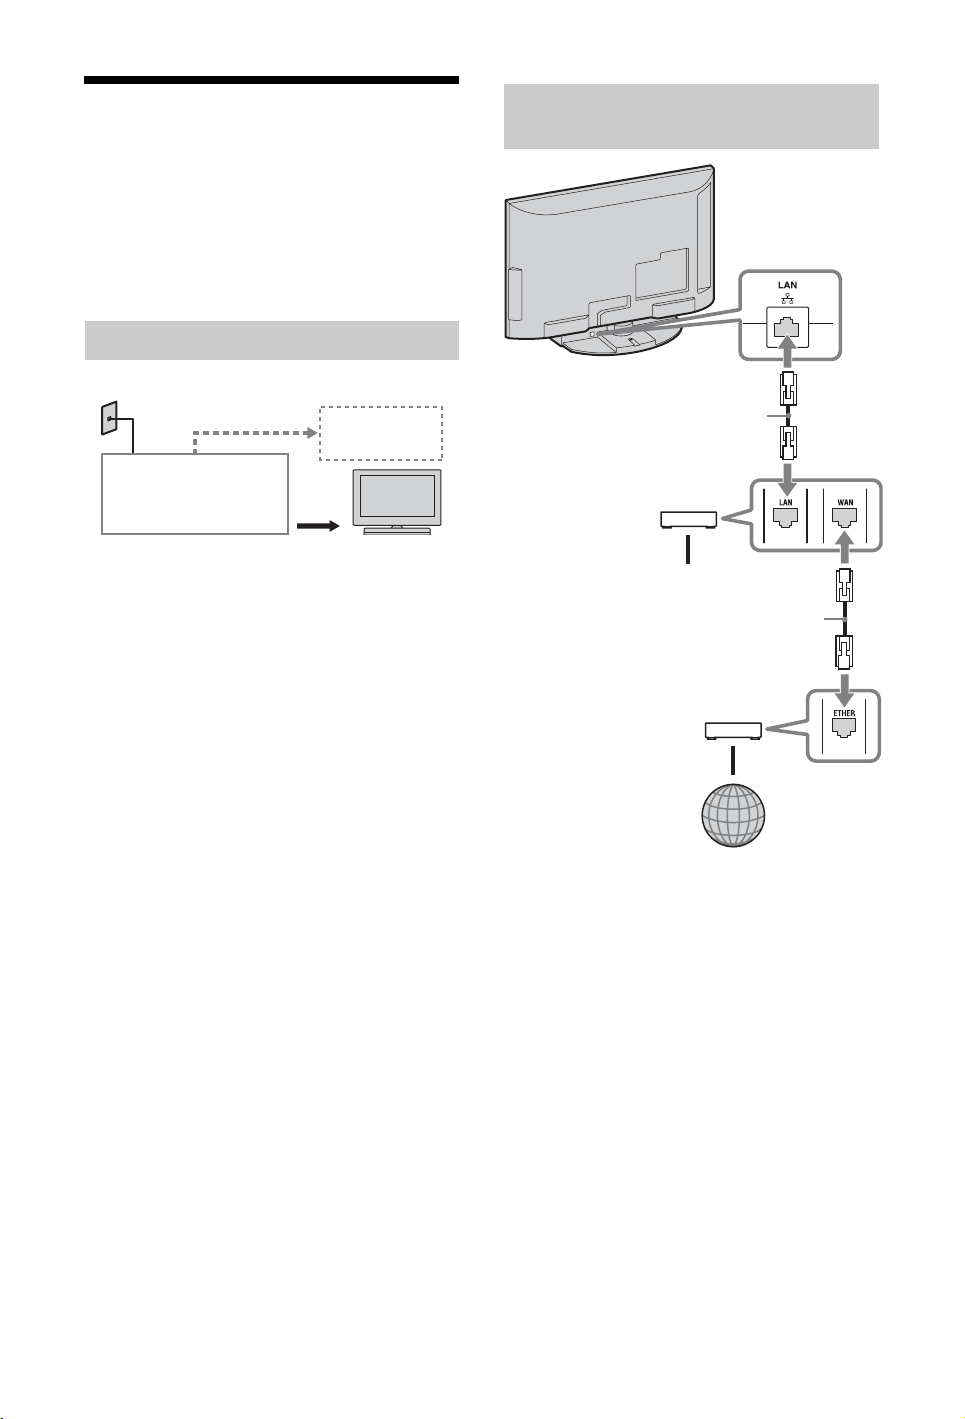
Connecting with an Ethernet Cable
You can connect the built-in PlayStation™2 to
a network using an Ethernet cable connected
to the NETWORK connector on the rear. You
can connect to a 100 Base-TX or 10 Base-T
network. Refer to the instructions supplied
with the network device for details.
Basic Network Setup
Network line
PC
Connecting the Built-in
PlayStation
Network cable (not supplied)
™
2
Built-in PlayStation
2
™
Broadband modem,
router etc.
Network equipment Ethernet cable
(not supplied)
Network line: This will vary depending on
the type of broadband service in your home.
Network equipment: The type of
equipment used will also vary depending on
the type of service.
z
• When connecting the built-in PlayStation
PC to the network, a network device such as a
router or a hub may be required. Refer to the
instructions supplied with the network device for
details.
• For more information on network setup, see
“About Advanced Operations of the
PlayStation
2” (page 32).
™
2 and a
™
Router
To network devices
Network cable (not supplied)
DSL Modem/Cable Modem
Internet
1 Connect the Ethernet cable to the
NETWORK connector on the rear.
2 Connect the Ethernet cable to the network
device.
~
• Do not plug the AC power cord (mains lead) for
the built-in PlayStation
until you have made all other connections.
• Do not connect Ethernet cables or telephone cords
of the following types to the network connector;
too much electrical current may pass through the
connector, causing a malfunction, excessive heat
or fire in the connector:
– Standard residential telephone lines
– Ethernet cables not appropriate for use with a
10Base-T/100Base-TX network
– Any ISDN (digital) compatible phone or data
line
– PBX phone lines
– Other unknown types of telephone lines
2 into the electrical outlet
™
42
GB
Page 43
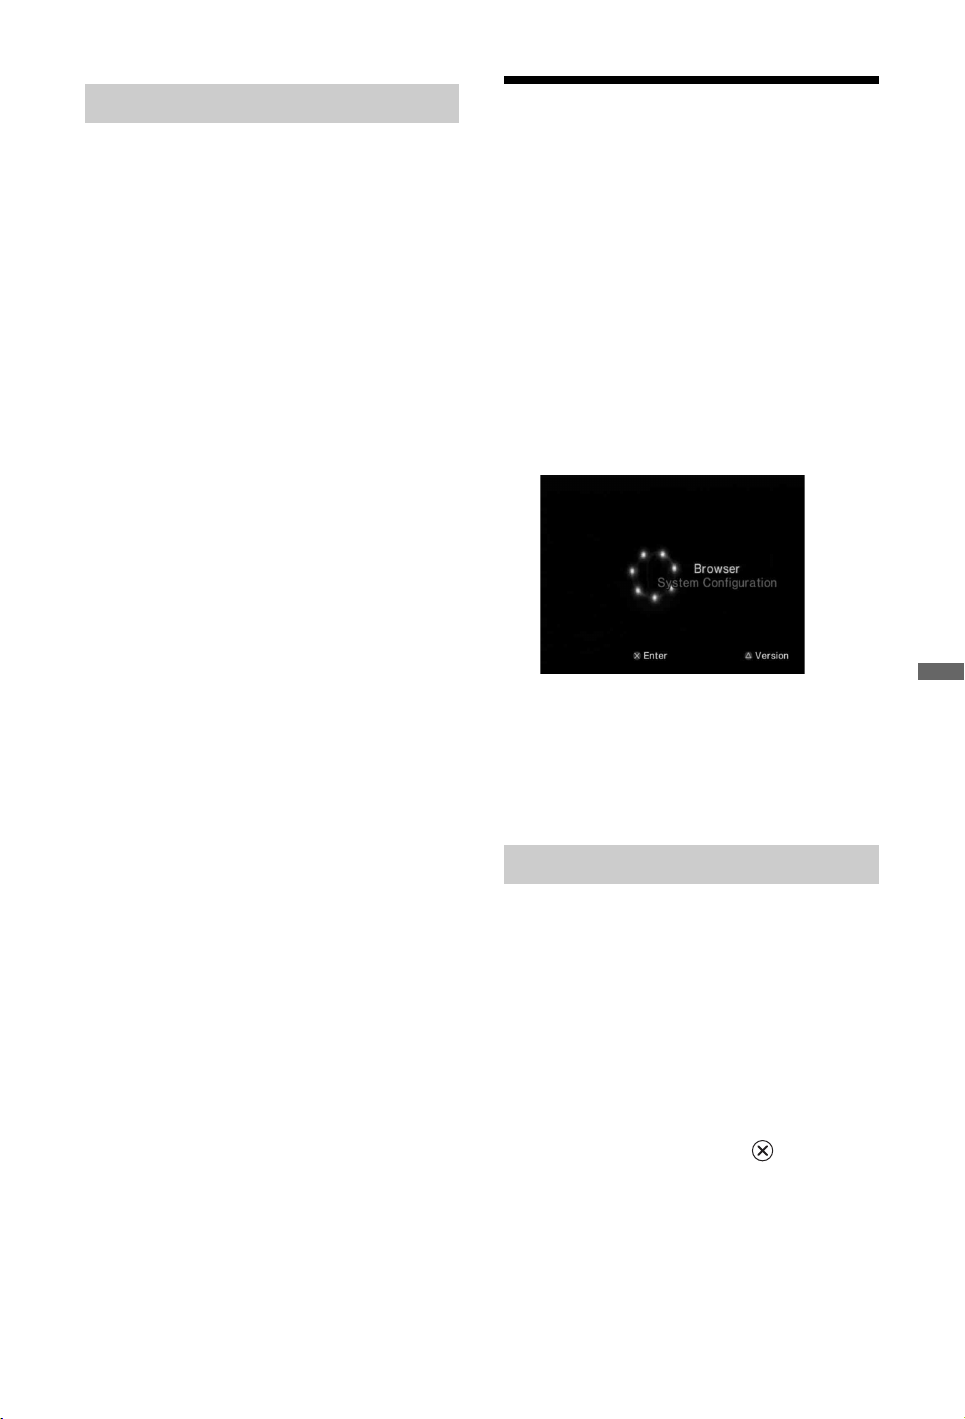
Creating Network Settings
After you have connected an Ethernet cable to
the built-in PlayStation
create and save network settings. To do this
you need a Network Access Disc supplied by
registering your PlayStation
register your PlayStation
information, see “About Advanced Operations
of the PlayStation
You will need the following items to create a
network setting:
– A Memory Card (8MB) (for
PlayStation
2) (sold separately)
™
– Login and network setup information
provided by your Broadband Internet
Service Provider
z
• Depending on the type of Internet service used,
you may need to provide your Broadband Internet
Service Provider with your MAC Address. You
can find the MAC Address for your
PlayStation
screen.
2 listed in the Version Information
™
2, you will need to
™
™
2. For more
™
2” (page 32).
™
2. You can
Displaying the Main Menu
From the main menu, you can access
information and change various settings. You
can also move to the following screens from
the main menu. The main menu is displayed
when you turn on the console without a disc
inserted.
• Browser screen (page 43)
• System Configuration menu (page 44)
1 Press PlayStation 2 POWER ON on
the TV’s remote.
The main menu is displayed. Note that it
may take some time for the main menu to
be displayed.
z
• If you press PlayStation 2 POWER ON on the
TV’s remote with a disc inserted, the main menu
will not be displayed. To display the main menu,
press the OPEN button on the console front and
remove the disc. Then press PlayStation 2
POWER ON on the TV’s remote.
Using the Browser Screen
Using PlayStation
™
2
You can do the following from the Browser
screen:
• Copy or delete game data saved on a
Memory Card
•Start a game
• Start playback of an audio CD
• Start playback of a DVD
1 Display the main menu.
2 Using the directional buttons, select
“Browser” and then press button.
The Browser screen is displayed.
3 Insert a disc or Memory Card.
The icon for the inserted item is displayed
on the Browser screen.
(Continued)
43
GB
Page 44
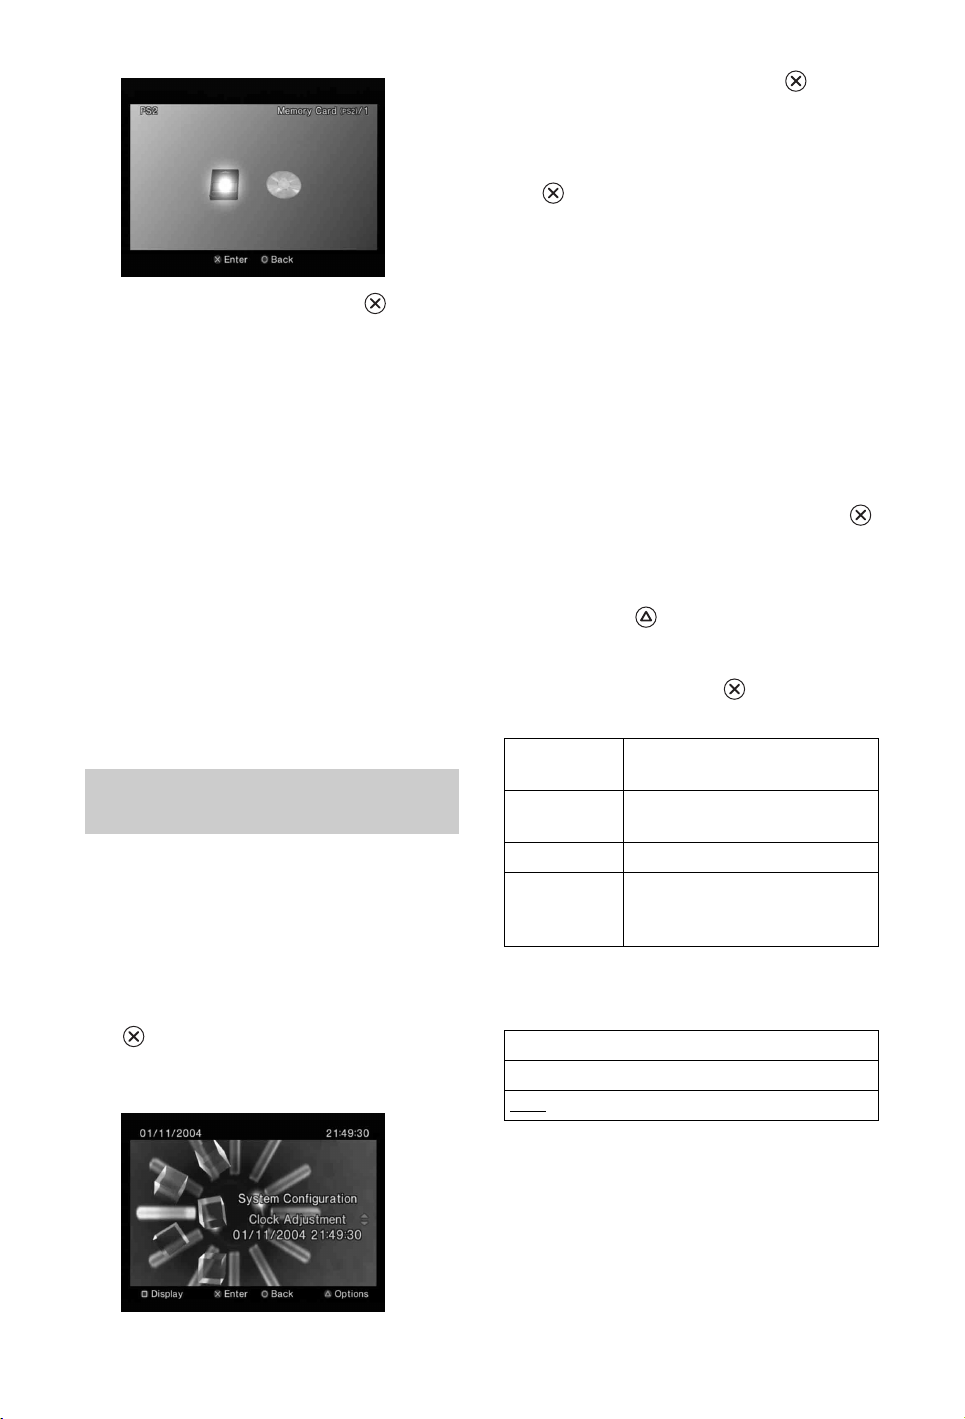
4 Select an icon, and then press button.
• When you select the Memory Card icon,
icons for data saved on the Memory
Card are displayed. To copy or delete
saved game data, see “To copy or delete
saved data” (page 36).
• If you select the icon for a
PlayStation
2 or PlayStation™ format
™
software disc, the game will start.
• When you select the icon for an audio
CD, the tracks contained on the CD are
displayed. See “Playing Content”
(page 35).
• If you select the icon for a DVD,
playback of the DVD will begin.
z
• The message “There is no data” is displayed on
the Browser screen when no Memory Card or disc
is inserted in the console.
Using the System Configuration
Menu
From the System Configuration menu, you can
change settings for numerous options
including language or time display, and audio
or video output method.
1 Display the main menu.
2 Using the directional buttons, select
“System Configuration” and then press
button.
The System Configuration menu is
displayed.
3 Select an item, and then press button.
The menu option becomes active and can
be selected.
4 Select the desired setting, and then press
button.
For details, see the instructions for each
menu item (pages 44 to 45).
z
• The default setting for each menu item is
underlined in the explanations below.
• Changes to each setting are saved and remain in
effect even after you turn off or reset the console.
Clock Adjustment
You can set the date and time. Use the
directional buttons to set “Year”, “Month”,
“Day”, “Hour”, “Minute” and “Second”. The
setting goes into effect when you press the
button.
Optional settings
If you press the button at the “Clock
Adjustment” screen, you can set options such
as “Date Format” or “Time Format”. Use the
directional buttons and the button to make
each setting.
Time
Format
Date Format Sets the display order of year,
Time Zone Sets the time zone
Daylight
Savings
Time
Screen Size
You can set the display mode for the TV.
4:3
Full*
16:9
* “Full” display mode is compatible with the System
Configuration menu, Browser screen and audio CD
screen.
Sets the system clock to either
12-hour or 24-hour clock display
month and day
Sets Standard or Daylight
Savings (Summer Time).
Normally select “Standard”.
44
GB
Page 45
Digital Out (Optical)
You can set whether to output the signal
through the DIGITAL OUT (OPTICAL)
connector.
On Select this option when you want
to output signal through the
DIGITAL OUT (OPTICAL)
connector.
Off Select this option when you do
not want to output signal through
the DIGITAL OUT (OPTICAL)
connector.
Remote Control
You can set this option when using the DVD
Remote Control (for PlayStation
2) (sold
™
separately).
Gameplay
Function On
Select this option when operating
PlayStation
2 or PlayStation™
™
format software with the DVD
Remote Control.
Gameplay
Function Off
Select this option when not
operating PlayStation
PlayStation
format software
™
™
2 or
with the DVD Remote Control.
z
• The following limitations apply when the DVD
Remote Control is set to “Gameplay Function
On”:
– Depending on the software, some remote control
buttons may not work properly.
– The buttons of the DVD Remote Control will not
work when two or more buttons are pressed at the
same time.
– Some software titles may stop operating properly
when a controller is removed from controller port 1.
If this happens, set to “Gameplay Function Off”.
Language
You can use this option to select the language
displayed on the main menu, Browser screen,
System Configuration menu, and Version
Information screen.
Using PlayStation
™
2
English
Displays messages in English
French Displays messages in French
Spanish Displays messages in Spanish
German Displays messages in German
Italian Displays messages in Italian
Dutch Displays messages in Dutch
Portuguese Displays messages in Portuguese
45
GB
Page 46
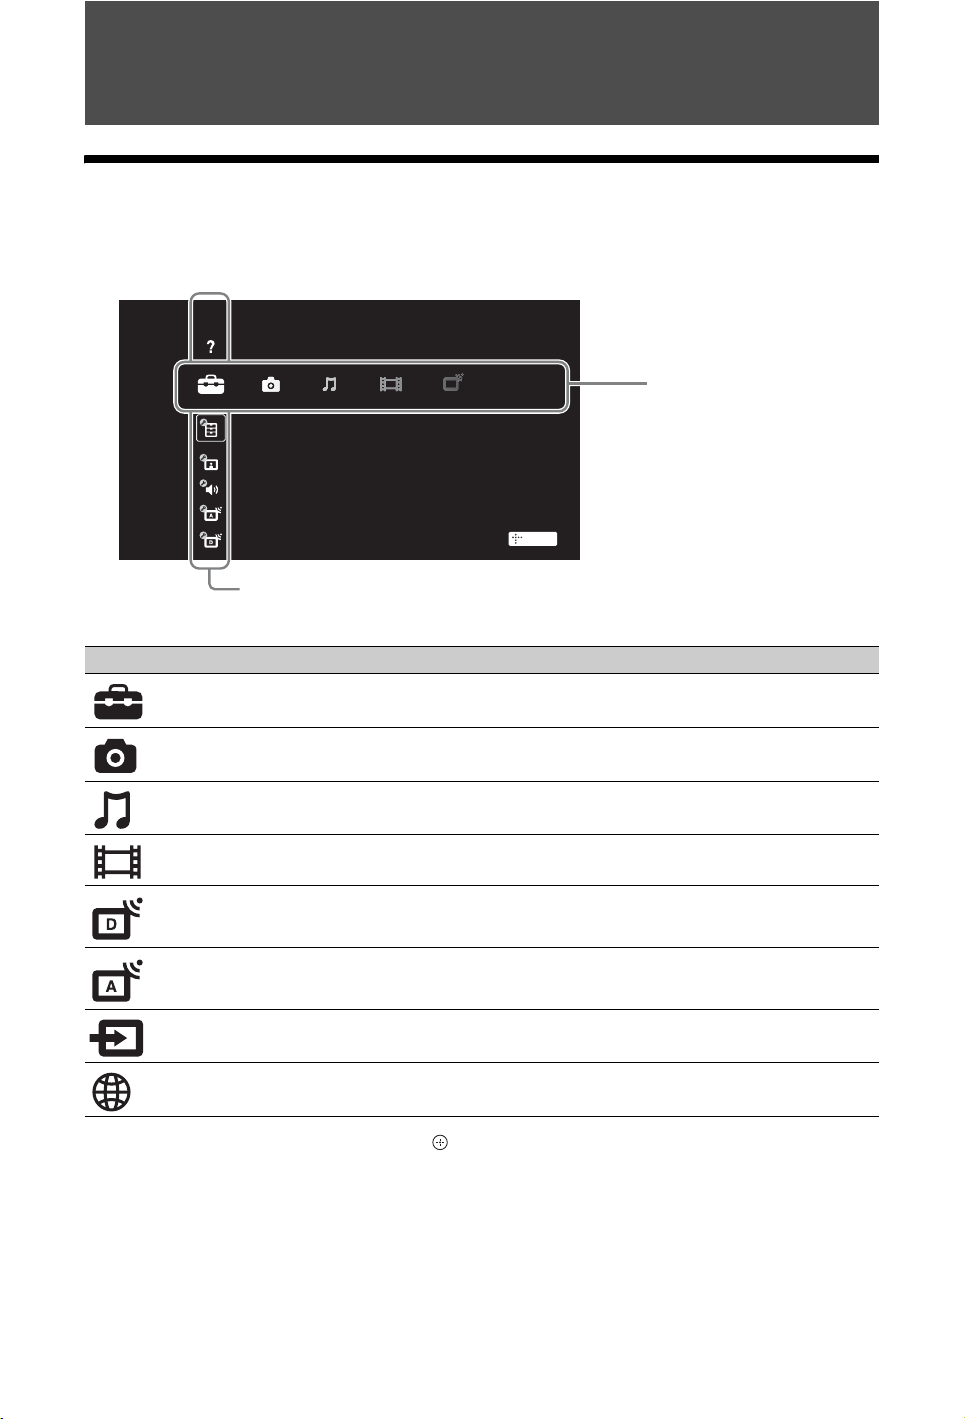
Using Menu Functions
Navigating through TV Home Menu (XMB™)
The TV Home Menu/XMB™ (XrossMediaBar) provides quick access to programme listings, input
sources, the settings menu of your TV and more.
1 Press HOME to display the XMB™.
Settings
System Settings
Category Object Bar
2 Press G/g to select a category.
Media category icon Description
Settings Contains all of the necessary configurations to customise your TV
settings. (page 47).
Photo You can enjoy photo content via USB devices or the network,
including Internet content services. (page 24, 30).
Music You can enjoy music content via USB devices or the network,
including Internet content services. (page 24, 30).
Video You can enjoy video content via USB devices or the network,
including Internet content services. (page 24, 30).
Digital You can select digital channel, and the Digital Electronic Programme
Guide (EPG) (page 19).
Analogue You can select analogue channel.
Media Category Bar
TV
External Inputs You can select equipment connected to the TV.
Network You can enjoy “Internet Video” (page 29).
3 Press F/f to select an item, then press .
4 Follow the instructions on the screen.
5 Press HOME to exit.
~
• The options you can adjust vary depending on the situation.
• Unavailable options are greyed out or not displayed.
• “Photo”, “Music” and “Video” are not supported with the USB connector on the front of PlayStation
GB
46
2.
™
Page 47
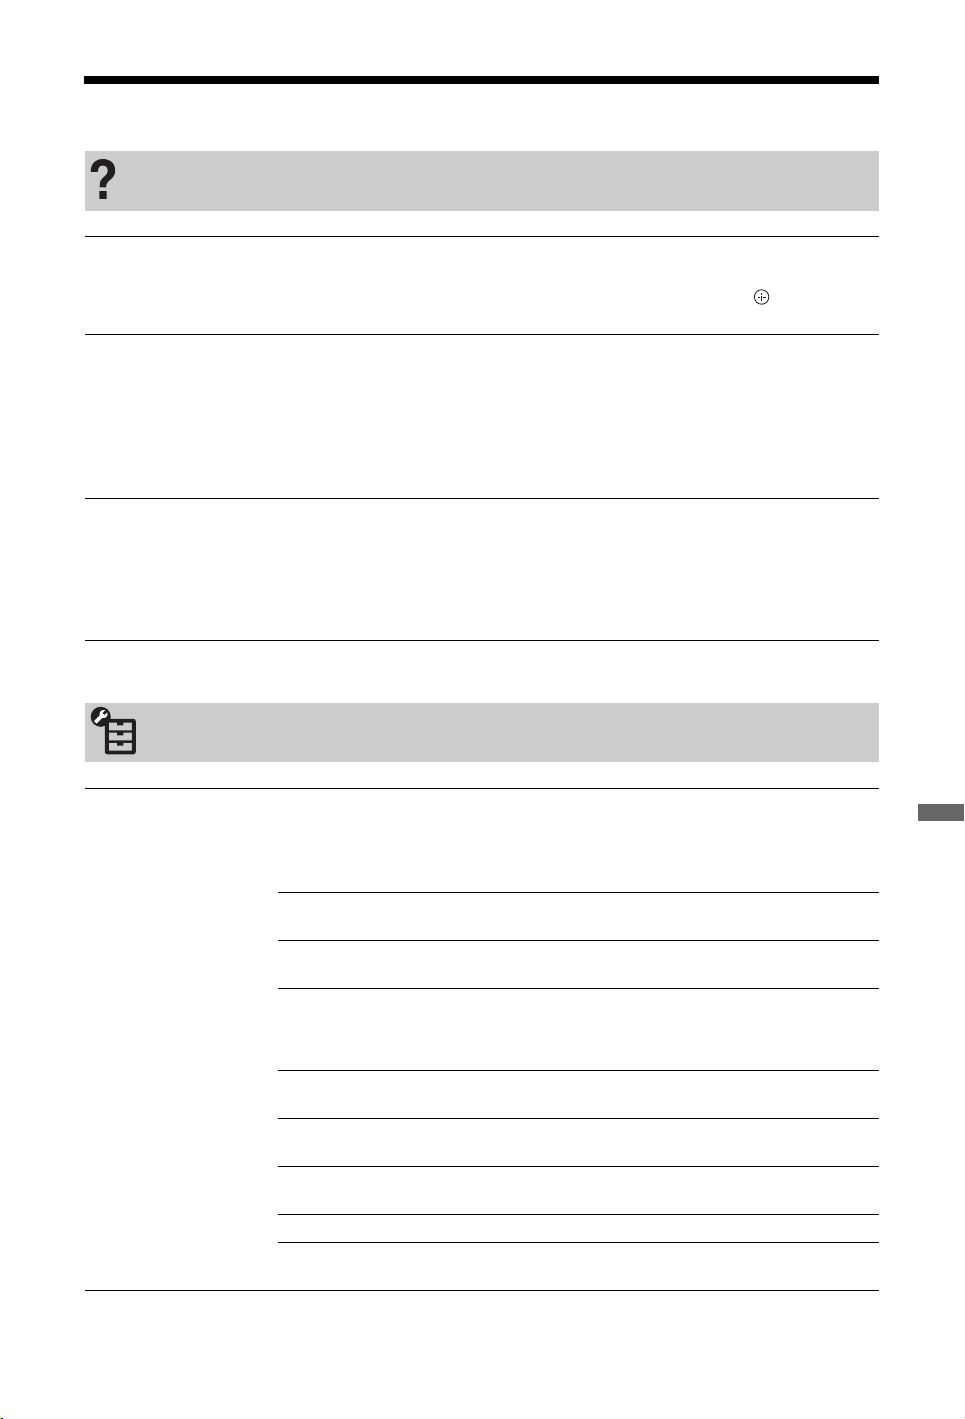
TV Settings Menu
Product Support
i-Manual Displays the on-screen instruction manual.
z
• Some functions can be started directly from the i-Manual. Press to start the
function when “Use this function” is displayed at the bottom of the screen.
System Update Updates the TV software automatically through your existing antenna (aerial)/
cable/Internet (when available).
To always keep the software updated to the newest version, it is recommended to
have this option set to “On”.
~
• The software updates when the TV is in standby mode.
• If performing an update, your TV may take up to several minutes to turn on.
System Information Displays the manufacturer, brand name, model number, serial number, software
version, and signal condition. The signal condition is for the currently viewed
channel.
As the signal condition changes, the level indicator on the screen rises or falls.
~
• The signal condition is unavailable for analogue channels and external inputs.
System Settings
Scene Select Optimises picture and sound quality by selecting the following options.
~
• When you set “Theatre Mode” to “On”, “Scene Select” is automatically set to
“Cinema”.
Cinema Optimises picture scenes and sound just like those in a
theatre.
Sports Presents realistic pictures and sound just like those in a
stadium.
Photo Reproduces the texture and colour of a printed photo.
~
• “Photo” is available only when the input signal is 1080i/p.
Music Lets you experience dynamic and clear sound just like at a
concert.
Game Broadens your game-playing experience with superb picture
and sound quality.
Graphics Eases prolonged monitor viewing with clearer detailed
pictures.
General Optimised to view general content.
Auto Automatically optimises picture and sound quality according
to the input source.
Using Menu Functions
(Continued)
47
GB
Page 48

Eco Changes the settings related to power consumption.
Power Saving Reduces power consumption by adjusting the TV backlight.
Idle TV Standby Turns the TV off after it has been idle for the preset length of
PC Power
Management
Clock/Timers Clock Set Set the current time. When the TV has received the clock
Time Zone Select the time zone you are in.
Auto DST Switches between summer and winter time according to the
On Timer Turns on the TV from standby mode at a time you set, and
Sleep Timer Turns the TV to standby mode after a preset length of time.
General Set-up USB Auto Start Select “Slideshow” or “Thumbnail View” to start photo
When you select “Picture Off”, only sound remains.
time.
Turns the TV to standby mode when there is no signal from
the PC input source for 30 seconds.
from the broadcast signal, the clock cannot be manually set.
calendar.
tuned to a channel or input of your preference.
z
• When you turn off the TV and turn it on again, “Sleep
Timer” is reset to “Off”.
playback automatically.
~
• Be sure to turn on the TV before connecting a USB device
to the TV.
• This option is not supported with the USB connector on the
2.
™
Home Menu
Cursor
Movement
Recommendation
Quick Start
front of PlayStation
Select the cursor speed for navigating through menu options
from “Fast Scroll”, “Slow Scroll” or “No Auto Repeat”.
Searches for and shows programmes you may like under
“Recommendations” in “Favourites”.
Turns the TV on faster than usual by pressing the power
button on the remote. Up to three time periods can be set.
When you set “Smart Mode” to “On”, the TV turns on at the
time of day when you watch TV the most.
~
• If “Quick Start” is set, power consumption may rise.
Factory Settings
Language Sets the language displayed on the menu screens.
Radio Display Displays the screen wallpaper for a radio broadcast. You can select a pattern or
Parental Lock Sets an age restriction to viewing, or blocks specific channels. To view any rated
DivX(R) VOD Select “DivX(R) VOD Registration Code” to register your TV for playback of
GB
48
“Photo Slideshow” for a wallpaper.
programme you specify or any blocked channel, enter the correct PIN code.
PIN Code
DivX contents. Select “DivX(R) VOD Deregistration Code” to delete the
registration.
z
• A new registration code will be displayed in “DivX(R) VOD Registration Code”
after deleting registration via “DivX(R) VOD Deregistration Code”.
Resets all settings to factory settings. After completing this
process, the initial set-up screen is displayed.
Enter your PIN code to activate “Parental Lock”. You can
also change the PIN code.
z
• PIN code 9999 is always accepted.
Page 49
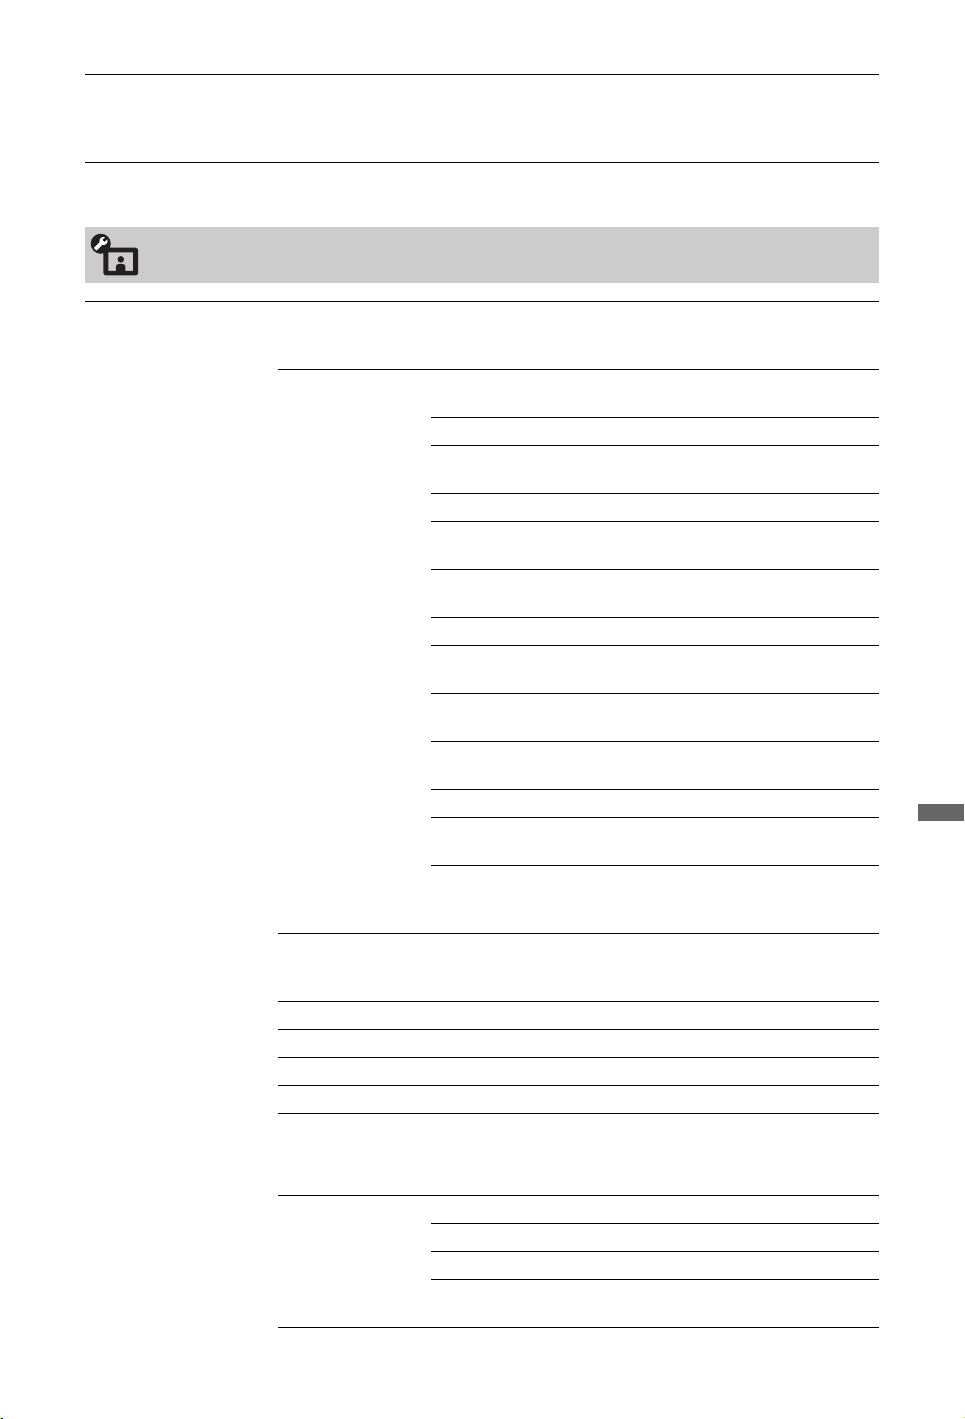
Auto Start-up You can run the initial Set-up that appeared when you first connected the TV, and
select the language and country/area, or tune in all available channels again. Even
if you have made the settings when you first connected the TV, you may need to
change the settings after moving house, or to search for newly launched channels.
Display
Picture Target Inputs Select “Current” to make custom picture settings to the
Picture Mode Sets a picture mode. The options that can be selected differ
Reset Resets all the “Picture” settings to the factory settings
Backlight Adjusts the brightness of the backlight.
Contrast Increases or decreases picture contrast.
Brightness Brightens or darkens the picture.
Colour Increases or decreases colour intensity.
Hue Increases or decreases the green tones and red tones.
current input. Select “Common” to apply common picture
settings to all input.
depending on the scene select settings.
Vivid Enhances picture contrast and sharpness.
Standard For standard pictures. Recommended for
basic home use.
Custom Stores your preferred settings.
Cinema For film-based content. Suitable in a
theatre-like environment.
Sports Optimises picture quality for viewing
sports.
Game-Standard For standard picture suitable for games.
Game-Original Adjusts the game picture according to
your preference.
Graphics Optimises picture quality for viewing
graphics.
Photo-Vivid Enhances contrast, sharpness, and colour
of photographs.
Photo-Standard For standard viewing of photographs.
Photo-Original Enhances the visual warmth of
photographs.
Photo-Custom Adjusts the detailed settings for viewing
photographs and stores your preferred
settings.
excluding “Target Inputs”, “Picture Mode” and “Advanced
Settings”.
~
• “Hue” is available depending on colour system.
Colour
Temperat ure
Adjusts the whiteness of the picture.
Cool Gives white colours a blue tint.
Neutral Gives white colours a neutral tint.
Warm 1/Warm 2 Gives white colours a red tint. “Warm 2”
gives a redder tint than “Warm 1”.
Using Menu Functions
(Continued)
49
GB
Page 50

Sharpness Sharpens or softens the picture.
Noise Reduction Reduces the noise level of pictures (snowy pictures).
~
• “Noise Reduction” is available when “Intelligent Picture” is
set to “Off”.
MPEG Noise
Reduction
Film Mode Provides improved picture movement when playing DVD or
Reduces picture noise in MPEG-compressed videos.
VCR images taken on film, reducing picture blur and
graininess.
Auto Provides the original film-based content
as is.
Off
~
• If the image contains irregular signals or too much noise,
“Film Mode” is automatically turned off even if “Auto” is
selected.
Advanced
Settings
Ambient Sensor Automatically optimises the picture settings according to the ambient light in the
room. The sensor detects ambient light levels to adjust the brightness and colour
temperature of the picture. With this feature you can have the best picture quality
under your room’s lighting conditions.
Allows you to set “Picture” settings in more detail. These
settings are not available when “Picture Mode” is set to
“Vivid” (or “Photo-Vivid”).
Reset Resets all the advanced settings to the
factory settings.
Black Corrector Enhances black areas of the picture for
stronger contrast.
Adv. Contrast
Enhancer
Gamma Adjusts the balance between bright and
Auto Light
Limiter
Clear White Emphasises white colours.
Live Colour Makes colours more vivid.
White Balance Adjusts the temperature of each colour.
Adjusts “Backlight” and “Contrast” by
judging the brightness of the screen. This
setting is effective for dark images and
scenes.
dark areas of the picture.
Reduces glare such as in scenes where the
entire screen is white.
50
GB
Page 51
Screen
(for input other than a
PC)
(for PC input) Auto Adjustment Automatically adjusts the display position, and phase of the
Video Input Settings Colour System Select the colour system according to the input signal from
Target Inputs Select “Current” to make custom picture settings to the
current input. Select “Common” to apply common picture
settings to all input.
Screen Format See “To change the Screen Format manually” (page 18).
Auto Format Automatically changes “Screen Format” to match the input
signal. If you want to use the setting that you specified in
“Screen Format”, select “Off”.
4:3 Default Sets the default screen format for 4:3 broadcasts.
Smart Displays conventional 4:3 broadcasts
with an imitation wide screen effect.
4:3 Displays conventional 4:3 broadcasts in
the correct proportion.
Off Uses the setting that you specified in
“Screen Format”.
Auto Display
Area
Display Area Adjusts the picture display area.
Screen Position Adjusts the vertical position and horizontal position of the
Ver tica l Siz e Adjusts the vertical size of the picture.
Reset Resets all PC screen settings to factory settings.
Phase Adjusts the phase when the screen flickers.
Pitch Adjusts the pitch when the picture has unwanted vertical
Horizontal Shift Adjusts the horizontal position of the picture.
Vertical Shift Adjusts the vertical position of the picture.
Screen Format Sets “Screen Format” for displaying pictures from your PC.
Automatically adjusts the picture to the most appropriate
display area.
+1 Displays pictures in their original size.
Normal Displays pictures in their recommended
size.
-1 Enlarges the picture so that the edges are
outside the visible display area.
picture.
picture in PC mode.
z
• “Auto Adjustment” may not work well with certain input
signals. In such cases, manually adjust “Phase”, “Pitch”,
“Horizontal Shift”, and “Vertical Shift”.
stripes.
Normal Displays the picture in its original size.
Full 1 Enlarges the picture to fill the display
area, while maintaining its original
proportion.
Full 2 Enlarges the picture to fill the display
area.
the input source.
Using Menu Functions
(Continued)
51
GB
Page 52
Sound
Sound Target Inputs Select “Current” to make custom picture settings to the
Sound Mode Sets a sound mode. “Sound Mode” includes options best
Reset Resets all the “Sound” settings to the factory settings
Treble Adjusts higher-pitched sounds.
Bass Adjusts lower-pitched sounds.
Balance Emphasises sound from the left or right speaker.
Surround Allows you to select the suitable surround effects depending
current input. Select “Common” to apply common picture
settings to all input.
suited for video and photographs, respectively. The options
that can be selected differ depending on the scene select
settings.
Dynamic Enhances the treble and bass sound to
Standard Provides natural sound.
Clear Voice Makes voice clearer by lowering
excluding “Target Inputs”, and “Sound Mode”.
on the genre of TV programme (movie, sport, music, etc.) or
video game.
The options that can be selected differ depending on the
“Scene Select” settings.
S-FORCE Front
Surround
Sports Delivers surround effects that make you
Music Delivers surround effects that make you
Cinema Delivers surround effects just like the
Game For virtual game world experience.
Off Turns off “Surround”.
make sound clear.
background sound.
Virtually reproduces realistic sound.
feel like you are watching a live sports
event.
feel like you are in a music hall.
high-grade audio systems found in movie
theatres.
52
~
• Before selecting “Surround”, be sure to set options in
“Scene Select” according to your target programme type to
obtain surround effects.
Sound Enhancer Reproduces clear sound by complementing high-frequency
sounds.
Auto Volume Keeps volume level constant across all programmes and
adverts (e.g. adverts tend to be louder than programmes).
Volume Offset Adjusts the volume level of the current input relative to other
inputs, when “Target Inputs” is set to “Current”.
GB
Page 53
Dual Sound Sets the sound from the speaker for a stereo or bilingual broadcast.
Stereo/Mono For stereo broadcasts.
A/B/Mono For bilingual broadcasts, select “A” for sound channel 1, “B”
for sound channel 2, or “Mono” for mono channel, if
available.
~
• For other equipment connected to the TV, set “Dual Sound” to “Stereo”, “A”, or
“B”.
Speakers TV Speakers Turns on and outputs the TV’s sound from the TV speakers.
Audio System Turns off the TV speakers and outputs the TV’s sound from
external audio equipment connected to the audio output jacks
(sockets) on the TV.
~
• To use multi-channel audio, select external audio system and connect optical out
for equipment compatible with Dolby Digital.
• “Audio System” must be selected to listen to 5.1 multi-channel audio.
Headphone Settings Headphone
Speaker Link
Audio Out Fixed The audio output of the TV is fixed. Use your audio
Variable When using an external audio system, volume output from
Key Tone Select “On” to play sounds as you navigate with the remote.
z
• When you select “Off”, the TV start-up sound is also turned off.
Optical Out For audio signals from the DIGITAL AUDIO OUT (OPTICAL). Select “Auto” for
equipment compatible with Dolby Digital, or “PCM” for equipment not
compatible with Dolby Digital.
Switches the TV’s internal speakers on/off when you connect
headphones to the TV.
receiver’s volume control to adjust the volume (and other
audio settings) through your audio system.
audio out can be controlled using the TV’s remote.
Analogue Set-up
Programme List
Display
1 Digit Direct Select “On” for changing analogue channels with one preset number button (0 – 9)
Select “Off” to hide the list of analogue channels from the XMB (XrossMediaBar).
on the remote.
~
• You cannot select channel numbers 10 and above by entering two digits on the
remote.
Auto Tuning Automatically tunes in all available analogue channels, and stores their settings in
Programme Sorting Changes the order of analogue channels stored in the TV.
the TV. You can run “Auto Tuning” after moving to a new residence, changing
service providers, or to search for newly launched channels.
(Continued)
53
GB
Using Menu Functions
Page 54
Programme Labels Assigns a channel name of your choice.
1 Press F/f to select the channel you want to name, then press .
2 Press F/f to select the desired letter or number (“_” for a blank space), then
press g.
If you enter a wrong character
Press G/g to select the wrong character. Then, press F/f to select the correct
character.
3 Repeat step 2 until you finish entering the name.
4 Press to exit the labeling procedure.
Intelligent Picture On with Indicator Automatically reduces the picture noise. The signal level bar
On Automatically reduces the picture noise.
Off Turns off the “Intelligent Picture” feature.
Manual Programme
Preset
To preset a channel, press PROG +/– to select the channel number.
~
• You cannot select a channel number that is set to “Skip” (page 54).
Programme Select a channel number to tune manually.
System Select a TV broadcast system.
Channel Select “S” for cable channels or “C” for terrestrial channels.
AFT Allows you to fine-tune the selected channel manually if you
Audio Filter Improves the sound of individual channels when distortion
is displayed when the channel is changed or the display is
changed from an input screen to a TV programme.
feel that a slight tuning adjustment may improve picture
quality.
When “On” is selected, fine tuning adjustments are made
automatically.
occurs in mono broadcasts.
~
• You cannot receive stereo or dual sound when “Low” or
“High” is selected.
Skip Skips unused analogue channels when you press PROG +/–
Signal Level Displays the signal level for current programme.
to select channels. To select channels you have programmed
to skip, use the corresponding number buttons.
Digital Set-up
Subtitle Set-up Subtitle Setting Displays visual aids for the hearing impaired with subtitles (if
available) by setting to “For Hard Of Hearing”.
Primary
Preferred
Language
Secondary
Preferred
Language
Audio Set-up Audio Type Switches to broadcast for the hearing impaired when you
GB
54
Select the most preferred subtitle language.
Select the secondary preferred subtitle language.
select “For Hard Of Hearing”.
Page 55
Primary
Preferred
Language
Secondary
Preferred
Language
Audio
Description
Mixing Level Adjusts the TV main audio and “Audio Description” output
Dynamic Range Compensates for differences in the audio level between
Select the most preferred language. Some digital channels
may broadcast several audio languages for a programme.
Select the secondary preferred language.
Provides audio description (narration) of visual information,
when such information is available.
levels.
different channels (only for Dolby Digital audio).
~
• The effect may not function or may vary depending on the
programme regardless of the “Dynamic Range” setting.
MPEG Audio
Level
Digital Auto Tuning Automatically tunes in all available digital channels and stores their settings in the
Auto Tuning Range Select the tuning range to search for available channels.
Digital Programme
Sorting
Digital Manual Tuning Tunes digital channels manually when “Digital Auto Tuning” is set to “Antenna”.
Digital Auto Service
Update
Service Replacement Automatically changes the channel when a broadcaster changes transmission of the
CA Module Set-up Provides access to a pay TV service after you obtain a Conditional Access Module
TV. You can run “Digital Auto Tuning” after moving to a new residence, changing
service providers, or to search for newly launched channels.
Normal Searches within your region/country.
Full Searches regardless of region/country.
Removes unwanted channels, or changes the order of digital channels stored in the
TV.
Detects and stores new digital services as they become available.
viewing programme to a different channel.
(CAM) and a view card. See the location of the (PCMCIA) jack (socket) (page
22).
Adjusts the MPEG audio sound level.
Using Menu Functions
External Inputs
AV Preset Assigns an icon or name to external equipment. Select “Auto” to display icons or
names only when the equipment is connected, or “Always” to display regardless of
connection status.
~
• For a SCART connection and PlayStation™2 mode, skip cannot be set.
• For a PC connection, icon and label cannot be set.
(Continued)
55
GB
Page 56
HDMI Set-up Communicates with equipment compatible with the “Control for HDMI” function.
~
• “Control for HDMI” settings must be made on the connected equipment.
Control for HDMI Links the operations of the TV and the connected equipment.
Auto Devices Off Turns off the connected equipment when you turn off the TV.
Auto TV On Turns on the TV when you turn on or perform playback, etc.,
HDMI Device List Displays a list of connected equipment that is compatible
Device Control
Keys
For specific Sony equipment compatible with “Control for
HDMI”, this setting is applied automatically to the connected
equipment when “On” is set.
on the connected equipment.
with Control for HDMI.
Select button functions of the TV’s remote to operate the
connected equipment.
Normal For basic operations, such as navigation
buttons (up, down, left or right, etc).
Tuning Keys For basic operations and operation of
channel-related buttons, such as PROG +/
– or 0 - 9, etc.Useful when you control a
tuner or set-top box, etc; via the remote.
Menu Keys For basic operations and operation of the
Tuning and
Menu Keys
HOME/OPTIONS buttons. Useful when
you select menus of a BD player, etc; via
the remote.
For basic operations and operation of
channel-related buttons and HOME/
OPTIONS buttons.
~
• You cannot use “Control for HDMI” if the TV operations are linked to the
operations of an audio system that is compatible with Control for HDMI.
Network
~
• For PlayStation™2, other settings are necessary.
Network Set-up Select “Custom” after selecting “Wired Set-up”.
IP Address
Setting
IP Address/
Subnet Mask/
Default Gateway/
Primary DNS/
Secondary DNS
MAC Address Displays the MAC address, which is a fixed, globally unique
Proxy Server Configure the proxy server name and port number if you use
Network (SSID) Select SSID (network name) of the target router.
Security Select an appropriate security key.
Select “Manual” to set the IP address manually, or “Auto” to
set it automatically.
Configure each option when “Manual” is selected in “IP
Address Setting”.
identifier of the network device.
a proxy server.
56
GB
Page 57

Refresh Internet
Content
Server Display
Settings
Server Diagnostics Diagnoses whether the TV can connect to each server on the home network.
Renderer Renderer
For reconnection to the Internet to receive available Internet content services.
Displays the connected server list. You can select the server to display in the Home
Menu.
Function
Renderer Access
Control
Renderer Set-up “Automatic Access Permission” permits access to the TV
Enables the TV to playback photo/music/video files located
on other control devices, such as a digital still camera or
mobile phone, using those control devices via the network.
Select “On” to allow access from a specified control device.
automatically when a control device accesses the TV for the
first time. When “Smart Select” is set to “On”, the TV can
respond to infrared signals sent from control devices. You can
set the name of the TV shown on the control device in
“Renderer Name”.
57
Using Menu Functions
GB
Page 58
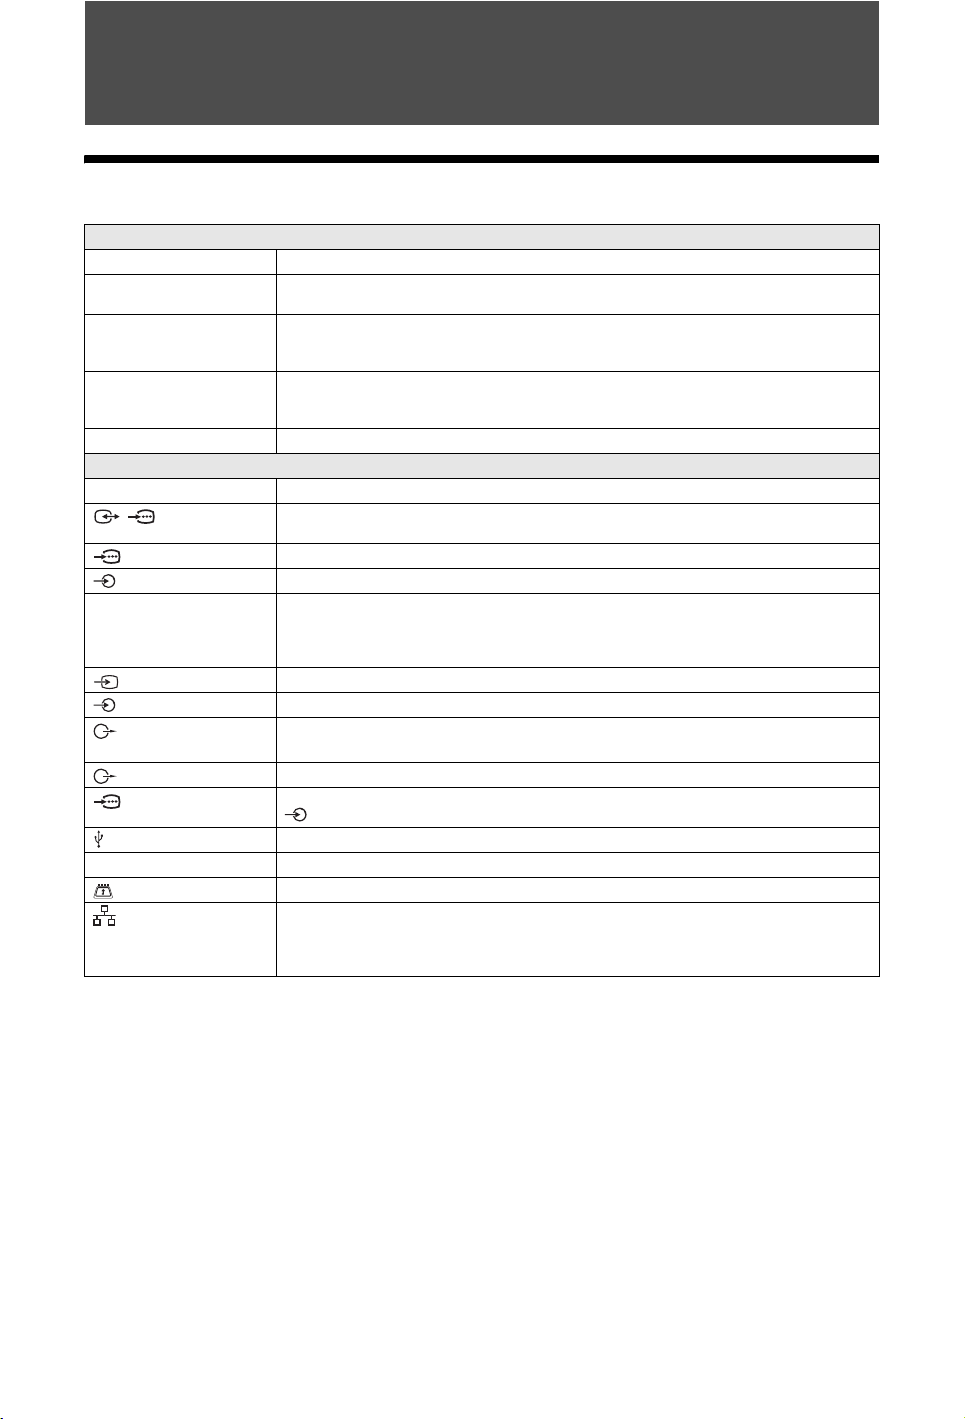
Additional Information
Specifications
System
Panel system
TV system
Colour/video system
Channel coverage
Sound output
Input/Output jacks
Antenna (aerial) cable
/AV1
COMPONENT IN
COMPONENT IN
HDMI IN1, 2, 3, 4
AV 2
AV 2
DIGITAL AUDIO
OUT (OPTICAL)
(VAR/FIX)
PC IN
i
LAN
LCD (Liquid Crystal Display) Panel
Analogue: Depending on your country/area selection: B/G/H, D/K, L, I
Digital: DVB-T/DVB-C
Analogue: PAL, PAL60 (only video input), SECAM, NTSC3.58 (only video input), NTSC4.43 (only
video input)
Digital: MPEG-2 MP@ML/HL, H.264/MPEG-4 AVC MP/HP@L4
Analogue: VHF: E2–E12/UHF: E21–E69/CATV: S1–S20/HYPER: S21–S41
D/K: R1–R12, R21–R69/L: F2–F10, B–Q, F21–F69/I: UHF B21–B69
Digital: VHF/UHF
5 W + 5 W
75 ohm external terminal for VHF/UHF
21-pin scart connector (CENELEC standard) including audio/video input, RGB input and TV audio/video
output.
Supported formats: 1080p, 1080i, 720p, 576p, 576i, 480p, 480i
Audio input (phono jacks)
Video: 1080/24p, 1080p, 1080i, 720p, 576p, 576i, 480p, 480i
Audio: Two channel linear PCM: 32, 44.1 and 48 kHz, 16, 20 and 24 bits, Dolby Digital
Analogue audio input (minijack) (HDMI IN 4 only)
PC Input (page 60)
Video input (phono jack)
Audio input (phono jacks)
Digital optical jack (Two channel linear PCM, Dolby Digital)
Audio output (phono jacks)
PC Input (Mini D-sub 15-pin) (page 60)
PC audio input (minijack)
USB port
Headphones jack
CAM (Conditional Access Module) slot
10BASE-T/100BASE-TX connector (Depending on the operating environment of the network, connection
speed may differ. 10BASE-T/100BASE-TX communication rate and communication quality are not
guaranteed for this TV.)
* For LAN connections, use a Category 7 10BASE-T/100BASE-TX cable (not supplied).
58
GB
Page 59
Model name KDL- 22PX300
Power and others
Power requirements
Screen size (measured
220 V – 240 V AC, 50 Hz
Approx. 54.8 cm/22 inches
diagonally)
Display resolution
Power
consumption
in “Home”/
“Standard”
1,366 dots (horizontal) × 768 lines (vertical)
39.0 W
mode
in “Shop”/
90.0 W
“Vivid” mode
Standby power
consumption*
Average annual energy
consumption*
1
2
Laser
0.9 W (13 W when “Quick Start” is set to “On”)
57 kWh
Type: Semiconductor, continuous
DVD Wavelength: 645 - 660 nm
Power: Max 6 mW
CD Wavelength: 770 - 800 nm
Power: Max 7 mW
Dimensions (Approx.) (w × h × d)
with Table-Top Stand
57.5 × 42.9 × 25.3 cm
Mass (Approx.)
with Table-Top Stand
Supplied accessories
Operating temperature
*1Specified standby power is reached after the TV finishes necessary internal processes.
2
4 hours a days and 365 days a year
*
9.8 kg
See “To check the accessories” (page 5).
5 °C to 35 °C
~
• To save power consumption
– when you reduce backlight setting (the brightness of the screen), the power consumption reduce.
– the “Eco” settings (e.g. “Power Saving”, “Idle TV Standby”) help you to reduce the power consumption and thus save
money by reducing electricity bills.
Design and specifications are subject to change without notice.
(Continued)
59
Additional Information
GB
Page 60
PC input signal reference chart for PC and HDMI IN 1, 2, 3, 4
Resolution
Signals Horizontal
VGA
SVGA
XGA
WXGA
(Pixel)
640 × 480 31.5 60 VGA
800 × 600 37.9 60 VESA Guidelines
1024 × 768 48.4 60 VESA Guidelines
1280 × 768 47.4 60 VESA
1280 × 768 47.8 60 VESA
1360 × 768 47.7 60 VESA
× Vertical
(Line)
Horizontal
frequency (kHz)
Vertical
frequency (Hz)
Standard
* 1080p timing when applied to the HDMI input will be treated as a video timing and not a PC timing. This
will affect the “Video Input Settings” and “Screen” settings. To view PC contents, set “Screen Format” to
“Wide”.
~
• This TV’s PC input does not support Sync on Green or Composite Sync.
• This TV’s PC input does not support interlaced signals.
60
GB
Page 61
Optional accessories
When purchasing optional accessories, be sure to purchase those that are compatible with this
model of the PlayStation
About the DVD remote control (for PlayStation™2)
When purchasing a new DVD remote control, choose model number SCPH-10420 E which does
not include the IR receiver unit (for PlayStation
Accessories not compatible with this model
The following accessories for the PlayStation™ console and the PlayStation™2 console are not
compatible with this model of the PlayStation
Product name
Network Adaptor (Ethernet) (for PlayStation™2)
Multitap
Vertical stand (for PlayStation
Horizontal stand (for PlayStation
Products that use the S400 i.LINK connector
Component AV Cable
Component AV Cable (for PlayStation
Euro-AV Cable
RFU Adaptor
2 console.
™
2)
™
™
2).
™
2 console.
™
2)
2)
™
61
Additional Information
GB
Page 62
Troubleshooting
Check whether the 1 (standby) indicator is flashing in red.
When the 1 (standby) indicator is flashing
The self-diagnosis function is activated.
1 Count how many times the 1 (standby) indicator flashes between each three second break.
For example, the indicator may flash three times, go off for three seconds, then flash again
three times.
2 Press 1 on the TV to turn it off, disconnect the AC power cord (mains lead), and inform your
dealer or Sony service centre of how the indicator flashes (number of flashes).
When the 1 (standby) indicator is not flashing
1 Check the items in the tables below.
2 If the problem persists, have your TV serviced by qualified service personnel.
Condition Explanation/Solution
Picture
No information from
connected equipment.
Ghosting or double images
appear.
Only noise appears on the
screen.
There is picture or sound noise
when viewing a TV
programme.
Tiny black points and/or
bright points appear on the
screen.
The pictures are distorted. • Change the current setting of “Film Mode” to other settings (page 50).
No picture colour. • Select “Reset” in “Picture” (page 49).
No picture colour from
equipment connected to the
COMPONENT IN jacks
(sockets).
No picture from the connected
equipment.
You cannot select connected
equipment in the Home Menu.
• Press to display the list of inputs, then select the desired input.
• Check the connection between the equipment and the TV.
• Check the antenna (aerial)/cable connection.
• Check the antenna (aerial) location and direction.
• Check if the antenna (aerial) is broken or bent.
• Check if the antenna (aerial) has reached the end of its serviceable life
(three to five years for normal use, one to two years at the seaside
location).
• Adjust “AFT” (Automatic Fine Tuning) to obtain better picture
reception (page 54).
• The screen is composed of pixels. Tiny black points and/or bright points
(pixels) on the screen do not indicate a malfunction.
• Check the connection of the COMPONENT IN jacks (sockets) and
check if connectors are fully plugged in.
• Turn the connected equipment on.
• Check the cable connection.
• Press to display the list of inputs, then select the desired input.
• Correctly insert the memory card or other storage device, such as digital
still camera.
• Make sure that the memory card (in equipment such as a digital still
camera) has been properly formatted.
• Operation is not guaranteed for all USB devices. Also, operations differ
depending on the features of the USB device or the video files being
played.
• Check the cable connection.
• Set the servers to be displayed in the Home Menu (page 31).
62
GB
Page 63
Condition Explanation/Solution
The size of the video image
from the built-in
PlayStation
the TV screen.
2 does not match
™
• Check the screen format settings on the TV.
• Adjust the image size of the DVD to match the TV screen. Start a DVD,
stop playback, and then select “Setup”, and select “TV Type” in “Screen
Setup” in the control panel of the PlayStation
• With some DVDs, image size cannot be changed.
2.
™
Sound
There is no sound. • Press 2 +/– or % (Muting).
• Check if the “Speakers” is set to “TV Speakers” (page 53).
• When using HDMI input with Super Audio CD or DVD-Audio,
DIGITAL AUDIO OUT (OPTICAL) may not output audio signals.
• When you select an analogue (RF) channel and pictures are displayed
correctly, refer to “System” in “Manual Programme Preset” (page 54)
and change the TV broadcast system.
There is no sound. (For the
built-in PlayStation
2.)
™
• Press 2 +/– or % (Muting).
• If the PlayStation™2 is connected to an audio device, check the settings
on the connected device. For details, refer to the instruction manual
supplied with the device.
• When playing PlayStation
audio output from the DIGITAL OUT (OPTICAL) connector, no sound
2 format software titles that do not support
™
will be produced even if you connect using an optical digital cable for
audio.
There is no sound or the sound
quality from the digital audio
device is poor. (For the built-in
PlayStation
2.)
™
• If the PlayStation
“Digital Out (Optical)” in the System Configuration menu is set to “On”.
• When playing DTS audio, set “DTS” to “On” in the control panel of the
PlayStation
“Audio Setup”). If the connected device does not have a built-in DTS
2 is connected to a digital audio device, check if the
™
2 (select “Setup”, and then select “Audio Digital Out” in
™
decoder, DTS audio cannot be played.
The surround effect is not
produced when playing a
DVD with a Dolby Digital
audio track. (For the built-in
PlayStation
2.)
™
The audio output from a DVD
is low.
• Check that the PlayStation
built-in Dolby Digital decoder using an optical digital cable.
• To play Dolby Digital audio, set “Dolby Digital” to “On” in the control
panel of the PlayStation
Digital Out” in “Audio Setup”).
• Select “Off” in “Digital Out (Optical)” (page 45), and change the output
volume from the DVD to “+1” or “+2”. For details, see the User’s Guide
2 is connected to an audio device with a
™
2 (select “Setup”, and then select “Audio
™
on the Internet (page 32).
Channels
You cannot select the desired
channel.
• Switch between digital and analogue mode, and select the desired
channel.
Some channels are blank. • The channel is for scrambled/subscription service only. Subscribe to a
pay TV service.
• The channel is used only for data (no picture or sound).
• Contact the broadcaster for transmission details.
You cannot view digital
channels.
• Ask a local installer if digital transmissions are provided in your area.
• Upgrade to a higher gain antenna (aerial).
Network Connection
Connection fails.
Check Connections
• By verifying that you are using a straight cable for the LAN cable.
• By examining if the cable is connected firmly.
• By examining the connection between the TV and router.
Check Settings
• By changing the IP Address for the DNS server (page 30).
• By contacting your Internet service provider.
• By specifying the IP Address of the router if you do not know the DNS
of your Internet service provider.
Additional Information
(Continued)
63
GB
Page 64

Condition Explanation/Solution
No server is found, no list is
retrieved, and playback fails.
• Once server settings are changed, turn the TV off and on by pressing 1
on the TV.
• Run “Server Diagnostics” (page 31).
When using a PC as the server
• Check if the PC is turned on. Do not turn off the PC while accessing it.
• If the PC has security software installed, allow connections from
external devices. For details, refer to the manual supplied with your
security software.
• Stop the server application and restart it if the server is experiencing
instability. If the server remains instable, restart the PC.
• Reduce the number of applications running on the PC; the server may be
overloaded.
• Reduce the amount of content; the server may be overloaded.
Changes on the server are not
made correctly.
No photo, music, or video files
are displayed.
• Sometimes changes are not applied to the TV display even though
content has been added and/or deleted on the server. Go back up one
level and try opening the folder or server again.
Preliminary Check
• Check that the connected device supports DLNA.
• Operations are not guaranteed for all servers. Also, operations differ
depending on the features of the server and the content in question.
• Turn the connected device on.
Check connections by examining that the LAN cable or AC
power cord (mains lead) of the server has been connected
properly.
Check Settings
• By examining that the connected device is registered under “Server
Display Settings” (page 31).
• By checking if that the server is correctly configured.
• By examining that the selected device is connected to the network and
can be accessed.
• If “IP Address Settings” in “Network Set-up” (page 56) is set to “Auto”,
it may take some time to recognise devices if there is no DHCP server.
• When playing content from your PC, adjust its firewall settings.
The TV cannot be found from
a renderer-compatible device.
• Check connections by examining that the LAN cable or AC power cord
(mains lead) of the device has been connected properly.
• Check connections or settings of the wireless LAN (page 28).
Check Settings
• By confirming that the “Renderer Function” is activated (page 57).
• By confirming that the connected device is registered under “Renderer
Access Control” (page 57).
Wireless LAN connection
fails or radio reception
conditions are bad.
A connection to the network
of the built-in PlayStation
cannot be established.
• Check the installation location for the TV and wireless LAN router.
Signal condition may be affected for the following reasons.
– Other wireless devices, microwaves, fluorescent lights, etc., are placed
nearby.
– There are floors or walls between the wireless LAN router and TV.
• When using a USB Wireless LAN Adapter, move it to avoid signal
interference by using an extension cable with base unit (optional
accessory).
• Check that the network settings are correct (page 42). Refer to the
2
information from your broadband Internet service provider and the
™
instructions supplied with the software in use, and adjust the settings
accordingly.
• Check that the Ethernet cable is properly connected (page 42).
• Check that you are using the correct type of Ethernet cable (cross or
straight cable). For details, refer to the instruction manual supplied with
the network device.
• Check that the network device is properly connected. Also check that the
settings of the network device in use are correct. For details, refer to the
instruction manual supplied with the network device.
64
GB
Page 65
Condition Explanation/Solution
Only a few icons appear under
• This is normal when internet connection is not available.
the “Network” in the Home
Menu.
Analog Controller (DUALSHOCK®2)
The controller does not
function correctly.
• If a software title is compatible only with the Analog Controller
(DUALSHOCK®2), it will not work properly with the Analog
Controller (DUALSHOCK®). Use a controller that is appropriate for the
software title. For details, refer to the instruction manual supplied with
the software.
• Some software specifies a specific controller port that must be used.
Check that the controller is connected to the correct port. For details,
refer to the instruction manual supplied with the software.
• There may be a problem with the controller in use. Try using another
2.
™
The left and right analog
sticks of the controller do not
operate properly.
controller that is compatible with the built-in PlayStation
• When these symptoms occur, rotate the left and right analog sticks of the
Analog Controller (DUALSHOCK®2) in a large circle to adjust the
sticks to an optimal range of operation. Be sure to rotate in a circle; do
not twist the sticks.
Operation (PlayStation™2)
Check the following items
first;
• Check that the PlayStation™2 is turned on. Press PlayStation 2
POWER ON on the remote to turn on the PlayStation
indicator on the front of the PlayStation
• Check that the AC power cord (mains lead) of the TV is fully inserted
2 will turn green).
™
2 (the "/1
™
into the electrical outlet (page 6).
• Check that the cables are correctly and securely connected.
A disc cannot be played. • Check that the disc is of a type that can be played on the PlayStation
(page 40).
• Check that the disc is clean and in good condition. If the disc is dirty,
wipe it gently with a soft cloth.
• Some PlayStation
more information, refer to the URL in the Operating Instructions (paper
format software may not perform properly. For
™
manual).
• If the disc has a label, place the disc in the PlayStation
side facing up (page 35).
2 with the label
™
• If a DVD-R or DVD-RW disc is not finalised, it cannot be played.
• Copy-protected video from a digital broadcast recorded on Content
Protection for Recordable Media (CPRM) compatible DVD-RW discs or
on CPRM compatible DVD-R discs cannot be played.
• Check that the region code of the DVD is correct for the PlayStation
in use (page 40). Also check that the broadcast standard is correct.
• The parental control feature may be set on the disc. Follow the on-screen
instructions and temporarily raise the parental control restriction level.
The PlayStation
recognise the memory card.
2 does not
™
Data cannot be saved or
copied to the memory card.
• Check that the memory card is compatible with the software in use
(page 36). To save or load PlayStation
card (8MB) (for PlayStation
PlayStation
• You cannot copy saved data from PlayStation™2 format software to a
format software, use a memory card (SCPH-1020 E).
™
2) (SCPH-10020 E). To save or load
™
2 format software, use a memory
™
memory card (SCPH-1020 E).
• Check that the memory card is securely inserted into the memory card
slot on the front of the PlayStation
• There may be a problem with the memory card in use. If you have
2 (page 36).
™
another memory card that is compatible with the PlayStation
switching memory cards.
™
2, try
2
™
2
™
Additional Information
(Continued)
65
GB
Page 66
Condition Explanation/Solution
Data saved on a memory card
is corrupted.
• While saving, loading, copying or deleting data, do not attempt any of
the following. Doing so may cause the data to become corrupted.
– Do not remove the memory card or the controller.
– Do not open the disc cover.
2.
™
2.
™
2 until the flashing stops (page 32). Placing
™
The PlayStation™2 does not
function properly.
The "/1 indicator flashes in
red and the PlayStation
does not work.
2
™
– Do not reset the PlayStation
– Do not turn off the PlayStation
• Static electricity and other similar occurrences may affect the
PlayStation
unplug the TV from the electrical outlet. Then plug in and turn it on.
2 operation. Turn off the PlayStation™2 and the TV, and
™
• Do not use the PlayStation
the TV in an extremely hot location or blocking vents of the
PlayStation
proper operation.
2 raises the internal temperature of it, thereby interrupting
™
You forgot your password. • You can clear the password using the following procedure:
1: Insert a DVD without the parental control feature.
2: In the control panel of the PlayStation
playback, and then select x (Stop) again to clear resume play.
2, select x (Stop) to stop
™
3: Select “Setup”, and then select “Parental Control” in “Custom Setup”,
and then press the button on the controller.
4: Press the SELECT button on the controller, and then enter the
number “7444” on the screen that is displayed. The registered
password is cleared, and the screen for registering a new password is
displayed. Enter a new password.
The DVD does not function.
Some DVD settings cannot be
changed.
• The playback status or settings of some DVDs are preset intentionally by
the manufacturer. Because the PlayStation
the settings on the disc, some functions may not be available even if you
2 plays DVDs according to
™
follow the procedures in this manual.
• Some settings cannot be changed during playback or resume play. In the
control panel of the PlayStation
and then select x (Stop) again to clear resume play.
2, select x (Stop) to stop playback,
™
General
Poor picture on BRAVIA
Internet Video.
• The quality of the video displayed on your TV depends on the quality of
the video provided by the video content provider as well as your
connected bandwidth.
Small picture on BRAVIA
• Press F/f to zoom in and out.
Internet Video.
Certain Internet video
programmes display a loss of
• Video quality and picture size vary and are dependent upon broadband
speed and delivery by content providers.
detail, especially during fastmotion or dark scenes.
Good picture quality but no
sound on the Internet video
content.
You do not see many videos in
• Quality depends on content provided by the video content provider as
well as your connected bandwidth.
• Due to the nature of Internet video, not all videos will contain sound.
• Press OPTIONS and select categories to view more content.
the Internet Video Guide.
Distorted picture and/or
sound.
• Keep the TV away from electrical noise sources such as cars, hair-dryers
or optional equipment.
• When installing optional equipment, leave some space between the
equipment and the TV.
• Check the antenna (aerial)/cable connection.
• Keep the antenna (aerial)/cable TV cable away from other connecting
cables.
The TV turns off
automatically.
• Check if the “Sleep Timer” is activated, or confirm the “Duration”
setting of “On Timer” (page 48).
• Check if the “Idle TV Standby” in “Eco” is activated (page 48).
66
GB
Page 67
Condition Explanation/Solution
The TV turns on
• Check if the “On Timer” is activated (page 48).
automatically.
Some input sources cannot be
selected.
• Select “AV Preset” and confirm the “Always” setting for the input
sources (page 55).
The remote does not function. • Replace the batteries.
• Your TV may be in SYNC mode.
Press SYNC MENU, select “TV Control” and then select “Home
(Menu)” or “Options” to control the TV.
• Check the function buttons on the remote (page 13). If PS2 is selected
in TV mode or TV is selected in PS2 mode, the remote will not function.
HDMI equipment does not
appear on “HDMI Device
• Check that your equipment is compatible with Control for HDMI the
value of “Control for HDMI” is “On”.
Selection”.
You cannot select “Off” in
“Control for HDMI”.
• You cannot select “Off” for any audio system compatible with “Control
for HDMI”. If you want to change the audio output to the TV speaker,
select “TV Speakers” in the “Speakers” menu (page 53).
The “Parental Lock” password
• Enter 9999 for the PIN code. (PIN code 9999 is always accepted.)
of the TV setting menu has
been forgotten.
Not all channels are tuned for
cable.
The TV surrounds become
warm.
• Check the support website for cable provide information.
http://support.sony-europe.com/TV/DVBC/
• When the TV is used for an extended period, the TV surrounds become
warm.
You may feel hot when touching there by the hand.
67
Additional Information
GB
Page 68

Index
Numerics
1 Digit Direct 53
14:9 18
4:3 18
A-G
Ambient Sensor 50
Ambient sensor 16
Audio Out 53
Audio Set-up 54
Auto Start-up 49
Auto Tuning 53, 55
Auto Tuning Range 55
AV Preset 55
BRAVIA Sync 26
CA Module Set-up 55
Channels
selecting 17
Skip 54
Clock/Timers 48
Connecting
an antenna (aerial) 5
network 27
optional equipment 22
Set Top Box/recorder 5
Wireless LAN Ready 28
Control for HDMI 26
Digital Auto Service Update 55
Digital Auto Tuning 55
Digital Manual Tuning 55
Digital Programme Sorting 55
Display photomap 25
DivX(R) VOD 48
Dual Sound 53
Duration 25
Eco 48
EPG (Digital Electronic Programme
Guide) 19
Fast Text 17
Favourites 20
General Set-up 48
H-Q
HDMI Set-up 56
Headphone Settings 53
Headphones
connecting 23
i-Manual 47
Initial Set-up 6
Intelligent Picture 54
Internet Video 29
Key Tone 53
Language 48
Manual Programme Preset 54
Music 24, 30
Network connection 30
Network Set-up 56
Optical Out 53
PAP 24
Parental Lock 48
Photo 24, 30
GPS 25
Picture 49
Picture Frame 25
Picture Off ( ) indicator 16
PIP 24
Power (") indicator 16
Power (1) switch 12
Programme Labels 54
Programme List Display 53
Programme Sorting 53
R-Z
Radio Display 48
Refresh Internet Content 57
Remote control 12
inserting batteries 5
sensor 16
Renderer 30, 57
Reset
PC settings 51
picture 49
sound 52
Scene Select 47
Screen 51
Screen Format 18
Server Diagnostics 57
Server Display Settings 31, 57
Service Replacement 55
Settings
Analogue Set-up 53
Digital Set-up 54
Display 49
External Inputs 55
Network 56
Product Support 47
Sound 52
System Settings 47
Smart 18
Sound 52
Speakers 53
Specifications 58
Standby (1) indicator 16
Subtitle Set-up 54
System Information 47
System Update 47
Text 17
Timer ( ) indicator 16
Troubleshooting 62
TV buttons/indicators 12
Using PlayStation
Video 24, 30
Video Input Settings 51
Wide 18
XMB™ (XrossMediaBar) 46
Zoom 18
2 32
™
68
GB
Page 69

Page 70

Page 71

Page 72

For useful information about Sony products
© 2010 Sony Corporation
4-256-733-F2(1)
 Loading...