

Page 1

Table of
Contents
Index
Operation Guide
NWZ-X1050 / X1051 / X1060 / X1061
©2009 Sony Corporation
4-141-609-11 (1)
Page 2

2
Table of
Contents
Index
2
Browsing the Operation Guide
To use the buttons in the Operation Guide
Click the buttons located at the upper right of the pages of this manual to jump
to “Table of Contents” or “Index.”
Jumps to the table of contents
Find what you are looking for from a list of topics in the manual.
Jumps to the index
Find what you are looking for from a list of key words mentioned in the manual.
Hints
You can jump to the indicated page by clicking a page number in the table of contents or
in the index.
ou can jump to the indicated page by clicking a page reference indication (e.g., page
Y
4) on each page.
o search for a reference page by keyword, enter the keyword into the find text field on
T
the Adobe Reader window.
peration procedures may differ, depending on your Adobe Reader version.
O
To change the page layout
The buttons on the Adobe Reader window enable you to select how pages are
displayed.
Text field to find text
Continuous
Pages are displayed as a continuous
roll of pages, fitting the page width
inside the window. When you scroll,
the previous or next pages scroll up
Single Page
Pages are displayed one at a time,
fitting the page into the window.
When you scroll, the display changes
to a previous or succeeding page.
or down continuously.
Page 3

3
Table of
Contents
Index
3
Table of Contents
Basic Operations and Screens
Parts and Controls ................................ 6
Connecting the headphones ...........................8
Turning the Player On and Off ............. 9
Disabling the operation buttons and the
touch panel ...................................................10
How to Use the Touch Panel ............... 11
About the Home Menu........................ 13
How to Use the Home Menu .
How to Use the Option Menu .
Text Input .
........................................... 20
About the Bundled Software .
Windows Media Player 11 ............................22
Media Manager for WALKMAN .................22
Content Transfer ............................................23
.............. 14
............ 18
.............. 22
Preparing the Player
Charging the Player ............................ 24
Setting the Date and Time .
Getting Music/Videos/Photos/
Podcasts .
........................................... 27
Transferring Music/Videos/Photos/
Podcasts .
........................................... 28
Wireless LAN Connection .
Wireless networks which may be used with
the player ......................................................33
Connecting to a wireless LAN .....................34
Disconnecting from a wireless LAN ...........36
................. 26
................. 33
Deleting Songs .................................... 44
Using the Music Option Menu .
Displaying the Detailed
Information screen ......................................46
........... 45
Changing the Music Settings .............. 47
Play Mode .......................................................47
Playback Range ..............................................48
Equalizer .........................................................48
VPT (Surround) .............................................50
DSEE (Sound Enhance) ................................51
Clear Stereo .....................................................52
Dynamic Normalizer .....................................52
Album Display Format ..................................53
Watching Videos
Playing a Video (Videos) ....................... 54
Video playback screen ...................................55
Browsing scenes
(Scene Scroll) .........................57
Searching for Videos ........................... 58
Deleting Videos .
Deleting currently playing video .................59
Deleting videos by selecting from a list ......59
.................................. 59
Using the Video Option Menu ............ 60
Changing the Video Settings .
Zoom Settings ................................................61
Playing only video sound
(On-Hold Display) .............................................63
Order of Video List ........................................63
............. 61
Viewing Photos
Playing Music
Playing Music (Music) ........................... 37
Music playback screen ...................................38
List screen .......................................................39
Browsing cover arts to select an album
(Album Scroll) ..................................................41
Searching for Songs ............................ 42
Searching for Reference Information on
a Song
(Related Links) ........................... 43
Viewing Photos (Photos) ....................... 64
Photo display screen ......................................66
Searching for Photos ........................... 67
Deleting Photos .
Using the Photo Option Menu .
Changing the Photo Settings .
Setting the Photo List Display Format ........70
.................................. 68
........... 69
............. 70
Continued
Page 4

4
Table of
Contents
Index
4
Listening to FM Radio
Listening to FM Radio ........................ 71
To listen to FM radio .....................................72
Presetting broadcast stations automatically
(Auto Preset).....................................................73
Presetting broadcast stations manually .......74
Deleting preset broadcast stations ...............74
Changing the FM Radio Settings ........ 75
Scan Sensitivity ...............................................75
Mono/Auto .....................................................75
Using the FM Radio Option Menu ...... 76
Watching YouTube
Watching YouTube .............................. 77
To watch YouTube ..........................................77
YouTube playback screen ..............................79
Searching for YouTube Videos ............ 80
Choosing country/region..............................81
Choosing timeframe ......................................81
Using the YouTube Option Menu ....... 82
Enjoying Podcast
Before Enjoying Podcast ..................... 83
What is a podcast? .........................................83
Registering a Podcast .......................... 84
Register a Podcast by using the Internet
browser of the player ..................................84
Downloading episodes ........................ 86
Downloading from a podcast .......................86
Downloading from all of the podcast
selected to refresh ........................................87
Selecting/deselecting podcasts to refresh ...88
Setting the number of episodes to be
downloaded..................................................89
Playing Podcast ................................... 90
To play podcast ...............................................90
Podcast playback screen ................................91
Searching for Podcasts ........................ 94
To search for podcasts ...................................94
Episode list screen ..........................................95
Podcast List screen .........................................96
Deleting Podcasts ................................ 98
Deleting the currently playing episode .......98
Deleting an episode in the episode list ........98
Deleting all episodes of a podcast ................98
Deleting a podcast .........................................98
Deleting all podcasts ......................................99
Using the Podcast Option Menu ....... 100
Viewing Websites
Viewing Websites (Internet Browser) ..... 102
Internet browser screen .............................. 104
Operations of the Control Buttons ... 105
Using favorites ............................................. 106
Using history list ......................................... 106
Changing the Internet Browser
Settings ........................................... 107
View Mode ................................................... 107
Page Information ........................................ 107
Startup Page ................................................. 108
Detailed Settings ......................................... 108
Privacy Settings ........................................... 109
Cookie Settings ........................................... 109
Using Noise Canceling Function
About Noise Canceling ..................... 110
Playing Back with Using the Noise
Canceling Function .
Listening to External Audio Sources
(External Input Mode) ........................... 113
Reducing the Ambient Noise without
Playing Back Music
Changing the Noise Canceling
Settings .
Select NC Environment ............................. 116
Set Noise Cancel Level ............................... 117
.......................................... 116
........................ 112
(Quiet Mode) ...... 115
Continued
Page 5

5
Table of
Contents
Index
5
Common Settings
Changing the Common Settings ....... 118
Unit Information ......................................... 118
AVLS (Volume Limit) ................................. 119
Beep Settings ............................................... 119
Screen Off Timer......................................... 120
Brightness..................................................... 121
Wallpaper Settings ...................................... 121
Set Date-Time .............................................. 122
Date Display Format ................................... 123
Time Display Format .................................. 123
Hold Settings ............................................... 123
Reset All Settings ........................................ 124
Clear Input History ..................................... 124
Format .......................................................... 125
USB Connection Mode .............................. 125
Language Settings ....................................... 126
Service Country/Region............................. 126
Changing the Wireless LAN
Settings ........................................... 127
WLAN Function On/Off ........................... 127
New Registration ......................................... 128
Access Points screen ................................... 133
Current Connection Details ...................... 136
Detailed Information .................................. 137
Disconnect from Network ......................... 137
Troubleshooting
Troubleshooting ................................ 143
Messages .
........................................... 160
Additional Information
Precautions ....................................... 161
Precautions about the display .................... 167
On cleaning .................................................. 168
On software.................................................. 168
License and Trademark Notice ......... 171
Specifications .
Index .
................................................ 179
................................... 173
Useful Facts
Maximizing Battery Life ................... 138
What are Format and Bit Rate? .
What is audio format? ................................ 139
What is video format? ................................ 140
What is photo format? ................................ 140
........ 139
Storing Data ...................................... 141
Upgrading the Player’s Firmware .
.... 142
Note
Depending on the country/region in which you have purchased the player, some models
may not be available.
Page 6
6
Table of
Contents
Index
6
Basic Operations and Screens
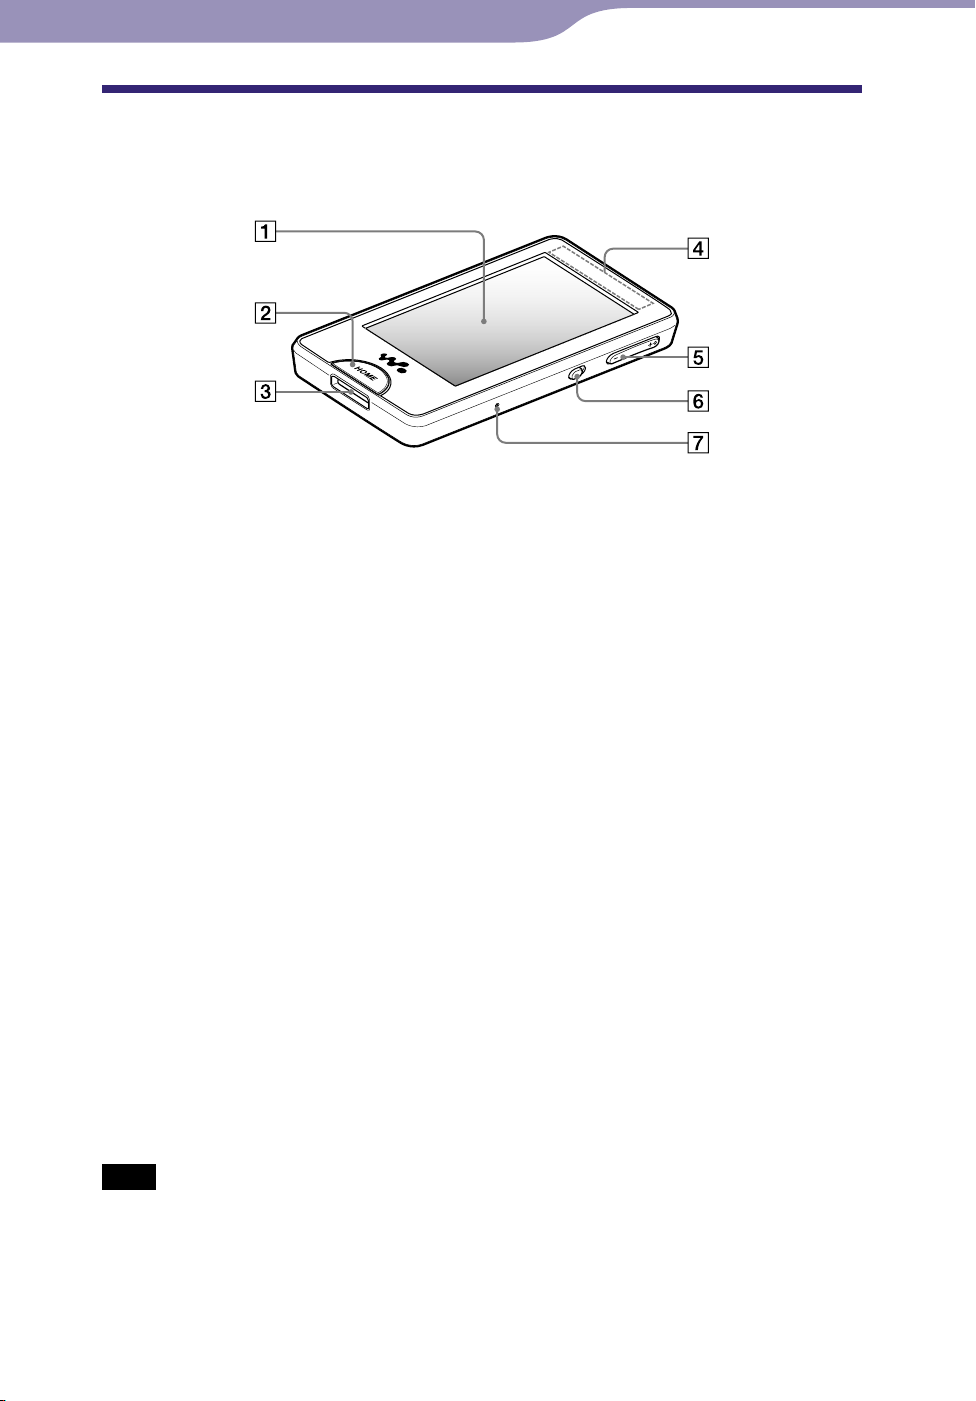
Parts and Controls
Front
Screen (touch panel)
Touch (tap) an icon, item, control
button, etc., on the screen to operate
the player ( page 11).
HOME button
Press to display the Home menu (
page 13).
If you press and hold the HOME
button, the screen turns off and the
player enters standby mode. If you
press any button while the player is
in standby mode, the screen that was
displayed before entering standby
mode such as playback screen, list
screen, etc., reappears and the player
is ready for operation.
Furthermore, if you leave the player
in standby mode for about a day, the
player turns completely off
automatically. Thereafter, if you press
any button when the player is turned
off, the start up screen appears first,
then the Home menu appears.
WM-PORT jack
Use this jack to connect the supplied
USB cable, or optional peripheral
devices.
Built-in antenna
Take care not to cover the antenna
with your hand or other objects
during wireless LAN
communication.
VOL +*
1
/- button
Adjusts the volume.
NOISE CANCELING switch
Slide the NOISE CANCELING
switch in the direction of the arrow
to activate the Noise Canceling
function ( page 110).
RESET button
Press the RESET button with a small
pin, etc., to reset the player ( page
143).
Note
The player consumes battery power very
slightly even when it is in standby mode.
Therefore, the battery can run down
rather sooner if you keep the player in
standby mode for a long time without
turning it off.
Continued
Page 7

7
Table of
Contents
Index
7
Basic Operations and Screens
Rear
/
Press to find the beginning of a song
or video, or to fast-forward/rewind.
buttons
Headphone jack
Connects the headphones ( page
8).
Press the button to start
playback of a song or video. During
playback, press the button to
pause.
*1 button
HOLD switch
Use the HOLD switch to disable the
buttons and touch panel to avoid
unintentional actions.
*1 There are tactile dots. Use them to help
with button operations.
Page 8
8
L
L
Table of
Contents
Index
8
Basic Operations and Screens
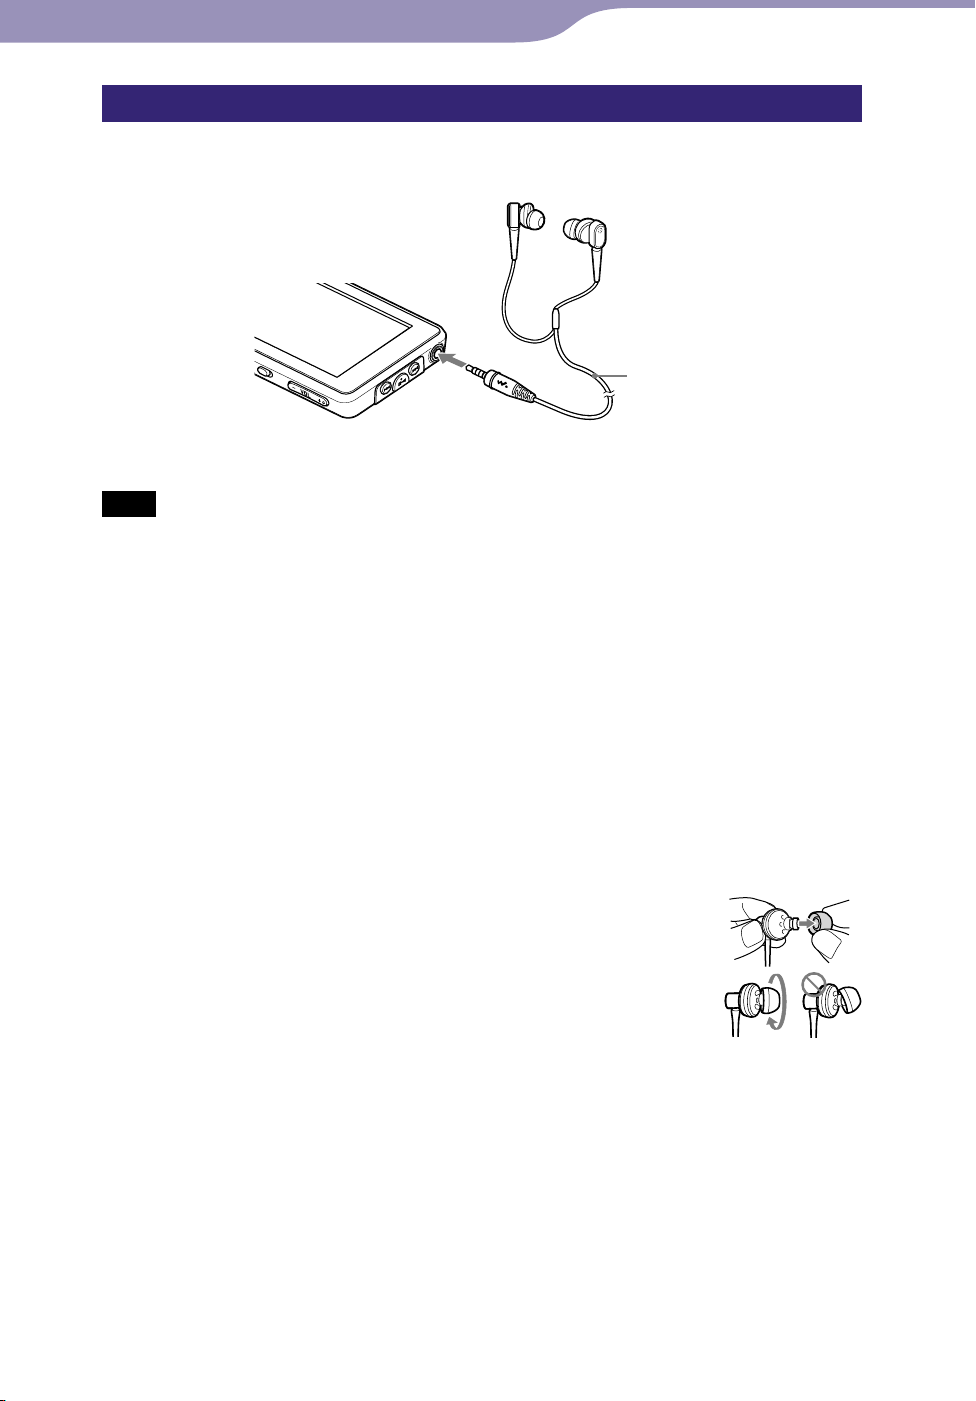
Connecting the headphones
Plug the headphones into the headphone jack of the player until they click into
place. If the headphones are not connected correctly, the sound does not play.
Headphones
Note
The supplied headphones are exclusive to this player only. If you connect the supplied
headphones to another device, the sound may not play.
About the Noise Canceling function
The Noise Canceling function ( page 110) is enabled when using the
supplied headphones. The supplied headphones are exclusive to this player
only and cannot be used with other devices.
How to install the earbuds correctly
If the earbuds do not fit your ears correctly, low bass sound may not be heard
and the Noise Canceling function ( page 110) may not work effectively.
To enjoy better sound quality, change the size of the earbuds or adjust the
earbud position to fit your ears snugly.
At purchase, M size earbuds are installed. If the earbuds do not
fit your ears, try one of the other supplied sizes, S or L.
When you change the earbuds, twist to install them firmly on
the headphones to prevent the earbud from detaching and
remaining in your ear.
When the earbud is broken, purchase the optional earbuds
(EP-EX1).
Page 9

9
Table of
Contents
Index
9
Basic Operations and Screens
Turning the Player On and Off
HOME button
To turn on the player
Press any button to turn the player on.
Hint
If
player in the opposite direction of the arrow to cancel the HOLD function.
appears on the top of the screen, slide the HOLD switch on the back of the
To turn off the player
If you press and hold the HOME button, “POWER OFF” screen appears, then
the player enters the standby mode and the screen turns off.
Furthermore, if standby mode is retained for about one day, the player turns off
completely automatically.
Hints
After a lapse of time of the “Screen Off Timer” setting ( page 120), the screen turns
off, but you can still tap the screen to turn it on.
bout 10 minutes after turning off the screen, the player enters the standby mode. You
A
cannot use the touch panel during the standby mode. Press any button of the player to
turn it on before using it.
djust the date and time of the player before using it ( page 26).
A
Notes
You cannot operate the player when it is connected to a computer. Disconnect the USB
cable before operating the player.
hen connected to a computer via the USB cable, the resume information of the last
W
played song, video, photo, etc., is cleared. Reselect the desired content from the list
screen.
Page 10
10
Table of
Contents
Index
10
Basic Operations and Screens
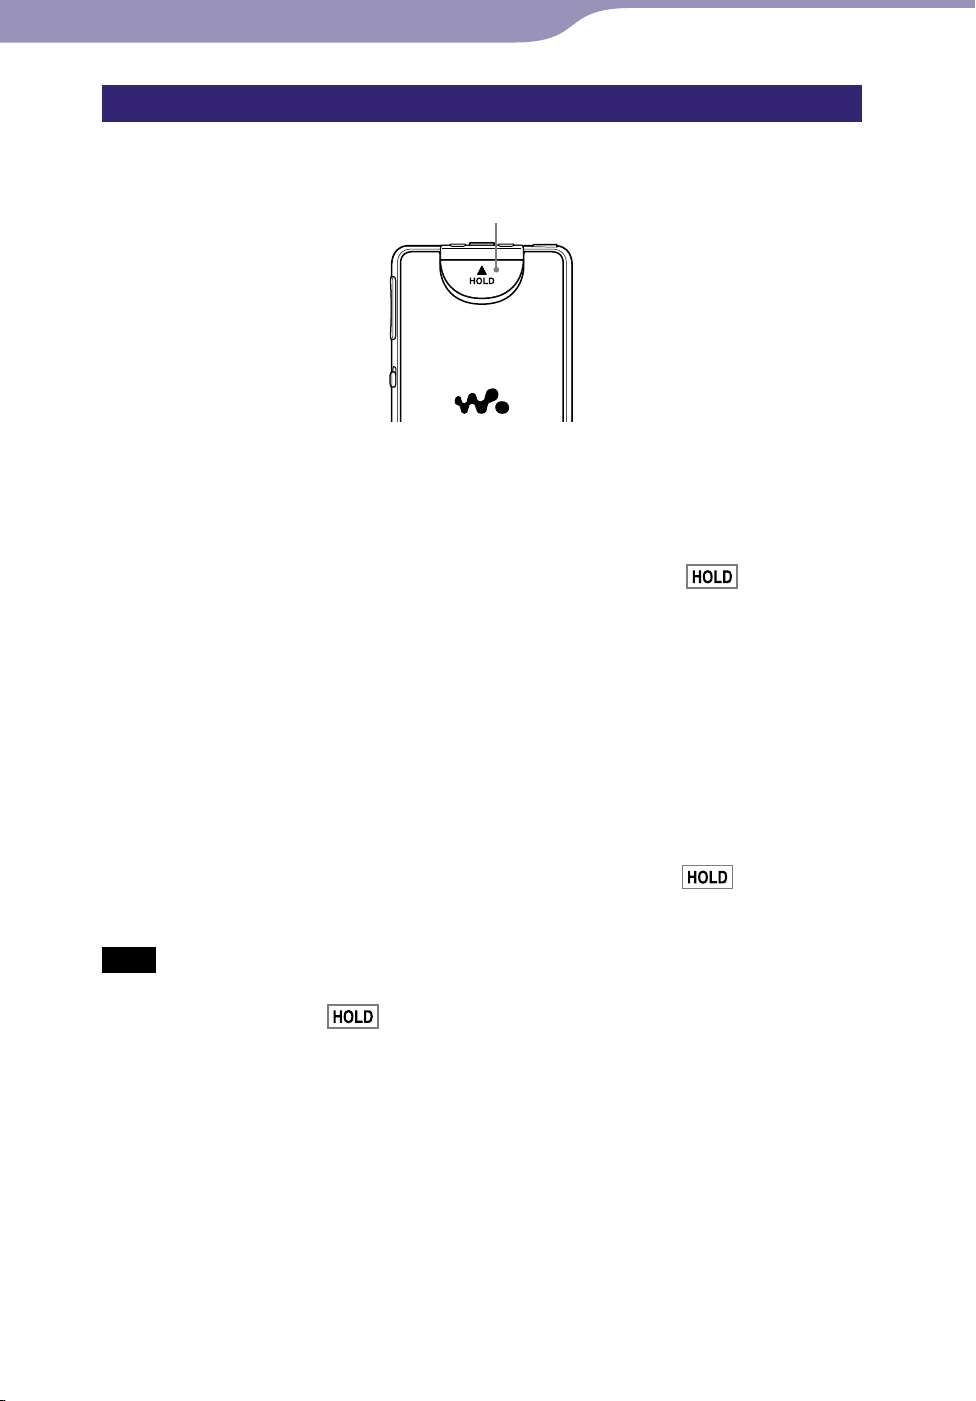
Disabling the operation buttons and the touch panel
You can protect the player against accidental operation by using the HOLD
switch when carrying it.
HOLD switch
To lock the player
Slide the HOLD switch in the direction of the arrow .
The operation buttons and touch panel are disabled and
the information area ( page 13).
appears on
Hint
You can also lock the touch panel only, keeping the operation buttons enabled ( page
123).
To unlock the player
Slide the HOLD switch in the opposite direction of the arrow .
The operation buttons and touch panel are enabled and
information area ( page 13) disappears.
Note
You cannot use the touch panel while the player is locked. If you press any button of the
player while it is locked, appears on the information area.
on the
Page 11
11
Table of
Contents
Index
11
Basic Operations and Screens
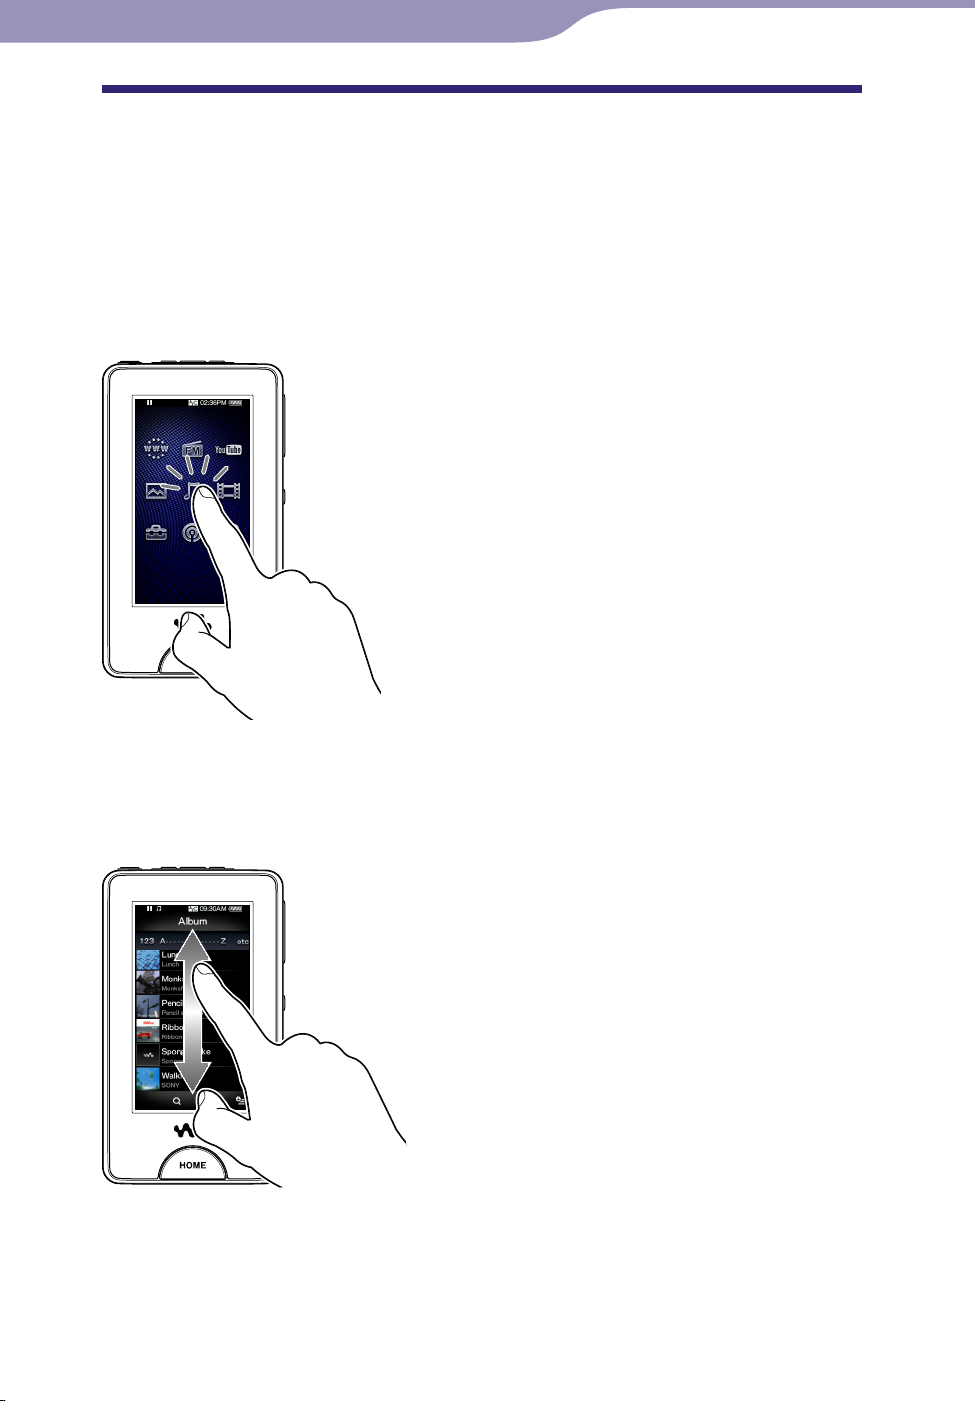
How to Use the Touch Panel
You can use the touch panel screen to operate the player.
Tap an icon, item, control button, etc., on the screen to operate the player. Also,
drag up or down to scroll through a list, and flick to scroll quickly through a
list or thumbnails (reduced-size images that appear in a list).
Tapping to select
Touch (tap) an icon, item, control button, etc., to select it.
Dragging to scroll
Drag your finger up or down on the list to scroll through the list. Also, drag the
indicator along the Seek Slider to choose a starting point for the playback.
Continued
Page 12

12
Table of
Contents
Index
12
Basic Operations and Screens
Flicking to scroll quickly
Flick the screen up or down with your finger to scroll quickly through a list.
Also, flick up, down or sideways to see the next/previous album on the album
scroll screen, or to see the next/previous image on the scene scroll screen.
Notice for touch panel operations
The touch panel of the player does not work properly when operated with:
A gloved finger.
wo or more fingers.
T
inger nail.
A f
et finger.
A w
en, ballpoint pen, pencil, stylus, etc.
A p
ouching with other objects in addition to a finger.
T
Page 13
13
Table of
Contents
Index
13
Basic Operations and Screens
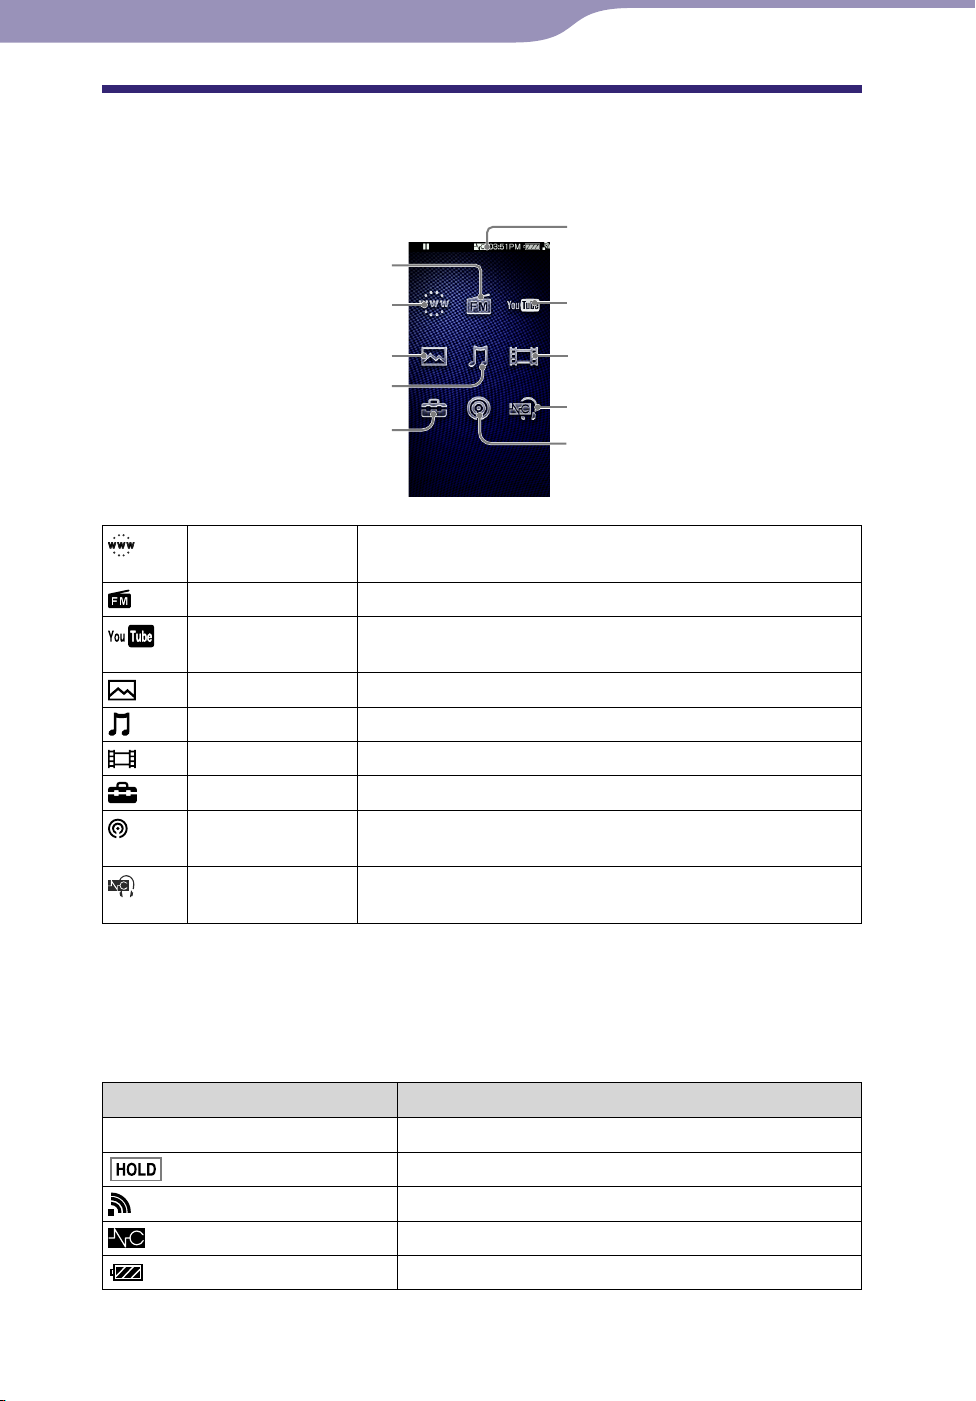
About the Home Menu
The following table shows the item list of the player.
For details about each menu item, refer to the specified reference page.
Information area
FM Radio
Internet Browser
Photos
Music
Settings
Internet Browser Browse websites over wireless Internet connection ( page
102).
FM Radio Listen to FM radio broadcasting ( page 71).
YouTube Watch videos on YouTube via wireless Internet connection
( page 77).
Photos View photos transferred to the player ( page 64).
Music Listen to songs transferred to the player ( page 37).
Videos Watch videos transferred to the player ( page 54).
Settings Set up the player and its applications ( page 118).
Podcasts Download podcast episodes via wireless Internet connection
and play them back ( page 83).
NC Modes Reduce unwanted ambient noise by active noise control
technology ( page 110).
YouTube
Videos
NC Modes
Podcasts
About the information area
The icons, shown in the table below, appear in the information area. The icons
vary according to the playback status, settings or the screens.
For details about each icon, refer to the specified reference page.
Icons Description
, , , , ,
, etc. Playback status ( page 38, 55, 79, 91, 92)
Hold indication ( page 10)
Wireless communication status ( page 129)
Noise Canceling indication ( page 112)
Remaining battery power indication ( page 24)
Page 14
14
Table of
Contents
Index
14
Basic Operations and Screens
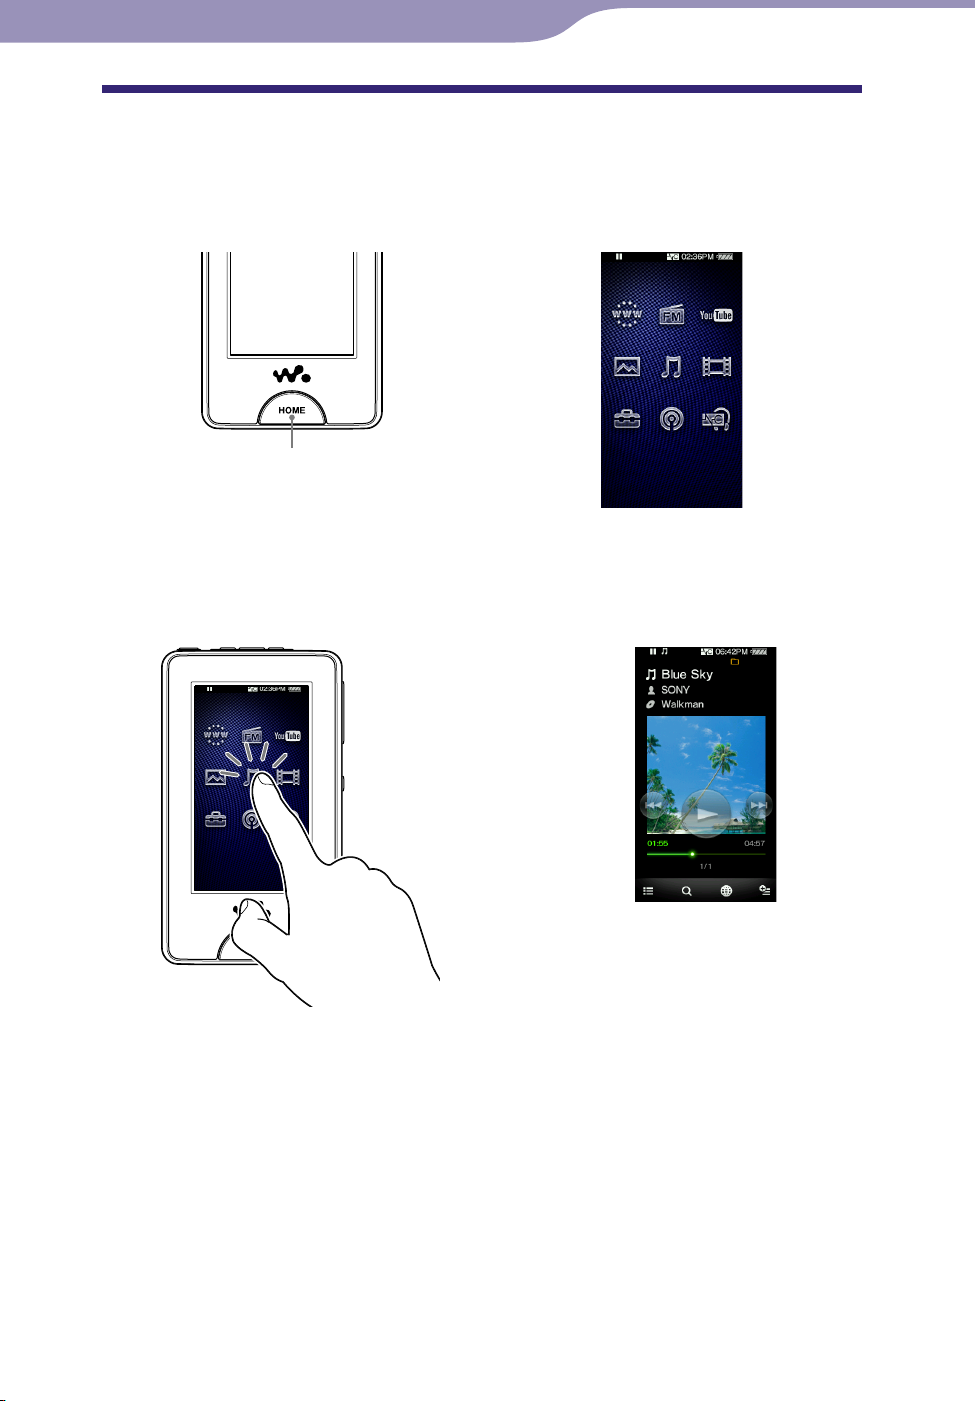
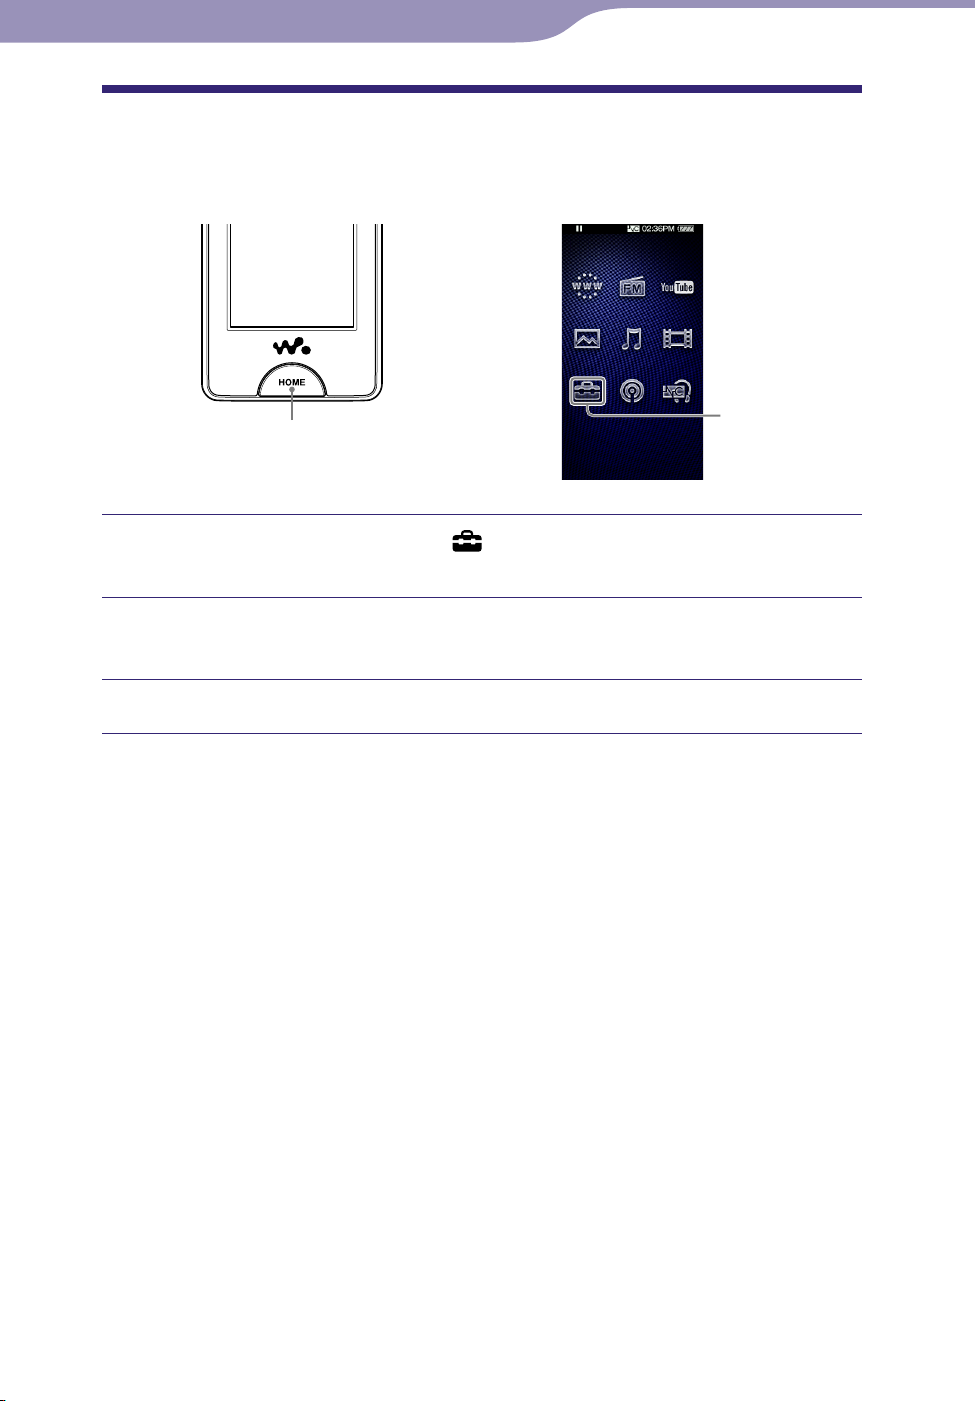
How to Use the Home Menu
The Home menu is the starting point of each application, such as searching for
songs, changing settings, etc.
You can display the Home menu by pressing the HOME button of the player.
HOME button
From the Home menu, you can select the desired item on the screen by touch
panel operations ( page 11). On the playback screen of music, video, photo,
etc., you can operate the player by selecting the control button or item on the
screen.
Continued
Page 15
15
Table of
Contents
Index
15
Basic Operations and Screens
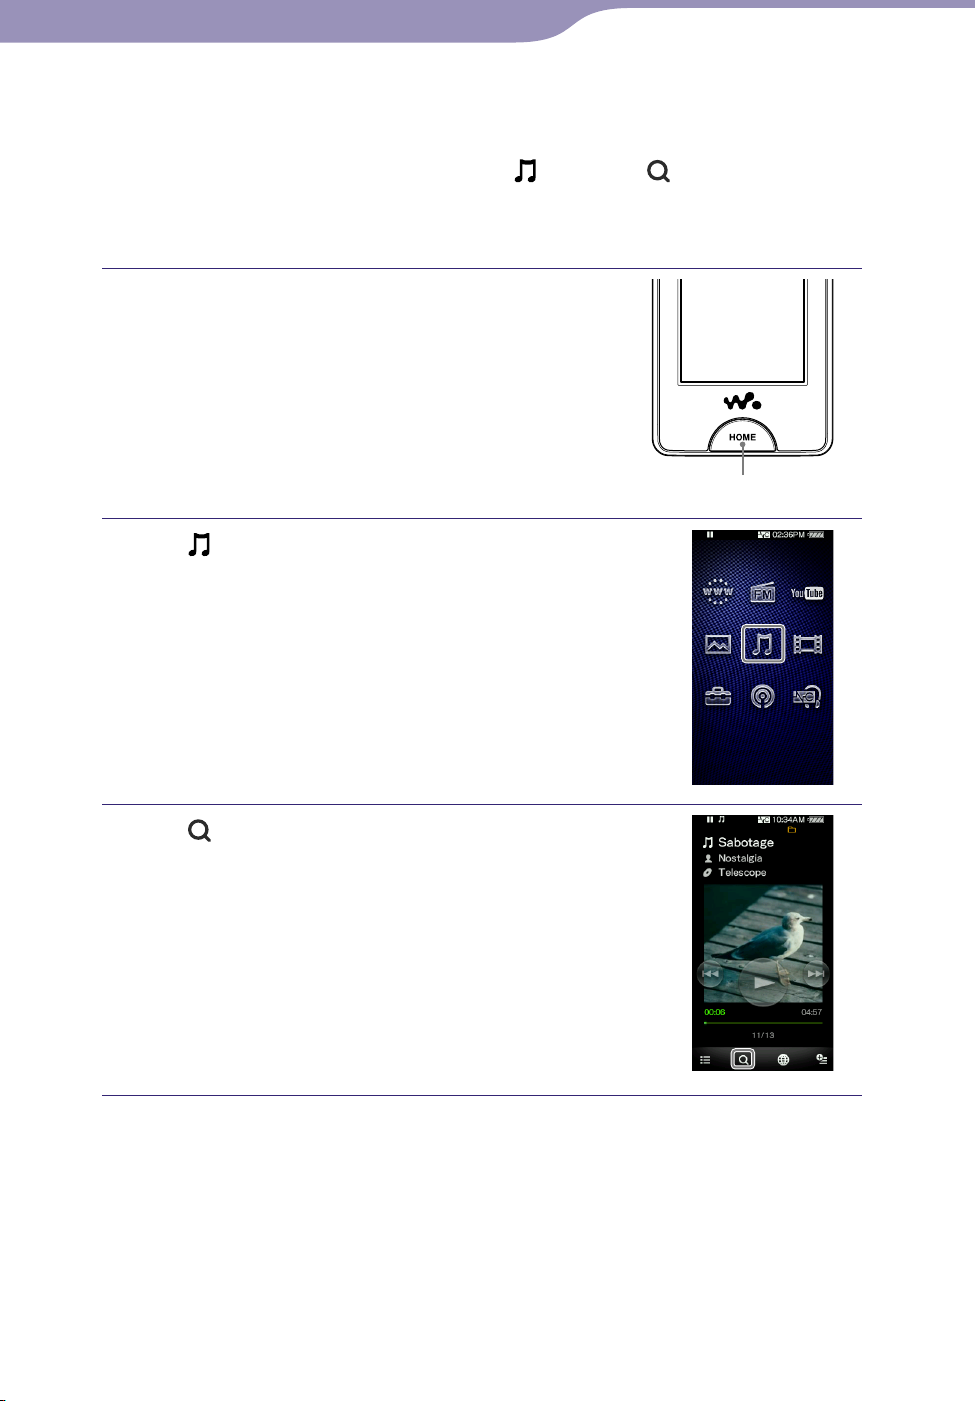
In this manual, operating instructions from the Home menu are described as
below.
Example: F
The actual operations for the example above are shown below.
rom the Home menu, select
“Album”
the desired album the desired song.
(Music) (Search)
Press the HOME button.
The Home menu appears.
Tap (Music).
The music playback screen appears.
ou can operate the player by tapping the
Y
control buttons on the music playback
screen.
HOME button
Tap (Search).
The search menu appears.
Continued
Page 16
16
Table of
Contents
Index
16
Basic Operations and Screens
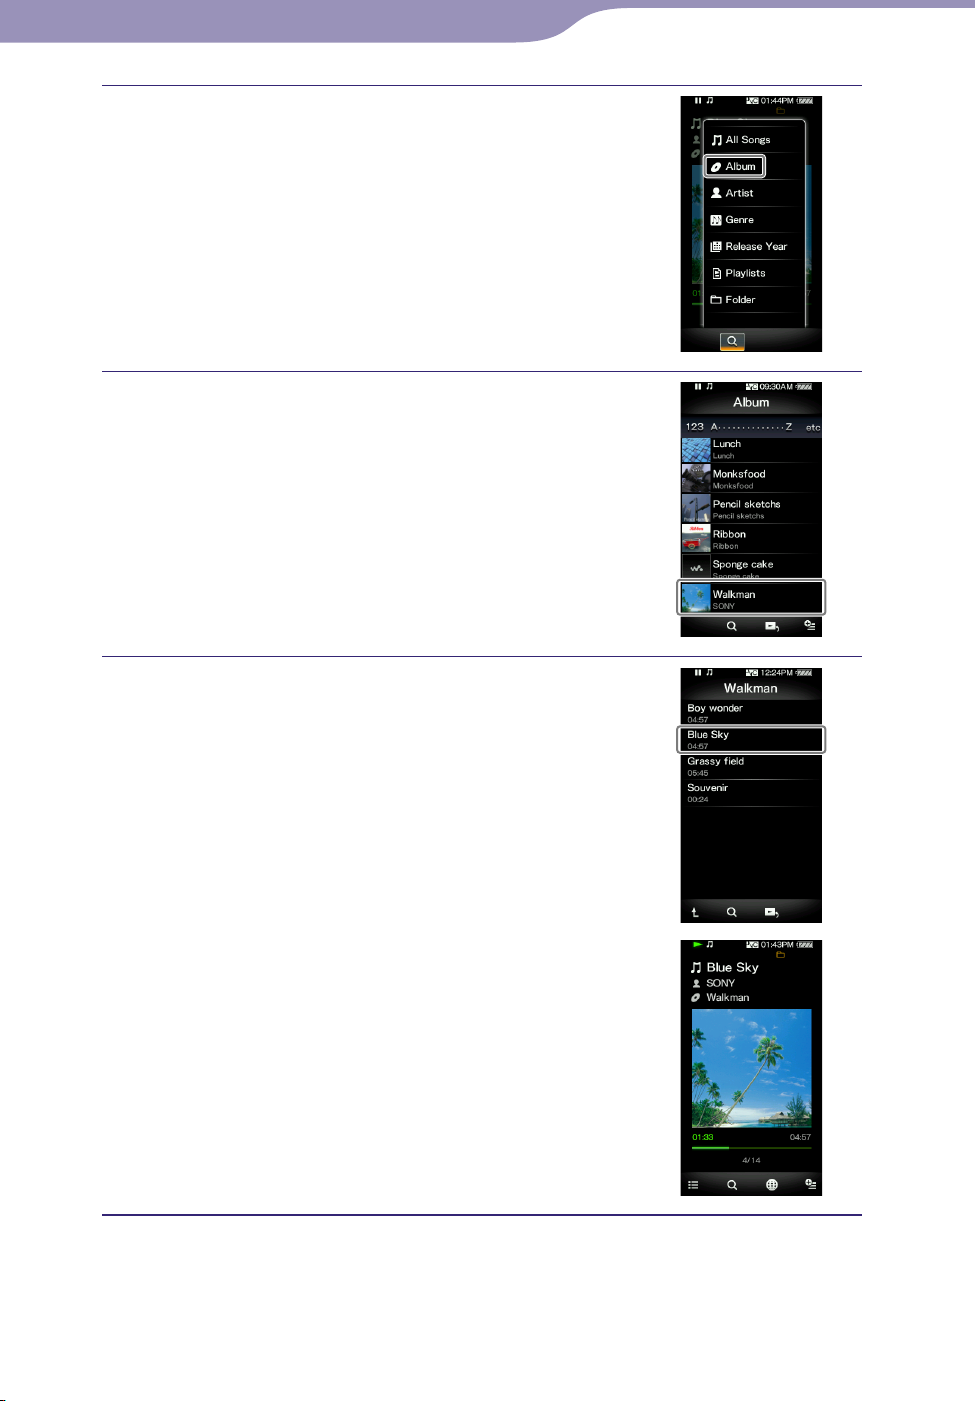
Tap “Album.”
The album list screen appears.
ou can scroll the list by dragging your
Y
finger up or down.
Tap the desired album.
The song list screen of the selected album
appears.
Tap the desired song.
The music playback screen appears and
playback begins.
Continued
Page 17

17
Table of
Contents
Index
17
Basic Operations and Screens
To return to the Home menu during operation
Press the HOME button.
To return to the previous screen during operation
Tap (To List)/ (Up).
Page 18
18
Table of
Contents
Index
18
Basic Operations and Screens
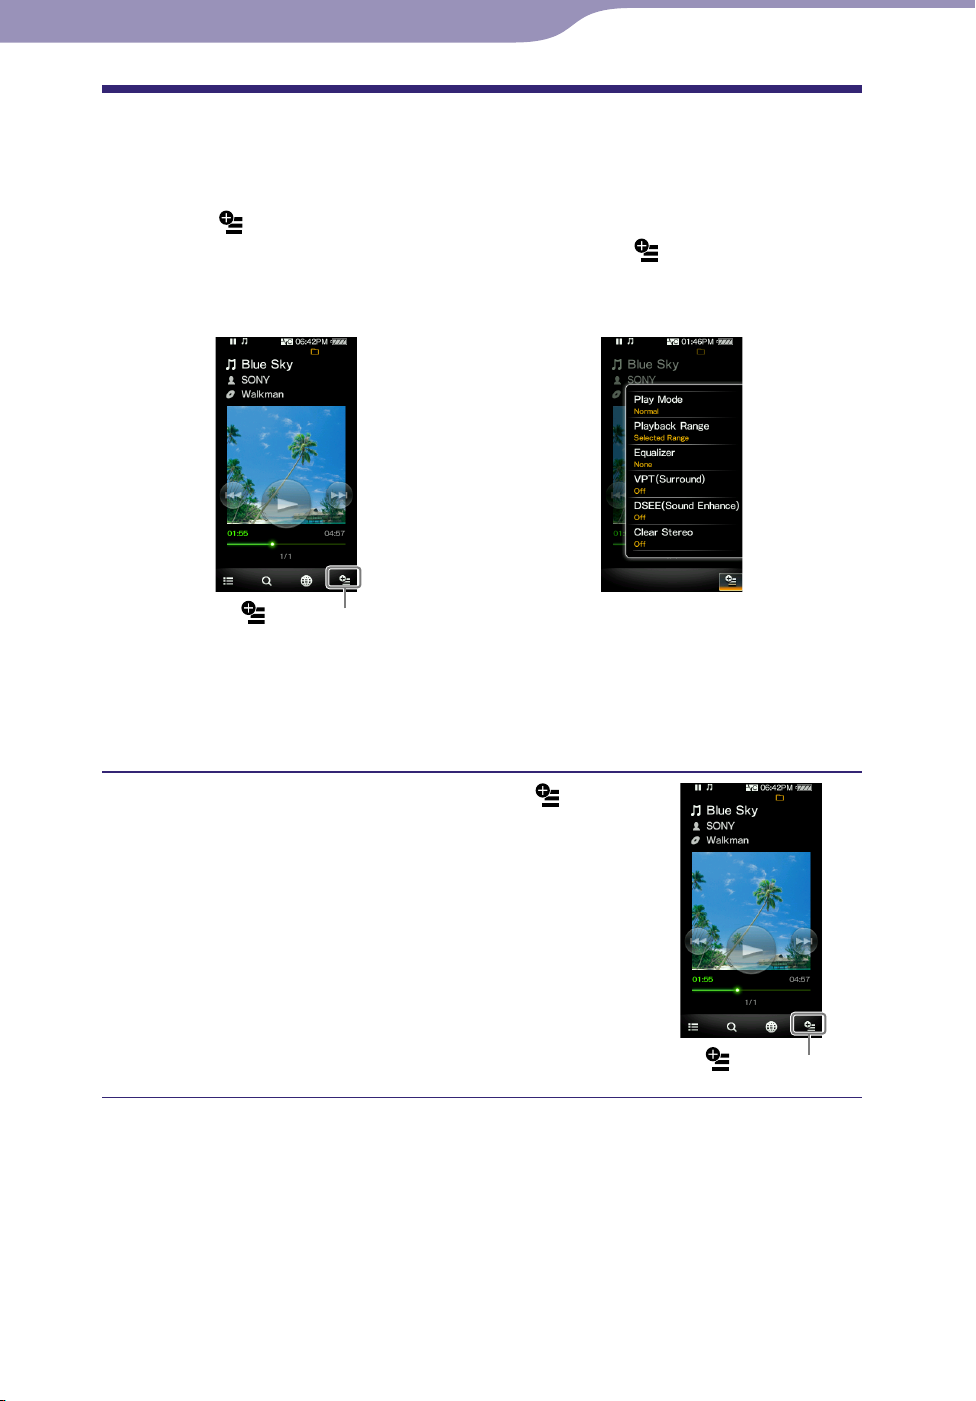
How to Use the Option Menu
The option menu items vary function-to-function, allowing you to change the
settings of each application.
You can tap
display the option menu. To close the option menu, tap
more.
(Option Menu) on the playback screen or the list screen to
(Option Menu) once
Playback screen
(Option Menu)
You can select the desired item on the option menu by touch panel operations
( page 11).
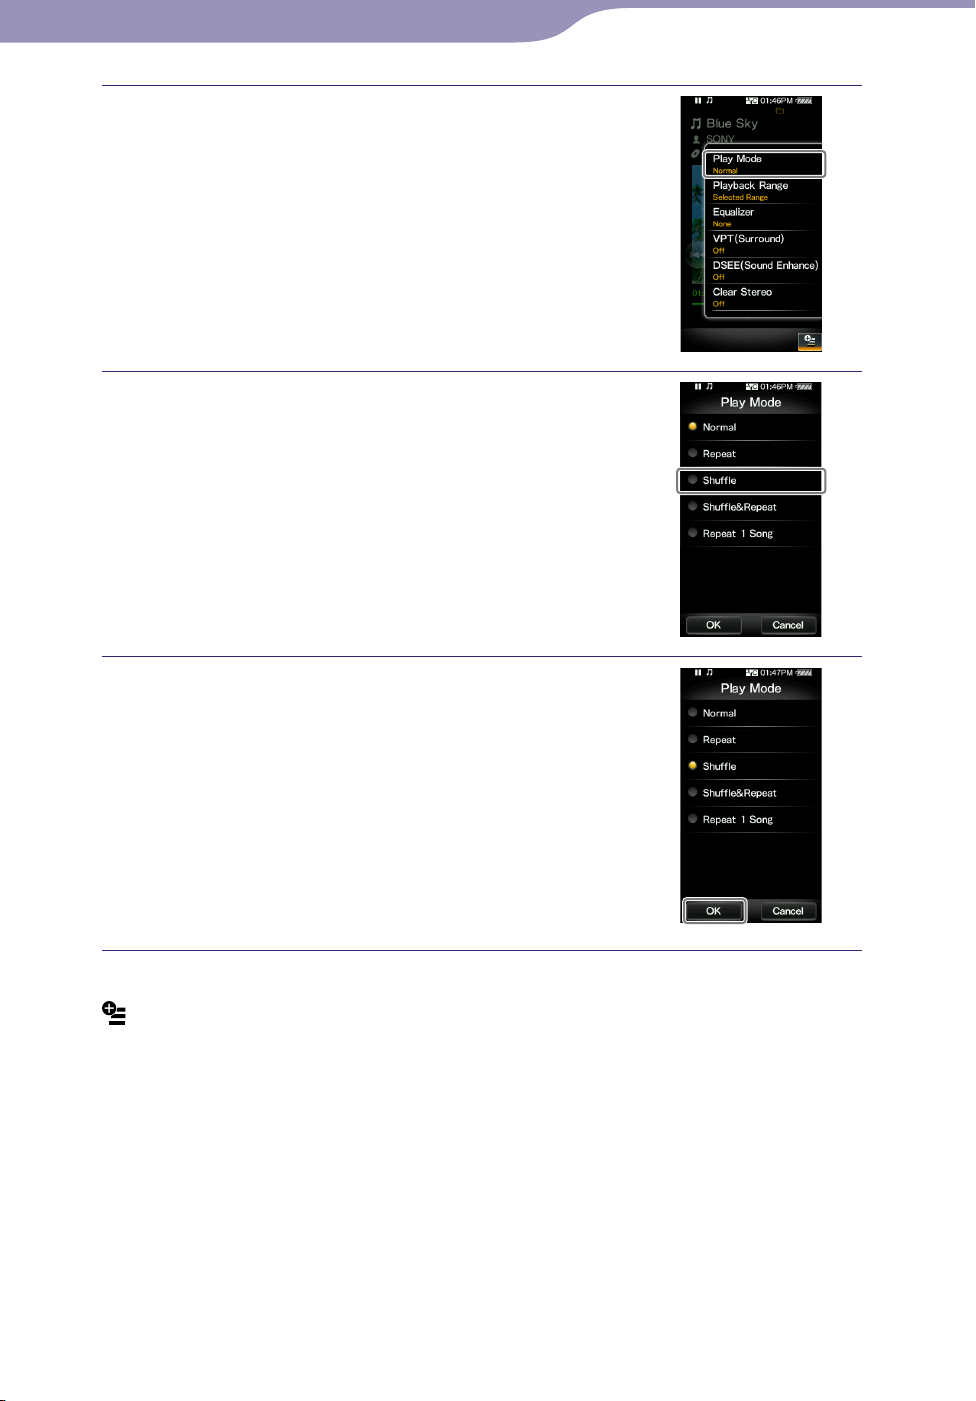
For example, the operations for setting “Play Mode” option to “Shuffle” are
shown below.
From the music playback screen, tap
(Option Menu).
The option menu appears.
Option menu
(Option Menu)
Continued
Page 19
19
Table of
Contents
Index
19
Basic Operations and Screens
Tap “Play Mode.”
Tap “Shuffle.”
Tap “OK.”
The play mode changes to “Shuffle.”
The items of the option menu differ, depending on the screen on which you tap
(Option Menu).
For details, see the following pages.
“
Using the Music Option Menu” ( page 45)
Using the Video Option Menu” ( page 60)
“
Using the Photo Option Menu” ( page 69)
“
Using the FM Radio Option Menu” ( page 76)
“
Using the YouTube Option Menu” ( page 82)
“
Using the Podcast Option Menu” ( page 100)
“
Page 20

20
Table of
Contents
Index
20
Basic Operations and Screens
Text Input
You can use the onscreen keyboard to enter text.
Select a text field you intend to enter text into, such as a web page address
entry, to bring up the onscreen keyboard.
Example: Alphanumeric keyboard for English
Input field
Predictive texts field
(English and Chinese only)
Input mode key
Changing the input mode (key assign)
As you tap the Input mode key, the key assignment changes cyclically. The key
assign maps vary depending on the language.
Note
Depending on the text field, you may not be able to change the input mode because of
character restrictions.
About the Chinese input method
You can use the pinyin input method (for simplified Chinese) and the zhuyin
input method (for traditional Chinese) to input Chinese text.
About the predictive text function
The onscreen keyboard for English and Chinese are implemented with
predictive text function. As you enter a character, the predictive text function
displays candidate words below the text you have entered. You can reduce the
number of keystrokes by selecting one of these words. To select, tap the
predictive text field to display the full list, drag the list to find the desired word,
then tap it to add to the text you have entered.
Hint
You can use the URL predictive text function by tapping the “URL” key in the
alphanumeric input mode. Candidate words for URL input that begin with the entered
characters appear in the predictive text field. If you tap the predictive text field, the full
list of the candidate words for URL input appears.
Continued
Page 21

21
Table of
Contents
Index
21
Basic Operations and Screens
Entering text
The following example shows how to enter “Blue” in the alphanumeric input
mode.
Tap the “ABC2” key five times.
“B” appears in the input field.
Each time you press the key, the character changes.
Tap the “
The text cursor moves to the right of the “B.”
” key.
Tap the “JKL5” key three times.
“l” appears in the input field.
Tap the “
The text cursor moves to the right of the “l.”
” key.
Tap the “TUV8” key two times.
“u” appears in the input field.
Tap the “
The text cursor moves to the right of the “u.”
” key.
Tap the “DEF3” key two times.
“e” appears in the input field.
Tap the “Set” key.
“Blue” in the input field is confirmed.
Tap the “OK” key.
The onscreen keyboard disappears and the text “Blue” is entered in the
text field that brought up the keyboard.
Page 22

22
Table of
Contents
Index
22
Basic Operations and Screens
About the Bundled Software
Windows Media Player 11
Windows Media Player can import audio data from CDs and transfer data to
the player. When you use copyright protected WMA audio files and copyright
protected WMV video files, use this software.
Transferable files: Music (MP3, WMA), Video (WMV), Photo (JPEG)
For details on operation, refer to the Help of the software or visit the following
website.
http://www.support.microsoft.com/
Hint
Some computers that already have Windows Media Player 10 installed may encounter
file limitations (AAC, video files, etc.) when transferring by drag-and-drop. If you install
Windows Media Player 11 from the supplied CD-ROM, you can solve this problem, then
you can transfer by drag-and-drop again. Before installing Windows Media Player 11 on
your computer, make sure to check whether your software or service corresponds to
Windows Media Player 11.
Media Manager for WALKMAN*
1
Media Manager for WALKMAN can transfer music, photos or videos from the
computer to the player and import audio data from CDs. Media Manager for
WALKMAN can also subscribe to RSS feeds and transfer the music and video
files that have been downloaded from Podcasts. For details on operation, refer
to the Help of the software. Audio files (AAC) or videos can also be transferred
by drag-and-drop using Windows Explorer as well as Media Manager for
WALKMAN.
2
Transferable files: Music (MP3, WMA, AAC*
(MPEG-4 Simple Profile, AVC (H.264/AVC) Baseline Profile, WMV*
, WAV), Photo (JPEG), Video
2*3
),
Podcast (music, video)
*1 Media Manager for WALKMAN is not bundled with the packages sold in the U.S.A.
Please download it from the following web site:
ttp://www.sonycreativesoftware.com/download/wmm_lite
h
2
DRM files are not compatible.
*
3
Some WMV files cannot be played back after being transferred by Media Manager for
*
WALKMAN. If you retransfer them using Windows Media Player 11, they may become
playable.
Note
Copyright protected video files, such as DVD movies or recorded digital television
programs, are not supported.
Page 23

23
Table of
Contents
Index
23
Basic Operations and Screens
Content Transfer
Content Transfer can transfer music, videos or photos from a computer to the
player by a simple drag-and-drop operation. You can use Windows Explorer or
iTunes® to drag and drop data to Content Transfer. Furthermore, if you transfer
a podcast from iTunes® to the player, the podcast is registered to the player,
allowing you to download the podcast’s episodes by using the wireless LAN
function of the player. For details on operation, refer to the Help of the
software.
Transferable files: Music (MP3, WMA, AAC*
(MPEG-4 Simple Profile, AVC (H.264/AVC) Baseline Profile, WMV*
Podcast (music, video)
*1 DRM files are not compatible.
2
Some WMV files cannot be played back after being transferred by Content Transfer. If
*
you retransfer them using Windows Media Player 11, they may become playable.
Hints
ATRAC files managed by SonicStage can be transferred to the player after conversion to
MP3 file format. To convert files, download the MP3 Conversion Tool from the
customer support website ( page 170).
ou can register podcasts to the player by using iTunes® and Content Transfer. To
Y
register, drag and drop the title of a podcast from iTunes® to Content Transfer.
1
, WAV), Photo (JPEG), Video
1*2
),
Page 24
24
Table of
Contents
Index
24
Preparing the Player
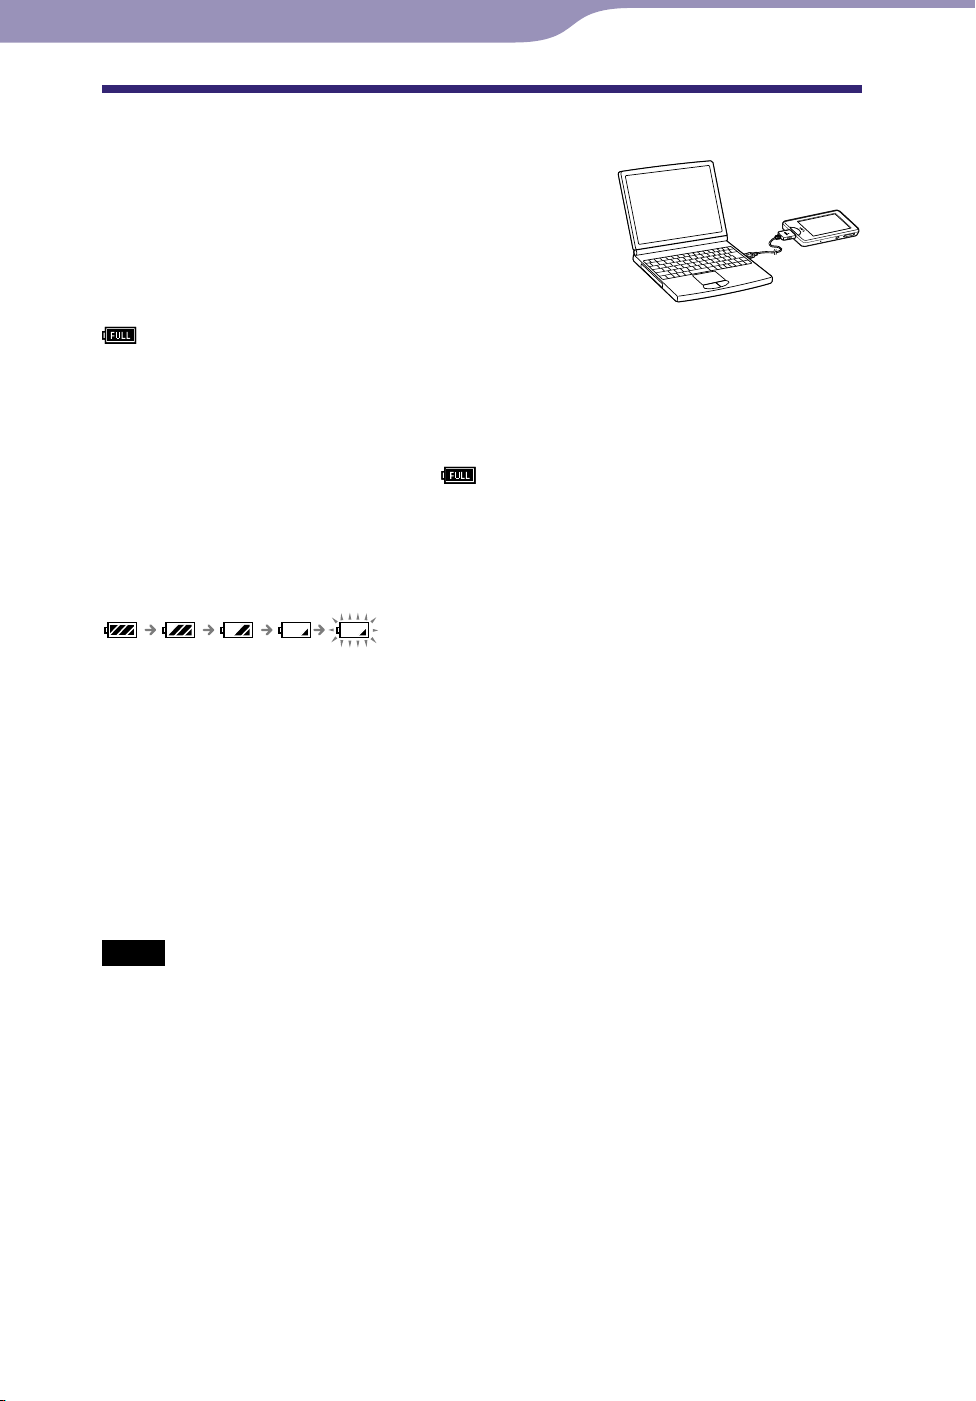
Charging the Player
The player’s battery is recharged while the player is
connected to a running computer.
When you connect the player to your computer, use
the supplied USB cable.
When the remaining battery power indication on
the upper right-hand corner of the display shows:
, charging is completed (charging time is approx. 3 hours).
If the remaining battery power indication is not displayed, press the HOME
button of the player to display it.
When you use the player for the first time, or if you have not used the player
for a long time, recharge it fully (to
indication of the display).
About the battery indicator
The battery icon in the information area shows remaining battery charge.
in the remaining battery power
As the battery power gets lower, the bars of the icon disappear. If “LOW
BATTERY. Please Charge.” appears, you cannot use the player. In this case,
charge the battery by connecting to your computer. See page 176 on battery
duration.
Hint
While charging, after a lapse of time of the “Screen Off Timer” setting ( page 120), the
screen turns off. To see the charging status or other indications, press the HOME button
to turn on the screen.
Notes
Charge the battery in an ambient temperature of between 5 ºC to 35 ºC (41 ºF to 95 ºF).
e number of times the battery can be recharged before it is used up is approximately
Th
500 times. This number may vary, depending on the conditions under which you use the
player.
e battery indicator on the display is only an estimate. For example, one section of
Th
black in the indicator will not always indicate exactly one-fourth of the battery’s charge.
Do not disconnect.” appears in the display while the player accesses the computer. Do
“
not disconnect the supplied USB cable while “Do not disconnect.” appears or data being
transferred may be damaged.
e touch panel and control buttons on the player are all disabled while it is connected
Th
to a computer.
f you do not intend to use the player for over half a year, charge the battery at least once
I
per 6 to 12 months for battery maintenance.
Continued
Page 25

25
Table of
Contents
Index
25
Preparing the Player
Some USB devices connected to the computer may interfere with the proper operation
of the player.
e do not guarantee the recharge of the battery using personally assembled computers
W
or modified computers.
f the computer enters a power saving mode, such as the sleep or hibernation mode,
I
while the player is connected via the USB cable, the player’s battery is not charged.
Instead, the player continues to draw power from the battery, discharging it.
o not leave the player connected for extended periods to a laptop computer that is not
D
connected to AC power, because the player may discharge the computer’s battery.
hile the player is connected to a computer, do not turn on, restart, wake up from sleep
W
mode, or shut down the computer. These operations may cause the player to
malfunction. Disconnect the player from the computer before performing these
operations.
hen connected to a computer via the USB cable, the resume information of the last
W
played song, video, photo, etc., is cleared. Reselect the desired content from the list
screen.
Page 26
26
Table of
Contents
Index
26
Preparing the Player
Setting the Date and Time
Some applications of the player do not work correctly until the date and time
are set. Set the current date and time before using the player.
HOME button
From the Home menu, select (Settings)
“Clock Settings”
“Set Date-Time.”
“Common Settings”
Settings
Drag or flick the year, month, date, hour and minute up or down to
adjust the date and time.
Select “OK.”
Page 27
27
Table of
Contents
Index
27
Preparing the Player
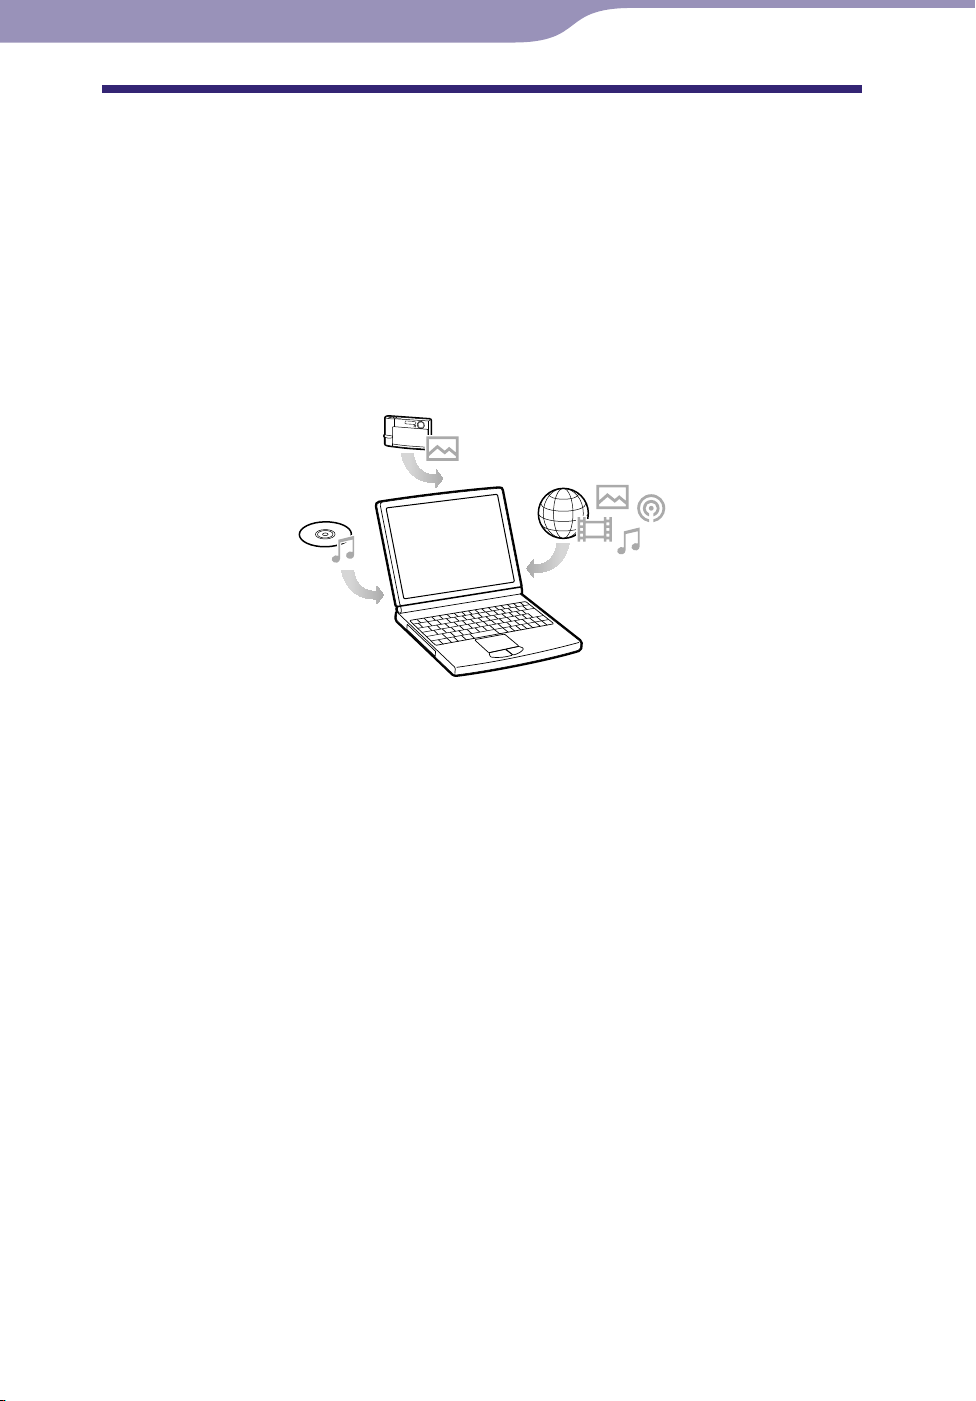
Getting Music/Videos/Photos/Podcasts
To enjoy music, videos, photos and podcasts on the player, you need to prepare
the data on your computer.
You can import music from audio CDs or from the Internet, etc. You can
import videos from recorded videos or from the Internet, etc. You can import
photos from a digital camera, etc.
To import the data into your computer, use appropriate software. For detailed
information on how to import data, refer to the Help of each software.
For details about supported file formats, see “Supported file format” ( page
173).
Hint
You can connect the player to the Internet by using the wireless LAN function to
download podcast episodes without using a computer ( page 84).
Page 28

28
Table of
Contents
Index
28
Preparing the Player
Transferring Music/Videos/Photos/Podcasts
You can directly transfer data by drag-and-drop using Windows Explorer on
your computer.
Playable data hierarchy has rules. To transfer data properly, see the following
instructions.
For details about the bundled software that can transfer data, see page 22.
Hints
Some computers that already have Windows Media Player 10 installed may encounter
file limitations (AAC, video files, etc.) when transferring by drag-and-drop. If you install
Windows Media Player 11 (for details, see “Installing the Operation Guide and software”
of “Quick Start Guide”) from the supplied CD-ROM, you can solve this problem, then
you can transfer by drag-and-drop again. Before installing Windows Media Player 11 on
your computer, make sure to check whether your software or service corresponds to
Windows Media Player 11.
ata hierarchy may differ, depending on your computer environment.
D
ome WMV files can be played back only by transferring using Windows Media Player
S
11.
Notes
Do not disconnect the USB cable while “Do not disconnect.” appears on the player, or
the data being transferred may be damaged.
f you turn on or restart the computer while the player is connected to the computer, the
I
player may malfunction. In this case, press the RESET button of the player to reset it (
page 143). Disconnect the player from the computer before turn on or restart the
computer.
ou cannot change the following folder names or delete them: “MUSIC,” “MP_ROOT,”
Y
“MPE_ROOT,” “VIDEO,” “PICTURES,” “PICTURE,” “DCIM,” “PODCASTS” and
“FEEDS.”
o not change the folder or file names directly under the “MP_ROOT” folder or “MPE_
D
ROOT” folder. Otherwise, they will not be displayed on the player.
Connect the player to your computer using the supplied USB
cable.
Insert the connector of the USB cable into the player with the
mark
facing up.
Select the player on Windows Explorer, and then drag and drop
files.
The player appears on Windows Explorer as [WALKMAN].
Continued
Page 29

29
Table of
Contents
Index
29
Preparing the Player
For songs
(On Windows Explorer)
Drag and drop files or folders into the “MUSIC” folder.
However, folders and files beyond the 8th level will not be
recognized.
Note
Do not change the folder name or delete the “MUSIC” folder.
(On the player)
Folders are displayed in the folder name order first, then files are displayed in
the file name order. In this case, upper or lower case letters are not
distinguished.
1st
7th
8th
9th
Continued
Page 30

30
Table of
Contents
Index
30
Preparing the Player
For videos
(On Windows Explorer)
Drag and drop files or folders into the “VIDEO” folder.
Files on the 1st to 8th level will be recognized. However, files
beyond the 8th level will not be recognized.
Note
Do not change the name of the “VIDEO” folder. If renamed, the folder will not be
displayed on the player.
(On the player)
In default setting, video files are displayed in the order they are transferred by
drag-and-drop operation. (The latest data is at the top.)
1st
7th
8th
9th
Hints
You can arrange the video list by transfer date or by video title ( page 63).
ou can set JPEG files as a thumbnails of video files, by placing JPEG files in the
Y
corresponding video folders. When you display the video list, you can see the
thumbnails (small pictures to display on the menu) for the video files on the player. To
display a thumbnail for a video file, create a JPEG file (horizontal 160 × vertical 120 dots,
extension: .jpg) and name it the same as the desired video file, then store it in the video
file folder.
e maximum video size playable on the player is 320 × 240. For detailed specifications,
Th
see “Specifications” ( page 173).
Continued
Page 31

31
Table of
Contents
Index
31
Preparing the Player
For photos
(On Windows Explorer)
Drag and drop files or folders into the “PICTURE,” “PICTURES”
or “DCIM” folder.
Files on the 1st to 8th level will be recognized. However, files
1st
beyond the 8th level will not be recognized.
7th
8th
9th
Note
Do not change the name of the “PICTURE,” “PICTURES” and “DCIM” folders. If
renamed, the folder will not be displayed on the player.
(On the player)
Photo files are displayed in alphabetical order. The files under the “PICTURE,”
“PICTURES” and “DCIM” folders are displayed in the “PICTURE,”
“PICTURES” and “DCIM” folders respectively.
If there are any folders under the “PICTURE,” “PICTURES” and “DCIM”
folders, they appear as folders. Tap the desired folder to display the photo files
within the folder.
Continued
Page 32

32
Table of
Contents
Index
32
Preparing the Player
For podcasts
(On Windows Explorer)
Drag and drop podcast folders into the “PODCASTS” folder and
episode files into the podcast folders.
On the 1st level, the “PODCASTS” folder will recognize only
folders. Episode files on the 1st level will not be recognized. On
the 2nd level, only files will be recognized and any folders will
not be recognized. Beyond the 2nd level, neither files nor folders
will be recognized.
(On the player)
Podcast folders under the “PODCASTS” folder are displayed in alphabetical
order.
Episode files under the podcast folders are displayed in reverse chronological
order. The episode files transferred using Windows Explorer are displayed
under the reverse chronological order list, in alphabetical order.
1st
2nd
3rd
Hint
You can connect the player to the Internet by using the wireless LAN function to register
podcasts, download episodes and play them back ( page 84).
Notes
Do not change the name of the “PODCASTS” folder. If renamed, it will not be displayed
on the player.
ou cannot refresh the podcasts transferred by Windows Explorer, even after you
Y
connect the player to the Internet via wireless LAN. To refresh a podcast, register it by
using the player ( page 84) or by using Media Manager for WALKMAN ( page 22).
Page 33

33
Table of
Contents
Index
33
Preparing the Player
Wireless LAN Connection
Wireless networks which may be used with the player
The player can connect to the following wireless LANs.
our Home wireless LAN
Y
our office or school wireless LAN
Y
blic wireless LANs, such as at coffee shops, hotels, or libraries.
Pu
Standard IEEE 802.11b
IEEE 802.11g
Security WEP (128 bit/64 bit, Open System Key)
WPA-PSK (TKIP/AES)
WPA2-PSK (TKIP/AES)
Communication range Approx. 50m (160 ft)
(The communication range may vary, depending on conditions
of use and settings.)
Notes
To connect to an access point, the SSID and encryption key may be required. For the
necessary settings ( page 127), consult the person who installed the access point. For
the settings of the access point, refer to the operation guide of the access point, or
consult the manufacturer of the access point.
or the necessary settings ( page 127) to connect to a wireless LAN, ask the
F
administrator of the network (at office/school) or the public Internet access service
provider.
e player does not support security systems customized in some access points. For
Th
details, refer to the operations guide for the access point.
e player does not support AOSS (AirStation One-Touch Secure System).
Th
et the “WLAN Function On/Off” option to “Off” where the network connection is
S
restricted or prohibited, such as in a hospital or in an airplane ( page 127).
ome public wireless LAN services require log-in by using the Internet browser.
S
Page 34

34
Table of
Contents
Index
34
Preparing the Player
Connecting to a wireless LAN
To connect to a wireless LAN, select the desired access point from a list, then
enter the encryption key if necessary.
Usually, when the connection is required by the Internet browser, YouTube or
Podcast, the connection confirmation screen appears automatically to connect
to a wireless LAN. The following instructions use the Internet browser as an
example. Move within the communication range of the access point you intend
to connect to before beginning the operation.
To connect to an access point by using the WPS method, see “New
Registration” ( page 128).
Notes
To connect to an access point using the WPS method, refer to “New Registration” (
page 128) to register the access point before connecting to it.
et the “WLAN Function On/Off” option to “On” before connecting to a wireless LAN
S
( page 127). The default setting is “Off.”
HOME button
From the Home menu, select (Internet Browser).
The connection confirmation screen appears.
Select “Yes.”
The Select Access Point screen appears.
he screen, registered access points and
On t
access points that are installed within the
communication range of the player are
displayed in a list.
Internet Browser
Yes
Continued
Page 35

35
Table of
Contents
Index
35
Preparing the Player
Select the access point you want to
connect to from the list.
If an encryption key is required, the entry
screen appears.
hen no encryption key is required, the
W
connecting dialog box appears. After
establishing the connection, the Internet
browser appears.
Select “WEP Key” or “WPA Key,” enter the
encryption key, then select “OK.”
The connecting dialog box appears. After
establishing the connection, the Internet
browser appears.
or how to input text, see “Text Input” (
F
page 20).
o register the access point, check “Save
T
encryption key.” After registering, you can
connect to the access point by simply
selecting it from the Select Access Point
screen.
f you do not know the WEP key or WPA key
I
for the access point, refer to the operation
guide for the access point, or consult the
administrator of the network or the public
Internet access service provider.
WEP Key or WPA Key
If you cannot connect
Some access point require more detailed settings. See “Changing the Wireless
LAN Settings” ( page 127) to set up. If you are not sure about the settings,
ask the person who installed the access point, the administrator of the wireless
LAN, or the public Internet access service provider.
Continued
Page 36

36
Table of
Contents
Index
36
Preparing the Player
Notes
If the “WLAN Function On/Off” option is set to “Off,” the player cannot connect to the
wireless LAN.
hile connected to a wireless LAN, if the player enters standby mode, is turned off, or is
W
connected to a computer via the USB cable, it is disconnected from the wireless LAN.
ome public wireless LAN services require log-in by using the Internet browser. In this
S
case, until you log in at the log-in site, you cannot browse other websites, cannot watch
YouTube, and cannot download podcast episodes. For details, consult with the public
Internet access service provider.
e sure to check that the access point you intend to register is secure before registering
B
it.
Hint
You can register an access point from the Home menu,
Settings” “New Registration” before connecting to it ( page 128). Also, you can
register an access point in this step if the desired access point does not appear in the list
of the Select Access Point screen.
(Settings) “Wireless LAN
Disconnecting from a wireless LAN
From Home menu, select (Settings)
“Disconnect from Network”
Notes
While connected to a wireless LAN, the battery is consumed quickly. Set the “WLAN
Function On/Off” option to “Off” when you do not intend to use the connection for the
time being.
et the “WLAN Function On/Off” option to “Off” where the network connection is
S
restricted or prohibited, such as in a hospital or in an airplane ( page 127).
“Yes.”
“Wireless LAN Settings”
Page 37

37
Table of
Contents
Index
37
Playing Music
Playing Music
To play music, select (Music) from the Home menu to display the music
playback screen.
You can search for desired songs by selecting
playback screen.
The song information, control buttons, etc., are displayed on the music
playback screen.
HOME button
(Music)
(Search) on the music
Music
From the Home menu, select (Music).
The music playback screen appears.
hen you select (Search) on the music playback screen, the search
W
menu appears. You can select the desired search method to display the
list screen and search for songs. For details, see “Searching for Songs”
( page 42).
Select .
The playback of the songs begins.
ou can tap the control buttons, icons etc.,
Y
on the music playback screen to operate
the player. For details on how to control
the music playback, see “Music playback
screen” ( page 38).
Page 38

38
Table of
Contents
Index
38
Playing Music
Music playback screen
You can bring up or dismiss the control buttons by tapping the screen. If there
is no operation for a while, they disappear.
Information area
Play Mode ( page 47),
Playback Range ( page 48),
Equalizer ( page 48),
VPT (Surround) ( page 50)
indication icons
Song name
Artist name
Album title
Elapsed time
Total time
Current song number/
Total song number to be played
Seek Slider
Operations on the music playback screen
You can tap the objects such as control buttons on the screen to operate the
player. Also, you can use the /
/
buttons on the body of the player
to operate it.
To (screen indication) Do this
)/
1
)/
Tap (play)/ (pause).
Press the button on the body.
Touch and hold /.
Press and hold the
Tap /.
Press the
The playback begins at the point of the indicator.
Drag or flick the cover art up or down to display the
album scroll screen. Drag or flick the cover art on the
screen to select the desired album. For details, see
“Browsing cover arts to select an album (Album Scroll)”
( page 41).
/
/
button on the body.
button on the body.
Play ()/pause ()*
Fast forward (
fast rewind ()
Find the beginning of the previous
(or current) song (
find the beginning of the next
song ()
Move to any point in a song Drag the indicator (playback point) along the Seek Slider.
Browse album covers to select an
album
*1 During pause, if there is no operation for a while, the player automatically enters
standby mode.
Continued
Page 39

39
Table of
Contents
Index
39
Playing Music
Icons on the playback screen
Icon Description
(To List) Shows a list screen.
(Search) Shows the search menu. You can select the desired search
method to display the list screen and search for songs. For
details, see “Searching for Songs” ( page 42).
(Related Links) Shows the Related Links screen. You can search the Internet for
reference information on the current playing song. For details,
see “Searching for Reference Information on a Song (Related
Links)” ( page 43).
(Option Menu) Shows the option menu. For details on the music option menu,
see “Using the Music Option Menu” ( page 45).
List screen
The following are examples of list screens.
Index
Select an initial letter for
song name, album title,
artist name, etc., to bring it
on the top of the list screen.
Song list screen
Album list screen
(Title & Cover Art)
Hint
You can change the display format of the album list to display the cover art thumbnails
only ( page 53).
Continued
Page 40

40
Table of
Contents
Index
40
Playing Music
Operations on the list screen
To Do this
Select an item
Scroll a list up or down
Tap an item.
Drag or flick up or down.
Icons on the list screen
Icon Description
(Up)
(Search) Shows the search menu. For details, see “Searching for Songs”
(To Play Screen) Returns to the music playback screen.
(Option Menu) Shows the option menu. For details on the music option menu,
Shows the list screen of the next upper level (for example, the
icon of a song list screen may show an album list screen).
( page 42).
see “Using the Music Option Menu” ( page 45).
Page 41

41
Table of
Contents
Index
41
Playing Music
Browsing cover arts to select an album (Album Scroll)
On the music playback screen, you can drag or flick the cover art up or down
to select the album.
Album scroll screen
Cover art
From the Home menu, select (Music).
Drag or flick the cover art up or down.
The album scroll screen appears.
Drag or flick the cover art
up or down to browse
album covers.
The cover art images are
arranged by title in
alphabetical order.
Tap the cover art of the desired album.
The music playback screen reappears and the playback of the selected
album begins.
To cancel the browsing
Tap (Back).
Page 42

42
Table of
Contents
Index
42
Playing Music
Searching for Songs
When you tap (Search) on the music playback screen or the list screen, the
search menu appears. You can select the desired search method to search the
list for desired songs.
Music
HOME button
Hint
“All Songs,” “Album” and “Artist” lists are arranged in alphanumeric order.
From the Home menu, select (Music)
search method
Select items as follows until a song list appears.
the desired song.
(Search) the desired
Search method
Method Description
All Songs Select a song from the song list.
Album Select an album
1
Artist*
Genre Select a genre
Release Year Select a release year
Playlists*
Folder Select a folder
*1 “The” at the beginning of the artist name is omitted when arranging the list.
2
Playlists are created by using Windows Media Player 11. For information on how to
*
2
create a playlist, refer to the Help of the Windows Media Player 11. Cover art images
registered to a playlist are not displayed on the player.
Select an artist an album a song.
Select a playlist a song.
a song.
an artist an album a song.
an artist a song.
a song.
Page 43

43
Table of
Contents
Index
43
Playing Music
Searching for Reference Information on a Song
(Related Links)
You can search the Internet by keyword for information on the current playing
song, album, artist, etc. You can search YouTube site for videos, or search a
website for information.
Select
for information on the playing song.
(Related Links) on the music playback screen to search the Internet
Music
HOME button
Notes
The Related Links function requires a wireless LAN connection.
e search function may not be available depending on the “Service Country/Region”
Th
setting.
From the music playback screen, select (Related Links)
desired keyword
the desired website to search.
the
After the search, the YouTube application or the Internet browser is
brought up.
ou can select artist name, song name or album title as the search
Y
keyword.
ou can select (Yahoo! oneSearch) or, (Search
Y
on YouTube) as the search website.*
When selecting (Search on YouTube) to search, the
playback of the song pauses. To restart the playback, select
1
(Music)
from the Home menu.
*1 The search website may vary or may not be available depending on the “Service
Country/Region” setting ( page 126).
Note
You can set the country/region to use the search websites of your residence. For how to
choose the country/region for YouTube, see “Choosing country/region” ( page 81).
For how to choose the country/region for Yahoo! oneSearch, see “Service Country/
Region” ( page 126).
Page 44

44
Table of
Contents
Index
44
Playing Music
Deleting Songs
When you delete songs from the player, use the software you used to transfer
the songs, or Windows Explorer.
For details about using the software, see the Help of the software.
Note
The player itself cannot delete songs without connecting to a computer.
Page 45
45
Table of
Contents
Index
45
Playing Music
Using the Music Option Menu
You can bring up the music option menu by selecting (Option Menu) on the
music list screen or on the music playback screen. For how to use the option
menu, see page 18.
The option items shown on the option menu vary, depending on the screen
from which you bring up the option menu. See the reference page for settings
and usage.
Option item appearing on the list screen
Option Item Description/reference page
Album Display Format Selects the album list format ( page 53).
Option items appearing on the playback screen
Option Items Description/reference page
Play Mode Sets the play mode ( page 47).
Playback Range Sets the playback range (
Equalizer Customizes the sound quality (
VPT(Surround) Customizes the “VPT(Surround)” settings (
DSEE (Sound Enhance) Enables/disables the “DSEE (Sound Enhance)” option (
51).
Clear Stereo Enables/disables the “Clear Stereo” option (
Dynamic Normalizer Enables/disables the “Dynamic Normalizer” option (
Detailed Information Displays the detailed information of a song, such as playing time,
audio format, and bit rate (
Add to Wishlist/Remove
from Wishlist
Adds the song to the wish list to purchase it from the service on
the corresponding software./Removes the song from the wish
list.
page 48).
page 46).
page 48).
page 50).
page 52).
page 52).
page
Page 46
46
Table of
Contents
Index
46
Playing Music
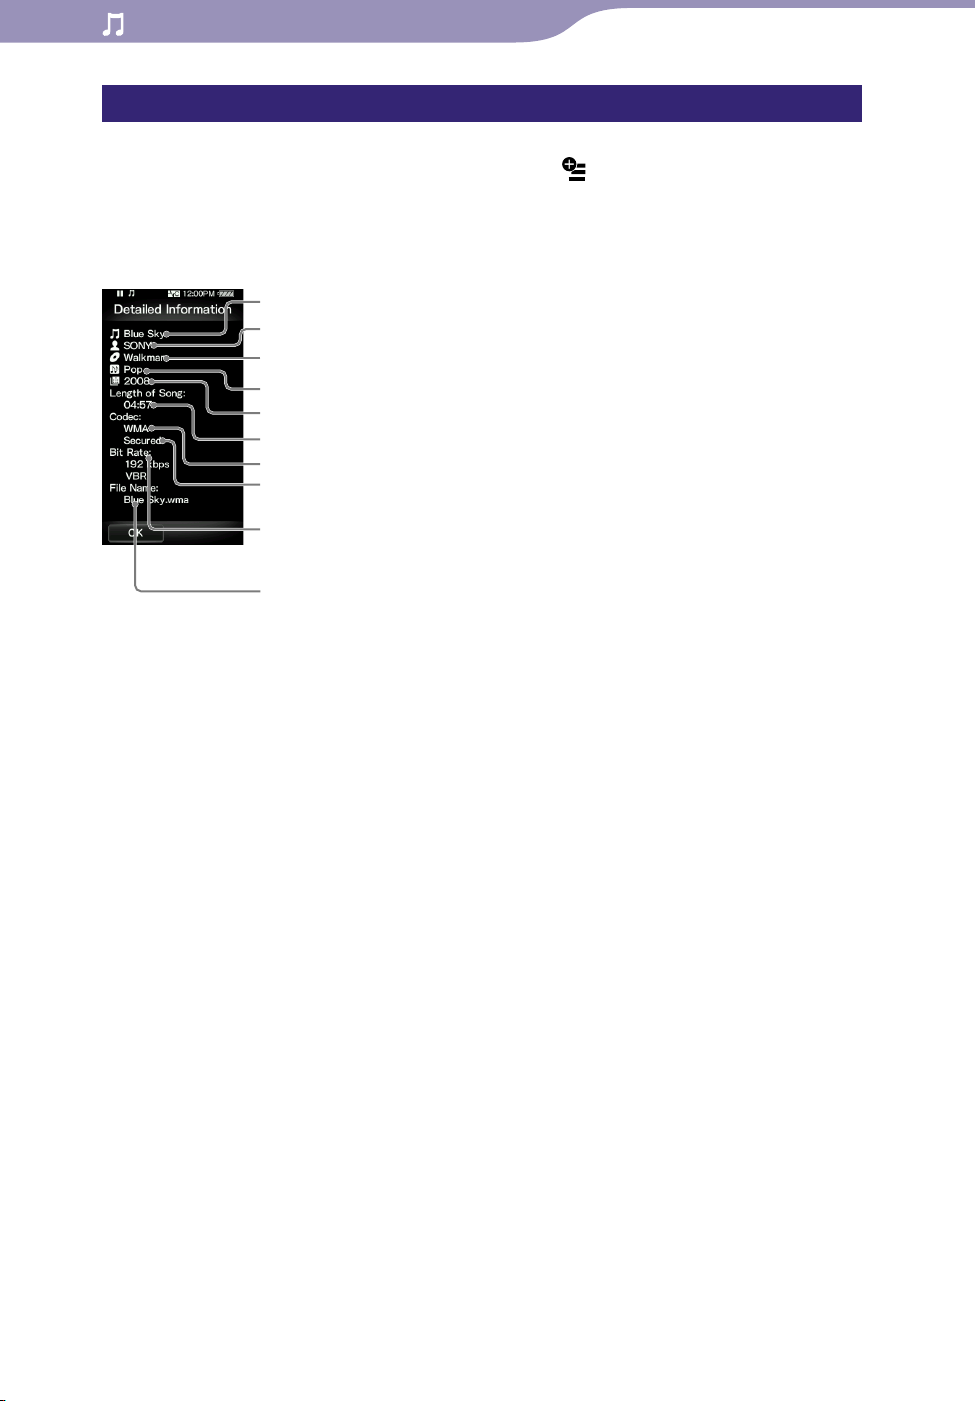
Displaying the Detailed Information screen
From the music playback screen, select (Option Menu)
“Detailed Information.”
Detailed Information screen
Song name
Artist name
Album title
Genre
Release year
Length of Song
Codec
Copyright protected content
Bit rate
While playing back variable bit rate songs, “VBR” is shown. During VBR playback, the
elapsed time indication and the Seek Slider indicator may be unstable and inaccurate.
File name
Page 47

47
Table of
Contents
Index
47
Playing Music
Changing the Music Settings
To change the music settings, select (Settings) from the Home menu, then
select “Music Settings.”
HOME button
Settings
Play Mode
The player offers a variety of play modes, including random play and selected
repeat play.
From the Home menu, select (Settings)
“Play Mode”
Type Description
Normal/ No icon The songs within the playback range are played back in the song
Repeat/
Shuffle/
Shuffle&Repeat/
the desired play mode type “OK.”
list order. (Default setting)
The songs within the playback range are played back in the song
list order and the playback repeats.
The songs within the playback range are played back in random
order.
The songs within the playback range are played back in random
order and the playback repeats.
“Music Settings”
Repeat 1 Song/
Note
Songs to be played back differ depending on the Playback Range settings ( page 48).
The current song or the song selected from a song list is played
back repeatedly.
Page 48

48
Table of
Contents
Index
48
Playing Music
Playback Range
You can set the playback range of songs.
From the Home menu, select (Settings)
“Playback Range”
Type Description
All Range Plays back all the songs in all the lists of the selected search
Selected Range
the desired playback range type “OK.”
method.
For example, if you start playback from an album list, all the
albums in the player are played back.
appears on the screen, and plays back songs only in the lists
from which the playback starts. (Default settings)
For example, if you start playback from an album list, the songs
in the album only are played back.
“Music Settings”
Equalizer
You can set the sound quality according to the music genre, etc.
From the Home menu, select (Settings)
“Equalizer”
Type Description
the desired equalizer type “OK.”
“Music Settings”
None Sound quality setting is not activated. (Default setting)
Heavy (
Pop (
Jazz (
Unique (
Custom 1 (
Custom 2 (
Notes
If your personal settings saved as “Custom 1” and “Custom 2” seem to produce a
different volume level than the other settings, you may have to adjust the volume
manually to compensate.
e “Equalizer” setting is not applied while playing a video, YouTube video, podcast
Th
video, or FM radio.
) Emphasizes high and low ranges for a powerful sound.
) Stresses the middle range audio, ideal for vocals.
) Emphasizes high and low ranges for a lively sound.
)
) User-customizable sound settings for which you can adjust each
)
Emphasizes high and low ranges, so that even soft sounds can be
heard easily.
frequency range individually. See page 49 for details.
Continued
Page 49

49
Table of
Contents
Index
49
Playing Music
Customizing sound quality
You can preset the value of CLEAR BASS (bass) and 5 bands Equalizer as
“Custom 1” or “Custom 2.”
From the Home menu, select (Settings)
“Equalizer”
“Custom 1” or “Custom 2.”
“Music Settings”
Drag the slider for the CLEAR BASS or the frequency range setting
to adjust the setting level, and then select “OK.”
The CLEAR BASS can be set to any of 4 sound levels, and the 5 frequency
ranges can be set to any of 7 sound levels.
Note
The “Equalizer” setting is not applied while playing a video, YouTube video, podcast
video, or FM radio.
Page 50

50
Table of
Contents
Index
50
Playing Music
VPT (Surround)
You can customize the surround sound by using the VPT*1 (Surround)
function to enrich the sound reproduction quality of the audio playback.
The sense of realism is more enhanced in the order of “Studio” “Live”
“Club” “Arena” (most enhanced).
From the Home menu, select (Settings)
“VPT (Surround)”
Type Description
None “VPT(Surround)” setting is not activated. (Default setting)
Studio (
Live (
Club (
Arena (
Matrix (
Karaoke (
*1 VPT, which stands for Virtual Phone Technology, is a proprietary sound processing
technology developed by Sony.
Note
The “VPT (Surround)” setting is not applied while playing a video, YouTube video,
podcast video, external input audio, or FM radio.
) Creates the sound of a recording studio.
) Creates the sound of a concert hall.
) Creates the sound of a club.
) Creates the sound of an arena.
) Reproduces an additional surround effect, and creates a natural,
)
the desired VPT (Surround) type “OK.”
yet richly enhanced sound.
Creates a stage-like sound field by suppressing vocal sounds, and
adding a surround effect to the music.
“Music Settings”
Page 51

51
Table of
Contents
Index
51
Playing Music
DSEE (Sound Enhance)
By activating the “DSEE*1(Sound Enhance)” feature, you can hear a rich and
natural sound almost exactly like the original source.
From the Home menu, select (Settings)
“DSEE(Sound Enhance)”
type
Type Description
On The “DSEE*1(Sound Enhance)” function is activated, and plays back naturally
Off Disables the “DSEE (Sound Enhance)” function and plays back normal sound.
*1 DSEE, which stands for Digital Sound Enhancement Engine, is a technology developed
by Sony, to enhance the sound quality of compressed audio files by restoring high-range
sound removed by the compression process.
Notes
The “DSEE (Sound Enhance)” setting is not applied while playing a video, YouTube
video, podcast video, external input audio, or FM radio.
e “DSEE(Sound Enhance)” function is not effective for songs with a file format that is
Th
not compressed, or songs that are of a high bit rate with no treble loss.
n the case of songs of very low bit rate, the “DSEE(Sound Enhance)” function will not
I
be effective.
“OK.”
extended sound that is close to the original sound.
(Default setting)
the desired DSEE (Sound Enhance)
“Music Settings”
Page 52

52
Table of
Contents
Index
52
Playing Music
Clear Stereo
“Clear Stereo” enables individual left and right digital processing of the sound.
From the Home menu, select (Settings)
“Clear Stereo”
Type Description
On Activates the “Clear Stereo” function when you use the supplied
Off Disables the “Clear Stereo” function and plays back normal
Notes
The “Clear Stereo” setting is not applied while playing a video, YouTube video, podcast
video, external input audio, or FM radio.
e “Clear Stereo” function is designed to obtain maximum effect with the supplied
Th
headphones. The “Clear Stereo” effect may not be obtained with other headphones.
When using other headphones, set “Clear Stereo” to “Off.”
the desired Clear Stereo type “OK.”
headphones. (Default setting)
sound.
“Music Settings”
Dynamic Normalizer
You can reduce the volume level between songs. With this setting, when
listening to album songs in the shuffle play mode, the volume level between
songs is moderated to minimize the difference in their recording levels.
From the Home menu, select (Settings)
“Dynamic Normalizer”
the desired Dynamic Normalizer type
“Music Settings”
“OK.”
Type Description
On Minimizes the difference of the volume level between songs.
Off Plays back songs with their original volume level as transferred.
(Default setting)
Note
The “Dynamic Normalizer” setting is not applied while playing a video, YouTube video,
podcast video, external input audio, or FM radio.
Page 53

53
Table of
Contents
Index
53
Playing Music
Album Display Format
You can select the album display format.
From the Home menu, select (Settings)
“Album Display Format”
“OK.”
Type
Screen
Title & Cover Art (Default setting) Cover Art Only
the desired Album Display Format type
“Music Settings”
Hint
The cover art only appears if the cover art information is included. You can set cover art
using the bundled Windows Media Player 11. For details on operation, refer to the Help
of Windows Media Player 11. Note that the player does not display cover art attached to
playlists.
Page 54

54
Table of
Contents
Index
54
Watching Videos
Playing a Video
To play a video, select (Videos) to display the video playback screen.
You can select the desired video by selecting
screen. The video’s information, control buttons, etc., are displayed on the
video playback screen.
HOME button
(Videos)
(Search) on the video playback
Videos
From the Home menu, select (Videos).
The video playback screen appears.
When you select (Search) on the video playback screen, the search
menu appears. You can select desired search method to display the list
screen and search for videos. For details, see “Searching for Videos” (
page 58).
Select .
The playback of the video begins.
ou can tap the control buttons,
Y
icons etc., on the video playback
screen to operate the player. For
details on how to control the video
playback, see “Video playback
screen” ( page 55).
Hint
When the “On-Hold Display” option is set to “No,” you can turn off the screen to enjoy
sound only by setting the HOLD switch to on during video playback. By this operation,
you can reduce power consumption to make the battery last longer.
Page 55

55
Table of
Contents
Index
55
Watching Videos
Video playback screen
You can bring up or dismiss the control buttons, icons, etc., by tapping the
screen. If there is no operation for a while, they disappear.
Information area
Total time
Seek Slider
Elapsed time
Operations on the video playback screen
You can tap the objects such as control buttons on the screen to operate the
player. Also, you can use the /
to operate it.
To (screen indication) Do this
)/
)/
1
Tap (play)/ (pause).
Press the button on the body.
Tap /, or touch and hold /.*
Press and hold the / button on the body.
Touch and hold / during pause.
Press and hold the / button on the body during
pause.
Play ()/pause ()*
Fast forward (
fast rewind ()
Fast forward (
fast rewind () during
pause*
3
/
buttons on the body of the player
2
Move to the previous
4
scene*
or chapter ()/
move to the next scene or
chapter ()
Rewind slightly/forward
slightly
Move to any point in a
video
Tap /.
Press the / button on the body.
Tap
Drag along the Seek Slider to move the indicator (playback
point). The playback begins at the point of the indicator.
(rewind)/ (forward) during pause.
*1 During pause, if there is no operation for a while, the player automatically enters
standby mode.
2
Forward speed changes through 3 levels by repeatedly tapping ( (×10),
*
(×30),
(
(×100)). Also, rewind speed changes through 3 levels by repeatedly tapping
(×10), (×30), (×100)). Tap to exit the operation and resume
normal playback.
3
The speed of fast forward/fast rewind during pause varies depending on the length of
*
the video.
4
If there is only one chapter in the video, the playback position moves with an interval of
*
5 minutes.
Continued
Page 56

56
Table of
Contents
Index
56
Watching Videos
Icons on the playback screen
Icon Description
(To List) Shows a list screen.
(Search) Shows the search menu. You can select desired search method to
display the list screen and search for videos. For details, see
“Searching for Videos” ( page 58).
(Scene Scroll) Shows the scene scroll screen. You can browse scenes or chapters
by flicking the thumbnail*1 on the screen, to select the desired
scene. For details, see “Browsing scenes (Scene Scroll)” ( page
57).
(Option Menu) Shows the option menu. For details on the video option menu,
see “Using the Video Option Menu” ( page 60).
*1 Thumbnail refers to a reduced size image of one scene of a video.
Page 57

57
Table of
Contents
Index
57
Watching Videos
Browsing scenes (Scene Scroll)
You can display thumbnails*1 to select a scene or chapter to play back.
1
Thumbnail refers to a reduced size image of one scene of a video.
*
Scene scroll screen
Scene interval setting
Hint
On the scene search screen, you can set the interval of scenes displayed as thumbnails.
You can set the interval to “15 Sec,” “30 Sec,” “1 Min,” “2 Min” or “5 Min.” Tap the Scene
interval setting on the top of the screen to select the desired interval. Use the scene
thumbnails as a guide (because each thumbnail may have a deviation from the exact
time interval).
From the Home menu, select (Videos)
desired video
The scene scroll screen appears.
(Scene Scroll).
Drag or flick the images sideways
to browse.
Tap the desired image.
The video playback screen reappears
and the playback begins from the
beginning of the scene you selected.
(To List) the
To cancel the browsing
Tap (Back).
Page 58

58
Table of
Contents
Index
58
Watching Videos
Searching for Videos
When you tap (Search) on the video playback screen or the list screen, the
search menu appears. You can select desired search method to search the list
for desired video.
Videos
HOME button
From the Home menu, select (Videos)
desired search method
the desired video.
Search method
Method Description
All Videos Select a video from the video list.
VIDEO You can search for videos by folder.
Select a folder
a video.
(Search) the
Page 59

59
Table of
Contents
Index
59
Watching Videos
Deleting Videos
You can delete videos from the player.
Deleting currently playing video
From the playback screen of the video, tap (Option Menu)
“Delete Video”
“Yes.”
Deleting videos by selecting from a list
From the video list screen, select (Option Menu)
the video you intend to delete “Yes.”
Hint
You can use Media Manager for WALKMAN or Windows Explorer to delete video files
from the player. Use Media Manager for WALKMAN to delete videos transferred by it.
Use Windows Explorers to delete videos transferred by it.
“Delete Video”
Page 60
60
Table of
Contents
Index
60
Watching Videos
Using the Video Option Menu
You can bring up the video option menu by selecting (Option Menu) on the
video list screen or on the video playback screen. For how to use the option
menu, see page 18.
The option items shown on the option menu vary, depending on the screen
from which you bring up the option menu. See the reference page for settings
and usage.
Option item appearing on the list screen
Option Item Description/reference page
Order of Video List Arranges the video list by date or by title ( page 63).
Delete Video Deletes videos (
page 59).
Option items appearing on the playback screen
Option Items Description/reference page
Zoom Settings Sets the zoom function ( page 61).
Brightness Adjusts the brightness of the screen (
On-Hold Display Sets to turn off the video screen during the player is on hold (
page 63).
Detailed Information Displays file information, such as file size, resolution, video/
audio compression format, and file name, etc.
Delete Video Deletes the videos from the player (
page 121).
page 59).
Page 61

61
Table of
Contents
Index
61
Watching Videos
Changing the Video Settings
To change the video settings, select (Settings) from the Home menu, then
select “Video Settings.”
HOME button
Settings
Zoom Settings
You can zoom in the currently playing video.
From the Home menu, select (Settings)
“Zoom Settings”
Type Description
Auto The video image is enlarged/reduced by fully fitting it to the available display
area, keeping the aspect ratio. (Default setting)
hen a 16:9 video image is displayed, it is enlarged/reduced by fully fitting
W
it to the available display area, keeping the aspect ratio.
W
hen a 4:3 video image is displayed, it appears with the short side of the
video image fully fit to the screen, and black bands right and left on the
screen.
the desired zoom setting type “OK.”
16:9 source
“Video Settings”
4:3 source
Continued
Page 62

62
Table of
Contents
Index
62
Watching Videos
Type Description
Full The video image is enlarged/reduced by fully fitting it to the available display
area, keeping the aspect ratio.
hen a 16:9 video image is displayed, it is enlarged/reduced by fully fitting
W
it to the available display area, keeping the aspect ratio.
W
hen a 4:3 video image is displayed, it appears with the long side of the
video image fully fit to the screen, with the top and bottom of the video
image cut to fit.
16:9 source 4:3 source
The dotted line frame represents the original video image size.
Off The video image is not enlarged/reduced, and appears at the original
resolution.
16:9 source 4:3 source
Page 63
63
Table of
Contents
Index
63
Watching Videos
Playing only video sound (On-Hold Display)
You can set to turn off the video screen during the player is on hold, allowing
you to enjoy the sound of videos only.
Setting this option to “No” saves battery power and battery life will last longer.
From the Home menu, select (Settings)
“On-Hold Display”
the desired On-Hold Display setting type
“Video Settings”
“OK.”
Type Description
Yes When the player is on hold, the touch panel and buttons are
deactivated, but videos will be played back normally. (Default
setting)
No When the player is on hold, the touch panel and buttons are
deactivated and the screen turns off, but the sound of the current
video is played back.
Order of Video List
Arranges the video list by date or by title.
From the Home menu, select (Settings)
“Order of Video List”
Type Description
Date/Time (Oldest) Arranges the video list by transfer/record date in ascending
the desired order of video list type “OK.”
order.
“Video Settings”
Date/Time (Newest) Arranges the video list by transfer/record date in descending
order. (Default setting)
Title (A>Z) Arranges the video list by title in ascending order.
Title (Z>A) Arranges the video list by title in descending order.
Page 64

64
Table of
Contents
Index
64
Viewing Photos
Viewing Photos
To view photos, select (Photos) from the Home menu to display the photo
display screen.
You can select desired photos from a list by selecting
display screen.
The photo information, control buttons, etc., are displayed on the photo display
screen.
HOME button
(Photos)
(Search) on the photo
Photos
From the Home menu, select (Photos).
The photo display screen appears.
hen you select (Search) on the photo display screen, the search
W
menu appears. You can select desired search method to display the list
screen and search for photos. For details, see “Searching for Photos” (
page 67).
Drag or flick sideways to display
the previous/next photo.
ou can tap the control buttons,
Y
icons etc., on the photo display
screen to operate the player. For
details on how to control the photo
display, see “Photo display screen”
( page 66).
Continued
Page 65

65
Table of
Contents
Index
65
Viewing Photos
Hints
Playback of songs continues even while you are searching for photos in the photo folder
lists or photo lists, or when the photo display screen is displayed.
ou can arrange photos transferred to the player by folder. Select the player (as
Y
[WALKMAN]) using Windows Explorer, drag and drop a new folder just under the
“DCIM,” “PICTURES” or “PICTURE” folder. For details on data hierarchy, see page 31.
Note
If the size of the photo is too large, or the photo file is damaged,
photo cannot be displayed.
appears, and the
Page 66

66
Table of
Contents
Index
66
Viewing Photos
Photo display screen
You can bring up or dismiss the control buttons, icons, etc., by tapping the
screen. If there is no operation for a while, they disappear.
Information area
Operations on the photo display screen
You can tap the objects such as control buttons on the screen to operate the
player.
To Do this
Display the next/previous
photo
Display the following/
previous photos
consecutively
Drag or flick left (next) or right (previous).
Tap (next) or (previous).
Touch and hold
(following) or (previous).
Icons on the photo display screen
Icon Description
(To List) Shows a list screen.
(Search) Shows the search menu. You can select desired search method
to display the list screen and search for photos. For details, see
“Searching for Photos” ( page 67).
(Option Menu) Shows the option menu. For details on the photo option
menu, see “Using the Photo Option Menu” ( page 69).
Page 67

67
Table of
Contents
Index
67
Viewing Photos
Searching for Photos
When you tap (Search) on the photo display screen or the list screen, the
search menu appears. You can select desired search method to search the list
for desired photos.
Photos
HOME button
From the Home menu, select (Photos)
desired search method
S
elect items as follows until a photo list appears.
the desired photo.
(Search) the
Search method
Method Description
All Photos Select a photo from the list of the all photos.
DCIM Select a photo by folder.
Select a folder in the “DCIM” folder
PICTURE Select a photo by folder.
Select a folder in the “PICTURE” folder
PICTURES Select a photo by folder.
Select a folder in the “PICTURES” folder
a photo.
a photo.
a photo.
Page 68

68
Table of
Contents
Index
68
Viewing Photos
Deleting Photos
Use Media Manager for WALKMAN or Windows Explorer to delete photos
from the player.
Use Media Manager for WALKMAN to delete photos transferred by Media
Manager for WALKMAN.
For details about using Media Manager for WALKMAN, see the Help of the
software.
Notes
If you use Windows Explorer to rename a photo on the player, Media Manager for
WALKMAN cannot delete the photo. Use Windows Explorer to delete it.
e player itself cannot delete photos without connecting to a computer.
Th
Page 69

69
Table of
Contents
Index
69
Viewing Photos
Using the Photo Option Menu
You can bring up the photo option menu by selecting (Option Menu) on the
photo list screen or on the photo display screen. For how to use the option
menu, see page 18.
The option items shown on the option menu vary, depending on the screen
from which you bring up the option menu. See the reference page for settings
and usage.
Option item appearing on the list screen
Option Item Description/reference page
Photo List Display Format Sets the photo list display format ( page 70).
Option items appearing on the display screen
Option Items Description/reference page
Brightness Adjusts the brightness of the screen ( page 121).
Detailed Information Displays file information, such as file size, resolution, and file
name, etc.
Set as Wallpaper Sets the currently displayed photo to the wallpaper(
page 121).
Page 70

70
Table of
Contents
Index
70
Viewing Photos
Changing the Photo Settings
To change the photo settings, select (Settings) from the Home menu, then
select “Photo Settings.”
HOME button
Settings
Setting the Photo List Display Format
The player offers 2 display formats. You can set the display format of the photo
1
list as “Thumbnail + Title*
From the Home menu, select (Settings)
“Photo List Format”
Type Description
Thumbnail + Title Displays a photo title with a thumbnail image in the photo list.
Thumbnail Only Displays only thumbnails in the photo list. (Default setting)
*1 Thumbnail refers to a reduced size image of a photo.
Note
Thumbnails may not be displayed, depending on the file format.
” or “Thumbnail Only.”
“Photo Settings”
the desired photo list format type “OK.”
Page 71

71
Table of
Contents
Index
71
Listening to FM Radio
Listening to FM Radio
To Listen to FM Radio, select (FM Radio) from the Home menu to display
the FM Radio screen.
The FM radio information, control buttons, etc., are displayed on the FM
Radio screen.
FM Radio
HOME button
Note
The headphone cord serves as an antenna, so extend it as far as possible.
Page 72

72
Table of
Contents
Index
72
Listening to FM Radio
To listen to FM radio
From the Home menu, select (FM
Radio)
Preset number.
ou can tap the control buttons, icons etc.,
Y
on the FM Radio screen to operate the
player.
FM Radio screen
To Do this
Tune the radio manually Drag or flick the frequency up or down.
Search the previous/
next receivable broadcast
station*
Select the previous/
next preset number*
1
the desired frequency or
Tap / .
To stop searching, tap the screen or press one of the
//
Tap / .
2
Press the / button on the body.
buttons on the body of the player.
Frequency
Preset number
*1 If sensitivity is too high, change the “Scan Sensitivity” setting ( page 75) to “Low.”
2
You cannot select the Preset number if no preset stations are entered. Preset the
*
receivable stations using “Auto Preset” ( page 73).
Icons on the FM Radio screen
Icon Description
(Option Menu) Shows the option menu. For details on the FM radio option
menu, see “Using the FM Radio Option Menu” ( page 76).
Page 73

73
Table of
Contents
Index
73
Listening to FM Radio
Presetting broadcast stations automatically (Auto Preset)
You can preset receivable broadcast stations (up to 30 stations) in your area
automatically by selecting “Auto Preset.” When you use the FM radio for the
first time, or when you move to a new area, we recommend you preset
receivable broadcast stations by selecting “Auto Preset.”
From the FM Radio screen, select (Option Menu)
“Yes.”
The receivable broadcast stations will be preset in order from low to high
frequency.
“Auto Preset completed.” appears when presetting is completed, then the
first preset station is ready to be received.
elect “No” to cancel the automatic presetting.
S
“Auto Preset”
Hint
If high sensitivity causes the player to receive many unwanted broadcast stations, change
the “Scan Sensitivity” setting ( page 75) to “Low.”
Note
The “Auto Preset” operation will delete already preset broadcast stations.
Page 74

74
Table of
Contents
Index
74
Listening to FM Radio
Presetting broadcast stations manually
You can preset broadcast stations which “Auto Preset” cannot detect ( page
73).
On the FM Radio screen, select the desired frequency.
Select (Option Menu)
The frequency you select in step
number appears below the frequency.
“Save to Preset.”
is preset and the assigned Preset
Hint
You can preset up to 30 stations.
Note
The preset numbers are stored in order, from low to high frequency.
Deleting preset broadcast stations
Tap / on the FM Radio screen to select a desired Preset
number for the frequency.
Select (Option Menu)
The selected preset broadcast station is deleted.
“Delete from Preset.”
Page 75

75
Table of
Contents
Index
75
Listening to FM Radio
Changing the FM Radio Settings
To change the FM radio settings, select (Settings) from the Home menu,
then select “FM Radio Settings.”
HOME button
Settings
Scan Sensitivity
When you select stations using the “Auto Preset” function ( page 73) or
tapping
because sensitivity is too high. In this case, set the reception to “Low.” “High” is
set by default.
From the Home menu, select (Settings)
/ , the FM receiver may receive many unwanted broadcast stations
“FM Radio Settings”
“Scan Sensitivity”
T
o set the reception sensitivity back to the default, select “High.”
“Low” “OK.”
Mono/Auto
If noise occurs during FM reception, set the receiver to “Mono” for monaural.
If you set it to “Auto,” monaural/stereo reception is selected automatically,
depending on reception conditions. “Auto” is set by default.
From the Home menu, select (Settings)
“Mono/Auto”
T
o return to the automatic setting, select “Auto.”
“Mono” “OK.”
“FM Radio Settings”
Page 76

76
Table of
Contents
Index
76
Listening to FM Radio
Using the FM Radio Option Menu
You can bring up the FM radio option menu by selecting (Option Menu) on
the FM Radio screen. For how to use the option menu, see page 18.
Option Items Description/reference page
Scan Sensitivity Adjusts the sensitivity of the radio reception ( page 75).
Mono/Auto Changes to either monaural or stereo (
Save to Preset Presets the currently tuned-in broadcast station (
Delete from Preset Deletes a broadcast station from the preset stations (
Auto Preset Presets the broadcast stations automatically (
page 75).
page 73).
page 74).
page 74).
Page 77

77
Table of
Contents
Index
77
Watching YouTube
Watching YouTube
To watch YouTube, select (YouTube) from the Home menu to display the
YouTube list screen. You can play a YouTube video by selecting the desired
video from the list.
The video information, control buttons, etc., are displayed on the YouTube
playback screen.
YouTube
HOME button
Notes
To watch YouTube, you need to connect to a wireless LAN. For information on wireless
LAN connection settings, see “Wireless LAN Connection” ( page 33).
efore watching YouTube, adjust the date and time ( page 26).
B
To watch YouTube
From the Home menu, select (YouTube).
If the player has not connected to a wireless LAN yet, the connection
confirmation screen appears. Follow the instructions of “Connecting to a
wireless LAN” ( page 34) to connect.
After establishing a connection, the YouTube list screen appears.
When you select (Search) on the YouTube playback screen or the
YouTube list screen, the search menu appears. You can select desired
search method to display the list screen and search for videos. For
details, see “Searching for YouTube Videos” ( page 80).
Continued
Page 78

78
Table of
Contents
Index
78
Watching YouTube
Select the desired video.
The playback of the YouTube video
begins.
ou can tap the control buttons,
Y
icons etc., on the YouTube playback
screen to operate the player. For
details on how to control the video
playback, see “YouTube playback
screen” ( page 79).
Page 79

79
Table of
Contents
Index
79
Watching YouTube
YouTube playback screen
You can bring up or dismiss the control buttons, icons, etc., by tapping the
screen. If there is no operation for a while, they disappear.
Information area
Total time
Seek Slider
Elapsed time
Operations on the YouTube playback screen
You can tap the objects such as control buttons on the screen to operate the
player. Also, you can use the /
operate it.
To (screen indication) Do this
Play ()/pause ()*
Find the beginning of the
current video
Move to any point in a
2
video*
1
Tap (play)/ (pause).
Press the button on the body.
Tap .
Press the button on the body.
Drag along the Seek Slider to move the indicator (playback
point). The playback begins at the point of the indicator.
buttons on the body of the player to
*1 During pause, if there is no operation for a while, the player automatically enters
standby mode.
2
You cannot move to a point where the video data has not been buffered.
*
Icons on the playback screen
Icon Description
(To List) Shows a list screen.
(Search) Shows the search menu. You can select desired search method to
display the list screen and search for videos. For details, see
“Searching for YouTube Videos” ( page 80).
(Option Menu) Shows the option menu. For details on the YouTube option
menu, see “Using the YouTube Option Menu” ( page 82).
Page 80

80
Table of
Contents
Index
80
Watching YouTube
Searching for YouTube Videos
When you tap (Search) on the YouTube playback screen or the list screen,
the search menu appears. You can select desired search method to search the
list for desired video.
YouTube
HOME button
From the Home menu, select (YouTube)
desired search method
Method Description
Featured*
Most Viewed*
Keyword Search Search for videos by keyword and display the video list.
Related Videos Select from the list of videos relating to the last played video.
*1 You can narrow down the list by choosing country/region ( page 81).
2
You can narrow down the list by choosing a timeframe ( page 81).
*
1
1, *2
Select from the list of featured videos on the YouTube site.
Select from the list of most viewed videos on the YouTube site.
You can enter a keyword by using the onscreen keyboard and
select “OK” to display the video list. For how to input text, see
“Text Input” (
the desired video.
page 20).
(Search) the
Page 81

81
Table of
Contents
Index
81
Watching YouTube
Choosing country/region
You can narrow down the “Featured” list and the “Most Viewed” list by
choosing country/region.
From the Home menu, select (YouTube)
“Featured” or “Most Viewed”
Region”
the desired country/region “OK.”
(Option Menu) “Country/
(Search)
Hint
You can also select
Home menu to choose country/region.
(Settings) “YouTube Settings” “Country/Region” from the
Choosing timeframe
You can narrow down the “Most Viewed” list by choosing a timeframe.
From the Home menu, select (YouTube)
Viewed”
timeframe type
Type Description
Today Displays the list of most viewed videos of the day.
This Week Displays the list of most viewed videos of the week.
This Month Displays the list of most viewed videos of the month.
(Option Menu) “Timeframe” the desired
“OK.”
(Search) “Most
All Time Displays the list of most viewed videos of all time. (Default
setting)
Hint
You can also select
menu to choose a timeframe.
(Settings) “YouTube Settings” “Timeframe” from the Home
Page 82

82
Table of
Contents
Index
82
Watching YouTube
Using the YouTube Option Menu
You can bring up the YouTube option menu by selecting (Option Menu) on
the YouTube playback screen or on the YouTube list screen. For how to use the
option menu, see page 18.
The option items shown on the option menu vary, depending on the screen
from which you bring up the option menu. See the reference page for settings
and usage.
Option item appearing on the list screen only
Option Item Description/reference page
Country/Region*
Timeframe*
*1 This option appears only when the “Featured” list or the “Most Viewed” list is displayed.
2
This option appears only when the “Most Viewed” list is displayed.
*
1
2
Narrows down the video list by choosing country ( page 81).
Narrows down the video list by choosing a timeframe ( page
81).
Option items appearing on the playback screen
Option Items Description/reference page
Zoom Settings Sets the zoom function ( page 61).
Brightness Adjusts the brightness of the screen (
On-Hold Display Sets to turn off the video screen during the player is on hold (
page 63).
page 121).
Page 83

83
Table of
Contents
Index
83
Enjoying Podcast
Before Enjoying Podcast
You can use the podcast function of the player in three ways. For details, see
each of the descriptions.
egister a podcast by using the player ( page 84), download episodes by
R
using the wireless LAN function of the player ( page 86), then play them
back ( page 90).
egister a podcast by using Media Manager for WALKMAN or Content
R
Transfer ( page 22), download episodes by using the wireless LAN
function of the player ( page 86), then play them back ( page 90).
ownload episodes to a computer ( page 22), transfer them from the
D
computer to the player by using Media Manager for WALKMAN, Content
Transfer, or Windows Explorer ( page 22), then play them back ( page
90).
Notes
If you transfer episodes of a podcast from a computer to the player by using Windows
Explorer, you cannot refresh the podcast by using the wireless LAN function until
registering the podcast.
e player supports video and audio podcasts. The player does not support photo
Th
podcasts.
What is a podcast?
A “podcast” is a group of audio or video files that is published on the Internet.
The files, called episodes, can be downloaded automatically by using RSS, to
play back. Many news sites, corporations, or individuals publish podcasts by
using RSS. You can register a podcast to the player by using an RSS icon on a
website. After registering, when the latest episodes are added to the podcast,
you can download them.
Page 84

84
Table of
Contents
Index
84
Enjoying Podcast
Registering a Podcast
To play back podcast episodes, you need to register the podcast to the player
and download episodes. You can register a podcast by selecting an RSS icon
displayed on the Internet browser of the player. For how to use the Internet
browser of the player, see “Viewing Websites (Internet Browser)” ( page
102).
You can also transfer a podcast by using Media Manager for WALKMAN or
Content Transfer to register the podcast to the player. For details about
transferring podcasts, refer to the Help of each software.
Internet Browser
HOME button
Hint
You can easily register podcasts by using the podcast link collection. From the list
screen, select (Option Menu) “To Podcast Links,” and then go to Step in the
next page.
Register a Podcast by using the Internet browser of the player
From the Home menu, select (Internet Browser).
If the player has not connected to a wireless LAN yet, the connection
confirmation screen appears. Follow the instructions of “Connecting to a
wireless LAN” ( page 34) to connect.
After establishing a connection, the Internet browser appears.
Continued
Page 85

85
Table of
Contents
Index
85
Enjoying Podcast
Open the web page of the desired podcast, then select the RSS
icon.
The podcast is registered to the player by selecting the RSS icon.
RSS ico
to select an RSS icon.
F
Browser)” ( page 102).
Hint
You can transfer episodes from a computer to the player, without registering the podcast.
For details, see “Transferring Music/Videos/Photos/Podcasts” ( page 28).
Note
If you transfer episodes of a podcast from a computer to the player by using Windows
Explorer, you cannot refresh the podcast by using the wireless LAN function. If you
intend to refresh the podcast, register it by using the player or Media Manager for
WALKMAN. For how to register podcasts by using Media Manager for WALKMAN,
refer to the Help of the Media Manager for WALKMAN.
ns differ between websites. Refer to descriptions on the website
or how to use the Internet browser, see “Viewing Websites (Internet
Page 86
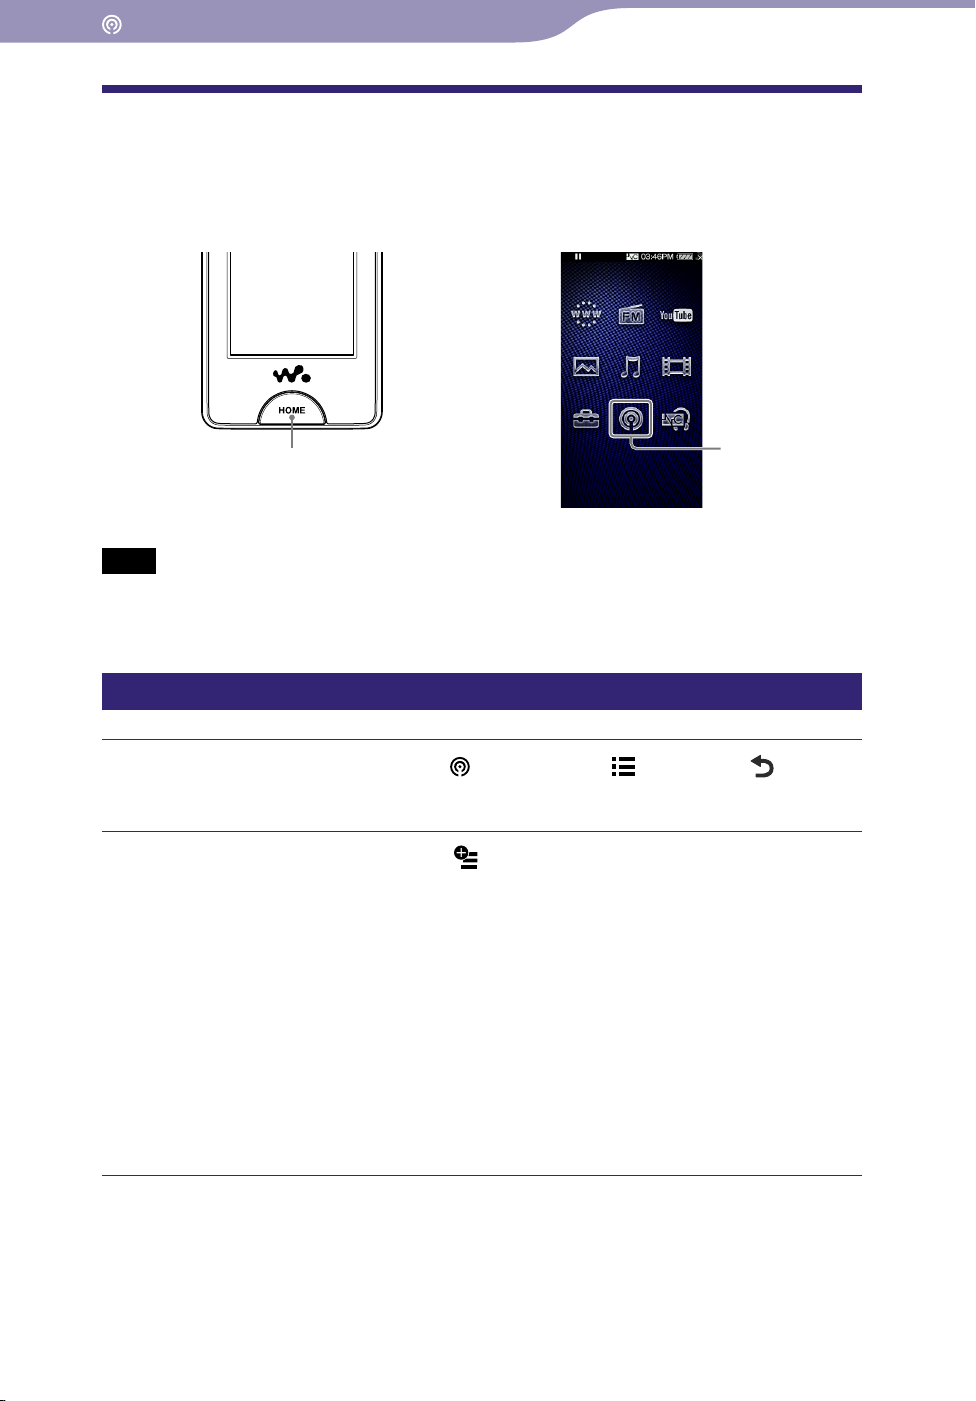
86
Table of
Contents
Index
86
Enjoying Podcast
Downloading episodes
You can download the latest episodes of the desired podcast. Also, you can
download the latest episodes from all of the podcasts you have selected to
refresh.
HOME button
Note
To download episodes from podcasts registered to the player, the player need to connect
to a wireless LAN.
Podcasts
Downloading from a podcast
From the Home menu, select (Podcasts)
The Podcast List screen appears.
Select the desired podcast
Podcast.”
If the player has not connected to a wireless LAN yet, the connection
confirmation screen appears. Follow the instructions of “Connecting to a
wireless LAN” ( page 34) to connect.
After establishing a connection, the download of the latest episodes
begins.
ou can select “Cancel” to cancel the download and return to the
Y
episode list screen.
ou can select “Skip” to skip the current episode and continue
Y
downloading from the next episode.
(Option Menu) “Refresh This
(To List) (Back).
Page 87

87
Table of
Contents
Index
87
Enjoying Podcast
Downloading from all of the podcast selected to refresh
You can download the latest episodes from all of the podcasts you have selected
to refresh. For how to select/deselect podcasts to refresh, see “Selecting/
deselecting podcasts to refresh” ( page 88).
From the Home menu, select (Podcasts)
The Podcast List screen appears.
Select (Option Menu)
If the player has not connected to a wireless LAN yet, the connection
confirmation screen appears. Follow the instructions of “Connecting to a
wireless LAN” ( page 34) to connect.
After establishing a connection, the download of the latest episodes of
each podcasts begins.
ou can select “Cancel” to cancel the download and return to the
Y
Podcast List screen.
ou can select “Skip” to skip the current episode and continue
Y
downloading of the next episode. If the last episode of the podcast is
skipped, the player continues downloading from the next podcast.
“Refresh Podcasts.”
(To List) (Back).
Hint
You can set the number of the latest episodes to be downloaded by setting “Number of
Downloads” option ( page 89).
Page 88

88
Table of
Contents
Index
88
Enjoying Podcast
Selecting/deselecting podcasts to refresh
You can select/deselect podcasts to refresh. By selecting podcasts to refresh,
you can download the latest episodes of the podcasts by using “Refresh
Podcasts” ( page 87).
From the Home menu, select (Podcasts)
The Podcast List screen appears.
Select (Option Menu)
to refresh
Check the podcast to select to refresh. Uncheck the podcast to deselect.
When a podcast is registered, it is selected to refresh.
“OK.”
“Select Podcast to Refresh” podcasts
(To List) (Back).
Hint
You can also select
from the Home menu to select/deselect podcasts to refresh.
Note
If you transfer episodes of a podcast from a computer to the player by using Windows
Explorer, you cannot refresh the podcast by using the wireless LAN function until
registering the podcast. If you intend to refresh the podcast, register it by using the
player or Media Manager for WALKMAN. The podcast that can be refreshed is
indicated by
(Settings) “Podcast Settings” “Select Podcast to Refresh”
in the Podcast List screen.
Page 89

89
Table of
Contents
Index
89
Enjoying Podcast
Setting the number of episodes to be downloaded
You can set the number of the latest episodes to be downloaded when
refreshing podcasts.
From the Home menu, select (Podcasts)
(Option Menu)
number type
Type Description
Latest Episode Downloads the latest 1 episode. (Default setting)
Latest 3 Episodes Downloads the latest 3 episodes.
Latest 5 Episodes Downloads the latest 5 episodes.
Latest 10 Episodes Downloads the latest 10 episodes.
Latest 100 Episodes Downloads the latest 100 episodes.
“Number of Downloads” the desired episode
“OK.”
(To List)
Hint
You can also select
the Home menu to set the number of the episodes to be downloaded.
Note
If an episode has already been downloaded, it is not downloaded when refreshing
podcasts. For example, if the option is set to “Latest 3 Episodes” and one of the latest 3
episodes has already been downloaded, the remaining 2 episodes are downloaded.
(Settings) “Podcast Settings” “Number of Downloads” from
Page 90
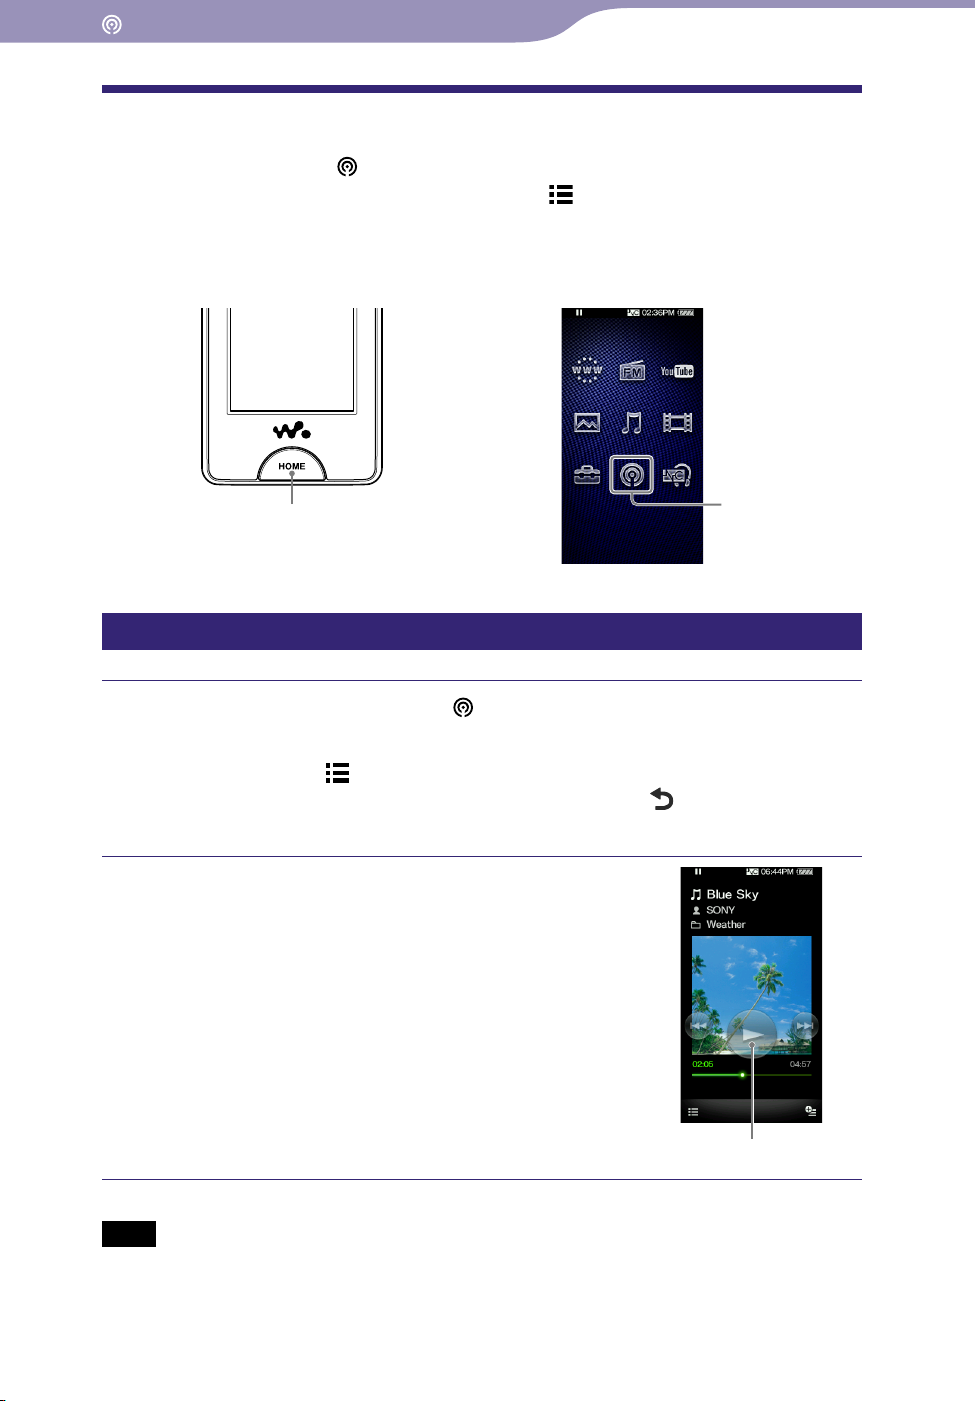
90
Table of
Contents
Index
90
Enjoying Podcast
Playing Podcast
To play a podcast, select (Podcasts) to display the podcast playback screen.
You can select the desired episode by selecting
playback screen.
The episode’s information, control buttons, etc., are displayed on the podcast
playback screen.
(To List) on the podcast
HOME button
To play podcast
From the Home menu, select (Podcasts).
The podcast playback screen appears.
hen you select (To List) on the podcast playback screen, the
W
episode list appears ( page 95). When you select
episode list screen, the Podcast List screen appears ( page 96).
Select
The playback of the episode begins.
ou can tap the control buttons, icons etc.,
Y
on the podcast playback screen to operate
the player. For details on how to control
the podcast playback, see “Podcast
playback screen” ( page 91).
.
Podcasts
(Back) on the
Note
You cannot play back podcast episodes continuously.
Page 91

91
Table of
Contents
Index
91
Enjoying Podcast
Podcast playback screen
You can bring up or dismiss the control buttons by tapping the screen. If there
is no operation for a while, they disappear.
You can tap the objects such as control buttons on the screen to operate the
player. Also, you can use the /
to operate.
Audio playback screen
Information area
Episode name
Artist name
Podcast name
Elapsed time
Total time
Seek Slider
/
buttons on the body of the player
Operations on the audio playback screen
To (screen indication) Do this
Play ()/pause ()*
Fast forward (
fast rewind ()
Find the beginning of the
episode*
Move to any point in a
song
2
*1 During pause, if there is no operation for a while, the player automatically enters
standby mode.
2
Both of the
*
/
episode, select
1
)/
Tap (play)/ (pause).
Press the button on the body.
Touch and hold
Press and hold the
Tap /.
Press the / button on the body.
Drag the indicator (playback point) along the Seek Slider. The
playback begins at the point of the indicator.
/
/
.
button on the body.
buttons find the beginning of the episode. To play back the next
(To List) to display the episode list to select the desired episode.
Continued
Page 92

92
Table of
Contents
Index
92
Enjoying Podcast
Video playback screen
Information area
Total time
Seek Slider
Elapsed time
Operations on the video playback screen
To (screen indication) Do this
)/
)/
1
3
Tap (play)/ (pause).
Press the button on the body.
Tap /, or touch and hold /.*
Press and hold the
Touch and hold / during pause.
Press and hold the
pause.
Play ()/pause ()*
Fast forward (
fast rewind ()*2*
Fast forward (
fast rewind () during
pause*
5
/
/
4
button on the body.
button on the body during
Move to the previous
scene (
next scene ()
Rewind slightly/forward
slightly
Move to any point in a
video
)/move to the
Tap /.
Press the / button on the body.
Tap
Drag along the Seek Slider to move the indicator (playback
point). The playback begins at the point of the indicator.
(rewind)/ (forward) during pause.
*1 During pause, if there is no operation for a while, the player automatically enters
standby mode.
2
If you fast-forward to the end of the episode, the playback pauses. If you fast-rewind to
*
the beginning of the episode during playback, the playback restart automatically. If you
fast-rewind to the beginning to the episode during pause, the playback remains paused.
3
These buttons may not work as described above depending on the episode.
*
4
Forward speed changes through 3 levels by repeatedly tapping ( (×10),
*
(×30),
( (×10), (×30), (×100)). Tap to exit the operation and resume
(×100)). Also, rewind speed changes through 3 levels by repeatedly tapping
normal playback.
5
The speed of fast forward/fast rewind during pause varies depending on the length of
*
the video.
Continued
Page 93

93
Table of
Contents
Index
93
Enjoying Podcast
Icons on the playback screen
Icon Description
(To List)
(Option Menu) Shows the option menu. For details on the podcast option menu,
(Scene Scroll)*
*1 Scene Scroll icon appears on the video playback screen only.
1
Shows an episode list screen. When you select
episode list screen, the Podcast List screen appears. For details,
see “Searching for Podcasts” ( page 94).
see “Using the Podcast Option Menu” ( page 100).
Shows the Scene Scroll screen. You can browse scenes by flicking
the images on the screen, to select the desired scene. For details,
see “Browsing scenes (Scene Scroll)” ( page 57).
(Back) on an
Page 94

94
Table of
Contents
Index
94
Enjoying Podcast
Searching for Podcasts
When you tap (To List) on the podcast playback screen, the episode list
appears, and you can select a desired episode to play back. When you tap
(Back) on the episode list screen, the podcast list appears, and you can select a
desired podcast to display its episode list.
HOME button
Podcasts
To search for podcasts
From the Home menu, select (Podcasts)
The Podcast List screen appears.
(To List) (Back).
Select the desired podcast.
The episode list screen appears.
Select the desired episode.
The playback of the selected episode begins.
Hints
Podcasts are arranged by name.
pisodes are arranged by published date and time in reverse chronological order. The
E
episodes transferred using Windows Explorer are arranged by name and displayed under
the reverse chronological order list.
fter you download an episode to the player, if you transfer the same episode from a
A
computer to the player, both episode files are displayed in the episode list.
Page 95

95
Table of
Contents
Index
95
Enjoying Podcast
Episode list screen
Podcast name
Playback icon
Video icon
Audio icon
New icon
Icons of episodes
The following icons are displayed in the episode field.
Icon Description
(Audio icon) Shows that the episode is an audio episode.
(Video icon) Shows that the episode is a video episode.
(New icon) Shows that the episode has never been played back yet.
(Playback icon) Shows that the episode is currently playing.
Operations on the episode list screen
To Do this
Select an episode Tap an episode.
Scroll the list up or down Drag or flick up or down.
Icons on the episode list screen
Icon Description
(Back) Shows the Podcast List screen.
(To Play Screen) Returns to the podcast playback screen.
(Option Menu) Shows the option menu. For details on the podcast option menu,
see “Using the Podcast Option Menu” ( page 100).
Page 96

96
Table of
Contents
Index
96
Enjoying Podcast
Podcast List screen
New icon
Selected to refresh icon
Refresh error icon
RSS icon
Icons of podcasts
The following icons are displayed in the podcast name*1 field.
Icon Description
(RSS icon) Indicates that the podcast is registered to the player. This icon
is not displayed for episodes that are transferred from a
computer by using Windows Explorer*2.
(Selected to refresh icon) Shows that the podcast is selected to refresh by using “Refresh
Podcasts.”
(New icon)*
(Refresh error icon)*4Appears when updating or downloading failed.
3
Shows that the latest episode(s) of the podcast has been
downloaded.
*1 The folder name is displayed for the podcast that is transferred from a computer to the
player by using Windows Explorer.
2
You cannot refresh the podcast that is transferred from a computer to the player by
*
using Windows Explorer. If you intend to refresh the podcast, register it by using the
player or Media Manager for WALKMAN.
3
After you display the episode list of the podcast, the New icon disappears.
*
4
After the podcast is refreshed correctly, the Refresh error icon disappears.
*
Continued
Page 97

97
Table of
Contents
Index
97
Enjoying Podcast
Operations on the Podcast List screen
To Do this
Select a podcast Tap a podcast.
Scroll the list up or down Drag or flick up or down.
Icons on the Podcast List screen
Icon Description
(To Play Screen) Returns to the podcast playback screen.
(Option Menu)
Shows the option menu. For details on the podcast option menu,
see “Using the Podcast Option Menu” (
page 100).
Page 98

98
Table of
Contents
Index
98
Enjoying Podcast
Deleting Podcasts
You can delete an episode, all episodes of a podcast, a podcast, and all
registered podcasts.
Deleting the currently playing episode
From the playback screen of the episode you intend to delete,
select
Deleting an episode in the episode list
(Option Menu) “Delete This Episode” “Yes.”
From the episode list, select (Option Menu)
the episode you intend to delete
“Yes.”
“Delete Episode”
Deleting all episodes of a podcast
This operation deletes all episodes of a podcast but does not delete the podcast
itself.
From the episode list of the podcast you intend to delete, select
(Option Menu)
“Delete All Episodes” “Yes.”
Deleting a podcast
The following operations delete all episodes of a podcast and delete the podcast
registration.
From the Podcast List screen, select (Option Menu)
Podcast”
or,
the podcast you intend to delete “Yes.”
“Delete
From the episode list of the podcast you intend to delete, select
(Option Menu)
“Delete This Podcast” “Yes.”
Page 99

99
Table of
Contents
Index
99
Enjoying Podcast
Deleting all podcasts
This operation deletes all episodes of all podcasts and deletes all podcast
registrations.
From the Podcast List screen, select (Option Menu)
Podcasts”
Note
Use the player’s functions to delete podcast episodes. If you attempt to delete episode
files using computer software, the files may not be deleted.
“Yes.”
“Delete All
Page 100

100
Table of
Contents
Index
100
Enjoying Podcast
Using the Podcast Option Menu
You can bring up the podcast option menu by selecting (Option Menu) on
the podcast playback screen or on the list screen. For how to use the option
menu, see page 18.
The option items shown on the option menu vary, depending on the screen
from which you bring up the option menu. See the reference page for settings
and usage.
Option items appearing on the podcast playback screen
Option Items Description/reference page
Equalizer (audio only) Customizes the sound quality ( page 48).
VPT (Surround)
(audio only)
DSEE (Sound Enhance)
(audio only)
Clear Stereo (audio only) Enables/disables the “Clear Stereo” option (
Dynamic Normalizer
(audio only)
Zoom Settings
(video only)
Brightness (video only) Adjusts the brightness of the screen (
On-Hold Display
(video only)
Detailed Information Displays detailed information of an episode.
Delete This Episode Deletes an episode (
Customizes the “VPT(Surround)” settings (
Enables/disables the “DSEE (Sound Enhance)” option (
51).
Enables/disables the “Dynamic Normalizer” option (
Sets the zoom function (
Sets to turn off the video screen during the player is on hold (
page 63).
page 98).
page 61).
page 50).
page 52).
page 121).
page 52).
page
Option item appearing on the episode list screen
Option Item Description/reference page
Number of Downloads Sets the number of the episodes to be downloaded ( page 89).
Refresh This Podcast Connects to the Internet via wireless LAN and downloads the
latest episode(s) of the current podcast (
Delete Episode Displays the delete episode screen to select an episode to delete
(
page 98).
Delete All Episodes Deletes all episodes of the podcast. The podcast registration itself
is not deleted (
Delete This Podcast Deletes the podcast (
page 98).
page 98).
page 86).
Continued
 Loading...