

Sony 60NX800, 55NX810, KDL-60NX810, 52NX800, 46NX710 Operating Instructions Manual
...
4-180-474-16(1)
LCD
Digital Colour TV
Operating Instructions GB
操作手冊
CT
KDL-60NX810 / 60NX800 / 55NX810 / 52NX800 / 46NX710 / 46NX700 / 40NX800 / 40NX710
KDL-40NX700
Introduction
Thank you for choosing this Sony product.
Before operating the TV, please read this
manual thoroughly and retain it for future
reference.
~
• The illustrations used in this manual are
of the KDL-40NX800 unless otherwise
state.
• The illustrations of the remote used in
this manual are of the RM-GD010 unless
otherwise stated.
• Only KDL-NX810 and NX710 series
supports Divx
®
.
Trademark information
HDMI, the HDMI Logo, and HighDefinition Multimedia Interface are
trademarks or registered trademarks of
HDMI Licensing LLC in the United States
and other countries.
®
DLNA
, the DLNA Logo and DLNA
CERTIFIED
marks, or certification marks of the Digital
Living Network Alliance.
DivX
technology, developed by DivX, Inc.
DivX
logos are registered trademarks of DivX,
Inc. and are used under license.
ABOUT DIVX VIDEO: DivX
digital video format created by DivX,Inc.
This is an official DivX Certified device
that plays DivX video. Visit
www.divx.com for more information and
software tools to convert your files into
DivX video.
ABOUT DIVX VIDEO-ON-DEMAND:
This DivX Certified
registered in order to play DivX Video-onDemand (VOD) content. To generate the
registration code, locate the DivX VOD
section in the device setup menu. Go to
vod.divx.com with this code to complete
the registration process and learn more
about DivX VOD.
Manufactured under license from Dolby
Laboratories. Dolby and the double-D
symbol are trademarks of Dolby
Laboratories.
“BRAVIA” and are
trademarks of Sony Corporation.
“XMB” and “xross media bar” are
trademarks of Sony Corporation and Sony
Computer Entertainment Inc.
The typefaces used on the screen display
are solely developed by DynaComware.
®
are trademarks, service
®
is a video file compression
®
, DivX Certified® and associated
®
is a
®
device must be
This television is designed for
use in Hong Kong and ensured
the usage in Hong Kong only.
Location of the
identification label
Labels for Model No. and Power Supply
rating (in accordance with applicable
safety regulation) are located on the rear of
the TV. For KDL-NX800 series models,
they can be found by removing the bottom
cover.
GB
2
Table of Contents
Checking the accessories.............................................................................................................. 4
Inserting batteries into the remote................................................................................................. 4
Setting Up
Attaching the Table-Top Stand...................................................................................................... 5
Connecting an antenna (aerial)/cable/VCR................................................................................... 7
Preventing the TV from toppling over............................................................................................8
Bundling the cables ....................................................................................................................... 8
Performing the initial set-up........................................................................................................... 9
Detaching the Table-Top Stand from the TV................................................................................. 9
Watching TV
To watch programmes................................................................................................................. 10
To utilise the TV’s features .......................................................................................................... 10
To use i-Manual........................................................................................................................... 11
Additional Information
Troubleshooting........................................................................................................................... 12
Specifications .............................................................................................................................. 13
Installing the Accessories (Wall-Mount/Wall-Hanging Bracket)................................................... 16
Safety Information ....................................................................................................................... 24
Precautions.................................................................................................................................. 25
GB
• Operating instructions are built into your BRAVIA TV. Refer to “To use i-Manual” for operation (page 11).
• Before operating the TV, please read “Safety Information” (page 24). Retain this manual for future reference.
GB
3

Checking the accessories
For all models
Remote (1)
Size AAA batteries (R3 type) (2)
Table-Top Stand (1)*
For KDL-60/52/40NX800, KDL-46/
40NX700 models
AC power cord (mains lead) (1)
Cable holder (1) (except KDL-60NX800)
Black spacers (4) (KDL-60/52/40NX800
only)
Screws (M6 × 20) (4) (KDL-60NX800
only)
Stand rear cover (1)*
Bottom cover (1)*2 (KDL-60/52/
40NX800 only)
Fixing screws for Table-Top Stand
(M5 × 16) (4)
Assembling screws for Table-Top
Stand (M5 × 16) (4) (KDL-40NX800 and
KDL-40NX700 only)
1
2
Inserting batteries into the
remote
1 Remove the protection sheet.
2 Push and slide the cover upward.
For KDL-60/55NX810, KDL-46/
40NX710 models
Hexagon wrench (1)
Assembling screws for Table-Top
stand (4) (except KDL-40NX710)
Assembling screws for Table-Top
stand (2) (KDL-40NX710 only)
*1
For KDL-60NX800, attached to the TV.
Disassembled except for KDL-60/52NX800 and
KDL-46NX700.
Refer to the supplied Table-Top Stand leaflet to
assemble the stand.
*2
For KDL-60NX800, attached to the TV.
GB
4

Setting Up
Attaching the Table-Top
Stand
3 After all the screws are tightened,
attach the supplied stand rear cover to
the Table-Top Stand.
Refer to the supplied Table-Top Stand leaflet
for proper attachment for some TV models.
~
• For best picture quality, do not expose the screen
to direct illumination or sunlight.
• If the TV is brought directly from a cold to a warm
location, or is placed in a very damp room, or is
placed in a room in which heating has just been
turned on, moisture may condense on the surface
or inside the TV. Should this occur, turn off the
TV and leave the TV off until the moisture
evaporates, and then the TV can be used. If you
notice moisture condensation between the glass
panel and the LCD, turn on the TV and the
condensation will evaporate after the TV has
warmed up.
For KDL-52/40NX800, KDL-46/
40NX700
1 Place the TV set on the Table-Top
Stand.
Setting Up
For KDL-60/55NX810, KDL-46/
40NX710
1 Align with the two dowels of the Table-
Top Stand, and gently place the TV,
checking the f mark is facing the front.
2 Fix the TV to the Table-Top Stand
according to the arrow marks that
guide the screw holes using the
supplied screws.
~
• If using an electric screwdriver, set the tightening
torque at approximately 1.5 N·m {15 kgf·cm}.
2 Attach the TV and Table-Top Stand
with the supplied screw and hexagon
wrench.
~
• Set the torque setting to approximately 3 N·m {30
kgf·cm}.
Reattaching the Table-Top Stand to the
TV
Attach to the original position using the
removed screws. See “Detaching the TableTop Stand form the TV” (page 9).
(Continued)
GB
5
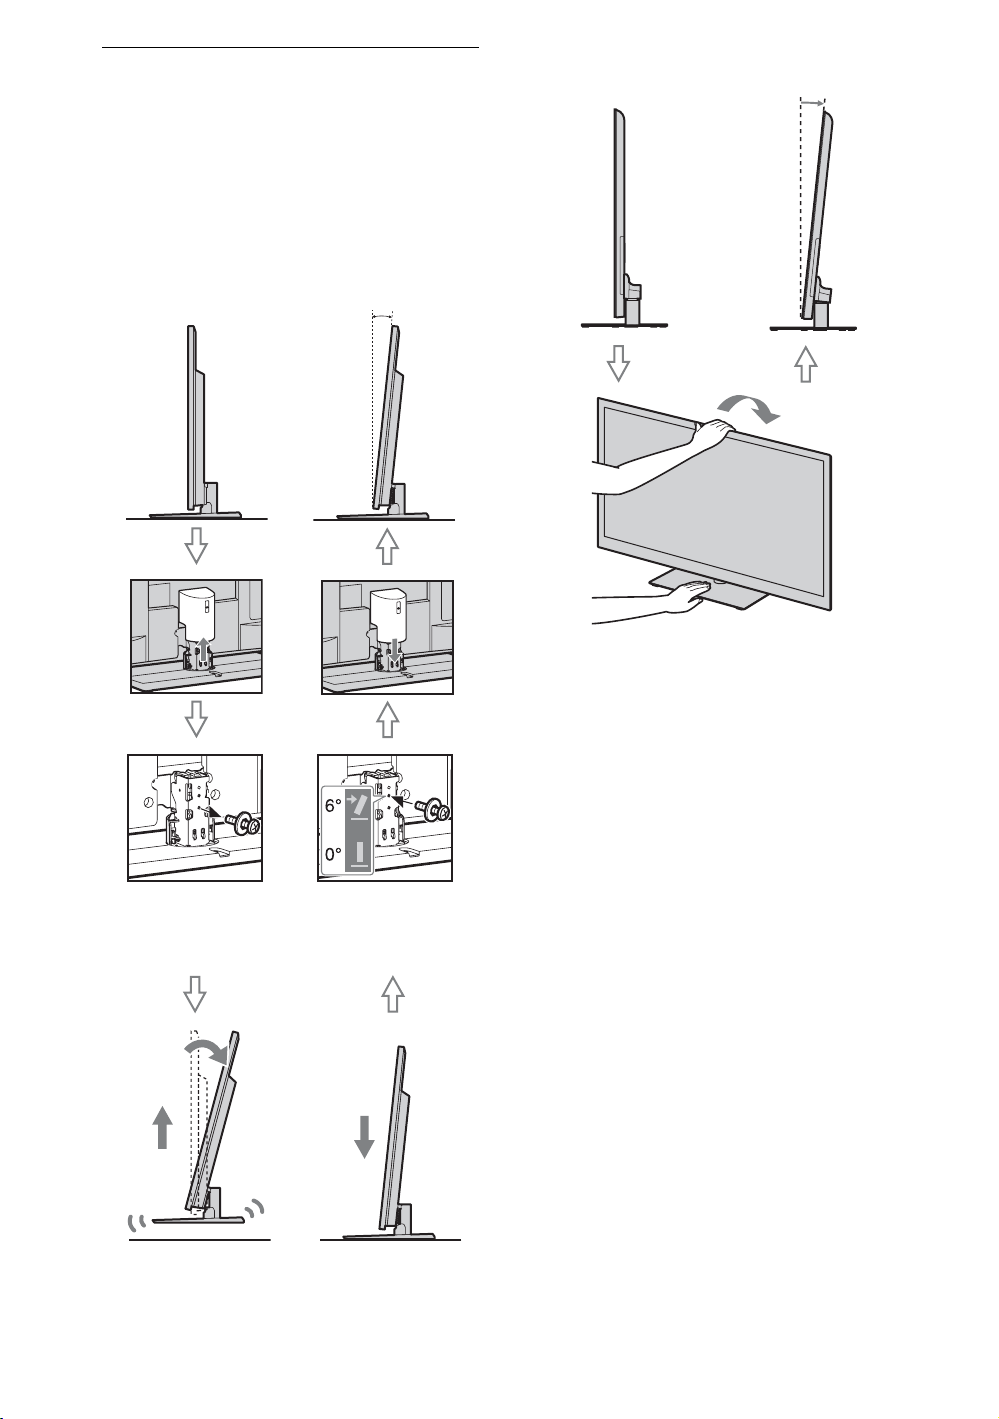
Adjusting the viewing angle of
the TV (except 60-inch models)
This TV can be adjusted within the angles
shown below.
~
• To return to 0°, reverse the below procedure.
For KDL-52/40NX800, KDL-46/
40NX700
6º0º
For KDL-55NX810, KDL-46/40NX710
6º0º
1
Remove screw as
shown.
2
4
Install screw into
the top screw hole
of the Table-Top
Stand.
3
Slide in.Lift up and tilt.
GB
6
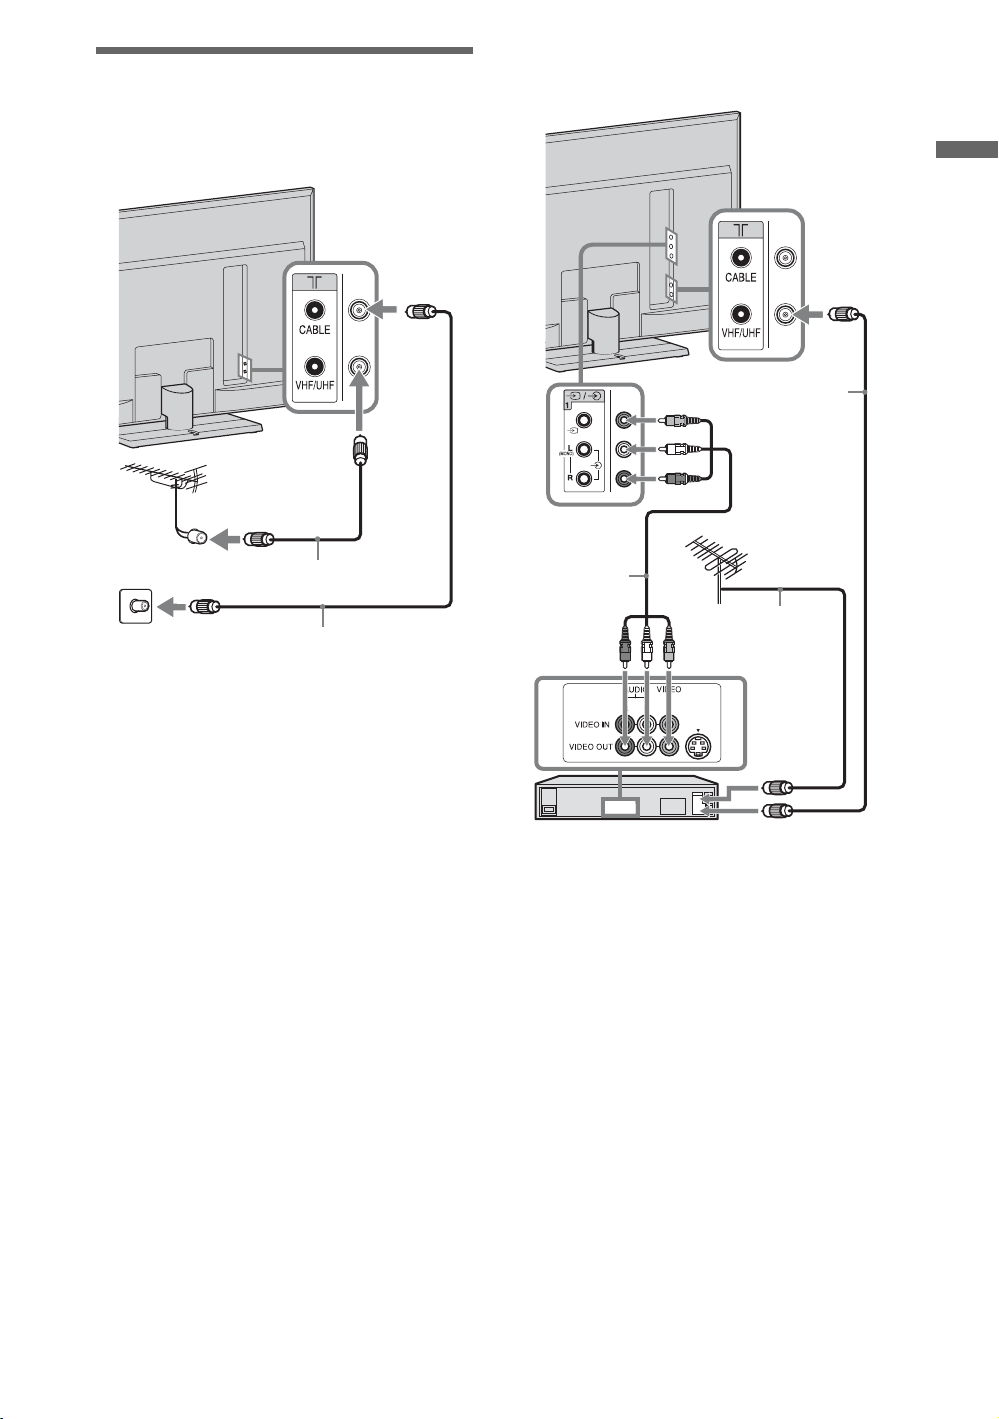
Connecting an antenna
(aerial)/cable/VCR
Connecting an antenna (aerial)/cable
and VCR
Connecting an antenna (aerial)/cable
Antenna (aerial) cable
(not supplied)
Antenna (aerial) cable
(not supplied)
Setting Up
Antenna (aerial)
cable
(not supplied)
AV cable
(not supplied)
Antenna
(aerial) cable
(not supplied)
VCR
~
• For KDL-60/52/40NX800, after connecting
cables, install the bottom cover and stand rear
cover.
GB
7
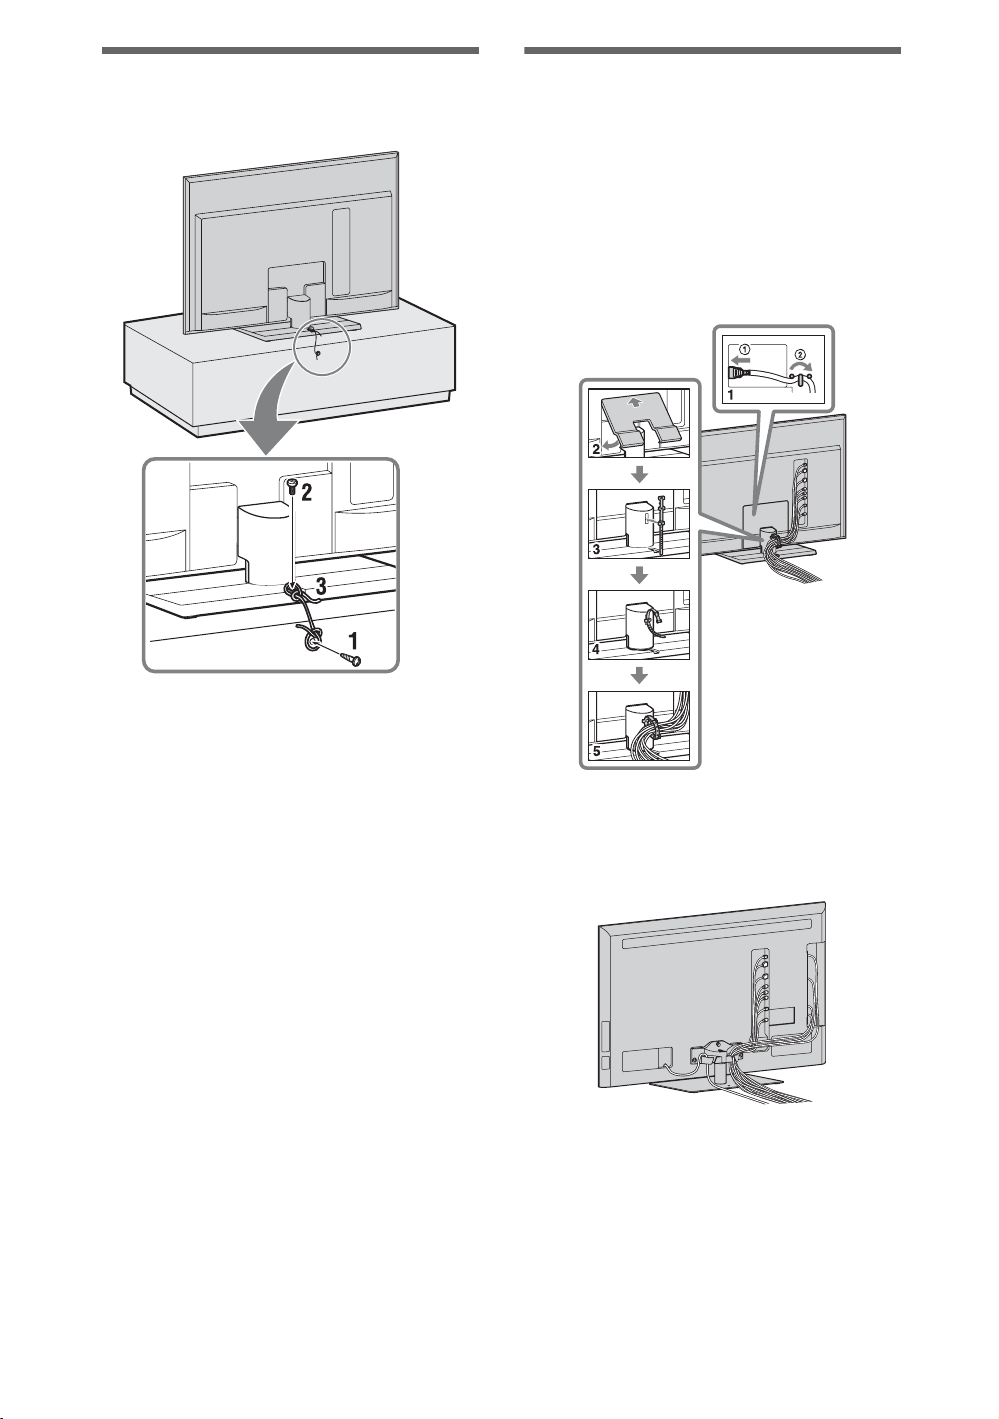
Preventing the TV from
toppling over
Bundling the cables
~
• Do not bundle the AC power cord (mains lead)
together with other cables.
• A cable holder is available for KDL-52/40NX800
and KDL-46/40NX700. To bundle the cables,
follow steps 3 to 5.
For KDL-60/52/40NX800, KDL-46/
40NX700
*
1 Install a wood screw (4 mm in
diameter, not supplied) in the TV stand.
2 Install a machine screw (not supplied)
into the screw hole of the TV.
For KDL-60/52/40NX800, KDL-46/
40NX700
Use M4 × 16 screw
For KDL-60/55NX810, KDL-46/
40NX710
Use M4 × 8 screw
3 Tie the wood screw and the machine
screw with a strong cord (not supplied).
z
• An optional Sony support belt kit is used to secure
the TV. Contact your nearest Sony service centre
to purchase a kit. Have your TV model name
ready for reference.
*KDL-60/52/
40NX800 only
For KDL-60/55NX810, KDL-46/
40NX710
GB
8
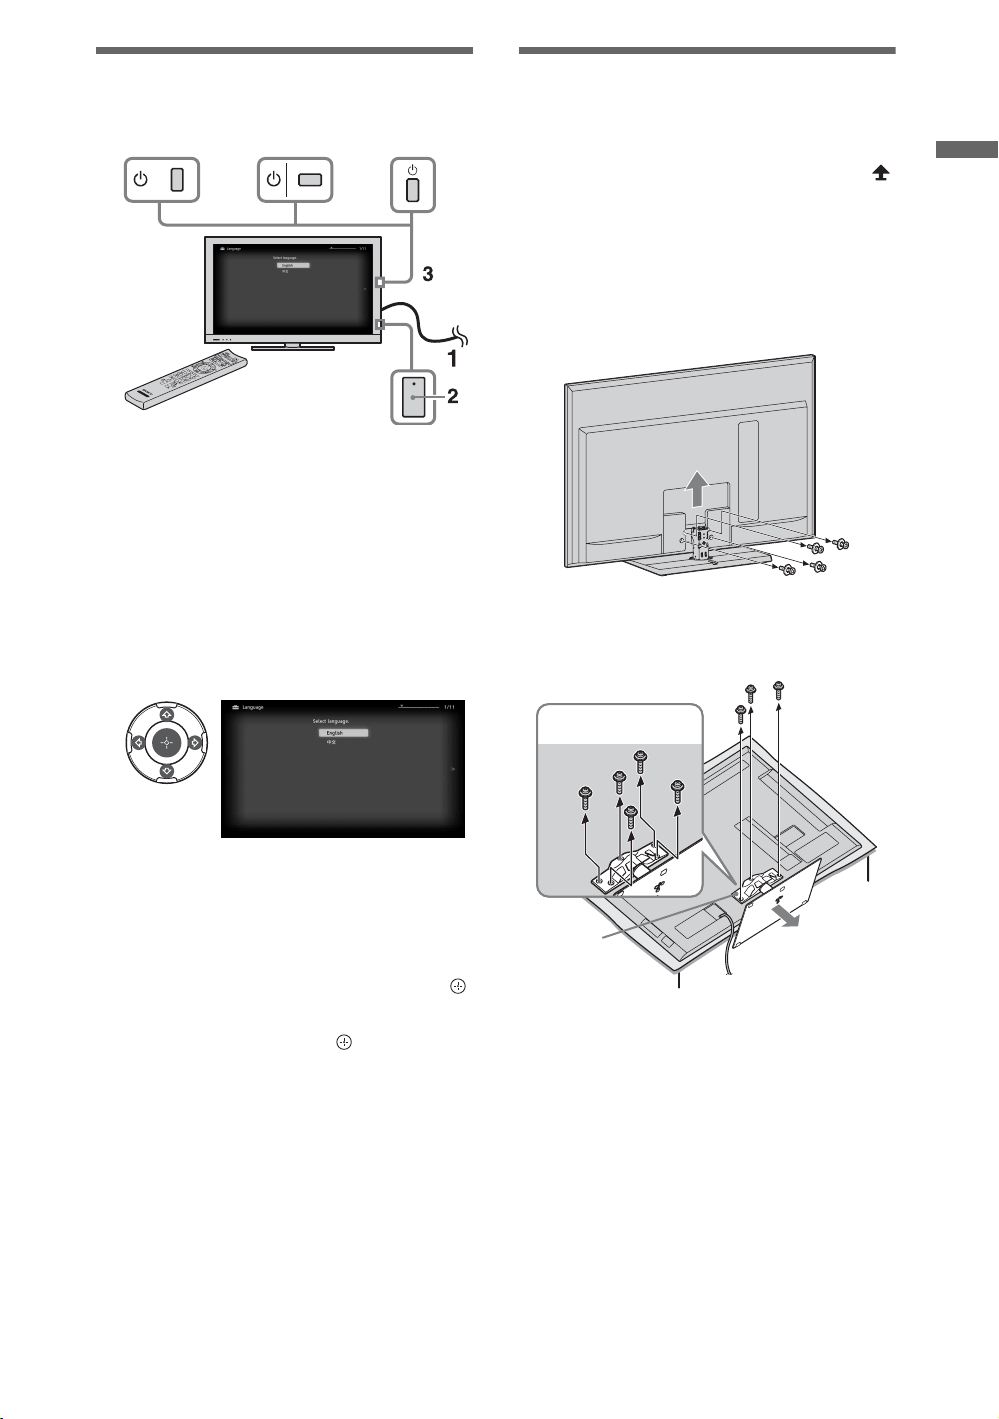
Performing the initial set-up
KDL-60/55NX810,
KDL-46/40NX710
KDL-60/52/
40NX800
KDL-46/
40NX700
1 Connect the TV to your AC power
outlet (mains socket).
2 Check the ENERGY SAVING
SWITCH setting is on (
z).
3 Press 1 on the TV.
When you switch on the TV for the first
time, the Language menu appears on the
screen.
Detaching the Table-Top
Stand from the TV
~
• Remove the screws guided by the arrow marks
of the TV.
• Do not remove the Table-Top Stand for any
reason other than to install corresponding
accessories on the TV.
For KDL-60/52/40NX800, KDL-46/
40NX700
For KDL-60/55NX810, KDL-46/
40NX710
Setting Up
4
Follow the instructions on the screen.
Programme Sorting: Changes the order of
analogue channels stored in the TV.
1 Press F/f to select the channel you want
to move to a new position, then press .
2 Press F/f to select the new position for
the channel, then press .
~
• You can also tune channels manually.
KDL-60NX810
Joint
GB
9
Watching TV
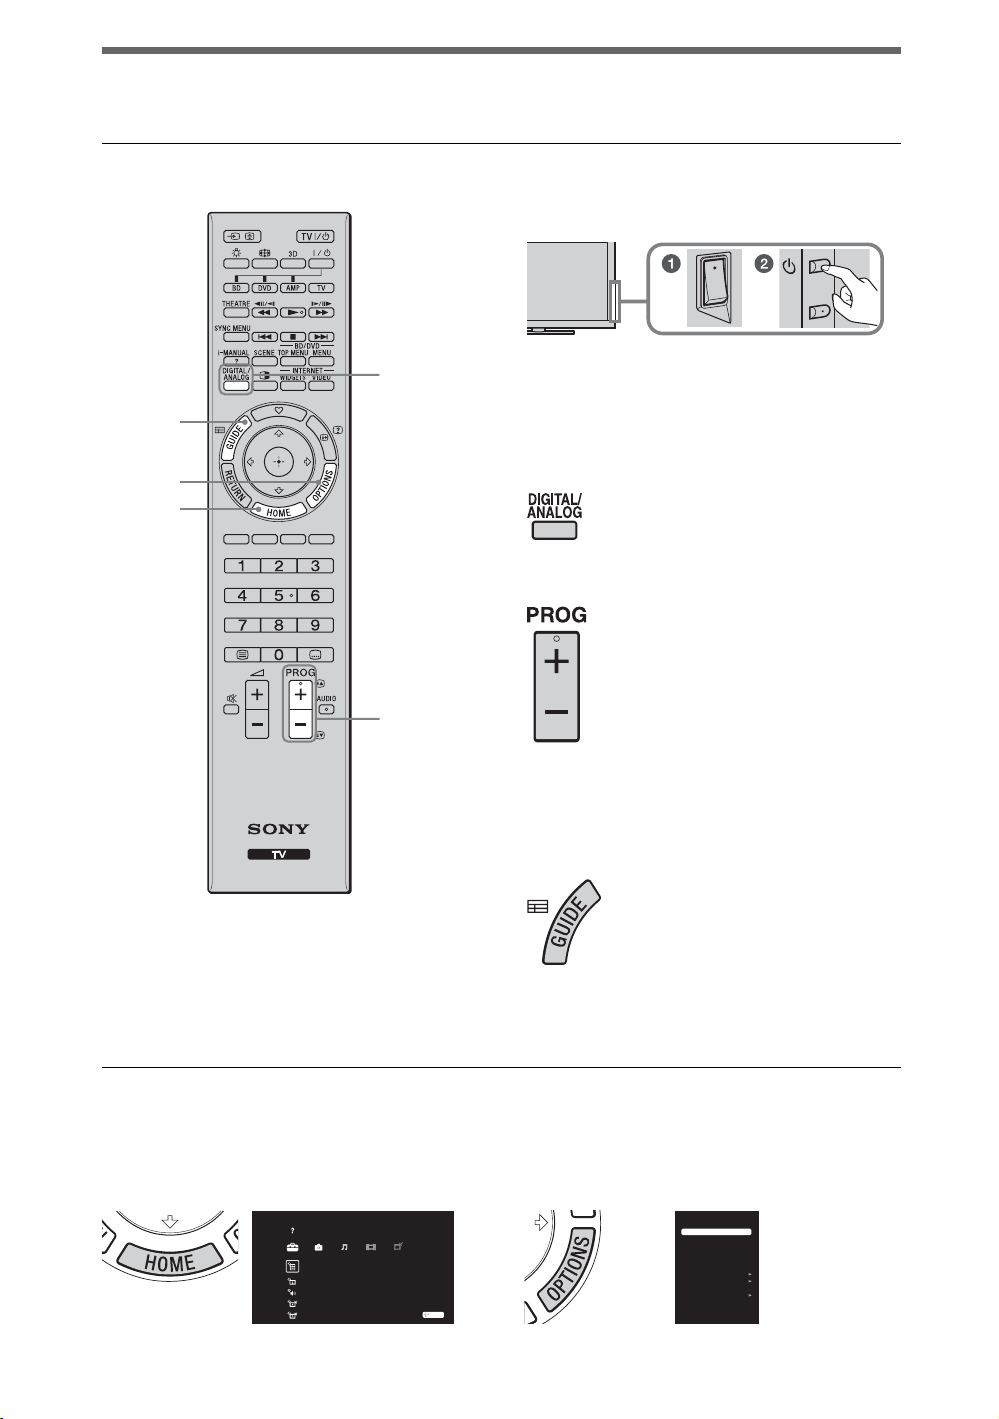
To watch programmes
Turn on the TV.
1
2
GUIDE
OPTIONS
HOME
3
z
• The number 5, N, PROG + and AUDIO
buttons on the remote have a tactile dot.
Use the tactile dots as a reference when
operating the TV.
1 Switch ENERGY SAVING SWITCH
z).
on (
2 Press 1 on the TV to turn on the TV.
Select a mode.
2
Select a TV channel.
3
Using Digital Electronic Programme
Guide
Press GUIDE in digital mode to display the
programme guide.
To utilise the TV’s features
HOME button
Press to display various operation and setting
screens.
Settings
System Settings
TV
GB
10
OPTIONS button
Press to display convenient functions based
on the current input or content.
Picture
Sound
BRAVIA ENGINE 3 PRO
Add to Favourites
Lock/Unlock
PAP
Motionflow
Sleep Timer
Headphone Volume
Speaker
System Information
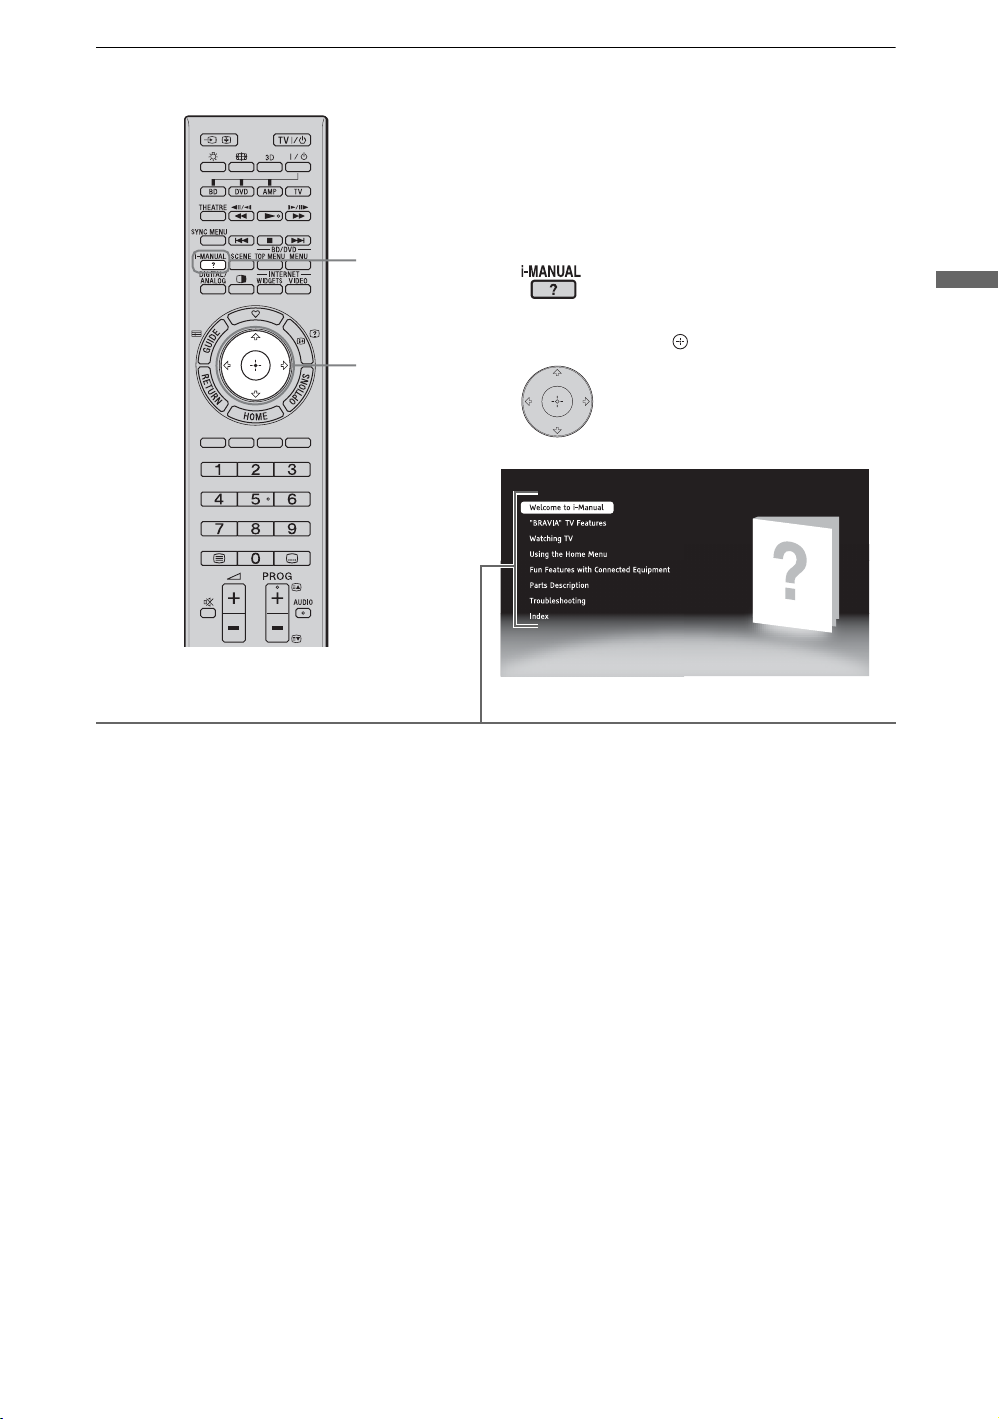
To use i-Manual
1
2
Operating instructions are built into your BRAVIA
TV and can be displayed on the screen.
You can browse your i-Manual anytime you need
to find the varieties of convenient functions.
Press i-MANUAL.
1
Press G/g/F/f/ to select items.
2
Watching TV
x Welcome to i-Manual
x “BRAVIA” TV Features
x Watching TV
Introduces convenient features such as EPG
Guide, Favourites, etc.
x Using the Home Menu
Customise your TV settings, etc.
~
• Images and illustrations may differ from what is displayed on the screen.
x Fun Features with Connected
Equipment
Introduces how to connect optional equipment.
x Parts Description
x Troubleshooting
Find solutions for your problem.
x Index
11
GB

Additional Information
Troubleshooting
Check whether the 1 (standby) indicator is flashing in red.
When the 1 (standby) indicator is flashing
The self-diagnosis function is activated.
1 Count how many times the 1 (standby) indicator flashes between each three second
break.
For example, the indicator may flash three times, go off for three seconds, then flash again three
times.
2 Press 1 on the TV to turn it off, disconnect the AC power cord (mains lead), and inform
your dealer or Sony service centre of how the indicator flashes (number of flashes).
When the 1 (standby) indicator is not flashing
1 Check the items in the tables below. (Also refer to “Troubleshooting” in the i-Manual.)
2 If the problem persists, have your TV serviced by qualified service personnel.
Condition Explanation/Solution
Picture
There is no picture (screen
is dark) and no sound.
Tiny black points and/or
bright points appear on the
screen.
General
The TV’s power cannot be
turned on.
The TV turns off
automatically (the TV
enters standby mode).
The remote does not
function.
The “Parental Lock” password
has been forgotten.
The TV surrounds become
warm.
• Check the antenna (aerial)/cable connection.
• Connect the TV to the AC power (mains), and press 1 on the TV.
• If the 1 (standby) indicator lights up in red, press TV"/1.
• The screen is composed of pixels. Tiny black points and/or bright
points (pixels) on the screen do not indicate a malfunction.
• Check if ENERGY SAVING SWITCH is on (z).
• Check if the “Sleep Timer” is activated, or confirm the
“Duration” setting of “On Timer”.
• Check if the “Idle TV Standby” is activated.
• Replace the batteries.
• Your TV may be in SYNC mode.
Press SYNC MENU, select “TV Control” and then select “Home
(Menu)” or “Options” to control the TV.
• Enter 9999 for the PIN code. (PIN code 9999 is always accepted.)
• When the TV is used for an extended period, the TV surrounds
become warm.
You may feel hot when touching there by the hand.
12
GB
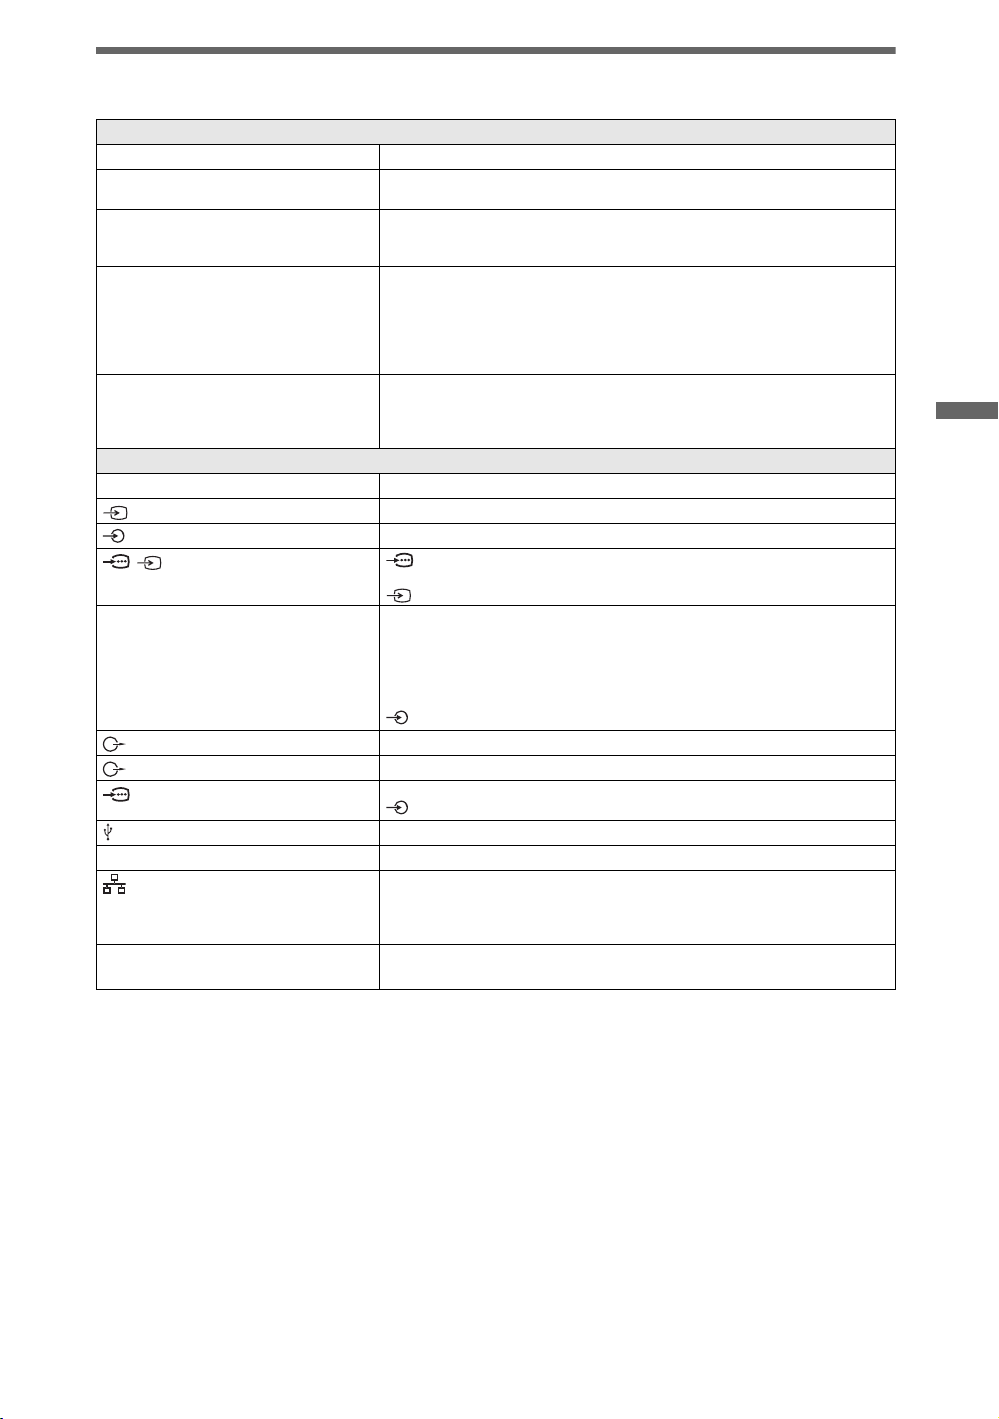
Specifications
System
Panel system
TV system
Colour/video system
Channel coverage
Sound output
Input/Output jacks
Antenna (aerial)/cable
1
1, 2
/2
HDMI IN1, 2, 3, 4
DIGITAL AUDIO OUT (OPTICAL)
(VAR/FIX)
PC IN
i
LAN
3D SYNC (KDL-60/55NX810, KDL-46/
40NX710 only)
LCD (Liquid Crystal Display) Panel
Analogue: B/G, I, D/K, M
Digital: DTMB
Analogue: PAL, PAL60 (only video input), SECAM, NTSC3.58, NTSC4.43 (only video
input)
Digital: MPEG-2 MP@ML/HL, H.264/MPEG-4 AVC MP/HP@L4
Analogue:B/G: VHF: E2–E12/UHF: E21–E69/CATV: S01–S03, S1–S41
I: UHF: B21–B69/CATV: S01–S03, S1–S41
D/K: VHF: C1–C12, R1–R12/UHF: C13–C57, R21–R60/CATV: S01–S03,
S1–S41
M: VHF: A2–A13/UHF: A14–A79/CATV: A8–A2, A–W+4, W+6–W+84
Digital: UHF
KDL-60/52/40NX800, KDL-46/40NX700
10 W + 10 W
KDL-60/55NX810, KDL-46/40NX710
8 W + 8 W + 10 W
75 ohm external terminal for VHF/UHF
Video input (phono jack)
Audio input (phono jacks)
COMPONENT IN
Supported formats: 1080p, 1080i, 720p, 576p, 576i, 480p, 480i
2 Video input (phono jacks)
Video:
KDL-60/52/40NX800, KDL-46/40NX700
1080/24p, 1080p, 1080i, 720p, 576p, 576i, 480p, 480i
KDL-60/55NX810, KDL-46/40NX710
1080/24p, 1080p, 1080i, 720/24p, 720p, 576p, 576i, 480p, 480i
Audio: Two channel linear PCM 32, 44.1 and 48 kHz, 16, 20 and 24 bits, Dolby Digital
Analogue audio input (minijack) (HDMI IN4 only)
Digital optical jack (Two channel linear PCM, Dolby Digital)
Audio output (phono jacks)
PC Input (Mini D-sub 15-pin)
PC audio input (minijack)
USB port
Headphones jack
10BASE-T/100BASE-TX connector (Depending on the operating environment of the
network, connection speed may differ. 10BASE-T/100BASE-TX communication rate and
communication quality are not guaranteed for this TV.)
* For LAN connections, use a Category 7 10BASE-T/100BASE-TX cable (not supplied).
3D Sync terminal for optional transmitter
Additional Information
(Continued)
13
GB
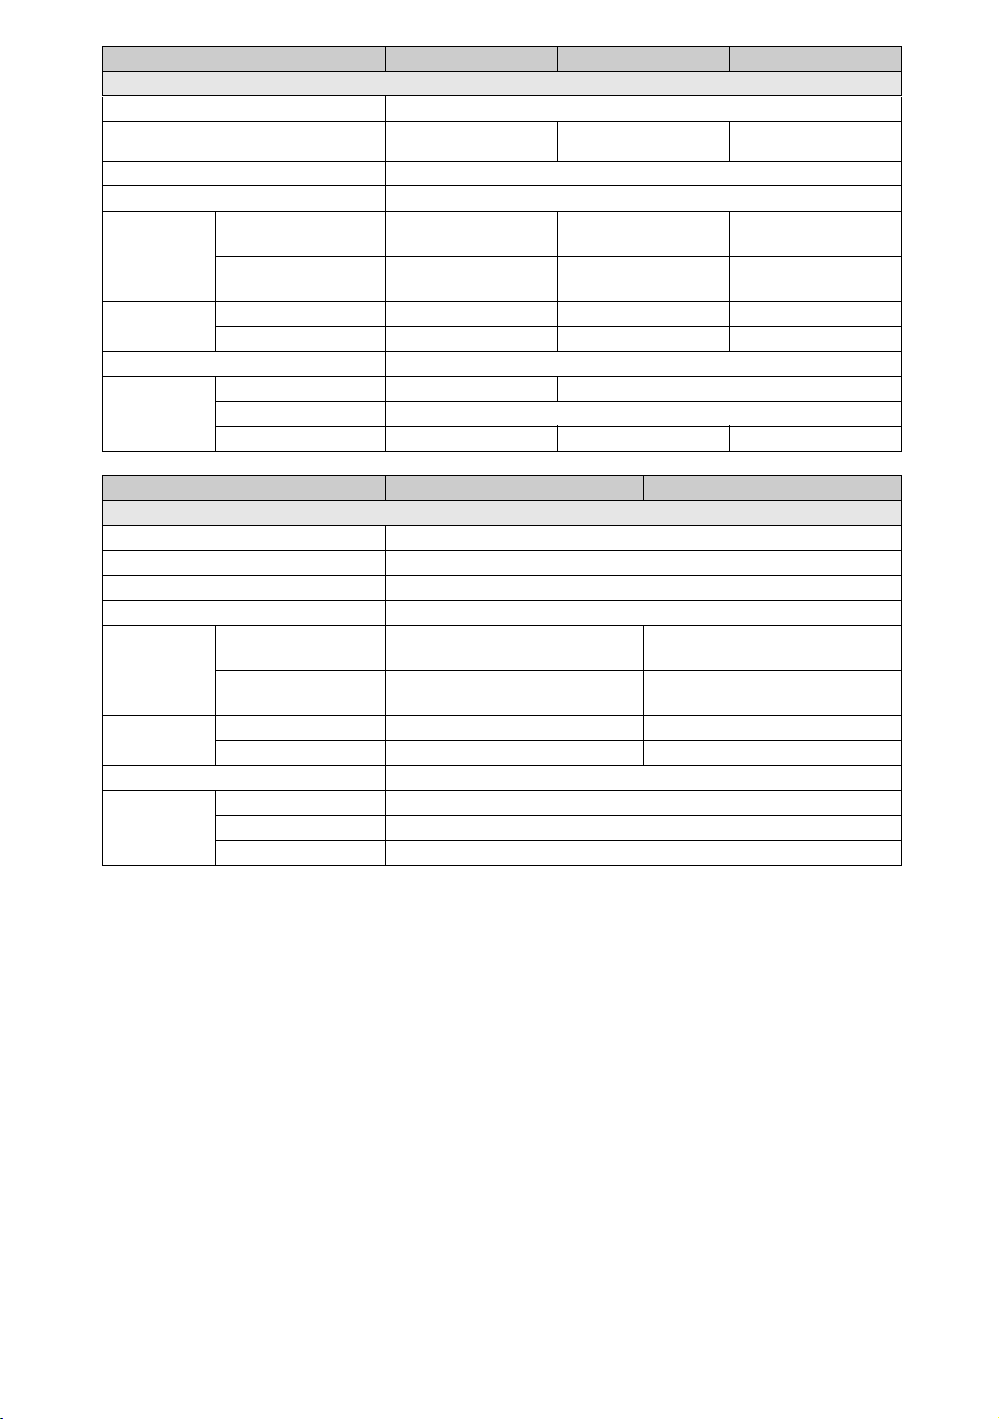
Model name KDL-
Power and others
Power requirements
Screen size (measured diagonally)
Display resolution
Power consumption
Dimensions
with Table-Top Stand
(Approx.)
(w × h × d)
without Table-Top Stand
Mass (Approx.) with Table-Top Stand
without Table-Top Stand
Supplied accessories
Optional
accessories
Wall-Mount Bracket
Wall-Hanging Bracket
TV Stand*
60NX800 52NX800 46NX700
220 V – 240 V AC, 50 Hz
60 inches
(Approx. 152.5 cm)
1,920 dots (horizontal) × 1,080 lines (vertical)
Indicated on the rear of the TV
1,440 × 921 × 380 1,261 × 819 × 400 1,127 × 748 × 320
52 inches
(Approx. 132.2 cm)
(mm)
1,440 × 889 × 64 1,261 × 787 × 64 1,127 × 716 × 64
(mm)
50.6 kg 36.1 kg 27.8 kg
43.3 kg 30.1 kg 24.0 kg
See “Checking the accessories” (page 4).
SU-WL500/WL50B SU-WL700/WL50B
SU-WH500
— SU-52NX1 SU-46NX1
46 inches
(Approx. 116.8 cm)
Model name KDL-
Power and others
Power requirements
Screen size (measured diagonally)
Display resolution
Power consumption
Dimensions
with Table-Top Stand
(Approx.)
(w × h × d)
without Table-Top Stand
Mass (Approx.) with Table-Top Stand
without Table-Top Stand
Supplied accessories
Optional
accessories
Wall-Mount Bracket
Wall-Hanging Bracket
TV Stand*
40NX800 40NX700
220 V – 240 V AC, 50 Hz
40 inches (Approx. 101.6 cm)
1,920 dots (horizontal) × 1,080 lines (vertical)
Indicated on the rear of the TV
994 × 669 × 290 994 × 673 × 290
(mm)
994 × 635 × 64 994 × 641 × 64
(mm)
23.8 kg 22.6 kg
20.1 kg 19.2 kg
See “Checking the accessories” (page 4).
SU-WL700/WL50B
SU-WH500
SU-40NX1
14
GB
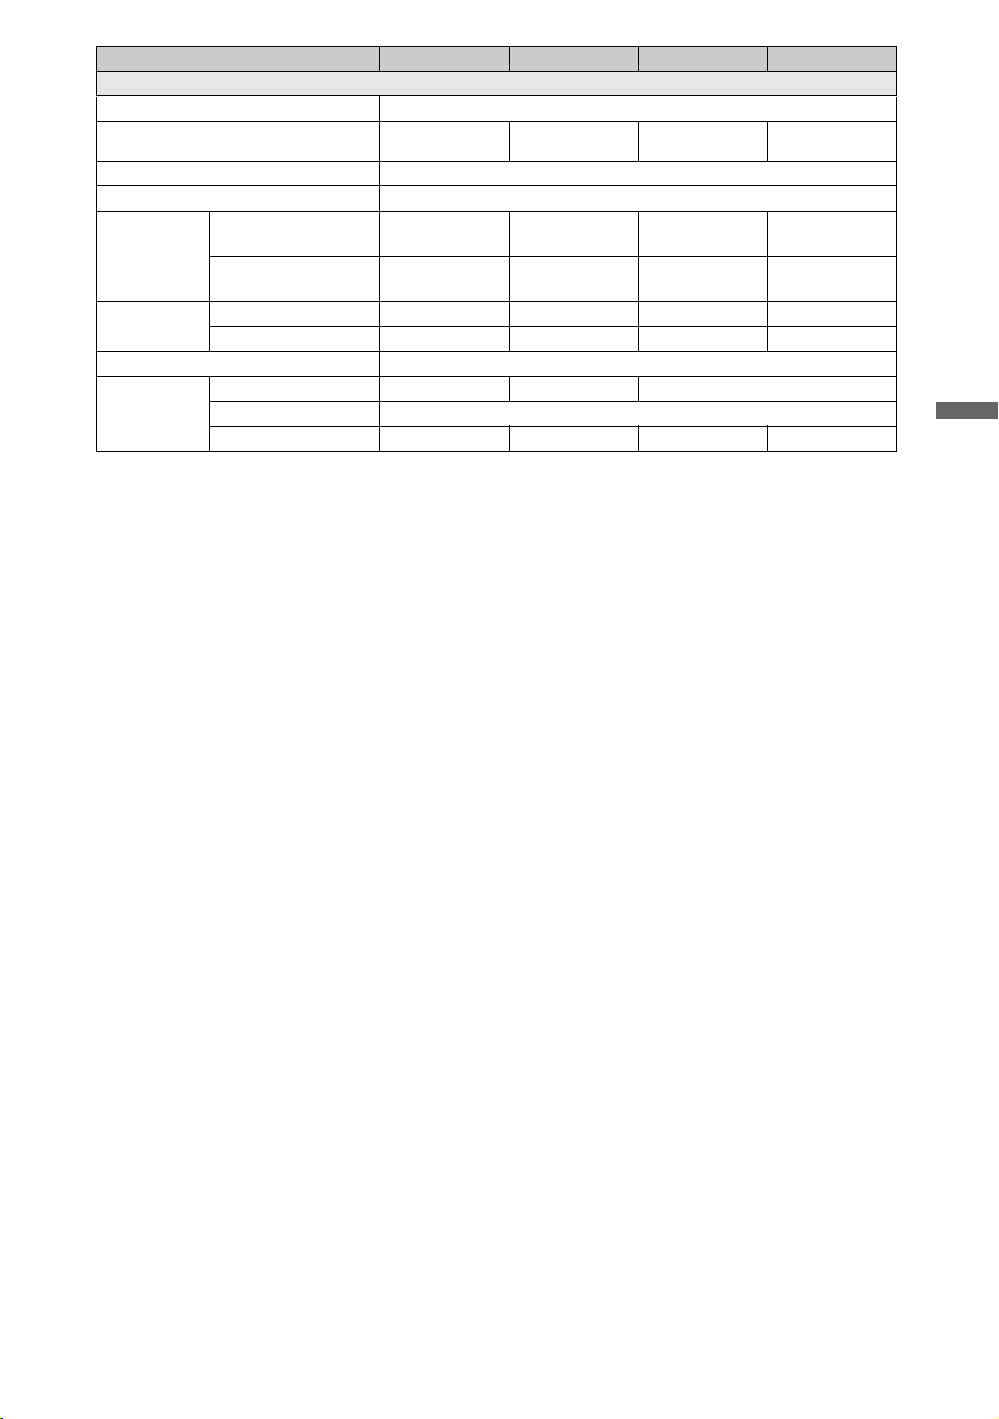
Model name KDL-
60NX810 55NX810 46NX710 40NX710
Power and others
Power requirements
Screen size (measured diagonally)
Display resolution
Power consumption
Dimensions
wit h Ta b l e - To p S t a n d
(Approx.)
(w × h × d)
wit h o u t Ta b l e - To p S t a n d
220 V – 240 V AC, 50 Hz
60 inches
(Approx. 152.5 cm)
1,920 dots (horizontal) × 1,080 lines (vertical)
Indicated on the rear of the TV
1,400 × 865 × 303 1,276 × 800 × 323 1,083 × 690 × 270 944 × 612 × 245
55 inches
(Approx. 138.8 cm)
(mm)
1,400 × 836 × 45 1,276 × 770 × 32 1,083 × 660 × 31 944 × 582 × 32
(mm)
Mass (Approx.) with Table-Top Stand
wit h o u t Ta b l e - To p S t a n d
Supplied accessories
Optional
accessories
Wall-Mount Bracket
Wall-Hanging Bracket
TV Stand*
43.0 kg 32.2 kg 24.4 kg 19.8 kg
36.6 kg 26.9 kg 20.5 kg 16.1 kg
See “Checking the accessories” (page 4).
SU-WL500 SU-WL700/WL500 SU-WL700/WL500/WL50B
SU-WH500
— SU-B550S SU-B460S SU-B400S
* TV Stand may not be available depending on your region/country.
Design and specifications are subject to change without notice.
46 inches
(Approx. 116.8 cm)
40 inches
(Approx. 101.6 cm)
Additional Information
15
GB
Installing the Accessories (Wall-Mount/Wall-Hanging
Bracket)
To Customers:
For product protection and safety reasons, Sony strongly recommends that installing of your TV be
performed by Sony dealers or licensed contractors. Do not attempt to install it yourself.
To Sony Dealers and Contractors:
Provide full attention to safety during the installation, periodic maintenance and examination of this
product.
Your TV can be installed using the SU-WL500 (except KDL-52/40NX800, KDL-46/40NX700)/
SU-WL50B (except KDL-60/55NX810), or SU-WL700 (except KDL-60NX810 / 60NX800) WallMount Bracket or SU-WH500 Wall-Hanging Bracket (sold separately).
• Refer to the Instructions supplied with the Wall-Mount Bracket or Wall-Hanging Bracket to
properly carry out the installation.
• Refer to “Detaching the Table-Top Stand from the TV” (in this manual).
Be sure to remove the joint when the Table-Top Stand is not attached to the TV. (KDL-60/
55NX810, KDL-46/40NX710 only)
Sufficient expertise is required for installing this product, especially to determine the strength of
the wall for withstanding the TV’s weight. Be sure to entrust the attachment of this product to the
wall to Sony dealers or licensed contractors and pay adequate attention to safety during the
installation. Sony is not liable for any damage or injury caused by mishandling or improper
installation.
16
GB
 Loading...