

Page 1

3-755-967-11(1)
MW/SW/FM Stereo PLL Synthesized Receiver
ICF-SW33
Operating instructions page 2
Before operating the unit, please read this manuai thoroughly
and retain it for future reference.
©1992 by Sony Corporation
Page 2

WARNING
English
Table of Contents
To prevent fire or shock hazard, do not expose the unit to rain or moisture.
To avoid electrical shock, do not open the
cabinet. Refer servicing to qualified
personnel only.
For the Customers in U.S.A.
You are cautioned that any changes or modifications not
expressly approved in this manual could void your authority to
operate this equipment.
INFORMATION
This equipment has been tested and found to comply with the limits
for a Class B digital device, pursuant to Part 15 of the FCC Rules.
These limits are designed to provide reasonable protection against
harmful interference in a residential installation. This equipment
generates, uses, and can radiate radio frequency energy and, if not
installed and used in accordance with the instructions, may cause
harmful interference to radio communications. However, there is no
guarantee that interference will not occur in a particular installation.
If this equipment does cause harmful interference to radio or
television reception, which can be determined by turning the
equipment off and on, the user is encouraged to try to correct the
interference by one or more of the following measures:
Features..................................................................................................4
Precautions............................................................................................. 5
Location of controls...................................................................................8
Power sources.......................................................................................14
Setting the clock.....................................................................................19
Changing the MW channel step............................................................... 29
Manual tuning........................................................................................ 30
Scan tuning
Preset tuning.............................................................................................36 «
Using the standby function..........................................................................38 <q
Using the sleep function............................................................................. 43 ?
Recording a broadcast............................................................................44
Troubleshooting guide.............................................................................45
Specifications.........................................................................................48
..............................................................................................
34 h
Owner’s Record
The model and serial numbers are located at the rear.
Record the serial number in the space provided below. Refer to
them whenever you call upon your Sony dealer regarding this
product.
Model No. ICF-SW33 Serial No.
- Reorient or relocate the receiving antenna.
- Increase the separation between the equipment and receiver.
- Connect the equipment into an outlet on a circuit different from
that to which the receiver is connected.
- Consult the dealer or an experienced radio/TV technician for help.
2
Page 3

Features
Precautions
An MW/SW/FM stereo portable receiver with worldwide band
coverage.
Quartz controlled PLL (Phase Locked Loop) synthesizer system
using a microcomputer makes pinpoint tuning easy.
Worldtime clock for international use.
Up to 5 local times in the world can be preset.
Current time in some place in the world can be checked.
17 stations in total can be preset.
The tuned frequency is digitally displayed to make searching of
the desired station easier.
You can preset a desired station to be received at a desired time.
2 buttons are equipped for 2 different time settings.
The radio can be turned off automaticaily after about 60 minutes
(Sleep timer).
FM stereo reception through stereo earphones.
Operate the unit only on 4.5 V DC.
For battery operation, use three R6 (size AA) batteries.
For AC operation and car battery operation, use accessories
recommended for the unit. Do not use any other type.
The unit is not disconnected from the AC power source (mains)
as long as it is connected to the wail outiet, even if the unit itself
has been turned off.
Disconnect the AC power adaptor (not supplied) from the wall
outlet when the unit is not to be used for a long period of time.
The nameplate indicating operating voltage, etc., is located on the
rear of the unit.
Use the unit within a temperature range of 0°C to 40^ (32°F to
104°F). If it is used in temperatures outside this range, an
irregular display may appear on the display window. If it is used in
temperatures lower than this range, the display may change vety
slowly. These irregularities wili disappear and there will be no
damage to the unit when the unit is used in its recommended
temperature range.
Do not leave the unit near heat sources, such as radiators or
airduct, or in a place subject to direct sunlight, excessive dust,
moisture, rain, mechanical vibration, or shock.
Should any solid object or liquid fall into the unit, remove the
batteries, and have the unit checked by qualified personnel before
operating it any further.
Since a strong magnet is used for the speaker, metallic objects
such as pins, etc., may cling to the unit. Keep personal credit
cards using magnetic coding, recorded tapes, and spring-wound
watches away from the unit to prevent damage by the magnet.
When the casing becomes soiled, clean it with a soft cloth
dampened with a mild detergent solution. Never use abrasive
cleansers or dremical solvents, as they may mar the case.
Page 4

Precautions
When there is lightning and you are using an external antenna,
immediately disconnect the AC power adaptor (if connected) from
the wall outlet. Never touch the antenna wire when there is
lightning storm.
In vehicles or in building, radio reception may be difficult or noisy.
Try listening near a window.
Never connect a ground wire to a gas pipe.
Note on the MW channel step
The MW channel step differs depending on areas. The channel step
of this unit is factory*set to 10 kHz or to 9 kHz to match the
frequency allocation system of the country as listed. You can
change the channel s^. (See ^Changing the MW Channel Step”
on page 29.)
-
----;---. ------
Area j '
North and South American
countries
Other countries 9 kHz
If you have any question or problem concerning your unit that is not
covered in this manual, please consult your nearest Sony dealer.
----------1
----------
^
MW channel step
10 kHz
Page 5

Location of Controls
See the pages indicated in • for details.
Profit, Rlg^Sld^ and
m
s
1
J
Ef
1
0
J
1
J
B
ID
B
B
0-
B
1
J
1
J
T
—
0
Cir
Telescopic antenna O
m
HOME TIME SET button €1
in
BATT(battery)/DST(Oaylight Saving Time) button
B
TUNE (tuning) indicator
(H
Lights up when a station is tuned in.
KEY PROTECT button ®
B
ENTER button 9 9
Speaker
0
HOME/WORLD button
®
METER BAND/TIME ZONE button
B
STANDBY MEMORY S Q. S D buttons ®
m
FREQ(frequency)/CITY MEMORY PRESET buttons # ®
im
LIGHT button ®
ON/OFF button ®
Press this button to turn on and turn off the radio.
POWER/LOCK switch
mi
When using the unit, set this switch to POWER. Set the switch
to LOCK when cariying the unit. When this switch is set to
LOCK, all the functions of the buttons are locked.
VOL (volume) control
SLEEP button
TONE selector
Bzl
BAND button ®
M
SCAN button
TUNE(tuning)/WORLD TIME -i-.- buttons
STANDBY/^Sil^il. D buttons
Display window
9
9
9
9
9 9
9
8
Page 6
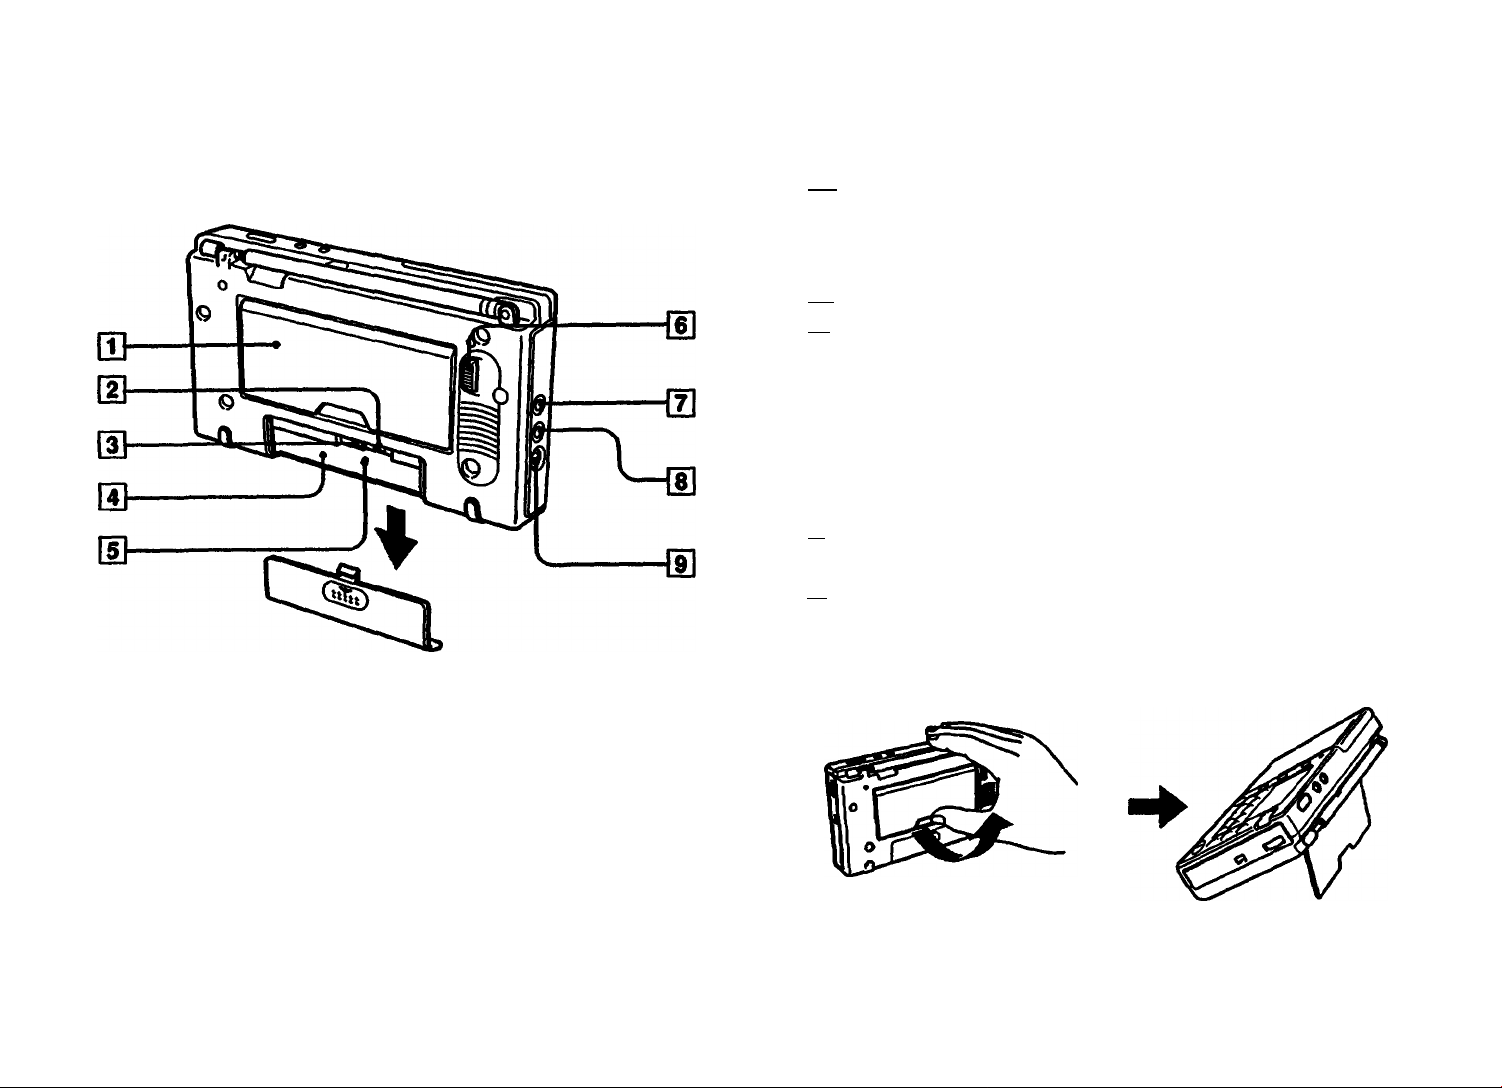
Location of Controls
IT) stand
[H 9/10 MW CH STEP (9 kHz/10 kHz MW channel step) selector
d] 12H/24H (12-hour/24-hour dock system) button ®
FT) Battery compartment
fs1 RESET button (inside the battery compartment)
When this button is pressed, ali the stored memories are
cieared and the dock is reset. The unit witi return to the same
condition as when you inserted the batteries for the first time.
[H SENS (sensitivity) OX/LOC/VL seiector fD
Normally set this selector to DX. When the scan stops so often,
or received station is too strong to become distorted, set it to
LOCAL.
[tI REC out (recording out) jack ®
d] PHONES (earphones) jack (stereo mini) ®
fFI DC IN 4.5 V (external power input) jack ®
9
10
11
Page 7

Location of Controls
E}-
m-
Eh
s
IS-^r
s—
&
ij
{HOME
L WORLD
‘SLEEP
’FMiA
SW
.MW »1
EMBSli
f
Bd S3 S3»& S3
tbi kB tbi*0!!i kbi
STANDBY B STANDBYS
4S
m
fTl Key protect indication #
d] Battery indication #
[U HOME/WORLD indication 9 ®
[4] Dayiight Saving Time indication ®
[5] SLEEP indication 9
dl Band indication 9
(7] AM/PM indication
When the clock is based on 12-hour system, this indication
appears.
(U Time difference/City name indication 9
Standby time indication ®
SW meter band indication ®
d] STANDBY O or D indication ®
iiol PRESET f and preset number indication ® ®
{m Frequency indication Qi
Current time indication 9
9
12
13
Page 8

Power Sources
Install three R6 (size AA) batteries with correct polarity as
illustrated.
When to replace the batteries
When the batteries become weak, sound becomes weak or
distorted.
You can check the battery condition with the battery indication.
While you are listening to the radio, check the battery condition by
pressing the BATT/DST button located in the upper side.
When the batteries are run down completely, the power is turned off
and 4Z3 indication flashes.
For battery life, see ‘Specifications” on page 48.
The indication of the power remaining in the battery
14
15
Page 9

Power Sources
When replacing the batteries
Turn the radio off.
Replace the batteries within about 3 minutes. If you take more time
than 3 minutes. The preset stations may be erased, the clock
setting may be cleared and ‘t):00” or “AM 12:00” flashes.
After replacing the batteries, indication still flashes. Once turn
on the radio to make this indication disappear.
When the batteries are removed for a long time
Preset stations may be erased and the clock setting may be
cleared.
Notes
• Even when the unit is not to be used for a long period of time,
keep the batteries installed for the back-up of the dock and the
built-in microprocessor unit.
• The internal batteries do not discharge while the power is
supplied through the AC power adaptor or from a car battery.
However, keep the batteribs installed as a back-up in case of
sudden power interruption or removal of the car battery cord.
Use the AC power adaptor (AC-E45M) recommended for this unit.
Conned the AC power adaptor to DC IN 4.5 V jack and the other
end to a wall outlet.
Note
Before connecting the AC power adaptor, be sure to set the voltage
of the adaptor to the local power line voltage.
Note on the AC power adaptor
Use only the AC power adaptor recommended. Do not use any
other AC power adaptor.
16
Polarity of the plug
17
Page 10

Power Sources
Use the Sony OCC-E145L car battery cord (not supplied).
Setting the Clock
The home time means the time in your area and the world time
means the time in some place in the world. They can be switched
each other with the HOMEANORLD button.
(HOME time)
Connect the car battery cord to DC IN 4.5 V jack and the other end
to a cigarette lighter socket of the car.
Note
When the AC power adaptor or car battery cord is connected to the
DC IN 4.5 V jack, the internal batteries (if present) are automatically
disconnected.
Before setting the clock, see the table on page 25. When your city
name is not shown, check the time difference in your area.
Use the world map in the rear panel only for your reference.
How to change the dock system
Clock system has been adjusted to either 12-hour or 24-hour
according to where you purchased. To change this system, press
the 12H/24H button in the battery compartment with some pointed
object Time indication changes automatically.
In 12-hour clock system, hour indicaton changes as follows.
AMI too...AM11:00-*PM12:00 (noon)-»PM1:00...PM11:00-*
AM 12.00 (midnight)...AM1:00...
18
19
Page 11

Setting the Clock (home time)
Note
Set the dock when the radio is turned off.
BATT/DST-
METER BAND/riME ZONE
When you insert the batteries for the first time, digits flash.
LDNUD
X ‘ ‘ /
_ n.nn.
^uuu
■ 1—I—I -■ ■
This illustration shows 24-hour dock system
3,5,7
Note
if you take longer than 64 seconds to proceed a step, the unit
returns to the condition before the step 2. In this case, proceed
again from the step 2.
Example: When you set the home time at 15:30 in Tokyo
1 Set the POWER/LOCK «witch to POWER.
2 Press the HOME Tíme SET button for more than 1 second.
HOME
- / П^/ 77f?
f I I t I %
n.nn
uuu
3 Press the or - button to select the time difference or city
name in your area.
• When you keep the + or - button pressed, indicatbns change
constantly in the order shown in the table on page 25.
Each time you press the -f or - button while keeping the
METER BANO/TIME ZONE button pressed, only the time
differences appear in the order, thus skipping city names.
• When a city name has more than 5 letters, the letters move
on the display. Ail the letters appear twice and then the first 5
letters flash.
20
21
Page 12

Setting the Clock (home time)
4 Press the HOME TIME SET button.
HOME ^ / t IL^
HOME /
YÜ
a'n n
5 Adjust the hour with the-for-button.
Home T n U
HOME 1 uis
N * ' y
^ #cnn
J JU U
When you keep the button pressed, hour indication changes constantiy.
6 Press the HOME TIME SET button.
NOME T n U '' n
I Uh I U
t/ n
1 u
7 Adjust the minute with the or-button.
NOME
/ n/./ '/ n
I Uh I U
IS3D-
When you keep the button pressed, minute indication changes constantly.
8 Press the HOME TIME SET button.
Just when you press the button, the clock starts operating from 0
second of that time. “;" flashes.
HOME I n /./
n
t Uh I U
,1
I con
iP:Pu
22
---------------
I JjUUJ
< C.n
^-1—r-^
n
----------------
23
Page 13

Setting the Clock (home time)
For areas where "Daylight Saving Time” Is used
When you set the clock during this period, press the BATT/DST
button between the steps 1 and 2. " appears. At the end of the
daylight saving time, press the BATT/DST button. Current time
Indication changes automatically.
Note
Press the BATT/DST button only when the radio is turned off.
You can set the Daylight Saving Time for HOME time and WORLD
time respectively.
Table of the time difference and the city names stored In this unit
Time difference
Cityname
0:00
LONDON
+1:00
AMSTERDAM
BERLIN
MADRID
PARIS
ROME
STOCKHOLM
ZURICH
+2:00
ATHENS
CAIRO
+3:00
JEDDAH
+4:00
DUBAI
+5:00
KARACHI
+6:00
DACCA
+7:00
BANGKOK
+8:00
BEIJING
HONG KONG
SINGAPORE
+9:00
SEOUL
TOKYO
+10:00
SYDNEY
+11:00
NOUMEA
+12:00
AUCKLAND
-11:00
-10:00
HONOLULU
-0:00
ANCHORAGE
-8:00
LOS ANGELES
VANCOUVER
-7:00
DENVER
-8:00
CHICAGO
DALLAS
MEXICO
-5:00
LIMA
NEW YORK
TORONTO
-4:00
CARACAS
SANTIAGO
-3:00
SAO PAULO
BUENOS AIRES
-2:00
-1:00
24
This table shows the time during standard time (not under daylight
saving time).
25
Page 14

Setting the Clock (home time)
How to Know the Current Time in Some Place In thé World '
ENTER
2
------------
METER BAND/riME ZONE ■
1 Set the POWEFVLOCK switch to POWER.
2 Press the HOME/WORLD button to make the WORLD
indication appear.
This button switches between HOME and WORLD.
3 Press the or - button to select the desired time difference
or the city name.
• You can skip the city names. Press the + or - button while
pressing the METER BAND/TIME ZONE. Only the time
differences will appear on the display.
Iqq
a
a
o
-luu atart
To check the current time in some piace in the world while
listening to the radio
Do the same procedures. In this case, the time indication shows
the time when you press the HOMEAWORLD button. Soon, the
display returns from the time indication to the radio indication.
Even while you are listening to the radio, you can check the time in
some other place In the world without affecting the radio reception.
Note
When your desired place is now under daylight saving time, press
the BATT/DST button after pressing the HOMEAWORLD button.
Press the BATT/DST button only when the radio is turned off.
26
27
Page 15

Setting the Clock (home time)
Changing the MW Channel Step
To Шсйе the City Naim áiid Rátbc^
Turn the radio off.
While pressing the ENTER button, press the button Ml to M5 in
which you want to store the city name or the time difference.
“PRESET Г and the number appear on the display.
Then, you can know the time in that place, only by pressing the
button Ml to MS.
fT
When you use the radio where the frequency allocation system is
based on the other MW channel step, proceed as follows;
1 Be sure to set the POWER/LOCK switch to LOCK.
2 Change the position of the MW CH STEP seiector In the
battery compartment with a bail-point pen or some pointed
object.
Í
1/
3 Set the POWER/LOCK switch to POWER.
Area
North and South American
countries
Other countries
9
MW Channel step
10 kHz
9 kHz
□
10
у
28
Note
You cannot change the MW channel step with the step 2 only.
Follow the steps from 1 to 3 completely.
29
Page 16

Manual Tuning
On TONE selector
When you listen to the news, set the TONE selector to NEWS.
Human voice will be heard more clearly. When you listen to music
set it to MUSIC.
To enjoy FM stereo
Connect the stereo earphones to the PHONES jack.
METER BAND/riME ZONE
1
Set the POWER/LOCK switch to POWER.
2
Press the ON/OFF button to turn the radio on.
3
Turn the VOL control a little to get sound.
4
Press the BAND button to select the band.
Each press of the button changes the band in the following
order.
MW^SW—FM-
in;
(The display window shows the last frequency chosen in each
band.)
For SW. while pressing the METER BAND/TIME ZONE button,
press the TUNE -i- or - button to select the meter band.
Tune in the desired station by pressing the TUNE -i- or button.
If you keep the button pressed, frequencies change
continuously.
For the channel step, see the table on page 35.
Adjust the volume.
6
To turn the radio off
Press the ON/OFF button.
□
To Improve Reception
MW: Since the reception is affected by the
position of the radio, rotate the unit
horizontally for optimum reception.
SW: Pull out the telescopic antenna to its
full length and set it vertically. Usually
the telescopic antenna is sufficient for
SW reception. However, in a metal or
concrete building, use the wire
antenna supplied.
FM:
Extend the telescopic antenna and
adjust the length, direction and angle
for the best reception.
30
Page 17

Manual Tuning
How to use the supplied SW compact antenna
Usually the telescopic antenna is sufficient for SW reception.
However, in a metal or concrete building, the use of the supplied
SW compact antenna (AN-71) is recommended.
1 Fully pull out the cord from the case.
2 Attach the coupler to the telescopic antenna.
3 When the window can be opened: Extend the cord and the
case out through the window, after making sure there is no
danger.
When the window cannot be opened: Fully extend the cord
along the frame of the window.
Using an external antenna for MW and SW reception
Use the wide range antenna AN-1 or AN-102 (not supplied).
1 With a connecting cord, connect the OUTPUT jack of the
antenna controller and the INPUT jack of the antenna coupler
(supplied with the AN-1 or AN-102).
2 For MW: Put the antenna coupler near the ICF-SW33.
For SW: Attach the antenna coupler to the telescopic antenna.
’ Antenna coupler for SW
AN-1
Antenna coupler for MW
Note
For further details, refer to the instruction manual of the AN-1 or
AN-102.
to Prevent Accidental ptoge of tt» Receiving Station
Press the KEY PROTECT >-» button. The <>-■ mark is displayed,
indicating that all the functions of the buttons are locked. You can
adjust the tone and volume even if the o-« mark is displayed. To
release the key protection, press the KEY PROTECT o-« button
again.
•: To Usellie dhM Ih a bimiy Lighted Area
Press the LIGHT button, (o^ should not be displayed.) The display
window will be illuminated for about 20 seconds.
32
33
Page 18

Scan Tuning
Use scan tuning to automatically scan the stations in the frequency
range of a broadcast band.
1 Set the POWER/LOCK switch to POWER.
2 Press the OH/OFF button to turn the radio on.
3 Press the BAND button to select the band.
For SW, select the meter band. too.
4 Press the SCAN button.
Within the frequency range of the table on page 35, scan tuning
will begin and stop automatically for about 2.5 seconds when a
station is received.
5 When your desired station is tuned in, press the SCAN
button.
When you do not press the SCAN button, scan tuning will
continue.
6 Tune the station more precisely with the TUNE or -
button, if necessary.
Frequency range and channel step of each broadcast band
Band Meter band
S31-1710 kHz
MW
75 m
60m
49 m
41 m
SW
FM
‘1 Countries except for Italy and Saudi Arabia
*2 Italy and Saudi Arabia
*3 Germany, Austria, Scandinavian countries, Italy and Saudi Arabia
*4 Countries except for *3
31 m
25 m
21 m
19 m
16 m
13m
11 m
530-1710 kHz
531-1602 kHz **
530-1610 kHz •*
3700-4200 kHz*’
3850-4200 kHz**
4650-5150 kHz
5800-6300 kHz
6950-7450 kHz
9375-10000 kHz
11525-12150 kHz
13375-14000 kHz
14975-15600 kHz
17475-18100 kHz
21320-21950 kHz
25475-26100 kHz
87.50-108.00 MHz **
76.00-108.00 MHz *^
Frequency Channel step
9 kHz
10 kHz
9 kHz
10 kHz
1 kHz
(Manual
tuning)
5 kHz
(Scan tuning)
0.05 MHz
On SENS selector
Normally set this selector to DX. When the scan stops so often, set
it to LOCAL.
34
35
Page 19

Preset Tuning
You can preset up to five stations for each band in the MEMORY
PRESET buttons Ml to MS (a total of 15 stations) and 2 stations in
the STANDBY MEMORY buttons S Q and S Q .
Note on the preset stations stored in the STANDBY MEMORY
buttons
These stations can be used as the memories for standby operation.
See page 38. Stations of any band can be stored in these two
buttons.
1 Tune in the desired station according to the procedures
expiained in “Manuai Tuning” or "Scan Tuning”.
'v^
To change the preset station
Preset a new station In the number of which you want to change the
station. The previous station will be canceled.
1 Press the POWERA.OCK switch to POWER.
2
Press the ONfOFF button to turn the radio on.
3 Press the BAND button to seiect the band.
For STANDBY MEMORY button S Q or S Q, skip this step.
4 Press the desired MEMORY PRESET button Ml to MS or
STANDBY MEMORY button S □ or S Q.
5 Adjust the voiume.
2 Whiie keeping the ENTER button pressed, press one of the
MEMORY PRESET buttons Ml to MS, or STANDBY
MEMORY buttons S O or S □ in which you want to preset
“PRESET f ” and preset number (or, 3 or b) appear in the display
window.
36
37
Page 20

Using the Standby Function
Beep sounds for about 10 seconds until the standby time comes,
and the radio will be turned on. The radio will be turned off
automatically after about 120 minutes, unless you turn it off.
Before setting the standby time, make sure that the desired station.is
preset in the STANDBY MEMORY button S El or Q.
The standby time which is preset in the STANOBY/STANDBY TIME
SET Q button works on the radio station which is preset in the
STANDBY MEMORY S B button. The standby time which is preset
in the STANDBY/STANDBY TIME SET Q button works on the radio
station which is preset in the STANDBY MEMORY S Q button.
• • ' *
....... * ■ * r
.......
Setting the Standby Ttane
Example: To set the standby time at 7:30
i
A
□□□□□
A
□□ ocp
0
L_S
o
: “
-4,6
3,5,7
When you leave the unit for more than 64 seconds during the steps
from 3 to 7, the unit returns to the condition before the step 3.
1 Set the POWERfLOCK switch to POWER.
2
Make sure that the radio is turned off.
3 Press the STANDBY/STANDBY TiME SET El or B button for
more than 1 second.
““ T OH
»/ n
1 u
HOME
'R.tTj m
“ u^tukj
STANOo/a 1 ^
10:33
4 Adjust the hour with the-for-button.
HOME
ETAMOBra •
tn.Z
?
1UZ
5 Press the STANDBY/STANDBY TIME SET El or Q button.
HOME
STANoarm i i t
in.Z
IU‘Z
D
ID
? J
iD
"t.rTJfTI
»
l‘kJU
38
39
Page 21

Using the Standby Function
6 Adjust the minute wHh the + or-button.
Press the ST ANDBY/ST ANDBY TIME SET Q or Q button.
Setting is complete. Soon the standby time indication will change to
the time difference or city name indication. STANDBY B or
STANDBY B indication shows that the standby function is preset.
STANDBY B and STANDBY B work independently of each other.
You can set either or both of them.
Notes
• To stop the beep, press the ON/OFF button.
• To turn off the radio, press the ON/OFF button.
• After presetting the standby time, if you happen to set the
POWER/LOCK switch to LOCK. STANDBY B and/or STANDBY
B indication disappear and the standby function will not activate.
Return the POWER/LOCK switch to POWER, and the standby
function will be recovered.
• Standby function will not activate while you are setting the clock
or setting the standby time.
• Radio sound will not be heard if the VOL control is turned down
completely. Check the VOL control setting.
ATTENTION!
The standby function will activate when the current time
indication becomes identical with the standby time which has
been preset. So, make sure that either HOME or WORLD
appears on the display. If you want to activate the standby
function at your home (locaO time, HOME indication should be
displayed. If you want to activate it at the time in some place in
the world, WORLD indication should be displayed. To change
the indication, press the HOME/WORLD button.
40
To cancel the standby function
Press the unnecessary STANDBY/STANDBY TIME SET button B
or B- STANDBY B or STANDBY B indication disappears. When
you press the button again, the standby function will be set again.
41
Page 22

Using the Standby Function
Using the Sleep Function
To check the standby time setting
Set the POWER/LOCK switch to POWER and press the STANDBY
MEMORY S B or S B button. Standby time indication wiil be
displayed for about 3 seconds.
In 12-hour clock system, the indication “A" and “P" show the “AM"
and “PM" respectively.
HOME T flu У/ П
1 Uh 1 U
номе
13B
жтиюшгт
in.D D
tU-JJ
Note
When you check the standby time setting while you are listening to
the radio, radio frequency changes to the frequency preset in the
STANDBY MEMORY S B or S B button. In this case, select the
band and frequency again.
When standby time preset comes while you are listening to the
radio
Beep sounds for about 10 seconds before the standby time preset
and the radio station now you are listening to will be replaced with
the station which is preset at the standby time.
10-33
You can fail asleep while listening to the radio.
1 Set the POWER/LOCK switch to POWER.
2
Press the SLEEP button.
SLEEP
FM
The radio is turned on. If necessary, select your desired station.
After about 60 minutes, the radio will be turned off automaticaily.
To turn off the radio before that time, press the ON/OFF button.
onnn^
JUUU"^
42
Note
To prolong the listening time, press the SLEEP button. The radio
will be turned off 60 minutes later from then.
43
Page 23

Recording a Broadcast
Troubleshooting Guide
You can record radio programs by connecting a tape recorder to the
REC OUT jack as illustrated below.
Tune in the desired station and start recording on the tape recorder.
The volume control setting on the radio has no effect on the
recording.
Tape recorder (not supplied)
to MIC
RK-G69 (not supplied)
to REC OUT
The following checklist will help you to solve most of the problems
that you may encounter with this unit. If problems persist after you
have checked the following items, please consult your nearest Sony
dealer.
The power is not turned on even if you press the ON/OFF
button.
• Weak batteries.
• Incorrect polarity of batteries. See page 14.
• The POWER/LCXiK switch is set to LOCK.
• The AC power adaptor or a car battery cord is not connected.
• Battery operation is attempted while an AC power adaptor or a
car battery cord is connected to the unit, but not to a wall outlet or
cigarette lighter socket.
No indication in the dispiay
• Incorrect polarity of batteries. See page 14.
• Weak batteries.
Display is dim.
• Weak batteries.
• The unit is being used in extremely high temperature or in a place
subject to excessive moisture.
44
Sound is not heard at all.
• The VOL control is turned down completely.
• The stereo earphones are plugged in.
• incorrect polarity of batteries. See page 14.
45
Page 24

Troubleshooting Guide
Very weak or interrupted sound, or unsatistactory reception.
• Weak batteries.
• Tuning or antenna adjustment is not correct.
• Weak signal.-»When using in a vehicle or in a building, listen near
a window.
• The SENS selector is set to LOCAL-»Set to OX.
Stations have not been stored.
• You made wrong operation when you stored stations.'^To store
the stations, see page 36.
No key input is acceptabie.
• The KEY PROTECT o-. button has been pressed.-»Press the
button again to release.
• The POWER/LOCK switch is set to LOCK.
The preset station cannot be received during preset tuning.
• Incorrect MEMORY PRESET or STANDBY MEMORY button has
been used when you stored the station.
• The preset station was erased.<-»Store the station again.
The radio is not turned on at the standby time.
• STANDBY B or STANDBY B indication did not appear. .
• You took more time than 3 minutes when replacing the batteries.
-»Set the standby time again.
• The POWER/LOCK switch is set to LOCK.
• The current time indication was not correct.-»Make sure that
either HOME or WORLD indication appears. Make sure that the
city name or the time difference is correct
You cannot change the city name or time difference.
• HOME indication appears.-»Press the HOME/WORLD button.
• The POWER/LOCK switch is set to LOCK.
Radio disconnects even though you press the ON/OFF button.
• Batteries are exhausted. (The mark flashes.) Replace all the
batteries with new ones.
46
47
Page 25

Specifications
Circuit system
Frequency range
Band
MW
SW
FM
Intermediate frequency
Antennas
Speaker
SW: Ouai conversion superheterodyne
MW/FM: Single conversion superheterodyne
Meter band
531-1710 kHz*'
530-1710 kHz*'
531-1602 kHz*»
530-1610 kHz*»
75 m
60m 4650-5150 kHz
49 m 5800-6300 kHz
41 m
31 m
25 m 11525-12150 kHz
21 m
19 m 14975-15600 kHz
16 m 17475-18100 kHz
13 m
11 m 25475-26100 kHz
3700-4200 kHz*'
3850-4200 kHz*»
6^0-7450 kHz
9375-10000 kHz
13375-14000 kHz
21320-21950 kHz
87.50-108.00 MHz*»
76.00-108.00 MHz *»
*1 Countries except for haly and Saud Arabia
*2 Italy and Saudi Arabia
*3 Germany, Austria, Scandinavian countries, Italy and
Saudi Arabia
*4 Countries except for *3
MW: 450 kHz
SW: 21.44 MHz (1st)
450 kHz (2nd)
FM: 10.7 MHz
SW/FM: Telescopic antenna
MW: Built-in ferrite bar antenna
Approx. e6.6 cm (2 Vt inches)
Fraqueney
Channel step
9 kHz
10 kHz
9kHz
10 kHz
1kHz
0.05 MHz
Power output
Output
Power requirements
Battery life
Dimensions
Mass
Accessories supplied
Design and specifications sulked to change without notice.
200 mW (at 10 % harmonic distortion)
PHONES jack (stereo miniiack)
REC OUT jack (minijack)
Output level 0.775 mV (-60 dB)
Oul^ impedance 1 kilohm
4.5 V DC, three R6 (size AA) batteries
DC IN 4.5 V jack accepts:
Sony AC-E45M AC power adaptor (not
supplied)
Sony DCC-E145L car battery cord (not
supped) for use with 12 V car battery
Approx. 11 hours of listening for 4 hours a day
at a normal volume using Sony batteries SUM-3
(NS)
Approx. 165.7 X 93 X 30.5 mm (w/tVd)
(A^fox. 6 Vt X 3 X1 V* inches)
not ind. projecting parts and controls.
Approx. 401 g (14.15 oz) ind. batteries.
Carrying case (1)
SW compact antenna (1)
Short wave guide (1) only English version
Note
This appliance oonfonns with EEC Diredive 87/308/EEC regarding
interference suppression.
Accessories not supplied
Your dealer may not handle some of the above listed accessories.
Please ask the dealer for detailed information about them available in your
country.
AC power adaptor AC-E45M
Car battery cord DCC-E145L
MW/SW wide range antenna AN-1/AN-102
Connecting cord RK-G69 (miniplug to miniplug,
no resistor type)
48
49
 Loading...