

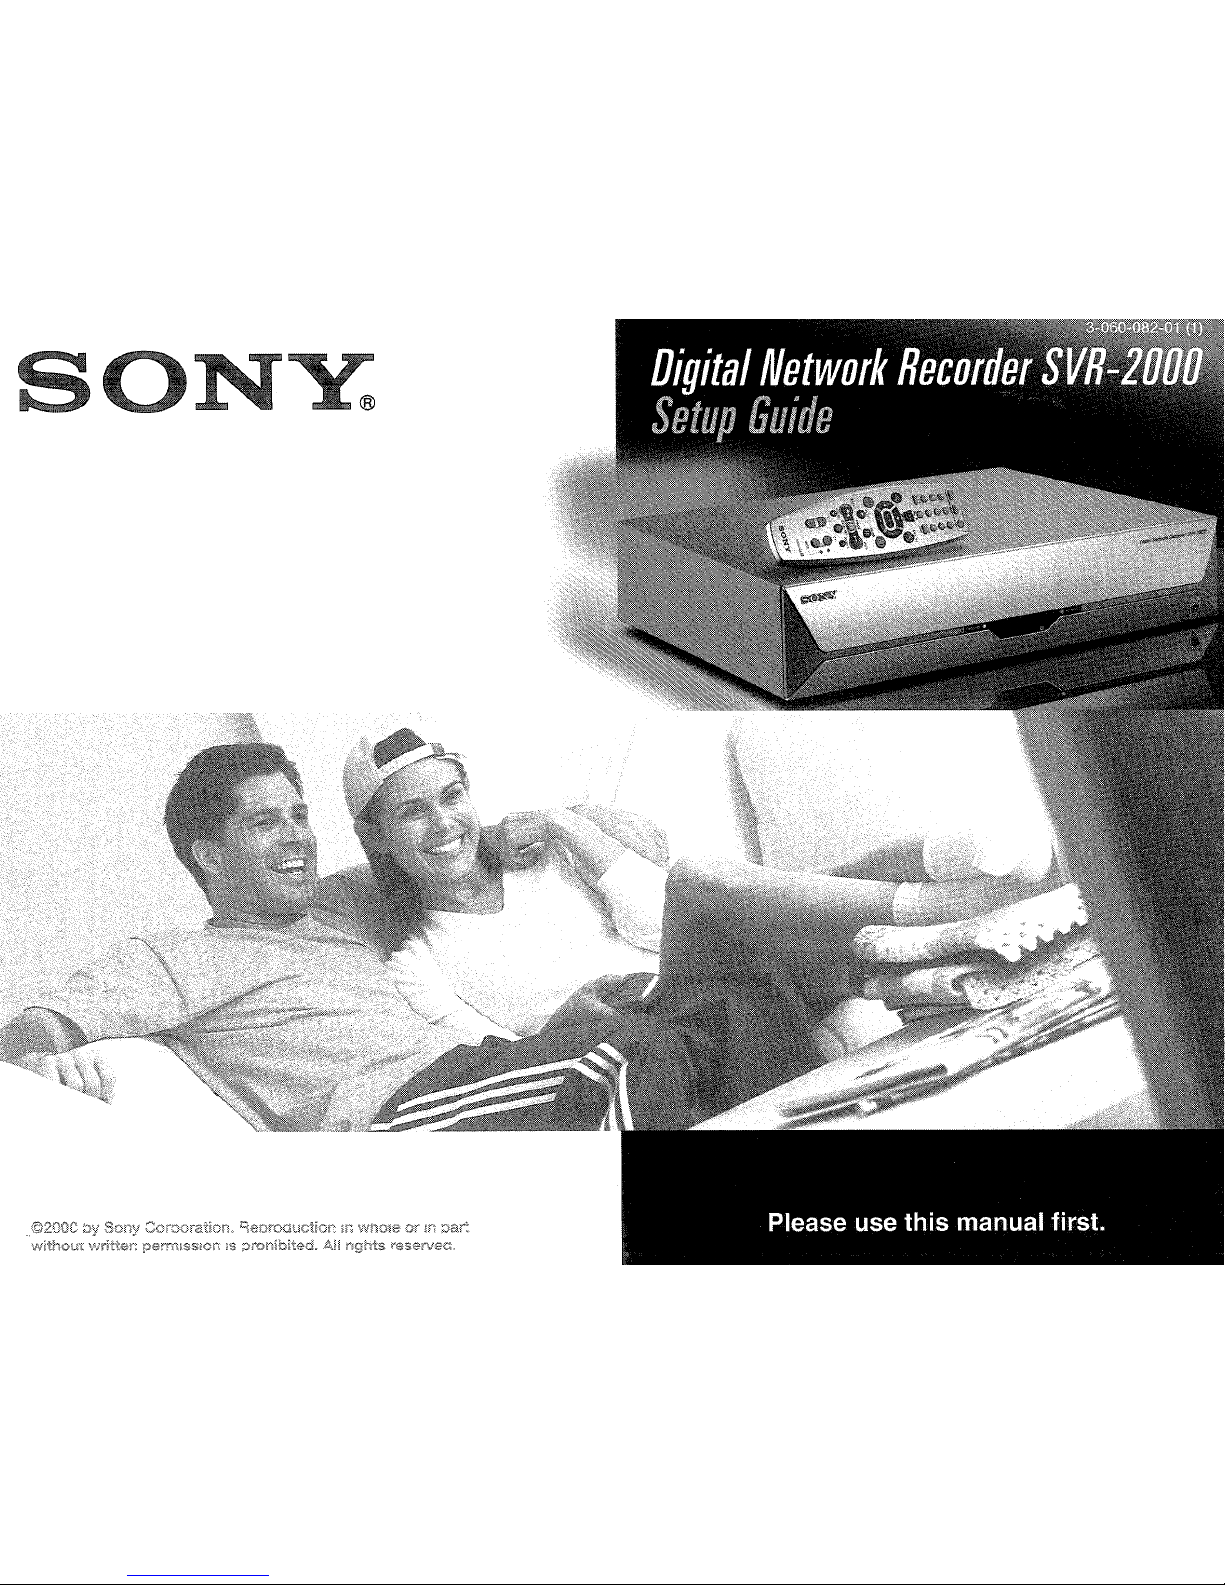
Sony 158SVR2000,SVR-2000 Setup Manual
>i
Z
o
en
TiVo, TiVo Central,
and
the TiVo logo are trademarks of TiVo Inc
2000
TiVo Inc
All rights reserved TiVo
Inc,
894 Ross Drive, Sunnyvale, CA 94089
WARNING
Owner's
Record
Attention
To reduce the
nsk
of fireorshock hazard,donot
expose the
unittoram
or
mOIsture.
You are cautioned
that
any changesormodifications
not
expressly
approvedmthIS
manual
could
VOId
your
authority to
operate
thIS
eqUipment.
Customer Support
Model Number: _
For
Hardware and Installation
To arrange for the mstallation of
your
SVR Recorder, call the dealer from
whom
you
purchased
your
system.
For general mformation,
or
to resolve problems related to the operation of
your
SVR
Recorder, please contact
your
Sony dealer.Ifyour
dealer or
mstaller
IS
unable to
answer
your
questions, call the Sony Direct Response
Center
at
1-877-585-S0NY (7669).
For
Programming
(liVo
Service and Activation)
To use most of the featuresofyour
SVR
Recorder, you will
need
to activate
the TiVo SerVIce (page 50). You can activate the TiVo SerVIce
on
the web
at
http://www.tivo.com/activate.orby
calling TiVo Customer Careat1-877-
For-TiVo (877-367-8486). TiVo Customer Care can also help you
if
you
have
questions about
your
channel lineup,
program
guide data,oron
screen
messages.
MacrOVISlon Information
ThIS
product
mcorporatescopyrIghtprotection technology thatISprotected
by U.S. patents
and
other mtellectual
property
rIghts. Use of
thIS
copyrIght
protection technology
IS
grantedbyMacrovlslon for
home
and
other
limited pay
per
VIew
uses only Reverse engmeerIng or disassembly
IS
prohibited.
Note on Recording Programming
ProgrammIng
may
be recorded for
home
vIewmgonly All otherrecording
IS
expressly prohibited. Some
programmmg
may
not
be recorded.
An
additional recording fee
may
be applied. Call
your
program
prOViders for
details.
SerIal Number: _
The
model
and
senal
numbers
are locatedontheback of the
SVR
Recorder.
Record these numbers m the space proVided below. Refer to these
numbers
whenever you need to call
your
sales or service representative regarding
thIS
product.
Lh
ThIS
symbolISIntended to alert the user to the presence
ofumnsulated
"dangerous
voltage"
withm
the
product's
enclosure that
may
be of sIgnificant
magnitude
to
constitute a
nsk
ofelectrIC shock to persons.
ThiS
symbolISIntended to alert the
user
to the presence
of Important operating
and
mamtenance (servIcmg)
mstructions m the literature accompanymgtheappliance.
it
it
it
Notetothe CATV Installer
ThIS
remmderISprovided
to call the CATV system mstaller's attention to
Article 820-40 of the NEC that provIdes gUIdelines for
proper
grounding
and, In particular, specifies that the cable
ground
shall be connected to the
grounding
system of the building as close to the
pomt
ofcable entry as
practical.
Telephone Line Interruption
PerIodically, the SVRRecorder dials m to the TiVo PersonalTVSerVIce,
free
of charge,
VIa
your
telephone line
usmg
a toll free or local number.Ifyou
pIck
up
your
telephone dUrIng the time mformationISbemg
transferred,
you
will
hear
static
nOIse.Ifyou
would
like to use
your
telephone while the
mformation
IS
bemg
transferred you can
hangupand
pIckupyour
telephone agam. The
SVR
Recorder will disconnect
and
allow you to place
your
call. You can also Interrupt the transfer at
any
timebytemporarily
unpluggmg
the
phone
line from the receiver.
The
SVR
RecorderISmtended
for use only
withm
the United States.
3

Table of contents
Getting Started
7 OvervIew
8 Carton Contents
9 Parts, Controls, and FunctIOns
9 Front Panel
10
Back Panel
11
Remote Control
13
Installing Battenes
Connecting Your Equipment
15
ConnectIOn Examples
16
Example1.Antennaorcable, wIth a VCR, and splittmg the
SIgnal
18
Example 2: Antenna or cable, wIth a VCR
20
Example3:Antenna or cable, wIthout a VCR
22
Example4:Satellite set-top box wIth senal connectIOn, and a
VCR, usmg S-Video cables
24
Example5:Satellite set-top box wIth IR mput, and a VCR,
usmg S-Video cables
About
This Setup
Guide
ThIS
Setup GUIdeISpart
of the complete documentation for
your
SVR
Recorder.
ThIS
Setup GUIde describes
how
to connect the
SVR
Recorder
and
activate the TiVo
SerVIce.
The Start
Here
poster prOVIdes
an
easy to read
summary
of thiS Setup GUIde. The TiVo Viewer's GUIde
prOVides detailed mformation about
how
to use
your
TiVoSerVice,
and
how
to use the different features of
thiS
product.
26
Example6:Satelliteorcable box wIth IR mput, and a VCR,
usmg RF cables
28 Example
7·
Satellite and antenna or cable, wIth a VCR
30
Example8:Satellite and cable wIth boxes, wIth a
VCR
32
Contmumg Your ConnectIOn Steps
35
Back Panel Connections Reference
39
General Hints
Setting Up Your System
41
GUIded
Setup
50
ActIvatmg the TiVo ServIce
51 Programmmg Your Remote Control
Additional Information
55
Troubleshootmg
61 SpecificatIOns
62
FCC Regulations and Information
The TiVo Viewer's GUIde
and
thiS
Setup GUide contam some sections with
the same name, such as the Troubleshooting section,
and
sImilar or related
mformation. These sections are m fact different,
butdorelate to each other.
You will find mformation regarding connections
and
activating the TiVo
SerVIce m thiS Setup GUIde. You will find mformation
about
the different
features of the
SVR
Recorder,
and
usmg the TiVo SerVice, m the TiVo
Viewer's GUIde.
A
Note
prOVides mformation that may be necessary to complete the task.
1
5


Getting Started
Overview
Your SVR Recorder comes complete wIth everythmg you need to enJoy and enhance
your
teleVISIon
vIewmg expenence.
You'll need to have a standard phone line (analog) for the SVR Recorder to use.
You
do
not need to mstall a new phone Jack or phone number for the SVR Recorder to work.
However, the SVR Recorder should always be connected to your phone line.
You can find detailed mstructiOns for connectmg your SVR Recorder on the
Start Here poster and m "Connectmg Your EqUipment" on page 15.
1 Connect Your SVR Recorder.
-
C)
~
:I
co
en
S'
~
CD
c.
@
o
V~I@
Note
This Setup GUide describes howtoconnect the
SVR Recorder and activate the TIVo Service. The
Start Here poster provides an easy to read
summary
of
this Setup GUide. The TIVo Viewer's
GUide provides detailed Information about how to
use your TiVo Service.
2 Complete Guided Setup,
and activate your TiVo
Service.
Overview
17
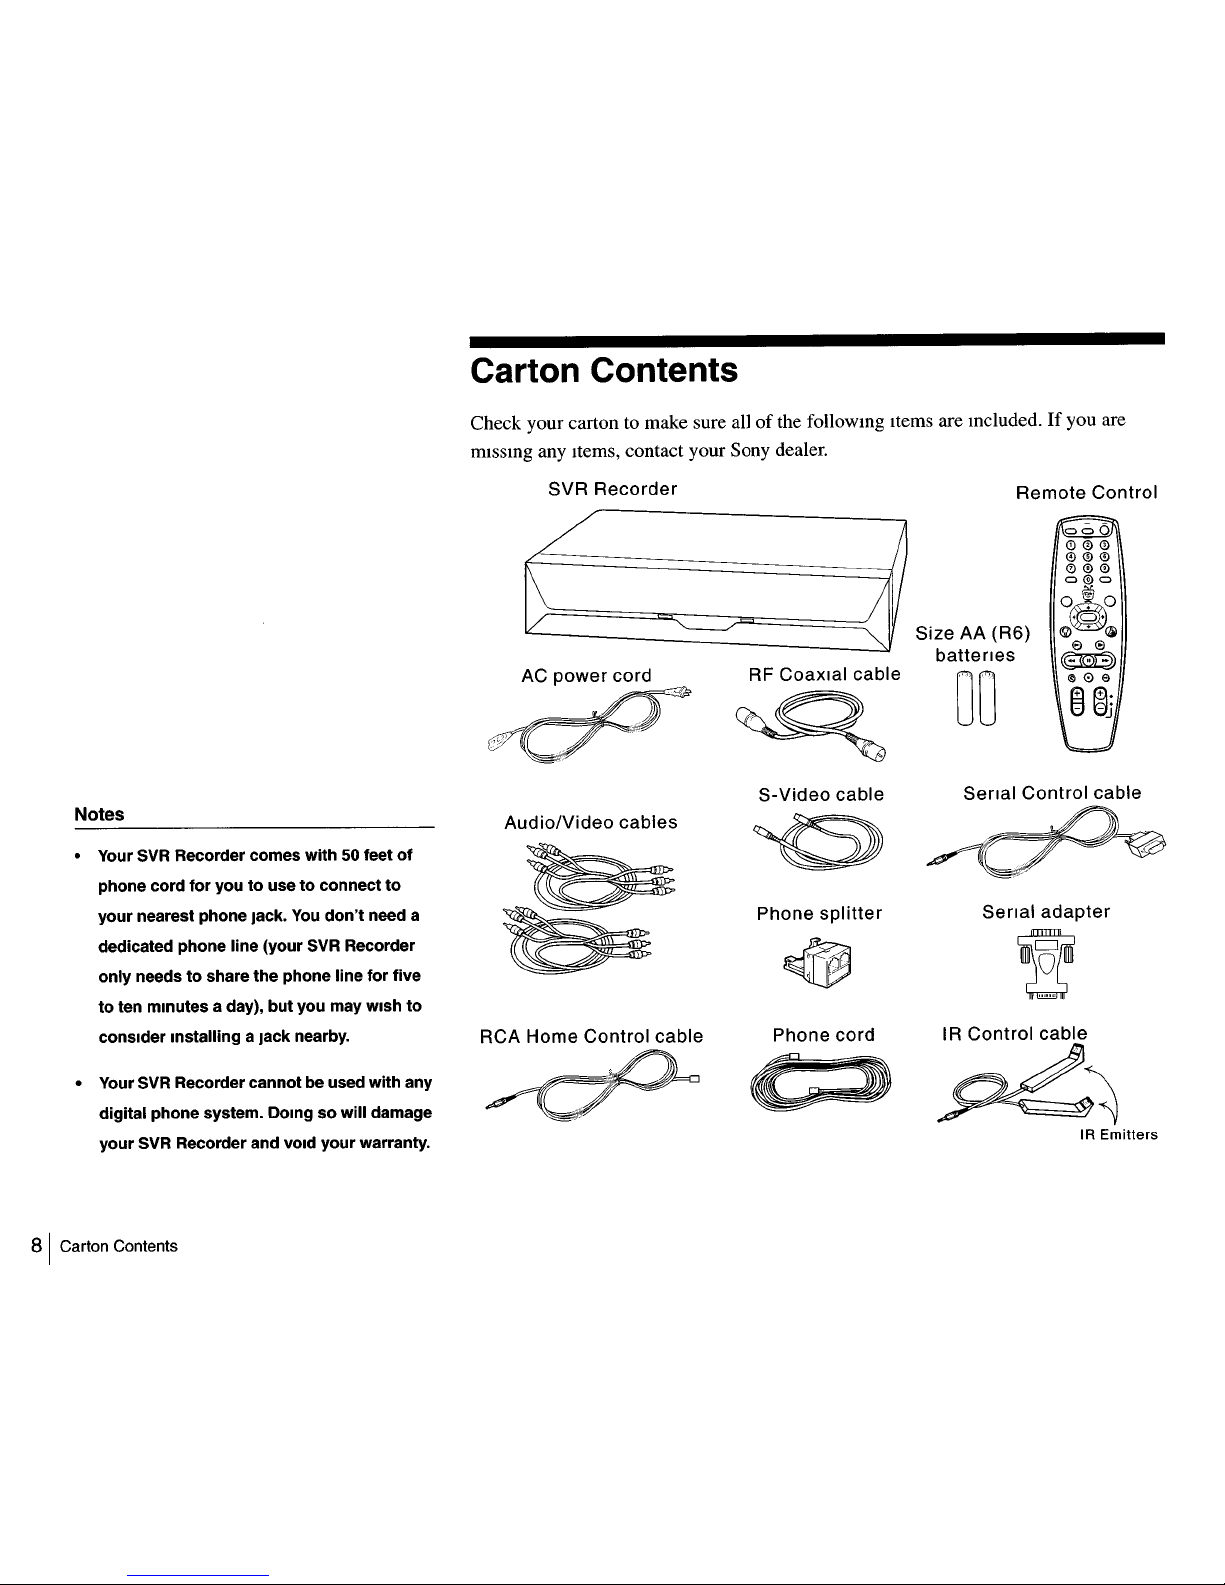
Carton Contents
Check your carton to make sure allofthe followmg Items are mcluded.Ifyou are
mIssmg any Items, contact your Sony dealer.
Remote
Control
SVR
Recorder
L
AC
power
cord
d*P~
:?~/
~
RF
Coaxial
cable
Size
AA
(R6)
batteries
00
poO
0®0
0®®
®®0
Cl@Cl
o~o
f:®;\
~~@
e
<3
~
~0e
rn
s:
S t;jJ
Notes
• Your
SVR
Recorder comes with50feet
of
phone cord
for
youtousetoconnect
to
your nearest phone
Jack.
You
don't
need a
dedicated phone line (your
SVR
Recorder
only needs
to
share the phone line for five
to
ten minutes a day),
but
you may wish
to
conSider Installing a
Jack
nearby.
• Your
SVR
Recordercannot be used with any
digital phone system. DOing
so
will damage
your
SVR
Recorder and
vOid
your warranty.
81
Carton Contents
Audio/Video
cables
RCA
Home
Control
cable
~
S-Video
cable
~
Phone
splitter
~
Phone
cord
c'
Serial
Control
cable
Serial
adapter
~
IR
Control
cable
~~~
IR
Emitters
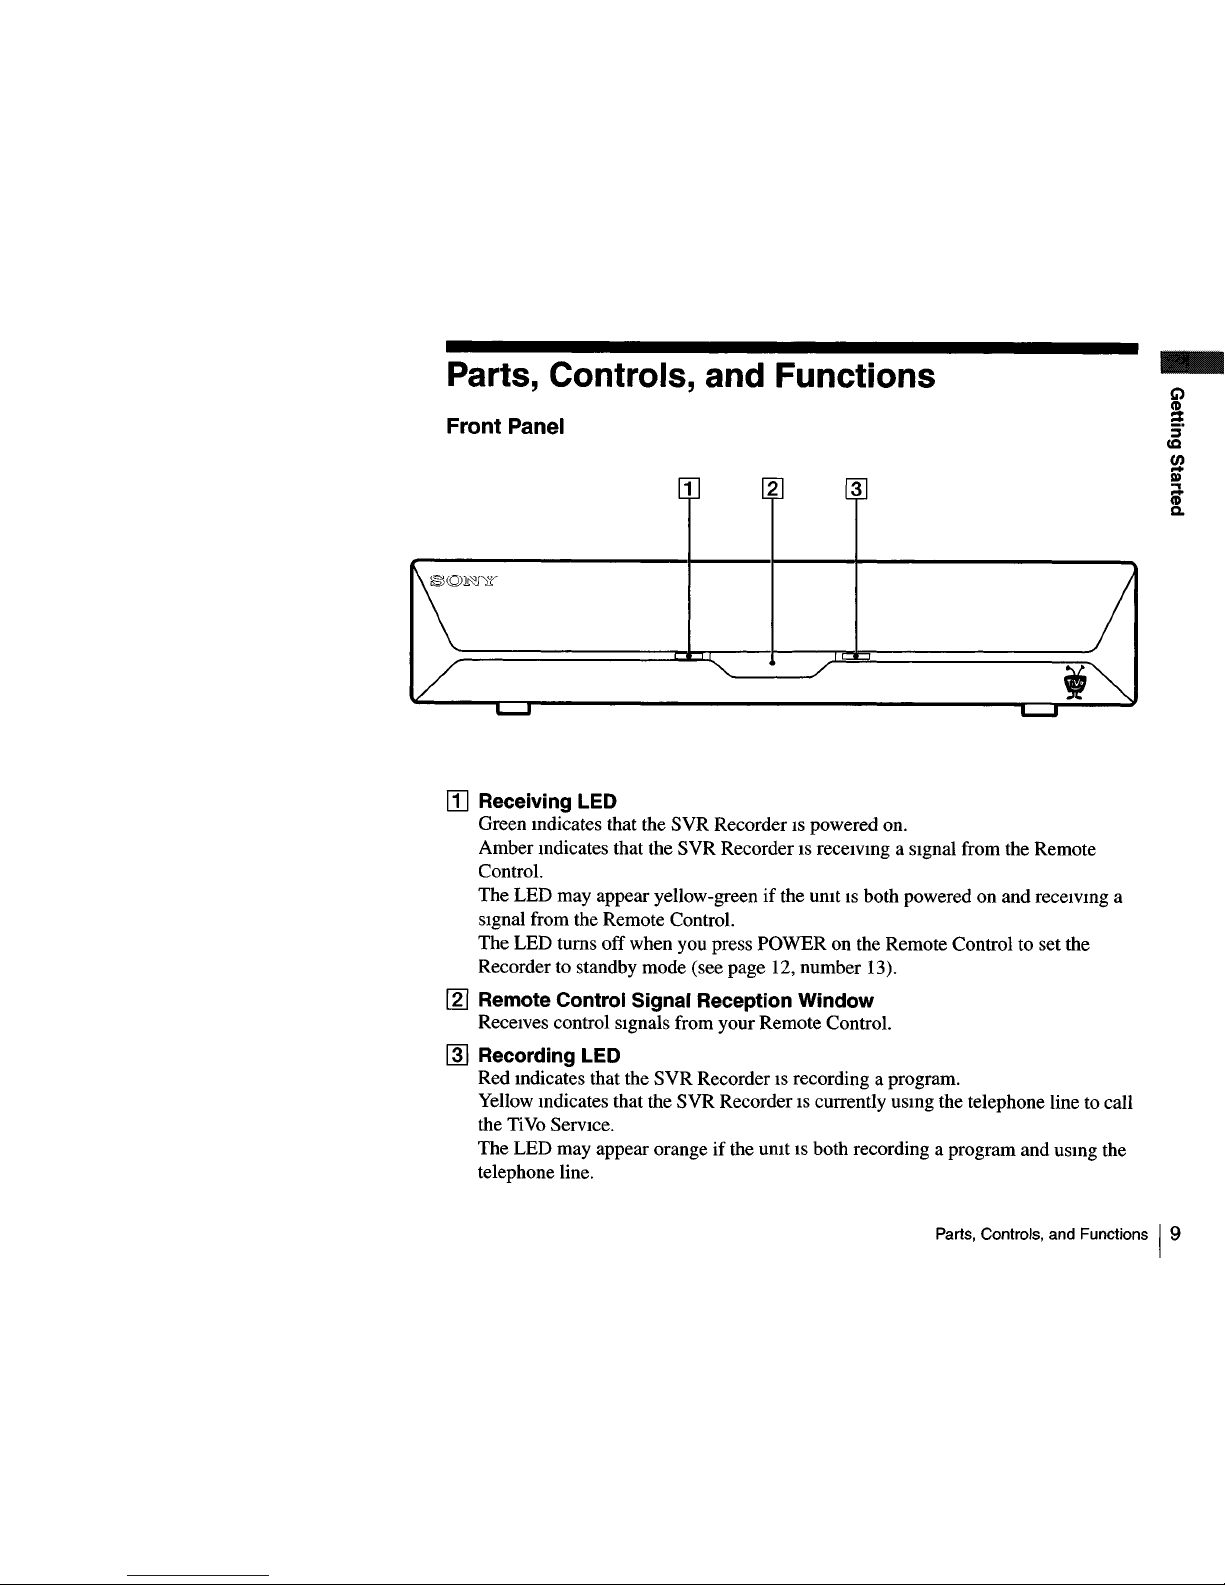
Parts, Controls, and Functions
Front Panel
1 2 3
-
C)
a
~
cc
gz
D)
i
c.
[I]
Receiving LED
Green mdicates that the SVR RecorderISpowered on.
Amber mdicates that the SVR Recorder
IS
receIvmg a sIgnal from the Remote
Control.
The LED may appear yellow-green
if
the umtISboth poweredonand receIvmg a
SIgnal from the Remote Control.
The LED turns offwhen you press POWER on the Remote Control to set the
Recorder to standby mode (see page 12, number 13).
[g]
Remote Control Signal Reception Window
ReceIves control SIgnals from your Remote Control.
[ID
Recording LED
Red mdicates that the SVR RecorderISrecording a program.
Yellow mdicates that the SVR Recorder
IS
currently usmg the telephone line to call
the Ti
Vo
ServIce.
The LED may appear orange
if the umt
IS
both recording a program and usmg the
telephone line.
Parts, Controls, and Functions I9
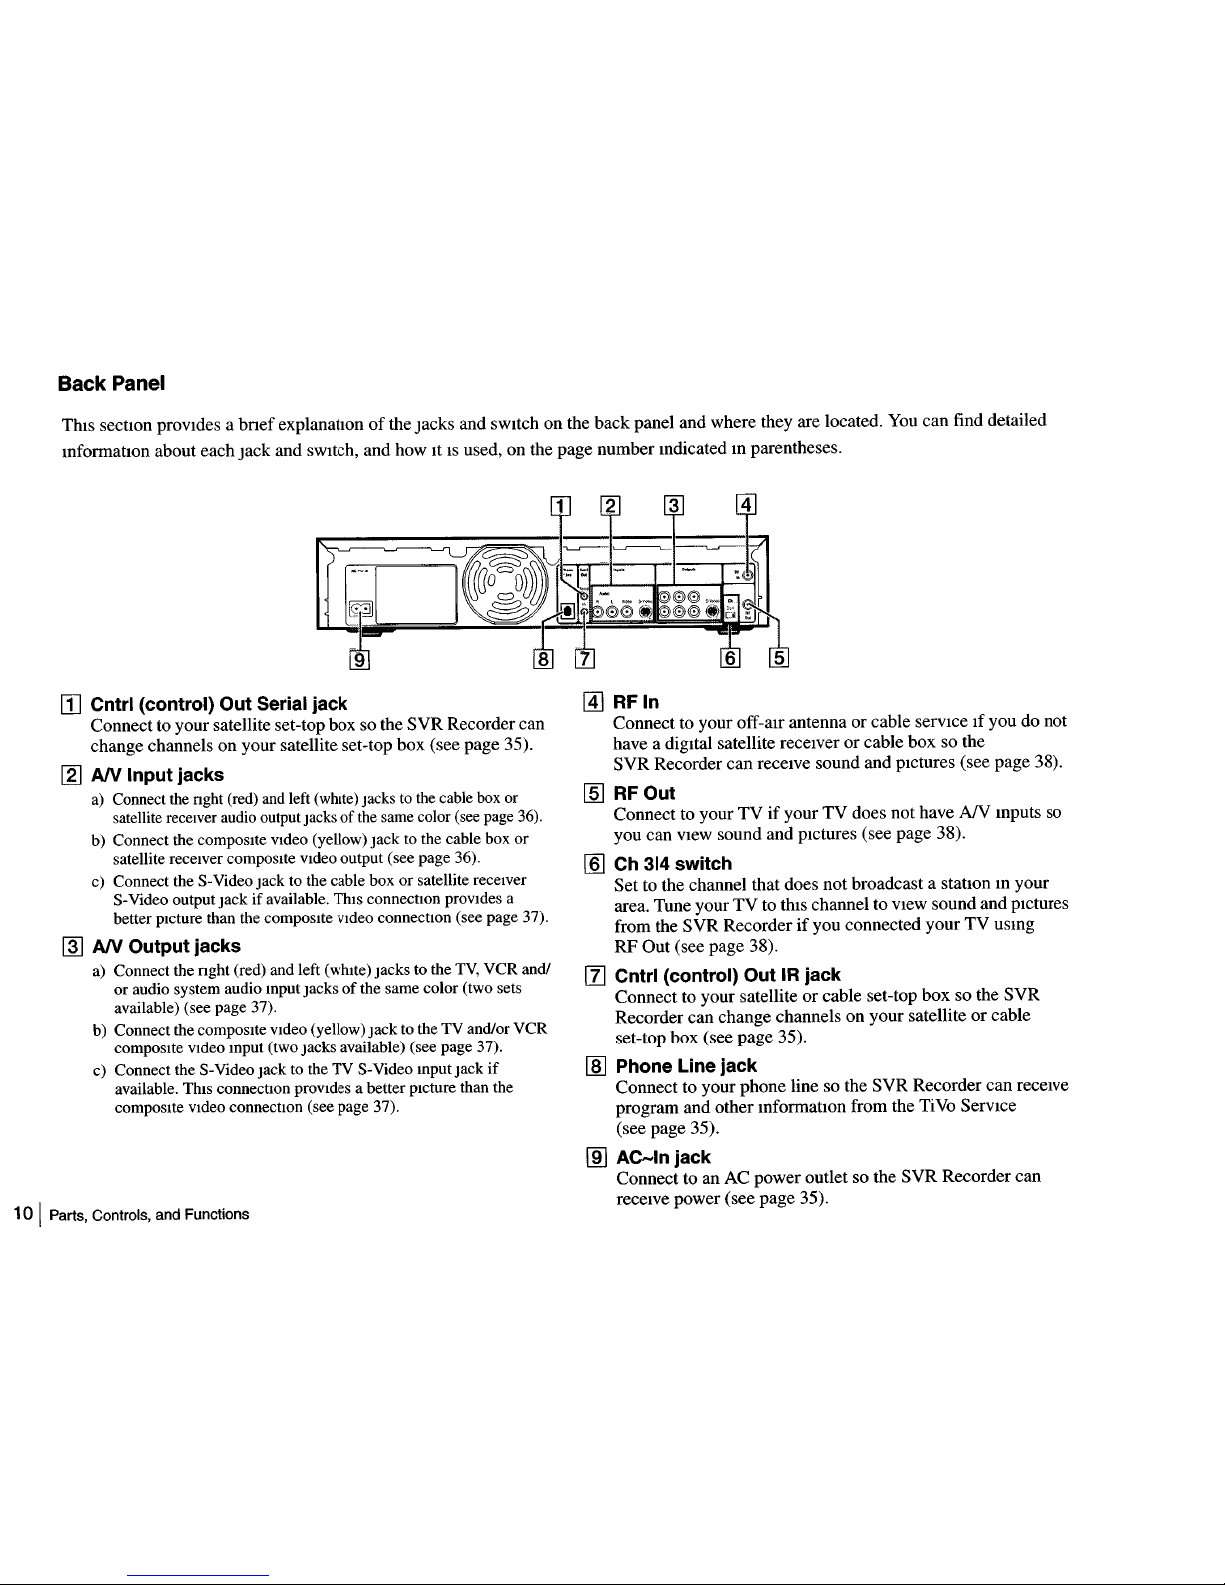
Back Panel
ThIS
sectIon proVIdes a
bnef
explanatIonofthe Jacks and
sWItch
on the back panel and where they are located.
You
can find detailed
mfonnatlon about each Jack and sWItch, and how
ItISused, on the page number mdicated m parentheses.
[I] Cntrl (control) Out Serial jack
Connect to your satellite set-top box so the SVR Recorder can
change channels on your satellite set-top box (see page 35).
[g]
AN
Input jacks
a)
Connect the nght (red) and left (whIte) jackstothe cable box or
satellite receIver audio output jacks
of
the same color (see page 36).
b) Connect the compOSIte
VIdeo
(yellow)
jack
to the cable box
or
satellite receIver compoSIte
VIdeo
output (see page 36).
c) Connect the S-Video
jack
to the cable boxorsatellite receIver
S-Video output
jackifavailable. ThIS connection provIdes a
better pIcture than the composIte
VIdeo
connectIon (see page 37).
@]
AN
Output jacks
a) Connect the
nght
(red) and left (whIte) jacks to the
TV,
VCR
and/
or
audio system audio Input jacksofthe same color (two sets
available) (see page 37).
b) Connect the compOSIte
VIdeo
(yellow)
jack
to the TV and/or VCR
compOSIte
VIdeo
mput (two jacks available) (see page 37).
c) Connect the S-Video
jack
to the TV S-Video mput
jack
if
available.
ThIS
connection provIdes a better pIcture than the
compOSIte
VIdeo
connectIon (see page 37).
10
I Parts, Controls, and Functions
@]
RF In
Connect to your off-aIr antenna or cable serVIce If you do not
have a digItal satellite receIver or cable box so the
SVR Recorder can receIve sound and pIctures (see page 38).
[ID
RF Out
Connect to your TVifyour TV does not have
AN
mputs so
you can
VIew
sound and pIctures (see page 38).
[ID
Ch
314
switch
Set to the channel that does not broadcast a statIon m your
area. Tune your
TVtothIS
channel to
VIew
sound and pIctures
from the SVR Recorder
if
you connected yourTVusmg
RF
Out (see page 38).
II] Cntrl (control) Out IR jack
Connect to your satellite or cable set-top box so the SVR
Recorder can change channels on your satellite
or
cable
set-top box (see page 35).
[ID
Phone Line jack
Connect to your phone line so the SVR Recorder can receIve
program and other mfonnatlOn from the TiVo SerVIce
(see page 35).
[ID
AC-In
jack
Connect to an AC power outlet so the SVR Recorder can
receIve power (see page 35).
Q
~
~
CQ
UJ
S'
i
Co
-
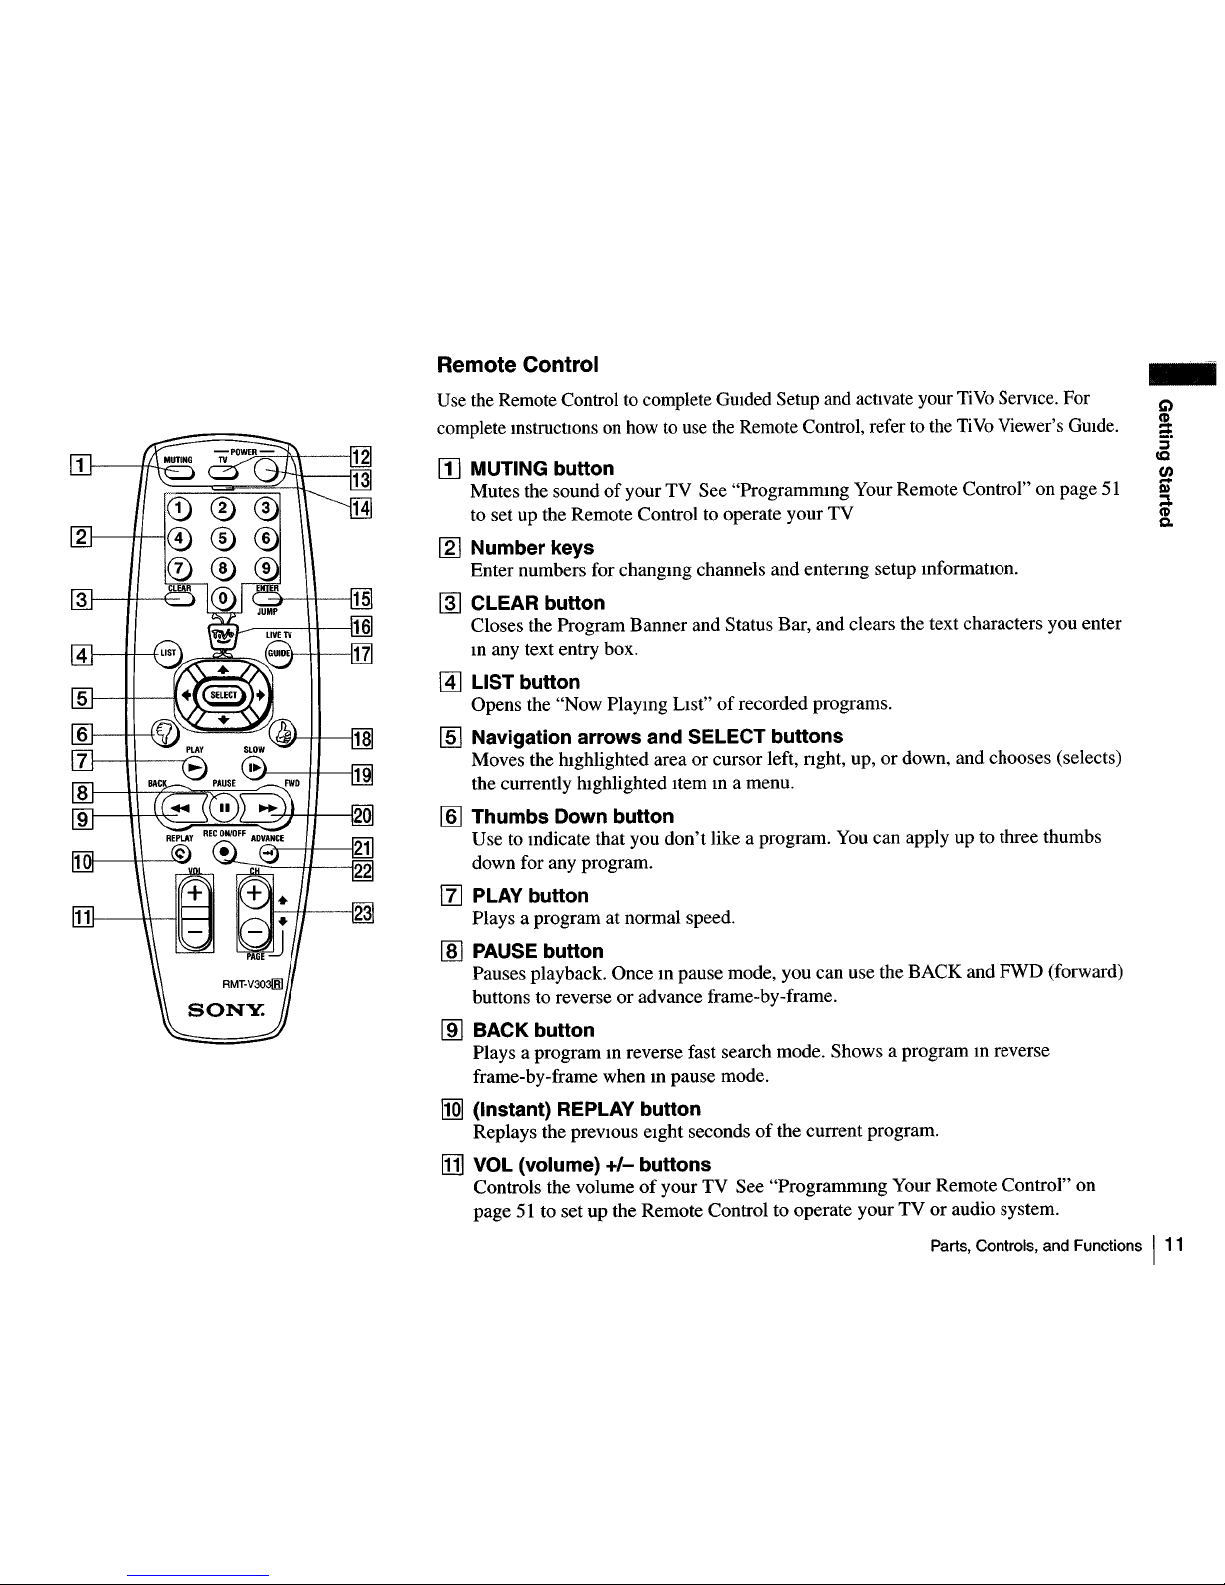
Use the Remote Control to complete
GUided
Setup and activate your
TiVo
ServIce. For
complete InstructIOns
on
howtouse the Remote Control, refer to the
TiVo
Viewer's
GUide.
Remote Control
I1J
MUTING button
Mutes the soundofyourTVSee "Programmmg Your Remote Control" on page
51
to set up the Remote Control to operate your
TV
[g] Number keys
Enter numbers for changmg channels and entenng setup mformatlon.
@]
CLEAR button
Closes the Program Banner and Status Bar, and clears the text characters you enter
m any text entry box.
~
LIST button
Opens the "Now Playmg LIst"ofrecorded programs.
[§]
Navigation arrows and SELECT buttons
Moves the hIghlighted area or cursor left, nght, up,ordown, and chooses (selects)
the currently hIghlighted Item m a menu.
[§]
Thumbs Down button
Use to mdicate that you
don't
like a program. You can apply up to three thumbs
down for any program.
l1J
PLAY button
Plays a program at normal speed.
[ID
PAUSE button
Pauses playback. Once m pause mode, you can use the BACK and
FWD
(forward)
buttons to reverse
or
advance frame-by-frame.
[ID
BACK button
Plays a program m reverse fast search mode. Shows a program m reverse
frame-by-frame when m pause mode.
MI
(Instant) REPLAY button
Replays the
prevIOUS
eIght secondsofthe current program.
[j]
VOL (volume)
+/-
buttons
Controls the volumeofyour TV See "Programmmg Your Remote Control" on
page
51
to set up the Remote Control to operate yourTVor audio system.
Parts, Controls, and Functions
111
RMT-V303lBl
SONY
121
Parts, Controls, and Functions
1121
TV
POWER button
Turns your TV or audio system on and off. See "Programmmg Your Remote
Control" on page51to set up the Remote Control to operate your TV
~
(Stand-by) POWER button
Puts your SVR Recorder mto and out
of
stand-by mode. When m stand-by mode,
the umt can record selected and suggested programs and connect to the TiVo
ServIce as needed.
!Hl
Remote Active LED
Hashes while the Remote Control
IS
transmIttmg sIgnals or bemg programmed.
[1§]
ENTER/JUMP button
Sets the currently entered number as the channel to watch, orJumps back to the
prevIously set channel.
~
TiVo button
Opens TiVo Central,
WhICh
provIdes access to features and optIOns.
I1II
LIVE TV/GUIDE button
SWItches between live TV and program
gUIde.
~
ThumbsUpbutton
Use to mdicate that you like a program. You can apply up to three thumbs up for
any program.
1m
SLOW button
Plays a program m slow speed.
I2QI
FWD (forward) button
Plays a program m fast search mode. Shows a program frame-by-frame when m
pause mode.
12]
ADVANCE button
Advances the vIewmg
of
a program eIther to the endofa recorded programorto
the current tIme m LIVE TV
~
REC (record) ON/OFF button
Starts or stops recording
of
the current program.
~
CH (channel)
+/-
or
PAGE
buttons
Changes the SVR Recorder's program channel shown on your
TV
Also pages up
and down m channel and program listmg gUides.
Notes
• When
the
batteries
become
weak,
the
Remote
Active
LED flashes.Ifthe
Remote
Control
does
not
work
properly,
the
batteries
may
be weak.
• When replaCing batteries, replace
both
batteries
with
new
ones. Do
not
mix
different
typesofbatteries together.
• When
you
remove
the
batteries,
any
manufacturer
codes
you've
programmed
may be erased. To
program
the
Remote
Control
again, see
"Programming
Your
Remote
Control"onpage 51.
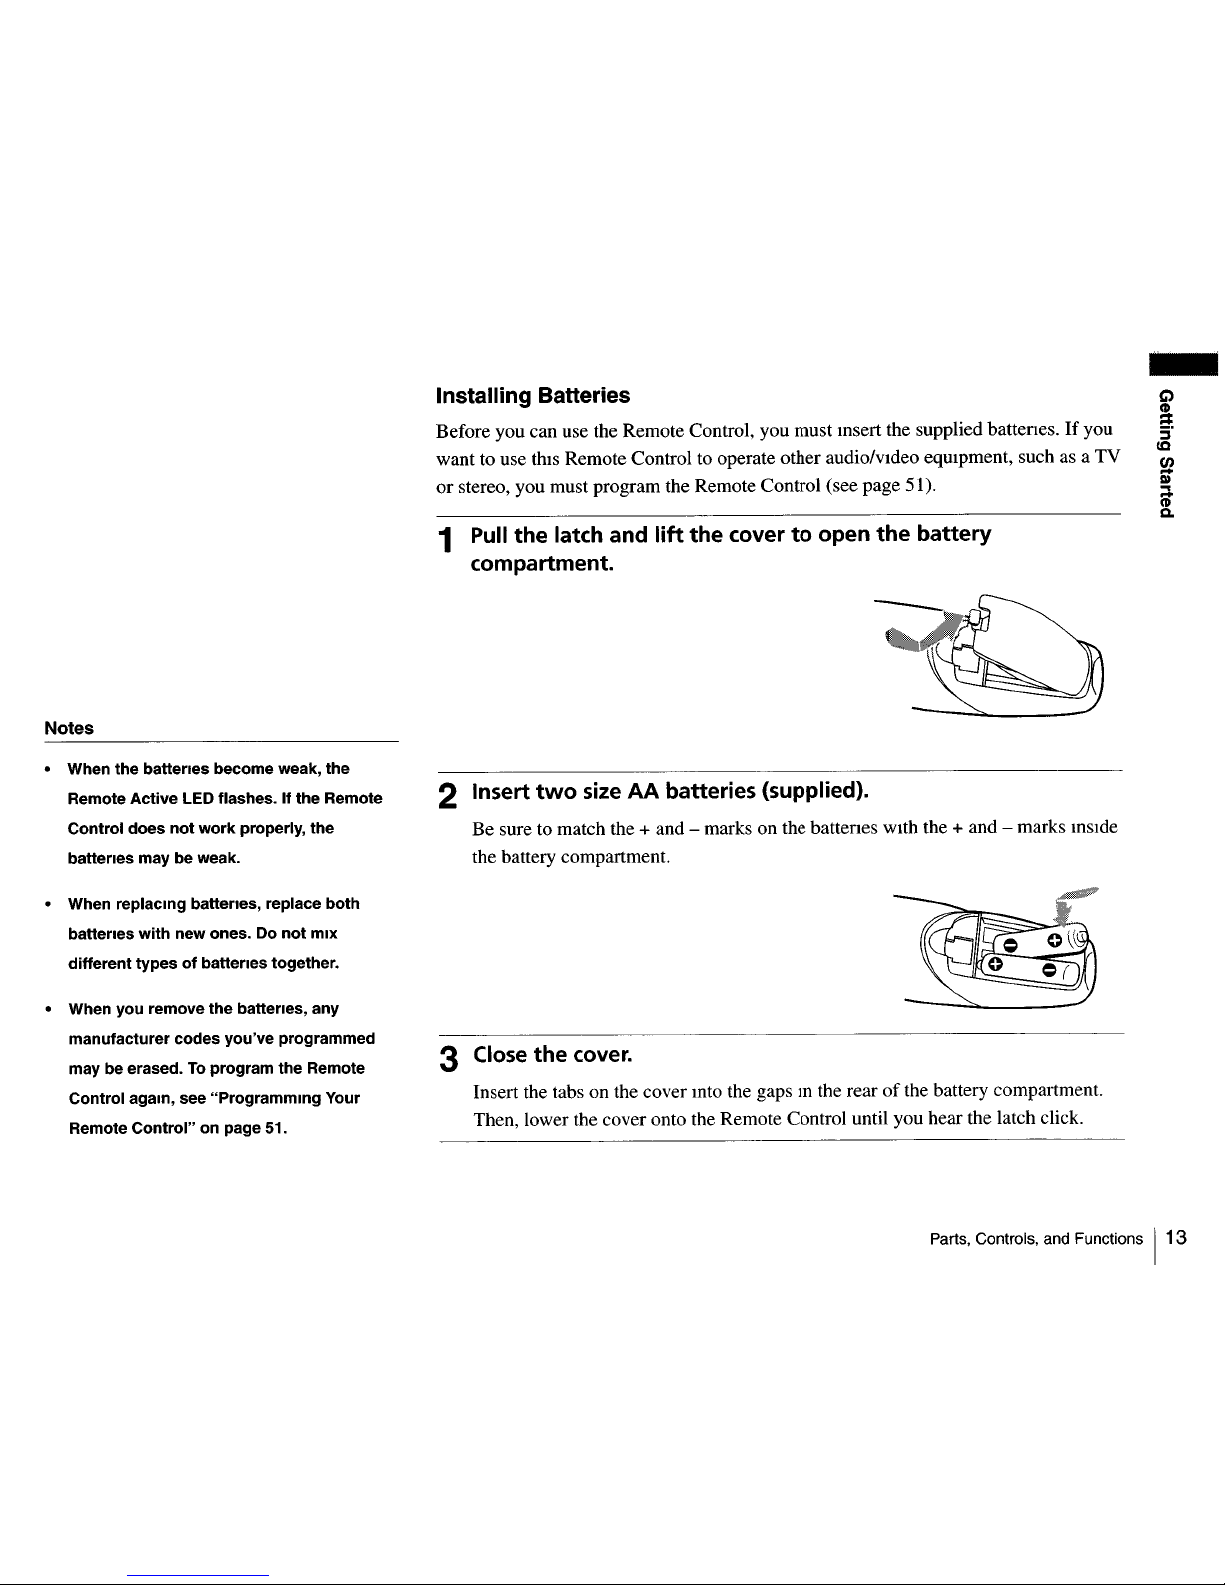
Installing Batteries
Before you can use the Remote Control, you must Insert the supplied battenes.Ifyou
want to use thIs Remote Control to operate other audio/vIdeo eqUIpment, such as a
TV
or
stereo, you must program the Remote Control (see page 51).
1
Pull
the
latch and lift
the
covertoopen
the
battery
compartment.
2 Insert
two
size
AA
batteries (supplied).
Be sure to match the + and - marks on the batterIes
WIth
the + and - marks inSIde
the battery compartment.
3 Close
the
cover.
Insert the tabs on the cover Into the gapsInthe rearofthe battery compartment.
Then, lower the cover onto the Remote Control until you hear the latch click.
-
C)
~
j
cc
!a
S»
~
Q.
Parts, Controls, and Functions
113

Connecting Your Equipment
Note
Your SVR RecorderISnot
designed
for
carrying
heavy
loads
such
as a
TV.
Structurally,
the
SVR RecorderISonly
capableofsupporting
the
weightofone
or
two
common
consumer
components
such
as VCRs,
DVD
playersorAN
Receivers
(provided
they
have
four
good,
broad,
padded feet
for
distributionofthe
weight
near
the
cornersofthe
SVR Recorder).
The SVR RecorderISwell-deSigned
for
stacking
since
ventilation
entersatthe
front
bottom
edgeofthe
SVR Recorder
and
exits
at
mid-rear.
This
helps
the
SVR Recorder
"breathe
In"
cool
air
and
"exhaust
out"
the
warm
airatthe
rear where
it's
least
likely
to
harm
the
other
componentsInyour
AN
stack.
Connection Examples
ThIS
sectIOn proVIdes examples showmg how to connect the
SVR
Recorder to your
eXIstmg antenna, cable, satellite, or audiO-VIsual system. Choose the example closest to
your configuration and follow the steps m that sectIOn.
Example 1: Antenna
or
cable,
WIth
a VCR, and splittmg the SIgnal (see page 16)
Example
2:
Antenna or cable,
WIth
a VCR (see page 18)
Example 3: Antenna or cable, Without a VCR (see page
20)
Example
4:
Satellite set-top box
WIth
senal
connection, and a VCR, usmg S-Video
cables (see page
22)
Example 5: Satellite set-top box
WIthIRmput, and a VCR, usmg S-Video cables
(see page 24)
Example 6: Satellite or cable box
WIth
IR mput, and a VCR, usmgRFcables (see
page 26)
Example
7:
Satellite and antenna or cable,
WIth
a VCR (see page 28)
Example 8: Satellite and cable
WIth
boxes,
With
a VCR (see page 30)
If
you have trouble orifyour configuration Isn't covered by oneofthese examples, see
"Back Panel ConnectIOns Reference" on page 35.
If
you have a more advanced system (perhaps mcluding a stereo game system, laser
disc player, or
SWItch
box), see "General Hints" on page 39
-
mo
J:20
C ::t
-::t
"C(1)
3
(")
(1)~
::t ::t
"'cc
~
C
...
Connection Examples
115
Note
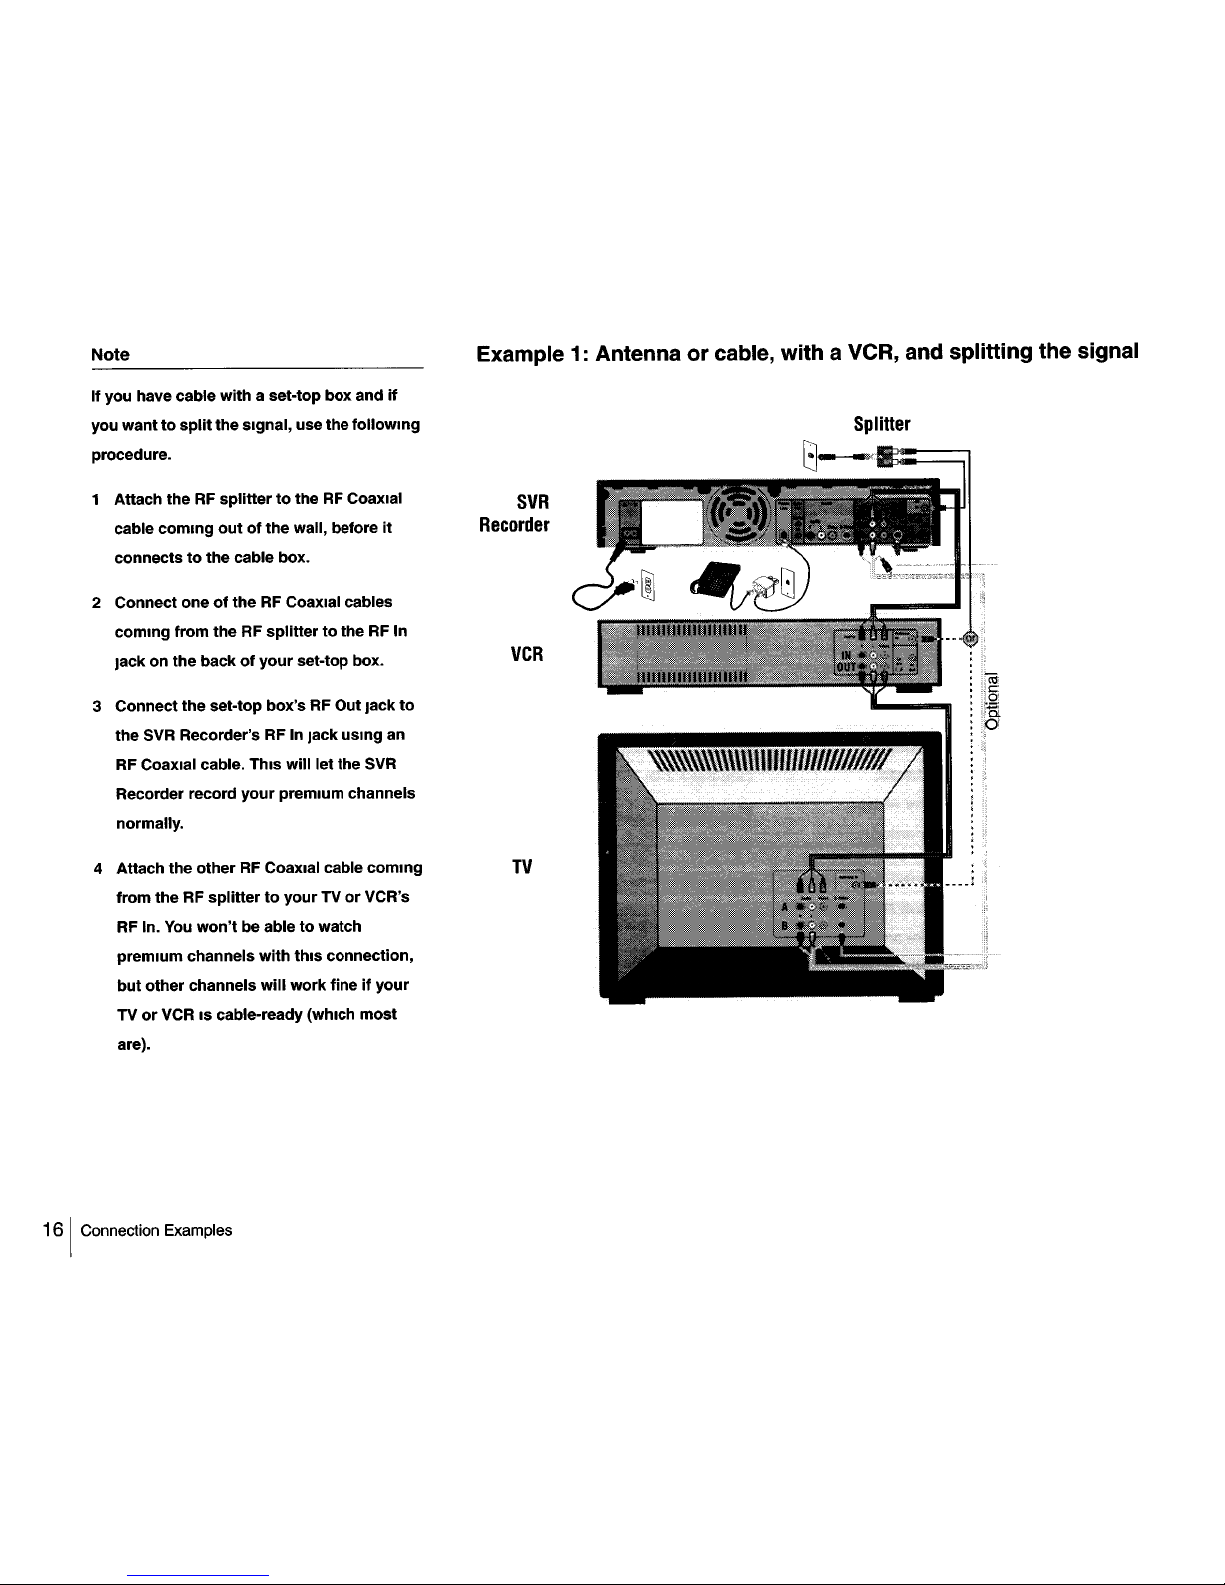
Example 1: Antennaorcable,
with
a VCR, and
splitting
the signal
:~
¥
m
::~
;::
:i
:i
c,
i~
:~
'j
TV
VCR
SVR
Recorder
4 AttachtheotherRFCoaxial cable coming
from the
RF
splittertoyourTVor
VCR's
RF
In.
You
won't
be able
to
watch
premium channels with
this
connection,
but
other channels
will
workfineifyour
TVorVCRIScable-ready (Which
most
are).
3 Connectthe set-top box's
RF
Out
Jack
to
the
SVR
Recorder's RF In
Jack
uSing an
RF
Coaxial cable, This will let the
SVR
Recorder record
your
premium channels
normally.
2 Connect one
of
theRFCoaxial cables
coming from the RF splitter
to
theRFIn
Jack
on the backofyour
set-top box.
If
you have cable with a set-top box and
If
you wanttosplit
the signal, use the following
procedure.
1 Attach the
RF
splittertotheRFCoaxial
cable coming
outofthe wall, before
it
connectstothe cable box.
161
Connection Examples
Use
thIS
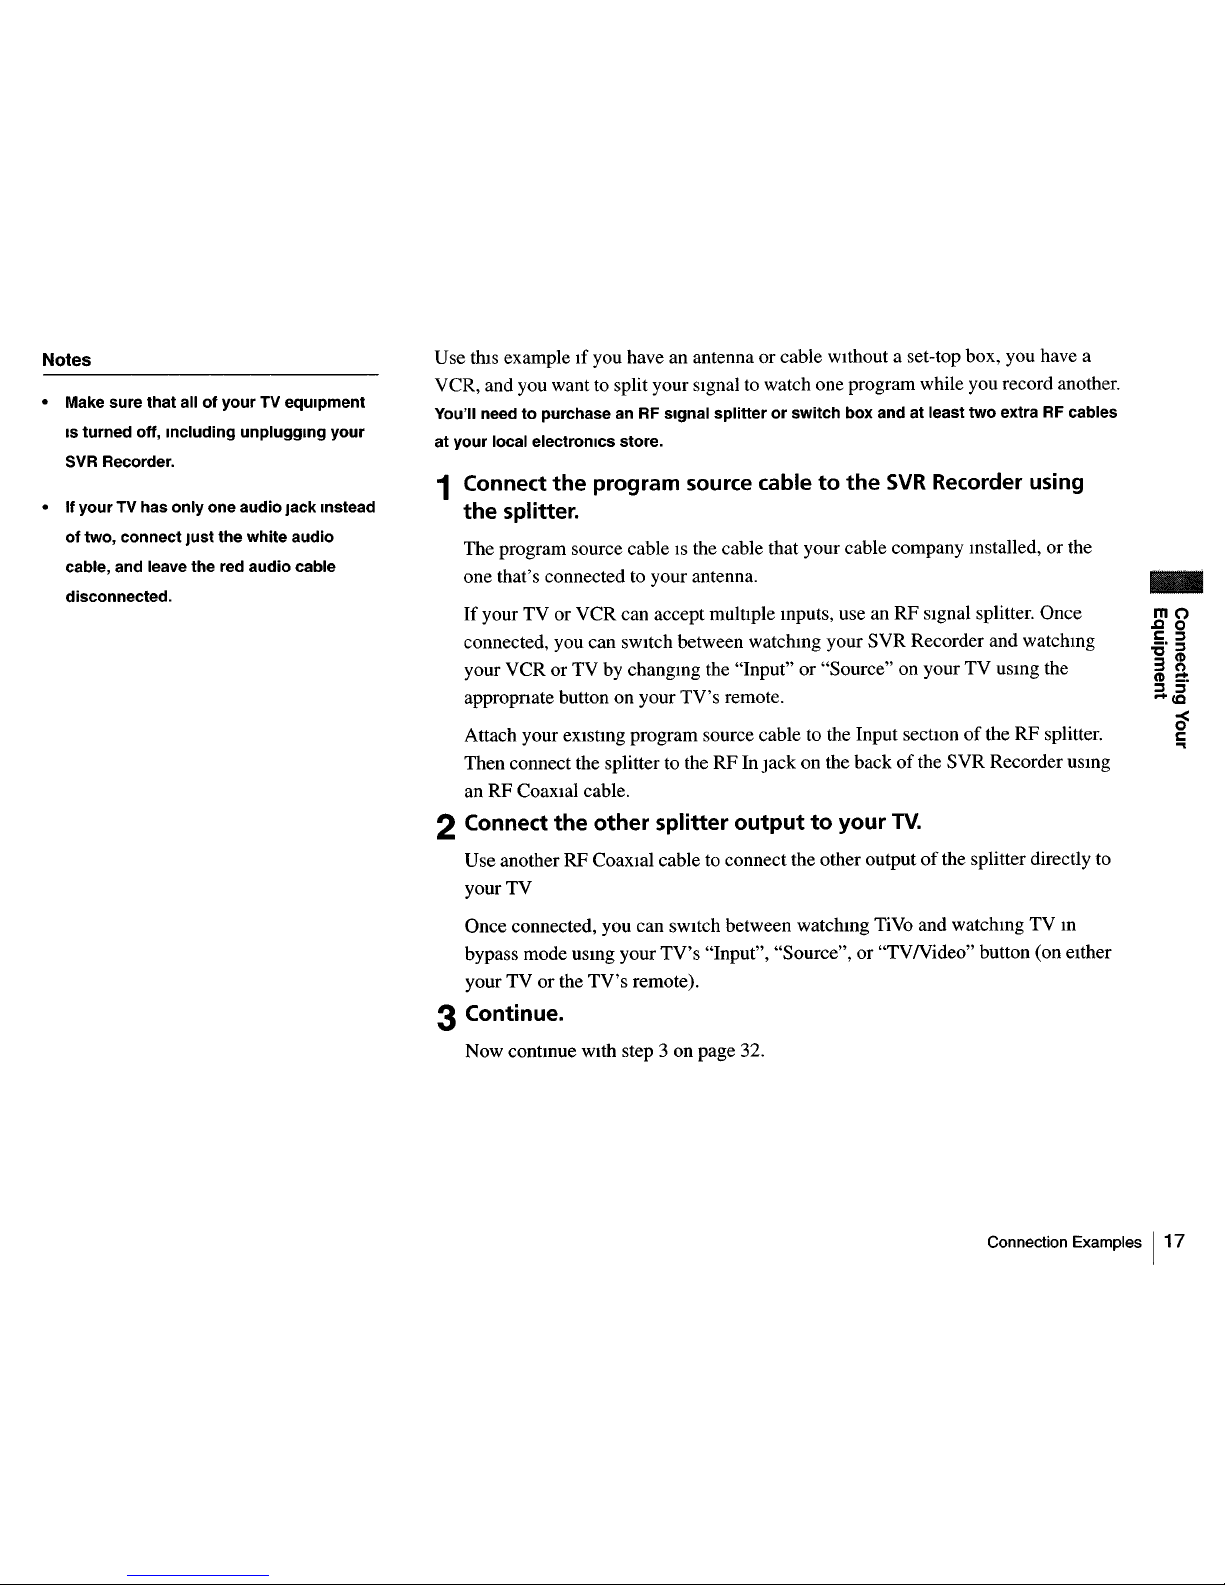
example If you have an antenna or cable wIthout a set-top box, you have a
VCR, and you want to split your sIgnal to watch one program while you record another.
You'll needtopurchase
an RF
signal
splitterorswitch
box
andatleast
two
extra
RF cables
at
your
local electrOnics
store.
Notes
• Make
sure
that
allofyourTVequipment
IS
turned
off,
mcluding
unpluggmg
your
SVR Recorder.
•IfyourTVhas
only
one
audio
Jack mstead
of
two,
connect
Just
the
white
audio
cable,
and
leave
the
red
audio
cable
disconnected.
1 Connect
the
program source cabletothe
SVR
Recorder using
the
splitter.
The program source cableISthe cable that your cable company Installed, or the
one that's connected to your antenna.
If
your TV or VCR can accept multIple Inputs, use an RF sIgnal splitter. Once
connected, you can
sWItch
between watchIng your SVR Recorder and watchIng
your VCR or
TV
by changIng the "Input" or "Source" on your TV
USIng
the
appropnate button on your TV's remote.
Attach your eXIstIng program source cable to the Input sectIon
of
the RF splitter.
Then connect the splitter to the RF In jack on the back
of
the SVR Recorder
USIng
an RF CoaxIal cable.
2 Connect
the
other
splitter
outputtoyour
TV.
Use another RF CoaxIal cable to connect the other outputofthe splitter directly to
your TV
Once connected, you can
sWItch
between watchmg TiVo and watchmg TV
In
bypass mode usmg your
TV's
"Input", "Source",or"TVNideo"
button (on eIther
your TV or the
TV's
remote).
3 Continue.
Now contmue
WIth
step 3 on page 32.
-
mo
.co
C j
_.
j
"(1)
3~
(I)
_.
j j
....cc
~
C
..
Connection Examples
117
Note
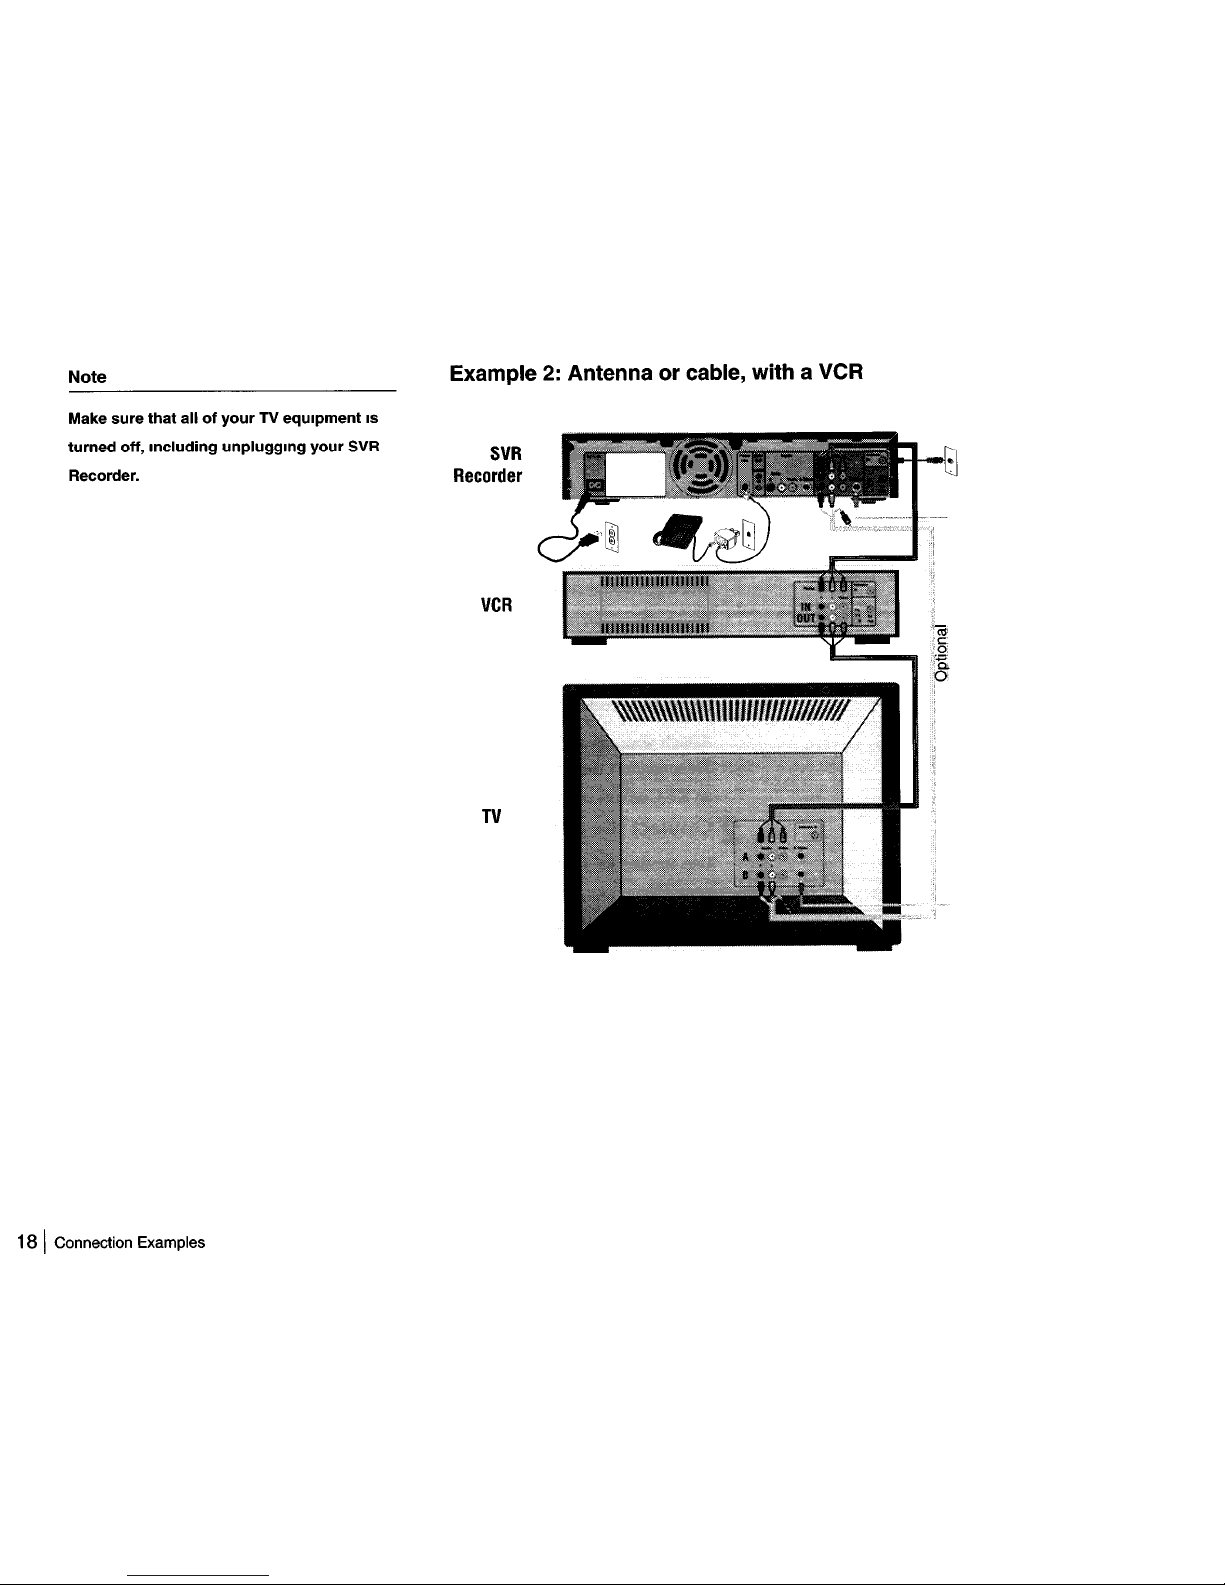
Example2:Antenna or cable, with a VCR
~j
)
:1
'it
·il
;j
'~l
-------'
,i
.
.~
\
..
J
i~
ie::
~~g
'le..
o
iii
ii~
VCR
TV
SVR
Recorder
Make sure that allofyour TV equipment
IS
turned off, Including unpluggmg your SVR
Recorder.
18 IConnection Examples
Use
thIS
example If you have an antenna or cable wIthout a cable box, and you have a
VCR, and you do not need to split your sIgnal m order to watch one program while you
record another.
1 Find your program source cable.
The program source cableISthe cable that your cable company mstalled, or the
one that's connected to your antenna.
ThIS
cableISprobably already hooked up to
your VCR or TV; If so, disconnect
It.
2 Connect your program source cable
to
theRFIn jack on
the
backofthe
SVR
Recorder.
3 Continue.
Now contmue wIth step 3 on page 32.
-
mo
.co
c
~
-~
"OCI)
3
()
CDQ:
~
:::J
-co
~
c
...
Connection Examples
119
Note
Make sure that allofyourTVequipment
IS
turned off, Including unplugging
your
SVR
Recorder.
20 IConnection Examples
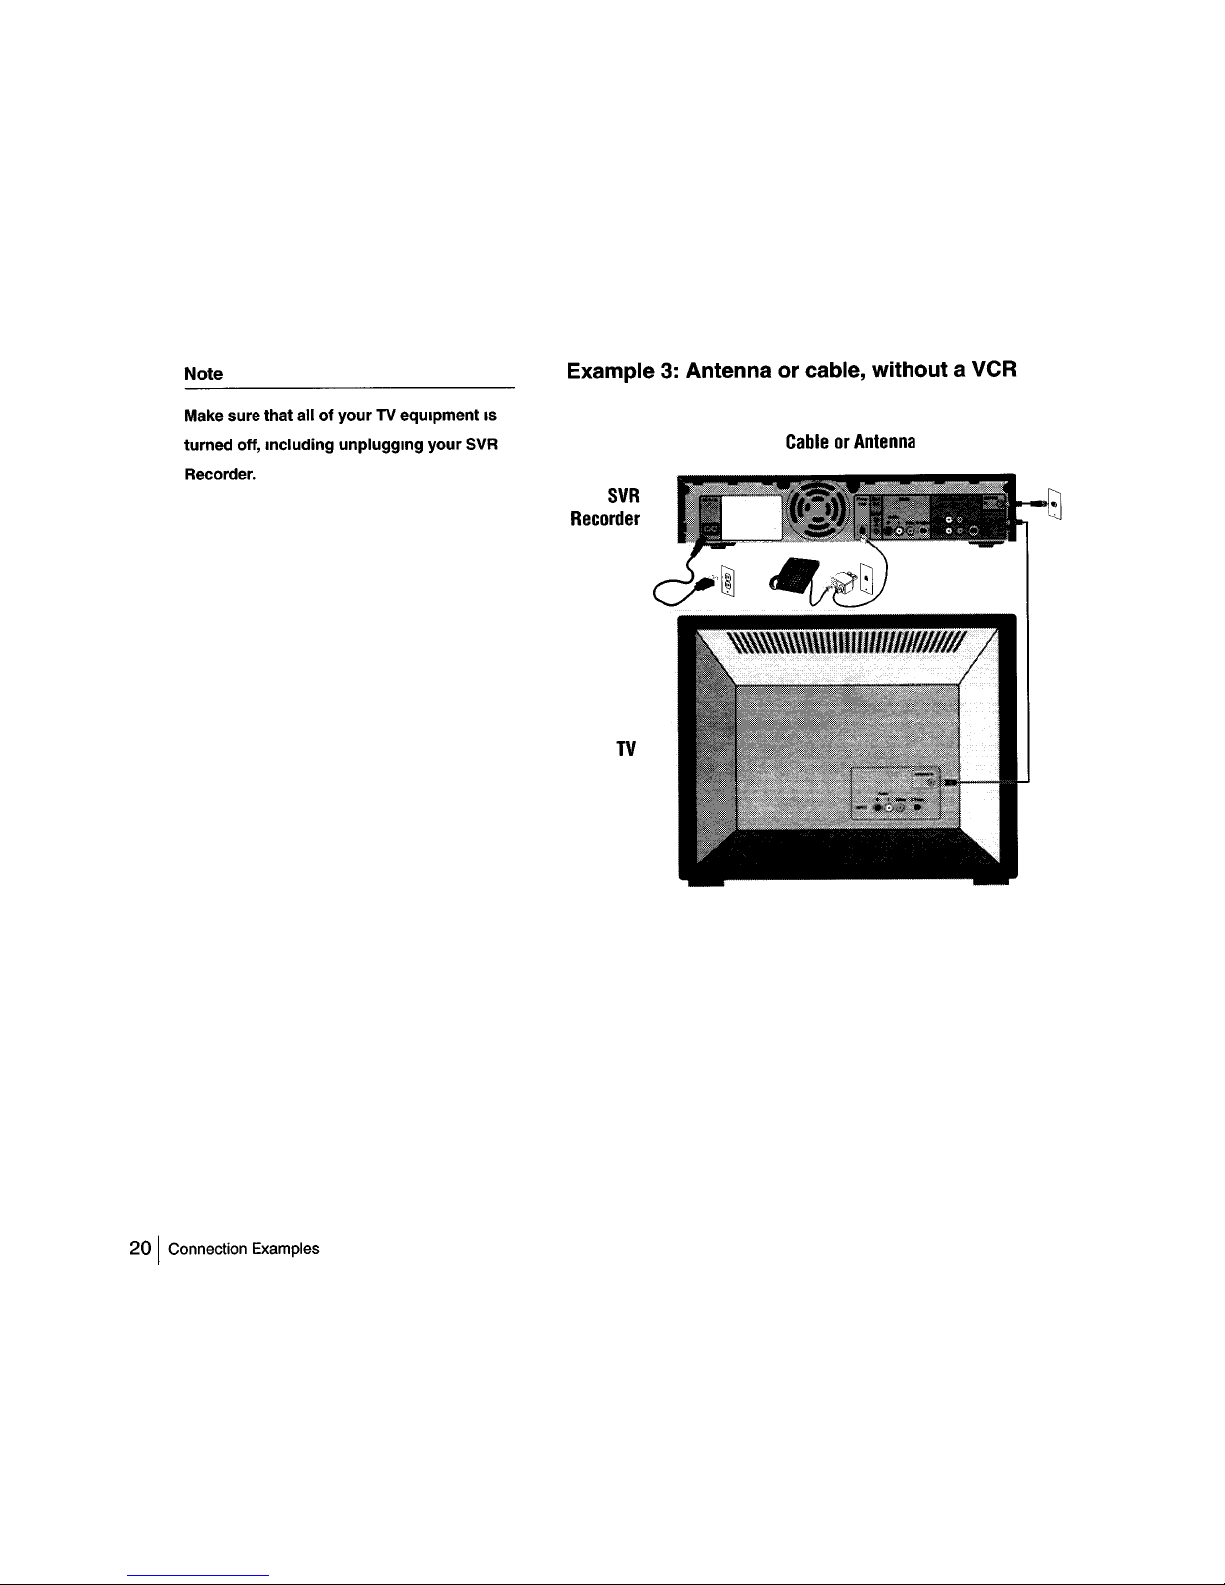
Example3:Antennaorcable,
withoutaVCR
CableorAntenna
SVR
Recorder
TV
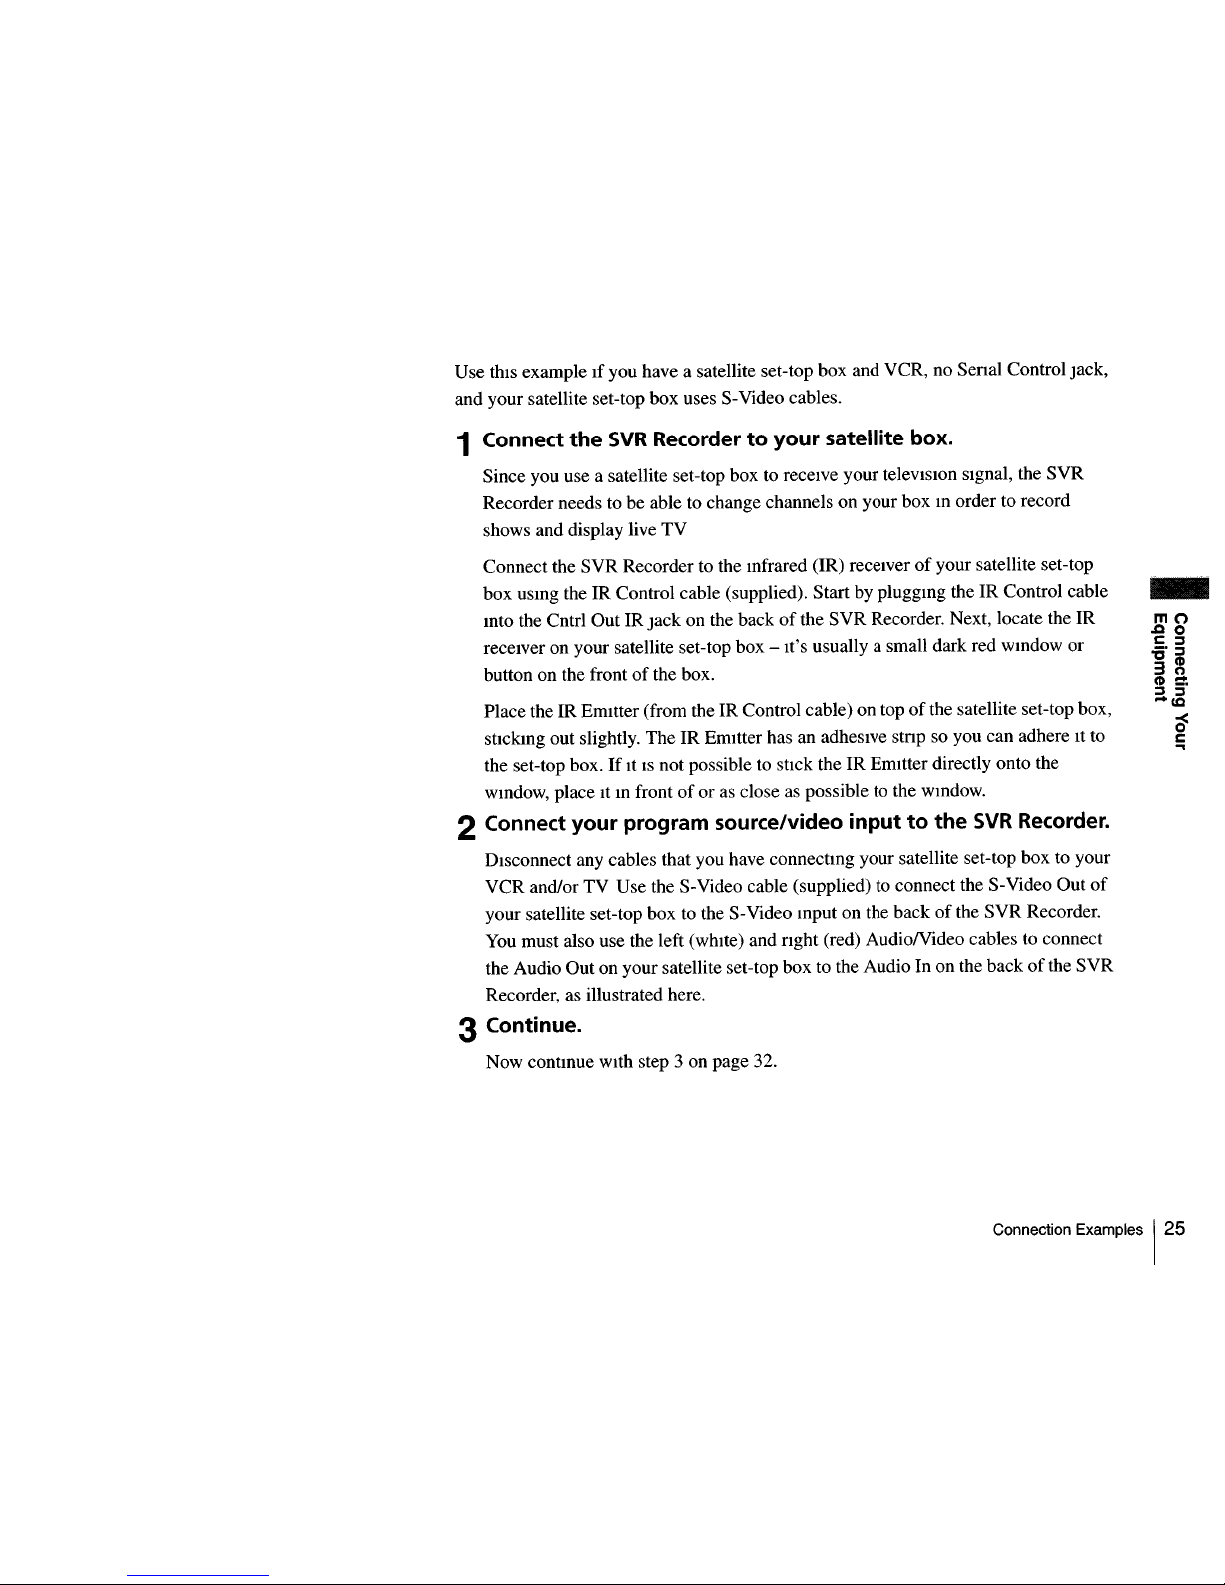
Use
thIS
exampleifyou have an antenna or cable wIthout a cable box,oryou do not
have a VCR.
1 Find your program source cable.
The program source cableISthe cable that your cable company Installed, or the
one that's connected to your antenna.
ThIS
cableISprobably already hooked up to
your VCR or TV; If so, disconnect It.
2 Connect your program source cable
to
theRFIn jackonthe
backofthe
SVR
Recorder.
3 Connect
the
SVR
Recordertoyour
TV.
If
your TV has a composIte vIdeo Input, connect an AudioNideo cable (supplied)
from the SVR Recorder Output to your
TV's
Input.Ifnot, connect theRFcoaxIal
cable (supplied) from the RF Out Jack on the backofthe SVR Recorder to RF In
on the backofyour TV
4 Continue.
Now continue wIth step 4 on page 34.
-
mo
.00
C
~
-~
"CCD
3
CO)
CD:
:::J
~
-cc
~
c
~
Connection Examples
121
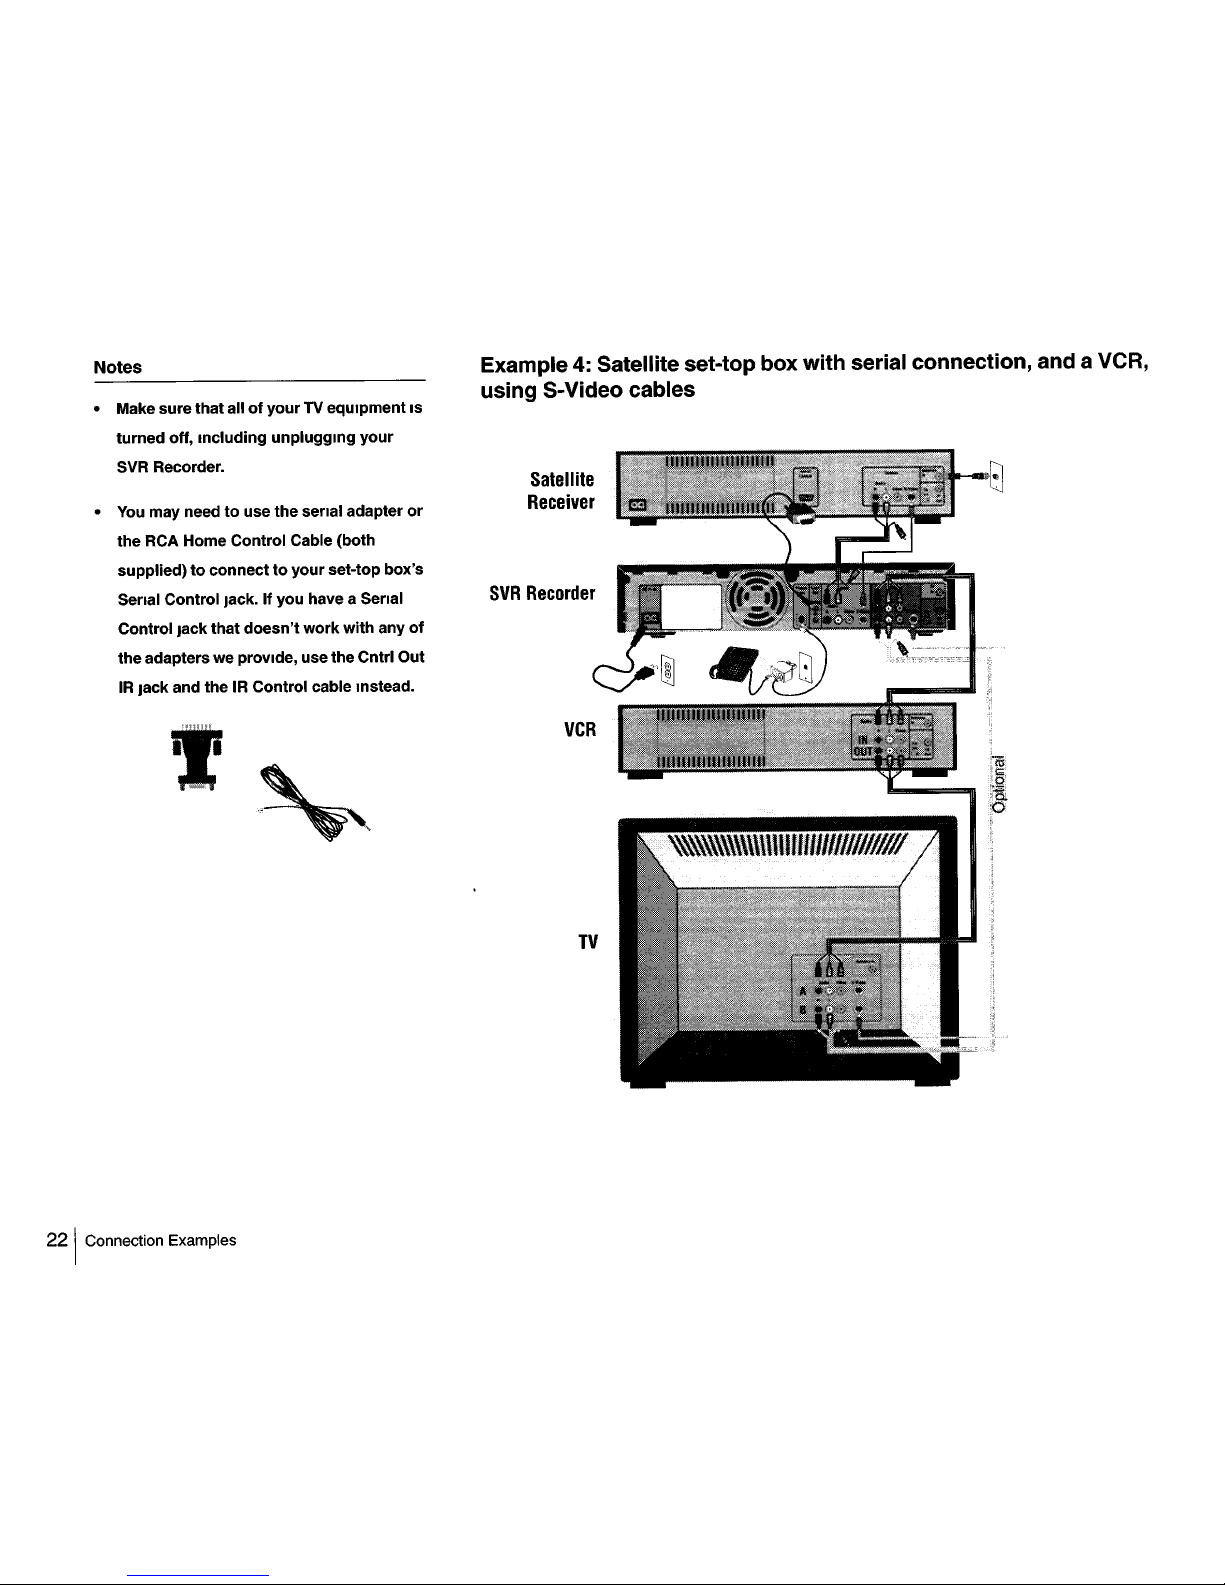
Example 4: Satellite set-top box with serial connection, and a VCR,
using S-Video cables
,8
..
''>"\\\\\\\\\\\\lUI'IIlIlfJlIll.' ,
TV
VCR
Satellite
Receiver
SVR
Recorder
Notes
• Make sure that allofyourTVequipment
IS
turned off, Including unpluggmg
your
SVR
Recorder.
•
You
may needtousethe serial adapter
or
the RCA Home Control Cable (both
supplied)
to
connecttoyourset-top box's
Serial Control
Jack.
Ifyou have a Serial
Control
Jack
that doesn't
work
with any
of
theadapterswe provide, usetheCntrl Out
IR
Jack
and theIRControl cable Instead.
221
Connection Examples

Note
A serial
connection
works
better
than
IR,
so
use senal
when
possible.
Use thIs example If you have a satellite set-top box wIth a senal connectIOn, and your
satellite set-top box uses S-vIdeo cables.
1 Connect
the
SVR
Recordertoyour
satellite
set-top
box.
Connect one endofthe Senal Control cable (supplied) to the Cntrl Out
Senal
In
Jack on the back
of
the SVR Recorder.
Your satellite set-top box may have twoJacks that look like SerIal ControlJacks. If
so, use the one labeled "low speed data." You may need to use the 9 to
25
pm
senal adapter (supplied) to match yourJacks, or the RCA Home Control cable (for
some RCA boxes).
2 Connect
your
program
source/video
inputtothe
SVR
Recorder.
DIsconnect any cables that you have connectmg your satellite set-top box to your
VCR and/or
TV
Use the S-Video cable (supplied) to connect the S-Video Out
of
your satellite set-top box to the S-Video mput on the backofthe SVR Recorder.
You
must also use the left (whIte) and
nght
(red) AudioNideo cables to connect
the Audio Out on your satellite set-top box to Audio In on the back
of
the SVR
Recorder, as illustrated here.
3 Continue.
Now contmue
WIth
step 3 on page 32.
-
mo
.co
c
~
_.~
"C
CD
3
()
CD::!:
~ ~
-(Q
~
c
...
Connection Examples I23
Notes
• Make sure that allofyourTV equipment
IS
turned off, Including unpluggmg
your
SVR
Recorder.
•
You
may needtopurchase a second
S-Vldeo cable
if
one wasn't supplied with
your satellite set-top box
or
VCR.
• Since yourTVsource comes from a box
that can only display one channel at a
time, It's
not
possible for youtosplit
your signal and watch one channel on
your
TV while the
SVR
Recorder records
a different channel.
241
Connection Examples
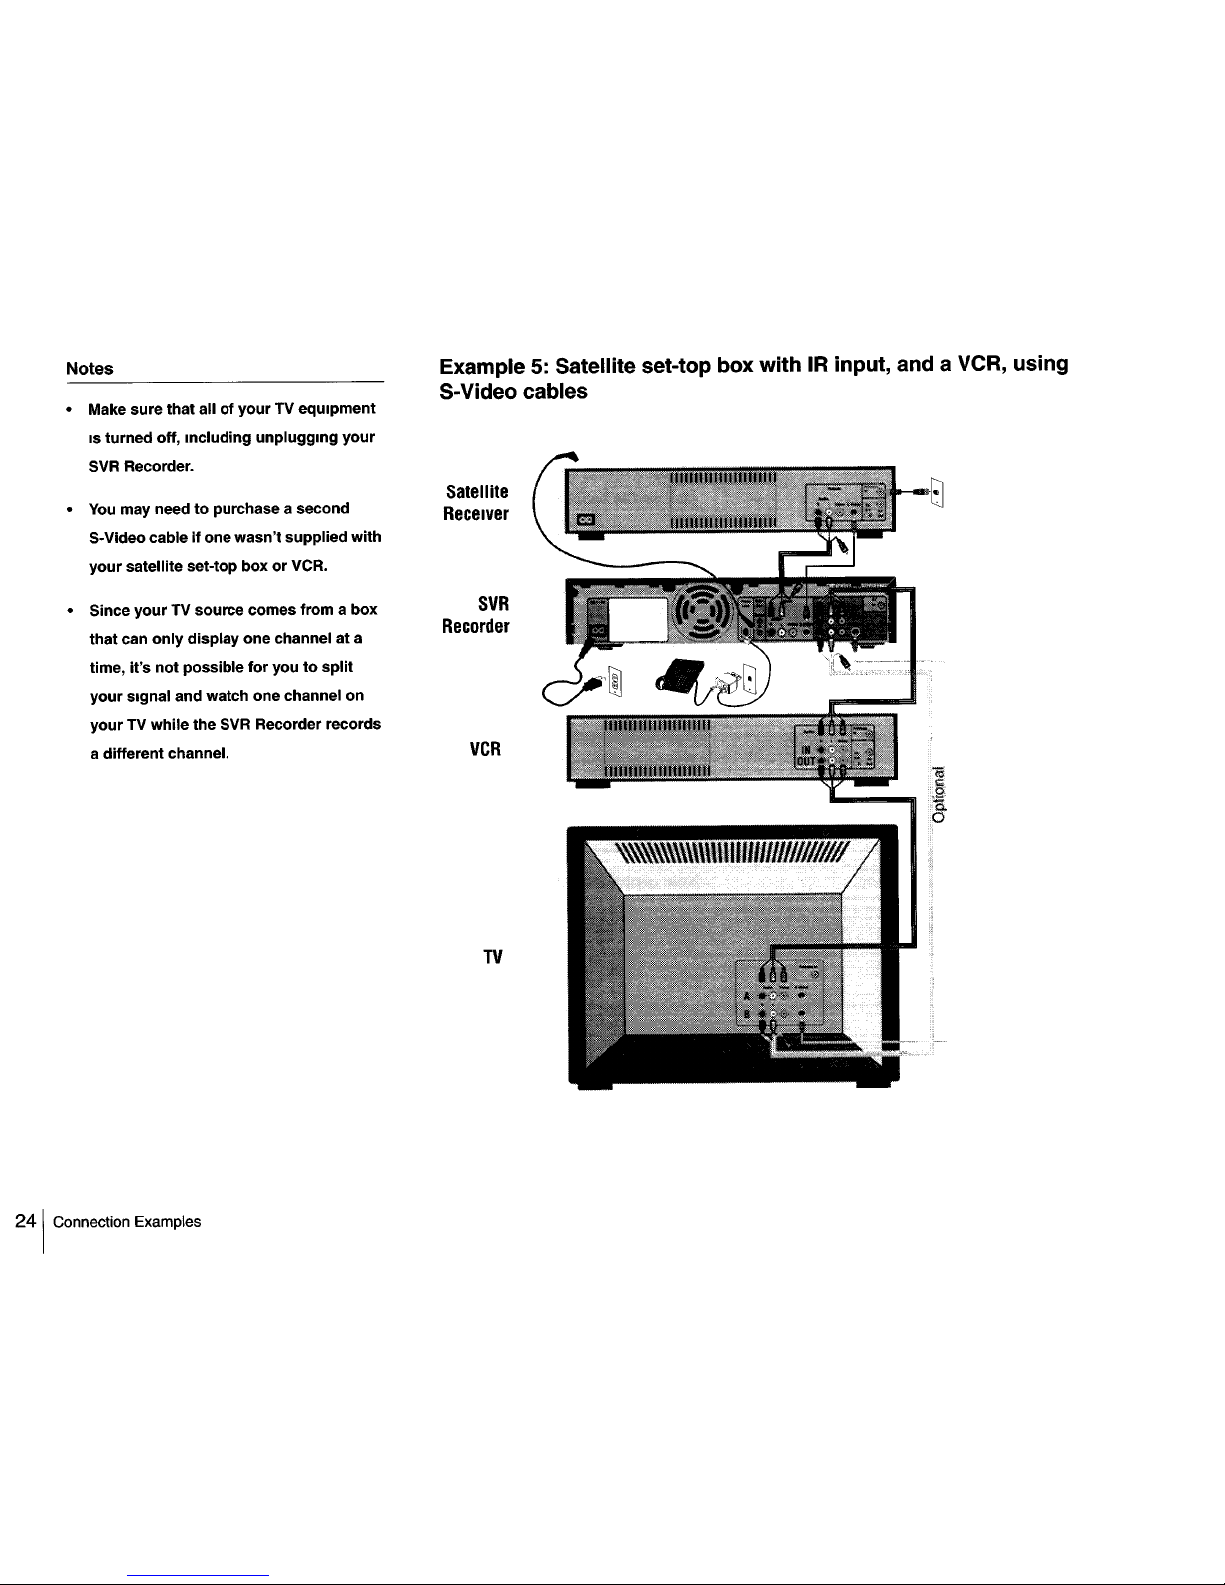
Example 5: Satellite set-top box
withIRinput, and a VCR, using
S-Video cables
Satellite
Receiver
SVR
Recorder
VCR
TV
Use
thIS
example If you have a satellite set-top box and VCR, no Senal Control Jack,
and your satellite set-top box uses S- Video cables.
1 Connect
the
SVR
Recordertoyour
satellite box.
Since you use a satellite set-top box to receIve your televlSlon sIgnal, the SVR
Recorder needs to be able to change channels on your box m order to record
shows and display live
TV
Connect the SVR Recorder to the mfrared (IR) receIverofyour satellite set-top
box usmg the IR Control cable (supplied). Start by pluggmg the IR Control cable
mto the Cntrl Out IR Jack on the back
of
the
SVR
Recorder. Next, locate the IR
receIver on your satellite set-top box
-It'S
usually a small dark red wmdow or
button on the front
of
the box.
Place the IR EmItter (from the IR Control cable) on top
of
the satellite set-top box,
stIckmg out slightly. The IR EmItter has an adhesIve
stnp
so you can adhere It to
the set-top box.
If
ItISnot possible to stick the IR EmItter directly onto the
wmdow, place
It
m frontofor as close as possible to the wmdow.
2 Connect
your
program source/video
inputtothe
SVR
Recorder.
DIsconnect any cables that you have connectmg your satellite set-top box to your
VCR and/or TV Use the S-Video cable (supplied) to connect the S-Video Out
of
your satellite set-top box to the S-Video mput on the backofthe SVR Recorder.
You must also use the left (whIte) and
nght
(red) AudioNideo cables to connect
the Audio Out on your satellite set-top box to the Audio In on the back
of
the SVR
Recorder, as illustrated here.
3 Continue.
Now contmue wIth step 3 on page 32.
-
mo
.00
c::
:::s
-':::s
'OeD
3
(")
eD~
:::s
:::s
-co
~
c::
...
Connection Examples
125

Example 6: Satelliteorcable box withIRinput, and a VCR, using
RF
cables
.J
~
l'
~i:
a.
:<:>
\\~\\\\\\\\\UIIIJl"IIIIlHI//I//
TV
VCR
Cable
Box
SVR
Recorder
Notes
• Most satellite set-top boxes have S-Video
outorComposite
out
Jacks. Check the
back
of
your
satellite set-top box
carefully;
If
there are Jacks other than
RF
Out, follow the steps.1n Example 4 on
page
22.
• Make sure allofyour
TV equipment
IS
turned off, Including unplugging
your
SVR
Recorder.
•
If
you have a cable set-top box that you
are
only
uSing because your TV and VCR
are
not
cable-ready, and you
don't
watch
premium channels, then you
don't
need
your cable set-top box any more. The
SVR
RecorderIScable-ready. Follow
Example 2 on page 18.
261
Connection Examples
Use this exampleifyou have a cable or satellite set-top box, the satellite box has no
serial input jack, and the cable or satellite box has no Composite Video and L/R audio
outputjacks
1 Connect
the
SVR
Recordertoyour cable or satellite box.
Since you use a cable set-top box or satellite set-top box to receive your television
signal, the SVR Recorder needs to be able to change channels on your box in
order to record shows and display live TV
Connect the SVR Recorder to the infrared (lR) receiver
of
your box using the IR
Control cable (supplied) Start by plugging the IR Control cable into the Cntrl Out
IRjack
on the backofthe SVR Recorder Next, locate the IR receiver on your box
- it's a small dark red window or button on the box's front
Place the IR Emitter (from the IR Control cable) on top
of
your set-top box,
sticking out slightly The IR Emitter has an adhesive strip so you can adhere it to
the set-top box Position the IR Emitter in front
oforas
close as possible to the
window
2 Connect
your
program sourcetothe
SVR
Recorder.
Find the RF coaxial cable coming from the RF Out jackofyour satellite box or
cable set-top box This cable is probably already hooked up to your VCR or TV,
if
so, disconnect it Now connect this cable to the RF In jackonthe backofthe SVR
Recorder
3 Continue.
Now continue with step 3 on page 32
-
mo
,go
c
~
-
~
"'C~
3
(")
~~
~ ~
-co
~
c
.,
Connection Examples
127
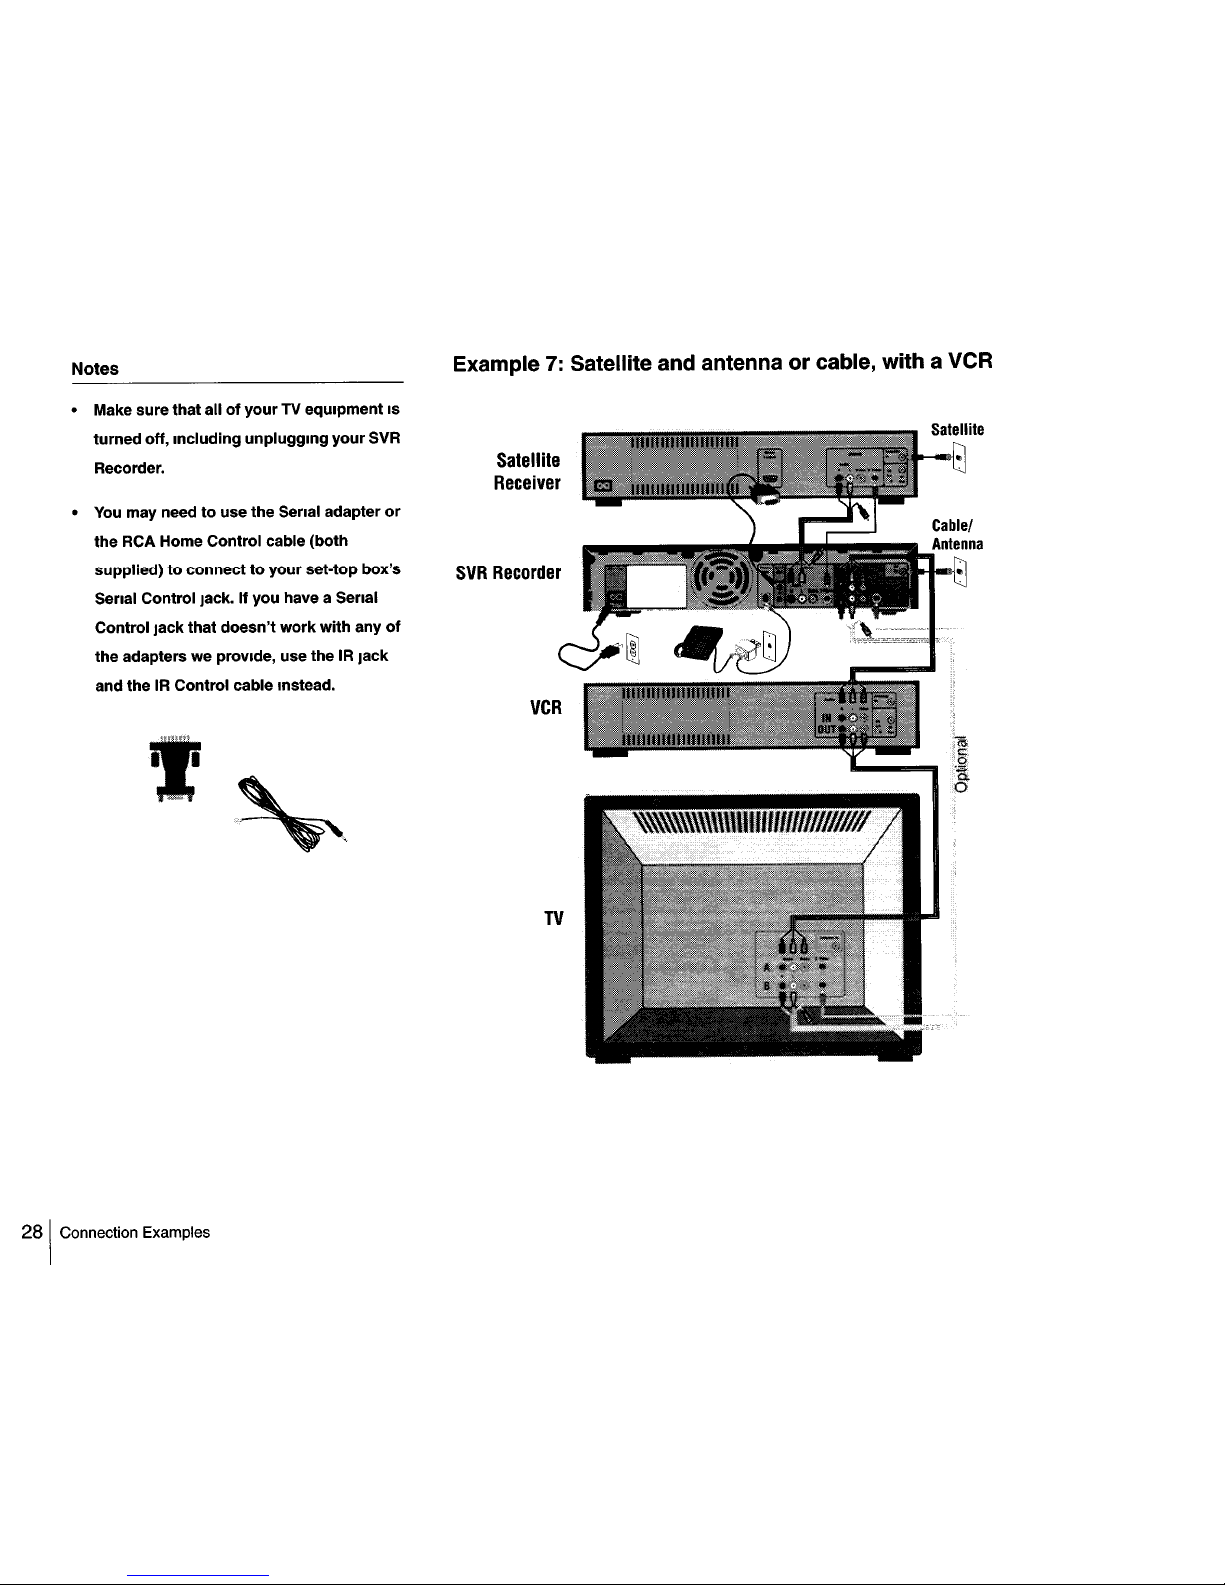
Notes Example 7: Satellite and antenna
or
cable, with a
VCR
,i
..
~
.,
::~
j~
~9i
-;Ql
P
TV
VCR
Satellite
Receiver
SVR
Recorder
I
.
,~
~~-
•
You
may needtouse the Serial adapter
or
the RCA Home Control cable (both
supplied)
to
connecttoyour set-top box's
Senal Control jack.
If
you have a Serial
Control jack that doesn't work with any
of
the adapters we provide, use theIRjack
and the
IR
Control cable Instead.
• Make sure that all
of
yourTVequipment
IS
turned off, including unplugging yourSVR
Recorder.
281
Connection Examples
Notes
Use
thIS
example If you have a satellite set-top box and eIther an antenna or cable
(WIth
no cable box), and a VCR.
• Since you use a satellite set-top
box
to
receive
your
televIsion signal,
the
SVR
Recorder needstobe abletochange
channelsonyour
boxInordertorecord
shows
and
display
live
TV.
• A senal
connection
works
betterthan
IR,souse senal If possible.
•
If
your
satellite set-top box has
two
Jacks
that
look
like Serial Control Jacks,
use
the
one
labeled
"low
speed data."
You may needtouse
the9to25pin
senal adapter (supplied)tomatch
your
box.
1 Connect
the
SVR
Recordertoyour
satellite box.
Serial Connection -
If
your satellite set-top box has a Senal In Jack, you can
connect the SVR Recorder to your box usmg the Senal Control cable (supplied).
OtherwIse, use the IR connectIon.
IR
Connection - Start by pluggmg the
IR
Control cable mto the
Cntd
Out IR
Jack on the backofthe SVR Recorder.
Next, locate theIRreceIver on your satellite set-top box
-It'S
usually a small dark
red wmdow or buttononthe frontofthe box. Place the IR EmItter (from the IR
Control cable) on topofthe satellite set-top box, stIckmg out slightly. The
IR
EmItter has an adheSIve stnp so you can adhereItto the set-top box.IfItISnot
possible to stIck the IR EmItter directly onto the wmdow, place theItm frontofor
as close as possible to the wmdow.
2 Connect
your
program source/video
inputtothe
SVR
Recorder.
a) Disconnect any satelliteorantenna/cable connectiOns to your VCR and/or
TV
Connect the satellite box to the mputofthe SVR Recorder usmg the S-Video
cable (preferred) and the left (white) and
nght
(red) AudioNideo cables.Ifyou
don't
have an S-Video output, use the Yellow Composite Video cable mstead.
b) Connect your coaxial antenna or cable to the RF In Jack on the backofthe
SVR Recorder.
3 Continue.
Now contmue wIth step 3 on page 32.
-
mo
,go
C
:::J
_.:::J
"CD
3
()
CD=:
:::J
:::J
~CQ
~
C
...
Connection Examples
129
Notes
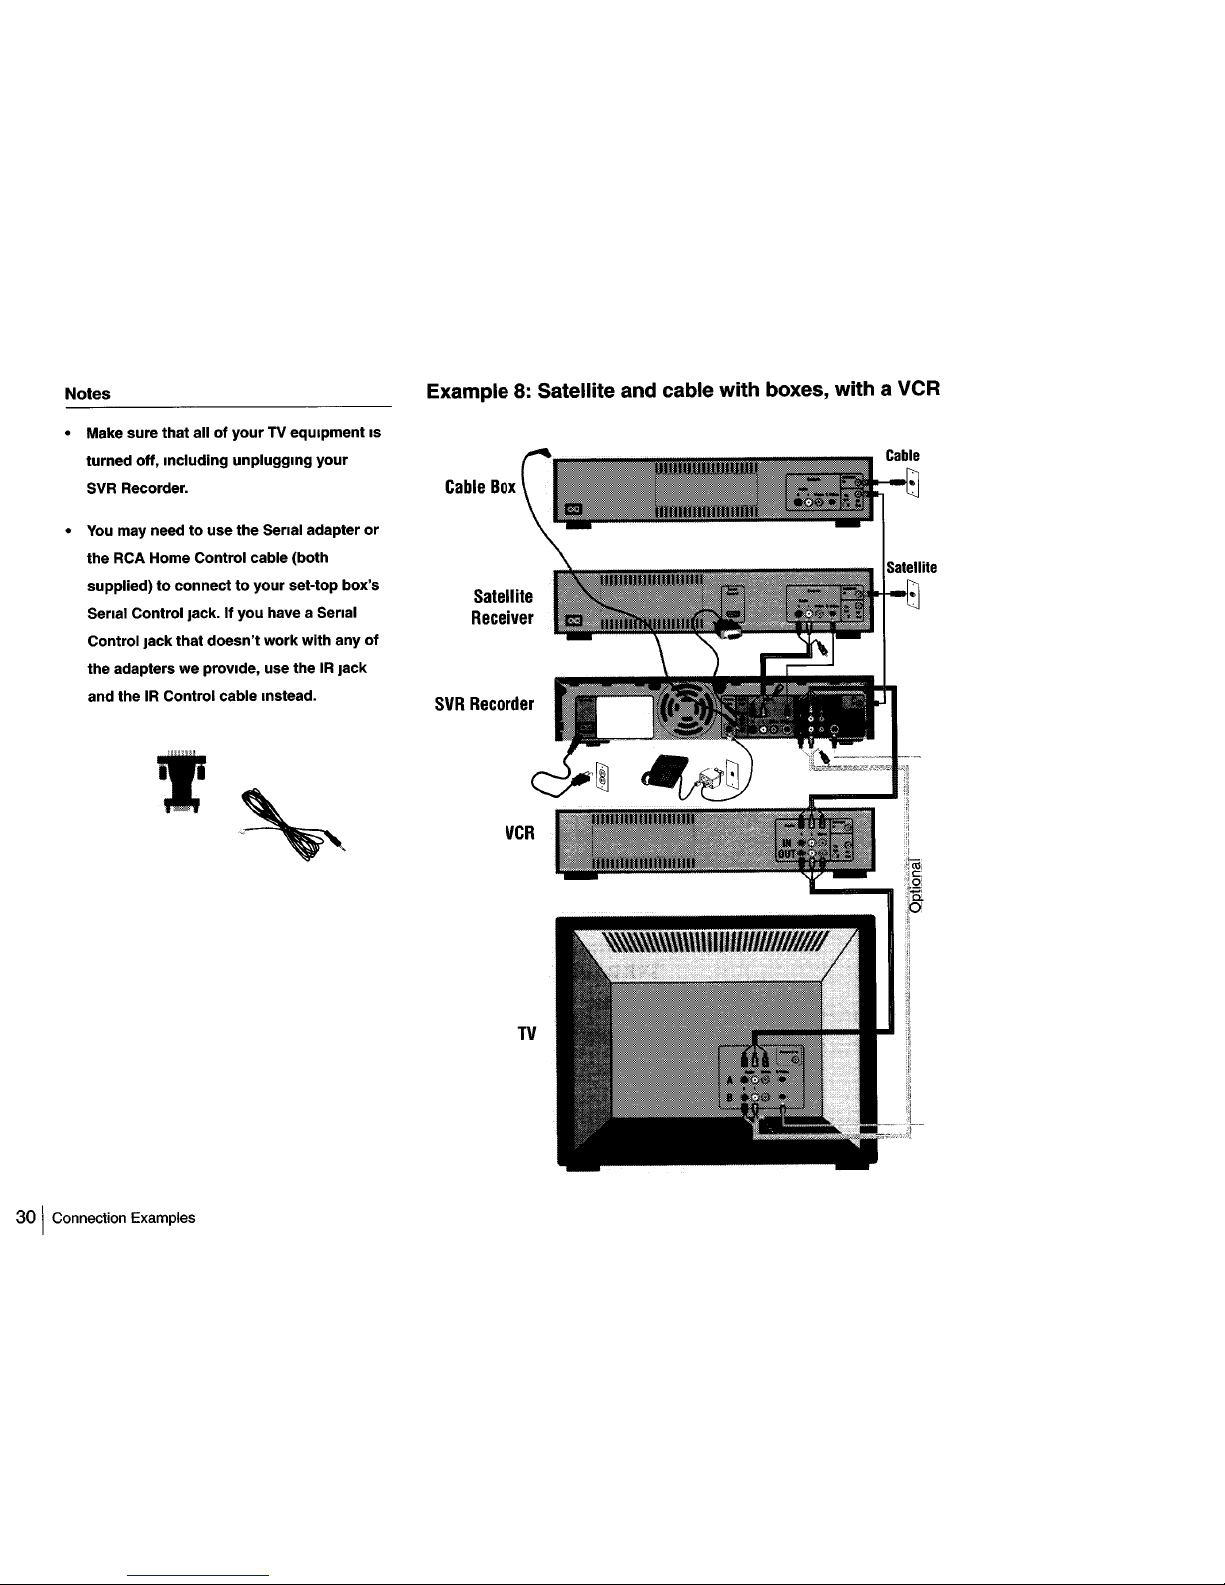
Example 8: Satellite and cable with boxes, with a
VCR
• Make sure that allofyourTVequipment
IS
turned off, Including unpluggmg your
SVR
Recorder.
•
You
may needtouse
the
Serial adapter
or
the
RCA Home Control cable (both
supplied)
to
connecttoyour set-top box's
Senal Control jack.
If
you have a Serial
Control jack that
doesn't
work
with any
of
the adapters we provide, use theIRjack
and the
IR
Control cable Instead.
t
30
IConnection Examples
~
Cable
Box
Satellite
Receiver
SVR
Recorder
VCR
TV
 Loading...