

Quick
Start
Guide
Guidededemarrage
US
rapide
Gufadeinicio
FR
rapido

Warning
PLEASE
COMPLETELY
SYSTEM.
INJURY
READ
IMPROPER
OR
THIS
BEFORE
DEATH.
MANUAL
INSTALLING
INSTALLATION
AND
THE
PRODUCT REGISTRATION
Following registration enables Sony
software, firmware updates and other
To
register your product, please visit ourwebsite at:
U.S.A.
http://productregistration.sony.com
SUPPLIED
OR
OPERATING
OR
USE
to
important
"IMPORTANT
YOUR
OF
THIS
send you periodic mailings about
DEVICE
PERSONAL
product information.
INFORMATION"
NAVIGATION
MAY
CAUSE
ACCIDENT,
2
Canada
http://www.sonystyle.ca/registration
Thank you.
Note
Illustrations in this manual may differ from the actual device.
" '
Table
" -
of
contents - - -- ,
, '
, , -
. - .
~
Getting
Started
.............................................•.
Installation I Connection
Navigation
Basic
Photo
Settings
Playback
.........•..................................•.•....
............................••............•..•..
......................................•.•.....
....................................
4
8
14
25
26
Questions I Problems
Extra Items
.............................................•....•
.................................•.....
27
28
3
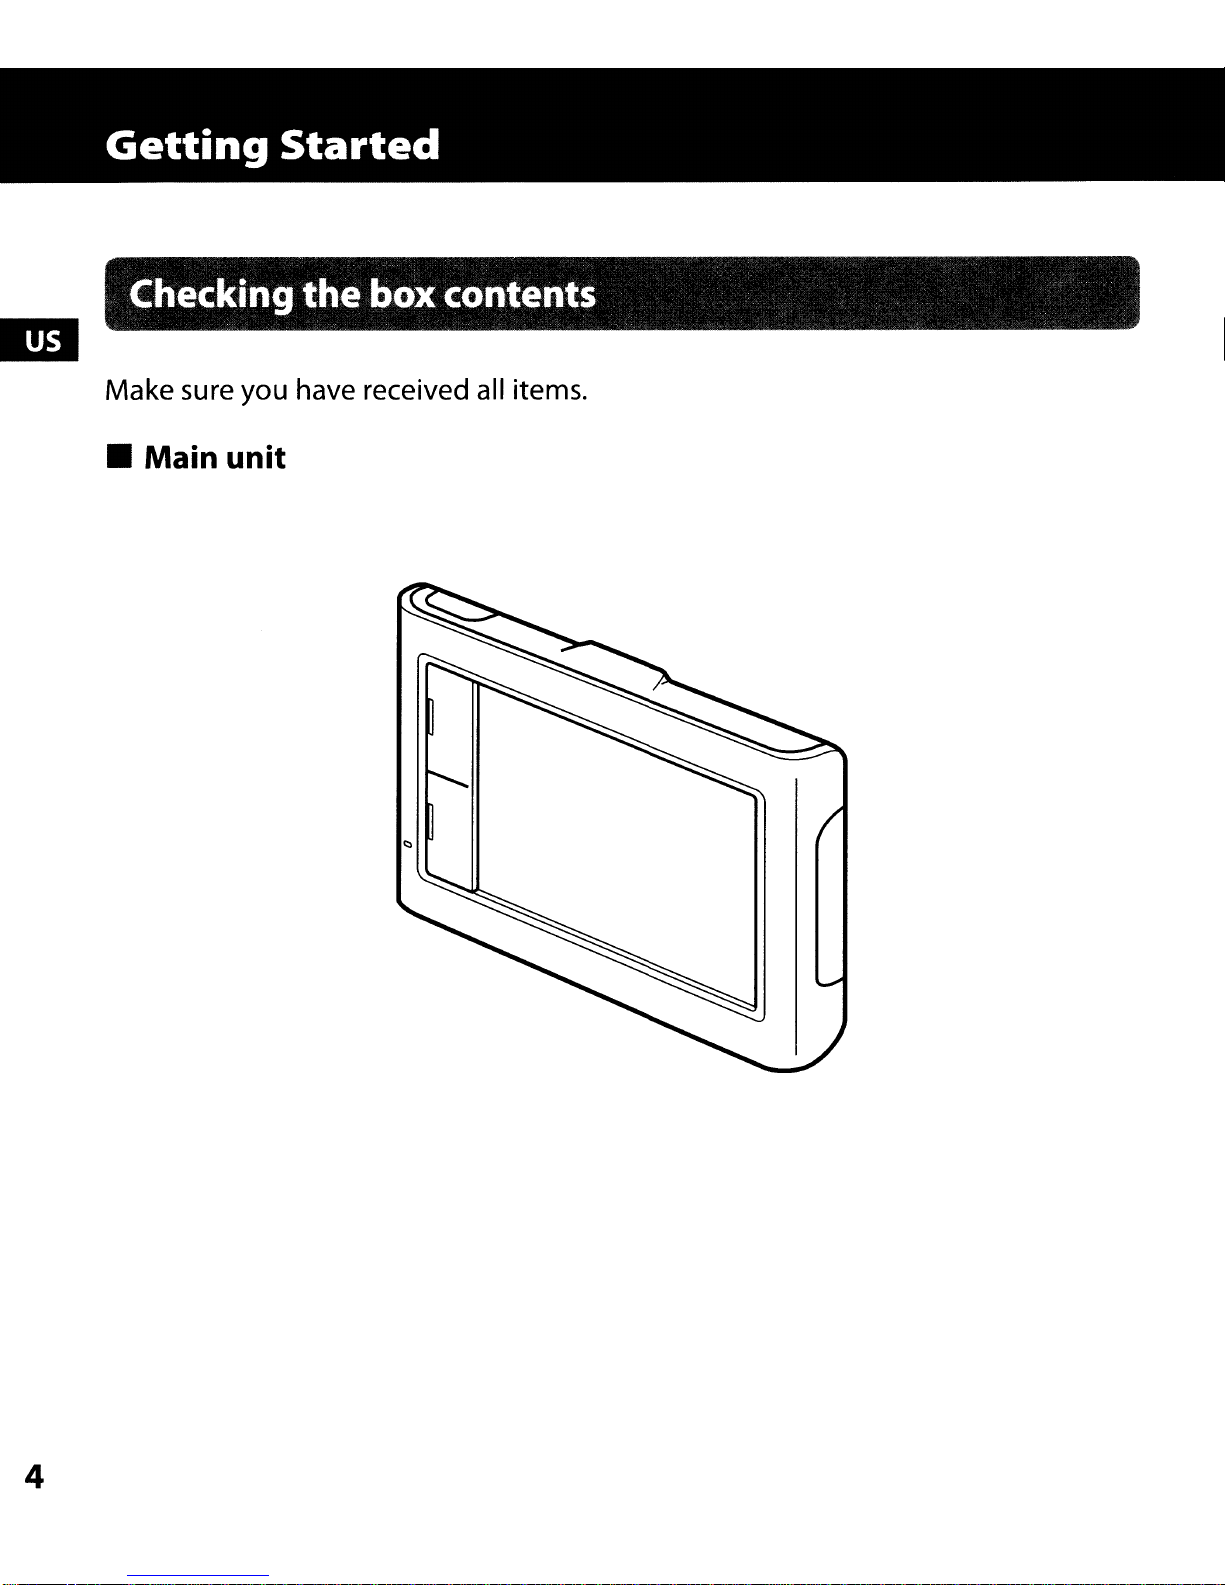
Getting
Started
Checking the box contents
Make sure you have received all items.
• Main unit
4
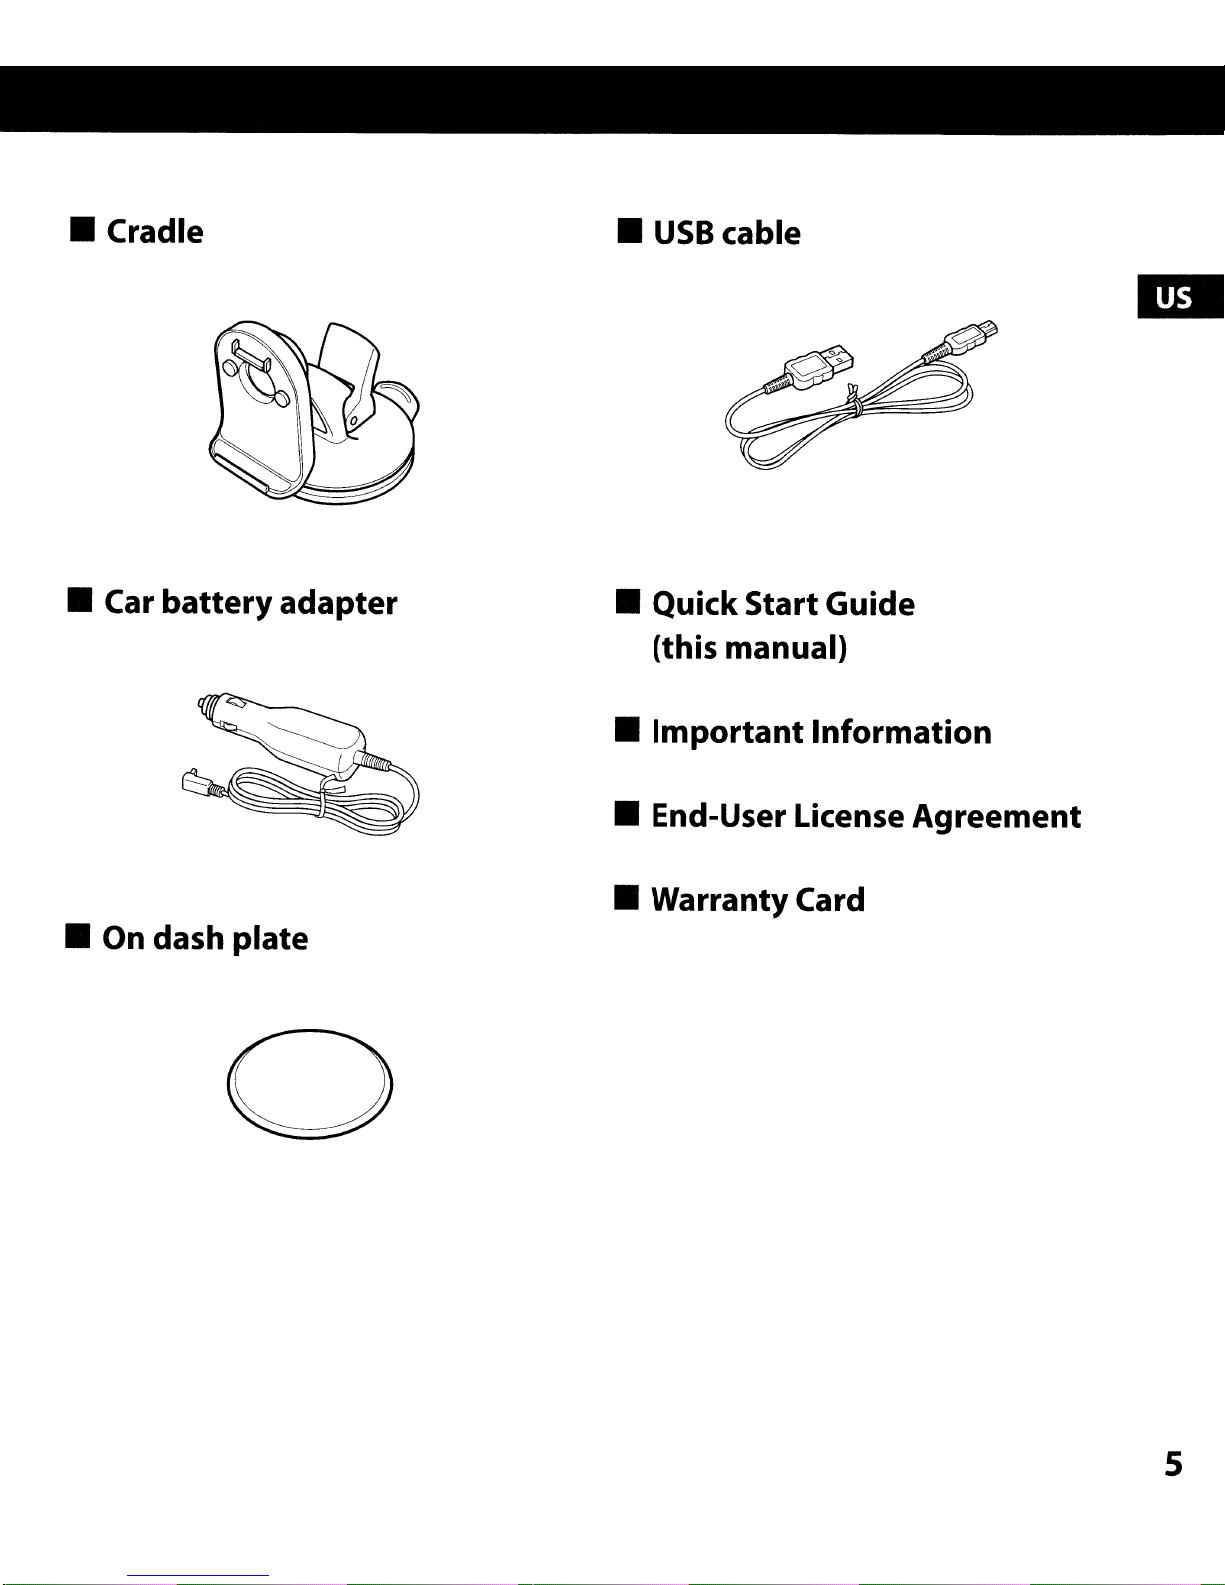
• Cradle
•
USB
cable
• Car
battery
adapter
• On dash plate
• QuickStartGuide
(this manual)
•
Important
Information
• End-User License
• WarrantyCard
Agreement
5
Getting
Started
--------1[ID
6
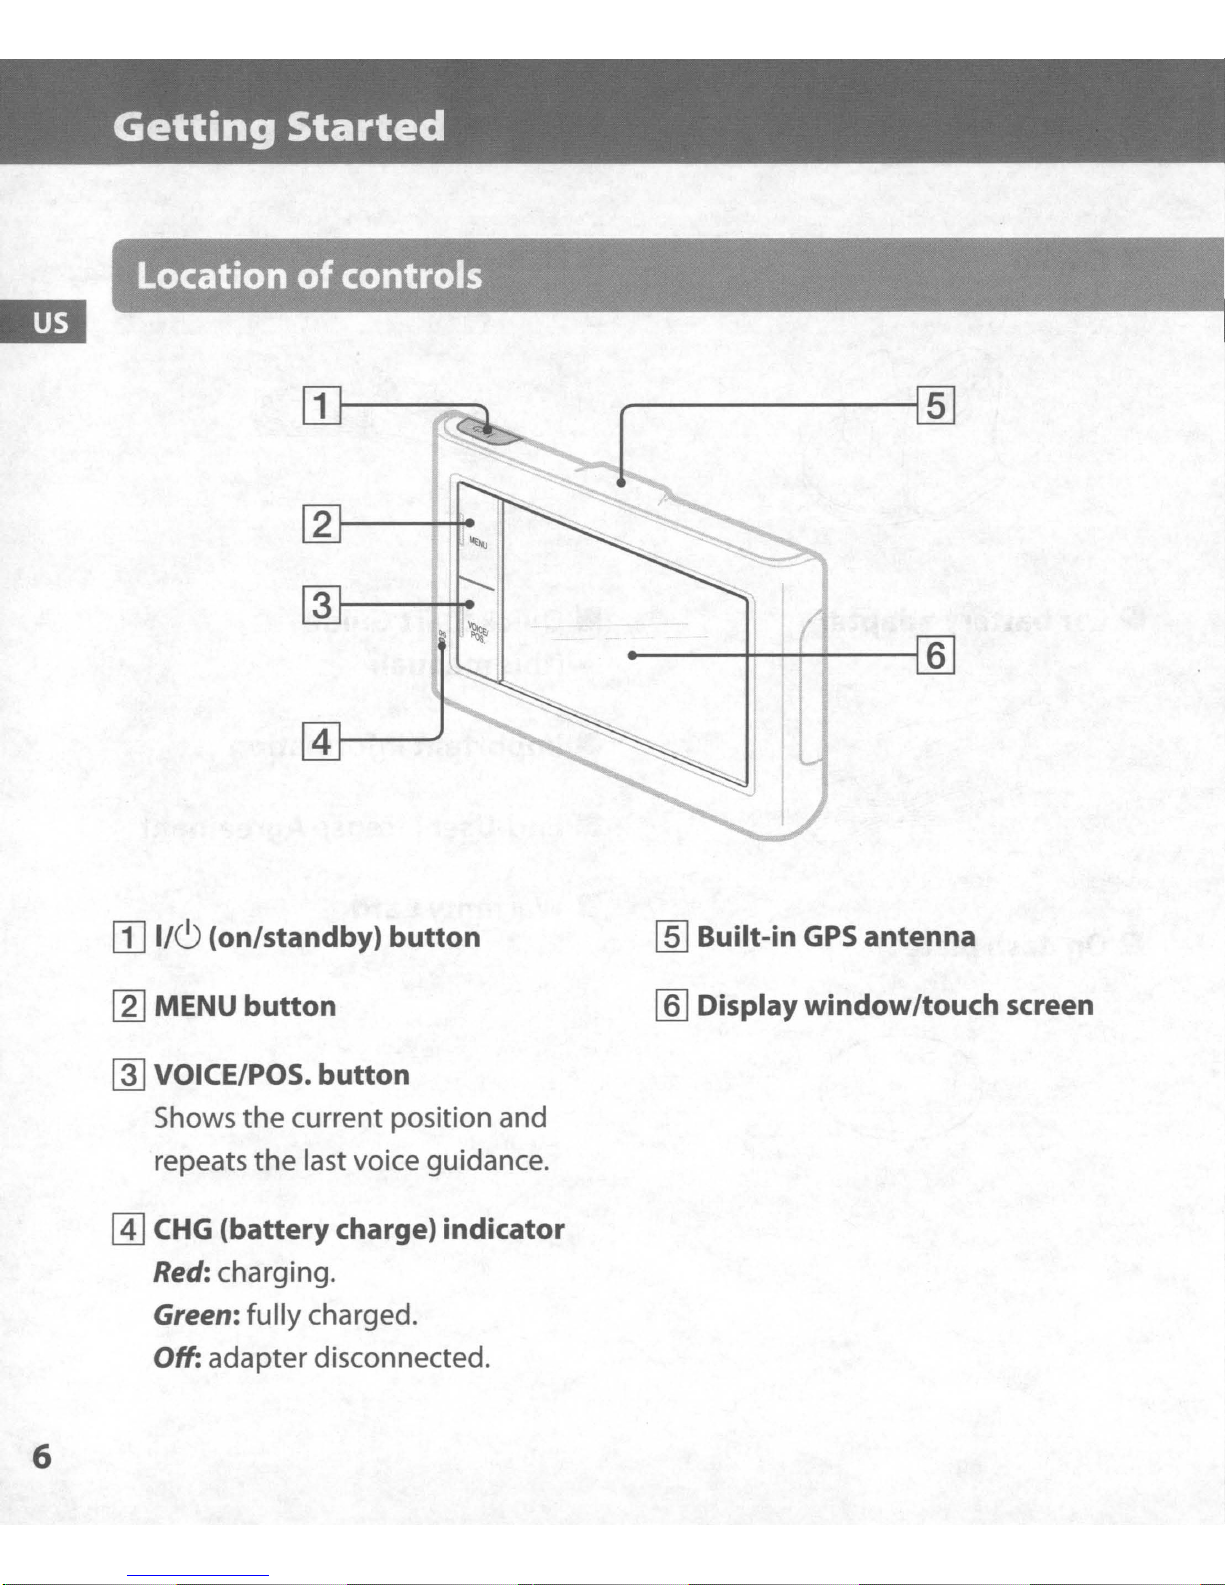
II] 1/(9 (on/standby) button
[gJ
MENU button
~
VOICE/POS. button
Shows
repeats
@]
CHG
Red:
Green:
Off: adapter disconnected.
the
current position and
the
last voice guidance.
(batterycharge) indicator
charging.
fully charged.
[ID
Built-in
[ID
Displaywindow/touch screen
GPS
antenna
[l]
9
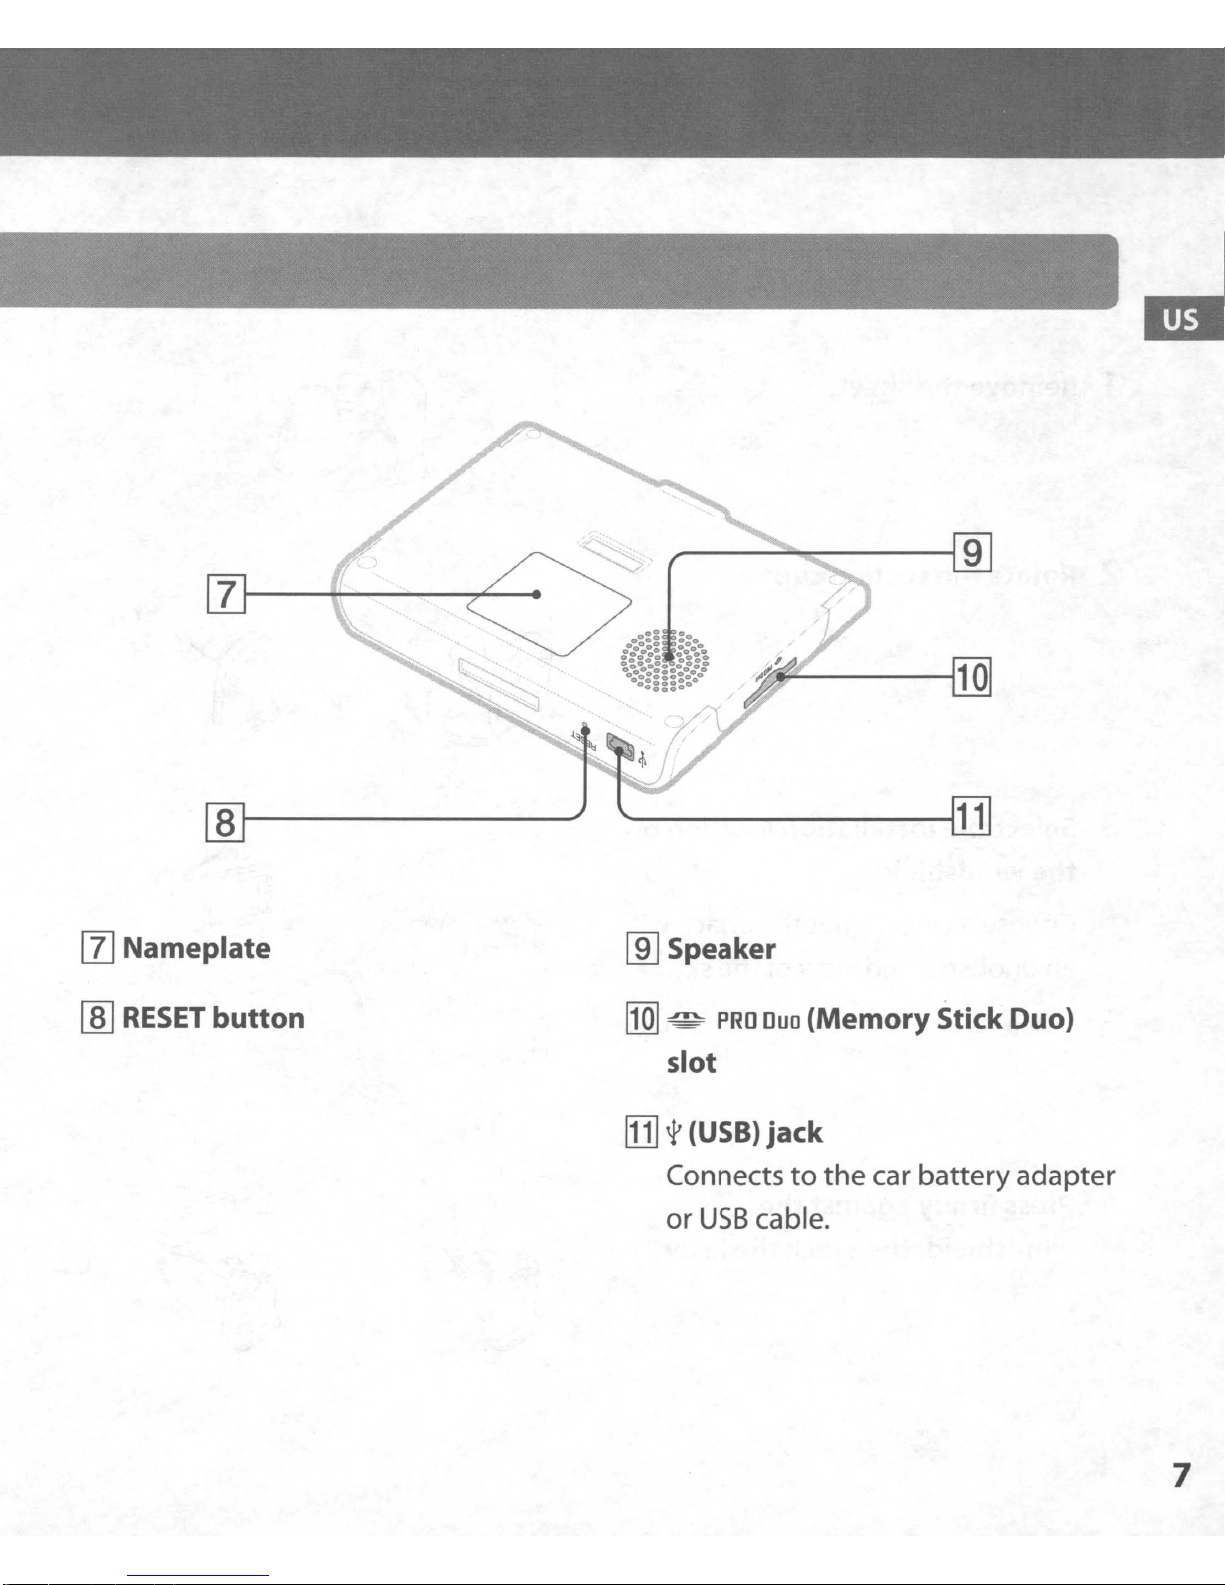
[l]
Nameplate
rnJ
RESET
[ID
button
0
...
:"
.
........
:::::
~:::
o_::::!:::!oO
000.·
J1'
lID
Speaker
ffQ]
~
slot
[j]
t (USB)
Connects to the car battery adapter
..
PRO
Ouo
(Memory
jack
[Q]
[DJ
Stick Duo)
or
USB
cable.
7
Installation
I
Connection
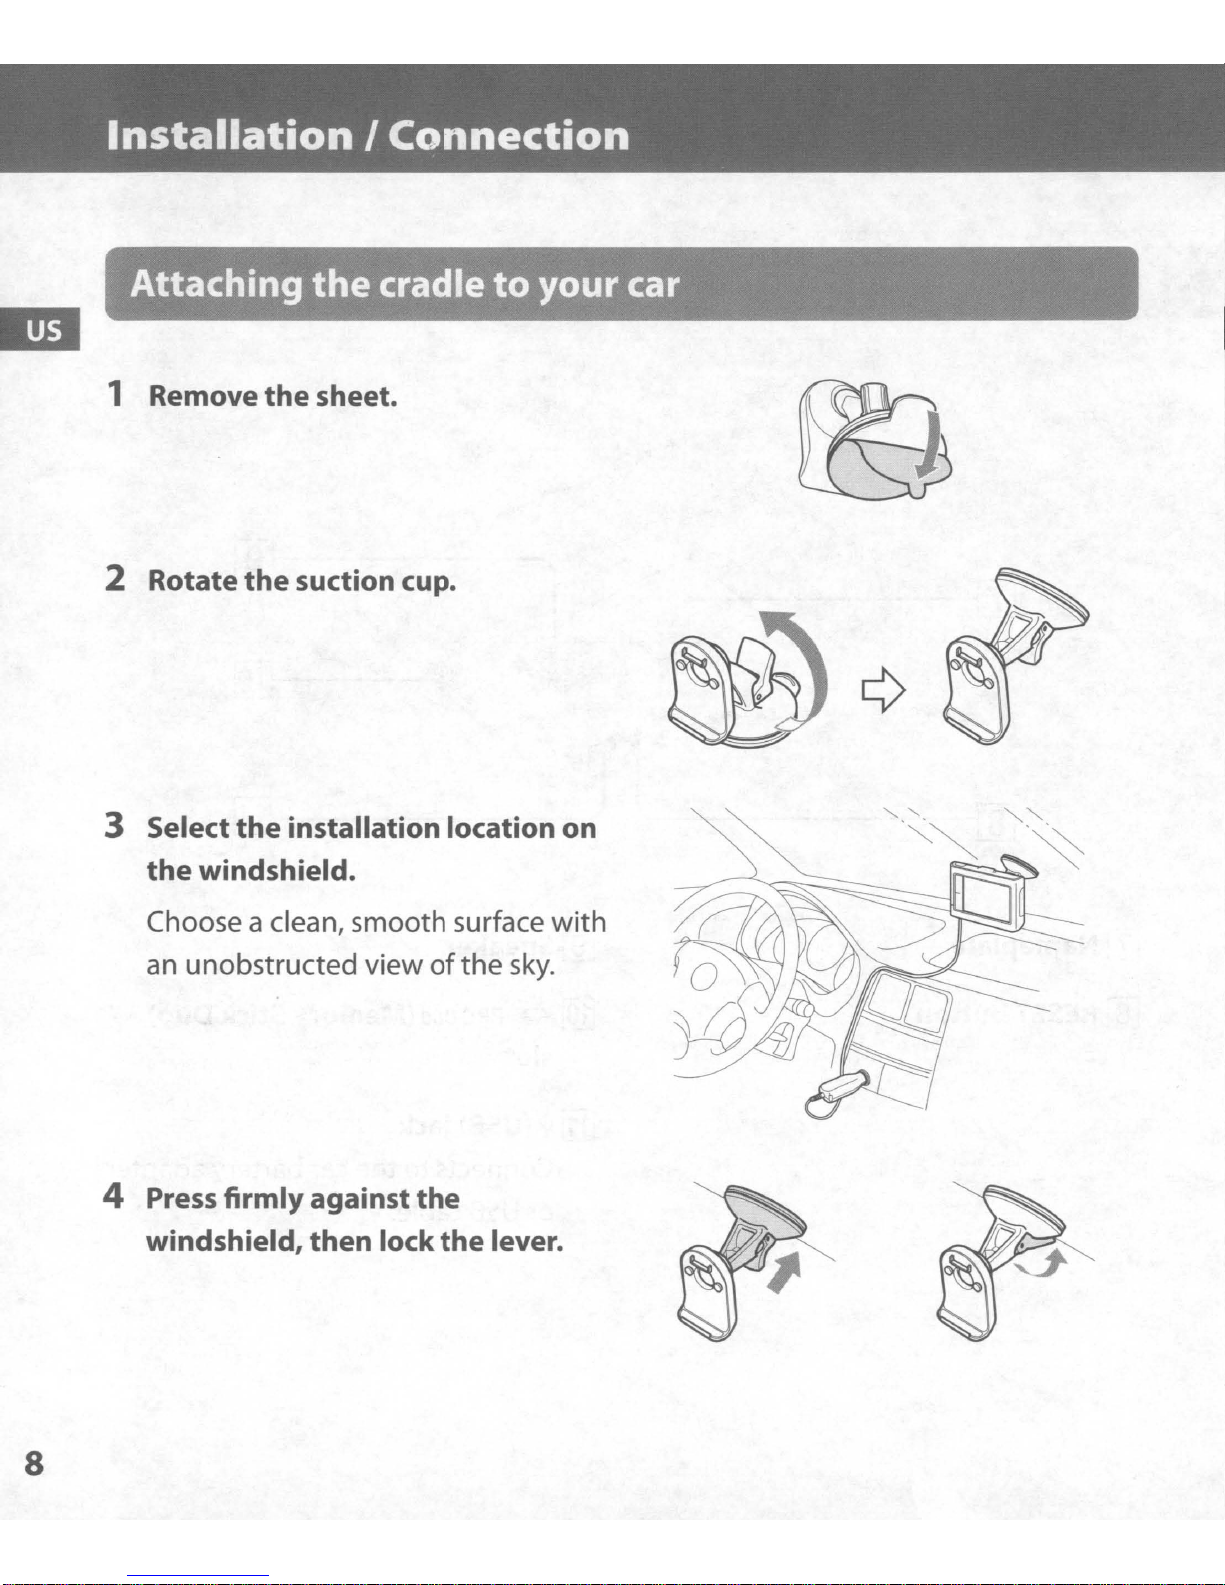
Attaching
1 Remove
2 Rotate
3 Select
the
the
the
sheet.
the
suction cup.
installation location on
cradle
to
your car
the
windshield.
Choose a clean, smooth surface
an
unobstructed viewofthe
4
Press
windshield,
firmly against the
then
lock
the
with
sky.
lever.
8
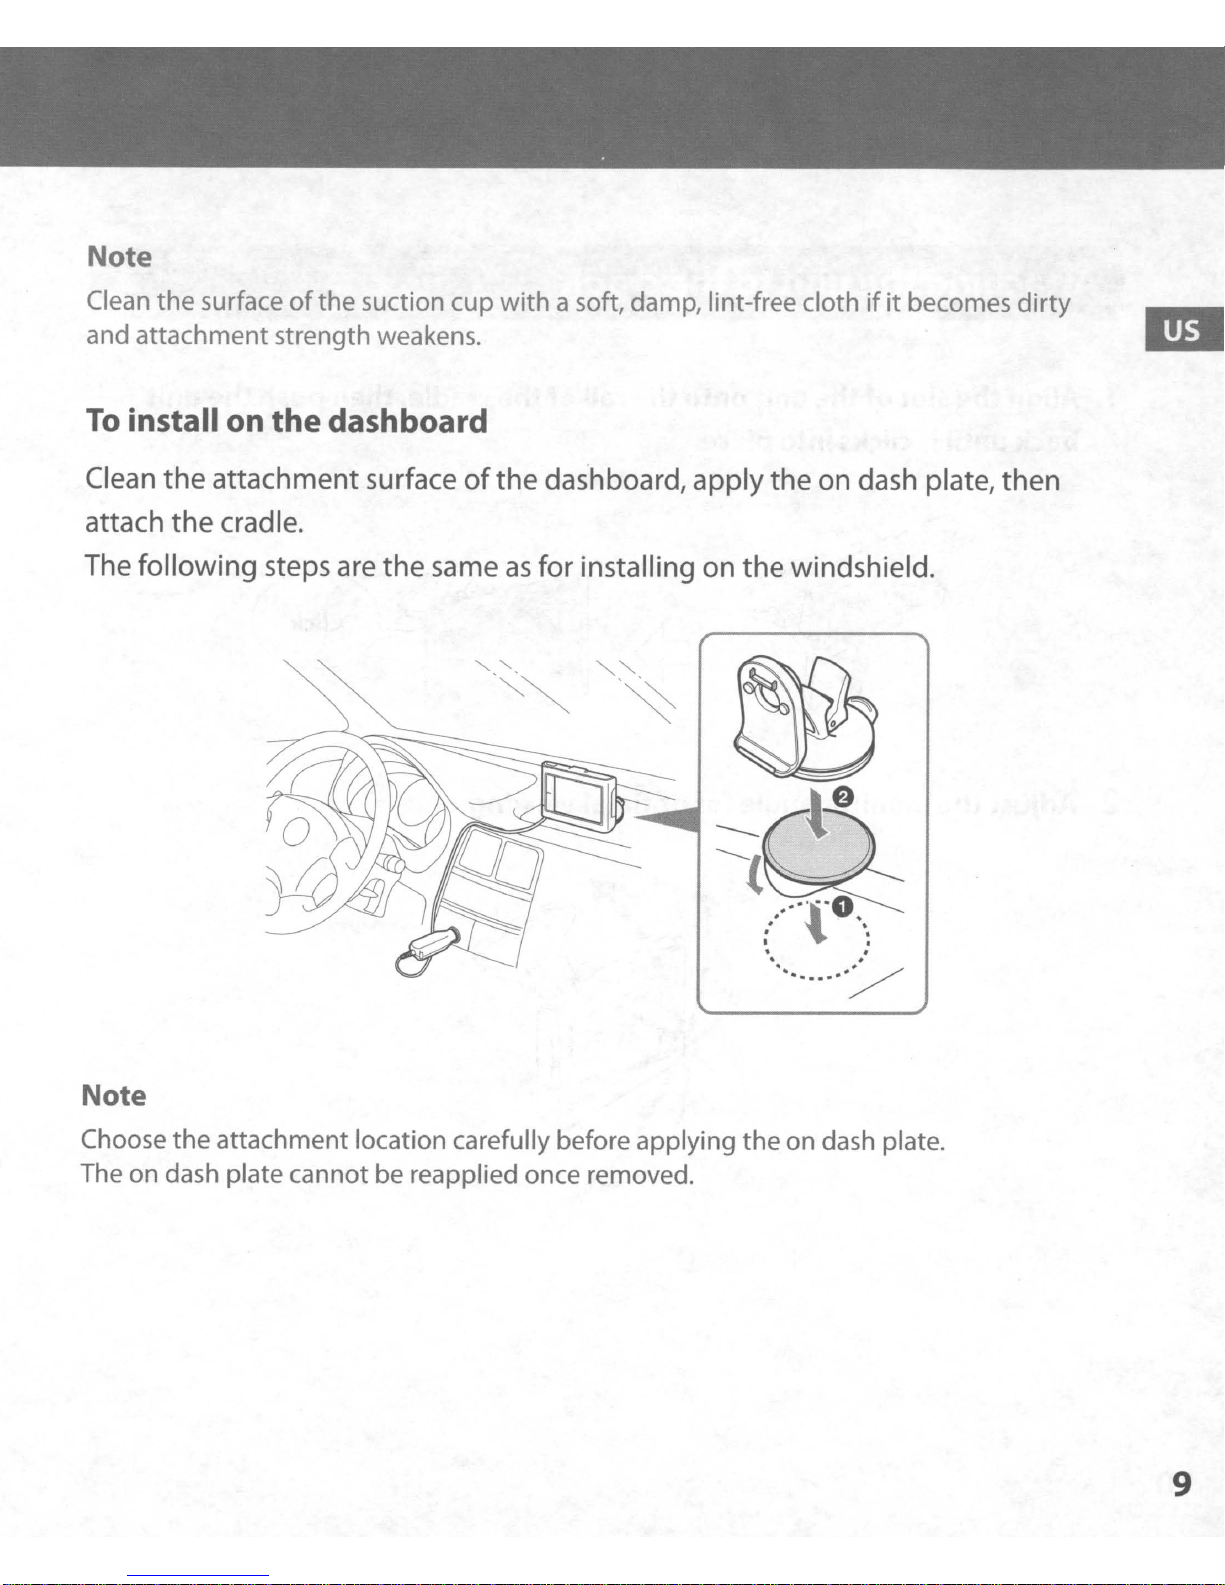
Note
Clean the surface ofthe suction cup with a soft, damp, lint-free cloth
and attachment strength weakens.
To
install on
the
dashboard
ifitbecomes dirty
Clean the attachment surface ofthe dashboard, apply the on dash plate, then
attach the cradle.
The following steps are the same
as
for
installing on the windshield.
Note
Choose the attachment location carefully before applying the on dash plate.
The on dash plate cannot be reapplied once removed.
9
Installation
I
Connection
m
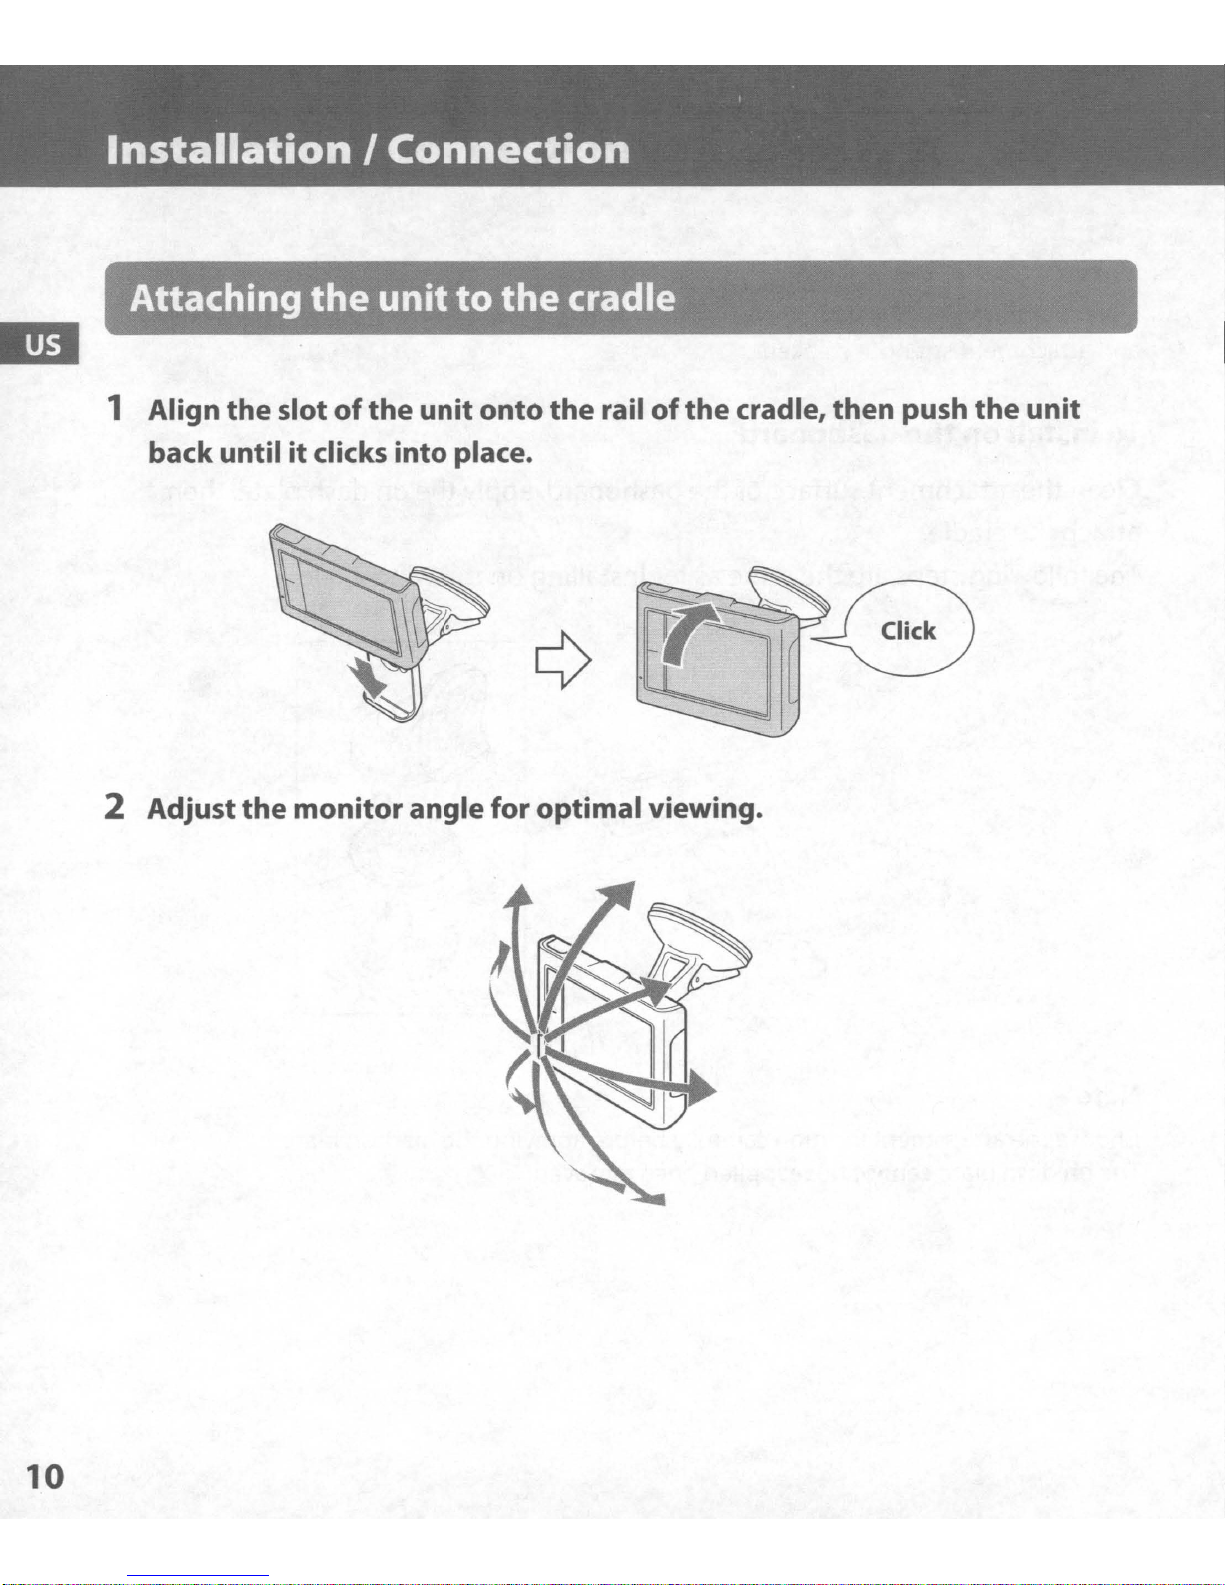
Attaching
1 Align
back
2 Adjust
the
until itclicks into place.
the
slotofthe
the
monitor
unit
unit
angle
to
the
onto
for optimal viewing.
cradle
the
rail
of
the
cradle,
then
push
the
unit
10
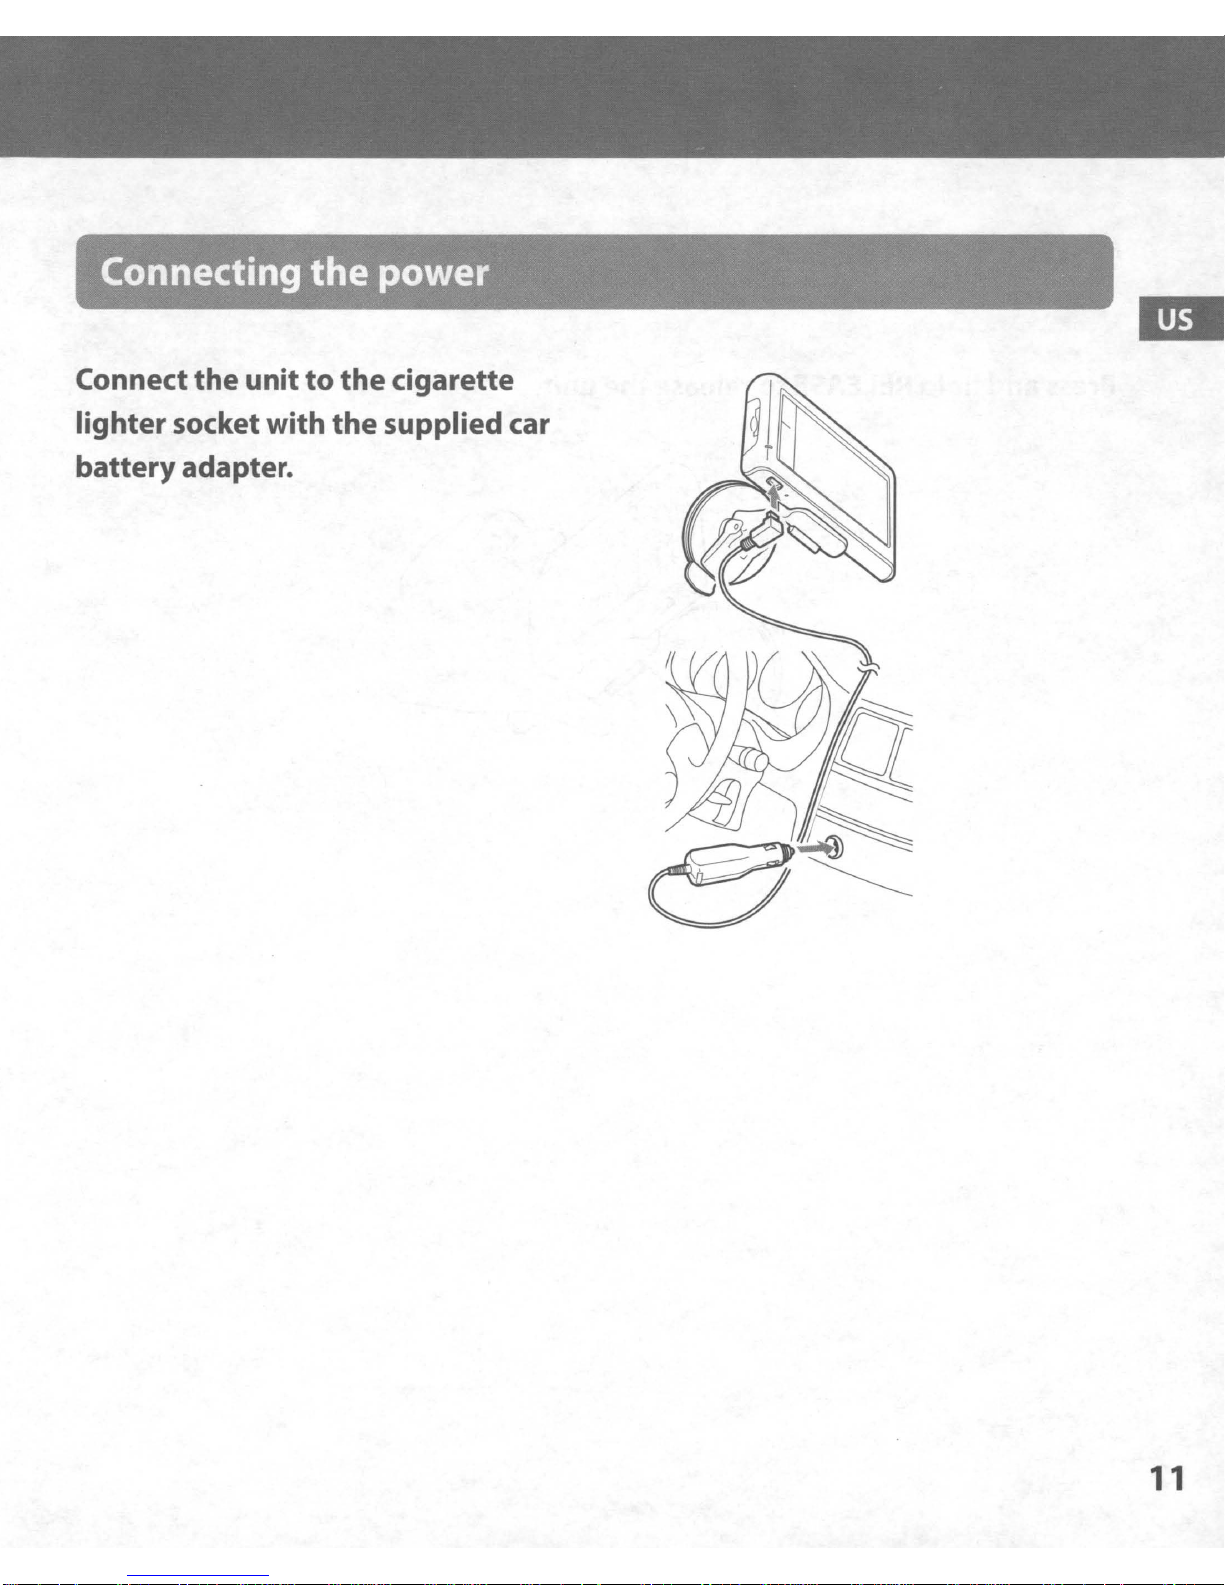
Connecting
the
power
Connect
lightersocket with
battery
the
unit
adapter.
to
the
cigarette
the
supplied car
11
Installation
I
Connection
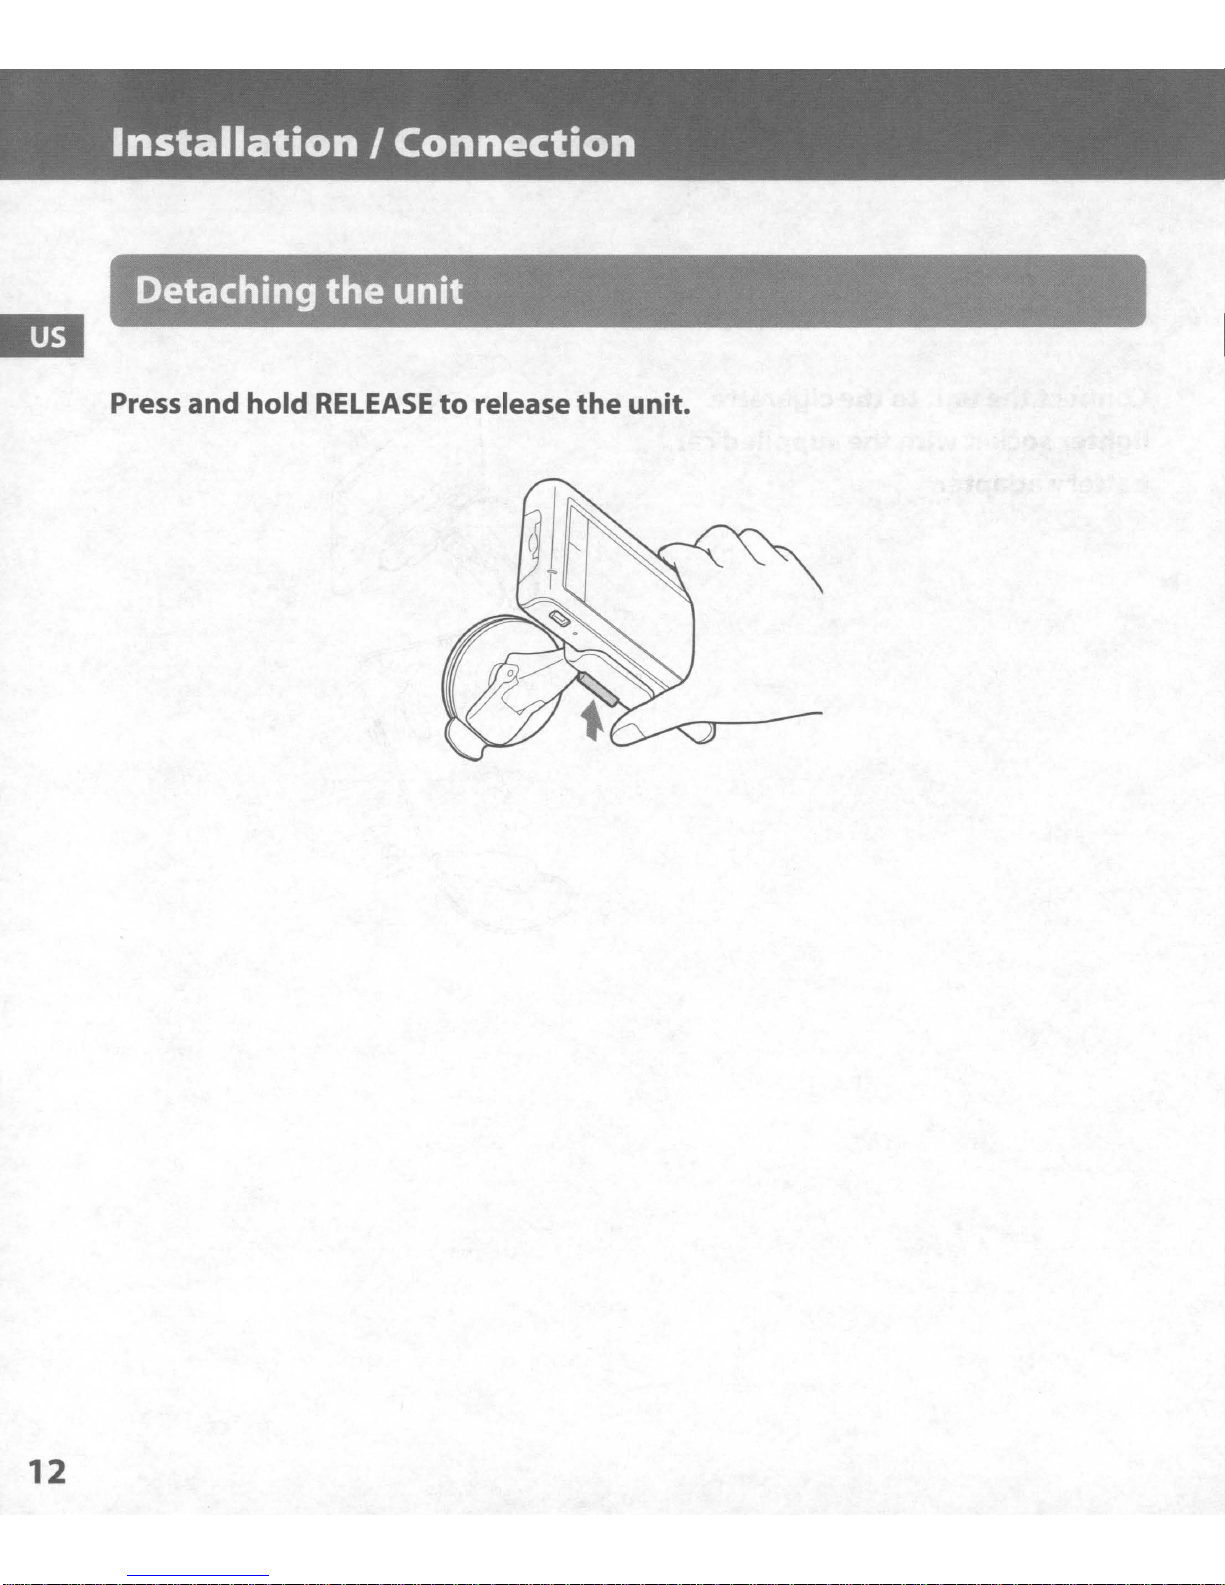
Detaching
Press
and
hold
the
RELEASEtorelease
unit
the
unit.
12
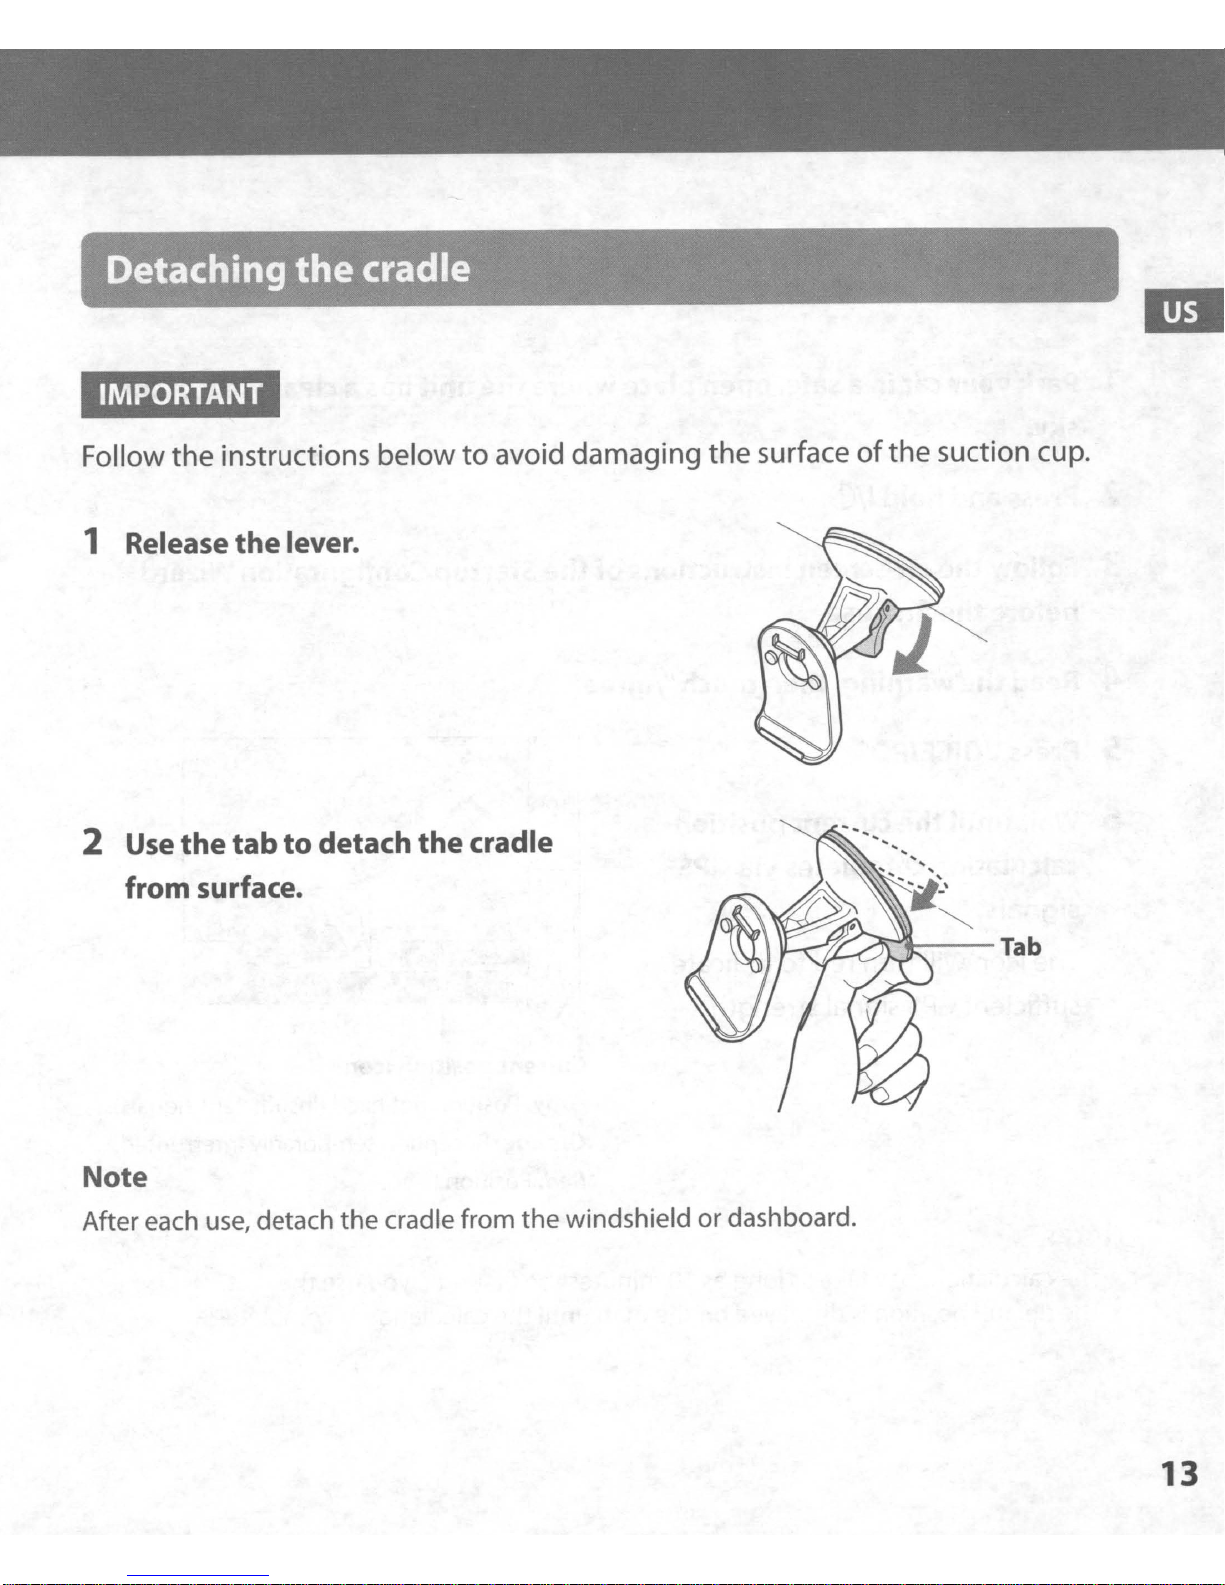
Detaching
IMPORTANT
the
cradle
Follow the instructions belowtoavoid damaging the surfaceofthe suction cup.
1 Release
2 Use
the tab
from surface.
the
lever.
to
detach
the
cradle
~~-Tab
Note
After each
use,
detach
the
cradle from
the
windshieldordashboard.
13
Navigation
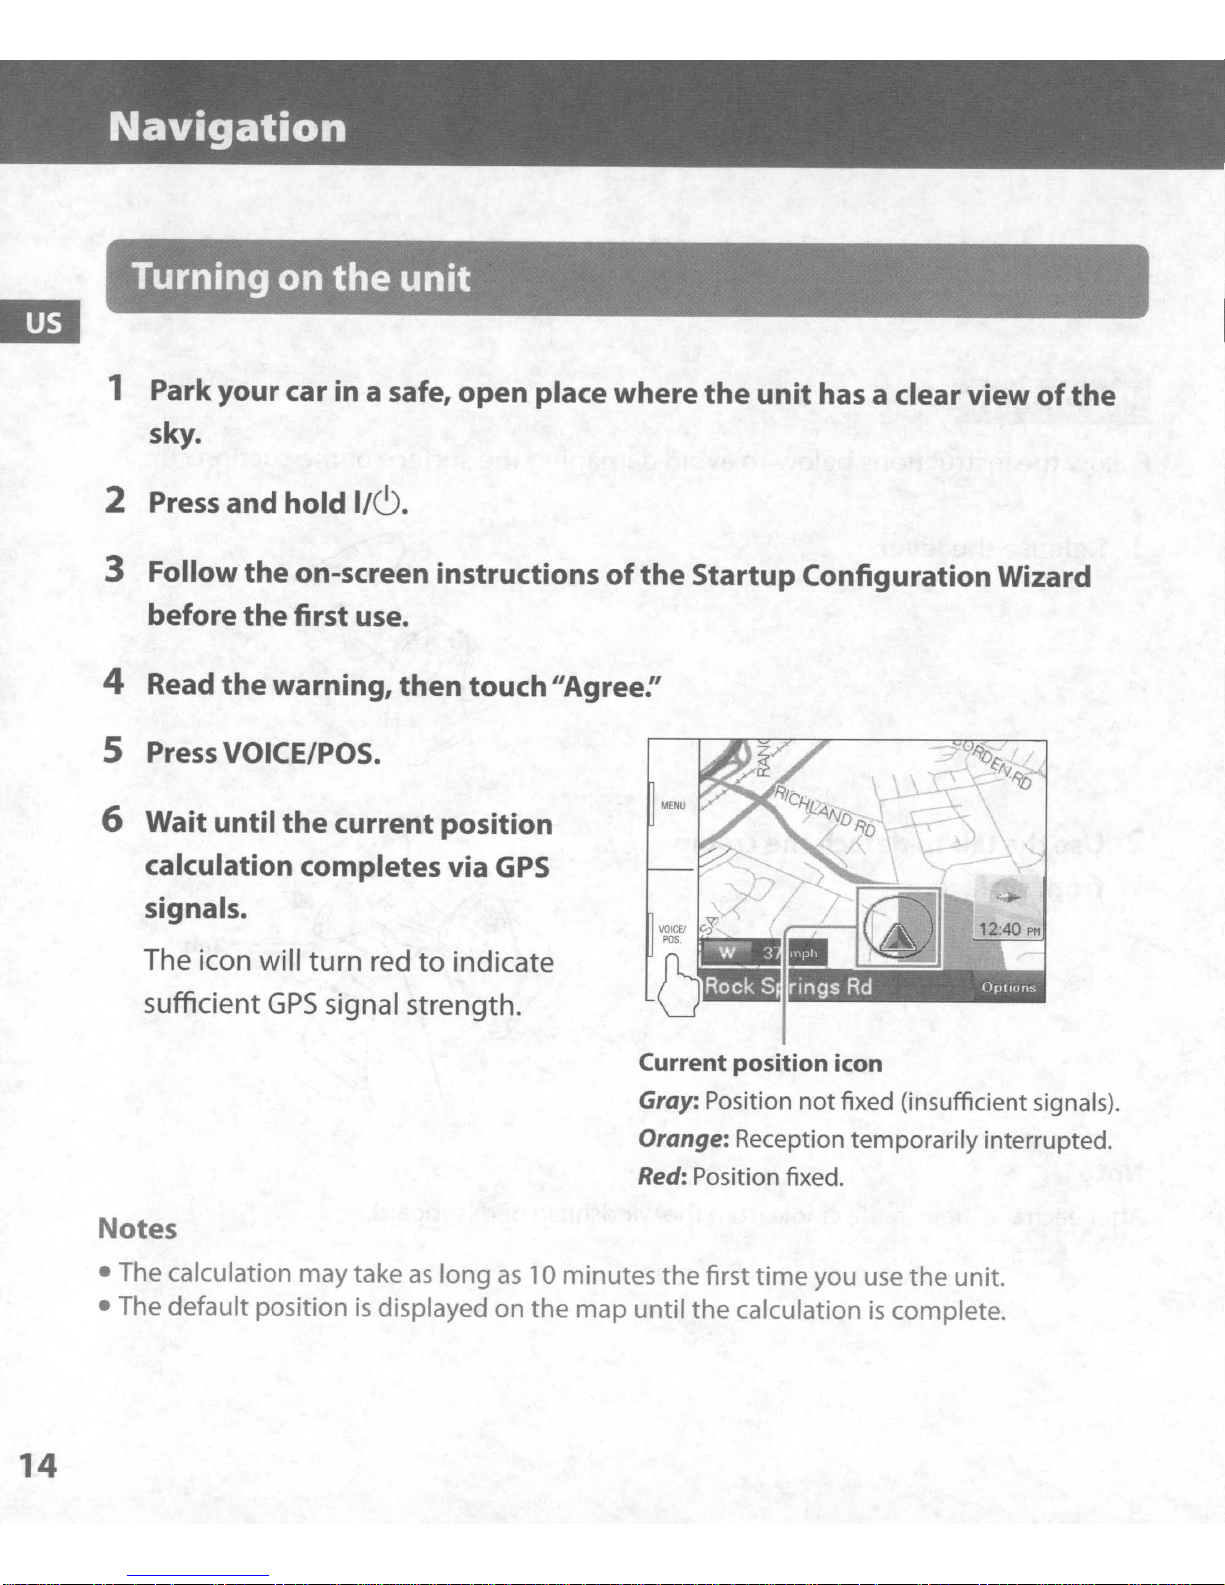
Turning
1 Park
your
on
car
the
in a safe,
sky.
2 Press
3 Follow
before
4 Read
and
the
the
the
warning,
hold I/C).
on-screen
first use.
5 PressVOICE/POS.
6 Wait until
the
current
unit
open
instructions
then
touch
position
place
of
"Agree:'
where
the
the
unit
Startup
has
a clearview
of
the
ConfigurationWizard
calculation
completes
via
GPS
signals.
The icon will turn red
GPS
sufficient
signal strength.
to
indicate
Current
Gray: Position notfixed (insufficient signals).
Orange: Reception temporarily interrupted.
Red:
Notes
• The calculation maytakeaslongas10 minutes
is
• The default position
displayed on
the
map
until
position
Position fixed.
the
first
time
the
calculationiscomplete.
icon
you use
the
unit.
14
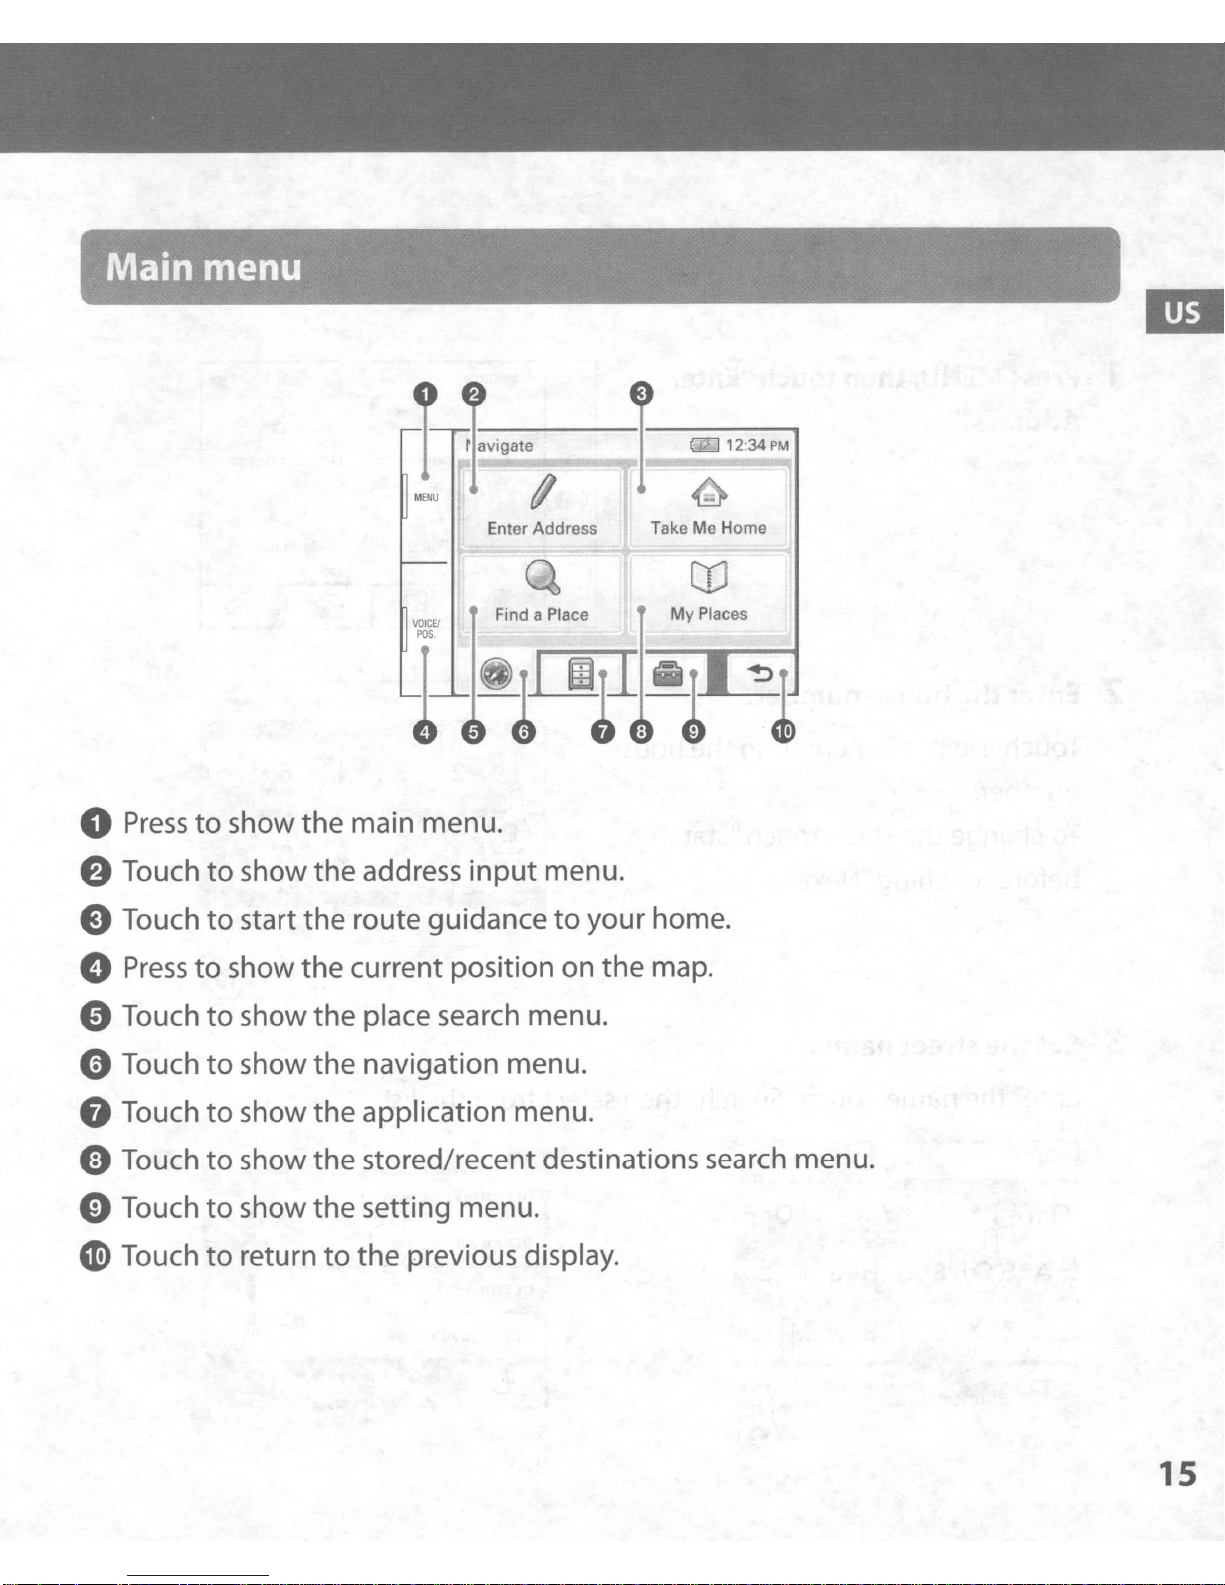
Main menu
ravigate
o
Presstoshow the main menu.
e Touch
eTouch
(»
Presstoshow the current position on
e Touch
oTouch
to
show
to
start
to
show the place search menu.
to
show the navigation menu.
the
address
the
route guidancetoyour home.
input
Enter Address
Find a Place
menu.
Take Me Home
the
map.
My
Places
G Touch
e Touch
eTouch
«e
Touch
to
to
to
to
show
show
show
return
the
application menu.
the
stored/recent destinations search menu.
the
setting menu.
to
the
previous display.
15
Navigation
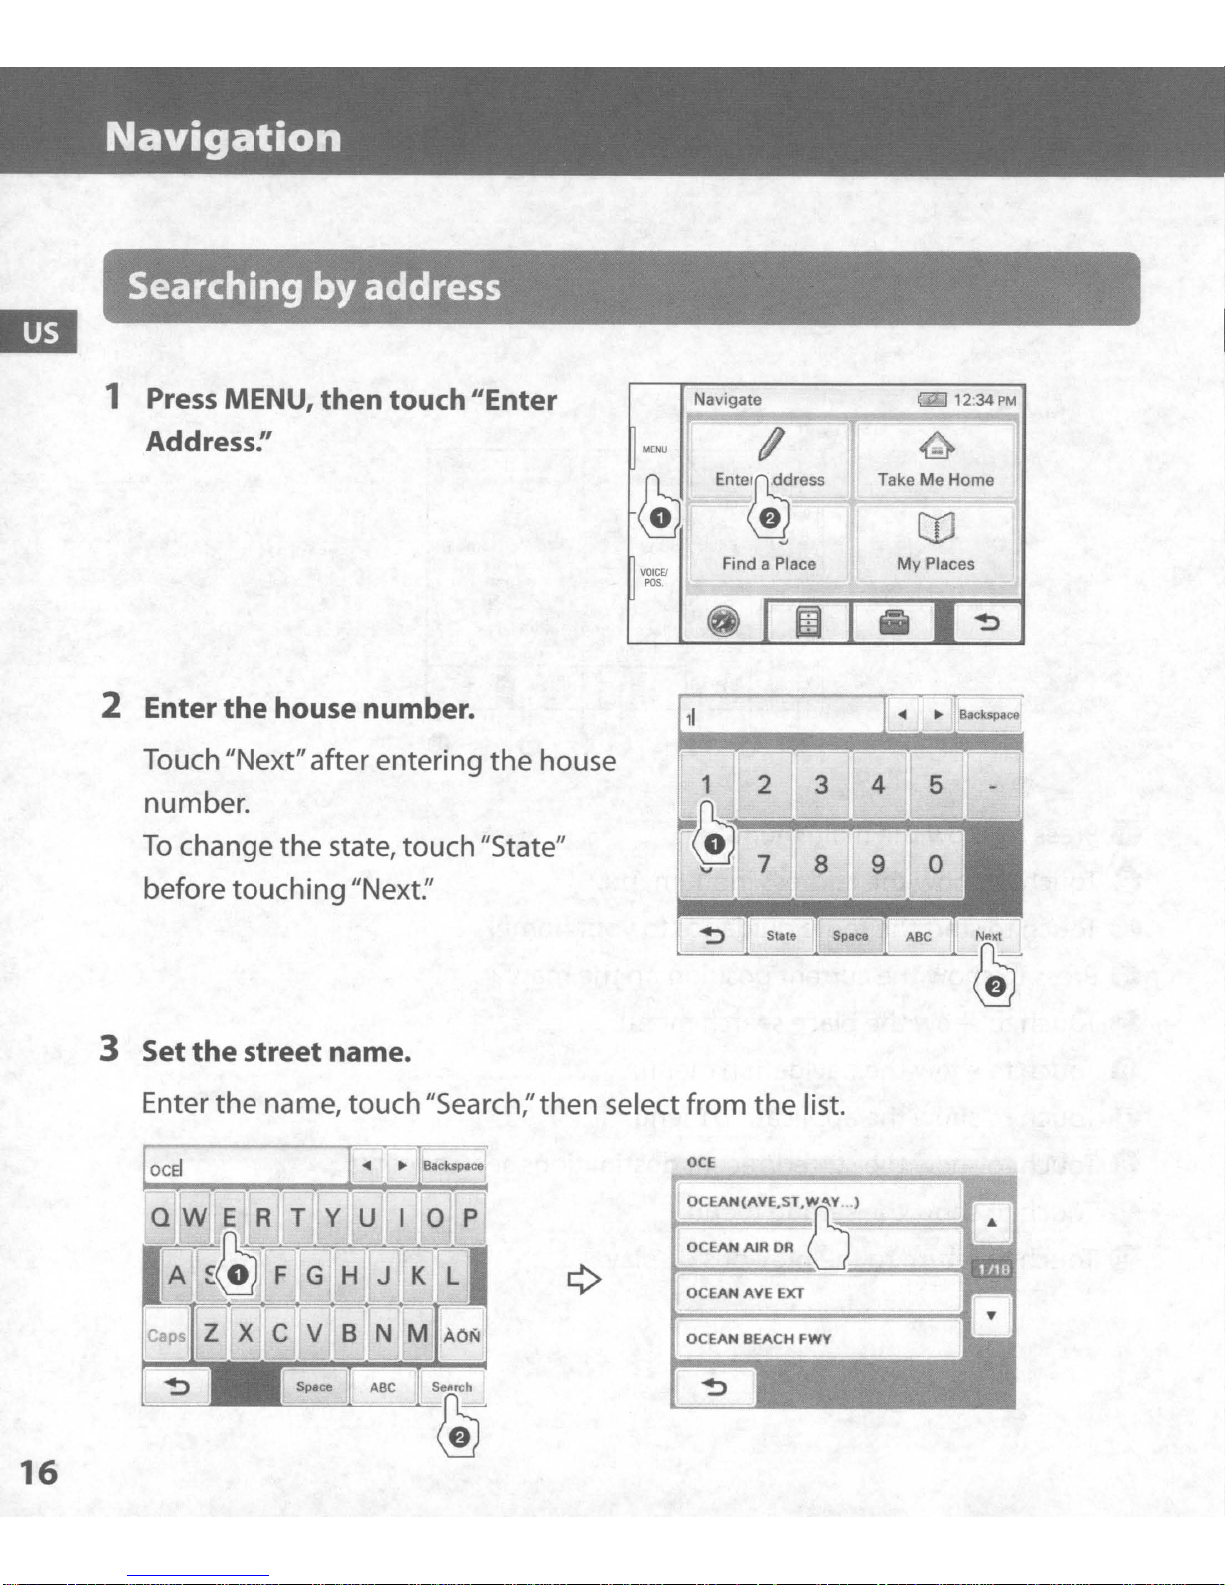
Searching
1
Press MENU, then touch "Enter
by
address
Address:'
2 Enter
the
house number.
Touch "Next"afterentering
number.
To
change the state, touch "State"
before touching "Next:'
the
house
MENU
@
VOICEI
POS
,1
Navigate
1/
Enl.~'."
.J
Find a Place
(i)
1 2
3
@
7 8
'"
em
12-34PM
TakeMeHome
to
My
Places
4
5
0
9
~
16
~
3 Set
the
street name.
Enter the name, touch"Search;'then select from the list.
OCE
QWERTY
A F G H
;~
Caps Z X C V
~
,
U
J K L
B N M
o p
A
Or;,
Search
OCEAN{AV~ST'~
OCEAN
OCEAN
~
~
AIR
AVE
Nflxt
~
l
DR
EXT
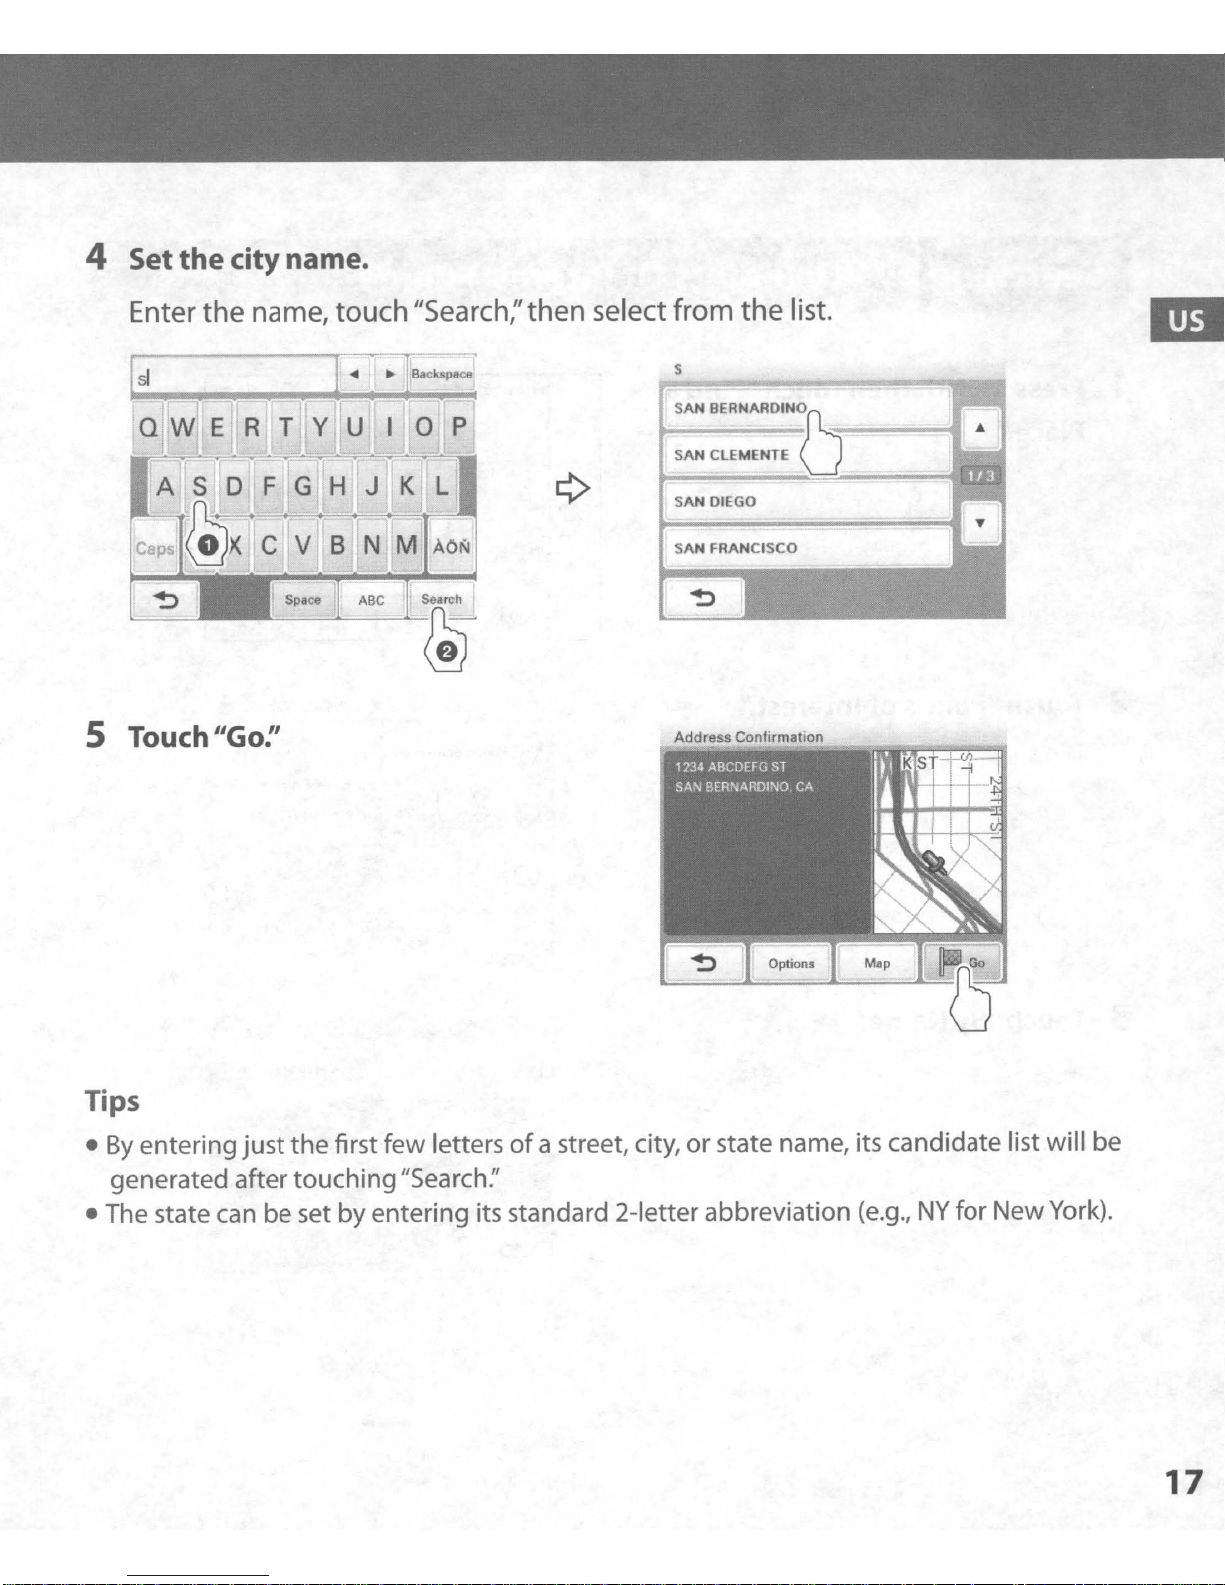
4 Setthecity name.
5
Touch
Enter
sf
QWERTY
the
"Go:'
name, touch
IIS
F G H J K L
earc
h;'
then select from
the
list.
s
SAN BERNAROINO
k
SAN CLEMENTE U
SAN DIEGO
Address ConfirmatIon
Tips
•
By
entering
generated after touching"Search:'
• The state
just
the
first few lettersofa street, city,orstate name, its candidate list will be
can
be set by entering its standard 2-letter abbreviation
(e.g.,
NY
for NewYork).
17
Navigation
_
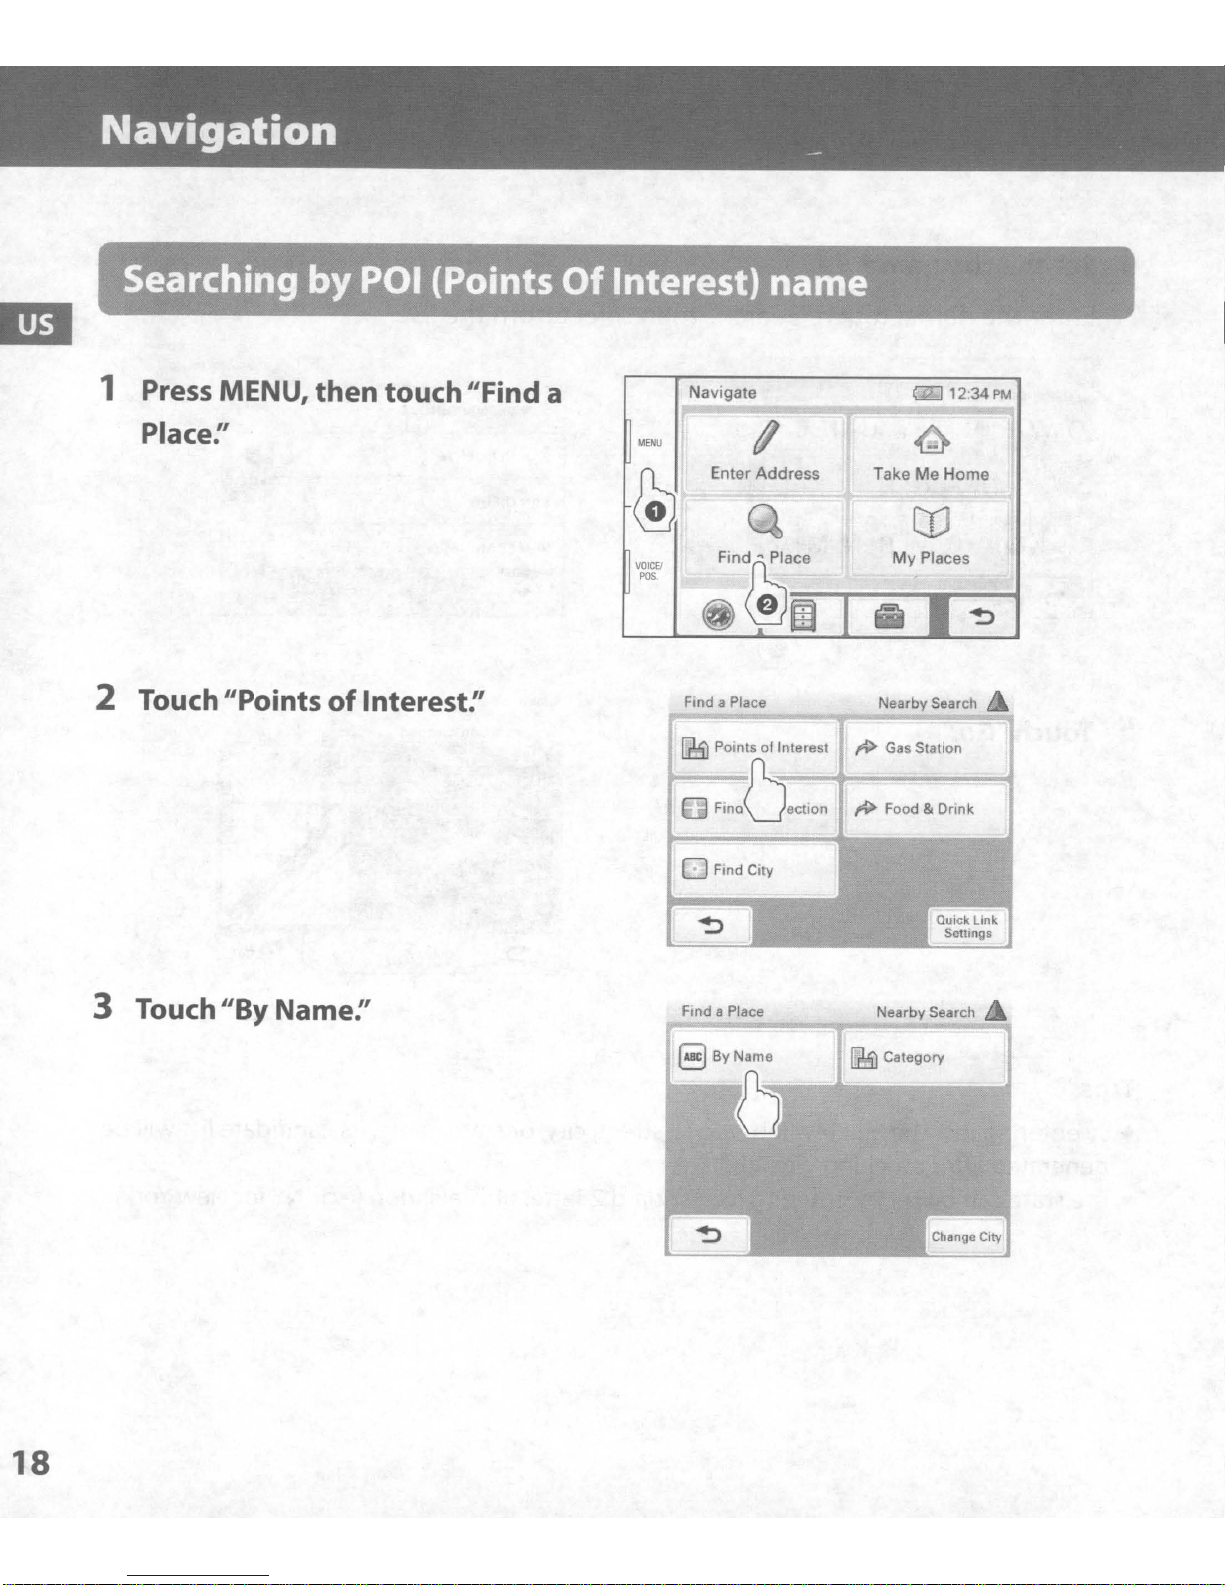
Searching byPOI (Points
1
Press
Place:'
2 Touch "Points
MENU,
then
of
Interest:'
touch"Find a
Of
Interest)
name
Navigate
(I
Enter Address
Find a Place
IJ1!3l
Points of Interest
Fi'OO,,,,,o,
(2]
Take Me Home
My
Places
NearbySearch
~
Gas Statron
12-34
PM
3 Touch
"By
Name:'
o
Fmd
FmdClty
a Place
Nearby Search
[23)
Category
18
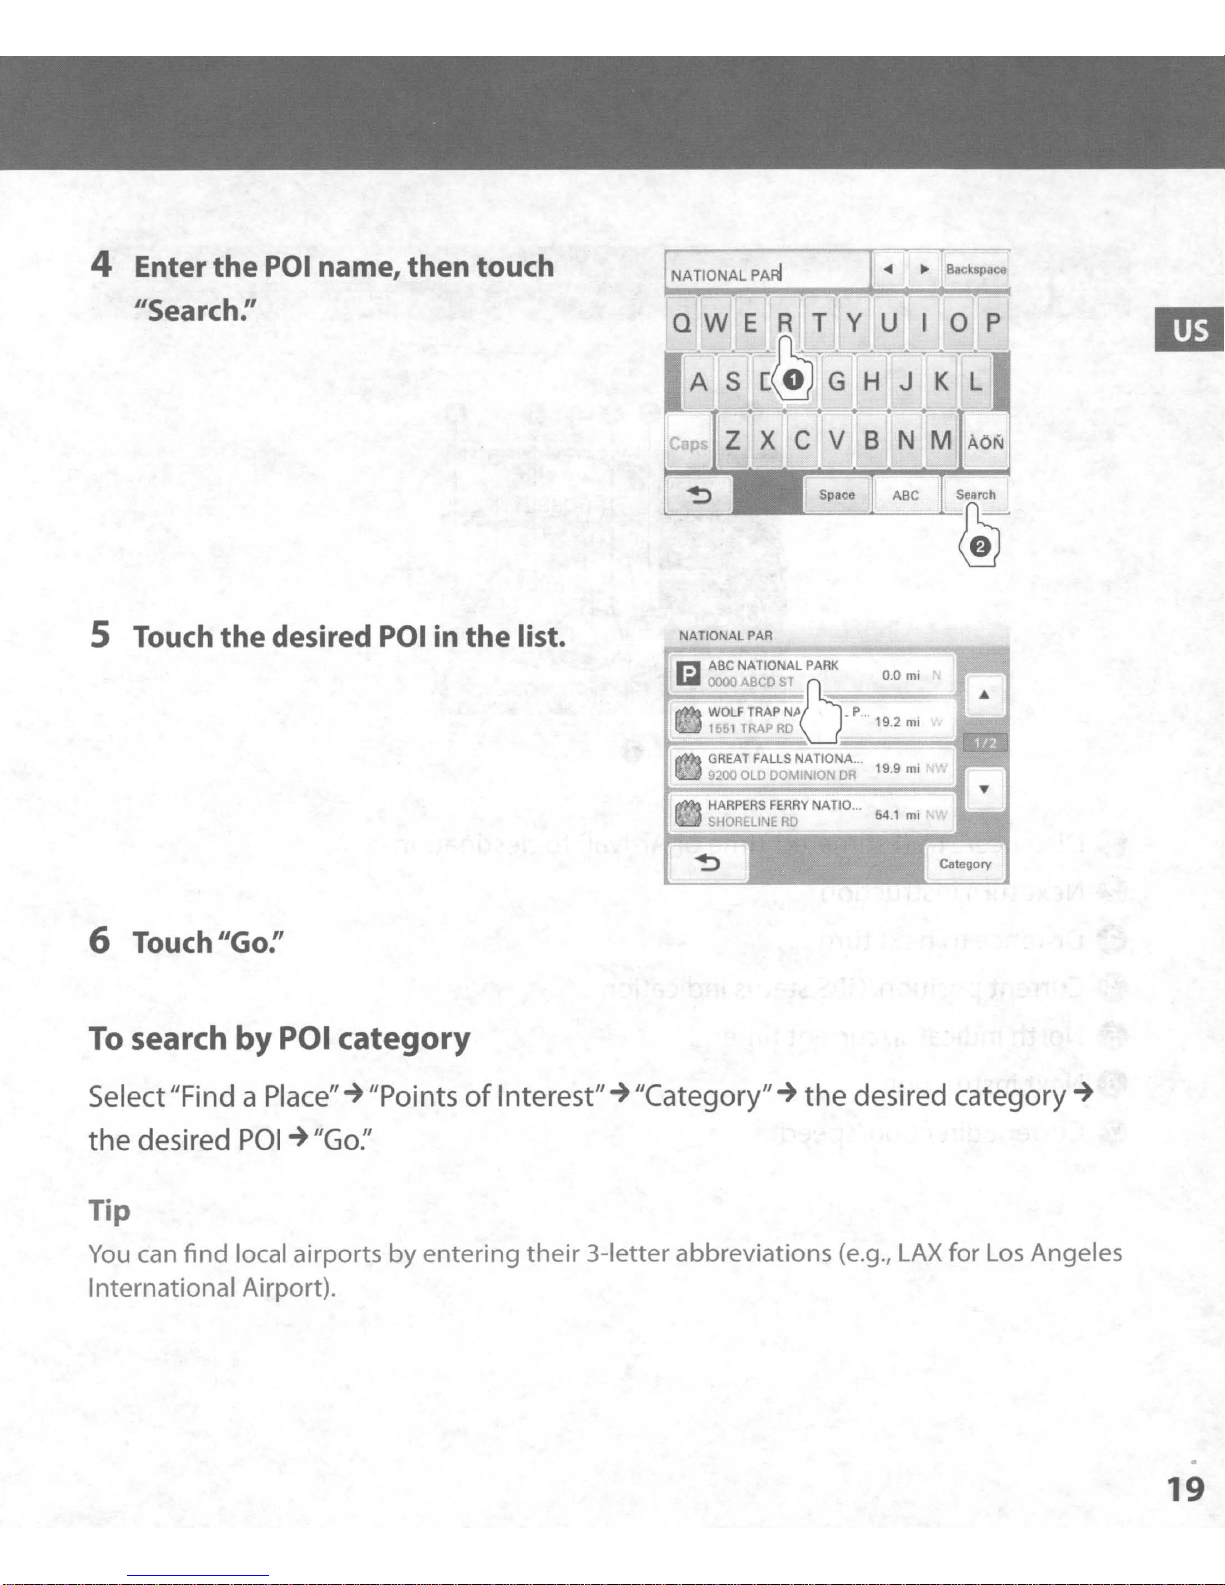
4 Enter
the
POI name, then touch
<4
~
Backspace
IIS
earc
5 Touch
h:'
the
desired POI in
the
list.
QWERTY
S-[@
E
c p Z X
"!:>
NATIO
ALPAR
~
C V
U
~~
J K L
H
NM
B
lOP
~
AON
6 Touch
To
search
IIGO:'
by
POI
category
Select"Find a Place"~"Points
the
desired
POI~"Go:'
Tip
You
can
find
local airports
International Airport).
by
entering
of
Interest"~"Category"~the
their
3-letter abbreviations (e.g.,
desired category
LAX
for
Los
Angeles
~
19
Navigation
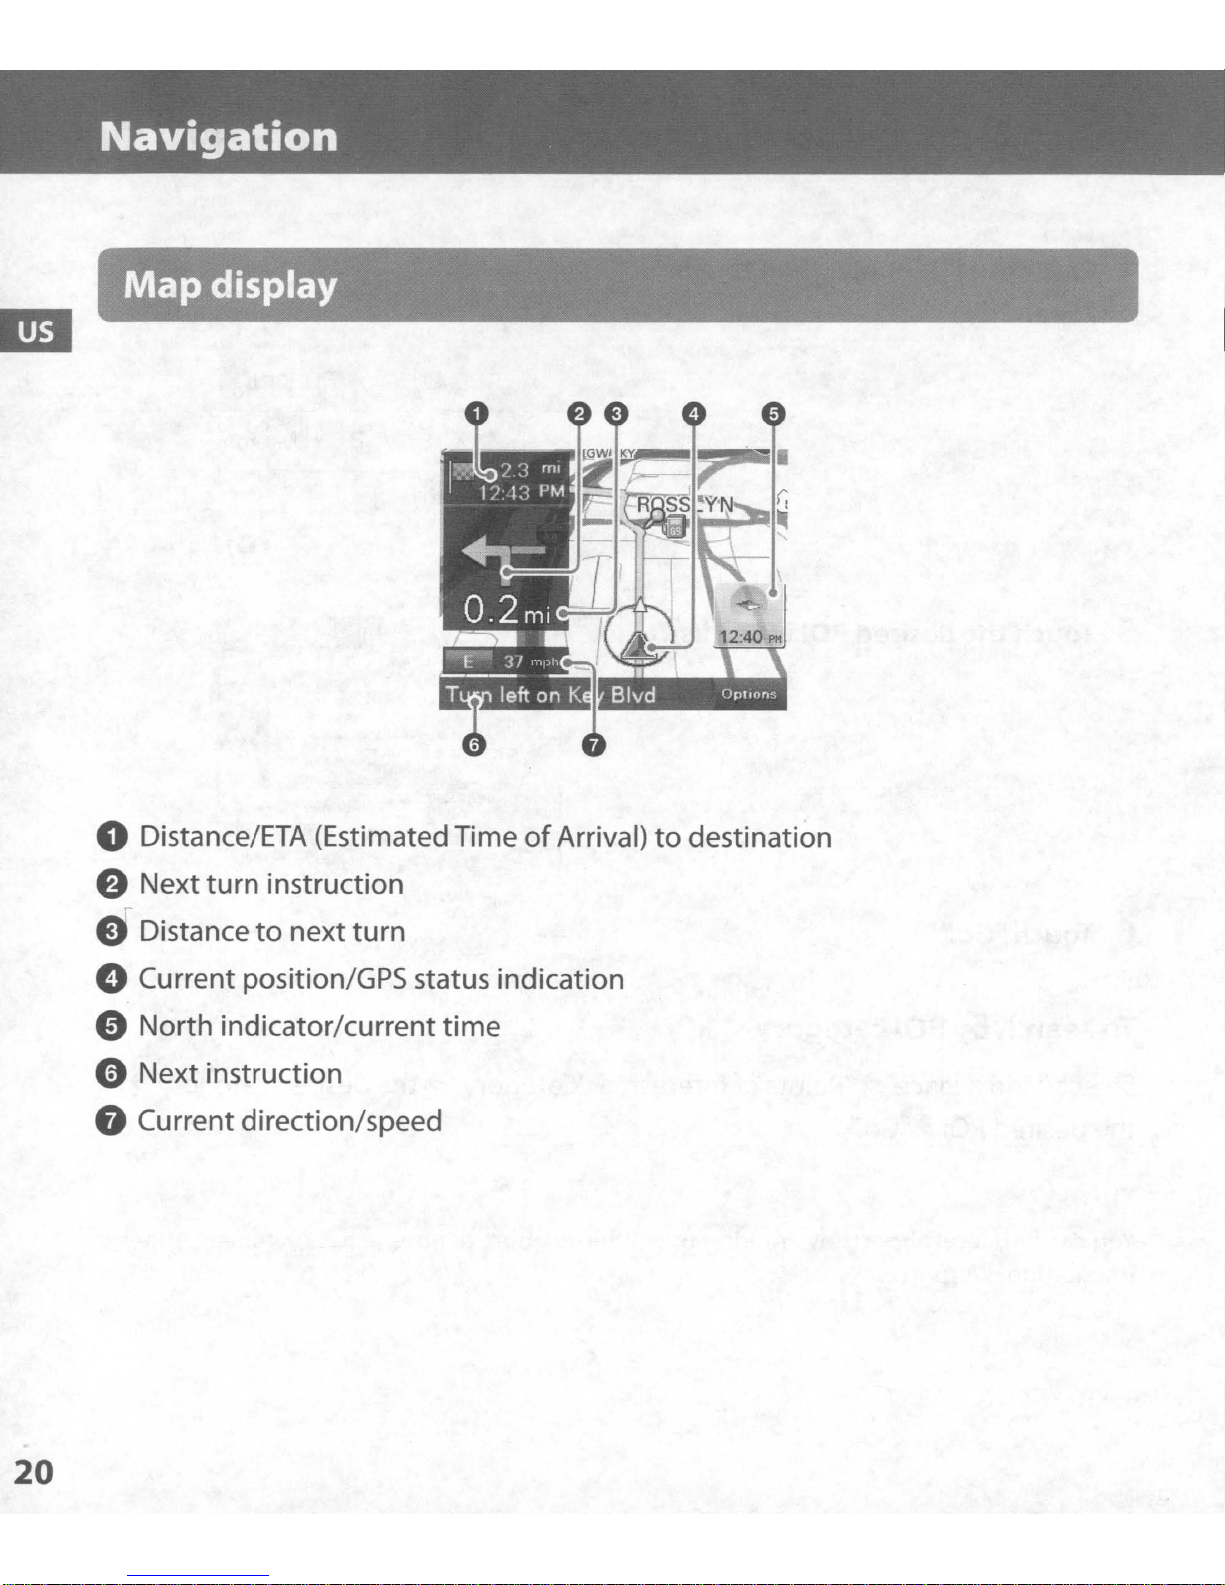
Map
display
o Distance/ETA (Estimated Time
of
Arrival)
to
destination
e Next turn instruction
eDistance
to
next turn
o Current position/GPS status indication
e North indicator/current
time
o Next instruction
8 Current direction/speed
20

Dual view
Approaching a freeway junction
o 3D
junction
image
e Lane guide(correct lane in yellow)
e Magnified view
of
an
intersection
Approaching a street intersection
oDistance bar
21
Navigation
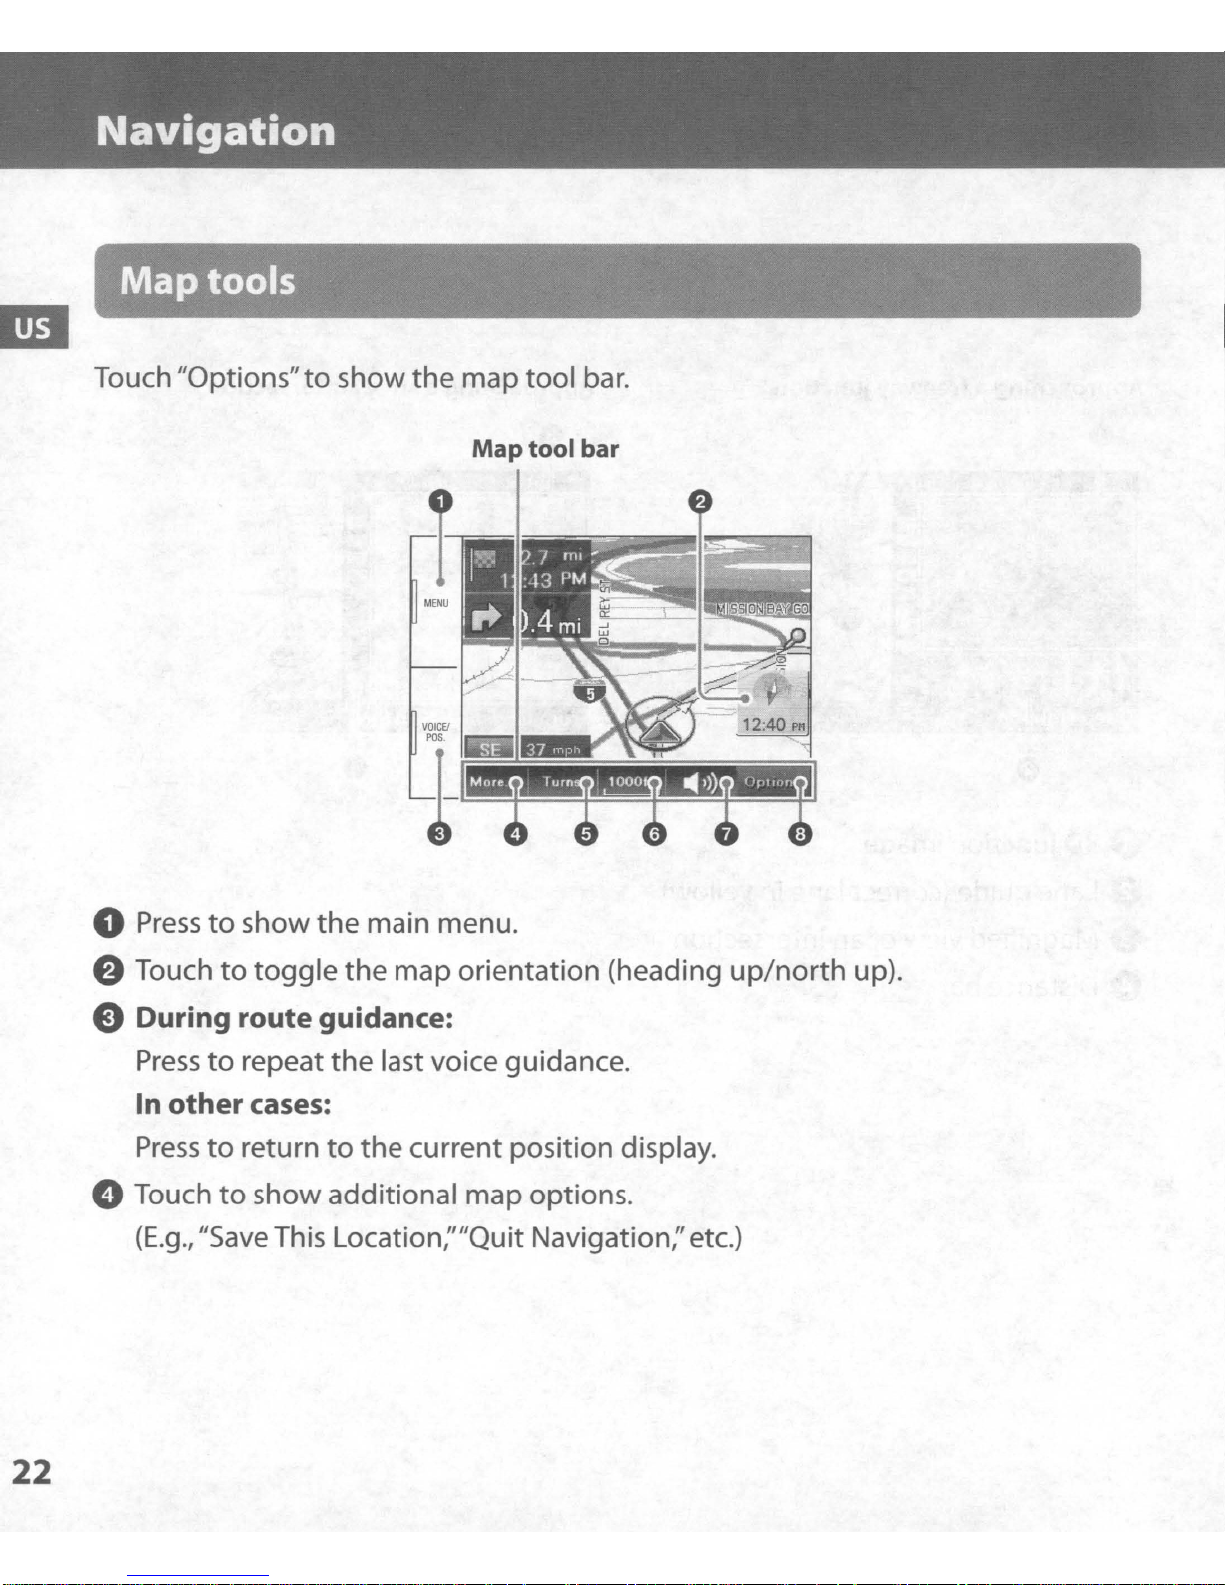
Map
Touch "Options"toshow the map tool
tools
MENU
VOICfJ
POS.
Map
tool
bar.
bar
22
o
Presstoshow
e Touch
to
toggle
the
main menu.
the
map orientation (heading
e During route guidance:
Presstorepeat
In
other
Presstoreturn
o Touch
(E.g.,
"Save
cases:
to
show additional map options.
the
last voice guidance.
to
the current position display.
This Location:'''Quit Navigation:'etc.)
up/north
up).
CD
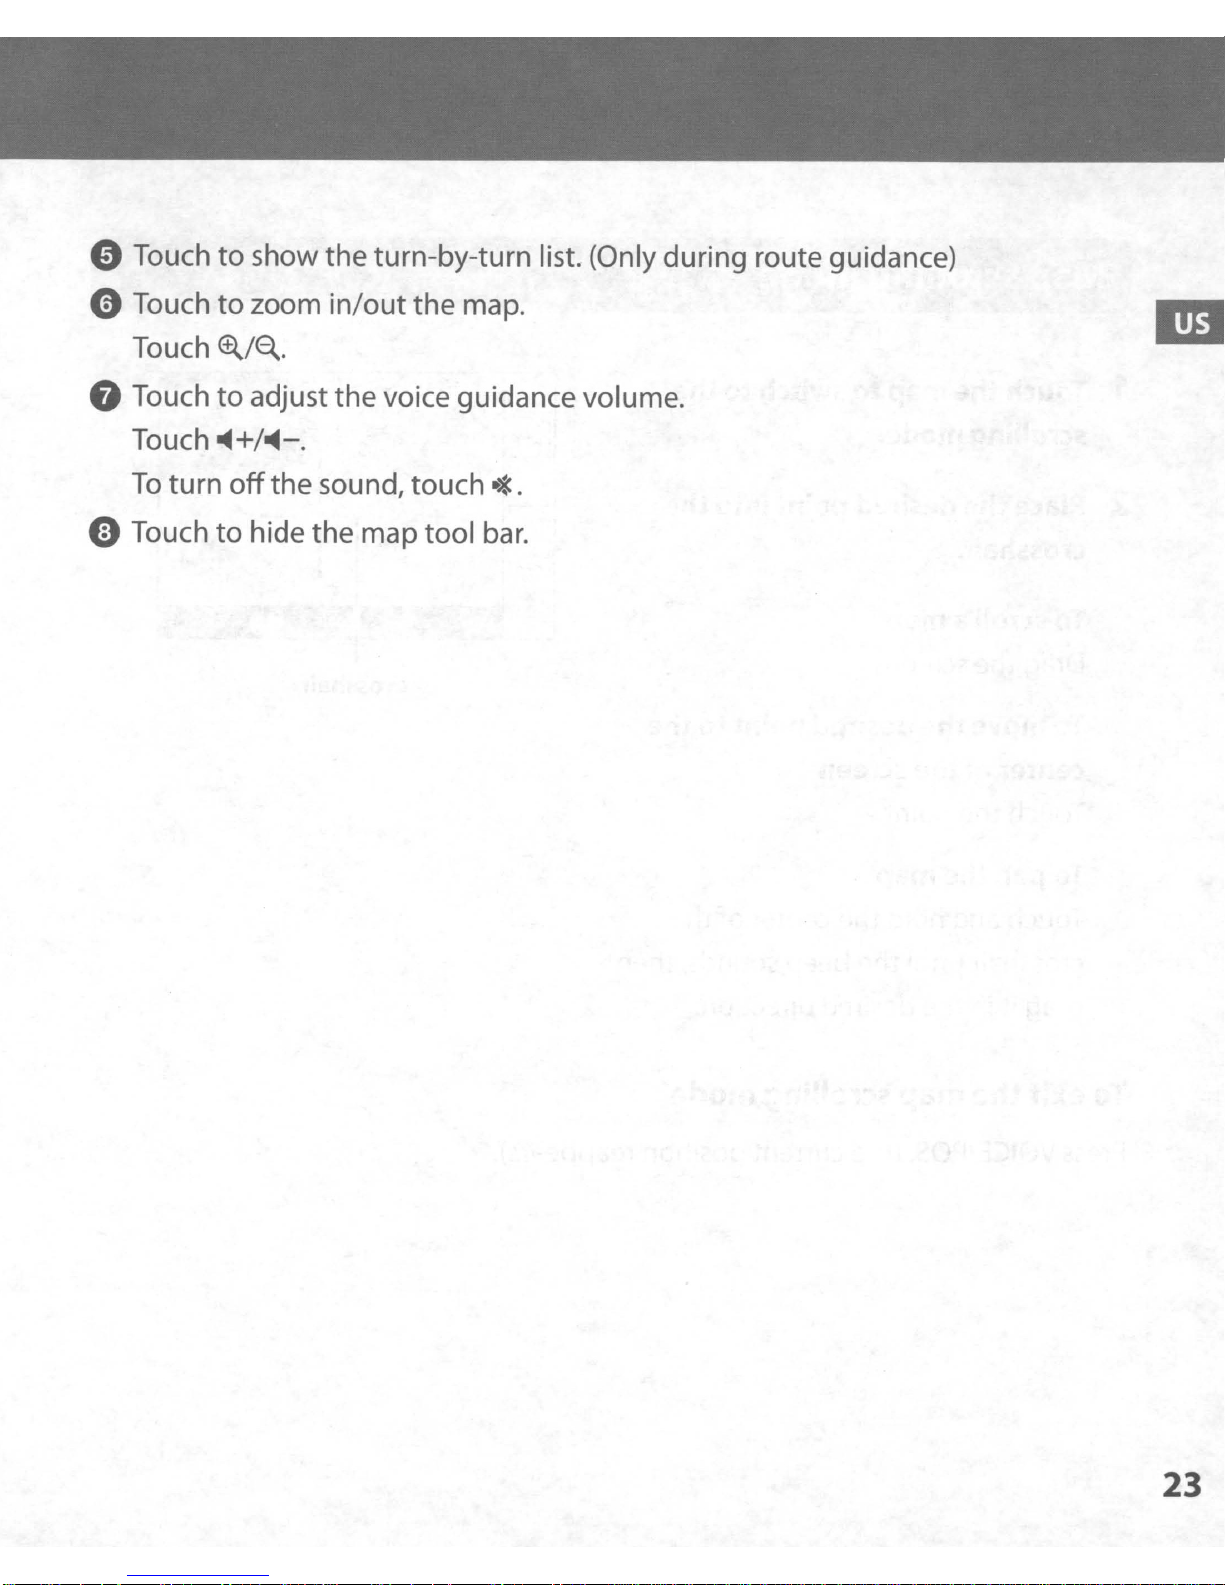
Touch
to
show the turn-by-turn list. (Only during route guidance)
oTouch
Touch
G Touch
Touch
To
turn
e Touch
to
zoom
~/~.
to
adjust the voice guidance volume.
~+/~-.
off
to
hide the maptool
in/out
the sound, touch
the
map.
.*.
bar.
23

Navigation
Map
1 Touch
scrolling
the
scrolling mode.
2 Place
the
crosshair.
To
scroll a map
Drag
To
center
Touch
the
move
of
the
mode
map
desired point into
screen.
the
the
point.
to
switch
desired point
screen
to
the
to
the
the
MENU
VOICE!
POS.
."
'0011 i
Crosshair
..
I»
Op'Ions
To
pan
Touch and hold
crosshair until
dragitin
To
exit
Press
the
VOICE/POS.
the
the
map
map
the
centerofthe
the
beep sounds,
then
desired direction.
scrolling
mode
(the current position reappears).
24
Basic
Settings
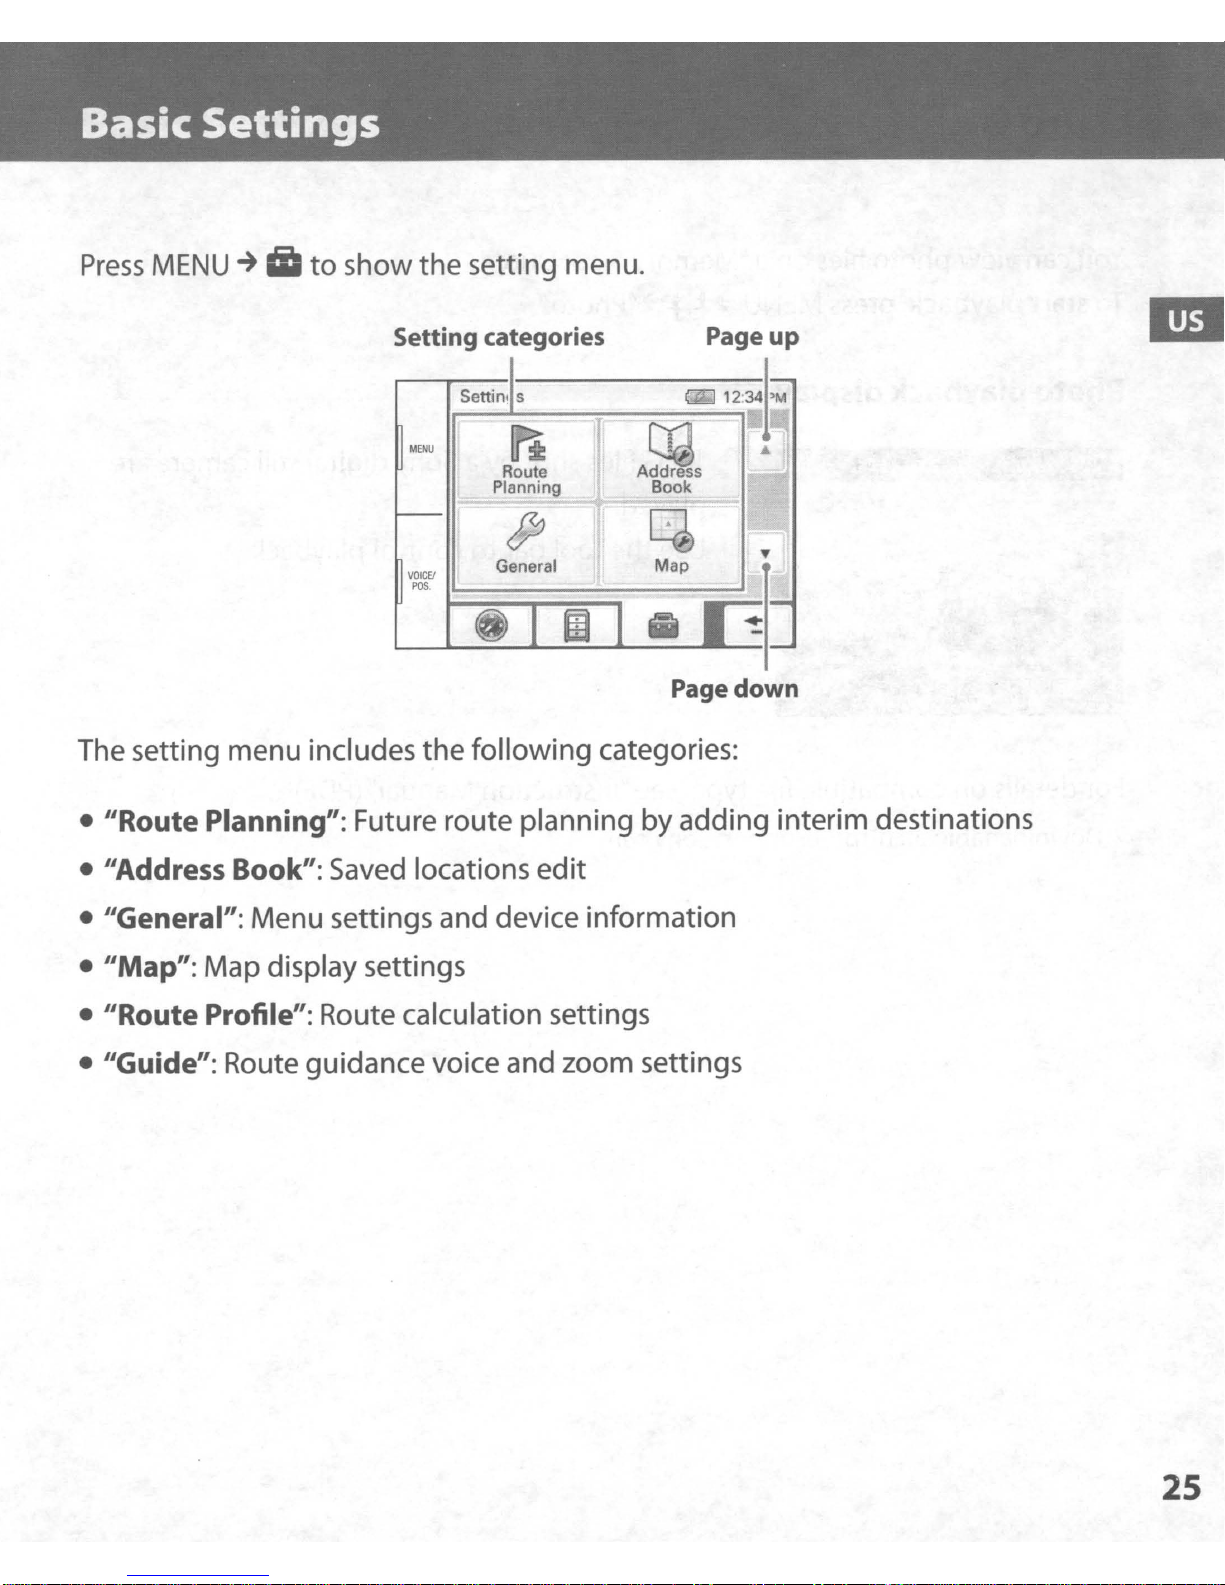
Press
MENU
~
iii
to
show the setting menu.
Setting categories
Settinl S
MENU
VOICEI
PaS.
General
1'-------.;..-------'1
Page
down
The setting menu includes the following categories:
• "Route Planning": Future route planning by adding interim destinations
• "Address Book": Saved locations edit
• "General": Menu settings and device information
• "Map": Map display settings
• "Route Profile": Route calculation settings
• "Guide": Route guidance voice and zoom settings
25
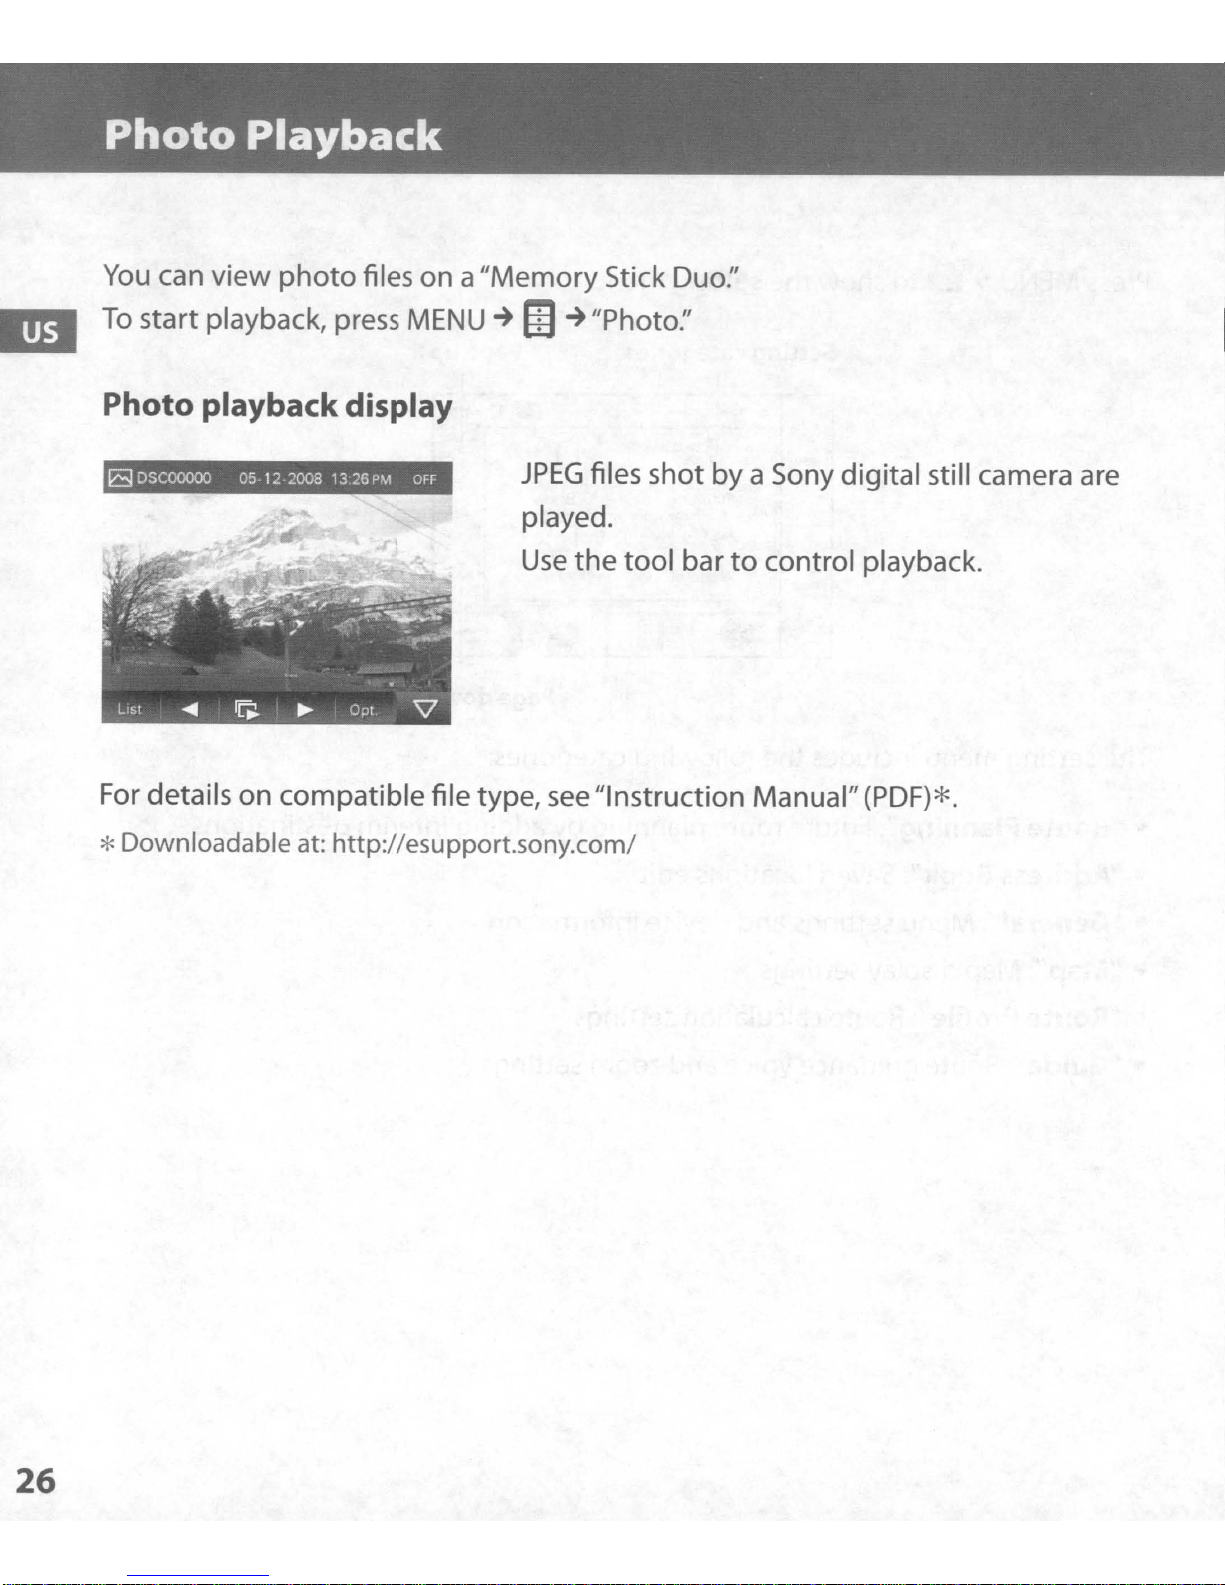
Photo
You
can
To
start playback, press
Playback
view
photo
files on a
MENU
Photo playbackdisplay
I
a
DSCOOOOO
05-12-
2008
13.26
PM
OFF
"Memory
~
m
~
JPEG
played.
Use
the
Stick Duo:'
"Photo:'
files shot
tool
bar
by
a Sony digital still camera are
to
control playback.
For details on
compatible
file type,
see
"Instruction Manual"(PDF)*.
*Downloadable at: http://esupport.sony.com/
26
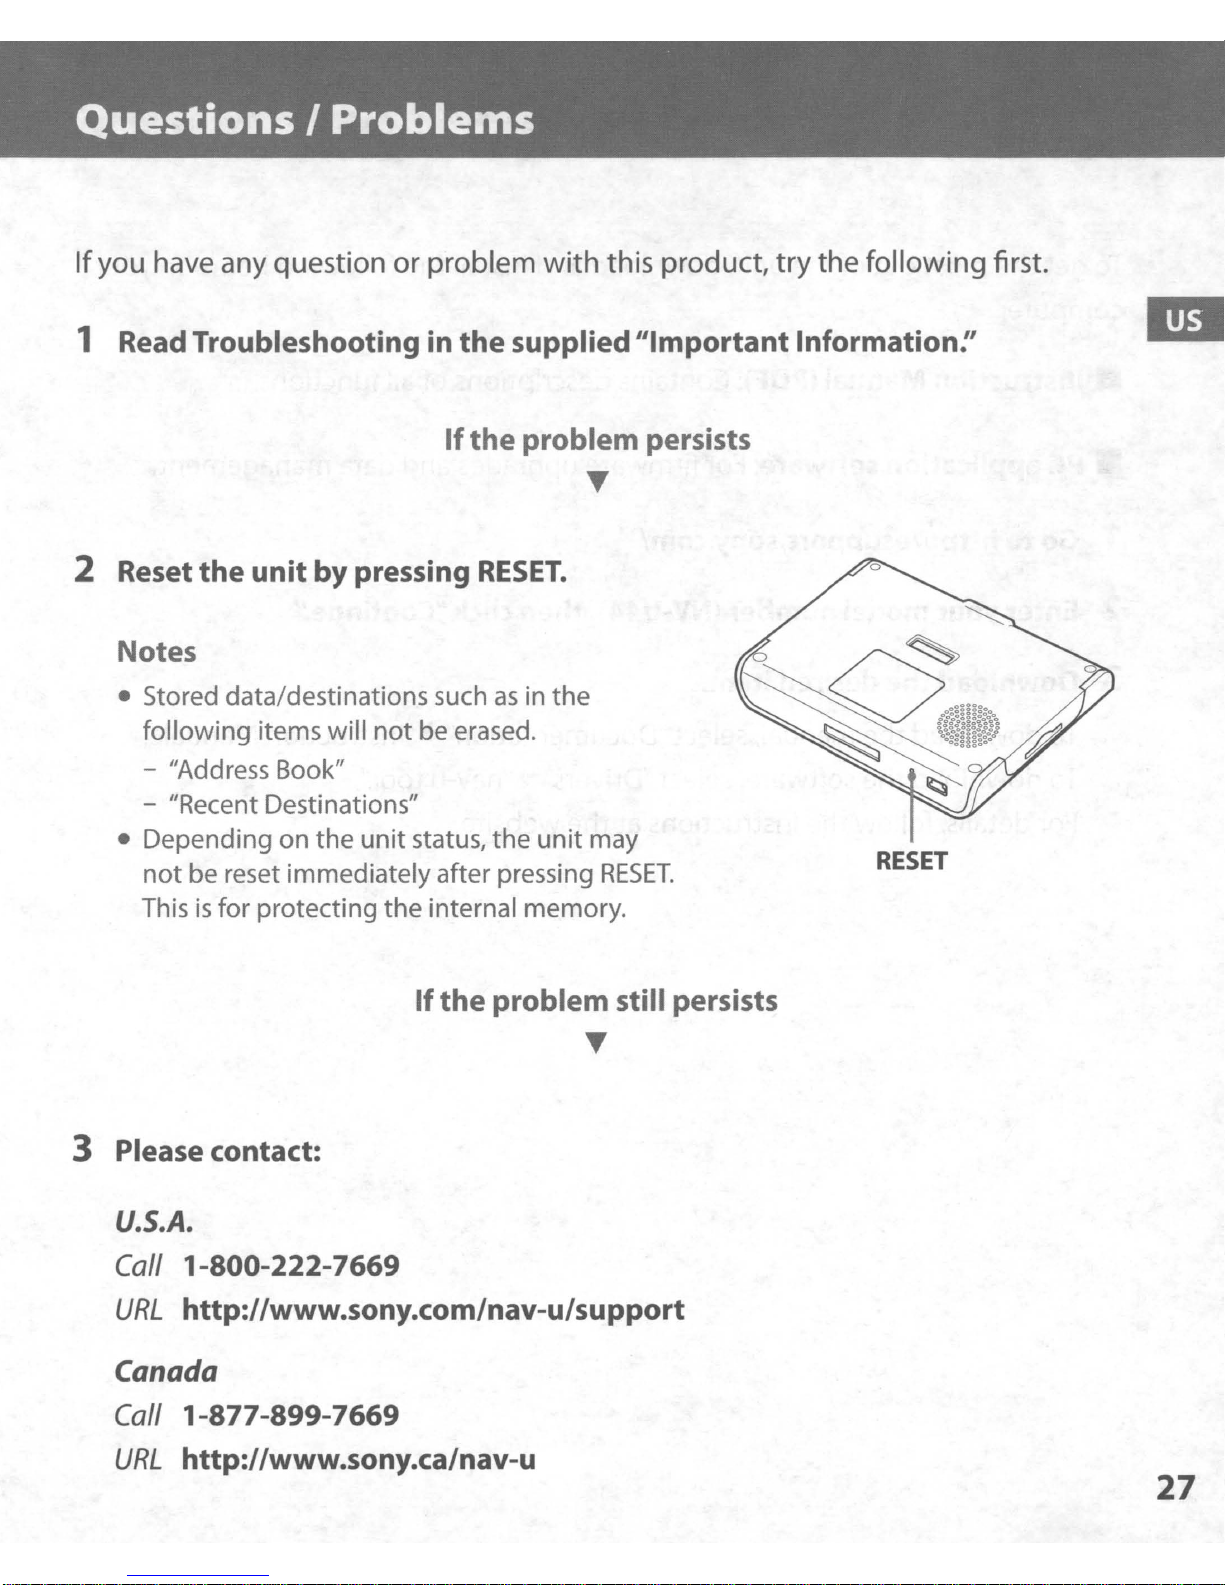
QuestionsIProblems
Ifyou have any question or problem with this product,
try
the following first.
1 Read Troubleshooting in the supplied"Important Information!'
If
the
problem persists
T
2 Reset the unit by pressing
Notes
• Stored data/destinations suchasin
following items will
- "Address Book"
- "Recent Destinations"
• Depending on
not
be reset immediatelyafter pressing
the
not
unit
status,
RESET.
be erased.
the
the
unit
may
RESET.
RESET
III
Thisisfor protecting the internal memory.
3 Please contact:
U.S.A.
Call
URL
Canada
Call
URL
1-800-222-7669
http://www.sony.com/nav-u/support
1-877-899-7669
http://www.sony.ca/nav-u
If
the
problem still persists
T
27
Extra
To
get
the most
Items
out
of
the unit, download and install the following items on your
• Instruction
•
PC
application software:
1 Go
to
http://esupport.sony.com/
M~nual
(PDF): Contains descriptions
of
all functions.
For
firmware upgrades and data management.
2 Enter your model number (NV-U44), then click"Continue:'
3 Download
To
download the manual, select"Documentation"~IIlnstruction Manual:'
To
download the software, selectIIDrivers"~"nav-u tool:'
For
details, follow the instructions at the website.
the
desired item.
28
4-00e~8Q6~·H·
_I
n_st_r_uc_ti_o_n
_M_a_nU_a_I
. .
(.1).
.
~
~
.
"..'
".
_

Using
The manuals for this unit consistofthe following 3 guides.
Before installing or operating the unit, read these manuals thoroughly and retain them for future
reference.
• Quick Start Guide
Contains instructions on basic operations, suchasinstallation, navigation operations, etc.
After you have read this manual, you should be ready to start using the unit.
• Important Information
Contains important notices to be read prior to use, including warnings, specifications, and
troubleshooting instructions.
• Instruction Manual (PDF) (this manual)
Contains descriptionsofall functions.
the
manuals
Note on this manual
Illustrations and screenshots in this manual may differ from the actual device.
2

TableofContents
Basic Operations
Menu operations 5
Gesture Command operations 7
Keyboard operations 9
Navigation
Checking the GPS status
Route searching
Address search
Home search . . . . . . . . . . . . . . . . . . . . . . . . . . . . . . . . . . . . . . . . . . . . . . . . . . . . . . . . . . . . . .
POI search
Intersection search
City center search
Quick Link search
Recent destinations search
Address book search 20
Favorites search 20
Option menu in the addresslPOI confirmation display
Map operations 22
Indications on the map 22
Map scrolling mode 25
Using the map tools 26
11
II
13
13
15
15
17
18
18
19
21
5
Route planning 28
Creating a new itinerary 28
Option menu for route planning
Adding an interim destination to the current route 32
Skipping to the next destination 32
Blocking the route 32
Route confirmation 33
Viewing the tum-by-tum list 33
Viewing the entire route 34
of
Viewing a map
Destination management 35
Recent destinations 35
Address book 35
Favorites 36
the vicinityofthe destination 34
continue to next
31
page!
3

Photo Playback
Viewing photos 37
Photo playback controls 38
Photo settings 39
37
Settings
Route planning settings 40
Address book settings
General settings 42
Map settings 44
Route profile settings 45
Guidance settings 46
Using the
System requirements 47
Installing the software 48
Connecting the unit to your computer 48
Starting the software 49
Guidance voice data management 50
Map data management. 5
PC
Application Software
40
41
47
I
Address book data management 52
Editing the address book data on your computer 52
Editing the address book data on the unit 52
Transferring address book data from your computer to the unit
Transferring address book data from the unit to your computer 53
Firmware upgrade 54
53
4

Basic
Common procedures to operate the system are explained.
General operations can be performed on the touch screen. Gently touch the displayed icons with
your finger.
Note
Do
the display.
Operations
not
press the display with excessive force. Do not use
any
sharp object, such as a pen, etc., to tap on
Menu
The main menu appears when you tum on the unit (except during route guidance,inwhich case
the map appears).
operations
T------N-a-v-i9-at-e------1
MENU
I 0
Enter Address
GQ
t
TakeMeHome
"'I
Q
My
VOICE!
POS.
Find a Place
Places
oPress to show the main menu.
e
To
check the battery status and current time.
e Press to show the current position on the map.
e Touch to show the navigation menu.
eTouch to show the application menu.
oTouch to show the setting menu.
8 Touch to return to the previous display.
5
continue to next page
~

Other basic menu operations
cancel the setting "Cancel"
confirm the selection/proceed to the next step "Done" or "OK"
About the battery status indication
The battery status can be checked by the indicator in the main menu.
Indicator;
G2J
CJ
Adapter connected.
Fully charged.
Not fully charged.
Low battery.
is
Battery
empty. Charge battery immediately.
6

Gesture
Frequently-used operations can be perfonned by assigning finger strokes such as a line, etc.
For navigation
In
the map display (except in map scrolling mode), draw the command stroke as below.
To;
Command
operations
start navigation to your home (page
start navigation to a destination stored in
Favorites (page 20)
to
change map scale
(page 44)
the "Preset Scale"
15)
"Favorite
"Favorite 2"
a circumflex
I"
an
"L"
shape
a mirror-reversed "L"
o
a clockwise circle
o
a counterclockwise circle
7
continue to next page
~

For photo playback
In
the photo playback display, draw the command strokeasbelow.
For details on photo playback, see page 37.
start the slideshow
(only when playback controls are shown)
skip to the previous file
skip to the next file
skip to the previous folder
skip to the next folder
•
a dot
+-
a horizontal line (right to left)
....
a horizontal line (left to right)
a vertical line (downwards)
t
a vertical line (upwards)
8

Keyboard
The keyboard display appears when you needtoenter text.
When entering addresses, you need only enter characters in upper case, as the system
automatically converts them to appropriate characters.
characters/symbols when necessary.
The following types
operations
of
keyboards are selectable:
You
can change the case or enter special
• "QWERTY
• "QWERTY": Large QWERTY layout without number keys.*
• "ABC": Alphabetical layout without number keys.
* "QWERTY" refers to the top row
For details on how to change the setting, see page 43.
QWERTY layout with number keys:
+ 123": QWERTY layout with number keys.*
of
letters, reading from the left,
Entry field
;R~
,..
...
....
~.
of
fla':ks''''':H
~-----_---I'-~"--.,,-
1 2 3 4 5 6 7 8 9 0
-t
•
..
- •
Q W E R T Y U
, A
-'S
~D.~.F
Z X C V B N M Abril!
~G~~~'J'~'K
lOP
a traditional typewriter style keyboard.
..~_
continue to next page
~
9

enter an alphabetical character
the desired character key
enter a number
enter a special character
enter a symbol
enter a space
delete a character
change the case
proceed to the next step
show the candidate list*2
confirm the entry
the desired number
"A.6N"
keyboard, then the desired character; and
"ABC" to switch back
"@
the desired symbol key; and "ABC" to switch
back
"Space"
"Backspace"
"Caps"
"Next"
"Search"
"Done"
to switch to the special character
!?" to switch to the symbol keyboard, then
key*1
*I When another keyboard type is selected, touch "123" to switch to the numeric keyboard.
*2 The candidate list automatically appears when candidates are narrowed down asyou continue inputting
characters.
10

Navigation
Checking
the
GPS
status
About the GPS status indication
The GPS status can be checked by the colorofthe current position icon.
If
the current position is not displayed, press
Current position icon
VOICE/paS.
to show the icon.
Note
AcquisitionofGPS
an
open
space
Tip
If
GPS
signal
display.
You
can
also
By
touching
information (page 12).
signal
for faster acquisition.
reception is
check
the information bar,
the
Signals are insufficient for navigation.
Reception temporarily interrupted (e.g., in a tunnel).
Signals are sufficient for navigation.
may
take up to 10 minutes,
poor
after
turningonthe unit, the information
GPS
status
by
you
can
the
message
jumptothe display where
especially
on
the information bar.
for
the
you
first time.
bar
appearsatthe
can
view
Make
sure
that
you
are in
topofthe
detailed
GPS
status
continue to next page
~
11

Viewing detailed GPS status information
Detailed GPS status information, such as the latitude, longitude, etc., can be viewed to check if
is
the current position
properly calculated.
1 In the menu display,
touch.
6ii ., "General," then "GPS Status."
12

Route
You
The following route search methods are available.
• "Address search" (page
• "Home search" (page
•
"POI
• "Intersection search" (page
• "City center search" (page
• "Quick Link search" (page 18)
• "Recent destinations search" (page
• "Address book search" (page 20)
• "Favorites search" (page 20)
searching
can search for a route in various ways.
13)
15)
search" (page
15)
17)
18)
19)
Address search
Address search allows you to set the destination by entering the address information such as
house number, street name, etc.
Note on the state selection
The system recognizes the state you usually drive in
at
the same state name
When GPS detects that the currentposition is
automatically appears, allowing you to
each address search.
set
the desired state.
and
sets it as default, so that you do
not
in the default state, the state selection display
not
needtoenter
Full address search
Follow the procedure belowifyou know the house number, street name, and the city nameofthe
destination.
1
In
the menu display,
If
the state selection display appears, select the new (current) state or "Change to Different
State."
When selecting "Change to Different State," enter the state name, then select the desired state.
The house number input display appears.
touch.
,~,
then "Enter Address."
2 Enter the house number.
The street name input display appears.
3 Enter the street name.
The listofstreet candidates appears.
4 Select the desired street
The city name input display appears.
in
the list.
5 Enter the city name.
The listofcity candidates appears.
continue to next
page!
13

6 Select the desired
If
more than one address candidate exists, the listofcandidates appears. In this case, select
the desired address.
The address confirmation display appears.
city
in the list.
Address
ConfirmatIon
7 Select "Go."
Route guidance starts.
Street search
If
the house numberisnot known, a search can be made to an approximate point on the street.
1 In the menu display,
If
the state selection display appears, select the new (current) state or "Change to Different
State."
When selecting "Change to Different State," enter the state name, then select the desired state.
The house number input display appears.
2 Select
The search method options appear.
"Skip"
without
touch.
'iJ,
then
"Enter
entering the house number.
Address."
3 Select "Representative Point
The street name input display appears.
of
the
Street."
4 Enter the street name.
The listofstreet candidates appears.
5 Select the desired street in
If
more than one city or address candidate exists, the setting display(s) appears. In this case,
set the city or select the address.
The address confirmation display appears.
the
list.
6 Select "Go."
Route guidance starts.
To
set
the
destination in another state
You
can select a different state when "State" appearsinthe name input displays.
Select "State," enter the state name, then select the desired state.
Tips
by
• The state can be set
• The listofstate/city/street candidates automatically appears without touching "Search" when narrowed
down
to
4 candidates.
entering its standard2-letterabbreviation (e.g.,
NY
for New
York).
continuetonext page
~
14

Home search
If you register your home, you can search for a route there.
For details on registering your home, see page 42.
1 In
the
menu display,
Route guidance starts.
Tip
If
you select 'Take Me Home"without having registered a home address, the registration display
automatically appears.
With
Gesture
In the map display, draw At. .
-,----------------------------------
POI
search
POI (PointsOfInterest) search allows you to set facilities such as restaurants, hotels, gas
stations, etc., as the destination.
The system searches for POls near the current position.
Command
touch.
,ilj .,
then
"Take Me Home."
To search
You
can specify the city before selecting the POI search method.
In
this case, the system searches for POlsinthe city center.
In
the menu display,
1
The search method selection display appears.
2 Select "Points
3 Select "Change City."
4 Enter the city name.
5 Select the desired city in the list.
To
switch back to the nearby search, select "Nearby."
for
the
POlsinanother
touch,
of
Interest."
city
,~
.'
then "Find a Place."
continuetonext
page!
15

By POI name
You
can search for a route to a POIbydirectly entering its name.
1 In the menu display,
The search method selection display appears.
touch.
:~
.,
then "Find a Place."
2 Select "Points of Interest:'
3 Select "By Name."
The POI name input display appears.
4 Enter the POI name.
The listofPOI candidates appearsinorderofdistance from the current position.
S Select the desired POI.
The POI confirmation display appears.
Address
6 Select "Go."
Route guidance starts.
Tip
If
there are too many POI candidatesinthe list after step 4 above, you can narrowdownbyselecting
category(ies). Select "Category" to showthe category list, then select the desired category(ies).
Confirmation
16
continue to next page
~

By
POI
category
You
can search for a route to a POI by selecting its category(ies).
1 In
the
menu display,
touch.~
.'
then
"Find
The search method selection display appears.
a Place."
2 Select
"PointsofInterest."
3 Select "Category."
The listofcategory candidates appears.
4 Select
Select sub category when necessary until the POI candidates are narrowed down.
The list
S Select
The POI confirmation display appears.
6 Sl:!lect "Go."
Route guidance starts.
Tip
If
there
POI
name.
Intersection
The intersection can be set as a destination,ifavailable for the selected street.
1 In
The search method selection display appears.
2 Select
The street name input display appears.
3 Enter
The listofstreet candidates appears.
the
desired category.
of
candidates appears in orderofdistance from the current position.
the
desired POI.
are
too
many
Select
the
menu display,
"Find
the
street name.
POI
candidatesinthe
"Name"toshow
search
touch.
Intersection."
the
POI
name
,ii
list
.,
after
input
then
step
4 above,
display, then
"Find
you
can
enter
a Place."
narrow
the
POI
downbyentering
name.
the
4 Select
the
desired
streetinthe
list.
If more than one city candidate exists, the city name input display appears.Inthis case, enter
the city name, then select the desired city.
The street name input display appears.
S Enter
the
other
street
name.
The listofstreet candidates appears.
6 Select
the
street.
The address confirmation display appears.
7 Select "Go."
Route guidance starts.
Tip
The intersection
house
number
search
input.
can
alsobemadebyselecting
For
details,
see
"Street
"Enter
search"onpage
Address"instep1above
14.
and
skipping the
continuetonext
17
page!

City center search
The city center can be set as a destination.
1 In the menu display,
The search method selection display appears.
touch.
'il
,then
"Find a Place."
2 Select "Find City."
The city name input display appears.
3 Enter
The listofcity candidates appears.
4 Select the desired
The address confirmation display appears.
the
city
name.
city
in the list.
5 Select "Go."
Route guidance starts.
Tip
The city centersearch can alsobemadebyselecting "EnterAddress"in step 1 above
house numberinput. For details, see "Street search"on page
Quick
Quick Link allows for quick access to the preset POI name/category.
Frequently-used POI categories (e.g., "Gas Station") are preset in Quick Links as default, which
can be changed
1 In the menu display,
Link
The search method selection display appears.
search
if
desired.
touch.
,:j)
., then "Find a Place."
14.
and
skipping the
2 Select the desired Quick Link.
The listofPOI candidates appearsinorderofdistance from the current position.
3 Select the desired
The POI confirmation display appears.
POI.
4 Select "Go."
Route guidance starts.
continue to next
page!
18

Changing a POI name/categoryinQuick Links
1 In the menu display, touch
2
SE~lect
3
SE~lect
Elly
Category
Category and By Name
--------------------------------
Recent destinations search
The system stores previous destinations, allowing you to selectone quickly from the list.
For details on how to delete the history, see page 35.
1
In
The search method selection display appears.
2
S4elect
The listofsearched destinations appearsinreverse chronological order.
"Quick Link Settings," then the desired Quick Link.
the desired setting method.
Name
the menu display,
"Recent Destinations."
touch.
,tlJ
'9)
,then
.'
"Find a Place:'
the POI name.
Enter the name.
the POI category.
Select category(ies).
the POI category and name.
Select category(ies)
enter the name.
then "My Places."
-+
"By Name," then
3 Sielect the desired item in the list.
The addresslPOI confirmation display appears.
4 Sielect "Go."
Route guidance starts.
19
continue to next page
~

Address book search
You
can select the destination saved in the address book.
For details on how to manage the address book, see page 35.
1 In the menu display,
The search method selection display appears.
2
Select"
The list
Address Book."
of
groups appears.
touch.
,ii) ., then "My Places."
3 Select the desired group.
The list
4 Select the desired entry
The addresslPOI confirmation display appears.
of
datainthe selected group appears.
in
the list.
5 Select "Go."
Route guidance starts.
Favorites search
You
can select a destination that is savedinthe Favorites.
For details on how to manage Favorites, see page 36.
1 In the menu display,
The search method selection display appears.
2 Select "Favorite
Route guidance starts.
With Gesture Command
In the map display, draw oneofthe command strokes:
- Favorite
- Favorite 2:
1:
L..
...J
touch.
1;'
"Favorite
(~,
then "My Places."
2,"
"Favorite
3,"
or "Favorite
4."
20
continue to next page
~

Option menuinthe address/POI confirmation display
The option menu in the addresslPOI confirmation display provides various useful operations.
When the confirmation display appears after setting a destination, select "Options," then one
the following items.
Save This Location*1 (page 35)
Edit Item*1 (page 41)
of
Interim Destination*2 (page 32)
*I Appears depending on your selection. "Edit Item" appears when you select "My Places"
Book." In other cases, "Save This Location" appears.
*2 Available only during route guidance.
Adds the point
current route. The system navigates you to
this point before the current destination.
as
an interim destination in the
-+
Fine adjusting the destination point
You
can jump from the addresslPOI confirmation display to the map scrolling mode, and fine
adjust the destination point.
1 Sielect "Map"
The map
For details on the map scrolling mode, see page 25.
in
in
the address/POI confirmation display.
the scrolling mode appears.
2 Drag the screen to fine adjust the destination point, then select "Go."
Route guidance starts.
"Address
21

Map
operations
Indications on the
When
no
route guidance isinprogress:
map
oCurrent direction (page 44)
eCurrent speed (page 44)
e Current position/GPS status indication (page
G)
North indicator/current time
4)
Current street name
II)
22
continue to next
page!

During route guidance:
Straight-ahead driving
G DistancelETA (Estimated Time
oDistance to next tum
CD
Next instruction
Approaching an intersection
o Next tum instruction
of
Arrival) to destination
continue to next
page!
23

Approaching an intersection (c1oser)*
• Magnified viewofan intersection (page 46)
oBar indication
of
the distance to next tum
Approaching an intersection
(even c1oser)*
G Current position
*
You
can set to hide the magnified viewofan intersection (page 46).
continue to next
page!
24

Map scrolling mode
You
can switch to map scrolling mode by touching the map, whether during route guidance
or
not.
By placing the desired point into the crosshair, you can view the information on the point or open
the map options.
of>
Mor.
I
Turns
I
~
I
..
,»
OptIon":
Operationsinmap scrolling mode
scroll a map
move the desired point to the center
screen
pan the map
exit the map scrolling mode
of
the
drag the screen
touch the point
touch and hold the center
of
the crosshair
until the beep sounds, then drag it in the
desired direction
press VOICEIPOS.
(The current position reappears.)
continue to next
page!
25

Using the map tools
The map tool bar appears when you touch "Options" on the map display.
oTo show the main menu.
e
To
toggle the map orientation (heading up/north up).
e During route guidance:
To
repeat the last voice guidance.
In other cases:
To
return to the current position display.
e
To
show more map options.
e To show the turn-by-turn list (page 33).*
e
To
zoom in/out the map.
Touch
8
To
Touch
To tum off the sound, touch
eTo hide the map tool bar.
~/~.
adjust the voice guidance volume.
..
+/..-.
~.
* Available onlyduring route guidance.
26
continue to next
page!

More map options
More options are available by selecting "More
Navigate to Here*1
Save This Location
(page 35)
Edit Item*2 (page 41)
Quit Navigation*3
Skip to Next Destination*3*4*5
(page 32)
Block Route*3*4 (page 32)
Search from Here*1
*1 Available only for the pointselected
*2 Available only for address bookentryicons.
*3 Available onlyduring route guidance.
*4 Appears when
*5 Available only
if
*4
in
map scrolling mode.
--.2LJ
is touched.
more than one destination pointexists.
...
"inthe map tool bar.
Starts route guidancetothe point.
Saves the point to the address book.
Edits the address book entry.
Exits the current route guidance.
Reroutes to skip to the next destination.
Routes a detour for a specified distance from
the current position.
Searches for POls near the selected point.
27

Route
planning
Creating a new itinerary
The procedure to create a new itineraryisexplained below.
1
In
the menu display,
touch.
Iii
.'
then "Route Planning."
2 Select "Route Planning," then "Options:'
3 Select "New Route:'
The route planning display appearsinwhich the current position is set as the start point.
Rout~
Planning
IJil
(Starting
For details on how to change the start point, see "Editing route points" on page 30.
Point)
4 Select "Add" to add a route point
The search method selection display appears.
:,i
.~
in
your itinerary.
5 Select the desired search method to set the route point.
Enter Address
Home
Find a Place
by address search (page 13)
your home as the route point (page 15)
15),
by POI search (page
(page 17), city center search (page 18), or
Quick Link search (page 18)
intersection search
My Places
Browse Map
Current Position
by recent destinations search (page 19),
address book search (page 20), or Favorites
search (page 20)
a route point from the map display (page 25)
the current position as the route point
continue to next
28
page!

6 After setting the route point, select "Done."
The route planning display reappears with the selected point added in the list.
Haute Planning
I~
(Starting
P
(Destination)
Point)
...
-:
...
.
ii;li;l.l)M~i[!i.i,,;$
Add
Add
-
".
o t Calculatc
PIOns.
Routc
...
!
The last settingislisted as the final destination.
to
Repeat step 4
6 to continue adding route points. Up to10route points can be set.
7 Select "Calculate Route."
The route calculation starts.
After the calculation is complete, the route confirmation display appears.
Route Calculation Result
."
'IEAC~~
~
------,.
:
s ,
~
:I.
,/"
:,.
- '
::."
::!.':;;;,~t~::l:,~:
8 Select one of the following items.
Go Starts the route guidance.
Change Condition
Changes the route calculation conditions.
continue to next
page!
29

Editing route points
You
can edit the selected route points while creating an itinerary.
Select the desired route point
in
the route planning display, then oneofthe following items.
1,!m"IT;.~"
'
Change Location
Delete
Change Order
Tip
You
can open the route planning display
and
modify
Shows the search method selection display to
set the route point again.
Deletes the selected point from the itinerary.
Changes the order
Select the point to move
your
itinerary, even afterstarting route guidance.
of
route points.
~
,/)
continue to next
~
"Done."
page!
30

Option menu for route planning
The option menu in the route planning/route confirmation display provides various useful
operations.
When the route planning/route confirmation display appears, select "Options," then one
following items.
Saves the current route.
Select an unregistered line in the list, then
enter the name.
To
overwrite a registered route, select a
~
registered line in the list
"OK."
of
the
Saved Routes*l
Route Profile
(page 45)
Calculation Condition*l
New Route*l
Sort
by Distance*l
Simulation*2
*I Appears onlyin the option menu
in
*2 Appears only
the option menuofthe route confirmation display aftersetting the route points.
Edits the route/starts the route guidance.
Select the route, then one
of
the following
options.
- "Edit": Shows the route planning display to
edit the route point.
- "Rename": Changes the name
selected route.
- "Delete": Deletes the selected route.
- "Start Navigation": Starts the route
guidance.
Shows/changes the current route profile
settings.
Sets the route calculation conditions.
Shows the route planning display to create a
new itinerary.
Sorts the route points in order
of
from the start point.
Simulates the current route.
of
the route planning display while setting the route point(s).
of
the
distance
31
continue to next page
~

Adding an interim destination to the current route
During route guidance, you can add an interim destination.
1 In the menu display, touch
the interim destination.
For details on search methods, see "Route searching" on page
You
can select the desired search method, except for home search and Favorites search.
2 After setting the interim destination, select "Options"
confirmation display.
:~
, then select the desired search method to set
13.
in
the address/POI
3 Select "Interim Destination."
The route guidance to the interim destination starts.
Skipping to the next destination
If
more than one destination point exists during route guidance, you can cancel the current
destination and reroute to skip to the next destination.
1 In the map display, select "Options," "More...
2 Select "Skip to Next Destination."
The current destination
Blocking the route
is
canceled, and the route guidance to the next destination starts.
,"
then
---.2LJ.
During route guidance, you can detour for a specified distance from the current position. For
example,
1 In the map display, select "Options," "More...
if
traffic congestion occurs aheadofthe route, you can reroute to avoid this area.
,"
then
---.2LJ.
2 Select "Block Route."
The distance setting display appears.
3 Select the desired distance, then "Detour."
Recalculation starts.
32

Route
I
confirmation
Viewing the turn-by-turn list
During route guidance, you can view the turn-by-turn list.
1 In the map display, select "Options," then "Turns."
The turn-by-turn list appears.
Turns
<:u
j
~
;
CfJ
Enter the highwaytoI·
2.5m;
1-5Ntol-5N
8.4m. 1-5 Nto1-5 N
...
2 Select the desired item to show the detailed information.
continue to next
page!
33

Viewing the entire route
During route guidance, you can view the entire route to the destination.
1 In the map display, select "Options," then "Turns:'
2 Select "Confirm Route."
The entire route appears.
Route Confirmation
:~
..
°.'
_
._,
..
,
~.
1
To
change the route calculation conditions
1 Select "Change Condition," then the desired option.
Route guidance starts.
Viewing a map of the vicinity of the destination
During route guidance, you can view a mapofthe vicinity of the current destination.
1 In the map display, select "Options," then "Turns:'
2 Select "Show Destination."
A mapofthe vicinity of the current destination appears.
34

Destination
management
Destinations on "Recent Destinations," "Address
Book,"
and "Favorites" can be managed.
Recent destinations
You
can delete the historyof"Recent Destinations."
1 In the menu display,
touch.
,~
.' "My Places;' then "Recent Destinations."
2 Select "Delete."
3 Sielect the item to delete.
To select all items, select "All."
Tounselect all items, select "Clear."
4 Select "Done," then "OK."
The selected item(s) is deleted.
Address book
You
can register the destinations or points on the map to the address book.
From the navigation menu
1 In the menu display,
For details on search methods, see "Route searching" on page
You
can select the desired search method, except for home search, address book search, and
Favorites search.
touch.
'iJ
,then
select the desired search method.
13.
2 After setting the destination, select "Options" in the address/POI confirmation
display.
3 Select "Save This Location."
The registration display appears.
Save to Address Book
SAN DIEGO. CALIFORNIA
~
Default
:
~-_/.~:-
......
h.".'
.............
continue to next
page!
35

4 Set the
following
items.
Name
Group
Phone
Icon
Sound
Enters the name.
Selects the group to categorize.
To
create a new group, select "New Group,"
then enter the group name.
Enters the phone number.
Selects the icon to show on the map.
To
select from the facility icon list, select
"Facilities Icons"
Configures the sound setting.
- "Sound Function": Sets to
notification sound upon approach.
- "Sound Source": Selects the sound source.
- "Distance
Selects the distance at which the sound
will be output.
~
category(ies)~icon.
"ON"
of
Starting to Play Back":
to have
5 Select "Done."
The destinationisadded to the address book and indicated by the selected icon on the map.
From
the
map
option menu
1 In
the
map display,
select the desired point.
touch
the
maptoswitchtothe map
scrolling
mode, then
2 Select "Options," then
Follow the procedure from step 3 above to add the selected point to the address book.
Tip
Further managementofaddress book is available from the setting menu (page 41).
"More
..."
Favorites
You
can register destinations to "Favorite
separately.
1 In the menu display,
touch.
1,"
"Favorite 2," "Favorite
..,
then "General."
3,"
and "Favorite
2 Select "Favorites."
3 Select "Favorite 1," "Favorite 2," "Favorite 3,"
4 Select
For details on search methods, see "Route searching" on page
You
5 After setting
display.
The destinationisstoredinthe selected Favorite.
To
change the registration in Favorites
Follow the procedure above and overwrite a registered Favorite.
the
desired search method.
can select the desired search method, except for Favorites search.
the
destination, select
"Done"
or
"Favorite
in the address/POI confirmation
4."
13.
4"
36

Phpto
You
Insert a "Memory Stick Duo" containing photo files shot by a Sony digital still camera in the
unit.
Playback
can view photo files stored on a "Memory Stick Duo" insertedinthe unit.
SUPI:lOrted
• File format
JPEG
• File extension
.JPG
• Number
Max.
Viewing
1 In the menu display,
The list
To
To
photo file type
of
pixels
12
mega pixels
photos
touch,
of
folders/files appears.
move to the upper level, touch
list files as thumbnails, select "Thumbnail."
2 Select the desired folder/file.
If
you select a folder, then select the desired file.
Tlhe
photo playback display appears with the selected photo file.
III,
then "Photo."
II:!J
•
continue to next page
~
37

Photo playback controls
Touch the display if the photo playback controls are not shown.
File name/shooting date and time
Ii~
oTo exit the photo browser.
e To select a file from the list.
e
To
skip to the previous file.
G To start the slideshow.
eTo skip to the next file.
G
To
open the option menu for photo playback.
oTo hide the playback controls.
With Gesture Command
of
In the photo playback display, draw one
- Start the slideshow (only when playback controls are
- Skip to the previous file: -
- Skip to the next file: -
- Skip to the previous folder: •
- Skip
to
the next folder: t
the commandstrokes:
1.1
shown):.
Option menu for photo playback
The following options for photo playback are available.
Select "Opt." in the tool bar, then one
Clockwise
Counterclockwise
of
the following items.
Rotates the current photo clockwise in 90
degree steps.
Rotates the current photo counterclockwise in
90 degree steps.
38

Photo
The following photo settings are configurable.
In
the photo file list, select "Settings"-+the desired item-+the desired option.
settings
Playing Interval
Repeat
Slideshow Range
File Order
Sets the slideshow interval.
Repeats the slideshow.
of
Plays slideshow
"Memory Stick Duo" or the currently selected
folder.
Sorts photo files by shooting date or name.
all photo files in a
39

Settings
The setting menu includes the following categories.
• "Route Planning" (page 40)
• "Address Book" (page
• "General" (page 42)
• "Map" (page 44)
• "Route Profile" (page 45)
• "Guide" (page 46)
41
)
Route
The following route planning settings are configurable.
In
the menu display,
Route Planning (page 28)
Simulation
planning
touch.
settings
iii
.
~
"Route Planning"~the desired item~the desired option.
Opens the route planning display to create
itinerary.
Simulates the last route.
an
40

Adldress
book
settings
The following address book settings are configurable.
In
the menu display,
touch.
Iil
.
~
"Address Book"~the desired item~the desired option.
Edits the address book entry.
Select the group, then oneofthe following
items.
- Entry in the list: Opens the display where
you can delete an entry,
group/phone/icon/sound setting.
- "Move": Categorizes entry(ies) to another
group. Select the entry(ies) to move
"Move To"~the new group~"OK."
- "Delete": Deletes an entry(ies). Select an
entry(ies) to delete
or
change the name/
~
"Done"~"OK."
~
Edit Groups
Make Backup
Restore Add ress Book
Import Items
Export Items
Edits the group setting.
- "New Group": Creates a new group.
- "Rearrange Group Order": Changes the
of
order
groups. Select the group~,/):
"Done."
- "EditGroup Name": Changes the group
name.
- "Delete Group": Deletes the group and all
its entries.
Backs up the address book data on a
"Memory Stick Duo."
Restores the address book data from a
"Memory Stick Duo."
Imports the address book entry(ies) from a
"Memory Stick Duo."
Select the file in the "Memory Stick Duo"
all entries or individual entry~"Done"
~
"OK"~"OK."
Exports the address book entry(ies) to a
"Memory Stick Duo."
Select the group
entry(ies)~"Done"
~
~
"Done"~"Done," select/create a file, then
~
select
"OK"~"OK."
~
~
41

General
The following settings related to the system are configurable.
In
the menu display,
settings
touch.
..
,~"General"
~
the desired item~the desired option.
Volume (Operation Sound)
Units
Time Format
Time Zone
Select Language
Display
Input Home Address
Presets the volume level for touch screen
3,"
operation sound: "Level
I,"
"OFF."
Selects the distance unit: "Kilometers,"
"Miles."
Selects the clock indication:
PM),"
"24hr."
Sets the time zone automatically
Selects the language for on-screen display.
Adjusts the display settings.
- "Brightness, Day / Night Mode": Switches
the display brightness automatically or sets
the brightness for day time/night time use:
"Automatic,"
brightness level for day time and night time
use can be adjusted manually.
- "Touchscreen Calibration": Performs the
touch screen calibration when the touch
function is
sequence.
Registers your home address.
- "Enter Address": Sets from the navigation
menu. For details on how to set the address,
see "Address search" on page
- "Map": Selects on the map. For details on
how to select the point on the map, see
"Map
scrolling mode" on page 25.
"Day,"
off
the mark. Touch the targets in
"Level 2," "Level
"12hr
or
"Night."
The
13.
(AM
/
manually.
Start the Configuration Wizard
Daylight Saving Time
Configures the basic settings by following the
wizard (i.e., to perform the Startup
Configuration Wizard again).
Sets daylight saving time automatically by
or
GPS
- "Automatic": Updates automatically by
- "Manual (+Ih)"/"Manual (+30min)": Sets
-
manually.
GPS.
manually.
"OFF':
Standard time.
continue to next
page!
42

Ite
GUI Day I Night Mode
Power Saving (Display OFF)
Keyboard Style (page 9)
Password Lock
Change Password
Reset Factory Default
Product Information
Selects the
Turns
several minutes
Selects the keyboard type:
123," "QWERTY," "ABC."
Locks the unit by setting a 4-digit numerical
password to prevent unauthorized access:
"ON," "OFF."
to enter the password when you turn on the
unit.
To activate, select "ON," enter the password,
reenter the password to confirm, then select
"OK."
To deactivate, select "OFF," enter the
password, then select "OK."
Changes the password for locking the unit.
Enter the current password, enter the new
password, then reenter the new password.
Resets settings to default.
Views the ID
connection, etc.)
color
themeofmenu displays.
off
the display automatically after
of
inactivity: "ON," "OFF."
"QWERTY
Once
activated, you will need
number
and status (cradle
of
the unit.
+
GPS Status
(page 12)
Firmware Version
Memory Stick Information
Demonstration Mode
Favlorites
(page 36)
Track Log
Views the detailed GPS status information.
Views the firmware version.
Views the information
inserted
free space; formats the
To format, select "Format"
repeatedly.
- "Automatic Demonstration": Sets to start
the demonstration automatically after
several minutes
- "Start Demonstration": Starts the
demonstration.
Registers destinations in Favorites.
- "Store Track Log": Logs your position
regular intervals while driving, and stores
the data on a
in the unit for later use on your computer,
etc.
- "Delete All Track Logs": Deletes all track
logs stored on a "Memory Stick Duo."
"Memory
"Memory
of
the currently
Stick
Duo,"
such as used!
"Memory
of
inactivity: "ON," "OFF."
Stick
-+
"OK"
Stick Duo."
Duo"
inserted
at
43

Map
The following map display settings are configurable.
In
settings
the menu display,
touch.
iii
.
~
"Map"~the desired item~the desired option.
20/30
Map View
Map Orientation
Map Color
Automatic Map Color Change
Preset Scale
(page 7)
Landmark Icon
Driving Trail
Delete Driving Trail
Address Book Icon
Selects the default map view.
-
"20":
Overhead view.
- "3D" (level I): Aerial view (high angle).
-
"3D"
(level 2): Aerial view (medium angle).
-
"3D"
(level 3): Aerial view (low angle).
of
Gesture
of20map.
Selects the default orientation
- "In Direction
- "Always North": North up.
Selects the map color schemes for day time
use and night time use.
Switches the map color scheme automatically.
Presets the map scale level for clockwise and
counterclockwise circles
Command.
Shows landmark icons on the map.
The settings can be configured separately for
each facility.
Shows driving trail on the map: "ON," "OFF."
Deletes driving trail.
Shows the address book entry icons on the
map: "ON," "OFF."
of
Travel": Heading up.
Road Width
Font Size
Icon Size
Zoom While Scrolling
Compass and Speedometer
Map Version
of
Selects the width
map: "Wide," "Standard."
Selects the size
map: "Large," "Medium," "Small."
Selects the size
map: "Large," "Medium," "Small."
Zooms out the map/fixes the scale when
scrolling:
Shows the current speed and direction on the
map when no route guidance is
"ON,"
Views the version
"ON,"
"OFF."
the road shown on the
of
the fonts shown on the
of
the icons shown on the
"OFF."
in
of
the current map.
progress:
44

Rqute
The following route profile settings are configurable.
In
the menu display,
profile
settings
touch.
..
.~"Route Profile"~the desired item~the desired option.
Ferries
Carpool Lanes
Driving Route History
Calculation Condition
Allows the useofferries/avoids them unless
no alternative is available: "Allow," "Avoid."
of
Allows the use
unless no alternative is available: "Allow,"
"Avoid."
Uses the driving route history when
calculating the route: "Use," "Not Use."
Sets the route calculation conditions.
carpool lanes/avoids them
45

Guidance
The following route guidance settings are configurable.
In
the menu display,
settings
touch.
..
:-+"Guide"-+the desired item-+the desired option.
Volume (Guide)
Voice Attention (Merge)
Automatic Zoom
Intersection Zoom
Select Voice
Presets the volume level for voice guidance:
"Level
Activates the audio warning on merge:
"OFF."
Zooms out the map automatically when
driving on the highway:
Shows the magnified viewofan intersection:
"ON,"
Selects the guidance voice type.
For details on how to import guidance voice
data from your computer, see "Guidance
voice data management" on page 50.
To
"Done."
To
"Delete"-+"OK."
3,"
"Level 2," "Level
"OFF."
select the desired item, select the item
delete the item, select the item to delete
"ON,"
I,"
"OFF."
"OFE"
"ON,"
-+
-+
46

,
USfng
You
thePCApplication
Software
can install the PC application software to your computer. Using the software, you can
manage various data to use on the unit.
System
requirements
Computer
• IBM PC/AT compatible machines
• USB port
OS
• Microsoft Windows 2000 Professional with Service Pack 4 (or later)
• Microsoft Windows XP Home EditionIProfessional with Service Pack 3 (or later)
• Microsoft Windows XP Media Center EditionlMedia Center Edition 2004/Media Center
Edition 2005
• Microsoft Windows Vista Home BasiclHome Premium/BusinesslUltimate with Service Pack 1
(or later)
Monitor
or
High color (16-bit color)
Other
Internet connection for data download and support
Notes
•
The'
following system environments are
PC
- Non IBM
- Homemade computers
-
as
upgradedcomputers
- Multi-monitor environment
- Multi-boot environment
• Depending on the computer condition, operation may
environment.
type computers, such as Macintosh, etc.
more, 800 x 600 dots or more
not
supported.
not
be possible even with the recommended
47

Installing
the
software
1 Go to http://esupport.sony.com/
2 Enter your model number, then click "Continue:'
3 Select "Drivers;' then "nav-u tool" to download the software.
4 Follow the instructions
at
the website and complete the installation.
Connecting
the
unittoyour
computer
1 Turn on the unit and your computer.
2 Connect the unit to your computer with the USB cable.
Note
While using the softwareortransferring data, do not:
- disconnect the USB cable.
- turn
offorreset the unit.
- shutdown the computer, enter computer standby mode,orrestart the computer.
Disconnecting
After using the softwareorcompleting the transfer, exit the software, then disconnect the USB
cable.
48

St
rting
1 Start the software.
Click "start," then select "(All) Programs"~"nav-u tool"~"nav-u tool."
The main menu appears.
the
software
I
I
I
I
I
•
Guidence
•
.....
•
Adlio'eS$
•
lJpcrade
•
Select
0
Voice
M.anoiIlIl'
0
-"
CIJ
Book
h4.anecer
1L;J
System
8
larcuaP
0
_l
..
0
G
e
(»
e
0 •
oTo manage guidance voice data (page 50).
e
To
manage the map data (page 51).
e
To
manage the address book data (page 52).
o
To
upgrade the firmware (page 54).
e To select the language for software on-screen displays.
o
To
access to the Sony navigation support site.
49

Guidance
You
can transfer guidance voice data from your computer to the unit, using the software.
Before starting, connect the unit to your computer and start the software.
You
can also transfer data to the "Memory Stick Duo" inserted in the unit.
voice
data
management
1 Select "Guidance Voice Manager."
If
the guidance voice data on your computer does not appear, select "Browse," then specify
the data location on your computer.
2 Select the drive corresponding to the unitl"Memory Stick Duo."
3 In the list, check the box(es)
-+ .
Transfer starts.
of
the guidance voice data to transfer, then select
4 Select "OK."
The guidance voice data is transferred to the unit/"Memory Stick Duo."
For details on how to select the transferred data on the unit, see page 46.
Note
In
step 3 above, a notification appearsiffree space is insufficientonthe unit/'Memory Stick Duo." Delete
by
unnecessary data
selecting
"OK""
"Show"in'Targef'"
the datatodelete"
"Delete""
"OK""
"OK."
50

M,p
You
data
Before starting, connect the unit to your computer and start the software.
data
can transfer and replace the map data on the unit, using the software (e.g., to restore map
if
necessary).
management
1 S,elect "Map Manager."
If
the map data does not appear, select "Browse," then specify the data location.
2
In
the list, select the map to transfer, then .....
3 Select
Transfer starts.
"OK:'
4 Select "OK."
The map on the unit is replaced.
51

Address
book
data
management
Address book data on the unit or your computer can be managed, using the software.
transfer or import the address book data on the unit
Editing the address book data
You
can edit the address book data on your computer, using the software.
1
Select"
If
the data does not appear in the list, select "Browse," then specify the data location.
2 Select
Address Book Manager."
i~~
on
or
your computer.
your computer
3 Select the group/entry to edit, then the desired edit menu.
Add
Edit
add a new group/entry.
edit the selected group/entry.
4 Select "OK" after editing is complete.
S Select "Save item(s) to PC:'
The address book data on the computerisupdated.
To
delete the group/entry
In
step 3 above, select the group/entry to delete~"Delete"~"OK."
You
can
Editing the address book data
You
can edit the address book data on the unit, using the software.
Before starting, connect the unit to your computer and start the software.
1
Select"
2 Select .
Follow steps 3 to 4of"Editing the address book data on your computer" on page 52 to edit
the address book data on the unit, then select "Apply to the Unit."
Address Book Manager."
....J
on
the unit
continue to next page
~
52

Transferring address
You
can transfer address book data from your computer to the unit, using the software.
Before starting, connect the unit to your computer and start the software.
1
Select"
2 Select
If
the data does not appear in the list, select "Browse," then specify the data location.
Address
Cl
.....J
•
Book
book
Manager."
data
from
your
computer
to
the
unit
3 Check
4 Select "Transfer
the
box(es)ofthe
including
group(s)/entry(ies)onyour
group
name."or"Transfer
computer.
only
item(s)."
5 Select "Transfer."
Transfer starts.
6 Sielect
The address book data is transferred to the unit.
Note
In
step 5 above, a notification appearsiffree space is insufficient on the unit. Delete unnecessary address
book data from the unit (page 52).
---------------------------------
Transferring address
You
can transfer address book data from the unit to your computer, using the software.
Before starting, connect the unit to your computer and start the software.
1
Select"
2 Sielect
3 Check
4 Select "Save
"Applytothe
Address
.....J
•
the
box(es)ofthe
.:;:d,
to
Book
•
PC."
Unit;'
then
"OK."
book
Manager."
data
group(s)/entry(ies)onthe
from
the
unit
to
unit.
your
computer
5 Select "Save."
Transfer starts.
6 Sielect "OK."
The address book data is transferred to your computer.
Note
In step 4 above, a notification appearsiffree space is insufficient on yourcomputer. Delete unnecessary
data from your computer.
53

Firmware
You
can upgrade the firmware on the unit, using the software.
For details, visit the website below:
http://www.sony.com/nav-u/support
upgrade
54


4-000-804-11 (1)
Important
_I
n_fo_r_m_at_io_n_i_m_po_rt_a_n_te_---'.
Informacion
Information
importante

Using
The following manuals are included with the unit.
Before installing
reference.
• Quick Start Guide
Contains instructions on basic operations, such as installation, navigation operations, etc.
After you have read this manual, you should be ready to start using the unit.
• Important Information (this manual)
Contains important notices to be read prior to use, including warnings, specifications, and
troubleshooting instructions.
To
learn more about the features and functions
The "Instruction Manual" (PDF) that contains descriptionsofall functions is available online.
You
can download the manual
the
manuals
or
operating the unit, read these manuals thoroughly and retain them for future
at:
http://esupport.sony.com/
, ' ,
Note on this manual
Illustrations in this manual may differ from the actual device.
" '
'"
"
2

Winlling
~,
.
"'
Operation is subject to the following two
conditions;
- this device may not cause interference.
- this device must accept any interference,
including interference that may cause undesired
of
operation
This equipment has been tested and found to
comply with the limits for a Class B digital
device, pursuant to Part
These limits are designed to provide reasonable
protection against harmful interference
residential installation.
This equipment generates, uses, and can radiate
radio frequency energy and,
used in accordance with the instructions, may
cause harmful interference to radio
communications. However, there
that interference will not occur in a particular
installation.
interference to radio or television reception,
which can be determined by turning the
equipment off and on, the user is encouraged to
try to correct the interference
the following measures:
- Reorient or relocate the receiving antenna.
- Increase the separation between the equipment
and receiver.
- Connect the equipment into an outlet on a
circuit different from that to which the receiver
is connected.
- Consult the dealer
technician for help.
the device.
If
this equipment does cause harmful
~,
or
an experienced radio/TV
, " '
15ofthe FCC Rules.
if
not installed and
is
by
one or more
'
,~
~
in
a
no guarantee
.
of
'""
Declaration of Conformity
Trade Name: Sony
Model No.: NV-U44
Responsible Party: Sony Electronics Inc.
Address: 16530 Via Esprillo,
San Diego, CA 92127
U.S.A.
Telephone number: 858-942-2230
This device complies with Part
Rules. Operation is subject to the following
two conditions: (1) This device may not cause
harmful interference, and (2) this device must
accept any interference received, including
interference that may cause undesired
operation.
15ofthe FCC
•
Caution
IN NO EVENT SHALL SONY BE LIABLE
FOR ANY INCIDENTAL, INDIRECT OR
CONSEQUENTIAL DAMAGES OR OTHER
DAMAGES INCLUDING WITHOUT
LIMITATION LOSS OF PROFITS, LOSS OF
REVENUE, LOSS OF
OF THE PRODUCT OR ANY ASSOCIATED
EQUIPMENT, DOWNTIME, AND
PURCHASER'S TIME RELATED TO OR
ARISING OUT OF THE USE OF THIS
PRODUCT, ITS HARDWARE AND/OR ITS
SOFTWARE.
DATA,
LOSS OF USE
You
are cautioned that any changes or
modifications not expressly approved in this
manual could void your authority to operate this
equipment.
If
you have any questions about this product, you
may call; Sony Customer Information Service
Center 1-800-222-7669 or
http://www.sony.com/nav-u/support
3

4

.
Table
.
Warning 6
'of
Contents'.-
>..
" -
'.
.. . .
'.
, ,
~
""
-
About "Memory Stick"
Wh
Types
Note on LCD panel 9
Maintenance 9
Cleaning 9
Fuse replacement 9
Notes on unit disposal
Specifications
Troubleshooting
Resetting the unit.
. "M S . k"? 8
at
IS a emory
of
"Memory Stick Duo" that the system can use 8
tIC
..
.
10
11
12
12
8
•
Checklist
12
5

"arning
PLEASE READ THIS MANUAL AND THE
SUPPLIED "QUICK START GUIDE"
COMPLETELY BEFORE INSTALLING OR
OPERATING YOUR PERSONAL
NAVIGATION SYSTEM. IMPROPER
INSTALLATION OR USE OF THIS DEVICE
MAY CAUSE ACCIDENT, INJURY OR
DEATH.
Be sure to use the supplied car battery adapter.
Otherwise, the excessive voltage may be
applied to the unit and may cause smoke, fire,
or accident.
Do not connect the car battery directly to the
jack
on the unit,asit may cause a malfunction.
Be sure to use the supplied car battery adapter
for connection.
•
If
you needtooperate the navigation system
"
while driving, be sure to stop the car in a safe
place before operating.
• Do not modify the unit.
• Do not disassemble the unit except when
of
disposing
it.
On installation
• Before installing the unit, check your local
traffic laws and regulations.
• Make sure you install the unit properly using
only the hardware provided and avoid
mounting it onto any critical component
vehicle.
• For information about the polarity, battery
voltage and location
please consult your car dealer.
• Take care to prevent cords or wires from getting
tangled or crimped
seat rail.
• Please consult a qualified technician or service
if
personnel
car securely.
you cannot attach the cradle to the
of
the airbag in your car,
in
the moving portionofthe
of
the
On safety
• Be sure
- install the navigation systemina safe place
where it does not obstruct the driver's view.
- not install the unit above an airbag.
- place the cables and cradle where they do not
obstruct driving.
- attach the unit to the cradle properly,
otherwise the unit may fall.
- clean the surface
attachment surface before attaching. When
installing on the dashboard, clean the surface
on which the suction cup will be attached.
Also, confirm that the suction cup is securely
attached after installation. Otherwise, the unit
or cradle may fall.
Failure to do so may result in unsafe driving
conditions.
• Do not apply excessive force to the unit or
cradle
• Comply with local traffic rules, laws and
regulations.
• Do not continuously watch the unit while
driving. It is dangerous and may cause a traffic
accident.
to:
as
it may fall.
of
the suction cup and
CAUTION
• Do not install the cradle where it will be
subjected to heat/high temperature.
of
• Depending on the size or shape
lighter socket, connection may not be possible.
the cigarette
6

On
handling
• Do not let foreign objects get inside the
of
connector
malfunction.
• When the unit is not in use, turn it offby
pressing 1/(9. Remove the unit from the cradle,
then disconnect the car battery adapter,
otherwise battery drain may result. Note the
following:
If
your car's cigarette lighter socket is not
connected to ACC on your ignition switch,
power will continue to be supplied to the unit's
built-in power supply even when the ignition is
off or the unit is not in use.
• Do not connect any accessory other than those
supplied or optional.
• Do not expose the unit to fire or water, as it
may cause malfunction.
•
To
disconnect a cable, pull it out by grasping
the plug, not the cable.
• Be sure to remove the unit outofthe car when
leaving your car to prevent theftorhigh
temperature damage inside the car.
•
If
the cradle is left attached for a long time, the
suction cup may leave a mark on the
windshield/dashboard. Be sure to detach the
cradle from the windshield/dashboard when it
is not being used.
• Detach and reattach the cradle regularly to
maintain the attachment strengthofthe suction
cup.
• Note that the built-in battery cannot be charged
outside the temperature range 5 - 45°C
113
OF).
• Do not leave the unit in high ambient
temperature as the built-in battery capacity will
deteriorate,orwill become unchargeable.
the unit,asit may cause
(41
-
OnGPS
As GPS information is obtained from satellites it
may be impossibleordifficult to obtain
information in locations such as:
• Tunnel
• Under a highway
• Between high buildings
• Between tall trees with dense foliage
or
underground
,
On the battery discharge mode
If
the unit's internal temperature becomes
excessive, it enters battery discharge mode and
automatically reduces the charge capacity to
protect the battery. In this case, the unit turns on
(display remains off), even while not in use.
On the software
Read the End-User License Agreement carefully
before use.
Warning
• This navigation system should not be used as a
substitute for your own judgment. Any route
suggestions made by this navigation system
may never override any local traffic regulations,
your own judgment, and/or knowledgeofsafe
driving practices. Disregard route suggestions
by the navigation system
would: cause you to perform a hazardous
illegal maneuver, place you in a hazardous
situation,
unsafe.
• The advice provided by the navigation system
is toberegarded only as a suggestion(s). There
may be situations where the navigation system
displays the vehicle's location incorrectly, fails
to suggest the shortest course, and/or fails to
direct you to your desired destination. In such
situations, rely on your own driving judgment,
taking into account current driving conditions.
• Do not use the navigation system to route you
to emergency services. The database does not
contain a complete listing
emergency service providers such as police,
fire stations, hospitals and clinics. Please use
your judgment and your ability
directions in these situations.
or
route you into an area you consider
continue to next page
if
such suggestions
of
locations
to
ask for
or
of
--+
•
Note
GPS signalreception may be
material
of
the car's windshield.
poor
depending on the
7

• As a driver you are solely responsible for your
road safety.
- In order to avoid traffic accidents, do not
operate the system while driving.
- In order to avoid traffic accidents, operate the
system only when the vehicle is stopped at a
safe place and the parking brake is set.
- In order to avoid a traffic accident or traffic
offence, remember that actual road conditions
and traffic regulations take precedence over
the information contained in the navigation
system.
- Accordingly, the Software may contain
inaccurate or incomplete information due to
of
the passage
and due to the nature
time, changing circumstances,
of
the sources used.
Please observe the actual traffic
circumstances and regulations at all times
while driving.
-
In
a situation when actual road conditions and
traffic regulations differ from the information
contained in the navigation system, then
abide by traffic rules.
- The navigation system does not provide, or
account for in any way; information regarding
traffic and road laws; vehicle specifications
including weight, height, width, load, and/or
speed restrictions; road conditions including
road slope, grade, and/or surface conditions;
obstruction information including bridge and
tunnel height and width, and/or other
prevailing driving and/or road conditions.
Always rely on your own driving judgment,
taking into account current driving
conditions.
of
- Minimize the amount
time spent viewing
the screen while driving.
About
~
,
What
"Memory
is
a "Memory Stick"?
811ck"
~
¥ N
$
..
Hi
"Memory Stick" is a compact-sizeIerecording
It
medium with a large capacity.
has been
designed not only for exchanging/sharing digital
data among "Memory Stick" compatible
products, but also for serving as an insertable/
removable external storage medium that can save
data.
• - .. -.
•
lin
]'ftC?
UWG
Types of "Memory Stick Duo" that
the system can use
With the system, you can use the following types
of
"Memory Stick
• "Memory Stick Duo" (Not compatible with
MagicGate)
• "MagicGate Memory Stick
• "Memory Stick PRO
*1 The system
with
a "Memory Stick
16
GBorsmaller. However, we do
the operations
media.
*2 "MagicGate
PRO
Duo"
are
MagicGate is copyright protection, using
encryption technology. Data with MagicGate
protection
Notes
• This system does
data transfer.
• Standard-size
system.
• When using
check
cause trouble with the system.
not
• Do
"Memory
adapter
If
you
M2*
adapter, it
not
• Do
Micro,"
prevent
Avoid
•
system
cannotbeplayed
correct insertion direction. Wrong
insert
Stick
supplied
attempttoinsertitwithout attaching to the
place
or
M2*
them from swallowingitby
removing the
while the
DUO."*1
DUO"*2
DUO"*2
has
been
demonstratedas operable
Duo"
with a capacity
not
guarantee
of
all
the "Memory Stick
Memory
equipped
"Memory
a
"Memory
"Memory Stick Micro"directly into
PRO"
may
the
adapter
Stick
Duo"
and
with MagicGate functions.
with this unit.
not
support
compliant
with the media
notbeable toberemoved.
"Memory
within the reachofchildren to
"Memory
system
parallel
Stick"
cannotbeused
Stick Duo," make
product
(or
Stick Duo,"
Stick
is reading
Duo"
"Memory
high-speed
sure
usage
without
sold
separately).
"Memory
accident.
Duo"
from the
or
writing data.
of
Stick
in this
to
may
M2*
Stick
m>
8

• Data
•
• Do
• Do
•
•
maybedamagedinsuch
"Memory
turned
"Memory
-
static electricity
We
recommend
not
bend, droporapply
"Memory
not
disassembleormodify
Duo."
Do
not
allow
Do
not
useorstore the "Memory Stick
location
Extremely
parked
-
Direct
- High
humidityorplaces with corrosive
Connector
[g
~
Write-protect
switch
occasions:
Stick
Duo"
is removedorthe
off
during a
Stick
Stick
the "Memory Stick
that
is subject to:
high temperature, such as in a
in the sun
sunlight
readorwrite operation.
Duo"isused
or
electricalnoises.
that
you
Duo."
in a location
backup
strong
the
Duo"toget
}---+--,
,---,
Memo area
any
important
shock
"Memory
Duo"
system
to the
substances
is
subject
data.
Stick
wet.
in a
car
to
Note
on
LCD
panel
Some stationary blue, redorgreen dots may
appear on the monitor. These are called "bright
spots," and can happen with any LCD. The LCD •
panel is precision-manufactured with more than
%
of
99.99
its segments functional. However, it
is possible that a small percentage (typically
%)
of
0.01
the segments may not light up
properly. This will not, however, interfere with
your vIewmg.
Maintlnans,
Cleaning
• Clean the surfaceofthe suction cup with a soft,
if
wet lint-free cloth
attachment strength weakens.
• Clean the display window with a commercially
available cleaning cloth.
it becomes dirty and
• Do
not
touch the "Memory Stick
your
fingerormetallic objects.
You
cannot
•
write-protect switch to LOCK.
• When
"Memory
• When
write-protect switch,
the data
• When
label,
• When
it in the
record,
you
slide the write-protect switchofthe
Stick
you
use
by
accident.
you
write on the
do
not
write forcefully.
you
carryorstore the
case
editordelete dataifyou
Duo," use a thin-pointed device.
a "Memory Stick
be
supplied
with
careful
memo
Duo"
Duo"
nottoeditordelete
areaofthe
"Memory
it.
* Abbreviation for "Memory Stick Micro."
connector
slide the
without the
attached
StickDuo,"
with
put
Note
If
the suction cup leaves a traceonthe windshield,
wipe with water.
Fuse replacement
When replacing the fuse in the car battery
adapter, be sure to use one matching the
amperage rating stated on the original fuse
(1.25 A).
connection and replace the fuse.
again after replacement, there may be an internal
malfunction. In such a case, consult your nearest
Sony dealer.
Warning
Never use a fuse withanamperage rating
exceeding the one supplied with the unit as this
could damage the unit.
If
the fuse blows, check the power
If
the fuse blows
9

•
,.•_,'.
•
'.
Y!4:f)tes
.,~
"Y-
Remove the built-in lithium-ion battery when
disposing
recycling location .
The procedure for removing the battery is
explained below.
Note
Never disassemble the unit except when disposing
it.
Notes on the lithium-ion battery
• Keep the battery out
• Do
otherwise
~'"
not
..
On
of
hold
a short-circuit may occur.
'HI
"7.'
uni_'_~i.aI,
,_~
the unit, and return the battery to a
the battery with metallic tweezers,
~
,t
of
the reachofchildren.
. . _ _ . - .
-...
-,'
- ....
--
of
1 Press the RESET button to turn off the
unit.
2 Remove the 4 screws on the rear
the unit, using a screw driver.
of
WARNING
Battery may explodeifmistreated.
Do
not recharge, disassemble,ordispose
in fire.
RECYCLING LITHIUM-ION BATTERIES
Lithium-ion batteries are recyclable.
You
can help preserve our
by
environment
rechargeable batteries
and recycling location nearest you.
For more information regarding recycling
rechargeable batteries, call toll free 1-800-822-
8837, or visit
Caution:
returning your used
to
the collection
of
http://www.rbrc.orgl.
Do not handle damaged or leaking
Lithium-ion batteries.
of
3 Remove the rear cover.
Use a sharp object, such as a flat head screw
driver, in the places shown in the illustration
to release the catches and open the rear cover.
10

4 Remove the 4 screws of the circuit
board using a screw driver, then lift
out.
5 Remove the battery.
o
Specificalions
, . .
Main unit
Operating
Power
from supplied USB cable or 12
adapter (negative ground)
Connection
USB jack
Memory
Speaker:
Consumption
Dimensions: Approx. 106
(4.2
(w x h x
Mass: Approx. 157 g (5.5 oz)
Monitor
System: Transmissive
Dimensions: 3.5 in (4:3)
Approx.
(2.8 x 2.1, 3.5 in)
Segment: 230,400 (720 x 320) dots
temperature:
requirements:
terminal:
card
slot: Memory Stick Duo slot
~28
nun (1.1 in) speaker
current:
x
3.1
x 0.7 in)
d,
protruding parts excluded)
70
x 53,88mm
5 -
45°C
DC 5 V •
Max. 0.8 A
x 78 x
Liquid
crystal display
(hxv,
d)
(41
- 113
OF)
V/24 V carbattery
17
mm
6 Insulate the connector terminal by
wrapping with a tape.
Notes
• Be suretoremove the battery with the case
attached.
• Do not damage the battery with
as a screw driver.
a sharp object such
Built-in battery charging time/usage
time
Charging time
With
the
supplied
Approx. 4 hours (with unit turned on),or3 hours
(in standby mode)
With
the
supplied
Approx. 4 hours (in standby mode)
Usage time
Up to 4 hours (depending on usage)
Design
without notice.
• Halogenated flame retardants are not used in the
• Halogenated flame retardants are not used in
• Use of rechargeable lithium ion batteries.
and
specifications are subjecttochange
certain printed wiring boards.
cabinets.
car
battery
USB cable:
adapter:
11

.
~"'M;
q:t
......
""'m""'·Nt'''''r
....·.......
·...·.....
IIiX
...'..
f""'·
__
KiB
•
.Troubleshooling
N~
~
"
H._~
~
" N
"'ee
.
Resetting the unit
When you encounterany malfunction with
or
software
Press the
Notes
• Afteryou reset the unit, it
receive GPS signals when turning on the unit.
• Depending on the unitstatus, the unit may
reset immediately afterpressing the
This is for protecting the internal memory.
hardware, try resetting the unit first.
RESET
button, then tum on the unit.
RESET
button
may
take some time
not
RESET
to
be
button.
";
';'
'"
Checklist
The following checklist will help you remedy
problems you may encounter with your unit.
Before going through the checklist below, check
the connection and operating procedures.
General
The unit does not turn on.
-.
Charge the built-in battery.
-.
Check that the car battery adapterissecurely
inserted into the cigarette lighter socket.
The unit turns on automatically (display
in
remains off), even while not
If
the unit's internal temperature becomes excessive, it
enters battery discharge mode and turns on
automatically to reduce the charge capacity
the battery.
The unit turns on automatically, even while not
in
use.
The unit may turn on automatically when the power is
connected and charging starts.
The CHG indicator is off even while the adapter
is
connected.
The CHG indicator turns off during the battery
discharge mode.
The built-in battery cannot be charged.
-.
Turn on the unit, then turn off the unit.
-.
If
the car battery adapterisbeing used, disconnect
it from the cigarette lighter socket, then reconnect.
-.
Tum on the computerduring USB charge.
Note that the CHG indicator may light up in green
in
the computer standby mode, even though the
built-in battery is not fully charged.
• Charging stops ifthe unitisturned off during USB
connection with the computer.
• The built-in lithium-ion battery can be charged at
temperatures between 5 battery may not be charged
the unit increases because
45°C
if
of
etc. This is not a malfunction.
•
If
the usage timeofthe built-in battery becomes
excessively short after charging, the battery may have
deteriorated.
-.
Contact the Customer Support Center:
U.S.A.: 1-800-222-7669
Canada: ]-877-899-7669
use.
to
protect
(41-113
OF).
The
the temperature inside
direct sunlightexposure,
12

The LCD is not displayed normally.
In high temperatures, the LCD may darken and not
display clearly. In low temperatures, afterimage may
occur on the LCD. These are not malfunctions, and the
LCD will return to normal when the temperature
returns to within the specified operating range.
The cradle comes off the attachment surface.
Attachment strength weakens if the surfaceofthe
suction cup or attachment surface becomes dirty.
---+ Clean the surface
attachment surface with a soft, wet lint-free cloth
(page 9). Dampen the surface
slightly to help it stick firmly.
of
the suction cup and the
of
the suction cup
Navigation
•
GPS signal cannot
Firstly, read the GPS overview (page 7), then check the
GPS status by touching
"General"~"GPS Status."
• The system cannot receive GPS signals due to an
obstruction.
---+ Move your car
received clearly.
• There is an obstacle in front
---+ Install the unit where the signal is not interrupted
by the body
The car position on the map does not match
the current road.
The error marginofthe signal from the GPS satellites
is too large. A maximum error margin
hundred meters can exist.
Voice guidance cannot be heard.
The volume is set too low.
---+ Raise the volume.
The demonstration mode starts automatically
even if no operationisperformed.
---+ Turn off the auto demonstration mode by touching
~
in the main menu~"General"
"Demonstration Mode." Then, confirm that
"Automatic Demonstration" is set to off.
be
received.
~
in
the main menu
to
a place where signals can be
of
the GPS antenna.
of
the car, etc.
of
~
~
a few
Photo playback
Photo playback is not possible.
• A "Memory Stick Duo" containing photo files is not
inserted in the unit.
• The unit supports only
• The unit supports only photos with a maximum pixel
numberof12
mega.
lPEG
files.
13

SON~
About the built-in battery
If
the usage
battery becomes excessively short
after charging,
deteriorated.
In such a
Support Center:
U.s.A.:
Canada: 1-877-899-7669
1-800-222-7669
time
case,
of
the
the
battery
contact
built-in
may have
the
Customer
Apropos de la batterie integree
Siladuree d'utilisation delabatterie
integree decroit de
peu de temps apres
batterie
Dans
d'assistance
Etats-Unis: 1-800-222-7669
Canada: 1-877-899-7669
ce
peut
cas,
s'etre deterioree.
contactezIeCentre
a
la
fa~on
la
charge,
clientele:
excessive
la
Acerca de la bateria
incorporada
Sieltiempo
incorporada
la
carga,
este deteriorada.
En
tal caso, p6ngase en contacto can
el
Centro de atenci6n
Estados Unidos: 1-800-222-7669
Canada: 1-877-899-7669
~ilJ{~7
pg~)
~~B~rB~b'~
pg~)
'\'YT
'\
'Y
de uso delabaterfa
es
demasiado
es
posible
IJ
T
IJ
U
-IC:::>L\T:
-~ft51ILft~L
L <
-b'~{t
quelabaterfa
al
~R
<tJ J
L
corto
c1iente:
Z"t>1~
IC~lSlct,
Z"l
I~
PJ~~'I'1
b'®O*9o
crJiJi
btt
<(J)
<
ICC
':J
=-(J)*El~~~DA.crJrD~lllS
llo
tras
©2008 Sony Corporation Printed in China
4-105-787-21
(1)

_:r;rnmM
YOU
SHOULD
CAREFULLY
READ
THE
FOLLOWING
AGREEMENT
BEFORE
INDICA
TIS
YOUR
ACCEPT
ANeEOFTHIS
IMPORTANT.READ CAREFULLY;
("5()NY").
the
li"-'l'\SOrofthe
with
your
PRODUCT,
the
SOFnN
any
"on-liIw" Or
thl..
map
p~'rmission
Corporation,
following
certain
Public
sovnvARE
conditions
such
sPffific
You
may
S(WrW
lhoe
SOFn'\'
of
the
SOFTWARE UCENSE
n......
SOFnVARE
SOFnV
GRANTOFUCENSE
ThIs
UCENSE
Software.
Personal
purposes.
DESCRIPTION OF OTHER RIGHTS
Restrictions.
otherwise
m"nagementorsim;jar
compuler
LimitationonReverse
SOr-nVAREinwholeorin
underlying
Ihal
would
SeparationofComponents.
compuler
StoragefNetworll.
specifically
Non-Circumvention:
operali""ly
Trademar1<s
Data
SOFIWARE
Single
PRODUCT
RenlaL
SOFTWARE
prm'ided
and any
Termination.
LICENSE, In
Confidentiality.
disclose
Dependent
d<.>pends
supplier:5donot
modification
COPYRIGHT
All title
and
'·applets",
suppliers.
USE
OF SOFTWARE WITH COPYRIGHTED MATERIALS
The
SOFn'\'
by
copyrighl.
agreements
us<'dbyU",
SOFTV/ARE
IJCENSEintI'IC
HIGH
TI..,
SOFnN
environments
control.
physicalor",,,,ironme'1\al
or
impli('(l
EXCLUSIONOFWARRANTY ON SOFTWARE
You
expressly
of
any
be
collecti\'l'ly
BlIT
NOT
FORAPARTICULAR
YOUR
ANY
ACCURACY,
I\UTHORIZED
WARRANTY.
A5.'>VME
EXCLUSIONOFIMPLIED
Wilhout
the
SOFn\'
SOFnV
Further,
changing
UMITATIONOFUABILITY
IN
THISSEcnON
S(")NY',
IMPLIED
RELATEDTOTHIS
DATA
ADVISEDOFTHE
LICENSE
JURISDICTIONSDONOT
ABOVE
PROHIBITIONONEXPORT
EXCEPT
ANY
FOREIGN
A
CITIZEN,
AGREEINGTOTHE
CONTROLorA
U.S. GOVERNMENT RESTRICTED RIGHTS
The
SOFTVV
as
set
ManufaClu"'risSony
SEVERABILITY
If
any
GOVERNING LAW
nus
LICENSE
Conn'ntion
subjecltoIh,:
jurisdictionofsuch
RELATINGTOnus
THIRD PARTY BENEFICIARY
For
all
beneficiaryofthis
ENTIRE
Th<:'5e
p"rt.,ining
n"Speettosuch
GOVERNMENT END USERS
11'IC
SOFnN
hereo(
applying
C.F.R.
,lnd
embedded
If
the
federal
Should
l{csponseCenler,
GNU
nll'~
!',,>duct
Lic,"'Si' (lIad"aft,'r r<,/aroiloas "I..GPL")
Y"u
"h'y
Ims
....
l>tlx.
furnishroonCD-ROM
ARE
TIUs
LICENSE
electronic
docurru.."tation,aswellasSon)·-suppliedorauthorized
dilla
which
is liccns<."dtoSONYbyNA
from
Canadian
and
GeoB.'se_tl'IC
trademarks
and
portionsofthe
Licenseasdefined
ARE,
entire
ARE is
Files. TIlt'
PRODUCT.
You
upgrad
such
and
RISK
diTeocl
kind
REQUIREMENTS,ORTHAT
REPRESENTATIONS
AREisat
LOSSOFUSEOFTHE
registrations
SOFrW
below.
are
includ."CIinthis
shall
apply10such
tenns
and
conditions
use
the
SOn.,VARE
rouag......tobe
AREtoyou.Insuch
PRODUCT
and
is prole"t,,,1bycopyril'J,t
lict'~,
n"t
granlS
~·"u
Ihe
You
may
Instolll olnd
Use.
Yo"
may
us,:
EXC'1'1asspecifically
co,m<.'Ctcd10orincommuni("tion
:>pplications;or(b)
devices.
including
Engineering,
user
interl~
I<'Chniqu..'Sn.
cause
the
SOn¥.'
wUess
expressly
aulhorizedbySony
Use.
You
describedindocumentalion
You
may
linked10Ihe
SOFTVV
and
Noti<es:
You
SOFrW
ARE
The
SOFn'\'
exceptasspecifically
may
not
""nturleaSt! !.he
Transfer.
You
you
ret,linnocopies,
..",ofIll<>
SOFn'\'ARE
Without
prejudicetoany
such
evenl,
you
You
agreetokeep
infoonationtoothers
Softwa~.
The
mighl
1><:
int<:rrupt<.-dordiseontinut-d
warrant
thai
copyrighlinandtoth"
incorporaled
All
rights
not
specifically
AREiscap.lbleofbeing
other
intellectual
that
applytosuch
SOFn'\'ARE.
Such
features,
refusaltoaccept
eventofyour
ACTrvmEs
AREisnot
faull-tolerant
rt'quiring
fail-safe
life
support
machines,orweapons
damage
warr,lIllyoffitn""", for
acknowledge
and
SONY,
SONY's
referrffitoas
LIMITED
TO,
THE
I'URI'OSE,
RELIABILITY,OROTHERWISENOORALORWRITTEN
REPRESENTATIVE
SHOULD
TI1E
THE
ENTIRE
COSTOFALL
limiting
you
SONY
WARRANTIF-S,SOTHE
the
foregoing..
AREomyour
PRODUCT
~·"ur
sol"
risk
expressly
underst;lnd
circwnslances.
sources
SONY,
ITS
SHALL
NOT
WARRANTYORCONDITION,
PRODUCT.
POSSIBILITYOFSUCH
SHALLBELIMITEDTOTHE
EXCI.USIONORLIMITATION
I'OR
EX/'ORTTOCANADA
UNDERLYING
TECHNOLOGY
PERSON"ASDEFrNEDBYUs.
NATIONAL.ORLAWFUL
FOREGOING
I'OREIGN
AREisprovided
forlhinsubpilr.1graph
Electronics
partofU\is
LICENSEisheld
AND
JURISDICTION
shall
b<:
gOVl'nl~..:!
for
Contracts
fur
"xdusiv"
"enueofthe
courts.
LICENSE
purposesofthis
LICENSE,
LICENSE
AGIIEEMENT
tenns
and
conditions
to
the
subject
maller
subjcct
matler
ARE
includes
with
rights
simibrtoIhose
2.HlL is liccn.-.cd in
.,s
ha"e
software
ca"'"i""
,>bra,,,.
al/pr.
reg,,,dtothe
appropriale
Officer,
agency,orany
any
questions
12451
Gateway
infoRnation:
Ihe
foI1m,';"s software
"",I
mli~lrilml<'
G"uPG.
the
federal
only
("FAR")
Contracting
go"emmt'nl
you
GPUlGPl
Lilluxlk..,<'!).
AGREEMENT
This
End-V".,.
Li""n"",
so~a,..,
indud~-d
covers
only
authorities,
Data
for
are
AREa.....
nol
Further.ifany
docwn~-nl
softwareinpriority10this
onlyinconneclion
boundbythe
e"·en\.
rou
includ"d
SOFn'\'
S<.,ld
following
non
use
one
copyoflhe
tht,
SOFTVVARE for p"'fSOTlolt
AND
LIMITATIONS
stakd
withoullimitation,
Dec.ompilation
parr,or(ii)
reverse
algorithmsofthe
AREtobe
placedinthe
n......
SOFn'\'
m,ly
not
use
the
providL"CI
not
bypass,
ARE
may
not
remove,
may
create
dala
AREislicensed
describedindocumentation
SOI'T'N
may
pennanenlly
transfer
allofthe
and
other
must
d.>stroy all copi,-'Softhe
infonnation
withoul
softwa.."
n,,""'ork
the
software,
SOFTVV
inlO
the
SOFrWARE),
);ranted
usedbyyoutostOT('.
property
laws.
contenl.
You
measures
rour
improp"r
useofIhe
andisnot
performance,
("High
High
Rb;k
and
agrc<'
that
licensors,
"SONY") EXPRESSLY
IMPLIEDWARRANIlES
SONY
THE
REGARDING
SHALL
SOn¥.'ARE
NECFSSARY
you
exp....,.,;ly Wld"r:5I"nd
and
II",t
and
you
at'('
thai
Ihe
used
and
AFFlUA
TES,
BE LIABLE I'OR
SUCH
DAMAGES
PRODUCTORANY
AI.LOW
THE
MAY
FOR
MAY
AND
PERSON
wilh
RESTRlCTED
(c)
(1)
and
Inc
16530 Via Esprillo,
invalidorunenforceable,
by
the
bwsofthe
th"
Inl.·tn.~tional
state
THE
PARTIES
t'ach01SONY's
and
sh.lU
have
constitute
the
hereof,
and
Data
whichislicensedbyNA
Data,ifthe
customarily
accordance
with
the
following
CONTRACTOR
These
Data
thi.,>
Agll'{'n,ent
govenm,enl
federal
concerning
Boulevard,
corOCrt>dbyII,,'
III,'
source
dosfsloois. "Ii!-I,,,ux, dfi;/"OKS.
Agreement
1Nith yOUT
Sony
mooia,
thl'
VfEQ
including'
areasofthe
ownedbythe
subjecttothis
or
any
le'nnsofthis
m"y
nOI
ARE
laws
....
xd"sil't'
abo
....e,you
wilh
withorin
cdlular
ARE
is
SOFnVARE
modify,
files
ARE
transfer
this
LICENSE),
rights.
SONY's
""rviu'S
ill
network
ARE
under
and/or
agree
include,
requesttoenable
suchasin
Risk
Activities')
Activities
useofthe
their
licensors
DOES
OPERATIONOFTHE
THE
CREATEAWARRANTYORCONDITIONORIN
PROVE
SONY
Nsponsibk
D;lla in
the
n;lt\Jreofcollecting
THEIR
BREACHOFCONTRACT,
DAMAGE.'>,INANY
AMOUNT
EXCLUSIONORLIMITATIONOFCONSEQUENTIAl.ORINCIDENTAL
NOT
USEINCANADABYCITIZENSOFTHE
NOT
C,()VERNMENT
PERMANENT
YOU
(2)ofIhe
Sale01(".nods,
and
federal
HEREBY
the
righllo
entiT'-'
superS<.odt'Sinu,..,ir ,--ntirdy
D"laisbeing
claimedbyu,..,
with
CONTRACTOR
221 Merch.'lT\dise
are
agenq',orany
official
this
Fort
e,~I<"111,,-,;e
hardware
download<.'d
SOFI'W
"nd
engineer,
hce~
with
alter,
with
SOFTVvARE
containedinthe
the
(including
SOFIW
designed,
syslems,inwhich
NOT
USEORTHE
ANY
RlGl-lTS.
Ihird
,'gr~'Cm,'nl
"Noli«"ofUse,"
commerci"l
must
UCENSEorthis
Mrers,
from
ARE.
lhc
SOFtWARE
North
America,
Her
Majesty
the
United
States
USPS,
Unit~"CI
LICENSE
and
lerms
and
conditions
oth
....
materials
(including
LICENSE.
lhis
with
the
useofthe
LICENSE. If
useorcopy
f.'ra..,fw,d
SOFn'\'
vehides
defealorcircumvent
automatically
prior
servicesorother
and
\his.
that
but are
DISCLAIMS
Ihe
ARE
SbleofNew
youdonol
the
SOFnVARE.
of
u...,
purchaS<.'
intern.,tiun"l
,,'pyright
and
non-trolnsfer.lblt'
ARE
on.mt.>
non-commercial
may
not
use
u,..,
capableof....
communication
with
phones,
palmtop
and
Disassembly.
de<:ompil(',
disassemble,
SOFTV/
AREbyany
public
domain.
asasingle
product.
overanetworkordistribute
the
SOFn'\'
ARE
co"erordeface
any
for
use
Iht'
PRODUCTasa
provided
allofyour
rights
(including
and
lhe
['('Cipient
SONY
may
tenninale
SOFTWARE
SOFn'\'ARE
written
approval
Or
Olh~'r
products
discrt'tionufthe
products
bul
not
limitedtoany
any
copiesofthe
LICENSE
are
",-'SCrvedbySONY
process
3nd
agreemellts.
You
SONY
may
take
not
limited
reslorationofdata
ARE
manufacturedorintended
Ihe
operationofnuclear
Ihe
SONY,
SONY's
SOFIWAREisal
"nd
suppliers
ALLWARRI\NTIES
AND
CONDITIONSOFNON-INFRINGEMENT,
WAI{RAm
THAT
SOfn-VARE
RESUl.TSOFTHE
DEFECTIVE
YOU
SERVICING.
REPAIRORCORRECllON
ABOVE
EXCLUSION
Ihat
Ihat
any
;s nOl
responsibk'
for
installationofthe
SOFnV
ARE
may
compr('[wnsive
RESPECfIVE
LICENSORS
INCIDENTALORCONSEQUENTIAL
INCLUDE.
BlIT
ARE
ASSOCIATED
HARDWARE,
CASE,
ACTUALLY
AI'PL
YroYOU
IlE
EXPORTED
REGULATIONS,
RESIDENTOFTHE
WARRANTING
Use,
duplication,urdh.clo.;urebythe
Commercial
Computer
San
Diego,CA92127
Ih..
other
parts
York
whicha....
courtsofNew
WAIVE
TRJALBYJURY
party
licen."",;ofanyofIhe
enforce
the
tt'rms
b,:hn'Cn
VTEQ.
Notwithst.,ndlng
acquiredbyOronbehalf
United
Slates
lhis
LICENSE,
and
and
shal[beIreatedinaccordance
NOTICE
(MANUFAcnJRER/
(MANUFAcnJRER/SUPPUERj
Mart
Plaza,
itemsasdefinct1 in
under
which
Ihis
data
©200SNAVTEQ-All
fed,'ral
notifyNAVTEQ
limiled
norida33913.
GNU
GWT"I
Public
soft"",n'
1itcc(/ibgec),
X/i!Jc."YOC/>s,
USING
("LlCENSE");salegal
device
w<,bsi"->s
LLC
("Dala").
QueeninRightofCanada,
includes
Slates
are
g()\!emedbythe
spedfically
LICENSE
PRODUCTByinstalling.. copying..
rights
unilofth,:
SOFIW
ehide
any
and
handheld
You
allYoflhe
trademarksurnOOo..'SOnthe
with
single
wilh
the
Wlder
all
copies,
agreestothe
this
and
allofils
other
suppliers
SOf<TI'\lAKE,
use
content
agreetouse
appropriate
tu, COWlting
failureofthe
licen.
your
sole
(in
this
THE
(AND
MAY
other
for
any
SOFIW
comain
NEGLIGENCE,
NOT
PAID
OUTSIDE
THAT
agn>emenl
("PRODUcr').
or
providedasupdates/upgrades
includes
software,
updates/upgrades
The
Data
for
infonnation
ZlP+4®
Postal
$..,rvice, USPS,
GNU~rGt>neral
applicable10any
CD-ROM)
accompanying10the
shall
apply10such
agreetoIhe
termsofthis
and
you
should
priu'
ofUwPRODUCr.
tN"ti~'S,
as
wdlasother
PRODUCr.
use
only
and
nol
ARE
(a)
with
any
navigation,
posilioning.
positioning
devic~'S
nm'puters,
may
nol
(i)
modify,
a~mpllO
m"ans
whate""rinwholeorin
Ils
component
p.,rts
Ihe
SOFn\'
functionsorprotectionsofIhe
Ihe
SOFTWARE.
integrated
product.
SOFIW
ARE
this
LICENSE
onlyaspartofa
component
lennsof
LICENSEifyou
component
whichisnot
publicly
than
SOFTVVARE
(softw3re
suppliers,
will
continue
to
1><:
0,1ta,
images,
ar~'
owntodbySONY.
crealedbyyou
the
SOFnVARE
n'ICasurestoprotect
the
fr('<luencyofyour
through
certain
for
useorresaleason-line
facilities,
aircrafl
SOFIWARE
.....N,their
licen.
risk,
The
SOFIW
sc<:hon,
SONY,
SONY's
AND
CONDITIONS.
FUNcnONS
WILLBEERROR
USEOFTHE
INFORMATIONORADVICE
NOT
SONYORA
NOT
APPLYTOYOU.
hardware.
software.o'data
such
da",aW'·
Y,.U "xpn.·s,.ly
ARE
and
useofthe
in;l(curateorincomplete
g<'Ographic
data.
ANDSUI'PLlERS
DAMAGES
STI{]CT
LIMITED
TO,
IX)WN
TIME
SONY'S
ENTIRE
ALLOCABI.ETOTHE
UNITED
THE
UNITED
INCLUDING,
WITHOlIT
UNITED
STATES,
YOU
ARE
NOTA"FOREIGN
Software-Restricled
wiil
Nmain
valid.
without
giving
eff~'Ct
to
excluded.
New
WITH
SOFnV
(and
its licen.sors,
t/-'w:,
Ollh.,
sueh
copyofsuch
SUPPLIER)
9(X),
Chicago,
FAR
provided
refusestouse
you
OUTcitulJkr
its
York,
RESPECTTOANY
ARE
UCENSE
existing
provision
Unit~od
D.,t., is a
D.,ta
NAME:NA\'TEQ
ADDRESS
[]]inois60654
2.101
and
Ihe
additiunalOraltemative
may
cont"ct
r~fcrrcd
exp",-'Ssly
York
County,
and
conditionsofthis
SONY
,my
andaUpreviously
goverrun~-nl,
each
OF
USE
Suite
w.,s
rightsrescrved.
official
pliortoseeking
warranty,
UcmSl:
,/C,,,,,·s,liblwm'. R"lboul.
4-120-089-11
THIS
SOFTWARE.
USING
THIS
SOFrWARE
between
you
and
Sony
All
software
and
the
i1ssociatcd
media,
th<.-rcto.Inaddition,
areas
of
Canad"
Queen'S
Printer
and
U,e
United
and
Z1P+4.).
Public
softwar"
PRODUCT,
software10Ihe
downloadingoroHwrwise
LICENSE,
promj>tly
conlaCI
intdk.'Ct>.,al
for
servin:'
bureau,
products,
sysh:msorapplications
dispatch,
or
any
mobile
Or wireles.'>-COIlI"-'Ctcd
pagers,
and
p"ThOTlal
port,
Iranslate,orcreate
"'-'eonslrucl,
identifyOrdiseover
parrOr(iii)
m"y
notbescpar"ted
AREtoolher
products
SOFnv
ARE
Any
such
d:lla files will
Th"
SOFn'\'
ARE
saleortransferofthe
part>;,
thc
media
and
this
LICENSE.
fail10comply
with
p.'rl,<
known
confidenTh,1toyourself,
upon
which
service
providers,orSONY).
3vaibb1e.orwill
photographs,
animation,
SONY's
and
third
parties.
onlyincompliance
copyrightofcontent
backup
SOFn'\'ARE
navig"tionorcommunication
could
leadtodeath,
.....rsand
suppliers
ARE
is provid,-..:!
licensors,
their
D<I'RJ:SSORIMPLIED,
MERCHANT
CONfAINEDINTHE
FREE.
SONY
DOES
SOFTWAREINTERMSOFIlSCORRECTNESS,
GIVENBYSONYORA
ANY
WAY
INCREASE
SONY
AUTHORIZED
SOME
ruRISDICTIONSDONOT
cuuld
be
acknowl"dge
SOFIW
ARE
infonnation
anyofwhich
may
SHALLBECOLLECIlVELYREFERREDTOAS
FOR
BREACHOFANY
L1ABlLl1l'ORANY
LOSSOFPROHTS.
AND
USER'S
TIME,
L1ABJLlTY
UNDER
ASSOCIATED
STATESORCANADA,
STATE.,>ORTO
LIMITATION,
IlY
USING
Uni"-"CI
Stat~'S
Governmenlissubject10....
Rightsal48
conflictoflaws
Any
dispute
arising
and
th"
pam,-os
h"r"by
MATTERS
shalloc"xpn."SSly
including
their
lic<.'Tl"'rs
Writtl,,"ororal
"US,
GOVERNMENT
Stalt'S
go"ernmentorany
"commerci;ll
item"asthat
deliver....:!orotherwise
with
such
nolice:
a..,
sub;"'CI
to
notice
provided
rights
SONYbywriting10SONY
'"
u--,
"GPL"j
Electronics
third
party
software
shaUbereferredtoherein
any
printed
materials
the
SOFTWARE
in<;ludes
in!ormati.m
for
Ontario,
Canada
States
Poslal
Scrvia:.<:!l,
Notwilhslandin);
tho"
License
and
GNU
which
comprisesapartofIh"
such
specific
exlenl
not
conflicled
SONYisWlwilling10liCCTISC
SONY
for
instructionson..,tum
prop"rty
laws
and
trc"'ies,
time-$h.1.ringorolher
time
digital
derivalive
knowingly
for
route
useonmore
installed
guidance.
electronic
assislantsorPDAs
works
any
source
take
real
overanetwork
SOFIW
AREuran)'
mechanisms
b<:
dt",m..:laspartufthe
m.,y
only
1><:
used
PRODUCT,
printed
materials,
lenn~
and
conditionsofthis
SOn¥.'ARE·s
SONY
without
int<:lTUption
video,
audio,
licensors,
their
content
maybeprotecled
with
all
such
storm,
re5loralion
through
and
terminationofthis
equipmenlinhazardous
syslems,
personal
injury,orsevere
disclaim
IS"
and
withOUI
licensors
and
suppliers
INCLUDING,
ABILITY
AND
SOFTVVARE
WARRANTORMAKE
THE
SCOPEOFTHIS
REPRF-SENTATIVE)
ALLOW
by
installingOrusing
and
agn.'C
thai
with
your
PRODUCT
due
10
the
passageofIin'e,
resulls
EXPRESS
OTHER
LEGAL
EVENIFSONY
ANY
PROVISIONOFTHIS
PRODUCT,
DAMAGFS,SOTHE
TI-fE
SOFTWARE
FOREIGN
ANYONE
WHOISNOT
SOFTWARE.
52.227-19,asapplicable
Unil~-d
LICENSE
consenl10the
ARlSING
an
intended
and
suppliers)
agn.",ments
betweenuswith
RESTRICTED
other
enlity
termisdefinedat4S
lunlished
shallbemarked
Ihe
Conlracting
in U,e
Dala
;ll
Sony
GNU
U:s.<;('T
GemTa/ Public
all
performance
licensors
processed
any
WILL
HAS
ENTITY
UNDER
lhe
the
operate
Such
and
features
control
specifically
"AS
NOT
damag~'(!
leadtoinCOlTL'Ct
LOSSOFREVENUE,
ANY
THE
PERSON"ORUNDER
CI'R
provisionsorthe
outofthis
d",-,m~od
herein,
(U,dlor
included
laken
fO"'-'going,
tenns
using
any
than
except
with
and
music.
laws
air
warranty
AlNESS
useofthe
THEORY
LOSS
YOU
venue
third
and
RIGHTS"
seeking
Technical
includes
General
similar
of
cock
action
versions
nol
and
certain
Iraffic
express
MEET
~NY
BEEN
SOME
AND
1'11£
"triction
N3tions
shall
Officer,
For
Ill<.'
ttmnS alld
rllt'Se,,.,..ree
code
itttp://www.s<mY·.lCljProd
P/CilSC"ole
llu>l
So"Y"':Cl.7'IS110
GNU GENERAL PUBUC
Versi<»,2,lwwl991
Inc
Copyrigl,I(C)1989,1991Fr,,,-,Sojll<,,,,,'Fou,,dallO",I,,e
59
T"",p/<!
PhlC<',
EI,<,rymlCl<"''r""IIN
Preamble
TI'IC
lken,;es
for
ink
'Odedtoguarantee
appliestomostofIhe
Foundation
softwareiscoveNdbythe
Whenwespeak
fn."Cdom
to
distribute
you
can
chang"
To
prot"",t
your
The~
restrictions
example.ifyou
For
must
make
sure
We
prok'Ct
your
and/o.
modify
Also.
for
each
author's
Ihe
softwareismodifiedbysomeone
inlroducedbyothers
Finally,
any
fn.'C
individually
obtain
pmgram
pmprietary.Topr""entthis,wehave
TIle
precise
tenns
o
This
License
the
tern,softhis
eith"rthe
PrOb'T;lmorany
or
wilh
modifications
·modification".)
Activities
other
Programisnut
of
having
been
Whelher
Ihatistrue
I
You
ITIi'y
copy
and
3pproprialely
License
andtothe
You
may
chargeafN<
2
You
may
modify
such
modific"tionsorwork
a)
You
mllst
b)
You
must
to
1><:
liceT1.5<."CIasa
c)Ifthe
modified
in
the
mosl
warranty
user
how10viewacopyofUlis License. (Exception:ifIhe
yuur
work
These
NquiNm"nts
.....
aSQnably
considered
diSlribute
themassepar;>le
distributionofthe
and
every
part
Thus,
it is
nut
righl
tocontrol
In
addition,
of
a
storageordistributiun
3.
You
may
copy
1
and2above
a)
Accompanyitwith
source
code,
b)
Accompanyilwithawritten
p"rfunning
S<-'CIionsIand2abo,'eona
e)
Accumpanyilwith
noncomm
Subs<-'Chunbabo,'~")
The
source
code
means
allUwsource
and
installationofthe
distribuled
executable
runs,
If
distributi,,,,ufexeculableorubject
source
code
with
lheobjcct
4
You
may
not
copy,
modify,
However,
parties
rcITlilinin
fuH
5
You
are
not
Ihe
Progr"morits
dislributing
conditions
for
Each
time
yOll
6
Iken",,,t"copy,
recipients'
exerciseofthe
You
are
not
7 If.asa
consequence
imposedOnyou
cunditionsofIhis
obligations,
redislributionufIhe
this
License
If
;lny
portionufthi<;
and
lhe
Sfftionasa
It
is
not
the
Ihis
section
practices
Many
gt'TlCTOUS
eontributiunstothe
to
the
,mthor/donortodecideifheorsheiswillingtodistribute
This
sectionisinlendedtom:lke
8.Ifthe
distribution
copyright
holder
SO
thai
distributionispennilled
in
the
b<.:x:1y01this
9
The
Free
Software
willbesimilarinspirillo
Each
versionisgiven
later
version",
Softw;>re Found:>tion.
Software
FoWld;ltion
10.Ifyou
wishtoincorporate
for
permission.
exceptions
for this.
promoting
the
11,
BECAUSE
PERMITTEDBYAPPLICABLE
PARTIES
PROVIDE
BUT
NOT
Ll1\-IITED
ENTIRE
RISKASTO
DEFECTIVE,
12,INNO
EVENT
OTHER
PAR1I'
DAMAGES,
INABlLITYTOUSE
OR
LOSSES
PROGRAMS),
ARE
party
a;;
and
with
Pust
(Th"
and
with
the
Th"
or
fleet
Or
the
one
as
Iht'
to
its
or
text
Ur
and
or
shall
THE
OR
OF
OR
be
and
TO
you
ENDOFTERMS
HowtoApply
ur
These
If
you
developanew
which
everyone
Todoso,
attach
of
warranty;
and
Copyright
(c)
1llis
programisfree
Software
Foundation;
This
programisdistribuledinthe
MERCHANT
ABlUIY
You
should
h.we
Temple
Place,
Suite
Also
add
informationonhowtocolltacl
If
u,..,
programisinteractive,
Gnomovisioll
version
This
is
fn.",
software.
The
hypothetical
uSC
maybeealled
You
should
also
~=ry,
Here
Yoyodyne,
Inc"
cOlldilw,,~
.:o"Cl7"i"8
GPL
""d
So"y
lj.,,'bsilc.
x/
i"quir;cscrmcc..,i"s
LGPL, plca,.,
ro
are mlr/i/abfr
u
cts/Li....
""
LICENSE
5"Ilr3.3O, 8os/on,,I..1A
must
of
th"
rights,wencc<:ltomake
translatetocertain
Ihal
rights
Ihc
software
programisIhrt'aten..od
illld
applies10any
madebyrunningUwl'r%'Tam)
and
cause
cause
ordinary
(or
basedOnth"
regardlessofwho
u...,
the
mere
and
provided
which
source
..rcial
(in
either
fmm
ax:le
copy,
sublicenseordistribute
compliance
requiredtoacrept
Ihe
copying.
n'Sponsible
th<.-nasa
wouldbeto
j>urposeofthis
has
you
sharing
THE
YOU
INO.UDING
SUSTAINEDBYYOUORTHIRD
EVENIFSUCH
AND
can
the
each
receivedacopyofu,..,
commands
something
get
isa
hereby
(121
1
10
COl'!!
software
your
Free
free
soflware,weare
copiesoffree
softwa
distribute
they.
with
protection
will
p.'k-nllic"nses,ineff<.-cl
conditions
General
F~'lCh
than
restricted,
distribute
publishon"ach
absenceufany
your
the
any
program
else,
whole
inlenl
distributionufd.'rivativeorcollecti""
agg"'-'gationofanother
distribute
mustbedistributed
dist.ibution
for a
w,less
th"
who
Program
redistribute
distributenrmodify
(whetherbycourt
License. If
wholeisintendedtoapplyinother
the
people
and/or
who
License
Fow,dation
have
r-or
software
PROGRAMISLICENSED
ASSUME
UNLESS
WHO
I-n07
and,lis/rib",,"
1~'rbMi",
aT'-'
designedtotake
freedomtosh.ue
Softw.lre
....uruse
too,
not
licen.""" is addre"-Sedas"you'
copying..
dep"ndsonwhat
for
copyorcopies
modified
work
wholealno
saying
apply10the
independenl
that
the
distribution,acompl"le
the
work
code
ex<.'Cutable.
sourceorbinary
that
same
modify,
hal'e
derivalive
di<;tributingormodifying
for
of"
consequence
Programbyall tJ>,os..,
sectiunisheld
sole
have
pL~ces
a
If
Our
and
11-IE
TO,
THE
THE
and
Foundation's
GNU
Library
referringtofreedom,
soflware
(and
pK.>CeSofilinnew
restrictions
responsibilities
copiesofsuchaprogram,
n'Ceiveorcangdthe
two
steps
(1)
copyright
and
ours,wewanttomake
else
and
passed
refk'Ctonthe
original
constantlybysoftware
making
for
copying.
distribution
TERMS
AND
programorother
Public
License,
The
derivative
work
and/or
Iranslated
diMribution
and
the
output
from
the
Program
v"rbalin,
copit"Suf
copyanappropriate
warranty;
Ih"
physical
actoftransf,'rringolcopy,
of
the
under
the
tennsofSectionI"bo\'c.
fil~'S
10
carry
th"t
you
distributeorpublish,
chargetoall
normally
reads
way,toprintordisplayanannoWlcemenl
that
you
provideawarranly)
Programisnot
R'<1uir<."CItoprinl.m
modifit'd
and
sep.1.rate
works.
But
whoen
mustbeon
the
tennsofthis
wrote
it
uf
this
S<.'chunluclaim
work
m<-..:!iwn
does
not
the
Program
you
alsodooneofthe
complete
corresponding
under
offcr,
valid
m..:lium
custumarily
infom,alion
you
and
unlyifyou
means
til<'
preferred
for all
modulesilcontains,
How..'ver,asa
lonn)
component
itself
codeismad"byoffering
place
countsasdistributionoflhe
sublicense,ordislribute
the
Programisvoid,
received
copies,orrights,
this
License,
works.
TI,,,se
(or
any
work
basedonIhe
Ihe
Prob".am
(or
Ihe
rights
granted
herein.
enforeing
compliancebylhird
court
judgm"",loralk-s"tionofpalo'nl
order.
agreemenloruth.,rwise)th••tcontradict
you
cannOI
distributeSOas10satisfy
you
may
who
rt'frain
"nliNly
from
im'alidnrtull"nforreable
S<.'Ction10induce
purposeofprotecting
made
wid~'
rang..of
thorOlJghly
useofthe
Progr.,m
U'"
Program
onlyinor
may
publish
the
present
'·ersion,
di~tinguishing
version
the
optionoffollowing
the
Prograrn
does
P.1rtsofthe
Program
whichiscopyrightedbyIhe
decision
willbeguided
reuseofsoflware
LAW.
EXCEPT
PROGRAM
"AS IS"
THE
IMPLIED
QUALl1I'
AND
THE
COSTOF
REQUIREDBYAPl'LlCABLE
MAY
MODIFY
AND/OR
ANY
GENERAL,
PROGRAM
(INCLUDING
HOLDEROROTHER
CONDITIONS
Terms10Your
New
program.
redislribute
following
file
software;
eilher
or
330, Boston.MA02111-1307USA
69,
and
you
your
sample;
disclaims
Programs
and
you
want
and
(hange
under
noticestothe
have
atleasl
you
can
version2of
ho[.>e
FORAPARTICULAR
program.Itis
redistributeitand/or
the
License,or(al
thatitwillbeuseful,
should
FJ1NESS
GNU
you
b)'
makeitoutputashort
Copyright
(c)
year
nameofauthor
a'"
welcometoredistributeilWlder
'showw'and
'showc'should
other
than
'showw'and
employer
(if
you
alter
the
names:
all
copyright
i1tobeof
General
workasa
rti,"10be/vw
dOll'"load.I'I,,'lT1.'C
"",I
n"'foIkm>i"1it
IIl,·co"ln.1
aflll"
USA
c<>pil!S
oftl,i~
11"""",-,
away
yuur
chilllge
fr<.'C
softwa
softw;lw
andtoany
General
Public
charge
for
this
free
prog"'"'s;
that
forbid
for
youifyou
whether
source
code.
the
software,
on,wewant
authors'
repulations
Ihe
madeitclear
Ihat
and
GNU
CONDmONS
FOR COPYING. DISTRIBUTION
work
which
"Program",
below,
undercopyrighllaw,
into
anolher
and
modification
the
Programi~cov"
do._'S
Ihe
Program's
copyright
and
give
any
olher
Programorany
promin<.'nt
notices
third
pam
..",
comm.,nds
ink'ractivdy
workasa
whole.Ifidentifiable
worksinthemselves,
you
distribule
License,
rightsOrcont
works
not
basedonu,..,
bring
the
other
(orawurk
bas<.-d
following:
machine-readable
the
I"rmsofs..'Ctions I
for at
least
three
machine-readable
used
for
R'c<.~v"od
as10th"
re<:civ..odthe
foonofthe
plus
special
with
the
major
accompanjes
the
Program
from
since
you
have
actions
are
Program>.
Itl'-'
Programorwork.<;
any
work
bas<-><'lonthe
Program
subject
not
distribule
receive
copies
dislributionufIhe
circumst;lnces.
youtoinfrin);e
thoe
integrityofthe
softwaw
distribut<:d
clear
whalisbelieved10beaconsequenceofthe
is
r"slrict~..:!
under
Ihis Licen5<:
among
countries
revised
and/or
bUI
may
differindetail10addl'l'SS
number.
If
the
tenns
not
sp<."'Cifyaversion
into
other
I'll'{'
by
the
two
generally
FREEOFCHARGE,
WHEN
OlHERWISE
WllHOUT
WARRANTIESOFMERCHANTABILITY
PERFORMANCEOFTHE
ALL
NF£ESSARY
LAWORAGREEDTOIN
REDISTRIBUTE
SPECIAL.
INCIDENTALORCONSEQUENTIAL
BUT
PARTIESORA
PART\'
the
grealest
tn..<se
terms
""festtoattach
the
"copyrighl"
modifyitunder
your
PURI~E,
Public
Ucense
electronic
and
notice
like
Gnomovision
show
'show
1";
programmer)oryour
interest
in
the
program
URL:
sou,eccodc.
docu""·,,I,
bul
d"'''Xi"X
f",,-odomtosha",
not
sen'iceifyou
anyonetodeny
And
cert"in
....
~to
make
other
License
inst~'ad.)
price,
Our
and
thai
distribute
gratisorfor ,1
you
must
,1Ild (2)
offer
that
everyone
its
recipientstoknow
and
~ure
program
General
wish),
yuu
know
yuu
these
copi~'S
of
fe<:,
show
you
this
patenls.Wewishtoavoid
allY
patent
must
b<:
modification
Ibm,;ed
follow
GENERAL PUBLIC UCENSE
mnlainsa"oti",
plaCl-dbythe
rderstoany
such
thatisto
say,awork
language.
(Hereinafter,
are
not
coveredbythis
....odonlrifits
conlents
source
codeasyou
notice
and
disclaimerofwarranly;
n'Cipientsofthe
ProgramacopyofIhis
and
you
mayatyour
portion
of
ii,
thus
fonningawork
pro'·ided
th"1
you
sl"ting
Ih"t
plU
Ihatinwholeorin
und".
and
the
..."t
work
on
S<.,ftwarc
offer10dislribute
wo.k
illly
~'xc"phon,
the
and
you
not
prohibit.,dbybwifyou
to
pmlies10this
the
any
i"
rnay
not
new
the
and
free
WARRANTYOFANY
NOT
line
oplion)
paper
this
tIley
chang,--d
part
the
te.msofthis
wn..-n
run,
you
includinganappropriate
thai
user:<
may
redistribute
Program
ilself is
interactive
announCemenl.)
sectionsofthai
then
this
same
sectionsaspartofa
whose
penllissions
your
rights10work
bas<--dunth.,
Program
Program
with
u,..,
under
the
SC0p"
ii,
und"r
S<.'CIion2)in objecl
and2alx",,,ona
years.togive
any
copyofthe
cnlTL'Sponding
int"rchang";
cor..,sponding
pmgraminobj.xt
for
making
modificationstoil.
assuciat.-d
int~'rfaC\'
the
source
components
(compiler,
executable
access10mpy
from"
Soun"" ,-,ode,
even
though
exceptasexpressly
will
automatically
under
this
License
signed
it.
1·lowever,
you
indicale
your
basedonil
Program>.
Itx_
directlyorindirectly
under
Program
Software
goalsofpreserving
HAS
and
Ihe
tern'S
and
conditions.
Ucen.se
infringe"..,ntorfor
~i",ult;lnt'Ously
ProgramataIL
For
Program.
any
particular
patentsorother
free
software
through
that
systemin..,lianceonconsistenl
software
through
certain
counl.ies
a(ldMIexplicit
Ihus
excluded.Insuch
versionsoft/-'w:,
new
specificsaversion
conditiOl'S
eitherofthai
nUOlberoflhis
License,
programs
whose
Foundation,
THEREISNO
STATEDINWRITING
PROGRAMISWITH
SERVlCING,REPAIRORCORRECTION.
THE
PROGRAMASPERMllTED
lIMITEDTOLOSSOFDATAORDATA
FAILUREOFTHE
BEEN
ADVISEDOFTHE
po!'Eible
usetothe
u,..,mtothe
a
pointertowhere
the
termsofthe
any
later
version.
but
WITHOUT
ANY
See
the
GNU
General
along
with
this
mail.
whenilslartsinan
comes
wilh
certain
conditions;
th<:
appropriate
part>;
could
evenbemouse-clic'ksormenu
school,ifany,tosigna"copyright
'GllOmovision'
il
IS
"0'
allm,
...
chang
.. it, By
the softwareisf...",
whose
authors
committousin);
You
can
apply
jllo
Public
Licenses
Ihat
you
receive
y"u
candotn..>se
rightsorto
asi<
th"
softwa
...., Or
if
you
must
give
the
t/-'w:,m
these
terrnssothey
license
which
givcs
und.'rstands
that
Ihat
what
they
thoe
danger
for
everyone's
AND
MODIFICATION
copyrighl
pmgramu.work.
containing
the
translatiOIlisincluded
LiCl-nS(";
Ihey
constil1Jt" a
receive
it.inany
option
offer
warranty
basedonthe
also"'....,t
,,11"fth<,sc condition.:>;
ll",
files
;lod
contains
Or is
d"riv~od
License
muSI
cause
ii,
when
copyrighl
the
program
but
doe:<
work
are
License,
and
its
krms,donol
whole whichisa
for
other
licenscc:s
written
entirelybyyou;
Program
(or
withawork
of
this
License
codeore",-'Culable
m~"CIiwn
customarily
third
party,
for a
source
or,
source
codeorexecut;lble
Forancx<.'Cutabl"
defmition
fik'S,
code
distribukd
kl'md,
andsoon)
designal..:l
place,
third
parti~'S
prm~ded
Wlder
lenninate
your
rights
will
nol
have
their
nothingdse
grants
dt>
not
"cccpt
acceptanceofIhis
recipienl
aUlomatically
You
may
any
oth"r
reason
n",
conditionsoflhis
yuur
obligalions
example,
if a P.1tent
through
yOll,th..-n
circumstance,
u,..,
P"'P"rty
right
d"imsor
distribution
syslem,
any
other
system
reslofthis
eilh,:rbypat"ntso.by
g"ographical
distribution
case,
lhis
License
General
Public
License
problemsorconcerns
numberofthis
version
orofany
you
m;ly
choose
distribution
conditionsawdiff"rent,
writetoIhe
Free
the
free
slatusofall
WARRAN1I'
THE
KIND,
EITHER
AND
FI1NESS
WRITlNG
WILL
DAlvIAGES
PROGRAMTOOPERATE
POSSIBlLllYOFSUCH
public,
the
best
startofeach
source
the
full
nuticeisfmmd.
GNU
Gcnerall'ublic
WARRANT\';
Public
License
program;ifnot,
writetothe
inleractive
mode:
ABSOLtJfELYNO
type
'show1"for
details
ofUwGent-ral
Public
(which
makes
passeo;
>J
conlr~st
the
GNU
General
for
all
its
usen;.
lllis
Gen"ral
it.
(Some
your
progr;lms,
are
thereisno
haveisnot
;l'"
chargenomore
n~'Cd
waytoachieve
tno
d'-'Signed 10
make
source
things
yuutosurn'",ier
~'ou
recipients
that
holder
anda"work
Programora
outside
work
medium,
keep
Licell""
the
not
not
exlend10the
code,tobe
code.
fonn
plus
then
aT'-'
licenses
lhis
not
(not
License,
und"r
the
balanceoftile
whichisimplemenledbypublic
and
Software
FOR
COPYRlGHT
EXPRESSEDORIMPLIED,
fORAPARnCULAR
YOU.
ANY
fileto",osteff'-'Ctively
sure
cod.,orcan
gditif
Ihc
rights
modify
il
all
the
rights
know
their
rights
you
legal
p"nnission10copy,
w"rranty
for
the
origin.l!.sothai
redistribulorsofa
fr,-",
useornot
licen.<;<.><:!atall
s.1ying il
maybedislributed
bas<-'(!onlhe
portionofit.
without
limilatiuninthe
•
its
seop".
The
lx.S<.odonthe
Pmgram
provided
thaI
inlacl
all
tlw
notices
along
wilh
the
prok'C!ioninexchange
Program,
and
dateofany
change
from
the
Programorany
started
nuuling
for
notice
andanotice
Wld"r
lhese
conditions,
normally
prinl
suchanannuuneement,
derived
from
the
Program,
apply10those
work
basedonthe
enm.,
wholt',
rather,
the
intenlisto
based
on
u...,
Prog.am)ona
fonn
under
the
used
lor
software
Ihan
your
distributed
(This
alternativeisallowed
wilh
suchanoffer,inaccord
work,
complet"
lhe
scripts
uS<."CItocontrol
nOI
include
,mylhing
uf
t/u,
0p"raling
systemonwhich
offering
equiv;llent
not
compelk-dtocopy
this
License,
Any
Wlder
you
Licensetodo
limitedtopatent
a licen.se,,:
Ucense.
incorporales
any
derivativesofOur
THE
att"mpt
\his.
License
lemlinatedsolongassuch
permissionI"modifyordistribute
Licens<c.
TIwrdore,bymodifying
so,
and
receivesaIicenS<.'
imlX'se
any
furtl",r
is.su~..,.),
theydonot
U,is
License
and any
license
would
not
only
way
you
could
sectionisinlendedtoapply
tocont",,1
validilyofany
applicationoftlMI
cannot
ionpuse
cupyrighK-d
inlerf"ces.
Iimilation
"xduding
Ihe
limilationasif
from
timetotime.
License
which
3pplies
later
version
publishedbyIhe
version
eVCr
publishedbyIhe
write
FOlmdatiun;
fn.'C
PROGRAM,TOTHE
HOLDERS
SHOULD
THE
PROGRAM
COPYRIGHT
ABOVE,BELIABLETOYOU
ARISING
OUTOFTHE
BEING
RENDERED
WITH
DMIAGES
thisisto
make
convey
Licenseaspublished
without
even
the
details
Free
Software
for
License.Ofmurse.
suits
imj>lied
details
formo....
WARRANT\';
ik'ms-whate"..'r
disclaimer"
011
compilers)
wrillenbyJamcs
Public
License
Public
License
ou,..,r
Free
Software
that
you
have
you
wanl
it.
thai
you
ha"",
distribut.·
this
fn.'C
software.
any
problems
f",-",
pmg.am
under
Program"
me:>ns
eilher
verb.,lin,
actofruruung
(indep"'ndenl
yOll
conspicu"usly
that
rder10this
Program
for a
k",
copy
and
distribute
part
U'ereof,
such
interactive
that
thereisno
and
telling
and
can
se<:lions
when
Program,th..
and
thus
to
exercise
volume
tern,sofSections
interchange;
or,
costofphysically
under
Ihe
tcnns
only
source
con'pibtion
thatisnorm,llly
aco.'SStocopy
tl>.,
source
along
uth"rwi,;..,
parties
all its
terms
from
lhe
original
",-'Striclionsonth"
c,,,,dl!iun,;
excuse
you
from
oU'er
pertinent
p"rmit
royalty-free
s.ltisfy
bothila"d
such
claims;
licen.'<C
~ysl"",;
it is
that
choice
th"
uriginal
Ihose
oounlries.
wrillen
Such
new
v,'rsions
toitand
to
the
aulhortoask
we
somt1im~'S
make
softwa,...'
and
EXTENT
AND/OR
OTHER
INCLUDING,
PURPOSE.
PROVE
HOLDER.ORANY
USE
INACCURATE
ANY
OTHER
it free
software
t/-'w:,
exclusion
by
th~,
warranly
Foundation,
Inc" 59
type
'show
tht'
commands
your
program
for
the
program,
Hacker
is
th,-'
th"t
You
If
will
term
Ule
use
the
be
you
ea~'h
the
of
for
with
code
Ih"
U'e
to
or
M,d
are
the
up
"any
Free
Frcc
of
THE
FOR
OR
F..,.,
of
w'
you
if

,1
Aprill9!I'l
TyCoon,
Pr<.'SidentofViC<'
TIus
<*oeral
Public
License
doc'S
not
JX'rmit
inoorporating
your
program
into
proprietary
may
cnnsid"ritmore
l'ublic
GNU
Version2.I,Februaryl999
Copyright
59
Temple
Everyone
of
this
[Thisislhe
as
the
the
version
Preamble
Th,·1io.'Ils('s
intendedtoguarantee
"n'is
Foundation
ordinary
VVhen
the
fTt-
thai
you
To
prolL'Ct
reslrictiuns
For
example,ifyou
make
r<.-'Cipients, "0
termssolh,~y
We
prolL'C1
copy.
To
prot
else
"nd
affeclt><:!byproblems
Finally.
the
usersofa
of
the
Most
Lkens<>.
Iibraoi""inordertopennitlinking
Whenaprogramislinked
work,aderivativeofthe
crileri"offreedom.
We
calilhis
"Iso
lhe
ordinary
For
e""mple.onra'"
standard.Toachieve
widely
License
In
other
For
example,
non-hee
Allhough
Library
TIle
prcciS<'
the
library"
libraryinorder10run.
tJ
This
authorized
addl"t'SS<.>das"'you
A '"library'"
someofthose
The
means
v,'rb"timorwith
liInitationinthe
''Source
source
of
Activities
program
Library
program
I
You
consricuously
thai
You
You
2
modification...or
a)
b)
c)
d)Ifil
(I'or
Therefore,
nol
Thes<'
reasonably
distribute
distributionofthe
and
Thus,
righttocontrol
In
slorageordistributionm...
3
You
you
Lia.·nsc.
ordinary
these
OrK'"
copies
lllis
4
You
&'CtionsIand2above
dislribut<'d
If
from
with
5 A
it, is
ofthisLiCl'Tl.S<".
However,
portionsofU,e
diStributionofsuch
WhL'l"Ia"work
workofIhe
Library,
If
or
objecl
Oth"rwise,ifthe
execut.~bles
6.
As
containing
(or
You
LiC<'llS<',
for
a)
b)
c)
d)Ifdistributionofthe
e)
Foran...·x...
executable
either
unIBS
II
operating
7.
You
coveredbythis
the
a)
usefultopennit
License
insteadofthis
LESSER GENERAL PUBUC UCENSE
(c) 1991, 1999
FrocSoftware
Place,
Suite
330,
is p<'rmitt
...>dtooopy
licen.~
document,
but
first
rcleaS<.>d
successorofthe
license,
we
.....
>domtodislribute
sure
distribute
....cteach
libr"ry
GNU
provides
usccI
the
The
Yuu
You
U,anasan
docs
supply
addition,
distributionofob;cel
program
suchanobjecl
lessinlength).lhen
.~n
lhe
the
A«ompany
in
complete
relinktoproduceamodifi
definitions
Useasuitable
librilry
withamooified
work
Accompany
forachargenomore
materials
Verify
may
other
Accompany
versionofthe
GNU
numr..,r2.1.]
lur
most
software
your
the
I-"'Sser
Gen"ral
and
other
authors
c.:,neral
Public
Licenseisthe
speak
of
frff
softwa
copiesoffree
can
change
the
;;oftware
your
rights,wen<.-...d10make
translate10cerbin
distribute
that
they,
I<X>,
R'Ceiv..orcan
tn.,t
lhey
can
know
their
rights
your
righls
with
and/or
modify
dislribulor,wewanl10makeilvery
passed
on,
the
recipients
th"t
software
has
"Libr<")''',
....
every
must
c"lleda"work
mightbeintroducedbyothers.
p<ltents pose a
freo,
progr
..mbyobtainingarestrictive
mustbeconsiSlenl
softw"re,
including
applies10certain
ooiginaJ
The
Lesser
liCt·n.~
U'e
"'lesser"
other
fn,
...
software
c.:,,,,,ral
Public
occasions,
this,
non-free
libraries.Inthisca,;."
cas
....s.permissiontouse"
pennissiontouse
programs
erulbles
the
1.L'SSCr
General
the
freedom
and
tt-nns
and
conditions
and
a '"work
that
Lic.-nse
AgR'Cment
party
""yingitmaybedistributed
means"
collectionofsoftware
functions
below,
rt'ferstoany
either
the
Libraryorany
mooifications
term
"'mooification",)
cooe"
forawork
code
for
all
modulesilcontains,
library
other
th"n
copying,
using
the
Libraryisnot
(independentofthe
that
uses
the
Library
may
copy
ill1d
distribule
and
appropoialely
fer10thi
..
Uc.-n.~
may
charg
...•ak,,'
for
may
modify
your
work
mooified
work
musl
musl
cause
the
must
cause
Ihe
whole
facility in
the
mooified
argumem
not
supply
such
ex,mlple,"function
Subsection2drequires
it,
the
'"-luare
requirements
apply10tl",
consider
...>dindependenl
themasseparate
whole
part
regardlessofwho
it is
nol
the
intento(this
the
distributionofderi""liveorcoJl<xtive
mere
"ggregationof<Utothcr
m"y
opttuapply
allc'r all
the
notic('S
(If"
newer
version
GNU
(;.,neral
notices
this
changeismade
and
deoivative
works
optionisuseful
when
may
copy
and
distribute
under
the
tennsofSections1atId2aboveona m
the
s.,me
place
s.,tisfies
tht'
object
code
that
containsnoderi""tiveof
that
linkinga"work
Library),
execul<~bles
\h;>1
uses
Library
even
Orifthe
workisitsdfalibr"ry,
file
uses
COOl'
plus
portionsofthe
work
cont.,ining
exceptiontothe
portion...of
the
customer's
own
must
give
prominent
You
must
supplyampy
Library
among
them,aswellasa
the
work
the
work
(which
machine-readable
filesinthe
shared
illready
pTt-'Senlonthe
versionofth..libr"ry.ifthe
W<lS
made
with.
the
work
from
the
same
that
the
user
has
"CUtable,
the
re<:Juin>d
from
it.
However,asa
sourceorbin"ry
U,at
component
happen
thai
Ihis
syslem.
Such"
may
pillce
library
LicellS<',
libmry
facilitiesisotherwise
the
oombined
linking
prorr;dary
Licensc
Foundation,
Boston,MA02111-1307
and
distribute
verbatim
changing
it is
11.01
Less,'r
GI'L.Italso
Library
Public
License.
are
desigTl(.>dtotake
fr<.-"lXlomtoshare
",link
designated
withalibrary,
non-fn.'C pn:>grams
many
and
andtothe
copyorcopiesofthe
lmder
filt'S
pas.;ed
functionorlable.
the
Public
codeismadebyoffering
uses
the
the
that
Sections
use
mustbedistoibut
than
workismadebyoffering
fonn)
itself
facilities
and
Public
License,
who
decidetouSC
better
....·,we
arc
referringtuheedomofuse,
s<,ftware
and
use
responsibilities
copiesofthe
get
Ihem
with
a tw<rt;lep
method:
Ihe
1ibr<~ry
should
constant
t:ltrcaltothe
with
the
""me
libraries,iscovert'dbythe
libraries,
Ihose
libraries
library.
General
Public
'.>Cner"l
Public
developers
License
for
many
there
maybea
particular
the
GNUCLibrary
more
people
Public
LicenseisLess
the
wherewithal
for
copying.
uses
the
library'.
TERMS
AND
applies10any
dala)10fonn
such
derivative
and/or
means
the
preferred
distribution
restrict<'d,
useofthe
docs
verbatim
publishoneach
"bscnceofany
lhe
physical
tI",
tenns
itselfbea
mooifiedIucarry
of
tile
work
Library
wh.m
in "
librarytocompute
that
root
function
mooifi<'d
and
works,
But
mustbeon
the
wrotc
sectiontoclaim
>diulll
does
not
tenllsofthe
th,~t
....
.fertothis
than
version2of
LicemiC
in a
givco
copy.itis
made
from
you
wish10copy
the
Library
provided
thai
the
'e<:Juirement to
the
Libr"ry'".
Ihat
u..es
the
ralher
thana"work
Library"
uses
though
the
only
numerical
uS<'ofthe
object
Library
is a
derivativeofIhe
work
..Iso fall
above,
Library,
and
and
reverse
notice
with
"fthis
with
the
complete
"work
that
....dexecutable
Library
will
not
library
medwusm
user's
withawrilten
the
costofperfonning
place
"lre"dy
received"
fonnofthe
special
with
the
accompanies
requirement
contradiclion
\h;>1
.Ue.l
distribute
library
witha"''Opyofthe
mld
strategy10useinany
piecesofit in t\Cw froc
restrictions
for
library.
Ihe
the
know
full
fmcdomofuse
whether
The
License
Less
libraries.
the
....isLittl..logainbylimiting
libraryinnon-free
to
software
functions
executables
software
translated
plus
Libraryina
copiesofthe
actoftrilTlSferring a
ofs..ctionIabove,
softw"re
tobe
",rerstoa
the
facility is
the
any
must
""-'Parate
when
tennsofthis
it
work
bring
ordina.ry
h.1s
thai
(oraportionorderiv"tive
you
any
Suchawork.
Library'"
material
source
The
parameters,
will
under
you
distribule
engineering
each
License.Ifthe
reference
...
><:!
uses
necessarilybeable10recompile
computer
offer.
exception,
major
the
conlradicts
means
such
permitted,
applications
Inc
USA
oopies
allow
...
>d.
counts
"ersion2.h..nce
away
your
I"-
change
fr<.-'C
software-to
"ppliestosome
it.
You
can
use
(and
charge
for
progr'In'S;
thai
forbid
distributorstodeny
youifyou
distribut.;>
whether
gratis
source
code.Ifyou
library
afler
making
(I)
we
copyrighl
clear
Ihat
thereisno
that
wh.1t
they
h.1ve is
exislenceofany
license
from
spedfiedinthis
ordinary
andisquite
different
into
non-free
programs.
staticallyorusingashared
ordin"ry
c.:,neral
Public
permits
more
License
becauseitdocs
ofanadvantage
However,
spedal
needtoenoourage
mustbeallowed10use
programs
in
to
usc
the
whole
GNU
prot<.-'Ctiveofthe
nm
that
program
distribution
and
mooification
The
fonner
cont"ins
GNU
LESSER GENERAL PUBUC UCENSE
CONDmONS
FOR COPYING, DISTRIBUTION
libraryOrother
under
the
lermsofthis
and/or
data
libraryOrwork
work
under
copyright
straightforwardly
fonnofthe
work
any
associ.,tL>d
inlerface
and
mooification
arc
and
output
from
tool
for
writing
Ubr"ry's
copyan'lppropri"te
warranty;
and
copy,
LibraryOrany
portionofit,
provid
librilry.
prominent
norices
licensedatnocharg"toall
function
or"
invoked,
thc'n
f..
cility
still
operales,
squ"re
roots
application-suppli
still
workasa
appe"rt'd,
threshold
file is
still fall
copyofthe
corr
under
"work
work
a combil>e<:!
compule
square
whol
.., If
worksinthe=lv"""
you
distribute
Lio.'nse.
righlsorcontesl
works
not
basedonthe
the
other
work
GNU
General
License,sothat
Ihe
then
you
irrt'versible
for
copy.
partofthe
codeofthe
accompanyitwith
...
>dium
"CCt'SS
to
copy
distribute
the
portionofth
....
Library,
itl i;;olation.isnotaderivative
with
Ihe
Library
thai
uses
the
libr"ry".
fromaheader
codeisnot.
Whctn.,r
for
this10be
dala
structure
WU"C'StriC1ed,
und('r
Section
Library,
you
Section6,whetherornot
may
"Iso
combineorlink"
that
work
under
for
debugging
work
work
during
directing
Ihe
...
""ponding
m"chin
Sections]
the
Library",asobjt'CI
conlaining
Ihe
for
linking
with
syslem,
rather
user
i1lSla]]s
one,aslongasthe
valid
foratleasl
this
distribution.
aC«.'SS10copy
copyofthese
maleriaL~
that
uses
the
the
materialstobe
components
(compiler.
excculilble.
the
Iicen.<;c
you
c"""ot
use
based
OIl
the
libr"ry,
and
provided
same
..d
they
may
and2above);
modified
both
work
with
.....
>domtoshare
make
spt-'Ci"lly desib"lmted
it
100,
bulwesuggesl
particular
not
priC<',
this
serviceifyou
copiesofthe
or
for.~
f~,
link
other
changes10the
the
library,
not
free.
program.Wewishtomake
a
p.~lent
GNU
from
License
I.~x
crileria
lesstoprot<!Ct U",
over
oompeting
the
Lesser
the
operaling
use",'
using"
mooified
code
program
l..esser
preparedsoastobe
which
law'
for
making
definili<m files,
not
coV{·n·dbythis
suchaprogramiscovered
it).
complete
distributeaa,pyufthis
and
you
...>dthat
stating
lable
of
dal<~
YOll
and
hasapurpose
functionortabl<.-·
rools.)
identifiabl..st.'CIionsofthai
the
same
whose
pennis.."ion."
your
oight:>towork
b"sedonIhe
Library
under
the
Publi"
.....
fer10the
c<Ut
specify
that
copy,sothe
Library
of
the
complet
customilrily
from
a
source
code.
bulisdesigned10work
createsanexCC\ttable
Th"ex...
file
thaiispartofthe
thisistrueiscsJX"'i"lly signific<Utt if
true
layouts
regardk'S.sofwn.,ther
6.)
distribute
tennsofyour
such
that
the
eXCC\ltion
user10the
.....
readable
code
the
Library.Asuilabl
than
copying
thre.,
years,tob";""
fromadesignated
or
thaI
Library"
kerneL
R'Slriclionsofolher
Ihem
Libr"ry
provided
that
youdolhese
basedOnthe
the
library.Ifthis
and
change
sure
the
software
software
you
case,
ooS<.>d"nthe
Our
General
wish);
"nd
that
you
"re
you
Iibr"ryorif
you
musl
gi"e
cooe
with
library
and
(2)
we
offer
warranty
for
Ihe
the
origin"l
version,sothai
holder.
Therefore,
license
Gener,,1
Public
the
ordinary
library.
the
therefore
permits
for
linking
user's
non-free
License
pro,'ides
the
widest
possible
library.Amore
the
free
library
e""blesagreater
system,aswellasit:>
freedom,itdocs
versiono(the
follow.
Pay
close
derived
from
the
which
contains.~notice
General
c<m,·eniently
has
been
distributed
Ih<ttisto
say,awork
into
another
mooificatiorn;toit.
plus
'Nhether
Ih<ttistrue
source
cOOl'asyou
copyright
notiC<'
may"Iyour
option
thus
fonningawork
you
also
met'l
th<tt
you
ehang
...>dthe
third
parties
tobesuppliedbyan
must
makeagood
perfom's
whatever
thatisentirely
usedbythis
then
this
Licefl$(',
sectionsaspart
for
other
written
Library
with
the
Library
scopeofthis
License
License
insleadofthis
ordinary
th"t
version
ordina.ry
inlo"
program
it.
under
Section2)in
...•corresponding
used
for
d~ignated
pbc.-.
even
thOl,gh
",utableistn.,reforc
is
not
precisely
and
accessors,
il is leg.,lIy a d
the
obj&t
they
"re
linked
"work
that
choice,
modific"tions
Libraryisust>dinit
displays
copyofthis
SOurce
cooe
and,ifthe
and/or
SOurce
Library.
(It
is
the
applicationtouse
...
• mt.'Ch'",ism is
library
functions
mooifi
...>dversionisinterface-compatible
the
place,
you
h"ve
already
must
include
.U>y
distributed
need
andsoon)ofthe
proprietary
"tld
the
Library
sid
....
by-sideina
thai
the
separate
two
things
Library,
programs.Iiyour
i..
what
it. By
packages-typically
first
explanations
Public
th<tl
you
infonned
these
rightsorto
you
the
recipients
the
library,
and
you
freo,
library.
w'" insisl
License.
c.:,n
...
·ral
combina.tionofthe
other
code
freedom
programs.
advantagesincertain
uS<'ofa
frequenl
to frcc
software
munberofpeople10use
ensure
attention10the
library,
AND
Publk
License
language.
the
,;cripls
License; tht.')'
onlyifit"
and
Licen.<;c
offer
basedonthe
allofthese
files
underIh..
faith
partofits pUI"JX'!'"
work
and
01 a
Ii""n.sees
conrelybyyou;
(or
withawork
GNU
General
inste"difyou
GNU
th"lisnot"
software
then
third
with
workofthe
thatisa
Library.
definedbylaw
and
cooe
directly
uses
Ihe
provided
and
copyright
License.
for
the
workisan
code,SOthat
understood
s,un<.-
user
offer
selll
d"l;il
not
togetherin<Ut
single
distriburionofthe
lmcombined
program
you
wanttodo.
contrast,
the
GNU
is
freo, forall ils
users.
think
C.:I.refu)ly
aboul
below
LiCftlse5
are
designed
re.;",ive
soun;e
cooe
th"t
you
c"ndothese
ask
you10surrender
modify
it
all
the
rights
you
must
provid..complcte
rc<:ompiling il.
And
Ihis
licen.<;e,
which
Also,ifIhe
the
original
sure
\h;>1.~
company
Ih<tt
any
palenl
This
license,
Public
License.W...•use
twoisI
such
linking
onlyifthe
with
the
library
th"n
the
ordin"ry
TI,cse
dis.,dvanlages
special
certain
library.soIhatitbecomesade-facto
caseisthaiafree
only,sowe
v"rianl,
the
GNU/Linux
that
the
userofa
Libr"ry
difference
wher""s
the
latter
MODIFICATION
placedbythe
(also
c"lIed
linked
with
application
under
these
tenns.A"work
containing
the
Library
(Hereinafter,
translalionisincluded
Foralibrary,
oomplde
u,;<,.>dtocontrol
an'
outside
amtenls
rcc
..iv.. it, in
along
with
w"rranty
conditions
and
the
tennsofthis
application
efforttoensure
well-defined
hmction
mustbeoptional:ifthe
are
nol
terms,donot
which
extend10the
oonstituteawork
any
the
Library
protectioninexchange
Libr"ry,
d"teofany
Licen.<;c
program
thai,inthe
remains
independentofthe
derived
"pply10those
is a
work
dependsonwhat
disclaimerofwarranty;
its
wholt'
ratho,r,th...,intentisto
oosedonthe
Licensc
to a
given
Public
License,
wish.)Donot
Gener"l
Public
LicemiC
libr"ry
objecl
cooeor"xL'CUtable
machine-
....
·"dabl
inlerchange.
offering
equivalent
p<,rties
are
not
compcllt.'C! to
the
Librarybybeing
Library,
and
derivatiwofthe
a>Ve
....>dby
this
Licen.<;c,
tn., objt'Cl
code
for
the
work
small
macros
and
...
·rivative
work.
for
the
work
under
with
the
Library
Libr"ry'"
with
the
that
the
tenns
pennit
th<tt
the
Libr"ry
notices,
you
must
Also.
rou
musldooneofthese
Library
including
executable
linked
the
user
can
Ihat
the
user
the
mooified
definitions.)
one
that
(1)
inlo
the
executable,
the
matt-rials
specifiedinSubsection
equivalenl
aco..'SStocopy
this
useracopy.
and
urility
progr"ms
include
anything
oper"ting
systemOnwhich
libraries
Ihatdonot
e"ecut"ble
libmry
together
work
with
any
other
is a
subroutine
the
GNU
Libraryc.:,neral
G.:-rwral
Public
the
whether
this licemiC
to
mak
..
sure
or
can
getitif
things
these
thatwegave
object
you
must
show
you
legal
reputation
CiUUlQI
effectively
license
obtained
GNU
Lcs.'iCr
this
license
...
-gally
spe3kingacombined
entire
combirultion
Gener,,1
Public
are
lhe
circumslances
library
does
the
less<'rGener,,1
body
of
operating
thatislinked
bdwcena'"
mustbecombined
copyrighl
holderorother
License").
programs
based
Or a
portionofit.
source
code
COmpll'ltion
scope,
The
actofrurulirlg
Libr"ry
dOl'S
medium,
provided
keep
intact
and
copy
<Utd
library,
Lic,·r\S(.'S
Free
that
you
rights.
you.
files
them
pennission
will
for"
General
for
reasonweu,;.,
lhe
same
free
system
work
Each
(which
on
the Libr,lry"
means
and
inslallation
basedonthe
and
all
the
for"
distribute
use
librarics-of
gives
libraryismooifiedbysom
author's
the
use
a illrge
program
"this
ilS
the
ch<Utge
Ihal
US<.-'S
the
facility,
evenlanapplication
meal'ingful
application.
"pplication
from
the
Libr.~ry,
and
sections
bast·dOnth..Library,
entire
whole,
"nd
thus10each
t'xercise
Libr"ry)ona
mpyoflhe
...•soora.·
"CCCSS10copy
therefore
the
small
itself
and
wh"
uses
thatisnonnally
tn.,t
with
volumeofa
Library.Todo
version
2. in."tc"d
make
any
other
applies10all
subsequent
fonn
under
Ill('
code,
which
the
source
copy
the
sour<:<"
compiledorlinked
falls ouLside
Libr"ry
(lx'Causeitcontains
SL'CI:ion()states
work
maybea
derivative
canbelinked
withoul
inIine
flmerions
(Executablesconlailung
the
termsofSection6Any
Librarytoproduceawork
mooificationofthe
its
usc
"re
coveredbythis
include
the
copyrighl
Uling...:
whatever
changes
were
with
the
Library,
modify
the
Libr"ry
ch"nges
Ihe
conlents
at
nUl
timeacopyofthe
and
(2)
will
operate
with
the
version
the
above
needed
for
reproducing
distribut<.-'Cl.
the
executable
nonnally
accompany
you
distribute
olher
library
facilities
b"sedonthe
Library
library
f"cilitics.
This
Software
or
you
have
want
These
You
musl
10
these
...
not
reslrict
version
Public
~rtain
fits ils
License.
job
Public
softwan:.
with
bm'ed
with
licensee
either
without
all the
what
that
nolices
fcc
oUler
can
when
oftothis
ch<Utg.. in
tcnns
muSI
code
along
lhe
scope
terms
(len
work
ootice
with
and
properly
thaI
6.~,
above,
specified
runs,
and
must
you
are
the
il;
the
to
",,1lC
be
It
as
the
on
the
is
use
a
the
you
such
docs
be
you
the
the
this,
of
be
with
for
Ihe
lines
Ihis
used
the
\hcn
of
the
the
(in
the
nol
of
be
distribuled
und
..r
Ihe
b)
Give
prominenl
accompanying
8.
You
may
otherwisetooopy,
LicellS<'.
However,
such
parties
9
You
are
not
the
Libr<~ry
the
Libr,,')'
copying.
distributingorm<xJifying
10,
Each
time
licensortocopy,
on
the
recipients'
II.
If,
as"
consequenC<'ofa
imposedonyou
oonditionsofthis
obligations,
redistributionofthe
this
License
If
any
portionofthis
and
the
sectionasa
Itisnot
the
this
S<.'Ction
practices.
consistenl
"ndalicensee
This
sectionisintendedtomake
12.[fthe
distribution
holder
who
distributionispenniltcd
bodyofthis
13.
The
Free
Softw"rc
versions
willbesimilarinspiril10the
Each
versionisgiwnadistinguishing
later
version",
Software
Foundation.
Foundation.
14. If
you
wishtoincorpor"te
authortoask
sometimes
software
<Utdofpromoting
termsofthe
notice
with
uncombined
not
copy,
mooify,
modify,
sublicense,
parties
who
remaininfull compli<Utce
requiredtoaccept
or
its
derivative
works.
(or
any
work
b.,sedOnthe
you
redislribute
the
distribut
..,
link
exerciseofthe
courl
(whetherbycourt
License,Ifyou
thenasa conseqU('IlCe
Libmrybyall
wouldbe10
refrain
sectionisheld
wholt'isintendedto"pplyinother
pur"fX'SCofthis
S<.'Ction10itlduce
h<ts
the
sole
purpoM'ofprotecting
M"ny
people
have
applicationofthai
make
c"nnol
places
License
for
and/or
you
pennission.
exceptions
impose
the
Library
onlyinor
Foundarion
have
the
If
Il'"
syslem;ilisupto
useofthe
optionoffollowing
Library
partsofthe
for
the
NOWAJl:RANTY
15.
BECAUSE
THE
PERMITTEDBYAPPLICABLE
EXCEPT
'"AS IS"
WARRANTIESOFMERCHANTABILITY
PERFORMANCEOFTHE
NECESSARY
16.INNO
OTHER
DAMAGES,
INABILITYTOUSE
OR
EVEN IF
HowtoApply
if
you
can
Gener,,1
To
apply
the
exclusionofwarranty;
Copyright
This
Free
useful.
PURPOSE.
You
Inc.,
AI;;o
You
n<.-ocessary.
Yoyooyne,
,1
April
Ty
Coon,
AnnouncementofTrue
The
SOFI\\'
LIBRARYISLICENSED
WHEN
OTHERWlSESfA
WITHOUT
WARRANTYOFANY
SERVICING,
EVENT
UNLESS
PARTY
WHO
INCLUDING
LOSSES
SUSfAINEDBYYOUORTHIRD
SUCH
HOLDEROROTHER
These
TennstoYour
developanew
redistribute
Software
should
5'lTemple
libr"ry,
and
change.
Public
License).
these
terms,
attach
(c)
libraryisfree
software;
Found"tion;
but
WITHOUT
5<.-""
the
GNU
hav
.. R'CCived a
PMce,
Suile3JO.
add
infonn"tionOnhowtocontact
should
also
get
your
Hereisa
sample;
Inc"
hereby
disclaims
1990
PresidentofVice
ARE
also
includes
LIBRARY IS
REPAIRORCORRECTION
REQUlREDBYAPPLICABLE
MAY
ANY
THE
LIBRARY
"nd
You
the
following
and
each
you
can
either
ANY
WARRANTY;
Lesser
Generall'ublic
a>pyofIhe
Boston,MA02111-1307USA
employer
aller
Type
fonl
AnnouncementofFreeType
Portions
of
thi~
software"r..
All right:> resel"\'ed
copyright
Announcementoflibjpeg
Thi..softwareisb.,St.>dinp"rt
OIl
Announcementoflibogg-l.1.3
Copyright
(c) 2002,
Xiph.org
and
uscinsource
cooe
and/or
olher
naTTl'-'ofthe
Xiph.org
specific
prior
INCLUDING,
PURI'OSE
INCIDENTAL,
THEORYOFLIABILlTI,
ARISINGINANY
Foundarion
musl
form
materials
wrilt<.-'n
ARE
and
RedistribUlion
- R<.->distributionsofsource
-
Redislributionsinbinary
dO<"umentatioll
-
Neither
the
software
without
THIS
SOfTWAREISPROVIDEDBYTHE
WAl<RANTIES,
PARTICULAR
DIRECT,
INDIRECT,
PROCUREMENTOFSUBSTITUTE
CAUSED
ANDONANY
OTHERWISE)
DAMAGE
AnnouncementoflibvorlHs-l.2.0
Copyright
(c) 2002-2004
and
and/or
the
name
without
specific
INCLUDING,
PURPOSE
INDIRECT,
ANDONANY
ARISINGINANY
Xiph.org
useinsourct'
code
otl",r
of
the
Xiph.org
poior
INCIDENTAL,
THF..oRY
materials
ARE
and
must
form
written
Redistribution
-
Redislributionsofsource
.
Redistributionsinbinary
documenl"tion
.
Neither
software
THIS
SOFTIVAREISPROVIDEDBYTHE
WARRANTIES.
PARTICULAR
DIRECT,
PROCUREMENTOFSUBSTITUTE
CAUSED
OTHERWISE)
DAMAGE
AnnouncementofnWr'SeS+S.6
Copyright
(c) 19'18-2005,2lXl6
PermiSSionishereby
dealinthe
Software
modificarions,
following
conditions
Announcementofzlib
Copyrighl
(C) 1995-2005
sublicense.
granled,
withoul
and/or
1,2.3
JeaJ,-loup
Free
freeofcharge,10any
restriction,
Announcementoflibpng
Copyright
(c) 2004, 2006-2006Gk'l"ln
Sections
above
Ihe
combined
libr"ryofII",
fnnnofthe
s.:>me
sublicense.
judgm
thai
f"Or
sharing
you
version
lhe
all
tI",
BUT
DISCLAIMED.INNO
work
link
with.ordistribule
link
wilh,ordislribule
have
rcct'ived
c"pies,orrighls,
Ihis
Lic..nse.
since
you
These
the
Library
withormooify
rights
....ntor
order,
cannot
you
th"sc
entirely
invalidorunenforceable
mad
...•g"nerous
choice
thoroughly
Libraryisrestrictedincertain
under
among
may
publish
does
software
Ilus.
LAW
TEDINWRIllNG
MODIFY
GENERAL,
(INCLUDING
New
want
candosobypennilting
file
should
redistributeitand/or
GNU
youbyelectronic
(il
nam(!l;
copyright
data
whichislicensed10SONYbyMonotypc
(c) 2C06
workofthe
birulry
retain
must
provided
Foundation
pennission
NOT
SPECIAL,
GOODSORSERVICES;
WAY
h"ve
actions
arc
prohibitt>dbylawifyoudunot
Ubr,lry),
you
indicate
Libmry
or
works
baS<....-lonit.
(nr
any
work
ba""donIhe
the
Libr"ry
granlt>d
herein.
You
allegationofpatent
agn.'Cmenlorotherwise)
distribuleSOastosatisfy
may
not
distribute
who
....
"'ei
......
copies
from
distriburionofthe
circums!.u>OX"S
you10infringe
the
int..grily
contributionstothe
the
aulhor
clear
whatisbelievedtobeaconsequence
this
Lio.'Il.~
may
addanexplicil
countries
not
revised
and/or
pr<.-'SCnl
version,
bul
version
numberifIhe
the
lenns
not
specify"
iicense
Library
inloother
whichiscopyrightedbythe
Our
d 'Cision willbeguid
and
·uscofsoftware
FREEOFCHARGE,
TIiE
KIND,
EITHER
ANDFrrNESS
WITH
YOU.
SHOULD
AND/OR
REDISTRIBUTE
SPECIAL,
INCIDENTALORCONSEQUENTIAL
BlfT
PARTIESORA
PARTY
HAS
BEEN
Libraries
il 10beof
the
g",atest
noticestothe
libr.lry.Itis
haveatleast
the
oflhe
without
LicellS<'
Lesser
modifyitunder
Licen."",or(al
even
for
more
C.ent'ral
the
2.1
and
you
workasa
programmer)Oryour
intereslinthe
library
The
FreeTypeProjecl
Independent
forms,
withorwilhout
the
above
LTIpyrighl
reproduce
the
above
with
the
distribution
nor
the
""m('5ofits
COPYRIGHT
LIMITED
TO,
EVENT
EXEMPLARY.ORCONSEQUENTIAL
WHETHERINCONTRACT,
OUTOFTHE
USEOFTHIS
foundation
binary
fonns,
withorwithout
retain
Ihe
above
musl
r""und,ltion
BUT
DISCLAIMED,INNO
01'
Software
sell
Gailly
copyright
reproduce
the
provid
...
'Cl.
with
the
nor
till'
permis...,ion
NOT
GOODSORSERVICES;
WAY
copiesofthe
"'un
COPYRIGHT
LIMITED
TO,
SPECIAL,
EXEMPLARY,ORCONSEQUENTIAL
LIABILITY,
WHETHERINCONTRACT,
OUTOFTHE
Foundation,
Inc
person
including
without
Software,
and
Mark
Adler
above
distribution
THE
EVENT
USEOFTHIS
oblainingacopyofthis
Rander5-Pehrson
f.'Ct
th"t
part
ofitis a
work
the
Library..xC..plas...
Ih('
Libraryisvoid,
fmm
you
not
signed
your
acceptanco;'ofthis
Library).
subjeo:tlo
th~
are
not
responsible
infring"''lTlentorfor
thai
simull<Ut
the
LibraryalalL
directlyorindirectly
Library
under
any
any
patentsorother
of
U""
free
wide
/donortodL'Cideifheorshe
countries..itherbypatentsorby
thus
excluded.Insuch
new
wrsionsofth
may
differindet"illo
Library
specitics
and
conditions
version
number.
froc
programs
..dbyth..two
gener<~lly.
THEREISNO
COPYRIGHT
EXPRESSEDORIMPLIED.
FORAPARTICULAR
THE
LAWORAGREEDTOIN
THE
NOT
LIMITEDTOlOSSOFOATAOR
FAn.UREOFHiE
ADVISEDOFTHE
possible
redistribution
safesltoattach
"copyright""
your
option)
implied
W,HrantvofMERCHANTABILITYorFITNESS
dL'Iaik
Public
License
papt'r
mail.
b"sedonthe
and
under
Ihis Licen.""
it.
However,
nolhing
'Keept
Ihe
r<xipi..nlautomatically
lenns
and
conditions,
for
enforcing
any
other
contradictth...•conditionsofIlus
...
'Ously
your
obligations
For
example,
through
particular
cin;umstanct·,
propt'rty
softw"re
disloibulion
rangeofsoftware
is willin!')
of
geographical
distribution
c"se,
this Lieen"",
..
I.L~r
address
new
a '·ersiOll
eitherofthat
you
may
cllOOS<'
whos.c
distribution
FR'e
Soflware
Foundation,
!')oolsofprescl"\'ing
WARRANTY
HOLDERS
AND/OR
INCLUDING,
PURPOSE.
LIBRARY
PROVE
WRITING
LIBRARYASPERMllTED
LIBRARYTOOPERATE
POSSIBILITYOFSUCH
usctothe
public,werc<:ommend
under
th..".,
tenns
them10the
line
andapointertowhere
the
tenns"f
the
GNU
any
I.,ter
version,
al,,"~
with
this
schooLifany,tosil;II "
'Frob'(alibra!)'
for
hw.,kin~
Imaging
Inc.orits
(www.frcetypcorg)
JPEG
Group
modific"tion,
arc
notice,
copyrighl
HOLDERS
THE
IMPUED
LOSSOFUSE,
notice.
copyrighl
...""of
its
HOLDERS
IMPLIED
LOSSOFUSE.
limitation
and10pemut
p<.>m'ittf'd
this
listofa,ndition...and
notice,
Ihis
lislofconditions
contributors
m.,ybeused10endorseorpromole
AND
CONTRIBUTORS
WARRANTIESOFMERCHANTABILITY
SHALL
THE
FOUNDATIONORCONTRIBUTORSBELIABLE
DAMAGES
OATA,OR
PROFITS;ORBUSINFSS
STRICT
LIAB[UTY.ORTORT
SOFTIVARE, EVENIFADVISEDOFTHE
mooific"tion.
arc
pennitted
this
listofmnditions
notice,
this
lislofconditions
contributors
m,lybeused10endorseorpromote
AND
CONTRIBUTORS
WARRANTIESOFMERCHANTABILITY
SHALL
THE
fOUNDATIONORCONTRIBUTORSBELIABLE
DAMAGES
DATA,ORPROFITS;ORBUSINESS
STRICT
LIABILITY,ORTORT
SOtTWARE,
EVEN
softw"re
the
rightstouse,
copy,
persons10whom
Libr.lry,
and
·"p"'ssly
will
automatically
will
clse
grants
this
Lkense,
License10do
compliancebythird
reason
if a
you.th..nthe
the
right
claim,.orto
system
distributed
10
tht'
restofthis
c.:,neral
problemsorconcerns
number
version
or of
any
condition..."re
HIE
DEFECTIVE,
WlLL
DAMAGES
(or,
alternatively,
startofe"ch
1-t·~S<.·rG'.'lleral
llus
ltbr;lry is
library;ifn"t.
kn"bs)
expl3ining
provided
tlnd..r
termin3le
not
have
tI'eir
licenses
you
permissiontomooifyordistribute
TI'eref.>re,bymooifyingordistoibuting
"0.
and
"II
its
rcceives
You
m.~y
not
impose
parties
(not
limitedtopatent
License.
theydonot
,mdt'r
thisUc...
'TlSt'
patent
license
would
only
w"y
you
bal'lllceofthe
contest
whichisimplenwnt<'dbypublic
through
di."tribut~
soflw'He
License
copyright<.-><:!
interfact'S.
limiti,tion
excluding
incorpor.ltes
the
limil
Public
Liccn.""
from
of
this
License
which
any
laler
version
version
ever
publishedbythe
inoomp
..rible
woitetothe
Fre.:·
t""
fr<.-'C
slatusofall derivativ<'-""ofour
FOR
THE
LIBRARY,TOTHE
OTHER
PARTIES
BUT
NOT
LIMITED
ENTIRE
RlSKASTO
YOU
ASSUME
ANY
COPYRIGl-fT
ABOVE.BELIABLETOYOU
ARISING
DATA
BEING
RENDERED
WITH
ANY
DAMAGES
m"kingilfR
under
sout"c(' file10most
the
full notiC<' is
found
Public
distributedinthe
wrile10the
"copyright
disclaimer"
writtenbyJarnes
"ffiliales.
provided
th"l
the
following
the
following
disclaimer
and
the
following
"AS
15"
AND
ANY
(INCLUDING,
INTERRUITfIONj
(INCLUDING
provided
th.~t
the
and
"nd
modify,
following
the
following
dio;claimer
.~nd
the
"AS
IS"'
AND
ANY
(INCLUDING,
(INCLUDING
[I'
ADVISEDOFTHE
associaled
documentation
merge,
publish,
the
Softwareisfurnishedtodo
following
INTERRUPT[ON)
wheretofind
Ihis
LicenSl'.
Any
,'ttf'mpl
your
rights
under
temlinaledsolong
lem,s
and
Clmdition." for
a lia.·nse
fromIh..
original
<Uty
further
rCSlriction.~
with
this
License
issues).
conditiotls
.."cu,;.,
you
from
and
<Uty
otht'r
p"rtin"nl
nol
permit
royahy-ft"l"e
could
satisfy
bothit""d
sectionisinlendedtoapply.
validityofany
such
claims;
systeminreliance
any
other
the
ooiginal
copyright
Ihose
muntries.sothai
...
tion
,lS
if woitt..n in tilt'
timetotime,
Such
applies10it
and..any
pubLish.>dbytheF.........
FTt-'<.-·
SoftW'lre
with
thcsc,
Writ
Fuundation;
license
syskm
..
to
that
through
Softwart·
EXTENT
PROVIDE
TIiE
LIBRARY
TO.
THE
IMPLIED
THE
QUALITY
AND
THE
COSTOFALL
HOLDER,ORANY
OUTOFTHE
USE
INACCURA
OTHER
SOFTWARE).
....
sof!v,'"re
th"t
en,!)'ot\C
the
teonsofthe
ordina!)'
effectively
convey
Licenseaspublish<.->dbythe
hope
thaI
il will
FORAPARTICULAR
Frt'e
Software
I'oundarion,
for
the
library.
Random
H.~cker.
conditions
"re
n",t
discl,'imerinIh.,
products
derine",1
from
EXPRESSORIMPLIED
AND
fiTNESS
F01~
FOR
NOT
LIMITED
NEGLIGENCE
are
ANY
HOWEVER
met
BUT
POSSIBILITYOFSUCH
condition.~
discl.limerinIhe
producls
deriL'L...-l
from
EXPRESSORIMPLIED
AND
FITNESS
FOR
FOR
BUT
NOT
LIMITED
HOWEVER
NEGLIGENCE
POSSIBILITYOFSUCH
files
(the
'"Software").
dislribule,
distribut
...•with
SO,
subjecltothe
PrintedinChina
ANY
the
this
as
.u,'
tile
on
new
Ih,'
"""
fro""
FOR
OR
n:
be
if
this
A
TO,
OR
this
A
TO.
OR
10
 Loading...