

Page 1
Desktop Editor Software Manual
Version 1.1.0
Page 2

Desktop Editor Software Manual
Introduction
The sonuus Wa hoo is an analogue dual-filter/wah stomp box for guitar, bass, and other
musical instruments. The warm-sounding analogue filters are digitally controlled which
enables them to be manipulated in new and exciting ways and also allows your carefullycrafted sounds to be stored as presets.
The design of the Wahoo is very flexible and powerful. To enable you to make full use of
this, we have provided a Desktop Editor Software application that runs on both Microsoft
OSX
Windows and Apple
quick and simple access to any configuration parameters you want to adjust on the
Wah oo.
The full operation of the Waho o is not described in this manual. Please refer to the
Owner’s Manual that came with your Wahoo for instructions on the detailed operation
and features of this product.
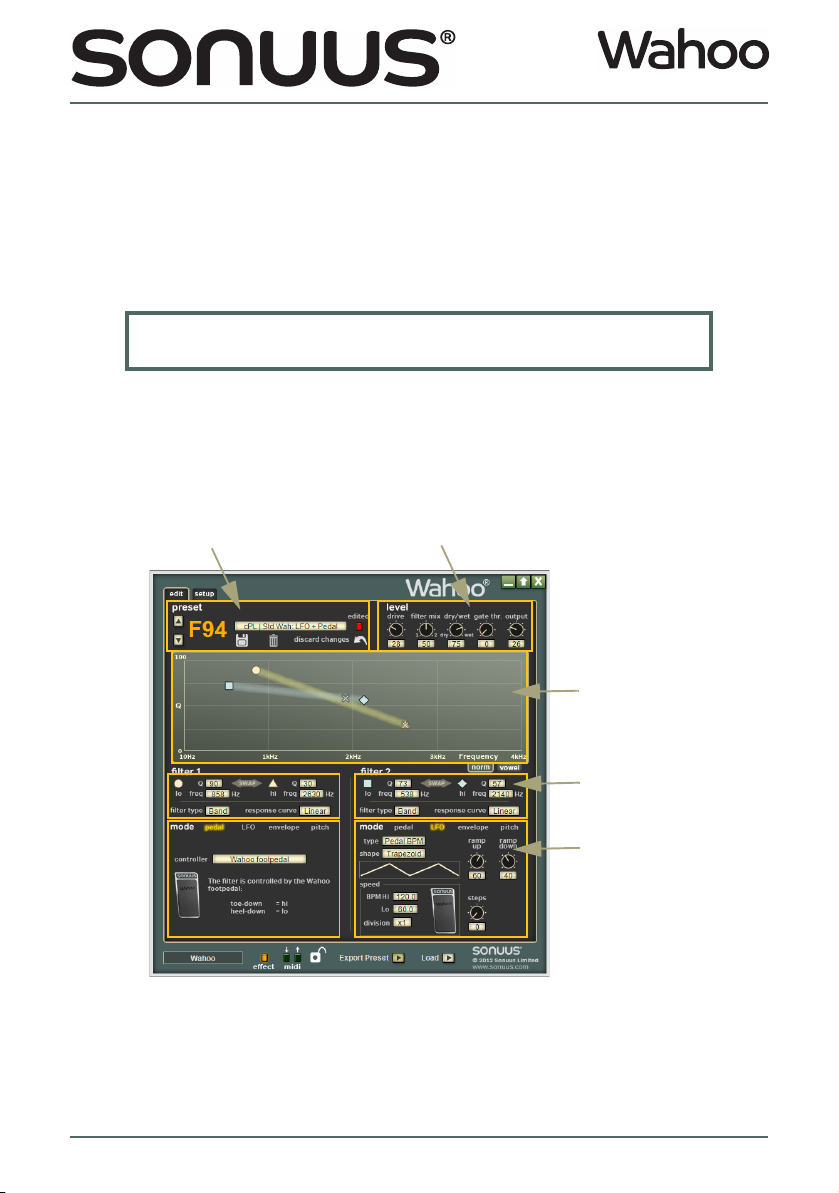
Select tabs to edit different sets of parameters
. You can run this beside your other audio applications to give you
Minimise editor window
Topmost button.
This keeps the Editor above
other application windows
Close editor (Quit)
Indicators are always visible
Effect can be enabled/bypassed remotely by clicking here
Name of current device is always available. Click this to select other connected devices
Figure 1: Overview of the Wah oo Desktop Editor window.
Wah oo
© Copyright 2012 Sonuus Limited 2
Settings and configurations
can be saved and loaded
as backup, or to swap with
other users
Page 3

Desktop Editor Software Manual
Application Overview
When you run the Desktop Editor Software, you will see the window in Figure 1.
The window has standard buttons similar to other applications to minimise the window,
and to close the application. There is also a “topmost” button, which keeps the window
floating above other applications even when the other application has focus. This feature
makes it easy to run the Desktop Editor Software alongside other applications, such as
sequencers, so it appears much like any other “floating palette” of your main application.
There are two pages of information and parameters which you can configure. These are
selected by clicking on the tabs at the top of the window.
Buttons and switches can be activated by left-clicking the mouse button while other
controls such as knobs can be adjusted by left-clicking and dragging the mouse while the
button is pressed. Some controls can also be adjusted by moving the mouse wheel when
the mouse pointer is above the control.
Any changes you make on the Wah oo control panel will also be updated on the Desktop
Editor, and vice-versa, so it is possible to use both at the same time.
Selecting which Waho o to configure
You can connect several Wahoo devices to your computer at once, but the Desktop
Editor Software can only configure one of these at a time. You can select which device is
currently being edited by clicking on the device name box at the bottom-left of the
application and choosing the required device from the menu.
So you can identify which device is which, you can give unique names to each of your
devices: see
Indicators
Next to the device name box are some indicators to show the status of the Wahoo.
The effect indicator replicates the behaviour of the main light on the Wahoo and will
illuminate when the effect is enabled. This can also be clicked to toggle the active state
of the effect, which can be useful if you are using the Waho o remotely.
The
MIDI
can be used to verify
receiving indicator only responds to
controller messages used for filter control.
The lock indicator shows when the lock switch on the Wah oo is enabled. When locked,
you can still select presets, but you won’t be able to edit them using the Desktop Editor,
or the control panel on the Wahoo.
“Device Name” on page 12.
indicators show when the Wahoo is receiving, or sending
MIDI
routing between the Wahoo and your software. Note that the
MIDI
that the Waho o is able to respond to, such as
MIDI
messages. This
Loading and Saving
The Wah oo allows you to save 100 user presets to its internal memory. Presets can also
be saved to a file with a
“wahoo”
edit tab is active. This lets you create vast libraries of presets beyond the 100 slots
Wah oo
file extension using the “Export Preset” button when the
© Copyright 2012 Sonuus Limited 3
Page 4
Desktop Editor Software Manual
available on the Wahoo and also lets you exchange your presets with other Wahoo
users.
To allow you to easily backup all of your presets and settings, or to transfer them to
another device, all user presets and settings of the Wah oo can be saved to a file with a
“wahoo_all”
setup tab is active.
The “Load” button lets you load these files.
file extension. This can be done by clicking the “Save All” button when the
Top Tip: To ensure you don’t loose your presets you have created, we
recommend that you regularly back up all your presets using Save All.
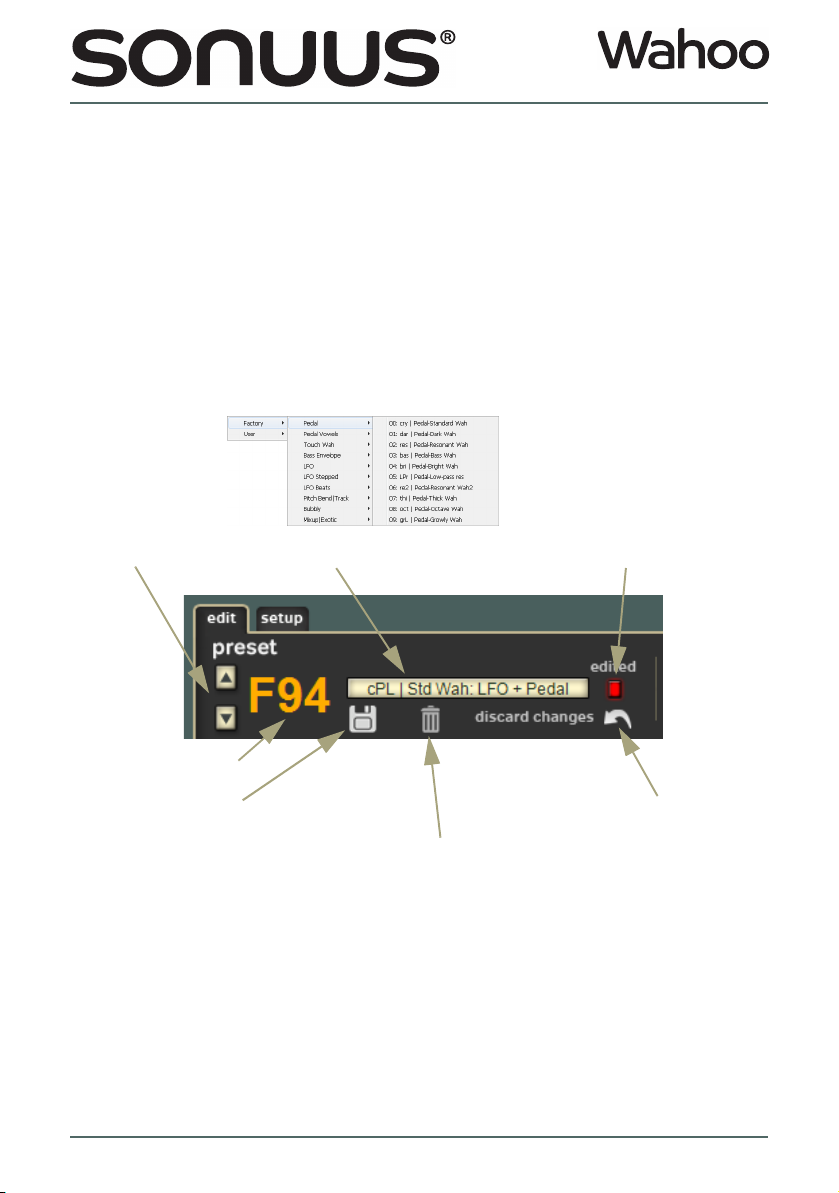
Edit—Editing and selecting presets
Figure 2 shows how the edit page is divided into functional regions. The next section
describes in more detail how to use these features.
Select, save and delete presets. Signal level mixer
Graphical filter control
(filter 1 and 2 are both shown)
Main filter parameters
(controls how it sounds)
Filter operating mode
(controls how the filter moves)
Figure 2: Overview of the edit page.
Wah oo
© Copyright 2012 Sonuus Limited 4
Page 5
Desktop Editor Software Manual
Edit—preset selection
Figure 3 shows the detail of the preset region. The current preset can be selected using
the up and down buttons (in the same way as can be done on the Wahoo itself) and also
by clicking on the menu which gives an overview of all the presets to make selection
faster.
When a preset has been modified, the edited indicator illuminates. This duplicates the
behaviour of the save light on the Wahoo itself. To abandon any changes you have made,
and restore the preset to its original state click discard changes.
User presets (P00 – P99) can also be deleted by clicking on the delete icon. Once deleted,
the preset is reverted to a default Wah pedal preset. Delete cannot be undone, so you are
given a warning before deletion is done in case you click this by mistake.
Up/down to select
next/previous preset
Current preset number
Save current preset to a new
memory location
Preset short name | long name
(click to open preset select menu)
Delete the current preset
(clears the selected memory location
reverting it to a “default” preset)
Illuminates to indicate that the
current preset has been modified.
Cancel any edits and
revert the current preset
to its original state
Figure 3: Preset selection and management.
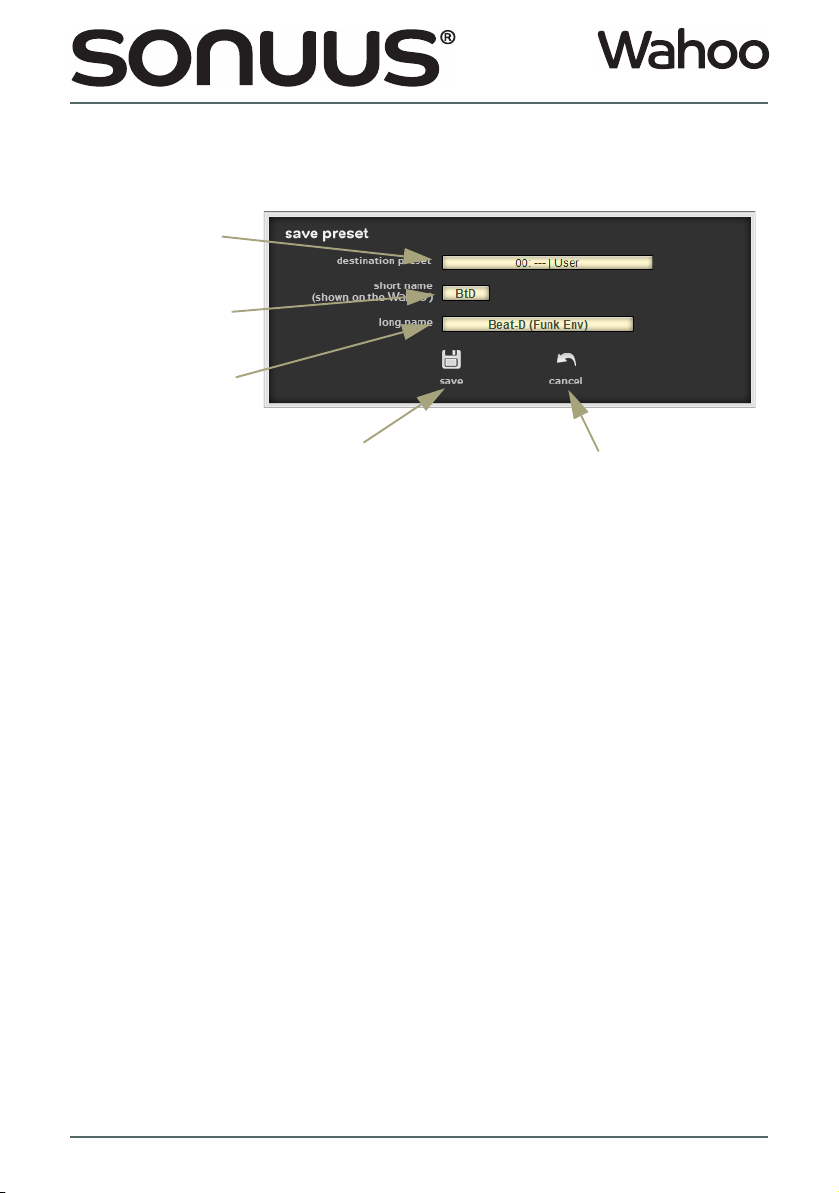
To store edited presets, or to simply copy existing presets to new locations, use the save
icon. This opens the save popup, as shown in
Figure 4. Presets can be given a short name
which is also shown on the Wah oo to help identify presets, and also a long name which
Wah oo
© Copyright 2012 Sonuus Limited 5
Page 6
Desktop Editor Software Manual
makes presets easier to identify when using the Desktop Editor. The selected destination
preset will be overwritten by the preset being saved.
Choose where to store
the new preset
(existing preset is
overwritten)
Choose a 3-character
short name
(also shown on Wahoo)
Choose a 20-character
long name
Click save to commit preset to
the selected destination
Figure 4: Saving a preset to internal memory.
Click cancel to abort the save operation
Wah oo
© Copyright 2012 Sonuus Limited 6
Page 7

Edit—signal mixer
Desktop Editor Software Manual
IN
filter 1
filt mix 1/2
thr
gate
drive
G.At
filter 2
dry/wet mix
OUT
out
Figure 5: Level — the signal mixer.
The signal mixer controls how the signal from your instrument at the IN jack is sent to the
OUT
filters and then recombined with the output of the filters and then sent to the
jack. In
other words the signal mixer lets you control the subleties of the sound, for a particular
filter configuration.
These level controls correspond to the level section on the Wahoo control panel. Figure
5 shows how the mixer controls relate to the mixer architecture in the Wahoo . Refer to
the Wah oo Owner’s Manual for details on each of the individual parameters.
The signal mixer controls how the signal from your instrument at the IN jack is sent to the
filters and then recombined with the output of the filters and then sent to the
OUT
jack. In
other words the signal mixer lets you control the subleties of the sound, for a particular
filter configuration.
These level controls correspond to the level section on the Wahoo control panel. Figure
5 shows how the mixer controls relate to the mixer architecture in the Wahoo . Refer to
the Wah oo Owner’s Manual for details on each of the individual parameters.
Wah oo
© Copyright 2012 Sonuus Limited 7
Page 8

Edit—filter parameters (normal)
Desktop Editor Software Manual
Click and drag control points to adjust
the hi and lo Q and frequency of each filter
Shading shows the response curve
Select response curve Swap hi/lo values (invert movement)Select band-pass or low-pass filter
The realtime position of the
filter is shown by a cross
Figure 6: Using the “norm” filter graphical control to adjust each filter’s Q and frequency at the hi and lo points.
The filter parameters let you adjust the filter Q and cutoff frequency (freq) at the lo and
hi points, the filter type (low-pass or band-pass) and the response curve which defines
how the filter moves between the lo and hi positions.
To make editing of Q and freq intuitive, the graphical filter control presents an alternate
way to view and adjust these parameters. Each filter is shown in a different colour, with
different marker symbols so you can clearly identify them and to see how they relate to
each other. If a filter is not active because the filter mix is set to 0 or 100, it will not be
displayed; you can only see the filters that you can hear.
By clicking and dragging the marker points, the Q and freq for that point are both
updated. However, you can also set the values by typing in the numeric fields if you want
to enter specific values.
The response curve of the filter is shown by shading going between the lo and hi
markers. The density of the shading corresponds to how much time the filter will spend
at that position.
The current filter position is shown in realtime with a cross marker, this helps you
understand how the filter is moving in relation to what you are hearing.
Wah oo
© Copyright 2012 Sonuus Limited 8
Page 9

Desktop Editor Software Manual
The best way to use the graphical filter control is to listen to what the effect is doing and
move the control points. In particular, when two filters are being used, changing the
relationship between the filters can give quite different sounds: for example, try making
their paths cross each other or run parallel to each other. Explore the factory presets to
see how the filter positions affect the sound in these presets, and adjust these to
experiment with the sound.
Edit—filter parameters (vowel)
Click and drag control points to adjust
the vowel sound at the hi and lo positions
(both filters are updated together)
Clicking on a hi/lo icon toggles the axes used for each filter
(the values for filter 1 and filter 2 are swapped)
Labels show which filter is on each axis,
based on the colour of the marker.
Figure 7: Using the “vowel” filter graphical control to adjust each filter’s hi and lo frequency.
To create convincing vowel sounds, you can use both Wahoo filters working together to
produce the characteristic frequency components of the desired vowels. This can be
done by configuring the hi & lo freq values of both filters based on a table of vowel
frequencies (such as the one in the Wah oo Owner’s Manual), but this is not intuitive and
can be confusing. The vowel mode of the graphical filter control makes it simple to
obtain, and fine-tune, vowel sounds. See
Figure 7.
In vowel mode, there are only two control points. One of these (the yellow circle or blue
square) controls the lo freq values of both filters simultaneously. The other (the yellow
triangle or blue diamond) controls the hi freq values of both filters simultaneously.
Wah oo
© Copyright 2012 Sonuus Limited 9
Page 10

Desktop Editor Software Manual
For yellow control points, filter 2 is on the x (horizontal) axis, and filter 1 is on the y
(vertical) axis. This is flipped for blue control points: filter 1 is on the x (horizontal) axis, and
filter 2 is on the y (vertical) axis.
A particular vowel sound is made by setting the cutoff frequency of two filters to values
typical for the vowel sound you want. For example an “ah” sound can be made with one
filter set to 800
which cutoff frequency: if both filters are identical (both set to low-pass, or band-pass and
both with the same Q) it will sound identical either way.
Clicking on the control point icon under the filter 1 or filter 2 lets you change which axes
are used: effectively swapping the freq setting of filter
this may not change the vowel sound at the hi or lo positions, but what it does is change
how the filters move from one vowel sound (at hi or lo) to the other vowel sound (at lo
or hi). So by changing the axes in this way, you can get very different transitions.
Hz and the other set to 1200 Hz. It doesn’t matter which filter is set to
1 and filter 2. As described above,
Top Tip: Explore the transitions between two vowel sounds by changing the
axes the filters are drawn on (click the control point icon to toggle the
control points between yellow and blue). Go further and also change
the response curve: you’ll find there is a lot of sonic variation
possible.
Edit—filter
SWAP exchanges the hi and lo Q and freq values
(it inverts/reverses the movement of the filter)
Select band-pass, or low-pass filter type The response curve controls how
Icons identify which control points on the graphical filter control
represent the numeric values
Figure 8: Configuring the filter. Filter 1 is shown, but filter 2 is similar.
The main filter parameters control how the filter sounds. Figure 8 shows the parameters
for filter 1 — filter 2 is configured in a similar way.
The cutoff frequency, freq, and the resonance, Q, are set at two points: lo and hi. In pedal
mode, these correspond to the heel-down and toe-down positions of the footpedal. In
the filter moves between lo and hi.
Wah oo
© Copyright 2012 Sonuus Limited 10
Page 11

Desktop Editor Software Manual
e
other modes, they correspond to the “hi” and “lo” extent of the control signal such as an
LFO
. These control points have icons shown next to them and these icons are also shown
on the graphical filter control as “control points”. Parameters can be edited by clicking on
the numeric fields and entering specific values, or by clicking directly on the control points
in the graphical filter control and dragging them.
The way the filter moves between the lo and hi values is controlled by the response
curve. This controls the feel of the footpedal, or the response of the envelope tracker.
filter type can be set to Band (band-pass) or Low (low-pass).
Edit—filter mode
Shows current filter operating mode. Click to select a new mode.
Bottom section shows the parameters specific to the current mode.
Figure 9: Configuring the operating mode of the filter. Each filter can be set to operat
in a different mode.
The mode of the filter defines how the filter is controlled, in other words what makes it
move between its lo and hi settings. The desired mode (pedal,
LFO
, envelope, pitch) is
selected by clicking it at the top of the mode section. Once selected, the mode will be
highlighted and the controls for that mode will become available.
When a parameter is controlled by the footpedal, the footpedal icon is displayed.
Alternatively, when a parameter is controlled by USB-MIDI, the USB-MIDI icon is displayed.
This gives you a visual reminder, and confirmation, of when the footpedal or USB-MIDI are
being used.
The details of the mode parameters are fully described in the Wahoo Owner’s Manual.
Wah oo
© Copyright 2012 Sonuus Limited 11
Page 12

Setup—manage
Desktop Editor Software Manual
Figure 10: The setup tab lets you change global settings, manage your device and
ives information on the version of hardware and firmware in your Wahoo.
The setup tab (shown in Figure 10) contains various global options and information
about the currently connected Wahoo. The options available in the manage section are
described below.
Device Name
To allow you to personalise your Wahoo and to make identification of it simpler, you can
give it a Device Name. This can be useful when you have several Wah oos connected to
Wah oo
© Copyright 2012 Sonuus Limited 12
Page 13

Desktop Editor Software Manual
the same computer. The Device Name can be anything you choose provided it is 16
characters or less in size.
The Device Name is shown in the manage section of the setup tab . Clicking the name
field will let you edit it.
Reset to Factory Settings
The Wahoo has several global settings which you can customise. However, you may
want to restore these to the default factory settings. This can be done easily by selecting
the reset to factory settings option. Any presets which you have created are not
affected by resetting the factory settings
NOTE: these settings are stored in a
perform a Save All operation, and will be restored when you load this file.
“wahoo_all”
file on your computer when you
Update Firmware
The firmware (internal software) of the Waho o can be upgraded with new versions which
fix problems or add new features. You can do this using the sonuus Firmware Loader
application, and the update firmware option gives you an easy way to access this utility.
Simply select this option and choose the firmware update file that you have downloaded
from the sonuus web site. The Firmware Loader will then launch automatically and
perform the firmware upgrade. When complete, the Desktop Editor Software will
reactivate and you can continue as before, with the new firmware running on your
Wah oo.
For more details on the upgrade process, there is a separate manual available for the
Firmware Loader application.
Pot Control Method
This is an editor option (it is not stored on the device) which lets you set the method used
for controlling pots (knobs) with the mouse. This can be rotary (where the pot position
follows the position of the mouse) or x–y (where left-right movement gives fine position
control, and up-down movement gives coarse position control). You can set this to the
method you find most intuitive.
Setup—settings
Instrument
The instrument option allows the Waho o’s pitch-detection algorithms and envelope
follower to be optimised for the note range, or other characteristics, of a particular
instrument. This therefore affects the behaviour of presets using pitch mode or
envelope mode. The presets themselves are not modified.
Wah oo
© Copyright 2012 Sonuus Limited 13
Page 14

Desktop Editor Software Manual
The available instruments are shown in the table below.
Instrument Note Range Description
Guitar E1 – C7 General guitar (electric and acoustic). This works
4-String Bass C#1 – A6 Similar to “Guitar”, but the note range is optimised
5-String Bass A0 – F6 Optimised to detect the lowest bass notes of a 5-
well with most instruments, including 4-string bass
guitar, but is optimised for the note range of 6- and 7-
string electric guitars.
for 4-string bass guitar.
string bass guitar.
Pedal Effect Enable
Sometimes it is not convenient to to have to press the footswitch to enable the effect. For
example, when using a Wah pedal preset it is often preferable to have the effect activate
when the footpedal is pressed to the toe-down position so that the effect is instantly
accessible when you need it. pedal effect enable lets you do this.
When set to “On only”, the effect is enabled when the footpedal is pressed to the toedown position. The effect must be turned off using the footswitch.
When set to “On/off (heel)”, the effect is enabled when the footpedal is pressed to the
heel-down position, and is also deactivated when the footpedal returns to this position
(after a time set by effect off time).
When set to “On/off (toe)”, the effect is enabled when the footpedal is pressed to the toedown position, and is also deactivated when the footpedal returns to this position (after
a time set by effect off time).
Effect Off Time
When pedal effect enable is set to “On/off (heel)”, or “On/off (toe)” this sets the time (in
seconds) that the footpedal must be in the “off” position before the effect is turned off.
This lets you adjust the time for your personal preference to ensure that the effect isn’t
turned off unexpectedly when you are using it.
Footswitch Preset Select Time
Selects how long the footswitch must be held to enter and exit foot-operated preset
selection mode.
Sensitivity Adjust
Different instruments can have quite different output levels. In envelope filter mode, this
means you may have to adjust the sensitivity parameter to get the desired response
when using different instruments. Needless to say, with lots of presets that’s a problem.
sensitivity adjust lets you apply an offset to envelope sensitivity that applies across all
presets. The range of adjustment is ±24 dB.
Wah oo
© Copyright 2012 Sonuus Limited 14
Page 15

Desktop Editor Software Manual
Noise Gate Attack
Sets how quickly the noise gate responds when the output falls to below the threshold
set. This only applies to presets with gate threshold set to a value above zero.
LED Brightness
LED
brightness can be adjusted from a minimum (1) to a maximum (100). High
brightness can be useful in bright conditions, and low brightness works better in dark
settings and also increases battery life.
NOTE: If the brightness has been set to 100 for a long time, then set to minimum, it may
take a few minutes for the display to stabilise to the new setting.
Power-Save Timeout
Sets the time in seconds after which the Waho o will enter a low-power state to conserve
battery power. Power-save mode will not be entered while the Wahoo is active, it only
takes effect in the bypassed (off) state. When set to 0, this feature is not active.
Wah oo
© Copyright 2012 Sonuus Limited 15
Page 16

Desktop Editor Software Manual
Setup—info
The info section gives you various pieces of information about your Wah oo and the
Desktop Editor Software. This is read-only and cannot be edited.
Firmware Version
This shows the version number of the currently installed firmware. This can be updated
using the sonuus Firmware Loader application, using Wahoo firmware updates available
from the sonuus web site.
Hardware Version
This shows which version of Wahoo hardware you have.
Desktop Version
This shows the version number of the Desktop Editor Software you are using.
Device ID
The Device ID is stored on the hardware of the Wah oo and allows your computer to
uniquely identify each device.
NOTE: This is not the same number as the product serial number printed on the serial
number sticker on the back of your Wahoo .
Wah oo
© Copyright 2012 Sonuus Limited 16
 Loading...