

Page 1
Connections
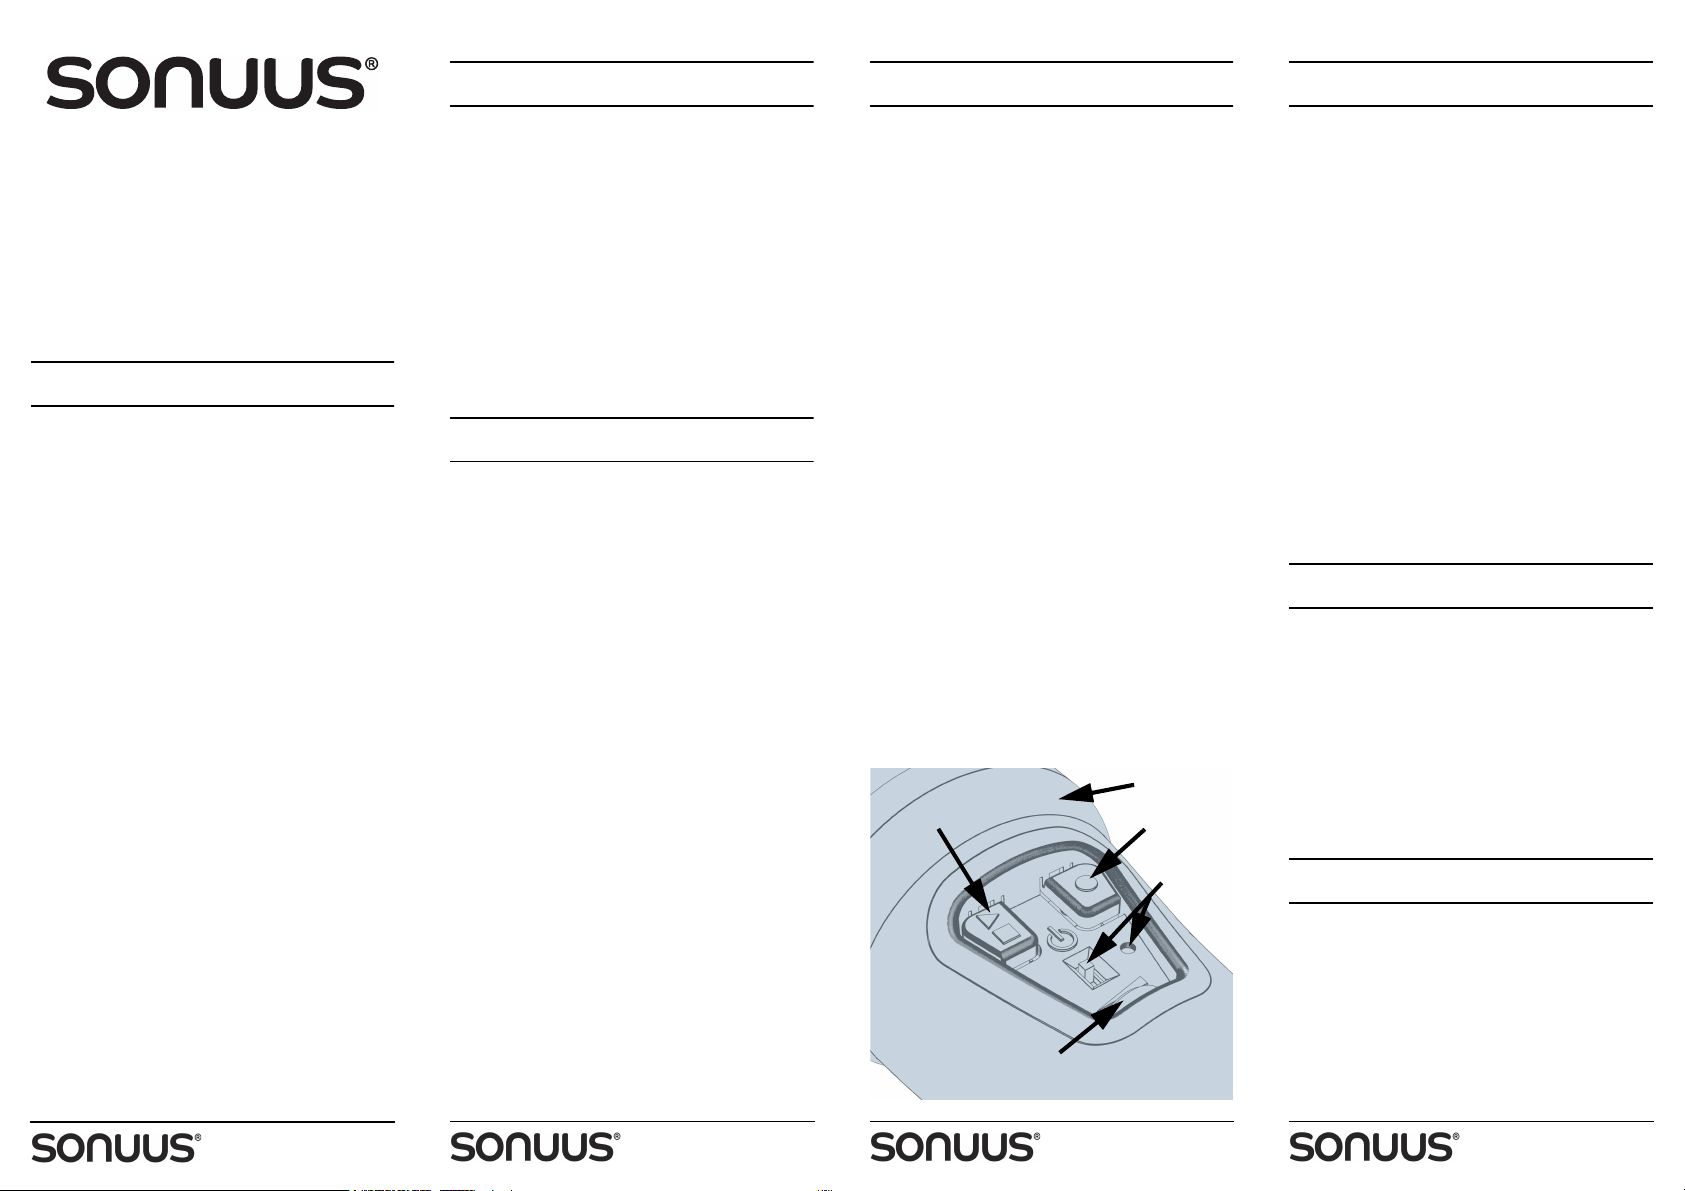
RECORD
PLAY/STOP
LOOP LEVEL
POWER
LIGHT RING
Record your first loop
Overdubbing
Loopa® Microphone
Owner’s Manual
Congratulations on your purchase of the
Loopa®. Please take the time to read through
this manual to ensure you get the best from
your Loopa®.
Introduction
What is the Loopa®?
The Loopa® is the world’s first looper
microphone. It can be used just like a regular
microphone but also has the ability to record
what you are singing, play that back in a loop
and let you sing on top of it. This way you can
build up layers of sound to create unique and
interesting performances.
Your new Loopa® features a unique highintegrity looper engine custom-designed by
sonuus. Built using the latest FLASH memory
technology for the most robust recording and
using 32-bit floating-point processing to
maximise the sonic quality of your recorded
loops.
Sound quality is further guaranteed by the
special “clip-free” architecture of the looper
engine: no matter how many times you
overdub your loop it will never clip and cause
unpleasant distortion.
A high-quality condenser microphone capsule
is combined with an acoustically-optimised
windscreen to ensure outstanding vocal
clarity and a powerful low-frequency
response.
The body of the Loopa® has been carefully
sculpted to ensure it balances correctly in your
hand, is easy to hold, and easy to operate the
controls. And it looks cool too!
XLR
On the end of the Loopa® is a standard 3-pin
XLR microphone connector. Connect the
supplied microphone cable (or use any other
standard microphone cable) and connect the
other end of the cable to your speaker or other
audio equipment.
Some equipment designed to be used with
microphones can supply phantom power
(+48V) to the microphone. If your equipment
can supply phantom power make sure this is
turned off before connecting the Loopa®.
Power
Battery (AA)
The Loopa® is powered by a single AA battery
(alkaline or rechargeable). Simply open the
battery door and put in a battery observing
the correct polarity. If you connect it the wrong
way round it won’t cause any damage, but the
unit won’t operate until the battery is inserted
correctly.
When you insert the battery make sure you
put the ribbon under the battery to make it
easy to remove later.
Use the power switch on the control panel to
turn on the Loopa®. The POWER LED will light.
To prolong the life of the battery, remember to
turn off the power switch when you have
finished using the Loopa®.
Because of its low power consumption, the
unit will run for many hours (typically for more
than 10) on a single battery. When the battery
is close to needing to be replaced, the POWER
LED will flash. It is not necessary to replace the
battery immediately since the Loopa® will
continue to function normally (typically for 1
hour). If you need the Loopa® to work reliably
for several hours (
when playing live) the battery should be
replaced if the POWER LED is flashing.
e.g.,
a recording session, or
Using your Loopa® couldn’t be simpler.
After you have connected the Loopa® to a
speaker and turned it on, you can start using it
like any other regular microphone.
To record your first loop, quickly press and
release the RECORD button (don’t keep the
button pressed). As soon as you do this
everything you sing will be recorded. To show
that you are recording, the light ring will
illuminate in red.
To stop recording your loop and play it back,
quickly press the RECORD button again
(remember not to keep the button pressed).
The light ring will now change from red to
green to show the loop is being played.
The level (or volume) of the loop can be
adjusted using the thumbwheel control.
Moving this fully to the right (number 10 is
positioned at the top of the thumbwheel) will
give maximum playback level (the same
volume as it was recorded). Use this level
control to balance the level of the loop and
your live singing. Typically, this is set so the
loop level is slightly lower than the live level
(position 8 or 9).
Recording a loop and singing over it is exciting,
but when you record another loop (or layer)
onto the first loop the fun really begins.
Recording onto an existing recording like this
is called overdubbing.
Overdubbing on the Loopa® works just like
recording: quickly press RECORD to start
overdubbing (the light ring will illuminate red
and the loop will continue to play at the same
time). To stop overdubbing press RECORD
again and the loop will continue playing; the
light ring will illuminate green.
You can start and stop overdubbing as often
as you like. For example, you can enable it
briefly to add a short accent sound, or you can
keep it active during your whole performance
to build up many layers.
Playing and stopping loops
The loop playback can be stopped at any time
by quickly pressing the PLAY/STOP button.
Similarly, quickly pressing PLAY/STOP will start
playback again. Each time you start playback,
the loop will play from the beginning.
Note that you can also start loop playback and
overdub at the same time by pressing RECORD
when the looper is stopped.
Erase loop (start again)
When you want to start a new performance
(or if you have made a mistake and want to
start again) it is easy to erase the existing loop.
Press and hold both RECORD and PLAY/STOP
buttons until the light ring blinks both red and
green to indicate the loop has been erased.
Loopa
®
Loopa
®
Loopa
®
Loopa
®
Page 2

Undo and redo
Register your product for
warranty support
sonuus does not share your personal
information with other companies. Your
details are only used to support claims
under your product warranty, and to keep
you informed of product updates and
special offers (if you choose to receive our
newsletter)
register.sonuus.com
When you overdub many loops, the Loopa
doesn’t simply overwrite the loop each time.
Instead it keeps a copy of each recorded layer
which means you can remove layers to go
back to earlier recordings (undo), then restore
these layers to bring them back (redo).
This powerful feature allows you to create very
dynamic performances.
Undo is also useful to correct mistakes: if you
record something you don’t like, you can
quickly undo it before it gets replayed.
Note that the base loop (the very first loop you
recorded) is always preserved, so if you undo
as far as possible you will always get back to
this base loop.
Tips for using the Loopa
The most important thing to master when
looping is the timing of the first (or base) loop.
This first loop defines the timing for the rest of
your performance.
The low-latency design of the Loopa® means
you don’t have to compensate for any timing
delays added by the microphone itself. All you
need to do is practice the timing of starting
and stopping the base loop recording.
As soon as you press the RECORD button the
Loopa® will start recording. Similarly, at the
end of recording when you press the RECORD
button, the loop length will be set and it will
immediately start to play from the beginning
of the loop.
As an example, if you want to record a 4-beat
loop “1, 2, 3, 4” where each number is on a
beat do the following:
• practice saying “1, 2, 3, 4, 1, 2, 3, 4” so the
time between 4 and 1 matches the time
between the other beats.
• press RECORD at exactly the same time as
you start to say “1”.
®
Loopa
• press record again at exactly the same
time you start to say the second “1”.
®
By saying the start of the second loop (the
second “1”) you help to set the correct timing.
This second “1” won’t be recorded, but your
timing will be perfect.
For more in-depth tips and demonstrations,
visit our online TV channel:
loopa.tv
Further Information
Recommendations
Always turn off the power switch when you
are not actively using the Loopa®. This will
prolong the life of the battery.
When storing your Loopa® for an extended
period, we recommend that you remove the
battery. Batteries can leak corrosive materials
Warranty claims must be made through the
retailer from whom the original purchase was
made.
Community
To see what other sonuus products are
available, please visit:
www.sonuus. com
To get assistance or to share your
experiences, tips and tricks with other Loopa
users, register on our user forum:
www.sonuus.com /forum
Specifications
Power 1·5V AA battery (1·0–3·0V)
Output
Imp.
Freq.
Resp.
Polar
ELECTRICAL
Resp.
Battery
®
life
Record
time
Undo
levels
LOOPER
Overdub Unlimited
Controls Play, Stop, Record, Overdub,
Size 195mm×51mm (diameter)
Weight 160g (without battery)
Outputs 3-pin XLR
PHYSICAL
1·5k
Ω,
unbalanced
110Hz – 20kHz
Cardioid (uni-directional)
10hours (typical)
> 13minutes
15 (maximum)
Loop level, Undo, Redo
(pin1&3 = ground; pin 2 = signal)
which could damage your unit.
Do not expose the Loopa® to rain or moisture.
If this occurs, disconnect the battery and allow
The above specifications are subject to change
without notice.
the unit to dry out completely before using it
again.
Warranty
The Loopa® is supported by a limited
warranty for a period of one year from the date
of purchase. During this period, any faults due
to defective materials or workmanship will be
rectified (by repair or replacement†) free of
charge. The warranty excludes damage
caused by deliberate or accidental misuse,
modification, or operation with an unsuitable
external power supply or an incorrect battery.
It is the user’s responsibility to ensure fitness
for purpose in any particular application. The
warranty is limited to the original purchase
price of the equipment, is limited to the
original purchaser, and excludes any
consequential damage or loss.
Proof of purchase date is required for any
claim under this warranty.
†. A unit replaced under warranty may be replaced
with a reconditioned unit.
®
Loopa
®
Loopa
®
© Copyright 2016 Sonuus Limited, All Rights Reserved.
sonuus® and Loopa® are registered trademarks of Sonuus
Limited.
Loopa
®
 Loading...