

Page 1
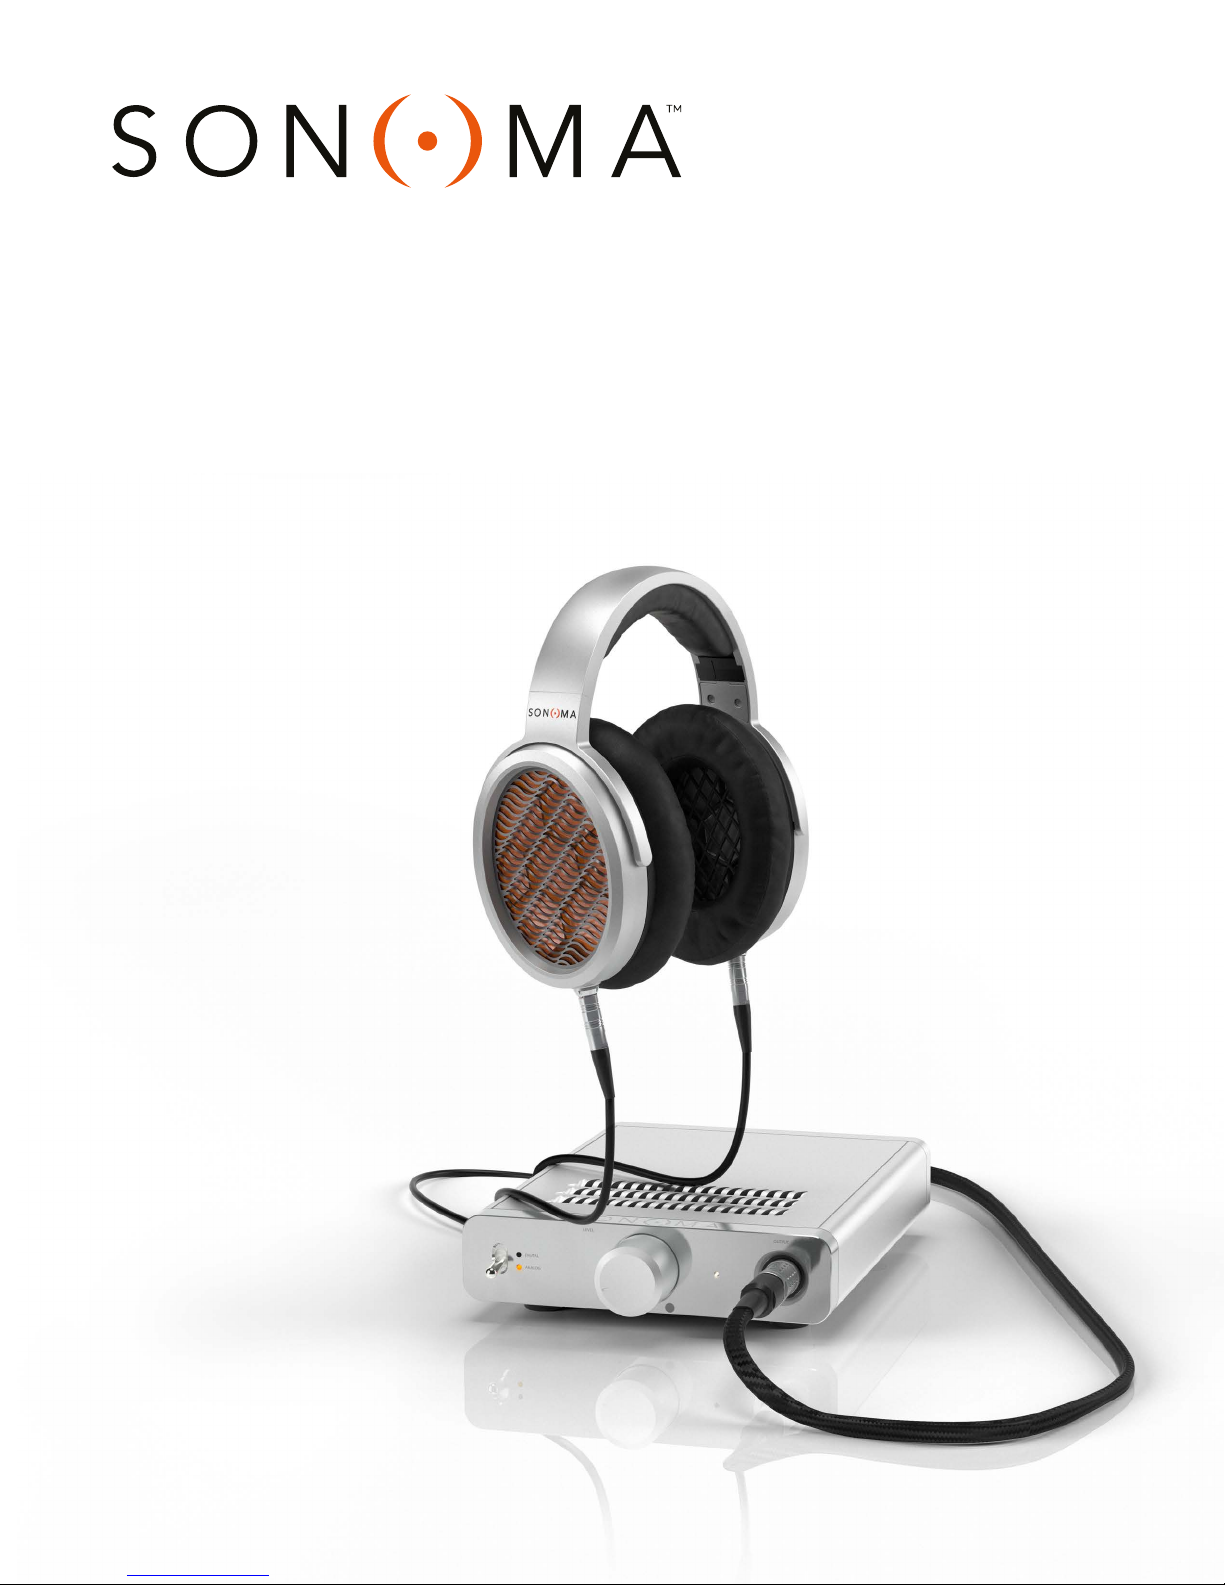
Model One Electrostatic
Headphone System
USER MANUAL
April 2017 l Version 1.0
Sonoma Acoustics Inc., 1434 Spruce St., Suite 100, Boulder, CO 80302, USA
Page 2

COPYRIGHT
This document is copyright © 2017 Sonoma Acoustics Inc.
All rights reserved. No part of this material may be reproduced or transmitted in any form or by
any means, electronic, mechanical, or otherwise, including photocopying and recording or in connection
with any information storage or retrieval system, without written permission from Sonoma Acoustics
Inc.
The Sonoma logo is a registered trademark of Super Audio Center LLC, Colorado, USA and is used under
license.
REVISION HISTORY
VERSION DATE DESCRIPTION
1.0 04/2017 First public release
Page 3

CONTENTS
TRANSLATED WARNING AND CAUTION MESSAGES ...............................................................................................................i
REGULATORY COMPLIANCE STATEMENTS ................................................................................................................................. vi
CHAPTER 1
INTRODUCTION ............................................................................................................................................................................................... 1
Thank You ................................................................................................................................................................................................................................. 1
Safety Information ............................................................................................................................................................................................................ 2
Liability Waiver ..................................................................................................................................................................................................................... 2
CHAPTER 2
INSTALLATION .................................................................................................................................................................................................. 3
System Contents.................................................................................................................................................................................................................3
Front Panel Controls ........................................................................................................................................................................................................3
Rear Panel Connections/Controls ........................................................................................................................................................................ 4
Headband Adjustment ................................................................................................................................................................................................ 4
Positioning the Headphones ................................................................................................................................................................................... 5
Connecting the Headphone Cable .................................................................................................................................................................... 5
Detaching the Headphone Cable ....................................................................................................................................................................... 6
Connecting the Headphones to the Amplifier ......................................................................................................................................... 6
Connecting Analog and Digital Sources to the Amplifier ...............................................................................................................6
Assembling and Connecting the Power Supply Unit ...........................................................................................................................7
Powering the Unit ON ................................................................................................................................................................................................... 8
CHAPTER 3
OPERATION ....................................................................................................................................................................................................... 9
Analog/Digital Source Selection ........................................................................................................................................................................... 9
Analog Input Selection ................................................................................................................................................................................................ 9
Digital Input Selection .................................................................................................................................................................................................. 9
Volume Control ...................................................................................................................................................................................................................9
Page 4

CHAPTER 4
COMPUTER-BASED AUDIO SET-UP ................................................................................................................................................. 10
XMOS Driver Installation for Windows Users ............................................................................................................................................10
Checking the Firmware Version (Windows Users) .................................................................................................................................12
Updating the Firmware Version (Windows Users) .................................................................................................................................12
Checking and Updating the Firmware Version (Macintosh Users) ..........................................................................................13
Configuring Your Playback Software ................................................................................................................................................................15
CHAPTER 5
CARE AND MAINTENANCE ................................................................................................................................................................... 16
Power Down ........................................................................................................................................................................................................................16
Cleaning ................................................................................................................................................................................................................................. 16
Replacing the Ear Pads .............................................................................................................................................................................................. 16
Replacing the Headband Pad ...............................................................................................................................................................................17
CHAPTER 6
TROUBLESHOOTING ..................................................................................................................................................................................18
CHAPTER 7
CUSTOMER SERVICE ................................................................................................................................................................................20
GLOSSARY ........................................................................................................................................................................................................ 21
SPECIFICATIONS...........................................................................................................................................................................................23
WARRANTY ..................................................................................................................................................................................................... 24
Page 5
TRANSLATED WARNING AND CAUTION MESSAGES
The following caution statements, warning conventions, and warning messages apply to the Sonoma
Model One (M1) system and manual.
Warning Symbol
Hazard Symbol
Caution Symbol
BEFORE OPERATION PLEASE READ THESE INSTRUCTIONS
Warning! Read and follow all warning notices and instructions marked on the product or included
in the documentation.
Avertissement! Lisez et conformez-vous à tous les avis et instructions d’avertissement indiqués sur
le produit ou dans la documentation.
Warnung! Lesen und befolgen Sie die Warnhinweise und Anweisungen, die auf dem Produkt
angebracht oder in der Dokumentation enthalten sind.
¡Advertencia! Lea y siga todas las instrucciones y advertencias marcadas en el producto o incluidas
en la documentación.
Aviso! Leia e siga todos os avisos e instruções assinalados no produto ou incluídos na documentação.
Avviso! Leggere e seguire tutti gli avvisi e le istruzioni presenti sul prodotto o inclusi nella
documentazione.
Warning! Do not block any ventilation openings. Install in accordance with the manufacturer’s
instructions.
Avertissement! Ne bloquez aucune ouverture de ventilation. Suivez les instructions du fabricant
lors de l’installation.
Warnung! Die Lüftungsöffnungen dürfen nicht blockiert werden. Nur gemäß den Anweisungen
des Herstellers installieren.
¡Advertencia! No bloquee ninguna de las aberturas de la ventilación. Instale de acuerdo con las
instrucciones del fabricante.
Aviso! Não obstrua nenhuma das aberturas de ventilação. Instale de acordo com as instruções do
fabricante.
Avviso! Non ostruire le aperture di ventilazione. Installare in conformità con le istruzioni del fornitore.
i
Page 6
Warning! Do not install near any heat sources such as radiators, heat registers, stoves, or other
apparatus (including amplifiers) that produce heat.
Avertissement! N’installez pas l’appareil près d’une source de chaleur telle que des radiateurs,
des bouches d’air de chauffage, des fourneaux ou d’autres appareils (amplificateurs compris) qui
produisent de la chaleur.
Warnung! Nicht in der Nähe von Wärmequellen wie Heizkörpern, Heizregistern, Öfen oder anderen
Wärme erzeugenden Geräten (einschließlich Verstärkern) aufstellen.
¡Advertencia! No instale cerca de fuentes de calor tales como radiadores, registros de calor, estufas
u otros aparatos (incluidos amplificadores) que generan calor.
Aviso! Não instale perto de nenhuma fonte de calor tal como radiadores, saídas de calor, fogões ou
outros aparelhos (incluindo amplificadores) que produzam calor.
Avviso! Non installare vicino a fonti di calore come termosifoni, diffusori di aria calda, stufe o altri
apparecchi (amplificatori compresi) che emettono calore.
Warning! Do not defeat the safety purpose of the polarized or grounding-type plug. A polarized
plug has two blades with one wider than the other. A grounding type plug has two blades and a
third grounding prong. The wide blade or the third prong are provided for your safety. If the provided
plug does not fit into your outlet, consult an electrician for replacement of the obsolete outlet.
Avertissement! La sécurité de la prise polarisée ou de la prise de type mise à la terre ne doit en
aucun cas être empêchée de fonctionner. Une prise polarisée a deux broches, l’une étant plus large
que l’autre. Une prise de type mise à la terre a deux broches et une troisième broche pour la mise
à la terre. La broche large ou la troisième broche sont fournies pour votre sécurité. Si la prise fournie
ne s’insère pas dans votre prise femelle, consultez un électricien pour le remplacement de la prise
femelle obsolète.
Warnung! Der Sicherheitszweck des gepolten bzw. Schukosteckers ist zu berücksichtigen. Ein
gepolter Stecker verfügt über zwei Pole, von denen einer breiter als der andere ist. Ein Schukostecker
verfügt neben den zwei Polen noch über einen dritten Pol zur Erdung. Der breite Pol bzw. der
Erdungspol dienen der Sicherheit. Wenn der zur Verfügung gestellte Stecker nicht in Ihren Anschluss
passt, konsultieren Sie einen Elektriker, um den veralteten Anschluss zu ersetzen.
¡Advertencia! No eche por tierra la finalidad del tipo de enchufe polarizado con conexión a tierra.
Un enchufe polarizado tiene dos espigas, una más ancha que la otra. Un enchufe con conexión a
tierra tiene dos espigas iguales y una tercera espiga que sirve para la conexión a tierra. La expiga
ancha, o la tercera espiga, sirven para su seguridad. Si el enchufe suministrado no encaja en el
tomacorriente, consulte con un electricista para reemplazar el tomacorriente obsoleto.
Aviso! Não anule a finalidade da segurança da ficha polarizada ou do tipo ligação terra. Uma ficha
polarizada tem duas lâminas sendo uma mais larga do que a outra. Uma ficha do tipo de ligação
à terra tem duas lâminas e um terceiro terminal de ligação à terra. A lâmina larga ou o terceiro
terminal são fornecidos para sua segurança. Se a ficha fornecida não couber na sua tomada,
consulte um electricista para a substituição da tomada obsoleta.
Avviso! Non compromettere la sicurezza della spina polarizzata o con messa a terra. Una spina
polarizzata ha due spinotti, di cui uno più largo. Una spina con messa a terra ha due spinotti eun
terzo polo per la messa a terra. Lo spinotto largo o il terzo polo sono forniti per motivi di sicurezza. Se
la spina fornita non si inserisce nella presa di corrente, contattare un elettricista per la sostituzione
della presa obsoleta.
ii
Page 7
Warning! Since the Mains plug is used as the disconnection for the device, it must remain readily
accessible and operable.
Avertissement! Puisque la prise principale est utilisée pour débrancher l’appareil, elle doit rester
aisément accessible et fonctionnelle.
Warnung! Da der Netzstecker als Trennvorrichtung dient, muss er stets zugänglich und
funktionsfähig sein.
¡Advertencia! Puesto que el enchufe de la red eléctrica se utiliza como dispositivo de desconexión,
debe seguir siendo fácilmente accesible y operable.
Aviso! Dado que a ficha principal é utilizada como a desconexão para o dispositivo, esta deve
manter-se prontamente acessível e funcional.
Avviso! Poiché il cavo di alimentazione viene usato come dispositivo di sconnessione, deve rimane
prontamente accessibile e operabile.
Warning! Protect the power cord from being walked on or pinched particularly at plugs, convenience
receptacles, and the point where they exit from the device.
Avertissement! Protégez le cordon d’alimentation pour que l’on ne marche pas dessus ou qu’on le
pince, en particulier au niveau des prises mâles, des réceptacles de convenance, et à l’endroit où il
sort de l’appareil.
Warnung! Vermeiden Sie, dass auf das Netzkabel getreten oder das Kabel geknickt wird,
insbesondere an den Steckern, den Steckdosen und am Kabelausgang am Gerät.
¡Advertencia! Proteja el cable de energía para que no se le pise ni apriete, en especial cerca del
enchufe, los receptáculos de conveniencia y el punto del que salen del equipo.
Aviso! Proteja o cabo de alimentação de ser pisado ou de ser comprimido particularmente nas
fichas, em tomadas de parede de conveniência e no ponto de onde sai do dispositivo.
Avviso! Proteggere il cavo di alimentazione in modo che nessuno ci cammini sopra e che non
venga schiacciato soprattutto in corrispondenza delle spine e del punto in cui esce dal dispositivo.
Warning! Unplug this device during lightning storms or when unused for long periods of time.
Avertissement! Débranchez cet appareil pendant les orages avec éclairsou s’il est inutilisé pendant
de longues périodes.
Warnung! Das Gerät ist bei Gewitterstürmen oder wenn es über lange Zeiträume ungenutzt bleibt
vom Netz zu trennen.
¡Advertencia! Desenchufe este dispositivo durante tormentas eléctricas o cuando no se lo utilice
por largos periodos del tiempo.
Aviso! Desconecte este dispositivo da tomada durante trovoadas ou quando não é utilizado durante
longos períodos de tempo.
Avviso! Utilizzare soltanto i collegamenti e gli accessori specificati e/o venduti dal produttore, quali
il treppiedi e l’esoscheletro.
iii
Page 8
Warning! Do not open the chassis. There are no user-serviceable parts inside. Opening the chassis
will void the warranty unless performed by a Sonoma Acoustics service center or licensed facility.
Avertissement! Ne pas ouvrir le châssis. Aucun élément à l’intérieur du châssis ne peut être réparé
par l’utilisateur. La garantie sera annulée si le châssis est ouvert par toute autre personne qu’un
technicien d’un centre de service ou d’un établissement agréé Sonoma Acoustics.
Warnung! Öffnen Sie das Gehäuse nicht. Keine der Geräteteile können vom Benutzer gewartet
werden. Durch das Öffnen des Gehäuses wird die Garantie hinfällig, es sei denn, solche
Wartungsarbeiten werden in einem Sonoma-Acoustics-Service-Center oder einem lizenzierten
Betrieb vorgenommen.
¡Advertencia! No abra el chasis. El interior no contiene piezas reparables por el usuario. El abrir el
chasis anulará la garantía a menos que se lo haga en un centro de servicio Sonoma Acoustics o en
un local autorizado.
Advertência! Não abra o chassi. Não há internamente nenhuma peça que permita manutenção
pelo usuário. Abrir o chassi anula a garantia, a menos que a abertura seja realizada por uma central
de serviços da Sonoma Acoustics ou por um local autorizado.
Avvertenza! Non aprire lo chassis. All’interno non ci sono parti riparabili dall’utente. L’apertura dello
chassis invaliderà la garanzia se non viene effettuata da un centro ufficiale o autorizzato Sonoma
Acoustics.
Warning! Disconnect the external AC power supply line cord(s) from the mains power before
moving the unit.
Avertissement! Retirez le ou les cordons d’alimentation en CA de la source d’alimentation principale
lorsque vous déplacez l’appareil.
Warnung! Trennen Sie die Wechselstrom-Versorgungskabel vom Netzstrom, bevor Sie das Gerät
verschieben.
¡Advertencia! Cuando mueva la unidad desenchufe de la red eléctrica el/los cable(s) de la fuente
de alimentación CA tipo brick.
Advertência! Remova os cabos CA de alimentação brick da rede elétrica ao mover a unidade.
Avvertenza! Scollegare il cavo dell’alimentatore quando si sposta l’unità.
Warning! Only use attachments and accessories specified and/or sold by the manufacturer.
Avertissement! Utilisez seulement les attaches et accessoires spécifiés et/ou vendus par le fabricant.
Warnung! Verwenden Sie nur Zusatzgeräte und Zubehör angegeben und/oder verkauft wurde
durch den Hersteller.
¡Advertencia! Utilice solamente los accesorios y conexiones especificados y/o vendidos por el
fabricante.
Aviso! Utilize apenas equipamentos/acessórios especificados e/ou vendidos pelo fabricante.
Avviso! Utilizzare soltanto i collegamenti e gli accessori specificati e/o venduti dal produttore.
iv
Page 9

Warning! The Sonoma Acoustics M1 has no user-serviceable parts. To remove power from the
unit, remove the power connector to ensure disconnection. Refer all servicing to qualified service
personnel. Serrvicing is required when the device has been damaged in any way, such as powersupply cord or plug is damaged, liquid has been spilled or objects have fallen into the device, the
device has been exposed to rain or moisture, does not operate normally, or has been dropped.
Avertissement! Aucun des composants du Sonoma Acoustics M1 ne peut être remplacé par
l’utilisateur. Pour mettre l’unité hors tension, déconnectez-la en débranchant le connecteur
électrique. Confiez l’entretien à du personnel de maintenance qualifié. Il faut effectuer une révision
lorsque l’appareil a été endommagé de quelque façon que ce soit, par exemple lorsque le câble
d’alimentation ou le connecteur est endommagé, lorsque du liquide a été renversé ou que des
objets sont tombés sur l’appareil, lorsque ce dernier a été exposé à la pluie ou à l’humidité, lorsqu’il
ne fonctionne pas normalement ou lorsqu’il a subi une chute.
Achtung! Der Sonoma Acoustics M1 besitzt keine vom Anwender zu wartenden Teile. Um die Einheit
stromlos zu schalten, den Stromanschluss abziehen, um Abschaltung sicherzustellen. Wartung
darf nur von qualifiziertem Wartungspersonal vorgenommen werden. Wartung ist erforderlich, falls
das Gerät auf irgendeine Weise beschädigt worden ist, z.B. wenn das Netzkabel oder der Stecker
beschädigt wurde, Flüssigkeit in das Gerät verschüttet wurde oder Gegenstände in das Gerät
gefallen sind, das Gerät Regen oder Feuchtigkeit ausgesetzt wurde, es nicht auf normale Weise
funktioniert oder fallengelassen wurde.
Avvertenza! Il Sonoma Acoustics M1 non contiene parti su cui l’utente possa intervenire. Per
spegnere il dispositivo, rimuovere il connettore di alimentazione. Per qualsiasi intervento rivolgersi
a personale di manutenzione qualificato. È necessario intervenire sul dispositivo se questo è stato
danneggiato in un modo qualsiasi, ad esempio la spina o il cavo di alimentazione ha subito danni,
è stato versato liquido o sono caduti oggetti sul dispositivo oppure se il dispositivo è stato esposto
alla pioggia o a umidità, non funziona normalmente o è caduto.
Aviso! O Sonoma Acoustics M1 não tem partes de manutenção pelo utilizador. Para retirar a energia
da unidade, retire o conector de energia, para assegurar a desconexão. Indique toda a manutenção
para pessoal de manutenção qualificado. A manutenção é necessária quando o dispositivo tiver
sido danificado sob qualquer forma, como, por exemplo, se o cabo eléctrico ou de alimentação foi
danificado, líquido foi derramado ou objectos caíram sobre o dispositivo, o dispositivo foi exposto a
chuva ou humidade, não funciona normalmente ou se tiver caído.
¡Advertencia! Sonoma Acoustics M1 no tiene piezas que el usuario pueda reparar. Para eliminar el
potencia de la unidad, retire el conector de alimentación de para asegurar la desconexión. Diríjase
a un personal calificado de servicio para toda reparación. Se requiere servicio cuando el aparato ha
sido dañado de cualquier forma, por ejemplo el cable de alimentación o el enchufe está dañado,
se ha derramado líquido u objetos han caído en el dispositivo, el dispositivo ha sido expuesto a la
lluvia o humedad, no funciona normalmente o se ha caído.
v
Page 10

REGULATORY COMPLIANCE STATEMENTS
FEDERAL COMMUNICATIONS COMMISSION (FCC) COMPLIANCE NOTICES
Class B Interference Statement
This equipment has been tested and found to comply with the limits for a Class B digital device, pursuant
to Part 15, Subpart B of the FCC Rules. These limits are designed to provide reasonable protection against
harmful interference in a residential installation. This equipment generates, uses, and can radiate radio
frequency energy and, if not installed and used in accordance with the instructions, may cause harmful
interference to radio communications. However, there is no guarantee that interference will not occur
in a particular installation. If this equipment does cause harmful interference to radio or television
reception, which can be determined by turning the equipment off and on, the user is encouraged to
try to correct the interference by one or more of the following measures:
Reorient or relocate the receiving antenna.
•
Increase the separation between the equipment and receiver.
•
Connect the equipment into an outlet on a circuit different from that to which the receiver is
•
connected.
Consult the dealer or an experienced radio/TV technician for help.
•
FCC Caution:
This device complies with Part 15 of the FCC Rules. Operation is subject to the following two conditions:
(1) This device may not cause harmful interference, and (2) this device must accept any interference
received, including interference that may cause undesired operation.
Canadian ICES Statements
Canadian Department of Communications Radio Interference Regulations. This digital apparatus
does not exceed the Class B limits for radio-noise emissions from a digital apparatus as set out in the
Radio Interference Regulations of the Canadian Department of Communications. This Class B digital
apparatus complies with Canadian ICES-003.
Règlement sur le brouillage radioélectrique du ministère des Communications. Cet appareil numérique
respecte les limites de bruits radioélectriques visant les appareils numériques de classe B prescrites
dans le Règlement sur le brouillage radioélectrique du ministère des Communications du Canada. Cet
appareil numérique de la Classe B est conforme à la norme NMB-003 du Canada.
European Union and European Fair Trade Association (EFTA) Regulatory Compliance
This equipment may be operated in the countries that comprise the member countries of the European
Union and the European Fair Trade Association. These countries, listed below, are referred to as The
European Community throughout this document: AUSTRIA, BELGIUM, BULGARIA, CYPRUS, CZECH
REPUBLIC, DENMARK, ESTONIA, FINLAND, FRANCE, GERMANY, GREECE, HUNGARY, IRELAND, ITALY,
LATVIA, LITHUANIA, LUXEMBOURG, MALTA, NETHERLANDS, POLAND, PORTUGAL, ROMANIA, SLOVAKIA,
SLOVENIA, SPAIN, SWEDEN, UNITED KINGDOM, ICELAND, LICHTENSTEIN, NORWAY, SWITZERLAND.
Declaration of Conformity
Marking by this symbol indicates compliance with the Essential Requirements of the
EMC Directive of the European Union (2014/30/EU). This equipment meets the following
conformance standards:
vi
Page 11
Safety:
EN 60065: 2002 + A1: 2006 + A11: 2008 + A2: 2010 + A12: 2011 (GS License)
Also Licensed for Standards:
IEC 60065: 2001 + A1: 2005 + A2: 2010, (CB Scheme Report/Certificate)
UL60065: 2003 R7.13 (NRTL License), CAN/CSA-C22.2 No.60065-03 +A1: 06 (R2012) + A2: 12
EN 50332-1: 2000, EN 50332-2: 2003
Emissions:
EN 55032: 2012, CISPR 22: 2008, EN 61000-3-2: 2014, EN 61000-3-3: 2013
Immunity:
EN 55103-2: 2009, EN 61000-4-2: 2009, EN 61000-4-3: 2006 + A1: 2008 + A2: 2010
EN 61000-4-4: 2004 + A1: 2010, EN 61000-4-5: 2006, EN 61000-4-6: 2009, EN 61000-4-11: 2004
Environments: E2, E3 and E4
The products are licensed, as required, for additional country specific standards for the International
Marketplace. Additional issued licenses available upon request. Environmental: Low Voltage Directive
2014/35/EU, RoHS 2011/65/EU, REACH 2006/1907/EC WEEE 2012/19/EU and Packaging 94/62/EC
Warning!
This is a Class B product. In a domestic environment, this product may cause radio interference, in
which case, the user may be required to take appropriate measures.
Achtung!
Dieses ist ein Gerät der Funkstörgrenzwertklasse B. In Wohnbereichen können bei Betrieb dieses Gerätes
Rundfunkstörungen auftreten, in welchen Fällen der Benutzer für entsprechende Gegenmaßnahmen
verantwortlich ist.
Attention!
Ceci est un produit de Classe B. Dans un environnement domestique, ce produit risque de créer des
interférences radioélectriques, il appartiendra alors à l’utilisateur de prendre les mesures spécifiques
appropriées.
This symbol on the product or its packaging indicates that this product must not be disposed
of with your other household waste. Instead, it is your responsibility to dispose of your waste
equipment by handing it over to a designated collection point for the recycling of waste electrical
and electronic equipment. The separate collection and recycling of your waste equipment at the
time of disposal will help conserve natural resources and ensure that it is recycled in a manner that
protects human health and the environment. For more information about where you can drop off your
waste for recycling, please contact your local authority, or where you purchased your product.
Please visit the following URL for a complete copy of the declaration of conformity and user manual:
www.sonomaacoustics.com/support
This is a Class B product based on the standard of the VCCI Council (VCCI V-3/2015.04). If this equipment
is used in a domestic environment, radio interference may occur, in which case, the user may be required
to take corrective actions.
vii
Page 12

CHAPTER 1
INTRODUCTION
THANK YOU
Dear Model One Customer,
Congratulations on the purchase of your Model One (M1) Electrostatic Headphone System! We urge
you to take the time to study this user manual because with proper operation and maintenance your
M1 will provide you with many years of unparalleled listening pleasure. Built around the revolutionary
High-Precision Electrostatic Laminate (HPEL) transducer, the M1 has been designed from the ground
up to be optimized for playing today’s hi-res music formats. These features are key to delivering its
extraordinary sonic quality and comfort:
1. Revolutionary lightweight High-Precision Electrostatic Laminate (HPEL) transducer
2. Injected magnesium ear cups for strength and lightness
3. Handmade ‘Cabretta’ sheepskin ear and headband pads
4. Custom low-capacitance headphone cable
5. Discrete FET Class-A energizing amplifier
6. 32-bit/384 kHz ESS SABRE Reference DACs
7. 32-bit/384 kHz AKM Premium ADCs
8. Custom 64-bit fixed-point double-precision Digital Signal Processing
9. Ultra-low phase-noise master oscillator (±80 femtoseconds of jitter at 100 MHz)
10. Superior USB cable
11. Precision-machined aluminum case
12. Custom, fixed-frequency universal power supply unit
In developing the Sonoma Model One, our paramount goal was to stay true to the precedent for
uncompromised audio quality set by its namesake, the Sonoma Digital Audio Workstation. We value
your thoughts so please let us know if you think we have achieved our goal. www.sonomaacoustics.
com/general-inquiry
Thank you!
The Team at Sonoma Acoustics
INTRODUCTION 1
Page 13

SAFETY INFORMATION
For your safety, and to ensure optimum performance, please thoroughly review the information in this
manual before using the product. In particular, please pay attention to the following:
1. Place the amplifier on a solid, level surface such as a desk or table, and do NOT block the ventilation
holes as this could result in damage to the amplifier.
2. Keep liquids and sprays away from the amplifier at all times!
3. Do not attempt to insert anything into the ventilation holes at any time, especially when the amplifier
is on!
4. Keep out of the reach of children at all times.
5. This product has been designed to conform to European standard EN 50332 on maximum volume
level, however, permanent hearing damage may still occur if you listen at a very high level for long
periods. Please protect your hearing by exercising some caution with the volume control, especially
when doing extended listening.
6 This product MUST be connected to a grounded mains outlet!
7. There are NO user serviceable parts inside, and, due to the high voltages needed for operation, we
strongly advise against opening the amplifier unit for any reason.
8. If any of the cables show signs of wear or damage, please do NOT use the system until they have
been replaced.
LIABILITY WAIVER
The Sonoma Model One Electrostatic Headphone System has been designed for home use only.
Sonoma Acoustics Inc. will not accept liability for any damage or injury arising from improper use/
misuse of this product.
INTRODUCTION 2
Page 14
CHAPTER 2
INSTALLATION
SYSTEM CONTENTS
The M1 system comprises two parts, a headphone and an associated energizing amplifier/digital-toanalog converter (DAC). These are packed separately: the amplifier/DAC in the larger of the two packing
boxes. The headphone box contains the following items:
1x M1 headphone
•
1x headphone cable
•
1x Quick Start Guide (headphone)
•
The amplifier/DAC box contains the following items:
1x M1 energizing amplifier/DAC unit
•
1x universal power supply unit
•
1x IEC power cord (region-specific)
•
1x USB cable
•
1x Quick Start Guide (amplifier)
•
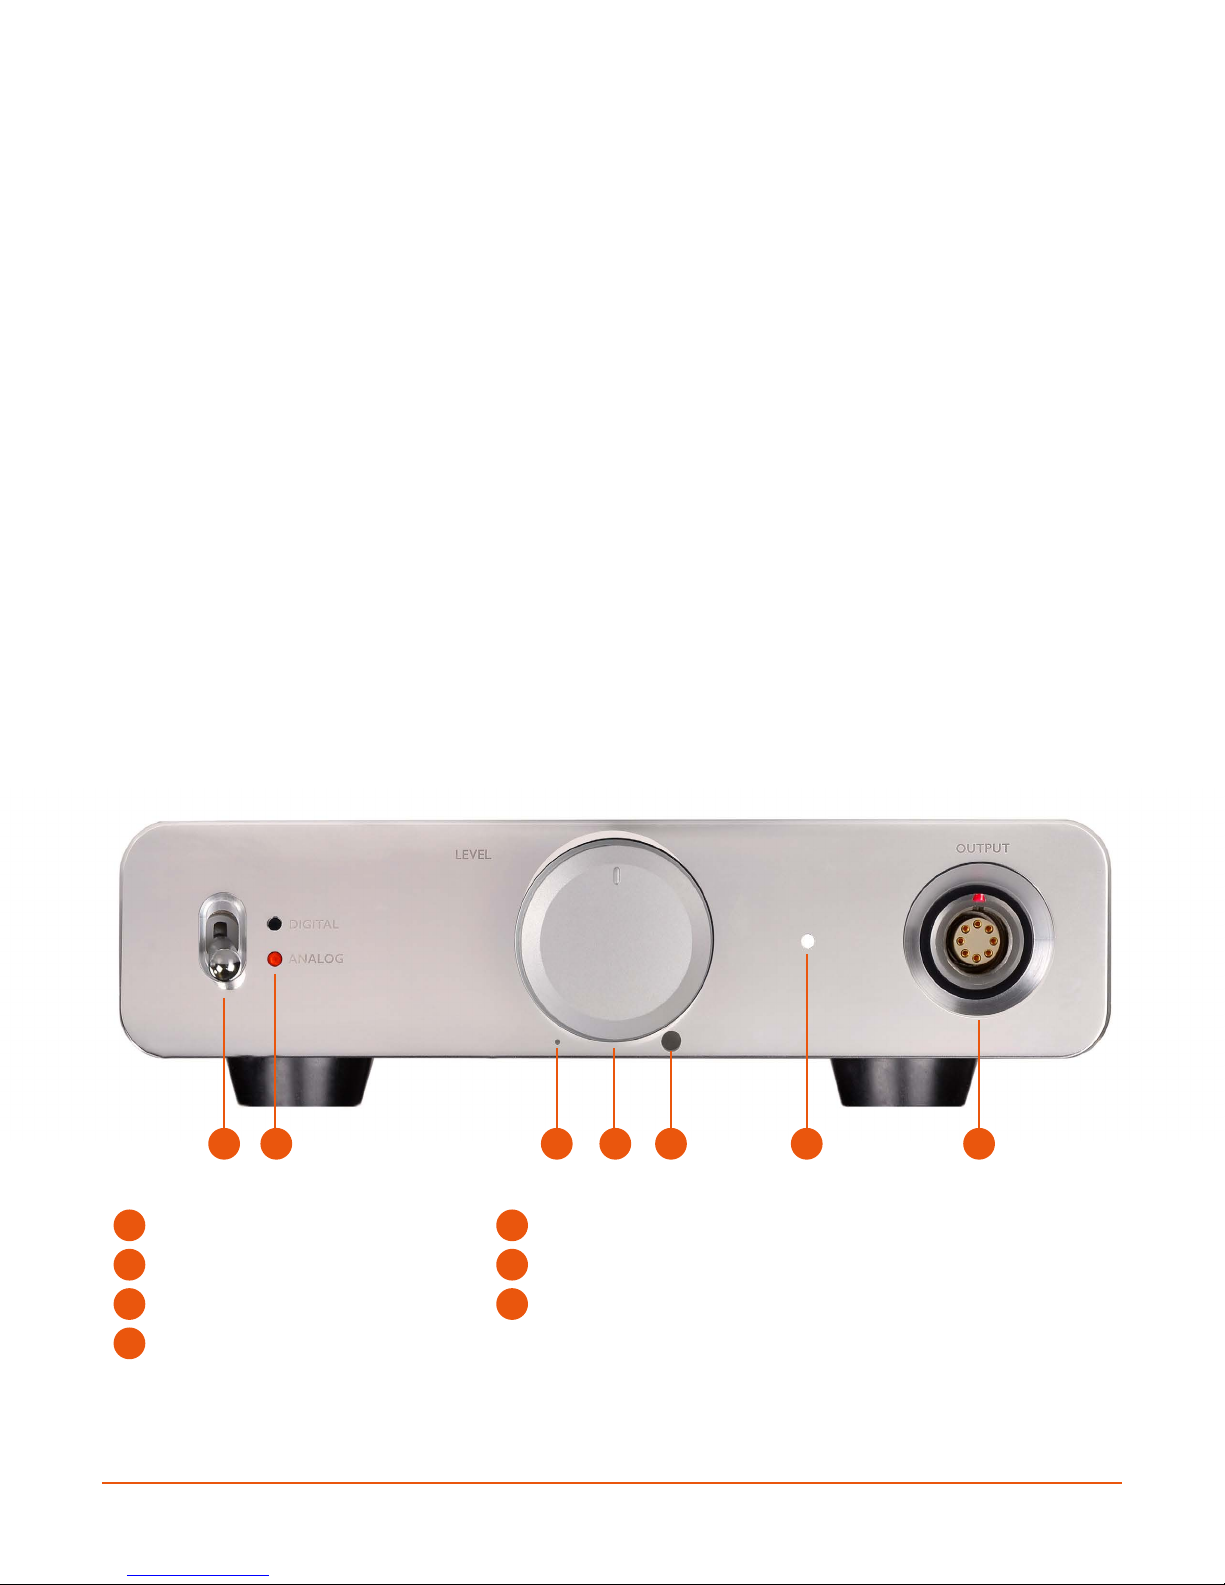
FRONT PANEL CONTROLS
1 2 3 4 6 75
1
Analog/digital input selector
2
Analog/digital input indicator
3
Min. volume level
5
Max. volume level
6
Power/status indicator
7
Headphone connector
4
Volume control
INTRODUCTION 3
Page 15
REAR PANEL CONNECTIONS/CONTROLS
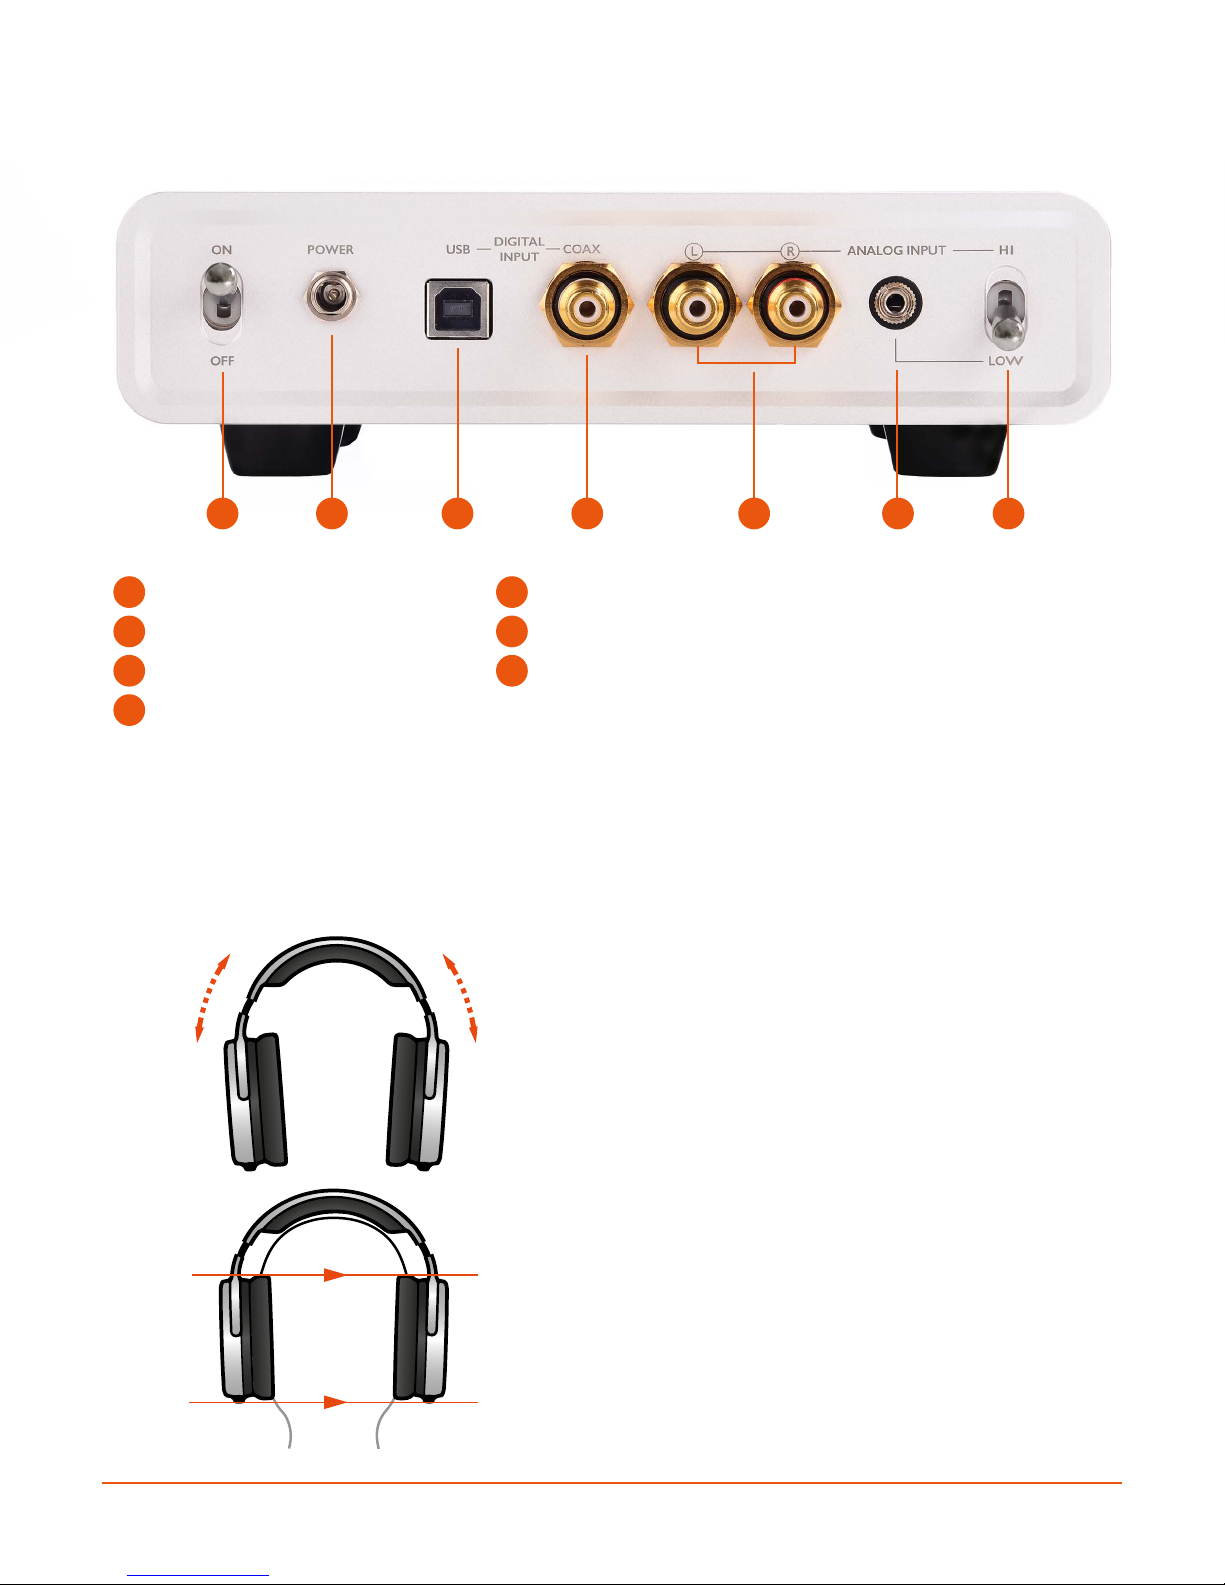
1 2 3 4 5 6 7
1
On/off switch
2
Power connector
3
USB (Type B) input
4
Coaxial S/PDIF input
5
RCA analog inputs
6
3.5 mm stereo analog input
7
Analog input selector
HEADBAND ADJUSTMENT
To get the best from your M1 headphones, it is important to ensure that they are correctly adjusted
to fit your head, and that they are properly positioned on your head.
The headband can be adjusted by means of an
inner band that can be lengthened/shortened as
needed. To adjust the band, hold the headband
with one hand, and carefully pull or push the earcup with the other. When new, the inner band
may be a little stiff.
Ensure that the same length of inner band is
visible on both sides of the headphone, so that
they sit level on your head. There should be no gap
between the top of your head and the underside
of the headband.
4INSTALLATION
Page 16
POSITIONING THE HEADPHONES
CONNECTING THE HEADPHONE CABLE
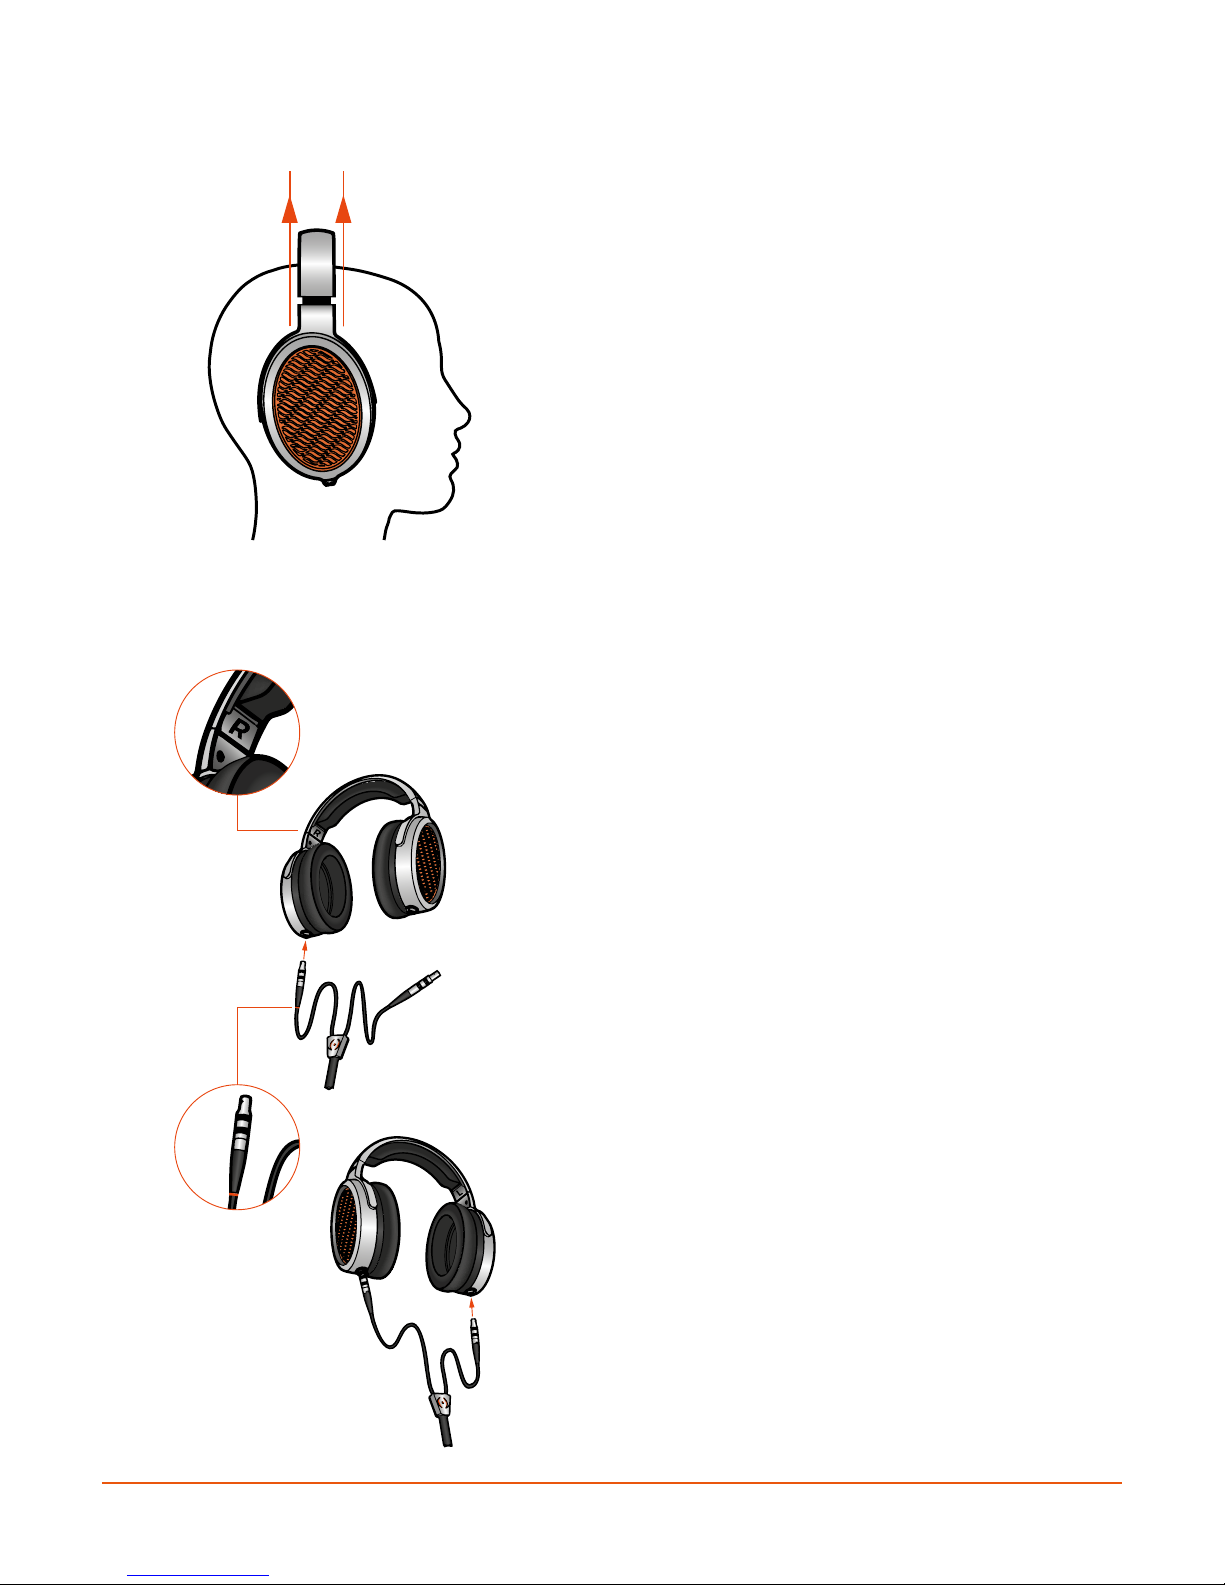
The headphones should be positioned on your head
such that the headband is vertical. When you have
the correct adjustment and orientation, you will have
a good seal of the ear-cup pad around your ear which
is essential for correct bass response. You can check
whether you have a good seal by carefully pushing on
the ear-cup. This should result in a crackling sound as
the trapped air in the ear-cup moves the electrostatic
transducer, causing it to work like a microphone.
As soon as you have properly adjusted the headband,
it will be time to connect the headphone cable to the
headphones.
The headphone cable connects to the headphone
via high precision, self-latching connectors. The cable
is color coded, and a small red band at the end of the
strain-relief indicates the right-hand channel. Locate
the ear-cup with the letter R indicated above it, and
insert the cable with the red band until it latches.
When the right-hand cable has been attached,
connect the other cable to the left-hand ear-cup in
the same way.
5INSTALLATION
Page 17
DETACHING THE HEADPHONE CABLE
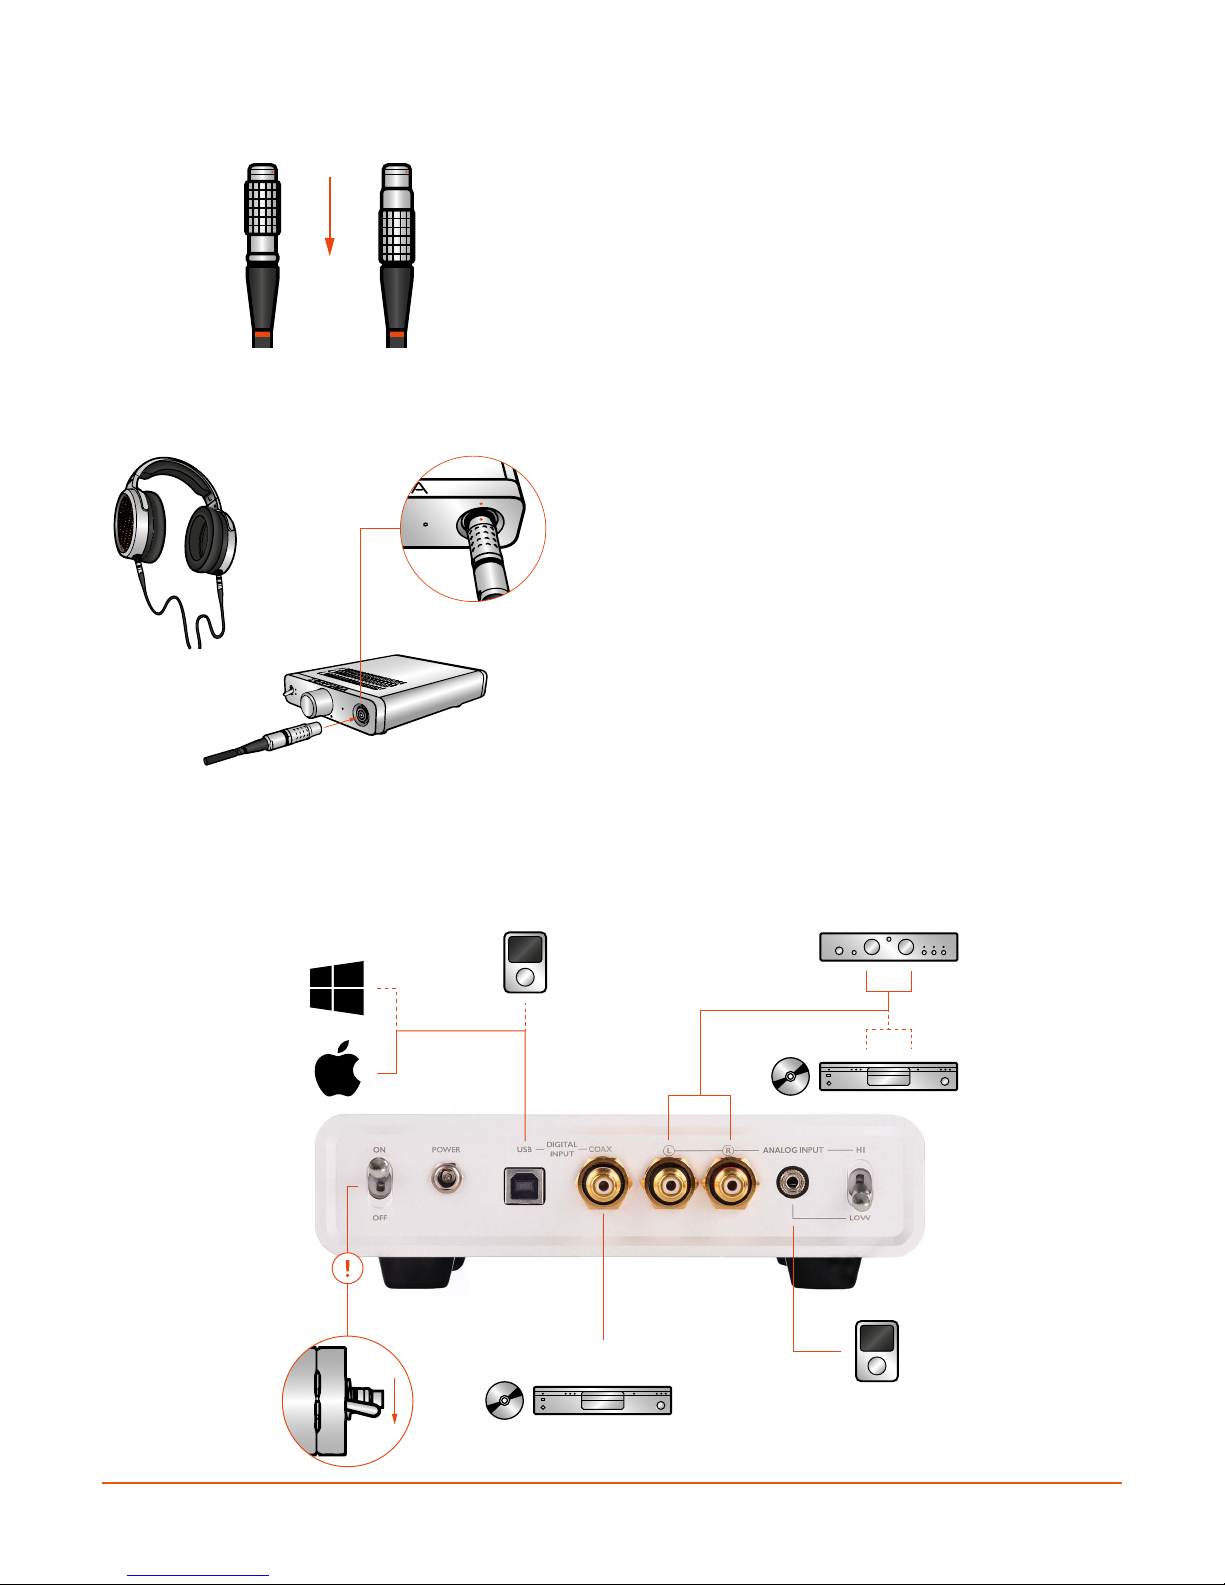
Should you need to detach the cable for any reason,
grasp the barrel of the cable and carefully pull
backwards until the cable disconnects. You can
then release the barrel and it will return to its usual
position.
CONNECTING THE HEADPHONES TO THE AMPLIFIER
With the cable connected to both ear-cups, connect
the headphone to the amplifier/DAC unit by inserting
the cable into the headphone connector. Be sure to
align the red dots on the connector and chassis. Push
the cable into the connector until it latches.
If you need to detach the cable, grasp the barrel of
the connector and carefully pull backwards until the
cable disconnects, as shown above. Please ensure
that the amplifier is switched OFF before connecting/
disconnecting the headphone cable.
CONNECTING ANALOG AND DIGITAL SOURCES TO THE AMPLIFIER
NOTE: Before beginning this section, please ensure that the power supply unit is NOT attached, and
that the amplifier/DAC unit’s power switch is in the OFF position!
PRE-O UT
SPDIF
COAX
OFF
6INSTALLATION
Page 18
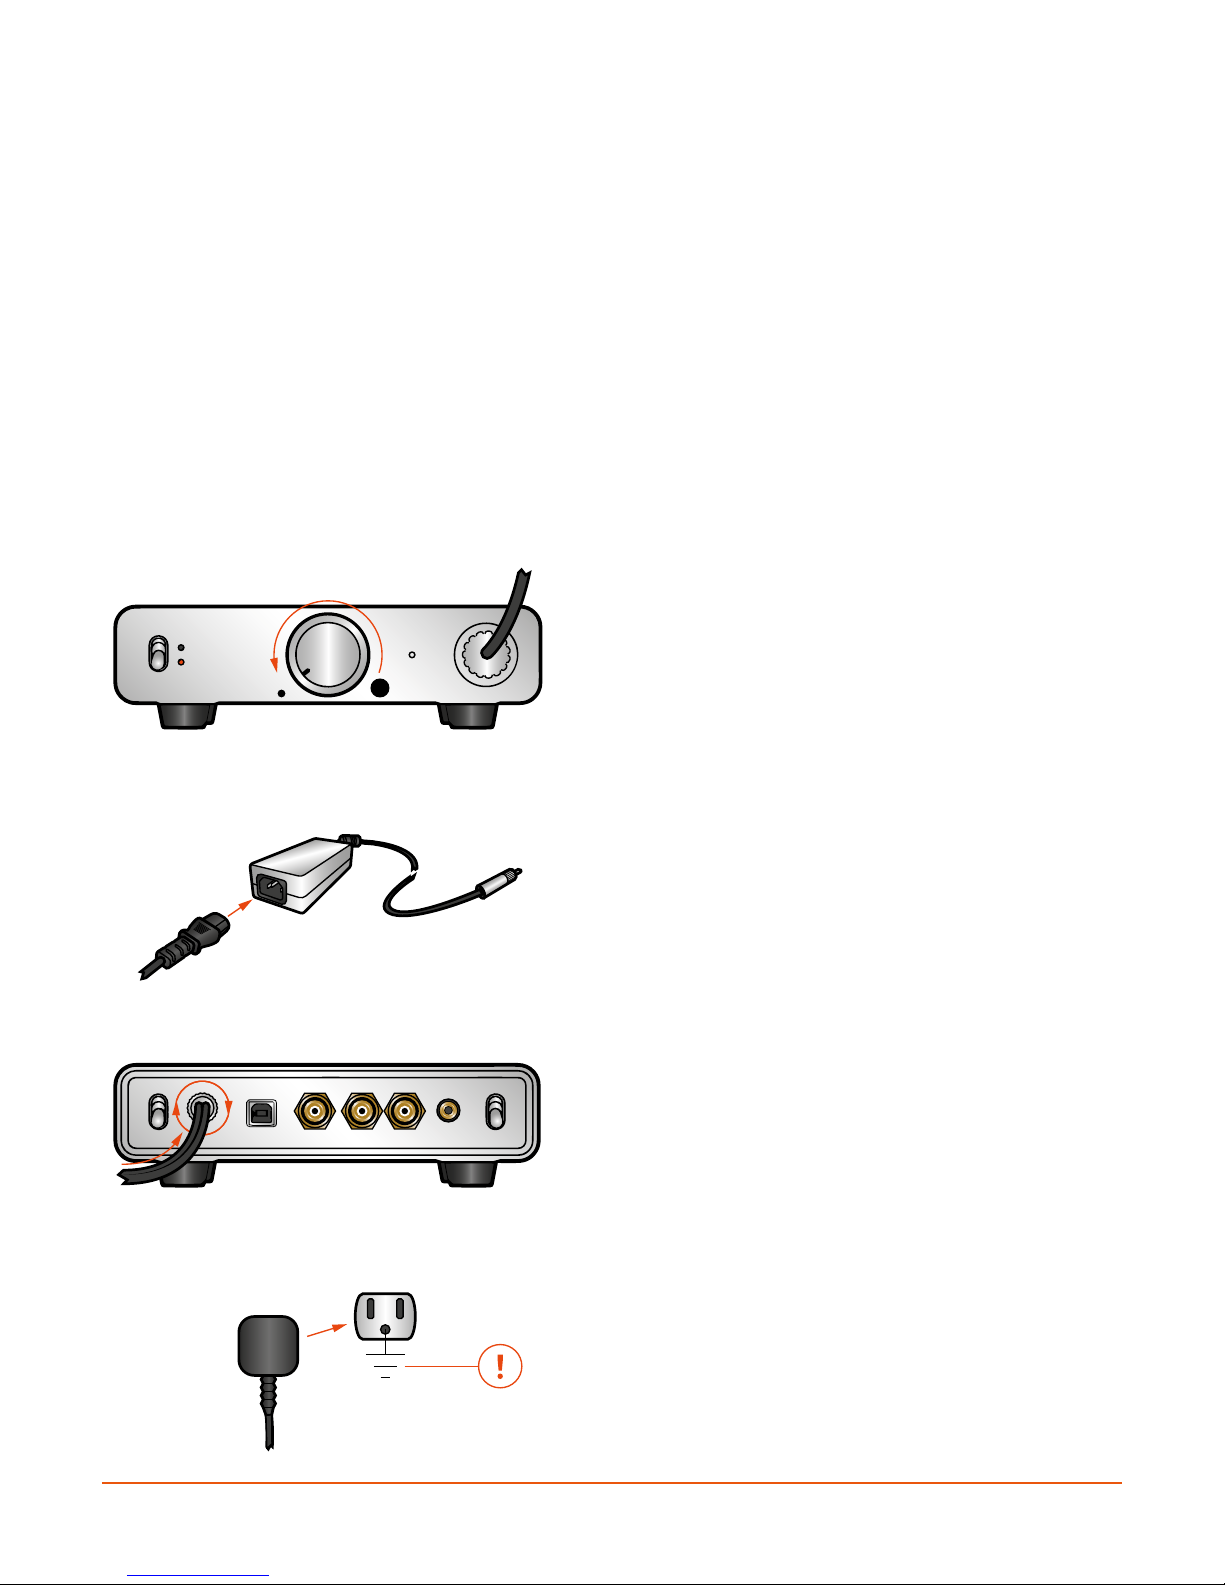
Connect the stereo analog output of a portable audio device, for example, to the 3.5 mm stereo input
jack. Simply insert the jack until it latches. To remove, carefully pull on the connector (not the cable!).
Connect the stereo (L and R) analog outputs of a disc player or the Pre-Outs of an amplifier using two
cables fitted with RCA connectors. Push the jacks until they make a firm connection. To remove, simply
pull on the connectors (not the cables!).
Connect the coaxial digital (S/PDIF) stereo output of a digital audio disc player (CD/DVD/SACD/BD) to
the coaxial S/PDIF digital input. Use a digital interlink fitted with RCA connectors. Push the jack until it
makes a firm connection. To remove, simply pull on the connector (not the cable!).
Connect a digital audio player or computer to the USB digital input using the supplied USB cable, or
any similar high-quality USB cable up to 2 meters in length. Avoid using longer USB cables or USB hubs.
NOTE: Windows PC users please refer to the section XMOS Driver Installation for Windows Users before
attempting to use a PC with this product!
ASSEMBLING AND CONNECTING THE POWER SUPPLY UNIT
When all audio sources and the headphones have
been connected to the amplifier/DAC unit, it will
be time to connect the power supply unit, however,
before beginning, please ensure that the volume
control is turned to its lowest position as shown.
Firmly insert the supplied IEC mains cable into the
power supply unit.
Carefully insert the cable from the power supply
unit into the power connector on the back of the
amplifier/DAC unit. Then lock the connector in place
by turning the threaded connector clockwise. To
remove, first unscrew the connector (by turning it
counter-clockwise) and then carefully pull on it (not
the cable!).
When the power supply unit has been assembled and
connected to the amplifier/DAC, insert the mains
plug into a GROUNDED mains socket!
PLEASE NOTE: your product has been supplied with
the correct mains cable for your geographic location,
and may differ in pin configuration from the model
illustrated!
7INSTALLATION
Page 19
POWERING THE UNIT ON
ON
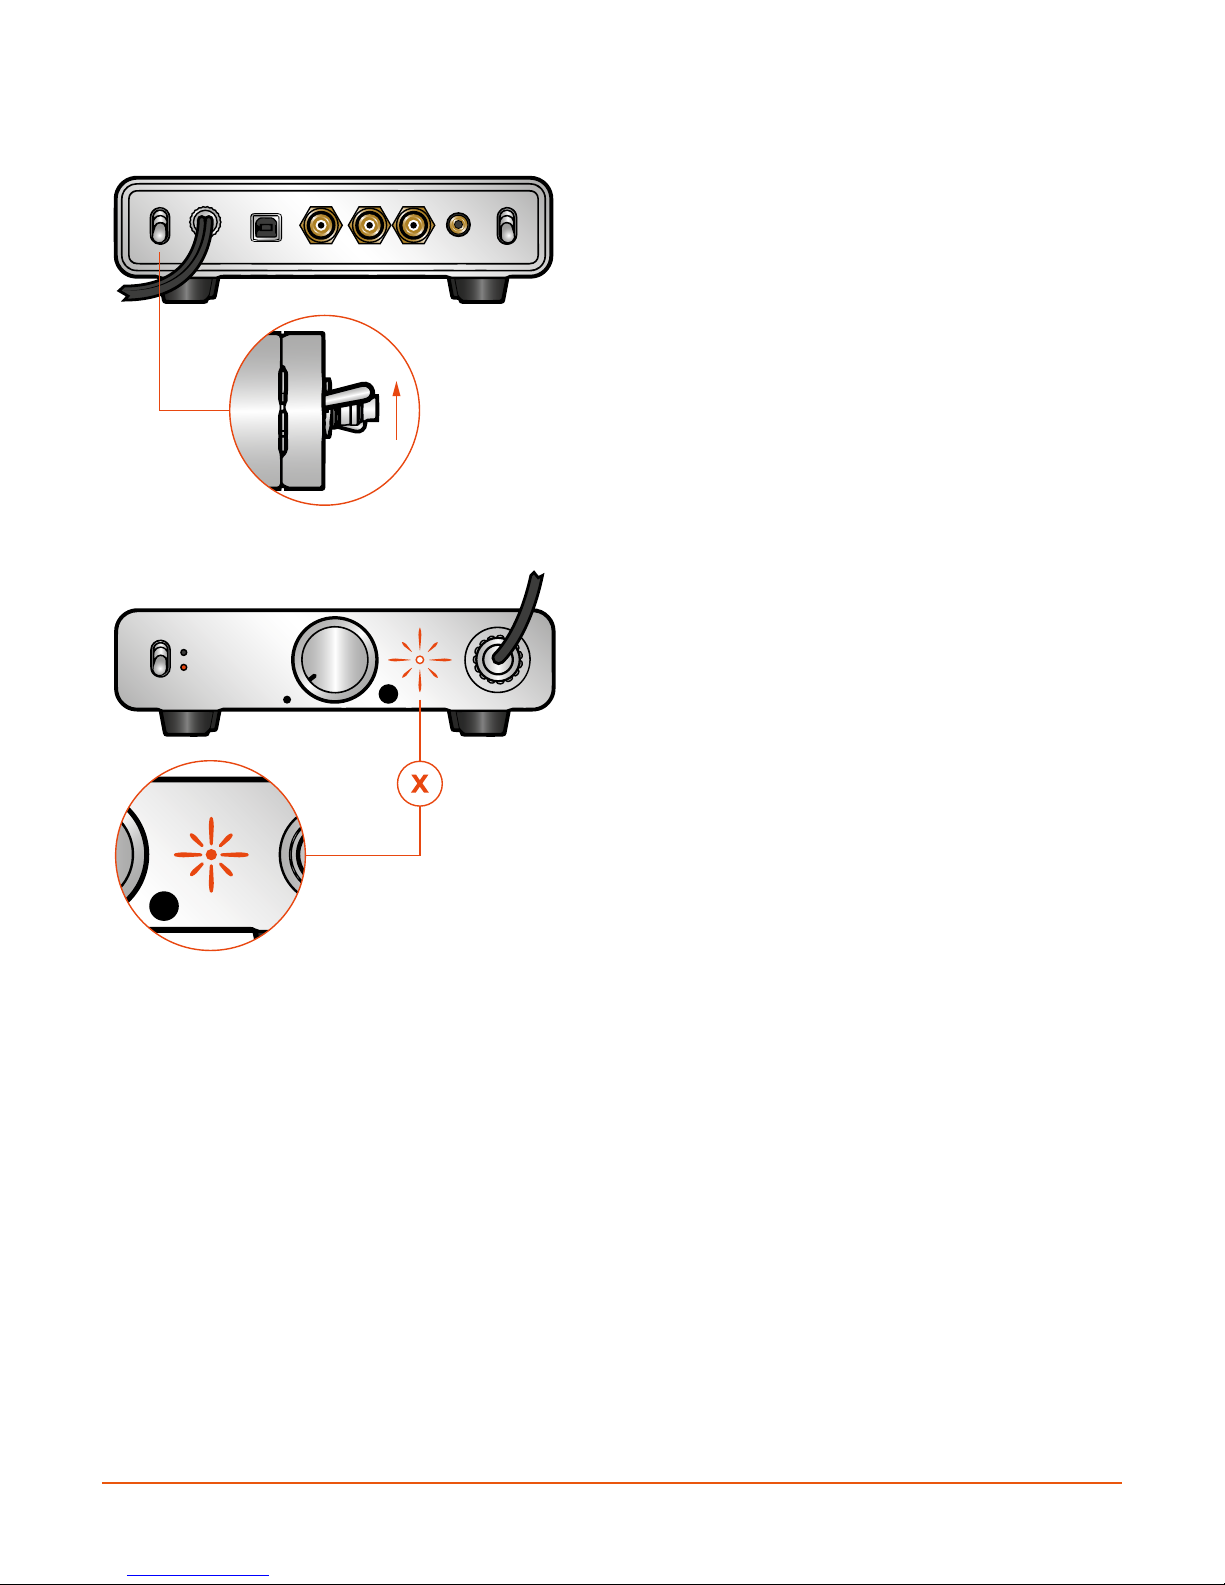
When all connections have been securely made,
power the amplifier/DAC unit ON by flipping the rear
panel power switch to the up position. To power OFF
simply depress the switch to the down position.
Provided all connections have been properly made,
the front panel status indicator should glow WHITE.
Your Sonoma M1 system is then ready to use.
If the amplifier/DAC detects a fault condition, the
status indicator will glow RED. In this case, first power
the unit OFF and re-check all the connections. If the
problem persists, please refer to the Troubleshooting
section.
8INSTALLATION
Page 20
CHAPTER 3
OPERATION
ANALOG/DIGITAL SOURCE SELECTION
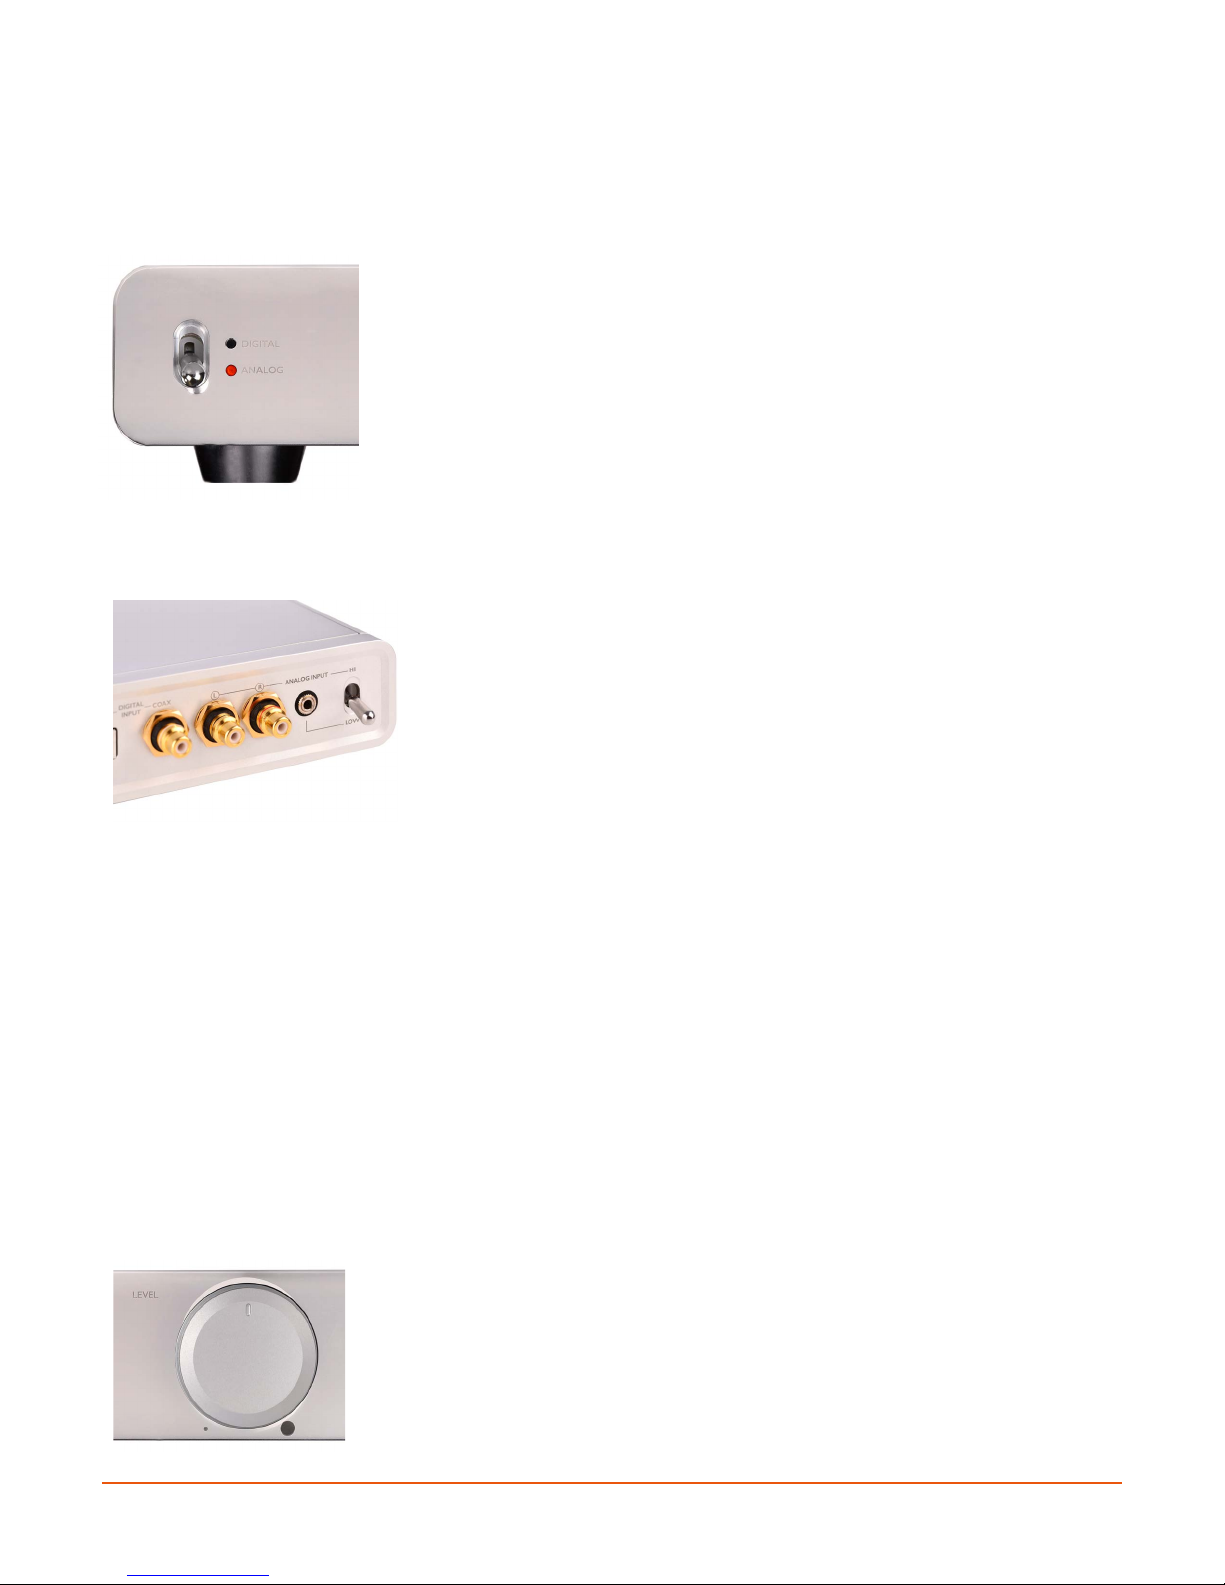
Choose between analog or digital input sources by means of the
front panel switch. Push the switch to the down position to select an
analog source, move it to the up position to select a digital source.
The orange input indicator lamp will confirm your choice.
You can freely switch between the two modes while music is playing.
Which source you will hear will depend on further configuration
options as described below.
ANALOG INPUT SELECTION
Choose between the 3.5 mm stereo analog input (LOW) and the RCA
Left/Right stereo analog inputs (HI) by means of the rear panel switch.
Push the switch to the down position to select the 3.5 mm analog
source, move it to the up position to select the RCA analog source.
The gain of each input is optimized for different source devices. The
3.5 mm (LOW) input should be driven by source devices with up
to 850 mV (rms) maximum output. The RCA (HI) inputs should be
driven by source devices with up to 2.1 V (rms) maximum output.
Higher maximum output source devices can be used for these
inputs, but levels will need to be reduced to avoid over-driving the
analog inputs.
DIGITAL INPUT SELECTION
The M1 amplifier/DAC unit has been configured to monitor the presence of a valid S/PDIF signal.
When detected, the unit switches the digital input to S/PDIF mode. The USB connection is then
effectively disconnected, and you will not be able to hear music via this connection while the
S/PDIF signal is present. If you use both USB and S/PDIF connections, you can control the digital input
selection via the following methods:
1. Turn the S/PDIF digital output OFF on your disc player or computer;
2. Turn the power OFF on the S/PDIF source.
VOLUME CONTROL
Use the front panel level control to increase/decrease volume. Turn
the control clockwise to increase level, and counter-clockwise to
decrease it. As a precaution, we recommend always powering ON/
OFF with the volume control at its minimum position!
9OPERATION
Page 21
CHAPTER 4
COMPUTER-BASED AUDIO SET-UP
The highest audio quality will be achieved by means of the USB digital connection as it is the only
connection which supports the highest resolution digital audio formats, namely:
PCM up to 32-bit/384 kHz
•
DSD64 and DSD128
•
As there are an enormous number of combinations of computer hardware and playback software, we
can only give some general recommendations here on how to configure your hardware/software for use
with the M1 system.
XMOS DRIVER INSTALLATION FOR WINDOWS USERS
In order to ensure bit-perfect transmission of digital audio signals via USB from a personal computer
(PC) running the Windows Operating System, it is essential to first install a special driver package. Use a
web browser to go to the following URL address:
www.sonomaacoustics.com/support
There locate the support features (manuals, downloads, etc.) for the M1, and click on the link for XMOS
USB Driver. This will link to a file of the following type:
Sonoma_M1_XMOS_xxxx.exe
where xxxx refers to the specific version of the file. The latest version will always be available from the
Sonoma Acoustics website.
Depending on the browser used, and your browser settings, you may be asked whether you want to
save this file to your PC, or run the file within the browser. If given the option, run the file, and follow
the instructions below, otherwise, save the file to your PC, and then locate the folder where you saved
it, and run the executable file from there. Depending on your PC settings, you may need to provide
Administrator privileges to install software.
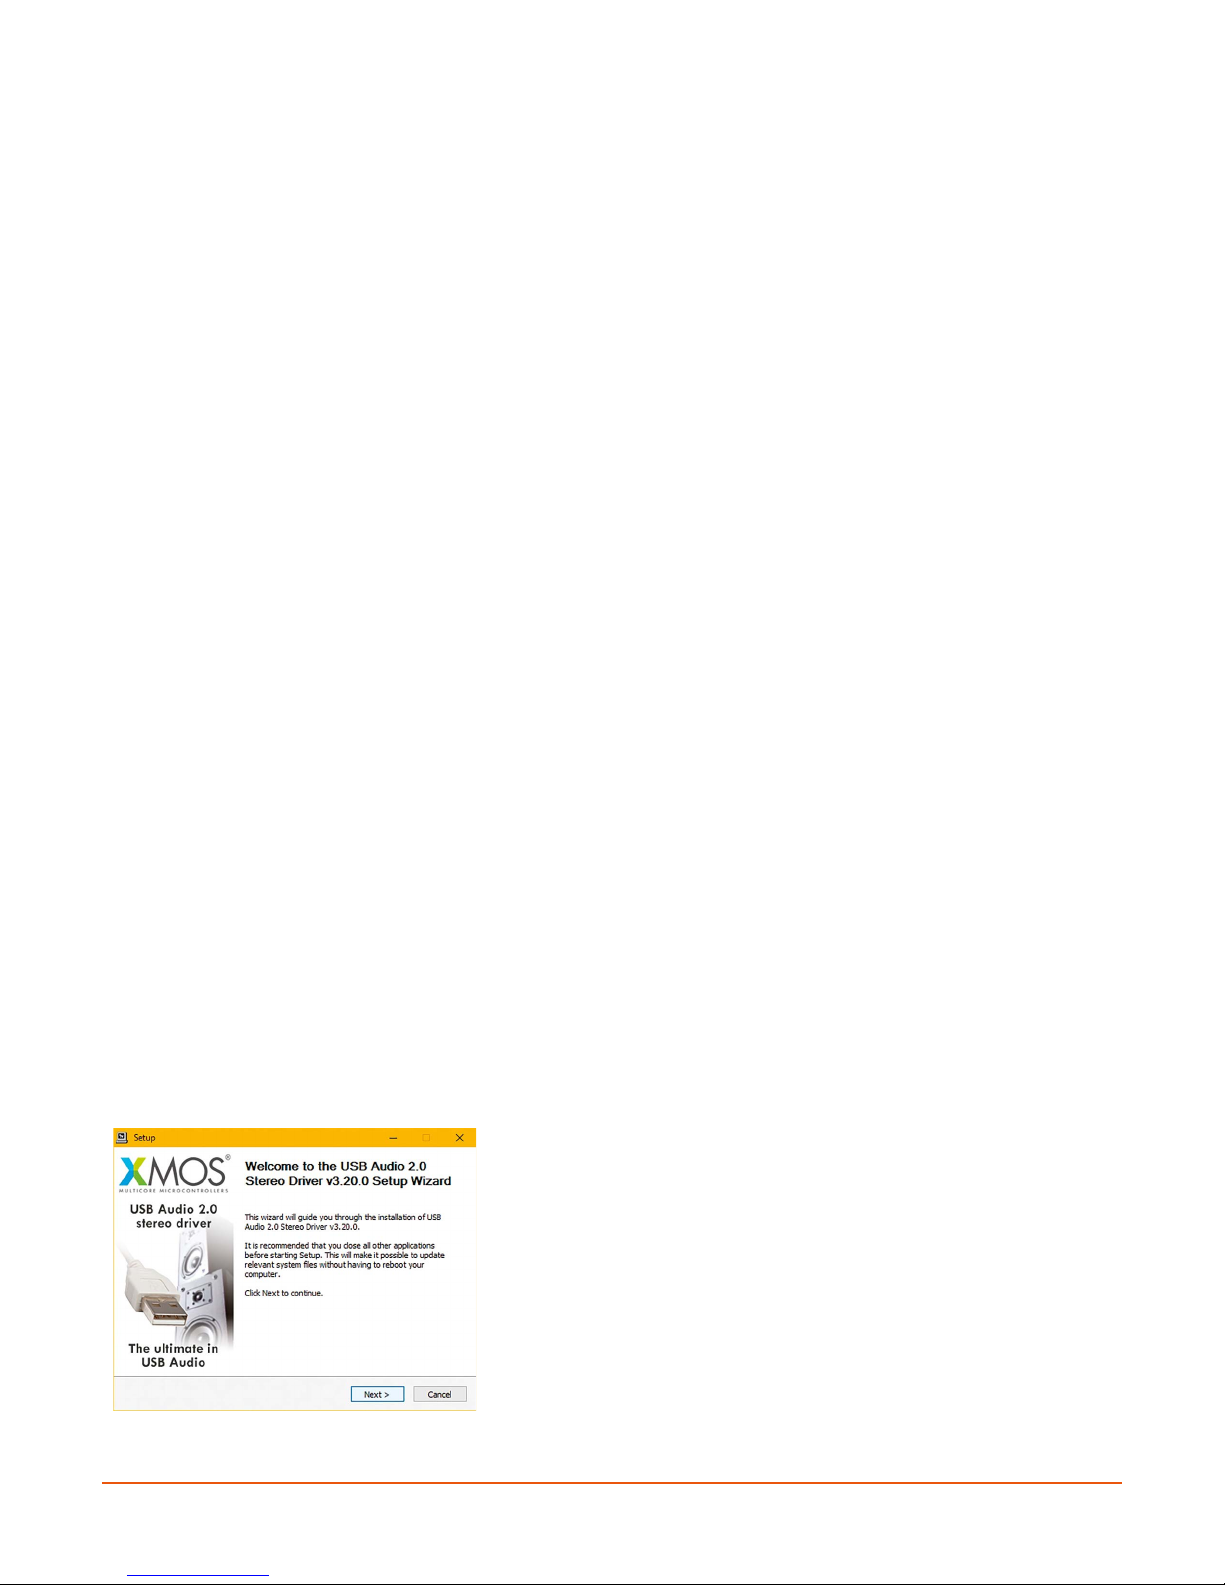
When the Sonoma_M1_XMOS_xxxx.exe executable has been launched, you may first be asked whether
you want to allow this program to make changes to your PC, if so, click Yes, and the following screen
will then appear:
Click the Next button, and you will be asked where you want
to install the program.
10COMPUTER-BASED AUDIO SET-UP
Page 22
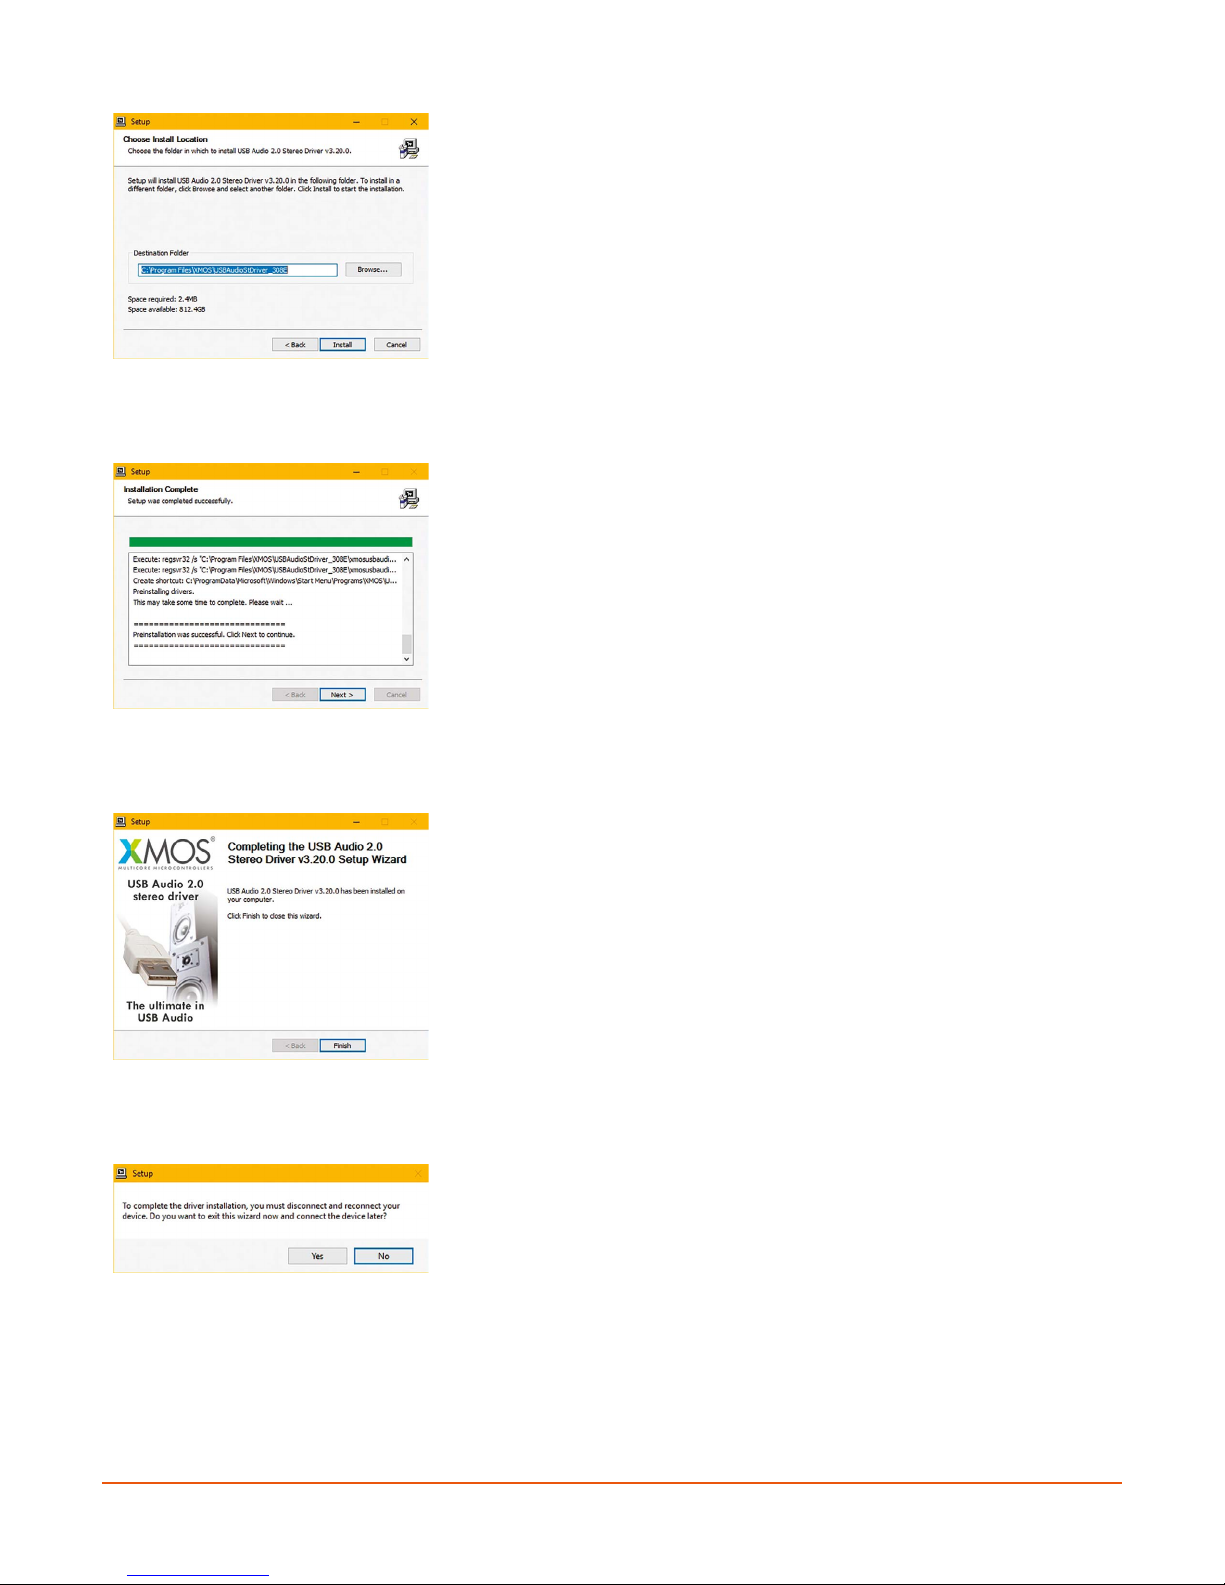
Unless you are an expert computer user, we strongly suggest that
you install the program in the suggested folder.
To do this, simply click the Install button.
If you want to install to a different location, first use the Browse…
button to locate the appropriate folder location.
Installation may take a few moments, when complete, click the
Next button.
When the driver has been successfully installed, you will obtain a
confirmation message. Click Finish to complete the installation
process.
You may also see a further completion message. If so, click Yes, and
then power cycle (turn off and then on again) your PC and the M1
system.
11COMPUTER-BASED AUDIO SET-UP
Page 23
CHECKING THE FIRMWARE VERSION (WINDOWS USERS)
As soon as the XMOS Driver has been successfully installed, and your PC and M1 are both powered ON,
use File Explorer to navigate to the following folder:
C:\Program Files\XMOS\USBAudioStDriver_308E
In the folder locate and run the following file:
xmosusbaudiost308E_cpl.exe
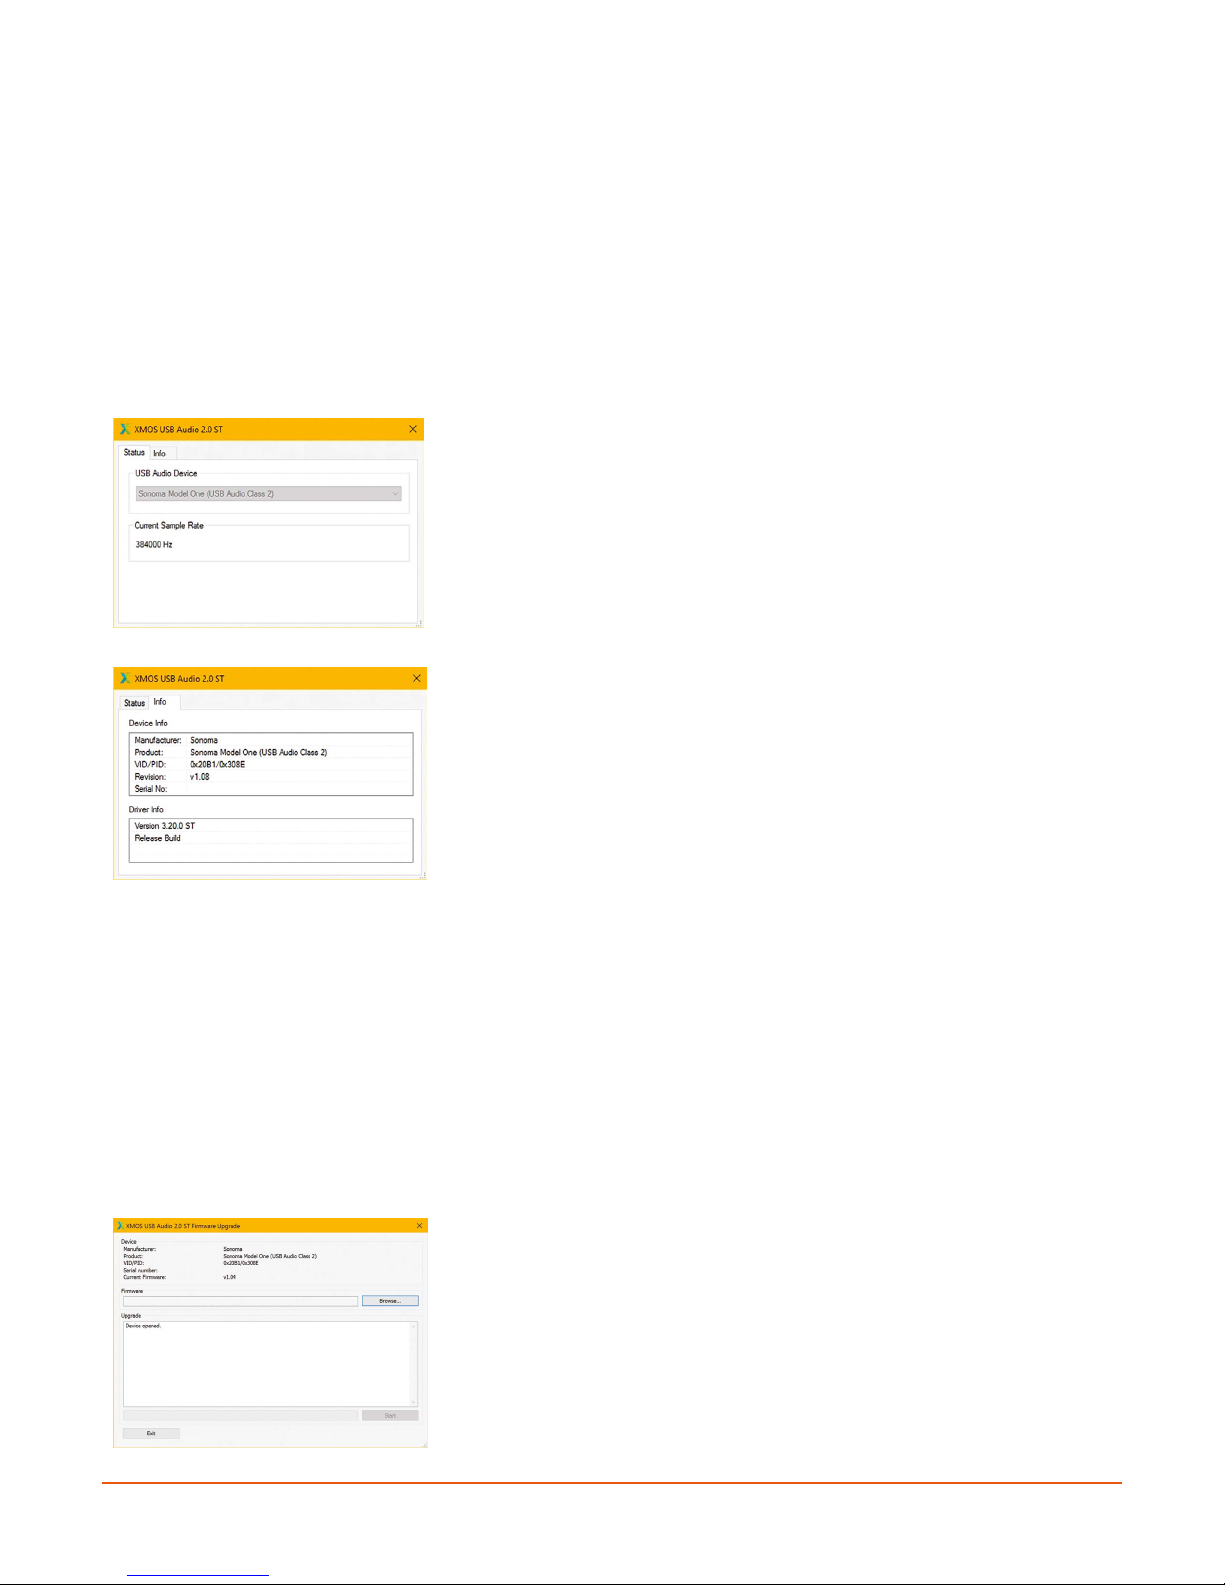
This will launch a small utility called the Control Panel, and you should see the following information
displayed:
The Status tab indicates that (a) the PC is correctly ‘seeing’ the
Sonoma M1 system, and (b) that it is capable of communicating at
its highest operating PCM sample rate (384 kHz).
The Info tab indicates the current version of the firmware loaded
onto the device (in this case v. 1.0.8). Compare the displayed
version number to the latest firmware version available at www.
sonomaacoustics.com/support. If the version number is different,
please see the section Updating the Firmware Version (Windows
Users) for instructions on how to update.
UPDATING THE FIRMWARE VERSION (WINDOWS USERS)
Should you need to update the M1’s firmware version, begin by saving the .bin firmware file located
at www.sonomaacoustics.com/support to a location on your PC which you can easily locate, e.g., the
Desktop. Then navigate to the following folder:
C:\Program Files\XMOS\USBAudioStDriver_308E
Locate and run the following executable file:
xmosusbaudiost308E_dfuapp.exe
This will launch the firmware update utility, and display the following.
In this example, the installed firmware version is v. 1.0.4. Use the
Browse… feature to locate the .bin file saved on your PC.
12COMPUTER-BASED AUDIO SET-UP
Page 24
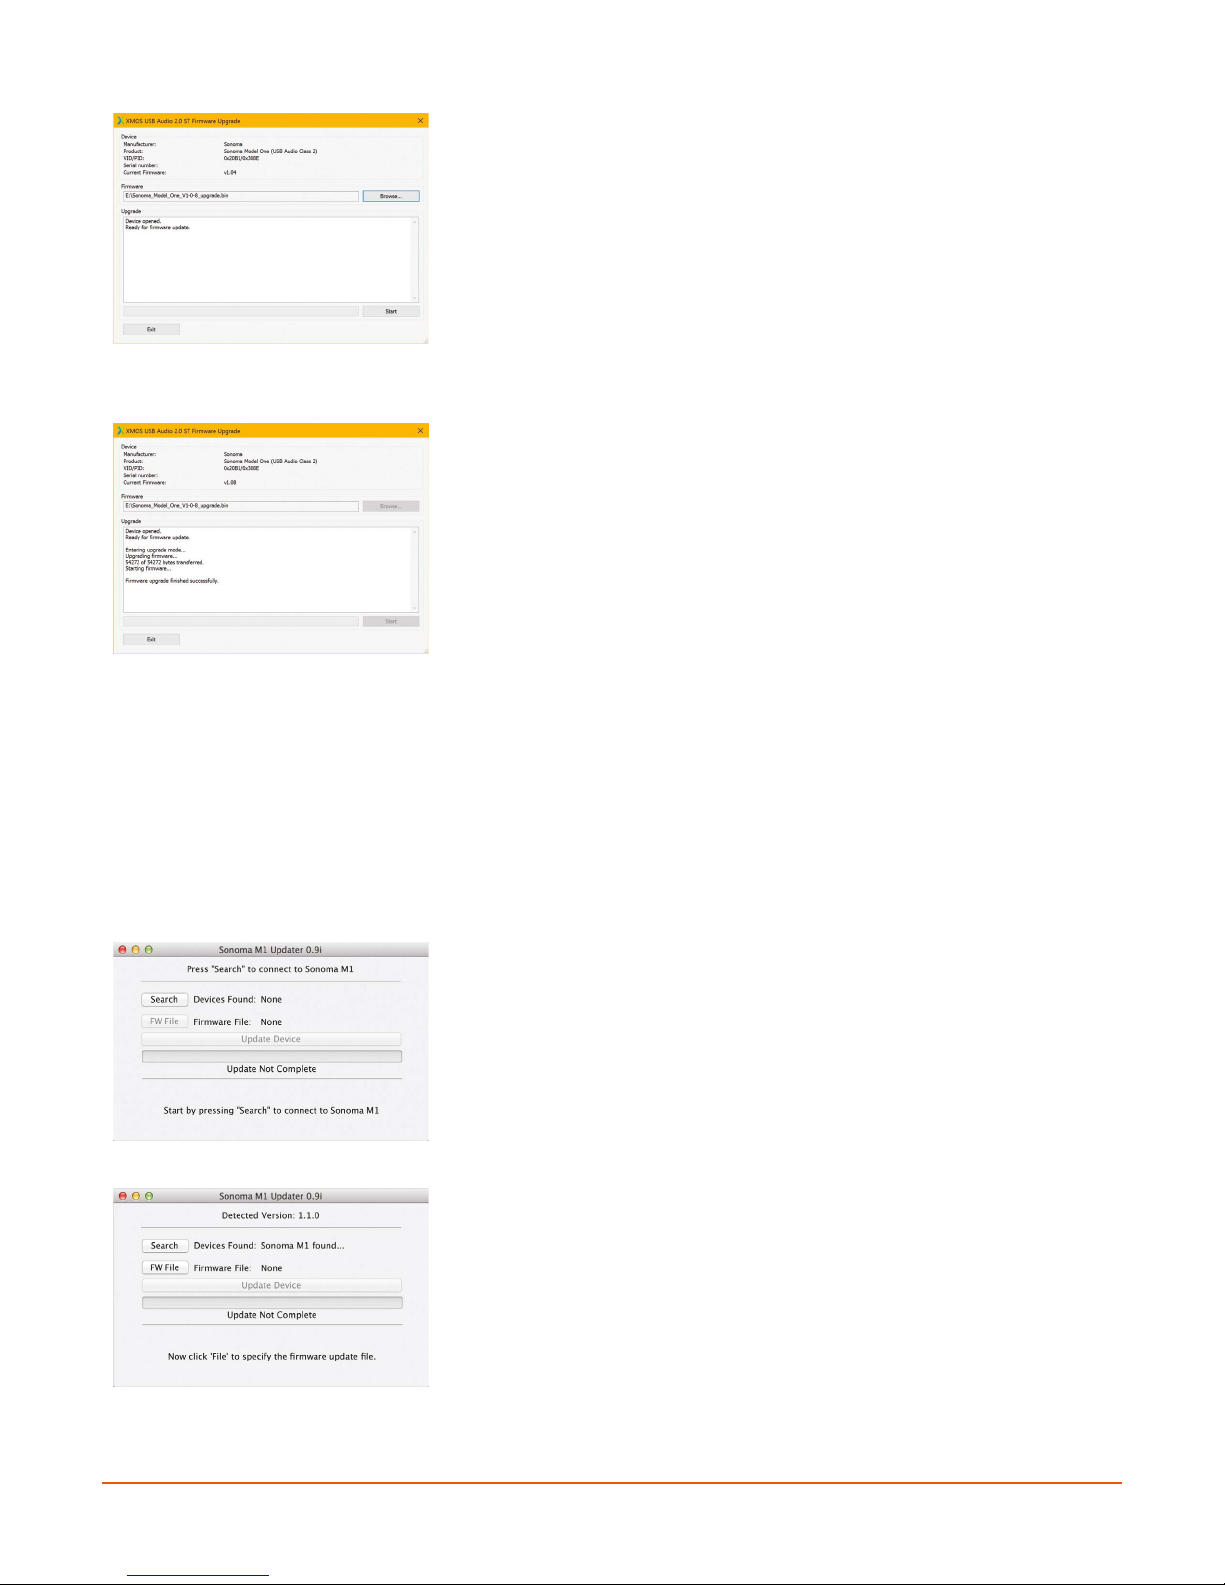
When you have located and selected the .bin file you saved, it
will appear in the Firmware window as shown. In this example,
the new Firmware is v. 1.0.8. To begin the update process, click
the Start button.
Updating takes only moments, and you will see the bytes
transferred field increase as the process runs. When the process
has ended, you can confirm that the version number is upto-date by looking at the Current Firmware value displayed.
As soon as you have confirmed that the update process has
successfully completed, click on Exit to close the updater utility.
CHECKING AND UPDATING THE FIRMWARE VERSION (MACINTOSH USERS)
NOTE: the following applies to Macintosh OSX 10.8 and later!
Download the Sonoma M1 Updater Application (Sonoma M1 Updater.app) from the Sonoma
Acoustics downloads page in the support section at www.sonomaacoustics.com/support. With the
Sonoma Model One USB port plugged into your MAC and the Sonoma Model One turned ON,
launch the application.
Press the SEARCH button to instruct the application to locate
the Sonoma Model One that is plugged into the USB port.
Upon finding the unit, the application will show the current
firmware version at the top of the dialog.
13COMPUTER-BASED AUDIO SET-UP
Page 25
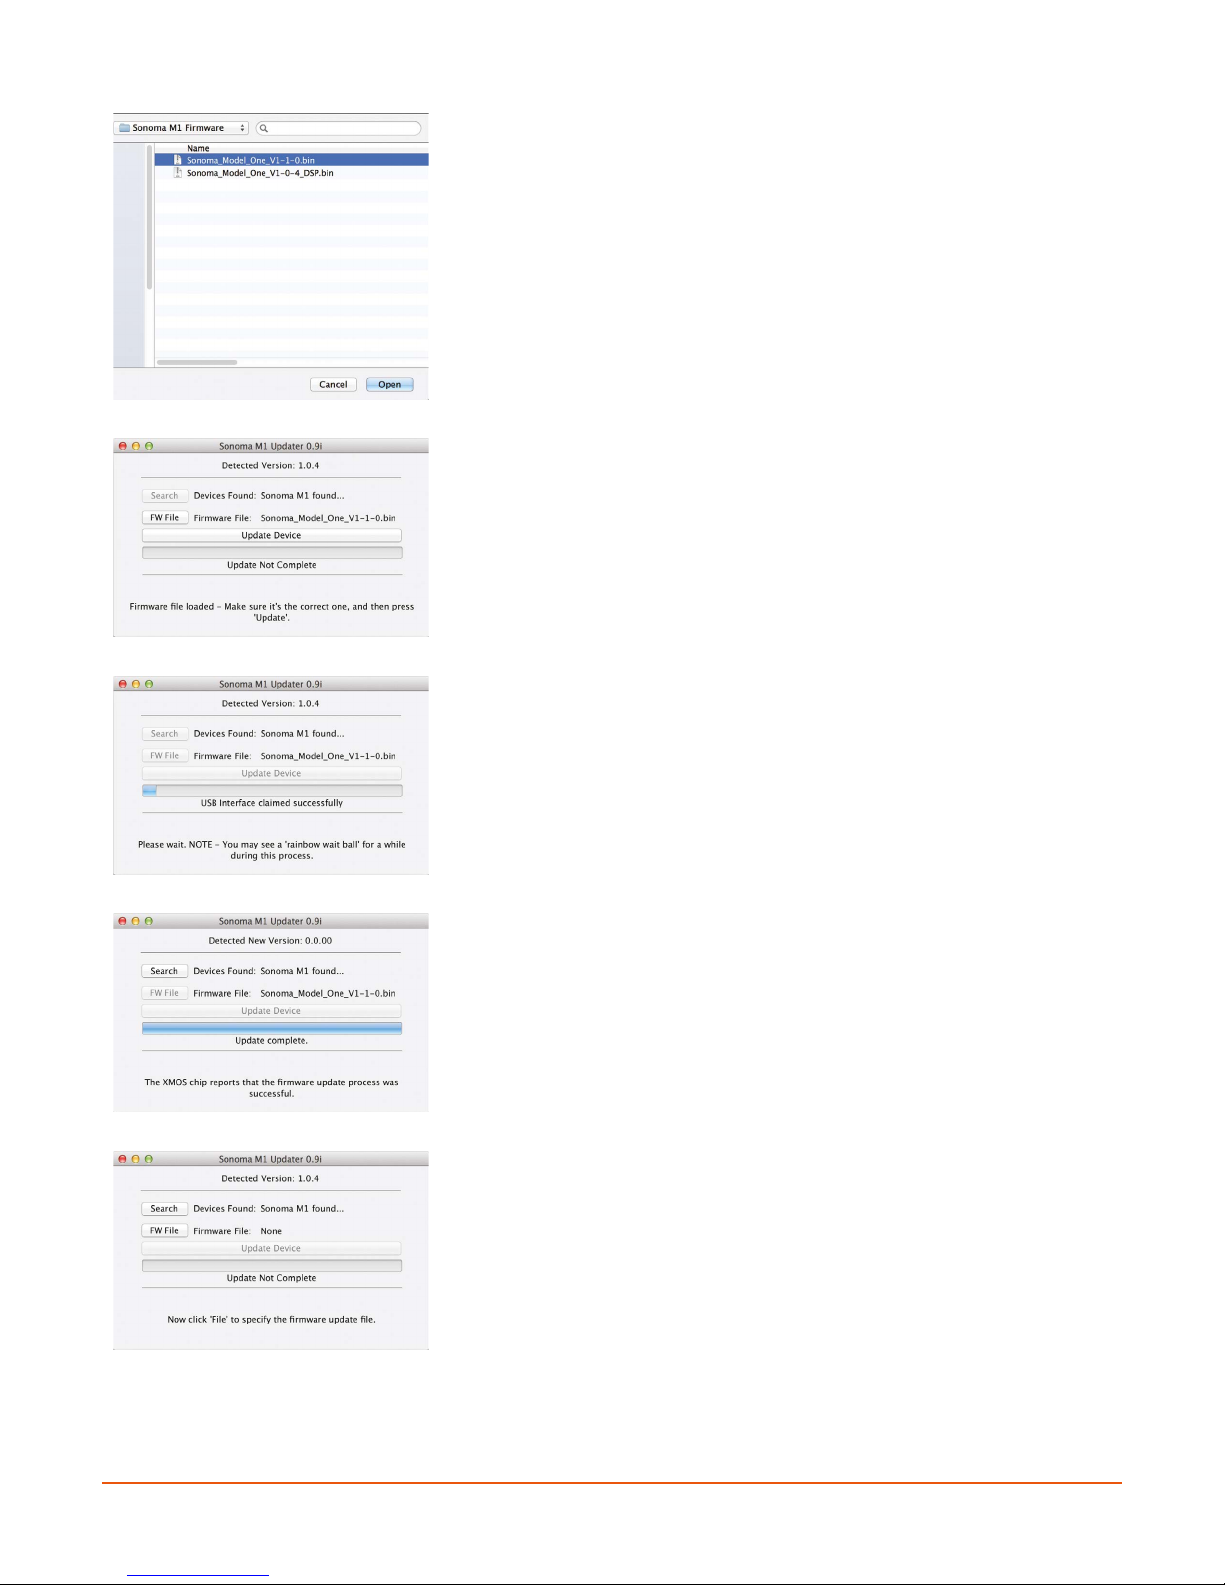
To update this version to a newer (or older) firmware version,
press the FW FILE button then locate and select the replacement
firmware file. It will have a .bin suffix. For example: Sonoma_Model_
One_V1-1-0.bin.
The correct firmware file will be shown in the dialog window.
Confirm that you have selected the correct file and press the
UPDATE DEVICE button. During the update, you will see the
progress bar advance, and messages will appear at the bottom of
the dialog window.
Do not remove the USB cable or close the application during
the update. To be safe, please make sure that your computer is
plugged into mains power. When you see the UPDATE COMPLETE
message under the blue bar, you can close the application. NOTE:
You must turn off the amplifier and turn it on again to activate the
new firmware!
If you want to interrogate the unit to confirm that the new version
is installed, you can run the Sonoma M1 Updater application again.
14COMPUTER-BASED AUDIO SET-UP
Page 26

CONFIGURING YOUR PLAYBACK SOFTWARE
The final step in the configuration process is to make each of the applications which you want to play
through the M1 system use the appropriate USB driver. We can only give general suggestions here, as
every software package has different menus, configuration options, etc. In principle, you want to select
one of the two following driver options within your software application:
1. XMOS USB Audio 2.0 ST 308E (ASIO)
2. XMOS USB Audio (WASAPI)
Both options work equally well, but we are unable to predict whether one will work better in your
specific situation. There is a known functional difference when it comes to the playback of DSD files
however, which we will explain below.
As the M1 supports PCM rates up to 32-bit/384 kHz and both DSD64 and DSD128, be sure to configure
your playback software to pass all sample rates up to these limits. NOTE: if you use the Control Panel to
look at the sample rate when transmitting DSD, it will appear as 176.4 kHz for DSD64 and 352.8 kHz for
DSD128 due to the need to use the DoP format for transmission.
If you plan to play DSD source files through your M1, you will need to ensure that your playback software
is configured for:
1. DSD bitstreaming ON
2. DSD bitstream in DoP format
The M1 can ONLY decode DSD signals which are transmitted using the DoP protocol–it cannot decode
raw DSD bitstreams. This is where the functionality of the ASIO and WASAPI driver options differ: ASIO
supports the transmission of DoP and raw DSD bitstreams, whereas WASAPI supports only DoP. NOTE:
DoP is NOT a conversion from DSD to PCM; it is merely the packaging of DSD data in a PCM ‘container’
for transmission using PCM protocols. The M1 unpacks the raw DSD data from the DoP frames, and
there is no change in audio quality.
15COMPUTER-BASED AUDIO SET-UP
Page 27
CHAPTER 5
CARE AND MAINTENANCE
POWER DOWN
Due to the fact that the M1 amplifier/DAC generates high-voltages and also runs warm in use (this is
perfectly normal for a Class-A amplifier), it should be powered down when not in use for extended
periods or left unattended.
CLEANING
The amplifier/DAC unit should be cleaned with a soft, dry cloth. Never use anything abrasive as this may
damage the metal finish. Do NOT use liquid/aerosol cleaners.
The headphones should be cleaned with a soft, dry, micro-fiber cloth. This is also the case for the leather
parts. Do NOT use any liquid/aerosol cleaners as they may damage the leather and cause failure of the
pads.
Failure to follow these instructions will invalidate your warranty.
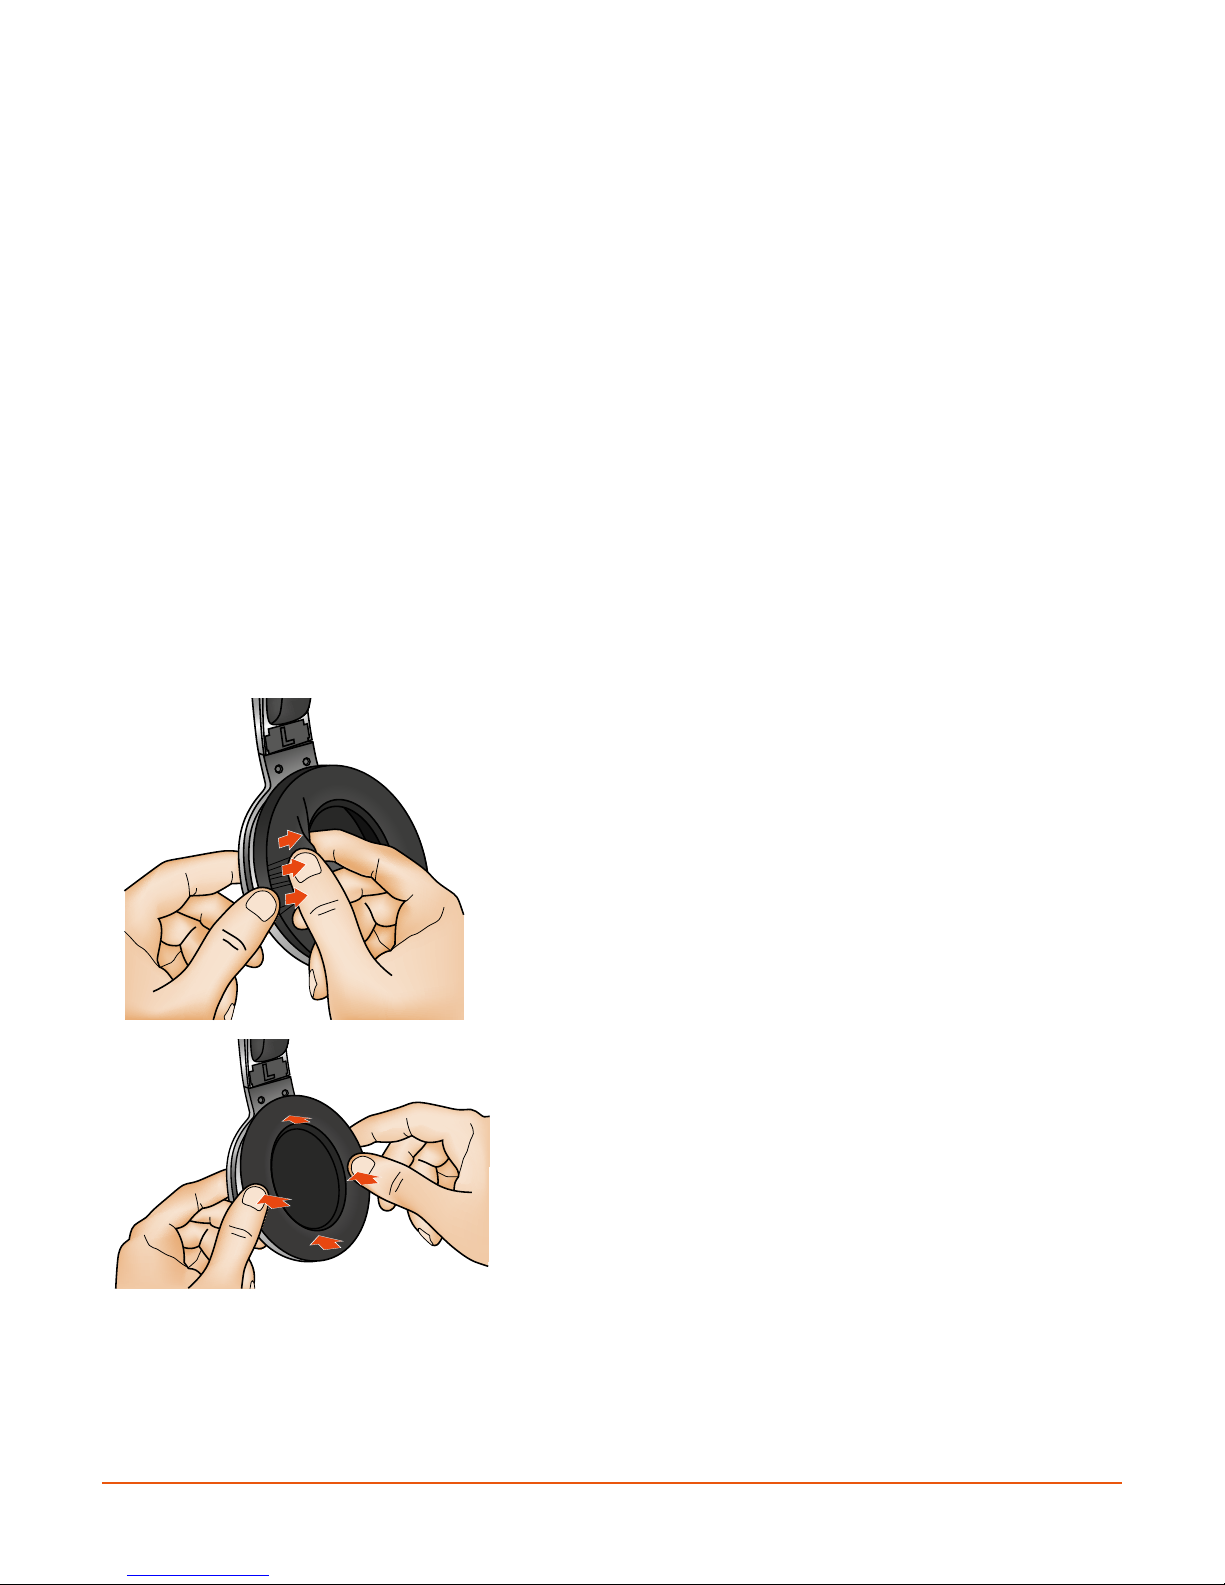
REPLACING THE EAR PADS
Ear pads may need replacement after years of extended use
or if inadvertently damaged. Replacement pads are available
from your dealer or the Sonoma Acoustics website.
To remove the old pads, carefully insert a finger into the ear
cup so that it is behind the ear pad as much as possible. Take
care not to damage the webbing or electrostatic panel! Then,
with your thumb, firmly grasp the ear pad, and pull it away
from the ear cup.
Place the new pad on the ear cup with the seam in the leather
at the BOTTOM of the ear cup. Then, carefully, press firmly all
around the pad to attach it. Check that the ear pad is firmly
seated and tight to the ear cup all around its perimeter. This is
essential to ensure an air-tight seal and correct bass response.
16CARE AND MAINTENANCE
Page 28
REPLACING THE HEADBAND PAD
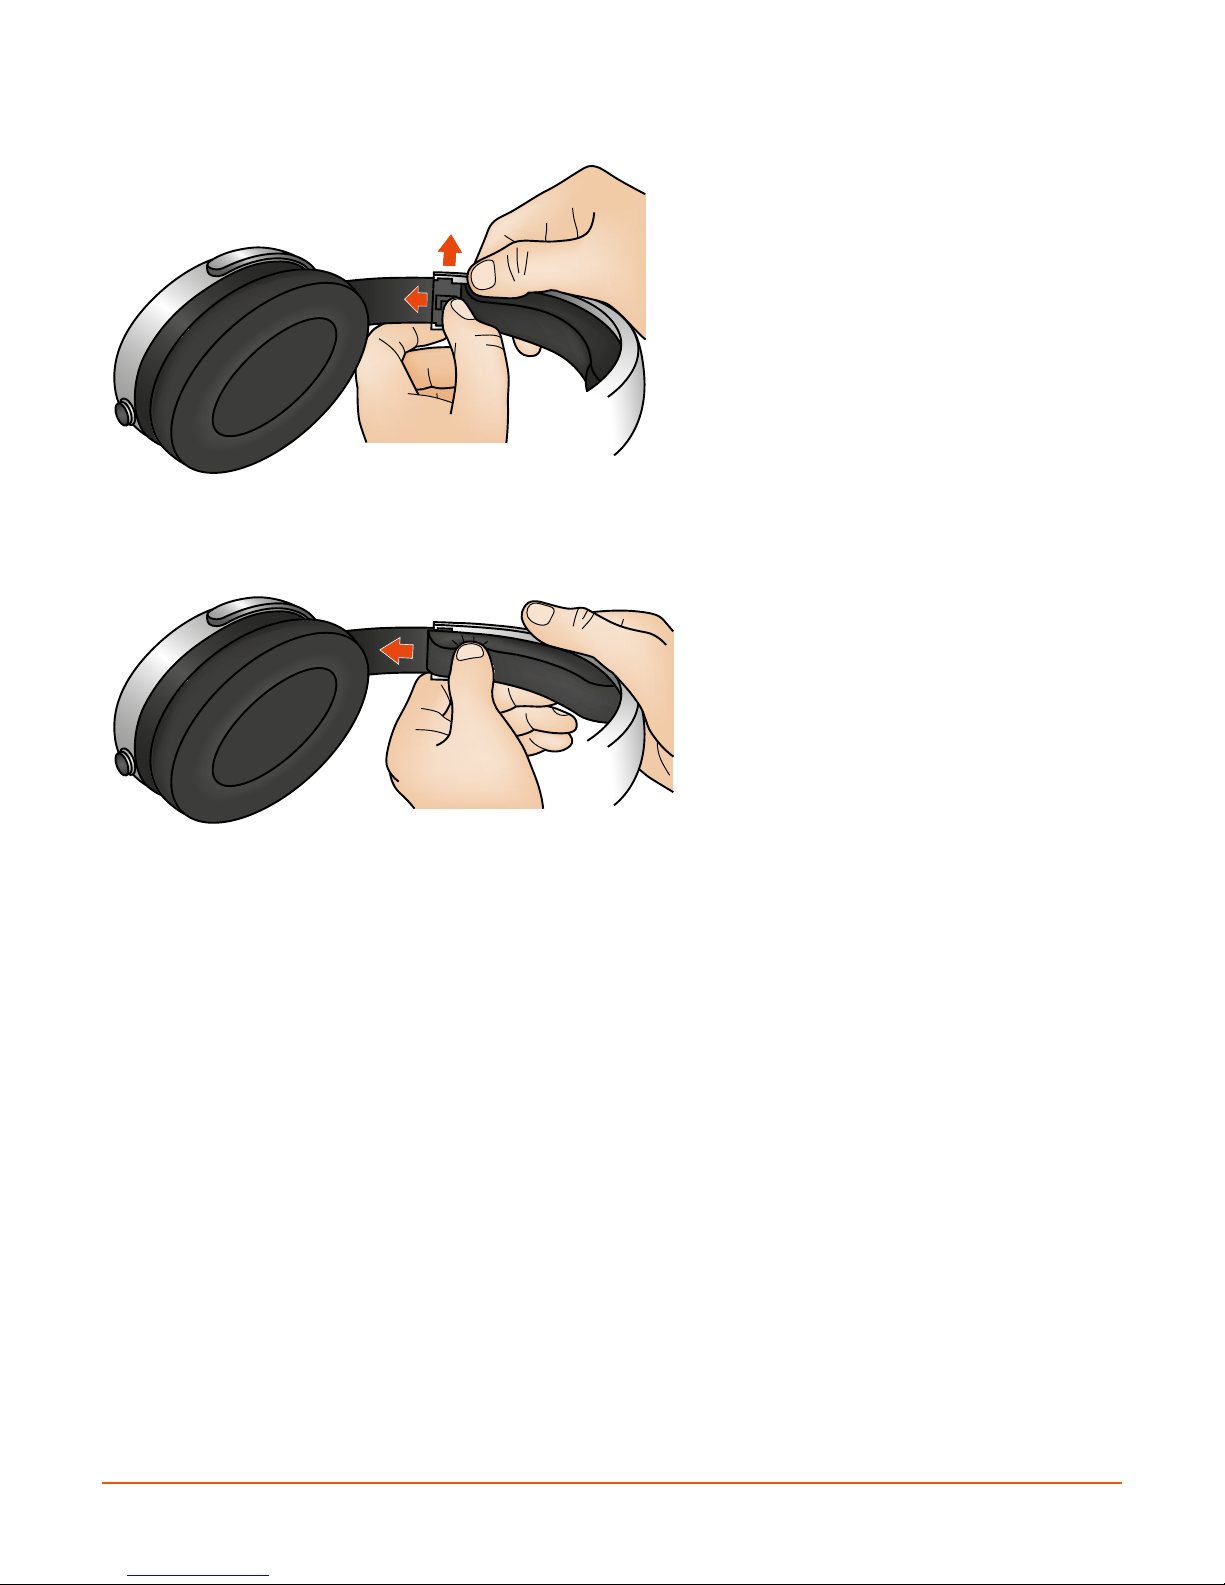
The headband pad is held in place by
the small plastic tabs marked L and R on
each side of the headband. To remove one
of the tabs, use your thumb to carefully
push the sidewall outwards (do this at the
thicker part as indicated). As you push the
sidewall out, pop the tab out.
With the tab removed, grasp the old
headband pad and slide out of the
headband as indicated.
The new headband pad needs to be
inserted into the slot within the headband
rail, and then carefully moved around
the headband until the end reaches
the in-place tab on the other side of the
headband.
When the new headband is fully in place,
press the removed tab back into the
headband to lock the pad in place.
17CARE AND MAINTENANCE
Page 29

CHAPTER 6
TROUBLESHOOTING
If you are encountering problems with using your Sonoma M1 system, it could be the result of something
simple. Please consult the following checklist first, and perform only the specific remedy for a particular
symptom. If the remedy does not resolve your problem, please contact our Customer Service team (see
Page 20) to assist you further. There are no user-serviceable parts inside, and any attempt at repair will
invalidate the warranty.
SYMPTOM REMEDY
Red light on amplifier/DAC Headphone cable is not connected properly either to the
amplifier/DAC unit or to each ear cup. Please check for a
good connection.
No sound via analog connection First check whether the analog/digital source selector is in
the analog position. If it is, then check that the Hi/Low rear
panel selector switch is in the appropriate position. If it is,
then check your source component to ensure it is operating
correctly (is the volume set to mute on a portable audio
player, for example?).
No sound via S/PDIF digital input First check whether the analog/digital source selector is
in the digital position. If it is, then check whether the S/
PDIF digital output of your source has NOT been turned off
via a menu function. If not, try a different S/PDIF cable to
eliminate breakages/connection issues.
No sound via USB input First check whether the analog/digital source selector is
in the digital position. If it is, then check whether a S/PDIF
signal is also present—if it is, either power off the S/PDIF
source or use a menu function to disable the S/PDIF digital
output. If a S/PDIF signal is NOT present, check whether the
XMOS USB driver has been selected on your computer and
in your playback software. Check also whether the output
has been muted within your playback software!
Stuttering/glitching in USB playback Is the USB connection made via a USB hub? We have found
that some inexpensive or poor quality hubs can introduce
playback issues. Try connecting the M1 directly to your
computer. Very long USB cables (> 2 meter) and some poor
quality USB cables can also compromise USB connectivity,
and should be avoided.
If no hub is used, check the activity level/number of open
programs on your computer, it could be that something
else needs computer resources which interrupts playback.
18TROUBLESHOOTING
Page 30

SYMPTOM REMEDY
Fit is poor/bass response is weak Check the headband for any deformation by fully retracting
(shortening) the metal inner bands. If the junctions at each
end of the headband are tight without any large uneven
gaps and the arc of the headband is smooth and continuous
to each ear cup the inner bands are correct. If this is not
the case, carefully push the ear cup assemblies inward until
the gaps are minimized and even, and the headband arc
becomes continuous and properly oriented.
Distortion is present on some
source material
Output level too low when using
analog inputs
Output is distorted when using
the analog inputs
Check the volume control setting. It is possible to overdrive
the electrostatic panels with excessively bass-heavy source
material at high volume settings.
When listening to these types of source material it may be
necessary to reduce the volume setting slightly.
Check that the correct input is selected for the type of
source device being used. The 3.5 mm (LOW) input should
be driven only by lower level source devices with up to
850 mV (rms) maximum output. The RCA (HI) inputs should
be driven by higher level source devices with up to 2.1 V
(rms) maximum output. If a low level source is connected
to the RCA (HI) level inputs using an adapter, there may not
be enough gain available. Low level source devices should
always be connected to the 3.5 mm (LOW) input for best
sound quality.
Check that the correct input is selected for the type of source
device being used. The 3.5 mm (LOW) input should be driven
only by lower level source devices with up to 850 mV (rms)
maximum output. The RCA (HI) inputs should be driven by
higher level source devices with up to 2.1 V (rms) maximum
output. Higher maximum output source devices can be used
for these inputs, but levels will need to be reduced to avoid
over-driving the analog inputs. If distortion is heard when
driving the correct input, try reducing the output level from
the source device until the distortion (or clipping) subsides.
This should be checked on the most dynamic, high level
material one expects to play from the source device.
19TROUBLESHOOTING
Page 31

CHAPTER 7
CUSTOMER SERVICE
If the product fails to work for any reason, or you want to purchase replacement parts, please contact
our Customer Service team via one of the following methods. Please provide as much detail as you can
about the problem and your specific configuration. Be sure to leave your name and contact details too!
E-mail: [email protected]
Online: www.sonomaacoustics.com/support/general-inquiry
20CUSTOMER SERVICE
Page 32

GLOSSARY
AC Alternating Current
ADC Analog-to-Digital Converter
ASIO Audio Stream Input/Output
BD Blu-Ray Disc
CD Compact Disc
CEN Comité Européen de Normalisation/European Committee for Standardization
CNC Computer Numerical Control
D Depth
DAC Digital-to-Analog Converter
DC Direct Current
DoP DSD Over PCM
DSD Direct Stream Digital
DSP Digital Signal Processing/Digital Signal Processor
DVD Digital Versatile Disc
EN European Norm/European Standard as developed by CEN
FET Field-Effect Transistor
H Height
HPEL High-Precision Electrostatic Laminate
Hz Hertz (aka cycles/second)
IEC International Electro-technical Commission
in Inch
kg Kilogram
kHz Kilohertz
lb Pound (weight)
M1 Model One
MHz Megahertz
mm Millimeter
mV Millivolt
OFHC Oxygen-free High-purity Copper
oz Ounce
21GLOSSARY
Page 33

PC Personal Computer
PCM Pulse Code Modulation
PE Polyethylene
RCA Radio Corporation of America
RMA Return Merchandise Authorization
rms Root Mean Square
SACD Super Audio Compact Disc
SMPS Switched-mode Power Supply
S/PDIF Sony/Philips Digital Interface Format
USB Universal Serial Bus
V Volt
VA Volt-Ampere
W Width
WASAPI Windows Audio Session Application Programming Interface
22GLOSSARY
Page 34

SPECIFICATIONS
HEADPHONE SPECIFICATIONS:
Configuration Open-back; circumaural type
Transducer HPEL, single-ended electrostatic
Effective Diaphragm Area 3570 mm
Frequency Response 10 Hz – 60 kHz
Output Level Compliant with EN 60065/A12:2011 (EN50332) when driven by M1
amplifier (for all inputs)
Ear and Headband Cushions “Cabretta” top-grain, sheepskin leather
Input Polarized, 4-pin, self-latching connectors for left and right channels
Drive Cable Ultra-low capacitance, silver-plated OFHC copper, with foamed PE
insulation and Kevlar reinforcement; 2 meter length
Weight 303 grams (10.7 oz), without cable
AMPLIFIER SPECIFICATIONS:
2
USB Input USB 2.0, type B; accepts digital audio formats up to
32-bit/384 kHz PCM and DSD (DSD64/DSD128) via DoP
Digital Coaxial Input S/PDIF; accepts digital audio formats up to 24-bit/192 kHz PCM
Analog Input (High Level) Dual RCA; 2.1 V (rms)
Analog Input (Low Level) 3.5 mm; 850 mV (rms)
DAC Dual mono, 32-bit/384 kHz DACs with balanced outputs
ADC 32-bit/384 kHz multi-channel ADC with balanced input buffers
Digital Signal Processing (DSP) 64-bit (double-precision) fixed-point processing
Amplifier/Energizer Discrete FET, single-ended, high bias Class-A output
Distortion + Noise < 0.05%
Bandwidth > 65 kHz
Enclosure CNC-machined 6063 aluminum
Power Supply
External: AC Adapter Model No. GPE072D-240270W
24 Volt DC, 2700ma 60 VA, fixed frequency, class Bcompliant SMPS Internal: fully isolated, ultra-low-noise
linear regulation
AC Mains
World voltage compatible (100-240 Volt AC, 50/60 Hz);
IEC-60320 C14, earth grounded power cable; 1.5 meter length
Dimensions H x W x D: 57 mm (2.24 in) x 190 mm (7.48 in) x 290 mm (11.42 in)
Weight 2.45 kg (5.40 lbs)
23SPECIFICATIONS
Page 35

WARRANTY
LIMITED WARRANTY
Sonoma Acoustics Limited is a company registered in England and Wales under company registration
number is 10308461 having its registered office at Forward House, 17 High Street, Henley in Arden,
UK, B95 5AA (“Sonoma Acoustics”). Sonoma Acoustics extends the following warranty periods for the
individual parts of a Sonoma Model One system.
The periods indicated begin on the date of purchase as specified on the original sales invoice and this
limited warranty is in addition to any statutory rights available to you under law. Details of your statutory
rights can be found in our online terms and conditions of sale (https://sonomaacoustics.com/terms)
HPEL Transducers/Headphones*/Energizer-DAC 2 Years
Ear Pads/Headband Pad/Cables 1 Year
* 2 year warranty excludes ear pads and cables
WHAT IS COVERED:
Sonoma Acoustics warrants that its products will be free of all defects related to manufacturing, parts,
materials, and/or workmanship under normal and accepted use. The conditions under which this
warranty ceases to be applicable are detailed in the next section.
WHAT IS NOT COVERED:
This warranty does not cover fair wear and tear, defects resulting from improper or unreasonable use or
maintenance; cosmetic damage including, but not limited to, scratches, dents and broken parts caused
by the owner; failure to follow all operating instructions; accident; excess moisture; excess temperature;
power surges; connections to improper voltage supply or any non-Sonoma energizer; unauthorized
alteration or modification of original condition; ‘Acts of God’; products purchased from unauthorized
dealers; or defects incurred during transportation for which claims must be presented to the carrier.
This includes any superficial damage to the boxes and packaging incurred during shipment.
As the Sonoma Model One uses natural leather, variations in texture and color are inherent and natural
characteristics of the material. These variations are normal and considered acceptable by Sonoma
Acoustics and are not covered by this warranty.
WHAT WE WILL DO:
Sonoma Acoustics will, at its sole discretion, replace (using new or refurbished parts/products) or repair
Sonoma products that are within the stated warranty periods from the date of original purchase.
WARRANTY REPLACEMENTS:
Sonoma Acoustics strives to improve the performance of its products, and, therefore, reserves the right
to make changes to designs/specifications/materials at any time without notification. Sonoma Acoustics
may, at its discretion, choose to replace the Sonoma product completely with a new or remanufactured
product.
24WARRANTY
Page 36

WARRANTY TRANSFER:
The terms of this warranty can be transferred to a subsequent owner provided the new owner is able to
provide proof of original purchase, or the original purchaser has registered the product with Sonoma
Acoustics.
WARRANTY PERIOD FOR REPAIRS/REPLACEMENTS:
All warranty repairs/replacements are guaranteed for 90 days or until the original warranty end date,
whichever is longer.
SHIPPING TO SONOMA:
Following submission of a Warranty Claim (https://sonomaacoustics.com/support/repair-inquiry), a
customer will be issued a Return Merchandise Authorization (RMA) and a return shipping label. Sonoma
Acoustics will pay for ground shipping to its local service center for all warranty returns. Customers
should include the RMA with their returned product(s), and indicate the RMA number on the shipping
box.
SHIPPING FROM SONOMA:
Sonoma Acoustics will pay for ground shipping to return all products repaired/replaced under warranty.
Customers will receive tracking confirmation from Sonoma, and signature authorization will be required
to receive your shipment.
25WARRANTY
 Loading...