

Page 1

Qui ck Inst allat ion Gui de V1.0
Zig Bee DIY S mart Sw itch
Mod el:BA SICZBR 3
中文 En glish De utsch
Espa ñol Fra nçais I talia no
Рус ский яз ык
Page 2

断 电
ON
ON
ON OFF
ON
1
Pow er off
Aus schal ten
Apa gado
Éte indre
Spe gnime nto
Вык лючить
OFF
OFF
OFF
1
Page 3

设备安 装、故障维 修请由专业 资质电工操 作,以免发
生触电 危险!设备 在正常使用 的情况下不 可触碰到。
To avoi d elec tric s hocks, please consult the dealer
or a qu alied profe ssional for help when insta lling
and repa iring! Ple ase do not touc h the switch dur ing
use.
Wenden Sie sich bitte an den Händler oder einen
qualiz ierten Fachman n, um Hilfe bei der Instal lation
und Repar atur zu erhalte n und um Stromsch läge
zu verm eiden! Bitt e berühren Sie den Scha lter nicht
während de s Betriebs nicht.
Para evitar d escargas eléctricas, consulte con su
distribuidor o un profesional cualicado para s olicitar
ayuda durante la instalación y la reparación ! No toque
el interruptor durante el uso.
Pour é viter le s électr ocution s, prene z contac t avec
le revend eur o u un profes sionne l qual ié p our
obten ir de l'aide po ur l'insta llation et l es réparat ions
évent uelles! Veuill ez ne pas touche r l’i nterrupt eur
penda nt l'utili sation.
Per evitare scos se elettriche, consul tare il rivenditore
o u n pr ofess ioni sta qual icat o pe r as siste nza
durante l'instal lazione e la riparazi one!Non toccare
l'interru ttore durante l'uso.
Во из бежани е пораж ения эл ектри ческим током
при у станов ке и рем онте об ращайт есь за
консультаци ями к продавцу или
квалифиц ированному спец иалисту! Не каса йтесь
переключ ателя во время использован ия.
2
Page 4
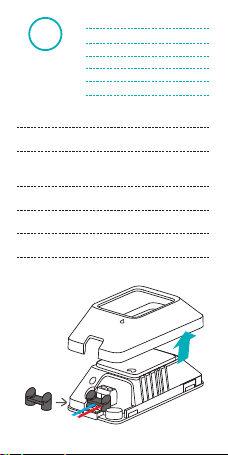
接 线
Wir ing ins truct ion
2
Verk abelu ngsan leitu ng
Ins trucc iones d e cable ado
Ins truct ions de c âblag e
Ist ruzio ni per il c ablag gio
拆下保护盖,先接线再安装压线柱。
Rem ove the p rotec tive co ver, the n conne ct
wir es befo re fixi ng the wi re fast ener.
Ent fer nen S ie d ie S chut zabd ecku ng u nd
sch lie ßen Si e dan n die Kabe l an, b evo r Sie
das Kabe lbef esti gung sele men t befe stig en.
Quite la ta pa de protección y, a continuación,
conecte los cables antes de fijar el sujetacables.
Ret irez le ca pot de pr otecti on, pui s branc hez
les f ils avan t d'ins taller l a fixat ion de fi l.
Rimuovere la prot ezione, quindi collegare i cavi
prima di fissare il dispositivo di fissag gio del filo.
Снимите защиту и подсоедините провода перед
тем, как зафиксировать провод крепежом.
Инс трукц ии по про водке
3
Page 5

安装保 护盖时确保 保护盖上的 标识 和设备上 的标
识 对齐, 否则无法合 上。
To ma ke su re a fu ll in sta llat ion , ple ase a lig n
wi th wh en se curi ng th e pro tec tiv e cov er.
Dam it die Ins talla tion ko rrekt f ertig geste llt wer den
k an n , ri c ht e n Si e b ei m B ef e st i ge n d er
Schu tzabd eckun g bittem it aus.
Para asegurar la instalación completa, alinee con
al sujetar la tapa de protección.
Pour garant ir l'installatio n complète, alignez sur
lorsque vou s installez le capot de protec tion.
Per effe ttua re un 'ins tall azi one co mpl eta, s i dev e
all ine are co n qua ndo si fiss a la pr otez ione .
Для завершения установки совмес тите с при
установке защиты.
电器接线示意
Appl iance wiri ng instruc tion
Anle itung zur Verk abelung vo n Geräten
Inst ruccione s de cablead o de aparatos
Inst ructions d e câblage de l' appareil
Istru zioni per il c ablaggio d ell'appa recchio
Инст рукция по подк лючению об орудовани я
100 -240V AC
4
Page 6
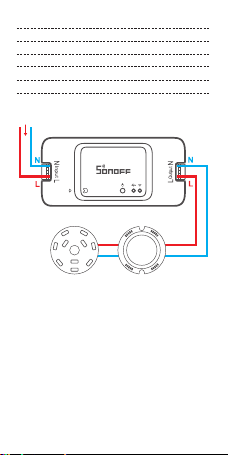
吸顶灯接线示意
Ceiling lamp wiring instruction
Verkabelungsanleitung für Deckenleuchten
Instrucciones de cableado de lámpara de techo
Instructions de câblage pour le plafonnier
Istruzioni per il cablaggio della lampada da softto
Инструкция по проводке: потолочная лампа
100 -240V AC
LED
Driver
5
Page 7
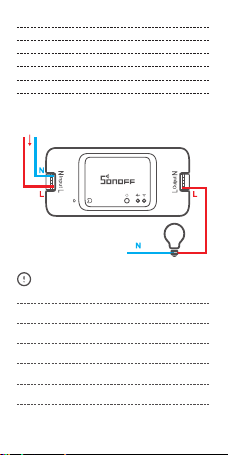
单火线输出接线示意
Single live wire wiring instruction
Verkabelung mit einer stromführenden
Instrucciones de cableado con un solo cable activo
Instructions pour le câblage du l sous tension
Istruzioni per il cablaggio con un solo cavo di fase
Инст рукция по пр оводке: о дин провод по д
напр яжением
100 -240V AC
确保零 火线接入无 误。
Mak e sure c orre ct con nect ion fo r the ne utra l wire
and l ive wi re.
Achten Sie auf den korrekte n Anschluss von Nulll eiter
und Stromkabel .
Com prueb e que las c onexi ones de l cable n eutro y
acti vo sea n corre ctas.
S'a ssur er que l a conn exio n entr e le l n eutr e et le
l so us ten sion e st co rrect e.
Accert arsi del corre tto collega mento del cavo ne utro
e di quello in te nsione.
Убедит есь в прави льност и соедине ний нулево го
прово да и провода п од напряже нием.
6
Page 8

下载A PP
Dow nload t he APP
3
APP h erunte rlade n
Des carga r la apli cació n
Tél échar ger l'a pplic ation
Sca rica la AP P
Cкач ать при ложен ие
请参照网关使 用说明下载相应APP,推 荐使用平台
如下:
Please re fer to the user guide of hu b to download
the corre spondin g APP, belo w plat forms a re
recomm ended:
Bit te beach ten Sie da s Benutz erhan dbuch de s
Hubs, um die entsprechende APP herunterzuladen,
die f olge nden P latt form en wer den em pfoh len:
Con sult e la guía d el usu ario p ara de scarg ar la
apl icac ión corr espon dien te. Se r ecom iend an
las s igui entes p lata form as:
Veuil lez-vo us référe r au manuel d 'utili sation du
hub p our té lécha rger l' APP co rresp ondan t, les
plat es-for mes ci-de ssous so nt recomm andées :
Far e rife rime nto all a guid a uten te del l'hu b per
scarica re l'APP corrisp ondente, si raccomanda no
le s egue nti p iat tafo rme :
Дл я п од кл юч ен ия к с оо тв ет ств ую щи м
пр ил ож ен ия м, п ож ал уй ст а, о бр ат ите сь
ин ст ру кц ии , р ек ом ен дуе м сл ед ую щи е
пл ат фо рм ы:
Sma rtTh ings
Ama zon Ale xa
7
Page 9
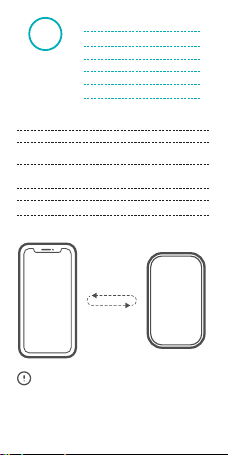
连接网 关
Hub c onnec tion
4
Hub Ve rbind ung
Con exión d el conc entra dor
Con nexio n du moye u
Con nessi one all 'hub
参照网 关说明书进 行网关相应 设置。
Set t he hub ac cordi ng to use r guide .
St el le n S ie den Hu b e nt sp re che nd de m
Ben utzer handb uch ein .
Congure el concentrador según las instrucciones
de la guía del usuario.
Rég lez le mo yeu sel on le mod e d'emp loi.
Congura re l'hub in base alla guida per l'utente.
Подключите шлюз в соответствии с инструкцией.
Под ключен ие шлюз а
HUB
设备支持的ZigBee网关有:Echo Plus(型号:ZE39KL)
2nd Gen Echo Show(型号:DW84JL)
2nd Gen Echo Plus(型号:L9D29R)
三星 SmartThings hub
8
Page 10

Supp ort Zig Bee hub s as foll ow:
Echo P lus (mo del: ZE 39KL)
2nd Ge n Echo Sh ow (mod el: DW8 4JL)
2nd Ge n Echo Pl us (mod el: L9D 29R)
Sams ung Sma rtThi ngs hub
Unte rstüt zt folg ende Zi gBee- Hubs:
Echo P lus (Mo dell: Z E39KL )
2nd Ge n Echo Sh ow (Mod ell: DW 84JL)
2nd Ge n Echo Pl us (Mod ell: L9 D29R)
Sams ung Sma rtThi ngs hub
Admite con centradore s ZigBee de la siguie nte manera:
Echo Plus (Mo dèle: ZE39KL)
2nd Gen Echo Sho w (Modèle: DW84 JL)
2nd Gen Echo Plu s (Modèle: L9D2 9R)
Samsung Sm artThings hub
Sout enez le s moyeu x ZigBe e comme s uit :
Echo P lus (Mo del: ZE 39KL)
2nd Ge n Echo Sh ow (Mod el: DW8 4JL)
2nd Ge n Echo Pl us (Mod el: L9D 29R)
Sams ung Sma rtThi ngs hub
Supp orta i se guent i hub Zig Bee:
Echo P lus (Mo dello : ZE39K L)
2nd Ge n Echo Sh ow (Mod ello: D W84JL )
2nd Ge n Echo Pl us (Mod ello: L 9D29R )
Sams ung Sma rtThi ngs hub
Подд ержив ают ZigB ee-шл юз:
Echo P lus (М одель: Z E39KL )
2nd Ge n Echo Sh ow (Мод ель: DW 84JL)
2nd Ge n Echo Pl us (Мод ель: L9 D29R)
Sams ung Sma rtThi ngs hub
如添加 不成功,请 将网关移近 设备,重新 添加。
If the c onnec tion fa ils, pl ease mo ve the hu b close r
to you r phone a nd try ag ain.
Wenn die Verbindung nicht zustande kommt, bewegen
Sie bitte den Hub näher an Ihr Telefon und versuchen
Sie es erneut.
Si fa lla la c onexi ón, ac erque m ás el co ncen trad or
al te léfon o y vuel va a int enta rlo.
Si la connexio n échoue, rapproc hez le concentrat eur
de votre télép hone et réessayez .
Se la conn essi one n on rie sce , avvi cin are l' hub a l
tel efon o e rip rov are.
Если с оедине ние проп адает, пере мести те шлюз
ближе к с воему тел ефону и по пробуй те снова .
9
Page 11
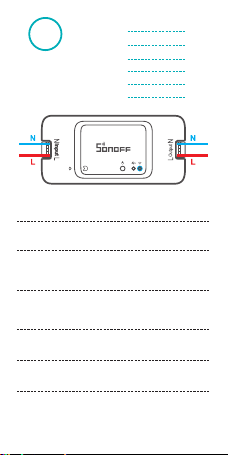
上 电
5
通电后,设备首 次使用,默认进入配对状态, 信号
指示灯呈“闪烁 ”状态。
After power ing on, the device will enter the pairi ng
mode duri ng the rst use and t he LED signal
indicato r ashes.
Nac h dem Ei nsch alte n scha ltet s ich da s Gerä t
wä hr en d de s er st en G eb rau ch s in d en
Kop plun gsmo dus u nd di e LE D-Sig nala nzei ge
bli nkt.
De spu és de enc ende r el d isp osi tiv o, es te s e
po ndr á en mo do de emp are jami ent o du rant e
el p rim er uso y e l ind ica dor d e seña l LED
em iti rá pa rpa deo s.
Aprè s la mis e sous te nsion, l'appa reil pa sse en
mode d 'appai rage lor s de la premi ère util isatio n
et l'i ndicat eur de sig nal LED cli gnote.
Al prim o utilizzo, d opo l'acce nsione il dis positivo
entre rà in modalit à di associa zione e l'ind icatore
LED lam peggerà.
По с ле в кл юч ен ия , в о в ре м я п ер во го
испол ьзован ия устрой ство пере йдет в режим
со пря же ния , и за миг ают св ето дио дны е
сигн альные ин дикато ры.
Pow er on
Ein schal ten
Enc ender
All umer
Acc ensio ne
Вкл ючить
10
Page 12

如长时间未进行下一步操作,设备可能退出配对模式,
如需 再次 进入, 长按 手动开 关5 秒直到 信号 指示灯
“闪烁”即可。
The dev ice will ex it the pair ing mode if n o next
opera tion for a lon g time. If ent er again, pl ease long
press the man ual swit ch for 5s until t he LED si gnal
indic ator ash es and relea se.
Das Gerät ver lässt den Kopplu ngsmodus, wen n über
einen läng eren Zeitraum kei ne w eitere Bedien ung
erfolgt . Bei erneuter Eingabe drücken Sie b itte de n
Handsch alter 5 Sekunden lang ge drückt, b is die
LED-Sig nalanzeige bl inkt und dann losla ssen.
El disposit ivo saldrá del modo de empare jamiento
si n o entra en funcionamie nto por durant e un largo
periodo . Si vu elve a i ngresar, ma ntenga pr esionado
el int erruptor m anual dura nte 5 seg undos hast a que
el indicad or de señal LED parpade e y suelte el botón.
L'ap pareil quitt era l e mod e d'a ppaira ge si aucu ne
opér ation suiva nte n' est ef fectuée pen dant u ne
long ue périod e. Si vous en trez à nouv eau, app uyez
lon guem ent sur l'i nter rupt eur man uel pen dant
5 secon des jusqu 'à ce que l'indi cateur de si gnal
LED cli gnote et s e relâche .
Senza n essuna operaz ione success iva per un lungo
periodo di t empo il dispositiv o uscirà dalla modalità
di associazion e. Per entrare di nuovo, tenere premuto
l'interrut tore manuale per 5s no a quando l'indicato re
di segnale LED lampegg ia e quindi rilasciare.
Устройство выйдет из режима сопряжения, если
на пр отя жен ии дол гог о в рем ен и н е бу дет
производиться никаких действий. Для повторного
по дкл юче ния за жми те на 5 с ек унд кн опк у
включения, после того, как загорятся светодиодные
индикаторы, отпустите.
11
Page 13

添加设 备
Add t he devi ce
5
Ger ät hinz ufüge n
Aña dir el di sposi tivo
Ajo uter l' appar eil
Agg iunge re il dis posit ivo
Доб авить у строй ство
在网关对应的A PP中按照提示添加设备 ,添加过
程中选择 eWeLin k 或 SONOFF 品牌。
Add devi ces ac cord ing to t he pro mpt on the
APP, no te tha t you s houl d choo se eWe Link
or S ONOF F.
Fügen Sie Geräte gemäß de r Aufforderung auf
der APP hinzu, beachten Sie, dass Sie eWeLink
oder SONOFF wählen sollten.
Aña da di spos itivo s se gún e l avi so de la
apl icac ión. Es i mpor tante q ue eli ja eWe Link
o SON OFF.
Ajout ez des apparei ls en fonction d e l'invite de
l'APP, n otez qu e vous devez c hoisir e WeLink
ou SONOF F.
Agg iunge re i disp ositi vi in bas e alla ri chies ta
nel l'APP, n otare che è nec essar io sc eglie re
eWe Link o SO NOFF.
До бавьте уст ройс тва в со ответ стви и с
по дск азк ами в пр ил оже нии , о бра тит е
внимани е, что необходимо выбрать eWeL ink
или SONOFF .
12
Page 14

User Manual
htt ps:// www.so noff.t ech/u serma nuals
扫码或 输入网址查 看产品的说 明书和帮助 。
Scan t he QR code o r visit th e website t o learn
the de tailed u ser guid e.
Scann en Sie den QR-Cod e oder besuche n Sie
di e We bs it e um a uf d ie d eta il li er te
Bedie nungsanle itung zuzug reifen.
Esc anee el cód igo QR o vis ite el siti o we b
par a cons ulta r la guí a del us uari o detal lada .
Sc ann ez l e co de QR ou vi si tez l e si te w eb
po ur c ons ult er l e gu ide d ét ail lé.
Sca nsi onar e il co dice Q R o vis ita il s ito w eb
per cons ulta re la g uida u tent e det tagl iata .
Ска нируй те этот QR- код или п ерейд ите на
наш веб -сайт дл я пр осмот ра п одроб ного
рук оводст во польз овател я.
13
Page 15

FCC Warning
Ch an ge s o r m odi c at io ns not ex pr es sl y
approved by the party responsible for compliance
coul d avoid the use r’s autho rity to ope rate th e
equ ipmen t.
Thi s devic e compl ies wit h part 15 o f the FCC
Rul es. O pera tion i s sub ject t o the f ollo wing
two con dition s: (1) This devi ce may not cau se
ha rm ful in ter fe ren ce , an d ( 2) t hi s de vi ce
mu st ac ce pt any in te rf er enc e r ec ei ve d,
including interfere nce that may cause undesired
ope ratio n.
FCC R adiat ion Exp osure S tatem ent:
Thi s equip ment co mplie s with FC C radia tion
exp osure l imits s et fort h for an un contr olled
en vi ron me nt. Th is e qu ipm en t sh ou ld b e
inst alled and op erated wi th minimum d istance
20c m betwe en the ra diato r& your bo dy. This
transm itter must not be co-locat ed or operat ing
in co nju nc tio n w ith an y ot he r an te nna or
tra nsmit ter.
Not e: Thi s equ ipm ent h as be en t este d an d
fou nd to c ompl y wit h the li mits for a C lass B
dig ital de vice, p ursua nt to par t 15 of the F CC
Rul es. T hese l imit s are d esig ned to prov ide
re as on ab le p ro te ct io n a ga in st ha rm fu l
int erfer ence in a r eside ntial i nstal latio n. This
equ ipme nt ge nera tes, u ses a nd can r adia te
rad io fr eque ncy en ergy and, i f not i nsta lled
and u sed in ac corda nce wit h the ins truct ions,
ma y c aus e h arm fu l in te rfe re nce to rad io
communications. However, there is no guarantee
tha t inter feren ce will n ot occu r in a part icula r
in sta lla tio n. I f th is e qu ipm ent doe s ca use
ha rmf ul i nte rfe re nce to r adi o or tel evi sio n
rece ption, wh ich can be dete rmined by tu rning
the equipment off and on, the user is encouraged
to try to correct the inte rference by one or more
of th e follo wing me asure s:
14
Page 16

— Reo rient o r reloc ate the r eceiving an tenna.
— Increase the separation between the equipment
and receiv er.
— Con nect th e equip ment in to an out let on a
circuit different from that to which the receiver
is connec ted.
— C ons ul t t he de al er o r a n e xp er ie nce d
rad io/ TV t echni cian fo r help.
Shen zhen So noff Tec hnolo gies Co ., Ltd.
Room 1001, 10F, Building 8, Lianhua Industrial Park,
Longyuan Road, Longhua District, Shenzhen,GD, China
htt ps:// sonoff .tech
MADEI NCHINA
15
Page 17

LIKE IT!
Glad to know you ar e satis ed wit h SONOF F
products.
It would mean a lot to us if you can take a minute
to share your b uying experienc e.
Sha re it on Ama zon
Sha re it on yo ur soci al medi a
Sha re it wit h your fr iends a nd fami ly
Get the latest news by following
us:
New arrival
Promotion
How-to videos
Page 18
HAVE A
PROBLEM?
We are so so rry for the inc onvenien ce caused
by the product.
Please cont act us for help via the email address
below.
sup port@ itead .cc
We wi ll get ba ck to you a s soon as p ossib le.
 Loading...