

Page 1
Special Instructions for Tempo HD (Without Drive, Windows Version)
You Should Have (Part Number THD-W)
In addition to the parts listed on the Tempo HD quick start guide, the following
items should be included in your product package:
• 4 hard drive mounting screws
The following item is required for installation of a 2.5 inch hard drive to the
Tem po HD:
• Medium Phillips screwdriver
The following items may be required for installation of a 2.5 inch hard drive:
• Small flat blade screwdriver
• Needle-nose pliers
Installation Preparation:
Prior to installing a hard drive onto the Tempo HD, you may need to prepare the
drive by installing, moving or removing jumpers.
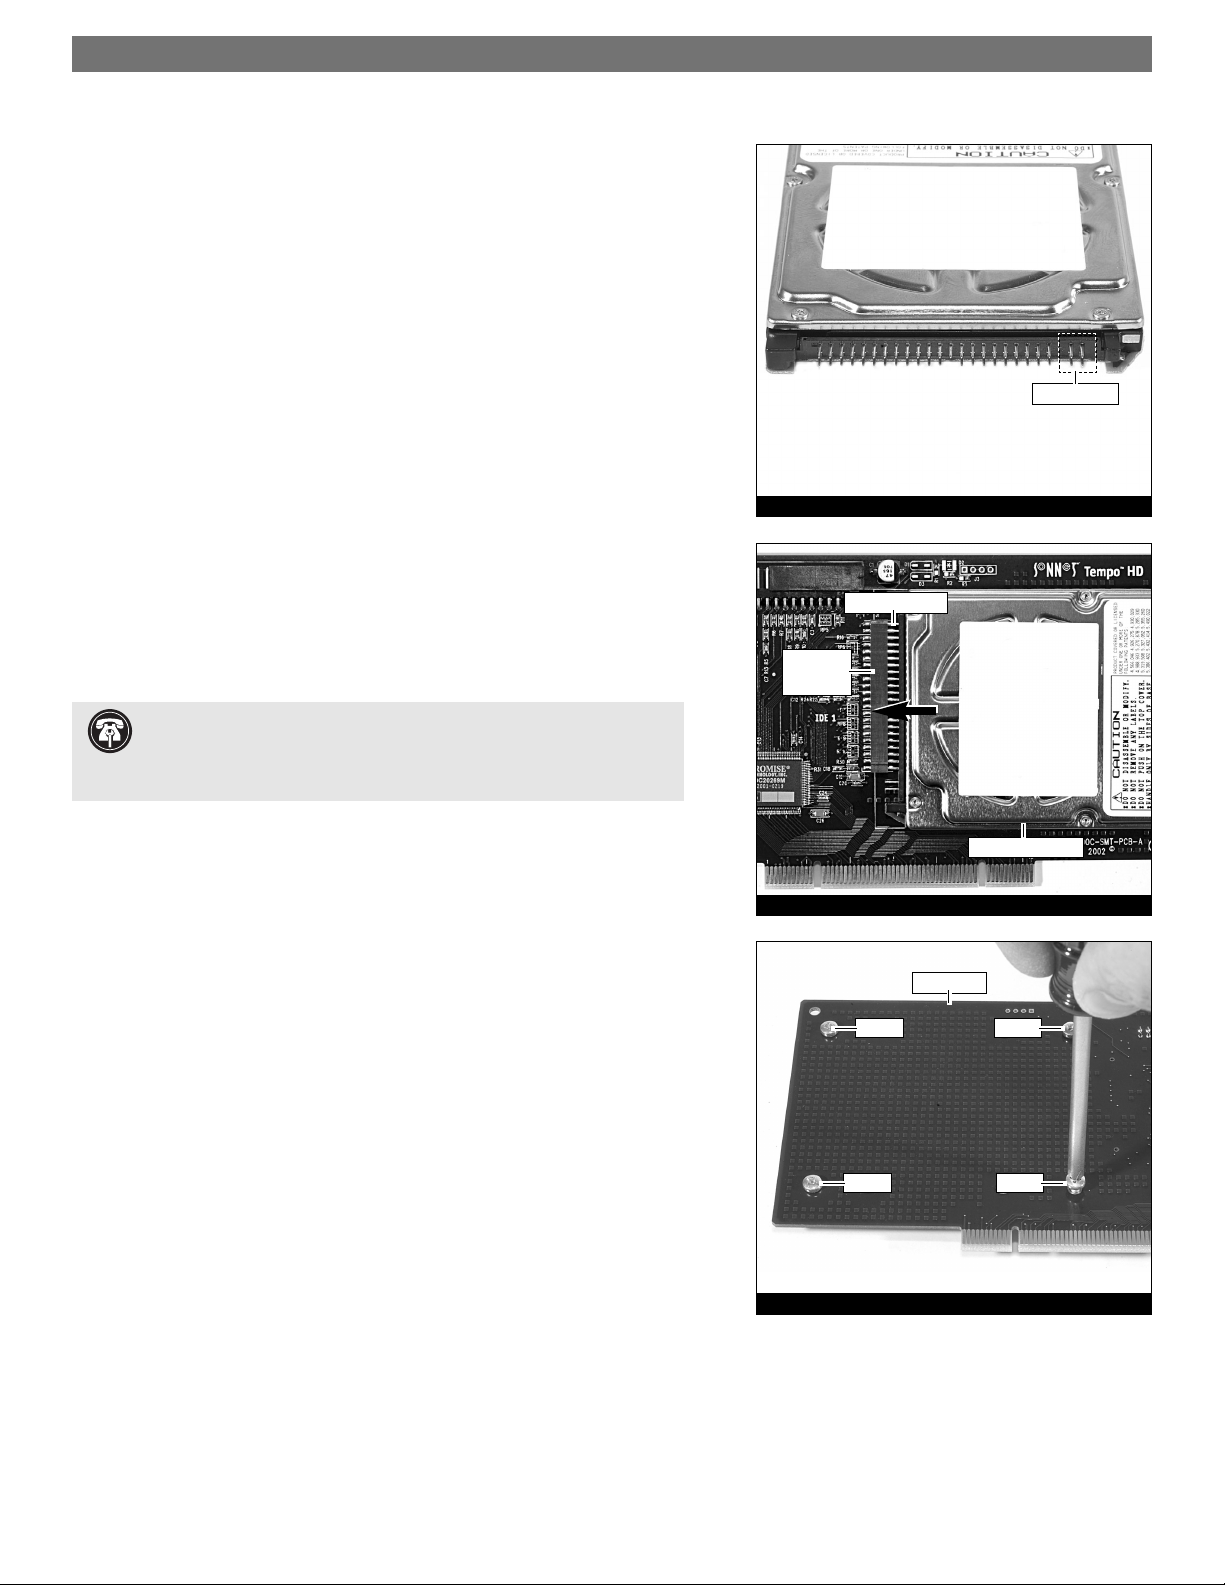
1. Remove your 2.5 inch hard drive from its packaging.
2. Locate the jumper block on your hard drive. Figure 1 shows the most com-
mon jumper block location.
2.5 Inch Hard Drive Installation Steps
This section covers the configuration, and the installation one 2.5 inch hard drive
onto your Tempo HD card.
1. Move, install, or remove jumpers (as necessary) on the hard drive to the
master setting.
2. Remove the Tempo HD card from its anti-static packaging, and lay it on a
flat surface with the surface-mounted connector face up.
3. Lay the 2.5 inch hard drive on the card within the rectangle imprinted on
the Tempo HD card, and align the hard drive’s pins with the Tempo HD
card’s surface-mounted connector (Figure 2). Push the hard drive’s pins into
the Tempo HD card's connector until the drive is completely seated.
4. Holding the drive against the card, flip the assembly over. Using the 4 screws
provided, secure the hard drive to the Tempo HD; be sure to use the correct
holes, and do not overtighten the screws (Figure 3).
5. Follow the instructions in the attached quick start guide to install the Tempo
HD into your system. Please note, you will need to format the drive you just
installed. Refer to the drive formatting information sections of the Quick
Start Guide for specific information.
. Support Note: Refer to the hard drive user’s manual for jumper
setting information specific to your drive. Alternately, you may find
jumper setting information printed on your hard drive’s labels. Make sure the
drive is oriented the same way as the illustration before moving jumpers.
Figure 1
Figure 2
Figure 3
screw screw
surface-
mounted
connector
screw screw
2.5 inch hard drive
hard drive’s pins
Tem po HD
jumper block
Page 2

Page 3
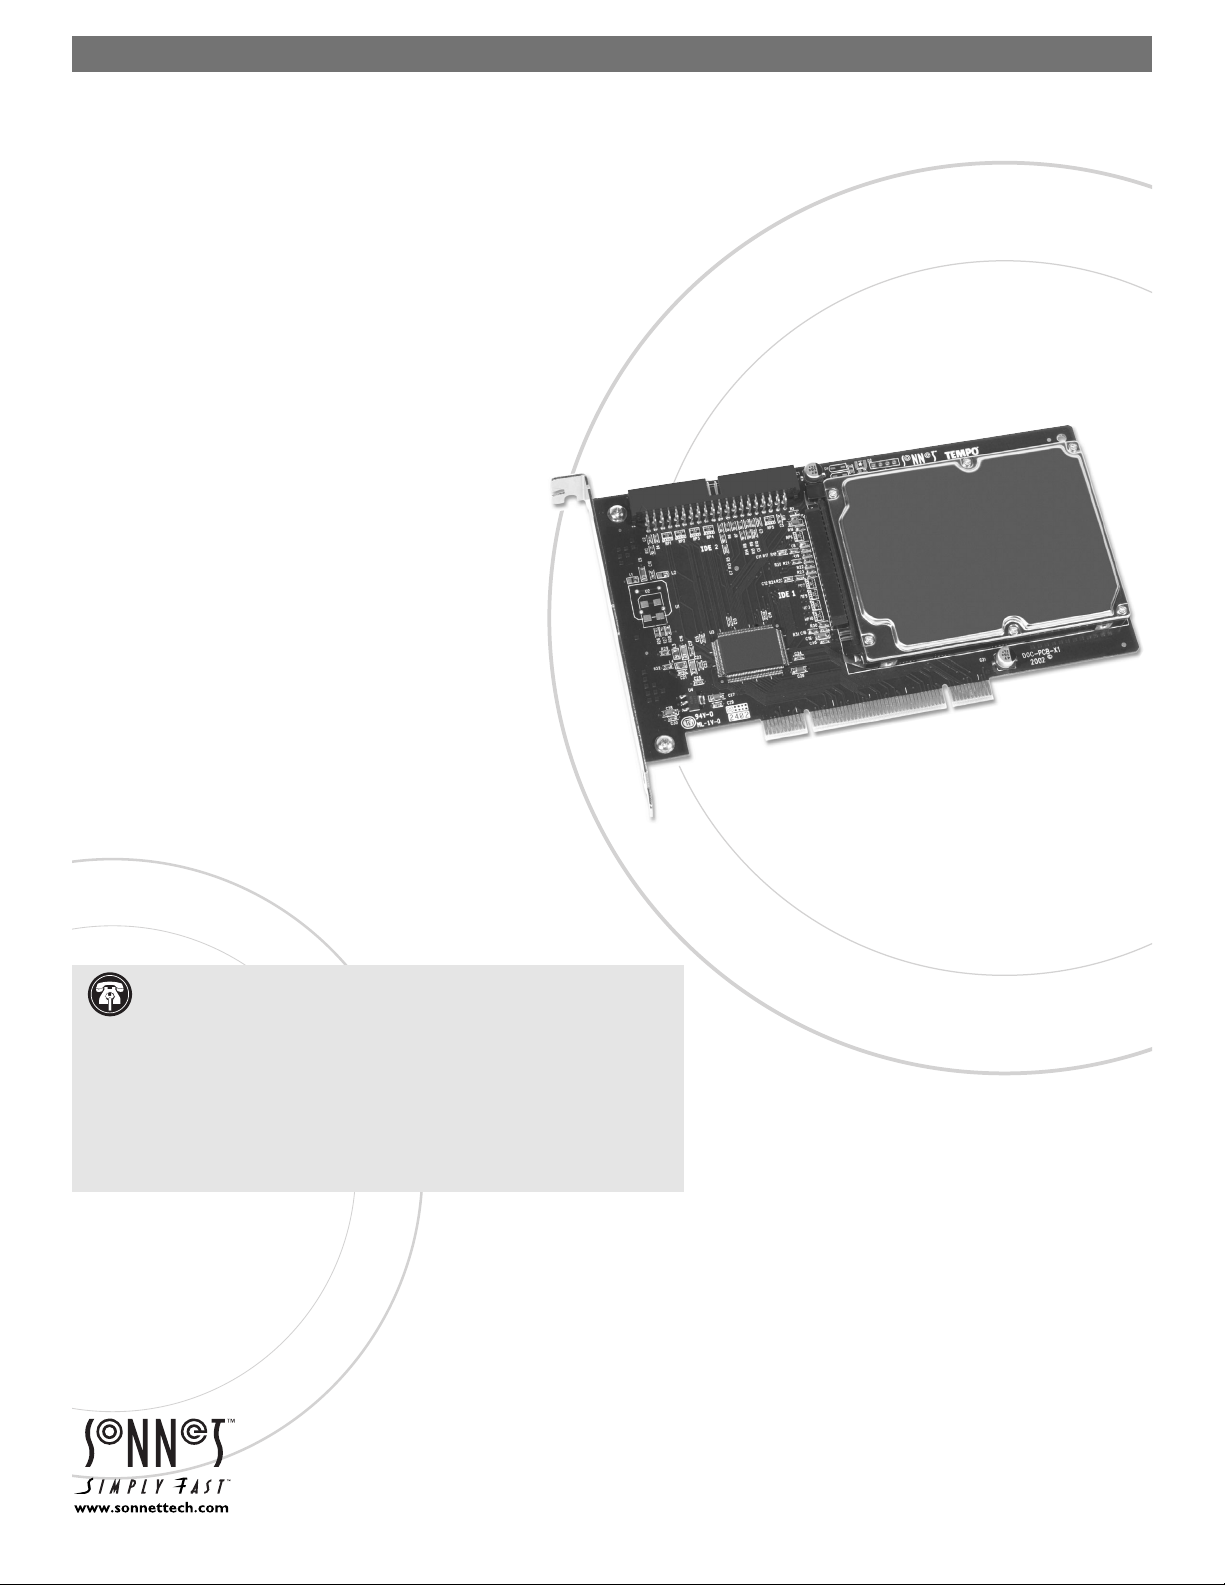
TEMPO™ HD
Quick Start Guide for Tempo HD
You Should Have
The following items should be included in your product package:
• Tempo HD Integrated Hard Drive/PCI Card
• Tempo HD Windows Driver diskette
The following items may be required for installation of the Tempo HD:
• Medium Phillips screwdriver
The following items may be required for installation of additional hard drives:
• Small flat blade screwdriver
• Needle nose pliers
Along with one or more available drive bays, the following items,
which are sold separately, may be required for installation of additional
hard drives:
• Ultra ATA cable
• Drive mounting brackets/carriers or drive mounting sleds
• Hard drive mounting screws
• One or more power cable Y-adapters
Hardware and Operating System Requirements
The Tempo HD requires the following in order to operate in your system:
• One available 2.1 PCI slot
• Pentium II (or equivalent) or higher
• Windows 98SE, Windows Me, Windows 2000, or Windows XP
Remember to register your product online at http://registration.sonnettech.com to be informed of future upgrades and product releases.
Software updates and links are available from the Sonnet web site at www.sonnettech.com.
•
Online support form available at http://supportform.sonnettech.com.
Sonnet Technologies Customer Service hours are Mon.-Fri., 7 a.m.–5 p.m. Pacific Time
•
Customer Service Phone: 1-949-472-2772 • E-mail: support@sonnettech.com
Sonnet Technologies, Inc., 15 Whatney, Irvine, California 92618-2808 USA • Tel: 1-949-587-3500 Fax: 1-949-457-6350
©2002 Sonnet Technologies, Inc. All rights reserved. Sonnet,the Sonnet logotype, Simply Fast, the Simply Fast logotype,and Tempo are trademarks of Sonnet Technologies,Inc. Tempo HD includes technolog y by FirmTek,LLC.
Other product names are trademarks of their respective owners.All specifications subject to change without notice. Printed in the USA. QS-THD-W-XXXG-E-102402
. Support Note: We recommend that you make a backup of important
information on your system’s current hard drive(s) prior to installing new
hardware or software.
When handling computer products, you must take care to prevent components
from being damaged by static electricity. Before opening your computer or
removing parts from their packages, always ground yourself first by touching an
unpainted metal part of the computer, such as a port access cover, and work in
an area free of static electricity; avoid carpeted areas. Handle all electrical components only by their edges, and avoid touching connector traces and component pins.
Integrated Hard Drive/PCI Card for Windows® PCs
Page 4
Quick Start Guide for Tempo HD (Windows Version)
2
Installation Preparation
Prior to installing the Tempo HD into your system, you should read the section in
your computer’s user manual that addresses PCI card installation.
Tempo HD Installation Steps
This section covers the installation of the Tempo HD without additional hard
drives into your system. For information on attaching additional hard drives, see
page 4.
1. Shut down your computer.
2. Open your computer to access its expansion card area (PCI slots); refer to
your computer’s user manual for specific information.
3. Remove the Tempo HD card from its anti-static packaging.
4. Locate an available PCI slot inside your computer and, if present, remove its
port access cover from the rear of the computer.
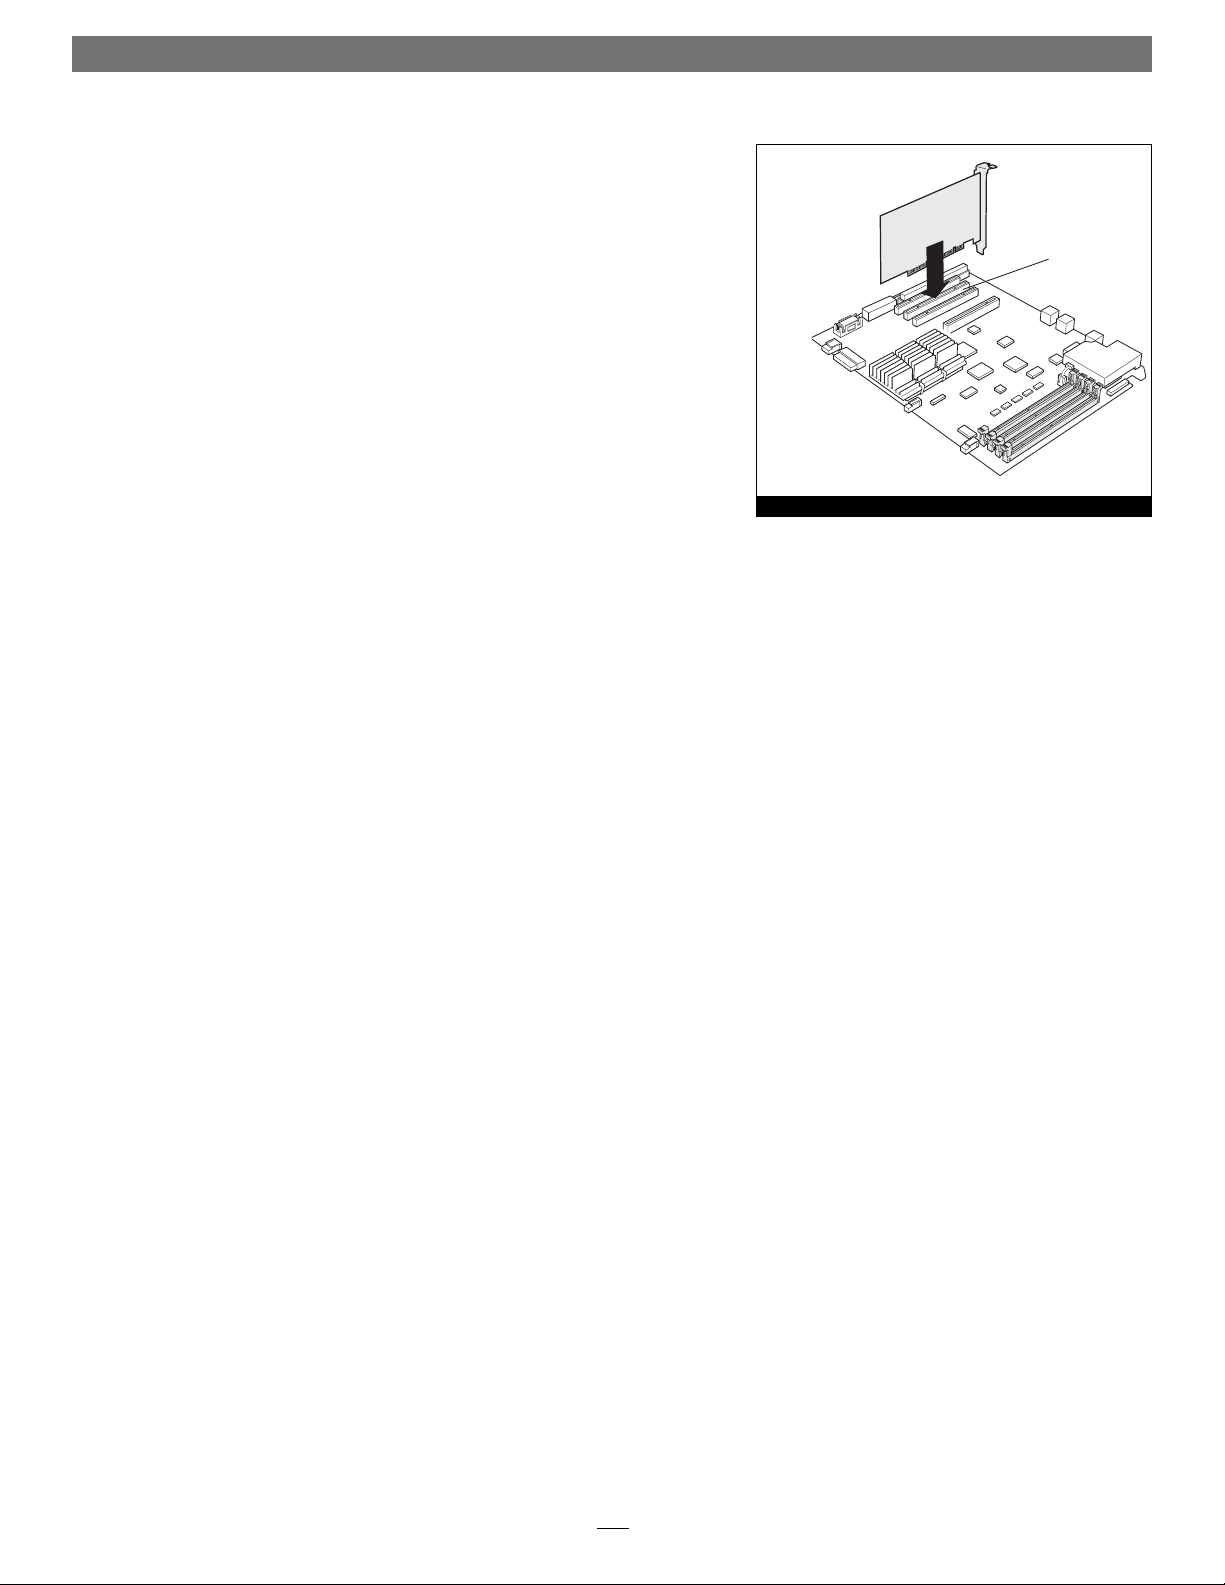
5. Install the Tempo card into the PCI slot; make sure the card is firmly seated
and secured (Figure 1).
6. If you are installing additional hard drives at this time, refer to “Hard Drive
Installation Preparation” and “Hard Drive Installation Steps” on page 4.
7. Close your computer.
Windows 98SE and Windows Me Driver Installation
This section describes the installation of drivers to support the Tempo HD in systems running Windows 98SE or Windows Me. If your system is running
Windows 2000 or Windows XP, skip to the next page.
1. Turn on your computer; during Windows startup, the New Hardware Found
window will briefly appear, with PCI Mass Storage Device listed as the new
hardware type.
2. When the Add New Hardware Wizard window appears, click Next.
3. When the next window appears, select “Search for best driver for your device
(Recommended),” and then click Next.
4. Insert the Tempo HD Windows Driver diskette into your floppy drive.
4. Type A:\Win9x-me, and then click Next.
5. When the message stating “Windows is now ready to install the best
driver…” appears, click Next, and then click Finish.
6. At the next prompt, click Yes to restart your system; you must now format
the attached drive. Skip to “Drive Formatting—Windows 98SE and Windows
Me” on page 5.
Figure 1
Tempo HD
PCI slots
The location of your
computer’s PCI slots may
vary from this illustration.
Page 5

Quick Start Guide for Tempo HD (Windows Version)
3
Windows 2000 Driver Installation
This section describes the installation of drivers to support the Tempo HD in
systems running Windows 2000. If your system is running Windows 98SE or
Windows Me, go back to “Windows 98SE and Windows Me Driver Installation”
on page 2. If your system is running Windows XP, skip to “Windows XP Driver
Installation” below.
1. Turn on your computer; during Windows startup, the New Hardware Found
window will briefly appear, with Mass Storage Device listed as the new hardware type.
2. When the Found New Hardware Wizard window appears, click Next.
3. When the Install Hardware Device Drivers window appears, select “Search for a
suitable driver for my device (recommended),” and then click Next.
4. When the Locate Driver Files window appears, insert the Tempo HD Windows
Driver diskette into your floppy drive.
5. Select Floppy disk drives under Optional search locations and then click Next; a
new window will appear.
6. Type A:\Win2000, and then click OK.
7. When the Driver Files Search Results window appears, click Next.
8. When the Digital Signature Not Found window appears, click Yes; the appro-
priate driver will be installed.
9. When the Completing the Found New Hardware Wizard window appears, click
Finish; you must now format the attached drive. Skip to “Drive Formatting—
Windows 2000 and Windows XP” on page 7.
Windows XP Driver Installation
This section describes the installation of drivers to support the Tempo HD in
systems running Windows XP. If your system is running Windows 98SE or
Windows Me, go back to “Windows 98SE and Windows Me Driver Installation”
on page 2. If your system is running Windows 2000, go back to “Windows 2000
Driver Installation” above.
1. Turn on your computer; during Windows startup, a New Hardware Found
pop-up will briefly appear, with Mass Storage Device listed as the new hardware type.
2. When the Found New Hardware Wizard window appears, insert the Tempo
HD Driver diskette into your floppy drive. Select “Install from a s
pecific loca-
tion (Advanced),” and then click Next.
3. When the next window appears asking you to choose your search and instal-
lation options, select “Search for the best drivers in these locations,” and
“Search removable media (floppy, CD-ROM…,” and then click Next.
4. When the next window appears, select “WinXP Promise…,” and then click
Next.
Page 6
Quick Start Guide for Tempo HD (Windows Version)
4
5. When the Hardware Installation window appears, click Continue Anyway; the
appropriate driver will be installed.
6. When the Completing the Found New Hardware Wizard window appears, click
Finish; you must now format the attached drive. Skip to “Drive Formatting:
Windows 2000 and Windows XP” on page 9.
Hard Drive Installation Preparation:
Prior to installing additional hard drives into your system, you should familiarize
yourself with the parts to be installed. We also strongly recommend that you read
the section in your computer’s user manual that addresses hard drive installation.
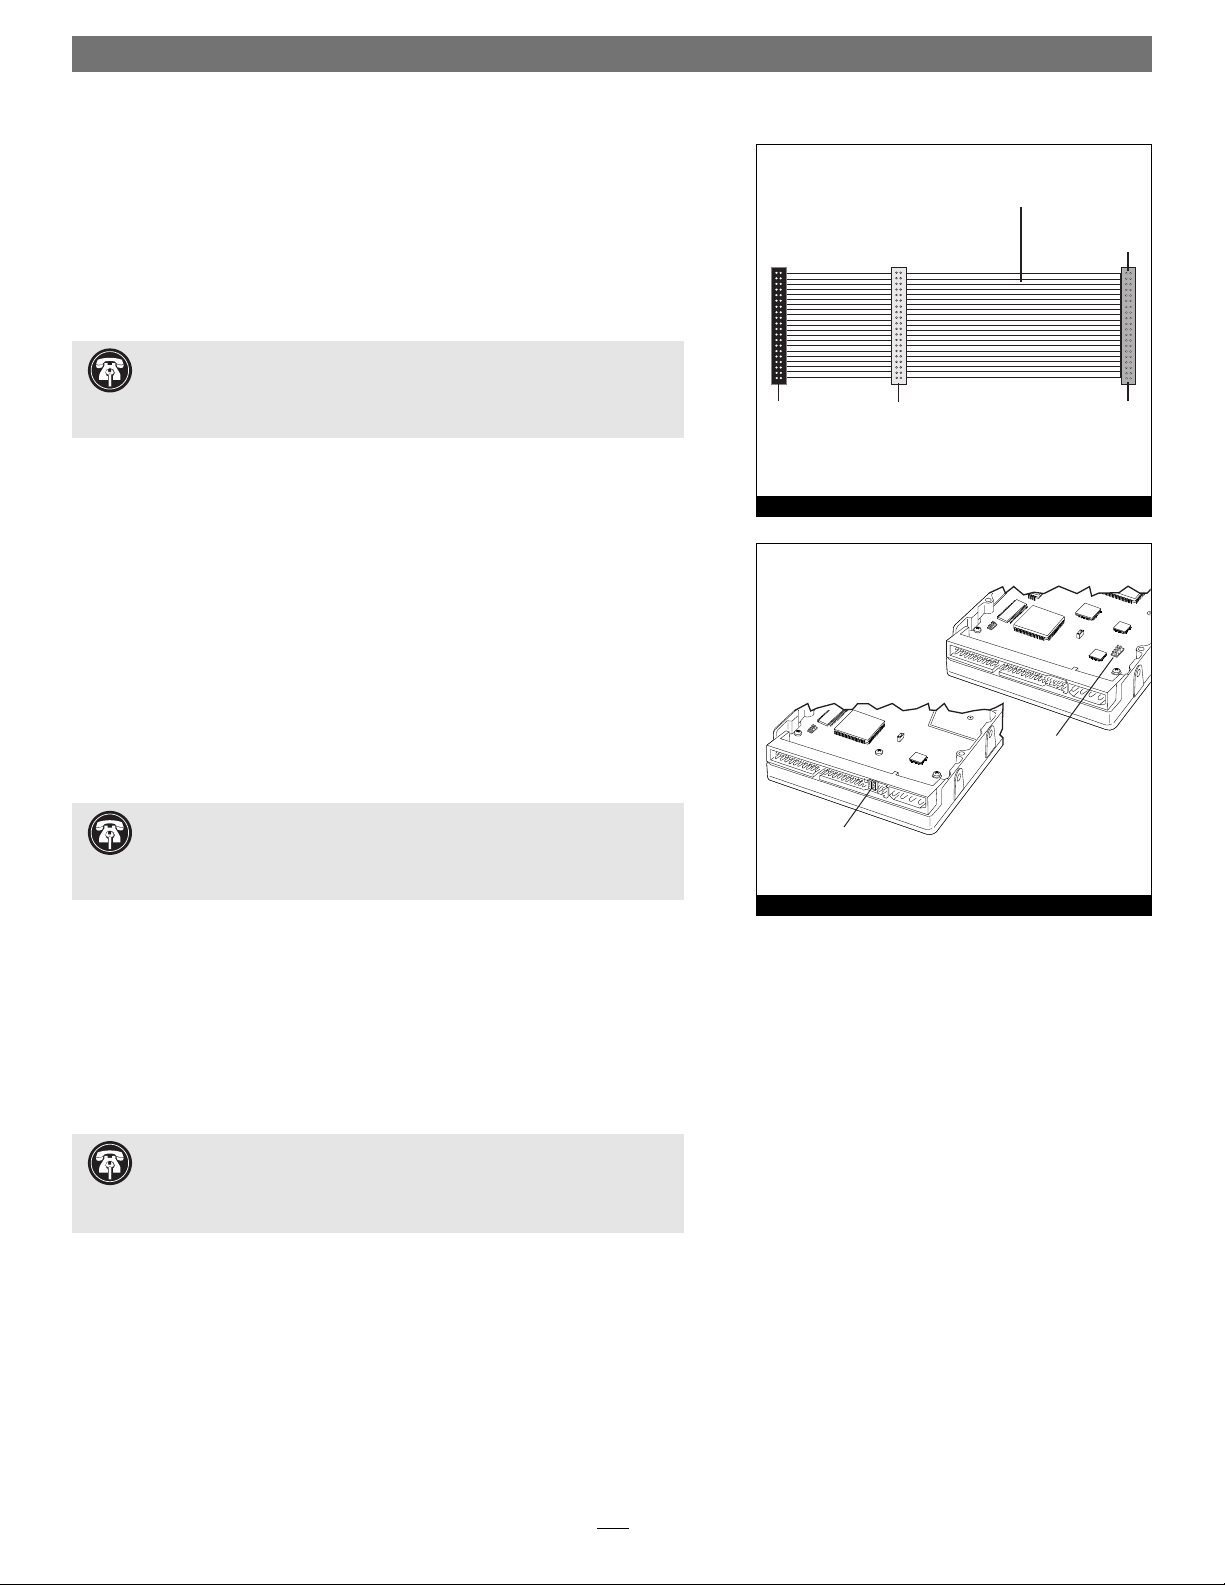
1. Identify the connectors on an Ultra ATA cable (sold separately) as shown in
Figure 2; the host connector plugs into the Tempo HD controller card, while
the master and slave connectors plug into the hard drives.
2. Remove the hard drive from its anti-static packaging.
3. Locate the jumper block on the hard drive. Figure 3 shows the two most
common jumper block locations.
Hard Drive Installation Steps
This section covers the installation and configuration one or two hard drives into
your system.
1. Shut down your computer.
2. Open your computer to access the expansion card area (PCI slots) and drive
bay(s); refer to your computer’s user manual for specific information.
3. Configure the hard drives’ jumpers as follows:
• When installing one drive, you must set its jumpers to the single setting
when available, or the master setting when not.
• When connecting two drives, you must set the jumpers on one drive to
the master setting, and to the slave setting on the other.
4. Install the hard drives into your computer’s expansion bays. (Depending on
your computer model, drive mounting brackets/carriers or drive mounting
sleds may be required to install your hard drives. Refer to your computer’s
user manual.)
jump
Figure 3
Figure 2
. Support Note: Refer to the hard drive’s user manual for jumper
setting information specific to your drives. Alternately, you may find
jumper setting information printed on your hard drives’ labels. Make sure the
drives are oriented the same way as the illustration before moving jumpers.
Support Note: Technical knowledge may be required to gain access to
the drive expansion bays in certain computer models. We recommend
you first consult your computer’s user manual. If you feel you are unable to
install the computer hardware, contact a qualified technician.
Support Note: Most new hard drives are factory preset for use as a sin-
gle or master drive. To change the setting, you will need to reconfigure
the hard drives’ jumpers. Be sure the jumpers are configured properly, otherwise,
your computer may not boot, or your new drives may not be recognized.
master
connector
(black)
40-pin/80-wire Ultra ATA cable
slave
connector
(gray)
connects to
Tem po HD
host
connector
(blue)
er block
jumper block
Page 7

Quick Start Guide for Tempo HD (Windows Version)
5
5. Connect the drive(s) to the Ultra ATA cable (sold separately) as follows:
• When connecting one drive, plug in the Ultra ATA cable’s master (black)
connector to it. Verify the connector is plugged in securely (Figure 4).
• When connecting two drives, connect the Ultra ATA cable’s master (black)
connector to the drive with jumpers set in the master setting; connect the
slave (gray) connector to the drive with jumpers configured in the slave
setting. Verify the connectors are plugged in securely (Figure 4).
6. Locate the 4-pin power connector plugged into your computer’s existing
hard drive. You should find at least one extra power connector near the existing drive; if you have installed only one new drive, plug the extra power connector into it. If you have installed two new drives, or there are no additional
power connectors, you must use a power cable Y-adapter (sold separately).
Verify the connectors are plugged in securely.
7. Route the Ultra ATA cable to the Tempo HD card; avoid heat sinks and make
sure the cable will not get crushed or pinched by any part of the case when
you reassemble your computer.
8. Attach the Ultra ATA cable’s host (blue) connector to the Tempo HD card.
Verify the connector is plugged in securely (Figure 4).
9. Check the cable connections; make sure the cable is properly connected to
the Tempo HD and the hard drives.
10. Close your computer and carefully replace its cover; be very careful not to
crimp the cables.
Drive Formatting—Windows 98SE and Windows Me
Formatting prepares a hard drive for use by dividing the data area into tracks and
sectors, enabling your computer to store and retrieve data from the drive. This
section describes the process of formatting hard drives connected to the Tempo
HD, using FDISK on systems running Windows 98SE or Windows Me. The following instructions detail the procedure to create a simple volume (single partition); if you need to format a drive with multiple partitions, refer to Windows
Help for details. As an alternative, you may choose to format and partition your
hard drive(s) with any software that was included with the drive, following the
included instructions.
1. Turn on your computer and start Windows.
2. From the taskbar, click on Start > Programs > MS-DOS Prompt.
3. At the C:\WINDOWS > prompt, type FDISK.
4. A message will appear stating, “Your computer has a disk larger than 512
MB;” press Enter (Figure 5).
5. From the FDISK Options screen, press 5, and then press Enter.
Figure 4
WARNING: Hard drives attached to the Tempo HD will not appear under
My Computer, and can’t be used until they have been formatted; this
also applies to drives with data on them, previously used in other computers.
Please be aware that formatting a drive erases any data present.
Figure 5
Tempo HD Integrated
Hard Drive/PCI Card
Ultra ATA cable
slave
- jumpers
single (or master*)
*jumpers must be set to the master setting when two drives connected
Page 8

Quick Start Guide for Tempo HD (Windows Version)
6
Figure 8
6. From the Change Current Fixed Disk Drive screen, select the last disk listed
(assuming you’ve connected only one drive at this time), and then press
Enter. Do not unintentionally choose an existing formatted drive.
7. When the FDISK Options screen appears again, select “Create DOS Partition
or Logical DOS Drive,” and then press Enter.
8. From the Create DOS Partition or Logical DOS Drive screen, select “Create
Primary DOS Partition,” and then press Enter.
9. As the primary DOS partition is created, the progress will be displayed. When
drive integrity verification is complete, press Enter.
10. The progress will be displayed again, followed by the message “Primary DOS
Partition created, drive letters changed or added;” press Esc to continue.
11. When the next screen appears instructing you to restart your system, press
Esc two times.
12. At the DOS prompt, type EXIT, and then press Enter.
13. From the taskbar, select Start > Shu
t Down… When the Shut Down window
appears, select R
estart, and then click OK.
14. After your computer restarts, double-click My Computer.
15. Right click on the new drive and select “Form
at…” (Figure 6).
16. When the Format window appears, select “F
ull” under Format Type, and
then click S
tart (Figure 7).
17. When the warning window appears, click OK.
18. While the format process continues, a progress bar will appear at the bottom
of the Format window (Figure 8).
19. When the drive formatting process is complete, a Format Results window will
appear; press Enter.
20. When the dialogue appears suggesting you run ScanDisk; press Enter.
21. A Windows Help window will appear; follow the instructions to run ScanDisk.
Once ScanDisk is finished, your installation is complete; you may access your
newly-formatted drive through your applications, as well as My Computer.
Figure 6
Figure 7
Page 9
Quick Start Guide for Tempo HD (Windows Version)
7
Drive Formatting—Windows 2000 and Windows XP
Formatting prepares a hard drive for use by dividing the data area into tracks and
sectors, enabling your computer to store and retrieve data from the drive. This
section describes the process of formatting hard drives connected to the Tempo
HD, using the Disk Management Administrative Tool on systems running
Windows 2000 or Windows XP. The following instructions detail the procedure
to create a simple volume (single partition); if you need to format a drive with
multiple partitions, refer to Windows Help for details. As an alternative, you may
choose to format and partition your hard drive(s) with any software that was
included with the drive, following the included instructions.
1. Turn on your computer and start Windows.
2. From the taskbar, click on Start > Settings > Control Panel.
3. In the Control Panel window, double-click Administrative Tools.
4. In the Administrative Tools window, double-click Computer Management.
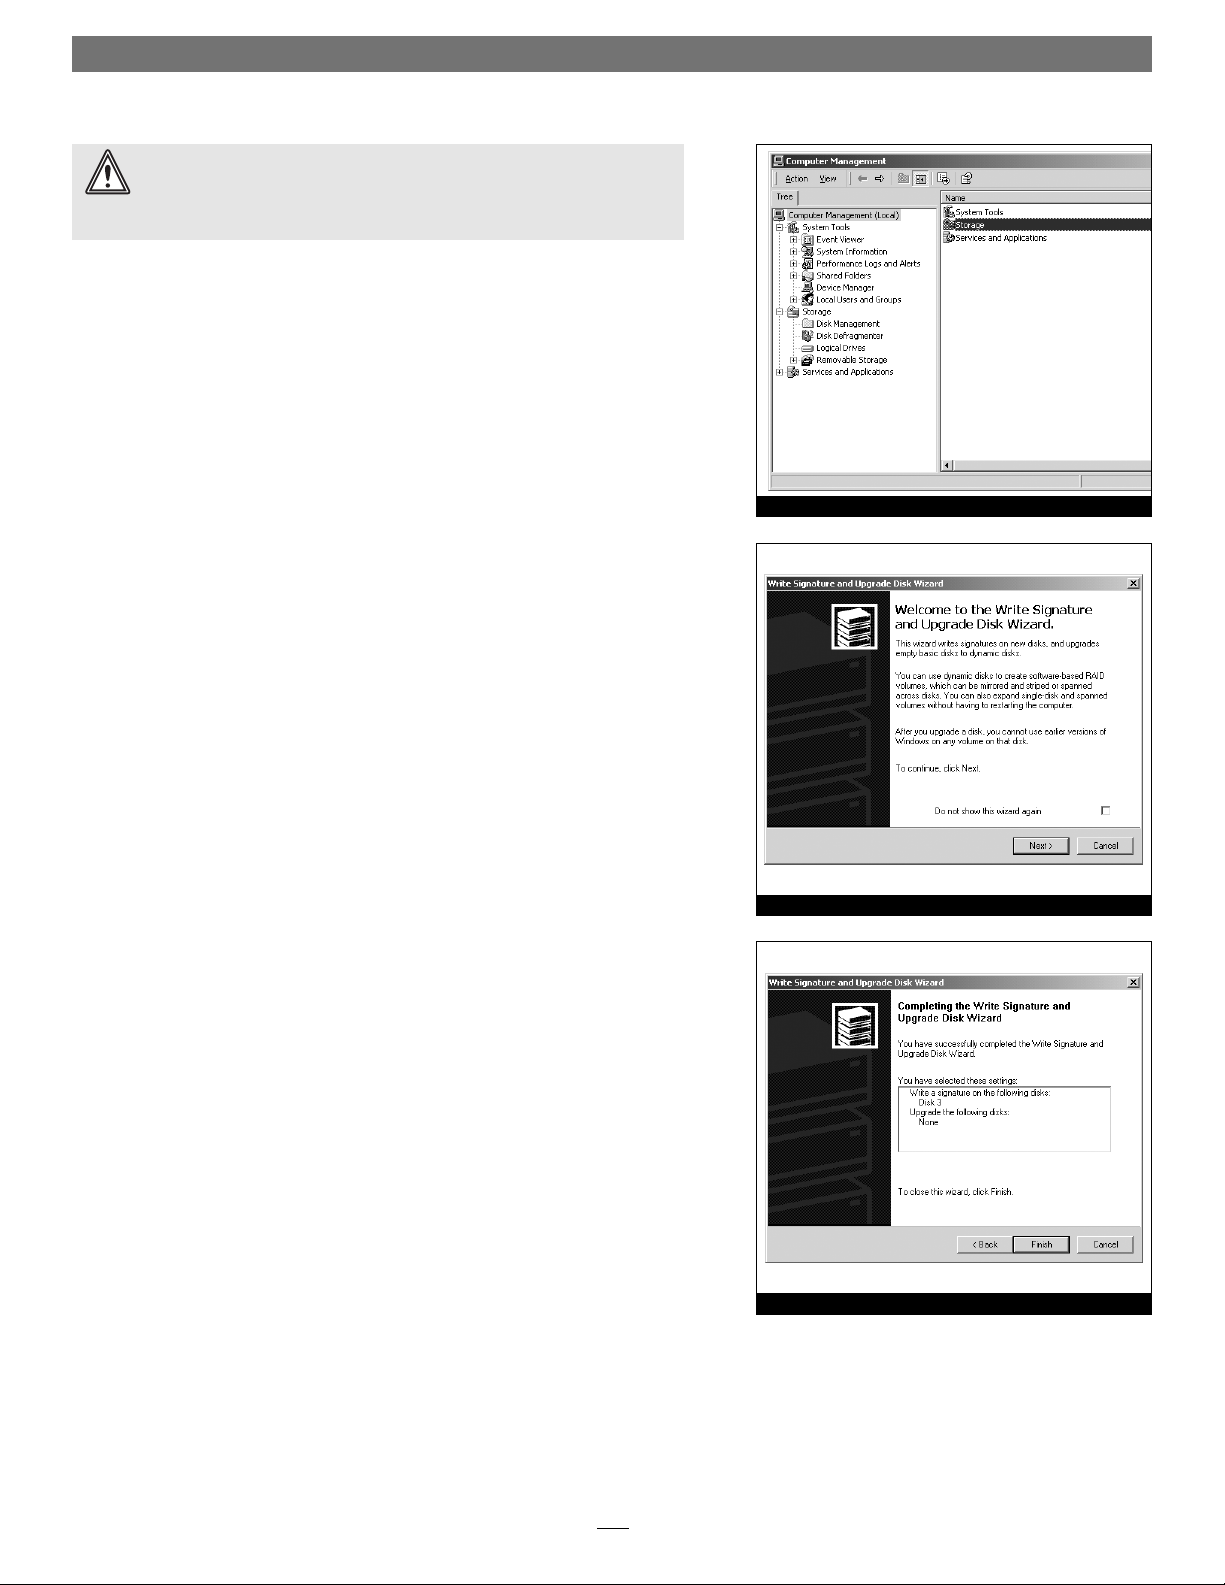
5. In the Computer Management window, double-click Storage in the right win-
dow pane (Figure 9).
6. In the right pane of the Computer Management window, double-click Disk
Management (Local); the Write Signature and Upgrade Disk Wizard will appear
(Figure 10). Click Next to continue.
7. In the Select Disk to Write Signature window, select the new disk (which
should be your only option), and then click Next to continue.
8. In the Select Disk to Upgrade window, select the new disk again (which should
be your only option), and then click Next to continue.
9. When the next window appears (indicating the write signature was completed successfully), click Finish to close the window (Figure 11).
WARNING: Hard drives attached to the Tempo HD will not appear under
My Computer, and can’t be used until they have been formatted; this
also applies to drives with data on them, previously used in other computers.
Please be aware that formatting a drive erases any data present.
Figure 9
Figure 10
Figure 11
Page 10

8
Quick Start Guide for Tempo HD (Windows Version)
Figure 12
Figure 13
Figure 14
10. Back in the Computer Management window, scroll down to locate the new
drive (listed as “unallocated”) in the lower right window pane, right-click on
it, and then select “Create Volume…” (Figure 12).
11. When the Create New Volume Wizard appears, click Next.
12. When the Select Volume Type window appears, select “Simple Volume,” and
then click Next (Figure 13).
13. When the Select Disks window appears, click Next.
14. When the Assign Drive Letter or Path window appears, select either the default
letter or choose a new one, and then click Next.
15. When the Format Volume screen appears, select “Perform a Quick Format,”
and then click Next (Figure 14).
16. When the Completing the Create Volume Wizard screen appears, click Finish
to complete the formatting procedure. Once the formatting procedure is finished, your installation is complete; you may access your newly-formatted
drive through your applications, as well as My Computer. Please note,
depending on the capacity of the drive you are working with, the formatting
procedure may take anywhere from a few seconds to a few minutes to
complete.
WARNING: By default, NTFS will be selected as the file system to use
when you format drives. Unless you need to move the Tempo HD
and hard drive(s) to another computer running Windows 98SE or Windows
Me, you should use the default (NTFS) file system choice. Windows 98SE and
Windows Me are incapable of using NTFS-formatted drives; those operating systems require FAT32-formatted drives.
If you choose to change the default setting to FAT32, you should do so only
when formatting hard drives with a capacity of less than35GB. Windows 2000
and Windows XP cannot “see” more than 35GB of a FAT32-formatted drive,
regardless the capacity.
Page 11

Quick Start Guide for Tempo HD (Windows Version)
9
Drive Formatting—Windows XP
Formatting prepares a hard drive for use by dividing the data area into tracks and
sectors, enabling your computer to store and retrieve data from the drive. This
section describes the process of formatting hard drives connected to the Tempo
HD, using the Disk Management Administrative Tool on systems running
Windows XP. The following instructions detail the procedure to create a simple
volume (single partition); if you need to format a drive with multiple partitions,
refer to Windows Help for details. As an alternative, you may choose to format
and partition your hard drive(s) with any software that was included with the
drive, following the included instructions.
1. Turn on your computer and start Windows.
2. From the taskbar, click on Start > Control Panel.
3. In the Control Panel window, click Performance and Maintenance.
4. In the Performance and Maintenance window, click Administrative Tools.
5. In the Administrative Tools window, double-click the Computer Management
shortcut (Figure 15).
6. In the left pane of the Computer Management window, double-click Disk
Management; the Initialize and Convert Disk Wizard will appear (Figure 16).
Click Next to continue.
7. In the Select Disks to Initialize window, select the new disk (which should be
your only option), and then click Next to continue.
8. In the Select Disks to Convert window, select the new disk again (which should
be your only option), and then click Next to continue.
9. When the next window appears (indicating the Initialize and Convert Disk
Wizard completed successfully), click Finish to close the window (Figure 17).
WARNING: Hard drives attached to the Tempo HD will not appear under
My Computer, and can’t be used until they have been formatted; this
also applies to drives with data on them, previously used in other computers.
Please be aware that formatting a drive erases any data present.
Figure 15
Figure 16
Figure 17
Page 12

Quick Start Guide for Tempo HD (Windows Version)
10
Figure 18
Figure 19
Figure 20
10. Back in the Computer Management window, scroll down to locate the new
drive (listed as “unallocated”) in the lower right window pane, right-click on
it, and then select “New Volume…” (Figure 18).
11. When the New Volume Wizard appears, click Next.
12. When the Select Volume Type window appears, select “Simple Volume,” and
then click Next (Figure 19).
13. When the Select Disks window appears, click Next.
14. When the Assign Drive Letter or Path window appears, select either the default
letter or choose a new one, and then click Next.
15. When the Format Volume screen appears, select “Perform a Quick Format,”
and then click Next (Figure 20).
16. When the Completing the New Volume Wizard screen appears, click Finish to
complete the formatting procedure. Once the formatting procedure finishes,
your installation is complete; you may access your newly-formatted drive
through your applications, as well as My Computer. Please note, depending
on the capacity of the drive you are working with, the formatting procedure
may take anywhere from a few seconds to a few minutes to complete.
WARNING: By default, NTFS will be selected as the file system to use
when you format drives. Unless you need to move the Tempo HD
and hard drive(s) to another computer running Windows 98SE or Windows
Me, you should use the default (NTFS) file system choice. Windows 98SE and
Windows Me are incapable of using NTFS-formatted drives; those operating systems require FAT32-formatted drives.
If you choose to change the default setting to FAT32, you should do so only
when formatting hard drives with a capacity of less than35GB. Windows 2000
and Windows XP cannot “see” more than 35GB of a FAT32-formatted drive,
regardless the capacity.
 Loading...