

Page 1
PRESTO™ GIGABIT USB
USB 3.0 TO GIGABIT ETHERNET ADAPTER
Quick Start Guide
You Should Have
The following items should be included in your product package:
• Presto Gigabit USB 3.0 USB 3.0 to Gigabit Ethernet adapter
• USB 3.0 cable
System Requirements
Presto Gigabit USB 3.0 requires the following in order to operate
with your system:
• One available USB 3.0 or USB 2.0* port
®
• OS X
10.6 or later; or Windows® 8, Windows 7, or Windows
®
Vista
• Internet access (for driver download)
3.0
* The Presto adapter is compatible with USB 2.0 ports, but with
reduced performance.
Remember to register your product online at http://registration.sonnettech.com to be informed of future upgrades and product releases.
Software updates and links are available from the Sonnet web site at www.sonnettech.com. • Online support form available at http://supportform.sonnettech.com.
Sonnet Technologies Customer Service hours are Mon.-Fri., 7 a.m.–4 p.m. Pacific Time • Customer Support Phone: 1-949-472-2772 • E-mail: support@sonnettech.com
Sonnet Technologies, Inc., California 92618 USA • Tel: 1-949-587-3500
©2013 Sonnet Technologies, All rights reserved. Sonnet, the Sonnet logotype, Simply Fast, the Simply Fast logotype, and Presto are trademarks of Sonnet Technologies, Inc. Mac, the Mac logo, and OS X are trademarks
of Apple Inc., registered in the United States and other countries. Other product names are trademarks of their respective owners. Product specifications subject to change without notice. Printed in the USA.
QS-USB3-GE-E-B-071113
Page 2
Installation Steps
INSTALLATION/CONFIGURATION STEPS FOR MAC USERS
The following section covers software installation steps for
the Presto Gigabit USB 3.0 adapter on a Mac computer, and
basic network connection configuration steps. If you are
using the Presto Gigabit USB 3.0 into a Windows PC, skip to
INSTALLATION/CONFIGURATION STEPS FOR WINDOWS
USERS on the next page.
Support Note: In order to complete the installation of
this software, you will need to restart your computer.
OS X Driver Download and Installation
This section describes the download and installation of the driver
required to support the Presto Gigabit USB 3.0 card with your
computer.
1. Launch a Web browser and go to www.sonnettech.
com/support, and then click the Downloads, Manual, &
Knowledgebase link.
2. On the Support Categories page, click the Accessories link,
and then click the Presto Gigabit USB 3.0 link.
3. On the Presto Gigabit USB 3.0 page, click the Driver link,
and then click the Download Now button next to “Presto
Gigabit USB 3.0 Driver (OS X)”; the software will be
downloaded.
4. Double-click the usb3-ge_mac_v1.4.0.dmg file; a disk image
with the name “AX88179” will appear.
5. Double-click the AX88179 disk image, and then double-
click the AX88179_178A_vX.x.x.pkg file (X.x.x is the version
number) to launch the driver installer.
6. When the Welcome to the AX88179/178A USB Ethernet
Adapter Driver Installer window appears, click Continue.
System Configuration Steps—Mac Users
Listed below are the steps necessary to add the Presto Gigabit USB
3.0 for use as one of your computer’s network connections.
1. Plug in one end of an Ethernet cable to the Presto Gigabit
USB 3.0 adapter’s Ethernet port. Connect the other end to a
cable or DSL modem, or a network.
Support Note: The Presto Gigabit USB 3.0 adapter
requires a USB 3.0 cable and a USB 3.0 port on your
computer to support Gigabit transfer speeds. Connecting the Presto
adapter to your computer using a USB 2.0 cable, or connecting the
adapter to a USB 2.0 port will result in reduced per formance.
2. Connect either the included USB 3.0 cable or another USB
3.0 cable between the Presto adapter and a USB port on your
computer; a window may appear stating a new network
interface has been detected. Click the Network Preferences…
button; System Preferences will open with Network
preferences selected.
3. If it is not already open, open System Preferences, and then
click the Network Preferences… button.
4. If it is not already selected, click on the Presto Gigabit USB
3.0 in the left panel, and then configure the settings as
necessary.
5. After you finish making changes to the settings, click the
Apply button.
6. Close System Preferences; if you used existing settings,
your installation is complete. For additional information on
configuring settings, refer to Mac Help (Help > Mac Help
from the Finder) and www.info.apple.com; type “network,
Ethernet” to display various articles.
7. When the Standard Install window appears, click Install.
When the notice about restarting your computer appears,
click Continue Installation.
8. When asked to do so, enter the Administrator password, and
then click Install Software; the software is installed.
9. When the next window appears, click Restart to restart
your computer and finish the driver installation. After the
computer has restarted, your installation is complete.
2
Page 3

Installation Steps
INSTALLATION/CONFIGURATION STEPS FOR WINDOWS
USERS
The following sections cover software installation steps for the
Presto Gigabit USB 3.0 adapter on a Windows computer, and
basic network connection configuration steps.
Windows 8 Driver Download and Installation Steps
1. Start your computer, launch Internet Explorer from the Start
screen, go to www.sonnettech.com/support, and then click
the Downloads, Manual, & Knowledgebase link.
2. On the Support Categories page, click the Accessories link,
and then click the Presto Gigabit USB 3.0 link.
3. On the Presto Gigabit USB 3.0 page, click the Driver link,
and then click the Download Now button next to “Presto
Gigabit USB 3.0 Drivers (Windows 8)”. When the message
asking whether you want to open or save the file appears,
click Save.
4. When alerted that the download has completed, click Open;
the desktop will appear with an open window containing a
AX88179_178A… folder inside.
5. Locate and click Extract all; a Select a Destination and Extract
Files window will appear. Select a new location or accept
the default location, and then click Extract; the files will be
extracted.
5. Double-click the A X88179_178A … zip file; a new window
will appear. In the new window’s menu bar, click “Extract
all files”; a new window will appear.
6. In the Select a Destination and Extract Files window, click
Extract; the file contents will be extracted.
7. Double-click the AX88179_178A… folder, and then doubleclick the folder inside.
8. Double-click the Setup application file to launch the
installer. If you haven’t disabled User Access Control (UAC)
on your computer, another window will appear asking you
to allow the program to run; click Yes.
9. An InstallShield Wizard window will appear briefly, and then
disappear.
10. When the InstallShield Wizard Complete window appears,
click Finish; the installation is complete.
Windows Vista Driver Download and Installation Steps
1. Start your computer, launch a Web browser and go to www.
sonnettech.com/support, and then click the Downloads,
Manual, & Knowledgebase link.
2. On the Support Categories page, click the Accessories link,
and then click the Presto Gigabit USB 3.0 link.
6. Double-click the AX88179_178A… folder, and then doubleclick the Setup application file to launch the installer. If
you haven’t disabled User Access Control (UAC) on your
computer, another window will appear asking you to allow
the program to run; click Yes.
7. An InstallShield Wizard window will appear briefly, and then
disappear.
8. When the InstallShield Wizard Complete window appears,
click Finish; the installation is complete.
Windows 7 Driver Download and Installation Steps
1. Start your computer, launch a Web browser and go to www.
sonnettech.com/support, and then click the Downloads,
Manual, & Knowledgebase link.
2. On the Support Categories page, click the Accessories link,
and then click the Presto Gigabit USB 3.0 link.
3. On the Presto Gigabit USB 3.0 page, click the Driver link,
and then right-click the Download Now button next to
“Presto Gigabit USB 3.0 Drivers (Windows 7)” and select
Save Target As; a Save Target As window will appear.
3. On the Presto Gigabit USB 3.0 page, click the Driver link, and
then click the Download Now button next to “Presto Gigabit
USB 3.0 Drivers (Windows Vista)”. When the message asking
whether you want to open or save the file appears, select Save
File, and then click OK; the software will be downloaded.
4. Locate and double-click the A X88179_178A… zip file you
just downloaded; a new window will appear. In the new
window’s menu bar, click “Extract all files”; a new window
will appear.
5. In the Select a Destination and Extract Files window, click
Extract; the file contents will be extracted.
6. Double-click the AX88179_178A… folder, and then doubleclick the folder inside.
7. Double-click the Setup application file to launch the
installer. If you haven’t disabled User Access Control (UAC)
on your computer, another window will appear asking you
to allow the program to run; click Yes.
8. An InstallShield Wizard window will appear briefly, and then
disappear.
4. Choose a download location, and then click Save; the
software will be downloaded.
9. When the InstallShield Wizard Complete window appears,
click Finish; the installation is complete.
3
Page 4
Installation Steps
System Configuration Steps—Windows Users
Listed below are the steps necessary to add the Presto Gigabit USB
3.0 for use as one of your computer’s network connections.
1. Plug in one end of an Ethernet cable to the Presto Gigabit
USB 3.0 adapter’s Ethernet port. Connect the other end to a
cable or DSL modem, or a network.
Support Note: The Presto Gigabit USB 3.0 adapter
requires a USB 3.0 cable and a USB 3.0 port on your
computer to support Gigabit transfer speeds. Connecting the Presto
adapter to your computer using a USB 2.0 cable, or connecting the
adapter to a USB 2.0 port will result in reduced per formance.
2. Connect either the included USB 3.0 cable or another USB
3.0 cable between the Presto adapter and a USB port on your
computer.
3. With your computer turned on, depending on your setup,
Windows may configure itself automatically to work with
the Presto adapter. Launch a Web browser and browse a
Website to verify.
4. If your system did not configure itself, access the Network
and Sharing Center to make necessary changes.
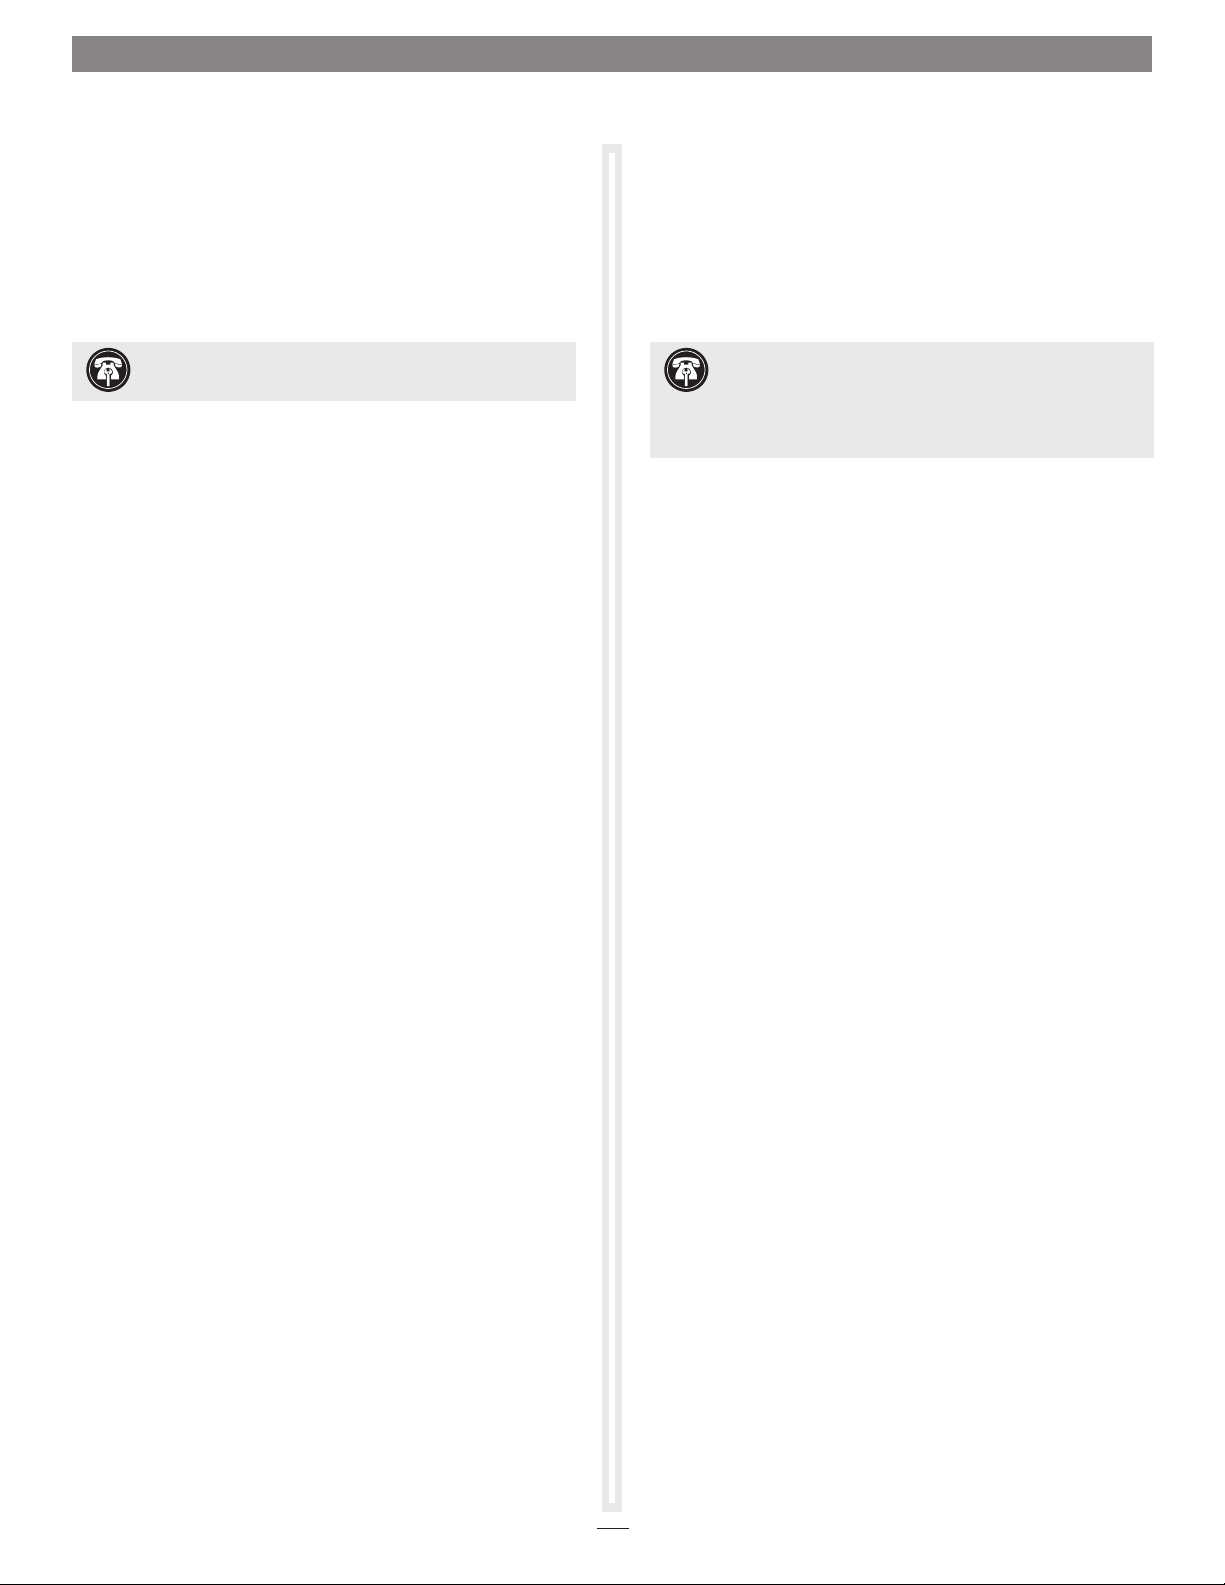
Presto Gigabit USB 3.0 Description
Listed below are pictures and descriptions of the Presto adapter’s
ports and indicators.
Power Socket
(not used)
Link
Indicator
Ethernet Port
(RJ -45 t ype)
Ethernet Port – Plug in any Category 5 or 6 unshielded twisted
pair (UTP) cable with RJ-45 connectors
Link Indicator – This green LED displays the link status.
• When the LED is off, there is no link between the Presto
adapter and the network.
• When the LED is on, a link is established between the Presto
adapter and the network.
Activity
Indicator
Activity Indicator – This yellow LED displays activity status.
• When the LED is off, there is no network activity.
• When the LED flashes, there is network activity.
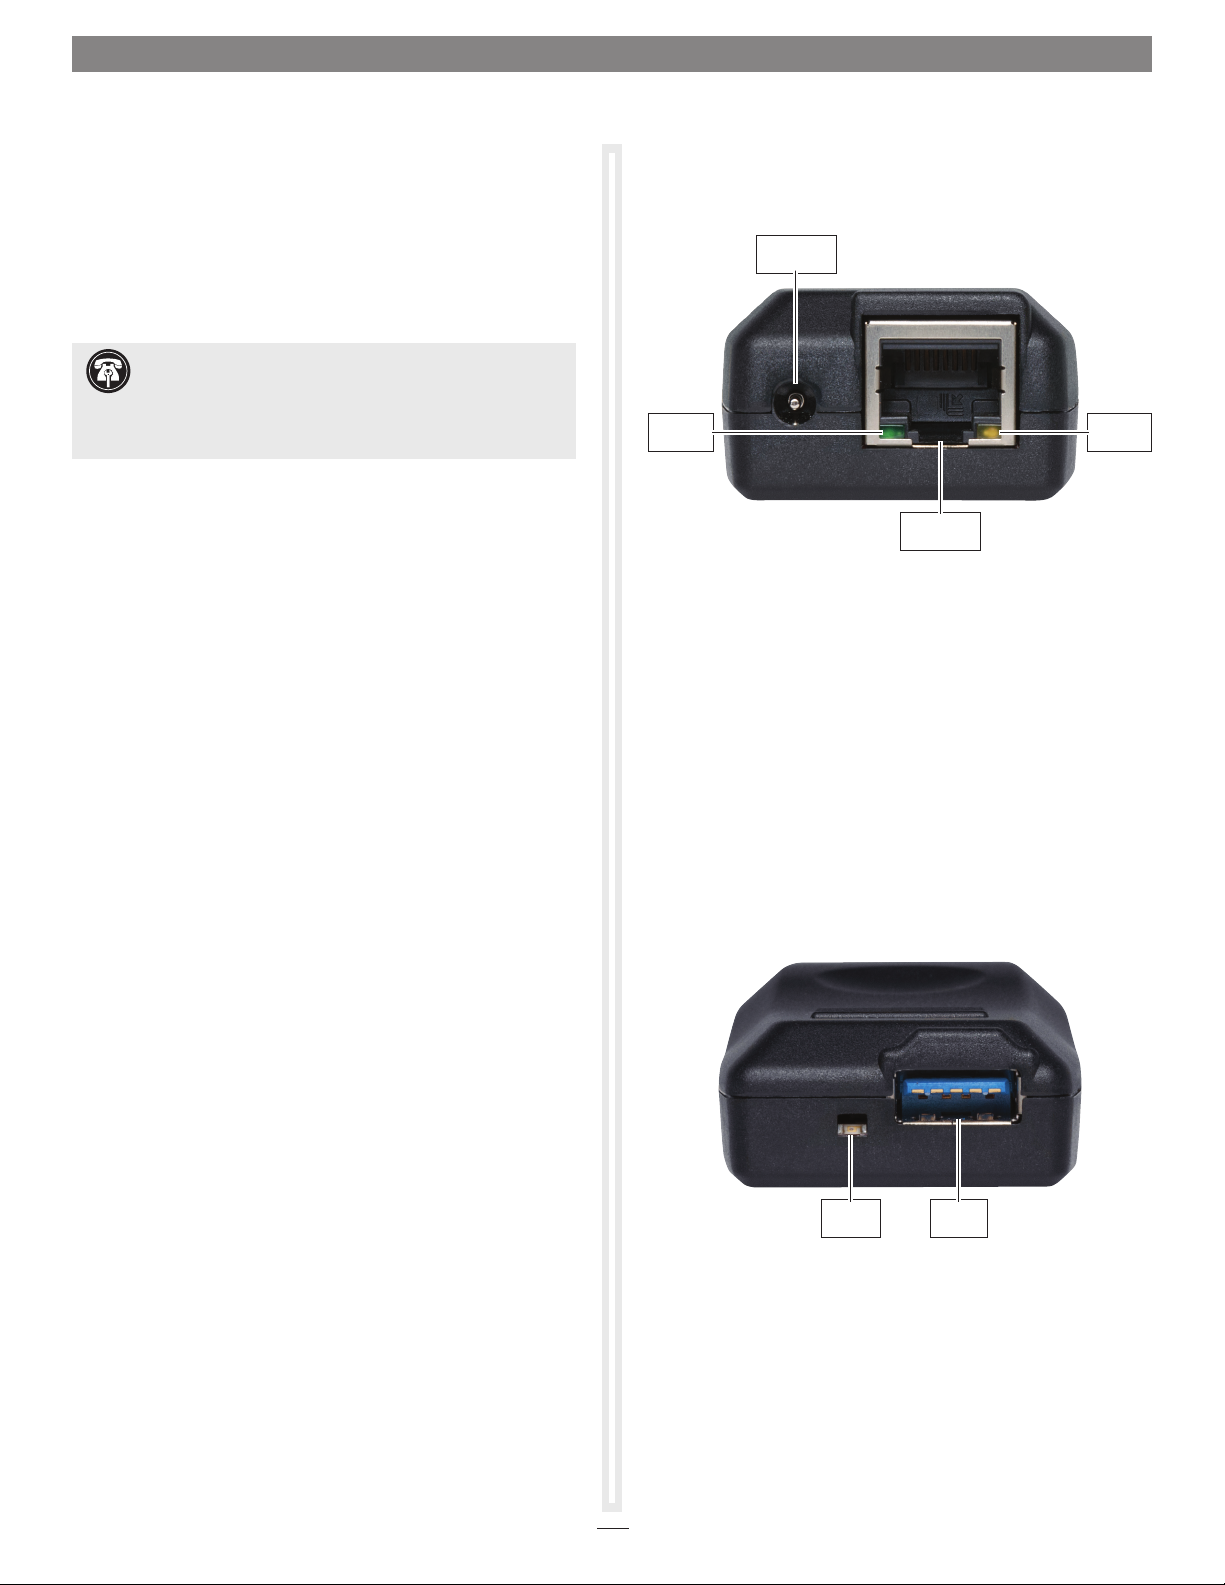
USB 3.0
Indicator
USB 3.0
Port
USB 3.0 Port – Connect either the included USB 3.0 cable or
another USB 3.0 cable between the adapter and your computer.
USB 3.0 Indicator – This LED lights green when there is a USB 3.0
connection between the computer and adapter.
4
 Loading...