

Page 1

™
For
FUSION
Rugged and Portable 2-Drive Hardware RAID SATA Storage System
F
3
User’s Guide
Windows
Page 2
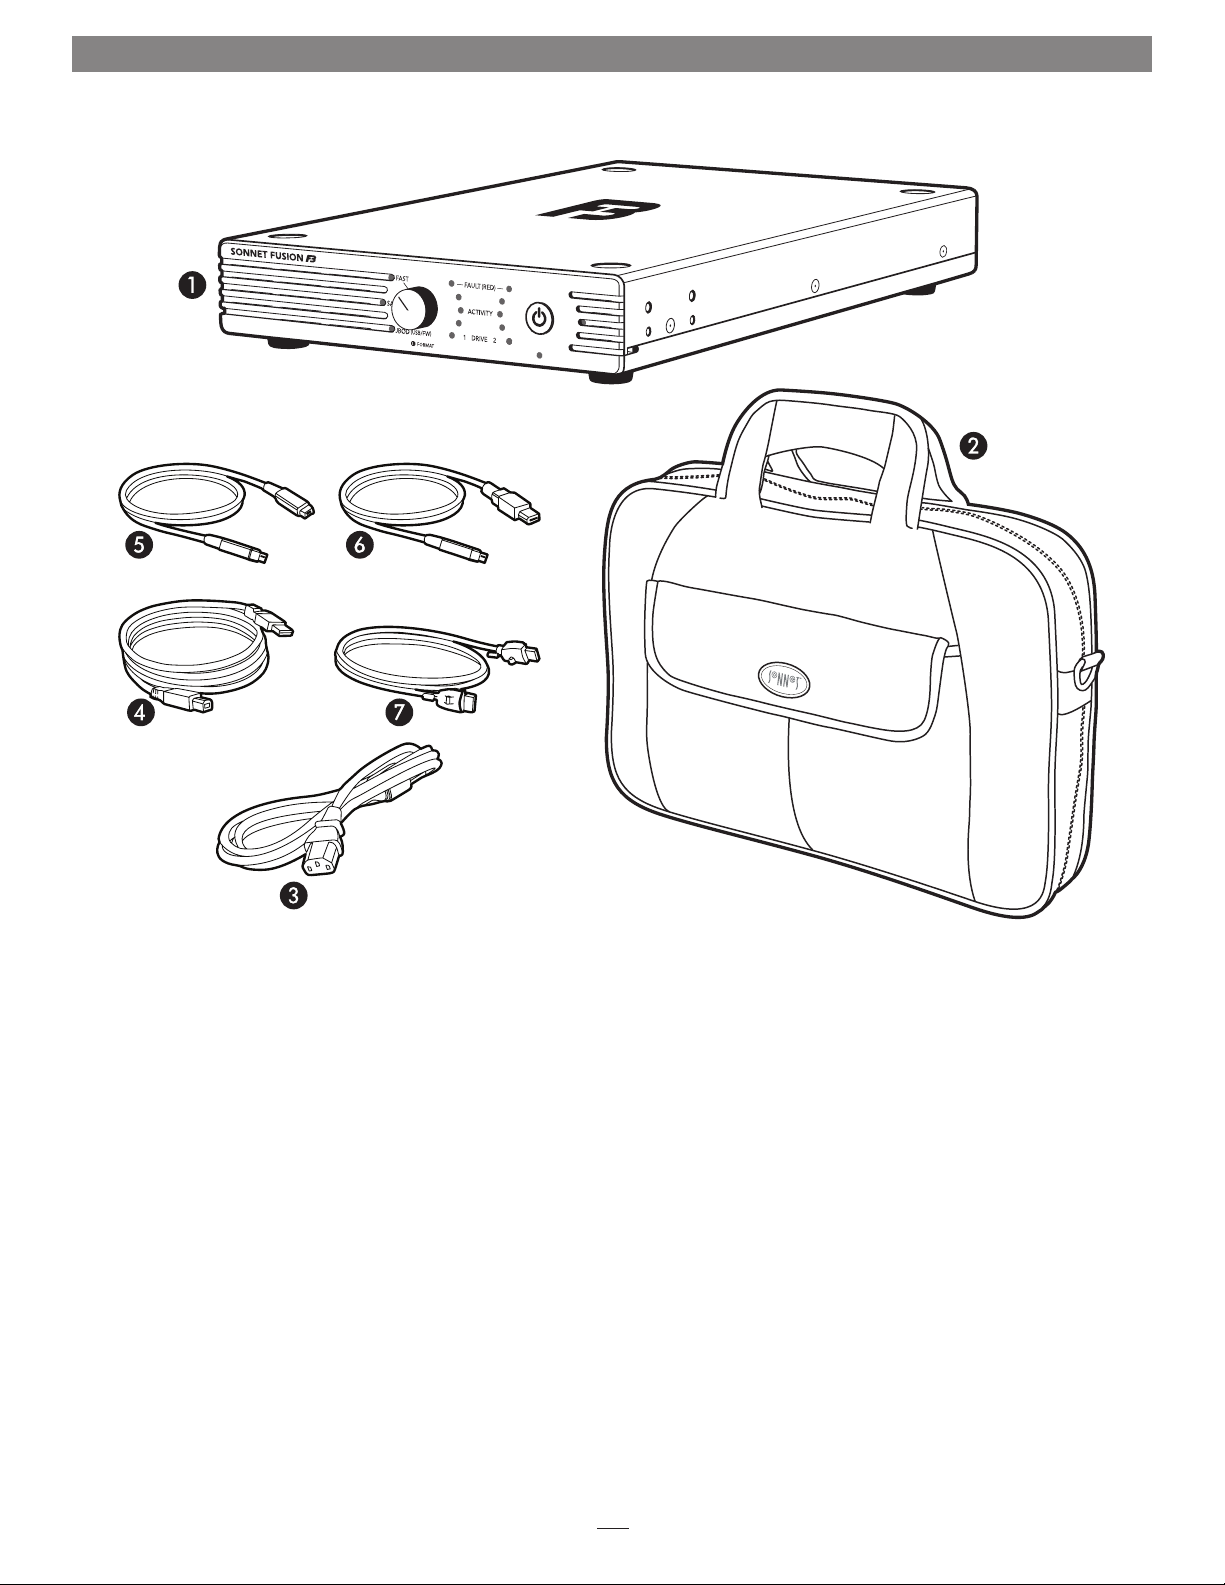
Fusion F3 Package Contents
1 – Fusion F3 2-Drive RAID SATA Storage System
2 – Carrying Case
Store the Fusion F3, interface cables and power cord for
on-the-go use.
3 – Power Cord
US version shown; version varies by region.
4 – USB 2.0 Cable
2-meter A male to B male cable
5 – FireWire 800 Cable
2-meter 9-pin male to 9-pin male cable
6 – FireWire 400 Cable
2-meter 9-pin male (FireWire 800) to 6-pin male (FireWire 400)
cable
6 – Locking eSATA Cable
2-meter eSATA data cable with locking connectors, compatible
with Fusion F3 and Sonnet Tempo PCI-X and PCIe eSATA host
controller cards. Note: You may remove the lock housing if
necessary.
2
Page 3
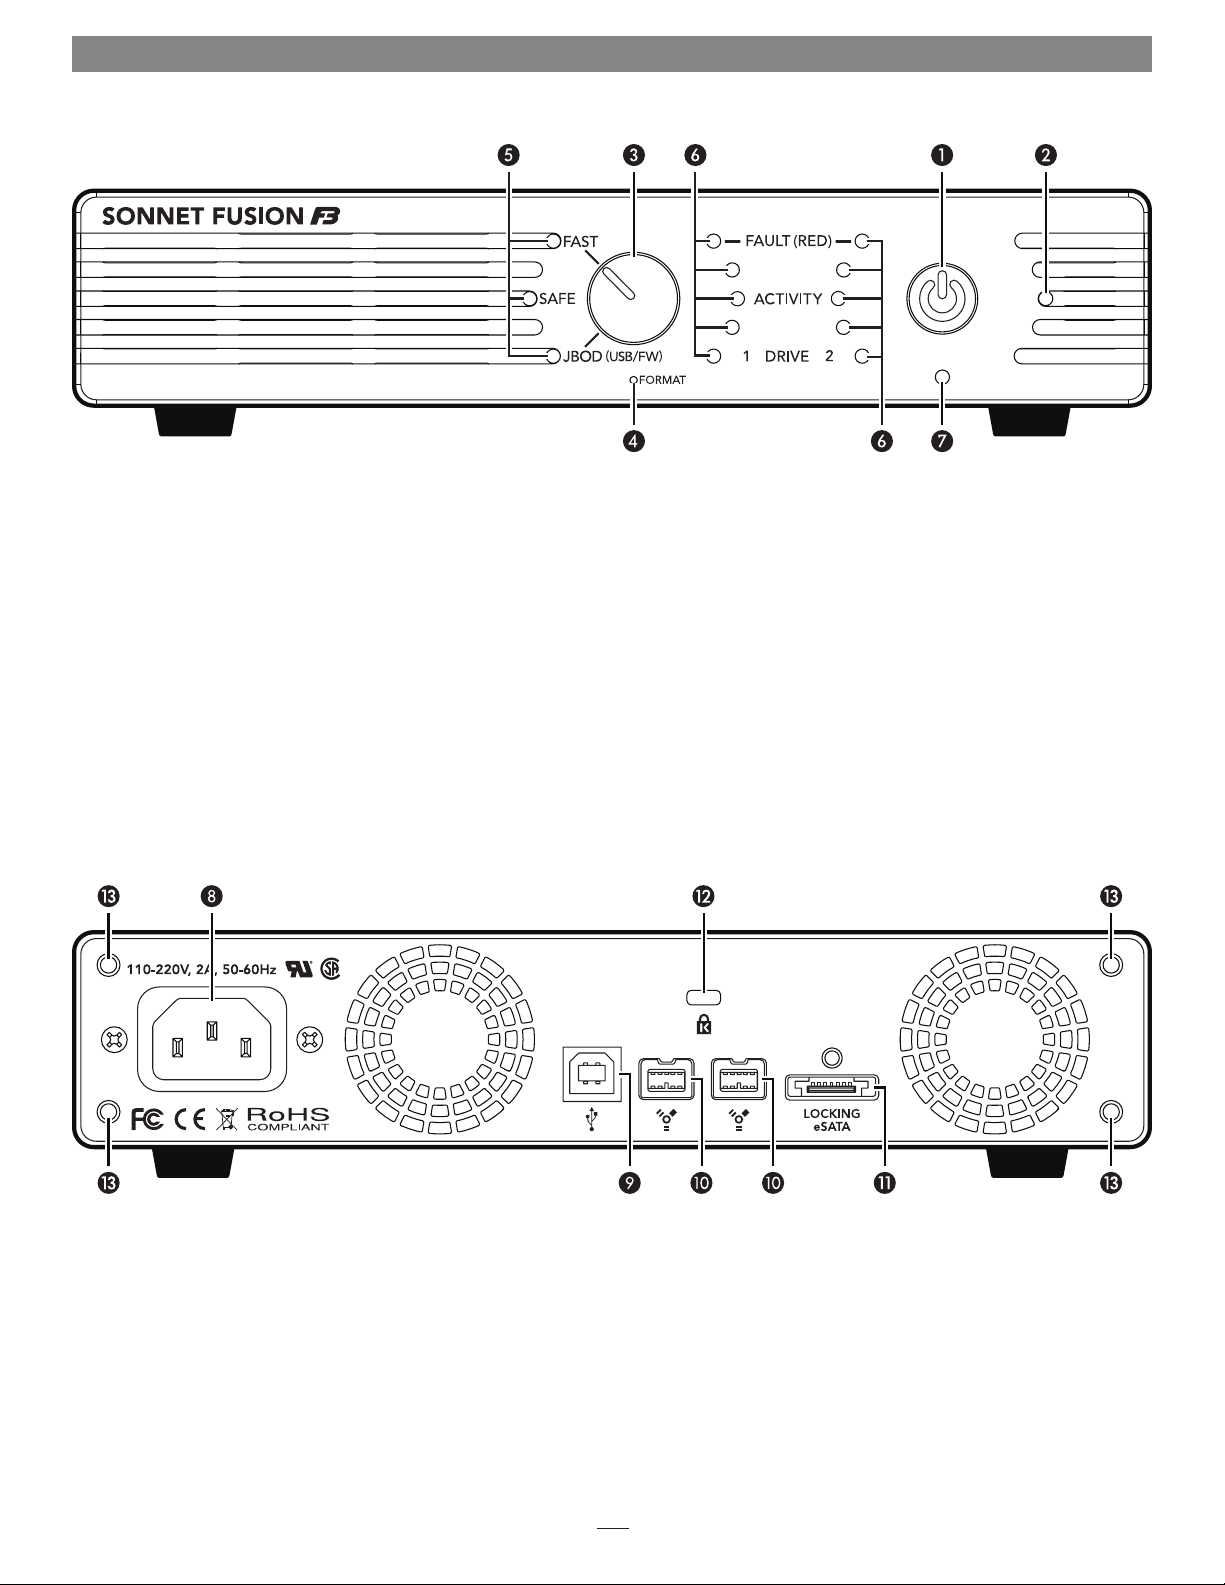
Fusion F3 Specifications and Features
1 – Power Button
2 – Power Indicator LED
This indicator lights when Fusion F3 is powered.
3 – Drive Configuration Selector Switch
Select the drive configuration using this switch.
4 – Drive Configuration Format Switch
This switch is mounted behind the front panel, and is
depressed with a paper clip to enable drive configuration
switching.
5 – Drive Configuration Indicator LEDs
These LEDs indicate the current drive configuration: FAST
(RAID 0), SAFE (RAID 1), and JBOD (individual drives).
6 – Drive Presence, Activity, and Fault Indicator LEDs
These LEDs indicate the drives’ ready state (bottom LEDs),
read and write activity (all LEDs), and fault (error) status (top
LEDs). LEDs on the left light and flash for drive 1, LEDs on
the right for drive 2.
7 – Ambient Light Sensor
This sensor controls the LEDs’ brightness. The lower the
ambient light level, the dimmer the LEDs will glow.
8 – Power Cord Socket
9 – USB 2.0 Interface Port
10 – FireWire 800 Interface Ports
These ports are compatible with FireWire 400 ports on
computers and adapter cards when the correct cable is used.
11 – Locking eSATA Interface Port
This port is compatible with the included Sonnet locking
eSATA data cable and standard eSATA data cables as well.
12 – Security Slot
This slot works with Kensington® brand and similar security
locks to secure the Fusion F3 enclosure and deter theft.
13 – Rackmount Kit’s Rear Bracket Mounting Holes
These holes are used when you attach the optional
rackmount kit’s rear mounting brackets. Note: The
rackmount kit for one or two Fusion F3 systems, part
number FUS-F3-RK, is sold separately, and is available for
purchase through your reseller.
3
Page 4

Safety Precautions and Disclaimers
SAFETY PRECAUTIONS
Please read this section carefully before proceeding. These
precautions explain the correct and safe use of this device,
thereby helping to prevent injury to you or others, and also help
you to minimize the risk of damaging the device.
Warnings
Always follow the basic warnings listed here to avoid the risk of
serious injury or death from electrical shock, short-circuiting, fire,
and other hazards. These warnings include, but are not limited to:
• With the exception of the user-swappable parts, do not attempt
to disassemble or modify the enclosure. If this device appears to
be malfunctioning, contact your reseller or local distributor.
• Do not drop the enclosure or any of its drive modules;
dropping or mishandling of the enclosure or drive modules
may result in a malfunction.
• Do not insert your fingers or foreign objects inside the enclosure;
take particular care when small children are present.
• Do not expose the device to rain, use it near water or containers
that contain liquids which might spill into any openings, or in
damp or wet conditions.
DISCLAIMERS
Drive Usage:
Sonnet Technologies has qualified the hard drives listed below
for use in Fusion F3 storage systems. These drives were chosen
for their superior performance, error handling, and reliability
characteristics, especially when used in RAID groups. One
important difference between these drives and standard hard
drives is how quickly each handles read errors—these qualified
drives attempt to recover from errors for just a few seconds,
while standard hard drives may take minutes. Because RAID
controller cards and software-based RAID schemes allow only
a very short time for drives to recover before dropping them
from the RAID group, hard drive manufacturers recommend
against using standard hard drives in RAID storage systems. The
hard drives qualified by Sonnet also feature improved vibration
characteristics that influence and support storage reliability. We
recommend the use of these Enterprise/RAID edition hard drives
and select, Sonnet certified desktop hard drives in your Fusion
storage system to ensure system reliability and performance.
STANDARD DRIVES MAY NOT BE SUPPORTED AND MAY
DEGRADE SYSTEM RELIABILITY AND PERFORMANCE. Check
the Sonnet Web site for the latest list of qualified hard drives.
2TB Models
• Hitachi Deskstar 7K2000, # HDS722020ALA330
• If unusual smells, sounds, or smoke come from the device, or if
liquids enter it, switch it off immediately and unplug it from the
electrical outlet.
• Follow the instructions in this manual carefully; contact your
reseller or local distributor for additional advice not covered in
this User’s Guide.
4
Page 5

Fusion F3 Setup
A. Set Drive Configuration
The drives inside Fusion F3 are configured as a RAID 0 group (FAST),
and Mac OS Extended (Journaled)-formatted. If this configuration
suits your needs, skip to B. Connect Interface Cable on the next
page. Otherwise, follow the steps below to configure the F3’s drives.
WARNING: Reconfiguring the drives in your Fusion F3
enclosure requires you to reformat them. Reformatting the
drives will erase any data on them! If there is any data on them,
back it up before configuring the drives.
1. Connect the supplied power cable between the Fusion F3 and a
grounded wall outlet or power strip; verify the cable is plugged
in securely. Leave the interface cable disconnected for now.
2. Power up the Fusion F3 and wait until the blue drive presence
LEDs stop flashing.
3. Turn the drive configuration selector switch to the drive
configuration setting you wish to use—FAST (RAID 0), SAFE
(RAID 1) or JBOD (individual drives) (Figure 1).
Support Note: If you intend to use the JBOD configuration
and access both drives separately, you must connect Fusion F3
to your computer via FireWire or USB, not eSATA. When JBOD
configuration is selected and Fusion F3 is connected via eSATA , only
one of the two drives may be used.
4. Insert a straightened paper clip straight into the hole next to
the Format label on the F3’s front panel (Figure 2), and then
gently press and hold the format switch for 6 seconds. During
that time, the LED next to the selected mode will first turn
yellow, and then start to flash after four seconds (Figure 2); if
you have selected a different configuration, the LED next to the
previous drive configuration setting remains lit green until the
configuration format is completed.
Figure 1
Figure 2
5. Release the switch and remove the paper clip from the hole; all
drive activity LEDs will quickly light up blue (Figure 3). The
LED next to the selected drive configuration will light green;
the new configuration is set (Figure 4). You may now format the
drives using your computer’s operating system drive formatting
application; go to page 6.
Support Note: If you release the Format switch before the
configuration LED starts to flash, the drive configuration will
not be changed; you must repeat steps 4 and 5 again to change the
drive configuration.
Figure 3
Figure 4
5
Page 6

Drive Setup
B. Connect Interface Cable
1. Using one of the supplied cables (eSATA, FireWire 800,
FireWire 400, USB 2.0), connect the Fusion F3 to your
computer. For maximum performance, connect the
D400QR5 to a SATA host controller card. Remember, if you
formatted the F3’s drives in JBOD mode, you must use either
a FireWire or USB cable, not eSATA.
Support Note: The supplied Sonnet locking eSATA
cable is compatible with all eSATA ports and provides a
far more secure connection when used with Sonnet drive
enclosures and host controller cards with the matching
connector. If necessary, you may remove the locking mechanism
from the connector by removing the screws securing the two
halves.
C. Drive Formatting - Mac OS Users’ Instructions
WARNING: Formatting the drives will erase any data
on them! If there is any data on them, back it up before
configuring the drives.
Support Notes: If you have selected JBOD configuration
for the Fusion F3’s drives, two Disk Insertion windows will
appear. Perform steps 1–4 for each drive.
1. Assuming your computer is turned on, after the Fusion F3
is powered, a Disk Insertion window will appear onscreen
stating that there is an unreadable volume; click Initialize;
Disk Utility will open.
2. In the Disk Utility window, the RAID group will appear as a
single volume. Select the volume, and then click the Erase tab
at the top of the window.
C. Drive Setup - Windows 7/Server 2008/Vista
Users’ Instructions
WARNING: Formatting the drives will erase any data
on them! If there is any data on them, back it up before
configuring the drives.
1. Click Start, then right-click Computer, and then click Manage.
2. In the Computer Management window, click Storage in the
left pane to expand the list (if necessary), and then click Disk
Management.
3. If you are using Windows Vista, an Initialize Disk window will
appear; skip to step 4. If you are using Windows 7 or Server
2008, when the disks are displayed, the Fusion F3’s drives
will appear as a single volume when configured as FAST or
SAFE (or as two drives if configured as JBOD), and listed as
“unallocated”. Right-click where the words “Not Initialized”
appear and select Initialize Disk.
4. In the Initialize Disk window, select GPT, and then Click OK.
5. Back in the Computer Management window, right-click where
the word “Unallocated” appears, and then select New Simple
Volume.
6. When the New Simple Volume Wizard window appears, click
Next.
7. When the Specify Volume Size window appears, click Next
if you want all of the F3’s capacity to remain as one block
(volume). Otherwise, adjust the volume size to meet your
needs, and then click Next.
3. Click Erase; a window will appear asking you to approve
your choice.
4. Click Erase; the Fusion F3 volume will appear on your
computer’s desktop.
5. Close Disk Utility; the F3 is ready for use.
8. When the Assign Drive Letter or Path window appears, select
Assign the following drive letter, choose a letter, and then
click Next.
9. When the Format Partition window appears, enter a new
name for the volume, select “Perform a quick format”, and
then click Next.
Note: If you do not select the quick format option, this process will take
much longer to complete.
9. When the next window appears, click Finish; once “Healthy
(Primary Partition)” appears, the F3 is ready for use.
6
Page 7

Specifications, Precautions, FCC Compliance, and Support Information
Specifications
Compatibility Compatible with Mac®,
Interface Connectors eSATA, 2x FireWire 800, USB 2.0
Data Transfer Speed Up to 205MB/s, depending on
OS Support Platform independent
Operating Temperature 32 to 95˚ F (0˚ C to +35˚ C)
Dimensions (WxDxH, with
feet attached)
Weight 8.5 lbs (3,9 kg)
RoHS Compliant Yes
Package Contents 2-meter locking eSATA data
Windows®, and Linux®
computers with compatible
interface
interface used and configuration
8.7 x 13.9 x 2 in
(22,1 x 35,3 x 5,1 cm)
cable, 2-meter FireWire 800
cable, 2-meter FireWire 800 to
400 cable, 2-meter USB 2.0 A to
B cable, User’s Guide
SAFETY PRECAUTIONS
Please read this section carefully before proceeding. These
precautions explain the correct and safe use of this device,
thereby helping to prevent injury to you or others, and also help
you to minimize the risk of damaging the device.
Warnings
Always follow the basic warnings listed here to avoid the risk of
serious injury or death from electrical shock, short-circuiting, fire,
and other hazards. These warnings include, but are not limited to:
FCC Compliance
Fusion F3 is an FCC Class A device, intended for commercial,
industrial, or business environments.
Contacting Sonnet Customer Service
USA Customers
The Sonnet Web site located at www.sonnettech.com has the
most current support information and technical updates. Before
you call Sonnet Customer Service, please check our Web site for
the latest updates and online support files, and check this User’s
Guide for helpful information. When you call Sonnet Customer
Service, have the following information available so our customer
service staff can better assist you:
• Product name
• Date and place of purchase
• Hard drive model(s)
• Computer model
• Operating system
• Software/firmware versions
If further assistance is needed, please contact Sonnet Customer
Service at:
Online Service Form: http://serviceform.sonnettech.com
Tel: 1-949-472-2772
(Monday–Friday, 7 a.m.–4 p.m. Pacific Time)
Fax: 1-949-457-6349
E-mail: support@sonnettech.com
For Customers Outside the USA
For support on this product, contact your reseller or local
distributor.
• With the exception of the user-swappable parts, do not attempt
to disassemble or modify the enclosure. If this device appears to
be malfunctioning, contact your reseller or local distributor.
• Do not drop the enclosure; dropping or mishandling of the
enclosure or adapter card may result in a malfunction leaving
the product inoperable.
• Do not expose the device to rain, use it near water or containers
that contain liquids which might spill into any openings, or in
damp or wet conditions.
• If unusual smells, sounds, or smoke come from the device, or if
liquids enter it, switch it off immediately and unplug it from the
electrical outlet.
• Follow the instructions in this manual carefully; contact your
reseller or local distributor for additional advice not covered in
this User’s Guide.
Visit Our Web Site
For the most current product information and online support
files, visit the Sonnet Web site at www.sonnettech.com/support/.
Register your product online at http://registration.sonnettech.
com to be informed of future upgrades and product releases.
7
Page 8

©2011 Sonnet Technologies, Inc. All rights reserved. Sonnet, the Sonnet logotype, Simply Fast, the Simply Fast logotype, Creativity Stored Here, and Fusion are trademarks of Sonnet Technologies, Inc. FireWire, the FireWire
logo, Mac, the Mac logo, and Mac OS are trademarks of Apple Inc., registered in the United States and other countries. Other product names are trademarks of their respective owners. Product specifications subject to
change without notice. Printed in the USA. UG-FUS-F3-WD-E-D-042111
 Loading...