

Page 1
™
For
FUSION
Portable 2-Drive Hardware RAID SATA Storage System
F
2
QR
User’s Guide
Windows
Page 2

Page 3
Introduction
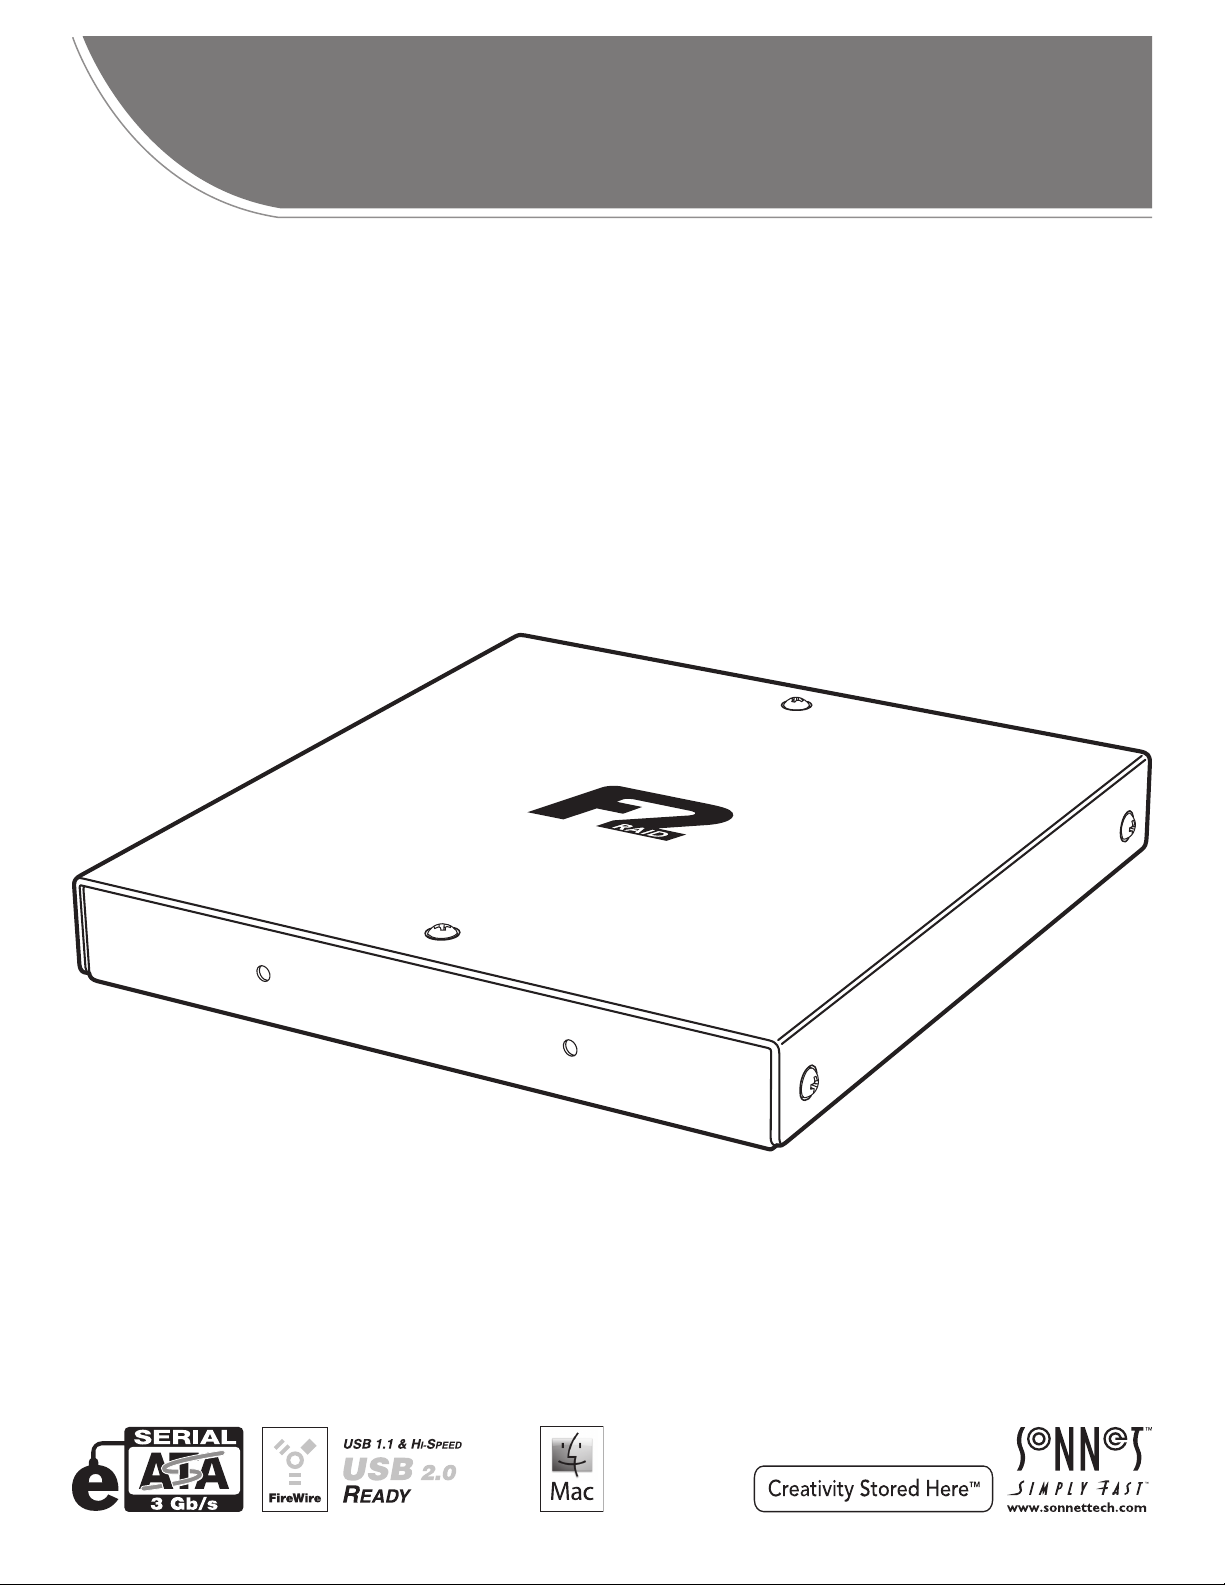
Thank you for purchasing the Sonnet Fusion
2-drive hardware RAID storage system with quad interface.
With its small footprint, low power requirements, and great
performance, this rugged device is ideally suited for use in the
field or office.
The F2QR’s quad interface offers extensive connectivity. Choose
eSATA or FireWire 800 for maximum speed or medium speed,
respectively. Or, use FireWire 400 or USB 2.0 for flexibility.
™
F2QR portable
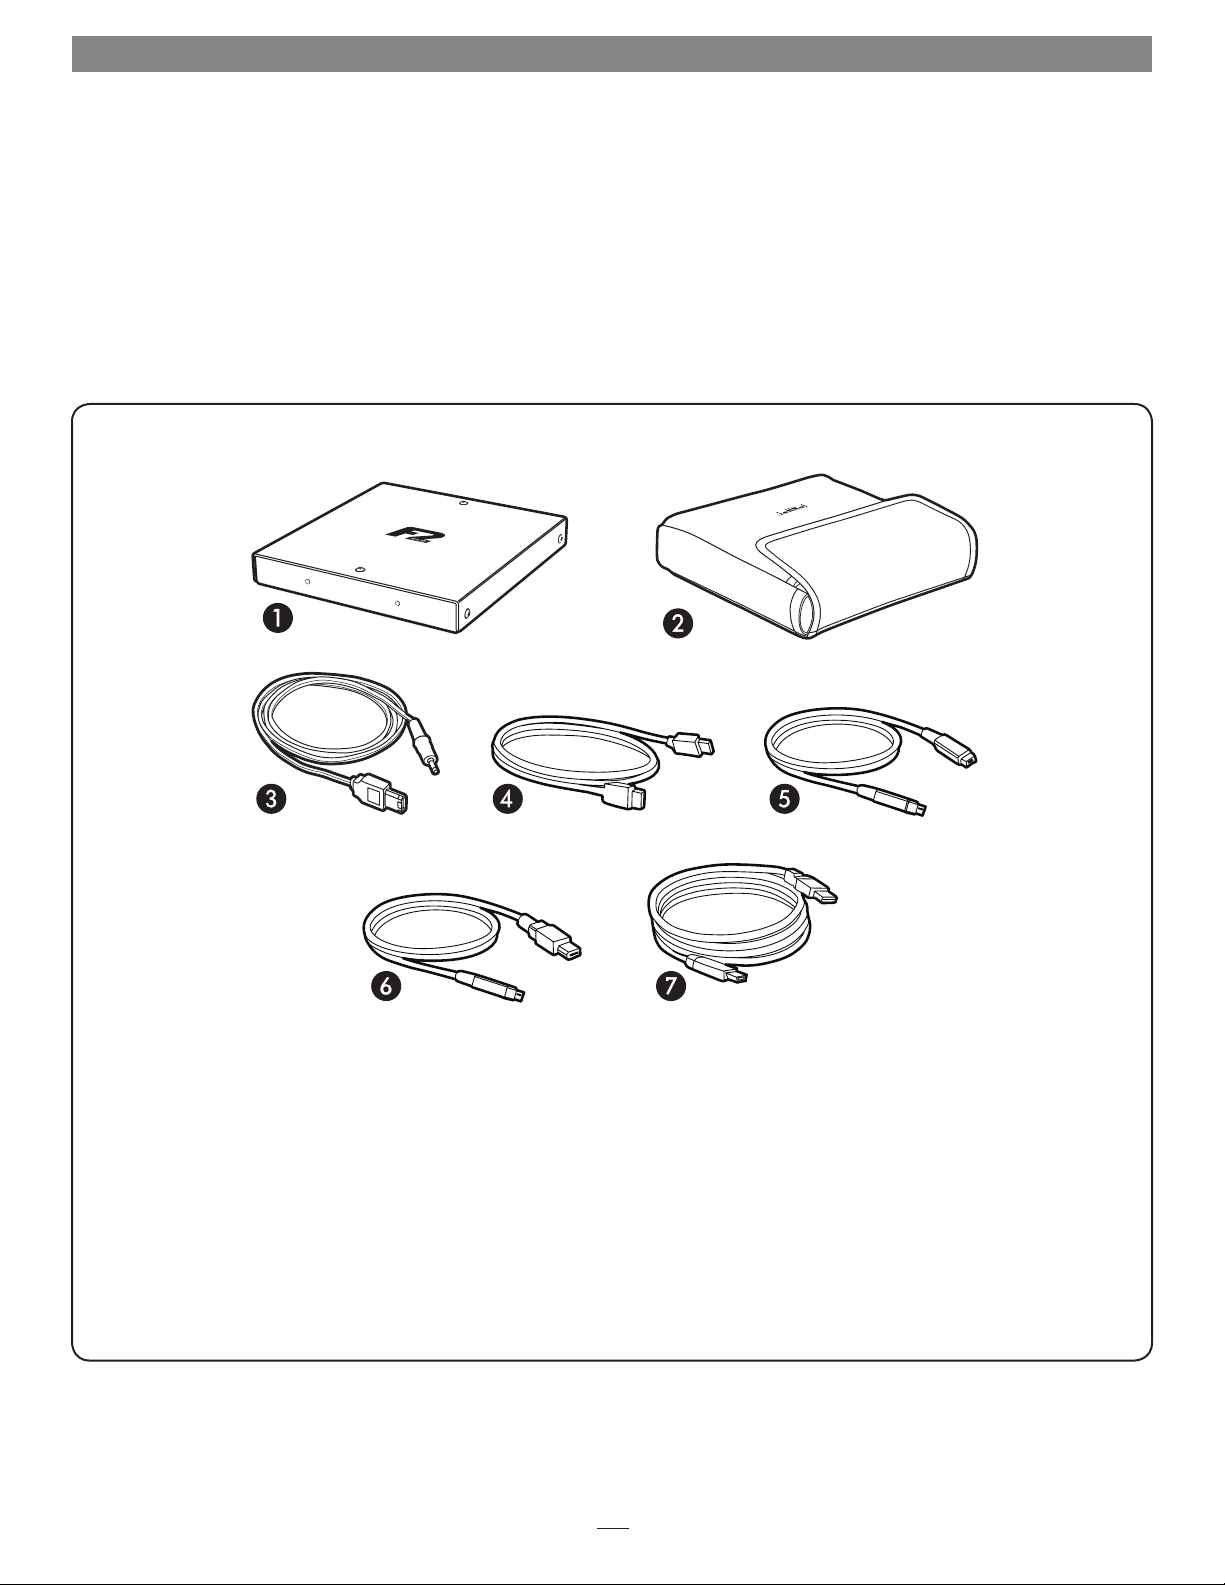
Fusion F2QR Package Contents
The F2QR’s built-in hardware RAID controller supports RAID 0
(striped), RAID 1 (mirrored), JBOD (just a bunch of disks) and
SPAN configurations without relying on a separate adapter card.
Out of the box, the drives inside Fusion F2QR are unconfigured
and unformatted. Continue reading to learn how to set the
drive configuration to meet your needs.
1 – Fusion F2QR 2-Drive RAID SATA Storage System
2 – Carrying Case
Store the Fusion F2QR, interface and power cables for on-the-
go use.
3 – Power Cable
Power the F2QR using a spare FireWire 400 port on your
computer or powered FireWire hub.
4 – eSATA Cable
1-meter eSATA data cable
5 – FireWire 800 Cable
1-meter 9-pin male to 9-pin male cable
6 – FireWire 400 Cable
1-meter 9-pin male (FireWire 800) to 6-pin male (FireWire
400) cable
7 – USB 2.0 Cable
2-meter A male to mini B male cable
1
Page 4
Fusion F2QR Features, Safety Precautions
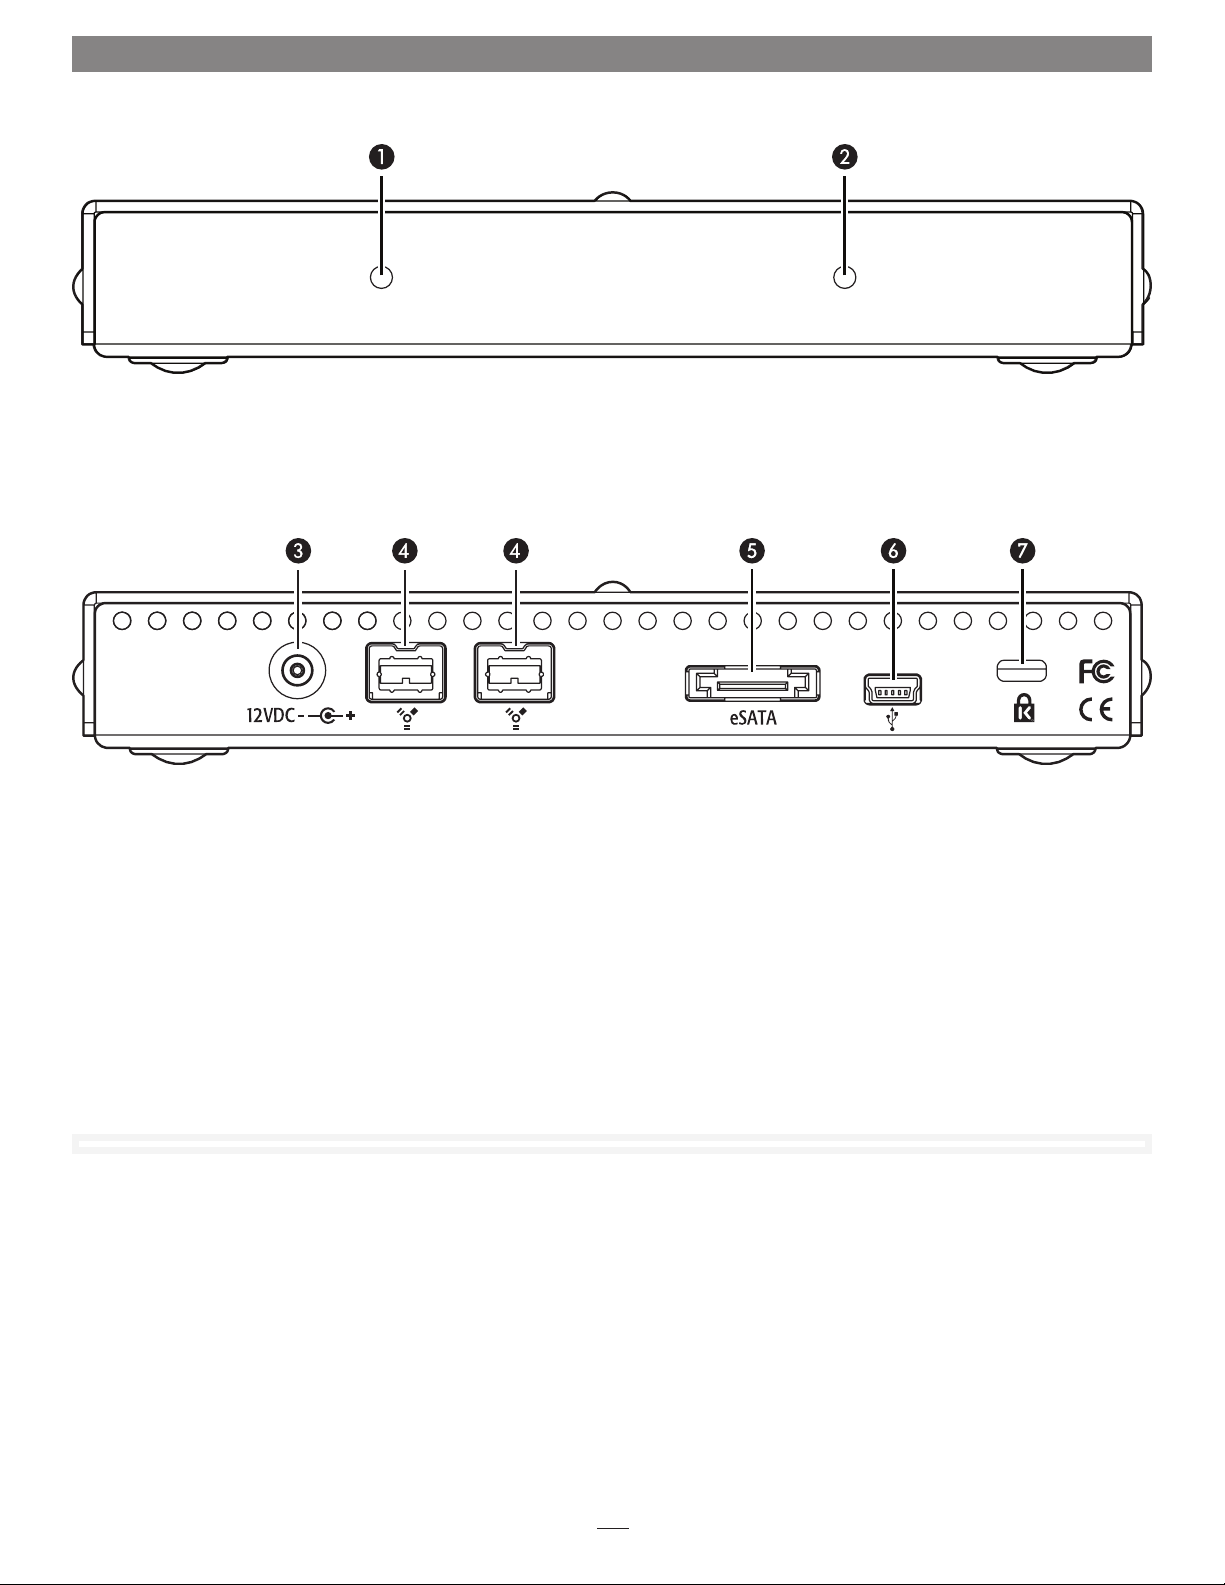
1 – Drive Power and Activity LED Indicator, Drive 2
This LED indicates the drive’s ready state (blue LED on), read
and write activity (blue LED flashing), drive error and RAID
1 rebuild operation (red LED flashing).
3 – Power Cable Socket
When you connect the Fusion F2QR to your computer using
an eSATA or USB cable, you must also provide power to the
drives using the included power cable or the optional Fusion
World Travel Power Adapter (part # PWR-UAC-12V).
4 – FireWire 800 Interface Ports
In addition to FireWire 800, these ports support FireWire
400 connections on computers and adapter cards when
used with the included FireWire 400 to FireWire 800 cable.
Fusion F2QR may be bus powered (no other power source
required) when connected to a powered FireWire port on a
computer or hub.
2 – Drive Power and Activity LED Indicator, Drive 1
This LED indicates the drive’s ready state (blue LED on), read
and write activity (blue LED flashing), drive error and RAID 1
rebuild operation (red LED flashing).
5 – eSATA Interface Port
This port is compatible with standard eSATA data cables.
When connected to your computer using the eSATA cable,
Fusion F2QR requires a power source.
6 – Mini USB 2.0 Interface Port
When connected to your computer using the USB cable,
Fusion F2QR requires a power source.
7 – Security Slot
This slot works with Kensington
locks to secure the Fusion F2QR enclosure and deter theft.
®
brand and similar security
SAFETY PRECAUTIONS
Please read this section carefully before proceeding. These
precautions explain the correct and safe use of this device,
thereby helping to prevent injury to you or others, and also help
you to minimize the risk of damaging the device.
Warnings
Always follow the basic warnings listed here to avoid the risk of
serious injury or death from electrical shock, short-circuiting, fire,
and other hazards. These warnings include, but are not limited to:
• Do not attempt to disassemble or modify the enclosure. If this
device appears to be malfunctioning, contact Sonnet Customer
Service.
• Do not drop the enclosure. Dropping or mishandling the
enclosure may void the warranty.
• Do not expose the device to rain, use it near water or containers
that contain liquids which might spill into any openings, or use
it in damp or wet conditions.
• If unusual smells, sounds, or smoke come from the device, or if
liquids enter it, disconnect the power cable immediately.
• Follow the instructions in this manual carefully; contact Sonnet
Customer Service for additional advice not covered in this
manual.
2
Page 5

Set Drive Configuration
The drives included in the Fusion F2QR are shipped
unconfigured and unformatted. In order to use the F2QR you
must first configure the drives (RAID 0, RAID 1, Span, or JBOD)
and then format them (Mac OS Extended or NTFS, for example).
A. RAID Master Application Software Download and
Installation Steps for Mac OS X Users
In order to set or change the F2QR’s drive configuration, you
must use the RAID Master application, which you may download
from the Sonnet Website.
1. Log onto the Internet.
2. Go to http://www.sonnettech.com/support/kb/kb.php, click
on the Storage Solutions link, and then click on the Fusion
F2QR link.
3. Locate and click the Driver link, then click the Fusion
F2QR RAID Master Software (Mac) link, and then click the
Download Now button; the file will be downloaded.
Support Note: The RAID Master application operates
only with the Mac OS X 32-bit kernel. If your computer
automatically starts with the 64-bit kernel, you must reboot it
with the 32-bit kernel in order to install and use the R AID Master
application. To restart your computer using the 32-bit kernel,
select Restart from the Apple menu, and hold the 3 and 2 keys
during startup. Your computer will rever t to using the 64-bit
kernel when you restart your computer again.
2. Go to http://www.sonnettech.com/support/kb/kb.php, click
on the Storage Solutions link, and then click on the Fusion
F2QR link.
3. Locate and click the Driver link, then click the Fusion F2QR
RAID Master (Windows) link, and then click the Download
Now button; depending on the OS and how your computer
is configured, a new window may appear asking you what
to do with the file; click Open. If another window appears
asking for permission to open the file, click Allow.
4. When the window showing the contents of the .zip file
appears, locate and click the Extract Files button (7 or Vista),
or select File > Extract All… from the menu (XP).
5. When the Extract Compressed (Zipped) Folders window
appears, click Browse.
6. When Select a destination window appears, click Desktop, and
then click OK; the application will appear on the desktop.
B. Connect Fusion F2QR for Drive Configuration
Setup
In order to configure the Fusion F2QR’s hard drives, you
must connect it to your computer via USB or FireWire, not
eSATA, before using the RAID Master application. After you
have configured the drives, you may connect the F2QR to your
computer via eSATA.
4. Double-click the raid_master_mac_vx.xx_sonnet.zip
file you just downloaded, and then double-click the
RaidToolVx.x.x.dmg icon. In the Install-RAID window,
double-click the RaidToolvx.x.x.mpkg file to launch the
installer; when the Welcome to the RaidMaster Installer
window appears, click Continue.
5. When the Standard Install window appears, accept the
default destination or choose a new destination, and then
click Install.
6. When asked for a password, enter your password, and then
click OK.
7. Click Continue Installation to install the RAID Master
application and restart your computer. Skip to “B. Connect
Fusion F2QR for Setup”.
A. RAID Master Application Software Download and
Installation Steps for Windows Users
In order to set or change the F2QR’s drive configuration, you
must use the RAID Master application, which you may download
from the Sonnet Website.
1. Log onto the Internet.
1. Connect the F2QR to your computer using one of the
supplied FireWire or USB cables; verify the connectors are
plugged in securely.
2. If you connected the F2QR to your computer using a
FireWire cable, skip to the next step. Otherwise, connect a
power source using either of the following methods; verify
the cable is plugged in securely:
a. Connect the supplied 1-meter power cable between the
Fusion F2QR and a FireWire 400 connector on your
computer or powered FireWire hub.
b. Connect the optional Fusion World Travel Power Adapter
(part # PWR-UAC-12V).
3. If you are a Mac user, two windows warning you about an
unreadable disk will appear onscreen; click Ignore.
If you are using Windows, go to the next step.
4. Go to the next page for an overview of the RAID Master
application, and the following pages for using it and OS
formatting tools to set up the F2QR for use with your
computer.
3
Page 6
Set Drive Configuration
C. RAID Master Application Overview
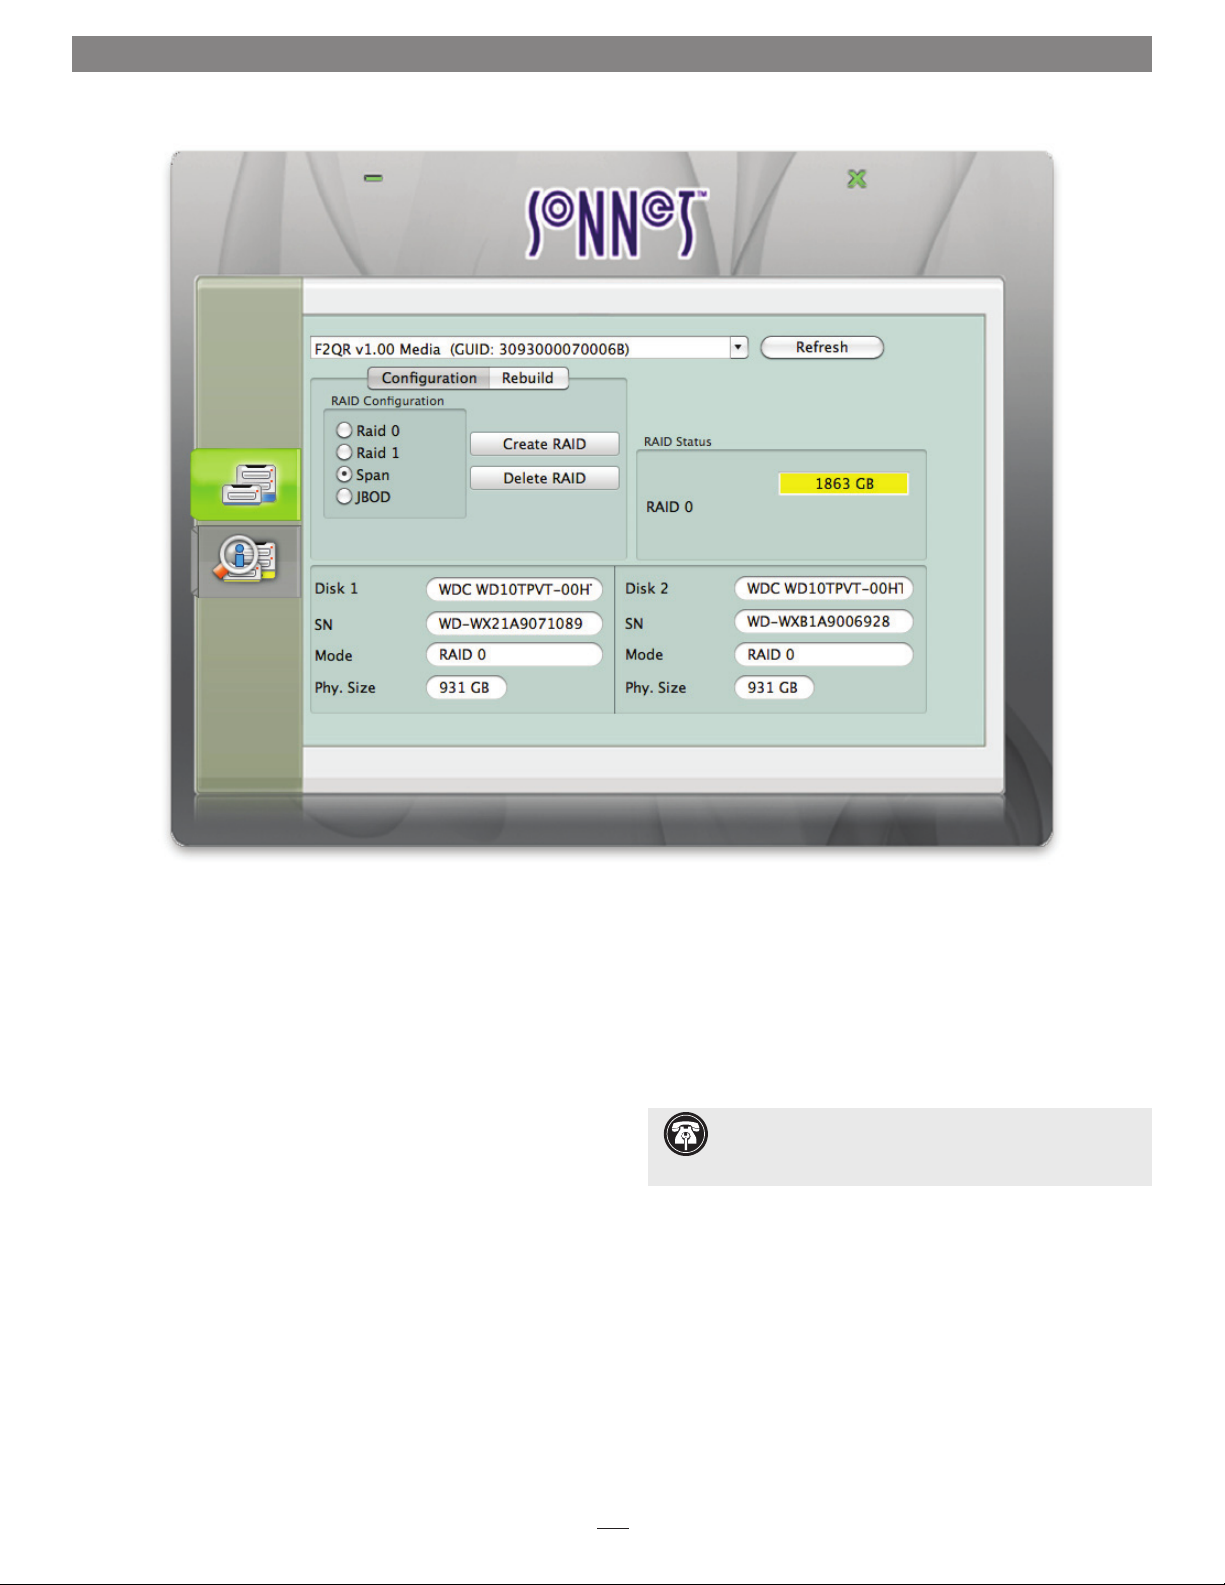
1 – Detail Tab
Default tab for the RAID Master application. When selected,
the window above is displayed.
2 – Summary Tab
Click to display a summary of information on the drives in
the Fusion F2QR.
3 – Minimize Button
Click this button to minimize the application to the dock
(or taskbar).
4 – Close Button
Click to close the RAID Master application.
5 – Name/Firmware Version of the Selected Storage System
Click the arrow to select another Fusion F2QR when more
than one is connected to the computer.
6 – Refresh Button
Click to update the information displayed for the attached
Fusion F2QR.
7 – RAID Configuration Setup and Rebuild Field
Click the Delete RAID button to erase the existing drive
configuration (including JBOD). Click a RAID Configuration
radio button to select a new configuration. Click the Create
RAID button to set the new drive configuration (including
JBOD and Span).
Support Note: Descriptions of RAID levels can be found
on the Wikipedia.org Website at the following address:
http://en.wikipedia.org/wiki/Standard_RAID_levels
8 – RAID Status Field
Indicates the current configuration of the drives in the
Fusion F2QR (RAID 0, RAID 1, Span, JBOD), capacity for
each drive or RAID group, and health for each drive or RAID
group (healthy or degraded).
9 – Detailed Drive Information Field
Displays the manufacturer, model number, serial number,
assigned drive configuration, and capacity for both drives.
4
Page 7

Set Drive Configuration
D. Set Drive Configuration—All Users
Follow the steps below to set the drive configuration using the RAID
Master application.
Support Note for Mac Users: The RAID Master application
operates only with the Mac OS X 32-bit kernel. If your computer
automatically starts with the 64-bit kernel, you must reboot it with the
32-bit kernel in order to use the R AID Master application. To restart your
computer using the 32-bit kernel, select Restart from the Apple menu,
and hold the 3 and 2 keys during startup. Your computer will revert to
using the 64-bit kernel when you restart your computer again.
1. Launch the RAID Master application; after a short time, the
connected F2QR’s information will appear (Figure 1).
2. With the RAID Configuration field selected, click the radio button
next to the RAID configuration you’ve chosen, and then click
Create RAID (Figure 1).
WARNING: Changing the Fusion F2QR’s RAID
configuration will erase all the files on its drives, and
the formatting as well. Back up any important files before proceeding.
Figure 1
3. When the warning window appears, click OK (Figure 2).
4. After a short period of time, the new RAID Configuration
information will appear in the RAID Master window.
5. If you are a Mac user, one or two windows warning you about an
unreadable disk will appear onscreen; click Initialize to launch the
Disk Utility application so you may format the drives for use with
your computer (Figure 3). Go to the next page.
If you are using the Fusion F2QR with a Windows computer, skip to
page 7, Drive Formatting—Windows User’s Instructions.
Figure 2
Figure 3
5
Page 8

Set Drive Configuration
E. Drive Formatting—Mac OS Users’ Instructions
After changing the F2QR’s drive configuration using the RAID Master
application, you must format the drives using Disk Utility.
WARNING: Formatting the drives will erase any data on
them! If there is any data on them, back it up before proceeding.
1. In the Disk Utility window, the RAID group will appear as a single
volume. Select the Fusion F2QR volume in the pane on the left, and
then click the Partition tab on the right (Figure 4).
Support Note: If you have selected JBOD configuration for the
Fusion F2QR’s drives, two F2QR volumes will appear in the Disk
Utility window. Perform steps 1–4 for each drive.
2. Click on the drop-down menu beneath “Volume Scheme:” to
select a number of partitions for the volume; you may optionally
choose to partition each drive to create two or more smaller
“virtual” drives (Figure 5).
Figure 4
3. Click Options; a window will appear giving the option to select a
partition scheme that suits your needs; select a radio button and
then click OK (Figure 6).
4. Back in the main window, click Apply; a window will appear
asking you to confirm that you want to partition the F2QR; click
Partition. After being partitioned, the Fusion F2QR volume will
appear on your computer’s desktop.
5. Close Disk Utility; the F2QR is ready for use.
Figure 5
Figure 6
6
Page 9
Set Drive Configuration
E. Drive Formatting—Windows Users’ Instructions
After setting the F2QR’s drive configuration using the RAID Master
application, you must format the drives using Disk Management.
The procedure listed below describes the process of formatting and
configuring drives under Windows 7; steps for formatting under other
versions are very similar.
WARNING: Formatting the drives will erase any data on
them! If there is any data on them, back it up before proceeding.
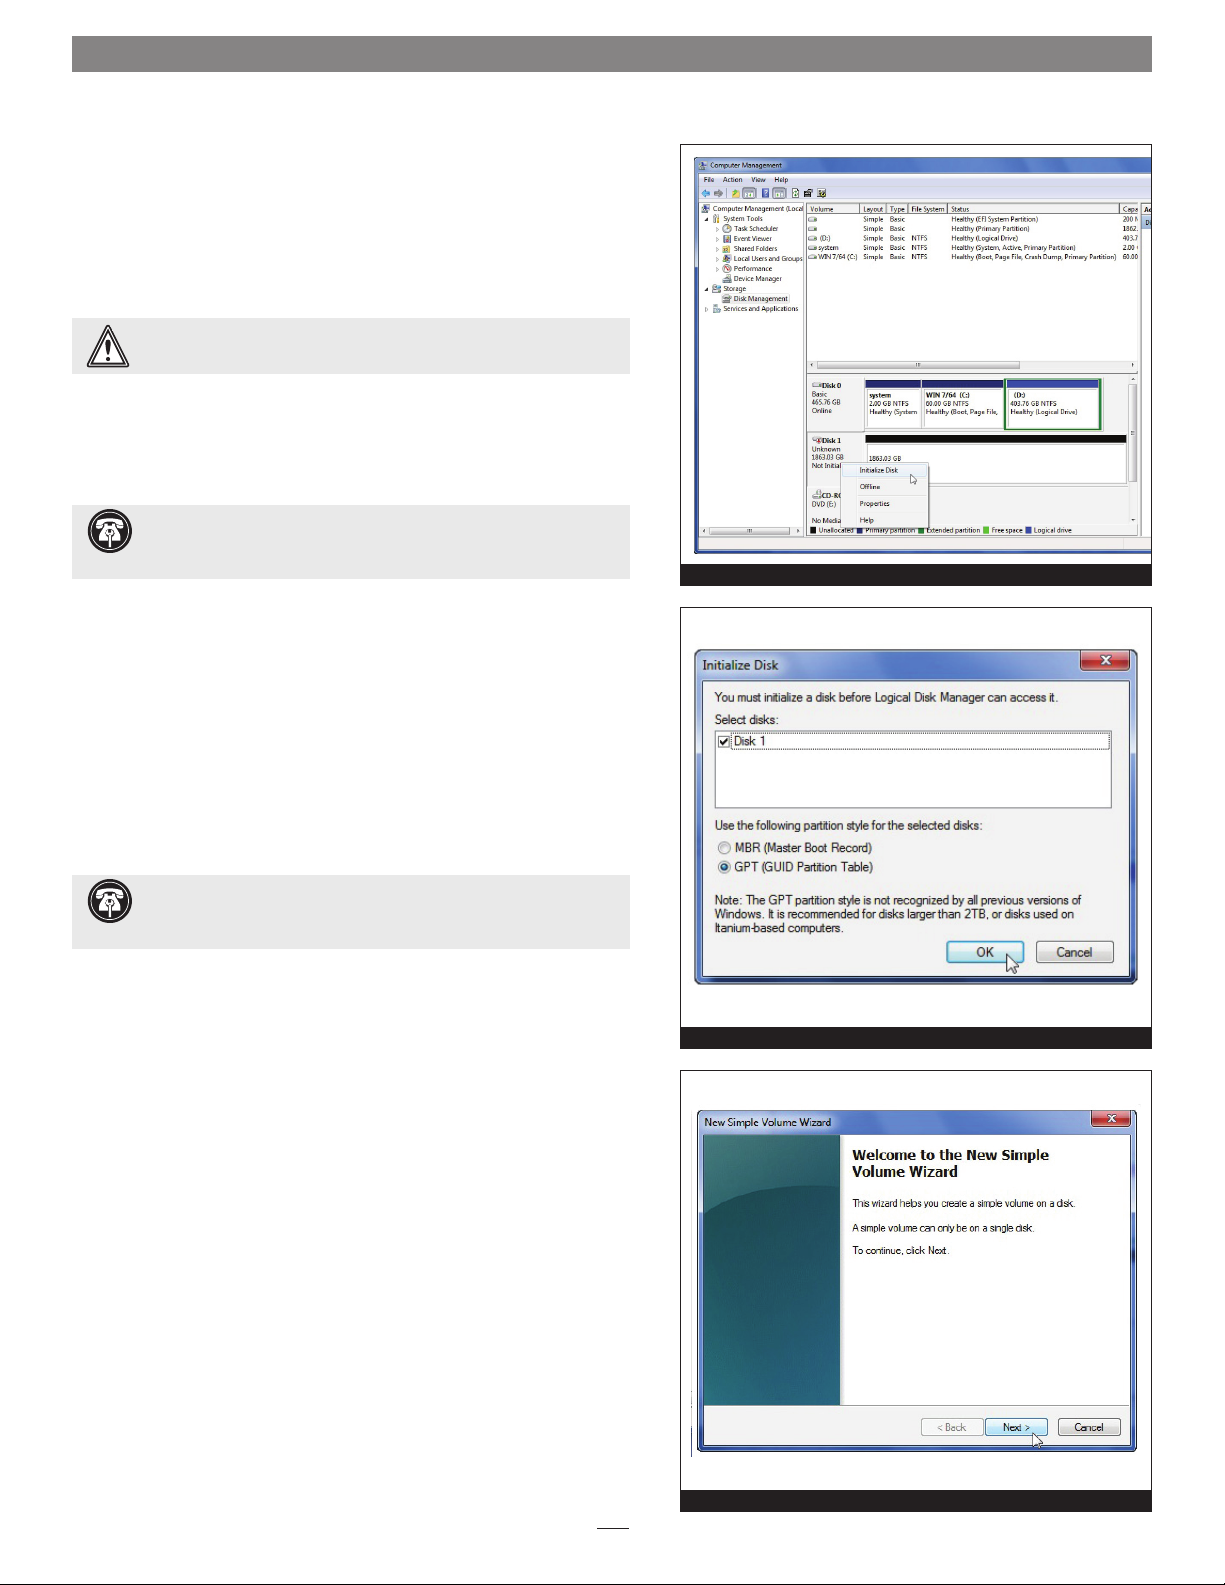
1. Click Start, then right-click Computer, and then click Manage.
2. In the Computer Management window, click Storage in the left pane
to expand the list (if necessary), and then click Disk Management.
Support Notes: If you selected JBOD configuration for the
Fusion F2QR’s drives, two F2QR disks will appear in the Disk
Management window. Perform steps 3–10 for each drive.
3. If you are using Windows Vista, an Initialize Disk window will
appear; skip to step 4. If you are using Windows 7, XP, Server 2008
or 2003, when the disks are displayed, the Fusion F2QR’s drives
will appear as a single volume when configured as RAID 0, RAID 1,
or Span (or as two drives if configured as JBOD), and listed as
“unallocated”. Right-click where the words “Not Initialized” appear
and select Initialize Disk (Figure 7).
Figure 7
4. In the Initialize Disk window, select GPT, and then Click OK
(Figure 8).
Support Note: If you intend to use the Fusion F2QR with a
computer running Windows XP 32-bit, select MBR; otherwise,
the F2QR will not be recognized by the computer.
5. Back in the Computer Management window, right-click where the
word “Unallocated” appears, and then select New Simple Volume.
6. When the New Simple Volume Wizard window appears, click Next
(Figure 9).
7. When the Specify Volume Size window appears, click Next if you want
all of the capacity to remain as one block (volume). Otherwise, adjust
the volume size to meet your needs, and then click Next.
8. When the Assign Drive Letter or Path window appears, select Assign
the following drive letter, choose a letter, and then click Next.
9. When the Format Partition window appears, enter a new name for
the volume, select “Perform a quick format”, and then click Next.
Figure 8
Note: If you do not select the quick format option, this process will take much
longer to complete.
10. When the next window appears, click Finish; once “Healthy
(Primary Partition)” appears, the F2QR is ready for use.
Figure 9
7
Page 10

Specifications, Precautions, FCC Compliance, and Support Information
Specifications
Compatibility Compatible with Mac® and
Windows
compatible interface
External Connectors eSATA, 2 x FireWire 800, mini-
USB 2.0, 12VDC @ 3A
OS Support Mac OS X Version 10.3+;
Windows 7, Windows Vista,
Windows XP, Windows Server
2008 and 2003
Operating Temperature 32 to 95˚ F (0˚ C to +35˚ C)
Dimensions (WxDxH) 5.9 x 6.1 x .95 in
(15 x 15,6 x 2,4 cm)
Weight 1.5 lbs (,68 kg)
RoHS Compliant Yes
Package Contents 1-meter eSATA data cable,
1-meter FireWire 800 cable,
1-meter FireWire 800 to 400
cable, 2-meter USB 2.0 A to
mini A cable, carrying case,
User’s Guide
®
computers with
Tips
Hot-plugging drives:
Fusion F2QR supports hot-plugging* for Mac users using any
interface, and for Windows users using FireWire or USB, or a
notebook computer with an eSATA ExpressCard adapter. This
function enables you to connect or disconnect the Fusion F2QR
without having to shut down your computer. This does not
mean you can simply unplug a cable at any time; you must
follow the procedures below or you may lose data in the process.
• Before disconnecting your Fusion F2QR, you must put away
(eject, unmount, dismount) the drive volume. For Mac OS
users, simply drag the drive icon(s) associated with the F2QR
to the eject icon on the dock. Windows users using the F2QR
connected via FireWire or USB, or with a notebook computer
with an eSATA ExpressCard adapter, may left-click the eject
icon in the taskbar for the F2QR.
• Mac Users—When disconnecting the Fusion F2QR in order
to connect it to another computer, or another interface (for
example, from eSATA to USB), you must also disconnect the
F2QR’s power source. This will prevent an error message that
states the drives were not readable from appearing. If you forget
to disconnect power to the F2QR and encounter the message,
simply click Ignore, and then disconnect and reconnect the
power source; no data will be lost.
Connections:
• Fusion F2QR supports only one interface at a time. Do not
connect more than one interface cable at a time between the
enclosure and computer; no damage will occur, but only one
interface will function.
Contacting Sonnet Customer Service
USA Customers
The Sonnet Web site located at www.sonnettech.com has the
most current support information and technical updates. Before
you call Sonnet Customer Service, please check our Web site for
the latest updates and online support files, and check this User’s
Guide for helpful information. When you call Sonnet Customer
Service, have the following information available so our customer
service staff can better assist you:
• Product name
• Date and place of purchase
• Hard drive model(s)
• Computer model
• Operating system
• Software/firmware versions
If further assistance is needed, please contact Sonnet Customer
Service at:
Online Service Form: http://serviceform.sonnettech.com
Tel: 1-949-472-2772
(Monday–Friday, 7 a.m.–4 p.m. Pacific Time)
Fax: 1-949-457-6349
E-mail: support@sonnettech.com
For Customers Outside the USA
For support on this product, contact your reseller or local
distributor.
Visit Our Website
For the most current product information and online support
files, visit the Sonnet Web site at www.sonnettech.com/support/.
Register your product online at http://registration.sonnettech.
com to be informed of future upgrades and product releases.
* Windows does not provide hot swap support for drives (drive
enclosures) connected to a SATA host controller card installed in
a desktop PC or server.
©2011 Sonnet Technologies, Inc. All rights reserved. Sonnet, the Sonnet logotype, Simply Fast, the Simply Fast logotype, Creativity Stored Here, and Fusion are trademarks of Sonnet Technologies, Inc. FireWire, the FireWire
logo, Mac, the Mac logo, and Mac OS are trademarks of Apple Inc., registered in the United States and other countries. Other product names are trademarks of their respective owners. Product specifications subject to
change without notice. Printed in the USA. UG-FUS-F2QR-WD-E-B-090611
 Loading...