

Page 1
™
CRESCENDO
Processor Upgrade Card for Macintosh
/ WS G3 or G4
®
PowerBook
®
G3 Series “Wallstreet“ Computers
Quick Start Guide for Crescendo/WS
Macintosh PowerBook and Operating System Compatibility
Crescendo/WS processor upgrade cards are compatible only with Macintosh
PowerBook G3 Series models (product family M4753) with 233, 250, 266, 292,
or 300 MHz processors; do not install this product into models with faster (333
MHz or higher) processors. If you are unsure which PowerBook model you have,
locate the label on the bottom with the product family number information.
At this printing, Crescendo/WS processor upgrade cards are compatible with
®
Mac
OS 8.1 through OS X version 10.2.x. Mac OS 9 or higher is required
for G4 processor AltiVec support. For up-to- date Mac OS compatibility information, check our web site.
You Should Have
The following items should be included in your product package:
• Crescendo/WS processor upgrade card
• Sonnet Installer CD
• Processor card removal tool
• Powered by Sonnet label
The following item is required for installation:
• Small Phillips screwdriver
System Requirements
The Crescendo/WS requires the following in order to work in your system:
• Fully operational original processor (you must install Sonnet software prior to
installing the processor upgrade)
Multiple Upgrade Recommendation
If you intend to perform multiple upgrades to your PowerBook, we strongly
recommend that you fi rst upgrade the Mac OS software. Next, install the
Crescendo/WS processor upgrade. Finally, install any remaining upgrades; com-
plete each upgrade and test it before proceeding to the next.
Support Notes: Please familiarize yourself with the following instruc-
tions before beginning the installation. If you feel you are unable to
install the computer hardware, please contact a qualified computer technician.
Before proceeding with the installation, we recommend that you make a backup of important information on your hard drive prior to installing new hardware
or software.
Remember to register your product online at http://registration.sonnettech.com to be informed of future upgrades and product releases.
Software updates and links are available from the Sonnet web site at www.sonnettech.com. • Online support form available at http://supportform.sonnettech.com.
Sonnet Technologies Customer Service hours are Mon.-Fri., 7 a.m.–5 p.m. Pacific Time • Customer Service Phone: 1-949-472-2772 • E-mail: support@sonnettech.com
Sonnet Technologies, Inc., Irvine, California USA • Tel: 1-949-587-3500 Fax: 1-949-457-6350
©2001 Sonnet Technologies, Inc. Revised 2003. All rights reserved. Sonnet, the Sonnet logotype, Simply Fast, the Simply Fast logotype, and Crescendo are trademarks of Sonnet Technologies, Inc. Macintosh and Mac are trademarks of Apple Computer, Inc., registered in the United States and other countries. Other product names are trademarks of their respective owners. Product specifications subject to change without notice. Printed in the USA.
QS-WS-E-071403
Page 2

Install Software… First!
Install Mac OS Software
If you intend to upgrade your PowerBook’s Mac OS software, you
should do so fi rst, before you run the Crescendo/WS installer applica-
tion and install your Cresendo/WS card. This is especially important
if you are planning to install or upgrade Mac OS X, and you are
installing a Crescendo/WS G4 upgrade card; this will avoid certain
compatibility issues reported in some PowerBook confi gurations.
1. If you are installing or upgrading your Mac OS software, do so
now.
2. After you complete the installation or upgrade process, restart
your computer.
WARNING: Before installing the Crescendo/WS processor
upgrade card, you must run the Crescendo/WS Install utility.
If you do not run the utility, your PowerBook will not operate
with the Crescendo/WS installed.
Ensure your system is booted in Mac OS 8.x or 9.x to run this utility.
Do not attempt this in Mac OS X Classic mode; this software will only
function in Mac OS 8.x through OS 9.x. A lso, quit any open applications and disable any security software installed in your system.
Please note that this installer only needs to be run once, prior to the
hardware installation.
Install Sonnet Software
1. Insert the Sonnet Installer CD into your computer’s CD-ROM
drive. Double-click the Crescendo/WS Installer icon to start the
utility.
2. Click the Install button to start the software installation; the
process takes just a few seconds.
3. After the software installation is complete, click the Shut Down
button to shut down your computer.
2
Page 3
Hardware Installation
Support Note: When handling computer products, you must
take care to prevent components from being damaged by
static electricity. Before opening your computer or removing parts
from their packages, always ground yourself first by touching a metal
part of the computer, such as a port access cover, and work in an area
free of static electricity; avoid carpeted areas. Handle all electronic
components only by their edges, and avoid touching connector traces
and component pins.
Shut Down and Open Computer
1. If you have not already done so, shut down your PowerBook. If
the computer has been on for any length of time, wait a couple
of minutes for it to cool before beginning the installation.
2. Disconnect all cables from your PowerBook, including the
power cable. If necessary, mo ve your PowerBook to an area with a
fl at, level surface where you can freely work.
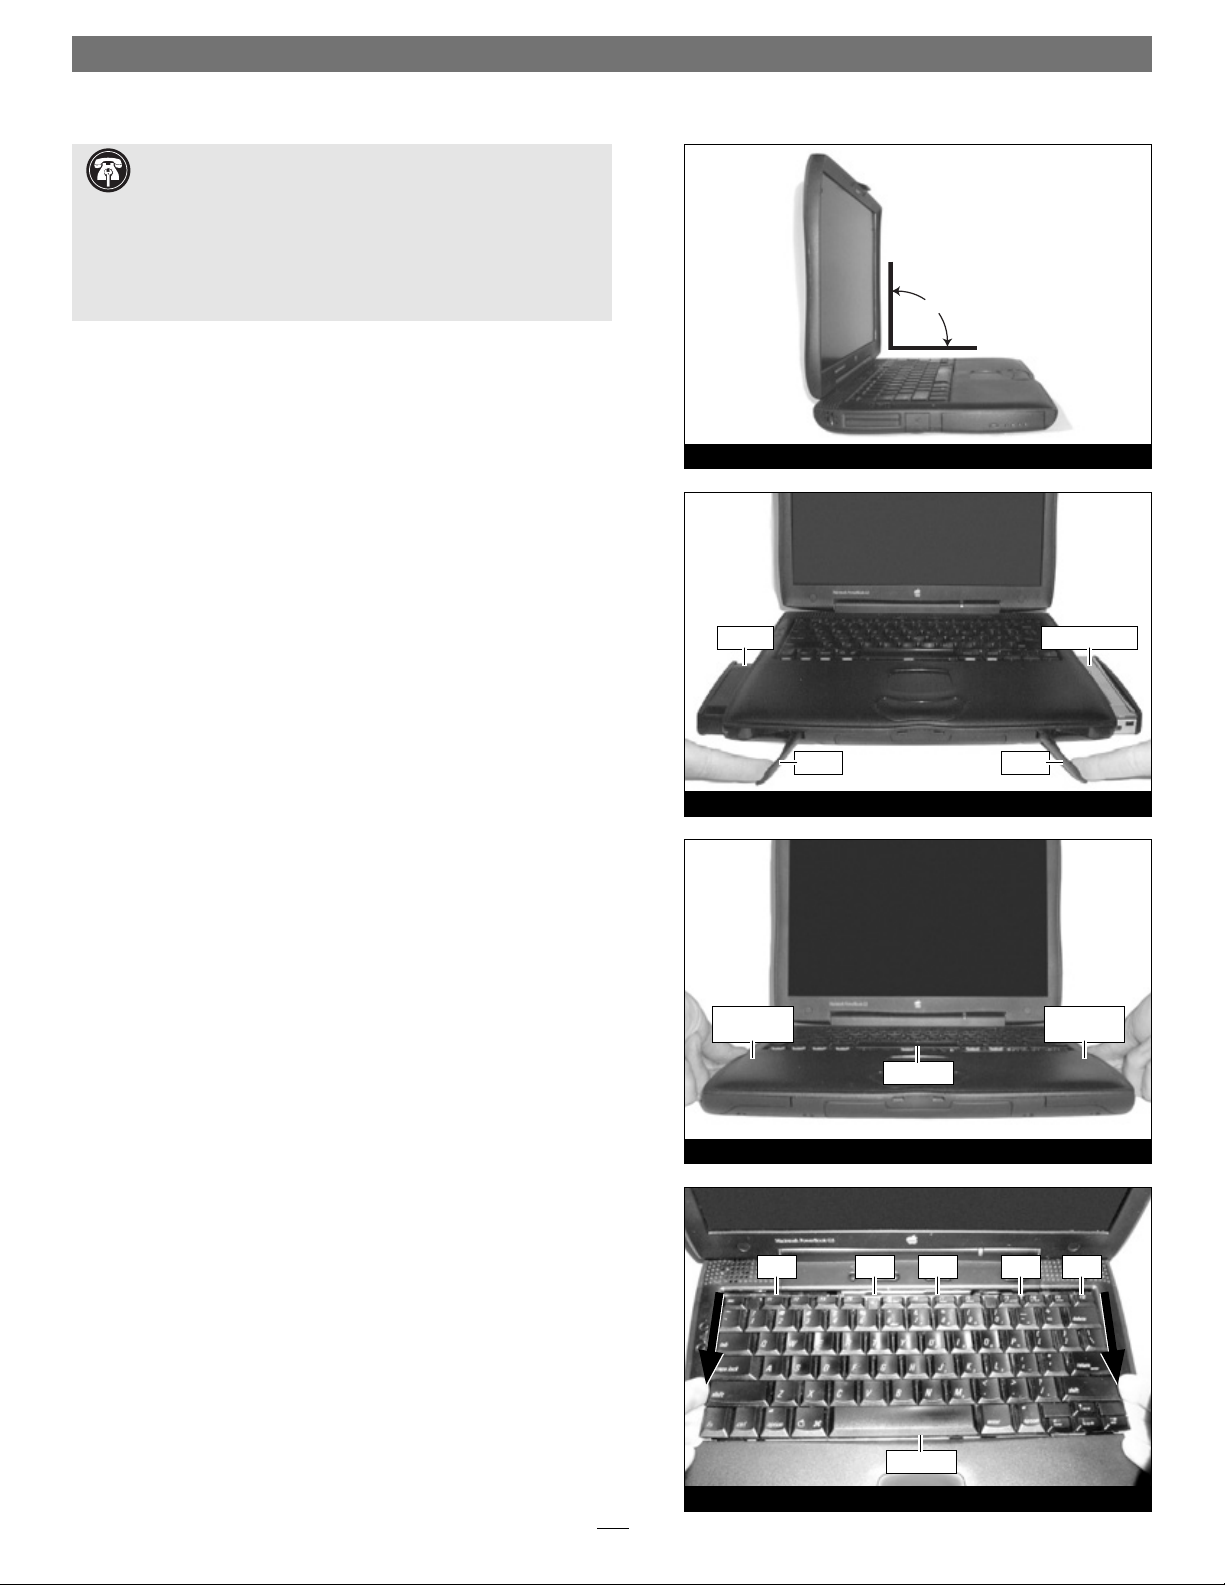
3. Open the display on your PowerBook to a 90˚ angle; you must
do this to prevent it from tipping over during the installation process
(Figure 1).
4. Locate the expansion bay release levers on the front edge of the
computer (Figure 2), then pull them out to eject and remove bat-
teries and modules installed in both expansion bays.
battery
90˚
Figure 1
CD- ROM drive
5. Reach inside the expansion bays to locate the two small, ridged
plastic tabs; these are the keyboard release levers. Slide the levers
toward you until the lower edge of the keyboard rises (Figure 3).
6. Lift up the lower edge of the keyboard slightly, and pull it
toward you until the tabs on the upper edge of the keyboard are
visible (Figure 4).
lever lever
Figure 2
release lever
(inside)
keyboard
Figure 3
tab tab tab tab tab
release lever
(inside)
keyboard
Figure 4
3
Page 4

Hardware Installation
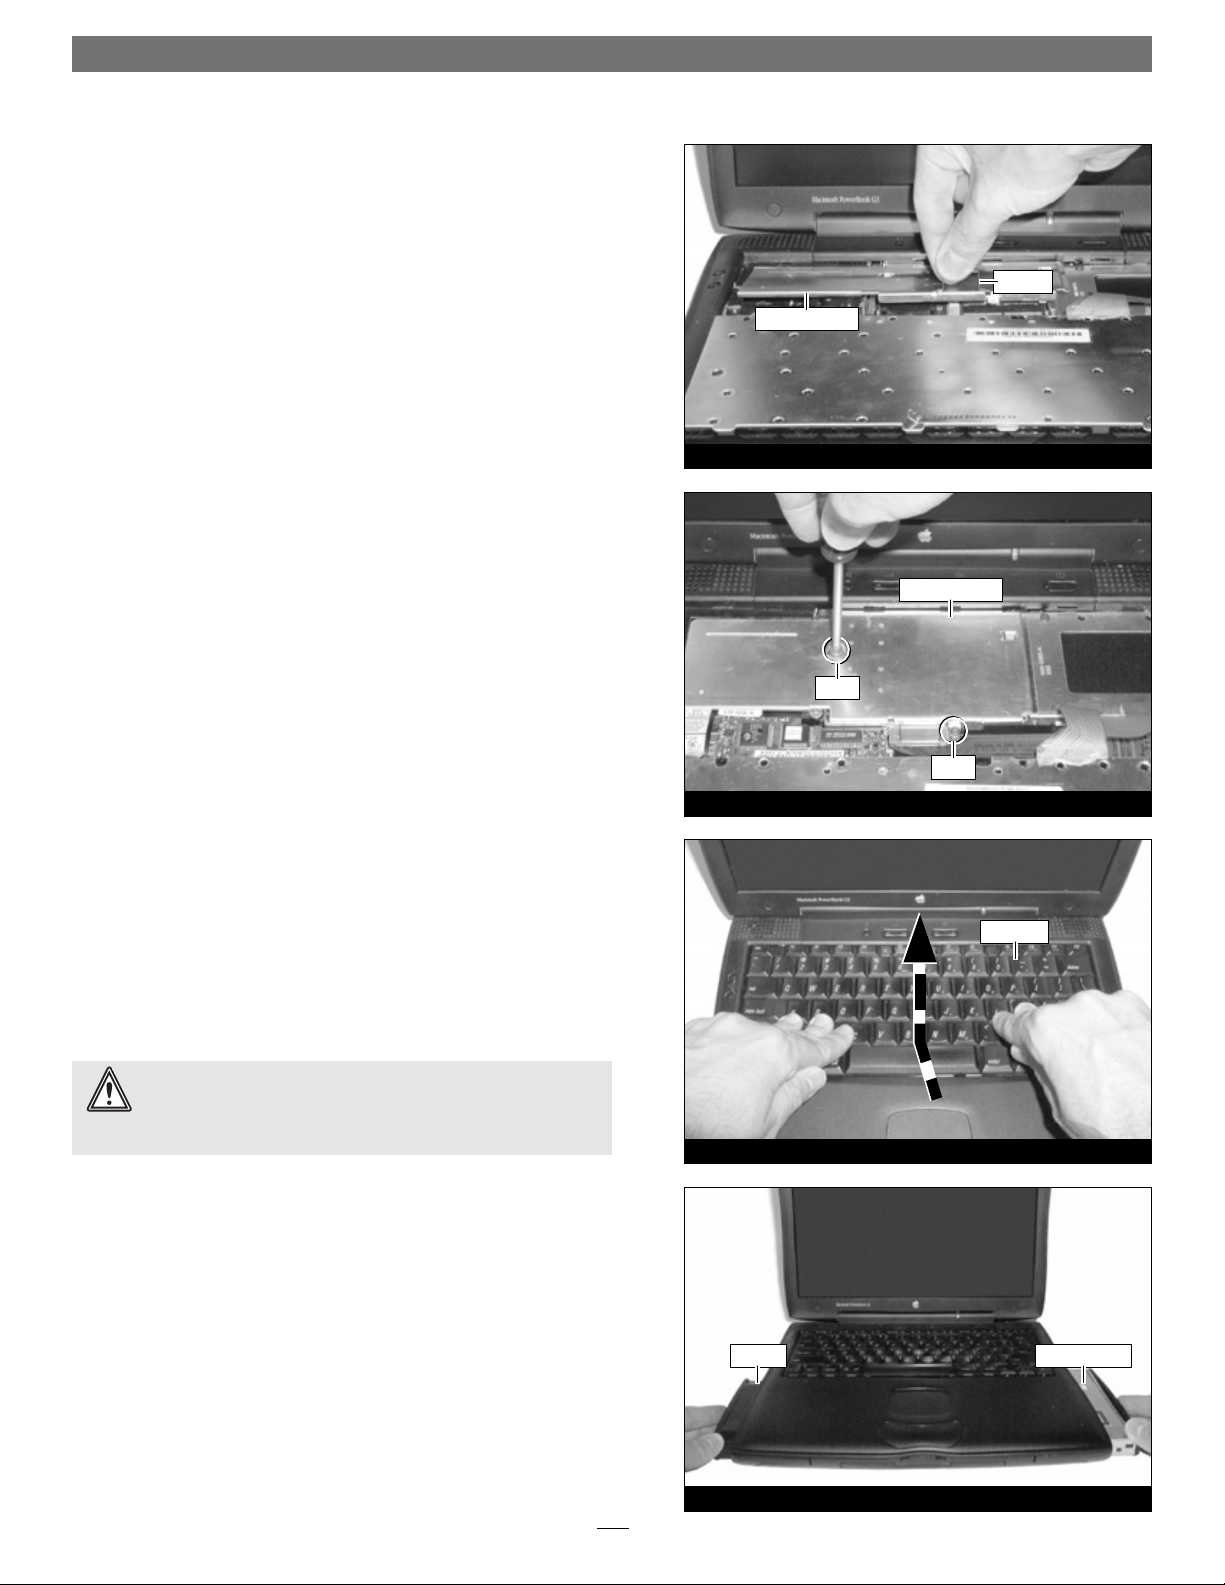
7. Gently fl ip the keyboard over on top of the palm rest and trackpad (Figure 5).
Support Note: To avoid generating a static charge in your
body, do not walk around the room until after you finish the
installation, reassemble and close the computer.
Remove Heat Sink Plate
1. Touch the metal surface of the hard drive to discharge static
from your body (Figure 6).
keyboard
Figure 5
hard drive
2. Remove the two screws securing the internal heat sink plate
(Figure 7).
3. Pull up on the attached handle and remove the heat sink plate
(Figure 8).
Figure 6
heat sink plate
screw
screw
Figure 7
handle
heat sink plate
Figure 8
4
Page 5

Hardware Installation
Remove Processor Card
1. While holding down your PowerBook with one hand, insert the
hook end of the processor card removal tool under the bottom
right corner of the processor card, then gently and slowly pull
straight up on the edge of the card to disengage it from the logic
board (Figure 9). Do not attempt to pry out the processor card;
you may damage the card or the hard drive.
processor card
Figure 9
processor card
removal tool
2. Grasping the processor card by its right edge and the edge of its
RAM slot, move the card to the right to disengage its tabs from
the processor card shield (Figure 10). Carefully lift the card up
and away from the logic board.
Move RAM (Memory) From Processor Card to Crescendo/WS
Depending on the confi guration of your PowerBook, your processor
card may have RAM modules installed on both sides of the processor
card.
WARNING: Do not touch the RAM modules’ pins; handle
them only by their edges.
1. Tur n t he process o r card over so the two connectors are face
up (Figure 11). Grasping the processor card by its edges, gently
spread apart the retainer clips on both sides of the RAM module
(Figure 11); the module will pop up. Remove the module and set
it aside on a static-free surface.
2. Remove the Crescendo/WS (Figure 12) from its anti-static package, making sure to handle the card by its edges.
tab
shield
tab
RAM module
processor
card
Figure 10
clip
clip
Figure 11
anti-static package
RAM slot
Crescendo/WS
Figure 12
5
Page 6

Hardware Installation
Support Note: If you are installing two RAM modules into
the Crescendo/WS card, be sure to install them into the
expansion slots that correspond to those on the original processor
card. When you install RAM, note that the modules are designed to fit
into the slot only one way; align the notch in the module to the guide
in the slot.
3. Tur n t he Crescend o / WS over, so that the two connectors are
face up (Figure 13). Align the RAM module removed from the
bottom of the original processor card with the RAM slot on the
Crescendo/WS, and insert it at a 30˚ angle, all the way into the
slot (Figure 13).
4. Gently push down on the RAM module until the retainer clips
snap into place (Figure 14).
5. If there is a second RAM module installed on the processor card,
remove it, then install it on the Crescendo/WS card following the
same procedure as for the fi rst RAM module.
6. Place the original processor card in the Crescendo card’s antistatic bag, and store it in a safe place.
30°
RAM module
RAM module
clip
Crescendo/WS
RAM slot
Figure 13
Crescendo/WS
Install the Crescendo/WS
1. Turn the Crescendo/WS so that the connectors are face down,
and the tabs on the edge of the card are facing left (Figure 15).
Grasping the card by its right edge and the edge of its RAM slot,
carefully insert the tabs into the processor card shield and align
the connectors on the bottom of the card with the corresponding connectors on the logic board (Figure 15).
2. Press on the right side of the Crescendo card until the connectors are completely coupled (Figure 16); the Crescendo card
should be level with the logic board.
tab
shield
tab
clip
Figure 14
Crescendo/WS
RAM slot
Figure 15
Crescendo/WS
Figure 16
6
Page 7
Hardware Installation
Reinstall Heat Sink Plate
1. Insert the tabs on the edge of the heat sink plate into the
PowerBook, then lay the plate fl at (Figure 17).
2. Gently press down on the lower section of the heat sink plate,
then secure the plate with its two screws (Figure 18); do not
overtighten the screws.
handle
heat sink plate
Figure 17
heat sink plate
screw
Reassemble Computer
1. Flip the keyboard over, and insert the tabs at the top of the
keyboard into the slots in the PowerBook case (Figure 19). Press
down on the keyboard until it snaps into place.
2. Install the battery and expansion module(s) back into the
expansion bays (Figure 20).
3. Connect the power cable to the PowerBook, but leave other
cables disconnected for now.
4. Affi x the Powered by Sonnet label to your computer.
WARNING: Do not shut down or otherwise interrupt the
operation of your PowerBook during the next three steps.
If this process is interrupted, your PowerBook may be left in a disabled
condition that is very difficult to remedy.
Turn On Computer
1. Press the Power button on your PowerBook. You will NOT hear
the normal startup sound, but a long tone instead; the display will
remain blank.
2. During the next 30 to 45 seconds, the hard drive will spin up
and you will hear eight tones.
3. Your PowerBook will restart. You r acc eler ated machine should
boot normally. If you have just installed a Crescendo/WS G3
card, your PowerBook is ready to use and your installation is
complete. If you have just installed a Crescendo/WS G4 card, continue
to page 8.
battery
screw
Figure 18
keyboard
Figure 19
CD- ROM drive
Figure 20
7
Page 8

Additional Software Installation—Crescendo/WS G4
Support Note: The Crescendo/WS G4 processor upgrade
card features AltiVec (dubbed Velocity Engine™ by Apple), an
on- chip vector processing unit that greatly speeds certain operations
in AltiVec-enabled applications. To take advantage of AltiVec- enabled
applications, your system must be running Mac OS 9.0 or higher. If
your PowerBook is running Mac OS 9.1 or later, AltiVec-support is
already enabled.
The following section covers the installation of additional software
your PowerBook may require to fully support the Crescendo/WS G4
processor card. Complete the steps on the following pages after you
have successfully installed the Crescendo/WS G4 card.
Check the requirements listed below to determine which, if any, additional software you must install. If you have multiple operating systems installed, install software into the appropriate System folder for
each operating system (OS). If you have already installed Mac OS X
on your system, be sure to also read the important information on
page 10 regarding updating your Mac OS X software.
• Mac OS 8.1–8.6: No additional software installation is required; you
may skip this section if OS 8.1–8.6 is your system’s only OS.
• Mac OS 9.0.x: You must rerun the Mac OS 9 install application to
install AltiVec libraries into your System Folder (instructions follow).
• Mac OS 9.1.x or 9.2.x: No additional software installation is
required; you may skip this section if OS 9.1.x or 9.2.x is your system’s only OS.
• Mac OS X (any version): You must download and run the Sonnet
X Tune-Up install application. This software installs a control panel
that enables your Crescendo/WS G4-upgraded PowerBook to switch
between Mac OS 9.x and OS X (see page 10).
Enable AltiVec—Existing OS 9.0 installation
Support Note: In some cases, the following procedure will
not work properly, and AltiVec support will not be installed. If
this is your experience, you should upgrade your system to Mac OS
9.1 or h igh er. When you upgrade to Mac OS 9.1 or higher, AltiVec
support is installed automatically.
This section describes how to update an existing Mac OS 9.0 installation to enable AltiVec on your Crescendo/WS G4-upgraded PowerBook.
If you are upgrading to Mac OS 9.0 at this point, go to the next section.
1. Make sure your PowerBook is plugged in, and if necessary, open
the Energy Saver control panel and set it so your PowerBook will
not go to sleep.
2. Insert the Mac OS 9 CD into your CD-ROM drive. In the Finder
menu, select Special: Restart, then immediately press and hold
down the C key on your keyboard until your system restarts and
the Welcome to Mac OS screen appears.
8
Page 9

Additional Software Installation—Crescendo/WS G4
Enable AltiVec—Existing OS 9.0 Installation
(continued)
3. Double-click the Mac OS Install icon. Proceed through the
next several screens until the installer tells you that Mac OS 9 is
already installed. Click the Add/Remove button to continue until
you reach the Install Mac OS 9 window.
4. Click the Customize button. In the Custom Installation and
Removal window deselect all software components except for
Mac OS 9. Click the pop-up menu to the right of Mac OS 9 and
change “Recommended Installation” to “Customized installation.” The Select Mac OS 9 Features to Install window will appear
shortly. Change “Recommended Installation” to “None” from
the pop-up menu. Click the Core System Software checkbox (it
should be the only checkbox with a checkmark). Click OK, Start,
then Continue to complete the installation. After the software
is installed, quit the Mac OS Install application and restart your
PowerBook; your PowerBook is ready to use and your installation
is complete.
Enable AltiVec—Upgrade to Mac OS 9.0
This section describes how to upgrade to your PowerBook’s system software to Mac OS 9.0 from a previous version; AltiVec support for your
Crescendo/WS G4-upgraded PowerBook will be installed automatically.
1. Make sure your PowerBook is plugged in, and if necessary, open
the Energy Saver control panel and set it so your PowerBook will
not go to sleep.
2. Insert the Mac OS 9 CD into your CD-ROM drive. In the fi nder
menu, select Special: Restart, then immediately press and hold
down the C key on your keyboard until your system restarts and
the Welcome to Mac OS screen appears.
3. Double-click the Mac OS Install icon. In the Select Destination
window, click the Options button and click the Perform Clean
Installation check box that appears in the subsequent screen.
Click the Select button. Proceed through the next several screens
until you reach the Install Software window. Click OK, Start, then
Continue, and complete the installation. After the software is
installed, quit the Mac OS Install application and restart your
PowerBook; your PowerBook is ready to use and your installation
is complete.
9
Page 10

Additional Software Installation—Crescendo/WS G4
Download and Run Sonnet X Tune-Up
Running the Sonnet X Tune-Up install application is necessary
only when Mac OS X (any version) is installed on your system
along with Mac OS 9.1.x or 9.2.x. Remember to install this software when you upgrade to Mac OS X. For complete information
on Sonnet X Tune-Up, please refer to the Read Me notes pro vided with the software.
1. Boot your system in Mac OS 9.1.x or 9.2.x from a hard
drive or partition, not a CD-ROM.
2. Log onto the Internet and type in the following address:
www.sonnettech.com/downloads/osx_upgrade_sw.html
3. Click on the Sonnet X Tune-Up link, and then click on
the pulsing Download button; after downloading the file,
move it to the Desktop.
4. Insert the Mac OS X Install CD into your CD- ROM drive
and allow it to mount to your Desktop; if the Mac OS X CD
was not inserted when you started this installer, the Sonnet
software will not be installed.
5. Run Sonnet X Tune-Up in Mac OS 9.1.x or 9.2.x. (Only
the active drive or partition from which your system is
booted can be updated.)
6. From the Apple menu, select Control Panels: Startup
Disk X. Select your Mac OS X volume (not the Mac OS X
CD), then click Restart; your installation is complete.
Updating and Maintaining Mac OS X
At some time in the future, you may wish to upgrade to Mac OS X,
or upgrade your Mac OS X software to a higher version using a Mac
OS X Update CD, you may need to run Disk Utility from the Mac OS
X Install CD, or you may even need to reinstall Mac OS X software.
Every one of these tasks require you to boot from an Apple CD.
In some instances, your Crescendo/WS G4 processor-upgraded
PowerBook may not boot from the CD as expected. If this is the case
with your PowerBook, please do the following:
1. Insert the Mac OS X CD into your PowerBook’s CD-ROM
drive. If your system is booted in Mac OS X, select Restart from
the Apple Menu. If your system is booted in Mac OS 9.x, select
Special: Restart from the Finder.
2. Wait for a few seconds after the startup chime. While holding
down the ctrl and
times, waiting for the chime to sound between each button press.
keys, press and release the Power button four
3. After the fourth startup chime sounds, release the ctrl and
keys; your PowerBook should boot from the Mac OS X CD.
If the above method does not work for you, please contact Sonnet
Customer Support for further assistance.
10
 Loading...