

Page 1

Installation Manual
Crescendo G3/G4 NuBus
Processor Upgrade Card for NuBus Power Macintosh
Page 2

Installation Manual
Crescendo
™
NuBus Processor Upgrade Cards
© 2000 Sonnet Technologies, Inc.
All rights reserved.
Sonnet Technologies, Inc.
18004 Sky Park Circle
Irvine, California 92614-6428 USA
Sales: 1-949-261-2800
Fax: 1-949-261-2461
Tech Support: 1-949-261-1426 (Monday–Friday, 8 am–5 pm Pacific Time)
Tech Support E-mail: support@sonnettech.com
Domestic Sales E-mail: sales@sonnettech.com
Website: http://www.sonnettech.com
Sonnet, the Sonnet logotype, Simply Fast, the Simply Fast logotype, and
Crescendo are trademarks of Sonnet Technologies, Inc. Macintosh, Mac and the
Mac logo are trademarks of Apple Computer, Inc., registered in the U.S. and
other countries. The PowerPC name and the PowerPC logotype are trademarks
of International Business Machines Corporation, used under license therefrom.
Other product names are trademarks of their respective owners.
This manual may not be copied, in whole or in part, without the written
consent of Sonnet Technologies, Inc. Your rights to software distributed by
Sonnet is governed by its accompanying software license agreement.
Sonnet has made every effort to ensure the accuracy of this manual. Product
specifications are subject to change without notice.
Manual Number: Z-C61-MNL-E
Release: v 1.0
Printed in the U.S.A.
Page 3

iii
Preface iv
Before You Get Started v
1 Power Macintosh 6100, Performa 611X, 1
and Workgroup Server 6150 Installation
2 Power Macintosh 6100 AV Installation 7
3 Power Macintosh 7100 Installation 17
Identify your computer’s video output 18
Install Crescendo card 22
AV/HPV Card Video Adapter Kit 23
4 Power Macintosh 8100, 8115, and Workgroup 37
Server 8150 Installation
Identify your computer’s video output 38
Install Crescendo card 42
AV/HPV Card Video Adapter Kit 43
5 Workgroup Server 9150 Installation 55
6 Power Computing 100 and 120 Installation 61
7 Radius System 100 and 81/110 Installation 67
8 Upgrading to Mac OS 9 and a G4 75
9 Learning About the Software 77
Sonnet Processor Upgrade Extension 77
Sonnet G4 Enabler 9 77
Nonvolatile RAM Patch 77
G4 Firmware Patch 77
G4 Firmware Patch Remover 77
Metronome 78
10 Removing a Level 2 Cache Card 79
11 Troubleshooting Guide 83
12 Warranty 87
13 Technical Support 89
Conten ts
Page 4

iv
This manual explains how to install the hardware and software for
Crescendo NuBus processor upgrade cards so that you can
accelerate your Power Macintosh®.
This documentation assumes you have a working knowledge of the
Macintosh
®
and its operating conventions. If you are unfamiliar with
the Macintosh, see your computer’s documentation.
Compatible Macintosh Models
At this printing, the following Power Macintosh and Mac®OS
compatible computers can be upgraded with Crescendo NuBus
processor upgrade cards:
• Power Macintosh 6100, 6100 AV, 7100, 8100, 8115
• Performa 6110, 6112, 6115, 6116, 6117, 6118
• Workgroup Server 6150, 8150, 9150
• Power Computing 100, 120
• Radius 81/110
• Radius System 100
Preface
Page 5
v
Check the Read Me File
For the most current information regarding this installation, check
the Read Me file on the Crescendo/Encore Install diskette packaged
with your product.
Visit our Website
The latest software updates and online support files are available from
the Sonnet website at http://www.sonnettech.com.
Take Precautionary Measures
We recommend that you make a backup of important information on
your hard drive prior to installing new hardware or software. When
handling computer products, you must take care to prevent the
components from being damaged by static electricity. Always work in
an area free of static electricity and avoid carpeted areas. Handle
processor upgrade cards by their edges and avoid touching connector
traces and component pins.
Familiarize Yourself with the Instructions
Please familiarize yourself with the instructions in this manual before
beginning the installation. If you feel you are unable to install the
computer hardware, contact a qualified computer technician.
As you read the instructions you may notice that your Sonnet processor
upgrade card may differ from those pictured.
Before You Get Started
Support Note:
If you are installing a G4 upgrade card, please refer to
Chapter 8, “Upgrading to a Mac OS 9 and a G4” for information that
applies exclusively to the G4.
Page 6

Page 7

1
This chapter contains instructions for installing Crescendo NuBus
processor upgrade cards into Power Macintosh 6100, Performa 611X,
and Workgroup Server 6150 computers.
System Compatibility
At this printing, Crescendo NuBus processor upgrade cards are
compatible with the latest Mac OS from Apple. Mac OS 9 is required
for G4 AltiVec use. For up-to-date Mac OS compatibility, check
our website.
You Should Have
The following items should be included in your product package:
• Crescendo NuBus processor upgrade card
• Crescendo/Encore Install diskette
• Installation manual
• Powered by Sonnet label
Installation Overview
This overview is intended for those with prior experience installing
Sonnet upgrade products or Macintosh hardware. We strongly
recommend following the full installation instructions if this is your
first installation of this hardware.
Installing the Crescendo card takes a few easy steps:
1) Install Mac OS 9 (if upgrading as part of this installation)
2) Install Sonnet software
3) Turn off computer
4) Remove case cover from computer
5) If installed, remove PDS card from PDS slot
6) Remove Level 2 cache card (if present)
7) Install Crescendo card into PDS slot
8) Replace case cover onto computer
9) Affix the Powered by Sonnet label to front of computer
10) Turn on your newly upgraded computer
11) To upgrade to AltiVec-enhanced software, see Chapter 8
For more complete instructions, follow the installation procedure
outlined in the pages that follow.
Power Macintosh 6100, Performa 611X, and Workgroup Server 6150
1
Page 8

2
Chapter 1
Power Macintosh 6100, Performa 611X, and Workgroup
Server 6150 Crescendo Installation
Install Software
1. If you are upgrading to Mac OS 9 as part of this installation,
do so now. Sonnet recommends a clean/universal install of the
Mac OS. Start up your computer from the Mac OS CD and double
click the Mac OS Install application. In the Select Destination
window, click the Options button and click the Perform Clean
Installation check box that appears in the subsequent screen.
Click the Select button. Proceed through the next several screens
until you reach the Install Software window. Click the Customize
button. In the Custom Installation and Removal window click
the pop-up menu to the right of Mac OS 9. Change the
“Recommended Installation” to “Customized installation.” The
Select Mac OS 9 Features to Install window will appear shortly.
Change “Recommended Installation” to “Universal Installation”
from the pop-up menu. Click OK, Start, then Continue to
complete the installation. After the software is installed, quit the
Mac OS Install application and restart your computer from the
hard drive where Mac OS 9 is installed.
2. Insert the Crescendo/Encore Install diskette into the floppy disk
drive. Double click the Crescendo/Encore Install icon. By default,
with “Easy Install” selected from the pop-up menu, the required
software will be installed into the active System Folder on the
boot drive. If this is ok, click the Install button; otherwise, select
“Custom Install” from the pop-up menu for more options or
select another drive to install the software. The installer will
install the appropriate software into the System Folder of your
computer. If the installation was successful, a dialog box will
appear. Click Quit to leave the installer and shut down your
computer.
Support Note:
We recommend that you make a backup of important
information on your hard drive prior to installing new hardware or
software. When handling computer products, you must take care to prevent
components from being damaged by static electricity. Avoid carpeted areas,
handle processor upgrade cards only by their edges, and avoid touching
connector traces and component pins.
Page 9
3
Power Macintosh 6100, Performa 611X, and Workgroup Server 6150 Installation
Shut Down and Open Computer
1. Shut down your Power Macintosh. If the computer has been on for
any length of time, wait a few minutes for it to cool before
beginning the installation.
2. Disconnect the power and peripheral cables from the back of the
computer and move it to an area where you can freely work.
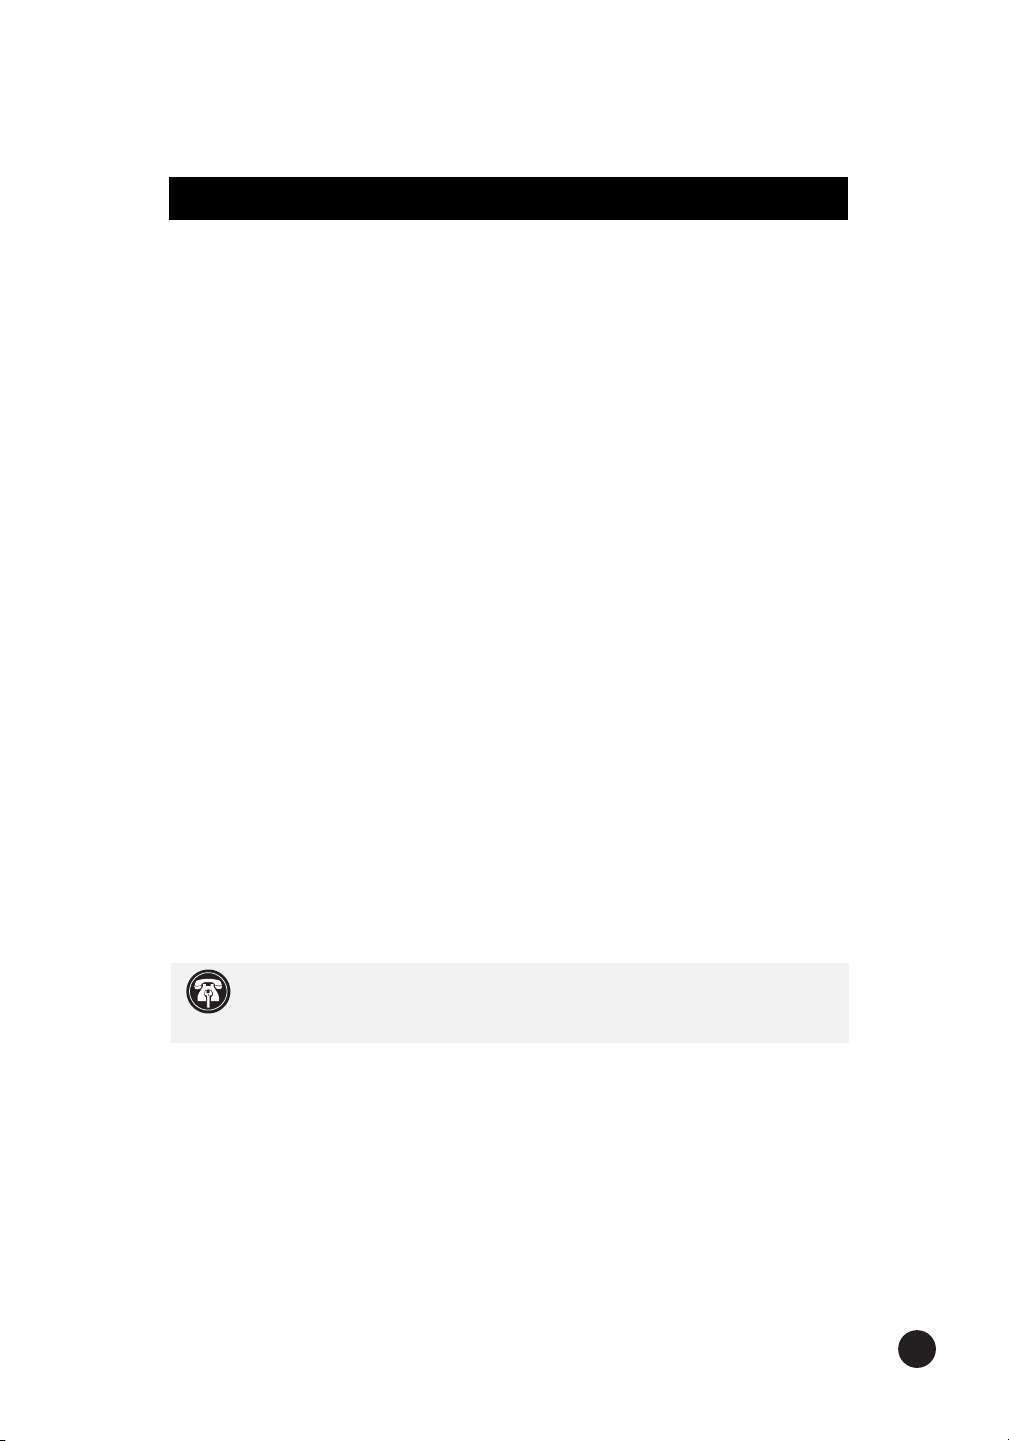
3. Open your Power Macintosh by unlatching the case cover
(Figure 1) and set it aside.
4. Identify the internal components of your computer. Touch power
supply metal shielding (Figure 2) to discharge any potential
damaging static electricity.
Figure 1: Unlatch and lift case cover from computer
Figure 2: Touch power supply metal shielding to discharge static electricity
Level 2 cache card
CPU
PDS slot
ROM card
power supply
metal shielding
Page 10
4
Chapter 1
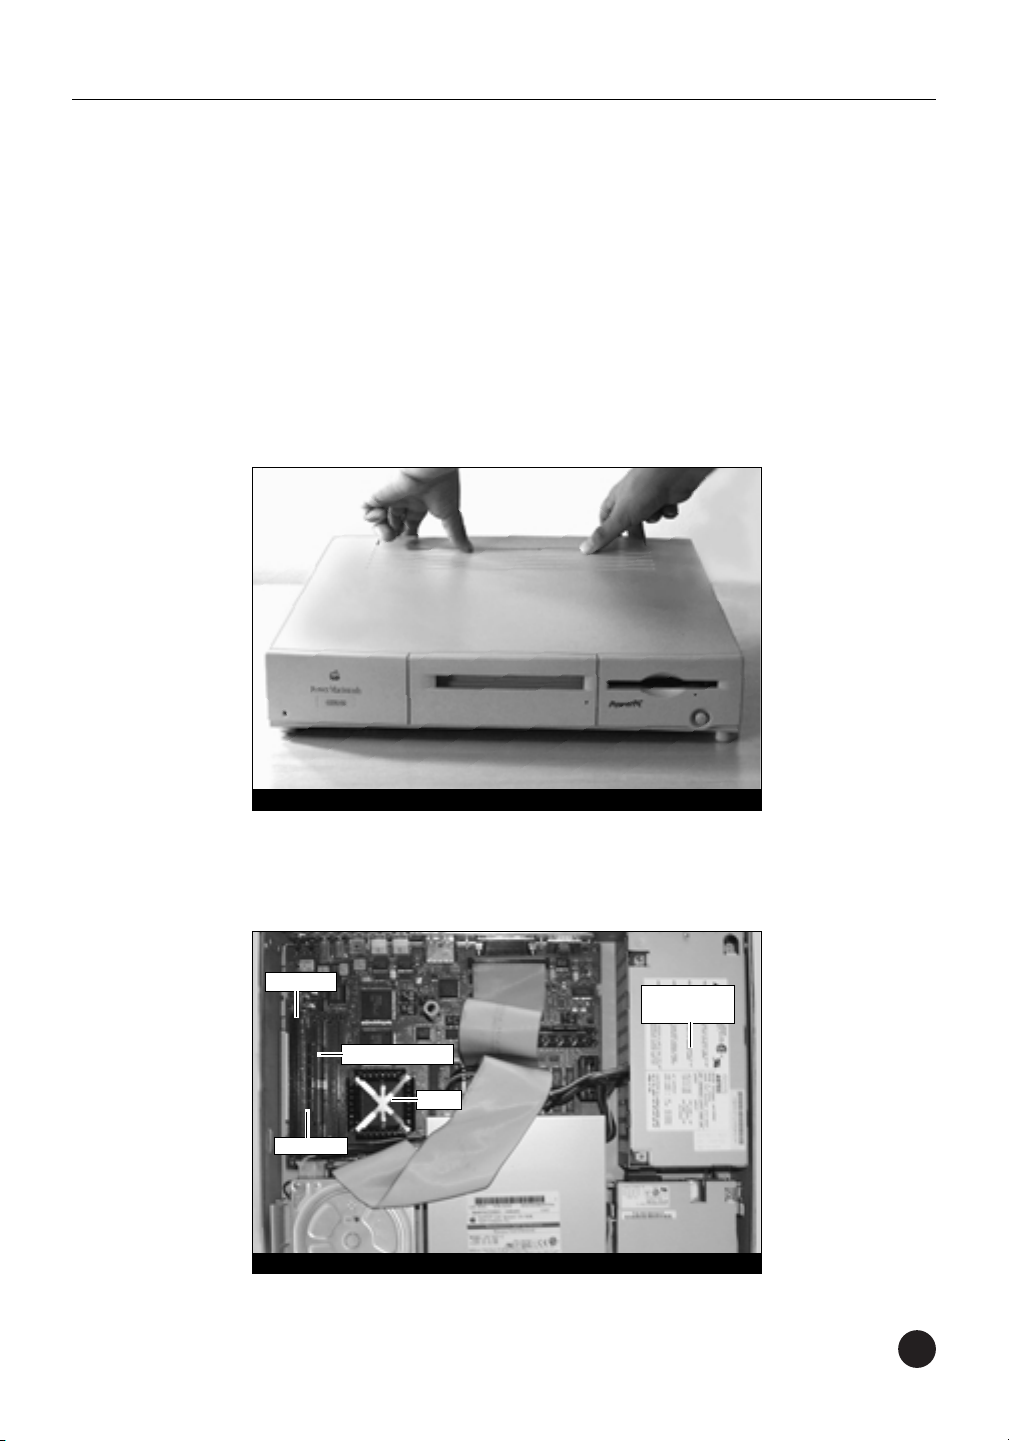
Remove PDS Card
Locate the PDS slot (Figure 3) located next to the ROM card. If there is
a PDS card already installed (such as the 6100 DOS card), remove it.
Remove Level 2 Cache Card
If your computer contains a Level 2 cache card, remove it. If you are
uncertain about whether you have a Level 2 cache card, or where it
might be located, consult your computer’s documentation or see
Chapter 10, “Removing a Level 2 Cache Card.”
Install Crescendo NuBus Processor Upgrade Card
1. Remove the Crescendo card from the anti-static package, making
sure to handle the card by the edges (Figure 4). Your card may
differ from what is pictured below.
PDS slot
Figure 3: Remove PDS card from PDS slot
Figure 4: Remove Crescendo card from packaging
ROM card
CPU (with heatsink)
Page 11
5
Power Macintosh 6100, Performa 611X, and Workgroup Server 6150 Installation
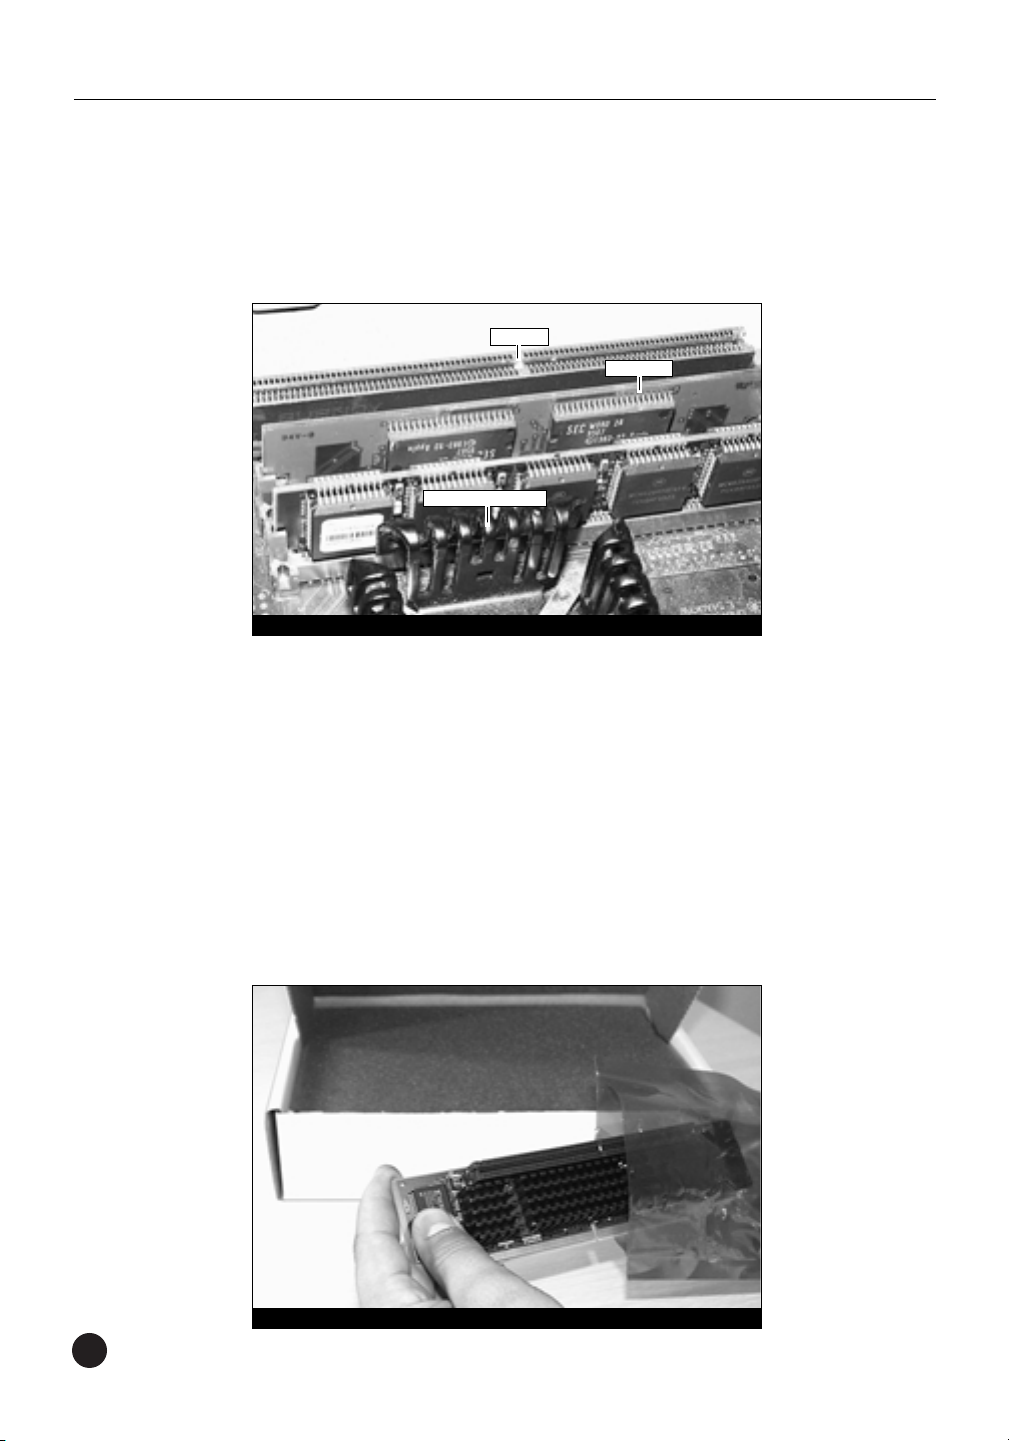
2. Align the Crescendo card over the PDS slot (Figure 5). Gently press
down until the card is firmly seated.
Replace Case Cover Onto Computer
1. Replace the case cover onto your computer (Figure 6).
2. Return the computer to your computing area and reconnect the
power and peripheral cables.
3. Affix the Powered by Sonnet label to the front of your computer.
Figure 5: Install Crescendo card into PDS slot
Crescendo card
Figure 6: Replace case cover onto computer
PDS slot
CPU (with heatsink)
Page 12
6
Chapter 1
Turn On Computer
1. Turn on your Power Macintosh. Your newly accelerated machine
should boot as normal.
2. If you are installing a Crescendo G4, see Chapter 8, “Upgrading to
Mac OS 9 and a G4” for information about enabling AltiVec
extensions in Mac OS and application software.
Support Note: Your computer must be upgraded with a G4
processor in order to take advantage of enhanced AltiVec applications
and software.
Page 13

7
This chapter contains instructions for installing Crescendo NuBus
processor upgrade cards into a Power Macintosh 6100 AV computer.
System Compatibility
At this printing, Crescendo NuBus processor upgrade cards are
compatible with the latest Mac OS from Apple. Mac OS 9 is required
for G4 AltiVec use. For up-to-date Mac OS compatibility, check
our website.
You Should Have
The following items should be included in your product package:
• Crescendo NuBus processor upgrade card
• Crescendo/Encore Install diskette
• Installation manual
• Powered by Sonnet label
For the installation you will also require:
• A medium Phillips screwdriver
Installation Overview
This overview is intended for those with prior experience installing
Sonnet upgrade products or Macintosh hardware. However, we
strongly recommend following the full installation instructions if
this is your first installation of this hardware.
Installing the Crescendo takes a few easy steps:
1) Install Mac OS 9 (if upgrading as part of this installation)
2) Install Sonnet software
3) Turn off computer
4) Remove case cover from computer
5) Remove AV card bracket from PDS slot
6) Disassemble AV adapter and AV card from bracket
7) Remove Level 2 cache card (if present)
8) Install AV card into pass-through slot on Crescendo card
9) Assemble Crescendo with attached AV card to bracket
10) Install bracket (with Crescendo and AV cards) into PDS slot
11) Replace case cover onto computer
12) Affix the Powered by Sonnet label to front of computer
13) Turn on your newly upgraded computer
14) To upgrade to AltiVec-enhanced software, see Chapter 8
For more complete instructions, follow the installation procedure
outlined in the pages that follow.
Power Macintosh 6100 AV Installation
2
Page 14

8
Chapter 2
Power Macintosh 6100 AV Crescendo Installation
Install Software
1. If you are upgrading to Mac OS 9 as part of this installation,
do so now. Sonnet recommends a clean/universal install of the
Mac OS. Start up your computer from the Mac OS CD and double
click the Mac OS Install application. In the Select Destination
window, click the Options button and click the Perform Clean
Installation check box that appears in the subsequent screen.
Click the Select button. Proceed through the next several screens
until you reach the Install Software window. Click the Customize
button. In the Custom Installation and Removal window click
the pop-up menu to the right of Mac OS 9. Change the
“Recommended Installation” to “Customized installation.” The
Select Mac OS 9 Features to Install window will appear shortly.
Change “Recommended Installation” to “Universal Installation”
from the pop-up menu. Click OK, Start, then Continue to
complete the installation. After the software is installed, quit the
Mac OS Install application and restart your computer from the hard
drive where Mac OS 9 is installed.
2. Insert the Crescendo/Encore Install diskette into the floppy disk
drive. Double click the Crescendo/Encore Install icon. By default,
with “Easy Install” selected from the pop-up menu, the required
software will be installed into the active System Folder on the boot
drive. If this is ok, click the Install button; otherwise, select
“Custom Install” from the pop-up menu for more options or select
another drive to install the software. The installer will install the
appropriate software into the System Folder of your computer. If
the installation was successful, a dialog box will appear. Click Quit
to leave the installer and shut down your computer.
Support Note:
We recommend that you make a backup of important
information on your hard drive prior to installing new hardware or
software. When handling computer products, you must take care to prevent
components from being damaged by static electricity. Avoid carpeted areas,
handle processor upgrade cards only by their edges, and avoid touching
connector traces and component pins.
Page 15
9
Shut Down and Open Computer
1. Shut down your Power Macintosh. If the computer has been on
for any length of time, wait a few minutes for it to cool before
beginning the installation.
2. Disconnect the power and peripheral cables from the back of
the computer.
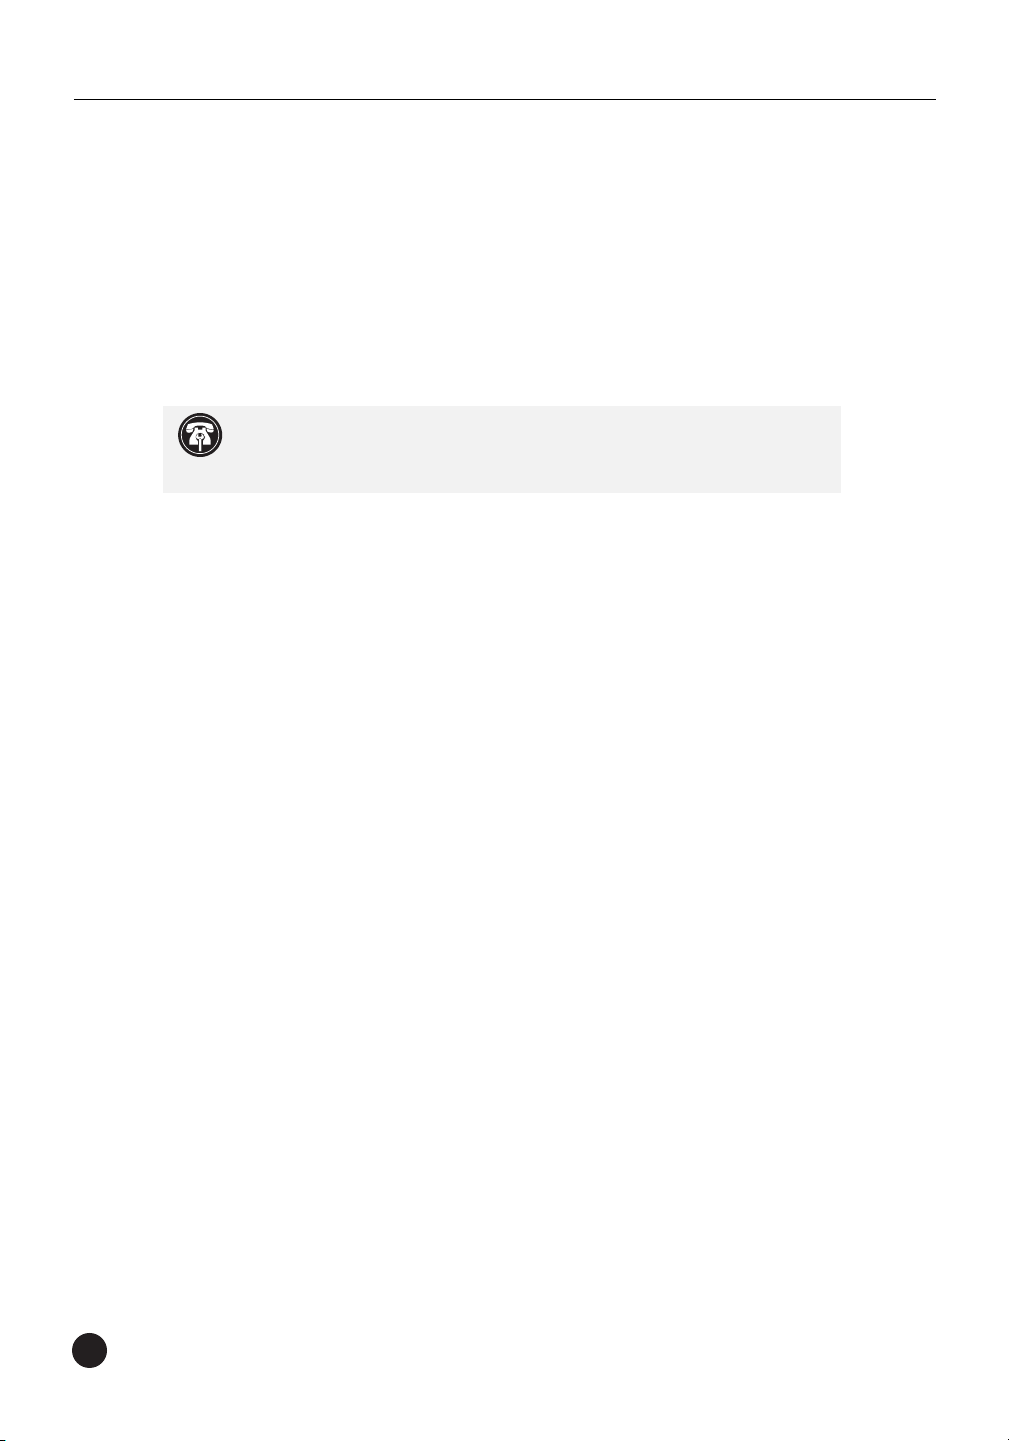
3. Disconnect any video cables connected to the back of the AV
card (Figure 1).
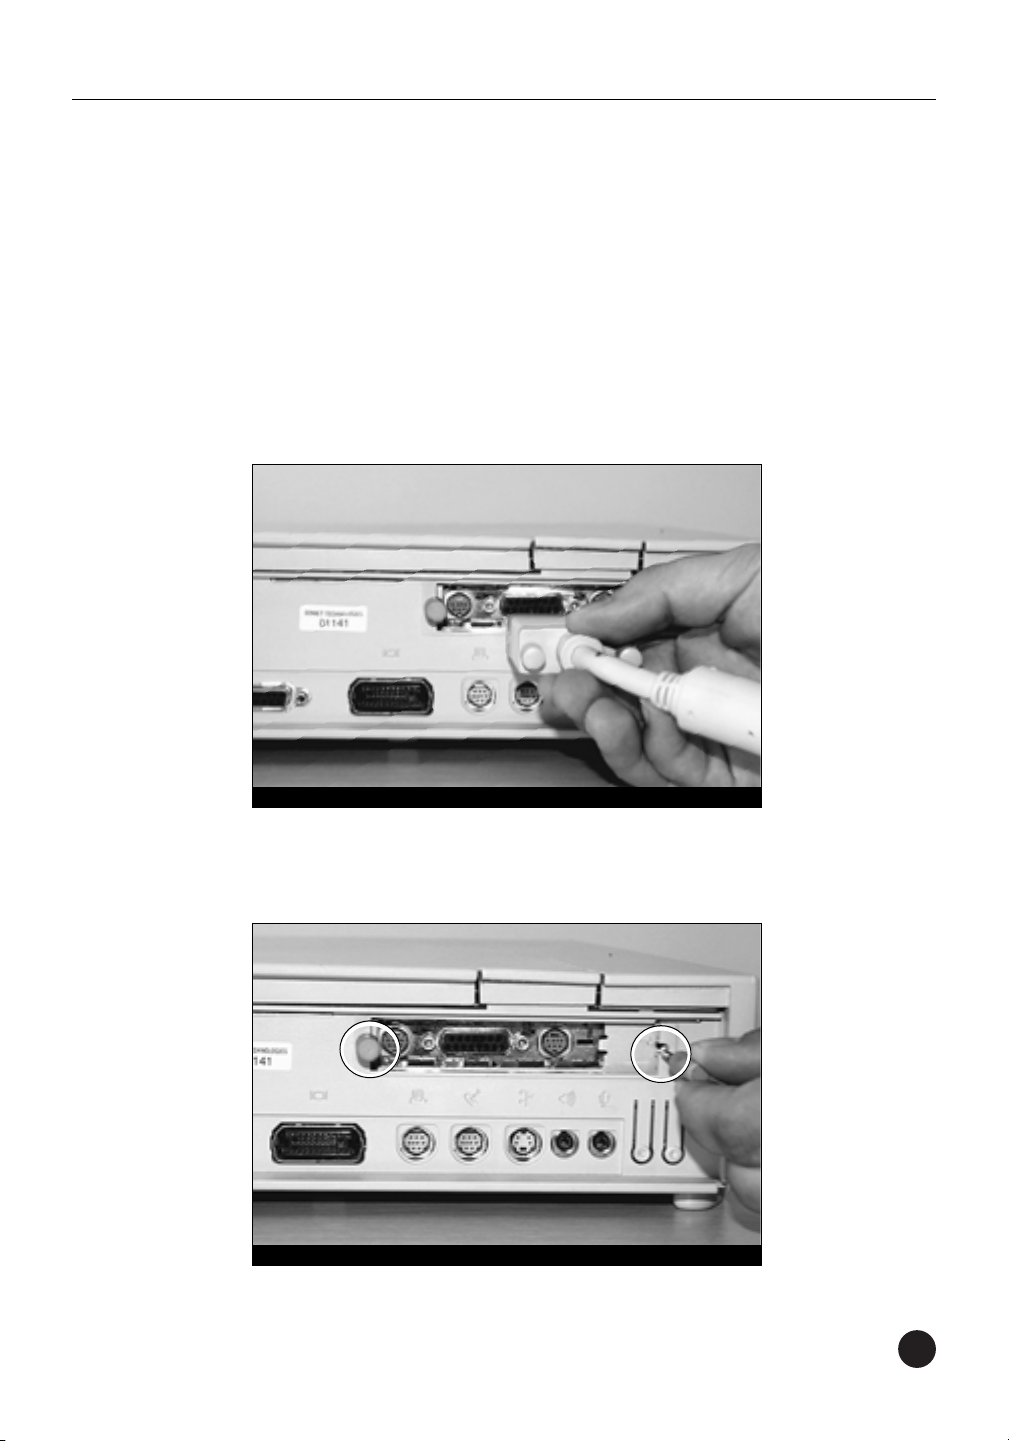
4. Remove the thumbscrews that secure the AV card to the back of
the computer (Figure 2).
Power Macintosh 6100 AV Installation
Figure 1: Disconnect video cables from AVcard
Figure 2: Remove thumbscrews from AVcard
Page 16

10
Chapter 2
5. Move the computer to an area where you can freely work.
6. Open your Power Macintosh by unlatching the case cover
(Figure 3) and set it aside.
Remove AV Card Bracket
1. Touch the power supply metal shielding (Figure 4) to discharge
any potential damaging static electricity.
2. Remove the AV card bracket from the PDS slot (Figure 4).
Figure 3: Unlatch and lift case cover from computer
Figure 4: Touch power supply metal shielding and remove AV card bracket
AV card bracket
PDS slot
metal shielding
of power supply
Page 17

11
Power Macintosh 6100 AV Installation
Disassemble AV Card from Bracket
1. Using a medium Phillips screwdriver, remove the screw that secures
the AV card to the bracket (Figure 5). Set the screw aside. Unplug
the AV card from the AV adapter.
Remove the Two Screws that Secure the Adapter
Using a medium Phillips screwdriver, remove the two screws that secure
the adapter to the bracket (Figure 6). Remove the adapter from the
bracket. Set the two screws and adapter aside.
Remove Level 2 Cache Card
If your computer contains a Level 2 cache card, remove it. If you are
uncertain about whether you have a Level 2 cache card, or where it might
be located, consult your computer’s documentation or see Chapter 10,
“Removing a Level 2 Cache Card.”
Figure 5: Remove screw that secures AVcard to bracket
Figure 6: Remove screws that secure adapter to bracket
adapter
bracket
Page 18

12
Chapter 2
Install Crescendo NuBus Processor Upgrade Card
1. Remove the Crescendo card from the anti-static package, making sure
to handle the card by the edges (Figure 7). Your card may differ from
what is pictured below.
2. Package the adapter and two adapter screw in the Crescendo’s
anti-static package and store it in a safe place.
3. Plug the AV card into the pass-through slot on the Crescendo card
(Figure 8); note the notch in the AV card for orientation. Press down
on the outer edges of the AV card until it is firmly connected to the
Crescendo card.
Figure 7: Remove Crescendo card from packaging
Figure 8: Plug AV card into Crescendo card
pass-through slot
on Crescendo card
AV card
Page 19

13
Power Macintosh 6100 AV Installation
4. Assemble the Crescendo with attached AV card onto the bracket.
Hook the AV card onto the outer prong of the bracket as you slide the
Crescendo card in between the metal runners (Figure 9). Verify that
the inner prong of the bracket lines up and protrudes through the
corner cutout on the AV card.
5. Secure the AV card and Crescendo card to the bracket with the
bracket screw (Figure 10) you removed earlier.
Figure 9: Align Crescendo card in between bracket runners
inner prong
runners
corner cutout on AV card
Crescendo card
Figure 10: Secure AVcard and Crescendo card to bracket
outer prong
Page 20

14
Chapter 2
6. With the Crescendo and AV cards securely mounted onto the bracket,
align the bracket over the PDS slot. Make certain the metal tab on the
bracket slides into the inner slot on the side of the computer’s case
(Figure 11). Gently press down on the bracket so that the Crescendo
plugs into the PDS slot.
Replace Case Cover Onto Computer
1. Replace the case cover onto your computer (Figure 12).
Figure 11: Align bracket over PDS slot and plug Crescendo into PDS slot
bracket
side slot
hard drive
Figure 12: Replace case cover onto computer
metal tab
Page 21

15
Power Macintosh 6100 AV Installation
2. Secure the AV card to the back of the computer with the thumbscrews
you removed earlier (Figure 13).
3. Return the computer to your computing area and reconnect the
video cable(s) to the back of the AV card (Figure 14).
4. Reconnect the power and peripheral cables to the back of
the computer.
5. Affix the Powered by Sonnet label to the front of your computer.
Figure 13: Replace thumbscrews onto AVcard
Figure 14: Reconnect video cable(s) to AV card
Page 22

16
Turn On Computer
1. Turn on your Power Macintosh. Your newly accelerated machine
should boot as normal.
2. If you are installing a Crescendo G4, see Chapter 8, “Upgrading to
Mac OS 9 and a G4” for information about enabling AltiVec
extensions in Mac OS and application software.
Chapter 2
Support Note:
Your computer must be upgraded with a G4
processor in order to take advantage of enhanced AltiVec applications
and software.
Page 23

17
This chapter contains instructions for installing Crescendo NuBus
processor upgrade cards into a Power Macintosh 7100 computer.
System Compatibility
At this printing, Crescendo NuBus processor upgrade cards are
compatible with the latest Mac OS from Apple. Mac OS 9 is required
for G4 AltiVec use. For up-to-date Mac OS compatibility, check
our website.
You Should Have
The following items should be included in your product package:
• Crescendo NuBus processor upgrade card
• Crescendo/Encore Install diskette
• Installation manual
• Powered by Sonnet label
For the installation you will also require:
• A large flatblade screwdriver
Installation Overview
This overview is intended for those with prior experience installing
Sonnet upgrade products or Macintosh hardware. However, we
strongly recommend following the full installation instructions if
this is your first installation of this hardware.
Installing the Crescendo card takes a few easy steps:
1) Install Mac OS 9 (if upgrading as part of this installation)
2) Install Sonnet software
2) Turn off computer and remove case cover from computer
3) If installed, remove AV or HPV card from PDS slot
4) Remove Level 2 cache card (if present)
5a) If you do not have an AV or HPV card:
• Install Crescendo card into PDS slot; skip to step 6
5b) If you have an AV or HPV card along with the AV/HPV Card
Video Adapter Kit (sold separately):
• Invert and attach AV or HPV card to video adapter board
• Plug video flex cable into Crescendo card’s connector
• Install Crescendo card into PDS slot
• Install video adapter board into middle NuBus slot and plug
video flex cable from Crescendo card into AV or HPV card
6) Replace case cover onto computer
7) Affix the Powered by Sonnet label to front of computer
8) Turn on your newly upgraded computer
9) To upgrade to AltiVec-enhanced software, see Chapter 8
For more complete instructions, follow the installation procedure
outlined in the pages that follow.
3
Power Macintosh 7100 Installation
Page 24

18
Chapter 3
Power Macintosh 7100 Crescendo Installation
Identify System Video Output Configuration
Before installing the Crescendo card into your computer, it is important
to identify your system configuration for video output.
Apple
®
manufactured the Power Macintosh 7100 with an AV (Audio/
Video) card or HPV (High Performance Video) card installed in the PDS
slot of the computer. Other video alternatives include onboard video
through the high density video port or a NuBus video card.
Determine your video output configuration by referring to Figure 1
below. There are three possible configurations:
• Apple AV or HPV Card – If the monitor is attached to a card
installed in the PDS slot (Figure 1-Label A), you have an AV or
HPV card. Since the Crescendo card installs into the PDS slot, you
will need the AV/HPV Card Video Adapter Kit (Sonnet part number
C61A-7181) to preserve the use of the AV or HPV card. If you
purchased a video adapter kit, continue with the installation on the
following page; otherwise, contact Sonnet or a Sonnet reseller to
obtain a one.
• Onboard Video – If the monitor is attached to the high density
video port (Figure 1-Label B), you have onboard video. Continue
with the installation on the following page.
• NuBus Video Card – If the monitor is attached to a card installed in
one of the three NuBus slots (Figure 1-Label C), you have a NuBus
video card; continue with the installation on the following page.
Figure 1: Power Macintosh 7100 video output ports
PDS slot port
(with AV or HPV card)
NuBus slot portshigh density video port
A
C
B
Page 25

19
Power Macintosh 7100 Installation
Install Software
1. If you are upgrading to Mac OS 9 as part of this installation,
do so now. Sonnet recommends a clean/universal install of the
Mac OS. Start up your computer from the Mac OS CD and double
click the Mac OS Install application. In the Select Destination
window, click the Options button and click the Perform Clean
Installation check box that appears in the subsequent screen.
Click the Select button. Proceed through the next several screens
until you reach the Install Software window. Click the Customize
button. In the Custom Installation and Removal window click
the pop-up menu to the right of Mac OS 9. Change the
“Recommended Installation” to “Customized installation.” The
Select Mac OS 9 Features to Install window will appear shortly.
Change “Recommended Installation” to “Universal Installation”
from the pop-up menu. Click OK, Start, then Continue to
complete the installation. After the software is installed, quit the
Mac OS Install application and restart your computer from the hard
drive where Mac OS 9 is installed.
2. Insert the Crescendo/Encore Install diskette into the floppy disk
drive. Double click the Crescendo/Encore Install icon. By default,
with “Easy Install” selected from the pop-up menu, the required
software will be installed into the active System Folder on the boot
drive. If this is ok, click the Install button; otherwise, select
“Custom Install” from the pop-up menu for more options or select
another drive to install the software. The installer will install the
appropriate software into the System Folder of your computer. If
the installation was successful, a dialog box will appear. Click Quit
to leave the installer and shut down your computer.
Shut Down and Open Computer
1. Shut down your Power Macintosh. If the computer has been on
for any length of time, wait a few minutes for it to cool before
beginning the installation.
2. Disconnect the power and peripheral cables from the back of the
computer and move it to an area where you can freely work.
Support Note:
IMPORTANT! – If you are installing a Crescendo card
into a Power Macintosh 7100 with an AV or HPV card, you will require
the AV/HPV Card Video Adapter Kit to preserve your video output.
We recommend that you make a backup of important information on your
hard drive prior to installing new hardware or software. When handling
computer products, you must take care to prevent components from being
damaged by static electricity. Avoid carpeted areas, handle processor upgrade
cards only by their edges, and avoid touching connector traces and
component pins.
Page 26

20
Chapter 3
3. Open your Power Macintosh by first loosening the security screw
(Figure 2, inset) on the back of the case with a large flatblade
screwdriver; then, gently slide the case cover off the computer
(Figure 2).
4. Identify the internal components of your computer. Touch the
power supply metal shielding (Figure 3) to discharge any potential
damaging static electricity.
Figure 2: Remove case cover from computer
Figure 3: Internal components of Power Macintosh 7100
NuBus slots
PDS slot (with AV or HPV card)
Security screw
power supply
metal shielding
Page 27

21
Remove PDS Card from PDS Slot
1. Locate the PDS slot (Figure 4). If there is a PDS card installed (such
as the Apple AV or HPV card), remove it (Figure 4), and set it aside.
2. To preserve the use of your AV or HPV card, you need the AV/HPV
Card Video Adapter Kit (Sonnet part number C61A-7181). If you
have the video adapter kit, continue with the installation
instructions. If you do not have the video adapter kit, please
contact Sonnet to obtain one.
Remove Level 2 Cache Card
If your computer contains a Level 2 cache card, remove it. If you are
uncertain about whether you have a Level 2 cache card, or where it
might be located, consult your computer’s documentation or see
Chapter 10, “Removing a Level 2 Cache Card.”
Power Macintosh 7100 Installation
Figure 4: Remove PDS card from PDS slot
PDS slot
Page 28

22
Install Crescendo NuBus Processor Upgrade Card
Remove the Crescendo card from the anti-static package, making sure to
handle the card by the edges (Figure 5). Your card may differ from what is
pictured below.
• If You Are Re-Installing an AV or HPV Card – Temporarily set the
Crescendo card aside and continue with the instructions on the
following page to install the Crescendo with an AV or HPV card.
• If You Do Not Have an AV or HPV Card – Align the Crescendo card
over the PDS slot (Figure 6). Gently press down until the card is firmly
seated in the PDS slot. Replace the cover onto your computer and
finish the installation in the section entitled, “Reconnect Power and
Peripheral Cables” on page 36.
Chapter 3
Figure 6: Touch power supply metal shielding to discharge static electricity
Crescendo card
PDS slot
Figure 5: Remove Crescendo card from packaging
NuBus slots
Page 29

23
AV/HPV Card Video Adapter Installation
Adapter Kit Inventory
Before installing the Crescendo NuBus processor upgrade card with
the AV or HPV card, you will require the following items (Figure 7):
Included with adapter kit:
1) Video adapter board
2) Video flex cable
3) Two 4-40 nuts
4) Support stand-off (required for 7100 only)
5) Two subassembly standoffs (required for 8100 only)
Needed; not included with adapter kit:
6) Small flatblade screwdriver
7) Small Philips screwdriver
8) Crescendo NuBus processor upgrade card
9) PDS-based AV or HPV card (AV card shown below)
We suggest you inventory and lay the items out in front of you prior
to proceeding with the installation of the AV or HPV card with the
Crescendo card.
Power Macintosh 7100 Installation
1
Needed; not included
Figure 7: Items needed for Crescendo card installation with AV or HPV card
2
3
4
6
8
9
Included with adapter kit
5
7
Page 30

24
Temporarily Remove NuBus Cards from Computer
Locate the NuBus slots (Figure 8). If any NuBus cards are installed,
temporarily remove them so you have better clearance for installing the
video adapter board. If you have three NuBus cards in your computer,
you will only be able to reinstall two of them. The middle NuBus slot is
required for the adapter board.
Identify Your PDS-based Video Card
Determine if you have an AV or HPV card as follows:
• AV Card – The AV card has a single 15-pin monitor connector
for a monitor and S-Video In and S-Video Out ports (Figure 9)
that support Audio/Video features. If you have an AV card,
continue with the instructions in the section entitled, “Affix the
AV Card to Adapter Board” on page 28.
Chapter 3
S-Video In port
S-Video Out port
15-pin monitor connector
Figure 9: AV card
Figure 8: Remove any NuBus cards from NuBus slots
NuBus slots
Page 31

25
Power Macintosh 7100 Installation
• HPV Card – The HPV (High Performance Video) card has a
single 15-pin monitor connector for a monitor and four
onboard Video RAM (VRAM) slots (Figure 10). If you have the
HPV card, continue with the instructions below.
Affix HPV Card to Video Adapter Board
1. B efore attaching the HPV card to the video adapter board, you
need to bend the metal tab 90° at the end of the card with a small
flatblade screwdriver (Figure 11) so it fits in its new location.
15-pin monitor connector
Figure 10: HPV card
Four VRAM slots
Figure 11: Bend back metal tab on HPV card
to here
90°
angle
bend tab from original position here
Page 32

26
Chapter 3
2. Orient the video adapter board in front of you as shown in Figure 12.
Using a small Phillips screwdriver, remove the upper left stand-off
from the adapter board (Figure 12).
3. Align the HPV card directly over the video adapter board with the
connector of the HPV card facing upwards (Figure 13). The holes
on the HPV card should align directly with the upper right and lower
left standoffs on the adapter board.
Figure 12: Remove upper left standoff from video adapter board
Figure 13: Orient HPV card over video adapter board
HPV card connector facing upwards
standoff
Page 33

27
Power Macintosh 7100 Installation
4. Secure the HPV card to the video adapter board with the two nuts
(Figure 14) supplied with the adapter kit.
5. Continue with the installation in the the section entitled,
“Install Support Stand-Off Onto Crescendo Card” on page 29.
Figure 14: Secure HPV card to video adapter board with nuts
Page 34

28
Chapter 3
Affix AV Card to Video Adapter Board
1. Before attaching the AV card to the video adapter board, you need to
bend the metal tab 90° at the end of the card with a small flatblade
screwdriver (Figure 15) so it fits in its new location.
2. Orient the video adapter board in front of you as shown in Figure 16.
Align the AV card directly over the adapter board with the connector
of the AV card facing upward (Figure 16). The holes on the AV card
should align directly with the standoffs on the adapter board.
bend tab from original position here
90°
angle
Figure 15: Bend back metal tab on AV card
Figure 16: Orient AV card over video adapter board
AV card connector facing upward
to here
Page 35

29
Power Macintosh 7100 Installation
3. Secure the AV card to the video adapter board with the two nuts
(Figure 17) supplied with the adapter kit.
Install Support Stand-Off Onto Crescendo Card
Place the Crescendo card in front of you with the pass-through slot facing
upward. Screw the support stand-off (supplied with the adapter kit) onto
the card (Figure 18).
Figure 18: Screw support stand-off onto Crescendo card
pass-through slot
Figure 17: Secure AV card to video adapter board with nuts
Page 36

30
Chapter 3
Install Video Flex Cable Onto Crescendo Card
Install the video flex cable into the pass-through slot of the Crescendo
card (note the notch in the cable for orientation). Press down on the
outer edges of the cable until it is firmly seated (Figure 19).
Install Crescendo Card Into PDS Slot
Align the Crescendo card over the PDS slot on the logic board. Gently
press down until the card is firmly seated in the PDS slot (Figure 20).
Figure 20: Install Crescendo card into PDS slot
PDS slot
Figure 19: Attach video flex cable to Crescendo card
notch in cable
pass-through slot
Crescendo card
(with attached video flex cable)
Page 37

31
Power Macintosh 7100 Installation
Remove Access Port Cover From Middle NuBus Port
1. Remove the access port cover (if installed) from the middle NuBus
port located at the back of the computer (Figure 21). Use your finger
or a small flatblade screwdriver to push it out from the port as shown
in Figure 21.
2. Insert the access port cover into the PDS port (Figure 22).
Figure 21: Push out middle NuBus access port cover
Figure 22: Insert access port cover into PDS port
Page 38

32
Chapter 3
Install Video Adapter Board Into Middle NuBus Slot
If you are reinstalling any NuBus cards, first install a NuBus card into the
NuBus slot closest to the power supply. Then, align the video adapter
board over the middle NuBus slot on the logic board with the inverted
AV or HPV card on the adapter board facing toward the power supply
(Figure 23). Verify the adapter board lines up with the inline NuBus
guides of the 7100’s case. Gently press down on the adapter board (not
directly on the AV or HPV card) until the adapter board is firmly seated in
the middle NuBus slot. If you encounter excessive resistance, check for
bent connector pins, re-align the adapter board over the middle NuBus
slot, and gently press down again. If you have a second NuBus card to
install, install it into the outer NuBus slot.
Figure 23: Install video adapter board into middle NuBus slot
middle NuBus slot
video adapter board
(with attached AV or HPV card)
Support Note: IMPORTANT! – The video adapter board installs into
the middle NuBus slot since it aligns with the proper clearance in the
support framing of the computer's case. The video adapter board uses
the middle NuBus slot as a holder; it does not convert your AV or HPV
card into a NuBus card.
Page 39

33
Power Macintosh 7100 Installation
Attach Video Flex Cable
1. Attach the connector on the video flex cable to the AV or HPV card
(Figure 24). Gently press down on the outer edges of the connector
to avoid pricking your fingers on the series of pins on top of the
connector. If necessary, use a piece of foam from the packaging
material your card shipped in to provide a cushion between your
finger and the pins.
2. Return the computer to your computing area.
3. IMPORT ANT! – Before replacing the cover onto your computer,
attach your monitor’s video cable to the AV or HPV card 15-pin
monitor connector (Figure 25). Secure the cable by tightening the
thumbscrews on the cable’s connector. Connecting the cable anchors
the card in place while replacing the cover.
attach connector
Figure 24: Attach video flex cable to AV or HPV card
Figure 25: Reattach 15-pin monitor connector
15-pin monitor connector
Page 40

34
Chapter 3
Replace Case Cover Onto Computer
1. Turn over the cover and locate the large cutout in the support
framing (Figure 26). This cutout provides the necessary clearance
required for the video adapter board to fit inside the computer.
Take care when removing and replacing the cover onto your
computer to prevent damaging the adapter’s video flex cable.
2. Carefully replace the cover onto your computer by slanting the front
end of the cover over the computer (Figure 27). Confirm the inner
grooves of the bottom of the case align with the tabs in the cover. As
you slide back the cover, the top of the video adapter board and
attached flex cable should fit nicely into the cutout of the cover.
When the cutout of the cover clears the connector, you can lower
the cover into place.
Figure 26: Location of large cutout in cover
(back of case)
cutout in cover
(front of case)
line tabs in cover with inner grooves of case
Figure 27: Replace case cover onto computer
Page 41

35
3. Make certain the cover lines up with the support runner of the
computer’s case (Figure 28). The video adapter board should be
firmly in place and not misaligned with the access port slot. If the
video adapter board appears “tweaked” you will need to carefully
realign the case back onto the computer.
4. Finish sliding the cover onto the computer until it lines up with
the rear of the computer (Figure 29).
Power Macintosh 7100 Installation
cover should align with support runner
Figure 28: Make certain cover aligns with support runner
Figure 29: Finish sliding cover onto computer
adapter board should be firmly in place
Page 42

36
Reconnect Power and Peripheral Cables
1. Once the cover is in place, tighten the security screw on the back of
computer’s case.
2. Reconnect the power and peripheral cables to the computer.
3. Affix the Powered by Sonnet label to the front of your computer.
Turn On Computer
1. Turn on your Power Macintosh. Your newly accelerated machine
should boot as normal.
2. If you are installing a Crescendo G4, see Chapter 8, “Upgrading to
Mac OS 9 and a G4” for information about enabling AltiVec
extensions in Mac OS and application software.
Chapter 3
Support Note:
Your computer must be upgraded with a G4
processor in order to take advantage of enhanced AltiVec applications
and software.
Page 43

37
This chapter contains instructions for installing Crescendo NuBus
processor upgrade cards into Power Macintosh 8100, 8115, and
Workgroup Server 8150 computers.
System Compatibility
At this printing, Crescendo NuBus processor upgrade cards are
compatible with the latest Mac OS from Apple. Mac OS 9 is required
for G4 AltiVec use. For up-to-date Mac OS compatibility, check
our website.
You Should Have
The following items should be included in your product package:
• Crescendo NuBus processor upgrade card
• Crescendo/Encore Install diskette
• Installation manual
• Powered by Sonnet label
For the installation you will also require:
• A large flatblade screwdriver
Installation Overview
This overview is intended for those with prior experience installing
Sonnet upgrade products or Macintosh hardware. However, we
strongly recommend following the full installation instructions if
this is your first installation of this hardware.
Installing the Crescendo card takes a few easy steps:
1) Install Mac OS 9 (if upgrading as part of this installation)
2) Install Sonnet software
2) Shut down computer and remove case cover from computer
3) If installed, remove AV or HPV card from PDS slot
4) Remove Level 2 cache card (if present)
5a) If you do not have an AV or HPV card:
• Install Crescendo card into PDS slot; skip to step 6
5b) If you have an AV or HPV card along with the AV/HPV Card
Video Adapter Kit (sold separately):
• Invert and attach AV or HPV card to video adapter board
• Plug video flex cable into Crescendo card’s connector
• Install Crescendo card into PDS slot
• Install video adapter board into middle NuBus slot and attach
video flex cable from Crescendo card to AV or HPV card
6) Replace case cover onto computer
7) Affix the Powered by Sonnet label to front of computer
8) Turn on your newly upgraded Power Macintosh
9) To upgrade to AltiVec-enhanced software, see Chapter 8
For more complete instructions, follow the installation procedure
outlined in the pages that follow.
4
Power Macintosh 8100, 8115, and Workgroup Server 8150
Page 44

38
Chapter 4
Power Macintosh 8100, 8115, and Workgroup Server 8150
Crescendo Installation
Identify System Video Output Configuration
Before installing the Crescendo card into your computer, it is important
to identify your system configuration for video output.
Apple manufactured the Power Macintosh 8100 with an AV (Audio/
Video) card or HPV (High Performance Video) card installed in the PDS
slot of the computer. Other video alternatives include onboard video
through the high density video port or a NuBus video card.
Determine your video output configuration by referring to Figure 1
below. There are three possible configurations:
• Apple AV or HPV Card – If the monitor is attached to a card
installed in the PDS slot (Figure 1-Label B), you have an AV or
HPV card. Since the Crescendo card installs into the PDS slot, you
will need the AV/HPV Card Video Adapter Kit (Sonnet part number
C61A-7181) to preserve the use of the AV or HPV card. If you
purchased a video adapter kit, continue with the installation on the
following page; otherwise, contact Sonnet or a Sonnet reseller to
obtain one.
• Onboard Video – If the monitor is attached to the high density
video port (Figure 1-Label A), you have onboard video. Continue
with the installation on the following page.
• NuBus Video Card – If the monitor is attached to a card installed in
one of the three NuBus slots (Figure 1-Label C), you have a NuBus
video card; continue with the installation on the following page.
Figure 1: Video output ports
NuBus slot ports
high density video port
A
C
B
PDS slot port
(with AV or HPV card)
Page 45

39
Power Macintosh 8100, 8115, and Workgroup Server 8150 Installation
Install Software
1. If you are upgrading to Mac OS 9 as part of this installation,
do so now. Sonnet recommends a clean/universal install of the
Mac OS. Start up your computer from the Mac OS CD and double
click the Mac OS Install application. In the Select Destination
window, click the Options button and click the Perform Clean
Installation check box that appears in the subsequent screen.
Click the Select button. Proceed through the next several screens
until you reach the Install Software window. Click the Customize
button. In the Custom Installation and Removal window click
the pop-up menu to the right of Mac OS 9. Change the
“Recommended Installation” to “Customized installation.” The
Select Mac OS 9 Features to Install window will appear shortly.
Change “Recommended Installation” to “Universal Installation”
from the pop-up menu. Click OK, Start, then Continue to
complete the installation. After the software is installed, quit the
Mac OS Install application and restart your computer from the hard
drive where Mac OS 9 is installed.
2. Insert the Crescendo/Encore Install diskette into the floppy disk
drive. Double click the Crescendo/Encore Install icon. By default,
with “Easy Install” selected from the pop-up menu, the required
software will be installed into the active System Folder on the boot
drive. If this is ok, click the Install button; otherwise, select
“Custom Install” from the pop-up menu for more options or select
another drive to install the software. The installer will install the
appropriate software into the System Folder of your computer. If
the installation was successful, a dialog box will appear. Click Quit
to leave the installer and shut down your computer.
Shut Down and Open Computer
1. Shut down your Power Macintosh. If the computer has been on
for any length of time, wait a few minutes for it to cool before
beginning the installation.
2. Disconnect the power and peripheral cables from the back of the
computer and move it to an area where you can freely work.
Support Note:
IMPORTANT! – If you are installing a Crescendo card
into a Power Macintosh 8100 with an AV or HPV card, you will require
the AV/HPV Card Video Adapter Kit to preserve your video output.
We recommend you make a backup of important information on your
hard drive prior to installing new hardware or software. When handling
computer products, you must take care to prevent components from being
damaged by static electricity. Avoid carpeted areas, handle processor upgrade
cards only by their edges, and avoid touching connector traces
and component pins.
Page 46

40
Chapter 4
3. Open your Power Macintosh by first loosening the four security
screws on the back of the case with a large flatblade screwdriver
and then gently slide the case cover off the computer (Figure 2).
4. Lay the computer on a flat surface so that you may gain access to the
interior of the computer (Figure 3).
5. Identify the internal components of your computer. Touch the
power supply metal shielding (Figure 3) to discharge any
potential damaging static electricity.
Figure 2: Slide case cover off computer
Figure 3: Touch power supply metal shielding to discharge static electricity
power supply
metal shielding
PDS slot (with AV
or HPV card)
NuBus slots
Page 47

41
Remove PDS Card from PDS Slot
Locate the PDS slot (Figure 3) directly under the metal shielding of
the internal power supply. If there is a PDS card installed (such as the
Apple AV or HPV card), remove it. Gently unlatch the inner case tab
away from the PDS card with your finger or the head of a small
flatblade screwdriver (Figure 4, inset), then grasp the edges of the
card firmly and pull it out of the PDS slot (Figure 4).
To preserve the use of your AV or HPV card, you need the AV/HPV Card
Video Adapter Kit (Sonnet part number C61A-7181). If you have the
video adapter kit, continue with the installation instructions. If you do
not have the video adapter kit, please contact Sonnet to obtain one.
Remove Level 2 Cache Card
If your computer contains a Level 2 cache card, remove it. If you are
uncertain about whether you have a Level 2 cache card, or where it
might be located, consult your computer’s documentation or see
Chapter 10, “Removing a Level 2 Cache Card.”
Power Macintosh 8100, 8115, and Workgroup Server 8150 Installation
Figure 4: Remove PDS card from PDS slot
tab
Page 48

42
Install Crescendo NuBus Processor Upgrade Card
Remove the Crescendo card from the anti-static package, making sure to
handle the card by the edges (Figure 5). Your card may differ from what is
pictured below.
• If You Are Re-Installing an AV or HPV Card – Temporarily set the
Crescendo card aside and continue with the instructions on the
following page to install the Crescendo with an AV or HPV card.
• If You Do Not Have an AV or HPV Card – Align the Crescendo
card over the PDS slot on the logic board with the card’s heatsink
facing away from the NuBus slots (Figure 6). Gently press down until
the card is firmly seated in the PDS slot. Replace the cover onto your
computer and finish the installation in the section entitled, “Reconnect
Power and Peripheral Cables” on page 53.
Chapter 4
Figure 6: Install Crescendo card into PDS slot
Crescendo card
PDS slot
Figure 5: Remove Crescendo card from packaging
NuBus slots
Page 49

43
AV/HPV Card Video Adapter Installation
Adapter Kit Inventory
Before installing the Crescendo NuBus processor upgrade card with
the AV or HPV card, you will require the following items (Figure 7):
Included with adapter kit:
1) Video adapter board
2) Video flex cable
3) Two 4-40 nuts
4) Support stand-off (required for 7100 only)
5) Two subassembly standoffs (required for 8100 only)
Needed; not included with adapter kit:
6) Small flatblade screwdriver
7) Small Philips screwdriver
8) Crescendo NuBus processor upgrade card
9) PDS-based AV or HPV card (AV card shown below)
We suggest you inventory and lay the items out in front of you prior
to proceeding with the installation of the AV or HPV card with the
Crescendo card.
Power Macintosh 8100, 8115, and Workgroup Server 8150 Installation
1
Needed; not included
Figure 7: Items needed for Crescendo card installation with AV or HPV card
2
3
4
6
8
9
Included with adapter kit
5
7
Page 50

44
Chapter 4
Temporarily Remove NuBus Cards from Computer
Locate the NuBus slots (Figure 8). If any NuBus cards are installed,
temporarily remove them so you have better clearance for installing the
video adapter board. If you have three NuBus cards in your computer, you
will only be able to reinstall two of them. The middle NuBus slot is
required by the adapter board.
Identify Your PDS-Based Video Card
Determine if you have an AV or HPV card as follows:
• AV Card – The AV card has a single 15-pin monitor connector
for a monitor and S-Video In and S-Video Out ports (Figure 9)
that support Audio/Video features. If you have an AV card,
continue with the instructions in the section entitled, “Affix the
AV Card to the Adapter Board” on page 47.
Figure 8: Location of NuBus slots
NuBus slots
PDS slot
S-Video In port
S-Video Out port
15-pin monitor connector
Figure 9: AV card
Page 51

45
Power Macintosh 8100, 8115, and Workgroup Server 8150 Installation
• HPV Card – The HPV (High Performance Video) card has a
single 15-pin monitor connector for a monitor and four
onboard Video RAM (VRAM) slots (Figure 10). If you have the
HPV card, continue with the instructions below.
Affix HPV Card to Video Adapter Board
1. Before attaching the HPV card to the video adapter board, you
need to bend the metal tab 90° at the end of the card with a small
flatblade screwdriver (Figure 11) so it fits in its new location.
15-pin monitor connector
Figure 10: HPV card
Four VRAM slots
Figure 11: Bend back metal tab on HPV card
90°
angle
bend tab from original position here
to here
Page 52

46
Chapter 4
2. Using a small Phillips screwdriver, remove the three standoffs from
the video adapter board. Locate the two subassembly standoffs
from the video adapter packaging. Assemble and secure one
subassembly standoff to the upper right corner of the board, and
the other subassembly standoff to the lower left corner (Figure 12).
3. Align the HPV card directly over the video adapter board with the
connector of the HPV card facing upwards (Figure 13). The holes
on the HPV card should align directly with the standoffs on the
adapter board. Secure the HPV card to the video adapter board with
the two nuts (Figure 13) supplied with the adapter kit.
4. Continue with the instructions in the section entitled, “Install
Video Flex Cable Onto Crescendo Card” on page 48.
Figure 12: Assemble and secure subassembly standoffs as shown
Figure 13: Secure HPV card to video adapter board with nuts
HPV card connector facing upwards
subassembly
standoff
subassembly
standoff
Page 53

47
Power Macintosh 8100, 8115, and Workgroup Server 8150 Installation
Affix AV Card to Video Adapter Board
1. Before attaching the AV card to the video adapter board, you need to
bend the metal tab 90° at the end of the card with a small flatblade
screwdriver (Figure 14) so it fits in its new location.
2. Using a small Phillips screwdriver, remove the three standoffs from
the video adapter board. Locate the two subassembly standoffs
from the video adapter packaging. Assemble and secure the two
subassembly standoffs to the upper left and right corners of the
adapter board (Figure 15).
Figure 15: Assemble and secure subassembly standoffs as shown
bend tab from original position here
90°
angle
Figure 14: Bend back metal tab on AV card
to here
subassembly
standoff
subassembly
standoff
Page 54

48
Chapter 4
3. Align the AV card directly over the video adapter board with the
connector of the AV card facing upward (Figure 17). The holes
on the AV card should align directly with the standoffs on the
adapter board. Secure the AV card to the video adapter board with the
two nuts (Figure 17) supplied with the adapter kit.
Install Video Flex Cable Onto Crescendo Card
Install the video flex cable into the pass-through slot of the Crescendo
card (note the notch in the cable for orientation). Press down on the
outer edges of the cable until it is firmly seated (Figure 18).
Figure 17: Secure AV card to video adapter board with nuts
AV card connector facing upward
Figure 18: Attach video flex cable to Crescendo
notch in cable
pass-through slot
Page 55

49
Power Macintosh 8100, 8115, and Workgroup Server 8150 Installation
Install Crescendo Card Into PDS Slot
Align the Crescendo card over the PDS slot on the logic board with the
card’s heatsink facing toward the power supply (Figure 19). Gently press
down until the card is firmly seated in the PDS slot.
Remove Access Port Cover From Middle NuBus Port
1. Remove the access port cover (if installed) from the middle NuBus
port located at the back of the computer (Figure 20). Use your
finger or a small flatblade screwdriver to push it out from the port
(Figure 20).
Figure 19: Install Crescendo into PDS slot
PDS slot
Crescendo card
(with attached video flex cable)
Figure 20: Push out middle NuBus access port cover with screwdriver
Page 56

50
Chapter 4
2. Insert the access port cover into the PDS port (Figure 21).
Install Video Adapter Board Into Middle NuBus Slot
If you are reinstalling any NuBus cards, first install a NuBus card into the
NuBus slot closest to the power supply. Then, align the video adapter
board over the middle NuBus slot on the logic board with the inverted
AV or HPV card on the adapter board facing toward the power supply
(Figure 22). Verify the adapter board lines up with the inline NuBus
guides of the 8100’s case. Gently press down on the adapter board (not
directly on the AV or HPV card) until the adapter board is firmly seated in
the middle NuBus slot. If you encounter excessive resistance, check for
bent connector pins, re-align the adapter board over the middle NuBus
slot, and gently press down again. If you have a second NuBus card to
install, install it into the outer NuBus slot.
Figure 21: Insert access port cover into PDS port
Support Note: IMPORTANT! – The video adapter board installs into
the middle NuBus slot since it aligns with the proper clearance in the
support framing of the computer's case. The video adapter board uses the
middle NuBus slot as a holder; it does not convert your AV or HPV card into a
NuBus card.
Page 57

51
Power Macintosh 8100, 8115, and Workgroup Server 8150 Installation
Attach Video Flex Cable
1. Attach the connector on the video flex cable to the AV or HPV card
(Figure 23). Gently press down on the outer edges of the connector
to avoid pricking your fingers on the series of pins on top of the
connector. If necessary, use a piece of foam from the packaging
material your card shipped in to provide a cushion between your
finger and the pins.
2. Return the computer to your computing area.
Figure 22: Install video adapter board into middle NuBus slot
video adapter board
(with attached AV or HPV card)
middle NuBus slot
Figure 23: Attach video flex cable to AV or HPV card
attach connector
Page 58

52
Chapter 4
3. IMPORTANT! – Before replacing the cover onto your computer,
attach your monitor’s video cable to the AV or HPV card 15-pin
monitor connector (Figure 24). Secure the cable by tightening the
thumbscrews on the cable’s connector. Connecting the cable anchors
the card in place while replacing the cover.
Replace Case Cover Onto Computer
1. Carefully replace the cover onto your computer by slanting the front
end of the cover over the computer, making sure the tabs on the back
of the cover slide inside the rear of the case (Figure 25).
15-pin monitor connector
Figure 25: Replace cover onto computer
Figure 24: Reattach 15-pin monitor connector
Page 59

53
Power Macintosh 8100, 8115, and Workgroup Server 8150 Installation
2. Finish sliding the cover onto the computer until it is flush with the
rear of the computer (Figure 26). The video adapter board should be
firmly in place and not misaligned with the access port slot. If the
adapter board appears “tweaked” you will need to remove the cover
and firmly align the adapter board.
Reconnect Power and Peripheral Cables
1. Once the cover is in place, tighten the four security screws on the
back of computer’s case.
2. Reconnect the power and peripheral cables to the computer.
3. Affix the Powered by Sonnet label to the front of your computer.
Turn On Computer
1. Turn on your Power Macintosh. Your newly accelerated machine
should boot as normal.
2. If you are installing a Crescendo G4, see Chapter 8, “Upgrading to
Mac OS 9 and a G4” for information about enabling AltiVec
extensions in Mac OS and application software.
Figure 26: Cover completely on computer
Support Note:
Your computer must be upgraded with a G4
processor in order to take advantage of enhanced AltiVec applications
and software.
Page 60

Page 61

55
This chapter contains instructions for installing Crescendo NuBus
processor upgrade cards into a Workgroup Server 9150 computer.
System Compatibility
At this printing, Crescendo NuBus processor upgrade cards are
compatible with the latest Mac OS from Apple. Mac OS 9 is required
for G4 AltiVec use. For up-to-date Mac OS compatibility, check
our website.
You Should Have
The following items should be included in your product package:
• Crescendo NuBus processor upgrade card
• Crescendo/Encore Install diskette
• Installation manual
• Powered by Sonnet label
Installation Overview
This overview is intended for those with prior experience installing
Sonnet upgrade products or Macintosh hardware. However, we
strongly recommend following the full installation instructions if
this is your first installation of this hardware.
Installing the Crescendo card takes a few easy steps:
1) Install Mac OS 9 (if upgrading as part of this installation)
2) Install Sonnet software
3) Shut down computer
4) Remove case cover from computer
5) If installed, remove PDS card from PDS slot
6) Remove Level 2 cache card (if present)
7) Install Crescendo card into PDS slot
8) Replace case cover onto computer
9) Affix the Powered by Sonnet label to front of computer
10) Turn on your newly upgraded computer
11) To upgrade to AltiVec-enhanced software, see Chapter 8
For more complete instructions, follow the installation procedure
outlined in the pages that follow.
Workgroup Server 9150 Installation
5
Page 62

56
Chapter 5
Workgroup Server 9150 Crescendo Installation
Install Software
1. If you are upgrading to Mac OS 9 as part of this installation,
do so now. Sonnet recommends a clean/universal install of the
Mac OS. Start up your computer from the Mac OS CD and double
click the Mac OS Install application. In the Select Destination
window, click the Options button and click the Perform Clean
Installation check box that appears in the subsequent screen.
Click the Select button. Proceed through the next several screens
until you reach the Install Software window. Click the Customize
button. In the Custom Installation and Removal window click
the pop-up menu to the right of Mac OS 9. Change the
“Recommended Installation” to “Customized installation.” The
Select Mac OS 9 Features to Install window will appear shortly.
Change “Recommended Installation” to “Universal Installation”
from the pop-up menu. Click OK, Start, then Continue to
complete the installation. After the software is installed, quit the
Mac OS Install application and restart your computer from the hard
drive where Mac OS 9 is installed.
2. Insert the Crescendo/Encore Install diskette into the floppy disk
drive. Double click the Crescendo/Encore Install icon. By default,
with “Easy Install” selected from the pop-up menu, the required
software will be installed into the active System Folder on the boot
drive. If this is ok, click the Install button; otherwise, select
“Custom Install” from the pop-up menu for more options or select
another drive to install the software. The installer will install the
appropriate software into the System Folder of your computer. If
the installation was successful, a dialog box will appear. Click Quit
to leave the installer and shut down your computer.
Support Note:
We recommend that you make a backup of important
information on your hard drive prior to installing new hardware or
software. When handling computer products, you must take care to prevent
components from being damaged by static electricity. Avoid carpeted areas,
handle processor upgrade cards only by their edges, and avoid touching
connector traces and component pins.
Page 63

57
Shut Down and Open Computer
1. Shut down your Power Macintosh. If the computer has been on
for any length of time, wait a few minutes for it to cool before
beginning the installation.
2. Disconnect the power and peripheral cables from the back of the
computer and move it to an area where you can freely work.
3. With the rear of the computer facing you, open your computer by
first removing the security screw on the back of the case; then,
unlatch the cover and set it aside (Figure 1).
Workgroup Server 9150 Installation
security screw
latch
latch
Figure 1: Remove case cover from computer
Page 64

58
Chapter 5
4. Lay the computer on a flat surface and touch the metal housing
(Figure 2) of the drive sled to discharge any potential damaging
static electricity.
Remove Level 2 Cache Card
If your computer contains a Level 2 cache card, remove it. If you are
uncertain about whether you have a Level 2 cache card, or where it
might be located, consult your computer’s documentation or see
Chapter 10, “Removing a Level 2 Cache Card.”
Install Crescendo NuBus Processor Upgrade Card
1. Remove the Crescendo card from the anti-static package, making sure
to handle the card by the edges (Figure 3). Your card may differ from
what is pictured below.
Figure 2: Internal components of Workgroup Server 9150
Figure 3: Remove Crescendo card from packaging
metal shielding of
drive sled
Page 65

59
2. Align the Crescendo card over the PDS slot (Figure 4). Gently press
down until the card is firmly seated.
Replace Case Cover Onto Computer
1. Replace the cover and security screw onto your computer (Figure 5).
Return your computer to your computing area and reconnect the
power and peripheral cables.
2. Affix the Powered by Sonnet label to the front of your computer.
Workgroup Server 9150 Installation
Figure 4: Install Crescendo card into PDS slot
security screw
Crescendo card
PDS slot
Figure 5: Replace case cover onto computer
metal shielding of
drive sled
Page 66

60
Chapter 5
Turn On Computer
1. Turn on your Power Macintosh. Your newly accelerated machine
should boot as normal.
2. If you are installing a Crescendo G4/NuBus, see Chapter 8,
“Upgrading to Mac OS 9 and a G4” for information about enabling
AltiVec extensions in Mac OS and application software.
Support Note: Your computer must be upgraded with a G4
processor in order to take advantage of enhanced AltiVec applications
and software.
Page 67

61
This chapter contains instructions for installing Crescendo NuBus
processor upgrade cards into Power Computing 100 and 120 computers.
System Compatibility
At this printing, Crescendo NuBus processor upgrade cards are
compatible with the latest Mac OS from Apple. Mac OS 9 is required
for G4 AltiVec use. For up-to-date Mac OS compatibility, check
our website.
You Should Have
The following items should be included in your product package:
• Crescendo NuBus processor upgrade card
• Crescendo/Encore Install diskette
• Installation manual
• Powered by Sonnet label
Installation Overview
This overview is intended for those with prior experience installing
Sonnet upgrade products or Macintosh hardware. However, we
strongly recommend following the full installation instructions if
this is your first installation of this hardware.
Installing the Crescendo takes a few easy steps:
1) Install Mac OS 9 (if upgrading as part of this installation)
2) Install Sonnet software
3) Turn off computer
3) Open computer
4) If installed, remove PDS card from PDS slot
5) Remove Level 2 cache card (if present)
6) Install Crescendo card into PDS slot
7) Replace case cover onto computer
8) Affix the Powered by Sonnet label to front of computer
9) Turn on your newly upgraded computer
10) To upgrade to AltiVec-enhanced software, see Chapter 8
For more complete instructions, follow the installation procedure
outlined in the pages that follow.
Power Computing 100 and 120 Installation
6
Page 68

62
Chapter 6
Power Computing 100 and 120 Crescendo Installation
Install Software
1. If you are upgrading to Mac OS 9 as part of this installation,
do so now. Sonnet recommends a clean/universal install of the
Mac OS. Start up your computer from the Mac OS CD and double
click the Mac OS Install application. In the Select Destination
window, click the Options button and click the Perform Clean
Installation check box that appears in the subsequent screen.
Click the Select button. Proceed through the next several screens
until you reach the Install Software window. Click the Customize
button. In the Custom Installation and Removal window click
the pop-up menu to the right of Mac OS 9. Change the
“Recommended Installation” to “Customized installation.” The
Select Mac OS 9 Features to Install window will appear shortly.
Change “Recommended Installation” to “Universal Installation”
from the pop-up menu. Click OK, Start, then Continue to
complete the installation. After the software is installed, quit the
Mac OS Install application and restart your computer from the hard
drive where Mac OS 9 is installed.
2. Insert the Crescendo/Encore Install diskette into the floppy disk
drive. Double click the Crescendo/Encore Install icon. By default,
with “Easy Install” selected from the pop-up menu, the required
software will be installed into the active System Folder on the boot
drive. If this is ok, click the Install button; otherwise, select
“Custom Install” from the pop-up menu for more options or select
another drive to install the software. The installer will install the
appropriate software into the System Folder of your computer. If
the installation was successful, a dialog box will appear. Click Quit
to leave the installer and shut down your computer.
Support Note:
We recommend that you make a backup of important
information on your hard drive prior to installing new hardware or
software. When handling computer products, you must take care to prevent
components from being damaged by static electricity. Avoid carpeted areas,
handle processor upgrade cards only by their edges, and avoid touching
connector traces and component pins.
Page 69

63
Shut Down and Open Computer
1. Shut down your Power Computing 100 or 120. If the computer
has been on for any length of time, wait a few minutes for it to
cool before beginning the installation.
2. Disconnect the power and peripheral cables from the back of the
computer and move it to an area where you can freely work.
3. With the rear of the computer facing you, open your computer by
first loosening the security screw on the back of the case; then, lift the
cover away from the computer (Figure 1).
4. Identify the internal components of your computer. Touch the
power supply metal shielding (Figure 2) to discharge any potential
damaging static electricity.
Power Computing 100 and 120 Installation
Figure 1: Remove case cover from computer
Figure 2: Touch power supply metal shielding to discharge static electricity
power supply
metal shielding
security screw
Page 70

64
Remove Level 2 Cache Card
If your computer contains a Level 2 cache card, remove it. If you are
uncertain about whether you have a Level 2 cache card, or where it
might be located, consult your computer’s documentation or see
Chapter 10, “Removing a Level 2 Cache Card.”
Install Crescendo NuBus Processor Upgrade Card
1. Remove the Crescendo card from the anti-static package, making sure
to handle the card by the edges (Figure 3). Your card may differ from
what is pictured below.
2. Align the Crescendo card over the PDS slot (Figure 4). Gently press
down until the card is firmly seated.
Chapter 6
Figure 4: Install Crescendo card into PDS slot
Figure 3: Remove Crescendo card from packaging
NuBus slots
PDS slot
Crescendo card
Page 71

65
Replace Case Cover Onto Computer
1. Replace the case cover and security screw onto your computer
(Figure 5).
2. Return the c omputer to your computing area and reconnect the
power and peripheral cables.
3. Affix the Powered by Sonnet label to the front of your computer.
Turn On Computer
1. Turn on your Power Computing 100 or 120. Your newly accelerated
machine should boot as normal.
2. If you are installing a Crescendo G4, see Chapter 8, “Upgrading to
Mac OS 9 and a G4” for information about enabling AltiVec
extensions in Mac OS and application software.
Power Computing 100 and 120 Installation
Figure 5: Replace case cover from computer
security screw
Support Note:
Your computer must be upgraded with a G4
processor in order to take advantage of enhanced AltiVec applications
and software.
Page 72

Page 73

67
This chapter contains instructions for installing Crescendo NuBus
processor upgrade cards into Radius System and 81/110 computers.
System Compatibility
At this printing, Crescendo NuBus processor upgrade cards are
compatible with the latest Mac OS from Apple. Mac OS 9 is required
for G4 AltiVec use. For up-to-date Mac OS compatibility, check
our website.
You Should Have
The following items should be included in your product package:
• Crescendo NuBus processor upgrade card
• Crescendo/Encore Install diskette
• Installation manual
• Powered by Sonnet label
Installation Overview
This overview is intended for those with prior experience installing
Sonnet upgrade products or Macintosh hardware. However, we
strongly recommend following the full installation instructions if
this is your first installation of this hardware.
Installing the Crescendo card takes a few easy steps:
1) Install Mac OS 9 (if upgrading as part of this installation)
2) Install Sonnet software
3) Turn off computer
4) Remove case cover from computer
5) Remove power supply brace above NuBus and PDS slots
6) If installed, remove PDS card from PDS slot
7) Remove Level 2 cache card (if present)
8) Install Crescendo card into PDS slot
9) Replace power supply brace
10) Replace case cover onto computer
11) Affix the Powered by Sonnet label to front of computer
12) To upgrade to AltiVec-enhanced software, see Chapter 8
For more complete instructions, follow the installation procedure
outlined in the pages that follow.
Radius System 100 and 81/110 Installation
7
Page 74

68
Chapter 7
Radius System and 81/110 Crescendo Installation
Install Software
1. If you are upgrading to Mac OS 9 as part of this installation,
do so now. Sonnet recommends a clean/universal install of the
Mac OS. Start up your computer from the Mac OS CD and double
click the Mac OS Install application. In the Select Destination
window, click the Options button and click the Perform Clean
Installation check box that appears in the subsequent screen.
Click the Select button. Proceed through the next several screens
until you reach the Install Software window. Click the Customize
button. In the Custom Installation and Removal window click
the pop-up menu to the right of Mac OS 9. Change the
“Recommended Installation” to “Customized installation.” The
Select Mac OS 9 Features to Install window will appear shortly.
Change “Recommended Installation” to “Universal Installation”
from the pop-up menu. Click OK, Start, then Continue to
complete the installation. After the software is installed, quit the
Mac OS Install application and restart your computer from the hard
drive Mac OS 9 is installed.
2. Insert the Crescendo/Encore Install diskette into the floppy disk
drive. Double click the Crescendo/Encore Install icon. By default,
with “Easy Install” selected from the pop-up menu, the required
software will be installed into the active System Folder on the boot
drive. If this is ok, click the Install button; otherwise, select
“Custom Install” from the pop-up menu for more options or select
another drive to install the software. The installer will install the
appropriate software into the System Folder of your computer. If
the installation was successful, a dialog box will appear. Click Quit
to leave the installer and shut down your computer.
Turn Off and Open Computer
1. Shut down your Radius System or 81/110. If the computer has
been on for any length of time, wait a few minutes for it to cool
before beginning the installation.
2. Disconnect the power and peripheral cables from the back of the
computer and move it to an area where you can freely work.
Support Note:
We recommend that you make a backup of important
information on your hard drive prior to installing new hardware or
software. When handling computer products, you must take care to prevent
components from being damaged by static electricity. Avoid carpeted areas,
handle processor upgrade cards only by their edges, and avoid touching
connector traces and component pins.
Page 75

69
Radius System 100 and 81/100 Installation
3. Open your computer by first removing the four security screws on
the back of the computer (Figure 1) with a medium Phillips
screwdriver; then, carefully remove the side panel.
Temporarily Remove Power Supply Brace
Lay the computer on a flat surface. Touch the power supply metal
shielding (Figure 2) to discharge any potential damaging static
electricity. To easily gain access to the PDS slot, temporarily remove the
power supply brace by unscrewing it and lifting it up and out of the
interior of the computer (Figure 2).
Figure 1: Remove case cover from computer
Figure 2: Touch power supply metal shielding and remove power supply brace
power supply brace
power supply
metal shielding
security screw
security screw
security screw
security screw
Page 76

70
Chapter 7
Remove Level 2 Cache Card
If your computer contains a Level 2 cache card, remove it. If you are
uncertain about whether you have a Level 2 cache card, or where it
might be located, consult your computer’s documentation or see
Chapter 10, “Removing a Level 2 Cache Card.”
Install Crescendo NuBus Processor Upgrade Card
1. Remove the Crescendo card from the anti-static package, making
sure to handle the card by the edges (Figure 3). Your card may differ
from what is pictured below.
2. Prior to installing the Crescendo card, note the inline metal
port covers of the PDS and NuBus slots. When installing the
Crescendo, take extra caution not to brush the card against the
port cover of the PDS slot (Figure 4). Doing so may break off
the delicate components on the edge of the Crescendo card
(Figure 4, inset).
Figure 3: Remove Crescendo card from packaging
Figure 4: PDS slot port cover and components on Crescendo card
PDS slot
PDS port cover
take care not to damage
these components on card
Page 77

71
3. Carefully install the Crescendo by first aligning the card over the
PDS slot, lining the notch in the card with the corresponding
notch in the PDS slot (Figure 5).
4. Once the card is correctly aligned over the PDS slot, rotate the
Crescendo card perpendicular to the logic board and slowly press
the card into the PDS slot until the card is firmly seated (Figure 6).
Radius System 100 and 81/100 Installation
Figure 5: Align notch in Crescendo card with notch in PDS slot
Figure 6: Install Crescendo card into PDS slot
notch in PDS slot
Crescendo card
PDS slot
Page 78

72
Chapter 7
Replace the Power Supply Brace
Replace the power supply brace over the PDS and NuBus slots and
screw it into place (Figure 7).
Replace Case Cover Onto Computer
1. Replace the case cover and security screws onto your computer
(Figure 8).
2. Return the computer to your computing area and reconnect the
power and peripheral cables.
3. Affix the Powered by Sonnet label to the front of your computer.
Figure 8: Replace case cover onto computer
Figure 7: Replace power supply brace
power supply brace
Page 79

73
Turn On Computer
1. Turn on your Radius System 100 or 81/110. Your newly accelerated
machine should boot as normal.
2. If you are installing a Crescendo G4, see Chapter 8, “Upgrading to
Mac OS 9 and a G4” for information about enabling AltiVec
extensions in Mac OS and application software.
Radius System 100 and 81/100 Installation
Support Note:
Your computer must be upgraded with a G4
processor in order to take advantage of enhanced AltiVec applications
and software.
Page 80

Page 81

75
8
This chapter contains instructions for installing Mac OS and
application software that adds libraries and extensions to use AltiVec
instructions for Crescendo G4/NuBus processor upgrade cards.
Upgrading to AltiVec Enhanced Software
Mac OS 9 – Mac OS 9 is the earliest Macintosh operating system to
include AltiVec libraries. The Crescendo G4/NuBus fully supports
AltiVec-enhanced software. To correctly install the AltiVec libraries,
make sure you perform the installation upgrade in the following order
(if you have already installed Mac OS 9, the Sonnet software, and the
Crescendo G4/NuBus processor upgrade card, skip to step 4).
1. Install Mac OS 9 – Sonnet recommends a clean/universal install of
the Mac OS. Start up your computer from the Mac OS CD and
double click the Mac OS Install application. In the Select Destination
window, click the Options button and click the Perform Clean
Installation check box that appears in the subsequent screen.
Click the Select button. Proceed through the next several screens
until you reach the Install Software window. Click the Customize
button. In the Custom Installation and Removal window click
the pop-up menu to the right of Mac OS 9. Change the
“Recommended Installation” to “Customized installation.” The
Select Mac OS 9 Features to Install window will appear shortly.
Change “Recommended Installation” to “Universal Installation”
from the pop-up menu. Click OK, Start, then Continue to
complete the installation. After the software is installed, quit the
Mac OS Install application and restart your computer from the
hard drive where Mac OS 9 is installed.
2. Install Sonnet software – Insert the Sonnet Installer CD into the
CD-ROM drive. Double click the Crescendo/Encore Install icon. By
default, with “Easy Install” selected from the pop-up menu, the
required software will be installed into the active System Folder on
the boot drive. If this is ok, click the Install button; otherwise,
select “Custom Install” from the pop-up menu for more options or
select another drive to install the software. The installer will install
the appropriate software into the System Folder of your computer.
If the installation was successful, a dialog box will appear.
Click Quit to leave the installer and shut down your computer.
Upgrading to Mac OS 9 and a G4
Page 82

76
3. Install Crescendo G4/NuBus – If you have a Power Macintosh
7100 or 8100 with an AV or HPV card along with the AV/HPV Card
Video Adapter Kit, install it first; otherwise, install the Crescendo
G4/NuBus into your computer’s PDS slot.
4. Rerun the Mac OS 9 Install Application – The Mac OS 9 Install
application will only install AltiVec libraries into your System
Folder if a G4 processor is present in your computer during the
Mac OS installation process. As a result, you will need to rerun the
installer to install the AltiVec libraries. Use the hard drive where
Mac OS 9 is installed. Insert the Mac OS 9 CD into your CD-ROM
drive and double click the Mac OS Install application. Proceed
through the next several screens until you reach the Install Software
window. Click the Customize button. In the Custom Installation and
Removal window deselect all software components except for Mac
OS 9. Click the pop-up menu to the right of Mac OS 9 and change
the “Recommended Installation” to “Customized installation.”
The Select Mac OS 9 Features to Install window will appear shortly.
Change “Recommended Installation” to “None” from the pop-up
menu. Click the Core System Software check box (it should be the
only check box with a checkmark). Click OK, Start, then Continue
to complete the installation.
Adobe Photoshop 5.5 – Adobe Photoshop 5.5 is the earliest Photoshop
version that supports Adobe AltiVec Plug-ins. The Crescendo G4/NuBus
fully supports these Plug-ins. The Adobe AltiVec Plug-ins are not
included on the Photoshop 5.5 CD, however. They must be downloaded from the Adobe website. At this printing, the AltiVec
Plug-ins can be downloaded at
http://www.adobe.com/support/downloads/psmac.htm.
Chapter 8
Page 83

77
9
Depending on your software and Macintosh model, Sonnet’s software
installer may perform the following software installation on your
computer:
Sonnet Processor Upgrade Extension
The Sonnet Processor Upgrade Extension is needed to attain
maximum performance of your G3 or G4 upgrade card. It is
installed into your Extensions folder.
Sonnet G4 Enabler 9
The Sonnet G4 Enabler 9 is needed only for G4 upgrade cards
running Mac OS 9. This system enabler activates the Velocity
Engine (AltiVec instructions). It is installed into your System
folder.
Nonvolatile RAM patch
The Nonvolatile RAM patch allows a Power Macintosh
73/75/76/85/86/95/9600 to use a G3 or G4 upgrade card.
G4 Firmware Patch
The G4 Firmware Patch allows a Power Macintosh G3
Blue & White to use a G4 processor upgrade card.
G4 Firmware Patch Remover
The G4 Firmware Patch Remover deinstalls the G4 Firmware
patch on a Power Macintosh G3 Blue & White.
Learning About the Software
Page 84

78
Chapter 9
Metronome
Metronome is a software utility that provides information
about the new processor card. This utility is placed into the
Apple Menu Items Folder. It provides useful information to
you and our technical support staff should you need to call
us for any reason.
Metronome displays bus/processor speeds. It also shows secondary
cache size and speed and the temperature for PowerPC processor
(Figure 1).
Figure 1: Metronome utility screenshot
Page 85

79
If your computer contains a Level 2 cache card, it is recommended
that you remove it. Your new Sonnet Crescendo NuBus processor
upgrade card includes its own backside cache architecture so
removing your old cache will have no negative effect on your
computing experience.
Level 2 Cache Card Removal – Power Macintosh 6100,
6100 AV, Performa 611X, and Workgroup Server 6150
If there is a Level 2 cache card installed in your computer, it will be
located in the L2 Cache Slot, located next in between the ROM card and
the CPU with the large heatsink (Figure 1). Do not mistakenly remove
the ROM card. If you remove the ROM card, you will need to replace it
otherwise your computer will not boot.
Removing a Level 2 Cache Card
10
Figure 1: Level 2 cache card slot
CPU (with heatsink)
ROM card
L2 cache card
Page 86

80
Level 2 Cache Card Removal – Power Macintosh 7100
If there is a Level 2 cache card installed in your computer, it will be
located in the L2 Cache Slot, located in between the power supply and the
ROM card (Figure 2). Do not mistakenly remove the ROM card. If you
remove the ROM card, you will need to replace it otherwise your
computer will not boot.
Level 2 Cache Card Removal – Power Macintosh 8100, 8115,
and Workgroup Server 8150
For these models, the logic board must first be removed from the
computer in order to gain access to the Level 2 cache card. Once the logic
board is removed, the Level 2 cache card will be in the L2 Cache Slot,
located in between the ROM card and the CPU with the large heatsink
(Figure 3). Do not mistakenly remove the ROM card. If you remove the
ROM card, you will need to replace it otherwise your computer will not
boot. After the Level 2 cache card is removed, reinstall the logic board and
proceed with installation of the Crescendo NuBus card.
Chapter 10
Figure 2: Level 2 cache card slot
ROM card
L2 cache card
Support Note: For the removal of the Level 2 cache card and the
installation of the Crescendo NuBus processor upgrade card into a Power
Macintosh 81XX, Sonnet strongly recommends that a qualified
technician performs the installation.
power supply
Page 87

81
Level 2 Cache Card Removal – Power Computing
100 and 120
If there is a Level 2 cache card installed in your computer, it will be in
the L2 Cache Slot, located in between the ROM card and the CPU with
the large heatsink (Figure 4). Do not mistakenly remove the ROM card.
If you remove the ROM card, you will need to replace it otherwise your
computer will not boot.
Removing a Level 2 Cache Card
Figure 3: Level 2 cache card slot
Figure 4: Level 2 cache card slot
CPU (with heatsink)
ROM card
(located behind L2 cache card
L2 cache card
L2 cache card
CPU (with heatsink)
ROM card
Page 88

82
Level 2 Cache Card Removal – Radius System 100
and 81/110
If there is a Level 2 cache card installed in your computer, it will be in
the L2 Cache Slot, located underneath the power supply and next to the
ROM card(Figure 5). In order to get to the Level 2 cache card, you will
need to temporarily remove the power supply from the computer. Do not
mistakenly remove the ROM card. If you remove the ROM card, you will
need to replace it otherwise your computer will not boot. After the Level 2
cache card is removed, reinstall the power supply and proceed with
installation of the Crescendo NuBus card.
Chapter 10
Figure 5: Level 2 cache card slot
L2 cache slot
power supply
ROM card
Page 89

83
11
Problem: Computer has blank screen and no tone.
Possible
Solutions: 1) The Crescendo card and/or video adapter board may
be improperly installed. Unplug the Crescendo from
the PDS slot (and if applicable, video adapter board
from middle NuBus slot) and reseat them in their
slots.
2) If installed, remove the Level 2 cache card installed in
the Level 2 Cache Card Slot.
3) Zap the PRAM (an area of the Mac’s memory that
stores such information as preference settings). Restart
your Mac and hold down the Command-Option-P-R
keys until the computer chimes three times. After the
computer finishes booting, open the Date & Time
control panel from the Control Panels Folder (located
inside the Systems Folder) and reset the date and time.
You may also want to reset your preference settings
for the Mouse and Keyboard control panels.
Problem: You have a flashing disk icon.
Possible
Solutions: 1) Are you trying to boot from a drive connected to an
ATTO or Adaptec SCSI accelerator card? If so, they are
not compatible with the Crescendo card. Hold down
the Command-Option-Shift-Delete keys to boot from
the internal drive.
2) Check internal and external SCSI cable connections.
Problem: Computer does not seem to run any faster.
Possible
Solutions: Rebuild the Desktop file (an invisible resource file where
the computer stores important system information).
Restart your computer and hold down the CommandOption keys until the Desktop rebuild dialog box
appears; click ‘OK’.
Troubleshooting Guide
Page 90

84
Chapter 11
Problem: Computer freezes at extension.
Possible
Solutions: 1) Try unplugging the Crescendo card and reseating it in
the PDS slot.
2) You may have a conflict with an extension that loads
early and changes low level processor control registers.
To identify which extension is causing a problem, do
the following:
• If you have RAM Doubler installed, insert the
RAM Doubler disk into the floppy disk drive
and run the RAM Doubler deinstaller program.
• Create a new folder on the desktop called
Disabled Extensions Folder. Except for the
Crescendo extension, move software
extensions like Disk Doubler, Speed Doubler,
and virus protection software from the
Extensions Folder (located inside the System
Folder) to the Disabled Extensions Folder on
the desktop.
• Restart the computer.
• If the computer boots normally, reinstall an
extension from the Disabled Extensions Folder
to the Extensions Folder and restart your
computer. Do this step with each subsequent
extension in the Disabled Extensions Folder
until you find the problematic extension.
Replace the offending extension with a newer
version or remove it from your system.
Problem: Computer freezes at desktop or at random.
Possible
Solutions: This may be due to the hard disk driver being old,
corrupted, or incompatible with the new processor
upgrade. You may need to:
1) Reinstall the latest drivers for your hard disk drive
after the Crescendo extension has been loaded and
the new processor upgrade is running. Contact the
manufacturer of your hard drive or visit their website
for driver updates.
Page 91

85
Troubleshooting Guide
2) Zap the PRAM (an area of the Mac’s memory that
stores such information as preference settings). Restart
your Mac and hold down the Command-Option-P-R
keys until the computer chimes three times. After the
computer finishes booting, open the Date & Time
control panel from the Control Panels Folder (located
inside the Systems Folder) and reset the date and
time. You may also want to reset your preference
settings for the Mouse and Keyboard control panels.
3) Rebuild the Desktop file (an invisible resource file
where the computer stores important system
information). Restart your computer and hold down
the Command-Option keys until the Desktop rebuild
dialog box appears; click ‘OK’.
Page 92

Page 93

87
Sonnet Technologies, Inc. warrants that its product(s) shall be free from
defects in materials and workmanship for a period of three years
following the date of original purchase. Sonnet’s liability under this
warranty shall be limited, at its option, to repairing or replacing
product(s) shown to be defective either in materials or workmanship.
The sole and exclusive remedy under this warranty shall be such repair
or replacement.
A claim of defective materials or workmanship in product(s) shall be
allowed only when it is submitted to Sonnet within the warranty
period. No claim shall be allowed in respect to product(s) which have
been altered, neglected, damaged or stored in any manner which
adversely affects them. No product(s) shall be returned to Sonnet for
any reason without a return authorization from Sonnet. You bear the
responsibility for shipping product(s) to Sonnet within 30 days of
authorization and paying for associated shipping and insurance costs.
Sonnet will pay the cost to ship repaired or replaced product(s) back to
you.
This warranty shall also apply to product(s) that replace defective
product(s) but only for the original warranty period. The warranty
period shall not be extended by reason of defect, or any period of time
during which the product(s) are not available to you because of defects,
without the express written consent of Sonnet.
EXCEPT FOR THE EXPRESS WARRANTY AGAINST DEFECTS IN
MATERIALS AND WORKMANSHIP CONTAINED HEREIN, SONNET
MAKES NO WARRANTY OF ANY KIND WHATSOEVER, EXPRESS OR
IMPLIED, AND ALL WARRANTIES OF MERCHANTABILITY AND
FITNESS FOR A PARTICULAR PURPOSE ARE HEREBY DISCLAIMED BY
SONNET. Without limitation of the foregoing, Sonnet expressly
disclaims any liability whatsoever for any damages incurred, directly or
indirectly, in connection with its product(s), including without
limitation, loss of profits and special, incidental or consequential
damages, whether caused by Sonnet’s negligence or otherwise.
Warranty
12
Page 94

Page 95

89
The Sonnet website located at http://www.sonnettech.com has the
most current support information and technical updates.
Before you call Sonnet Technical Support please
• Check our website for the latest updates and online support files
• Check your manual for helpful information
When you call Sonnet technical support, have the following
information available so our technical support staff can better
assist you:
• Product name
• Serial number
• Date of purchase
• Place of purchase
• Computer type and model
• Operating system and version
If further assistance is needed, please contact us at:
Website: www.sonnettech.com
Sonnet Technical Support:
Tel: 1-949-261-1426 (Monday–Friday, 8 am–5 pm Pacific Time)
Fax: 1-949-261-2461
E-mail: support@sonnettech.com
Technical Support
13
Page 96

Page 97

 Loading...