

Page 1

Guide for
Macintosh
®
Users
Support Note: The documentation included in this package
supports the installation of the Aria extreme PCI into Power
Macintosh® and equivalent Mac clone computers. If you are installing this product into a compatible Windows® PCs, please visit our
web site at www.sonnettech.com/downloads/adapter_sw.html to
download Windows driver software and appropriate documentation.
Introduction
This user’s guide explains how to install and confi gure the Aria™
extreme PCI wireless networking PCI adapter card in your compatible Power Macintosh
The Aria extreme PCI is a cross-platform, high-speed, wireless LAN
adapter card. It is compatible with Apple AirPort® Extreme base stations and other 802.11g devices, is capable of data transfers of up to
54 Mbps, and is backward-compatible with 802.11b devices.
®
or equivalent Mac clone computer.
System Requirements
The Aria extreme PCI requires the following to work in your compatible Power Macintosh or Mac clone computer:
• One available PCI slot • Mac OS
• AirPort 3.1 software or higher.
®
X Version 10.2.6 or higher
You Should Have
The following item may be required for installation:
• Medium Phillips screwdriver
Getting Started
This section describes the physical aspects of the Aria extreme PCI.
• Antenna - You must screw in the antenna in order for the Aria
extreme PCI to work; the antenna may positioned to achieve better reception (Figure 1).
• MAC number - Also known as the AirPort ID, this number is used
in a wireless networking administration program to limit access to
a closed network (Figure 1).
MAC
number
MAC:996063-71BD0AD
antenna
For Additional Information
For additional information regarding setup and confi guration of networks and security, and working with Windows-based systems, refer
to AirPort help fi les and Apple’s AirPort online support pages.
Aria extreme PCI Card Installation Instructions
Support Note: We recommend you make a backup of
important information on your system’s current hard drive(s)
prior to installing new hardware or software.
When handling computer products, you must take care to prevent
components from being damaged by static electricity. Before opening your computer or removing parts from their packages, always
ground yourself first by touching a metal part of the computer, such
as a port access cover, and work in an area free of static electricity;
avoid carpeted areas. Handle all electronic components by their
edges, and avoid touching connector traces and component pins.
1. Shut down your computer.
2. Open your computer to access the expansion card area (PCI
slots); refer to your computer’s user manual for specifi c info.
3. Locate an available PCI slot inside your computer and remove
its port access cover, if present, from the rear of the computer.
4. Remove the Aria extreme PCI card from its packaging, and
screw in the included antenna.
Figure 1
5. If you will be connecting to a closed network and access is
restricted to specifi c users, write down the MAC number from
the back of the card.
6. Install the Aria extreme PCI into the PCI slot; make sure the
card is fi rmly seated and secured.
7. Close your computer and carefully replace its cover.
Page 2

Configure Your Mac
Part 1 - Enable AirPort on Your Computer
Because the Aria extreme PCI uses Apple AirPort driver software,
confi guring your system to work with the card is very simple.
1. Confi rm your computer is running Mac OS X Version 10.2.6
or later, and is using AirPort 3.1 or later; if necessary, update the
software using Software Update in System Preferences.
2. If you are using your computer with the Aria extreme PCI as
a client, set up (or confi gure) your AirPort Base Station or other
wireless hub now.
3. If you will be connecting to a closed network, obtain the net-
work’s name and password; you’ll need to enter this information while you confi gure your AirPort settings. If access to the
closed network is restricted to specifi c users, give your network
administrator the MAC number from the back of your Aria
extreme PCI card before you continue, so you can be added to
the list of users with access privileges.
Support Note: The screen shots in this document were cre-
ated in Mac OS X Version 10.2.x (Jaguar). If you are using
Mac OS X Version 10.3.x (Panther), you will notice that what appears
on screen does not exactly match the screen shots in this manual;
tabs have been replaced with buttons. Despite these differences, the
information and instructions in this manual apply to all users.
Enable AirPort on Your Computer (continued)
4. Launch the AirPort Setup Assistant utility (located in the
Utilities folder within the Applications folder). If you are
instructed to turn on your AirPort card, click OK; you may have
to click OK twice (Figure 2). If there is no active AirPort (wireless) network nearby, or if you are only creating a computer-tocomputer network, quit the AirPort Setup Assistant, and skip to
Part 2 on the next page. Otherwise, continue to the next step.
Figure 2
5. Select “Set up your computer to join an existing Airport
Network,” and then click Continue (Figure 3).
Enable AirPort on Your Computer (continued)
6. The AirPort Setup Assistant will locate nearby wireless net-
works; choose the network you want to use from the dropdown menu and then click Continue (Figure 4).
Figure 4
7. If the network you’ve chosen is protected, you will be requested
to enter a password (Figure 5). If this is the case, enter the password and click Continue.
Figure 3
Enable AirPort on Your Computer (continued)
8. The AirPort Setup Assistant will give you the option to
accept the settings you’ve entered or go back; click Continue
(Figure 6).
Figure 6
9. Click Done when the AirPort Setup Assistant is fi nished
(Figure 7).
Figure 5
Figure 7
Page 3
Configure Your Mac
Part 2 - Set Network Settings
1. From the Apple Menu, select System Preferences.
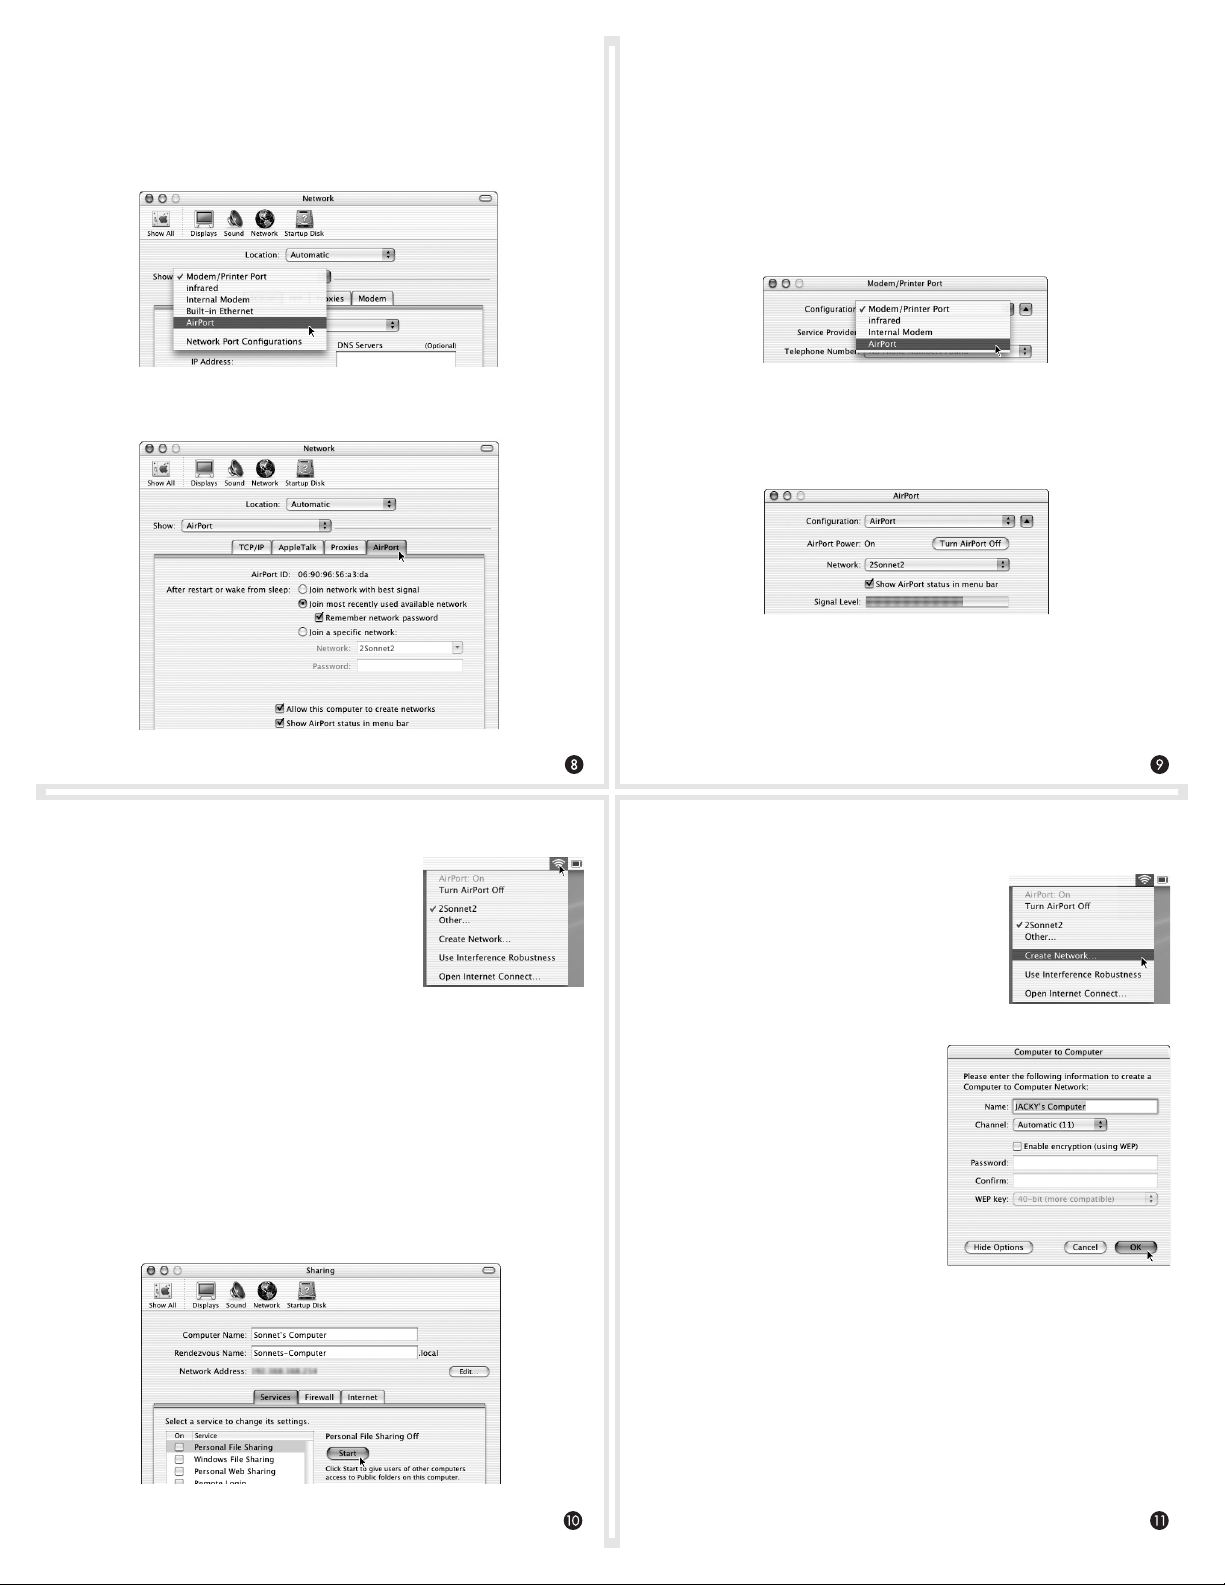
2. Click on the Network icon at the top of the window, and then
select AirPort from the Show: drop-down menu (Figure 8).
Configure Your Mac
Part 3 - Enable Internet Access Using Aria extreme PCI
If you wish to access the Internet through the Aria extreme PCI, you
will need to change settings in the Internet Connect application.
1. Launch the Internet Connect application (located in the
Applications folder).
2. Click on the Confi guration drop-down menu and select
AirPort (Figure 10).
Figure 8
3. Click on the AirPort tab to reveal and adjust settings (Figure 9).
Figure 9
Enable Internet Access Through Aria extreme PCI
(continued)
5. In the right corner of the menu bar at
the top of the screen, you will see the
AirPort status indicator (Figure 12). This
icon indicates signal strength and status
of your selected network; click on the
icon and choose items to change settings
and open the Internet Access application.
Figure 12
Figure 10
3. After selecting AirPort, you will see basic information regarding your setup (Figure 11). If it is not checked, click the box
next to “Show AirPort status in menu bar.”
Figure 11
4. Quit the Internet Access application; you should now be able
to access the Internet through the Aria extreme PCI (provided
you are within range of a base station or access point).
Create a Computer to Computer Network (continued)
3. Close System Preferences.
4. Click on the AirPort status icon and select
“Create Network…” (Figure 14).
Figure 14
Configure Your Mac
Part 4 - Create a Computer to Computer Network
You can create a wireless network of two or more computers and
share fi les, so long as each is equipped with an 802.11b or 802.11g
wireless LAN card, such as the Aria extreme PCI.
1. From the Apple Menu, select System Preferences.
2. Click on the Sharing icon in the middle of the window, and
then click the Start button under “File Sharing Off” (Figure 13).
Figure 13
5. Enter the required information,
including the name you choose
for the Computer to Computer
network, and then click OK
(Figure 15). Note that you must
use the same name and channel
settings for the other computer.
Figure 15
Page 4

Create a Computer to Computer Network (continued)
6. From the Finder menu, select Go >
Connect to Server (Figure 16).
Figure 16
7. In the Connect to Server window, choose the other computer in
your Computer to Computer network, and then click Connect
(Figure 17); the other computer’s drive(s) will appear on your
desktop.
Figure 17
Configure Your Mac
Part 5 - Share Your Internet Connection
You can share your connection to the Internet with other wireless
clients through the Aria extreme PCI card.
Support Note: If you access your local network and the
Internet through the same port (such as your computer’s
built-in Ethernet connector), it is possible that you may affect other
ISP customer’s network settings by sharing your Internet connection.
Check with your ISP before proceeding, as some providers may terminate your service if your computer interferes with their network.
1. From the Apple Menu, select System Preferences.
2. Click on the Sharing icon in the middle of the window,
and then click the Internet tab (or button) (Figure 18). Click
the check box next to “Share your Internet connection with
AirPort-equipped computers, and then click Start.”
Share Your Internet Connection (continued)
3. If a warning dialog appears, click Start.
4. Quit System Preferences.
5. Confi gure the other computer(s) sharing your computer’s
Internet connection to use a wireless connection.
Technical Specifications
Software Requirements Mac OS - Mac OS X Version 10.2.6 or later, AirPort drivers
Card Specifications Electrical Interface - 3.3V, PCI specification 2.2
Radio Specifications
Operating Frequency2.412~2.497 GHz
Operating Channels 802.11b - North America: 11, Japan: 14, Europe (ETSI): 13
Security Hardware 64/128-bit WEP engine, WEP weak key avoid-
Output Power 15 dBm maximum
Data Transmission Rates 802.11b - 11 Mbps maximum. Auto-ranging 1, 2, 5.5, a nd
Indoor Coverage Area (typical) 802.11b - Up to 60 M at 11 Mbps, up to 125 M at 1 Mbps
Receiver Sensitivity -80 dBm at 6 Mbps
Wireless Standards Compliance IEEE 802.11b, IEEE 802.11g
version 3.1 or later
Windows OS - Windows 98SE, Me, 2000, or XP
802.11g - North America, Japan, Europe (ETSI) : 13
ance, TKIP, hardware AES engine supporting CCM and
OCB, 802.1x, SSN
11 M bps
802.11g - 54 Mbps maximum. Auto-ranging 6, 9, 12, 18,
24, 36, 48, and 54 Mbps
802.11g - Up to 20 M at 54 Mbps, up to 75 M at 18 Mbps
Figure 18
Limited Warranty
Sonnet Technologies, Inc. warrants that its product(s) shall be free
from defects in materials and workmanship for a period of three
years following the date of original purchase. For complete warranty
information, go to www.sonnettech.com/support/warranty.
Contacting Customer Service
The Sonnet web site located at www.sonnettech.com has the most
current support information and technical updates.
Before you call Sonnet Customer Service, please check our web site
for the latest updates and online support files, and check your user’s
guide for helpful information. When you call Sonnet Customer
Service, have the following information available so our customer
service staff can better assist you:
• Product name • Date and place of purchase • Computer type
and model • Operating system and version
If further assistance is needed, please contact us at:
Sonnet Customer Service:
Tel : 1-949-472-2772
(Monday–Friday, 7 a.m.–5 p.m. Pacific Time)
Fax: 1-949-457-6349
E-mail: support@sonnettech.com
Online Service Form: http://serviceform.sonnettech.com
Visit Our Web Site
For the most current product information and online support fi les,
visit the Sonnet web site at www.sonnettech.com. Remember to register your product online at http://registration.sonnettech.com to be
informed of future upgrades and product releases.
©2003 Sonnet Technologies, Inc. Revised 2004. All rights reserved. Sonnet, the Sonnet logotype, Simply Fast, the Simply Fast logotype, and Aria are trademarks of Sonnet Technologies, Inc. Macintosh, Mac, and AirPort are trademarks of Apple Computer, Inc.,
registered in the United States and other countries. Other product names are trademarks of their respective owners. Product
specifications subject to change without notice. Printed in the USA. UG-G54-PCI-E-B-010604
 Loading...