

Page 1
ARIA™ EXTREME N PCI
Draft 802.11n Wireless PCI Adapter Card
Support Note for Windows
documentation included in this package supports
the installation of the Aria extreme n PCI into Power Mac®
and equivalent Mac clone computers. If you are installing this
product into a compatible Windows PC, please refer to the
appropriate documentation included on the software CD.
®
Users: The printed
Quick Start Guide for Mac® Users
You Should Have
The following items should be included in your product
package:
• One Aria extreme n PCI 802.11n wireless PCI adapter card
• Three antennas
• One software CD
The following may be required for installation:
• Medium Phillips screwdriver
System Requirements
Aria extreme n PCI requires the following in order to operate
in your system:
• One available PCI slot
• Mac OS® X Version 10.5 or 10.4
Support Notes: We recommend you make a
backup of important information on your system’s
current hard drive(s) prior to installing new hardware or
software.
When handling computer products, you must take care
to prevent components from being damaged by static
electricity. Before opening your computer or removing
parts from their packages, always ground yourself first
by touching a metal part of the computer, such as a port
access cover, and work in an area free of static electricity;
avoid carpeted areas. Handle all electronic components
by their edges, and avoid touching connector traces and
component pins.
Remember to register your product online at http://registration.sonnettech.com to be informed of future upgrades and product releases.
Software updates and links are available from the Sonnet web site at www.sonnettech.com. • Online support form available at http://supportform.sonnettech.com.
Sonnet Technologies Customer Service hours are Mon.-Fri., 7 a.m.–4 p.m. Pacific Time • Customer Service Phone: 1-949-472-2772 • E-mail: support@sonnettech.com
Sonnet Technologies, Inc., Irvine, California 92618 USA • Tel: 1-949-587-3500 Fax: 1-949-457-6350
©2008 Sonnet Technologies, All rights reserved. Sonnet, the Sonnet logotype, Simply Fast, the Simply Fast logotype, and Aria are trademarks of Sonnet Technologies, Inc. Macintosh and Mac are trademarks of Apple Inc., registered
in the United States and other countries. Other product names are trademarks of their respective owners. Product specifications subject to change without notice. Printed in the USA. QS-N80211-PCI-E-A-092608
Page 2
Quick Start Guide for Mac Users
Installation Preparation
Sonnet strongly recommends that you read the section
in your computer’s user manual that addresses PCI card
installation, prior to installing the Aria extreme n PCI into
your system.
1. If you are going to use your computer with with the
Aria extreme n PCI card as a client, set up or configure
your AirPort base station or other wireless router prior to
installing the Sonnet card and software
2. If you will be connecting to a closed network, get
the network’s name and password; you’ll need this
information when you configure the Wireless Utility
settings. If access to the closed network is limited to
specific users, provide the MAC number from the label
on the Aria card to your network administrator so your
computer can be added to the list of users with access
privileges.
Card Installation Steps
1. Shut down your computer, and then open it to access
the expansion card area (PCI slots); refer to your
computer’s user manual for specific information.
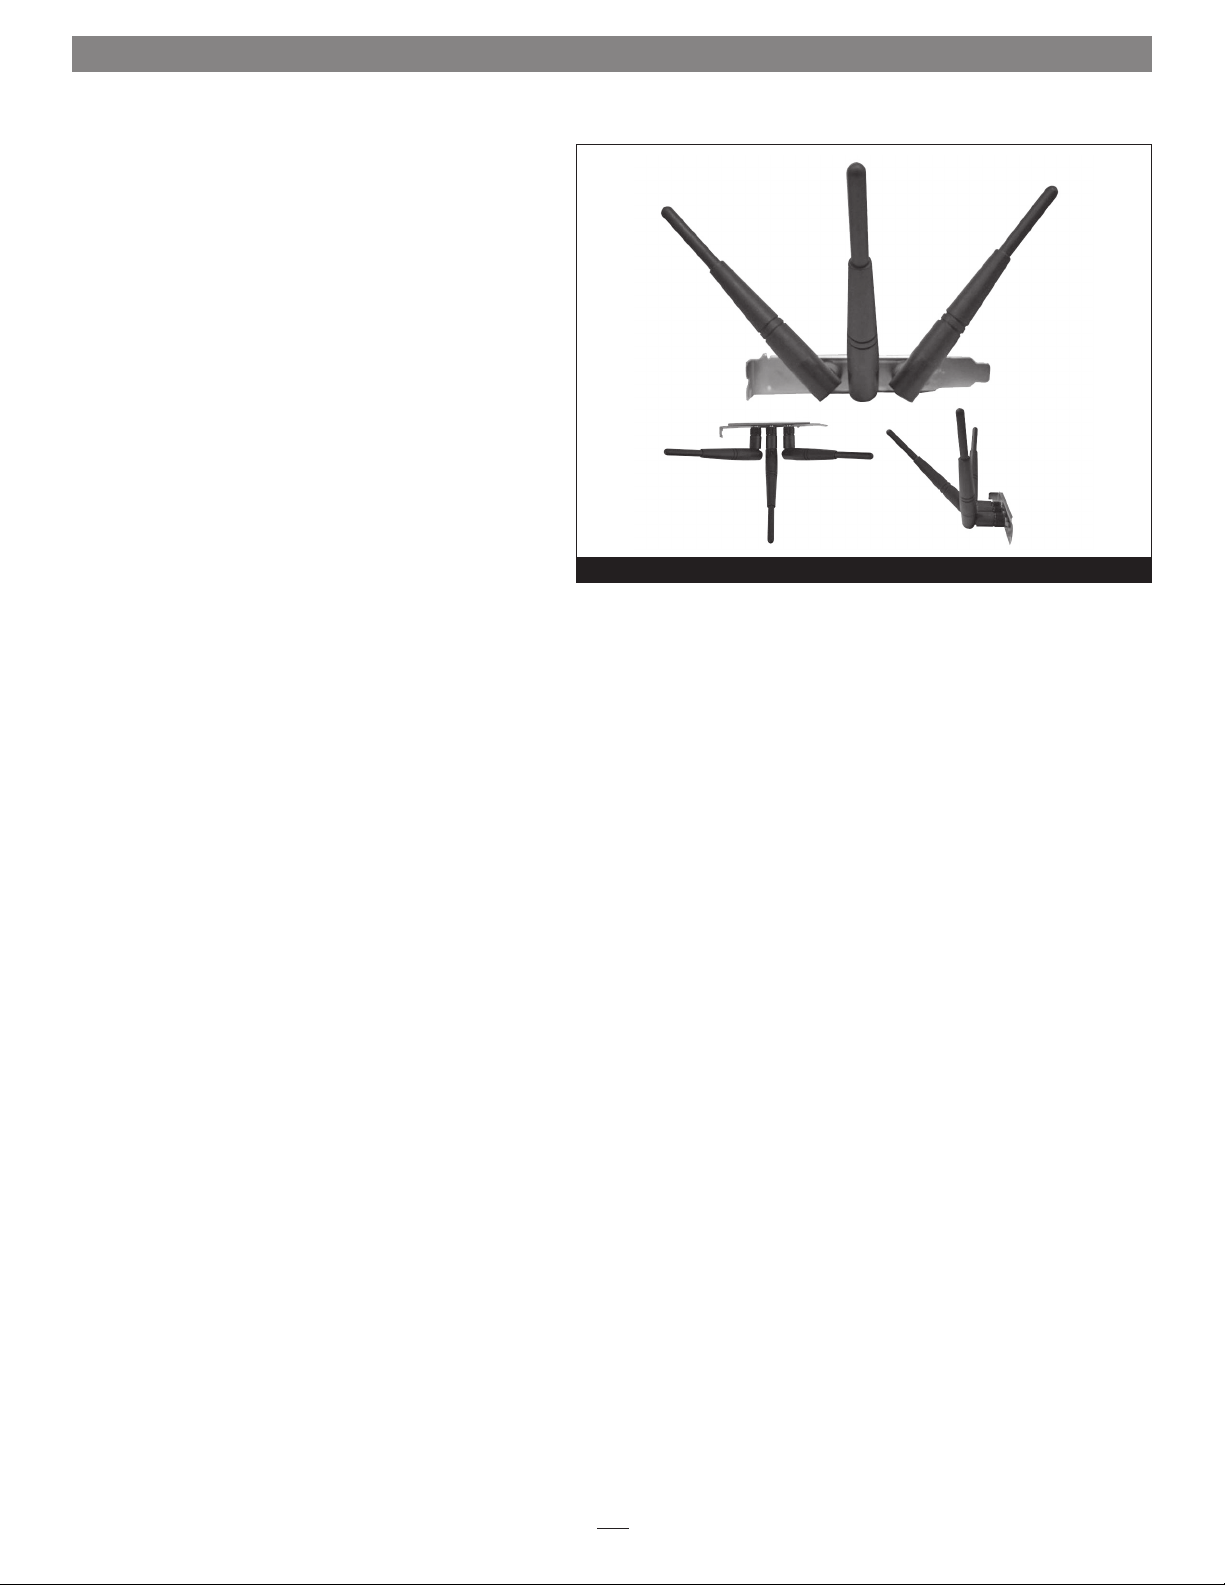
Figure 1
2. Locate an available PCI slot inside your computer and
remove its access cover.
3. Remove the Aria extreme n PCI from its packaging,
making sure to handle the card by its edges.
4. If you will be connecting to a closed network and access
is restricted to specific users, write down the MAC
(Media Access Control) number from the label on the
back of the card.
5. Install the Aria extreme n PCI into the PCI slot; make
sure the card is firmly seated and secured.
6. Close your computer and carefully replace its cover.
7. Install all three antennas included with the Aria
extreme n PCI card, making sure to screw them all the
way in. For improved reception and transmission, orient
the antennas in one of the positions shown in Figure 1.
Software Installation Steps
1. Turn on your computer, and then insert the included
CD into the computer’s optical drive.
2. Double-click the Sonnet 802.11n icon, then double-click
the N802.11n-PCI.pkg file to launch the installer; when
the Welcome window appears, click Continue.
3. When the Read Me window appears, click Continue.
2
Page 3

Quick Start Guide for Mac Users
Software Installation Steps (continued)
4. When the License window appears, read the license,
click Continue, and then click Agree.
5. When the Select Destination window appears, accept the
default destination or choose a new destination, and
then click Install.
6. When asked for a password, enter your password, and
then click OK.
7. While the software is installed, a progress bar appears.
When the Installation Completed Successfully screen
appears, click Restart.
Support Notes: Before selecting the Aria extreme n
PCI card for use as your computer’s active network
port, you must first use the Wireless Utility to connect to a
wireless network or another computer. After configuring the
card, you may then select it in the System Preferences’
Network pane.
For a glossary of terms used in the Wireless Utility, please
go to the last page of this quick start guide.
Figure 2
Wireless Utility Configuration Steps
Prior to selecting the Aria card for use as your computer’s
wireless network card, you must connect to a network. The
Wireless Utility application installed from the CD enables you
to survey nearby wireless access points, configure the Aria
card, create profiles, and see additional link information.
1. Upon startup, the Wireless Utility will launch
automatically, and the Wireless Utility window will
appear (Figure 2). Note: In some cases, the Wireless
Utility application, named WirelessUtilityCardbusPCI.
app, may not have been added to the list of startup
items. Locate the application, launch it, locate and
control+click its icon in the dock, and select Open at
Login.
2. If it is not already selected, click the Site Survey tab;
local wireless networks will appear in the window
(Figure 3).
is located in the SSID column if it is not a private
network), note whether encryption is enabled (check
the status in the Encryption column) and then click
Add Profile; a profile configuration window will appear
with the System Configuration tab selected.
Select your wireless network (the name
Figure 3
3. In the profile configuration window, accept the default
or change the profile name (Figure 4). If the network to
which you are attempting to connect has encryption
enabled, click the Authentication and Security tab and
proceed to step 4. Otherwise, click OK and skip to step 5.
Figure 4
3
Page 4

Quick Start Guide for Mac Users
Wireless Utility Configuration Steps (continued)
Support Note: Authentication or encr yption
settings are generated by the wireless router and are
detectected by the Aria card.
4. In the profile configuration window with the
Authentication & Security tab selected, enter the
necessary key(s) in the empty fields and then click OK
(Figure 5)
.
Support Note: If the Aria card does not connect
to the network, you may need to choose different
authentication and encryption settings than the defaults.
Select the profile you created, click Edit, select the
Authentication and Security tab, and adjust the settings as
necessary.
5. The profile you created will appear in the Profile List
(Figure 6)
. Select it and then click Activate; a green
checkmark box will appear next to it within 30 seconds
showing the Aria card is connected to the network. If a
red checkmark box appears, the Aria card is not is not
connected. You may not have entered the correct key(s);
delete the profile and repeat steps 2–4.
6. Once the Aria card is connected to the desired network, you
must change your computer‘s network preferences to make it
the active network port; go to page 5.
Figure 5
Figure 6
4
Page 5

Quick Start Guide for Mac Users
System Configuration Steps—Mac OS X Version 10.5
(Leopard) Users
Listed below are the steps necessary to configure your computer
running Mac OS X Version 10.5 to use the Aria card as its active
network port.
1. From the Apple menu, select System Preferences, and then
click the Network Preferences button; a message will appear
stating a new network interface has been detected. Click OK.
2. If it is not already selected, click on the Aria card (identified
as a PCI Ethernet card) in the left panel, and then click
Apply.
3. Close System Preferences; your installation is complete.
System Configuration Steps—Mac OS X Version 10.4
(Tiger) Users
Listed below are the steps necessary to configure your computer
running Mac OS X Version 10.4 to use the Aria card as its active
network port.
1. From the Apple menu, select System Preferences. and
click the Network icon. If a window appears stating that
a new port is detected, click OK, and then skip to step 4.
Otherwise, go to step 2.
2. From the Show: drop-down menu, select Network Port
Configurations, and then click New.
3. From the Port: drop-down menu, select the Aria card
(identified as an Ethernet adapter), enter a name, and then
click OK.
Glossary of Terms
Listed below are descriptions for some of the terms used in the
Wireless Utility application.
SSID: The Service Set IDentifier is the name of the wireless access
point or device, as determined by the manufacturer (default
name), user, or network administrator.
BSSID: The Basic Service Set Identifier refers to the unique
Ethernet ID (or MAC address) for a wireless access point or
device. For example, if you are in a neighborhood with several
wireless routers from the same manufacturer, the SSID may be
the same for all of them, but the BSSID for each is unique.
Signal: Signal indicates the signal strength of wireless access
points and devices.
Channel: Refers to the radio frequency the Aria card is tuned to
and using for communication with the wireless access point.
Encryption: Refers to the data encryption method (WEP, WPA,
AES, etc.) used between wireless access point or device and the
Aria card.
Authentication: Refers to the type of key used for authenticating
communication between the wireless access point or device and
Aria card.
Network Type
computer-to-wireless access point (e.g. a wireless router) network.
AdHoc refers to a computer-to-computer network or computerto-device link without a wireless access point between.
: Infrastructure or AdHoc. Infrastructure refers to a
4. From the Show: drop-down menu, select Network Port
Configurations. Locate the Aria card in the list, and then
drag it to the top of the list.
5. Click Apply Now, and then close System Preferences; your
installation is complete.
5
 Loading...