

Page 1

Items Packaged with the Sonnet Presto Plus Processor Upgrade Card:
• Presto Plus
™
processor upgrade card
• Presto diskette
• Powered by Sonnet label
• Mac OS 8 Installation Boot diskette
• Mac OS 8 installation instructions
If your Macintosh will be connected to an Ethernet network, you will require:
• An unshielded twisted-pair (CAT 3-5 UTP) cable
System Software Compatibility:
• Compatible with System 7.1–Mac
™
OS 8.1.
Note: We r ecommend you make a backup of important information on your
hard drive prior to installing new hardware or software. When handling computer
products, you must take care to prevent components from being damaged by static
electricity. Avoid carpeted areas, handle cards only by their edges, and avoid touching
connector traces and component pins.
If you plan to upgrade to Mac OS 8, you will need to first install the Presto Plus.
For instructions on the installation of Mac OS 8, please refer to the separate
Mac OS 8 software installation instructions packaged with the Presto Plus.
1. Insert the Presto diskette into the floppy disk drive. Double-click
the Presto Installer icon. By default the software will be installed
on the boot drive. If this is ok then click ‘Install’; otherwise, select
another drive and click ‘Install’. If the installation was successful, a
dialog box will appear. Click ‘Quit’ to leave the installer or click
‘Continue’ to perform additional installations.
The Presto Installer will install the following items:
• ‘Presto’ will be placed into the Extensions Folder.
• ‘Presto 7 Enabler’ will be placed into the System Folder.
• ‘Presto 8 Enabler’ will be placed into the System Folder.
• ‘Metronome’ will be placed into the Apple Menu Items Folder.
2. Shut down your Macintosh. If the computer has been on for any
length of time, wait a few minutes for it to cool before beginning
the installation.
3. Disconnect the power and peripheral cables from the back of the
computer and move it to an area where you can freely work.
4. Open your computer by unlatching the cover (Figure 1) and set it aside.
5. Remove the PDS access cover port from the back panel (Figure 2).
6. Touch the metal shielding of the internal power supply to discharge
any potential damaging static electricity.
7. Locate the PDS slot (Figure 3). If there is a PDS card already installed,
remove it.
8. Remove the Presto Plus card from the anti-static package, making
sure to handle the card by the edges. Note the small cutout in the
horizontal plate of the Presto Plus Ethernet connector (Figure 4).
9. Aligning the card flush with the rear of the computer, the small cutout
in the Ethernet connector plate should align directly over the small
plastic tab inline with the PDS slot (Figure 5).
Figure 1: Remove case cover
Installation Instructions for Macintosh LC, LC II, LC III,
LC III+, and Performa 250, 275, 400, 405, 410, 430, 450
Figure 2: Remove PDS access port cover
Figure 3: Locate PDS slot
Figure 4: Presto Plus Ethernet connector
cutout
PDS slot
Software updates and links are available from the Sonnet web site at www.sonnettech.com.
Sonnet Technologies Customer Service hours are Monday-Friday,8am-5pm PT.
Customer Service Phone: 1-949-472-2772 • E-mail: support@sonnettech.com
Sonnet Technologies, Inc., 15 Whatney, Irvine, California 92618-2808 USA • Tel: 1-949-587-3500 • Fax: 1-949-457-6350
©1999 Sonnet Technologies, Inc. Revised 2000. All rights reserved. Sonnet,the Sonnet logotype, Simply Fast,the Simply Fast logotype, and Presto are trademarks of Sonnet Technologies, Inc. Macintosh,Mac, and the
Mac logo are trademarks of Apple Computer, Inc., registered in the U.S.and other countries. The PowerPC name and the PowerPC logotype are trademarks of International Business Machines Corporation, used
under license therefrom. Other product names are trademarks of their respective owners.Product specifications are subject to change without notice. Printed in the U.S.A. PPLC-090500
Figure 5: Align Presto Plus over PDS slot
plastic tab
cutout
Page 2
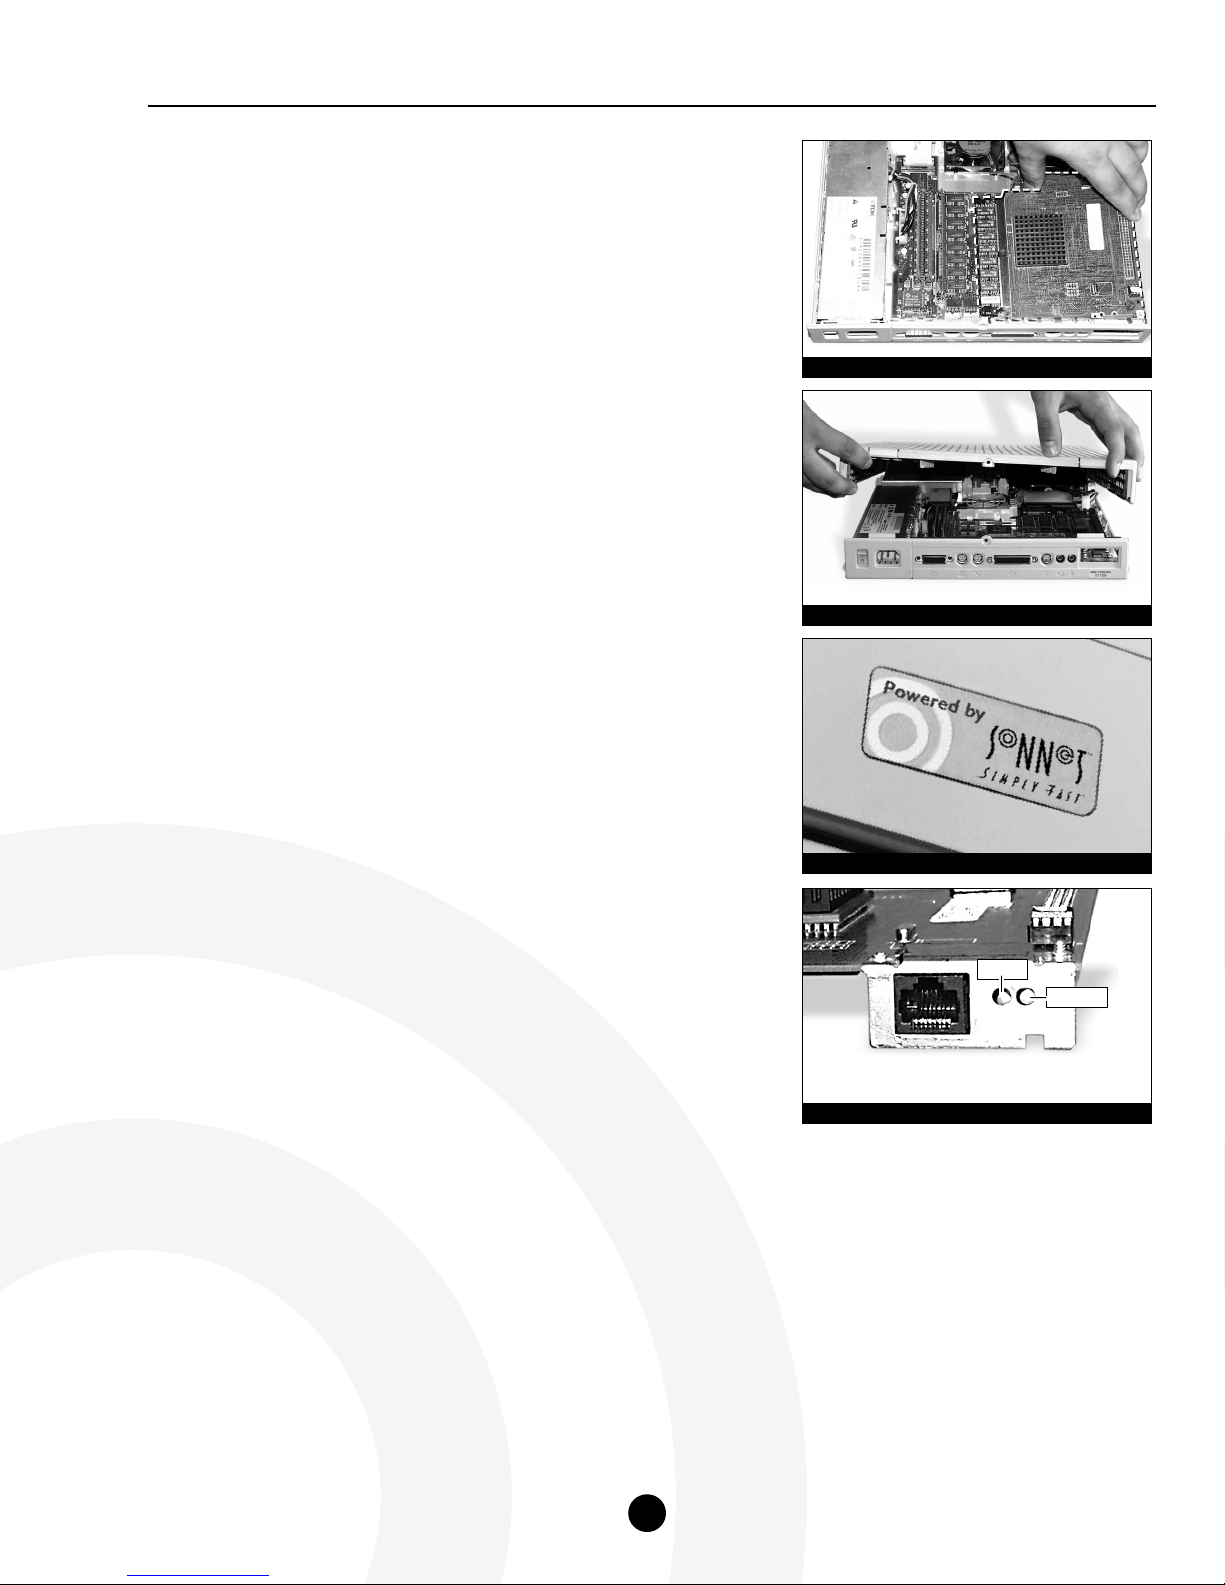
10. Gently press down until the Presto Plus card is firmly seated in the PDS
slot (Figure 6). If you encounter any resistance, lift the card out of the
PDS slot, check for bent pins, and reinstall the card.
11. Replace the case cover onto your computer (Figure 7).
12. Return your Macintosh to your computing area and reconnect the
power and peripheral cables to the computer.
13. Affix the Powered by Sonnet label (Figure 8) to the front of your
computer.
14. Turn on your Macintosh. You should see the Presto extension icon load
during startup.
15. The Presto Plus processor upgrade card has an onboard RAM expansion
SIMM slot with a 32 MB SIMM that adds additional RAM to your
system. For example, if your computer has 10 MB of RAM the Presto
Plus adds an additional 32 MB for a total of 42 MB. To determine the
amount of RAM available to your system, select “About this Macintosh”
or “About This Computer” (depending on the installed System software)
from under the Apple Menu.
16. The Presto Plus features 10BaseT Ethernet via a RJ45 Ethernet port. If
you intend to connect your Macintosh to an Ethernet network, you will
require an unshielded twisted-pair (CAT 3-5 UTP) cable. You will also
need to configure the system software (via AppleTalk and TCP/IP control
panels) to recognize proper Ethernet settings.
Two LED indicators on the Presto Plus provide status information for
verification and diagnostic purposes:
• The LED Link indicator (Figure 9) indicates a valid connection to
a network. When a connection is established, the LED is on; if a
connection is not detected, the LED should be off.
• The LED Transmit indicator (Figure 9) indicates the transmission of
data. When on, the LED should blink on as data is being transmitted.
When no data is being sent, the LED should be off.
Presto Plus Installation Instructions for Macintosh LC, LC II, LC III; and Performa 250-450
2
Figure 6: Gently press Presto Plus card into PDS slot
Figure 7: Replace case cover
Figure 8: Powered by Sonnet label
Figure 9: Ethernet LED indicators
Link
Transmit
 Loading...