

Sonnet GPU-650W-TB3, eGFX Breakaway Box, GPU-350W-TB3DEK, GPU-350W-TB3Z, GPU-550W-TB3 Quick Start Manual
...Page 1

• Quick Start Guide • Guide d’installation rapide
For
Windows
• Installations-Anleitung • Guía de pasos rápidos
• Guía de pasos rápidos •
クイックスタートガイド
eGFX Breakaway™ Box
for the following models:
pour les modèles suivants :
für folgende Modelle:
para los siguientes modelos:
下記のモデルに対応:
• GPU-350W-TB3Z
• GPU-350W-TB3DEK
• GPU-550W-TB3
• GPU-650W-TB3
• GPU-650WOC-TB3
Support Note: Important GPU Card Compatibility
and Installation Information
For users installing a GPU card: Due to the quickly-evolving
status of external GPU (eGPU) support and compatibility, you
must visit the Sonnet web site for the latest information, and
download additional instructions not included in this guide.
Please visit the eGFX Breakaway Box support page at www.
sonnettech.com/ebb-support, and then locate and download the
OS-specific instructions.
For additonal information on supported cards and eGPU support,
visit sonnettech.com/product/egfx-breakaway-box.html.
Conseil : Informations importantes sur la
compatibilité et l’installation de la carte GPU
Pour les utilisateurs qui installent une carte GPU: En raison de
l’évolution constante du support et de la compatibilité du GPU
(eGPU) externe, visitez le site Web de Sonnet pour obtenir les
dernières informations. On peut télécharger des instructions
supplémentaires non incluses dans ce guide. Veuillez visiter la
page de support eGFX Breakaway Box sur www.sonnettech.
com/ebb-support et télécharger les instructions spécifiques au
système d’exploitation.
Pour plus d’informations sur les cartes compatibles et le support
eGPU, visitez - sonnettech.com/product/egfx-breakaway-box.html.
Anmerkung: Wichtige Informationen bezüglich der
Installation und Kompatibilität von Grafikkarten
Benutzerinstallation einer Grafikkarte: Der Support und die
Kompatibilität von externen Grafikkarten (eGPU) ändert sich
momentan relativ schnell, daher sollten Sie die Sonnet Webseite
besuchen, um die neuesten Informationen sowie zusätzliche
Anweisungen diesbezüglich zu erhalten. Bitte besuchen Sie die
Support-Seite der eGFX Breakaway Box unter www.sonnettech.
com/ebb-support, und lokalisieren und downloaden Sie die
Anweisungen für Ihr Betriebssystem. Weitere Informationen
über unterstützte Karten finden sie unter www.sonnettech.com/
product/egfx-breakaway-box.html.
Nota de soporte: Información importante sobre la
compatibilidad y la instalación de la tarjeta GPU
Pour les utilisateurs qui installent une carte GPU : Debido al
cambio rápido del estado de soporte y compatibilidad de la
GPU externa (eGPU), debe visitar la página web de Sonnet para
obtener la información más reciente, y descargue instrucciones
adicionales no incluidas en esta guía. Visite la página de soporte
de eGFX Breakaway Box - www.sonnettech.com/ebb-support,
localice y descargue las instrucciones específicas para el sistema
operativo que está utilizando.
Para obtener información adicional sobre tarjetas compatibles y
soporte de eGPU, visite - sonnettech.com/product/egfx-breakawaybox.html.
参考情報: 重要なGPUカードの互換性ならびに
インストールに関する情報
GPUカードをご自身でインストールされる場合、外付けGPU (eGPU)の互換性
状況が頻繁に更新される事情から、Sonnetウェブサイトへアクセスし最新
ー
情報や本書に含まれていない追加の取扱説明書をダウンロ
あります。eGFX Breakaway Box サポートページ www.sonnettech.com/
ebb-support にアクセスし、特定のOS向け取扱説明書を確認しダウンロ
ドしてください。
対応するカード製 品 とeG PUカードに関する追加情報は、sonnettech.com/
product/egfx-breakaway-box.html をご覧ください。
ドする必要が
ー
Page 2
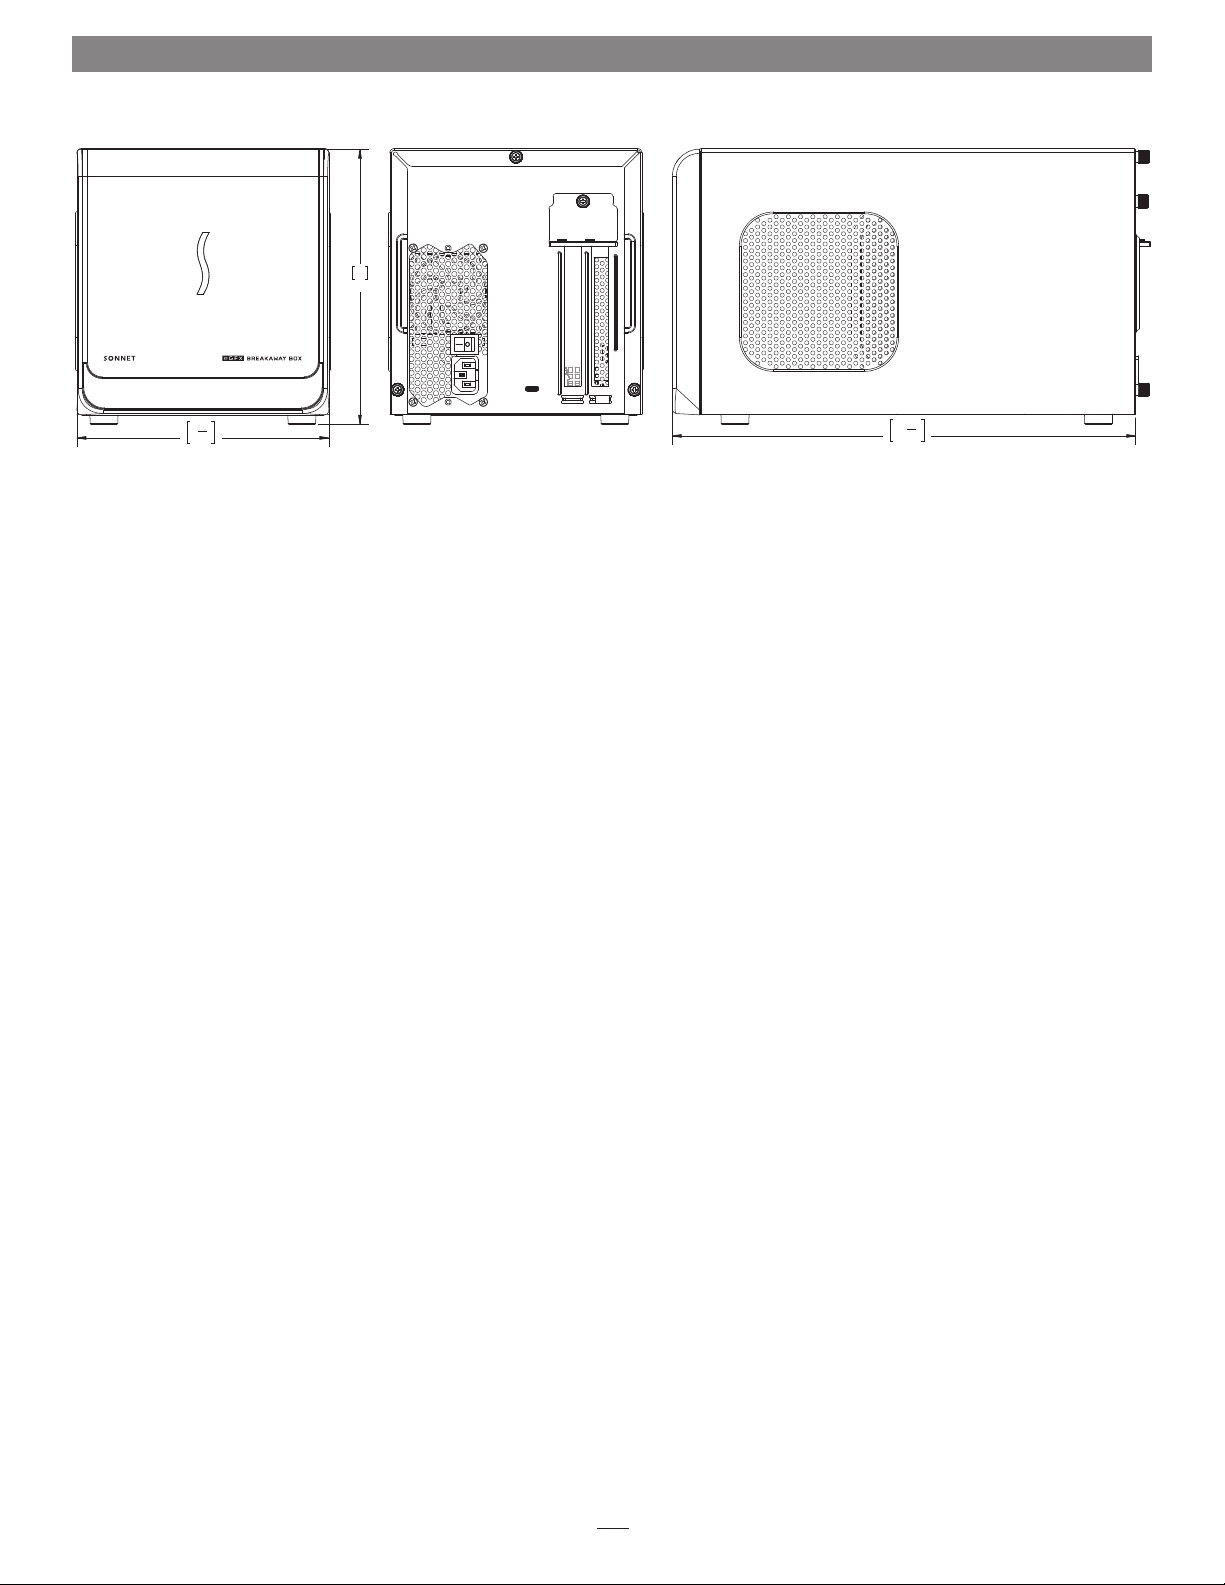
Sonnet eGFX Breakaway Box Quick Start Guide
8"
202
1
"
7
4
185
Introduction
Congratulations on your purchase! This quick start guide covers
PCIe card installation steps.
Compatibility Information and System Requirements
Visit www.sonnettech.com/product/egfx-breakaway-box.html for
the latest information.
Introduction – Français
Félicitations pour votre achat ! Ce guide couvre les étapes
d’installation de la carte PCIe.
Informations de compatibilité et exigences système
Visitez www.sonnettech.com/product/egfx-breakaway-box.html
pour les dernières informations.
Introduction – Deutsch
Congratulations on your purchase! This quick start guide covers
PCIe card installation steps.
3
"
13
8
340
Introducción – Español
Felicitaciones por su compra! Esta guía cubre los pasos de
instalación de la tarjeta PCIe.
Información de compatibilidad y requisitos del sistema
Visita www.sonnettech.com/product/egfx-breakaway-box.html
para la información más reciente.
はじめに – Japanese(日本語)
お買 い上げいただきありがとうございます! このクイックスタートガイドは
PCIeカードのインストール手順を網羅しています。
互換 性 情報とシステム 条件
www.sonnettech.com/product/egfx-breakaway-box.html にて最新情
報をご 覧ください。
Compatibility Information and System Requirements
Visit www.sonnettech.com/product/egfx-breakaway-box.html for
the latest information.
Introduction – Deutsch
Congratulations on your purchase! This quick start guide covers
PCIe card installation steps.
Compatibility Information and System Requirements
Visit www.sonnettech.com/product/egfx-breakaway-box.html for
the latest information.
2
Page 3

Description / Description / Descripción / Beschreibung / 説明
English
1 – Power Indicator LED
This lights up when the Box is
connected to a power source and
the power switch turned on, the
Thunderbolt cable between the
chassis and your computer is plugged
in, and the computer powered on.
2 – PCIe Card Bracket Locking Plate
3 – Port Access Cover
4 – Power Switch*
5 – Power Input Socket
6 – Thunderbolt 3 Port
7 – Main Fan
8 – Power Supply*
The power supply has its own fan
that operates independently from
the main fan.
9 – PCIe Slot
* Product may not be exactly as shown.
Français
1 – Indicateur d’alimentation – LED
Ce voyant s’allume lorsque la
Box est connectée à une source
d’alimentation, que l’interrupteur
d’alimentation est sous tension, que
le câble Thunderbolt entre la boîte
et l’ordinateur est branché et que
l’ordinateur est sous tension.
2 – Plaque de verrouillage pour la
carte PCIe
3 – Couverture du port
4 – Interrupteur d’alimentation*
5 – Prise d’entrée d’alimentation
6 – Thunderbolt 3 Port
7 – Ventilateur primaire
8 – Source de courant*
L’alimentation dispose de son
propre ventilateur qui fonctionne
indépendamment du ventilateur
principal.
9 – Emplacement PCIe
Deutsche
1 – Power-LED
Leuchtet auf, wenn die Box an einer
Steckdose angeschlossen ist, der
Netzschalter auf „on“ gestellt ist, die
Box über ein Thunderbolt Kabel mit
dem Computer verbunden und der
Rechner eingeschaltet ist.
2 – Montagehalterung für PCIe-Karte
3 – PCIe-Blende
4 – Netzschalter
5 – Netzbuchse
6 – Thunderbolt 3 Anschluss
7 – Hauptlüfter
8 – Netzteil*
Das Netzteil verfügt über einen
eigenen Lüfter, der unabhängig vom
Hauptlüfter arbeitet.
9 – PCIe-Steckplatz
* Das Produkt ist möglicherweise nicht
genau wie abgebildet.
Español
1 – Indicador de encendido - LED
Se ilumina cuando la caja está
conectada a una fuente de
alimentación y el interruptor de
encendido se enciende, el cable
Thunderbolt entre el chasis y su
computadora está enchufado, y la
computadora encendida.
2 – Placa de bloqueo para el soporte de
la tarjeta PCIe
3 – Cubierta del puerto
4 – Interruptor de alimentación*
5 – Toma de entrada de alimentación
6 – Puerto Thunderbolt 3
7 – Ventilador principal
8 – Fuente de alimentación
La fuente de alimentación tiene
su propio ventilador que funciona
independientemente del ventilador
principal.
9 – Ranura PCIe
* Le produit peut ne pas être exactement
comme indiqué.
Japanese(日本語)
1 – パ ワ ー イ ン ジ ケ ー タ L E D
製品本体が電源と接続されており電源が
入っており、Thunderboltケーブルが 筐
体とお 使いのコンピュータに 接 続され た
状 態 で 、且 つ コ ン ピュ ー タ の 電 源 が 入っ
ている時、このLEDが点灯します。
2 – PCIeカード 用ブラケット固定板
3 – ポートアクセスカバー
4 – パワー入力ソケット
3
* El producto puede no ser exactamente
como se muestra.
5 – Thunderbolt 3 ポート
7 –
中 枢 フ ァン
8 –
パ ワ ー サ プ ラ イ
パワ ー サプ ライ は ファン を搭 載し
中枢ファンとは別系統で稼働します。
9 –
P C I e ス ロ ット
* 製品が正確に示されていない可能性があ
ります。
Page 4
Card Installation Steps / Installez la carte / PCIe-Karte Installationsschritte / Instalar la tarjeta
English
1. Remove the eGFX Breakaway Box from its packaging, and
then set it on a flat, level surface.
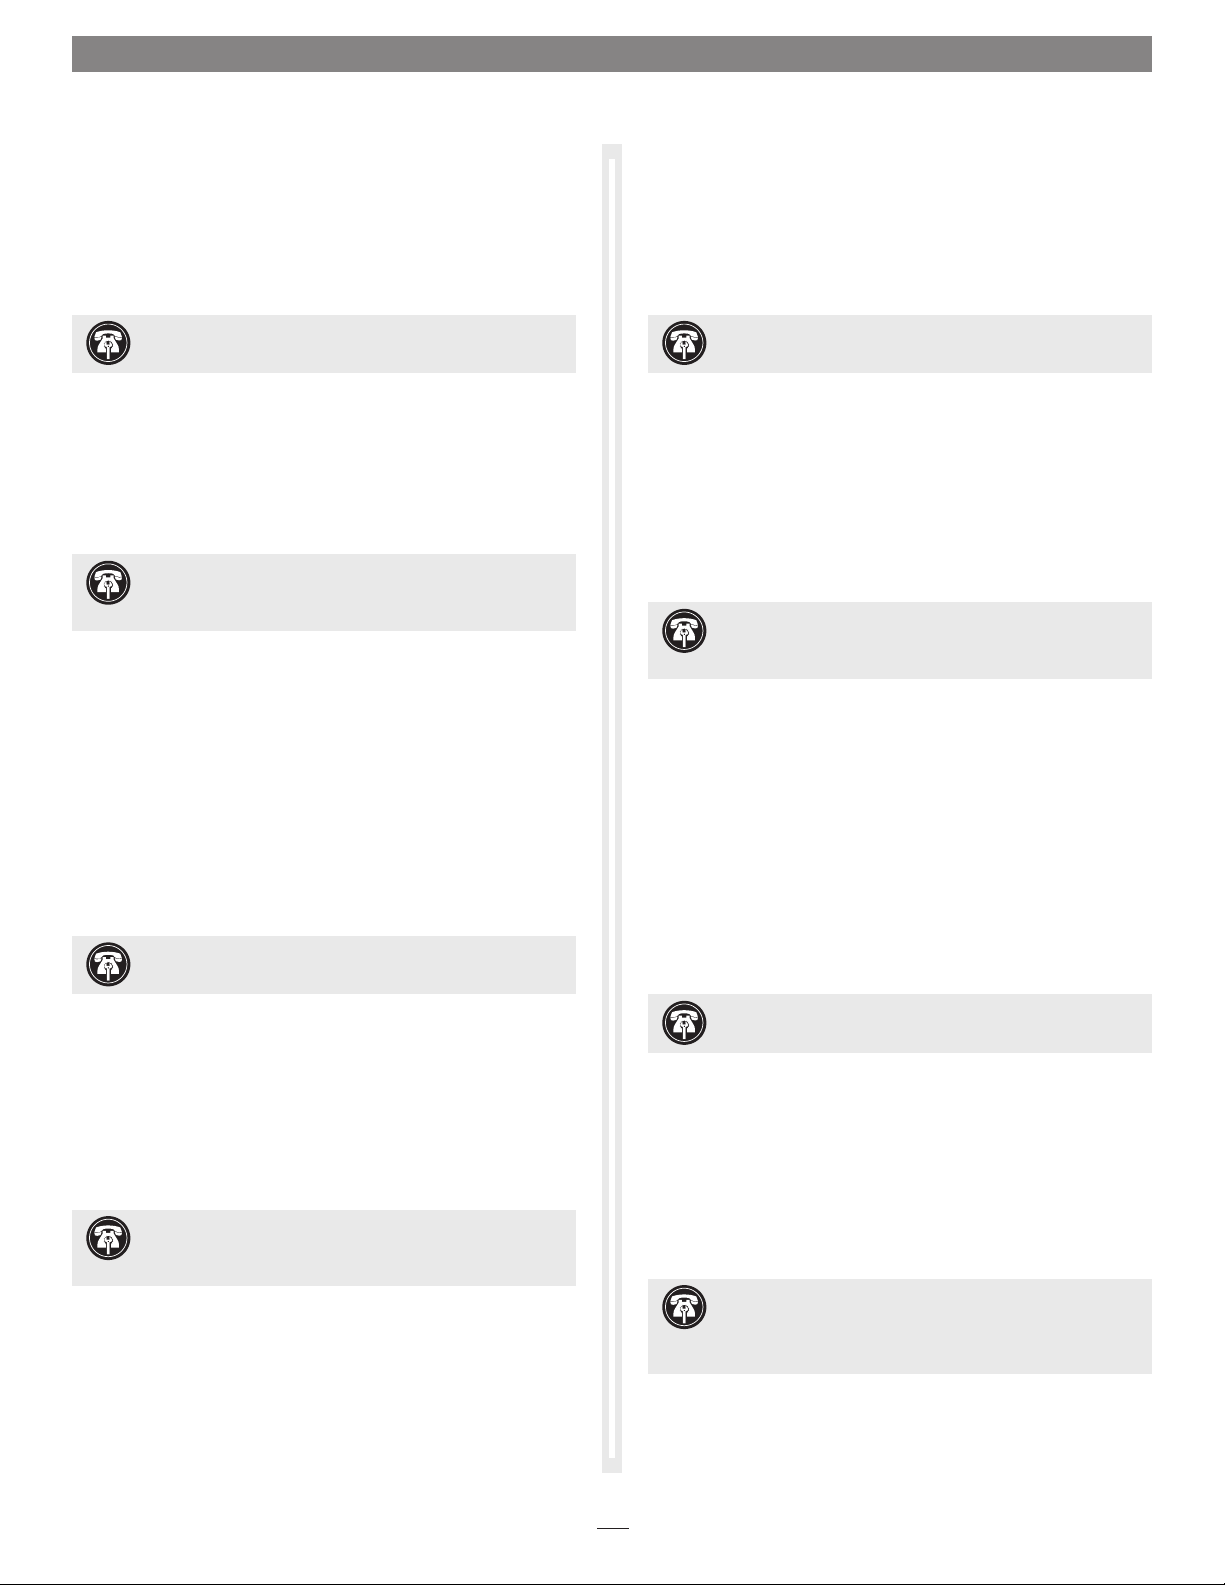
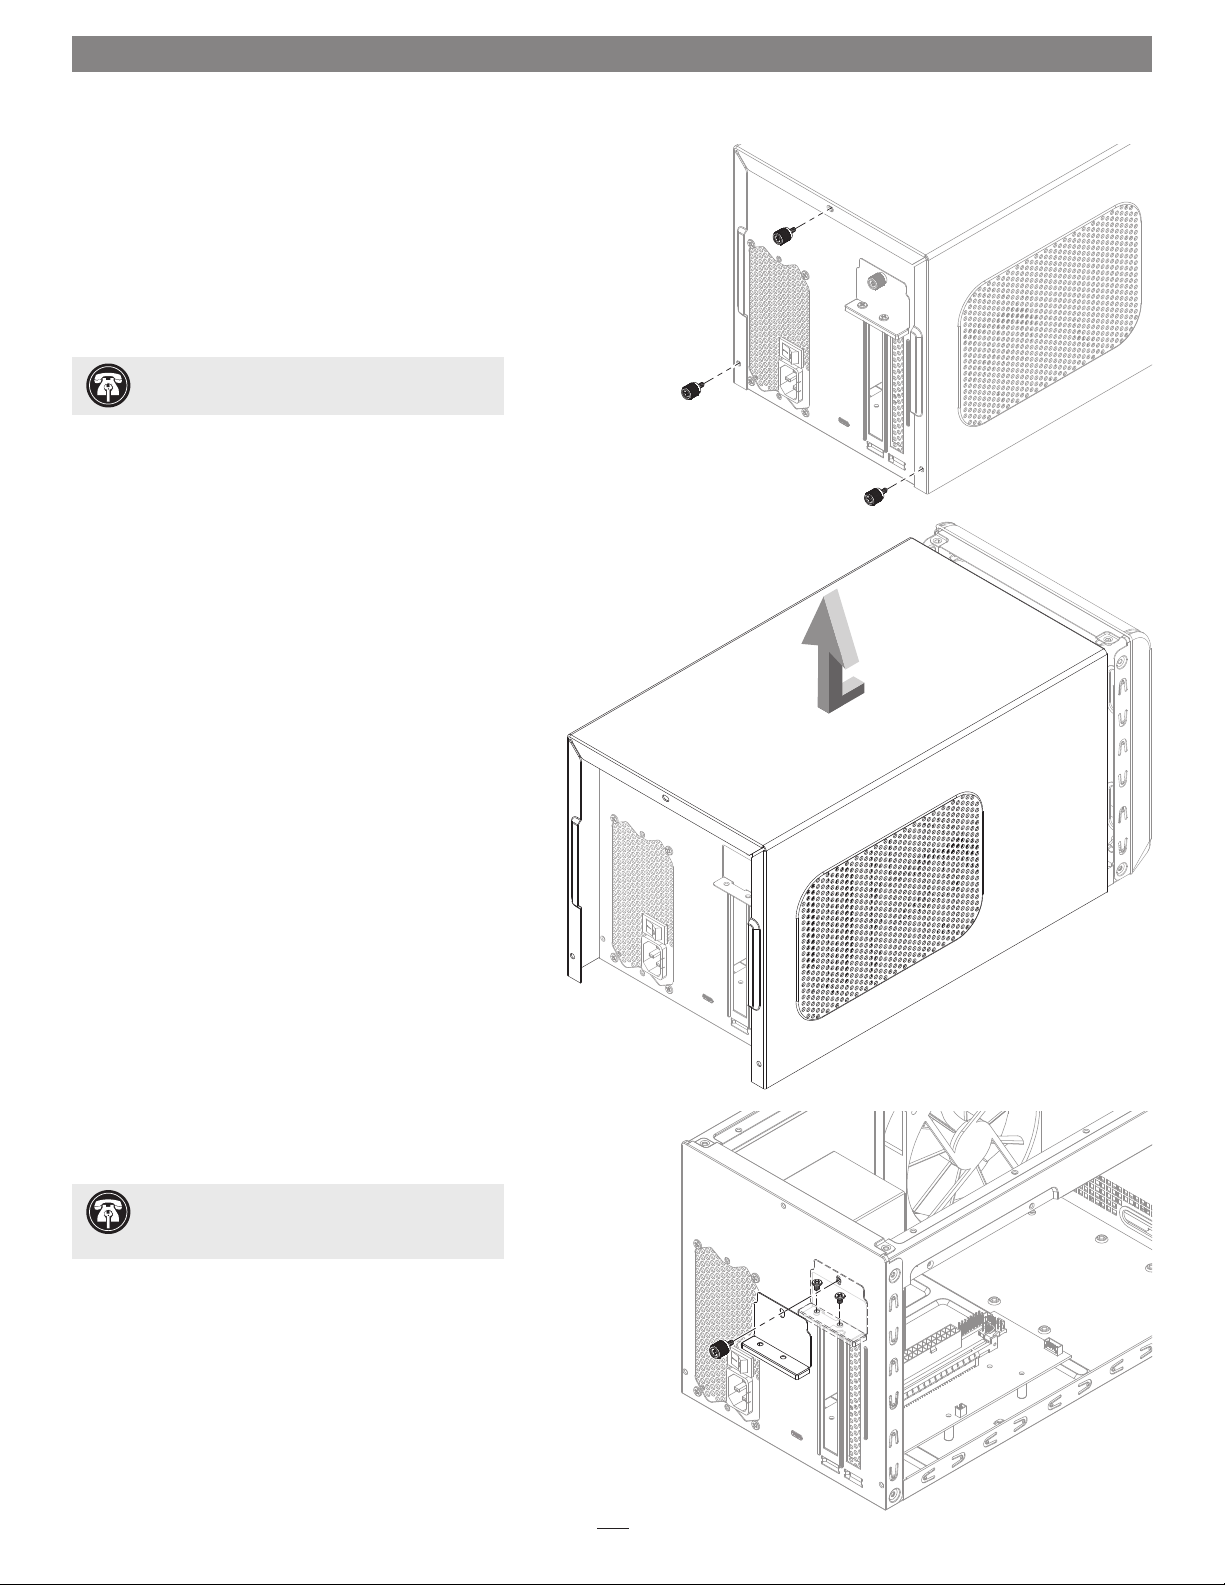
2. Remove and set aside the three thumbscrews securing the top
cover to the inner assembly (Figure 1).
Support Note: Product may not be exactly as shown
3. Slide the top cover toward you until it stops (Figure 2).
4. Remove and set aside the cover (Figure 2).
5. Remove and set aside the two screws securing the PCIe card
bracket locking plate (Figure 3).
Support Note: To avoid damaging components due to
static electricity discharge, wear an antistatic wrist strap
while working inside the eGFX Breakaway Box.
6. Remove and set aside the thumbscrew securing the PCIe
card bracket locking plate, and then remove the port access
cover (Figure 3).
Français
1. Retirez le eGFX Breakaway Box de son emballage, puis placezle sur une surface plane et de niveau.
2. Retirer et mettre de côté les trois vis de fixation du couvercle
sur l’ensemble interne (Figure 1).
Conseil : Le produit peut ne pas être exactement
comme indiqué.
Deutsche
1. Packen Sie die eGFX Breakaway Box aus und stellen Sie diese
auf eine ebene Oberfläche.
2. Öffnen Sie die drei Rändelschrauben, welche die
Gehäuseabdeckung sichern. (Siehe Abbildung 1)
Anmerkung: Das Produkt ist möglicherweise nicht
genau wie abgebildet.
3. Ziehen Sie die Gehäuseabdeckung zu sich. (Siehe
Abbildung 2)
4. Nehmen Sie die Gehäuseabdeckung ab. (Siehe Abbildung 2)
5. Öffnen Sie die beiden Schrauben, welche das PCIe-KartenSicherungsblech befestigen und legen Sie diese zur Seite.
(Siehe Abbildung 3)
Anmerkung: Tragen Sie ein antistatisches Armband, um
zu verhindern, dass Komponenten durch statische
Elektrizität beschädigt werden.
6. Öffnen Sie die Rändelschraube, welche das PCIe-KartenSicherungsblech hält und legen Sie diese zusammen mit
dem Sicherungsblech zur Seite. (Siehe Abbildung 3)
Español
1. Retire la caja eGFX Breakaway Box, y luego coloque sobre una
superficie plana y nivelada.
2. Retire y ponga a un lado los tres tornillos de apriete manual
que sujetan la cubierta superior al conjunto interior (Figura 1).
3. Glisser le capot supérieur vers vous jusqu’à ce qu’il s’arrête
(Figure 2).
4. Retirer et mettre de côté le couvercle (Figure 2).
5. Enlever et séparer les deux vis de fixation du support plaque
de fixation carte PCIe a l’assemblage intérieur (Figure 3).
Conseil : Pour éviter d’endommager les composants en
raison de la décharge d’électricité statique, porter une
poignet antistatique tout en travaillant à l’intérieur de la case.
6. Retirez et mettez de côté la vis pouce fixant la plaque de
verrouillage du support de la carte PCIe, puis retirez le
couvercle d’accès du port (Figure 3).
Nota de soporte: El producto puede no ser
exactamente como se muestra.
3. Deslice la cubierta superior hacia usted hasta que se detenga
(Figura 2).
4. Retire y separe la cubierta (Figura 2).
5. Retire y aparte los dos tornillos que fijan la placa de fijación
del soporte de la tarjeta PCIe al conjunto interior (Figura 3).
Nota de soporte: Para no dañar los componentes
debido a la descarga de la electricidad estática, póngase
una pulsera antiestática mientras se trabaja dentro del eGFX
Breakaway Box.
6. Retire y ponga a un lado el tornillo de apriete que asegura la
placa de bloqueo del soporte de la tarjeta PCIe y luego retire
la cubierta de acceso (Figura 3).
4
Page 5
カードインストール手 順
Japanese
1. eGFX Breakaway Box (以降の呼称を「ボックス」としま
す)を梱包から取り
出 し 、作 業 台 の 上 に 置 き ま す 。
2. トップカバーと内部アセンブリを固定する3箇所のつま
み ねじ を外して
おきます (図1)。
参考情報:
ります。
3. トップカバーの背面の端側を若干持ち上げながら、手前
側に向かって止まるところまでスライドさせます
4. カ バ ー を真 っ 直 ぐ 持 ち 上 げ 、別 に 置 い て お き ま す (図2)。
製品が正確に示されていない可能性があ
(図2)。
1
5. PCIeカード 用ブラケット固定板を固定している2箇所の
ねじ を外して お きま す
参考情報:
は、静電気の部品への 影響がないよう、静電気除去
ストラップの装着をしてください。
6. PCIeカードブラケット用の固定板のつまみねじを外し、
ポ ートアク セ ス カ バー を 外 し ま す
(図3)。
GFX Breakaway Box内部の部品を扱う際
(図3)。
2
3
5
Page 6

Card Installation Steps / Installez la carte / PCIe-Karte Installationsschritte / Instalar la tarjeta
English
WARNING: When handling computer products, take care
to prevent components from being damaged by static
electricity; avoid working in carpeted areas. Handle PCIe cards
only by their edges and avoid touching connector traces and
component pins. Also, avoid touching the box’s circuit boards and
any of its components.
7. Remove the GPU card from its packaging.
8. Insert the PCIe card into the inner assembly through the
top or side, depending on the size of your card (Figure 4).
Please note that in some instances, it may be necessary to
remove the main fan in order to insert the card into the inner
assembly.
9. Line up the card’s connector with the PCIe slot, and
then gently but firmly press the card straight into the slot
(Figure 5).
10. Connect the auxiliary power connectors to the card.
Français
ATTENTION : Lors de la manipulation de produits
informatiques, veillez à éviter que les composants ne soient
endommagés par l’électricité statique ; Évitez de travailler dans les
zones moquettées. Manipulez les cartes PCIe uniquement par leurs
bords et évitez de toucher les traces du connecteur et les broches
des composants. Aussi, évitez de toucher les circuits imprimés de
la boîte et l’un de ses composants.
7. Retirez la carte GPU de son emballage.
8. Insérez la carte PCIe dans le châssis en haut ou sur le côté, en
fonction de la taille de votre carte (Figure 4). Notez que, dans
certains cas, il peut être nécessaire d’enlever le ventilateur
principal pour insérer la carte dans le châssis.
9. Alignez le connecteur de la carte avec la fente PCIe, puis
appuyez doucement mais fermement sur la carte directement
dans la fente (Figure 4).
10. Connectez le connecteurs d’alimentation auxiliaire à la carte.
Deutsche
Achtung: Stellen Sie sicher, dass elektrische
Komponenten nicht durch statische Elektrizität beschädigt
werden, während Sie mit der Computerelektronik arbeiten.
Vermeiden Sie Arbeitsräume mit Teppich. Fassen Sie PCIe-Karten
nur an deren Rändern an und vermeiden Sie das Anfassen von
Stecker-Pins und Leiterbahnen. Fassen Sie außerdem nicht die
Platine der eGFX Box an.
7. Packen Sie die Grafikkarte aus und fassen
8. Führen Sie die PCIe-Karte über die Seite bzw. Oberseite in
das Innengehäuse ein, je nachdem wie groß Ihre Karte ist
(siehe Abbildung 4). Bei besonders langen Karten kann es
erforderlich sein, den Hauptlüfter ausbauen zu müssen, um
die Karte in das Innengehäuse einführen zu können.
9. Richten Sie den PCIe Stecker anhand des PCIe Steckplatzes
aus und drücken Sie die Karte vorsichtig in den Slot. (Siehe
Abbildung 5)
10. Verbinden Sie den Stromanschlüsse mit der Karte.
Español
ADVERTENCIA: Cuando maneje productos informáticos,
tenga cuidado de evitar que los componentes sean
dañados por electricidad estática; Evite trabajar en áreas
alfombradas. Maneje las tarjetas PCIe sólo por sus bordes y evite
tocar las trazas del conector y las clavijas componentes. Asimismo,
evite tocar las placas de circuitos de la caja y cualquiera de sus
componentes.
7. Retire la tarjeta GPU de su embalaje.
8. Inserte la tarjeta PCIe en el chasis por la parte superior o
lateral, según el tamaño de su tarjeta (Figura 4). Tenga en
cuenta que, en algunos casos, puede ser necesario quitar el
ventilador principal para insertar la tarjeta en el chasis.
9. Alinee el conector de la tarjeta con la ranura PCIe y presione
suavemente pero con firmeza la tarjeta directamente en la
ranura (Figura 5).
10. Conecte el conectors de alimentación auxiliar a la tarjeta.
6
Page 7

カードインストール手 順
Japanese
コンピュータ製品を取り扱う際は、部品が静電
警告:
気の影響を被らないよう注意し、カーペット敷の場所
での作業はお避けください。PCIeカードは端を持ち、
コネクタトレースやピンに触れないようにしてください。同様に
ボックス本体の回路版やコンポーネントにも触れないようご注意
ください。
7. G P U カ ードを 梱 包から 取り出します。
8. ご使用になるPCIeカードを内部アセンブリの上部と側面
に 沿 って 、カ ード の サ イ ズ に 合 わ せ て 装 着 し ま す
例えば、内部アセンブリにカードを装着するために、
場合によってはメインのファンを外す必 要があります。
(図4)。
9. PCIeスロットのカードコネクタに 沿 って、カ ード を
丁 寧 且 つ し っか り 押 し 、ス ロット に 対 して 真 っ 直 ぐ 装 着
します (図5)。
電源補助用パワーコネクタをカードに接続します。
10.
4
5
7
Page 8

Card Installation Steps / Installez la carte / PCIe-Karte Installationsschritte / Instalar la tarjeta
English
11. Secure the card using the previously-removed PCIe card
bracket locking plate, screws, and thumbscrew (Figure 6).
12. Lower the top cover over the inner assembly’s top brackets as
shown, and then slide the cover all the way forward until it
stops (Figure 7).
13. Secure the top cover to the inner assembly with the three
thumbscrews you removed previously (Figure 8).
14. Connect the included Thunderbolt cable, or a comparable
Thunderbolt 3 (40Gbps) cable, between the Thunderbolt 3
port on the Box and a Thunderbolt 3 port on your computer.
Cables marked with the USB icon (
15. Connect the included power cord between a wall outlet or
power strip and the Box’s power socket. If equipped with a
power switch, flip it to the on position. Note that the Box’s
power indicator will not light until the computer is turned on.
16. If you installed a GPU card, you must download additional
instructions on how to enable it to work with your system.
Please visit the eGFX Breakaway Box support page at www.
sonnettech.com/ebb-support.
) are NOT compatible.
Français
11. Fixez la carte à l’aide de la plaque de fixation carte PCIe
précédemment retirée, des vis et de la vis à oreilles (Figure 6).
12. Abaissez le couvercle supérieur sur les supports supérieurs de
l’ensemble intérieur comme indiqué. Faites ensuite glisser le
couvercle complètement vers l’avant jusqu’à ce qu’il s’arrête
(Figure 7).
13. Fixez le capot supérieur à l’ensemble intérieur avec les trois vis
à oreilles que vous avez supprimées précédemment (Figure 8).
Deutsche
11. Sichern Sie die Karte mit dem vormals entfernten PCIe-
Karten-Sicherungsblech und dessen Schrauben. (Siehe
Abbildung 6)
12. Führen Sie die äußere Gehäuseabdeckung über das
innere Gestell und senken Sie diese vertikal ab, bis die
Abdeckung auf dem Innengestell aufliegt. Schieben Sie die
Gehäuseabdeckung nun horizontal noch vorne, bis diese in
das Gestell einrastet (siehe Abbildung 7).
13. Verwenden Sie die drei Rändelschrauben, um die
Gehäuseabdeckung zu sichern. (Siehe Abbildung 8)
14. Verbinden Sie den Thunderbolt 3 Anschluss der Box mit
dem Ihres Computers über das mitgelieferte Thunderbolt 3
Kabel. Sie können dafür natürlich auch andere Thunderbolt 3
40Gbps Kabel verwenden. Kabel, die mit dem USB Logo
(
) versehen sind, können NICHT verwendet werden
15. Verbinden Sie das Netzkabel mit der eGFX Box. Falls Ihr Gerät
über einen Netzschalter verfügt, dann stellen Sie diesen bitte
auf „on“. Die Status LED der Breakaway Box wird erst blau
leuchten, wenn Sie ihren Computer einschalten.
16. Falls Sie eine Grafikkarte installiert haben, dann sollten Sie
zusätzliche Anweisungen herunterladen, die erklären, wie Sie
diese mit Ihrem System zum laufen bringen.
Español
11. Asegure la tarjeta usando la placa de bloqueo de la tarjeta PCIe
previamente retirada, los tornillos y el tornillo de mariposa
(Figura 6).
12. Baje la cubierta superior sobre los soportes superiores
del conjunto interno muestra, y luego deslice la tapa
completamente hacia adelante hasta que se detenga (Figura 7).
14. Connectez le câble Thunderbolt inclus dans l’emballage,
ou un câble similaire Thunderbolt 3 (40Gbps), entre le port
Thunderbolt 3 sur la boîte et un port Thunderbolt 3 sur
votre ordinateur. Les câbles marqués avec l’icône USB (
NE SONT PAS compatibles.
15. Connectez le cordon d’alimentation fourni et mettez
l’interrupteur d’alimentation en position de marche. Si un
interrupteur d’alimentation est fourni, réglez-le sur la position
ON. Notez que l’indicateur d’alimentation sur la boîte ne
s’allume pas jusqu’à ce que l’ordinateur soit sous tension.
16. Si vous avez installé une carte GPU, vous devez télécharger
des instructions supplémentaires sur la façon de l’activer
avec votre ordinateur. S’il vous plaît visitez la page de support
eGFX Breakaway Boîte à www.sonnettech.com/ebb-support.
13. Fije la cubierta superior al conjunto interior con los tres
tornillos de mariposa que quitó previamente (Figura 8).
)
14. Conecte el cable Thunderbolt incluido o un cable
Thunderbolt 3 comparable (40 Gbps), entre el puerto
Thunderbolt 3 en la caja y un puerto Thunderbolt 3 en su
computadora. Los cables marcados con el icono USB (
NO son compatibles.
15. Conectar el cable de alimentación. Si su Breakaway Box está
equipada con un interruptor de alimentación, colóquelo en
la posición de encendido. Tenga en cuenta que el indicador
de alimentación de la caja no se encenderá hasta que la
computadora esté encendida.
16. Si instaló una tarjeta GPU, debe descargar instrucciones
adicionales sobre cómo habilitarla para que funcione con
su computadora. Por favor, visite la página de soporte eGFX
Breakaway Box en www.sonnettech.com/ebb-support.
8
)
Page 9

カードインストール手 順
Japanese
11. カード を、先 程外しておいた P C Ieカード用 固 定板、ねじ 、
つまみねじを使って固定します
12. 図のように、インナーアセンブリのブラケット上部の上方
向よりトップカバーを下げてゆき、最 後 の止まるところま
で カ バ ー を ス ラ イド して い き ま す( 図 7 )。
(図6)。
6
13. トップカバーと内部 アセンブリを先に外しておいた3本
のつまみ ねじで固定します
(図8)。
14. 付属のThunderboltケーブルあるいは同等の
Thunderbolt 3 (40Gbps)ケーブルを使ってBox の
Thunderbolt 3ポートとコンピュータのThunderbolt 3
ポートに接続します。USBアイコン (
ブルとは互換性がありませんのでご注 意ください。
) のついたケー
15. 付 属 の パワーコード で 壁コン セント や 電源 タップボック
スの電源ソケットを接 続します。電 源を O N 状 態 にしま
す。パワースイッチ搭載の場合は、ONの位置に入れてく
ださい。この時、ボックスのパワーインジケータはコンピ
ュータの電源が入らないと点灯しない点にご注意くださ
い。
16. GPUカードをご自身でインストールされる場合、外付け
GPU (eGPU)の互換性状況が頻繁に更新される事情か
ら、Sonnetウェブサイトへアクセスし最新情報や本書に
含まれて いない 追加の 取 扱 説明 書 をダウン ロードする
必要があります。eGFX Breakaway Box サポートページ
www.sonnettech.com/ebb-support にアクセスし、特
定のOS向け取扱説明書を確認しダウンロードしてくだ
さい。
7
8
9
Page 10

General Information/Informations générales/Allgemeine Information/Información general/一般情報
English
Please visit the Breakaway Box Support Page for details on the
following topics:
• Fan Operation, and Keeping the Installed Card Cool
• Power Indicator LED Operation
• Why the Breakaway Box Has Only One Thunderbolt 3 Port
• Not All Computers’ Thunderbolt 3 Performance is Equal
• GPU Card Power Requirements
• Replacing a Card After Initial Installation
• PCIe CARDS ARE NOT HOT-PLUGGABLE!
•
GPU Card Performance in an eGFX Breakaway Box
•
Using the eGFX Breakaway Box to Charge Your Notebook or
Laptop Computer
• Thunderbolt 3 (40Gbps) Cable Information (They Don’t All
Offer the Same Performance Capabilities!)
• Operating System (OS) Updates May Break Compatibility
Français
Veuillez visiter la page de support Breakaway Box pour plus
d’informations sur ces sujets :
• Fonctionnement du ventilateur, et garder la carte installée
fraîche
• Fonctionnement de l’indicateur de puissance LED
• Pourquoi la boîte Breakaway a un seul port Thunderbolt 3
• Les performances de Thunderbolt 3 peuvent varier en fonction
de l’ordinateur.
• Exigences d’alimentation de la carte GPU
• Après l’installation initiale, comment remplacer une carte
• On NE PEUT PAS connecter les cartes PCIe à chaud!
• Performances de la carte GPU dans une eGFX Breakaway Box
• Utilisation de la eGFX Breakaway Box pour charger votre
ordinateur portable
• Informations sur le câble Thunderbolt 3 (40Gbps) (ils n’offrent
pas toutes les mêmes capacités de performance ! )
• Les mises à jour du système (OS) d’exploitation peuvent
changer la compatibilité.
Deutsche
Bitte besuchen Sie die Breakaway Box Support Webseite für
Informationen bezüglich der folgenden Themen:
• Lüfterbetrieb, und Die installierte Karte kühl halten
• Power-LED Funktion
• Warum hat die Breakaway Box nur einen Thunderbolt 3
Anschluss?
• Nicht alle Computer verfügen über dieselbe Thunderbolt 3
Performance
• Grafikkarten Leistungsanforderungen
• Karte austauschen
• PCIe-Karten können nicht im laufenden Betrieb ausgewechselt
werden!
• Grafikkarten Performance in einer eGFX Breakaway Box
• Notebook bzw. Laptop über die eGFX Breakaway Box laden
• Thunderbolt 3 40Gbps Kabelinformationen (Nicht alle Kabel
sind gleich schnell!)
• Updates von Betriebssystemen (OS) können die Kompatibilität
beeinträchtigen
Español
Visite la página de asistencia de Breakaway Box para obtener
detalles sobre los siguientes temas:
• La operación de los Fans, y mantener fresco el GPU
• Funcionamiento del indicador LED de encendido
• ¿Por qué la caja Breakaway tiene solo un puerto Thunderbolt 3?
• El rendimiento de Thunderbolt 3 no es igual para todas las
computadoras
• Requisitos de potencia de la tarjeta GPU
• Reemplazar una tarjeta después de la instalación inicial
• ¡LAS TARJETAS PCIe NO SON ENCHUFABLES MIENTRAS SE
ENCIENDEN!
•
Rendimiento de la tarjeta GPU en una caja eGFX Breakaway Box
•
Uso del Breakaway Box para cargar su computadora portátil
• Información del cable Thunderbolt 3 (40 Gbps) (¡No todos
ofrecen las mismas capacidades de rendimiento!)
• Las actualizaciones del sistema operativo (OS) pueden romper la
compatibilidad
Japanese
Breakaway Box サポートページには下記のトピックを掲載しています:
•
カードを 低 温に保 つ
•
ファンの操作
•
パワーインジケータLEDの操作
• Breakaway Box のThunderbolt 3ポートが1基しか搭載されていな
い理由
•
全てのコンピュータのThunderbolt 3の性能が同等ではない
•
初 期 化後 に カ ードの入れ替えを行う
•
PCIeカードはホットプラグ対応ではありません!
• GPU カードに必要な電力
•
e GF X B re ak aw a y B o xを 使 用してノートブック や ラップトップ コン ピ
ュータを使用する
• Thunderbolt 3 (40Gbps) ケーブル情報 (全てのケーブルが同じパフ
ォー マ ン スとは 限りま せん!)
•
オペレーションシステム (OS) のアップデートで互換性がとれず問題
化することがある
10
Page 11

Additional Information
SAFETY PRECAUTIONS
Please read this section carefully before proceeding. These
precautions explain the correct and safe use of this device,
thereby helping to prevent injury to you or others, and also help
you to minimize the risk of damaging the device.
Warnings
Always follow the basic warnings listed here to avoid the risk of
serious injury or death from electrical shock, short-circuiting, fire,
and other hazards. These warnings include, but are not limited to:
• Do not attempt to modify the enclosure. If this device appears
to be malfunctioning, contact your reseller or local distributor.
• Do not drop the chassis; dropping or mishandling chassis may
result in a malfunction leaving the product inoperable.
• Do not insert your fingers or foreign objects inside the slot(s).
• Do not expose the device to rain, use it near water or containers
that contain liquids which might spill into any openings, or in
damp or wet conditions.
• If unusual smells, sounds, or smoke come from the device, or if
liquids enter it, unplug it from the electrical outlet immediately.
• Follow the instructions in this manual carefully; contact your
reseller or local distributor for additional advice not covered in
this User’s Guide.
FCC Compliance
eGFX Breakaway Box, eGFX Breakaway Box 550, and eGFX
Breakaway Box 650 comply with Part 15 of the FCC Rules.
Operation is subject to the following two conditions: This device
may not cause harmful interference, AND this device must accept
any interference received, including interference that may cause
undesired operation.
Contacting Customer Service
The Sonnet Web site located at www.sonnettech.com has the
most current support information and technical updates. Before
you call Customer Service, please check our Web site for the latest
updates and online support files, and check this User’s Guide for
helpful information.
When you call Customer Service, have the following information
available so the customer service staff can better assist you:
• Product name
• Serial number of that product
• Date and place of purchase
• Computer model
• GPU or other PCIe card model
• Operating system version you’re using
• Software/firmware versions
• A System Report (macOS) or a Microsoft System Information
MSINFO32 (Windows) report (Windows)
USA Customers
If further assistance is needed, please contact Sonnet Customer
Service at:
Tel: 1-949-472-2772
(Monday–Friday, 7 a.m.–4 p.m. Pacific Time)
E-mail: support@sonnettech.com
For Customers Outside the USA
For support on this product, contact your reseller or local
distributor.
Visit Our Web Site
For the most current product information and online support
files, visit the Sonnet Web site at www.sonnettech.com/support/.
Register your product online at http://registration.sonnettech.com
to be informed of future upgrades and product releases.
11
Page 12

Information Additionnelle
PRÉCAUTIONS DE SÉCURITÉ
Veuillez lire attentivement cette section. Ces précautions
expliquent l’utilisation correcte et sûre de cet appareil. Ils aident
à prévenir les blessures à vous ou aux autres et réduisent le risque
d’endommager l’appareil.
Avertissements
Suivez toujours les avertissements de base énumérés pour éviter
tout risque de blessure grave ou de mort par électrocution, courtcircuit, incendie et autres dangers. Ces avertissements incluent,
mais ne sont pas limités à :
• N’essayez pas de modifier le boîtier. Si cet appareil fonctionne
mal, contactez votre revendeur ou votre distributeur local.
• Ne laissez pas tomber le boîtier ; Si vous laissez tomber ou
manipulez mal le boîtier, vous risquez de provoquer un
dysfonctionnement et de rendre le produit inutilisable.
• N’introduisez pas vos doigts ou des corps étrangers dans les
fentes.
• N’exposez pas l’appareil à la pluie ou dans des conditions
humides. Ne l’utilisez pas à proximité d’eau ou de récipients
contenant des liquides qui pourraient se répandre dans
l’appa reil
• Si des odeurs, des sons ou de la fumée inhabituels proviennent
de l’appareil ou si des liquides y pénètrent, débranchez-le
immédiatement de la prise électrique.
• Suivez attentivement les instructions de ce manuel. Contactez
votre revendeur ou votre distributeur local pour obtenir des
conseils supplémentaires qui ne figurent pas dans ce Guide de
l’utilisateur.
Conformité FCC
Cet appareil est conforme à la Section 15 du règlement de la FCC
(Commission fédérale des communications des États-Unis). Son
fonctionnement est assujetti aux deux conditions suivantes : (1)
Cet appareil ne peut pas causer d’interférence nuisible et (2) cet
appareil doit accepter toutes les interférences reçues, y compris
celles qui risquent d’entraîner un fonctionnement non désiré.
Comment contacter le service clientele
Le site Sonnet, www.sonnettech.com, contient les dernières
informations d’assistance et mises à jour techniques. Avant
d’appeler le service clientèle, consultez notre site Web pour les
dernières mises à jour et fichiers de support, et consultez ce guide
de l’utilisateur pour des informations utiles.
Lorsque vous appelez le service clientèle, ayez les informations
suivantes à disposition pour que le personnel du service clientèle
puisse mieux vous aider :
• Nom du produit
• Numero de serie
• Date et lieu d’achat
• Modèle d’ordinateur
• Modèle de GPU ou autre carte PCIe
• Version Système opérateur
• Versions du logiciel / firmware
• Rapport du système (macOS) ou un rapport d’informations
système Microsoft MSINFO32 (Windows).
Clients – USA
Contactez le service clientèle de Sonnet à :
Tel : 1-949-472-2772
(Lundi–Vendredi, 8 a.m.–4 p.m. Pacific Time)
E-mail : support@sonnettech.com
Pour les clients hors des États-Unis
Pour le support sur ce produit, contactez votre revendeur ou
distributeur local.
Visitez notre site web
Pour les plus récentes informations produit et les fichiers de
support en ligne, visitez le site web Sonnet à www.sonnettech.
com. N’oubliez pas d’enregistrer votre produit en ligne à http://
registration.sonnettech.com pour être informé des futurs mises à
jour et sorties de produit.
12
Page 13

Zusätzliche Informationen
Vorsichtsmaßnahmen
Bitte lesen Sie diesen Abschnitt sorgfältig durch bevor Sie
fortfahren. Diese Vorsichtsmaßnahmen erklären den richtigen
und sicheren Umgang mit diesem Gerät, damit Verletzungen bei
Ihnen und bei anderen vermieden werden. Außerdem helfen die
folgenden Maßnahmen dabei Schäden am Gerät zu vermeiden.
Warnhinweise
Bitte folgen Sie stets diesen einfachen Warnhinweisen, um das
Risiko von ernsthaften Verletzungen bzw. Tod durch elektrische
Schocks, Kurzschlüsse, Feuer und andere Gefahren zu vermeiden.
Die folgenden Anweisungen sind zu befolgen:
• Versuchen Sie nicht das Gehäuse zu modifizieren. Falls das
Gerät eine Fehlfunktion aufweist, dann kontaktieren Sie bitte
Ihren Vertriebspartner oder lokalen Händler.
• Lassen Sie das Chassis nicht fallen. Durch falsche Handhabung
bzw. Fallenlassen des Gerätes können Fehlfunktionen auftreten,
die das Gerät unbrauchbar machen.
• Führen Sie keine Finger oder andere Gegenstände in Steckplätze
oder andere Öffnungen ein.
• Setzen Sie das Gerät keiner Feuchtigkeit oder Regen aus und
halten Sie das Gehäuse von offenen Getränken fern, die
ausversehen über das elektrische Gerät verschüttet werden
könnten.
• Falls das Gerät ungewöhnlich riecht oder ungewöhnlich laut ist,
oder falls Rauch aus dem Gehäuse aufsteigt, dann stecken Sie
das Netzkabel sofort aus.
• Folgen Sie den Anweisungen in dieser Anleitung. Kontaktieren
Sie Ihren Vertriebspartner oder Händler für zusätzliche
Hinweise und Ratschläge, die nicht in dieser Anleitung
enthalten sind.
FCC Konformität
Die eGFX Breakaway Box, eGFX Breakaway Box 550 und eGFX
Breakaway Box 650 entsprechen Abschnitt 15 der FCC Regularien.
Der Betrieb unterliegt den folgenden Konditionen: Dieses Gerät
verursacht keine schädlichen Interferenzen UND dieses Gerät
muss die Einwirkung jeder Interferenz akzeptieren, inklusive
Interferenzen, die dessen Betreib unbeabsichtigt beeinflussen.
Kontaktieren des Kundenservice
Die Sonnet Website unter www.sonnettech.de hat die aktuellsten
Supportinformationen und technischen Updates. Bevor Sie den
Kundenservice in englischer Sprache kontaktieren, überprüfen Sie
bitte die aktuellsten Updates und online Support Informationen,
und durchsuchen Sie diese Benutzeranleitung auf hilfreiche
Informationen.
Bitte kontaktieren Sie unser Serviceteam nur in englischer
Sprache. Wenn sie den Kundenservice kontaktieren, dann
haben Sie bitte die folgenden Informationen parat, damit der
Servicemitarbeiter Ihnen besser behilflich sein kann:
• Produktname
• Seriennummer des Produktes
• Datum und Ort an dem das Produkt erworben wurde
• Computermodell
• Grafikkarten- oder PCIe-Karten-Modell
• Version des Betriebssystems
• Software/Firmware Version
• macOS „Systembericht“ (Im Menü „Apple“ > „Über diesen
Mac“ > „Systembericht“ > „Ablage“ > „Sichern“) oder Windows
„Systeminformationen“ (In Suchleiste „msinfo32“ > „Datei“ >
„Speichern“)
Kunden in den USA
Falls Sie zusätzliche Hilfe benötigen, dann kontaktieren Sie den
Sonnet Kundenservice in englischer Sprache unter:
Tel: +1-949-472-2772
(Montag- Freitag, 8:00 Uhr bis 16:00 Uhr PST)
E-mail: support@sonnettech.com
Für Kunden außerhalb der USA
Kontaktieren Sie bitte Ihren Händler oder Vertriebspartner.
Besuchen Sie unsere Webseite
Für die aktuellsten Produktinformationen und Online-SupportDateien, besuchen Sie die Sonnet Webseite unter http://www.
sonnettech.com/de/support/index.html. Registrieren Sie Ihr
Produkt online unter http://registration.sonnettech.com, um
über zukünftige Upgrades und Produktveröffentlichungen
informiert zu werden.
13
Page 14

Información Adicional
PRECAUCIONES DE SEGURIDAD
Lea atentamente esta sección antes de continuar. Estas
precauciones explican el uso correcto y seguro de este dispositivo,
lo que ayuda a evitar lesiones a usted y a otros, y también
minimiza el riesgo de dañar el dispositivo.
Advertencias
Siga siempre las advertencias básicas enumeradas aquí para evitar
el riesgo de lesiones graves o la muerte por descargas eléctrica,
cortocircuito, incendio y otros peligros:
• No intente modificar el recinto. Si parece que este dispositivo no
funciona bien, contacte a su revendedor o distribuidor local.
• No deje caer el chasis; si deja caer o maneja mal el chasis puede
provocar un mal funcionamiento y un producto inoperable.
• No inserte sus dedos u otros objetos dentro de la ranura.
• No exponga el dispositivo a la lluvia, ni lo use cerca del agua
o recipientes que contengan líquidos que podrían entrar en el
dispositivo, o en lugares húmedos o mojados.
• Si olores, sonidos o humo inusuales provienen del dispositivo,
o si ingresan líquidos, desenchúfelo de la toma de corriente de
inmediato.
• Siga las instrucciones en este manual cuidadosamente; póngase
en contacto con su revendedore o distribuidor local para
obtener asesoramiento adicional no cubierto en esta Guía del
usuario.
Cumplimiento con la FCC
eGFX Breakaway Box, eGFX Breakaway Box 550 y eGFX
Breakaway Box 650 cumplen con la Parte 15 de las Reglas de la
FCC. La operación está sujeta a las siguientes dos condiciones:
Este dispositivo no puede causar interferencias dañinas, Y este
dispositivo debe aceptar cualquier interferencia recibida, incluidas
las interferencias que puedan causar un funcionamiento no
deseado.
Cómo comunicarse con el Servicio al Cliente
El Sitio Sonnet, www.sonnettech.com, tiene la información de
soporte más reciente y actualizaciones técnicas. Antes de llamar
a Servicio al cliente, consulte nuestro sitio web para obtener las
últimas actualizaciones y archivos de soporte, y consulte esta
Guía del usuario para obtener información útil.
Cuando llame a Servicio al Cliente, tenga la siguiente
información disponible para que el personal de servicio al cliente
pueda ayudarlo mejor:
• Nombre del producto
• Número de serie del producto
• Fecha y lugar de compra
• Modelo de computadora
• Modelo de GPU u otra tarjeta PCIe
• Versión del sistema operativo
• Versiones de software / firmware
• Informe del sistema (macOS) o un informe de información del
sistema Microsoft MSINFO32 (Windows))
Clientes de USA
Si necesita asistencia adicional, comuníquese con el Servicio al
cliente de Sonnet a:
Tel: +1-949-472-2772
(lunes a viernes, de 8 a 16 horas, horario del Pacífico
E-mail: support@sonnettech.com
Para clientes fuera de los EE. UU.
Para soporte en este producto, contacte a su revendedor o
distribuidor local.
Visita nuestro sitio web
Para obtener la información del producto y los archivos de
soporte más recientes, visite www.sonnettech.com/support/.
Registre su producto en http://registration.sonnettech.com para
estar informado de futuras actualizaciones y lanzamientos de
productos.
14
Page 15

Additional Information
安全上の注意事項
作業 を 開 始する前に必ずこの項をよくお読 みください。この注 意 事項で
は、身体の安全を守り、本デバイスの損傷の可能性を最低限に抑えられ
るよう、製品 の正しく安 全な使 用方 法を 説明して い ま す。
警告
取り扱いを誤ると、感電やショート、火災、その他発 生する可能 性のある
危 険 に よ り 死 亡 ま た は 重 傷 を 負 う お そ れ が あ り ま す の で 、常 に 以 下 の 基
本的な注意事項を守ってお使いください。以下の注意事項が挙げられ
ま す が 、こ れ に 限 定 さ れ る も の で は あ り ま せ ん 。
• 筐体の分解や改造を試みないでください。正常に動作していないよう
に思われる場合は、製品をお求めになられた正規代理店または販売
店までお問 い 合わ せください。
• 筐体やアダプタを落下させたり乱暴に扱うと故障の原因になりますの
で 、取 り 扱 い の 際 に は 充 分 ご 注 意 くだ さ い 。
• 本デバイスを雨にさらしたり、水の近くや隙間にこぼれる恐れのある液
体が入っている容器 の 近くで使 用したり、湿気が高いまたは濡れた状
態で 使 用しないでください。
• 異 臭や異音、煙などが本デバ イスから生じた場 合 や誤ってデバイスを
濡らしてしまった場 合 は、直ちに電 源を切り、コンセントからプラグを
抜 いてくだ さい。
• 必ずこのマニュアルに記載の手順に従ってください。ユーザガイドに記
載されていない情報が必要な場合は、製品をお求めになられた正規
代理店または販売店までお問い合わせください。
FCC 準拠
eGFX Breakaway Boxは、FCC規制パート15に準拠しています。この機
器は次の要件2点を満たした上で稼働します。この機器は有害な電波干
渉を引き起こさないこと、且つ、望ましくない動 作を引き起こす可能性
のある干渉を含む、あらゆる干渉を受け入れること。
Contacting Customer Service
The Sonnet Web site located at www.sonnettech.com has the
most current support information and technical updates. Before
you call Customer Service, please check our Web site for the latest
updates and online support files, and check this User’s Guide for
helpful information.
When you call Customer Service, have the following information
available so the customer service staff can better assist you:
• Product name
• Serial number of that product
• Date and place of purchase
• Computer model
• GPU or other PCIe card model
• Operating system version you’re using
• Software/firmware versions
• A System Report (macOS) or a Microsoft System Information
MSINFO32 (Windows) report (Windows)
USA Customers
If further assistance is needed, please contact Sonnet Customer
Service at:
Tel: 1-949-472-2772
(Monday–Friday, 7 a.m.–4 p.m. Pacific Time)
E-mail: support@sonnettech.com
For Customers Outside the USA
For support on this product, contact your reseller or local
distributor.
Visit Our Web Site
For the most current product information and online support
files, visit the Sonnet Web site at www.sonnettech.com/support/.
Register your product online at http://registration.sonnettech.com
to be informed of future upgrades and product releases.
15
Page 16

©2018 Sonnet Technologies, Inc. All rights reserved. Sonnet, the Sonnet logotype, Simply Fast, the Simply Fast logotype, and Breakaway are trademarks of Sonnet Technologies, Inc.
Thunderbolt 3 and the Thunderbolt logo are trademarks of Intel Corporation in the U.S. and/or other countries. Other product names are trademarks of their respective owners. Product
specifications subject to change without notice. QS-GPU-XXXW-TB3-E-E-101918
 Loading...