

Page 1

TORONTO 14“
Standventilator
Bedienungsanleitung
Artikelnummer: 10510401
Page 2

Inhaltsverzeichnis
1 Sicherheitsvorkehrungen �������������������������������������������������������������������������������3
2 Aufbauanleitung ��������������������������������������������������������������������������������������������4
3 Funktionen�����������������������������������������������������������������������������������������������������5
4 Bedienungsanleitung �������������������������������������������������������������������������������������6
5 Teilebeschreibung ����������������������������������������������������������������������������������������10
6 Reinigung des Gerätes ���������������������������������������������������������������������������������10
7 Garantie / Entsorgung / Technische Änderungen�����������������������������������������11
Page 3

1. SICHERHEITSVORKEHRUNGEN
Bitte lesen Sie vor erster Inbetriebnahme die Gebrauchsanweisung genau durch und beachten Sie die Sicherheitshinweise, um Schäden durch falsche oder unsachgemäße Bedienung
sowie unzulässige Umgebungsbedingungen zu vermeiden. Bewahren Sie diese zum späteren Nachschlagen gut auf.
Kontrollieren Sie das Gerät nach dem Entfernen der Verpackung auf Beschädigungen. Setzen Sie das Gerät bei Verdacht auf eine Beschädigung nicht in Betrieb und wenden Sie sich
an einen Fachmann. Das recyclingfähige Verpackungsmaterial darf nicht für Kleinkinder
zugänglich aufbewahrt oder entsorgt werden, sondern muss fachgerecht entsorgt werden.
Dieses Gerät darf nur für den Zweck, für den es ausdrücklich entwickelt wurde, verwendet
werden. Jeder andere Gebrauch ist als unsachgemäß und folglich als gefährlich anzusehen.
Der Lieferant haftet nicht für eventuelle Personen- und/oder Sachschäden, die auf einen
unsachgemäßen oder falschen Gebrauch zurückzuführen sind.
Dieses Gerät darf von Kindern, die 8 Jahre oder älter sind, sowie von Personen mit reduzierten körperlichen, sensorischen oder geistigen Fähigkeiten oder einem Mangel an Erfahrung
und Wissen genutzt werden, sofern sie beaufsichtigt werden oder Anweisungen bezüglich
der sicheren Nutzung des Geräts erhalten haben und die damit verbundenen Gefahren
verstehen. Kinder dürfen nicht mit dem Gerät spielen. Kinder dürfen die Reinigung und
benutzerseitige Wartung nicht ohne Beaufsichtigung durchführen. Bitte achten Sie darauf,
dass Sie das Geräte auf eine geeignete und unempfindliche Flächen stellen, sodass auslaufende Flüssigkeiten keinen Schaden verursachen können.
DE
Reparaturen an elektrischen Geräten dürfen nur von Fachkräften durchgeführt werden.
Unsachgemäß durchgeführte Reparaturen und Abänderungen an den Geräten können
gefährliche Folgen für den Benutzer nach sich ziehen, worauf die Garantieansprüche abgelehnt werden.
1. Vor Inbetriebnahme prüfen, ob die häusliche Spannungsversorgung mit der Angabe
auf dem Ventilator übereinstimmt.
2. Vor dem Zusammenbau und Umstellen des Ventilators darauf achten, dass das Gerät
vom Netz getrennt ist. Den Netzstecker nicht mit nassen Händen ziehen. Achtung:
Elektroschockgefahr!
3. Nicht die Finger und keine Gegenstände während des Betriebs durch die Schutzgitter
3
Page 4

DE
stecken.
4. Das Gerät vor Hitze und Nässe, Säure, Lauge, Öl und sonstigen aggressiven Mitteln
schützen und von Gegenständen wie Gardinen etc. fernhalten.
5. Der starke Luftstrom ist nicht für Babys oder Kleinkinder geeignet.
6. Nicht auf schrägen Untergründen aufstellen.
2. AUFBAUANLEITUNG
Montage des Motors und Hauptteils
Steckverbindung des zweiteiligen Kabels (schwarz/
schwarz) Entsprechend miteinander verbinden
vgl. Abbildung. Hauptteil mit oberen Teil entsprechend
verbinden; Motor und Hauptteil mit den zwei Schrauben entsprechend befestigen vgl. Abbildung.
Montage des Hauptteils und Standfußes
Montage des hinteren Gitters
– Verschlussmutter des Flügelrads von der Motorspindel abschrauben.
– Winkel des zusammengebauten Gitters entsprechend ausrichten.
Anschließend auf den drei Stiften auf der Vorderseite des Motorgehäuses montieren.
– Die Befestigungsmutter des Gitters im Uhrzeigersinn aufschrau-
ben und festdrehen.
Montage des Flügelrads
– Das Flügelrad hat rückseitig einen Schlitz, der auf die Motorspin-
del aufgesteckt wird.
– Die Verschlussmutter des Ventilators im Uhrzeigersinn festdrehen.
Montage des vorderen Gitters
– Der Montagering des vorderen Gitters wird auf das hintere Gitter montiert.
– Der Ring wird rundherum auf dem hinteren Gitter passend
festgeklemmt.
– Abschließend die Klemme befestigen.
4 5
Page 5

Montage des Stromkabel
3. FUNKTIONEN
reaktive Taste Im Energiesparmodus (Temperaturkon-
trolle) wird die Geschwindigkeit des
Ventilators automatisch angepasst.
DE
Bedienfeld mittig angeordnet für
komfortable Bedienung.
Fernbedienung mit großer Reichweite.
5
Page 6

DE
Übersichtliches LED-Display. Stufenlose Einstellung des Luftstroms bis
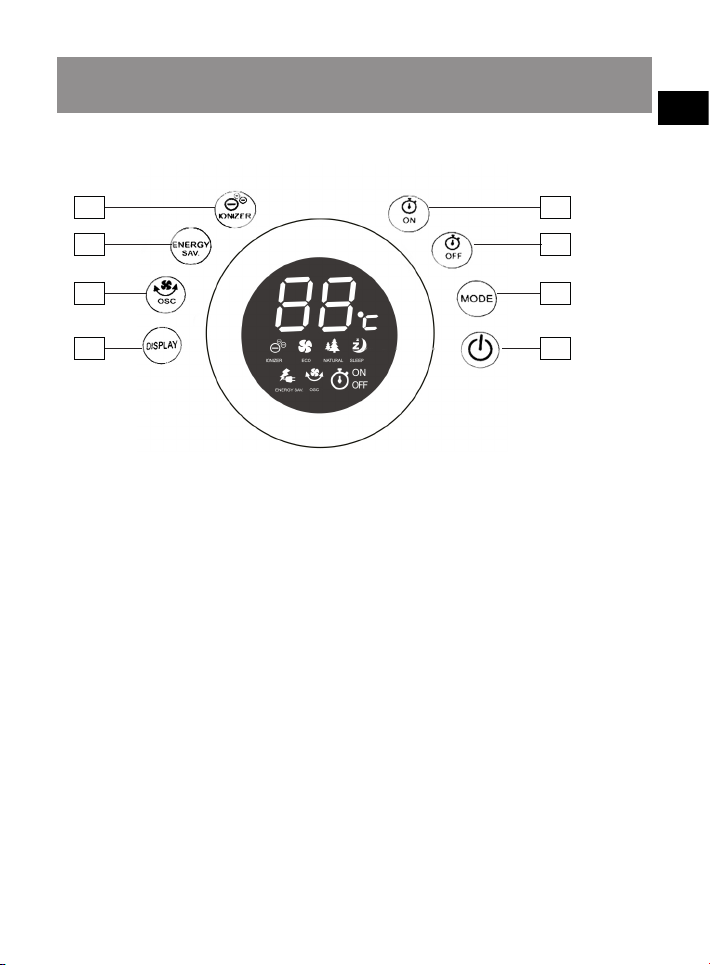
4. BEDIENUNGSANLEITUNG
1 5
2 6
3 7
4 8
zu 24 Stufen
Ionizer (1)
Die Taste „1“ drücken (oder auf der Fernbedienung). In der LED-Anzeige erscheint das
negative Ion-Symbol. Nach einigen Minuten wird ein ionisierter Luftstrom erzeugt. Bei erneutem Drücken der Taste wird Ionisierung beendet.
6 7
Page 7

Energy sav. (2)
Die Taste „2“ drücken (oder auf der Fernbedienung). Auf dem Bedienfeld leuchtet die
LED-Anzeige ENERGY SAV. auf. Im Energiesparmodus erkennt der Ventilator automatisch
die Umgebungstemperatur. Bei einem Temperaturanstieg bzw. -abfall von 1-3°C passt der
Ventilator seine Geschwindigkeit entsprechend an. Je nach Temperatur wird er schneller
oder langsamer. Liegt die Geschwindigkeit im entsprechenden Grenzbereich, erfolgt keine
Anpassung mehr. Wird ENERGY SAV. in diesem Grenzbereich abgespeichert, ändert sich
die Geschwindigkeit entsprechend. Liegt die Umgebungstemperatur unter 23°C, schaltet
sich der Ventilator automatisch ab.
Osc. (3)
Die Taste „3“ drücken (oder auf der Fernbedienung). Leuchtet entsprechend die LED-Anzeige auf. Die Dreh- bzw. Schwingfunktion startet. Durch erneutes Drücken der Taste wird die
Funktion beendet. Über die LED-Anzeige wird das OSC Symbol angezeigt oder geschlossen.
Display. (4)
Die Taste „4“ drücken (oder auf der Fernbedienung). Bei nicht aktivem Display erlischt die
LED-Anzeige, durch erneute Auswahl leuchtet sie wieder.
Timer ON (5)
So schalten Sie das Produkt automatisch in einer bestimmten Zeit aus. Die Taste „5“ drücken (oder auf der Fernbedienung). In der LED-Anzeige wird voreingestellt 1 Std angezeigt.
Das Timer-Symbol blinkt (nach 1 Stunde stellt sich der Ventilator aus). Die Zeit kann durch
Drehen des Rasters bzw. des Drehpads stundenweise eingestellt werden. Nach 24 Stunden
beginnt durch weiteres Drehen der Taste die Stundenauswahl wieder bei 1 Std. Erfolgt
innerhalb von 5 Sekunden keine Eingabe, schaltet sich der Timer aus. Durch Drücken der
Timer ON-Taste wird die Funktion beendet. Bei blickender LED-Anzeige die Timer ON-Taste
erneut drücken. Der Timer ist ausgeschaltet.
Timer OFF (6)
Um das Produkt innerhalb einer bestimmten Zeit automatisch auszuschalten. So schalten
Sie das Produkt automatisch in einer bestimmten Zeit aus. Die Taste „6“ drücken (oder
auf der Fernbedienung). In der LED-Anzeige wird voreingestellt 1 Std. angezeigt. Das Timer-Symbol blinkt (nach 1 Stunde stellt sich der Ventilator aus). Die Zeit kann durch Drehen des Rasters bzw. des Drehpads stundenweise eingestellt werden. Nach 24 Stunden
beginnt durch weiteres Drehen der Taste die Stundenauswahl wieder bei 1 Std. Erfolgt
innerhalb von 5 Sekunden keine Eingabe, schaltet sich der Timer aus. Durch Drücken der
Timer OFF-Taste wird die Funktion beendet. Bei blickender LED-Anzeige die Timer OFF-Taste erneut drücken. Der Timer ist ausgeschaltet.
Mode (7)
Die Taste „7“ drücken (oder auf der Fernbedienung. Nach Einschalten des Ventilators kann
DE
7
Page 8

der gewünschte Modus über die entsprechende ausgewählt werden.
DE
– Eco wind: Sparsames Gebläse: Geschwindigkeit auf Stufe 8 gesperrt. Durch erneutes
Auswählen der Taste automatischer Wechsel in den Modus „Natürlich“.
– Natural wind: Gebläse gleicht natürlichem Wind. In beiden Einstellungen können
jeweils die Gebläsestufen 1-24 variabel über das Drehpad des Bedienfelds eingestellt
werden: nach links drehen bedeutet weniger, nach rechts drehen bedeutet mehr Wind.
– Sleep wind: Die Temperatur wird reduziert, um sich an den menschlichen Schlaf anzu-
passen. Passen Sie die gewünschte Lüftergeschwindigkeit an. Es reduziert automatisch
die Lüftungsgeschwindigkeit alle zwei Stunden um zwei Stufen.
On/Off (8)
Die Taste „8“ drücken (oder auf der Fernbedienung). Zum Einschalten des Ventilators; zum
Ausschalten die Taste erneut drücken.
Stromversorgung über Akku:
Ist das Netzkabel nicht angeschlossen oder kein Strom verfügbar, arbeitet der Ventilator
über den integrierten Lithium-Akku bei vollem Funktionsumfang. Die Höchststufen liegen
im Gegensatz zum Betrieb mit externer Stromversorgung allerdings bei 12 anstatt 24. Die
Akkuverbrauchsanzeige befindet sich unten am Gerät. 4 vollen Zellen bedeuten aufgeladen, 1 Zelle bedeutet fast leer. Wird das Gerät mit dem Stromnetz verbunden, schaltet
der Ventilator automatisch in Netzbetrieb, die Begrenzung der Leistungsstufen wird
aufgehoben und der Akku gleichzeitig aufgeladen. Der Akkuladestand erscheint unten in
der LED-Anzeige. Wenn alle 4 Zellen leuchten, ist der Akku vollständig geladen, durch die
automatische Mikrostromversorgung wird die Leistung des Gerätes nicht beeinträchtigt.
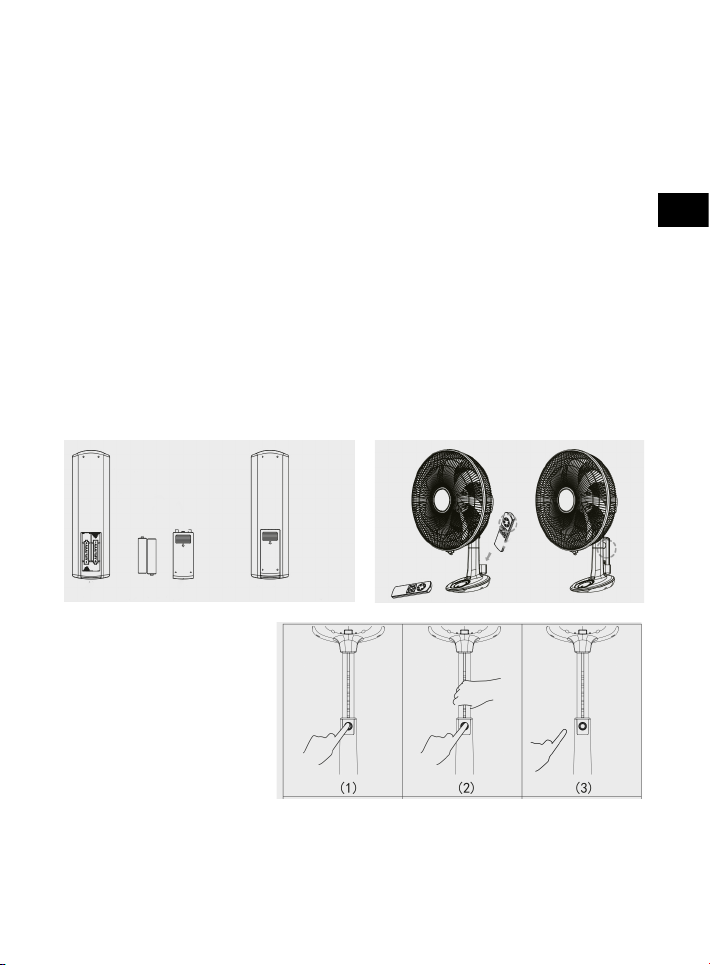
Verwenden der Fernbedienung
– Nachdem Sie das Produkt aus der Verpackung genommen haben, legen Sie die Batte-
rien richtig in die Fernbedienung ein. Achten Sie auf die Polarität, wie in der Abbildung
gezeigt.
– Wenn nicht in betrieb, sollte die Fernbedienung wie in der Abbildung gezeigt platziert
werden. Auf der Rückseite des Produkts und mit den Tasten nach außen gerichtet.
8
Page 9

Weitere Funktionen:
– Knopf drücken und gedrückt
halten (1); Die höhenverstellbare Stange des Ventilators
mit der anderen Hand wie
gewünscht verstellen (2);
Nach dem Einstellen der gewünschten Höhe den Knopf
loslassen (3).
– Einstellen des Neigungswinkels:
Ventilator einschalten und mit beiden Händen
das Gitter wunschgemäß nach oben oder unten
verstellen.
– Der Ventilator schaltet sich bedienungslos nach
12-stündigem Betrieb automatisch ab.
DE
Contrôle
9
Page 10

DE
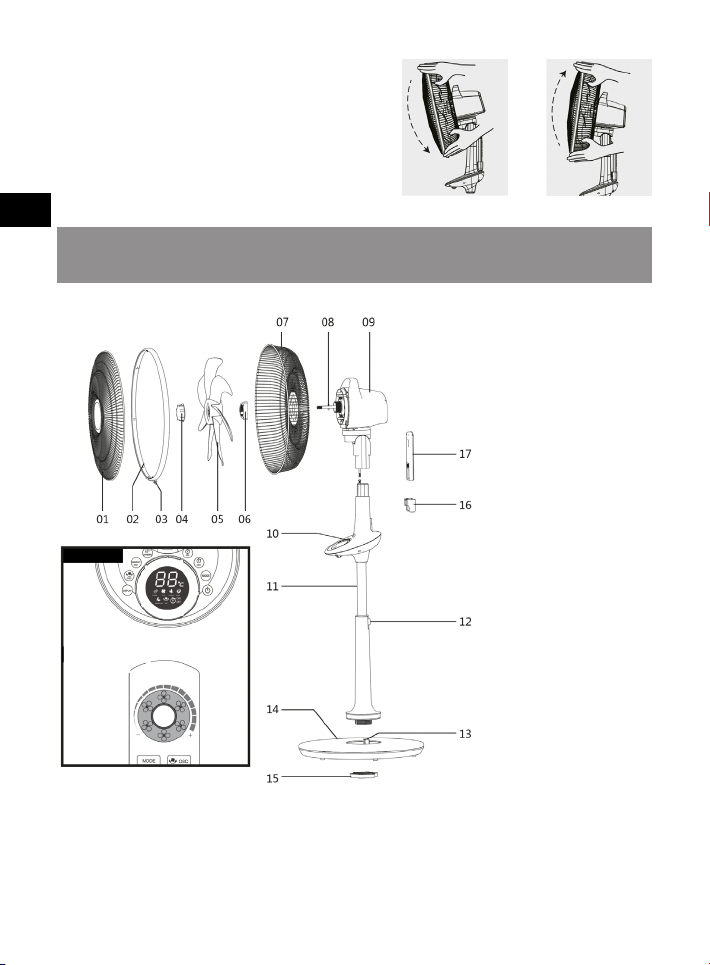
5. TEILEBESCHREIBUNG
Bedienfeld
01 Vorderes Schutzgitter
02 Montagering für Gitter
03 Schließklemme f. Gitter
04 Verschluss-mutter für
Flügelrad
05 Flügelrad
06 Befestigungs-mutter
für Gittermontage
07 Hinteres Schutz-
gitter
08 Motorspindel
09 Gehäuse
10 Bedienfeld
11 Höhenver-stellung
12 Einstellknopf
13 Stromanschluss
14 Standfuß
15 Befestigungs-mutter
für Standfuß
16 Halter f.Fernbedienung
17 Fernbedienung
6. REINIGUNG DES GERÄTES
– Vor Reinigung des Gerätes bitte den Netzstecker ziehen.
– Geräteteile wie Netzschalter oder Motorblock dürfen nicht mit Wasser oder sonstigen
flüssigen Reinigungsmittel gereinigt werden. Teile nur mit einem Tuch abwischen.
– Das Gerät nicht zwecks Umbau auseinanderbauen. Die regelmäßige Wartung und Pflege
des Gerätes verlängert seine Lebensdauer.
10
Page 11
7. GARANTIE / ENTSORGUNG / TECHNISCHE ÄNDERUNGEN
GARANTIE:
Die Geräte werden vor der Auslieferung genau kontrolliert. Sollte trotzdem einmal ein Mangel an Ihrem Gerät auftreten, wenden Sie sich vertrauensvoll an Ihren Verkäufer. Bitte
bringen Sie den Kaufbeleg mit, denn dieser ist für jede Garantieleistung vorzulegen. Die
Garantie beträgt 24 Monaten ab dem Kaufdatum.
ENTSORGUNG
Das Gerät muss fachgerecht entsorgt werden. Das Gerät kann bei jedem Fachhändler kostenlos zur Entsorgung abgegeben werden.
TECHNISCHE ÄNDERUNGEN
Änderungen in Technik und Design vorbehalten. Wir haften nicht für technische oder redaktionelle Änderungen oder Auslassungen in diesem Dokument.
Bitte behalten Sie das Verpackungsmaterial für das Gerät auf.
CE-Konformitätserklärung
Das Gerät entspricht folgenden Standards:
EN 60335 -1:2012+A11:2014
EN 60335-2-80:2003+A1+A2
EN 62233:2008
EN 55014-1:2006+A1+A2
EN 55014-1:2017
EN 55014-2:2015
EN 61000-3-2:2014
EN 61000-3-3:2013
DE
11
Page 12
Firma
Armin Schmid
Olensbachstrasse 9–15
CH-9631 Ulisbach
Tel. Int. +41 71 987 60 60
Tel. Nat. 0848870850
info@sonnenkoenig.ch
www.sonnenkoenig.ch
Firma
Armin Schmid
Peter-Henlein-Strasse 5
D-89331 Burgau
Tel: 0180 500 64 35
info@sonnenkoenig.ch
www.sonnenkoenig.ch
Festnetz 14 Cent/Minute
Mobilnetz bis 42 Cent/Minute
12DE12
Page 13

TORONTO 14“
Ventilateur sur pied
Mode d’emploi
FR
Article-nr. : 10510401
Page 14

FR
Contenu
1 Consignes de sécurité �����������������������������������������������������������������������������15
2 Étapes d’installation ������������������������������������������������������������������������������ 16
3 Fonctionnalités du ventilateur ���������������������������������������������������������������17
4 Instructions d’utilisation ������������������������������������������������������������������������19
5 Schéma des pièces ������������������������������������������������������������������������������� 23
6 Nettoyage �������������������������������������������������������������������������������������������� 23
7 Garantie / élimination / modifications techniques ����������������������������������24
14
Page 15

1. CONSIGNES DE SÉCURITÉ
Avant la première mise en service, veuillez lire scrupuleusement le mode d‘emploi dans
son Intégralité et tenir compte des consignes de sécurité afin d‘éviter les dommages liés
à une commande mauvaise ou non conforme ainsi qu‘à des conditions d‘environnement
non autorisées. Conservez ce mode d‘emploi afin de pouvoir le consulter de nouveau ultérieurement.
Après avoir retiré l‘emballage, contrôler que l‘appareil ne présente aucun dommage. Si
vous Soupçonnez des dommages, ne mettez pas l‘appareil en marche et adressez-vous à
un spécialiste. L‘emballage recyclable doit être tenu hors de portée des petits enfants ou
être jeté aux ordures, mais doit être jeté de manière appropriée.
Cet appareil ne doit être utilisé que pour l‘usage pour lequel il a été expressément mis au
point. Toute autre utilisation doit être considérée comme inappropriée et par conséquent
comme dangereuse. Le fournisseur décline toute responsabilité concernant d‘éventuels
dommages corporels et/ou matériels, pouvant être imputés à une utilisation inappropriée
ou incorrecte.
Cet appareil peut être utilisé par des enfants âgés de 8 ans et plus et par des personnes
à capacités physiques, sensorielles et mentales réduites ou sans expérience et sans les
connaissances nécessaires, à condition qu‘ils soient assistés ou qu‘ils aient reçu des instructions concernant l‘utilisation en toute sécurité de l‘appareil et qu‘ils comprennent quels
sont les dangers encourus. Les enfants ne doivent pas jouer avec l‘appareil. Les opérations
de nettoyage et d‘entretien de l‘appareil ne doivent pas être effectuées par des enfants
sans surveillance. Assurez-vous de placer l‘appareil sur une surface appropriée et étanche,
de sorte que le liquide déversé ne peut pas causer de dommages.
FR
Les réparations des appareils électriques ne doivent être effectuées que par des spécialistes. Des Réparations et de modifications des appareils effectuées de manière inappropriée peuvent avoir des conséquences dangereuses pour l‘utilisateur, pour lesquelles les
prétentiNe suspendez pas et ne fixez pas le ventilateur au plafond ou au mur.
1. Avant d’utiliser l’appareil, vérifiez que la tension de la prise est la même que le voltage
inscrit sur le ventilateur.
2. Ne pas brancher à l’alimentation électrique avant que le ventilateur ne soit assemblé.
Débranchez l’appareil de l’alimentation avant de déplacer le ventilateur. Ne pas tirer
Page 16

sur la fiche secteur avec les mains mouillées pour éviter toute décharge électrique
3. Ne pas insérer ses doigts ou tout autre objet pointu dans la grille lorsque le ventilateur
FR
est en marche.
4. Ne pas exposer l’appareil à des températures élevées, à une forte humidité, à de l’huile
acide ou alcaline, ou à des pesticides. Maintenez-le éloigné de tout rideau, etc.
5. Ne pas exposer directement les nourrissons et les personnes âgées à une forte ventilation.
6. Ne pas placer le ventilateur sur une surface inclinée car il risquerait de se renverser.
2. ÉTAPES D’INSTALLATION
Installation de la tête et du corps principal
Branchez le cordon de raccordement de chaque câble
à deux conducteurs (noir noir) comme indiqué sur
l’image; insérez le corps principal dans la prise de la
tête; fixez la tête et le corps principal en insérant deux
vis à l’endroit voulu, comme indiqué sur l’image.
Installation du corps principal et du châssis
Installation de la grille arrière
– Dévissez le bouchon de serrage de l’hélice de l’arbre du moteur.
– Une fois la grille assemblée, placez-la à l’angle souhaité, puis in-
sérez-la contre les boutons pression de la coque avant du moteur
– Fermez l’écrou de serrage de la grille, puis faites tourner la grille
dans le sens des aiguilles d’une montre pour le serrer.
Installation de l’hélice
– Insérez l’hélice dans l’axe du moteur ; la fente à l’arrière de l’hé-
lice doit venir se placer sur le boulon de l’axe ; placez l’hélice au
fond de manière à la fixer contre l’arbre du moteur.
– Tournez le bouchon de serrage du ventilateur dans l’axe du
moteur dans le sens des aiguilles d’une montre jusqu’à ce qu’il
soit fixé.
16
Page 17

Installation de la grille avant
– Fixez l’arceau de la grille avant par-dessus la grille arrière.
– L’arceau entoure la grille arrière et les grilles avant et arrière se
rejoignent.
– Enfin, fermez l’agrafe de fixation sous l’arceau
Installation du câble d’alimentation
3. FONCTIONNALITÉS DU VENTILATEUR
Touches sensibles Le mode d’économie d’énergie détecte
automatiquement la température environnante et régule la vitesse d’aération
FR
Page 18

Panneau de commande au milieu du corps
principal, très pratique.
FR
Écran LED, direct et grand. Disque rotatif 24 vitesses, réglage continu
Fonctionnement à distance avec télécommande.
de la vitesse d’aération.
18
Page 19
4. INSTRUCTIONS D’UTILISATION
1 5
2 6
3 7
4 8
Ionizer (1)
Appuyez sur le bouton « 1 » ou appuyez sur le bouton correspondant de la télécommande;
le symbole d’ions négatifs s’affiche à l’écran LED ; au bout de plusieurs minutes, le flux
d’air de l’hélice diffuse des ions. Appuyez de nouveau sur le bouton « 1 » pour éteindre la
fonction « ions négatifs ».
Energy sav. (2)
Appuyez sur le bouton « 2 » pour passer en mode économie d’énergie. L’écran LED affiche
le symbole d’économie d’énergie. Dans ce mode, le ventilateur détecte automatiquement
la température environnante. Lorsque la température augmente ou baisse de 1 à 3°C,
la vitesse de rotation est automatiquement ajustée par l’hélice. La vitesse de ventilation
augmente ou baisse en fonction de la température. La vitesse du ventilateur augmente ou
diminue en fonction de la température. Lorsque la température ambiante est inférieure à
23 ° C, le ventilateur s’arrête automatiquement.
Osc. (3)
En appuyant sur le bouton « 3 » ou appuyez sur le bouton correspondant de la télécommande; l’écran LED affiche le symbole OSC. La fonction OSC du ventilateur est activée.
La plage OSC est de 85 degrés. Pour éteindre l’OSC, il suffit d’appuyer de nouveau sur le
bouton correspondant. L’écran LED affiche ou éteint le symbole OSC lorsque cette fonction
FR
Page 20

est activée ou désactivée.
Display. (4)
FR
En appuyant sur le bouton « 4 » ou appuyez sur le bouton correspondant de la télécommande. L’écran LED s’éteint sans affichage et se rallume dès que vous appuyez de
nouveau sur ce bouton.
Timer ON (5)
Pour allumer automatiquement le produit dans un certain délai. Appuyez sur le bouton
« 5 » ou appuyez sur le bouton correspondant de la télécommande; l’écran LED affiche 1H
de pré-configuration. Le symbole de la minuterie s’allume (et s’éteint au bout d’une heure).
Vous pouvez régler le temps préconfiguré en tournant le disque rotatif. Un cran de rotation correspond à une heure. Si l’écran affiche 24H, vous pouvez tourner le disque rotatif
dans le sens des aiguilles d’une montre pour repartir à zéro (1H, 2H, etc.). Si l’appareil ne
fonctionne pas pendant plus de cinq secondes, cela signifie que le réglage est terminé.
Vous pouvez annuler la fonction de minuterie en appuyant sur le bouton « 5 ». Lorsque le
symbole de minuterie s’allume sur l’écran LED, appuyez de nouveau sur le bouton « 5 » de
la minuterie, et la fonction de minuterie sera définitivement annulée.
Timer OFF (6)
Pour éteindre le produit automatiquement dans un certain délai. Si l’appareil est en marche,
appuyez sur le bouton « 6 » ou appuyez sur le bouton correspondant de la télécommande;
l’écran LED affiche 1H de pré-configuration. Le symbole de la minuterie s’allume (et s’éteint
au bout d’une heure). Vous pouvez régler le temps préconfiguré en tournant le disque rotatif. Un cran de rotation correspond à une heure. Si l’écran affiche 24H, vous pouvez tourner
le disque rotatif dans le sens des aiguilles d’une montre pour repartir à zéro (1H, 2H, etc.).
Si l’appareil ne fonctionne pas pendant plus de cinq secondes, le réglage est terminé. Vous
pouvez annuler la fonction de minuterie en appuyant sur le bouton « 6 ». Lorsque le symbole de minuterie s’allume sur l’écran LED, appuyez de nouveau sur le bouton « 6 » de la
minuterie, et la fonction de minuterie sera définitivement annulée.
Mode (7)
Le mode de fonctionnement du ventilateur peut être configuré en appuyant sur le bouton
ou le bouton « 7 » ou appuyez sur le bouton correspondant de la télécommande.
– Eco wind: Le volume d’air est en mode de blocage ; le ventilateur est en 8ème vitesse.
En appuyant sur le bouton « mode », l’appareil passe automatiquement en mode ventilation naturelle.
– Natural wind: Définissez une valeur comprise entre 1 et 24. La vitesse de ventilation
varie à intervalles réguliers pour simuler une ventilation naturelle.
– Sleep wind: La température est réduite pour s’adapter au sommeil humain. Ajustez
la vitesse de ventilation souhaitée. Il produit automatiquement diminuer la vitesse de
20
Page 21

ventilation de deux niveaux toutes les deux heures.
On/Off (8)
Lorsque l’appareil est allumé, appuyez sur le bouton «8» ou sur la télécommande de la
télécommande pour allumer le ventilateur, puis appuyez de nouveau sur le bouton pour
l’éteindre.
Fonctionnement avec la batterie
Lorsque le courant alternatif externe est éteint ou non branché, l’appareil fonctionne sur
batterie lithium incorporée. Tout fonctionne exactement de la même façon, mais les vitesses maximales de chaque mode passent du niveau 24 au niveau 12 lorsque le courant
alternatif externe est coupé. Le niveau de charge de la batterie s’affiche en bas de l’écran
LED. Quand les quatre cellules sont allumées, cela signifie que la batterie est pleinement
chargée. Lorsque seule une cellule est allumée, cela signifie que la batterie est presque
déchargée. Lorsque l’appareil est branché, il passe automatiquement à une alimentation
en courant alternatif, la limitation de vitesse s’arrête automatiquement et la batterie
lithium se met en charge. Le niveau de recharge s’affiche en bas de l’écran LED. Quand
les quatre cellules sont allumées, cela signifie que la batterie est pleinement chargée.
Le système commence automatiquement la recharge au micro-courant afin d’éviter tout
dommage sur l’appareil.
Utilisation de la télécommande
– Après avoir retiré le produit de l’emballage, insérez correctement les piles dans la télé-
commande. Faites attention à la polarité de la même, comme le montre la figure.
– Lorsque ce n’est pas le cas, la télécommande doit être placée comme indiqué sur la
figure. À l’arrière du produit et avec les touches orientées vers l’extérieur.
FR
Page 22

Autres opérations
– Appuyez sur le bouton avec
FR
votre doigt sans relâcher
(1); De l’autre main, tenez
le support du ventilateur et
réglez-le à la hauteur souhaitée. (2); Après avoir réglé
la hauteur, lâchez le bouton.
pulsante (3).
– Régler l’angle d’inclinaison du ventilateur :
Lorsque l’appareil est en état de mise sous
tension, placez une main en haut et l’autre en
bas de la grille et tirez le ventilateur vers le haut
et vers le bas afin d’en régler la tête.
– Lorsqu’aucune fonction n’est enclenchée, le
ventilateur s’éteint automatiquement au bout
de douze heures.
22
Page 23

5. SCHÉMA DES PIÈCES
Contrôle
FR
01 Grille avant
02 Arceau de grille
03 Fermoir de la grille
04 Bouchon de serrage
de l’hélice
05 Hélice
06 Écrou de serrage
de la grille
07 Grille arrière
08 Arbre du moteur
09 Boîtier
10 Panneau de contrôle
11 Barre d’extension
12 Bouton flexible
13 Connecteur électrique
14 Châssis
15 Écrou de serrage du
châssis
16 Support de la
télécommande
17 Télécommande
6. NETTOYAGE
– Débranchez le câble d’alimentation avant de nettoyer le produit.
– Ne jamais nettoyer les parties électrifiées de l’appareil (telles que le câble, le moteur,
etc.) avec de l’eau ou tout autre liquide. Les parties électrifiées peuvent être nettoyées
avec un tissu sec..
– Ne pas démonter le produit pour en changer les pièces. Nous vous conseillons d’effectuer
un contrôle et de nettoyer le produit une fois par an pour prolonger sa durée de vie.
Page 24

7. GARANTIE / ÉLIMINATION / MODIFICATIONS TECHNIQUES
FR
GARANTIE
L‘appareil sont contrôlés de manière précise avant la livraison. Si malgré tout un vice devait
être constaté sur votre appareil, adressez-vous en toute confiance à notre revendeur. Veuillez joindre la preuve d‘achat, car celle-ci doit être présentée pour la prestation de garantie.
La période de garantie est de 24 mois à compter de la date d‘achat.
ELIMINATION
L‘appareil doit être jeté de manière appropriée. L‘appareil peut dans tous les cas être remis
gratuitement à tout revendeur spécialisé.
MODIFICATIONS TECHNIQUES
Sous réserve de modifications techniques ou de forme. Nous déclinons toute responsabilité
en cas de modifications, d‘erreurs ou d‘omissions techniques ou rédactionnelles dans ce
document.
S‘il vous plaît conserver les matériaux d‘emballage de l‘appareil.
CE-Déclaration de conformité
L‘appareil est conforme aux normes suivantes :
EN 60335 -1:2012+A11:2014
EN 60335-2-80:2003+A1+A2
EN 62233:2008
EN 55014-1:2006+A1+A2
EN 55014-1:2017
EN 55014-2:2015
EN 61000-3-2:2014
EN 61000-3-3:2013
24
Page 25

Firma
Armin Schmid
Olensbachstrasse 9–15
CH-9631 Ulisbach
Tel. Int. +41 71 987 60 60
Tel. Nat. 0848870850
info@sonnenkoenig.ch
www.sonnenkoenig.ch
Firma
Armin Schmid
Peter-Henlein-Strasse 5
D-89331 Burgau
Tel: 0180 500 64 35
info@sonnenkoenig.ch
www.sonnenkoenig.ch
Festnetz 14 Cent/Minute
Mobilnetz bis 42 Cent/Minute
FR
Page 26

IT
TORONTO 14“
Ventilatore su piedistallo
Manuale dell’utente
Nr. articolo: 10510401
26
Page 27

Contenuto
1 Avvertenze per la sicurezza �������������������������������������������������������������������������28
2 Montaggio ���������������������������������������������������������������������������������������������������29
3 Caratteristiche ��������������������������������������������������������������������������������������������30
4 Istruzioni operative �������������������������������������������������������������������������������������� 31
5 Componenti �������������������������������������������������������������������������������������������������35
6 Pulizia ����������������������������������������������������������������������������������������������������������35
7 Garanzia / Smaltimento / Modifiche tecniche ����������������������������������������������36
IT
Page 28

1. AVVERTENZE PER LA SICUREZZA
IT
Prima di mettere in funzione per la prima volta il prodotto, si raccomanda di leggere con
cura le istruzioni d’uso e di rispettare le avvertenze di sicurezza al fine di evitare un utilizzo
improprio o sbagliato come pure condizioni ambientali non idonee. Si raccomanda di conservare le istruzioni per futura consultazione.
Controllare l’apparecchio dopo averlo rimosso dall’imballo. In caso di sospetto danneggiamento non mettere in funzione l’apparecchio e rivolgersi ad un tecnico specializzato.
Non conservare alla portata dei bambini il materiale d’imballo riciclabile, ma provvedere
all’opportuno smaltimento.
Utilizzare l’apparecchio esclusivamente per lo scopo per il quale è stato espressamente
progettato. Qualsiasi altro impiego è improprio e quindi da ritenersi pericoloso. Il fornitore
non risponde di eventuali danni a cose e persone, che sono imputabili ad un utilizzo inappropriato o errato.
Questo elettrodomestico può essere usato da bambini che abbiano compiuto gli 8 anni di
età e da persone con capacità fisiche, sensoriali o mentali ridotte, oppure che manchino
di esperienza e conoscenza, purché abbiano ricevuto assistenza o formazione per un uso
sicuro dell‘elettrodomestico e ne comprendano quindi i rischi connessi. I bambini non devono giocare con l‘apparecchio. Operazioni di pulizia e di manutenzione non devono essere
effettuate da bambini senza supervisione. Assicurarsi di posizionare il dispositivo su una
superficie idonea e impermeabile, in modo che i liquidi sversati non possano causare alcun
danno.
Eventuali riparazioni su apparecchi elettrici devono essere svolte esclusivamente da personale tecnico qualificato. Riparazioni e modifiche effettuate in maniera non qualificata
possono avere conseguenze pericolose per l’utente, per le quali si declina ogni responsabilità e garanzia.
1. Prima di utilizzare l’unità, verificare che la tensione della presa sia uguale a quella
della ventola.
2. Non collegare l’alimentazione finché la ventola non è assemblata. Scollegare l’unità
dall’alimentazione prima di spostare la ventola. Non tirare la spina di alimentazione
con le mani bagnate per evitare scosse elettriche.
3. Non inserire le dita o altri oggetti appuntiti nella griglia quando la ventola è in funzione.
4. Non esporre il dispositivo a temperature elevate, umidità elevata, acido o olio alcalino o
28
Page 29

pesticidi. Tenerlo lontano da tende, ecc.
5. Non esporre i neonati e gli anziani direttamente davanti al ventilatore.
6. Non posizionare il ventilatore su una superficie inclinata poiché potrebbe ribaltarsi.
2. MONTAGGIO
Installazione della testa e del corpo principale
Collegare la testa del prodotto al resto del ventilatore
come mostrato in figura prestando attenzione ai due
innesti neri. Fissare i due elementi tramite le viti.
Installazione della base
Installazione della griglia e dell’elica
– Svitare il tappo di bloccaggio dell’elica dall’albero motore.
– Una volta assemblata la griglia, posizionarla all’angolazione
desiderata, quindi inserirla contro i pulsanti sullo scafo anteriore
del motore.
– Chiudere il dado della fascetta della griglia, quindi ruotare la
griglia in senso orario per serrarla.
Installation de l’hélice
– Inserire l’elica nell’albero del motore; la fessura sul retro dell’elica
deve essere posizionata sul bullone dell’asse; posizionare l’elica
nella parte inferiore in modo da fissarla contro l’albero del
motore.
– Ruotare il tappo di bloccaggio della ventola nell’albero del motore
in senso orario fino a bloccarlo in posizione.
Installazione della griglia anteriore
– Attaccare l’arco anteriore della griglia sulla griglia posteriore.
– Il telaio circonda la griglia posteriore e le griglie anteriore e
posteriore si incontrano
– Infine, chiudere la clip di fissaggio sotto il telaio.
IT
Page 30

Installazione del cavo di alimentazione
IT
3. CARATTERISTICHE
Tasti sensibili. La modalità di risparmio energetico rileva
automaticamente la temperatura circostante e regola la velocità di aerazione.
Pannello di controllo nel mezzo del corpo
principale, molto pratico.
Funzionamento remoto con telecomando.
30
Page 31

Schermo a LED, diretto e grande. Disco rotante a 24 velocità, regolazione
continua della velocità di ventilazione.
4. ISTRUZIONI OPERATIVE
1 5
2 6
3 7
4 8
IT
Ionizer (1)
Premere il pulsante “1” o il corrispettivo sul telecomando; il simbolo dello ione negativo
viene visualizzato sullo schermo LED; dopo diversi minuti, il flusso d’aria dell’elica diffonde
ioni. Premere di nuovo il pulsante “1” per disattivare la funzione “ioni negativi”.
Page 32

Energy sav. (2)
Premere il pulsante “2” sul ventilatore per passare alla modalità di risparmio energetico.
Il display a LED mostra il simbolo di risparmio energetico. In questa modalità, la ventola
rileva automaticamente la temperatura circostante. Quando la temperatura aumenta o di-
IT
minuisce da 1 a 3 ° C, la velocità di rotazione viene regolata automaticamente. La velocità
della ventola aumenta o diminuisce a seconda della temperatura. Quando la temperatura
circostante è inferiore a 23 ° C, la ventola smette automaticamente di funzionare.
Osc. (3)
Premere il pulsante “3” o il corrispettivo tasto sul telecomando, il display LED mostra il
simbolo OSC. La funzione OSC della ventola è attivata. L’intervallo OSC è di 85 gradi. Per
disattivare l’OSC, basta premere nuovamente il pulsante.
Display. (4)
Premere il tasto “4”o il corrispettivo tasto sul telecomando. Lo schermo LED si spegne.
Premendo nuovamente il pulsante Lo schermo LED si riaccende.
Timer ON (5)
Per accendere automaticamente il prodotto entro un determinato lasso di tempo. Se l’unità
è spenta, premere il pulsante “5” o il corrispettivo tasto sul telecomando; il display a LED
mostra la pre-configurazione di 1 ora. Il simbolo del timer si accende (e si spegne dopo
un’ora). È possibile regolare l’orario preimpostato ruotando il disco rotante. Una tacca di
rotazione corrisponde a un’ora. Se il display mostra 24H, è possibile ruotare il disco rotante
in senso orario per ricominciare (1H, 2H, ecc.). Se il pannello di controllo non viene toccato
per più di cinque secondi, l’impostazione è completa. È possibile annullare la funzione
del timer premendo il pulsante “ON”. Quando il simbolo del timer si accende sul display a
LED, premere nuovamente il pulsante “ON” del timer e la funzione timer verrà cancellata
definitivamente.
Timer OFF (6)
Per spegnere automaticamente il prodotto entro un determinato lasso di tempo. Se l’unità
è accesa, premere il pulsante “6” sul timer o il corrispettivo tasto sul telecomando; il display
a LED mostra la pre-configurazione di 1 ora. Il simbolo del timer si accende (e si spegne
dopo un’ora). È possibile regolare l’orario preimpostato ruotando il disco rotante. Una tacca di rotazione corrisponde a un’ora. Se il display mostra 24H, è possibile ruotare il disco
rotante in senso orario per ricominciare (1H, 2H, ecc.). e il pannello di controllo non viene
toccato per più di cinque secondi, l’impostazione è completata. È possibile annullare la
funzione del timer premendo il pulsante “OFF”. Quando il simbolo del timer si illumina sullo
schermo LED, premere di nuovo il tasto OFF del timer e la funzione timer verrà cancellata
definitivamente.
32
Page 33

Mode (7)
È possibile configurare la modalità di funzionamento della ventola premendo il pulsante
“7” sul prodotto o il corrispettivo pulsante sul telecomando.
– Eco wind: Il livello di ventilazione viene bloccato a livello 8. Premendo nuovamente il
pulsante si passa alla modalità “natural wind”
– Natural wind: impostare una valocità compresa tra 1 e 24. la velocità di ventilazione
varierà ad intervalli regolari per simulare la ventilazione naturale.
– Sleep wind: La temperatura è ridotta per adattarsi al sonno umano. Regolare la velocità
di ventilazione desiderata. Il prodotto decrescerà automaticamente la velocità di ventilazione di due livelli ogni due ore.
On/Off (8)
Quando l’unità è accesa, premere il pulsante “8” o il corrispettivo sul telecomando per
accendere il ventilatore, quindi premerla nuovamente il tasto per spegnerlo.
Funzionamento con la batteria
Quando l’alimentazione esterna è disattivata o non collegata, l’unità funziona con la batteria al litio incorporata. Tutto funziona allo stesso modo, ma le velocità massime di ogni
modalità passano dal livello 24 al livello 12. Il livello di carica della batteria è visualizzato
nella parte inferiore dello schermo a LED. Quando tutte e quattro le celle sono accese,
significa che la batteria è completamente carica. Quando è attiva una sola cella, significa
che la batteria è quasi scarica.
Quando l’unità viene ricollegata, Il livello di ricarica viene visualizzato nella parte inferiore
dello schermo a LED. Quando tutte e quattro le celle sono accese, significa che la batteria
è completamente carica.
Utilizzo del telecomando
– Dopo aver estratto il prodotto dalla confezione, inserire correttamente le batterie all’in-
terno del telecomando. Prestare attenzione alla polarità delle stesse, come mostrato in
figura.
– Quando non in unso, Il telecomando va collocato come mostrato in figura. Sul retro del
prodotto e con i tasti rivolti verso l’esterno.
IT
Page 34

Altre operazioni
– Premi il pulsante con il dito
senza rilasciarlo (1); Con
l’altra mano, tenere la staffa
IT
della ventola e regolarla
all’altezza desiderata (2);
Dopo aver regolato l’altezza,
rilasciare il pulsante (3).
– Regola l’angolo di inclinazione della ventola:
Quando l’unità è in stato di accensione, posizionare una mano in alto e l’altra nella parte
inferiore del rack e tirare la ventola verso l’alto
e verso il basso per regolare l’inclinazion
– Quando nessuna funzione è attivata, la ventola
si spegne automaticamente dopo 12 ore.
34
Page 35

5. COMPONENTI
P. di Controllo
6. PULIZIA
01 Griglia frontale
02 Guarnizione
03 Chiusura della griglia
04 Cappuccio dell’elica
05 Elica
06 Dado di bloccaggio
07 Griglia posteriore
08 Albero motore
09 Alloggiamento
10 Pannello di controllo
11 Barra di estensione
12 Pulsante
13 Connettore elettrico
14 Telaio
15 Dado di bloccaggio
16 Supporto per
il telecomando
17 Telecomando
IT
– Scollegare il cavo di alimentazione prima di pulire il prodotto.
– Non pulire mai le parti elettrificate dell’apparecchio (come cavo, motore, ecc.) Con
acqua o altri liquidi. Le parti elettrificate devono essere pulite con un panno asciutto.
– Non smontare il prodotto per cambiare le parti. Vi consigliamo di controllare e pulire il
prodotto una volta all’anno per prolungarne la durata.
Page 36

7. GARANZIA / SMALTIMENTO / MODIFICHE TECNICHE
IT
GARANZIA
I prodotti vengono controllati attentamente prima della spedizione. Se dovesse comunque
presentarsi un vizio sul vostro apparecchio, vi invitiamo a rivolgervi in tutta tranquillità al
vostro rivenditore. Vi rammentiamo di portare appresso la ricevuta d’acquisto, che deve
essere presentata per ogni prestazione in garanzia. Il periodo di garanzia è di 24 mesi dalla
data di acquisto.
SMALTIMENTO
Provvedere ad un corretto smaltimento del prodotto. L’apparecchio può essere consegnato
gratuitamente per il relativo smaltimento a qualsiasi rivenditore specializzato.
MODIFICHE TECNICHE
Salvo modifiche tecniche ed estetiche. Non siamo responsabili per tali modifiche, differenze
od omissioni contenute in questo manuale dell’utente.
Si prega di conservare il materiale d‘imballaggio dell‘apparecchio.
CE-Dichiarazione di Conformità
Il dispositivo è conforme alle seguenti norme :
EN 60335 -1:2012+A11:2014
EN 60335-2-80:2003+A1+A2
EN 62233:2008
EN 55014-1:2006+A1+A2
EN 55014-1:2017
EN 55014-2:2015
EN 61000-3-2:2014
EN 61000-3-3:2013
3636
Page 37

TORONTO 14“
Pedestal fan
Instruction Manual
EN
Item number: 10510401
Page 38

EN
Table of Contents
1 Safety Instructions�������������������������������������������������������������������������������� 39
2 Montage ���������������������������������������������������������������������������������������������� 40
3 Feautures ����������������������������������������������������������������������������������������������41
4 Operation instruction �������������������������������������������������������������������������� 43
5 Parts drawing ��������������������������������������������������������������������������������������� 46
6 Cleaning ������������������������������������������������������������������������������������������������47
7 Warranty / Disposal / Technical change �������������������������������������������������47
38
Page 39

1. SAFETY INSTRUCTIONS
Please read before first commissioning the safety instructions carefully and observe the
safety instructions to prevent damage due to misuse, improper operation, and improper
environmental conditions to be avoided. Keep these for later reference.
Check the device after removing the packaging for damage . Do not put the unit in case of
suspected corruption in operation and consult a specialist. The recyclable packaging material must not be stored or disposed accessible for young children , but must be disposed
of properly.
This appliance is only for the purpose for which it was explicitly developed. Any other use
is regarded as improper and therefore dangerous . The supplier is not liable for damage to
persons and / or property damage due to an improper or incorrect use.
This appliance can be used by children aged from 8 years and above and persons with reduced physical, sensory or mental capabilities or lack of experience and knowledge if they
have been given supervision or instruction concerning use of the appliance in a safe way
and understand the hazards involved. Children shall not play with the appliance. Cleaning
and user maintenance shall not be made by children without supervision. Please make sure
to place the device on a suitable and waterproof surfaces, so that spilled liquids can not
cause harm.
Repairs to electrical appliances must only be carried out by trained personnel only . Improperly performed repairs and alterations to the equipment can have dangerous consequences
for the user according to what the warranty will be rejected.
EN
1. Before using, please check whether the voltage of the fan is the same with marked
voltage of the fan or not.
2. Before the fan is combined, the power is not connected; and power must be cut off
when moving the fan.
3. Don`t insert fingers or any sharp object into the mesh enclosure, when the fan is running.
4. Please avoid high temperature, high humidity, acid and alkali oil, pesticide, curtain, etc.
5. The direct strong wind is not suitable for the infants and the older.
6. The fan is not placed in the inclined ground in case of being poured.
7. When the users are away from the fan or the fan is not in using state, the power is be
cut off and the power plug must be pulled in case of faults and accidents.
Page 40

8. Please check whether the power wire or plug is damaged or not, before using the
fan.If the power soft wire is damaged, for avoiding risk, it must be replaced by the
manufacturer, maintenance department or similar professional persons.
2. MONTAGE
EN
Installation of head and main body
Connect the patch plug of each Two-core cable (black
black) Respectively as Figure .
Insert the main body part into The socket of head. Lock
the Head and main body with two Screws at the
Installation of main body and chassis
Installation of mesh enclosure and blade
– Screw off the lock cap of the blade from the motor shaft.
– The angle of the assembled mesh enclosure is adjusted Suitable;
and then the mesh enclosure is sleeved aiming at.The three studs
of the front shell of the motor.
– The lock nut of the mesh enclosure is assembled and rotatesIn
clockwise to be tightened.
Installation of blade
– The blade is inserted into the motor axis; the slot at the back
Of the blade aims at the axis bolt; the blade is installed at the
Bottom so that the blade matches with the motor shaft.
– The lock cap of the fan is locked in the motor axis in clockwise,
And then the lock cap is fixed.
Installation of front mesh enclosure
– The hoop of the front net is fixed above the rear net.
– The hoop is buckled around the rear net; and the front and Rear
mesh enclosures match with each other.
– Finally, the fixing netting clip below the hoop is buckled.
40
Page 41

Installation of power cable
3. FEAUTURES
Touch key. Energy sav. and temperature-control
mode, detect the environment temper
ture automatically, regulate air speed.
EN
FFU, operation board in the middle of
the main body, convenient for use.
Long-distance remote operation.
Page 42

EN
LED screen display, direct and generous. Rotary disk 24-gear infinitely variable
speed air supply.
42
Page 43

4. OPERATION INSTRUCTION
1 5
2 6
3 7
4 8
Ionizer (1)
Under the power-off state, press the key of timing ON, or press the timing key of theremote
Under the power-on state, press the ion key, or press the ion key of the remote control; LED
display the negative ion symbol; after several minutes, the airflow of the blade comprises
ion; and the negative ion function is closed when pressing again.
Energy sav. (2)
press the Energy sav. key of the fan; LED screen displays the symbol of Energy sav.; under the energy sav. Mode, the fan can detect the environment temperature automatically;
When the temperature rises or declines 1-3 °C, the rotary speed is automatically adjusted
by the blade; the wind speed is reduced or increased along the temperature; when the
wind speed is changed to the limit, it stops changing; and when it is energy sav.vered to
the change range, the wind speed is changed con-tenuously. When the environment temperature is lower than 23 °C , the fan is powered off automatically.
Osc. (3)
When pressing the OSC function key or OSC key of the remote control, the LED display the
OSC symbol; the OSC function of the fan is started; the OSC range is 85 degrees; and the
OSC is closed when pressing again. LED screen can display or close the OSC symbol.
EN
Page 44

Display. (4)
Under the power-up state, touch the display key or press the display key of the remote
control, LED screen is extinguished without display; and the display is recovered when
pressing the key again.
Timing on (5)
Under the power-off state, press the key of timing ON, or press the timing key of theremote
control; LED display 1H pre-timing; the timer symbol flicks (it powers off after 1 hours);
EN
the setting time can be adjusted by rotating the rotary disk; every rotating one grid, it
is increased one hour, conversely, it is reduced. When it is adjusted to 24H and rotates
clockwise, it circulates to 1H starting point. When there is no operation within 5 seconds,
the setting is finished. The timing is canceled by pressing the key of timing ON; when the
LED screen timer symbol flicks, press thetiming ON again, the timing function is canceled.
Timing off (6)
Under power-on state, press the key of timing OFF, or press the timing key of the Remote
control, LED display 1H pre-timing; the timer symbol flicks (it powers off After 1 hours);
the setting time can be adjusted by rotating the rotary disk; every Rotating one grid, it
is increased one hour, conversely, it is reduced. When it is a-Dusted to 24H and rotates
clockwise, it circulates to 1H starting point. When there is no operation within 5 seconds,
the setting is finished. The timing is canceled by pressing the key of timing OFF; when the
LED screen timer symbol flicks, press the timing OFF again, the timing function is canceled
Mode (7)
Under the power-on state, the working state of the fan can be set by pressing the key or
the mode key on remote control.
– Eco wind: The air volume is locking mode; the gear is 8; when touching the mode press,
it is automatically changed to the mode of natural wind.
– Natural wind: To simulates the natural wind; under the state of power-on and Natural
wind, 01-24 gears of air volume can be freely adjusted by the rotary disk; the Wind speed
is infinite variable; the left rotation is small and right rotation is big.
– Sleep wind: The temperature is reduced when simulating the human sleep; Through
the knob to change the setting, and based on the wind speed will set down 2. Files per
hour, gradually reduced to the lowest gear after adjustment and the running. Speed is
no longer again. When touch “mode” button, switch to other modes, the wind out of
sleep pattern.
On/Off (8)
Power on/off: under the power-up state, press the key to start fan; and then press this key
to power off the fan (or press power key of remote control).
44
Page 45
Power supply mode of Battery
When the external AC is off or not plugged in, the unit is working via the Lithium battery
inside, all the operation is same. But all maximum gear of each mode will get down to 12
levels from 24 levels when external AC. The quantity of electricity charge will display on
the LED screen at the bottom of the unit. The 4 cell is all light means the electricity is full ,
If just one cell is light, it means the electricity is about to run out.
When the unit is plugged in, the unit will shift to AC power supply automatically, the gear
limitation is relieved automatically, and the lithium battery is charging at the same time.
The status of the charging will display on the LED symbol on the bottom, If 4 cell is all
light, it means the battery is full , the system will start micro current charge automatically,
it will bring any affect to the unit.
Usage of remote control
– After unpacking, the remote control and the battery are taken out from the package
box; the socket sleeve and the battery cover are dismounted; the battery is arranged
according to the anode and cathode; and then the battery cover is arranged.
– The remote control sleeve is inserted into the slot at the back of the fan; and then the
remote control is arranged in the socket sleeve (as shown in figure).
Other operation
– Press the button by a finger
without loosening (1); The
fan support is held by other
hand to adjust the support
up and down to the suitable
height(2); (3) After adjusting
the height, loosen the key.
EN
Page 46
– Adjust the pitching angle of the fan: In the
power-up state, the two hands hold the upper
and lower ends of the mesh enclosure to pull
the fan up and down; The head is adjusted.
– Without any operation, the fan is automatically
powered off when running for 12 hours.
EN
5. PARTS DRAWING
Control panel
01 Front mesh enclosure
02 Mesh hoop
03 Mesh buckle
04 Locking cap of blade
05 Blade
06 Lock nut of
mesh enclosure
07 Rear mesh enclosure
08 Motor shaft
09 Enclosure
10 Control panel
11 Expansion link
12 Flexible button
13 Power connector
14 Chassis
15 Lock nut of chassis
16 remote control holder
17 Rermote control
46
Page 47
6. CLEANING
– Before cleaning the product, the power must be cut off firstly.
– The appliance parts (such as power, motor and the like) cannot be cleaned by the water
or other liquids; and the appliance parts can be cleaned by cleaning cloth.
– The product cannot be dismounted for transformation. It is suggested checking and
cleaning the product in each year so as to prolong the service life.
7. WARRANTY / DISPOSAL / TECHNICAL CHANGE
WARRANTY
The Products are controlled just before delivery. If despite a lack of your product, try trustfully your seller. Please bring your receipt, as this is to be submitted for each warranty. The
guarantee period is 24 months from date of purchase.
DISPOSAL
The device must be disposed of properly. The device can be distributed free of charge for
disposal at each dealer.
TECHNICAL CHANGES
We reserve the right to modify the price, the design and the technical features.
Please save the packaging materials of the unit.
CE declaration of Conformity
This device complies with the following standards:
EN
EN 60335 -1:2012+A11:2014
EN 60335-2-80:2003+A1+A2
EN 62233:2008
EN 55014-1:2006+A1+A2
EN 55014-1:2017
EN 55014-2:2015
EN 61000-3-2:2014
EN 61000-3-3:2013
Page 48

Firma
Armin Schmid
Olensbachstrasse 9–15
CH-9631 Ulisbach
Tel. Int. +41 71 987 60 60
Tel. Nat. 0848870850
info@sonnenkoenig.ch
www.sonnenkoenig.ch
Firma
Armin Schmid
Peter-Henlein-Strasse 5
D-89331 Burgau
Tel: 0180 500 64 35
info@sonnenkoenig.ch
www.sonnenkoenig.ch
Festnetz 14 Cent/Minute
Mobilnetz bis 42 Cent/Minute
 Loading...