

SONiVOX Vocalizer Pro User Manual
Introduction
Thank you for purchasing Vocalizer Pro! Vocalizer Pro transforms vocals and instruments
with a revolutionary new patent-pending technology. Just step up to the mic and let go—the
results are astounding, and not to mention a ton of fun. Speak, sing, whisper, yell, or even run
your drum tracks or anything else through it, Vocalizer Pro will take your source input apart and
pitch, harmonize, de-harmonize, modify, fortify, enhance, re-fry, re-synthesize, and reassemble
to your imagination's outermost limit.
The foundation for this instrument comes from Vocalizer, SONiVOX’s groundbreaking original
vocoder instrument. Vocalizer Pro has a number of new features, such as FFT audio
processing and a new set of live performance controls in the Parameter Snapshot Pads and
Chord Pads enabling even greater control and playability.
Vocalizer Pro is available as a VST™, AU and RTAS
and Windows
®
systems.
Credits
Jennifer Hruska Ryan Pietras Scott Stepenuck Ishaan Chhabra
Colman O’Reilly Bobby Zlatkov Feuler Tovar David Szebeda
Jason Jordan Jeremy Bridge John Teele Andrew Tomasello
Erik Pearson Chris Rudzinski Jamie Billings Aaron Hachen
Samara Winterfeld Bryce Kanzer Katy Cone
Jack O’Donnell, Executive Producer
®
plug-in for 32-bit and 64-bit Mac® OS X®
2
System Requirements and Product Support
For complete system requirements, compatibility information, and product registration, visit the
SONiVOX website: sonivoxmi.com.
Installation
Windows
1. Right-click the .zip file you downloaded and select Extract All.
2. Follow the on-screen instructions. By default, Windows will show you the extracted files
when it has finished extracting them.
3. Double-click the .exe installer file
4. Follow the on-screen instructions.
Note: Vocalizer Pro uses PACE copy protection, so it will install the PACE InterLok driver on
your system if you do not already have it. As most audio software uses PACE copy protection,
though, this is probably already installed on your system.
Mac OS X
1. Double-click the .zip file you downloaded. The archive utility will extract the files and put
them in a folder in the same location as the .zip file.
2. Open the Vocalizer Pro folder.
3. Double-click the .pkg installer file.
4. Follow the on-screen instructions.
3

Setup in Your Host Software
Important: Your host software must be able to record both audio and MIDI tracks for Vocalizer
Pro to work. Most host software can do this, but some cannot (e.g., GarageBand™).
Here are the basic steps to set up Vocalizer Pro in some popular host software applications.
Avid® Pro Tools®
1. Create or open a Pro Tools Session.
2. Create 1 new audio track named Vocalizer – Audio.
3. Create 1 new MIDI track named Vocalizer – MIDI.
4. Load an audio clip onto the Vocalizer – Audio track.
5. Insert Vocalizer Pro on the Vocalizer – Audio track.
6. Route the output of the Vocalizer – MIDI track to Vocalizer Pro.
7. Press Play in Pro Tools and then play MIDI notes with your connected keyboard
controller. The output of your audio track will now be "vocalized."
Ableton™ Live
1. Create or open a Live Set.
2. Create 1 new audio track named Vocalizer – Audio
3. Create 1 new MIDI track named Vocalizer – MIDI.
4. Load an audio clip onto the Vocalizer – Audio track.
5. Insert Vocalizer Pro on the Vocalizer – Audio track.
6. Route the output of your Vocalizer – MIDI track to your Vocalizer – Audio track.
7. Record-enable the Vocalizer – MIDI track.
8. Trigger your audio clip in Live and then MIDI notes with your connected keyboard
controller. The output of your audio track will now be "vocalized."
4
Apple® Logic Pro™
1. Create or open a Logic Pro project.
2. Create 1 new audio track named Vocalizer – Audio.
3. Create 1 new software instrument track named Vocalizer – MIDI.
4. Load an audio clip onto the Vocalizer – Audio track.
5. Load Vocalizer Pro onto the Vocalizer – MIDI track from the AU MIDI Controlled Effects
list.
6. Set the Vocalizer – Audio track as Vocalizer Pro’s sidechain input by selecting it from the
drop-down menu in the upper right corner of Vocalizer Pro.
7. Mute the Vocalizer – Audio track.
8. Record-enable the Vocalizer – MIDI track.
9. Press Play in Logic and then play MIDI notes with your connected keyboard controller.
The output of your audio track will now be "vocalized."
Steinberg Cubase™
1. Create or open a Cubase Project.
2. Create 1 new audio track named Vocalizer – Audio.
3. Create 1 new MIDI track named Vocalizer – MIDI.
4. Load an audio clip onto the Vocalizer – Audio track.
5. Insert Vocalizer Pro on the Vocalizer – Audio track.
6. Route the output of the Vocalizer – MIDI track to the Vocalizer – Audio track.
7. Record-enable the Vocalizer – MIDI track.
8. Press Play in Cubase and then play MIDI notes with your connected keyboard controller.
The output of your audio track will now be "vocalized."
5
Cakewalk® SONAR™
1. Create or open a SONAR Project.
2. Go into your Utilities.
3. Open the Plug-in Manager.
4. Select Vocalizer Pro from the list of VST audio effects.
5. Click on the Plug-in Properties button under VST configuration.
6. Check the Configure as Synth box to allow Vocalizer Pro to receive MIDI input.
7. Create 1 new audio track named Vocalizer – Audio.
8. Create 1 new MIDI track named Vocalizer – MIDI.
9. Load an audio clip onto the Vocalizer – Audio track.
10. Insert Vocalizer Pro as an FX Plugin on the Vocalizer – Audio track.
11. On the Vocalizer – MIDI track, assign the MIDI output to Vocalizer Pro.
12. Press Play in SONAR and then play MIDI notes with your connected keyboard controller.
The output of your audio track will now be "vocalized."
MOTU® Digital Performer®
1. Create or open a Digital Performer project.
2. Create 1 new audio track named Vocalizer – Audio.
3. Create 1 new MIDI track named Vocalizer – MIDI.
4. Load an audio clip onto the Vocalizer – Audio track.
5. Insert Vocalizer Pro on the Vocalizer – Audio track.
6. Route the output of the Vocalizer – MIDI track to Vocalizer Pro.
7. Record-enable the Vocalizer – MIDI track.
8. Press Play in Digital Performer and then play MIDI notes with your connected keyboard
controller. The output of your audio track will now be "vocalized."
6
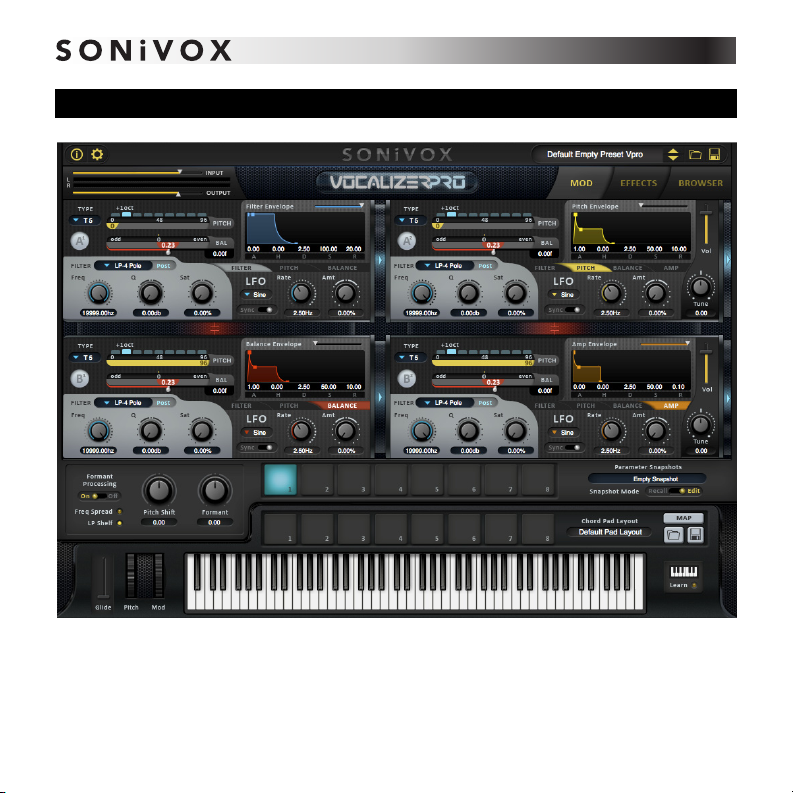
Overview
Vocalizer Pro's graphical interface lets you easily access many of the available settings for its
filters and effects. This manual gives an overview of the interface's different sections.
7

Adjusting the Controls
• Drop-Down Menus: Open an available drop-down menu by clicking the
downward arrow () to the left of the field (e.g., Type, Filter, or LFO). Click
an option to select it.
• Knobs: Change the position of a knob (e.g., Freq, Q, Sat, Rate, Amt) by
clicking and dragging it up or down. Release it when you reach the desired
position. Double-clicking the knob sets it to the 12 o'clock position.
The knob's numerical value is displayed under the knob. You can double-click
this value to manually enter a specific value.
• Sliders: Change the position of a slider (e.g., Input,
Output, Filter Envelope, Volume, or Glide) by clicking
and dragging it. Release it when you reach the desired
position. You can also simply click anywhere along the slider's track, and the slider will
"jump" to that position.
• Switches: Change the setting of a two-position switch (e.g., Sync, Formant
Processing, or Snapshot Mode) by clicking on the opposite side of it.
• Buttons: Enable or disable a function with an LED (e.g., Freq Spread, LP
Shelf, or Learn) by clicking it.
8
 Loading...