

Page 1
Page 2

Caution
Imp ortan t safet y instr uctio ns to be ke pt with t he prod uct ple ase rea d atten tivel y
To prev ent fir e and ele ctric s hock, d o not exp ose thi s recei ver to ra in or moi sture . In orde r to
avo id any po ssibl e risk of e lectr ic shoc k, neve r attem pt to ope n the uni t. In cas e of brea kdown ,
rep arati on shou ld be mad e by qual ified t echni cians . No part o f this un it shou ld be rep aired b y
use rs.
G!
NIN
R
WA
e of d
enc
res
P
par
ex
I
Th
P
-Do n
Su
-
-
-
El
-
d b
ul
o
h
t s
y b
vel
i
lus
c
e p
r co
h
owe
f t
al
e, qu
c
rvi
e
t mus
uc
rod
he p
d ba
se
e u
ur re
r yo
e
t
tal
s
r In
ope
r
e re
e th
c
a
lac
r
ot p
tin
a
rhe
e
ov
ut an y
t p
m- D
o
o n
ent Ve
i
ffi c
e the r
ac
Pl
f a
ea
ap o
t l
erh
id ov
avo
bs
ot o
i t
.
c
et
ing t
t
c
ote
ver s
i
e
he rec
ts fil
c
No obje
lac
ot p
lac
ot p
u
m
0-
Th
I
s
Thi
Th
v
ei
c
s r
i
e
ity S
c
i
ctr
e
pl
e un
s
ea
er c
w
o
e p
f th
e, qu
ic
v
er
e m
ic
v
e
s d
g mu
u
e pl
f
i
tte r
ta
c
e t
g
n
ec
e
ruc
t
he R
e a
e a
e
up
u
a
l
.
s
r is t
l
st r
e repa
y qua
i
i
ger
an
d i
r
s d
ed elec
t be i
s mus t b
e
i
r fo
e
l
n
o
ati
er o
v
ei
he r
hin
t
t
til a
ive
e
cm to t
t 10
g.
n
i
at
ny v
t a
ec
u
ho
led w
y o
n
y s
n
o b
ply
e r
g th
ord i
d e
ifi e
t be co
us
em
lif i
r mo
ec
g a
ion
r i
eiv
d n
l
it
b
o
s da
a
am
l
us t
o
ire d b
d p
e
age
ric
t
nst
re de
n a f
ive
e
o
b
n a w
en
e
ot be e
iqu
h l
ec
j
rc
u
e us
eiv
ec
ma
tri
c
e
in re
en
y u
ers
d, it m
n or p
a
i
lled i
a
e dispo
t, fi
a
l
r o
e t
v
l
e
e r
h
lat
ti
r fro
ds, s
i
s th
t
e of f
d i
e
r in cas
e
g
ian o
c
ec
n
n
adi
ion i
s
s. Th e ma i
r
se
s.
n
o
us
er
n acco
se
) in
s
l
tai
rm an sta
p o
n to
he unit (
nti
l-ve
r a
a
e
on open
i
m Hi
ghPr
os
p
x
uc
g
t mi
a
me
a
l
e
n a t
ed, it mu
r si
d t
e
t
c
y ac
l
ns
t e r
o
s
d of
f an
ted
a
l
d th to
n
d t
e
h a
t d ma
h
s s
p
m
e of
m
o a 2
es
rat
ppa
de a
i
a
ten
n
d o
ce
l
ep
b a fte
n
r
o daf
d b-Pl
fo
T
s v
e
t b
s
il
a
s
r q
a
l
i
sim
s o
f
th na
e i
c
da
wT
n
. Th
fel
a
s
y
t
ro
r to p
r e
fac
r
u
e s
l
ce
vi
de
e
oth
, C
r exa ple
on to pr
oca
l
ti A
he unit
of t
p
e h d tog
tem
i
ngswi
h-Do n
es, H
r
ratu
pe
em
g w
pi
p
ri
o d
n- T
all b
s, sh
e
as
u
e yo
g
a
nd
t ca
h s l
c
i-Do n
a
e a
at
m
i
cl
e
rat
ed no
g
n
olo
r
p
- Pl
e
lac
e r p
e-
ati
c
ifi
l
a
u
r q
H
z e
V ~ 50
4
r th
e
aft
e
ibl
s! Do no
u
e of t
nc
epa
r r
ali
u
tio
w them
ro
he envi
ect t
. Do n
e
, su
s o
D
eve
s su
er o
t
a
e pl
r unit n
les o
nd s
-us
n
d o
r re
s to th o
n
o
lec
ns
e i
h
ire
at
c
i
f
al re
n
o
h as a
c
r ma
t a
n
s wel
, a
ch as ne
idi
um
r sp
ce
a
ear i
n th
ho
.
e
air
p
rica
t
t
lla
a
t
t op
e re
d by th
o
i
g
in coll
t p
g
c
t
a
l
d on t
t (
e re
uld n
e
s
l ne
io
. R
en
v
ei
c
e manu
n in ord
n
tio
a
ul
c
e
ent
onm
r
ut it o n a c
p
n am
e
zin
a
la
u
cum
l a
s a spa c
wsp
, Wat e
y
g
n
i
sh
he unit
g. liq
.
e
v
ei
c
ot b
d by th
e t
v
o a
wor
t
n o
h
f t
i
er s
e
s.
tio
.
lifi
s).
ion o
t
ape
r a
.
ui
er.
e u
e ma
d poss
i
o
.
k
e pr
k of e
s
r to a
n b
r.
e
rs
nd D
d f
ed i
s
o
ho
fa
n
i
rpe
a
Th
e of 5
, ta
.
ill
ufa
n
uc
d
u
vo
s pr
f i
c
le
ld b
rer, i
u
ct
d po
i
o
t or r
is ma
ern
t
n
cm t
e
bl
t
s
u
d ob
e
n a tro p
tu
c
e dag
bl
i
t.
tric s
e cari
ts a r s
ss
e
d
vi
ug.
y l
e
l he
a
o bot
h
lot
c
t
jec
c
i
r, its a
re
n
ho
r
b
i
d (i
ad t
s, cu
s
al cl
e
le da
at.
e
o d-Do n
r.
c
d ou
nq
o
si
r can
i a
t
f
o
N
k!
t
s
e
al
r.
ng
es
re
i
u
ow a
l
l
es
,
ns
i
rta
.
)
les
e.
t
es
l
a
r-s
e
Thi s produ ct comp lies wi th the re quire ments i mpose d by the 20 06/95 /EC (re peali ng the
73/ 23/EE C Direc tive, a mende d by the 93 /68/E EC Dire ctive ) and 200 4/108 /EC (re peali ng
89/ 336/E EC Dire ctive ) Direc tives .
Thi s logo af fi xe d to th e recei ver mea ns that i t is a devi ce of whi ch the wa ste pro cessi ng fall s
wit hin the f ramew ork of th e 2002/ 96/EC d irect ive of 27 J anuar y 2003, o n Waste E lec trica l and
Ele ctron ic Equi pment ( WEEE) .
Page 3

Tab le of C ont ent s
Tabl e of Co nt ents
Table of Contents
Pro duct Ove rv ie w
Remote Controller
Basic Ope ration
Tro ub le sh oo ti ng
Technical Specification
4-7
8
9
1
2
3
- 1 -
Page 4
Prod uct O ver vie w
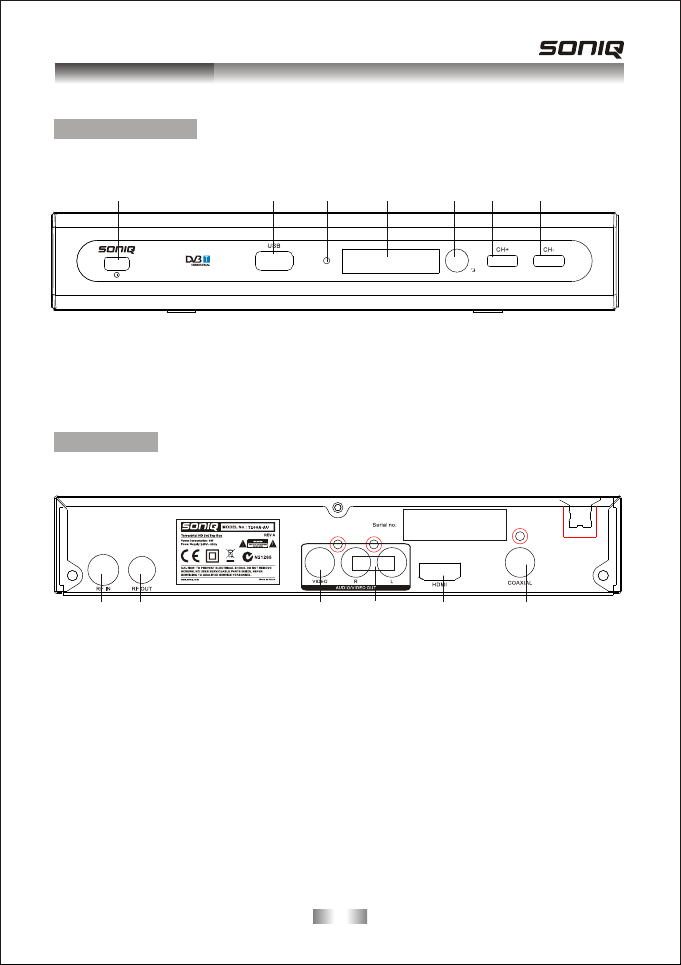
1. Fro nt Pa nel a nd Re ar Pa nel
Fro nt P an el
1
1. PO WE R SW IT CH
2. USB PO RT
3. STA ND BY I ND IC ATOR
4. LE D DI SP LAY
Rear panel
21
1. RF IN : Th is s oc ke t co nn ec ts t o yo ur e xt er na l ae ri al .
2. RF LOO P TH RO UG H: T hi s so ck et w il l by p as s th e RF s ig na l to e it he r yo ur T V or a no th er v id eo
sys te m.
3. COMP OS IT E VI DE O OU TP UT : C on ne ct t hi s to y ou r TV.
4. AU DI O OU TP UT S : Le ft /R ig ht .
5. HDMI: High definition multimedia interface.
6. COAXIA L: T hi s so ck et c on ne ct s to a c oa xi al s oc ke t on y ou r su rr ou nd s ou nd s ys te m.
3
2
3
4
5. RE MO TE C ON TR OL S EN SO R
6. CH +
7. CH -
4 5 6
7
65
- 2 -
Page 5
Remote Contr oll er
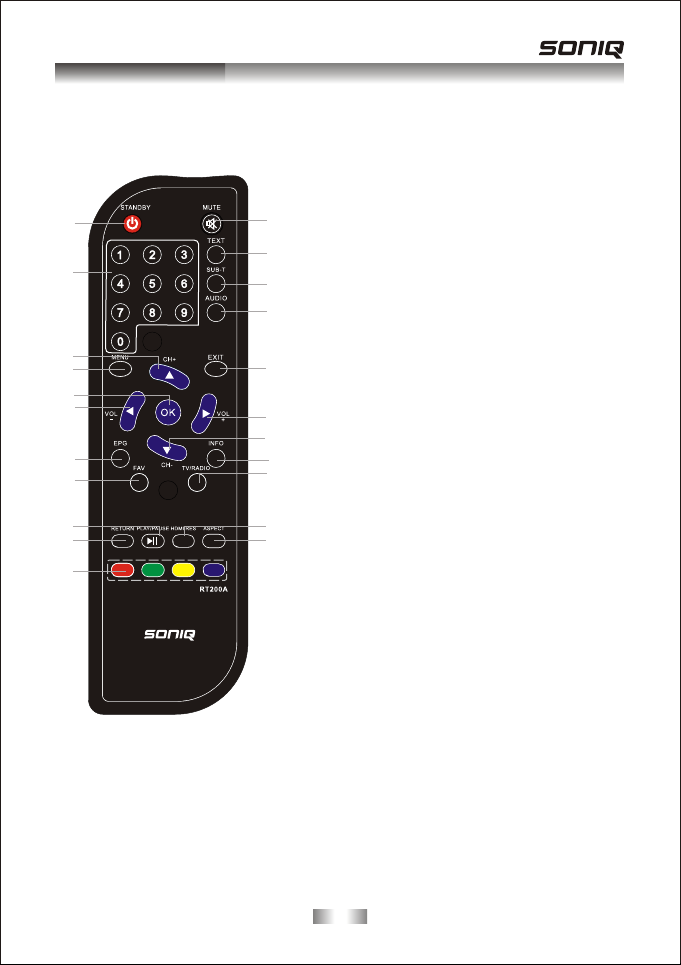
2. Rem ot e Con tr ol ler
1
2
3
4
5
6
7
8
9
10
11
1.STAN DBY:S witch t he r ec ei ver in an d ou t of
12
stan db y mo de .
2.<0 >- <9 >: Nu meric k ey s.
3/18 .C H+ /C H- :Prog ra m ch an ging ke ys . Mo ve
13
curs or u p or d ow n in m enu ite m.
4.ME NU :D is pl ay main m en u on T V sc re en , and
14
pres s ag ai n to d is appea r me nu .
5.OK :To co nf ir m cu rrent s et ti ng , or disp la y al l
15
prog ra ms i n no -m enu mod e.
6/17 .V OL -/ V OL +:To incr ea se / d ec re ase
volu me . Mo ve c ur sor lef t or r ig ht i n menu it em .
7.EP G: Sh ow s th e Elect ro ni c Pr ogram G ui de .
16
8.FAV:Di spl ay s yo ur f av orite c ha nn el s list.
9.PL AY/PA US E: Pl ay or Pau se c ur re nt prog ra m.
10.R ET UR N :G o ba ck to the p re vi ou s viewe d
17
18
19
20
21
22
chan ne l.
11.RE D/ BL UE /G REEN /Y EL LO W: U se t o
navi ga te b et we en page s in t el et ext mod e.
12.M UT E: To nav ig ate ins id e th e me nus.
13.T EX T:Sw it ch o n Tele te xt, if cu rr en t ch an nel
has th is o pt io n, a nd use EX IT key t o qu it
Telete xt .
14.S UB -T:D is pl ay subt it le o pt ions (a va il ab il ity
depe nd s on t he c ha nnel) .
15.A UD IO : Ch an ge the Aud io l an gu age or
swit ch t o AC3 m od e (a vaila bi li ty d epend s on
the ch an ne l) .
16.E XI T:Us e th is k ey to qui t cu rr en t menu.
19.I NF O: Di sp lay inf or ma ti on abou t th e cu rr en t
chan ne l.
20.T V/ RA DI O: Switc h be tw ee n Digit al R ad io
and DV B- T mo de s.
21.H DM I RE S: S wt ich vid eo o ut pu t HDMI
576i /5 76 p/ 72 0p/10 80 i.
22.A SP EC T:Pr es s16:9 /4 :3 k ey, y ou c an s el ect
diffe ren t vi de o mo de : 4 :3 LB, 4: 3 PS ,1 6: 9.
- 3 -
Page 6

Basic Ope ration
3. Fir st T im e Insta ll ati on
Aft er a ll c onnections have been made properly, swi tc h on T V an d ma ke s ur e th e un it i s co nn ec te d
to th e Ma in Power. Press Power button to switch the unit on.If you are using the unit for the first
tim e or have restored the unit to Factory Default, th e In st al lati on Guide Menu will appear on your
TV sc re en .
(1)OS D La ng ua ge p re ss R IG HT /L EF T ke y to s el ec t a la ng ua ge .
(2)Coun tr y pr ess RI GH T/ LE FT k ey t o se le ct y ou r co un tr y of r es id en ce .
(3)Channe l Se ar ch pre ss RIG HT o r OK k ey t o be gi n Aut om at ic c ha nn el s ea rc h.
(4)TV F or ma t pr es s RI GH T/ LE FT k ey t o se le ct N TS C/ PAL in s ys te m TV.
(5)Antenna Po we r pr es s RI GH T/ LE FT k ey t o se le ct O N/ OF F.
(6)On ce c hannel tuning is complete, you can start watching TV p ro gr am s.
4. Bas ic O per at io n
4.1 P rogr am M anage Se tt in gs
To access the Menu, press the M EN U button and select [Program]. usi ng t he
RIG HT /L EF T ke ys t o na vi ga te t hr ou gh t he m en u. T he M en u pr ov id es o pt io ns t o ad ju st t he
Pro gram Manage Settings. Select an option and press OK or RIGHT to ad ju st t ha t se tt in g. P re ss
the E XI T bu tt on t o ex it t he M en u.
4.1 .1 Pro gr am E di t
To edit your program preferences (lock, skip, favorite, move, delete or rename), you will need to
enter the Program Edit Menu. Th is M en u re qu ir es a p as sw or d to a cc es s. E nt er t he d ef au lt
password '0000’.
a)Set Fav or it e Ch an ne ls
You ca n cr ea te a s ho rt l is t of f av or it e pr og ra ms t ha t yo u ca n ea si ly a cc es s.
Set Fav or ite TV o r Ra di o pr og ra m:
1. Se lect you r desired channel then press the FAV but to n.
A heart-shaped symbol will appear and the channel is marked as a favorite.
2. Re pe at the p re vi ous step to se lect mor e Fa vo ri te c ha nnels.
3. To con fi rm a nd e xi t th e Me nu , pr es s th e EX IT k ey.
b)D is able F av or it e TV o r Ra di o Ch an ne l:
Select th e Fa vo ri te c ha nnel and press Favorite button on the remote control to cancel.
c)Vie w Fa vo ri te C ha nn el
1. Wh il e in normal viewing mode, press Favorite button and the Favorite Menu will appear.
2. Pr es s UP /D OW N to b ro ws e th ro ug h yo ur Favorite Channels.
3. Pr es s OK t o se le ct y ou r fa vo ri te c ha nn el .
d)D elete a TV or Ra di o Pr og ra m
1. Se lect the P ro gr am a nd t he n press th e BL UE butto n.
A warning message will appear. Press OK to delete the channel.
2. Re peat the p revious step to se lect more channels to delete.
e)Skip TV o r Ra di o Ch an ne l
1. Se lect the c ha nnel you would like to skip and press the GREEN button.
A skip symbol is displayed. Th e ch an ne l is m ar ke d as a s ki p.
2. Re pe at the p re vi ous step to sk ip m ore ch annels.
3. To sav e yo ur s et ti ng s an d ex it t he m en u, p re ss E XI T ke y.
4. Di sa ble the Skip Channel function: Select the Skip channel and press the GREEN button on the
remote control to cancel.
f)M ov e a TV o r Ra di o Pr og ra m
1. Se lect the p re fe rr ed c ha nnel then press the RED button. A move symbol will appear.
2. Pr es s UP /D OW N to m ov e th e ch an ne l.
3. Pr es s OK t o co nf ir m.
4. Re peat the a bove steps to move more channels.
g)L oc k Pr og ra m
You ca n lo ck s el ec te d pr og ra ms f or r es tr ic te d vi ew in g. L oc k a TV or Radio channel:
1. Se lect the p re fe rr ed c ha nnel then press the YE LL OW b ut to n. A loc k- sh ap ed s ym bo l is
displayed. Th e ch an ne l is n ow m ar ke d as l oc ke d.
2. Re peat the p revious step to lock more channels.
3. To con fi rm y ou r se tt in gs a nd e xi t th e me nu , pr es s th e EX IT b ut to n.
4. Pr es s th e YE LL OW b ut to n to d is ab le t he l oc ke d ch an ne ls f un ct io n.
5. To vie w th e lo ck ed c ha nn el s, y ou w il l be r eq ui re d to e nt er e it he r th e de fa ul t pa ss wo rd ' 00 00 ' or
your last set p as sw ord.
- 4 -
Page 7

Basic Ope ration
h) Re na me Progr am
To rename channel, press UP/DOWN key to choose the line where the channel needs to be
renamed.
4.1 .2 EPG ( El ec tr on ic p ro gr am g ui de )
The E PG i s an o n- sc re en TV gu id e th at s ho ws s ch ed ul ed p ro gr am s se ve n da ys i n ad va nc e fo r
every tun ed channel. Press the EPG button o n th e Remote C ontrol to acce ss the g uide.
You ca n us e th e UP /D OW N ke y to s el ec t th e pr ef er re d pr og ra m. I f th er e is m or e th an o ne p ag e of
informati on, use th e BL UE/G RE EN b ut to n fo r pa ge d own and the RED/YELLOW button for page
up.
4.1 .3 Sor t
Sort yo ur c ha nnels from the following options:
By LC N - So rt the c ha nnels in ascending order.
By Service Name - Sort the channels in alphabetical order.
By Service ID - Sort th e ch an nels according to the station.
By ON ID - S or t th e ch an ne ls according to ONID.
4.1 .4 L CN ( Lo gi ca l ch an ne l nu mb er )
Set LCN on or off .
4.2 Pic tu re S et ti ng
To access the Menu, press MEN U th en select Picture using the RIGHT/LEFT k ey. The Menu
provides options to adjust the video settings. Press UP/DOWN to select an option and press
RIG HT /L EF T to a dj us t th at s et ti ng . Pr es s EX IT t o ex it t he m en u.
4.2 .1 A sp ec t Ra ti o:
4:3 L B (L ette rbox): For c on ve ntional 4:3 TV. Th e fu ll w id th o f a wi nd sc re en c on te nt i s di sp la ye d on
a normal TV w it h bl ac k ba rs a bo ve a nd b el ow t he p ic tu re .
4:3 P S( P an & S ca n) : Fo r co nv en ti on al 4 :3 T V. It crops th e left and right edges of a windscreen
conte nt to fi t a no rm al T V.
16:9-If you a re u si ng a wide screen TV, select this option.
Auto:Au to matic switching ASPECT.
4.2 .2 R esolut io n
You ca n ch an ge t hi s se tt in g if t he p ic tu re r es ol ut io n do es n ot a pp ea r to b e co rr ec t. This setting is to
match t he m os t co mm on s et ti ng f or H DM I.
576I: For PA L TV sy st em .
576P: For PAL TV sy st em .
720P: For NTSC or PAL TV sy st em .
1080I: Fo r NTSC o r PAL TV s ys te m.
4.2 .3 T V Fo rm at
If th e pi ct ur e do es n ot appear to be correct you can change this setting.
Thi s sh ould match the most common setti ng for TVs i n yo ur c ou nt ry.
NTS C: For N TS C sy st em T V.
PAL: F or PA L sys te m TV.
4.2 .4 O SD Tr ansparency
Pre ss Men u th en select Picture using the RIGHT/LEFT k ey. P re ss U P/ DO WN t o se le ct O SD
Tra ns pa re nc e. The diaphaneity of menu will be tuned up.
4.3 C ha nn el S ea rc h
To access the menu, press MEN U and select Search Channel using the RIGHT/LEFT key s.
Thi s Menu provides options to adjust the Search Channel settings.
Pre ss UP/ DO WN t o se le ct a n op ti on a nd p ress RIG HT /L EF T to a dj us t th e se tt in gs . Pr es s EX IT t o
exit th e Me nu .
- 5 -
Page 8

Basic Ope ration
4.3 .1 Auto Sea rch
Thi s option will automatically search for channels and save them once the scanning is complete.
All previously saved channels and settings will be deleted.
1. Se lect Auto S earch and press OK or RI GH T to s ta rt c ha nn el s ea rc h.
2. To can ce l ch an ne l se ar ch , pr es s EX IT. Any c ha nn el s th at h av e be en f ou nd w il l be s av ed .
4.3 .2 M anua l Se ar ch
Thi s option allows you to scan for new channels without deleting previously saved channels and
setti ng s.
1. Se lect Man ual Search then press OK or RIGH T. The c ha nn el s ea rc h sc re en w il l ap pe ar.
2. Pr es s th e RI GH T/ LE FT k ey t o se le ct t he c ha nn el f re qu en cy.
3. Pr es s OK t o st ar t se ar ch in g ch an ne ls .
If a ch an ne l is fou nd, it is sa ved and added to the channels list. If channels can not be found during
searching, the unit will exit automatically.
4.3 .3 Coun tr y
Select yo ur country of re si dence.
4.3 .4 A nt en na P ow er
Enable Antenna Power if an external active antenna is connected.
4.4 T im e Se tt in g
To access the Menu, press MEN U th en select Time using the RIGHT/LEFT key s. T he M en u
provides options to adjust the time settings.
Pre ss UP/ DO WN t o se le ct a n op ti on a nd p ress RIG HT /L EF T to a dj us t th e se tt in gs . Pr es s EX IT t o
exit th e me nu .
4.4 .1 T im e of fs et
Select auto or ma nual for GMT o ff se t ad ju st me nt s.
4.4 .2 C ou nt ry R eg io n
Select th e Country Region when Time Offs et i s se t to Au to .
4.4 .3 T im e Zo ne
Select th e Time Zone Off se t wh en Ti me O ff se t is s et t o Ma nu al .
4.4 .4 Aut o St an db y
Automatic switch to sta nd by mode after 3 hours of active mode without action from user.
4.5 O pt io n
To access the Menu, press MEN U and select Option using the RIGHT/LEFT k ey s. T he m en u
provides options to adjust the OSD Language, Subtitle Language and Audio Language.
Select an option and press RIGHT/LEFT to ad ju st t he s et ti ng . Pr es s EX IT t o ex it t he M en u
4.5 .1 O SD ( On S cr ee n Di sp la y) L an gu ag e
Select an OSD l anguage.
4.5 .2 S ub ti tl e La ng ua ge
Select th e prefer re d su btitle language.
4.5 .3 A ud io L an gu ag e
Select th e prefer re d audio language for watching TV c ha nn el s.
If th e la ng uage is not available, the default program language will be used.
4.5 .4 D ig it al A ud io
Select digital audio output mode.
4.6 S ystem Setting
To access the Menu, press MEN U and select [System ] us in g th e RI GH T/ LE FT k ey s. T he m en u
provides options to adjust the system setti ngs.
Pre ss the U P/ DO WN k ey t o se le ct a n op ti on a nd p ress RIG HT /L EF T to a dj us t th e se tt in g. P re ss
EXI T to e xi t th e Me nu .
- 6 -
Page 9

Basic Ope ration
4.6 .1 P arental Gi ud an ce
Change PIN: Allows you to change the PIN. A PIN can be composed of six numbers. To cha ng e th e
PIN , in put th e old, new PIN in the provided fields.(the default PIN is “0000”)
4.6 .2 S et Password
Set or ch an ge the password for locked programs. Enter your old password or the default
password '0000'. You will then be asked to enter your new password. Press OK button to confirm
your new password.
Onc e it is co nf ir me d, p re ss E XI T to e xi t th e Me nu .
4.6 .3 R estore Factory Default
Reset your Set Top Bo x to t he D ef au lt F ac to ry S et ti ng s.
In Ma in Menu select [Restore Factory Defa ult] usi ng the R IG HT /L EF T ke ys a nd p re ss O K or
RIG HT t o se le ct . En te r yo ur p as sw or d or t he d ef au lt p as sw or d '0 00 0' a nd p re ss O K to c on fi rm .
Thi s option will delete all preset channels and settings.
4.6 .4 I nf or ma ti on
Pre ss MEN U th en select System b y us in g th e LE FT /R IG HT k ey. P re ss U P/ DO WN k ey t o se le ct
Inf or ma ti on, th e soft wa re v ersi on information will be found.
4.7 U SB
Pre ss MEN U th en select System b y us in g th e LE FT /R IG HT k ey. P re ss D OW N or O K ke y to s el ec t
Softw are Update to update the new software.
5. The M en us
Not e: The m en us a re s im pl e an d ea sy t o na vi ga te . Us e th e ar ro ws , ok a nd n um be r bu tt on s an d
always follow the instructions given in the bottom toolbar.
A flow chart of th e me nu :
Main Menu
Prog ra m
Prog ra m Edit
EPG
Sort
LCN
Opti on
OSD La ng uage
Subt it le Lang ua ge
Audi o La nguag e
Digi ta l Audio
Pict ur e
Aspe ct R atio
Reso lu tion
TV For ma t
OSD Tra ns paren cy
Pare nt al Guid an ce
Set Pa ss word
Rest or e Facto ry D efa ul t
Chan ne l Searc h
Manu al S earch
Ante nn a Power
Main Menu
Syst em
Info rm ation
- 7 -
Auto S ea rch
Coun tr y
Tim e
Tim e Of fs et
Coun tr y Regio n
Tim e Zo ne
Auto S ta ndby
USB
Soft wa re Upda te
Page 10

Trou ble sho oti ng
6. Trou bl esh oo ti ng
Sym ptom Pos sible C ause Rem edy
LED o n front p anel
doe s not dis play.
No pi cture o r sound
AC po wer cor d
dis conne cted
Inc orrec t conne ction o f the
vid eo/au dio out put to TV
inp ut term inal
Inc orrec t Conne ction o f
ant enna ca ble
Inc orrec t place ment of
ant enna
No si gnal or w eak sig nal
Con nect po wer cor d
pro perly i nto the p ower
soc ket
Con nect tw o termi nals
cor rectl y with RC A
Con nect th e anten na
cab le corr ectly
Adj ust the d irect ion of
ant enna
Che ck the ca ble
con necti ons, TV a nd
oth er equi pment
con necte d betwe en the
TV an d the rec eiver o r
adj ust the a ntenn a
Bla ck and wh ite scr een
or V-H old
The r emote c ontro ller is
not w orkin g
No Po wer
Your TV m ode is
dif fe re nt f rom S et Top
Box b roadc astin g mode
Bat tery ex haust ed
Flu oresc ent lig ht
int erfer ing wit h the
rem ote con troll er
Pow er Down
- 8 -
Use AV mo de
Cha nge the b atter ies
Swi tch off t he l ig ht
Unp lug the p ower fr om
the w all and p lug it ba ck in
Page 11

Tec hni cal S pec ifi cat ion
7.Techn ic al Spec if ica ti on
Item
Tune r
Demo du la ti on
Inpu t/ Ou tp ut
Term in als
Powe r
Disp la y
Deco di ng
Othe r
Spec if ic at io n
Freq ue nc y
Impe da nc e
Inpu t Si gn al L ev el
Band wi dt h
Demo du la to r
OFDM M od ul at io n
Pack et Tr an sm is sion
Guar d In te rv al
RF Inp ut
RF Out pu t
Vid eo Ou tp ut
Coax ia l
USB Po rt
HDTV O ut pu t
Entr y
Cons um pt io n
Deco de r
Reso lu ti on
Aspe ct R at io
Vid eo
Audi o
Conf or mi ty
Soun d mo de s
Deta il
VHF: 1 74 t o 23 0 MH z
UHF: 4 70 t o 86 2 Mh z
75 Ohm s un ba la nc ed
-78- 25 d Bm
7Mhz
COFD M
2K, 8K F FT, SF N an d MF N
2K/8 K
1/4, 1 /8 , 1/ 16
IEC 16 9- 2 fe ma le c onnec to r
IEC 16 5- 2 ma le c on necto r
Comp os ite Vid eo
RCA for d ig it al S PD IF audi o ou tp ut
USB 2. 0
HDMI 1 .3
240 V ~ 50 H z
8 W max
PAL, N TS C
720 x 57 6 (PAL) ; 72 0 x 48 0 (N TS C)
4:3 (L et te rb ox , PanSc an ), 1 6: 9
MPEG 2 Tra ns po rt M P@ML
MPEG 2 Aud io L ay er I @ I I
ETSI E N 30 0 74 4 DV B- T St an dard
Righ t, L ef t, S te reo
- 9 -
Page 12

 Loading...