

Page 1
QV29
0
Page 2

Please read this instruction manual carefully first before operation so that
Dear Customer:
Thank you for purchasing our latest TV set.
you can use it in a safe and reliable manner and bring all its functions into full
play. Please also keep it properly for future reference.
Contents
I. Safety and Precautions . . . . . . . . . . . . . . . . . . . . . . . . . . . . . . . . . . . . .. . .. . . . . . . . . . . . . ….. 1
II. Installation
Antenna connection. . . . . . . . . . . . . . . . . . . . . . . . . . . . . . . . . . . . .. . . . . . . . . . . . . . . . ………..2
Prepare the remote controller . . . . . . . . . . . . . . . . . . . . . . . . . . . . . . . . . . . . . . . . . … . . . . . . . 3
III. Names and Functions of Controls
Front of the machine. . . . . . . . . . . . . . . . . . . . . . . . . . . . . . . . . . . . .. . . . . . . . . . . . . . . . ………4
Back of the machine . . . . . . . . . . . . . . . . . . . . . . . . . . . . . . . . . . . . . . . . . . . . . . . . . …. . . . . . 4
Remote controller . . . . . . . . . . . . . . . . . . . . . . . . . . . . . . . . . . . . .. . . . . . . . . . . . . . . . …………5
IV. Operation for the Whole Machine
Turn the power supply ON/OFF. . . . . . . . . . . . . . . . . . . . . . . . . . . . . . . . . . . . . . . . . . ... . . . . . 6
V. TV operation
Start operation: Watch TV Programs. .. . . . . . . . . . . . . . . . . . . . . . . . . . . . . . . . . . . . . … . . . . 7
Adjustment . . . . . . . . . . . . . . . . . . . . . . . . . . . . . . . . . . . . .. . . . . . . . . . . .. . . . . … .7
Program presetting (automatic searching)
Program presetting (Semi automatic searching)
Fine tune.
Basic operation: Picture and sound control…………………………………………………...9
Mute and screen display…………………………………………………………...9
Selectable picture…………………………………………………………………...9
Set your desired picture mode . . . . . . . . . . . . . . . . . . . . . . . . . . . . . . . . . . . . . . . 10
Setting time………………………………………………………………………..10
Technical operation: Single button hopping and language selection. . . . . . . . . . . . . . . . . .. 11
Setting the screen display language…………………………………………… ...12
Calendar…………………………………………………………………………...12
The using of AUDIO menu. . . . . . . . . . . . . . . . . . . . . . . . . . . . . . . . . . . . . . . . . . .12
VI. Connection with Other Devices
Connect CD, VCD, DVD or other sound, picture and audio or video
output devices . . . . . . . . . . . . . . . . . . . . . . . . . . . . . . . . . . .. . . . . . . . . . . . . . . . . . . . . . . . . . 13
VII. Miscellany
Guide to simple trouble-shooting. . . . . . . . . . . . . . . . . . . . . . . . . . . . . . . . . . . . . . . . . . . . . . ..14
Specification . . . . . . . . . . . . . . . . . . . . . . . . . . . . . . . . . . . . . . . . . . . . . . . . . . . . . . . . . . . . . .. . 15
Page 3

Safety and Precautions
To ensure safe and reliable operation of the TV set, please observe the following
precautions in installation, operation and maintenance.
Attention:
1·Pay attention to the power supply cord before installing the TV set. Do not hang
anything on the cord, and avoid treading on the cord.
2·The slots on the housing back are designed for ventilation to ensure reliable
operation of the TV set and prevent overheating. They must never be covered or blocked.
The TV set must not be placed near a heat source or it might be damaged.
3·The outdoor antenna must not be erected close to HV lines or other power supply
lines. Use extreme care when erecting the antenna and not to touch living wire, or vital
injury may occur.
4·This TV set can only use the supply voltage and frequency indicated on the back of
the housing. If your power supply does not comply them, please consult with the service
personnel.
5·Do not let any object fall into the ventilation openings of the TV set housing, nor let
any liquid flow into the machine via the openings to cause short-circuiting in TV set.
6·Do not subject the TV set to rain, or use it in damp environment. In cleaning dust, be
sure to remove the power supply plug from its socket first. Do not clean the housing
directly with liquid detergent, use a damp cloth. Be sure to remove the power supply plug
from its socket and remove the antenna plug during a thunderstorm or when it will not be
used for long time, to avoid components being damaged by lightning.
7·If you use an indoor antenna, do not let it touch any electrical appliance, or normal
receiving of TV program may be affected.
Safety:
1. Don’t remove the back of housing by yourself, as the high potential in the machine is
hazardous. If it is necessary to open the back, ask a technician with specialized service
experience.
2. Remove the power supply plug from its socket in case of the following conditions,
and consult with service personnel.
(1) The power cord and plug has damaged or shows cracking.
(2) Any object has fallen into or liquid flown into the TV set.
(3) The performance of TV set has deteriorated significantly or there is damage on the
housing.
(4) The TV set will not operate normally according to the instructions.
3. Please remove the power supply plug from its socket when the TV set will not be
used for long time.
1
Page 4
Installation
l First read carefully the relevant instructions in
“Safety and Precautions”.
l Place the TV set in the room where there is no direct sunlight on it. Any light reflecting
from the screen will cause fatigue of your eyes.
l Use gentle indirect lighting for comfortable watching. The best distance of watching is
5~7 times the screen height.
l Keep a space of 10 cm or over between the TV set and wall for good ventilation.
l Never put the TV set at location with excessive temperature or moisture, to avoid
damage or failure of its components
.
Automatic demagnetizing
A color TV set is likely to be affected by magnetic field, to cause stain on screen or
color distortion. If the TV set is moved while on, turned or affected by a magnetic object
nearby, turn off the power supply and wait for at least 1 hour to turn it on again, to ensure
that the automatic demagnetizing circuit will work normally again, to eliminate the effect of
magnet on color and resume the vivid pictures.
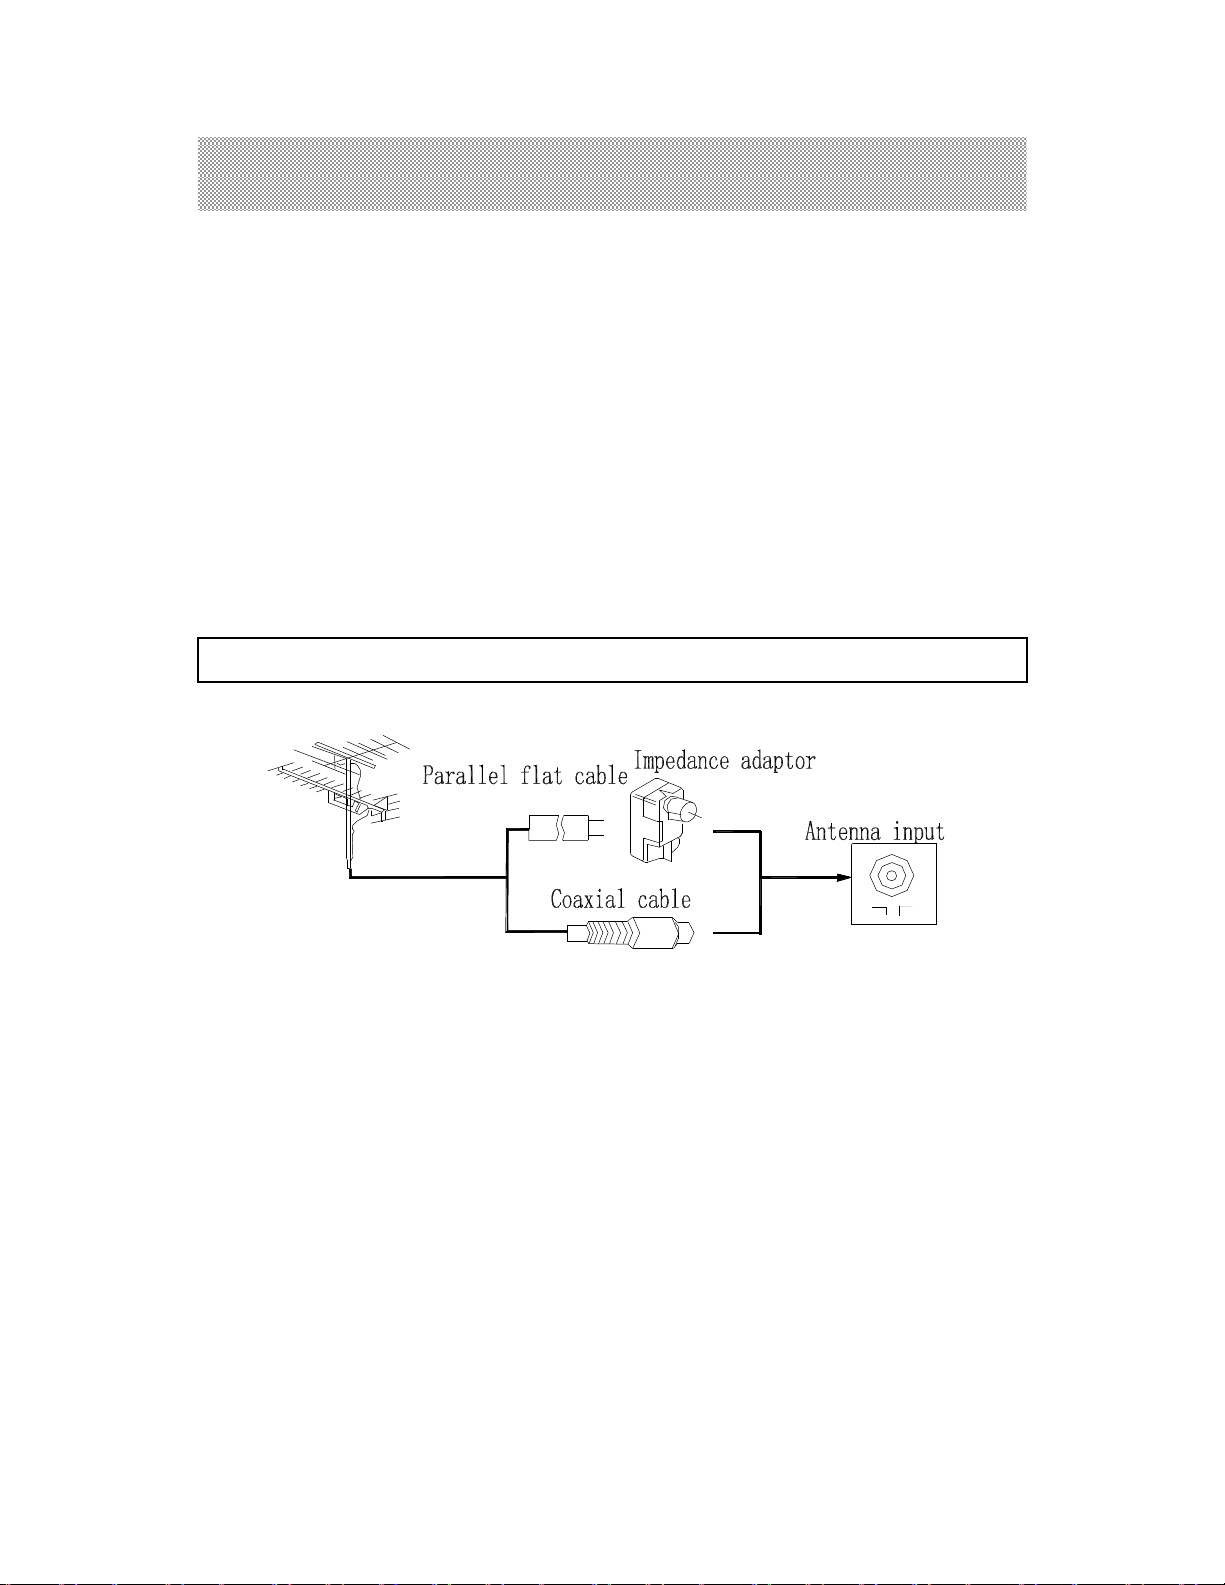
Antenna connection method
(300Ω)
(75Ω)
(300Ω-75Ω)
To ensure best receiving effect, use outdoor antenna or cable antenna (CATV). The type
and location of antennas shall vary with places.
Notes: l Connect the outdoor antenna as shown above, and also install a lightning arrester
and perform periodical checking and repair.
l It is suggested to better use a 75Ω coaxial cable, to eliminate interference or noise
due to improper matching of impedance.
l The cable must not be tied together with supply cord.
2
Page 5

2
Installation
Prepare the remote controller
Install the batteries
1 Remove the sliding cover
of remote controller.
Precautions in operating the remote controller
● Direct the remote controller to the infrared receiving window of the TV set.
● Do not press the keys on the remote controller quickly and continuously.
● If the remote controller will not be used for long time or if the batteries has depleted,
please take the batteries out to prevent leaking.
● Never throw the battery into fire, and properly dispose of the used batteries.
● Take care not to drop, damp or dismantle the remote controller.
Load two No. 5 batteries into the
chamber, with the +/- poles of batters
in line with the +/- marks.
3
Page 6
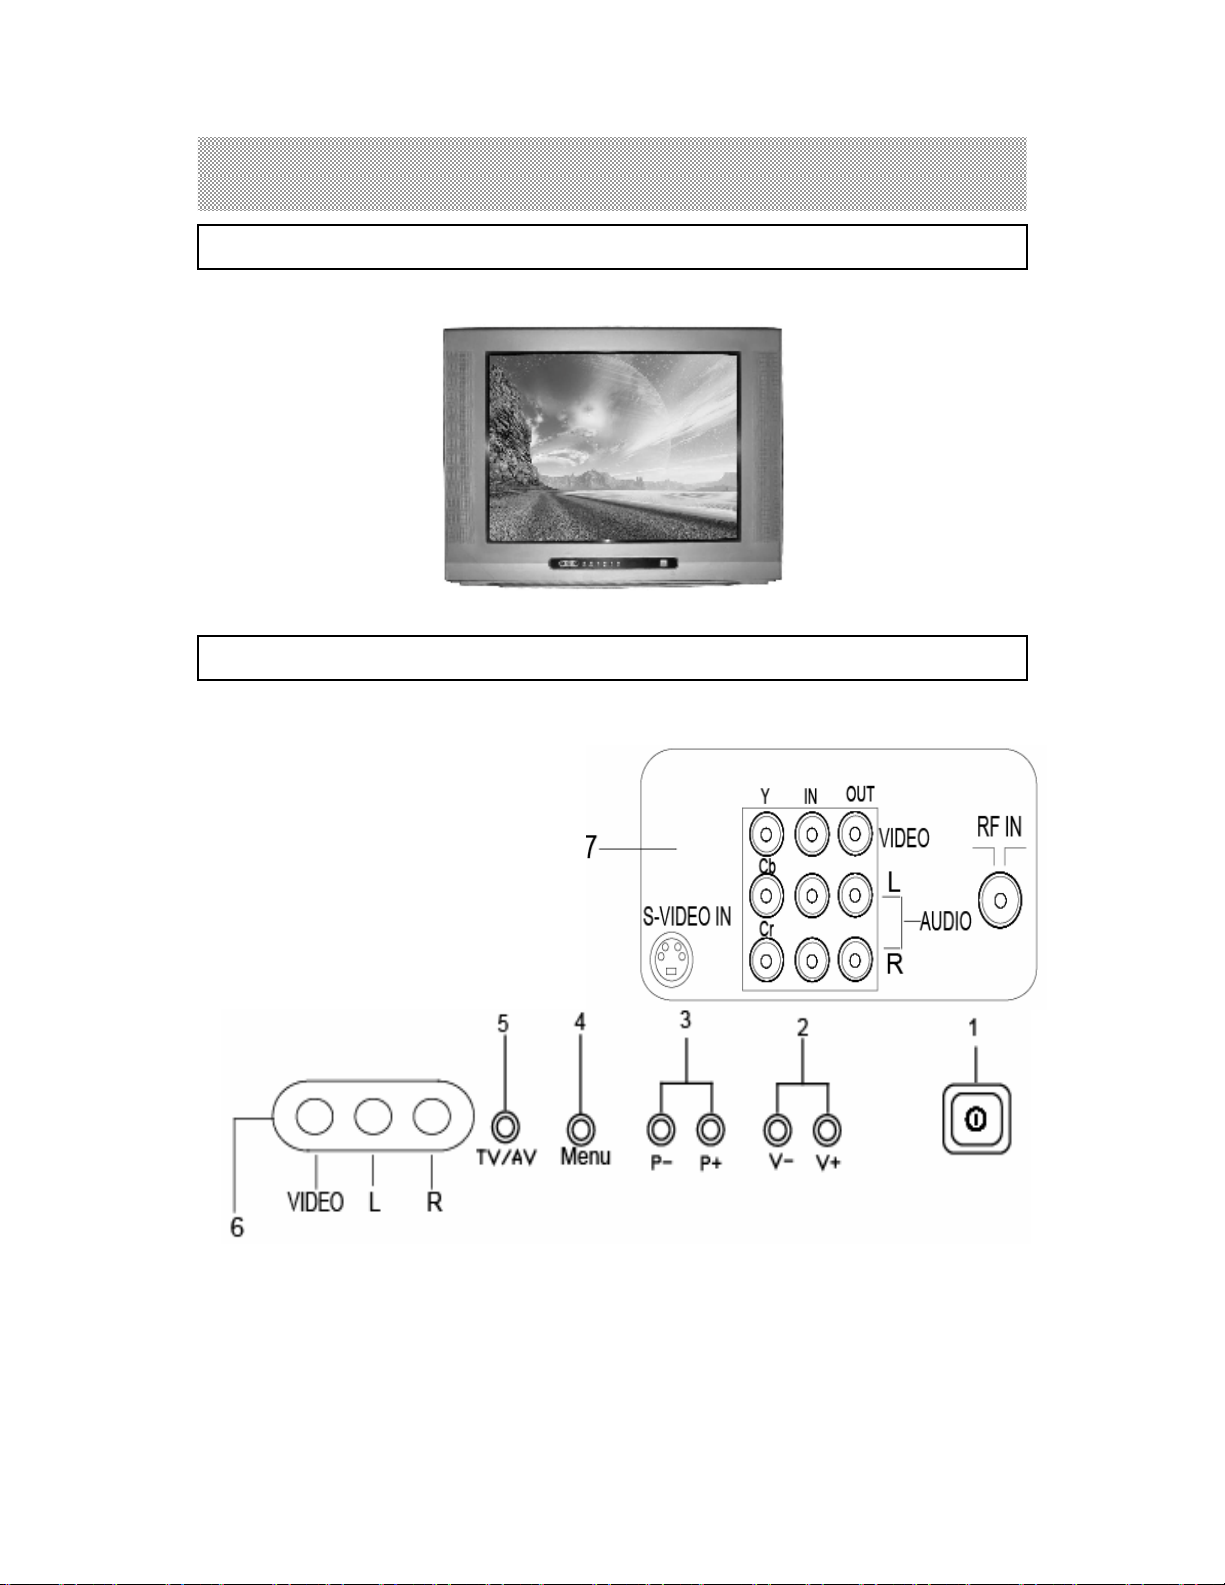
Names and Functions of Controls
Front of the machine
The functions of adjusting buttons and sockets of AV input
The adjusting buttons are in the front of the TV (below the picture tube).
1. Main power switch
2. Volume decrease (V-) and increase (V+)
3. Program number down (P-) and up (P+)
4. Menu button
5. TV/AV button
6. AV IN socket
7. Antenna input and AV IN/OUT
YUV IN S-Video sockets
Video and audio inputs connection:
When you receive DVD and VCD or the output signal of the video and audio of video
machine, directly connect the output lines of the video and audio signal with the relevant
jacks of the back of the TV set.
Note: 1, The rear AV output of the TV is only the signal output in the TV status.
2, If the AUDIO OUT is MONO, the rear AV and the side AV can not be used at
same time.
4
Page 7

Names and Functions of Controls
Buttons on remote controller
1. Standby Button
It controls power on/standby. Press this button
once, it will exchange between working mode
and standby mode. When TV is in standby mode,
it is in the state of low power consumption and
the screen is unlight. Press the Standby button,
the TV set will working and the indicator will
turns green from red.
2. Mute Button
Press this button to mute the sound. Press it again
or press “V+” to restore the sound.
3. PP Button
There are five models to select: “STANDARD”,
“SOFT”, “VIVID”, “LIGHT” and “PERSONAL”.
Press this button, it can display relevant state of
picture. “PERSONAL” is used for adjusting
brightness, contrast, color etc. by yourself, the
adjusted state will be put automatically into
memory.
4.REVIEW Alternate Program
Press this button once,it can alternate between
the present and previous program.
5. SYSTEM Button
Press the button to switch among the color
systems.
6.DISPLAY Button
Press it once for displaying the present condition.
Press it again for canceling the display
7. Program Number (0-9)
To select a one-digit TV program.,then press the
number button you want.
8. TV/AV Button
Press AV button to receive video signal as VCR or CD video. Press it again to switch to
TV program.
9.-/--/--- Button
To select a two-digit TV program. press the[-/--/---] button, then press the number buttons.
To select a three-digit TV program. press the[-/--/---] button twice, then press the number
buttons.
5
Page 8

Names and Functions of Controls
10. Sleep Button
It can set the time of standby for sleeping. The maximum time of sleeping is 120
minutes,when you press it once, the time will reduce 15 or 10 minutes. If you set the time
of sleeping,it will delete automatically the set of OFF-TIME.
11. Volume Control Button V+/V-
Press the button [V+] to upward the selected one, press the button [V-] to make it reduce.
12. MENU Button (see the operation method).
13. Program Selector Button P+/P-
Press these two buttons, the number of program will increase one or decrease one or will
realize the choice of upward or downward items in menu of full-screen. Change the
number of program by pressing P+/P-, it will skip the number of program in MEMORY
OFF (in PRESET menu, it displays “MEMORY OFF”). If all programs are in state of
SKIP OFF,it receives only the first program when you press this button. If only one
program is in state of MEMORY ON,it receives the only program which is in
MEMORY ON .
Operation for the Whole Machine
Turn the power supply ON/OFF
1. Press the power switch, the power indicator will be on, and after several seconds, the
TV set will start normal operation.
2. Press the standby button on the remote controller, the whole machine will be at standby
status, and the power indicator will be on but the screen is dark. In this status, press the
standby button on the remote controller, the machine can start working again.
Note: To ensure normal operation at all times, never turn the machine on and off
frequently. Wait for at least 5 seconds before turn it on again.
3. If you want to completely turn off the power supply, please press the power switch on the
TV set and remove the power supply plug from its socket.
Note: It is not proper to place the machine in standby status for long time. Please turn
off the power switch and remove the power supply plug from its socket if the
TV set will not be used for long time.
6
Page 9

TV Operation
Start operation: Watch TV programs
1 Select a desired program
●Use the direct Program No. selection buttons
Operation method see previous page "buttons on remote controller."
●Use the Program No. Up/Down Button “P+” “P-” buttons
Pressing “P+” will select a Program No. in the increasing number;
Pressing “P-” will select a Program No. in the decreasing number.
2 Adjust the volume by Volume “V+/V-” button.
3 If the color of a channel is not normal, it may be a wrong setting of color system, and
it can be adjusted as described below:
Directly pressing the SYSTEM button on the remote controller to select the correct
color system.
AUTO→PAL→PAL/M→PAL/N →N3.58 →N4.43 will appear in turn.
Note: If you are using the machine for the first time, please first make the automatic
searching and store the programs as described in “Adjustment” in the subsequent
page.
Start operation: Adjustment
When you turn on the TV set for the first time, please operate as follows.
1 Program presetting (automatic searching)
Press the “MENU” button continuously on the machine to enter "PRESET", so that the
following menu is displayed on the screen:
PRESET
POSITION 2
MEMORY NO
FINE
SEARCH
AUTO —SEARCH
l l l l l l l l l l l l . . . . . . . . . .60
CH+/CH- :SELECT
VOL+/VOL- :ADJUST
Use “P+/P-” button to select “AUTO-SEARCH” option, now the characters of this
option turn red, then press “V+/V-” button to place the machine in the automatic searching
7
Page 10

TV Operation
status. In this status, you can press “MENU” button to stop the searching.
At the end of automatic searching, the Program No. will jump automatically to the
Program No.0, and set the picture state as "STANDARD", the volume output value will be
set as "15".
2 Program presetting (semi-automatic searching)
If the automatic searching function cannot fine the desired channel, please use the
semi-automatic searching function. You can also first press the “MENU” to the “PRESET”
menu, then press “P+/P-“button to point the arrow to “PRESET”, Select “SEARCH”,then
use “V+/V-”button will start searching channel .Select “V+” button will start searching to
higher channel numbers, and pressing“V-” button for searching to lower channel. Repeat
this step until you fine your desired channel.
In semi-automatic searching will stop when a program is found.
PRESET
POSITION 2
MEMORY NO
FINE
SEARCH
AUTO —SEARCH
l l l l l l l l l l l l . . . . . . . . . .60
CH+/CH- : SELECT
VOL+/VOL- : ADJUST
3 Fine tune
You can first use “P+/P-” or direct Program No. buttons to select the Program No. for
fine tuning press “MENU” button to display the “PRESET” menu ,then press “P+P-”
button to point the arrow to “POSITION”, then use the “V+/V-” button to adjust the
Program No. to your desired one.
Select “FINE”, pressing “V+” button will make the fine tune to high end from the
current channel, and pressing “V-” button will make the fine tune to high end, unit the best
sound and picture are obtained.
During fine tune , the “V+” or “V-” button must be pressed all the time for fine tune to
respective directions, and releasing the “V+” or “V- ” button can stop the fine tune. After
fine tune, the set value will put into memory automatically.
Fine tune is not necessary under normal conditions. In areas with poor transmission
signal, adjustment may be fine tune.
8
Page 11

TV Operation
Basic operation: Picture and sound selection
1 Mute and screen display
Mute
The Mute function may be used when you want to receive a call or visitors. When you
need mute, press the “MUTE” button on the remote controller, and the screen will display
the red characters “MUTE”. If you want to restore the sound, press the “ MUTE” button
once more.
Note: Automatic mute is on in program switchover, non-signal in TV and AV mode,
reminding status and during searching.
Screen display
Press the “DISPLAY” button, the screen will have character display to show the current
Channel No., color systems, set time and sleep time. If it is in the screen display mode,
pressing the “DISPLAY” button will cancel the existing screen display.
Pressing the “DISPLAY” button can close the display menu.
Note: 1 Pressing the “DISPLAY” button in AV mode will enable inquiry of current video
status and color systems, set time and sleep time.
2 When the channel is changed, the Program No. is displayed at the right top of the
screen for about 5 seconds.
3. If you want to display the set time and sleep time on the display screen, the set time
and sleep time will be set firstly.
4. If the TV has SAP/STEREO function, it will also be displayed on screen.
2 Selectable picture
Selecting the picture mode
Press the “PP” button to select your desired picture quality.
Press the “PP” button can select one of the five picture modes in turn from
STANDARD, SOFT, VIVID, LIGHT, and PERSONAL.
STANDARD
Standard and appropriate picture
SOFT Pale picture
VIVID Light picture
LIGHT Clear and bright, with strong gradation
PERSONAL Picture quality adjusted by your own
Set your desired picture mode
Repeatedly press “MENU” button to show “Picture” menu on the screen, then press
“P+/P-” to select the item you want to adjust, then press “V+/V-” to adjust the effect.
9
Page 12

PICTURE
V+/V
-
:ADJUST
TV Operation
Output value of every item is average-divided 100 steps: 0~100. After every value of
the "PICTURE" menu has been changed that will be stored. If you do nothing during 10
seconds, the TV will exit automatically from the "PICTURE" menu.
Note: When the color system of the TV is AUTO and input signal is NTSC system or is
forced into NTSC system and the picture is color, the item of TINT will display on the
screen, in other situations, there is no item of TINT . The adjusting range of TINT is
-50~+50, and the adjusting range of other items are 0~100.
The display of PICTURE menu is as follows:
BRIGHT 60
CONTRAST 80
COLOR 60
SHARP 50
CORING OFF
BLACK STRETCH ON
llllllllllllllllllllllll. . . . . . . . . .60
P+/P- : SELECT
Basic operation: Setting time
With this function, you can watch the preset program or place the TV set in
standby mode at set time.
For example, it is 18:28 now, and you want to watch News Program at 19: 00
(Supposing the Program No. is 6), and turn it off at 22:30 (standby); then turn it on at 7:30
the next morning (supposing the Program No. is 12). The operation is as follows:
1. Repeatedly press “MENU” button to enter “CLOCK” menu.
CLOCK
TIME 18:28
ON-TIME --:- OFF-TIME --:- ALARM --:- BESPOKE TIME --:- POSITION -
P+/P- : SELECT
V+/V - : ADJUST
2. Press Program No. Up/Down (P+/P-) button, select “TIME” option (The characters
"TIME" turn into red), then use the Volume Down “V-” button to set hour at 18, and use
“V+” button to set Min. at 28.
Now, the characters selected on the screen will be in red.
3. Select “BESPOKE TIME” option, then use the Volume Down “V-” button to set hour as
19, and use “V+” button to set Min. as 00.
4. Select “POSITION” option, then use the Volume Up/Down (V+/V-) button to set the
Program No. as 6.
10
Page 13

TV Operation
5. Select “OFF- TIME” option, then use the Volume Down “V- ” button to set hour as 22,
and use “V+” button to set Min. as 30.
6. Select “ON- TIME” option, then use the Volume Down “V-” button to set hour as 07, and
use “V+” button to set Min. as 30.
Note: The last program before turning off the TV is just the one after turning on at the
preset on-time.
CLOCK
TIME 18:28
ON-TIME --:- OFF-TIME --:- ALARM --:- BESPOKE TIME --:- POSITION -
P+/P- : SELECT
V+/V - : ADJUST
★NOTE : In "CLOCK" menu, you must set "TIME" item firstly, then select other items.
★You can preset the designated time by "ALARM" item.
For example: Set "ALARM" as 09:00, when the designated time arrives, there will be
a symbol "
" on the screen twinkling continuously and remains until you press any
button on the remote controller or the TV set. When the yellow " " is twinkling and
reminding, the TV will mute. If you have no operation during 10 seconds, the TV will exit
automatically from "CLOCK" time.
Technical operation: Single button hopping and language selection
Single button hopping
With this function, you can watch the Program No. you were just watching with ease.
Operation method:
In TV mode, press directly the “REVIEW “ button in the TV section of the remote
controller, and you can jump from the current program to the previously watched one
directly.
For example: You were watching Program No. 20, and are now watching Program No. 5.
Now press the “REVIEW “ button, Program No. will jump directly from 5 to 20; then press
it again, Program No. will jump back from 20 to 5. Repeatedly pressing this button will
jump between these two numbers.
11
Page 14

OPTION
AUDIO
TV Operation
Language, picture remove noise, calendar selection
1. Picture remove noise
LANGUAGE ENGLISH
CALENDAR
GAME
LOTTERY
BIOLOGY CLOCK
P+/P- : SELECT
V+/V- : ADJUST
2. Setting the screen display language
Press the “MENU” button of the TV set for many times or press “OPTION” button on
the remote controller to show “OPTION” menu:
Press Program No. "P+/P-" to choose "LANGUAGE" item, then press Volume
Up/Down "V+/V-" button, according to your requirement, select screen display language.
3. Calendar
Press Program No. "P+/P-" to choose "CALENDAR" item, then press Volume
"V+/V-"to enter into "CALENDAR" item, press Program No. "P+/P-" button to set year,
press Volume Up/Down "V+/V-" button to set month. After every value has been
accomplished, which will be stored.
2006 NOV
SU MO TU WE TH FR SA
1 2 3 4 6 7
8 9 10 11 12 13 14
15 16 17 18 19 20 21
22 23 24 25 26 27 28
29 30 31
VOLUME 20
BALANCE 00
lllllllllllllllllll. . . .. . . . 20
P+/P- : SELECT
V+/V-: ADJUST
Technical operation: The using of AUDIO menu
Repeatedly press the “MENU” button to show “AUDIO” menu on the screen, move
the arrow to point at “VOLUME” with the button on the remote controller. By pressing
"V+/V-" button to change volume; select BALANCE, by pressing "V+/V-" to adjust left
and right sound channel balance. The screen will display as follows:
★NOTE: If the AUDIO OUT is MONO, the BALANCE item can not be seen.
12
Page 15

Connect with Other Devices
d
Connect CD, VCD, DVD or other sound, picture and audio or video output devices
Video machine, VCD, DVD, game set or other sound and
pic
ture output devices
OUT
IN
Y
VIDEO
OUT
VIDEO
RF IN
RF IN
To v
RF output
To antenna input
Video machine, CD, satellite receiver or other sound an
picture output devices
ideo input
AUDI O
L- OUT- R
S-VIDEO
Cb
Cr
AUDIO
IN
Y
Cb
Cr
AUDIO
S-VIDEO
S-VIDEO
Y
Cb
Cr
YUV input
IN
OUT
AUDIO
To audio input
Video and Audio input devices
Vid
eo output
VIDEO
RF IN
dio output
Au
AUDIO
L- I N- R
13
Page 16

Miscellany
Guide to simple trouble-shooting
The following phenomena are not necessary faults, and the following checks should be
performed first before asking a specialized person for repair. If the cause of fault cannot be
found and corrected with this guideline, remove the power plug from the socket and have a
specialized person to repair it.
Symptom Inspection
Is the fuse or breaker in the house OK?
No picture nor sound
Is the power supply plug inserted? Is it in good contact?
Is the system of the TV correct?
No picture but the
sound is OK
Normal picture but no
sound
Only picture with snow
and noise
No color
Small dots, lines or
strips on the picture
Adjust brightness and contrast.
Press the V (+) or Mute button several times.
Adjust the indoor or outdoor antenna.
Connect a proper antenna
Is a color program being broadcasted?
Are the hue and system correct?
They are usually caused by interference from cars, neon
lights and electrical hair dryers.
Adjust the antenna to minimize the interference.
Usually caused by reflection from hills or high buildings
Ghost
nearby. Change the antenna direction or height. Better use
outdoor antenna with good directivity
If color stain appears after changing the angle of the TV
Color stain
set, turn its main power switch off and wait for at least 15
minutes before turning it on again.
Afterglow when turned
off
It is normal to have an afterglow on the screen for 1-3
seconds after the power to the TV set is cut off, and it will
not affect the CRT.
Note: The design and structure is subject to change without notice.
Do not attempt to repair or refit the machine by yourself, or it may cause a fire and
there is high voltage hazard inside.
14
Page 17

Miscellany
Specification
●I/O interface: RF: antenna 75Ω co-axial
●Receiving system: RF: PAL B/G
AV: PAL NTSC4.43MHZ/3.58MHZ
●AV Input:AV1 AV2
●AV output×1
●S-Video Input×1
●YUV Input×1
●Power consumption: ≤150W
●No. of programs stored: 0-255
●Power input: AC 240V 50Hz
●CRT: 68cm measured diagonally
●Sound output: ≥4W×2
●Loudspeaker: 8Ω, 8W×2
15
 Loading...