

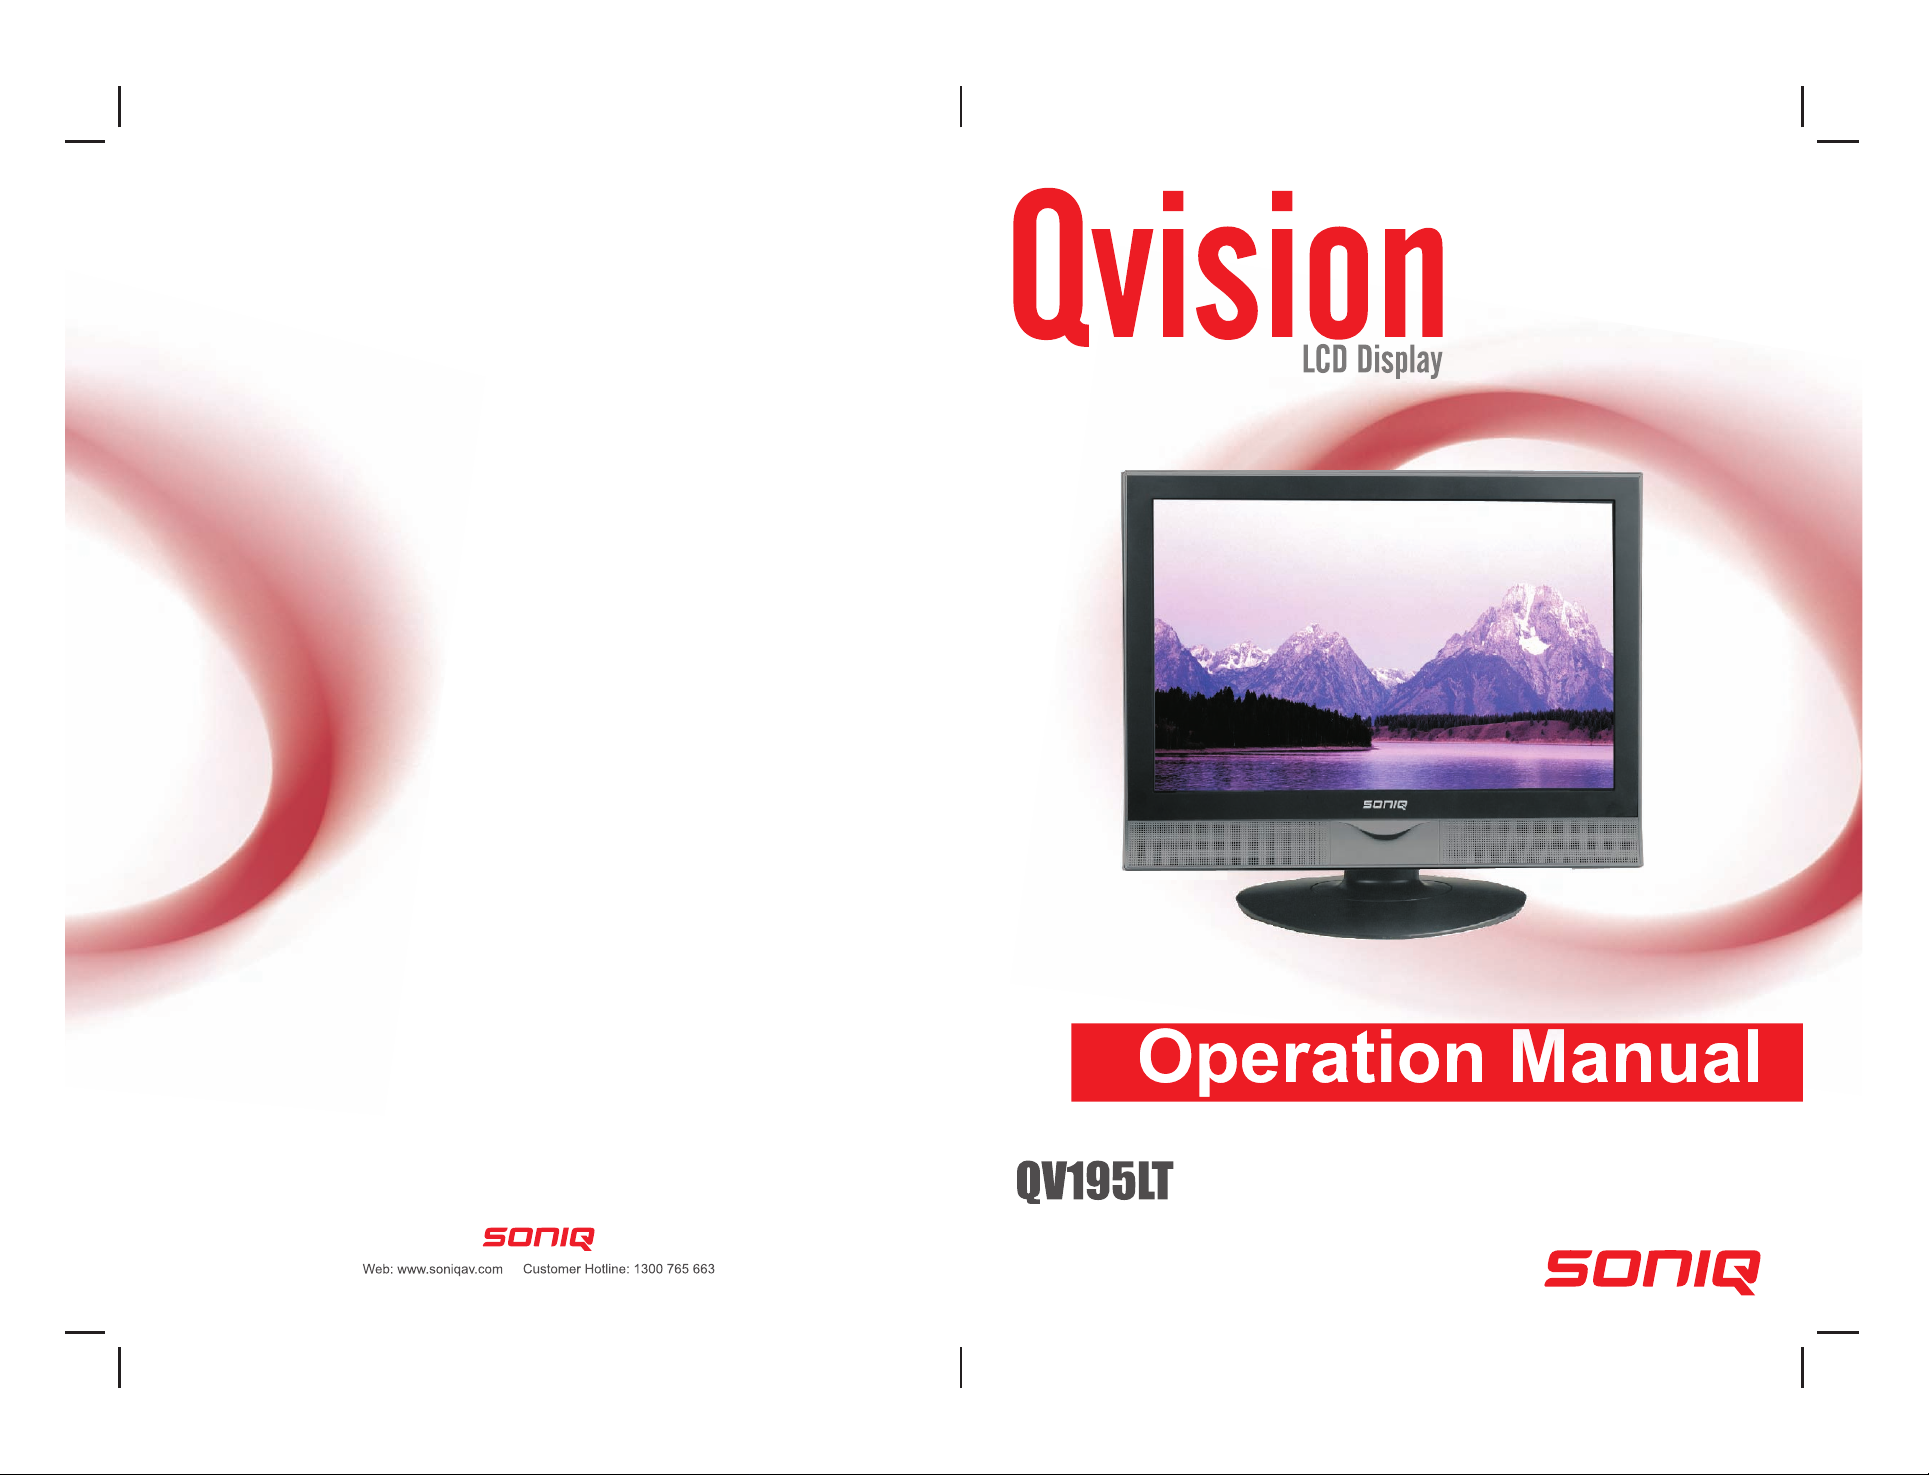
Page 1
Page 2
Page 3
Page 4
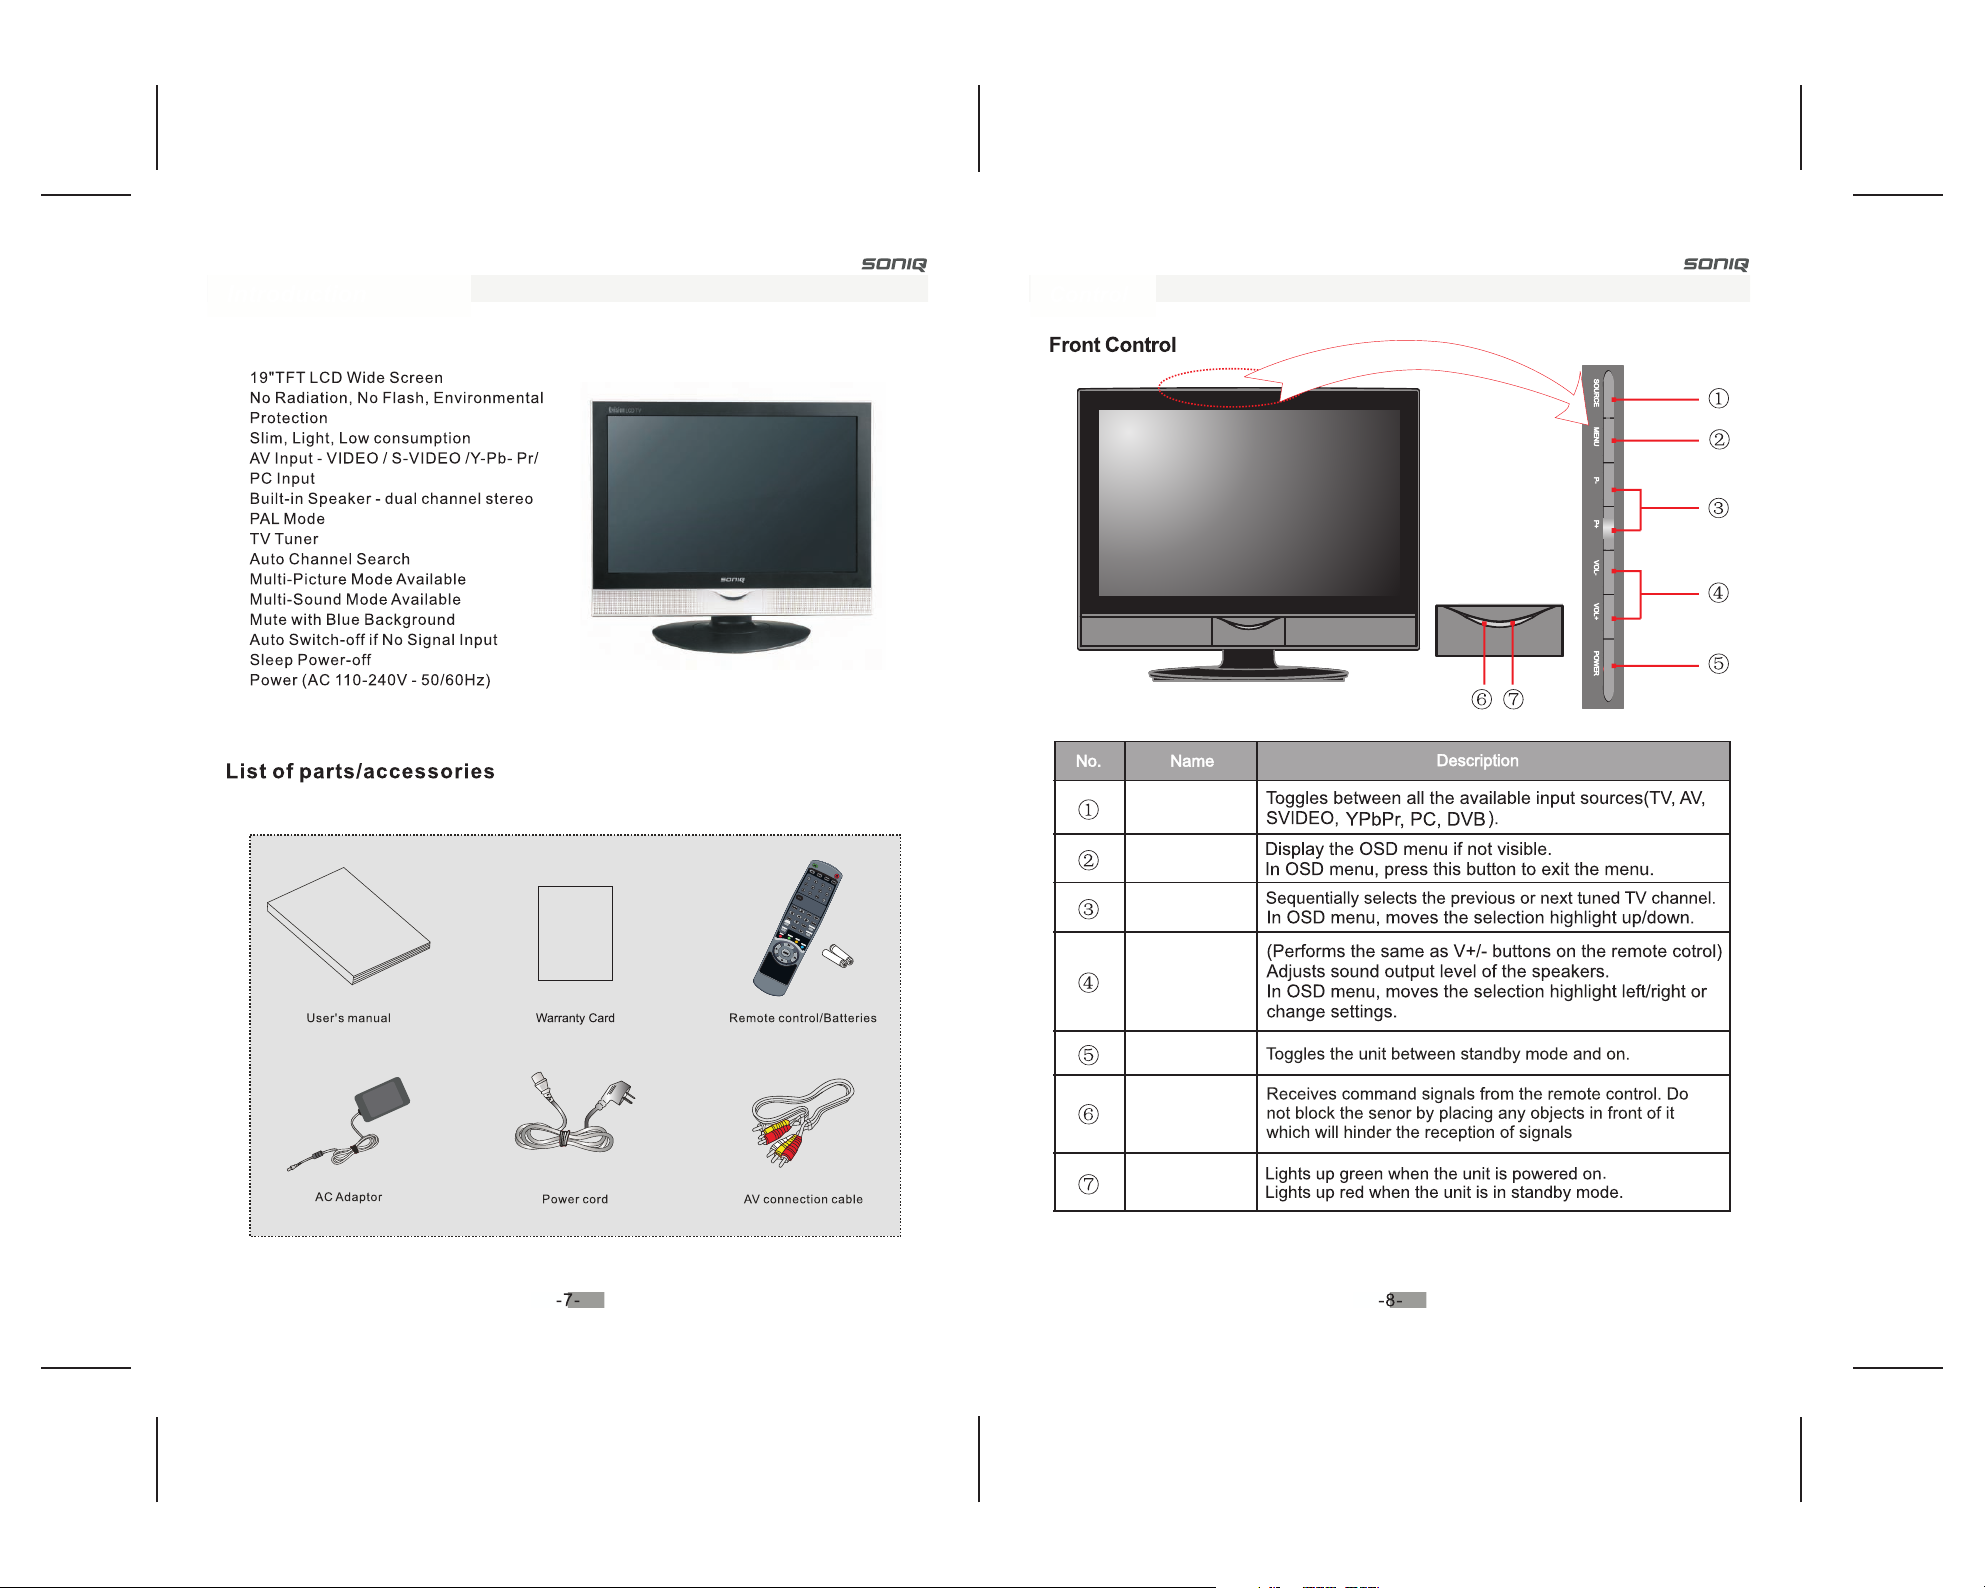
Product Feature List
SOURCE
MENU
P+/-
VOL+/-
POWER
Remote control
sensor window
Power indicator
Page 5
Function For TV
LCD Button
Press to make buttons
effectively in TV mode.
Numerical Buttons
Press the number
buttons for direct access
TV channels.
EXIT Button
Press to exit on screen
menu.
SLEEP Button
Press to activate sleep
timer.
V+/- Buttons
Press Volume+ to
increase the volume, or
Volume- to decrease. At
the OSD menu, press
these buttons to move the
selection focus left and
right or change settings.
Button
Toggles the unit between
standby mode and on.
DISPLAY Button
Press to display mode
and on.
Button
Press to select single
and double-digit channel.
MENU Button
Press this button to
display the OSD menu.
When the OSD menu is
on, press this button to
exit the menu.
P+/- Buttons
Press these buttons to
sequentially select channels.
When the OSD menu is on,
press these buttons to
move the selection focus
up or down.
Page 6
Function For DTV
DVB-T Button
Press to make buttons
effectively in DTV mode.
Numerical Buttons
Press the number
buttons for direct access
TV channels.
SETUP Button
Press to display DTV
menu.
OK Button
Press execute selection
in DTV mode.
DIGEST Button
Press to display Nine
Pictures.
EPG (Electronic
Program Guide) Button
Press to display the
electronic program guide.
INFO Button
Press this button to
display the DTV channel
message. Press EXIT
button to turn the
information off.
Button
Press to display
information about DTV
programme.
/ / / Buttons
Press these buttons to
highlight, select and
adjust items. Press /
to sequentially change
the channels.
EXIT Button
Press to exit DTV menu.
PAUSE Button
Press to make the
screen stops.
SUB Button
SUB (Subtitle) Button
Press to show subtitle.
TTX Button
Press to display teletext
information about news,
weather television
programmes and many
other topics.
TV/RADIO Button
Press to change TV and
Radio channel.
FAV Button
Press to turn on and off for
favorite channel.
ASPECT Button
Press to Changes the
shape of pictures.
Page 7

Page 8
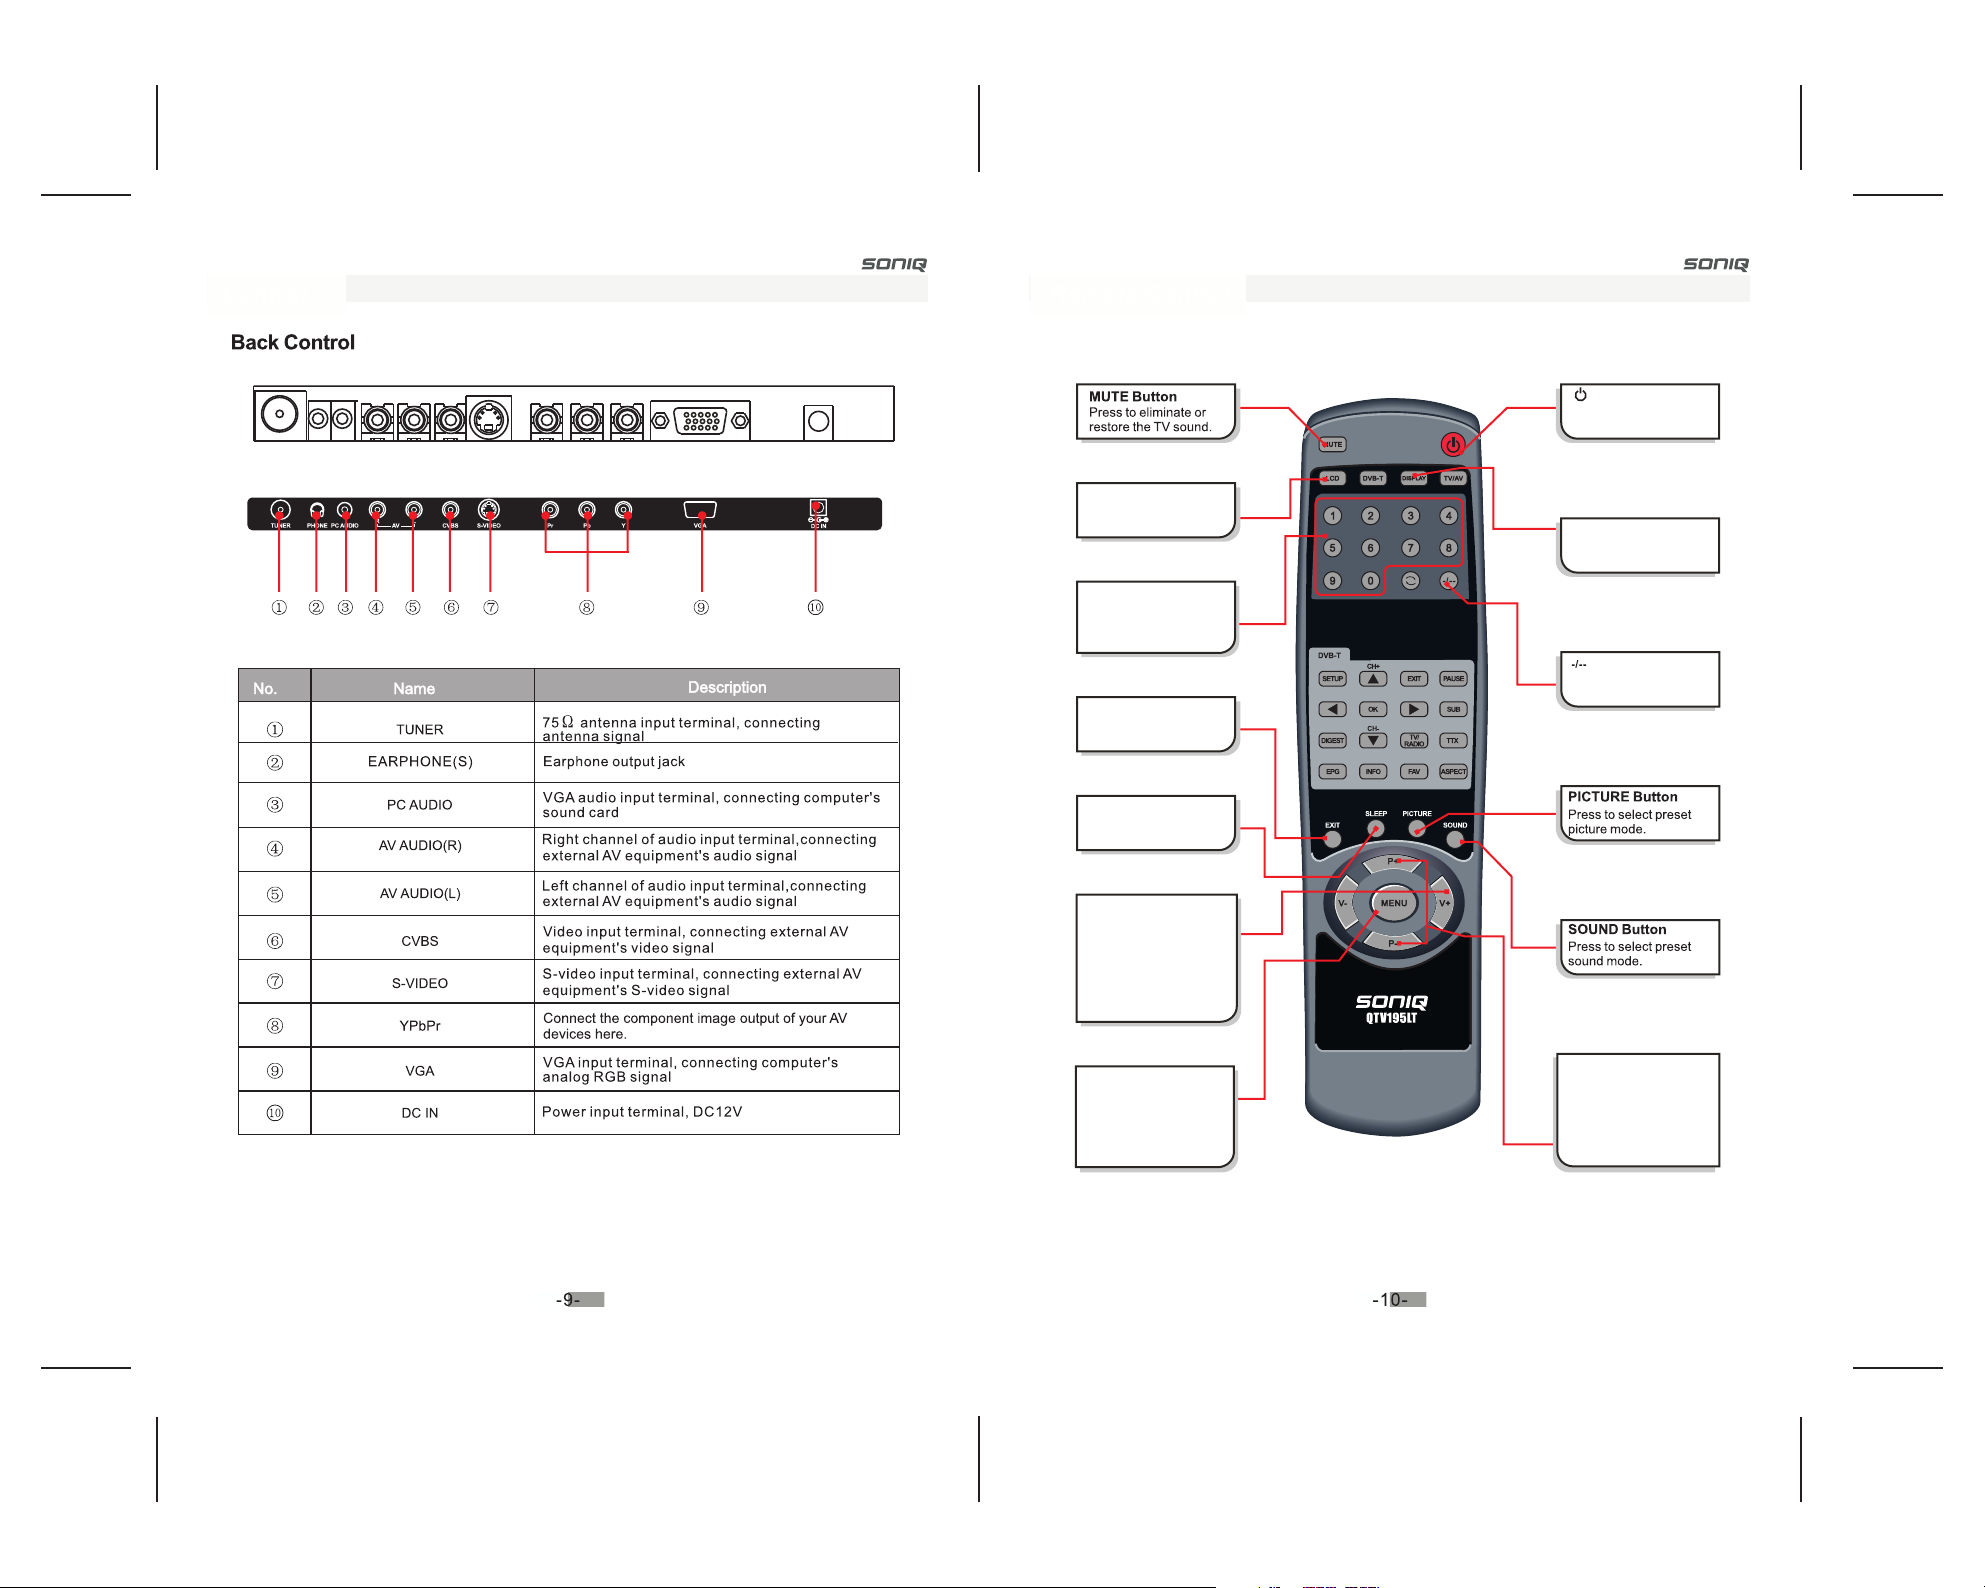
white
Page 9

Page 10

Press POWER button on the unit or button on
the remote control to turn on , the unit power
indicator will light up in orange.
Press POWER button on the unit or button on
the remote control again the unit will go into standby
mode. (The power indicator will turn red).
1. Press VOL+ button on your unit or V+ button on
your remote control to increase volume. The
volume indicator will increase in length as volume
rises.
2. Press VOL- button on your unit or V- button on
your remote control to decrease volume. The
volume indicator will decrease in length as volume
falls.
Page 11

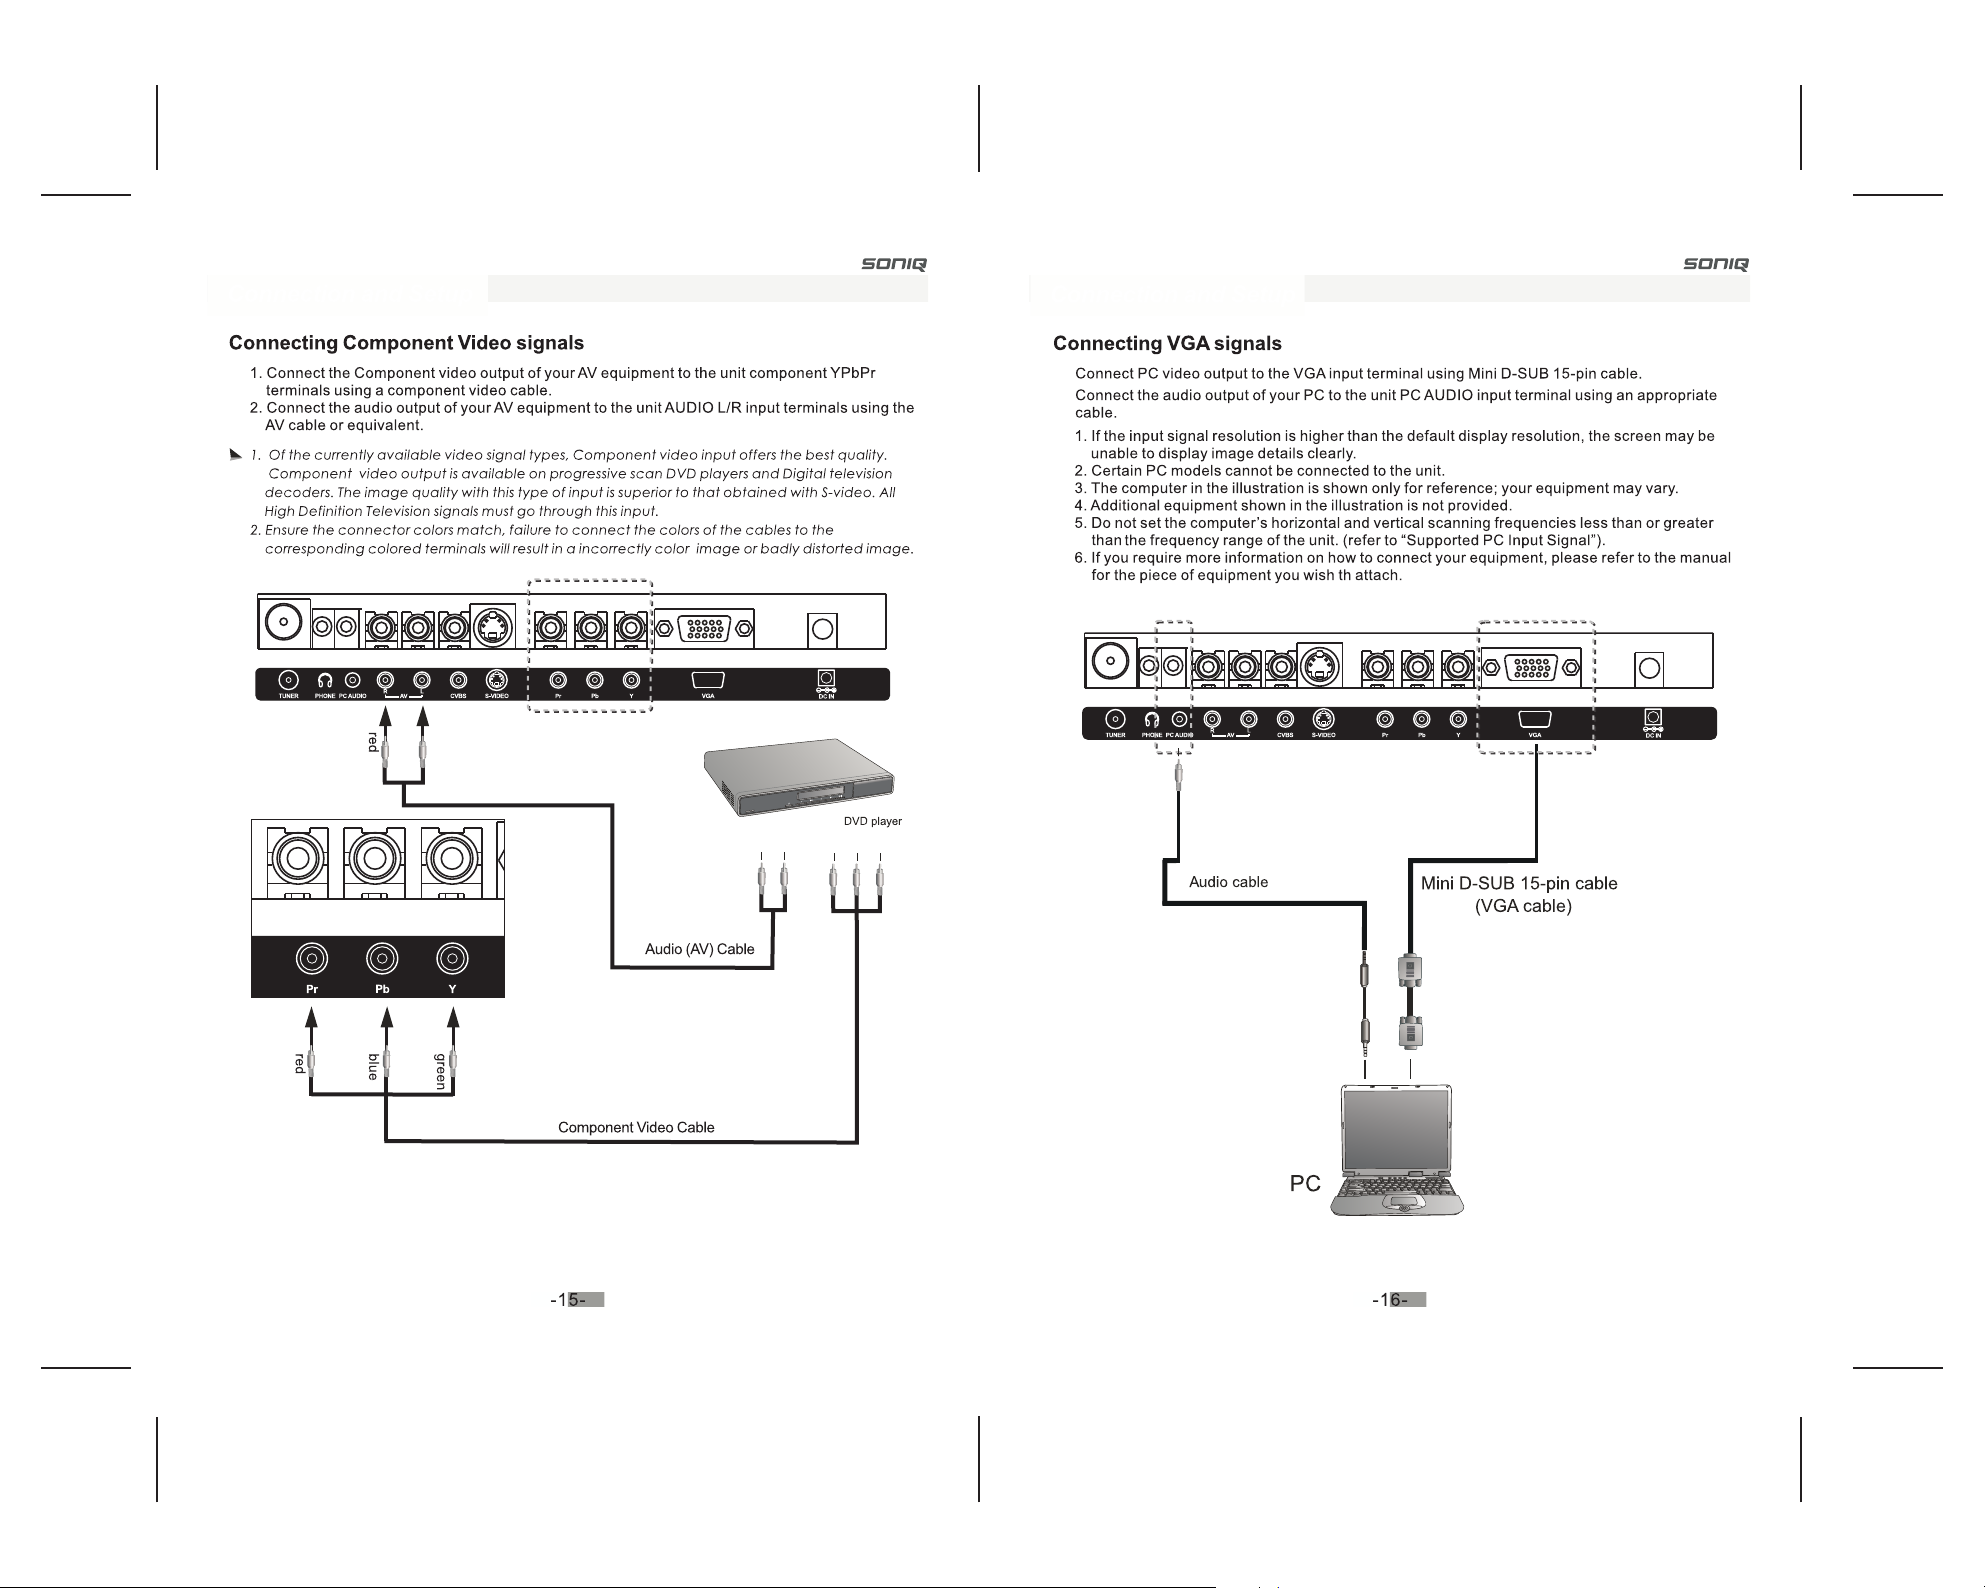
Switching Source
DISPLAY
Functions below only be used in DTV mode.
Subtitle On/Off
You can simply play subtitle by pressing SUB
button on remote control (only in DTV mode).
1. Press SUB button to display Sub On and
show subtitle when it is available.
2. Press SUB button again to off the subtitle.
SUB
TV/AV
TV/AV
Page 12

Viewing the EPG (Electronic Program Guide) information
The EPG (Electronic Program Guide)
information is provided by the broadcasters.
Program entries may appear blank or out of
date as a result of the information broadcast
on a given channel. The display dynamically
update as soon as new information becomes
available.
You can press EPG button to navigate all TV
programs you had saved.
This function depends on program services
support.
Display Program Information
While viewing a channel, additional information
about the current program may be displayed.
1. While viewing a program (in DTV mode).
press INFO button to display program’s
information.
2. Press EXIT button to exit from this function.
EPG
INFO
Favourite channels
FAV
1. Press FAV button to display FAV On and then
you can only view selected favourite programs.
2. You can use CH+/- buttons to change favourite
channel sequentially.
3. Press FAV button again to display FAV Off then
you can choose from all received programs.
-23-
-24-
Page 13

VIDEO
INPUT
Scheme
Brightness
Contrast
Hue
Saturation
Sharpness
Color Temp.
TV
AV
S-VIDEO
PC
YPbPr
DVB
User
Normal
Vivid
Soft
Standard
Cool
Warm
OSD
OSD Language
OSD Position
OSD Timer
DCDI
Factory Reset
Volume
Bass
PC
Treble
Balance
Navigating the OSD Menu
You can use the OSD menu screen to adjust settings on your unit. Follow the steps outlined
below to select the function you desire.
Press MENU button on your remote control, or MENU button on your unit to bring up the
following main menu on your screen:
TV
PC
Program No.
TV System
Skip
Channel Search
Press P+/P-/V+/V- buttons on the remote control, or P+/P-/VOL+/VOL- buttons on the unit to
select items on the main menu, choose functions or change settings.
Press MENU button to return to the upper layer of menu.
Press EXIT ( ) button on the remote control to exit the menu.
VIDEO Menu
Channel Swap
Auto Adjust
H Position
V Position
Phase
Clock
Auto Color
If no signal received, VIDEO menu can not be adjust.
-25- -26-
1. Press MENU button on the unit or on the remote
control and then use V+/- buttons to display the
VIDEO menu.
2. Use P+/- buttons to select what you want to adjust
in the VIDEO menu.
3. Press V+/- buttons to adjust.
4. When you are satisfied with your adjustment, press
MENU button to return or EXIT ( ) button to exit
the main menu.
Page 14

TV Menu TV Menu
VIDEO Menu
Scheme
Brightness
Contrast
Hue
Saturation
Sharpness
Color Temp.
Hue is only adjusted under NTSC.
To restore a factory preset
or user customized picture
mode.
Adjust image black level.
Adjust color hue.
Adjust color saturation.
Adjust the sharpness level
of the image.
Use P+/- buttons and V+/- buttons
to change selection.
Use P+/- buttons and V+/- buttons
to reduce/increase to setting.
Use P+/- buttons and V+/- buttons
to reduce/increase to setting.
Use P+/- buttons and V+/- buttons
to reduce/increase to setting.
Use P+/- buttons and V+/- buttons
to reduce/increase to setting.
Use P+/- buttons and V+/- buttons
to reduce/increase to setting.
Use P+/- buttons and V+/- buttons
to change selection.
User
Normal
Vivid
Soft
0 to 100
0 to 100
0 to 100
0 to 100
0 to 100
TV Menu
Program No.
TV System
Skip
Select channel no you
desired to program
Change sound system
of reception.
Skip function on, channel
will not be displayed when
press P+/- buttons
Press MENU button on the unit or on the remote
control to display the TV menu when in TV mode
as below:
1.Use P+/- buttons to select you want to adjust in
the TV menu.
2. Press V+/- buttons to adjust.
3. When you are satisfied with your adjustment ,
press MENU button to return or EXIT button to
exit the main menu.
Use V+/- buttons to adjust the
program no in direct input
program no using numerical
buttons(eg. program no 8 press
0 and 8)
Use V+/- buttons to adjust
sound system.
Use V+/- buttons to adjust skip
On/Off.
0 to 99
SECAM D/K, PAL B/G,
PAL D/K, PAL I,
SECAM BG
0 to 100
INPUT Menu
1. Press MENU button on the unit or on the remote
control and then use V+/- buttons to display the
INPUT menu.
2. Use P+/- buttons to select input source what you
want and press V+ button to confirm it.
-27-
Channel Search
Press V+/- buttons to enter the channel search
menu as below:
-28-
Page 15

TV Menu DTV Menu
Fine Tune
Manual Search
Auto Search
AFC
Channel Swap
Only necessary where
image or sound reception
is poor.
To search the program
manually.
This function lets the TV tuner
of your unit search through all
available channels and added
then to memory.
When AFT is set “on”, the
frequency will be fine tuning
automatically.
Use P+/- buttons to select ,
then press V+/- buttons to
adjust.
Use P+/- buttons and V+/buttons to reduce/increase to
setting.
Use P+/- buttons and V+/buttons to change selection.
Use P+/- buttons and V+/buttons to reduce/increase to
setting.
-15 to 15
Press P+/- buttons and then use V+ button to
display SWAP menu on screen.
Swap option allows you to swap the current channel.
When set On, the program number will be swapped
when you select the swapped channel with V+/buttons.
1. Press V+/- buttons to select the current channel.
2. Press V+/- buttons to select the swap channel.
3. Press V+ button at Perform Swap to swap the
channel.
-29-
U
-30-
Page 16

DTV Menu DTV Menu
unit.
OK button
OK button
-31- -32-
Page 17

DTV Menu DTV Menu
OK button
The unit
OK
The unit
-33- -34-
OK
EXIT
TTX
to
Page 18

DTV Menu DTV Menu
unit
SUB button
EPG
EXIT
-35- -36-
Page 19

DTV Menu DTV Menu
unit
is
SETUP
OK
OK button
FAV
-37- -38-
Page 20

DTV Menu DTV Menu
SETUP
EXIT
button
button
-39-
OK
OK button
OK
-40-
Page 21

DTV Menu DTV Menu
to
to
OK button
OK
-41- -42-
Page 22

DTV Menu DTV Menu
EXIT
SETUP
OK
OK
If a picture like this appears, it indicates the signal
too weak, if you are using an indoor antenna please adjust the
antenna position.
If a picture like this appears, it indicates the TV standard of the
unit does not match your TV set. You must switch to another TV
standard in system setting menu or TV.
received is
-43-
will not be displayed. The default password of this
receiver is 8888.
-44-
picture
Page 23

DTV Menu Connect to PC
OK
-45-
-46-
Page 24

Troubleshooting Specifications
-47-
-48-
 Loading...