

Page 1
Page 2
Table of Contents
Safety Instructions
Table of Contents
Table of Contents.......................................................................................
Safety Instruction.....................................................................................
Introduction.................................................................................................
Introduction................................................................................................
Package Contents.......................................................................................
Main Unit Control......................................................................................
Front Panel.................................................................................................
Rear Panel..................................................................................................
Remote Control.....................................................................................
Remote Control Key Functions...................................................................
Using the Remote Control...........................................................................
Batteries...................................................................................................
Notes on Using Batteries............................................................................
Connection and Setup...........................................................................
Connecting Antenna ..................................................................................
Connecting Composite Video signals..........................................................
Connecting S-Video signals.......................................................................
Connecting Component Video signals.........................................................
Connecting VGA signals............................................................................
Connecting HDMI signals............................................................................
Connecting the Power Cord.........................................................................
Basic Operation....................................................................................
Power On/Off and Standby.........................................................................
Switching Source......................................................................................
Changing Channels...................................................................................
Display Channel List..................................................................................
Adjusting the Volume.................................................................................
TV Sound Mode Selection..........................................................................
Display Information...................................................................................
Favorite Channels................................................................................
Displaying favorite list.............................................................................
Adding favorite channels.........................................................................
Deleting favorite channels.......................................................................
Adjusting Aspect Ratio...............................................................................
Using the Pause Function..........................................................................
Using Sleep Timer.....................................................................................
1-2
3-6
8-9
10-11
12-15
16-21
18-19
10
11
11
11
12
12
13
13
14
15
15
16
16
16
17
17
17
18
18
18
19
19
20
20
Functions for Digital TV.........................................................................
Teletext On/Off.......................................................................................
7
7
7
8
9
Subtitle On/Off........................................................................................
Viewing the EPG (Electronic Program Guide) Information...........................
Display Program Information....................................................................
OSD (On Screen Display) Menu..............................................................
OSD Structure......................................................................................
Navigating the OSD Menu..........................................................................
Video Menu..........................................................................................
Video Menu (VGA mode).......................................................................
Audio Menu..............................................................................................
TV Menu..............................................................................................
Digital and Analog TV Auto Scan...............................................................
Manual Scan.....................................................................................
Digital TV Manual Scan.........................................................................
Analog TV Manual Scan.........................................................................
Analog TV Channel Edit............................................................................
Digital TV Channel Edit............................................................................
Set Up Menu.........................................................................................
Setting Time......................................................................................
Setting Power On/Off Timer......................................................................
Setting Sleep Timer.................................................................................
Removing Ghost Image...........................................................................
Reset System.........................................................................................
Parental Menu...........................................................................................
Parental Control Function.....................................................................
Setting up your Password...........................................................................
Program Block in Digital TV Mode................................................................
Input Block................................................................................................
Change Password.....................................................................................
Clean All Blocks........................................................................................
Troubleshooting....................................................................................
TV Unit.....................................................................................................
Antenna....................................................................................................
Supported PC Input Signal.........................................................................
Specification.............................................................................................
20-21
20
20
21
21
22-35
22-23
24
24-26
26-27
28
28-31
29
29-30
29
30
30
31
32-34
32-33
33
34
34
34
35
36-38
36
36
37
37
38
39-40
39
40
40
41
-1- -2-
Page 3
Safety Instruction Safety Instruction
1.
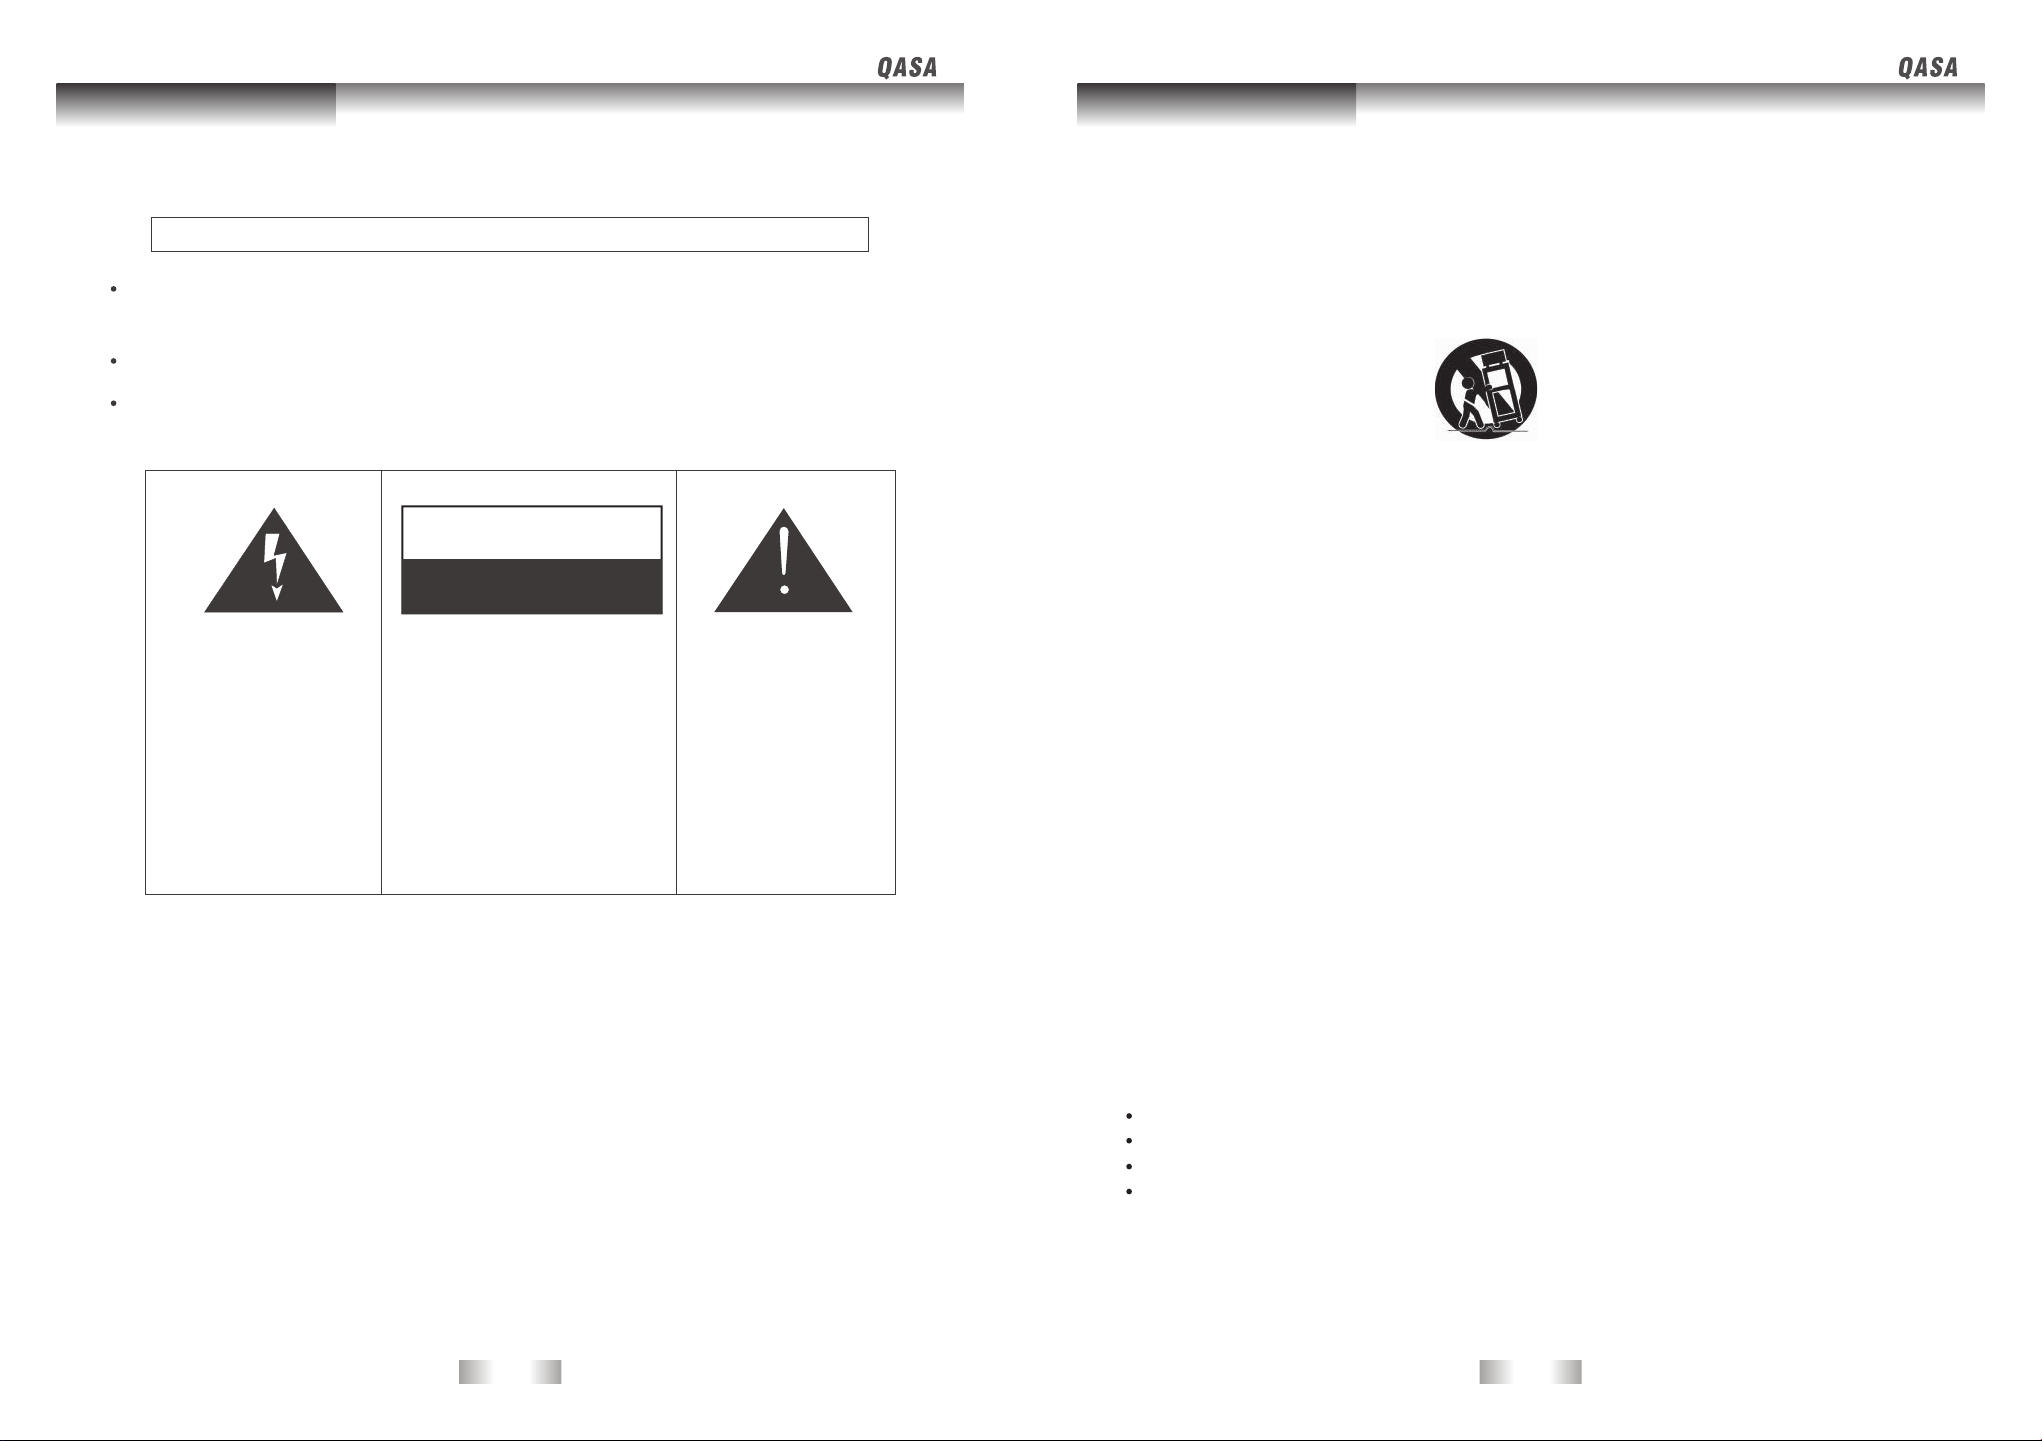
IMPORTANT SAFETY INSTRUCTIONS
WARNING
TO PREVENT FIRE OR SHOCK HAZARD, DO NOT USE AN EXTENSION CORD,
RECEPTACLE OR OTHER OUTLET UNLESS THE BLADES CAN BE TO PREVENT
BLADE EXPOSURE.
TO PREVENT FIRE OR SHOCK HAZARD. DO NOT EXPOSE THIS APPLIANCE.
TO RAIN OR MOISTURE.
TO PREVENT ELECTRICAL SHOCK, MATCH WIDE BLADE PLUG TO WIDE
SLOT FULLY INSERTED.
CAUTION
RISK OF ELECTRIC SHOCK
DO NOT OPEN
This lightning flash with
arrowhead symbol in an
equilateral triangle alerts
users to the presence of
uninsulated dangerous
voltage within the
products enclosure that
may be of sufficient
magnitude to constitute
a risk of electric shock to
persons.
This appliance should not be exposed to water and no object filled with liquid, such as a vase,
should be placed on the unit.
Warning: To reduce the risk of
electric shock, do not remove
cover(or bark). No user
serviceable parts inside. Refer
servicing to qualified service
personnel.
The exclamation mark
within an equilateral
triangle alerts users
to the presence of
important operating
and maintenance
(servicing) instructions
in the literature
accompanying the
appliance.
Read Instructions-All the safety and operating instructions should be read before the appliance is
operated.
2.
Retain Instructions-The safety and operating instructions should be retained for future reference.
3.
Heed Warnings-All warnings on the appliance and in the operating instructions should be adhered
to.
4.
Follow Instructions-All operating instructions should be followed.
Water and Moisture-The appliance should not be used near water.
5.
Cart and Stands-The appliance should only be used with a cart or stand that is recommended by
6.
the manufacturer.
Wall or Ceiling Mounting-The appliance should be mounted to a wall or ceiling only as recommended
7.
by the manufacturer.
Ventilation-The appliance should be well situated so that its location or position does not interfere
8.
with its proper ventilation.
Heat-This appliance should be placed away from heat sources such as radiators, heat registers
9.
and stoves.
Power Sources-The appliance should only be connected to a power supply as described in the
10.
operating instructions or as marked on the appliance.
Grounding or Polarization-Precautions should be taken.
11.
Power Cord Protection-Power supply cord should be routed so that it is not likely to be walked on,
12.
pinched by items placed upon it against the cord and its end.
Cleaning-The appliance should be cleaned only as recommended by the manufacturer.
13.
Power Lines-An outdoor antenna should be located away from power lines.
14.
Outdoor Antenna Grounding-If an outside antenna is connected to the receiver , the antenna
15.
system must be grounded so as to provide against voltages and built-up static charges.
Non-use Periods-The power cord of the appliance should be unplugged from the outlet when left
16.
unused for a long period of time.
Object and Liquid Entry-Care should be taken so that objects do not fall, and liquids are not
17.
spilled into the enclosure through openings.
Conditions Requiring Service-The appliance should be serviced by qualified service personnel
18.
when:
The power-supply cord or the plug has been damaged.
Objects have fallen on or liquid has been spilled into the appliance.
The appliance has been exposed to rain.
The appliance does not appear to operate normally or exhibits a marked change in performance.
This appliance should not be exposed to water and no objects filled with liquids such as a vase should
19.
not be placed on the unit. Where the MAINS plug or an appliance coupler is used as the disconnect
device, the disconnect device shall remain readily operable.
-3-
-4-
Page 4
Safety Instruction Safety Instruction
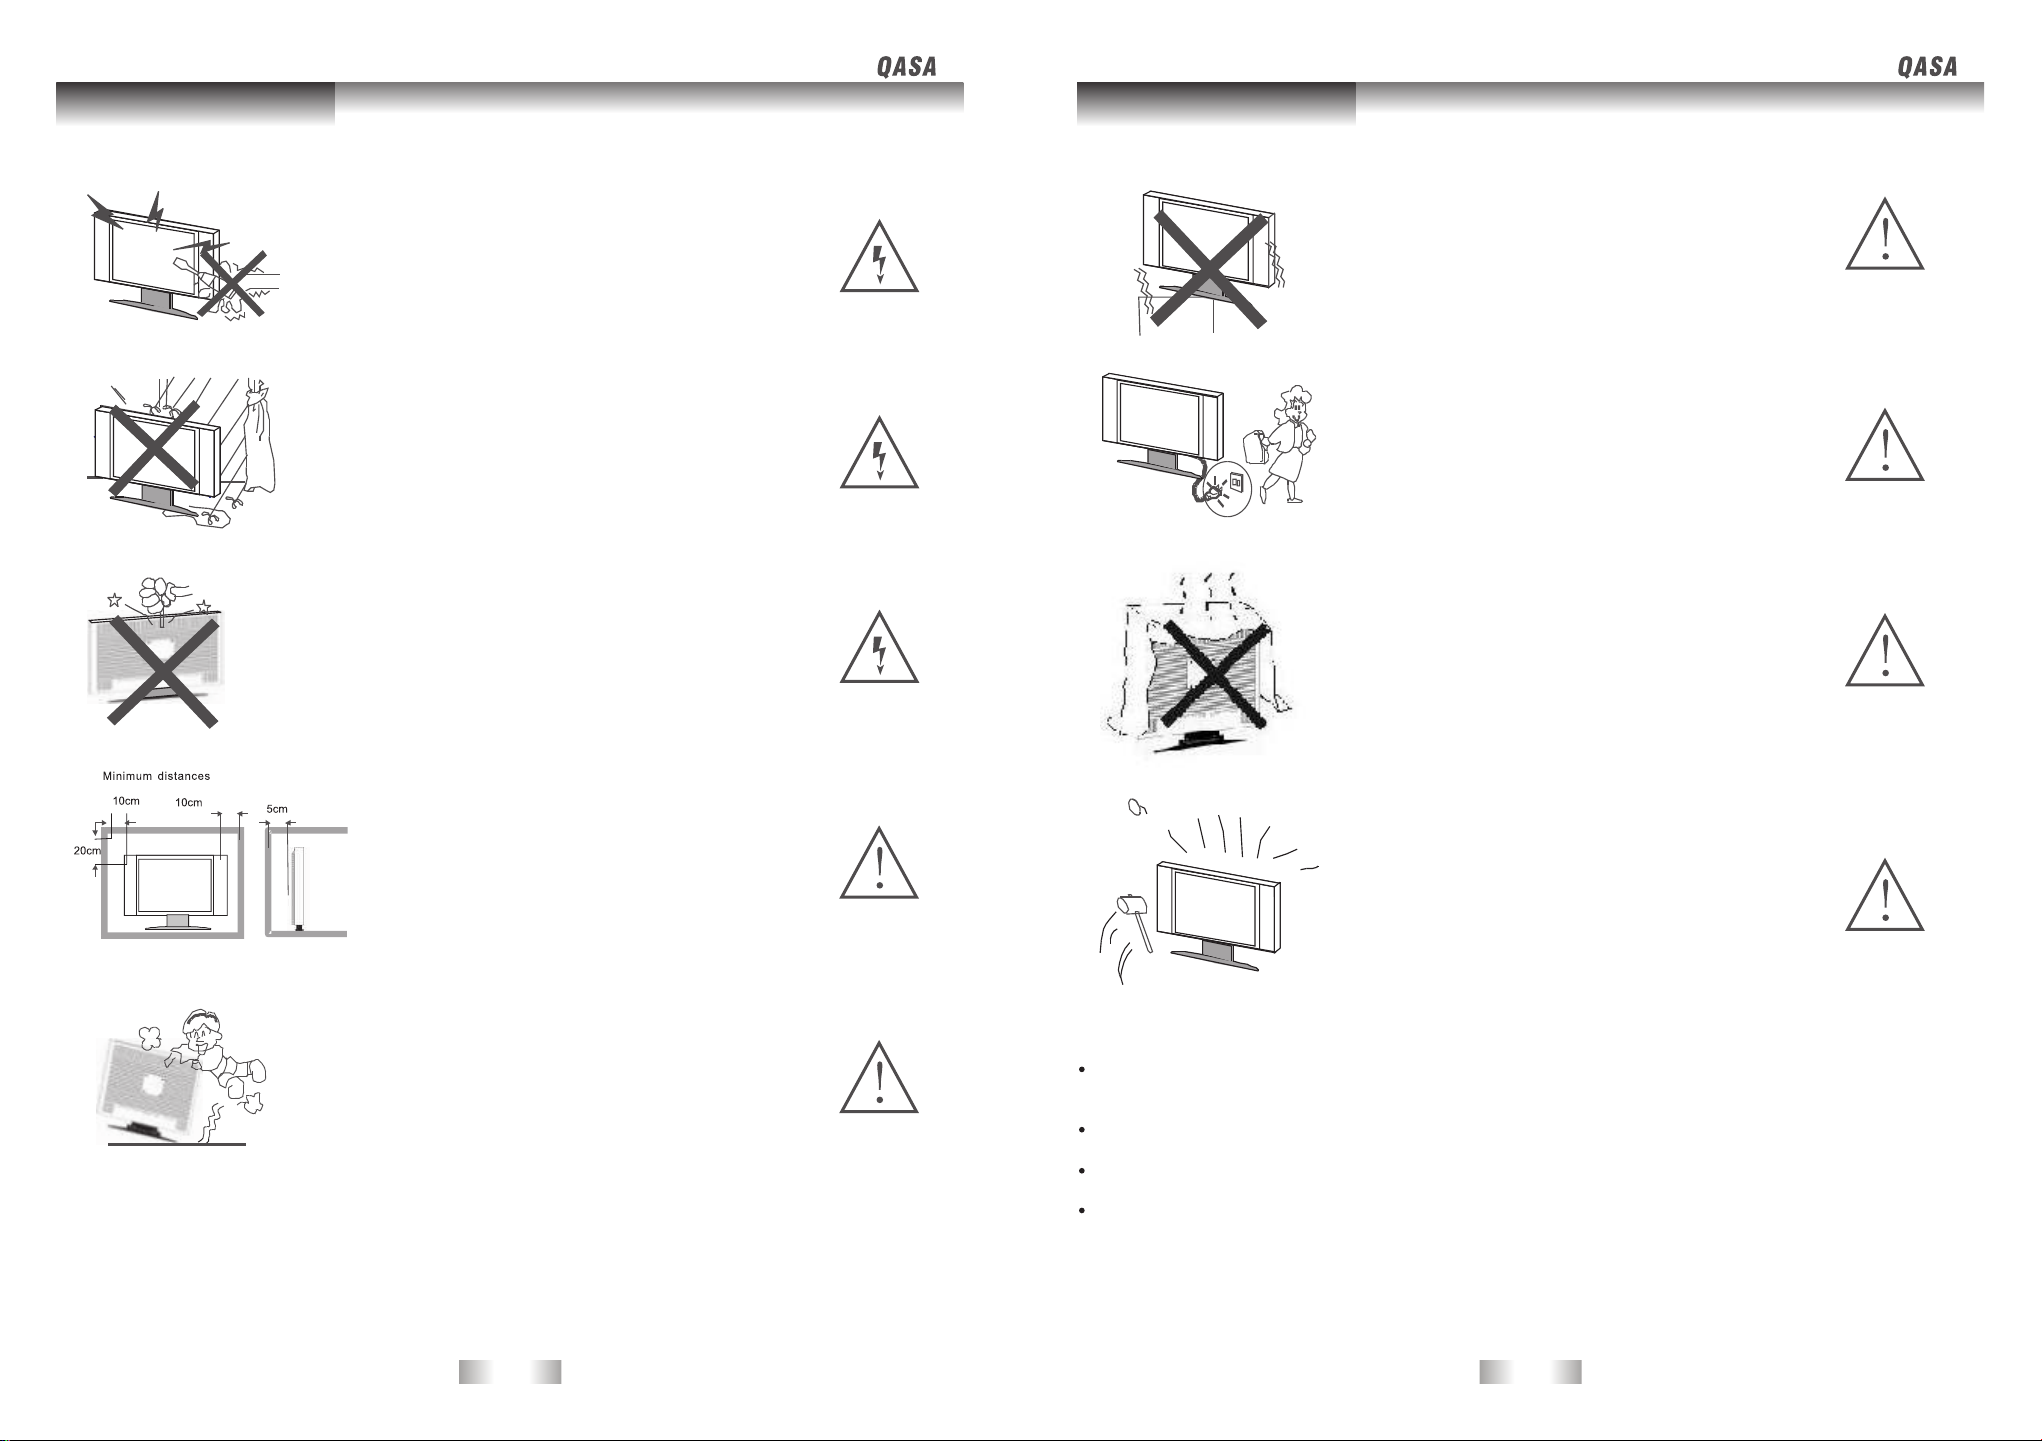
Warning
High voltages are used in the operation of this product.
Do not remove the back cover of the cabinet. Refer servicing
to qualified service personnel.
Warning
To prevent fire or electrical shock hazard, do not expose the
main unit to rain or moisture.
Warning
Do not drop or push objects into the television cabinet slots
or openings. Never spill any kind of liquid on the television
receiver.
Caution
Do not place the main unit on an unstable cart stand,
shelf or table.
Serious injury to an individual, and damage to the
television, may result should it fall.
Caution
When the product is not used for an extended period
of time, it is advisable to disconnect the AC power
cord from the AC outlet.
Caution
Avoid exposing the main unit to direct sunlight and
other sources of heat. Do not position television
receiver directly on other products which give off heat.
E.g. video cassette players, audio amplifiers. Do not
block the ventilation holes in the back cover.
Ventilation is essential to prevent electrical failure.
Do not squash power supply cord under the main unit.
Caution
If the television is to be built into a compartment or
similarly enclosed, the minimum distances must be
maintained.
Heat build up can reduce the service life of your
television, and can also be dangerous.
Caution
Never stand on, lean on, push suddenly the product or its
stand.
You should pay special attention to children.
-5-
Caution
The panel used in this product is made of glass.
It can break when the product is dropped or applied
with force. Individuals should execute caution when
dealing with broken glass should the panel break.
Exemptions
SONIQ is not liable for any damage caused by fires, natural disaster (such as thunder,
earthquake, etc.), acts by the third parties, accidents, owner's misuse or use in other
improper conditions.
SONIQ is not liable for incidental damages (such as profit loss or interruption in business,
modification or erasure of record data, etc.) caused by use or inability to use of product.
SONIQ is not liable for any damage caused by neglect of the instructions described in the
owner's manual.
SONIQ is not liable for any damage caused by misuse or malfunction through simultaneous
use of this product and the connected equipment.
-6-
Page 5
Introduction
Main Unit Control
Introduction
Thank you for purchasing the unit. Your unit will bring you years of high-quality viewing
enjoyment. The television is easy to operate and provides exceptionally high quality image.
The manual will explain the operation of the unit, including its functions features and other
important features. Before installing or operating your unit, please take the time to thoroughly
read this manual, particularly the sections on safety.
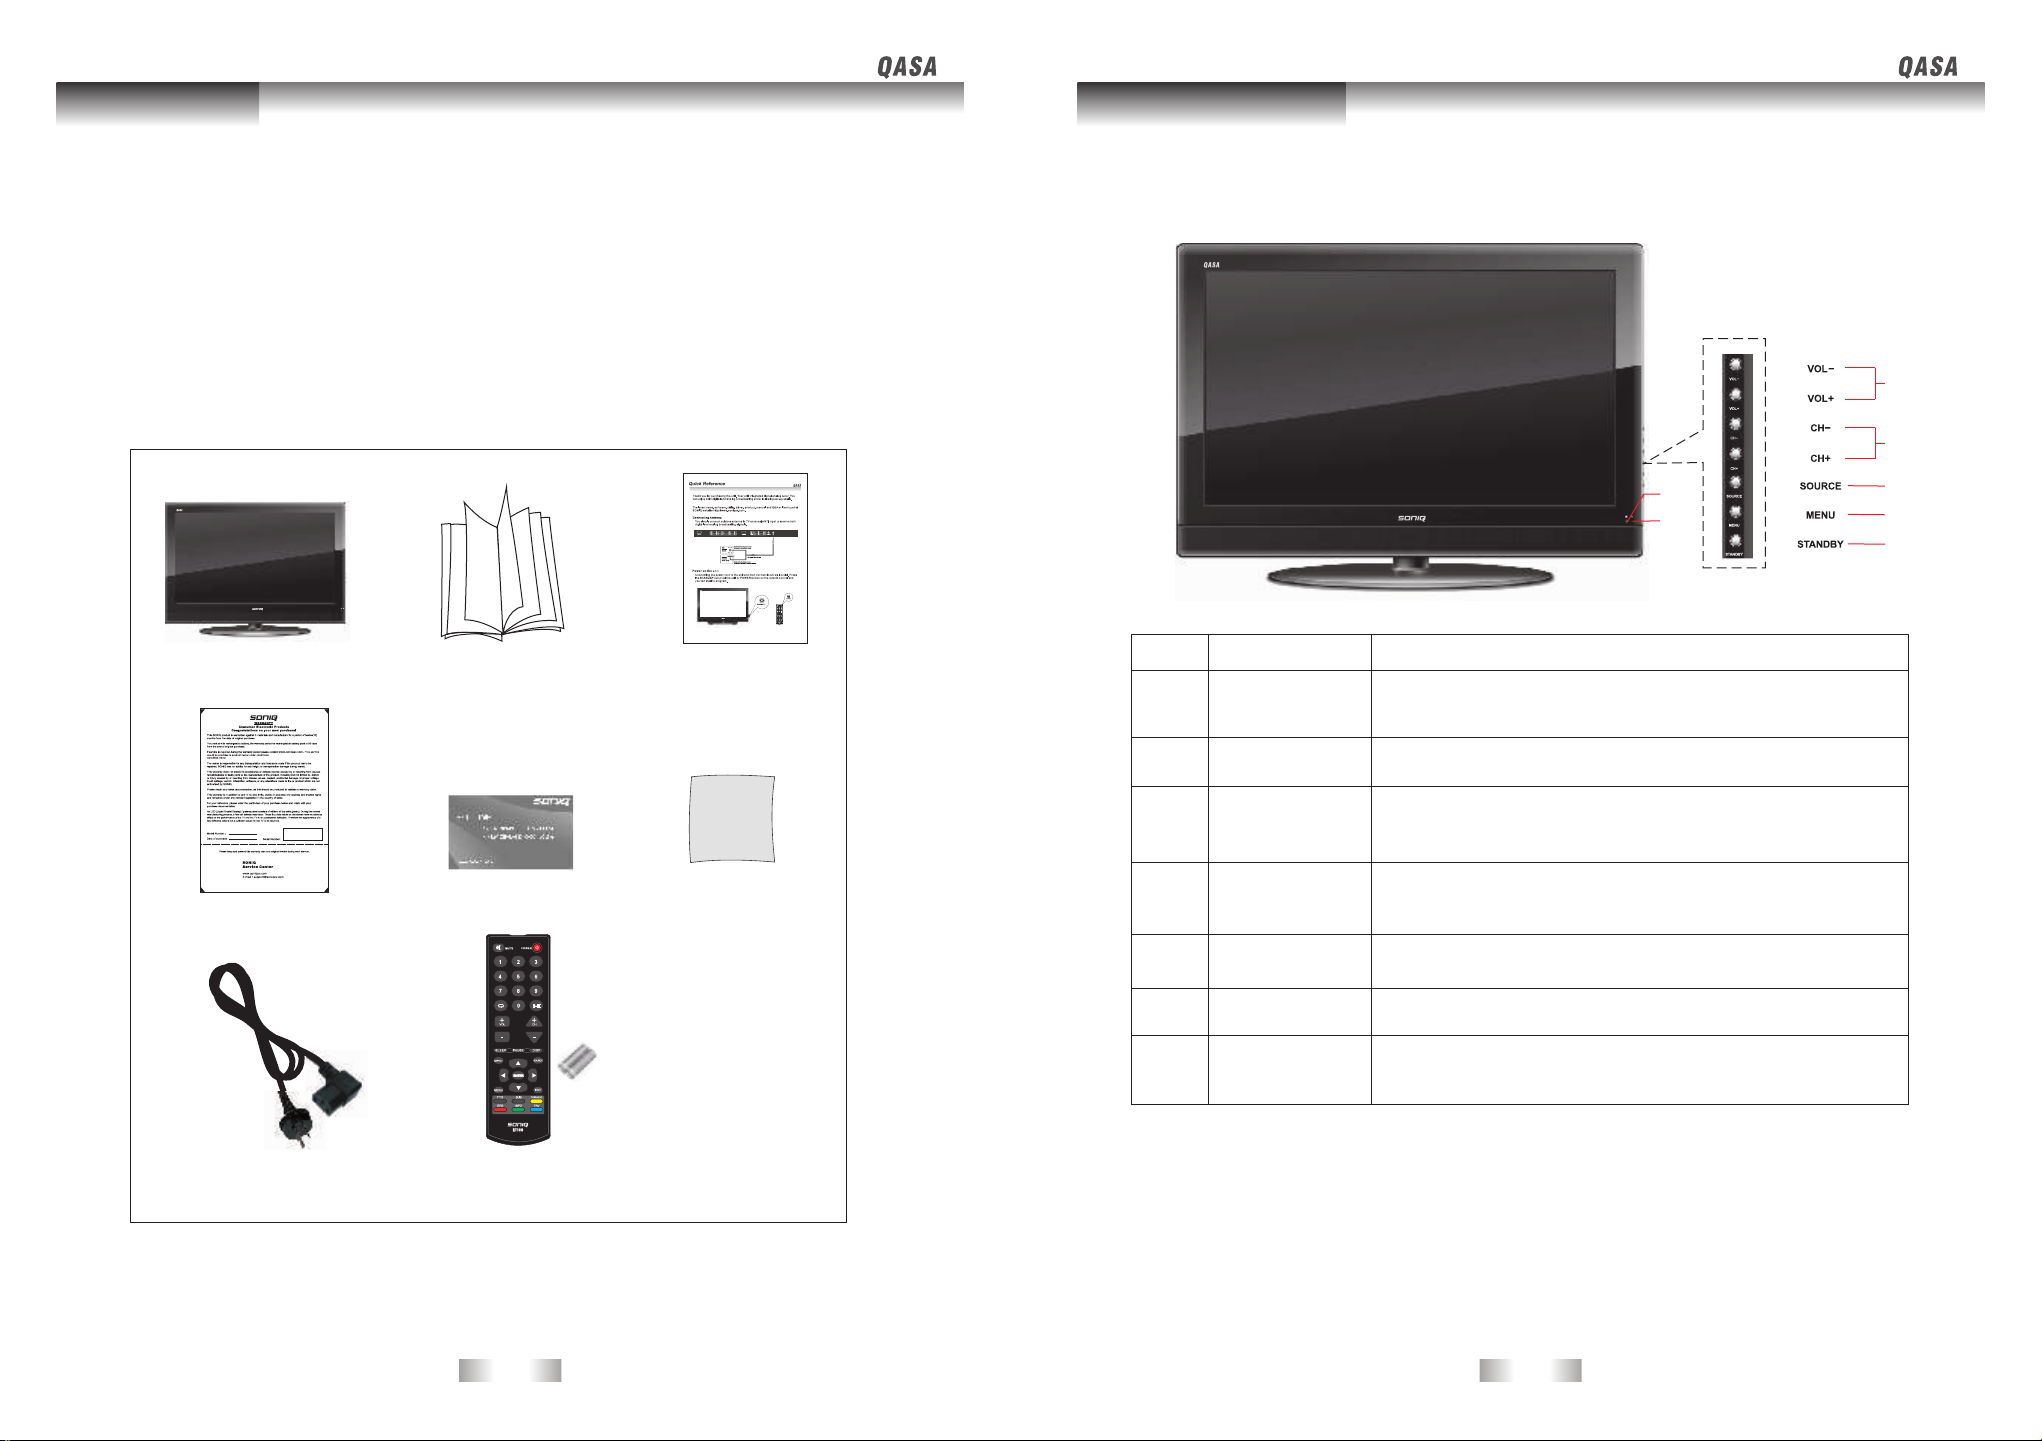
Package Contents
Main Unit
Operation Manual
Quick Reference
Front Panel
No.
1
2
Name
Remote Control
Sensor Window
Power Indicator
1
2
Description
Receives the signal from the remote control. Do not put any
objects in front of the window in order not to hinder the
reception of signals.
Lights up blue when the unit is powered on;
Lights up red when the unit is in standby mode.
3
4
5
6
7
Warranty Card Cleaning Cloth
Power Cord
Hotline Card
Remote Control
AAA Batteries(x2)
-7-
Press VOL+ to increase volume, or VOL - to decrease.
3
4
5
6
7
VOL+ / -
CH+ / -
SOURCE
MENU
STANDBY
At the OSD menu, press these buttons to move the selection
focus left and right to change settings.
Press these buttons to sequentially select channels.
When the OSD menu is on, press these buttons to move the
selection focus up or down to change settings.
Press to display all possible input signal sources.
Press to cycle through various sources.
Press this button to display the OSD menu.
When the OSD menu is on, press this button to exit the menu.
Press this button to turn the unit on when it is in standby mode.
Press this button once more to turn the unit off and put it to
standby mode.
-8-
Page 6
Main Unit Control
Remote Control
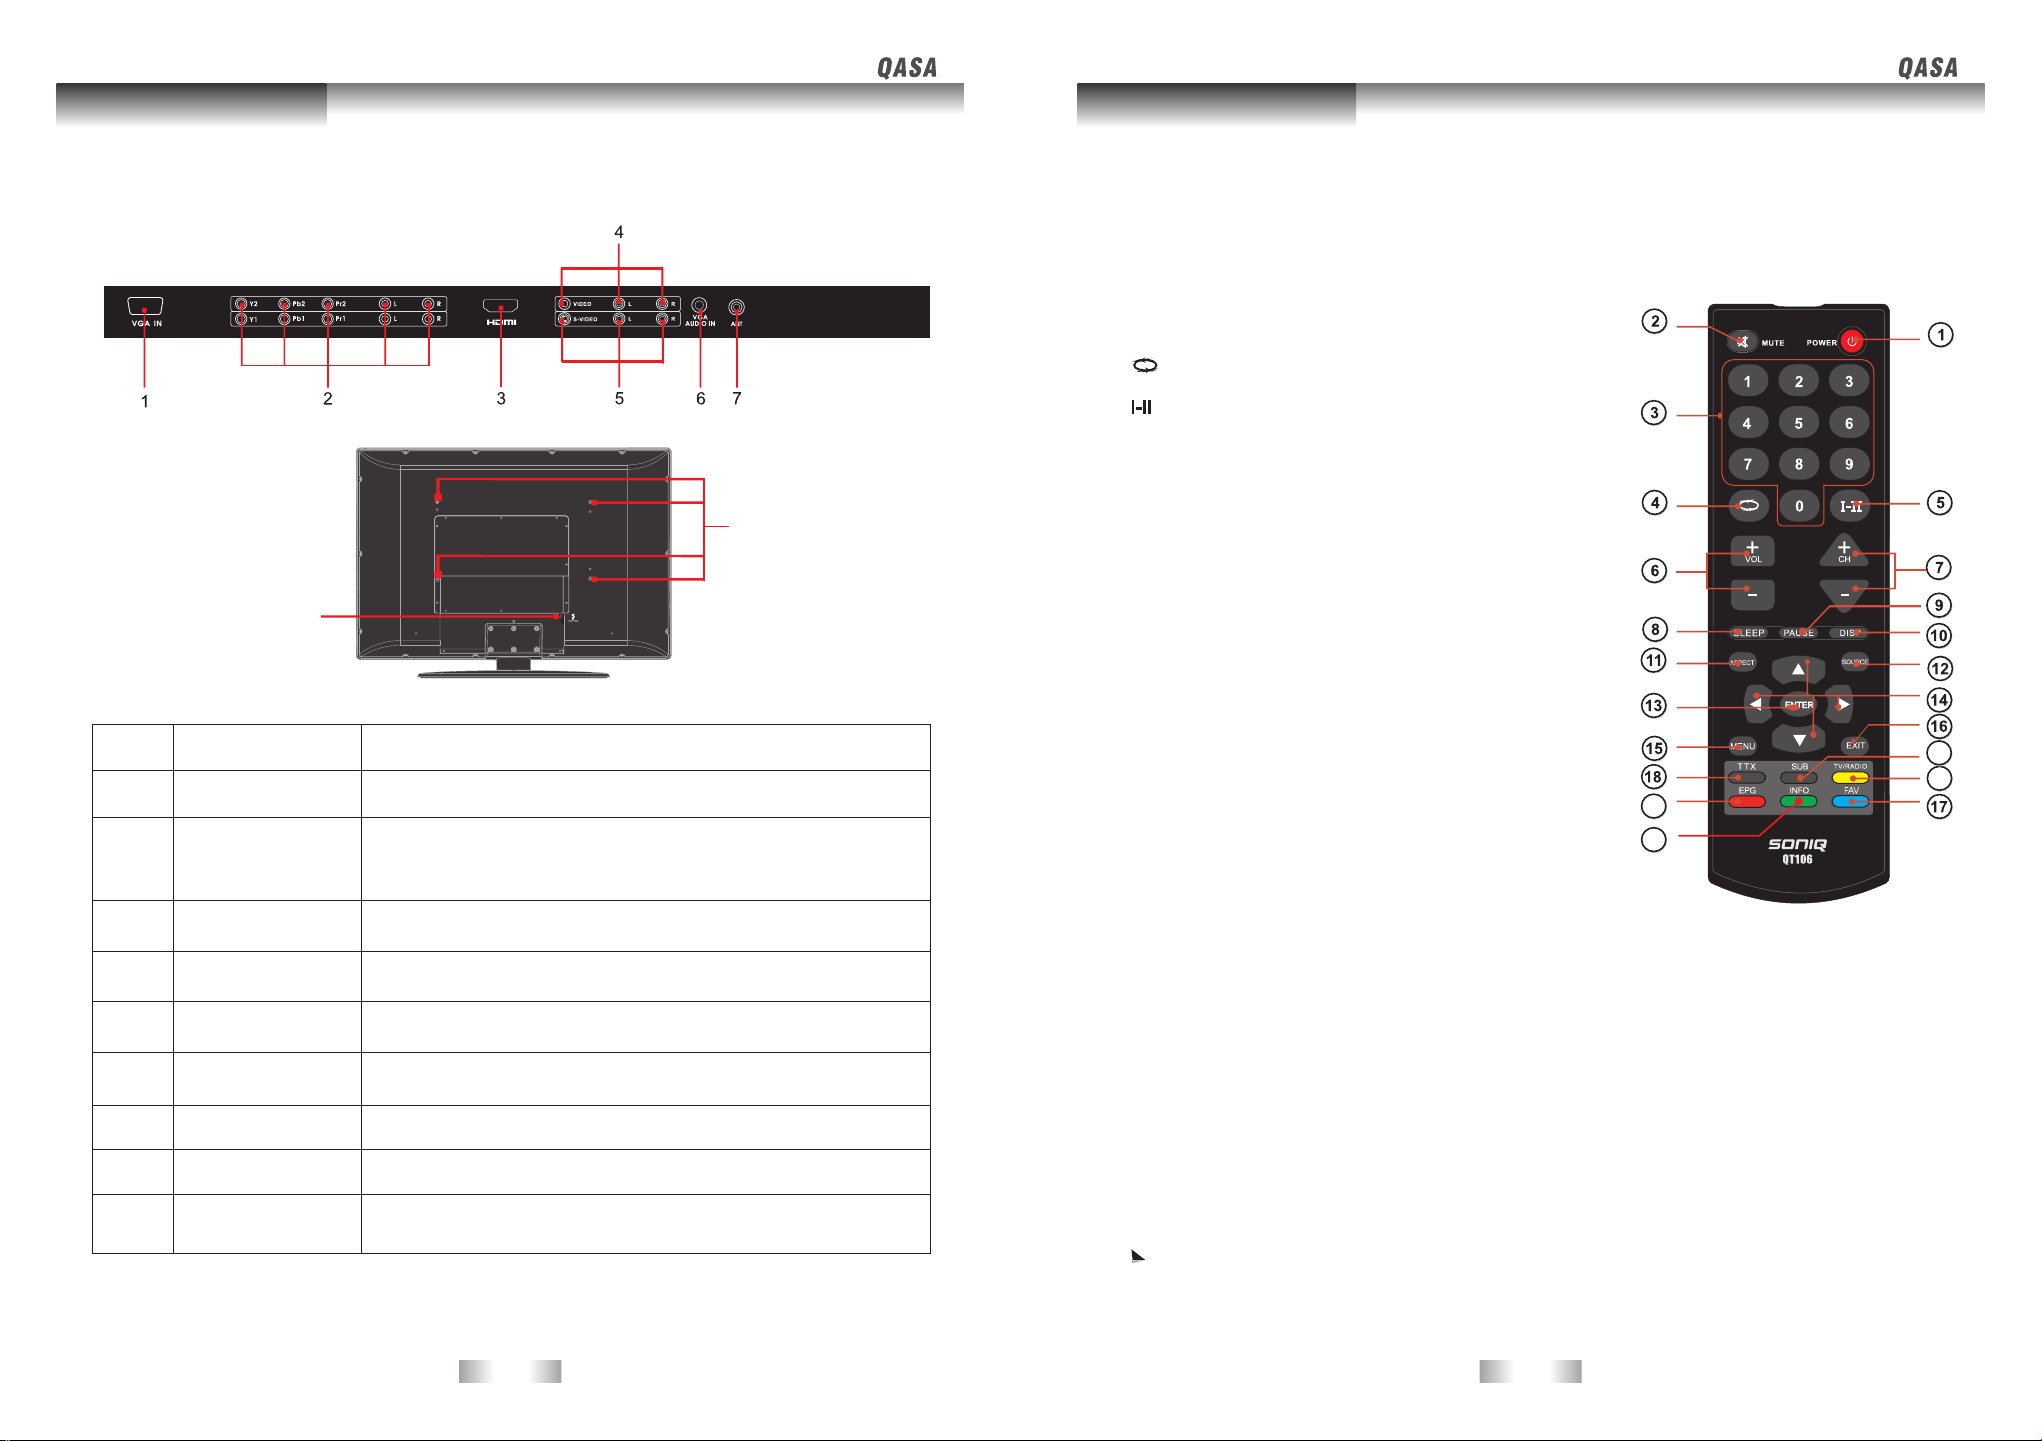
Rear Panel
No. Name
1
2
3
4
VGA IN
YPbPr2/
YPbPr1
HDMI
VIDEO
Remote Control Key Functions
POWER button
1.
Toggles the unit between standby mode and on.
MUTE button
2.
Press to eliminate or restore the TV sound.
Numerical buttons
3.
Press number buttons for direct access TV channel.
button
4.
Press to return to previous channel.
button
5.
Press to select sound output mode.
(Under the TV mode)
VOL +/ - button
6.
Press to adjust the volume level.
CH +/ - buttons
9
8
Description
Connect the PC VGA signal output of your personal computer.
Connect the component video output of your AV devices here.
Audio (Audio input,L/R):Connect the audio output of your AV
device here.
Connect an HDMI signal of your HDMI device.
Connect composite Audio/Video output of your AV device.
7.
Press to sequentially change the channels.
SLEEP button
8.
Press to activate sleep timer.
PAUSE button (only in TV mode)
9.
Press to pause the current picture, press again to resume.
DISP button
10.
Press to display current status, TV channel, input source.
ASPECT button
11.
Press to change the aspect ratio of the TV display.
SOURCE button
12.
Press to display all possible input sources.
ENTER button
13.
Press to execute selection
Navigation cursors
14.
Press these buttons to highlight, select or adjust items
on OSD menu.
MENU button
15.
Press to activate or disactivate on OSD menu.
EXIT button
16.
Press to back to previous level.
FAV button (Blue Key)
17.
Press FAV button to display, add or delete favorite programs.
19
20
21
22
5
6
7
Main Power Socket
8
9
S-VIDEO
VGA AUDIO IN
ANT
Wall Mounting
Install Hole
Connect S-video output and Audio output of your AV device.
Connect PC audio output of your personal computer.
Connect to external antenna.
Connect to the power cord.
-9- -10-
Function for Digital TV only
TTX button
18.
On/Off teletext.
SUB button
19.
On/Off subtitle (Closed Caption)
TV/RADIO button (Yellow Key)
20.
Switching function between TV and RADIO is not supported in this model.
EPG button (Red Key)
21.
Displays the electronic programme guide.
INFO button (Green Key)
22.
Displays the information about the channel and program.
For detailed usage, please refer to
Four color keys of the remote control are valid in EPG menu.
Viewing the EPG information under basic operation on page 21.
Page 7
Remote Control Connection and setup
Using the Remote control
When using the remote control, aim it at remote control sensor window on the unit, If there
is an object between the remote control and the signal remote control sensor window on the
unit, the remote may not operate.
When using the remote control, please note:
Do not strike or drop the remote. Do not expose the remote control to liquids and do not place
it in humid environments.
Do not install or place the remote control in direct sunlight. The heat may damage the remote
control.
If the remote control sensor window on the unit is in direct sunlight or strong light, the remote
control may not operate normally. In this situation, change the light source or read just the angle
of your unit, or operate the remote control from a location closer to the remote control sensor
window on the display.
Batteries
You will need to install the supplied batteries into the remote control to make it operate
following the instructions below.
Open the lid of the remote control battery
1.
compartment.
Insert two size-AAA batteries.
2.
Ensure that the batteries are inserted with the
positive and negative terminals in the correct
direction corresponding to the (+) and (-) marks
in the battery compartment.
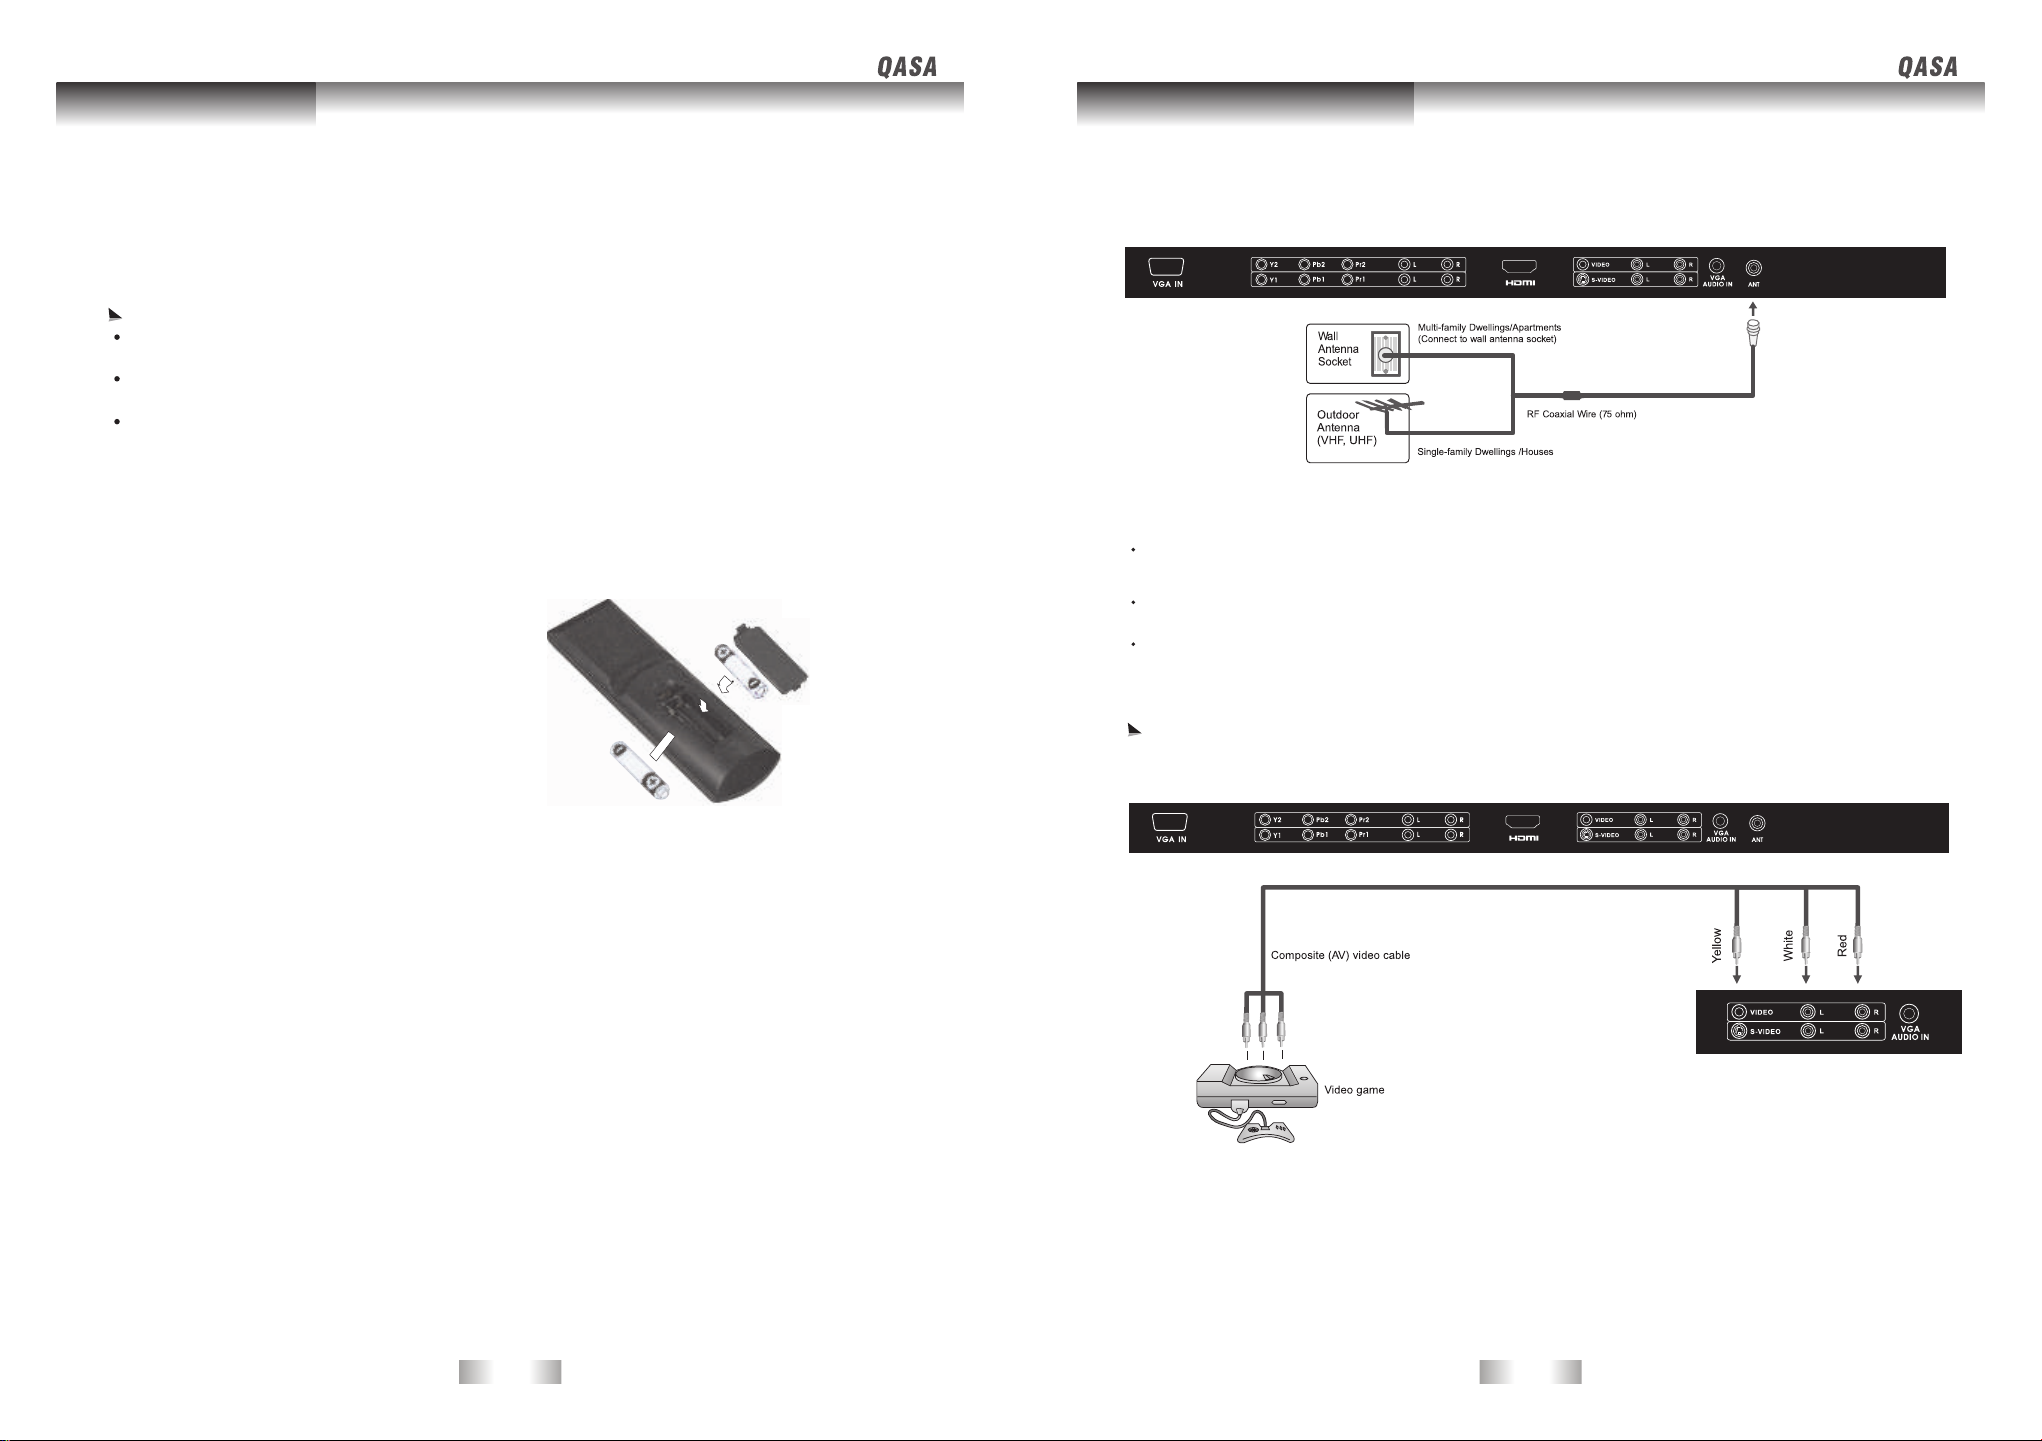
Connecting Antenna
Connecting Composite Video Signals
Connect the Composite (AV) output of your AV equipment to the Composite VIDEO signal
terminal on the unit using a Composite (AV) video cable (RCA connector) as illustrated.
Before connecting any component, please familiarise yourself with the location and type of
each input.
If incorrect connections are made, picture or color quality may be adversely affected. Please
ensure that all connectors are firmly seated.
Before connecting, turn off the power to the external devices for safety.
Composite video input is the most commonly used signal input. However, this type of input also
provides a less optimal image quality. Many video sources can only output Composite video
signals, for example, VCRs, camcorders and Video game.
Install the lid of the remote control battery compartment.
3.
Notes on Using Batteries
The use of the wrong type of batteries may cause chemical leaks and/or explosion. Please
note the following:
Always ensure that the batteries are inserted with the positive and negative terminals in the
correct direction as shown in the battery compartment.
Different types of batteries have different characteristics. Do not mix different types.
Do not mix old and new batteries. Mixing old and new batteries will shorten battery life and/or
cause chemical leaks from the old batteries.
When batteries fail to function, replace them immediately.
Chemicals which leak from batteries may cause skin irritation. If any chemical matter seeps
out of the batteries, wipe it up immediately using a dry cloth.
Due to varying storage conditions, the battery life for the batteries included with your unit
may be shortened. If the remote control is not used for a long period of time, remove the
batteries.
-11- -12-
Page 8

Connection and Setup Connection and setup
Connecting S-Video signals
1.
Connect the S-Video output of your AV equipment to the unit S-VIDEO terminal using an S-Video
cable. Pay attention to the direction of the connector on the S-Video cable when inserting.
2.
Connect the audio output of your AV equipment to the unit S-VIDEO AUDIO L/R input terminal
using the AV cable or equivalent.
An S-video signal provides a higher quality image to that of Composite video. It is recommended
to use this input whenever possible. If your AV equipment provides a component video output
( YPbPr) or HDMI, this should be used in preference to either composite or HDMI signals.
Connecting VGA signals
Connect PC video output to the VGA IN input terminal using Mini D-SUB 15-pin cable.
Connect the audio output of your PC to the unit VGA AUDIO IN input terminal using an appropriate cable.
If the input signal resolution is higher than the default display resolution, the screen may be unable
1.
to display image details clearly.
Certain PC models cannot be connected to the unit.
2.
The computer in the illustration is shown only for reference; your equipment may vary.
3.
Additional equipment shown in the illustration is not provided.
4.
Do not set the computer s horizontal and vertical scanning frequencies less than or greater than
5.
the frequency range of the unit.(refer to Supported PC Input Signal )
If you require more information on how to connect your equipment, please refer to the manual for
Connecting Component Video signals
1.
Connect the Component video output of your AV equipment to the unit COMPONENT
YPbPr terminals using a Component video cable.(green,blue,red cable)
6.
the piece of equipment you wish to attach.
2.
Connect the audio output of your AV equipment to the unit AUDIO L/R input terminals
using the AV cable or equivalent.
Of the currently available video signal types, Component video input offers the best quality.
1.
Component video output is available on progressive scan DVD players and Digital television
decoders. The image quality with this type of input is superior to that obtained with S-video.
All High Definition Television signals must go through this input.
Ensure the connector colors match, failure to connect the colors of the cables to the
2.
corresponding colored terminals will result in an incorrectly color image or badly distorted
image.
-13-
-14-
Page 9

Connection and setup Basic Operation
Connecting HDMI signals
Connect the HDMI output terminal of your HDMI device to the HDMI input terminal on the unit
using an HDMI cable.
HDMI cable
HDMI device
Connecting the Power Cord
1. Connect the female end of the AC power cord to the AC input on the unit.
2. As shown in the diagram connect the male end to a wall power outlet.
Power On/ Off and Standby
After the power cord is plugged into a wall outlet, the unit will enter standby mode and the red
indicator will be on.
Turning on the unit
In standby mode, press STANDBY button at the control
panel on the unit, or POWER button on the remote control.
The unit will turn on and power indicator will light up in blue
STANDBY
STANDBY
POWER
before picture appears.
Turning off the unit
Press STANDBY button at the control panel, or POWER
on the remote control again, and the unit will turn off.
Switching Source
Power outlet
Power cord
The product must be operated only from the type of power source indicated on the marking
label (100-240~ 50/60Hz).
If the unit will not be used for a long period of time, it should be unplugged from the wall
outlet.
-15- -16-
Changing Channels
Return
SOURCE
CH+/-
Source
TV
VIDEO
S-Video
YPBPR1
YPBPR2
VGA
HDMI
Press SOURCE button on your
1.
unit or remote control to display
input signal.
Press the button several times to
2.
cycle through various sources.
Using CH+ /- button on your unit or / buttons on the
remote control to sequentially select the TV channels
available in your channel list.
Using numerical buttons to directly input channel.
Eg. To select channel 8, press 8 button on the remote control.
To select channel 12, press 1 button and then 2 on the
remote control.
Using button to return to the previous channel.
Page 10

Basic Operation Basic Operation
Display Channel List
1.
ENTER
2.
3.
Channel List
9 Nine Digital
90 Nine Digital HD
99 Nine Guide
Adjusting the Volume
Press VOL+ button on your unit or press button
1.
on your remote control to increase volume. The volume
indicator will increase in length as volume rises.
Press VOL- button on your unit or press button
2.
on your remote control to decrease volume. The volume
indicator will decrease in length as volume falls.
Mute setting
Press MUTE button on your remote control to
1.
temporarily cut off the sound.
Press MUTE button again, or / button
2.
to restore the sound.
TV Sound Mode Selection
When the unit in TV mode, you can also get
channel list simply by pressing the ENTER
button on remote control.
Use or button to select.
Press ENTER button to confirm your selection,
or press EXIT to exit the menu.
MUTE
VOL+ /-
Display Information
Press DISP button on your remote control to
display the signal information, including input video
signal source, system, TV sound and current selected
channel.
Program start/
finish time
Rating
information
Favorite Program
CC
TTX
Subtitle on
Teletext
Subtitle
English
Program
HI-5
3:30 PM - 4:00 PM
P
The Arts
Hi-5 provides fun, entertainment and education for pre-schoolers in an exciting
and colourful way.
In Digital TV mode In Analog TV mode
Resolution
Multiple Audio
Stereo
Nine Digital HD
1080i HD
Program introduction
90
Favorite channels
Displaying favorite list
1. Press the FAV button to display Favorite List.
2. You can use the / button to select and then
press the ENTRE button to change favorite
FAV
Favorite List
9 Nine Digital
90 Nine Digital HD
99 Nine Guide
channel sequentially.
3. Press the FAV button again to exit Favorite List.
Channel number
Channel Name
Multiple Audio
(No program title.)
(No program details.)
Favorite Program
Resolution
Mono
576i SD
DISP
Channel number
900
Press button to select Ac3 or MPEG in Digital TV mode.
Ac3: If you select this option, the TV will select the first Ac3
audio track, if available. However, if the channel
does not contain any Ac3 audio track, then the
first available MPEG audio track will be selected.
MPEG: If you select this option, the TV will select the first MPEG
audio track.
Press button to select Stereo, Mono, Dual1 and Dual2
in Analog TV mode.
Items available will depend on the TV sound system being broadcasted.
-17-
Press enter to select
Adding favorite channels
1. Please display the channel on the screen you want to add on the Favorite List.
2. Press the FAV button to display the Favorite List.
3. Use / to select the blanks.
4. Press the ENTER button to add.
-18-
Page 11

Basic Operation Basic Operation
Favorite List
9 Nine Digital
90 Nine Digital HD
Favorite List
9 Nine Digital
90 Nine Digital HD
99 Nine Guide
Press enter to select
Press enter to select
Deleting favorite channels
1. Please display a channel on the screen you want to delete from the Favorite List.
2. Press the FAV button to display the Favorite List.
3. Use / button to select the channel you want to delete.
4. Press the ENTER button to delete.
Favorite List
9 Nine Digital
90 Nine Digital HD
99 Nine Guide
Press enter to select
You can display the channel from the Channel List or simply input the channel number by
pressing numerical buttons on the remote control.
Favorite List
9 Nine Digital
90 Nine Digital HD
Press enter to select
Adjusting Aspect Ratio
Press ASPECT button on your remote control to select
the image aspect ratio you prefer.
Press the button several times to cycle through various
ASPECT
ratios.
Using the Pause Function
PAUSE
When watching a TV program, press the PAUSE
button on the remote control to pause the image
on the screen (the signal will continue to be
broadcast). Press the PAUSE button again to
restore normal motion.
The pause function works only in TV mode.
Using Sleep Timer
Press SLEEP button on your remote control to set
the automatic sleep timer. Press the button again
to increase the time interval. Time is set in
increments of 10 minutes from 10 to 60 minutes,
and in increments of 30 minutes from 60 to 120
SLEEP
minutes.
When Sleep Timer is on, press SLEEP button once
to display the remaining time.
Press the button continuous to increase the time
interval.
Functions for Digital TV
Teletext On/Off
Teletext is a free service broadcast by some Digital TV stations which gives up-to-the-minute
information on news, weather, television programs, share prices and many other topics.
You can simply display the teletext by pressing the TTX button.
1. Press TTX button to switch to teletext and
P1 0 0 0 00 3 0 0 05 S: 00 04 0 1/ 0100 0 4
main index page appears on the screen.
2. Enter the desired page number as three
digital number with the Numerical buttons.
If you press wrong number during selection,
you must complete the three digital number
and then re-enter the correct page number.
3. Use / button to select the preceding or
following page.
Items available will depend on the Digital TV system being broadcasted.
When you are watching the teletext program, OSD menu are invalid.
Au ste xt S un 2 5 De c 10 0 10 :36 :12
A U S T E X T M A I N I N D E X
CO PYR IGH T IN FO RMAT IO N ON 104
INDEX
MA IN IND EX .. .. .
BU SI NE SS. .. .. ... .
NE WS ... .. .. .. ... .. .
SP OR T.. ... .. .. .. ...
FI NA NCE .. .. .. ... ..
WE ATH ER .. .. ... ..
TA B SE RV IC E.. ..
GE NE RA L IN FO .
TV PR OGR AM S.
CA PT ION S. .. .. ...
MA KE A UST EXT YOU R FI RS T CH OIC E
NAT ION AL N EW S IN DEX PAG E 12 0
10 0
111
11 9
16 0
20 0
30 0
50 0
60 0
65 0
80 1
FO R LO CAL NEW S
INFORMATION
FO RE CAS T:
CA PI TAL CI TIE S. .. .
BR IS BAN E. .. .. ... .. .
SY DN EY. ... .. .. .. ... .
CA NB ER RA. .. .. ... ..
ME LB OUR NE .. .. ... .
HO BA RT. ... .. .. .. ... .
AD EL AI DE. .. .. ... .. .
PE RT H.. .. .. .. ... .. .. .
DA RW IN. .. .. .. ... .. ..
30 1
30 2
32 0
33 6
34 1
35 3
35 8
36 7
39 0
16:9 -Fill the entire screen with a 4:3 video signal. Some deformations may be
identified on the edge of the image. When the input video source is 16:9 in ratio,
no change will occur.
4:3 - Display the standard 4:3 video signal in the center of the screen at the ratio
of 4:3. The screen does not change, but black blocks appear in the left and right
sides of the screen. When the input video source is 16:9 in ratio, deformation will
occur on the screen.
-19- -20-
Subtitle On/Off
You can simply display subtitle by pressing the SUB button on
your remote control.
1.
Press SUB button to display subtitle when it is available.
Press SUB button again to exit the subtitle.
2.
Items available will depend on the Digital TV system being
broadcasted.
Page 12

Basic Operation
OSD(On Screen Display) Menu
Viewing the EPG (Electronic Program Guide) information
The EPG (Electronic Program Guide) information is
provided by the broadcasters. Program entries may
appear blank or out of date as a result of the
information broadcast on a given channel. The display
will dynamically update as soon as new information
becomes available.
You can press EPG button to navigate all TV programs
you had saved.
This function depends on program service support.
Press the Red Key to exit EPG.
Friday, 29-June-2007 3:50:40 AM
9 99
Today
Today
3:30 PM - 4:00 AM Fri, 29-Jan
The Arts
Hi-5 provides fun, entertainment and education for pre-schoolers in an exciting and
Exit Next day View detail
3:30 PM
4:00 AM
90 Nine Digital HD
HI-5
THE SHAK
CC
1/ 2
Press the Green Key to display previous day
program information.
Press the Blue Key to display the next day
program information.
Press the Yellow Key to view detail.
Display Program Information
While viewing a Digital TV program, repeatedly
1.
press the INFO button to display three kinds of
present screen information.
Press EXIT button to exit from this function.
HI-5
3:30 PM - 4:00 PM
P
The Arts
Hi-5 provides fun, entertainment and education for pre-schoolers in an exciting
and colourful way.
TTX
Ster eo
1080 i HD
CC
90
Nine Digital HD
HI-5
3:30 PM - 4:00 PM
P
Ster eo
1080 i HD
CC
TTX
90
Nine Digital HD
90
Nine Digital HD
OSD Structure
Menu List
VIDEO
AUDIO
Picture mode
Brightness
Contrast
Saturation(not support in VGA mode)
Hue (only in NTSC mode)
Sharpness(not support in VGA mode)
Color Temperature
VGA
(only in VGA mode)
Auto Adjust
H.Position
V.Position
Phase
Clock
DNR
Black Level Extender
Advanced Video
White Peak Limiter
CTI
Flesh Tone
Adaptive Luma Control
Blue Mute
Sound Mode
Balance
Bass
Treble
Auto Volume Control
User
Vivid
Standard
Mild
Cool
Standard
Warm
User
R Gain
G Gain
B Gain
Medium
Strong
Auto (only in TV mode)
Low
Off
Medium
Strong
Low
Off
News
User
Standard
Pop
Rock
-21- -22-
Page 13

OSD(On Screen Display) MenuOSD(On Screen Display) Menu
OSD Structure
Menu List
TV
(only in
TV mode)
SETUP
PARENTAL Password
NSW/ACT
VIC
Country Region
QLD
SA
WA
TAS
NT
Channel Scan
Manual Scan
Channels
Channel Edit
Analog Channel Fine Tune
Display Mode
16:9
DPMS(only in VGA mode)
Time Setup
Time
Sleep Timer
Subtitle
Teletext
Version Info
Reset Default
All White
Program Block
Input Block
Change Password
Clean All Blocks
4:3
Digital Manual Scan
Analog Manual Scan
Navigating the OSD Menu
You can use the OSD menu screen to adjust settings on your unit. Follow the steps
outlined below to select the function you desire.
Press MENU button on your remote control, or MENU button on your unit to
bring up the following main menu on your screen:
Video
Audio
TV
Setup
Parental
Press / / or button on the remote control, or CH+/-, VOL+/- button on the unit
to select items on the main menu, choose functions or change settings.
Press EXIT button to return to the upper layer of menu.
Press MENU button on the remote control to exit the menu.
Video Menu
1. Press MENU button to bring up the main menu.
2. Press / button to select Video and then
press ENTER button to enter the submenu.
3. Press / button to select an item.
Video
Audio
TV
Setup
Parental
Picture Mode
Brightness
Contrast
Saturation
Sharpness
Color Temperature
Advanced Video
Standard
40
52
50
4
-23-
-24-
Video
Select
EXIT
Back
/
Page 14

OSD(On Screen Display) MenuOSD(On Screen Display) Menu
Advanced Video
Item Function
Picture Mode
Brightness
Contrast
Saturation
Hue
(only in NTSC
mode)
Sharpness
Color
Temperature
Advanced
Video
To restore a factory preset
or user customized picture
mode.
Adjust image brightness
level.
Adjust image contrast.
Adjust color saturation.
Adjust color hue.
Adjust the sharpness level
of the image.
Adjust the color tone of the
image.
Adjust DNR, Black level
Extender, White Peak
Limiter, CTI, Flesh Tone,
Adaptive Luma Control,
Blue Mute.
Operation
Use and buttons to change
selection.
Use and buttons to reduce/
increase to setting.
Use and buttons to reduce/
increase to setting.
Use and buttons to reduce/
increase to setting.
Use and buttons to reduce/
increase to setting.
Use and buttons to reduce/
increase to setting.
Use and buttons to change
selection.
Press / button to select
an item.
Press / button to make
adjustment.
Range
Standard
Mild
Vivid
User
0 to 100
0 to 100
0 to 100
0 to 100
0 to 7
Warm: Biased toward red.
Standard: Standard video/
TV color temperature.
Cool: Biased toward blue.
DNR(Medium, Strong,
Auto, Low, Off)
Black Level Extender
(On/Off )
White Peak Limiter( On/Off )
CTI(Medium, Strong,
Low, Off)
Flesh Tone ( On/Off )
Adaptive Luma Control
( On/Off )
Blue Mute ( On/Off )
Item Function
DNR
(Digital Noise
Reduction)
Black Level
Extender
White Peak
Limiter
CTI
(Color Transient
Intensity)
Flesh Tone
Adaptive Lume
control
Blue Mute
Adjust to reduce the
appearance of digitizing
error caused by the
compression.
Adjust the ability in the black
areas detail of the picture.
Adjust the ability in the white
areas detail of the picture.
Adjust the picture for color
errors.
Adjust the flesh colors.
Adjust changes in the
luminance of the picture.
Adjust the blue mute.
Use and buttons to change
selection.
Use and buttons to change
selection.
Use and buttons to change
selection.
Use and buttons to change
selection.
Use and buttons to change
selection.
Use and buttons to change
selection.
Use and buttons to change
selection.
Operation
Contrast, Brightness, Saturation, Sharpness only adjust under user mode.
Video Menu (VGA mode)
1. Press MENU button to bring up the main menu.
2. Press / button to select Video and then press
ENTER button to enter the submenu.
3. Press / button to select an item.
Video
Audio
Setup
Parental
Medium
Strong
Auto
Low
Off
On/Off
On/Off
Medium
Strong
Low
Off
On/Off
On/Off
On/Off
Picture Mode
Brightness
Contrast
Color Temperature
Advanced Video
VGA
Range
Standard
50
52
Video
Audio
TV
Setup
Parental
Color Temperature
Color Temperature
R Gain
G Gain
B Gain
Warm
/
Select
EXIT
4
1
-2
Back
Video
Audio
TV
Setup
Parental
Advanced Video
DNR
Black Level Extender
White Peak Limiter
CTI
Flesh Tone
Adaptive Luma Control
Blue Mute
Color Temperature Advanced video
-25- -26-
Medium
on
on
Medium
on
on
on
Select
EXIT
Back
Video
Select
EXIT
Back
/
ENTER
Enter
/
Page 15

OSD(On Screen Display) MenuOSD(On Screen Display) Menu
Item Function
Picture Mode
Brightness
Contrast
Color
Temperature
Advanced
Video
VGA
VGA Setting:
To restore a factory preset
or user customized picture
mode.
Adjust image brightness
level.
Adjust image contrast.
Adjust the color tone of the
image.
Adjust DNR, Black level
Extender, White Peak
Limiter, CTI, Flesh Tone,
Adaptive Luma Control,
Blue Mute
For VGA setting.
Picture Mode
Video
Brightness
Audio
Contrast
Color Temperature
Setup
Advanced Video
VGA
Parental
Standard
Operation
Use and buttons to change
selection.
Use and buttons to reduce/
increase to setting.
Use and buttons to reduce/
increase to setting.
Use and buttons to change
selection.
Press / button to select
an item.
Press / button to make
adjustment.
Please refer to the related
information in the form
below.
50
52
Video
Audio
Setup
Parental
Range
Standard
Mild
Vivid
User
0 to 100
0 to 100
Warm: Biased toward red.
Standard: Standard video/
TV color temperature.
Cool: Biased toward blue.
DNR(Medium, Strong,
Auto, Low, Off)
Black Level Extender
(On/Off )
White Peak Limiter( On/Off )
CTI(Medium, Strong,
Low, Off)
Flesh Tone ( On/Off )
Adaptive luma Control
( On/Off )
Blue Mute ( On/Off )
Auto Adjust
H.Position
V.Position
Phase
Clock
127
Audio Menu
1. Press MENU button to bring up the main menu.
2. Press / button to select Audio and then
press ENTER button to enter the submenu.
3. Press / button to select an item.
Item Function
Video
Audio
TV
Setup
Parental
Audio
Operation
Sound Mode
Balance
Bass
Treble
Auto volume Control
Pop
Off
Select
/
Range
EXIT
0
50
50
Back
News
Sound Mode
To restore a factory present or
user customized sound mode.
Use and buttons to change selection.
User
Standard
Pop
Rock
Balance
Bass
Treble
Auto volume
control
Adjust left and right volume
levels.
Adjust bass tones.
Adjust treble tones.
Automatically keeps on an
equal volume level if you
change program.
Use button to increase right volume,
button to Increase left volume level.
Use button to increase tone,
bass
button to decrease bass tone.
Use button to increase tone,
treble
button to decrease treble tone.
Use / button on the remote, control to
change selection.
-50 to +50
-50 to +50
-50 to +50
On/Off
TV Menu (TV mode)
1. Press MENU button to bring up the main menu.
2. Press / button to select TV and then press
Video
Audio
ENTER button to enter the submenu.
65
49
5
3. Press / button to select an item.
Setup
Parental
Manual Scan
Country Region
Channels
TV
NSW/ACT
/
Select
EXIT
Back
Video
Item Function
Auto Adjust
H. Position
V. Position
Phase
Clock
To auto adjust the VGA
timing automatically.
Adjust horizontal position
of the image.
Adjust vertical position of
the image.
Adjust the phase.
Adjust the clock.
ENTER
Enter
Select
EXIT
Back
VGA
Operation
ENTER
Range
/
Use or ENTER button to
make adjustment.
Use / button to change
selection.
Use / button to change
selection.
Use / button to change
selection.
Use / button to change
selection.
0-100
0-100
0-31
0-255
-27-
Enter
Select
EXIT
Back
Country Region
Adjust the country region for
country with multiple time
Use / button to select an item.
/
zones.
Use / button to select an item.
Channels
Adjust the channel related
setting.
Use or ENTER to make
adjustment. For detailed operation,
please refer to the related
description on page 29-31.
-28-
Item Function
Operation
Range
NSW/ACT;VIC;QLD;
SA;WA;TAS;NT.
Channel Scan
Manual Scan
Channel Edit
Analog Channel
Fine Tune
Page 16

OSD(On Screen Display) MenuOSD(On Screen Display) Menu
Digital and Analog TV Auto Scan
You can perform digital and analog TV auto search program by the following steps.
1. Press SOURCE button at remote control to display input source.
2. Use / button
to highlight TV and press ENTER button to confirm.
3. Press MENU button and then use / button to select TV menu.
4. Press or ENTER button and then use / button to highlight Country Region.
5. Press or ENTER button and then use / button to select your location in Country Region
(time zone).
Source
TV
VIDEO
S-Video
YPBPR1
YPBPR2
VGA
HDMI
Video
Audio
TV
Setup
Parental
Manual Scan
Country Region
Channels
NSW/ACT
Select
/
6. Use / button to select channels and then press or ENTER button.
7. Use / button to highlight Channel Scan and then press or ENTER button t o start.
TV
Channel Scan
Manual Scan
Channel Edit
Analog Channel Fine Tune
ENTER
Scan
Video
Audio
TV
Setup
Parental
Select
EXIT
Back
Channel Scan
/
Status: Scanning.
Analog Channels: 0
Digital Channels: 0
176.25
Digital TV program No. default range:1-899Analog TV program No. default range: 900-1000
Video
Audio
Setup
Parental
Channels
Manual Scan
Press MENU button and then use / button to select TV.
1.
Press or ENTER button and then use / button to select Channels.
2.
Press or ENTER button and then use / button to select Manual Scan
3.
Press or ENTER button to bring up Manual Scan menu.
4.
Digital TV Manual Scan
1.
Select Digital Manual Scan and then press or ENTER to enter Digital Manual Scan.
2.
Use / button to select RF Channel number(6-69).
3.
Press ENTER to start searching.
TV
Digital Manual Scan
Analog Manual Scan
Video
Audio
TV
Setup
Parental
Status: Scan Complete
Digital Channels: 0
RF Channel
Start Frequency (MHZ)
Signal Level
177.5
6
Video
Audio
Setup
Parental
EXIT
100%
EXIT
8%
Back
Cancel
0
Analog TV Manual Scan
1.
Select Analog Manual Scan and then press or
ENTER to enter Analog Manual Scan.
2.
Use / button to select Scan Up /Down and then press or ENTER to start up /down scan.
Video
Audio
TV
Setup
Parental
Analog Manual Scan
Search for analog channels
Start Frequency (MHZ)
Scan Up
Scan Down
Analog TV Channel Edit
Press MENU button and then use / button to select TV.
1.
Press or ENTER button and then use / button to select Channels.
2.
Press or ENTER button and then use / button to select Channel Edit.
3.
Video
Audio
Setup
Parental
Manual Scan
4.
Press or ENTER button and then use / button to select items.
5.
Press ENTER to start edit.
Video
Audio
Setup
Parental
Channels Edit
Country Region
Channels
TV
900
901
902
903
TV
Analog
Analog
Analog
Analog
ENTER
ENTER
ENTER
NSW/ACT
Enter
Enter
176.25
/
/
Scan Up
Select
Select
EXIT
EXIT
EXIT
Back
Back
Back
Video
Audio
TV
Setup
Parental
Manual Scan
Video
Audio
TV
Setup
Parental
Analog Manual Scan
Video
Audio
TV
Setup
Parental
Channels
Video
Audio
TV
Setup
Parental
Channels Edit
Digital Manual Scan
Analog Manual Scan
ENTER
Status: Scanning...
Frequency: 183.30 MHz
Start Frequency (MHZ)
Scan Up
Scan Down
Channel Scan
Manual Scan
Channel Edit
Analog Channel Fine Tune
ENTER
Channel Number
Channel Name
Frequency
Sound system
Channel Skip
ENTER
Enter
Enter
Enter
/
176.25
/
900
144.25
Off
/
I
Select
Select
Select
EXIT
EXIT
EXIT
EXIT
Back
Cancel
Back
Back
Manual Scan
ENTER
Enter
Scan
EXIT
Back
-30-
Select
EXIT
Back
Digital Manual Scan
/
ENTER
-29-
Page 17

OSD(On Screen Display) MenuOSD(On Screen Display) Menu
Item Function
Channel
Number
Channel
Name
Frequency
Sound System
Channel Skip
To edit channel
numbers.
To edit channel
names.
Directly find the
program you desire
by inputting frequency
number.
To adjust sound
system
To skip channel
Operation
Select Channel number and
input a digital number you
want.
Select Channel number and
then input digital number.
Input the frequency number
by directly pressing digital
number.
Use / button to change
selection.
Use / button to change
selection.
ATV: 46.25MHz-
863.25MHz
DTV: 177.5MHz(VHF6)-
816.5MHz(UHF69)
ATV: I, D/K, B/G
DTV:
On/Off
Digital TV Channel Edit
1. Press MENU button and then use / button to select TV.
2. Press or ENTER button and then use / button to select Channels.
3. Press or ENTER button and then use / button to select Channel Edit.
TV
TV
Channel Scan
Manual Scan
Channel Edit
Analog Channel Fine Tune
Channel Number
Channel Name
Frequency
Sound system
Channel Skip
Video
Audio
TV
Setup
Parental
Manual Scan
Country Region
Channels
ENTER
NSW/ACT
Enter
Video
Audio
Setup
Parental
Select
EXIT
Back
Channels
/
4. Press or ENTER button and then use / button to select items.
5. Press ENTER to start edit.
ENTER
Nine Digital
Nine Digital HD
Nine Guide
/
Set
Select
EXIT
Back
Video
Audio
Setup
Parental
Channels Edit
Video
Audio
TV
Setup
Parental
Channel Edit
1
Digital
2
Digital
3
Digital
Range
Invalid
ENTER
ENTER
Enter
Enter
/
1
Eurosport
177.25
I
Off
/
Select
Select
EXIT
EXIT
Back
Back
Set Up Menu
1. Press MENU button to bring up the main menu.
2. Press / button to select Set Up and then
press ENTER button to enter the submenu.
3. Press / button to select an item.
Item Function
Display
mode
DPMs
(Display Power
Management
signaling)
To display Aspect Ratio.
Put unit to power off
when there is no VGA
signal in VGA mode.
Setup
Parental
Setup
Operation
Use / button to change
selection.
Use / button to change
selection.
Video
Audio
TV
Display Mode
DPMS
Time Setup
Subtitle
Teletext
Version Info
Reset Default
All White
16:9
4:3
On/off
Normal
/
Range
Use / button to select an item
Time Setup
Set up Time
and Sleep Timer.
Use / button to change
selection. For detailed operation,
please refer to Setting Time.
(only
Subtitle
in Digital TV
mode)
Teletext (only
in Digital TV
mode)
Version Info
Reset
Default
All white
To display subtitle on
the screen.
To display teletext on
the screen.
To display version
information.
To reset all menu settings
to factory default.
Refresh the display.
Use button to bring up Digital
Subtitle.
Use / button to select on/off.
Use button to bring up Digital
Teletext.
Use / button to select on/off.
Use button to display version
information.
For detailed operation,
please refer to Reset System.
Use ENTER or button to let
the screen become white.
off/English
On/off
Setting Time
Auto Time Setup
Screen time is automatically set from the digital channel signal. The digital channel signal
includes information for the current time provided by the broadcasting station.
1. Press MENU button and then use / button to select the Setup menu.
2. Press ENTER button and then use / button to select the Time Setup menu.
3. Press ENTER button and then use / button to select the Time menu.
Select
EXIT
Back
Digital TV Channel Number, Channel Name, Frequency and Sound System can not be edited
in Channels Edit menu.
-31-
-32-
Page 18

OSD(On Screen Display) MenuOSD(On Screen Display) Menu
Setup
Time
Video
Audio
TV
Setup
Parental
Video
Audio
TV
Setup
Parental
Display Mode
DPMS
Time Setup
Subtitle
Teletext
Version Info
Reset Default
All White
Auto Synchronization
Date
screen
Timer
Power On Timer
Power Off Timer
ENTER
Enter
Normal
On
/
On
2007/12/11
21:58:28
Off
00:00:00
00:00:00
/
Select
Select
EXIT
EXIT
Back
Back
Video
Audio
Setup
Parental
Time Setup
Time
Steep Timer
TV
ENTER
4. Press ENTER button and then use /
button to highlight Auto Synchronization.
5. Use / to select On in the Auto
Synchronization and then press Menu
button to return to normal TV viewing.
Manual Time Setup
Set the time manually, if current time is set incorrectly by the auto synchronization.
1. After bringing up the Time menu, use /
button to highlight Auto Synchronization.
2. Use / to select Off in the Auto
TV
Auto Synchronization
Date
screen
Timer
Power On Timer
Power Off Timer
Synchronization and then use / to
highlight Date.
3. Changing the date by directly inputting digital
numbers and then use / button to
highlight Screen.
Video
Audio
Setup
Parental
4. Changing the screen time by directly inputting
digital numbers and then press the Menu
button to return to normal TV viewing.
Time
Enter
Off
/
Off
2007/12/11
21:58:28
On
00:00:00
00:00:00
/
Select
Select
EXIT
EXIT
Back
Back
Power On/Off Timer function can be canceled by selecting Off in the Timer.
Digital number can be inputted by pressing numerical buttons on the remote control
Setting Sleep Timer
1. Press MENU button and then use /
button to select the Setup menu.
2. Press ENTER button and then use /
button to select the Time Setup menu.
3. Use / to highlight Sleep Timer and
then use / to select sleep timer
optional (Off, 10, 20, 30, 40, 50, 60, 90
Video
Audio
Setup
Parental
Time
Steep Timer
TV
Off
and 120 minutes).
Select
Time Setup
/
Removing Ghost Image
A frozen still picture from a PC/video game displayed on the screen for prolonged periods will
result in a ghost image. Use the below method to minimize any fixed image on the screen.
1. Press MENU button and then use / button
to select the Setup menu.
2. Press ENTER button and then use / button
to highlight All White.
3. Press the ENTER button to start removing
ghost image.
4. Press MENU button to return to normal TV
viewing.
An excessive permanent image may be
impossible to clear entirely with All White.
Setup
Video
Audio
TV
Setup
Parental
Display Mode
DPMS
Time Setup
Subtitle
Teletext
Version Info
Reset Default
All White
ENTER
Enter
16:9
On
Select
/
Reset System
Use to reset all menu options to the original factory default settings.
EXIT
EXIT
Back
Back
Setting Power On/Off Timer
Set the power of your unit automatically turn on and off daily.
Video
Audio
TV
Setup
Parental
Auto Synchronization
Date
screen
Timer
Power On Timer
Power Off Timer
Off
2007/12/11
21:58:28
On
00:00:00
00:00:00
1. After bringing up the Time menu, use /
button to highlight Timer.
2. Use / to select ON in the Timer and then
use / to highlight Power On Timer.
3. Changing the power on time by directly
inputting digital numbers and then use /
button to highlight Power Off Timer.
Time
Select
EXIT
Back
/
4. Changing the power off time by directly
inputting digital numbers.
-33- -34-
1. Press MENU button and then use /
button to select the Setup menu.
2. Press ENTER button and then use /
button to select Reset Default.
Setup
Video
Audio
TV
Setup
Parental
Display Mode
DPMS
Time Setup
Subtitle
Teletext
Version Info
Reset Default
All White
ENTER
Enter
16:9
On
Select
EXIT
Back
/
Page 19

OSD(On Screen Display) Menu
Parental Control Function
3. Press ENTER button and then input the 4-digital password .
(the default password:0000)
4. A confirm window will be popped up after inputting the password.
5. Use / button to select OK and then press ENTER to start reset.
Password
Video
Audio
Parental
TV
Setup
Parental
EXIT
Back
Are you sure?
OK
Cancel
Initial Setup window will be appeared after reset.
For more details of Initial Setup please refer to our Quick Reference.
Parental Menu
1.
Press MENU button to bring up the main menu.
2.
Press ENTER button to enter password submenu.
3.
Input the password and a submenu will appear.
4.
For more detailed information, please refer to Parental Control Function on page 36-38.
Video
Audio
TV
Setup
Parental
Password
Video
Audio
TV
Setup
Parental
Program Block
Input block
Change Password
Clean All Blocks
Setting Up your Password
Set up blocking schemes to block specific program and external input sources.
A password is required to gain access this menu.
1. Press MANU button and then use / button to select the Parental. Then press or ENTER
button.
Enter the password as requested.
The TV is set up with the initial password 0-0-0-0.
Video
Audio
Setup
Parental
Parental
Password
TV
Back
EXIT
Parental
Video
Audio
TV
Setup
Parental
Program Block
Input block
Change Password
Clean All Blocks
ENTER
Enter
Select
/
EXIT
Program Block in Digital TV Mode
Prevents children from watching certain children's TV programs according to the rating
limited set.
1. After inputting the password, use / to choose Program Block.
2. Press ENTER button and use / button to select Restriction of Access (Block G, Block
PG, Block M, Block MA, Block AV, Block R, Block All and No Block)
Back
Parental
Item Function
Program
Block
Input Block
Change
Password
Clean All
Blocks
To lock a program by rating.
To lock an input source.
To change the password.
To reset parental menu
setting to the default values.
Back
EXIT
Parental
Operation
Use / button to change selection.
Press or ENTER to execute
related operation on page 37.
Press or ENTER to execute
related operation on page 37.
Press the OK button on the screen
to unlock all blocks.
-35- -36-
ENTER
Block G
Block PG
Block M
Block MA
Enter
/
Range
Block AV
Block R
Block ALL
No Block
Select
EXIT
Back
Video
Audio
TV
Setup
Parental
Parental
Program Block
Input block
Change Password
Clean All Blocks
ENTER
Enter
Select
EXIT
Back
/
Block G-General audience
Block PG-Parental guidance suggested
Block M-Mature audience
Block MA-Mature adult audience
Block AV-Adult audience
Block R-Restricted
Block All(Restricts all programs)
No Block(Permits all programs)
3. Press MENU button to return to normal TV viewing.
Video
Audio
TV
Setup
Parental
Parental Block
Program Block
No Block
/
Select
EXIT
Back
Page 20

Parental Control Function
Parental Control Function
Input Block
Enables you to select a source to block from the external source device you have hooked up.
After inputting the password, use / button to choose Input Block.
1.
Press ENTER button and then use / button to select a source.
2.
Press ENTER button to lock on or off on the each source.
3.
Press MENU button to return to normal TV viewing.
4.
TV
1
VIDEO
2
S-Video
3
YPBPR1
4
YPBPR2
5
VGA
6
HDMI
7
Enter
Select
ENTER
/
Parental
Video
Audio
TV
Setup
Parental
Program Block
Input block
Change Password
Clean All Blocks
ENTER
Enter
Video
Audio
TV
Setup
Parental
Select
EXIT
Back
Input Block
/
Change Password
Change the password by inputting a new password twice.
1.
After inputting the password, use / button to choose Change Password.
2.
Press ENTER button and input any 4 digits for any your new password next to the New
Password.
As soon as the 4 digits are entered, re-entered the same 4 digits next to the Confirm
Password. The new password is memorized.
EXIT
Back
Clean All Blocks
Reset all Parental menu settings to the default values except Password.
1. After inputting the password, use / button to choose Clean All Blocks.
2. Press ENTER button and then a confirm window will pop up.
3. Use / button to select OK to reset.
Video
Audio
Setup
Parental
Parental
Program Block
Input block
Change Password
Clean All Blocks
TV
OK
Enter
Select
ENTER
/
EXIT
Back
Are you sure?
Cancel
Parental
Video
Audio
TV
Setup
Parental
Program Block
Input block
Change Password
Clean All Blocks
ENTER
Enter
Select
EXIT
Back
/
Video
Audio
Setup
Parental
Change Password
3. Press MENU button to return to normal TV viewing.
If you forget your password, key in 2-0-8-0 on the remote control.
-37- -38-
New Password
Confirm Password
TV
Back
EXIT
Page 21

Troubleshooting
Supported PC Input Signal
Antenna
Before calling a service center, attempt the following steps to diagnose the problem.
TV unit
Problem
There is no power
There is no picture or sound
There are spots on the screen
Degraded colors or tints
Improper screen position or size
The image appears distorted
The image appears too bright,
and there is a loss of definition in
the brightest areas of the image.
The image appears too washed
out, or the darkest areas of the
image appear too bright.
Remote control does not
function properly
There is no picture or sound,
just noise
Picture is not clear
No sound
Ensure the power plug is securely inserted into the unit and wall
outlet.
Try a different input source to check whether the source is at fault.
Check for mis-connection of cables or for wrong input source.
Your unit is being affected by interference from automobiles, trains,
high-voltage transmission lines, neon signs or another sources of
interference. Try redirecting or relocating your antenna to reduce the
affects of the interference.
Check whether all the picture adjustments have been properly
performed.
Try selecting a different aspect ratio by pressing the ASPECT button
on the remote control.
Ensure the display s aspect ratio is correctly set to suit the program
source.
Reduce the contrast setting.
The AV video signal has not been terminated properly somewhere
in the external AV equipment.
Reduce the brightness level till the black areas of the picture
appear as black.
Check for incorrect battery orientation.
Check for dead batteries.
Check your distance and angle from the display.
Check whether remote control sensor window.
Check for any obstacle between the remote control and the remote
control sensor window.
Check that the remote control sensor window is not under strong
fluorescent lighting.
Check for any devices (PC or personal digital assistant, PDA)
nearby that transmit infrared signal which may cause interference
to signal transmission between the remote control and the unit.
Turn off the infrared function of these devices.
Make sure the antenna cable is properly connected.
Change channels to conrirm if the symptom is still present.
Make sure the antenna cable is properly connected.
Change channels to confirm if the symptom is still present.
If PC (VGA) is selected as the input signal source, use the Auto
Sync Function in the Set Up Menu (In VGA Mode) to let the display
adjust picture automatically.
Check whether you have selected the Mute function.
Make sure the volume is not set to minimum.
Check the AV cables for disconnection.
Suggested Action
Problem
The picture is not sharp or the
picture moves contains image
movement.
The picture is doubled or
tripled.
The picture is spotted.
There are stripes on the
screen or colors fade.
The panel uses a panel consisting of sub pixels which require sophisticated technology to produce.
However, there may be few bright or dark pixels on the screen. These pixels will have no impact on
the performance of the TV.
The reception may be weak.
Change channels to confirm if the symptom is still present.
Make sure the outside antenna is not disconnected.
Make sure the antenna is facing the right direction.
Make sure the antenna is facing the fight direction.
Picture ghosting is caused by reflections from buildings, large metal
structures and mountains, Carefully realign your antenna to minimize
the ghost images. Ultimately a higher quality antenna professionally
installed may be necessary to reduce the ghosting.
There may be interference from automobiles. trains, high voltage lines,
neon lights, etc.
There may be interference between the antenna cable and power cable,
try positioning them further apart.
Is the television receiving interference from other devices? Transmission
antennas of radio broadcasting stations and transmission antennas of
amateur radios and cellular phones may also cause interference.
Use the television as far away as possible from devices that may cause
possible interference.
Suggested Action
Supported PC Input Signal
Your unit can use as PC monitor, it supports below PC input timing.
VESA @ (Recommend)640x480 60Hz
VGA
SVGA
XGA
This VGA signal format is converted to match the number of Pixels of PDP Panel, the unit may
not display small text properly.
If you connect this unit to your PC, the compressed image is displayed in other VGA mode.
Therefore the picture quality may deteriorate and characters may not be read.
VESA @ (Recommend)640x480 72Hz
VESA @ (Recommend)640x480 75Hz
VESA @ (Compressed)800x600 60Hz
VESA @ (Compressed)800x600 72Hz
VESA @ (Compressed)800x600 75Hz
VESA (Compressed)1024x768@60Hz
VESA (Compressed)1024x768@75Hz
-39- -40-
Page 22

Specification
Specification
Operation Voltage
Power Consumption
Video Format Supporting
Digital TV
Analog TV
Panel Spec
100-240V~ 50/60Hz
210W, <1W (Standby)
COMPONENT
HDMI
Input Frequency
Channel Bandwidth
Video Decode
Audio
TV System
NICAM
Active Area
Display Resolution
Contrast Ratio
Brightness
480i,480p,576i,576p, 720p (50Hz/60Hz),
1080i (50Hz/60Hz).
640x480/60Hz, 800x600/60Hz, 480p, 576p,
720p (50Hz/60Hz),1080i (50Hz/60Hz),
1080p (50Hz/60Hz).
VHF: 174MHz to 230 MHz
UHF: 520MHz to 820 MHz
7MHz
1080i,720p,576p,576i
MPEG; AC-3
PAL B/G; D/K;I
NICAM
Stereo
708.01(H)x398.4(V) 0.5mm, (32.02 Inch diagonal)
852xR.G.Bx480 (pixel)
Average 50:1
(In a bright room with 100Lux at center)
Typical 550cd/m (25% White Window)
Expected Life Time
RF input
VIDEO input
S-VIDEO input
Connection Interface
Audio Power
Dimension
Weight
Design and specifications are subject to change without prior notice.
AUDIO input
YP
B
P
R input
VGA input
HDMI input
10W+10W
825(L)x233(W)x596(H)mm
Net: 20.1kg; Gross: 23.1kg
Typical 60,000Hrs
RFx1
VIDEOx1
S-VIDEOx1
AUDIO x 4+PC Audio x 1
YP
BP
R x2
VGA x1
HDMI
x1
-41-
 Loading...