

Page 1

QSL402XT
Page 2

Page 3
Table of Contents
Safety Instruction
Introduction
Introduction
Package Contents
Main Unit Control
Front Panel
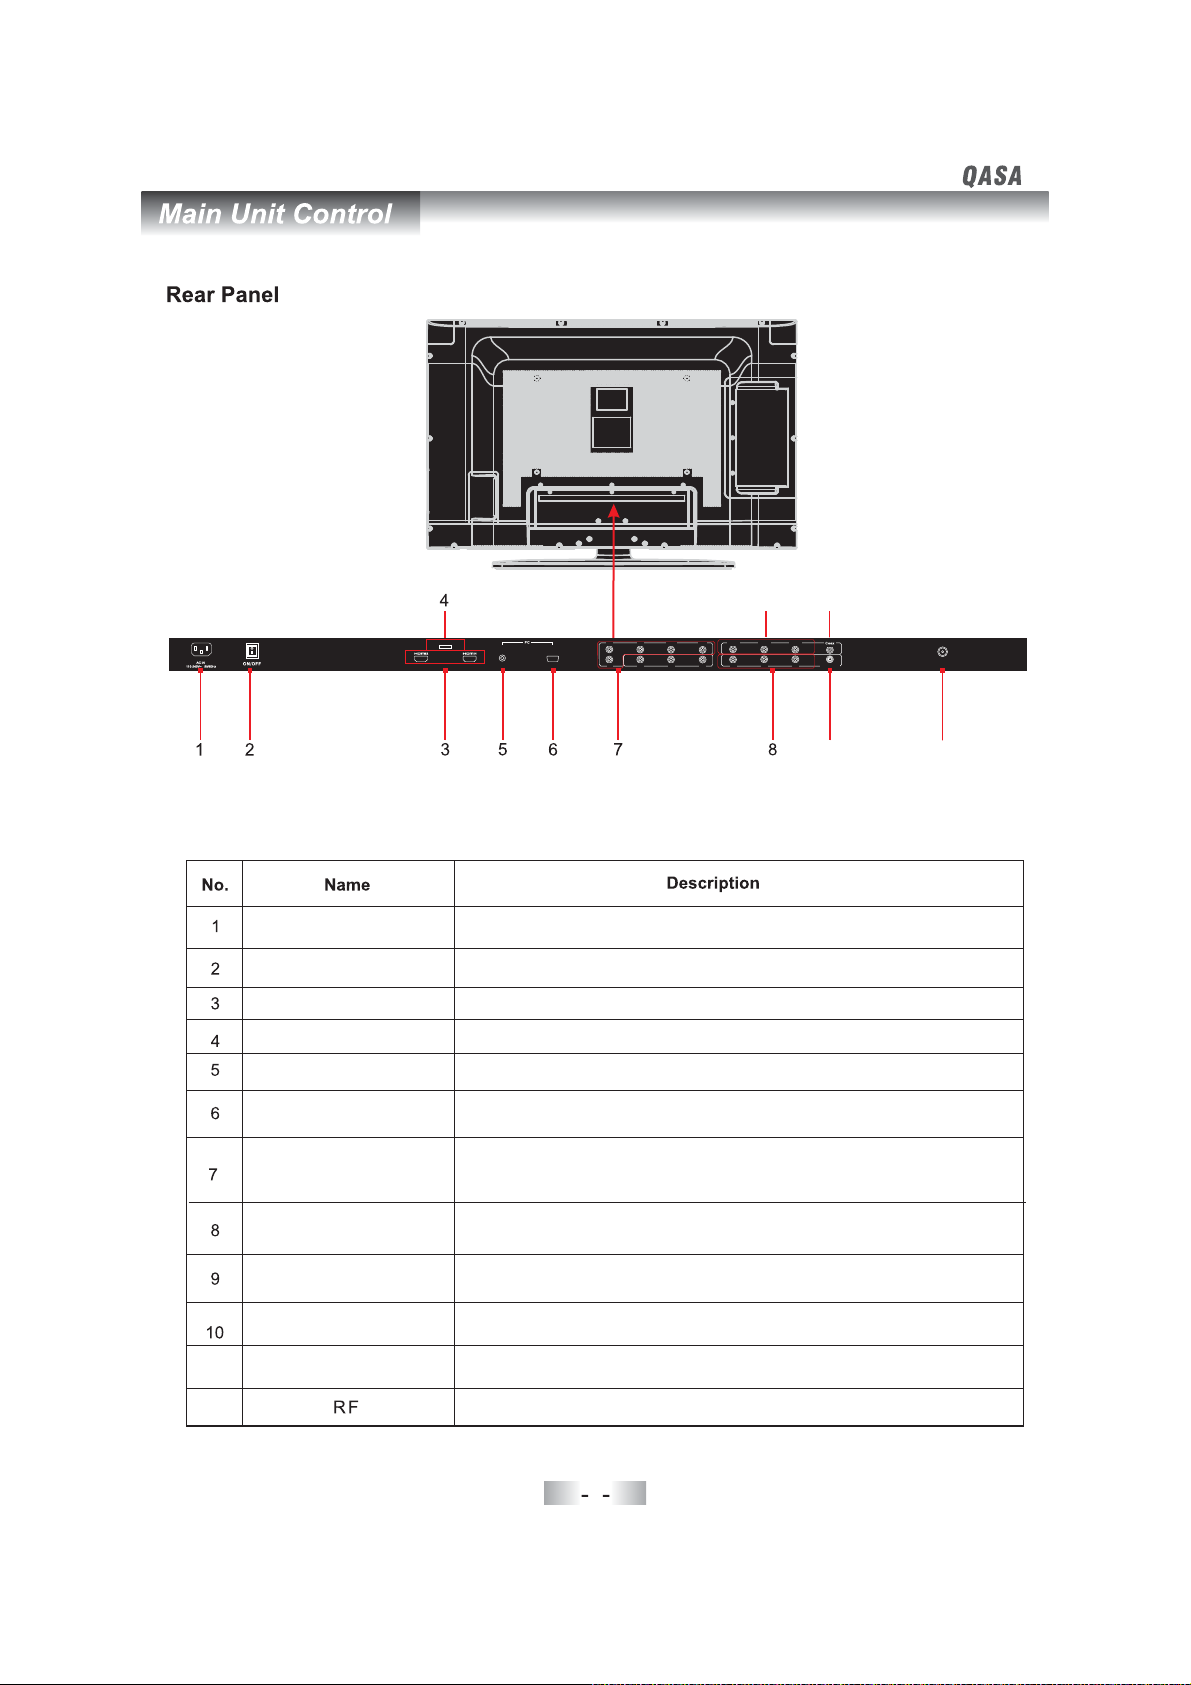
Rear Panel
REMOTE CONTROL
Remote control instructions in TV mode
Remote control instructions in TELETEXT mode
Remote control instructions in DTV mode
Using the Remote Control
Batteries
Notes on Using Batteries
Connection and Setup
Connecting Antenna
Connecting Composite Video signals
Connecting S Video signals
Connecting Component Video signals
Connecting VGA signals
Connecting HDMI signals
Connecting the Power Cord
CONFIGURATION OF THE LCD
Channel menu
Picture menu
Sound menu
Time menu
Option menu
Lock menu
EPG menu
Fast Channel List
Input Source
Troubleshooting and Advice
Specifications
-
25-
78-
912-
10
11
12
12
12
13 16
-
13
13
14
14 15
-
15
16
16
17 25
-
17 20-
-
20 21
21 2222 23
-
23
24
24
25
25
26
27
1
6
6
6
7
8
9
Page 4

234
Page 5

Page 6

Page 7

5
Page 8

STANDBY MUTE SOURCE
PMODE SMODE AUDIO SLEEP
1234
5678
0
TVMENU
EXIT9TEXT
OK
ENTER
VOL-
VOL
+
SUBTITLE HOLD
MIX INDEX
ZOOM
TV/RADIO
QT107
STANDBYMUTE SOURCE
PMODESMODEAUDIO SLEEP
I/II
1234
5678
LIST
0
TVMENU
DISPLAY
EXIT9TEXT
INFO
OK
ENTER
CH+
VOL-
VOL
+
CH-
SIZE
SUBTITLEHOLD
REVEAL
MIXINDEX FAVSUBPAGE
ZOOM
TV/RADIO
EPG
QT107
Instruction
I/II
LIST
DISPLAY
INFO
CH+
CH-
SIZE
REVEAL
SUBPAGE
FAV
EPG
6
Page 9
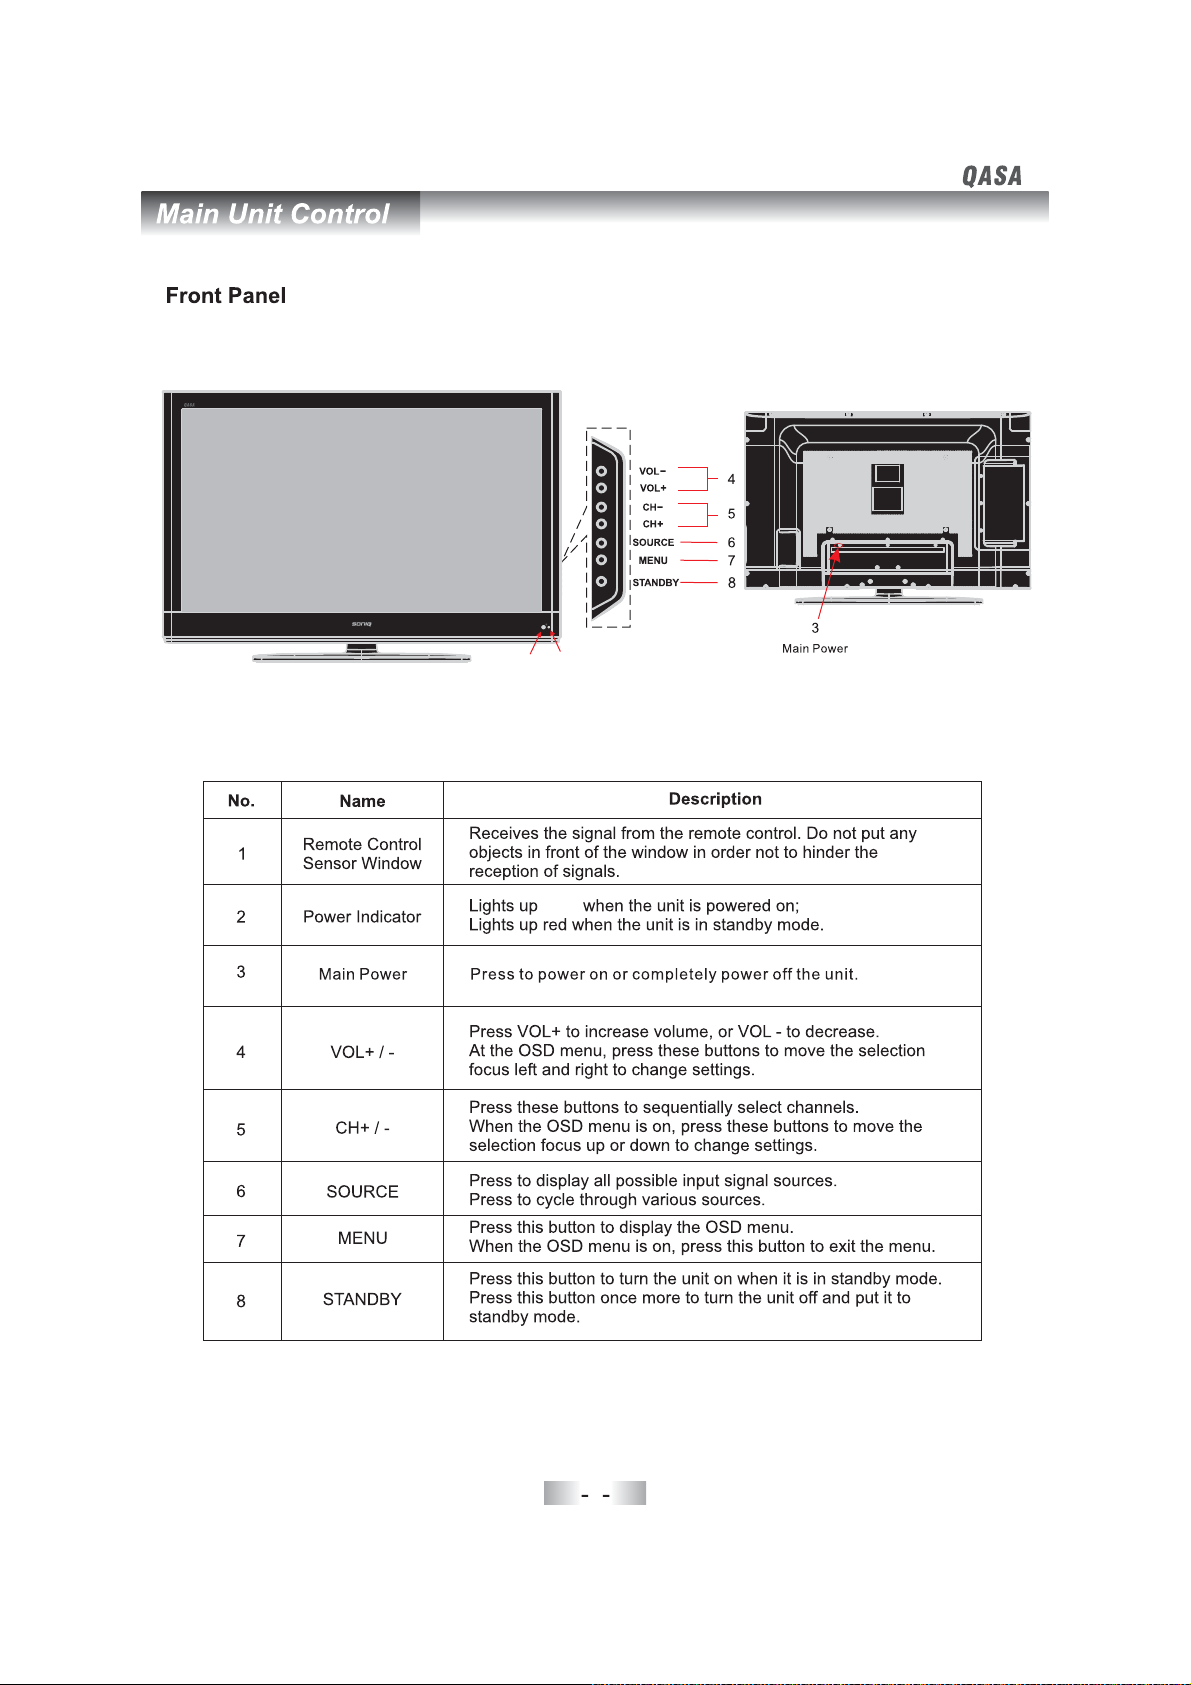
1
2
1green
VOL-
VOL+
CH-
CH+
SOURCE
MENU
STANDBY
7
Page 10
9
11
AC IN
/ON OFF
HDMI1/2
SERVICE
PC AUDIO
PC IN
YPbPr
SERVICEPORT
PC AUDIO
PC IN
Pb
Pr
Y
YR-
V2
R2
YL-
L2
VoutV1RoutR1Lout
SVIDEO-
L1
10
Connect to the power cord.
Mains switch.
Connect an HDMI signal of your HDMI device.
For software upgrade only.
Connect PC audio output of your personal computer.
Connect the PC VGA signal output of your personal computer.
Connect the component video output of your AV devices here.
Audio (Audio input, L/R): Connect the audio output of your AV
device here.
RF IN
12
11
12
VIDEO
AUDIO OUT
S-VIDEO
COAX
Connect composite Audio and Video output of your AV device.
Connect to the audio equipment.
Connect S-Video output of your AV device.
Connect the audio amplifier.
Connect to external antenna.
8
Page 11

Remote control instructions in TV mode
STANDBY
Toggles the unit between standby mode and on.
STANDBY MUTE SOURCE
PMODE SMODE AUDIO SLEEP
I/II
LIST
0
EXIT9TEXT
OK
ENTER
3
7
DISPLAY
12
56
TV MENU
4
8
INFO
MUTE
Press to mute the sound. Press again or press V+ to
un-mute the TV.
SOURCE
Press SOURCE to display the OSD input source,
press▲▼toselect an input source,and then press
OK to confirm.
PMODE
Press repeatedly to cycle through the available video
picture modes.
SMODE
Press to cycle through the different sound settings.
AUDIO(I/II)
Press to search the NICAM modes.
SLEEP
Lets you select amount of time before your TV turn itself
off automatically.
NUMBER BUTTONS
Press 0-9 to select a TV channel directly when you are
watching TV. The channel change after 2 seconds.
VOL-
VOL
SUBTITLE HOLD
MIX INDEX
ZOOM
TV/RADIO
+
QT107
CH-
SIZE
FAV
CH+
REVEAL
SUBPAGE
EPG
LIST
Press to display the TV program list.
Return to the previous channel viewed.
DISPLAY(INFO)
Press to display the source and channel's information.
THUMBSTICK( ▲/ ▼/◄ / ►/ OK ENTER )
Allows you to navigate the on-screen menus and
adjust the system settings to your preference.
TV MENU
Brings up the main TV menu to the screen.
EXIT
Exit the main TV menu to the screen.
V+/V-OL OL
Press to increase / decrease the sound level.
CH CH+/ -
Press to scan through channels.
ZOOM
Press to change the screen scale.
9
Page 12

Remote control instructions in TELETEXT mode
STANDBY MUTE SOURCE
PMODE SMODE AUDIO SLEEP
I/II
12
56
TV MENU
EXIT9TEXT
VOL-
VOL
SUBTITLE HOLD
MIX INDEX
ZOOM
TV/RADIO
0
OK
ENTER
+
LIST
CH-
SIZE
FAV
3
4
8
7
NUMBER BUTTONS
Press 0-9 to select a teletext page.
DISPLAY
INFO
TEXT
Press to switch between TV and Teletext mode or DTV and
Teletext mode.
CH CH+/ -
Page up and Page down.
COLOR BUTTONS
CH+
Select 4 Preferred TELETEXT pages.
SUBTITLE
To display subtitle.
HOLD
Freeze the current page.
SIZE
REVEAL
SUBPAGE
EPG
Change the picture size.
REVEAL
Reveal or hide the hidden words.
MIX
TV and TXT pictures are mixed together in
transparent background.
INDEX
Request index page when index link is valid.
SUBPAGE
TELETEXT Subpage.
QT107
10
Page 13

Remote control instructions in DTV mode
STANDBY MUTE SOURCE
PMODE SMODE AUDIO SLEEP
I/II
12
56
TV MENU
EXIT9TEXT
VOL-
VOL
SUBTITLE HOLD
MIX INDEX
ZOOM
TV/RADIO
0
OK
ENTER
+
LIST
CH-
SIZE
FAV
3
4
AUDIO
8
7
To display audio menu.
LIST
DISPLAY
INFO
Press to display the DTV program list.
INFO
Shows information .about the current channel
COLOR BUTTONS
Select 4 Preferred TELETEXT pages.
CH+
SUBTITLE
To display subtitle menu.
FAV
Press to increase decrease your favourite program/
EPG
REVEAL
SUBPAGE
EPG
Launches the EPG (Electronic Program Guide) in D
TV
mode.
TV/RADIO
When watching a channel, it allows you to switch between
TV and Radio modes.
ZOOM
Press to change the screen scale.
QT107
11
Page 14

1213141516
Page 15

Page 16

Page 17

Page 18

Page 19

Configuration of the LCD
Configuration of the LCD
Press MENU to display the OSD menu. Press to select the submenu, CHANNEL, PICTURE,
SOUND, TIME, OPTION and LOCK.
◄►
Channel menu
CHANNEL
Auto Scan
DTV Manual Scan
ATV Manual Scan
Programme Edit
Quit
EXIT
▲▼ to
Press select the items you want, press ► or OK to confirm.
Press MENU to return to previous menu.
Press EXIT to exit the menu.
MENU
Back
OK
Select
Auto tuning
Channel Tuning
3%...
ATV
DTV
Radio
Press <menu>to skip.
Press <Exit>to exit.
EXIT
96.00 MHz TV
1 Programme(s)
:
0 Programme(s)
:
0 Programme(s)
:
Quit
MENU
Skip
Press ► or to start auto tuning.
When it's starting, press to
skipitandpressEXIT toexitit.
OK
17
MENU
Page 20

Configuration of the LCD
DTV Manual Tuning
DTV Manual Tuning
VHF CH 52
Please select channel then
Press OK to search
NO SIGNAL
Bad
EXIT
Normal
OK
MENU
ATV Manual Tuning
ATV Manual Tuning
Storage To
System
Current CH
Search
Fine-Tune
Skip
Good
1
BG DK I//
1
No
Press ◄► to select the channel, and
then press to start the search.
OK
Frequency
EXIT
Press ▲▼ press◄►to adjust the option as requirement. See details in
the following sub options.
Press SAVE to save the channel.
SAVE
to select the selection,
55.00MHz
-
18
Page 21

Configuration of the LCD
Storage To
Press ◄► to select the channel number you want to save to.
Current CH
Press ◄► to select the current channel.
Search
Press ◄► to search backward/forward, MENU or EXIT to stop the searching.
Fine-Tune
Press ◄► to fine turning the signal of the current channel is weak.
Skip
Press ◄► to turn on/off the switch of skip. When the switch is turned on, the current channel
will be skipped you scan channels with button.
Frequency
Display the frequency of the current channel.
.
if
if
Program Edit
press
CH+/ CH-
Programme Edit
DTV
1 SZTVM01
DTV
2 SZTVM02
DTV
3 SZTVM03
TV
1C-03
DELETE
RENAME
Delete
Press ▲▼ to select the channel you want to delete, and then press DELETE (RED) to mark
DELETE of the channel you selected. Press DELETE (RED) again to delete it, or press MENU
to cancel.
SWAP
SKIP FAV
19
Page 22

Configuration of the LCD
Rename (only for ATV)
Press▲▼ to select the channel you want to rename, and then press RENAME (GREEN) to
mark RENAME of the channel you selected. Press ◄► to select the position of the word and
then press ▲▼ to choose the letter you want.
Swap
Press ▲▼ to select the channel you want to move, and then press SWAP (YELLOW) to mark
SWAP of the channel you selected. Press SWAP (YELLOW)again to move it or press MENU
to cancel
.
Skip
Press▲▼ to select the channel you want to skip or dis-skip, and then press SKIP (BLUE) to
mark or dis mark the channel. The channel marked SKIP will be skipped if you scan channels
-
with CH+/CH- button .
Favorite
Press▲▼ to select the channel you want, and then press FAV to mark
The channel marked FAV will be stored to the favorite list.
PictureI menu
,
or dis mark the channel.
-
MENU
PICTURE
Back
Medium
16 9:
On
Select
OK
23
20
50
PICTURE
Picture Mode
Contrast
Brightness
Color
Sharpness
Tint
Quit
EXIT
MENU ▲▼
Press to display the OSD menu, press to select the menu PICTURE, to enter
MENU
Back
Dynamic
Select
OK
70
60
70
60
0
◄►
Color Temperature
Red
Green
Buel
Aspect Ratio
Noise Reduction
Quit
EXIT
the submenu .
Press to return to the main menu from the submenu.
MENU
Picture Mode
Press◄► to selec picture mode. Dynamic, Standard, Mild, User. Press OK to confirm and return to
t
the previous menu.
Contrast
Press◄► to adjust the contrast of user mode.
Brightness
Press◄► to adjust the brightness of user mode.
Color
Press◄► to adjust the color saturation of user mode.
20
Page 23

Configuration of the LCD
Sharpness
Press ◄►to adjust the sharpness.
Color Temperature
Press◄► , , ,to select Color Temperature. Cool User Warm Medium
Aspect Ratio
Press◄► Full, ,to select Aspect Ratio. Zoom1, Zoom2, Auto 4:3,16:9.
Noise Reduction
Press◄► to open or close Noise Reduction.
Screen ( Only available on PC mode. )
PICTURE
Screen
Quit
EXIT
Auto Adjust
Back
MENU
Select “Auto Adjust”and press , the unit will automatically adjust all items to
achieve the best effect.
H-Position
V-Position
Size
Phase
Allow you to use button to adjust the H Position.
Allow you to use button to adjust the V Position.
Allow you to adjust the width of image.
Allow you to adjust the definition.
Sound menu
PICTURE
Auto Adjust
Horizontal Pos.
Vertical Pos.
Size
Phase
Select
OK
EXIT
Quit
MENU
Back
OK
50
50
0
60
Select
►
◄►
◄►
Sound
Sound Mode
Treble
Bass
Balance
Auto Volume
Surround Sound
Quit
EXIT
MENU
Back
28
21
standard
Off
Off
Select
OK
50
50
L25
Page 24

Configuration of the LCD
Press to display the OSD menu, ◄► to select the menu SOUND, ▲▼ to enter
the submenu.
Press to return to the main menu from the submenu.
MENU
pressMENU
Sound Mode
Press ◄► to select sound mode. Surround, Music, Cinema, Sports, User.
OK t
Press o confirm and return to the previous menu.
Treble
Press ◄► to adjustthe treble volume of user mode.
Bass
Press ◄► to adjust the bass volume of user mode.
Balance
Press ◄► to adjust the balance of user mode.
Auto Volume
Press ◄►to select off or on.
Surround Sound.
Press ◄►to select off or on.
Time menu
TIME
Clock
Off Time
On Time
Sleep Timer
Auto Sleep
Time Zone
Quit
EXIT
Press to display the OSD menu, ◄► to select the menu TIMER, ▲▼ to
enter the submenu.
Press MENU to return to the main menu from the submenu.
MENU press press
MENU
Back
19/Apr 04:43
Off
Off
Off
Off
Western AustraliaGMT 8+
Select
OK
22
Page 25

Configuration of the LCD
Clock
Press ► to select Date, Month, Year,Hour and Minute, press to set the time.▲▼◄►
Off time
Press ► to select on, ▲▼press to enter the setup item, use ◄►▲▼ to set the time you want
th e TV to be turned off.
On time
Press ► to select on, press ▲▼toenterthesetupitem,use ◄► to set the time you want▲▼
theTVtobeturnedon.
Sleep Timer
Allows you to set up the sleep timer among: 10min, 20min, 30min, 60min, 90min, 120min, 180
min, 240min and off.
Auto Sleep
Automatic shutdown function of timing options.
Time Zone
Allows you to set up the Time Zone: Western Australia GMT 8, South Australia GMT
9 5, Northern Territory GMT 9 5, New South Wales GMT , Victoria GMT ,
+. +. + +
GMT , GMT .
++
10 Tasmania 10
+
10 10 Queensland
Option menu
OPTION
Language
Audio Language
Subtit e Languagel
Hearing Impaired
Country
Restore Setting
Quit
EXIT
Press MENU to d isplay the OSD menu, press ► to select the menu OPTION, press▲▼
to enter the submenu.
Press MENU to return to the main menu from the submenu.
MENU
Back
Language
Press◄► to select the OSD, Audio and Subtitle languages you want.
Restore Setting
Press enter restore the factory default settings.►
English
English
English
Off
Australia
Select
OK
23
Page 26

Configuration of the LCD
Lock menu
LOCK
Lock Channel
Off
Change Password
Block Program
Parental Guidance
Quit
EXIT
MENU
Back
No Block
Select
OK
Press MENU to display the OSD menu, ◄► to select the LOCK submenu, press enter the▼to
password "0000", and to select item.▲▼
Press MENU to return to the main menu from the submenu.
Lock Channel
Press ◄► to select off or on.
Change Password
Press new password and confirm.
Block Program
Channel lock.
Parental Guidance
In DTV mode press ◄► to select ., Parental Guidance s grade'
EPG Menu
Use EPG button on the remote control to display the EPG menu directly as below: (only available
on DTV mode)
.
PROGRAMME GUIDE
19 Apr 2008 04:58
DTV
800 SZTVM01
801 SZTVM02
802 SZTVM03
803 Data
EXIT
Quit
DTV 803 Data
00:00-00:00
04:30 05:30
INFO
More Change Day Select
19 Apr
No Information
No Information
No Information
No Information
DATE
24
OK
Page 27

Configuration of the LCD
Fast Channel List
Channel List
DTV
800 SZTVM01
DTV
801 SZTVM02
DTV
802 SZTVM03
DTV
803 Data
Select
EXIT
Quit
Quit
MENU
Select
Press LIST button to enter into Channel List menu directly when there is no OSD on screen.
Input Source
Input Source
DTV
ATV
AV1
AV2
S-V
ideo
YPbPr
VGA
HDMI1
HDMI2
Select
Quit
Quit
EXIT
Press SOURCE to display the OSD input source, press▲▼to select an input source,and then
press OK to confirm.
MENU
Select
25
Page 28

Troubleshooting and advice
Troubleshooting and advice
Should your unit develop a problem, please refer to the below troubleshooting table before
requesting assistance.
Troubleshooting
No signal
No color shades
Stain show on the
screen.
Double or multiple
display image
Snow on the screen
The remote control
does not work
"Zip" noise on
coming from TV
Control
Please check that all cables are correctly plugged in.
Adjust the contrast, color and brightness
Maybe result from a lighting signal from car, motor, neon light and
other electrical devices or appliances.
Maybe the result of an electrical wave disturb from other TV,
Computer and Game machine or Radio
The cables of the antenna are not correctly plugged in.
Please check the polarity of the batteries.Check that the receiver
of the remote control is not sheltered by something.
Even if the display image is correct, the noise may come from an
unsteady fixation of the panel.
No sound
Make sure that you have not press the MUTE button on the panel
or on the remote control.
26
Page 29

Specifications
Specifications
Screen Size
Display Type
Resolution(Pixel)
Aspect Ratio
AC INPUT
TV System
Video Input Format
Antenna Input
Audio Output
Video
S-Video
Input
Audio (S-Video/PC/YPbPr)
(Videos-Video-PC)
Audio
YPbPr
PC
40 Inch
TFT LCD
1920 X 1080
16:9
AC110-240V 50/60Hz 200W
PAL /B G
PAL/NTSC
Standard antenna socket 75Ω
L/R W2X8
Video 0Vp-p75 RCA1. ;Ω
Y:1.0Vp-p±3db C:0.3Vp-p±3db
640 480/60Hz 800 600/60Hz 1024 768/60HzXX X
R/L 200mVrms (max3.0vp-p) 20K RCAΩ
Y: 1V p-p PB/PR: 0.7Vp-p
HDMI
Weight
Dimensions (with stand)
This manual is only for your reference, any change to the design and specification will not
be advised.
Standards TMDS Max. 1080P
27kgs
1062(L)X328(W)X754(H)mm
27
Page 30

Page 31

Page 32

 Loading...