

Page 1
Page 2

Page 3

Contents
1 Important ............................................................................................................................... 4-5
Safety and important notice ....................................................................................................4-5
2 Your Product ..........................................................................................................................6-8
Regions codes ...........................................................................................................................6
Product overview .......................................................................................................................7
Remote Control ..........................................................................................................................8
3 Connect ................................................................................................................................9-10
Connecting to a TV ....................................................................................................................9
Optional Connection ................................................................................................................10
Connect USB device ................................................................................................................10
Connect power .........................................................................................................................10
4 Preparation..............................................................................................................................11
Prepare the remote control ......................................................................................................11
Setting Up The Player ..............................................................................................................11
5 Playback ............................................................................................................................ 12-14
Playback Functions .............................................................................................................12-14
6 Customizing ...................................................................................................................... 15-21
General Setting ...................................................................................................................15-19
Display Setting ....................................................................................................................19-20
Audio Setting ......................................................................................................................20-21
System information ..................................................................................................................21
7 Specication ...........................................................................................................................22
8 Troubleshooting ............................................................................................................... 23-24
9 Glossary ............................................................................................................................ 25-26
-3-
Page 4

Important
Safety and important notice
WARNING:
• TO REDUCE THE RISK OF FIRE OR
ELECTRIC SHOCK, DO NOT EXPOSE
THIS APPLIANCE TO RAIN OR
MOISTURE.
• DANGEROUS HIGH VOLTAGES ARE
PRESENT INSIDE THE ENCLOSURE,
DO NOT OPEN THE CABINET.
REFER SERVICING TO QUALIFIED
PERSONNEL ONLY.
• DO NOT INSTALL NEAR ANY HEAT
SOURCES SUCH AS RADIATORS,
HEAT REGISTERS.
• NEVER PLACE THE PRODUCT,
REMOTE CONTROL OR BATTERIES
NEAR NAKED FLAMES OR OTHER
HEAT SOURCES
• THE APPARATUS SHALL NOT BE
EXPOSED TO DRIPPING OR
SPLASHING;
• NO OBJECTS FILLED WITH LIQUIDS,
SUCH AS VASES, SHALL BE PLACED
ON THE APPARATUS;
• MINIMUM DISTANCES AROUND THE
APPARATUS FOR SUFFICIENT
VENTILATION, NO LESS THAN 5 CM.
• THE VENTILATION SHOULD NOT BE
IMPEDED BY COVERING THE
VENTILATION OPENINGS WITH
ITEMS, SUCH AS NEWSPAPERS,
TABLE-CLOTH, CURTAINS ETC.;
• NO NAKED FLAME SOURCES, SUCH
AS LIGHTED CANDLES, SHOULD BE
PLACED ON THE APPARATUS;
• ATTENTION SHOULD BE DRAWN TO
THE ENVIRONMENTAL ASPECTS OF
BATTERY DISPOSAL;
• THE USE OF APPARATUS IN
MODERATE CLIMATES ONLY;
• THE REMOTE CONTROL BATTERY
SHALL NOT BE EXPOSED TO
EXCESSIVE HEAT SUCH AS
SUNSHINE, FIRE OR THE LIKE.
• THE MAINS PLUG IS USED AS THE
DISCONNECT DEVICE, THE
DISCONNECT DEVICE SHALL BE
READILY OPERABLE.
CAUTION:
This product employs a Laser
System(Class 1M).
This BD DVD player employs a Laser
System.
To ensure proper use of this product,
please read this owner’s manual carefully
and retain for future reference. Should the
unit require maintenance, contact an
authorized service location.
Use of controls, adjustments or the
performance of procedures other than
those specied herein may result in
hazardous radiation exposure. To prevent
direct exposure to laser beam, do not try to
open the enclosure. Visible laser radiation
when open.
DO NOT STARE INTO BEAM.
The appliance is not intended for use by
young children or inrm persons without
supervision.Young children should be
supervised to ensure that they do not play
with the appliance.
These servicing instructions are for use by
qualied service personnel only.
To reduce the risk of electric shock do not
perform any servicing other than that
contained in the operating instructions
unless you are qualied to do so.
This product incorporates copyright
protection technology that is protected
by U.S. patents and other intellectual
property rights. Use of this copyright
protection technology must be
authorized by Rovi Corporation, and is
intended for home and other limited
viewing uses only unless otherwise
authorized by Rovi Corporation.
Reverse engineering or disassembly
is prohibited.
-4-
Page 5

Important
Notice for Trademark
HDMI, the HDMI logo and High-Denition
Multimedia Interface are trademarks or
registered trademarks of HDMI Licensing
LLC in the United States and other
countries.
‘Blu-ray Disc’ and ‘Blu-ray Disc’ logo are
trademarks.
DVD Video is a trademark of DVD Format/
Logo Licensing Corporation.
Manufactured under license from Dolby
Laboratories. Dolby and the double-D
symbol are trademarks of Dolby
Laboratories.
Manufactured under license under U.S.
Patent #'s: 5,451,942; 5,956,674;
5,974,380; 5,978,762; 6,226,616;
6,487,535; 7,212,872; 7,333,929;
7,392,195; 7,272,567 & other U.S. and
worldwide patents issued & pending. DTS
and the Symbol are registered trademarks,
& DTS-HD, DTS-HD Master Audio, and the
DTS logos are trademarks of DTS, Inc.
Product includes software. © DTS, Inc. All
Rights Reserved.
Java and all other Java trademarks and
logos are trademarks or registered
trademarks of Sun Microsystems, Inc. in
the United States and/or other countries.
*Java and all Java-basd trademarks and
logos are trademarks or registered
trademarks of Sun Microsystems, Inc. in
the U.S. and other countries.
DivX®, DivX Certied®, DivX PlusTM HD
and associated logos are registered
trademarks of DivX, Inc. and are used
under license.
-5-
Page 6

ALL
4
Region
U.S.A. and
Canada regions
U.K.,
Europe regions and
Asia Paci c,
Taiwan, Korea
Australia,
New Zealand,
Latin America
Russia and
India regions
China, Calcos Islands,
Walls and Futuna
Islands
ALL
ALL
5
6
DVD discs that
can be played
ALL
1
ALL
ALL
2
3
Japan
Region
North America,
Central America,
South America,
Korea, Japan, Taiwan,
Hong Kong and
South East Asia.
Europe, Greenland,
French territories,
Middle East, Africa,
Australia and
New Zealand.
India, China, Russia,
Central and
South Asia.
BD discs that
can be played
Your Product Your ProductYour Product
Regions Codes
Both the Blu-ray Disc player and the discs
are coded by region. These regional codes
must match in order to play the disc. If the
codes do not match, the disc will not play.
The Region Number for this Blu-ray Disc
player is described on the rear panel of the
Blu-ray Disc player.
Blu-ray Disc Java
Blu-ray Disc Java(BD-J) Application
The BD-ROM format supports Java for
interactive functions. “BD-J” offers content
providers almost unlimited functionality
when creating interactive BD-ROM titles.
-6-
Page 7
1
2
3 876 94 5
1
4
7
5 6
3
2
Your ProductYour Product
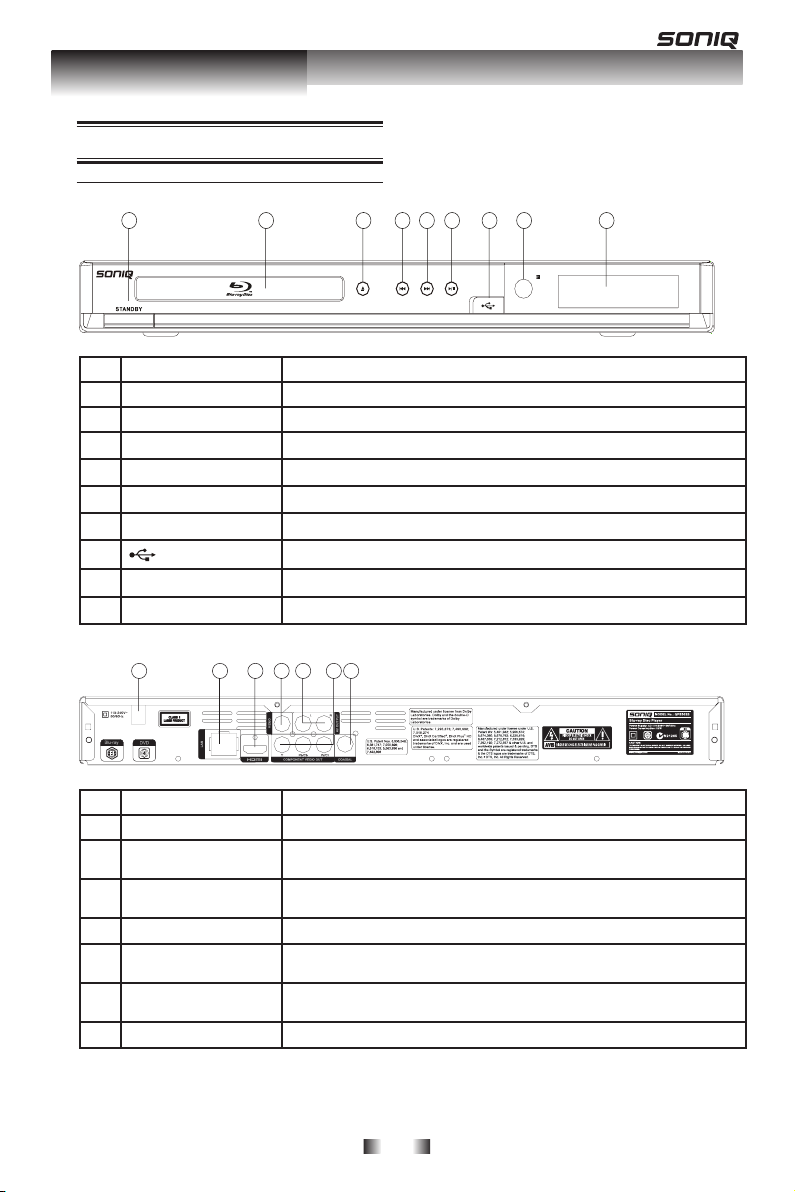
Product overview
Main Unit
NO Control Function
STANDBY button Turns the power on or restores the unit to the standby mode.
a
Disc compartment Loads a disc into the disc drive.
b
c
Z
d
.
e
>
f
B/[[
g
IR Sensor Point the remote control at the IR sensor.
h
Display panel Show information about the current status of this unit.
i
Open or close the disc compartment.
Search backward.
Search forward.
Playback/Pause.
Connect a USB ash drive.
NO Control Function
AC power cord Connects to a standard AC outlet.
a
ETHERNET Use this to connect to a network with an always-on broadband connection. It is
b
HDMI OUTPUT jack Outputs video/audio signals to a connected TV, monitor or AV amplier.
c
VIDEO Output video signals to a connected TV.
d
ANALOG AUDIO OUTPUT
e
jacks
COMPONENT VIDEO
f
OUTPUT jacks
COAXIAL socket Output digital audio signals when connecting the coaxial digital cable.
g
reserved for future usage of BD-Live.
Connect to a TV, monitor or AV amplier equipped with HDMI input.
Outputs audio signals to a connected TV or AV amplier.
Outputs video signals to a connected TV or monitor.
Connect to a TV or monitor equipped with component video jacks.
-7-
Page 8

|
ON / STANDBY
• To switch the DVD player to ON or standby mode.
SETUP
• Enters or exits the system setup menu.
1
MC
• To OPEN/CLOSE Media Center. When there is no
disc or DVD is in stop mode, press MC button to
switch between DVD and USB mode.
2
ANGLE
• Switch the camera angle during playback.
MUTE
• Mutes the sound output from player.
REPEAT
• Selects various repeat mode.
DIGEST
• During playback a JPEG disc, press to view a page of 12
thumbnail images. This button is only available in JPEG mode.
ZOOM
• To zoom out/in.
/
F.R & F.F
• Fast Reverse/ Forward search.
PAUSE
•
Pause playback.
3
RETURN
• Return to previous menu.
4
DISPLAY
• To display a window to locate a title, chapter or track.
6
A/B/C/D
•
To operate as indicated by the video display during some BD
disks playback. These keys have no effect for DVDs and CDS.
PROGRAM
• To set track/chapter in a favourite order during CD/DVD/VCD
playback.
CLEAR
•
To clear all programmed items.
7
Number Buttons
• Select numbered items in a menu.
• Press to enter track/ chapter/ title numbers/password directly.
8
SLOW
• Do a slow forward.
9
SEARCH
• To search a title, chapter to track or playing time.
10
DISC MENU
• To display a menu include on many BD/DVD video discs.
11
TITLE MENU
• To display the disc title during playback.
12
PLAY
• Start playback.
/
PREV & NEXT
• Skip to previous. next chapter/title/track.
13
SUBTITLE
• To display subtitle; press repeatedly to select different subtitles
available in your disc.
RANDOM
• To play in random (for CD , VCD, JPEG, WMA and DivX).
REPEAT A-B
• To repeat from A to B.
PIP (Picture in Picture)
• Switch on or off the secondary video and audio.
STOP
• Stop playback
AUDIO
• To select the sound stream; press repeatedly to select different
audio streams availble in your disc.
14
OPEN/CLOSE
• Open/ Close the disc tray.
15
REMOTE SIGNAL EMITTER
• Point remote control to the sensor on the front panel.
16
OK
• Acknowledge/Confirm menu selection.
• Navigation/Cursor buttons for moving to the left. right/ up/ down.
• During JPEG playback, press button to rotate the image to left
or right. Press button to flip the image horizontally, reversing the
left and right sides of the image. Press button to flip the image
vertically, reversing the top and bottom sides of the image.
5
1
2
3
4
6
7
8
9 10
11
12
13
14
15
16
5
Your Product Your ProductYour Product
Remote Control
-8-
Page 9

AUDIO IN
VIDEO IN
PbY
Pr
AUDIO IN
HDMI IN
Connect ConnectConnect
Make the following connection to use this
product.
Connecting to a TV
Connect the product to TV to view disc
play, Select the best video connection that
TV can suport:
Option 1: Connect to the composite video
jacks
Option 2: Connect to the component video
jacks
Option 3: Connect to the HDMI Jack.
Option 1: Connect to the composite
video jacks
You can connect this unit to a TV through
the composite video cable which provides
standard picture quality.
1. Connect the component video cables
from the Y Pb Pr jack on this unit to the
corresponding component video input
jacks on your TV.
2. Connect the audio cable from AUDIO L/
R_AV OUTPUT jacks on this product to
the audio input jacks on your TV.
Option 3: Connect to the HDMI Jack
This type of connection provides better
picture quality
1. Connect a composite cable from the
VIDEO jack and AUDIO L/R_AV OUTPUT
jacks on this product to the video input
jack(yellow) and audio input jack(white/
right) on the TV.
Option 2: Connect to the component
video jacks
You can connect this unit to a TV through
the component video cables which
provides superior picture quality.
The progressive scan video quality is only
available when using Y Pb Pr connection
and a progressive scan TV is required.
1. Connect a HDMI cable from the HDMI
OUTPUT jack on this product to the HDMI
input jack on the TV.
Notes:
– If the TV has a DVI connector only,
connect via an HDMI/DVI adapter.
Connect an audio cable for sound output.
-9-
Page 10

COAXIAL
DIGITAL AUDIO
INPUT
AUDIO IN
Connect
Optional Connection
Option 1: Connect to digital amplier/
receiver
Option 2: Connect to analogue stereo
system
Option 3: Connect network.
Option 1: Connect to the digital
amplifer/receiver
Round the sound from this player to other
device to enhance audio play.
1. Connect a coaxial cable from the
COAXIAL jack on this product to the
COAXIAL jack on the device.
Option 2: Connect to an analogue
stereo system
1. Connect the network cable from the LAN
jack on the player to the LAN jack on the
system.
Connect USB device
A USB device provides an additional
memory to software updates and enjoy
BD-Live bonus content.
1. Connect the USB device to the USB
jack on this player.
Notes:
- Connect a USB device only to the USB
jack on this player.
- We are not guarantee 100% compatibility
with all USB devices.
1. Connect the audio cable from the
AUDIO L/R_AV OUTPUT jack on the
player to the audio input jack to the
system.
Option 3: Connect network
Connect this product to the network to
enjoy BD-Live bonus content.
Connect Power
1. Connect the AC power cable to:
- the main unit.
- the wall socket.
• The player is ready to be set up for
use.
Notes:
– Before connecting the AC power cord,
ensure you have complete all other
connections.
– Risk of product damage! Ensure that the
power supply voltage corresponds to the
voltage printed on the back of the unit.
– The type plate is located on the back of
the main unit.
-10-
Page 11

Preparation PreparationPreparation
Always follow the instructions in this
chapter in sequence.
Note:
- Use of controls or adjustments or
performance of procedures other than
herein may result in hazardous radiation
exposure or other unsafe operation.
Prepare the remote control
1.Open the battery compartment.
2.Insert 2 AAA batteries with correct
polarity (+/-) as indicated.
3 Close the battery compartment.
Notes:
- Keep the batteries away from the
heat,sunshine or re. Never discard
batteries in re.
- If you are not going to use the remote
control for a long time, remove the
batteries.
- Do not use old and new or different types
of batteries in combination.
- Risk of explosion! Keep batteries away
from heat, sunshine or re. Never discard
batteries in re.
Setting up the player
Find the correct viewing channel
1.Press 2 to turn on this product.
2.Turn on the TV and switch to the correct
video-in channel (refer to the TV user
manual on how to select the correct
channel)
Use the HOME MENU
1.Press SETUP to display the setup menu
when the BD Player is playing or no disc.
And press SETUP to exit the Setup menu.
Select menu display language
1.Press.PressPress SETUP
[General Setting] menu is displayed
2.Select [Language], then press
3.Select [OSD], then press .
- The language options may vary from
different regions.
4.Press to select a language, then
press OK
Note:
- If this disc player is connected to a HDMI
CEC compliant TV, skip this setting. It
switches automatically to the same OSD
menu language as per your TV setting.
-11-
Page 12

Playback PlaybackPlayback
Playback Functions
Basic Playback
1. Press 1/STANDBY switch on the front
panel or the remote control, your player will
turn on.
The unit will take around 30 seconds to
warm up.
2. Turn on the TV, and then select the
input setting on the TV that matches the
connection method you used to connect
your player.
3. Press OPEN/CLOSE Z to slide out the
disc tray.
4. Place a disc on the disc tray with the
label facing up, and then press OPEN/
CLOSE Z to slide back and close the disc
tray.
The disc loading time depends on the
types of disc you are loading, and loading
a Blu-ray Disc will take longer time.
5. If the disc does not start playing
automatically, please press PLAY to
start playback.
6. If a Blu-ray disc or DVD menu displays,
press CURSOR button to select PLAY.
Then, press OK to conrm.
7. To eject the disc, press OPEN/CLOSE
Z.
Pause playback
1. Press PAUSE X to pause playback. The
sound will be muted.
2. Press PAUSE X or PLAY to resume
the playback.
Stop playback
1. Press STOP button once to go to Prestop mode, the TV screen will show the
Pre-stop logo.
2. Press STOP twice to stop the
playback completely.
3. Press PLAY to resume playback from
the point where playback is pre-stopped or
from the beginning of the disc after the
playback is completely stopped.
Not all Blu-ray Discs support the resume
feature.
Fast Forward and Fast Reverse
1. Press F.FWD M to fast forward
through the disc. The fast forward speed
changes based on how many times you
pressed the button. The speed will
increase through the following sequence:
X1, X2, X3, X4, X5
2. Press PLAY to resume playback.
3. Press F.REV m to fast reverse through
the disc. The fast reverse speed changes
based on how many time you pressed the
button. The speed will increase through the
following sequence:
X1, X2, X3, X4, X5
4. Press PLAY to resume playback.
Previous and Next
During playback, press PREV button,
and you can skip back to the start of the
chapter or track. Each press of this button
will allow you to skip a chapter or track till
the beginning of the disc.
Press of NEXT button during playback
will allow you to skip the playback to next
chapter or track.
Slow Forward
1. During playback, press SLOW button.
The slow forward speed is 1/16X in default.
2. To change slow forward speed, press
SLOW button repeatedly, and the slow
forward speed will be changed in the
following sequence: 1/16X, 1/8X, 1/4X,
1/2X, normal.
3. To exit slow forward mode and return to
normal playback, press PLAY .
-12-
Page 13

Playback
Advanced Playback
DISPLAY
Press this button and the screen will
display some information about disc, such
as: Title number, Chapter number, Time
Elapsed, Mode, Audio, Angle, Subtitle
languages, Bitrate, Still Off, Instant Search
and Instant Replay.
Press this button twice to turn off the
information display.
REPEAT
Press once or more times to select
different repeat modes as the following
looped sequences:
DVD discs: CH, TT and ALL;
VCD/CD/JPEG/WMA discs: Track and
ALL;
BD discs: CH and TT.
REPEAT A-B
To play certain section within the video or
song, press REPEAT A-B button to set the
start-point. Then, press REPEAT A-B
button again to set the end-point and
complete the setting. The selected section
will be played repeatedly.
Press REPEAT A-B button the third time to
cancel this function.
The end point cannot be set until 5
seconds of playback has elapsed from the
start point.
RANDOM
Press this button during Audio CD/VCD/
WMA/JPEG/DivX playback, and the tracks
will play in random sequence.
SEARCH
During playback, press SEARCH button to
repeatedly to select different search modes
as following sequences:
Title ---
1.
Chapter ---
2.
Time --:--:--
3.
Cancelled
4.
Press / and OK button on the remote
control to select above modes.Then Press
the numeric buttons and then OK.The Play
back will skip.
SUBTITLE
Press this button repeatedly and the
screen will display “X/XX XXX” and
“SUBTITLE Off”. The “X” indicates the
current number of this language; “XX”
indicates the total number of language;
“XXX” indicates the language name.
The number of available languages
depends on the disc.
RETURN
Press this button to return to the main
menu. (This option is only available to
Data(WMA/JPEG) disc.)
ANGLE
During playback, press this button to
change the angle of the picture. The
screen will display “Angle X/X.” The rst “X”
indicates the current number of angle, and
the second “X” indicates total number of
angle.
Not all BD or DVD has the multi-angle
feature. The screen will take around 5
seconds to change.
DISC MENU
You may press this button at any time, and
the BD or DVD video disc playback will pop
up the disc menu.
TITLE MENU
During Blu-ray Disc playback, press TITLE
MENU to display the disc title, and the
playback will not be stopped even the
menu is on the screen.
1. Press the / / / buttons to
select an option, then press OK to conrm.
2. Press TITLE MENU to close the menu.
During DVD playback, press TITLE MENU
to open the disc menu.
During VCD playback, press TITLE MENU
to switch PBC on/off.
SETUP
Press the SETUP button, and the screen
will display some information about the
player, such as:
General Setting
•
Display Setting
•
Audio Setting
•
System Information
•
-13-
Page 14

Primary video
Secondary video
with Secondary Audio
Playback
Red(Program)/Yellow(Clear)
During CD/DVD/VCD playback ,you can use
Program to edit the track onto the CD or the
chapter onto the DVD. then press / to
select track/chapter to press Clear to
delete track/chapter.
Red(A)/Green(B)/Yellow(C)/Blue(D)
A/B/C/D button only will be used by BD
discs.
A button: Delete bookmark;
B button: Add bookmark;
C button: View bookmark;
During BD playback,you can use these
button to edit, see or delete bookmark.
short press B button once, it can add a
bookmark. Press C button to view the
bookmark, then use / to select the
bookmark to play the content of the selected
bookmark and press A button to deleted the
selected bookmark.
AUDIO
Press AUDIO button on the remote control
to select the audio streams that set within
the Blu-ray or DVD disc.
The screen will display:
AUDIO: X / XX XXX XXXX
“X” - the Current Audio Stream Number
“XX” - The total number of Audio Stream
“XXX” - Audio Language Name
“XXXX” - Audio Technology
DIGEST
During playback JPEG disc, press DIGEST
to view a page of 12 thumbnail images.
- Use / / / to select an image.
Press OK to view the selected image in
full-screen and subsequent images will be
displayed one after another automatically.
- Press PREV / NEXT to view the
previous or next thumbnail screen.
Blu-ray Disc Bonus View
Playing Secondary Video (Picture-inPicture) and Secondary Audio for Blu-ray
Disc only Secondary video can be played
from a disc compatible with the Picture-inPicture (PIP) function.
For the playback method, refer to the
instructions for the disc.
1. Turn on secondary video by pressing the
PIP button, and press the PIP button again
to display a PIP ON sign.
2. Press the Display button to select
Second Audio, and select a option except
off. The secondary audio is opened. You
can listen the disc video sound.
3. Press the PIP button again to turn off the
secondary video.
MC
During no disc, press MC to interchange
between DVD and USB.
During playback, press STOP to stop
playing disc and MC to interchange
between DVD and USB.
MUTE
Press MUTE once will display mute off (no
sound), and press the button twice to
resume the volume.
ZOOM
Press ZOOM button repeatedly to Zoom in/
out playback in the video.
Zoom mode : Zoom 2x -> Zoom 3x ->
Zoom 4x -> Zoom 1/2x -> Zoom 1/3x ->
Zoom 1/4x.
This function is not available when the
primary video is played in Search, SlowMotion, or Frame-by-Frame or Fast
Forward/ Reverse mode.
To listen to the secondary audio, the digital
audio output must be set to "Bitstream",
"Reencode" or "PCM". Otherwise, only the
secondary audio can be listen.
-14-
Page 15

System
Screen Saver On
On
On
On
More...
Use cursor key to move focus,use
“Enter ” key ro select
Language
Disc Auto Playback
Playback
CEC
Security
Disc Auto Upgrade
Network
Load Default
... General Setting ...
Home Exit
Load Default
OK Cancel
Do you want to load default?
Load Default
30%
Loading default, please wait...
Welcome
ENTER Next
to use BD Player Setting wizard!
Some simple settings are needed before you
enjoy it. Please make detail settings of home
menu later.
Choose
Previous
an OSD language before starting.
The language selected will be applied not only
here but also in other OSD windows, menus etc.
English
French
ENTER Next
Customizing
This section describes the various setting
option of this player.
If the setup option is grayed out, it means
the setting cannot be changed at the
current state.
General Setting
1. The DVD Player and TV will be opened,
after they are connecting the power.
- [General Setting] menu is displayed.
2. Press. PressPress to select an option, then press
to access.
3. Press. PressPress to select a setup option andto select a setup option and
press .
4. Select the setting you wish to change
and press OK to conrm.
- Press to return to the previous
menu.
[System]
To change the following system option to
personalize your BD player.
Electronics Control) protocol. You can
use one single remote control to control
all EasyLink-compliant devices that are
connected through HDMI connectors.
{On} - Turns on EasyLink features.
{Off} - Disables EasyLink features.
• [Disc Auto Upgrade]
Turn on or Off the disc automatic
upgrade switching models.
{On} - Start upgrade from the insert
disc.
{Off} - Disable disc auto upgrade mode.
• [Load Default]
Reset all settings of DVD player to intial
default state.
- Follow the instruction on the TV screen
to conrm the default setting operation.
1. Select Load Default.
2. A dialog box pops up shown as
below. Select OK.
3. Load Default it in progress, which
may take a while. Please wait...
• [Screen Saver]
Turn on or Off the screen saver mode.It
helps to protect the TV screen.
{ On } – Set the screen saver active
after 10 minutes no operation.
- The BD player will switch to standby
mode if there is no operation till 25
mintues.
{ Off } – Turn off the screen saver
mode.
•• [Disc Auto Playback]
Turn On or Off the disc automatic
playback switching model.
{On} – The disc auto playback after
loading.
{Off} – Turn off disc auto playback
mode.
• [CEC]
This player supports Easylink which
uses the HDMI CEC (Consumer
4. TV will display as follows:
5. Press. Press OK, enter language setting.
Press to select a language option.to select a language option.
-15-
Page 16

Choose
Previous
a resolution that fit your TV.
Change will be applied immediately, you have
15s to determine whether to save the setting or
rollback to prior resolution. Better performance
will be provided by a HDMI connection!
Auto
480I/576I
480P/576P
720P
1080I
1080P
ENTER Next
Resolution
Previous
has been changed!
14s
Does everything looks all right with this
resolution? Press Yes if you want to apply it.
Press No to rellback to previous one.
Yes
No
ENTER Next
Choose
Previous
an aspect ratio that fit your TV.
Change will be applied in next page, you should
determine whether to save the setting or
rollback to prior aspect ratio.
16:9 Fill
16:9 Normal
4:3 PanSScan
4:3 letterbox
ENTER Next
Setting
FinnishPrevious
Now press finish button to go to Home Menu.
Please enjoy it.
wizard is to be finished!
ENTER
System
OSD English
English
English
English
Use cursor key to move focus,use
“Enter ” key ro select
Language
Menu
Playback
Audio
Security
Subtitle
Network
... General Setting ...
SETUP
Exit
Customizing
6. Press. Press OK, enter Resolution setting.
Press to select an option. Pressto select an option. Press
OK.
7. Press. Press OK, enter Aspect ratio setting.
Press to select an option. Pressto select an option. Press
OK.
Enter key is pressed.
Notes:
- If set [Disc Auto Upgrade]to [Off], after
you insert the disc that contains the
upgraded infromation to upgrade system,
you have to start upgrade from this option
of Setup Menu.
- If the upgrade le package did not pass
the verication, error prompt is displayed ,
check the package again (such as the
package is not complete)
- Make sure the rmware version is not an
old version.
• [Easy Setup]
Re-congure some settings. It is the
same as "Load Default" of steps 4-8.
Note:
For setting osd and TV resolution and TV
aspect.
• [BUDA]
BUDA will display Information.
1. Press OK.
2. Follow the instruction on the TV
screen to select {BUDA Information}.
Note:
BUDA: use for choosing the exterior usb or
inner part to buffer, in order to keep the
download address of the BD-live. To save
your inner space, you are suggested to
choose the exterior usb for storage.
8. Press. Press OK. Return [Gereral Setting]
Menu.
• [Upgrade]
For software upgrades to enhance
performance, you could select the
following upgrade method and start to
upgrade.
{ Disc }/{USB Storage}/
Upgrade the software from the disc or
USB device.
1. Insert the disc or connect the USB
device which contains the upgrade
le package.
2. Follow the instruction on the TV
screen to conrm upgrade operation.
- The system will reboot after 5s or
[Language]
Select the OSD(On-Screen Display), Setup
Menu, Audio, Subtitle default language for the
player.
• [OSD]
Select the default on-screen display
language.
• [Menu]
Select the menu language.
• [Audio]
-16-
Select the default audio language.
• [Subtitle]
Select the default subtitle language.
Page 17

System
Closed Caption On
On
On
On
On
Use cursor key to move focus,use
“Enter ” key ro select
Language
Playback
Security
Angle Mark
PIP Mark
Secondary Audio...
Last Memory
Network
... General Setting ...
Home Exit
System
Change Password More...
More...
More...
Language
Parental Control
Country code
Playback
Security
Network
... General Setting ...
Home Exit
Use cursor key to move focus,use
“Enter ” key ro select
System
Screen Save Off
On
On
On
More...
Language
Disc Auto Playback
Playback
CEC
Security
Disc Auto Upgrade
Network
Load Default
... General Setting ...
Please enter current password:
Change Password
Return Return
Use cursor key to move focus,use
“Enter ” key ro select
Customizing
[Playback]
• [Closed Caption]
Allow people who are deaf or hard of
hearing, to have access to television
programming by displaying the audio
portion of a televison programm as text
on the screen.
{On} – the Closed Caption will display.
{Off} – the Closed Caption will hide.
• [Angle Mark]
Some DVDs/BDs contain the scenes
recorded with multiple angles, which
allow you to enjoy the videos with your
desired angles, therefore the angle
mark is displayed only when the
DVD/BD disc is supportable for multiangle and Angle Mark is set to ON.
{On} – Dispaly the angle mark.
{Off} –Hide the angle mark.
• [PIP Mark]
The Picture -In- Picture (PIP) mode
display two pictures on the TV screen at
the same time, the full screen picture is
called Main Window and the small inset
windows is called Sub Windows. The
PIP mark is displyed when in PIP mode
and PIP Mark is set to ON.
{On} – Dispaly the PIP mark.
{Off} –Hide the PIP mark.
• [Secondary Audio Mark]
{On} – Dispaly Secondary Audio Mark.
{Off} – Hide the Secondary Audio Mark.
• [Last Memory]
If you open a disc or switch this player
to standby state during normal
playback, the BD Player can memory
the end playing point, the player will
start playback from the memory point
next time.
{On} – Active Last Memory feature.
{Off} – Disable Last Memory feature.
• [PBC]
VCD2.0 has PBC control (Playback
Control) menu, which allow you to
interact with the system via menu.
{On} – Display playback control menu,
use NUMBER keys to select desired
option.
{Off} – Hiden playback control menu
and start playback from track1
automatically.
• [DivX(R) VOD DRM]
Select DivX(R) VOD DRM option to see
your registration code in order to view
DivX(R) Video.
The DivX(R) means DivX(R) Video on
Demand Digital Right Management. You
can bum your DivX les directly to a
regular data CD or DVD and enjoy high
quality DivX video directly on your home
cinema system.
DivX is the name of a revolutionary new
video code which is based on the new
MPEG-4 compression standard for video.
You will be able to play DivX movies using
this player.
To learn more please visit
http://www.divx.com/vod.
[Security]
• [Change password]
Follow the instruction on the TV set or
change the password for locked discs
and play restricted DVDs/BDs.
1. Use number keys to enter four digit
old password.
2. Enter the new password
-17-
Page 18

System
Screen Save Off
On
On
On
More...
Language
Disc Auto Playback
Playback
CEC
Security
Disc Auto Upgrade
Network
Load Default
... General Setting ...
Change Password
New password
Confirm password
Return Return
Use cursor key to move focus,use
“Enter ” key ro select
System
Screen Save Off
On
On
On
More...
Language
Disc Auto Playback
Playback
CEC
Security
Disc Auto Upgrade
Network
Load Default
... General Setting ...
Parental Control
Enter password:
Return Return
Use cursor key to move focus,use
“Enter ” key ro select
System
Screen Save Off
On
On
On
More...
Language
Disc Auto Playback
Playback
CEC
Security
Disc Auto Upgrade
Network
Load Default
... General Setting ...
Parental Control
Select level:
KID SAFE
G
PG
Return Return
Off
Off
Items Description
KID SAFE Safe for kids
G All children and general guidance
PG Parental guidance
PG-13 Parental guidance for children under 13
PGR Parental guidance Recommended
R Restricted viewing
NC-17 No one 17 and under allowed
ADULT Adult only
System
Internet Connection Enable
More...
More...
Auto
Premitted
Use cursor key to move focus,use
“Enter ” key ro select
Language
Information
Playback
Connection Test
Security
IP Setting
Network
BD-Live Connection
... General Setting ...
Home Exit
Customizing
3. Enter the new password again to
conrm.
• [Parental Control]
Restricts access to discs that are
unsuitable for children. These discs
must be recorded with rating.
1. Press OK.
2. Use number keys to enter the
password.
3. Select a rating level, then press OK.
• [Country Code]
This ensures you see the scenes intended
for your current residential region/country.
Use 0-9 keys to enter the country code.
Country Code List:
Argentina (ar) 0118
Australia (au) 0121
Austria (at) 0120
Belgium (be) 0205
Brazil (br) 0218
Canada (ca) 0301
Chile (cl) 0312
China (cn) 0314
Denmark (dk) 0411
Finland () 0609
France (fr) 0618
Germany (de) 0405
Hong Kong (hk) 0811
India (in) 0914
Indonesia (id) 0904
Italy (it) 0920
Japan (jp) 1016
Korea, Republic of (kr) 1118
Malaysia (my) 1325
Mexico (mx) 1324
Netherlands (nl) 1412
New Zealand (nz)
1426
Norway (no) 1415
Pakistan (pk) 1611
Philippines (ph) 1608
Portugal (pt) 1620
Russian Federation (ru) 1821
Singapore (sg) 1907
Spain (es) 0519
Switzerland (ch) 0308
Sweden (se) 1905
Taiwan (tw) 2023
Thailand (th) 2008
United Kingdom (gb) 0702
United States of America (us) 2119
Notes:
- Rated discs above the level you set in
[Parental Control] require a password to be
played
- The ratings are country-depended. To
allow all disc to play, select 'Off'.
[Network]
To enjoy software updates of this player
-18-
Page 19

TV
TV Screen 16:9 Full
Auto
PAL
RGB
Off
Use cursor key to move focus,use
“Enter ” key ro select
Video Process
Resolution
TV System
Color Space
HDMI Deep color
... Display Setting...
Home Exit
Customizing
and BD-Live bonus contents, setup the
network connection.
Note:
- Ensure that the network cable is properly
connected and the router is switched on.
1. Connect the disc player to the
broadband modem or router.
2. Insert a BD disc with Bonus View/
BD-Live.
3. In the Setup menu, Select [Network],
then press .
4. Select [IP Setting] in the menu, then
press OK to select [Auto]. An IP
address is obtained automatically.
If no IP address is obtained, select
[Manual] input IP Address, Subnet
Mask, Default Gateway, DNS and
press OK to re-connect again to the
network. It will be try to obtain the IP
address again.
5. Press [Return] or press OK to exit.
Notes:
- This player does not support automatic
detection of cross-cables. Use the straight
(standard) LAN cable.
- Loading BD-Live content from the internet
may take some time, depending on the le
size and the speed of the internet
connection.
- When BUDA mode is set to External, an
external USB(1GB or above) stick is
needed to store or erase BD-live content.
{Manual} – Manual setup network
information.
• [BD-Line Connection]
{Permitted} – During playback BD-Live
disc, the disc may automatically
downloading all information from
appointed network.
{Partial Permitted} – During playback
BD-Live disc, the disc may automatically
downloading the part of information from
appointed network.
{Prohibited} – Disable downloading
information from network.
• [Proxy Setting]
{Enable} – Automatically obtained proxy
information.
{Proxy Host} – Setup appointed proxy
host.
{Proxy Port} – Setup appointed proxy
port.
Display Setting
1. Press. PressPress SETUP
[General Setting] menu is displayed.
2. Press. PressPress to select [Display Setting],
then press .
3. Select an option, press. Select an option, pressSelect an option, press to access.
• [Internet Connection]
{Enable} – Enable connect to internet.
{Disable} – Disable connect to internet.
• [Information]
Display the Network Information page.
In this page, you can view the info of
Interface, Address Type, IP Address,
Subnet Mask, Default Gateway and
DNS.
• [Connection Test]
Test both cable connecting and IP
settings, it will ping default gateway. If
connection test is failed, a message box
will pop up to prompt you the test is
failed. Please check connection related
settings and re-test it again.
• [IP Setting]
{Auto} – Auto obtain network
information.
4. Press. PressPress to select a setup option andto select a setup option and
press
5. Select the setting you wish to change
and press OK to conrm.
- Press to return to the previous
menu.
- Press SETUP to exit the menu.
[TV]
• [TV Screen]
Select the screen format according to
how you want the picture to appear on
the TV.
{16:9 Full} – For a disc with the aspect
ration of 4:3, the output video is
stretched into 16:9 full screen.
-19-
Page 20

Brightness
Contrast
Hue
Satutation
Return ExitChange
Home Exit
Audio Output
Spdif
PCM
PCM
48K
Use cursor key to move focus,use
“Enter ” key ro select
HDMI
Down_samp
OffDRC
... Audio Setting...
Customizing
{16:9 Normal} – For a disc with the
aspect ration of 4:3, the output video is
resized vertically to match what will be
seen on the display.
{4:3 Pan&Scan} – For standard TV,
Display a wide picture on the entire
screen and cuts off the redundant
portions.
{4:3 Letterbox} – For standard TV,
Display a wide picture with two black
borders on the top and bottom of 4:3
screen.
• [Resolution]
Select a video output resolution that is
compatible with your TV display
capability.
{Auto} – Select the most suitable
resolution according to the input video.
{480I/576I},{480P/
576P},{720P},{1080I},{1080P} – Select
a video resolution setting that is best
supported by the TV, See TV manual for
details.
• [TV System]
If the video does not appear correctly,
change the setting.By default, this
setting matches the most common
setting for TVs in your country
{NTSC} – For NTSC-system TV.
{PAL} – For PAL-system TV.
{Multi} – For Multi-system
TV,compatible with both PAL and
NTSC.
• [Color Space]
Select a predenned color space of
picture
{RGB} – Select RGB color space.
{YCbCr} – Select YCbCr color space.
{YCbCr422} – Select YCbCr422 color
space
{Full RGB} – Select Full RGB color
space.
• [HDMI Deep Color]
This feature is available only when the
display device is connected by a HDMI
cable, and when it supports deep color
feature.
{Off} – Output standard 24 bit color.
{30 bits} – Output 30 bits color.
{36 bits} – Output 36 bits color.
• [HDMI 1080P 24Hz]
{On} – Enable to select this video
resolution setting.
{Off} – Disable to select this video
resolution setting.
[Video Process]
• [Video Adjust]
Select a predened set of the video.
1. Press OK .
2. Press to adjust the video
Brightness, Contrast, Hue and
Saturation.
3. Move to [Exit] to exit.
• [Sharpness]
Select the sharpness level: High,
Middle, Low.
Audio Setting
1. Press. PressPress SETUP
[General Setting] menu is displayed.
2. Press. PressPress to select [Audio Setting],
then press .
3. Select an option, press. Select an option, pressSelect an option, press to access.
4. Press. PressPress to select a setup option andto select a setup option and
press
5. Select the setting you wish to change
and press OK to conrm.
- Press to return to the previous
menu.
- Press SETUP to exit the menu.
[Audio Output]
• [Spdif]
Select the output mode of Digital Out
jack, options include Bitstream, PCM,
Reencode and Off.
-20-
Page 21

SETUP
Exit
Use cursor key to move focus,use
“Enter ” key ro select
Software version: BDP V3.0
MAC: 00-1C-50-XX-XX-XX
... System Information ...
Customizing
{Bitstream} – output digital signal
without any processing.
{PCM} – output digital signal with
processing, only two channels export.
When Connect a HDMI cable from the
HDMI OUTPUT jack on this product to
the HDMI input jack on the TV, output
multi channels export.
{Reencode} – Auto select signal type
from Digital Out jack according to the
Audio streamon disc.
{Off} – Disconnet bit stream export.
• [HDMI]
Select the output mode of HDMI Digital
Out jack, options include Bitstream,
PCM, Reencode and Off.
{Bitstream} – output HDMI digital signal
without any processing.
{PCM} – output digital signal with
processing, only two channels export.
When Connect a HDMI cable from the
HDMI OUTPUT jack on this product to
the HDMI input jack on the TV, output
multi channels export.
{Reencode} – Auto select signal type
from Digital Out jack according to the
Audio streamon disc.
{Off} – Disconnet bit stream export.
• [Down_samp]
Select the digital audio signal sampling
frequency.
{48K} – For discs recorded at sampling
rate of 48 KHz.
{96K} – For discs recorded at sampling
rate of 96 KHz.
{192K} – For discs recorded at sampling
rate of 192 KHz.
• [DRC]
Select the Dynamic Range Control
mode which makes it available to listen
to a movie at a low volume without
losing sound clarity.
{On} – Dynamic range compress.
{Off} – Non-dynamic range compress.
{Auto} – Adjust the DRC according to
input audio.
System Information
1. Press. PressPress SETUP
[General Setting] menu is displayed.
2. Press. PressPress to select [System
Information],
- The current software version and MAC
address display
- Press to return to the previous
menu.
- Press SETUP to exit the menu.
-21-
Page 22

Specication
Playback media
BD-Video, BD R V2.0/BD RE V2.x,
BD RE V3.0, DVD-Video, DVD+R/+RW,
DVD-R/-RW, CD-R/CD-RW, Audio CD,
Video CD/SVCD, Picture CD.
Video
Signal system:PAL/NTSC
Composite video output: 1Vp-p (75
ohm).
Component video output: 480/576i,
480/576p, 720p,1080i
HDMI Output: 480i/576i,480p/
576p,720p,1080i,1080p.
Audio
• 2 Channel analog output
- Audio Front L&R : 2 Vrms (> 1 kohm)
• Digital output: 0.5 Vp-p (75 ohm)
• Coaxial
• HDMI output
Main Unit
• Power supply rating:
110V-240, 50HZ/60HZ
• Power consumption: 25W
• Power consumption in standby mode:
<1W
• Dimensions (w x h x d):
430×45×225 (mm)
• Net Weight: 2.3 kg
Accessories supplied
• Remote control and batteries
• CVBS, Audio LR cable
• Power cable (1.5m)
• User manual
• Warranty Card
• Hot Line Card
-22-
Page 23

TroubleshootingTroubleshooting
If you experience any of the following difculties while using this unit, check the list below
before consulting your nearest dealer.
Problem Tip
No reaction to the
remote
control.
No video signal on the
display device.
No audio / video signal
on the display device
via HDMI cable.
No high-denition video
signal on the TV.
No audio signal from
the loudspeakers of the
TV.
No audio signal from
the loudspeakers of the
audio system.
Connect the product to the power outlet.
Point the remote control at the product.
Insert the batteries correctly.
Insert new batteries in the remote control.
Turn on the TV.
Set the TV to the correct external input.
Select the correct video resolution
If the unit is connected to the unauthorized display device with
an HDMI cable, the audio/video signal may not be output.
Does the disc contain high-denition video High-denition video
is not available when the disc does not contain it.
Does the TV support high-denition video? High-denition video
is not available when the TV does not support it.
Assign the audio input of the TV to the corresponding video
input.
Turn on the audio system.
Set the audio system to the correct external input.
Increase the volume level of the audio system.
-23-
Page 24

TroubleshootingTroubleshooting
Cannot play back a
disc.
Cannot play back JPEG
les from a disc.
Cannot play back
Windows Media
Audio les from a disc.
Cannot nd a JPEG le. Make sure that the selected group (folder) does not contain
Cannot nd Windows
MediaTM Audio le.
Cannot SW upgrade When you upgrade the system used USB Flash device, you
Cannot USB Flash
Device
TM
Make sure that the product supports the disc.
Make sure that the Blu-ray Disc player supports the region code
of the DVD or BD.
For DVD+RW/+R or DVD-RW/-R, make sure that the disc is
nalized.
Clean the disc.
Make sure that the disc was recorded in the UDF, ISO9660 or
JOLIET format.
Make sure that the sample rate of the Windows Media TM Audio
les is 44.1kHz or 48kHz.
more than 9,999
les for DVD, and 999 les for CD.
Make sure that the le extension is .wma or .WMA, .jpg, .JPG, .
jpeg or .JPEG.
Make sure that the selected folder does not contain more than
9,999 les for DVD, and 999 les for CD.
should make a new folder named upg/UPG, and copy the
upgrade le into this folder.
Use USB Flash Device corresponding to the Mass Storage
Class Driver.
-24-
Page 25

Glossary
Aspect ratio
Aspect ratio refers to the length to height
ratio of TV screens. The ratio of a standard
TV is 4:3, while the ratio of a high-denition
or wide TV is 16:9. The letter box allows
you to enjoy a picture with a wider
perspective on a standard 4:3 screen.
Blu-ray Disc (BD)
Blu-ray Disc is a next generation optical
video disc capable of storing ve times
more data than a conventional DVD. The
large capacity makes it possible to benet
from the features such as high-denition
videos, multichannel surround sound,
interactive menus and so on.
BONUSVIEW
This is a BD-Video (Final Standard Prole
or Prole 1.1) that supports interactive
content encoded on the disc, such as
picture-in-picture. This means you can play
the primary video and secondary video
simultaneously.
Digital Audio
Digital Audio is a sound signal that has
been converted into numerical values.
Digital sound can be transmitted through
multiple channels. Analogue sound can
only be transmitted through two channels.
Dolby Digital
A surround sound system developed by
Dolby Laboratories that contains up to six
channels of digital audio (front left and
right, surround left and right, center and
subwoofer.)
DTS
Digital theatre Systems. A surround sound
system for providing 5.1 channels of
discrete digital audio in consumer
electronics products and software content.
It is not developed by Dolby Digital.
®
DivX
DivX® is a codec (compression/decompression) that can compress images to a very
small amount of data.
ABOUT DIVX PLUS ® HD: DivX ® is a digital
video format created by DivX, Inc. This is an
ofcial DivX Certied ® device that plays
DivX video, including DivX Plus ® HD video
(H.264/.MKV) up to 1080p and premium
content. Visit www.divx.com for more
information and software tools to convert
your les into DivX video.
ABOUT DIVX VIDEO-ON-DEMAND: This
DivX Certied ® device must be registered
in order to play DivX Video-on-Demand
(VOD) content. To generate the registration
code, locate the DivX VOD section in the
device setup menu. Go to vod.divx.com with
this code to complete the registration
process and learn more about DivX VOD.
HDCP
High-bandwidth Digital Content Protection.
This is a speci cation that provides a
secure transmission of digital contents
between different devices (to prevent
unauthorized copyright.)
-25-
Page 26

Glossary
HDMI
High-Denition Multimedia Interface
(HDMI) is a high-speed digital interface
that can transmit uncompressed high
denition video and digital multichannel
audio. It delivers high quality picture and
sound quality, completely free from noise.
HDMI is fully backward-compatible with
DVI. As required by the HDMI standard,
connecting to HDMI or DVI products
without HDCP (High-bandwidth Digital
Content Protection) will result in no Video
or Audio output.
JPEG
A very common digital still picture format.
A still-picture data compression system
proposed by the Joint Photographic Expert
Group, which features small decrease in
image quality in spite of its high
compression ratio. Files are recognized by
their le extension ‘.jpg’ or ‘.jpeg.’
LAN (Local Area Network)
A group of linked devices in a company,
school or home. Indicates the boundaries
of a particular network.
Local storage
This storage area is used as destination for
storing additional contents from BD-Live
enabled BD-Video.
PBC
Playback Control. A system where you
navigate through a Video CD/Super VCD
with on-screen menus that are recorded
onto the disc. You can enjoy interactive
playback and search.
PCM
Pulse Code Modulation. A digital audio
encoding system.
Region code
A system that allows discs to be played
only in the region designated. This unit
only plays discs that have compatible
region codes. You can nd the region code
of your unit on the product label. Some
discs are compatible with more than one
region (or ALL regions.)
WMA
Windows Media™ Audio. Refers to an
audio compression technology developed
by Microsoft Corporation. WMA data can
be encoded with Windows Media player
version 9 or Windows Media player for
Windows XP. Files are recognized by their
le extension ‘.wma.’
-26-
 Loading...