

Page 1

Page 2
1 2
3
4
5 678 9 10
11 121314
15
Important Notes
This safety and operating instruction should be retained for future
reference.
Avoid installing the unit in locations described below:
- Places exposed to direct sunlight or close to heat radiating
Appliances such as electric heaters.
On top of other stereo equipment that radiate too much heat.
- Places blocking ventilation or dusty places.
- Places subject to constant vibration.
Humid or moist places.
Make sure not to obstruct the ventilation openings.
Operate turning controls and switches as instructed in the manual.
Before turning on the power for the first time, make sure the
batteries is properly installed.
For safety reasons, do not remove any covers or attempt to gain access
16
17
18 19 20
to the inside of the product. Refer any servicing to qualified personnel.
Do not attempt to remove any screws, or open the casing of the unit;
there are no user serviceable parts inside, refer all servicing to qualified
service personnel.
2221
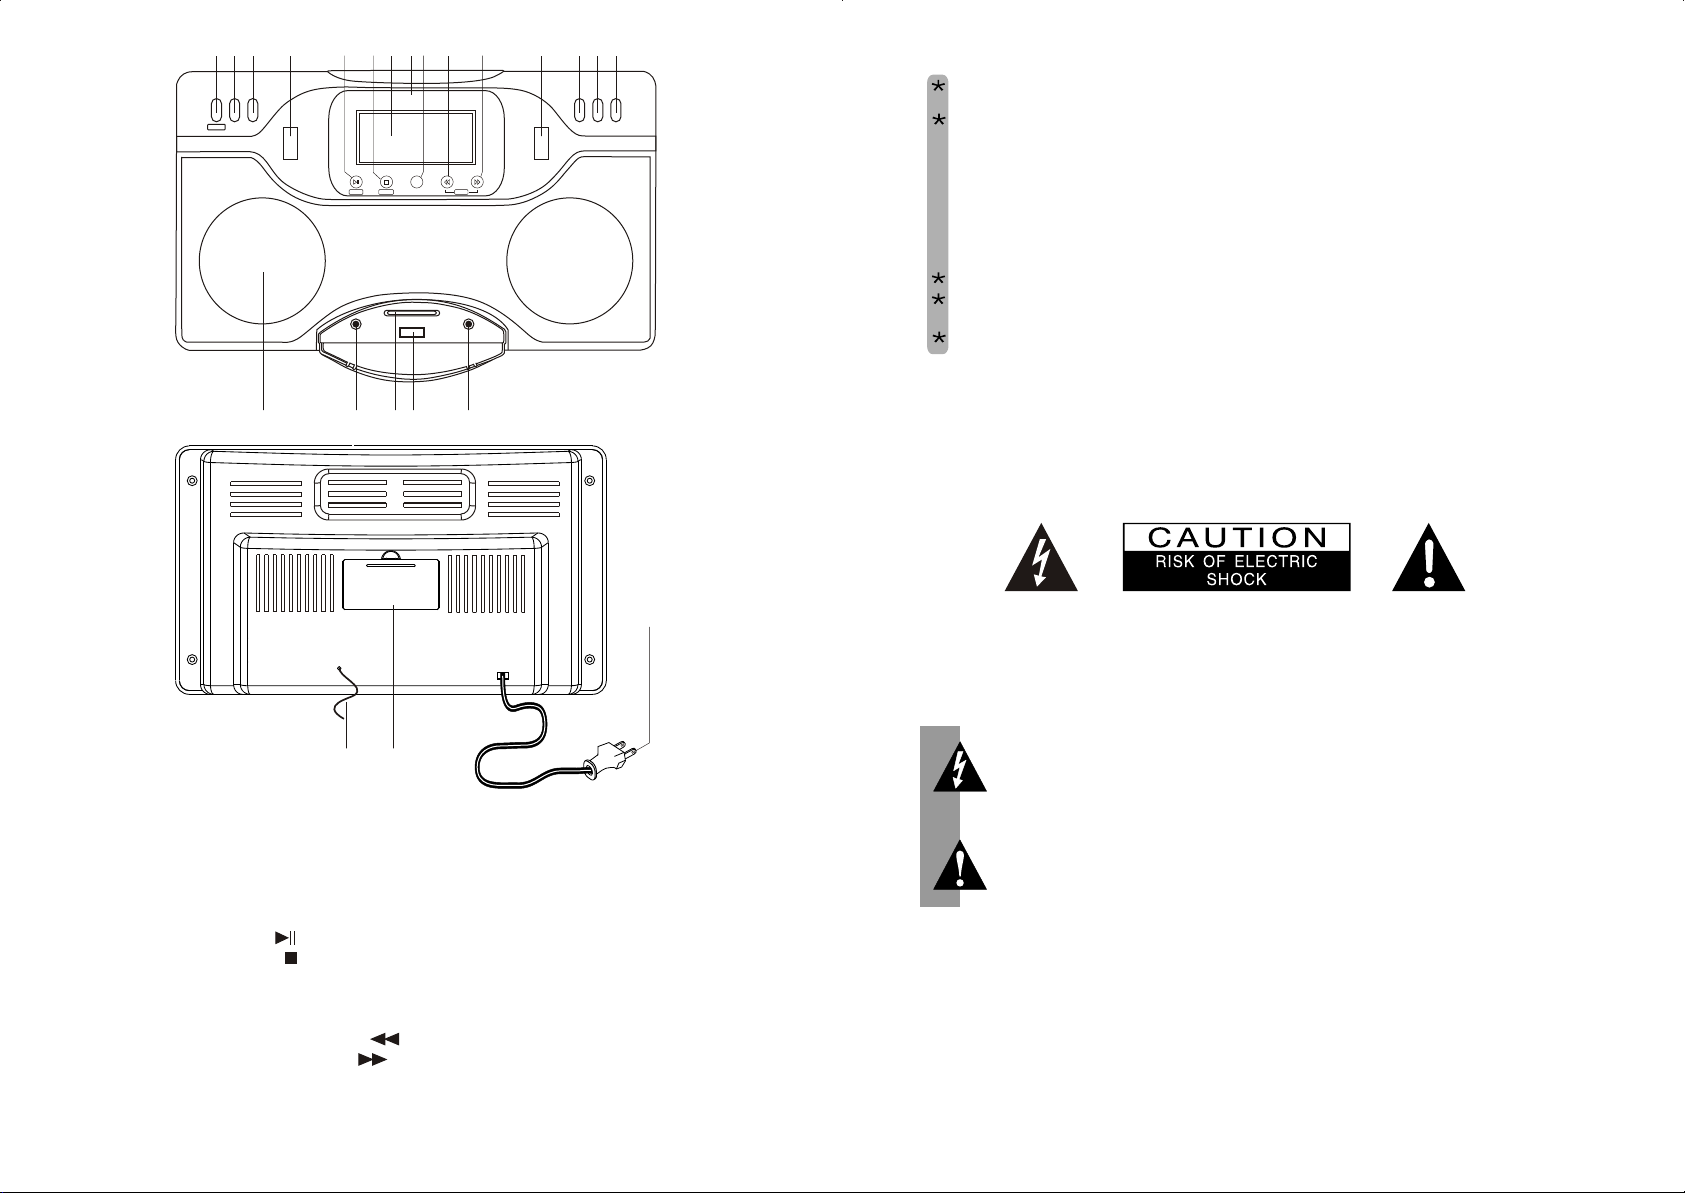
1. POWER/AL.RESET button
2. SLEEP button
3. DISP button
4. VOLUME JOG CONTROL/EQ
SET button
5. PLAY/BAND button ( )
6. STOP/MONO button ( )
7. LCD display
8. SNOOZE/BACKLIGHT button
9. FUNCTION button
10. BACKWARD/SCAN DN button ( )
11. FORWARD/SCAN UP button ( )
23
12. TUNING JOG CONTROL/REPEAT
/PROGRAM/RANDOM button
13. TRANSFER button
14. Al1 ON/OFF button
15. Al2 ON/OFF button
16. Speaker
17. LINE IN
18. SD/MMC CARD input
19. USB input
20. EARPHONE JACK
21. FM ANTENNA
22. BATTERY DOOR
23. POWER CORD
1
CAUTION: TO REDUCE THE RISK OF ELECTRIC SHOCK DO NOT REMOVE
COVER(OR BACK),NO USER SERVICEABLE PARTS INSIDE,
REFER SERVICING TO QUALIFIED SERVICE PERSONNEL.
Conductor dangerous voltage, that may be of sufficient magnitude
to constitute a risk of electric shock to persons is present within this
product's enclosure.
The owner's manual contains important operating and maintenance
instructions, for you safety, it is necessary to refer to the manual.
DANGEROUS VOLTAGE
ATTENTION
WARNING: TO PREVENT FIRE OR SHOCK HAZARD, DO NOT EXPOSE
THIS APPLIANCE TO DRIPPING OR SPLASHING.
Note:
This unit will become warm used for a long period of time.
This is normal and does not indicate a problem with the unit.
This player includes micro-processors which may malfunction
as a result of external electrical interference or noise. If the
player is not working properly, disconnect the power source and
them reconnect it.
2
Page 3

1 : indicates when RANDOM is selected in USB or SD/MMC mode
Copy completeCurrent Track
Track
X X X
Start Copy
Alb
X X
Confirm OK Table of Content
X X X
Track
X X
Alb
2 : indicates when select Random in SD/MMC mode if USB and SD/MMC
devices are both inserted
3 : indicates when playback USB
4 : indicates when playback SD/MMC
5 : indicates when the time is PM(12 hour mode)
6 : show clock : hour digit
7 : show clock : minute digit
8 : indicates radio memory/ program mode
9 : indicates USB or SD/MMC program mode
10 : indicates radio memory/ program mode
11 : indicates when sleep function is selected
12 : indicates when alarm2 is set to radio mode
13 : illuminates when alarm2 is set to USB mode
14 : illuminates when alarm2 is on
15 : illuminates when alarm2 is set to weekend mode
16 : illuminates when alarm2 is set to SD/MMC mode
17 : illuminates when alarm2 is set to buzzer mode
18 : illuminates when alarm2 is on
19 : indicates when alarm2 time is PM (12 hour mode)
20 : indicates FM stereo mode (station is received in stereo)
21 : indicates FM mono mode
22 : indicates when select repeat all in USB or SD/MMC mode
23 : indicates when select repeat a album in USB or SD/MMC mode
24 : indicates when select repeat one in USB or SD/MMC mode
25 : indicates when playback MP3 format song
26 : indicates when playback WMA format song
27 : indicates when alarm1 time is PM (12 hour mode)
28 : illuminates when alarm1 is on
29 : indicates when playback SD/MMC
30 : illuminates when alarm1 is set to buzzer mode
31 : illuminates when alarm1 is set to SD/MMC mode
32 : illuminates when alarm1 is on
33 : illuminates when alarm1 is set to USB mode
34 : indicates when alarm1 is set to radio mode
35 : illuminates when alarm1 is set to weekend on mode
28
27
1
4
3
2
26
25
5
24
6
35
34
33
32
31
30
29
23
22
7
21
8
20
9
11 12 13
10
14
15
16
17
18
19
POWER CORD CONNECTION
Before using, connect the AC Power plug to the AC socket, then turn
on the power switch of the unit.
.
OPERATING THE UNIT
When you plug the unit into the AC socket firstly, the unit will be in
standby mode, the LCD will show the time and day. In standby mode
press snooze/backlight key to turn the backlight on/off.
When the unit have no power but the back up battery(AA X 2), the
system will keep running but LCD show nothing. You can press the
POWER button to switch the unit ON and OFF. Pull the AC plug out
of the AC socket if you want to switch off the unit completely.
12 58
Sun.
MP3/WMA music file playback
- Press the [FUNC] key to select USB or SD/MMC mode. USB or
SD/MMC icon will be indicated individually.
- Press key to start music playback after read out the TOC. The
LCD will show the file format (Mp3 or WMA), album number, track
and playing time. Press the key again to pause playback and
the track will flash unti release pause function.
- Press key to stop music playback and the LCD will show total
album and tracks.
- Press key to up skip track select, press and hold the key to fast
forward search.
- Press key to down skip track select, press and hold the key to fast
backward search.
- Roll [Tuning bar/Program button] to select desired track.
- Press [Tuning bar/Repeat button] to select following
play mode during playback: (LCD will show in sequence as below)
Repeat 1 Repeat Album Repeat All Random
Remarks: In SD/MMC mode, the mix Random (USB+SD/MMC) will
be occurred if both device are inserted and the LCD will show (USB+
SD/MMC) icon.
- In stop mode, press [Tuning bar/Program button] to enter Program
mode (up to 32 tracks can be programmed),
press & or roll the [Tuning bar/Program button] to select track
and press the bar to confirm. When Program is complete,
press for program play.
- Remarks: Mix Programming can be selected if SD/MMC and USB
devices are both inserted. User can press [Func] key to select either USB
or SD/MMC mode during programming.
Music file transfer between SD/MMC and USB device
- In SD/MMC or USB mode, press [ ] key to achieve file transferTRANSFER
- Copy the current track
Press [TRANSFER] key while the track is played, and LCD will indicate as
the following sequence:
3
4
Page 4

1st Program Track copy complete1st Program Track
Track
X X X
1st Program Track start Copy
Alb
X X
Next Program Track Confirm OK1st Program Track
X X X X X
Track Alb
1st Program Track Confirm OK
Next Program Track copy complete
Next Program Track start Copy
- Copy all files of a device
Track
Table of Content
X X X
Alb
X X
X X X
Table of Content
Track
X X
Alb
1st Track start Copy 1st Track copy complete 1st Track Confirm OK Next Track start Copy
Next Track copy completeNext Track Confirm OK
Whole device copy complete
Press [TRANSFER] key in stop mode, and LCD will indicate as the following
sequence:
- Copy the track programmed
Press [TRANSFER] key in program play mode, and LCD will indicate as the
following sequence:
- When the target device is full, the copy function will stop automatically and
the LCD will display device full .
Radio Functions:
- Press [FUNC] key to select radio mode and the LCD will display the
band & frequency.
- Press key to select AM or FM.
- Press and hold key to have upward auto tuning.
- Press and hold key to have downward auto tuning.
- Roll [
- Press
station. Press [ ] to confirm and exit program mode
Tuning bar/Program button] to select desired station.
[Tuning bar/Program button] to enter program mode.
Press & key to select desired
Tuning bar/Program button
- Press & to recall the preset station (Total preset station,
FM/20 and AM/10)
- Press key to switch to mono mode when the stereo reception
is not stable
AUX Function :
Press [FUNC] key repeatedly to select AUX mode, LCD will show :AUX
ON, sound will come out if external audio device is plugged into the unit.
Volume and Equalizer Control
- Roll the [Volume bar/EQ set button] up and down to achieve higher or
lower volume level and the LCD will display the current volume level,
When the level decrease to 0, the LCD will show : VOL MIN. If the level
increase to 40 , the LCD will show : VOL MAX.
- Press the [Volume bar/EQ set button] repeatedly to select 6 preset EQ,
the LCD display EQs in sequence as below
Flat
Classic
Rock
Pop
Jazz
X-Bass
Clock and Alarm Functions :
Clock and Day setting :
- In standby mode, you are able to set the clock.
- Press the [ ] to enter clock setting mode
Tuning bar/Program button
- When hour digit flash, press & key for hour adjustment
- Press the [ ] and minute digit flash, press
Tuning bar/Program button
& key for minute adjustment.
- Press [ ] and day digit flash, press & key
to change the day.
- Press [ ] again to complete clock and day
Tuning bar/Program button
Tuning bar/Program button
setting and it will exit to standby mode.
In standby mode, you are able to set the alarm too.
.
- Press and hold AL1 ON/OFF key to enter alarm1 setting mode
- When alarm1 hour digit flash press & key for alarm1 hour
adjustment
.
- Press the key again, the minute digit flash, press & key for
alarm1 minute adjustment.
- Press the key again, the weekend icon flash press key to
disable weekend sleeper function, press key to enable
weekend sleeper function.If weekend is enabled, the icon will be
indicated and the alarm will turn off during weekend automatically
( SAT and SUN ).
- When the radio icon flash, Press & key to select wake up
mode. For example : radio buzzer USB or SD/MMC.
- When radio is selected , the icon will be indicated . And the first station
that played is the station you last listened to. The volume level defaults
to level (20) when the alarm sound.
- When buzzer is selected, the icon will be indicated. The BB sound
can be heard when the alarm sound.The BB sound can not
controlled by volume controls.
- When USB or SD/MMC is selected, the icon will be indicated, the
location of day will appear 3 digit for track selection (maximum
599 tracks), press & key to select desired track .The
selected track will be playback and the volume defaults to level (20)
when the alarm sound.
(Note:1: When the selected track is out of USB/SD then it will playback
from the first track.
2: When you forget to insert the USB or SD/MMC, the USB or
SD/MMC wake up mode will change to Buzzer mode
automatically when the alarm arrives
.
3: When the unit is working, the USB or SD/MMC wake up mode
will change to Buzzer mode automatically when the alarm
time arrive.
5
6
Page 5

Alarm Enable and Disable
- Press the Al1 key to enable (with alarm icon is shown)
- Press the Al1 key to disable (without alarm icon is shown)
- When alarm is arrived:
(i) Press [SNOOZE] key to stop alarm temporarily, alarm will
turn on 9 minutes later.
(ii) Press [AL.Reset or FUNC] key to turn off the alarm.
Remarks :
If [SNOOZE] key or [AL.Reset or FUNC] key is not pressed,
the unit will turn off automatically after 60 minutes.
Alarm2 settings are the same as Alarm1, but the
sound is different from Alarm1 in order to recognise them.
Sleep Function
During radio, USB, SD/MMC, Aux mode, press sleep key to enable
sleep timer and the LCD will show the icon ,Press and hold the key
to select sleep timer:
90 80 70 ......10 9 8......1
Setting check :
During radio, USB, SD/MMC, Aux mode, press [DISP] key repeatedly to
check the clock/day, AL1/AL2 time , sleep timer settings.
SPECIFICATIONS:
Unit Power Source: AC 240V ~ 50Hz
Receiving Bands: AM/FM
Radio Frequency Range: AM 522 ~ 1629Khz
FM 87.5 ~ 108 Mhz
Output Power: 1.5W (RMS) x 2
Dimensions: 260x150x98mm (WxHxD)
BB
7
 Loading...