

Page 1
QMD90B
Page 2

TABLE OF CONTENTS
TABLE OF CONTENTS......................................... ............................................. ............... ..1
BATTERY INSTALLATION ................................................... .......... ................................
OVERVIEW OF THE DVD PLAYER &GET A QUICK GLACE OF THE REMOTE CONTROLLER
USING THE REMOTE CONTROLLER AND THE AC ADAPTER.............. ..... . ......4
CONNECT THE DVD PLAYER TO OTHER APPLIANCES & HOW TO USE THE EARPHONES
OPERATIONS.......................................................................................................... ........ ....6-7
preparation
get started
adjust the volume
skip ahead or back
rapid advance/reverse
stop playback
slow motion play (DVD/VCD)
repeat button
search for preferred scene
program play
zoom play
on screen display information
change audio sound track language (DVD/VCD disc)
multi-angle viewing (DVD only)
changing subtitle language (DVD only)
enjoying video CDs with PBC feature
MP3 playback
KODAK Picture CD/JPEG CD playback
KODAK Picture CD/JPEG CD operations
INITIAL SETTINGS....................................................... .............................................7-8
common procedures for initial settings
system setup
language setup
audio setup
video setup
speaker setup
DISC HANDLING PRECAUTIONS.................................................................................................................................................9
TROUBLESHOOTING....................................................................................................................................................................9
CAUTIONARY NOTES.............................................................................................................................................................10-11
........................................... ..... ........... ......2
.................................................. .... ......
........................................
..... ..3
................................................................... ..... .
.................................................5
................................................ ........
..................................................................
1
Page 3
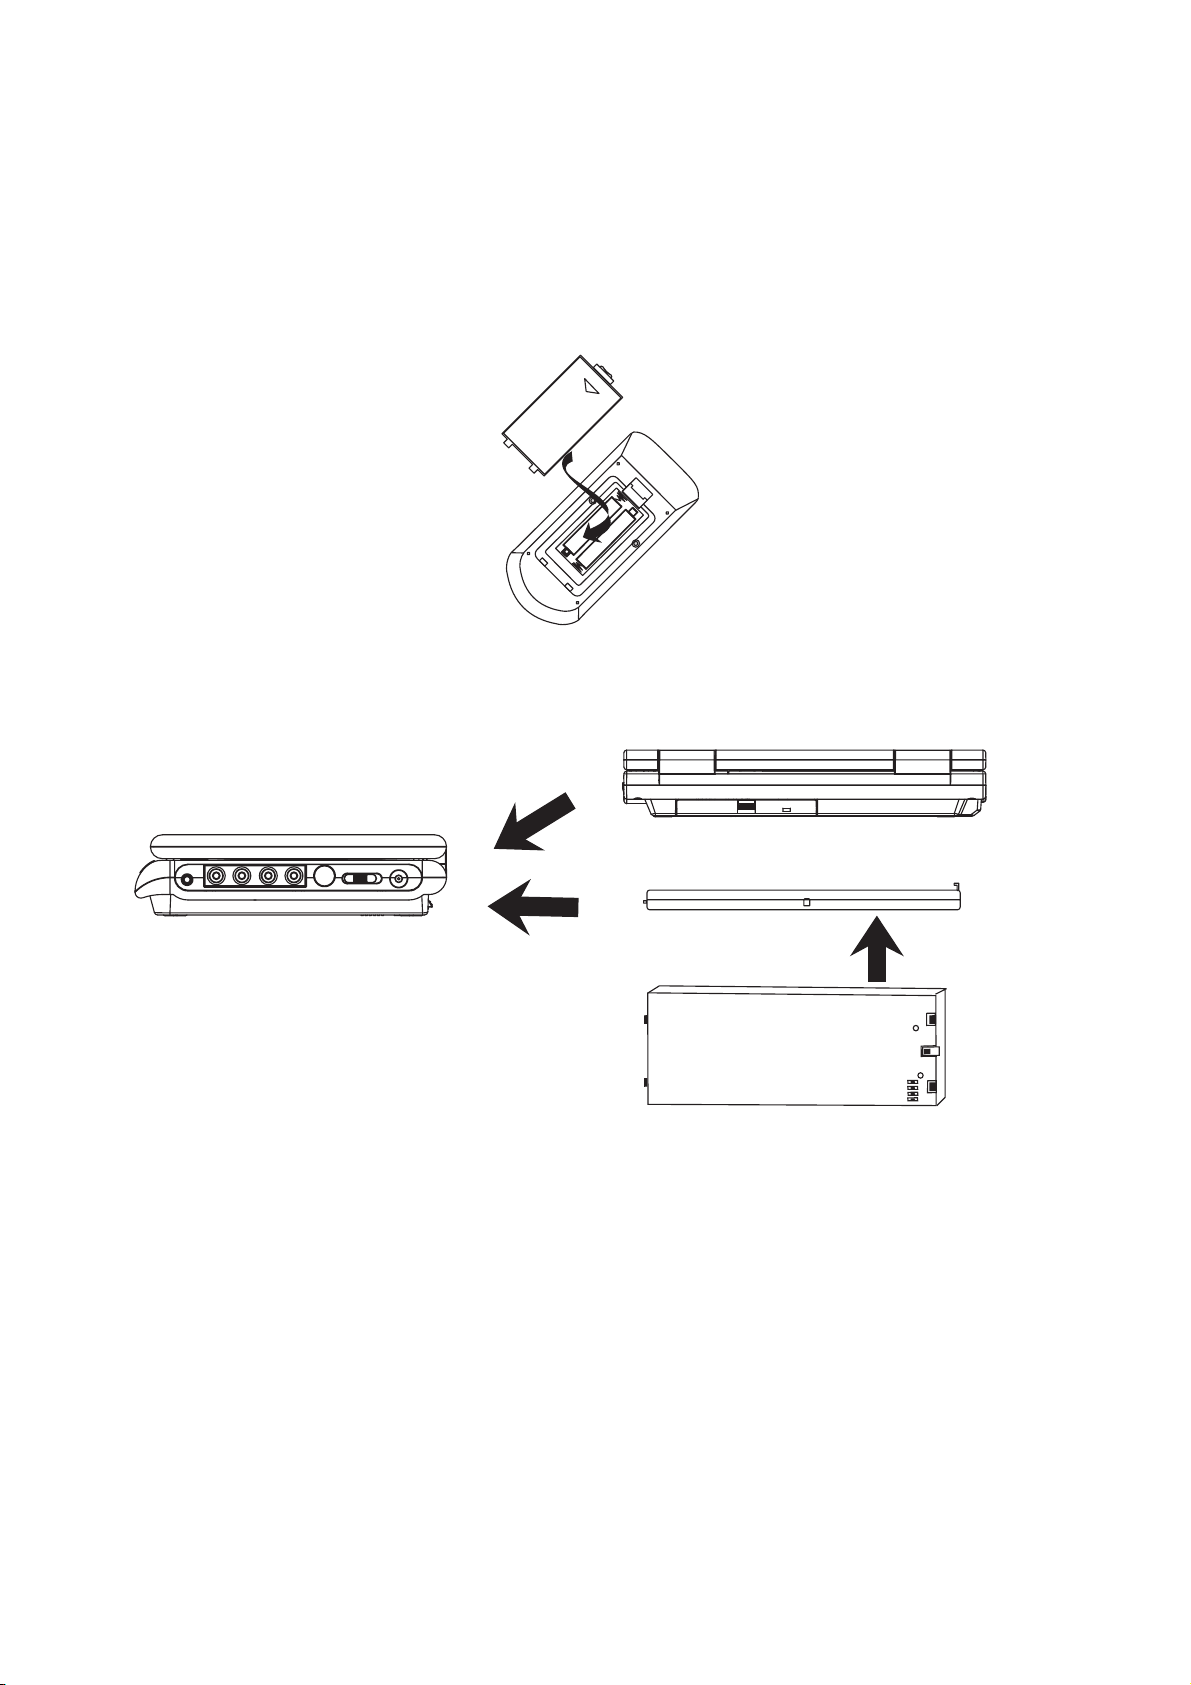
BATTERY INSTALLATION
Insert the batteries while observing the correct (+) and (-) polarities as illustrated below.
Service life of batteries
!
A pair of new batteries normally last about one year. Service life of batteries depends largely on the frequency the remote
controller is used.
!
If the remote controller fails to work even when operating very near the remote sensor, the batteries should be flat, and you
need use a new pair of batteries.
!
Use 2 pieces of "AAA" batteries.
OPEN
+
+
Attach the rechargeable battery pack onto the play's bottom as illustrated below:
BACK VIEW
SIDE VIEW
NOTE:
This unit works either on the battery pack supplied or the AC power: unplug the AC Power adapter from the DC input jack to
work on the battery pack (after fully charged); plugging the AC Power adapter while the battery pack is attached initiates the
charging of this battery, the charge LED indicator lights up red once, and then turns off (about 5 seconds), after that, the
indicator will steady on red. When the battery is fully charged the indicator turns off again. Fully charging a run-out battery pack
may take 5 hours or longer. A fully charged battery pack can endure approximately 2.5 hours of continuous DVD playback. This
playing time may vary with the surrounding environment, the volume level of the speaker and the battery condition. It is advised
that you wait 10-20 minutes before recharging the battery pack if it has turned flat during operation.
2
Page 4
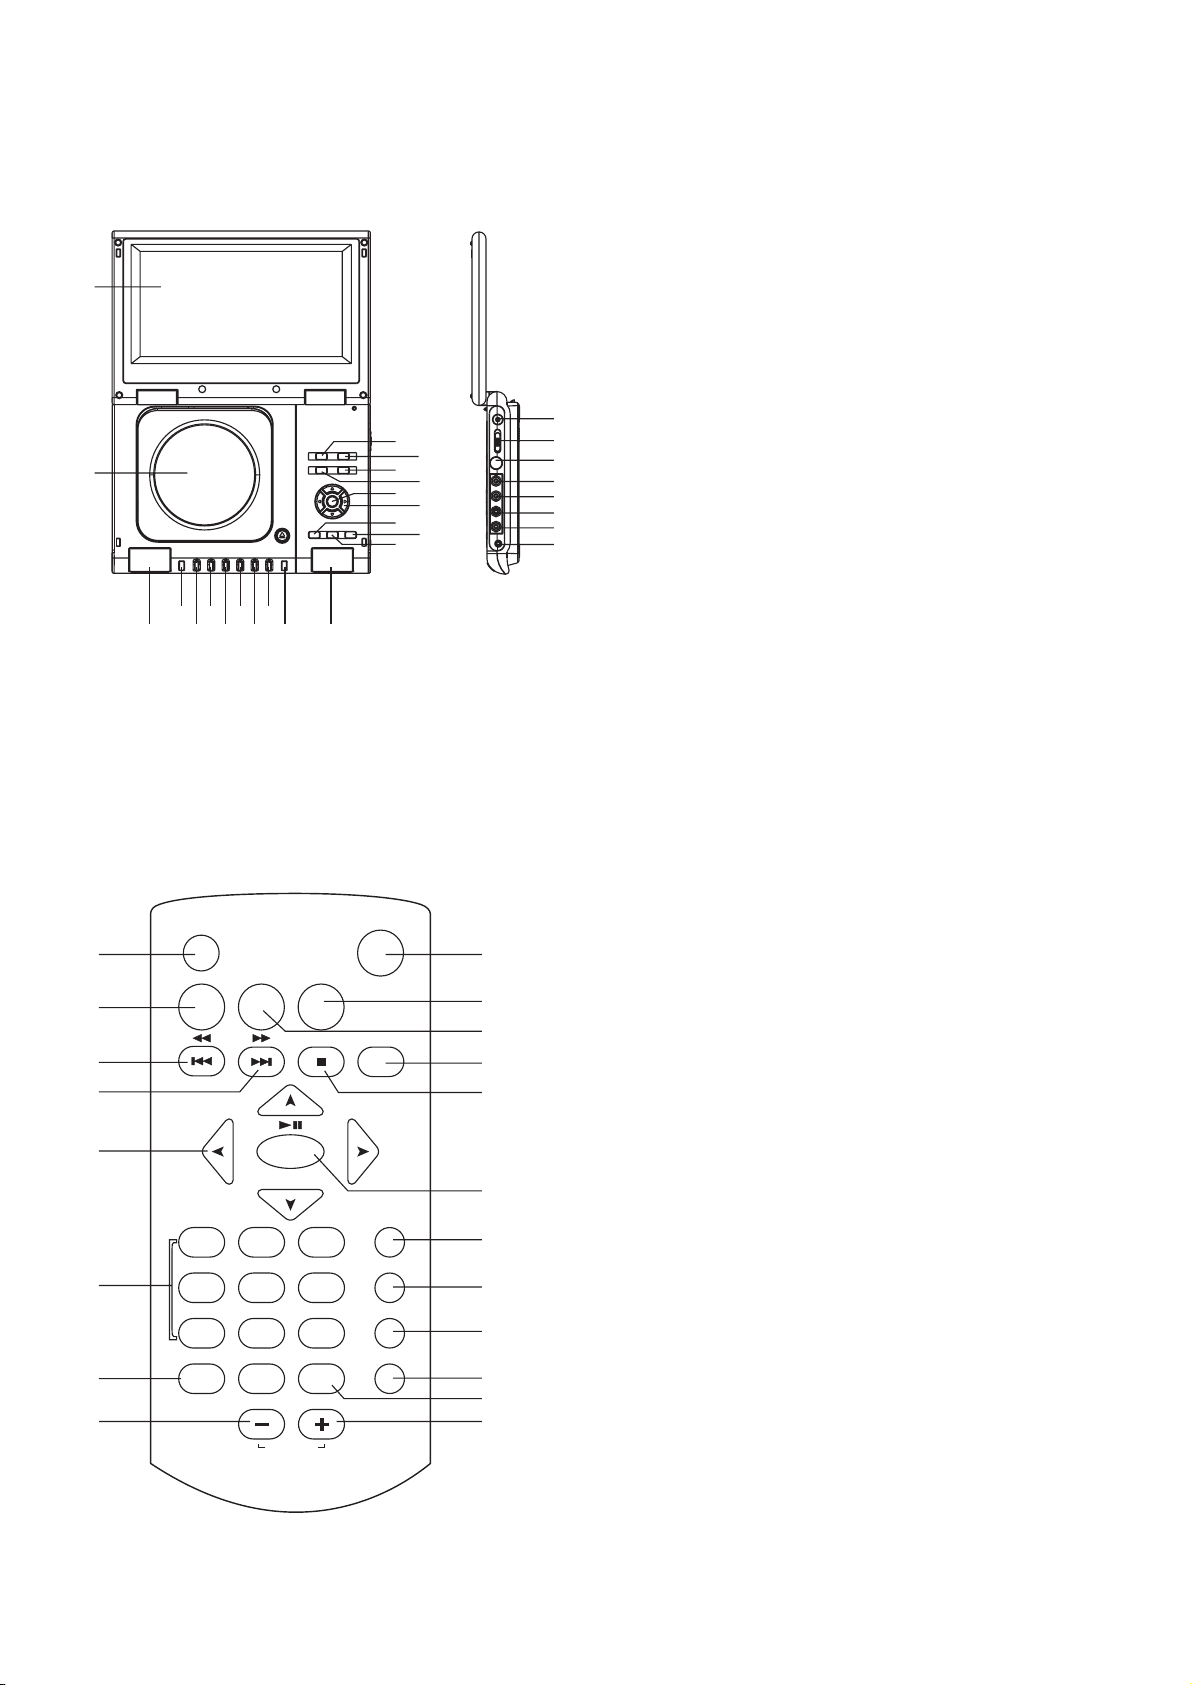
OVERVIEW OF THE DVD PLAYER:
1
21
12
13
2
678910
4
5
3
11
3
14
16
18
20
15
17
19
22
23
24
25
26
27
28
1. TFT SCREEN
2. CD DOOR
3. SPEAKERS
4. ON STANDBY INDICATOR
5. SKIP/SEARCH DOWN BUTTON(PREVIOUS BUTTON)
6. SKIP/SEARCH UP BUTTON(NEXT BUTTON)
7. VOLUME - BUTTON
8. VOLUME + BUTTON
9. STOP BUTTON
10. PLAY/PAUSE BUTTON
11. REMOTE SENSOR
12. TITLE BUTTON
13. MENU BUTTON
14. SETUP BUTTON
15. SEARCH BUTTON
16. OK BUTTON
17. NAVIGATION BUTTONS
18. DISPLAY BUTTON
19. AUDIO BUTTON
20. SUBTITLE BUTTON
21. DC 9V IN JACK
22. POWER ON/OFF SWITCH
23. S-VIDEO
24. AUDIO-LEFT
25. AUDIO-RIGHT
26. VIDEO
27. COAXIAL
JACK
JACK
JACK
JACK
JACK
28. PHONES JACK
GET A QUICK GLANCE AT THE
REMOTE CONTROLLER
SETUP
STOP
3
6
SLOW
ON/STANDBY
DISPLAY
SUBTITLE
AUDIO
SEARCH
REPEAT
9
10
11
12
13
14
15
16
17
18
19
SCREENON/OFF
TITLE
BRI/COL
MENU
1
2
3
4
5
12
6
7
4
789
PROGRAM ZOOM
ANGLE
OK
PLAY/PAUSE
5
0
820
VOLUME
1. SCREEN ON/OFF BUTTON: Press this button to adjust the color and
brightness of the screen, press and hold this button to turn on or turn
off the TFT screen.
2. TITLE BUTTON: Play the title (DVD).
3. PREV/REV BUTTON: Press this button, the scene will skip the
previous chapter or the next track, press and hold this button, the
scene will search the previous point of the chapter or track.
4. NEXT/FWD BUTTON: Press this button ,the scene will skip the next
chapter or the next track, press and hold this button, the scene will
search the forward point of the chapter or track.
5. NAVIGATION BUTTONS
6. NUMERIC BUTTONS
7. PROGRAM/ANGLE BUTTON: During playing DVD disc, pressing this
button will display the angle number and change to different angles;
and playing the other discs, pressing this button can setup the memory
order tracks.
8. VOLUME DOWN BUTTON
9. ON/STANDBY BUTTON
10. SETUP BUTTON: Press this button will enter initial settings menu.
11. MENU (PBC) BUTTON: Select Playback Control for VCD if PBC is on,
when you press return button, the player will start at the VCD root.
12. DISPLAY BUTTON: press this button, the screen will display the
elapsed time and remaining time.
13. STOP BUTTON: Press this button, the player will stop playing.
14. OK(PLAY/PAUSE) BUTTON: Press this button to confirm what you
select; press this button to play or halt the disc.
15. SUBTITLE BUTTON: Press this button will display the different
subtitle language on the screen.
16. AUDIO BUTTON: Select the sound track.
17. SEARCH BUTTON: Press this button during play then press numeric
button to choose number corresponding to the desired play point.
18. REPEAT BUTTON: Press this button once, the player will repeat play
the current track or the whole track, press this button twice, the
player will repeat play one chapter or one title ,or whole tracks,
press this button three times, the player will repeat sections between
two specific points(A-B).
19. ZOOM/SLOW BUTTON: Press this button to enlarge picture size;
Press and hold this button during playback the play speed will be
reduced.
20. VOLUME UP BUTTON
3
Page 5

USING THE REMOTE CONTROLLER:
Position the remote controller at a distance NO FARTHER THAN 7m away from and at an angle of 60 in relation to the remote sensor.
NOTE:
The operating range of this remote controller may vary according to the brightness of the room.
Avoid bright light (sunshine or artificial light) aiming directly at the remote sensor. This may cause the remote controller not to work
properly.
Do not block the remote controller from the remote sensor by solid objects placed between them.
Use of this remote controller while operating the remote controller of another appliance is not recommended as such operation may
cause the remote controller not to work reliably.
REMOTE SENSOR
307m30
o
Another note:
Uninstall the battery when the player is not to be used for a long period of time to prevent battery from leaking, which may result in harm.
INFRARED EMITTER OF REMOTE CONTROLLER
USING THE AC ADAPTER:
Always turn off the DVD player via the Power on/off Key prior to connecting or disconnecting the AC ADAPTER.
Be sure to use the supplied AC adapter. Using a different type of adapter may cause malfunction or damage to the product.
When the AC adapter is used for prolonged periods of time, it may heat up. This is normal and is not a cause for concern.
When not using the adapter, unplug it from the wall outlet.
Keep the AC adapter free from moisture, cold, and dust. Otherwise, a risk of fire or electric shock may be resulted in.
To power
outlet
WARNINGS:
Only use the AC adapter supplied with this player.
Be sure to unwind the AC adapter cable (DC output cable) before using, as electromagnetic interference may cause problems with
other devices.
Always turn off the DVD player when inserting or removing the AC adapter.
Before storing the battery pack, make sure it is completely drained.
Be sure to recharge the battery at least once every six months to ensure proper battery life.
Connecting to a car adapter
The 9V car power adapter is designed for use with vehicles that have a 12V, negative ground electrical system.
WARNING:
Disconnect the car power adapter when not in use. Not in use in 24V vehicles.
To the cigarette lighter socket
CAUTIONS:
! Use the unit only with 9V car power adapter, use with other car power adapter could damage the unit.
!
The recommended 9V car power adapter is for use with this unit only. Do not use it with other equipment.
!
In the interests of road traffic safety, do not operate the unit or view video software while driving a vehicle.
!
Make sure the unit is fastened securely to prevent from moving about inside the vehicle in the event of an accident
!
When the inside of the cigarette lighter socket is dirty with ashes or dust, the plug section may become hot due to poor contact.
Be sure to clean the cigarette lighter socket before use.
!
After use, disconnect the 9V car power adapter from both the unit and cigarette lighter socket.
FUSE REPLACEMENT
FUSE
4
Page 6

CONNECT DVD PLAYER TO OTHER APPLIANCES
It is recommended you connect the player to a multi-system TV.
Ensure that this player and other appliances (TV set and amplifier) that will be connected to the player are set to OFF mode and
that the AC cords are disconnected from the wall outlet.
Avoid blocking ventilation holes of the connected appliances and make sure air around there can circulate freely.
Read carefully and follow the instructions before connecting other appliances.
Observe the color coding when connecting audio and video cables.
AUDIO L
AUDIO R
AVAUDIO/VIDEO INPUT
VIDEO IN
S-VIDEO
YUV INPUT
TV SET
A/V cable
S-video cable
(optional)
Coaxial digital audio cable
To coaxial digital audio
input connector
Decoder or Amplifier with Dolby Digital
(AC-3/DTS) processing
(All sold separately)
After connection is firmed and securely done, plug AC ADAPTER to an applicable wall outlet and turn on the player.
S-VIDEO OUTPUT CONNECTORS
1
The S (separate) video output connector separates the color (C) and luminance (Y) signals before transmitting them to the
TV set in order to achieve a sharper picture.
Use the S-video cable when connecting the player to a TV set equipped with an S-Video input connector for the best picture
clarity possible.
COAXIAL DIGITALAUDIO OUTPUT
2
When a DVD recorded in Dolby Digital/DTS is played, Dolby digital/DTS bitstream is output from the player's OPTICAL digital
audio output connector. When the player is connected to a Dolby Digital/DTS decoder , you can enjoy theater-like audio quality at
your home. [Acoaxial audiocable (not included) is requiredwhen an optionalDolby digital/DTS decoder is used.]
HOW TO USE A PAIR OF EARPHONES OR HEADPHONES(DIAMETER 3.5MM)
You can attach a pair of headphones or earphones with a stereo mini-jack plug to the earphones socket for private
listening as illustrated as on the right:
CAUTION:
Listening at high power for a long moment could damage users' ears
NOTE:
1. Turn the Volume down before connecting.
2. The speakers are disconnected once earphones are attached to the
Earphones Socket.
3. Adjust the volume to a comfortable level using the Volume keys.
.
5
Page 7

OPERATIONS
PREPARATION
Power on the TV set and select video input mode.
Power on the audio system which is connected to the player.
GET STARTED
1. Press POWER switch to turn on the player.
2. Press CD cover Open to open the disc tray.
3. Place a disc onto the disc tray.
4. Press CDcover Open to close the disc trayand the playback
starts automatically.
5. When a menu screen appears on the TV, move the
navigation buttons or press the numeric buttons to select a
preferred track number, then press OK button to start
playback.
ADJUST THE VOLUME
Press the VOLUME+ button to increase or
to reduce
SKIP AHEAD OR BACK
Press NEXT SKIP or PREV SKIP button once during play to
skip a chapter(DVD) or a track (Video CD/CD) ahead or
backwards.
RAPID ADVANCE/ REVERSE
During playback, press F.FWD button or F. BWD button
several times to scan the disc forward or backward at X2, X4,
X8, X20 normal speed.
Press PLAY button to resume normal play.
STOP PLAYBACK
Press STOP button during playback to stop playback; the
player activates its resume function when STOP is pressed in
STOP mode; press PLAY button again, playback resumes at
the point it stopped previously; open the disc tray or press the
STOP button one more time to clear the resume function.
SLOW-MOTION PLAY (DVD/VCD)
Press and hold ZOOM/SLOW button on the remote control
for a moment during playback, the disc will be played at 1/ 2
normal speed at first, each time this button is pressed, the
play speed becomes slower (down to 1/7 normal speed.)
Press PLAY button, normal play will resume.
REPEAT BUTTON
Press REPEAT button during play, it will repeat play one
chapter/title or repeat all(for DVD disc), or repeat play a
track or all tracks (for VCD / CD), or repeat sections
between two specific points (A-B repeat).
NOTE: repeat 1/all for VCD/CD disc will ONLY work in
PBC OFF mode.
the volume.
VOLUME- button
PROGRAM PLAY(UP TO 16 MEMORIES)
1. Press PROGRAM during playback to display the program
menu.
2. Select location(s) to be memorized via navigation buttons
and then enter desired Titles/Chapters numbers via
numeric buttons.
Note: Inputting leading zero is not necessary. If the
chapter/title/track number is behind the cardinal 10, press
the unit digit key first and then another unit digit. Some
figure inputs may be useless, because it 's greater figure
than total title/chapter/tracknumber on the disc.
Example: Track 3, press "3"
Track 12, press "1"and then "2"
Track 21, press "2" and then "1"
3. To start programmed playback, select PLAY onthe menu;
pressing PROGRAM buttonagain to exit programming.
4. To clear programmed items, select the items and then press
CLEAR button on the menu. To clear all items, select the
<CLEAR> on the menu, and then press OK button on
remote control.
5. You can also cancel program mode by clearing all the
items in theprogram menu.
ZOOM PLAY
Press the ZOOM key continuously to zoom in the picture by
2, 3, and 4 times, zoom out by 1/2, 1/3, 1/4 normal size.
Press this key once more when the picture is at 1/4 size to
return to the normal size display.
Scroll to view the enlarged picture using Navigation buttons.
ON SCREEN DISPLAY INFORMATION
When the player is in operation, press DISPLAY button
continuously on the remote control, the screen will
display parts of information(current disc type, title number,
chapter number, playtime, audio language, audio type,
subtitle language and multi angle, etc) in a sequence.
CHANGING AUDIO SOUNDTRACK
LANGUAGE(DVD/VCD DISC)
It is possible to change the audio soundtrack language to a
different language from the one selected at the initial
settings (This operationworks only with discs on which
multiple audio soundtrack languages are recorded).
Press AUDIO button during DVD disc play, the sound
track language changes with the current sound track
number shown on the TV screen.
Pressing AUDIO button during VCD disc play will
change audio output mode: MONO L, MONO R and
stereo.
NOTE: When no soundtrack languages are recorded,
pressing this buttonwill not work.
SEARCH FOR PREFERRED SCENE
1. Press SEARCH button during play and highlight the item
to be played (Title, Chapter, or Chapter time)by navigation
buttons
2. Input the desired number or time via the numeric buttons.
3. Press OK button to confirm and the playback from the
located scene starts.
4. To exit search menu, press SEARCH button directly.
6
Page 8

OPERATIONS
MULTI-ANGLE VIEWING (DVD ONLY)
Press ANGLE button during playback to display the number of
angles being played and then select a desired angle to view the
scene.
Note: only the DVDs shot with multi-angle scenes have this
function.
CHANGING SUBTITLE LANGUAGE (DVD ONLY)
Press SUBTITLE button during playback, the subtitle language
shown on the screen will change as a response to each press;
When the desired language appears, release the button to view
the subtitle in that language.
Note: this function only works on the DVDs recorded with multilanguage subtitles.
ENJOYING VIDEO CDS WITH PBC FEATURE
After loading a VCD 2.0/1.0 with PBC, the TV screen shows the
Disc formats and then a menu.
Select desired track by means of numeric buttons: use one
corresponding key of numeric buttons 1~ 9 to choose track.
During playback, press MENU button to return main
menu(DVD).press this button to select PBC ON/OFF
mode(VCD)
TITLE button: Play the title (DVD)
MP3 PLAYBACK
1.
Load the Mp3 disc onto the disc tray and the TV screen will
show all its folders after a few seconds.
2. Select the folder you want by the navigation buttons and then
OK button to confirm.
3. The files in this folder are displayed and select your favourable
song via navigation buttons and press OK button to start
playback.
4.
Press NEXT and PREV button to select track directly.
5.
Press REPEAT 1/all button change play mode.
REPEAT 1- repeat one file.
REPEAT DIR- repeat all tracks in the current album
REPEAT ALL- repeat all tracks in current disc.
REPEAT OFF-cancel repeat modes.
KODAK PICTURE CD / JPEG CD PLAYBACK
Slide show of Kodak Picture CD after being loaded begins
automatically;
Folders of JPEG picture CD after being loaded are displayed on
the TV screen; use the navigation buttons to select the desired
folder and then press OK button to confirm.
The files in this folder are displayed and you can select your
favourable pictures using the up/down navigation buttons and
press OK button to start playback.
Preview of the picture will be displayed while you scroll across
the filenames.
KODAK PICTURE CD / JPEG CD OPERATIONS
1. PLAY MODES
Press 1/all button during play to change the play modes.
REPEAT 1- repeat one file
REPEAT DIR- repeat all picture in the current album
REPEAT ALL- repeat all pictures in current disc.
REPEAT OFF- cancel repeat modes.
During playback, press STOP to enter preview mode.
2.
SKIP TO NEXT/PREVIOUS PICTURE
Press NEXT button to skip to the next picture or PREV
button to the previous picture.
If no key is pressed for a few seconds, it will skip to next
picture automatically.
3.
PICTURE ROTATIONS
Press RIGHT and LEFT navigation buttons to rotate the picture
Clockwise and anti-clockwise respectively.
4.
PICTURE FLIPS
Press UP navigation button to flip the picture vertically.
Press DOWN navigation button to flip the picture horizontally
5.
PICTURE ZOOM IN/OUT
Press ZOOM button continuously ,the picture zooms in by 2, 3,
4 times or zooms out by 1/2, 1/3, 1/4 the original size.
Press this button once more when the picture getting 1/4 size to
return to the normal play.
If the picture is enlarged, you may use the navigation buttons to
view blocked parts of the picture.
6.
SLIDE SHOW TRANSITION MODES
During slide show playback, press the PROGRAM button
cyclically to select one of the following modes to play.
WIPE TOP
WIPE BOTTOM
WIPE LEFT
WIPE RIGHT
DIAGONAL WIPE LEFT TOP
DIAGONAL WIPE RIGHT TOP
DIAGONAL WIPE LEFT BOTTOM
DIAGONAL WIPE RIGHT BOTTOM
EXTEND FROM CENTER H
EXTEND FROM CENTER V
COMPRESS TO CENTER H
COMPRESS TO CENTER V
WINDOW H
WINDOW V
WIPE FROM EDGE TO CENTER
RANDOM
NONE
SCREEN ON/OFF (BRI/COL) BUTTON
Press SCREEN ON/OFF button on the remote control to
adjust the color intensity and brightness respectively.
Press and hold this button for a moment to open or close
the TFT display.
INITIAL SETTINGS
Initial settings page is for you to make your preferred settings up
for your player. Once the initial settings are done they are
retained in the CPU of the player until otherwise modified.
COMMON PROCEDURES FOR INITIAL SETTINGS
1. Press SETUP button.
2. Use the navigation buttons to select the item you want to
modify, press OK button to confirm, setting page with further
setting items displayed shows on the TV screen. Again use
navigation buttons to make changes. Press again OK button
to confirm modifications.
3. Use navigation buttons to switch to another setting on the
main setting page.
4. Press SETUP button to exit main setting page.
7
Page 9

INITIAL SETTINGS
1.SYSTEM SETUP
SYSTEM SETUPSYSTEM SETUP
TV SYSTEM
LCD MODE
TV TYPE
PASSWORD
RATING
DEFAULT
EXIT SETUP
1.1 TV SYSTEM
Options:
NTSC / PAL/ AUTO
Please select this option as per your TV set.
LCD MODE
1.2
Options: 4:3 16:9
1.3 TV TYPE-
set as per your TV set.
Options: Normal Pan & scan mode
4:3PS :
4:3LB :
16:9 :
1.4 PASSWORD
The steps are as follows:
1.4.1 Enter SYSTEM SETUP , select the PASSWORD item
by scrolling the down navigation button, and then press
the right navigation button to select the input box.
1.4.2 Input user's password"0000" to unlock it, in this case,
select the input box again to change the password by
inputting another new four numeric numbers and then
press SELECT button to confirm. When the password
is changed, you are needed to input the new one to
unlock the system.
1.4.3 Once you forget your own password, use the
supervisor's password "8200" to unlock it.
: If wrong password was input in unlock status, the
NOTE
system will lock.
1.5 RATING -
change the rating of parental lock, please input the
password to unlock first.
Options:
1KIDSAFE/2G/3PG/4PG13/5PG-R/6R
/ 7 NC-17 / 8 ADULT
1.6 DEFAULT -
Options: RESTORE
2. LANGUAGE SETUP
- it is used to select the TV mode.
it is used to select the TV scan mode, please
normal Letter box mode
16:9 wide screen mode
- input password to unlock the system.
Set the rating of this player. If you want to
Reset to factory settings.
LANGUAGE SETUPLANGUAGE SETUP
OSD LANGUAGE
AUDIO LANG
SUBTITLE LANG
MENU LANG
EXIT SETUP
2.3 SUBTITLE LANG-
(DVD only, need disc software support)
Options:
2.4 MENU LANG -
Options:
CHINESE/ENGLISH/JAPANESE/FRENCH/SPANISH/
PORTUGUESE/GERMAN/LATIN
(DVD only, need disc software support)
CHINESE/ENGLISH/JAPANESE/FRENCH/SPANISH/
PORTUGUESE/GERMAN/LATIN
Select preferred subtitle language.
Select preferred disc menu language.
3. AUDIO SETUP
AUDIO SETUPAUDIO SETUP
AUDIO OUT
EXIT SETUP
3.1 AUDIO OUT -
Options:
SPDIF/OFF:
Set digital output code format.
I
f you are not connecting to an amplifier via
digital output, please select this option.
SPDIF/RAW:
Used in general home theatre, select this can
output 5.1 channels audio.
SPDIF/PCM:
S
elect this it can only output 2 channel, but you
will get higher quality audio output.
4. VIDEO SETUP
VIDEO SETUPVIDEO SETUP
BRIGHTNESS
CONTRAST
HUE
SATURATION
EXIT SETUP
4.1 - to set the brightness for the display.
BRIGHTNESS
Options: 0/2/4/6/8/10/12
4.2 CONTRAST - to set the contrast effect for display.
Options:
4.3 HUE - to set the colour impression for display.
Options: -6/-4/-2/0/+2/+4/+6
4.4 SATURATION - to set the saturation level for display.
Options: 0/2/4/6/8/10/12
0/2/4/6/8/10/12
5. SPEAKER SETUP
SPEAKER SETUPSPEAKER SETUP
DOWNMIX
2.1 OSD LANGUAGE -
2.2 AUDIO LANG -
ENGLISH
select preferred audio language.(DVD
only, need disc software support)
Options: CHINESE/ENGLISH/JAPANESE/ FRENCH/SPANISH/
PORTUGUESE/GERMAN/LATIN
5.1 DOWNMIX
8
EXIT SETUP
LT/RT-Options: Left/Right mix mode
STEREO-
Select this option if you don't
have a 5.1 channels amplifier.
Page 10

DISC HANDLING PRECAUTIONS
Hold the disc by the edge so the surface will not be soiled with finger prints. Finger prints, dirt and scratches can
cause skipping and distortion.
Do not write on the label side with a ball-point pen or other writing utensils.
Do not apply benzine, thinner, and liquid that prevents against static electricity.
Be careful not to drop or bend the disc.
Instal only one disc on the disc tray.
Do not try to close the disc tray when the disc is not in stalled properly.
Be sure to store the disc in it's case when not in use.
TROUBLESHOOTING
If your DVD player does not seem to be functioning properly, check the items below before you contact an authorized service center
Symptom Check
Power does not turn on or
suddenly turns off.
Battery pack is in place but
the power does not turn on
or suddenly turns off
Make sure the AC adapter is securely plugged into an AC outlet.
Turn the power off and then back on.
Check that the battery pack is charged. If not, recharge it.
Remote control won't work
No picture or sound
No picture
No sound
No picture and sound
Distorted video or sound
Check that the battery is inserted in the
The battery may be flat. Replace it with a new one.
Check that the signal transmission is directed at the remote control sensor on the DVD player.
Remove the obstacle between the remote controller and remote control sensor.
Check that the A/V cables are securely connected.
Check that the disc is a DVD (region number 1 or all), DVD-RW, VIDEO CD or AUDIO CD.
Do not use a disc that has scratches or dirt.
Check that the label-side of the disc is facing up.
The pick-up lens of the DVD player may be dirty. Contact the service center for lens cleaning.
Check that the TV channel is set to VIDEO or AV if viewing with a TV.
Check that the LCD display is turned on.
Check that the display panel is open. If it is closed, audio will not be output to the speakers.
Check the volume setting. If set to zero, turn up volume level.
Check that the headphones are plugged into the PHONES socket.
Speakers cannot be used with the headphones.
Check that the battery is properly installed and AC Adapter is properly connected.
Use a disc without scratches or dents.
and direction properly.
9
Page 11

Cautionary Notes
When Moving the Player
Be sure to remove the disc from the player before packing for moving.
It is recommended that you also remove the disc from the player and turn off the power when not using the player.
Saving Power
It is recommended that you turn off the power to the DVD player when not in use.
If you are not going to use it for prolonged period of time, unplug the power cord from the wall outlet.
Maintenance of LCD Screen
To keep the screen clean, turn off the power and then wipe with a soft cloth.
About LCD Screen
This LCD panel is designed with the latest technology, ensuring 99.99% of active pixels.
Cautions on Using Battery pack
Danger!
Always follow the safety information below when using the battery pack. Otherwise, a short circuit, overheating, smoke, fire, or
damage to the product may result.
1. Never disassemble or modify the battery pack in any way. Do not touch the terminal of the battery pack with a metal object.
2. Do not let any metal object inside the battery pack.
3. Do not place the battery pack in direct sunlight, dashboard of a vehicle, or high temperature.
4. Do not expose the battery pack to water, fire, or heat.
5. Always use the included AC adapter when charging the battery pack.
6. This battery pack is designed exclusively for your portable DVD player. Do not use it with other devices.
Warning!
1. Do not drop or subject to strong vibration.
2. Keep out of reach of children.
3. The battery pack may leak fluid that is harmful to your eyes.
If this fluid gets in your eyes, wash eyes immediately with large amounts of running water and get medical attention at once.
If the fluid gets on your skin or clothing, wash immediately with water.
Caution!
1. When not using the battery pack, remove it and store in a cool place.
2. Do not use the AC adapter or battery pack for a prolonged period of time during recharging. You might burn the battery.
3. Keep the battery pack free from smoke, steam, moisture, and dust.
Do not place the battery pack near a kitchen, heater, or any other place where there is smoke or steam.
Doing so may result in fire or electric shock.
Avoid direct sunlight, heater, or high temperature place. etc, inside of a car. It can cause explosion or fire.
Doing so may cause a short circuit, overheating, smoke, fire, or damage to the product.
4. Using the battery pack under 10
o
C or over 30 C can cause reduced battery life.
o
10
Page 12

Cautions on Storing Battery pack
Even when not in use, power is consumed continuously. To reduce the power consumption, follow the procedure below.
1. Remove the battery pack from the DVD player after every use.
2. When not using the DVD player, turn off the power. If the player is left in the standby mode, power will be slowly drained
from the battery pack and the charging capacity will decrease.
3. Before storing the battery pack, completely drain the power by operating the player and store in a cool, dry place.
If stored in a hot place, the capacity of the battery pack will decrease.
4. The battery pack must be recharged and then used on the DVD player at least once every 6 months.
This helps to prevent the loss of capacity.
AC Adapter
The supplied AC adapter is compatible with 50/60Hz electrical system (110V~240V range).
Use of the AC adapter depends on the specific voltage requirements and electrical outlet design.
Using the AC adapter near a radio may cause poor reception.
Do not let any type of flammables, liquid, or metal objects in the adapter.
The adapter is covered with an outer plastic sheath. Do not peel open the sheath.
Do not drop, jar, or shake the adapter.
Do not place in direct sunlight.
Do not use in high temperature or cold and humid environments.
Cleaning and Maintenance
Many plastic parts are used in this DVD player casing. Do not use volatile chemicals such as benzene or thinner.
This might damage the finish.
Wipe the casing with a soft, dry cloth. For excessive dirt, use a cloth dampened in a diluted neutral detergent. and wipe again
with a soft, dry cloth.
Wipe off fingerprints or dirt on the LCD screen using a soft, dry cloth.
Cautions on Charging Battery pack
Charge within the surrounding temperature range of 10-30 degrees. Charging at a low surrounding temperature takes longer
charging time and shortens the life time of the battery pack. While it is not likely to fully charge it at high temperatures.
The battery pack becomes warm during recharge or use. This is normal and is not a cause for concern.
A hot battery pack may take longer to charge or may not be charged at all. Wait until the battery pack cools down before charging.
CAUTION
To avoid electric shock, this unit must not be exposed to dripping water or water splash.
Minimum distances around the apparatus for sufficient ventilation.
The ventilation should not be impeded by covering the ventilation openings with items, such as newspapers, table-cloths,
curtains, etc.
No naked flame sources, such as lighted candles, should be placed on the apparatus.
The use of apparatus in tropical and/or moderate climates.
Before scrapping the appliance, remove the batteries and place them in the appropriate battery collection container.
11
 Loading...