

Page 1
MD170103-01
Printed in China
N75UX17A-AU
www.soniq.com
AUSTRALIA :1300 765 663
NEW ZEALAND :0800 100 236
HOTLINE
Page 2
Important Safety Instructions
WARNING
• TO PREVENT FIRE OR SHOCK HAZARD. DO NOT USE AN EXTENSION
CORD.
• TO PREVENT FIRE OR SHOCK HAZARD, DO NOT EXPOSE THIS
APPLIANCE TO RAIN OR MOISTURE.
• TO PREVENT ELECTRIC SHOCK, MATCH WIDE BLADE PLUG TO
WIDE SLOT FULLY INSERTED.
The appliance should not be exposed to water and no object filled with liquid
such as a vase should be placed on the unit.
The exclamation mark within
the triangle alerts users to
the presence of important
operating and maintenance
(servicing) instructions for
the appliance.
WARNING: To reduce the
risk of electric shock, do
not remove cover (or back).
No user serviceable parts
inside. Refer servicing to
qualified service personnel.
The lightning flash with
arrowhead symbol in a
triangle indicates the
presence of uninsulated
dangerous voltage within
the product enclosure that
may be of sufficient
magnitude to constitute a
risk of electric shock.
RISK OF ELECTRIC SHOCK
DO NOT OPEN
1
Page 3

Important Information
If a television is not positioned in a sufficiently stable location, it can be
potentially hazardous if it falls. Many injuries, particularly to children, can be
avoided by taking simple precautions such as:
· Using cabinets or stands recommended by the manufacturer of the
television.
· Only using furniture that can safely support the television.
· Ensuring the television is not overhanging the edge of the supporting
furniture.
· No placing the television on tall furniture (for example, cupboards or
bookcases) without anchoring both the furniture and the television to a
suitable support.
· Not standing the televisions on cloth or other materials places between the
television and supporting furniture.
· Educating children about the dangers of climbing on furniture to reach the
television or its controls.
· Figures and illustrations in this user manual are provided for reference
only and may differ from actual product appearance. Product design &
specification may be changed without notice.
2
Page 4

1. Read Instructions - All the safety and operating instructions should be
read before operating.
2. Retain Instructions - The safety and operating instructions should be
retained for future reference.
3. Warnings - All warnings on the appliance and in the
operating instructions should be adhered to.
4. Follow Instructions - All operating instructions should
be followed.
5. Earthing Connection - The TV shall be connected to a
MAINS socket outlet with a protective earthing connection.
6. Water and Moisture - The appliance should not be used near water.
7. Cart and Stands - The appliance should only be used with a cart or
stand that is recommended by the manufacturer.
8. Wall or Ceiling Mounting - The appliance should be mounted to a wall
or ceiling only as recommended by the manufacturer.
9. Ventilation - The appliance should be well situated so that its location or
position does not interfere with its proper ventilation.
10. Heat - This appliance should be placed away from heat sources such as
radiators, heat registers and stoves.
11. Power Sources - The appliance should only be connected to a power
supply as described in the operating instructions as marked on the
appliance.
12. Power Cord Protection - Power supply cord should be routed so that it
is not likely to be walked on, pinched by item placed upon it against the
cord and its end.
13. Cleaning - The appliance should be cleaned only as recommended by
the manufacturer.
14. Power Lines - An outdoor antenna should be located away from power
lines.
15. Outdoor Antenna Grounding - If an outside antenna is connected to
the receiver, the antenna system must be grounded so as to provide
against voltages and built-up static charges.
16. Non-use Periods - The mains plug is used as disconnect device, the
disconnect device shall remain readily operable.The power cord of the
appliance should be unplugged from the outlet when left unused for a
long period of time.
17. Conditions Requiring Service - The appliance should be serviced by
qualified service personnel when:
· The power-supply cord or the plug has been damaged.
· Objects have fallen on or liquid has been spilled into the appliance.
Safety Instruction
3
Page 5

· The appliance has been exposed to rain.
· The appliance does not appear to operate normally or exhibits a
marked change in performance.
18. This appliance should not be exposed to water and no objects filled with
liquids such as a vase should be placed on the unit.
Safety Instruction
4
WARNING
High voltages are used in the
operation of this product. Do not
remove the back cover of the
cabinet. Refer servicing to
qualified service personnel.
WARNING
To prevent fire or electrical
shock hazard,do not expose
the main unit to rain or moisture.
WARNING
Do not drop or push objects
into the television cabinet slots
or openings. Never spill any
kind of liquid on the television
receiver.
CAUTION
If the television is to be built
into a compartment or similarly
enclosed space theminimum
distance must be maintained.
Heat build up can reduce the
service life of your television,
and can also be dangerous.
CAUTION
Never stand or lean on product
or its standor push suddenly.
Always pay specialattention
when children are near product
to avoid harm.
Minimun Distances
10cm
20cm
10cm
5cm
CAUTION
Do not place the main unit on an
unstable cart stand, shelf or table.
CAUTION
When the product is not used for
an extended period of time, it is
advisable to disconnect the AC
power cord from the AC outlet.
CAUTION
The panel used in this product is
made of glass.
It can break when the product is
dropped or applied with force.
CAUTION
Avoid exposing the main unit to
direct sunlightand other sources
of heat. Do not positiontelevision
receiver directly on other products
which give off heat.E.g. video
cassette players,audio amplifiers.
Do not block the ventilation holes
in the back cover.Ventilation is
essentialto prevent electrical
failure.Do not squash power
supply cord under the main unit.
Page 6
5
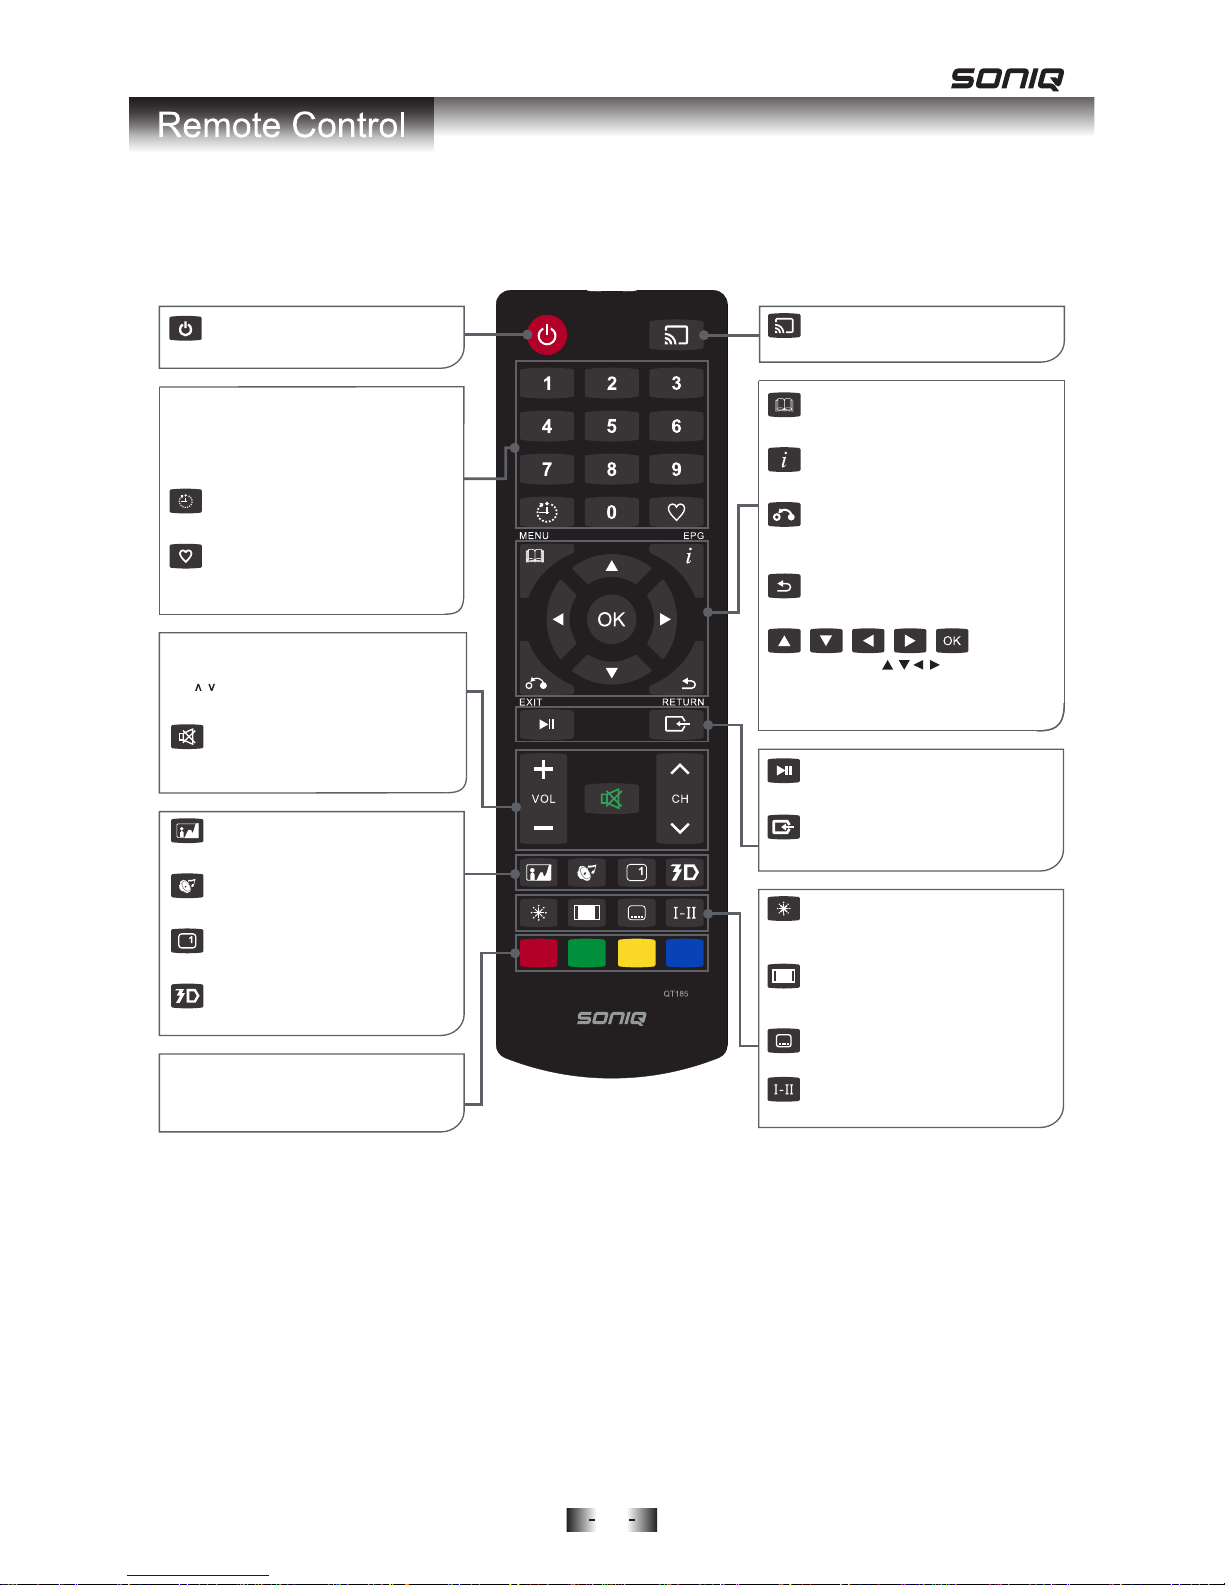
Model No.: QT185
Quickly access Cast Mode.
Cast button
Press to display the main menu.
Menu button
Launch the Electronic Program Guide (DTV).
EPG button
Exit from the main TV menu displayed on the
screen.
Exit button
Back to previous.
Return button
Start or pause playing.
Pause button
Press to display the Source menu.
Source button
Pause the current image but continue playing
audio. Press again to resume.
Press to change the aspect radio of the TV
display.
Enable/disable subtitles.
Press to select sound output mode.
Still button
Aspect button
Subtitle button
I-II / Audio button
Toggles the unit between standby and on.
Power button
Color buttons
When color function buttons shown on screen,
follow the instructions to access different color
functions.
P.Mode button
Switch the picture mode.
S.Mode button
Switch the sound mode.
INFO button
Display information of the current programme.
3D button
Not available.
Mute button
Press to mute the sound. Press it
again or press VOL+/- to resume.
VOL +/-
Press to increase/decrease the sound level.
CH /
Selects a programme in DTV mode.
Numerical buttons
Press 0-9 to select a TV channel directly when
watching TV. The channel will switch after 2
seconds or press “OK” button to change
immediately.
Sleep button
Press to activate sleep timer.
FAV button
In TV mode, press FAV button to display your
favorite programmes.
Navigation keys ( / / / /OK)
Allows you to navigate the on screen menus
and adjust the system settings to your preference.
Press OK to confirm your selection.
Page 7
6
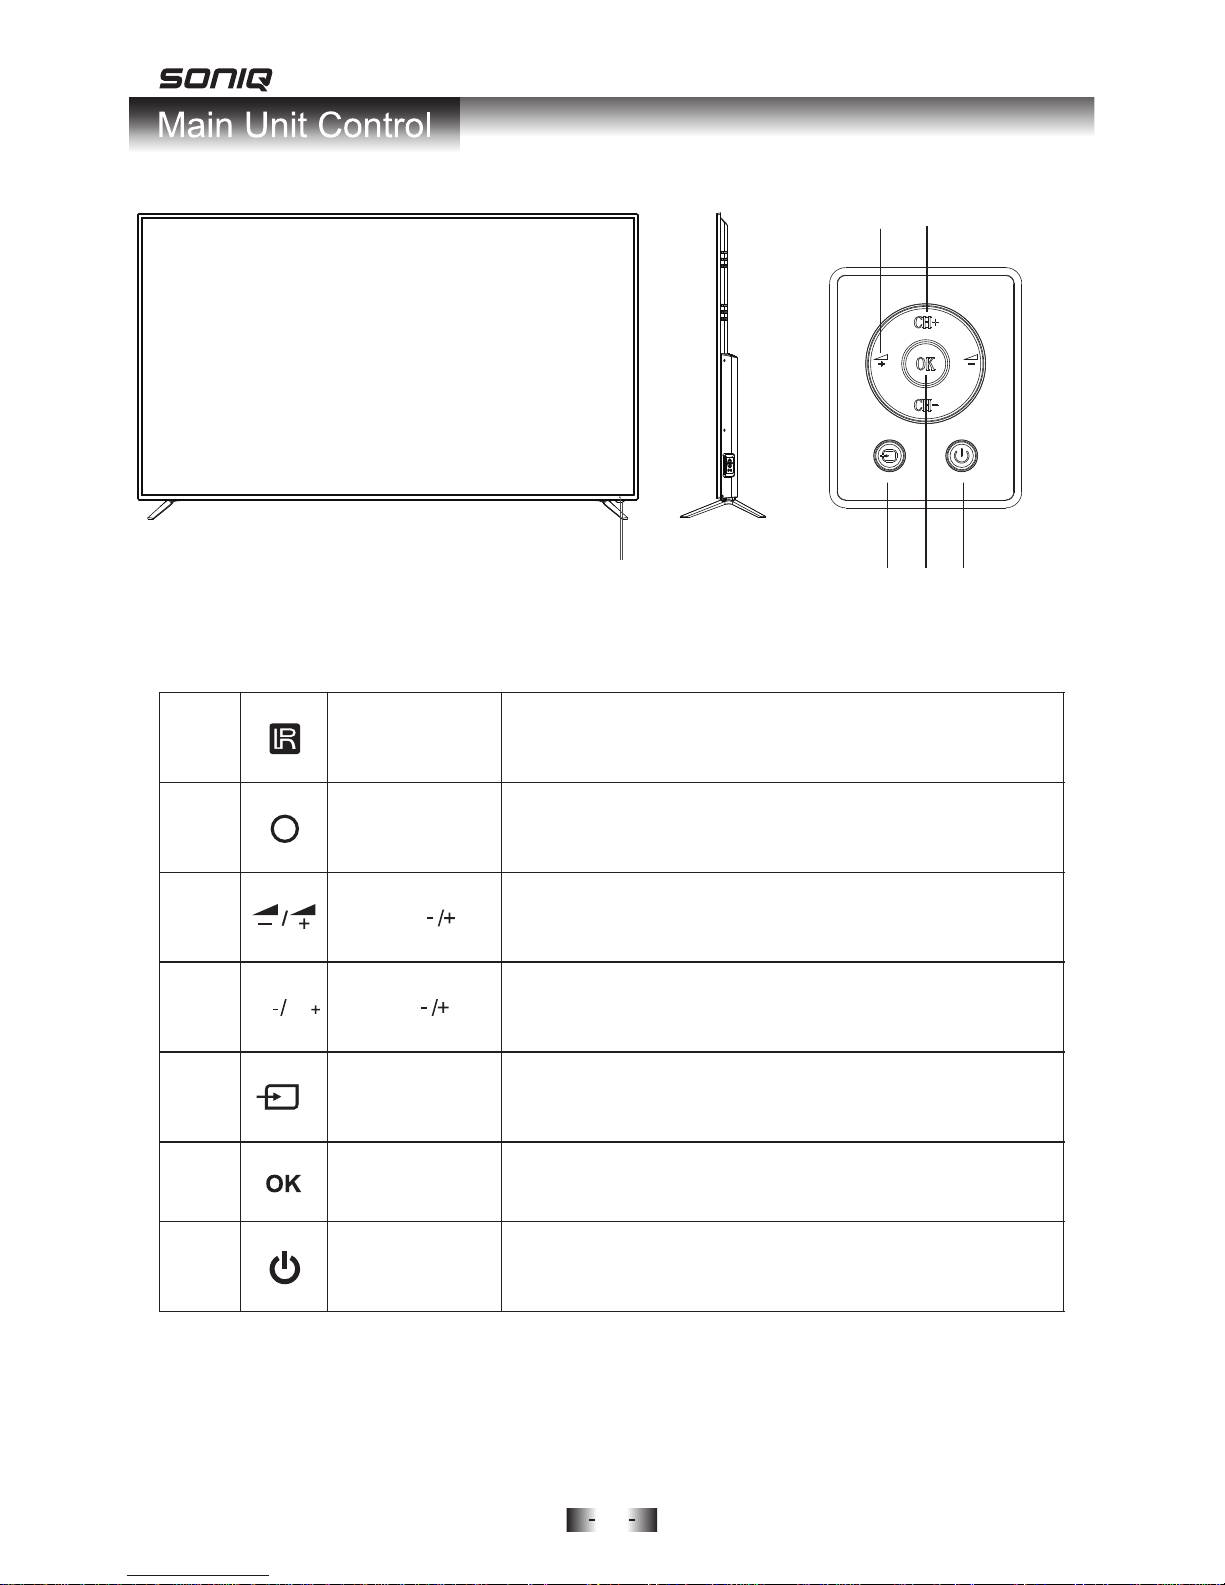
Front View
Note:
Please use the above instructions according to the actual keys showed on
TV.
Remote Control
Sensor Window
Receives signal from Remote Control. Do not put any
objects in front of the window to hinder the reception
of signal.
Press these buttons to sequentially select channels.
When the OSD menu is on, press these buttons to move
the selection focus up or down to change settings.
CH
CH CH
Press VOL- to decrease volume, or VOL+ to increase.
At the OSD menu, press these buttons to move the
selection focus left and right to change settings.
VOL
Press to display all available input signal sources.
Press to cycle through various sources.
SOURCE
Press this button to turn the unit on when it is in standby
mode.
Press this button once more to put it to standby mode.
STANDBY
Power Indicator
Flashes red when the unit is powered on;
Lights up red when the unit is in standby mode.
1
2
3
4
5
6
7
1 2
7
5
6
4
3
Press this button to display the OSD menu.
When the OSD menu is on, press this button to exit the
menu.
MENU
Page 8
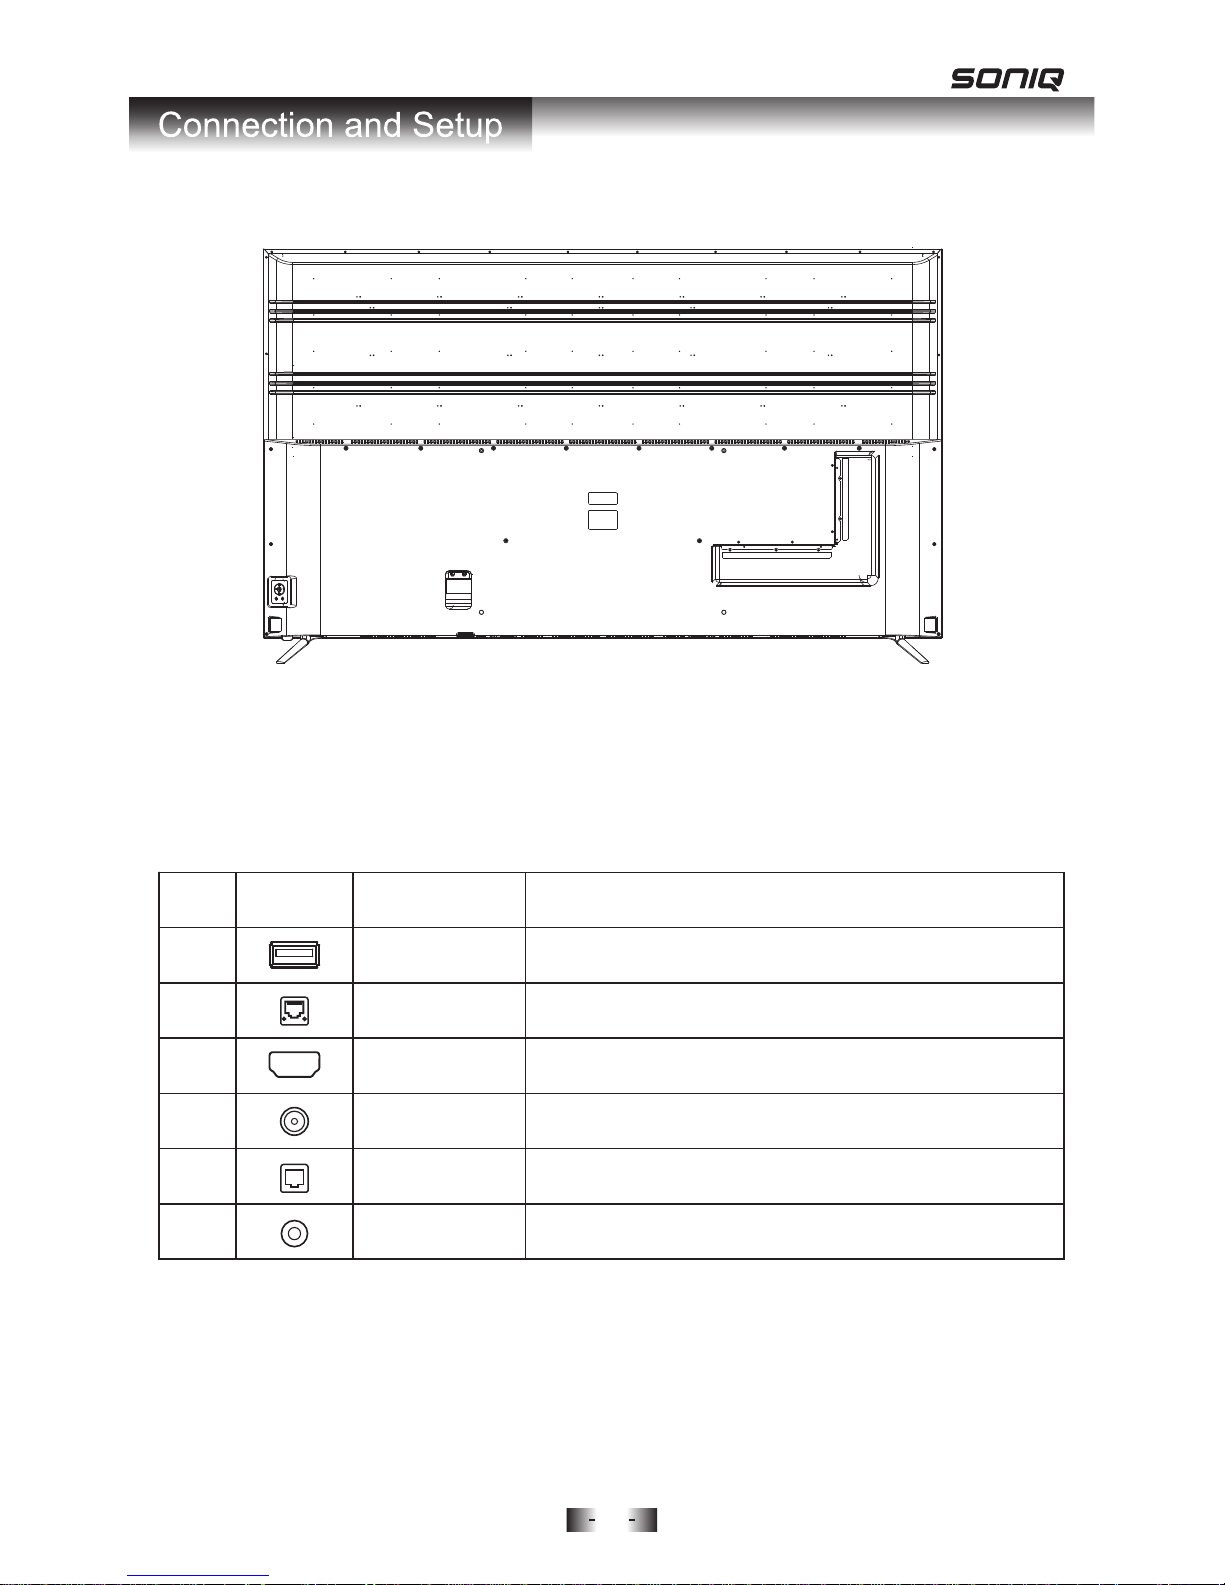
Terminals on TV
Note:
Above listed is the universal version of SONIQ TV. Some terminals may not
contained in some models.
Back View
7
Icon
ETHERNET
Connect the RJ45 Interface Ethernet.
Name
Description
ANT IN
Connect to External Antenna.
SERVICE
For after-sales service.
Digital Audio Out
(OPTICAL)
Connect to Digital Audio Amplifier OPTICAL Input.
HDMI
Connect to HDMI signal.
EARPHONE
Connect to external headphones.
1
2
3
4
5
6
Page 9

8
When you turn on the SONIQ TV for the first time, the default mode is Cast
Mode.
Follow the bellow steps to launch Cast Mode.
CAST MODE
Or if you don’t want to enter Cast Mode, press the BLUE button on the remote
control (and use the Right button to move the cursor to “YES” in pop-up
dialogue) to skip Cast Mode. In future, to access Cast Mode, directly Press
the Cast button on the remote control or press the Source button to choose
Cast Mode.
Use your mobile device as the best remote to cast your favorite shows,
movies, music, sports, games, and more to the big screen.
Just open the mobile apps you already know and love to quickly access your
TV shows and playlists. No new log-ins or downloads required.
Scan below QR codes to download Google Home quickly :
1. DOWNDOAD THE GOOGLE HOME APP
For iOS For Android
Page 10
9
• iOS phone or tablet (iOS 8.0 and higher)
DISCOVER NEW ENTERTAINMENT WITH THE GOOGLE HOME APP
The Google Home app lets you easily browse featured content and search
for your favorite movies and TV shows. Plus, it’s your central place for
finding the latest on new apps and offers.
ENJOY HIGH-QUALITY VIDEO, POWERED BY THE CLOUD
Google Home uses the cloud to stream content to your TV, so you get HD
video (and Ultra High Definition video using select devices and apps) with
high-quality sound.
MULTI-TASK WITHOUT INTERRUPTION
Send texts and accept calls while casting without disrupting what’s playing
on the TV or draining your phone’s battery.
Features
Availability subjects to change without notice.
• Android phone or tablet (Android 4.1 and higher)
For a list of supported devices, see Google Play™ supported devices article.
If Google Home app can't be downloaded directly via the QR code due to the
download address has been changed. Please download it at Google Play
Store or Apple App Store.
ANDROID APP ON
Download on the
App Store
Page 11

10
2. PAIR YOUR MOBILE DEVICE WITH SONIQ DISPLAY
(1).Turn on the SONIQ Display by pressing the Power button on the side of
the TV or by pressing the Power button on the Remote Control.
(2).The TV can connect with wireless Wi-Fi network (use your phone/tablet
and follow below steps to connect) or wired network(use a RJ45 Ethernet
cable to connect). Make sure your phone or tablet is connected to the
same network you will use with your Chromecast built-in TV.
(3).Launch the Google Home app on your device. But first, tap “Accept” to
agree to the Terms of Service and Privacy Policy of Google Home.
NOTE: For iOS devices, Google Home app will ask you to turn on
Bluetooth.
Highly recommended: Turn on Bluetooth to help improve the setup process.
You can swipe up from the bottom and turn on Bluetooth or tap SETTINGS
to turn on Bluetooth, then return to the Google Home app.
If you don't want to use Bluetooth for set up, use Wi-Fi hotspot to setup:
Tap your iPhone’s Home button > Go to your iOS Settings > WLAN
Connect to the Wi-Fi network that matches your Chromecast built-in
device. Look for something like CastTVXXXX.
Navigate back to the Google Home app. Your device should now be
detected. Tap CONTINUE.
(4).Hold your device close to the SONIQ TV and look for the code on the
bottom right corner of your TV. And tap “I SEE THE CODE” to continue.
Your DeviceSONIQ Display
(5).Use the phone to select your region and name your SONIQ Display. And
tap “CONTINUE” to proceed. If guest mode is enabled, it will allow
compatible
devices in the same room to cast without being on your Wi-Fi
network.
Page 12

11
(6).The phone begins to search for a wireless network to connect to. Choose
the Wi-Fi network you want to connect your Chromecast built-in TV to
and enter your password.
Tap “CONTINUE” to next
step.
If your TV connected with a wired network via the Ethernet jack, this step won't
exist.
(7).
The First-Time setup is complete.
Contents on the cast-enabled apps can
be casted on the SONIQ display by pressing the Cast icon.
SONIQ Display
Page 13

12
Note: The images shown here are for illustrative purposes only and may be subject to change. The actual
on-screen image and text may vary, depending on the phone model.
The contents in the downloaded cast-enabled apps will display under the
WATCH menu.
Find more cast-enabled apps under DISCOVERY menu.
Your connected SONIQ TV will display in the DEVICES menu. Tap “STOP
CASTING” to stop casting.
1.Tap the icon to reveal Settings Menu.
(1).Settings: Check the device information, and you can rename your SONIQ
TV in this menu.
(2).Backdrop setting: tap to set the backdrop to show on your SONIQ
display.
(3).Guest Mode: to turn On or Off guest mode.
2.Tap the top left corner button to reveal a list of content to get more
Google Home information.
The Google Home app lets you find your favorite content, across multiple
cast-enabled apps in one simply aggregated screen, making it easy to
discover and enjoy videos, games, music and more.
Navigate the Google Home app
3. LAUNCH THE GOOGLE HOME APP
1
Page 14

13
4. PICK SOMETHING TO WATCH
After you get the hang of using the Google Home app, it’s time for you pick
and choose something to watch.
1. Find films, TV shows, and more with the Cast-enabled apps, open an app
and tap the Cast icon to mirror your mobile device.
Tab the cast icon to start casting
Select a TV to watch videos on
2. Depending on which video app you pick, the content will be organized into
several collections. Scroll up and down through the list to pick what you
want to watch or search for a title by tapping the search icon.
3. Select a source and tap the play button.
Page 15

14
Note: The images shown here are for illustrative purposes only and may be subject to change. The actual
on-screen image and text may vary, depending on the app.
4. A) Tap on the Cast icon again and select “Disconnect” to stop casting.
B) Tap the icon to add the video to Queue and/or Playlist.
C) Tap icon to set the video to Play next, or to Add to Queue, or to Add
to Watch Later, or to Add to Playlist.
D) Your title begins playing on your display.
E) Tap the title on the bottom row to display the QUEUE.
Page 16

15
Note: The images shown here are for illustrative purposes only and may be subject to change. The actual
on-screen image and text may vary, depending on the app.
1. Open a cast-enabled music app on your mobile device, tap the Cast
icon to cast it to the SONIQ display.
4. PICK SOMETHING TO LISTEN TO
2. You can pick your content from the list or search for a title by tapping the
search icon.
3. Tap on the content you want to listen to and the music begins to play on
your SONIQ TV.
4. Depending on which music app you pick.
A) Tap on the Cast icon again and select “Disconnect” to stop casting.
B) Select “Add Playlist” to set up New Playlist and add the track to your
library.
C) Tap the Home button to see your Music Playlist.
SONIQ Display Your Device
Page 17

16
Note: The images shown here are for illustrative purposes only and may be subject to change. The actual
on-screen image and text may vary, depending on the app.
2. Use your mobile phone as a controller and begin to play the game in big
screen.
3. Tap the Cast icon on your mobile phone again to select “Disconnect” to
stop casting.
Use Google Cast to turn your SONIQ TV into a dancefloor, racetrack, and more.
Friends can use their own phones as controllers, all while watching the action
live on the big screen.
1. Find popular games from the Google Home app, pick a game app and tap
the Cast icon to mirror your mobile device.
4. GAME ON. GAME BIG.
Page 18

17
Mirror any website on your laptop’s Chrome browser. Supports Mac, Windows
PC or Chromebook. Meanwhile you can carry out other tasks on your PC
without disrupting what’s playing on the TV.
1.
Connect your laptop to the same LAN (Local Area Network) as your
SONIQ
TV. Open your Google Chrome Browser.
2. Click “Cast” icon and select a TV to cast to.
3. The website on your laptop starts to cast to the SONIQ display.
4. BROWSE WEBSITE
Programme Selection:
Depending on which app you pick, use your mobile device/PC as a remote
control to freely switch any on-line programmes in cast-enabled apps for your
preference.
Volume Adjustment:
Just press the Volume+/- buttons on your mobile devices to adjust the volume
of your SQNIQ TV. You can also use the TV remote control to change the
volume.
5. USE YOUR MOBILE DEVICE / PC AS THE BEST REMOTE
CONTROL
Page 19

18
Before operating OSD(On Screen Display) menu, please switch to full
screen
playback.
Press Menu button on the remote control to show the available menus on
the
bottom of the screen.
OSD Menu Operation
Check your antenna connection and press Source button on the remote control
to select DTV mode first.
Press Menu button to access CHANNEL menu. From this menu you can
access
the following options: Auto Tuning, Manual Tuning, Program Edit.
CHANNEL MENU
Automatically finds all channels available through antenna or cable inputs,
and stores them in memory on the channel list.
Run this function if you change your residence or move the TV.
1.
Use Up/Down button to highlight Auto Tuning, and press OK button to proceed.
2. Press navigation keys to select Time Zone.
3. Press OK button to start Auto Channel Tuning.
Auto Tuning
Page 20

19
Manual Tuning
1. Press RED button on the remote control to delete the selected channel
from the channel list.
2. Press the BLUE button to skip a channel when using CH +/- buttons.
3. Press the FAV button to add a channel to your favorite List, press it again
to remove the channel from the Favorite List.
Color Function buttons
When selecting DTV input signal in Manual Tuning, you can view the on-screen
signal strength monitor to see the quality of the signal being received.
1. Press Up/Down buttons to highlight Manual Tuning, then press OK to enter
sub-menu.
2. Press Left/Right buttons to select channel and press OK button to start
searching.
Press Up and Down button to select Program Edit, then to press OK to enter.
Program Edit
Page 21

20
1. Use Up/Down button to highlight Picture Mode and press OK to enter
sub-menu.
2. Press Left and Right buttons to adjust the picture mode by Standard, Mild,
User and Dynamic.
Standard - This mode offers a better color balance when used in an
average lit room.
Mild - This mode typically produces an excellent image and makes your
eyes feel comfortable.
Dynamic - This mode is for when your room is brightly lit or during the day.
User mode - Contrast, Brightness, Color and Sharpness can be manually
adjusted under this mode.
Contrast: Increases or decreases the gradient of the video signal. You may
use Contrast when the bright part of the picture is saturated.
Brightness: Adjusts the base level of the signal in the picture. You may use
Brightness when the dark part of the picture is saturated.
Color: Adjusts intensity of all colors.
Sharpness: Adjusts the level of crispness in the edges between the light
and dark areas of the picture. The lower the level, the softer the image.
3. Press Menu button to return to the main menu.
Picture Mode: Go a long way to giving you the best possible image.
The Picture menu offers options to enhance and refine the picture displayed on
your TV based on ambient room light and personal preferences.
Press Menu button, then press Left and Right button to select PICTURE MENU.
PICTURE MENU
Page 22

21
1.
Use Up/Down buttons to highlight Color Temperature and press OK to
enter
sub-menu.
2. Press Up and Down buttons to select Off, Low, Middle or High.
Noise Reduction: Remove irregular and erratic pixels for a clearer image.
1. Use Up/Down button to highlight Aspect Ratio and press OK to enter
sub-menu.
2. Press Up and Down button to select Full, 4:3 or Auto.
Aspect Ratio: Adjust picture size.
Press Up/Down to highlight Energy Saving and Press OK button to switch it
between Standard, High and No. It can reduce the TV’s power consumption
by lowering the backlight level.
Energy Saving: Adjust brightness of TV's screen.
Use Up/Down button to highlight Color Temperature and press OK to enter
sub-menu.
Press Left and Right buttons to adjust the mode between Standard(balanced),
Warm(reddish),User(adjustable) and Cool(bluish).
Color Temperature: Adjust picture color temperature.
Use Up/Down buttons to choose Screen Mode.
Press OK to switch PC(100%)
or Video(97%).
Screen Mode: Available under HDMI signal to adjust the picture ratio.
Run this setting when the picture color is abnormal.
Press OK to switch it among Auto, RGB Full or RGB Limited until the picture
color can normally display.
Color Space: Available under HDMI signal to adjust picture color.
Page 23

22
The Sound menu offers options to enhance and refine the sound setting on your
TV based on personal preferences.
Press Menu button to display the main menu. Press Left/Right buttons to
access
SOUND MENU.
SOUND MENU
Press Up/Down to highlight Auto Volume, and press OK button to switch it On
or Off.
Auto Volume: Set the digital audio out setting.
Press Up/Down to highlight SPDIF Mode, and press OK button to adjust it
among Bistream, Off or PCM.
PCM (Pulse-code modulation)- Modifies the incoming audio signal and
outputs in 2-channel stereo sound.
Bistream- Does not make any changes to the incoming signal and passes
through the original Dolby sound output.
Off- Turns off the Optical audio signal.
SPDIF Mode: Set optical audio output.
1. Press Up/Down to highlight Balance, and press OK to enter sub-menu.
2. Press Left/Right buttons to adjust the value.
Balance: Adjust the left/right sound of speaker to suit your taste and room
situations.
Highlight Sound Mode and press OK to enter. Press Left/Right buttons to pick
Sound Mode among Standard, Music, Movie, Sport, User Mode.
You can adjust the value of Bass and Treble under User Mode.
Treble: Adjusts the high frequency intensity setting.
Bass: Adjusts the low frequency intensity setting.
Sound Mode: Adjust for optimum sound quality.
Page 24

23
1. Press Up/Down to highlight Audio Delay, press OK to enter.
2. Press Up/Down buttons to select SPDIF Delay or Speaker Delay. Speaker
Delay is to adjust the setting to fix any lip sync issues; SPDIF Delay is to
adjust the setting to fix any lip sync issues when the TV is connected to an
external amplifier.
3. Press Left/Right buttons to adjust the delay time.
Audio Delay: Fix audio and lip sync issues.
Press Up/Down to highlight Power On Music, and press OK button to switch
it On or Off.
Power On Music: Set music on or off when turning on TV.
To access Time menu, press the MENU button, then to use Left/Right buttons
to
select TIME menu.
TIME MENU
Select your time zone.
1. Press Up/Down buttons to select Time Zone and Press OK to enter.
2. Press Navigation keys to select Time Zone.
Time Zone:
Set the timer in minutes for when you would like the TV to turn off.
1. Press Up/Down buttons to select Sleep Timer and Press OK to enter.
2. Press Up/Down button to set the time.
Sleep Timer:
Page 25

24
Press Up/Down buttons to select HDMI EDID and press OK to switch it
between EDID1.4 (supports 4K@30Hz) or EDID 2.0 (supports 4K@60Hz) until
your device can work properly.
HDMI EDID: Deal with picture problem when connecting a HDMI device.
Press Up/Down buttons to select HDMI CEC and Press OK to enter.
1.
HDMI CEC On/Off: Turn On CEC to activate Auto Standby and ARC settings.
2. Auto Standby On/Off: When turned On, the CEC-enabled external device
will go into standby when the TV is placed in standby.
3. ARC On/Off: (Only available under HDMI 2) When turned On, send audio
back to the ARC-enabled
external audio device.
4.
Auto Power On: Press Left/Right buttons to Auto Power, and press Up/Down
Buttons to select On or Off. Turn on to activate the TV on when switch on the
external DVD.
HDMI CEC:
Hearing impaired subtitles translate all the sound in the show into words.
(Only available in DTV mode and must be supported by viewing program)
Press Up/Down buttons to highlight this item, and press OK to switch it On or Off.
Restore Default: Reset to factory default settings.
Press Up/Down buttons to highlight Restore Default, and press OK.
There will be a dialogue box to remind Yes or No.
Subtitle Hearing Impaired:
The Option menu offers options to set the TV operating environment.
To access Option menu, press the MENU button, then to use Left/Right
buttons to select OPTION menu.
OPTION MENU
Page 26

25
MFC:(Motion Flow Compensation)
MFC effect technology removes drag from fast scenes with a lot of movement
to provide a smoother picture. Press OK to enter and use Up/Down button to
set MFC effect as Off/Low/Middle/High.
Set personal password. Press Up/Down buttons to highlight Set Password
and press OK button to enter.
Set Password:
Enables or disables the blocking scheme you set up previously.
Lock System:
Press Up/Down buttons to highlight System Information, and press OK to see
the system Information.
System Information:
Press Up/Down buttons to highlight Active Standby Mode, and press OK to
switch it On or Off. Switch this setting on, the television can be turned on by
pressing the Cast icon on your mobile device when it is in Standby mode.
Active Standby Mode:
Press Up/Down buttons to highlight Ambient Mode, and press OK to switch it
On or Off. If it is turned on, the television will automatically switch to cast mode
when pressing Power button and the screen's light becomes darker.
Ambient Mode:
Press the MENU button, then to use Left/Right buttons to select LOCK menu.
A password is required to gain access to this menu. Press OK button and
input the factory default password “0000” using the number buttons on the
remote control.
LOCK MENU
Page 27

26
Parents can set age limit level by this function (System Lock should be
switched
On). Press Up and Down to select Parental Lock, then press OK to enter the
setting.
Parental Guidance:
EPG TV Guide (for DTV mode only)
EPG stands for Electronic Program Guide. It is supplied by the program
providers and offers information about the programs to be broadcast.
1. Press EPG button on the remote control to display the EPG interface.
2. Press Left/Right buttons repeatedly to sort the available channels by
scheduled time or Channel name.
3. Press the Up/Down buttons to select a different channel/program in the list
and press OK to activate the channel.
Color Function buttons
Press RED Button to display the program index.
Press GREEEN Button to display full program information.
Press YELLOW Button to schedule the program.
Press BLUE Button to set a reminder for the selected program.
EPG (Electronic Program Guide)
Page 28

27
If you experience any problems with your TV, check the list below and take
any necessary steps before calling for service. If none of the solutions help
you solve the problem, turn the power off and contact the after sales support
line for advice.
Before calling a service center, attempt the following steps to diagnose the
problem.
1. There is no power.
Ensure the power plug is securely inserted into the unit and wall outlet.
2. There is no picture or sound.
Try a different input source to check whether the source is at fault.
Check for mis-connection of cables or for wrong input source.
3. There are spots on the screen.
Your unit is being affected by interference from automobiles, trains,
high-voltage transmission lines, neon signs or another sources of
interference. Try redirecting or relocating your antenna to reduce the
affects of the interference.
4. Degraded colors or tints.
Check whether all the picture adjustments have been properly performed.
5. Improper Screen position or size.
Try selecting a different aspect ratio by pressing the <ASPECT> Button on
the remote control.
6. The image appears distorted.
Ensure the display aspect ratio is corredctly set to suit the program
source.
7. The image appears too bright,and there is a loss of definition in the
brightest areas of the image.
Reduce the contrast settings.
8. The image apperas too washed out, or the darkest areas of the image
appear too bright.
Reduce the brightness level till the black areas of the picture appear as
black.
9. Remote Control does not function properly.
Check for incorrect battery orientation.
Check for dead batteries.
Check your distance and angle from display.
Check whether remote control is pointing at sensor window;
Check for any obstacle between the Remote Control and Remote Control
sensor.
Check that the Remote Control sensor window is not under strong
fluorescent lighting.
Page 29

28
Check for any devices (PC or personal digital assistant, PDA) nearby
that transmit infrared signal which may cause interference to signal
transmission between the Remote Control and the unit.
Turn off the infrared function of these devices.
10. There is no picture or sound,just noise.
Make sure the antenna cable is properly connected.
Change channels to confirm if the symptom is still present.
11. Picture is not clear.
Make sure the antenna cable is properly connected.
Change channels to confirm if the symptom is still present.
12. No sound.
Check whether you have selected the Mute function.
Make sure the volume is not set to minimum.
Antenna
1. The picture is not sharp.
The reception may be weak.
Change channels to confirm if the symptom is still present.
Make sure the outside antenna is not disconnected.
Make sure the antenna is facing the right direction.
2. The picture is doubled or tripled.
Make sure the antenna is facing the right direction.
Picture ghosting is caused by reflections from buildings, large metal
structures and mountains.
Carefully realign your antenna to minimize the ghost images. Ultimately a
higher quality antenna professionally installed may be necessary to
reduce the ghosting.
3. The picture is spotted.
There may be interference from automobiles, trains, high voltage lines,
neon lights, etc.
There may be interference between the antenna cable and power cable,
try positioning them further apart.
4. There are stripes on the screen or colors fade.
Is the television receiving interference form other devices? Transmission
antennas of radio broadcasting stations and transmission antennas of
amateur radios and cellular phones may also cause interference. Use the
television as far away as possible from devices that may cause possible
interference.
Page 30

29
Supports HDMI-PC Input Signal
Your SONIQ TV unit can also be used as a HDMI-PC monitor, which supports
below modes:
HDMI/1/2/3 input
Page 31

30
~220-240V AC, 50Hz
310W
8W + 8W
1679(L) x 289(W) x 1026(H)mm
Unit Dimension
with Stand
1650.2(H) x 928.3(V)
3840 x 2160 pixels
290 cd/m
2
5000:1 Typ
Earphone x 1Earphone out
Digital Audio Optical Out x1Digital Audio Out (Optical)
LAN x 1LAN
HDMI x 3
SERVICE x 1SERVICE
Wireless LAN
Specification
Output Power(max)
2.4~2.4835 GHz 19dbm ,
5.150~5.725 GHz 16.5dbm,
5.725~5.825 GHz 15dbm
Frequency Band
2.4~2.4835 GHz ISM Band,
5.150~5.825 GHz ISM Band
Standard 802.11a/b/g/n
3840x2160(24/25/30/50/60Hz)
VHF 06 to 12Programme
UHF 27 to 69Coverage
10-bit(D), 1.07 Billion colorsColor Depth
We reserve the right of final interpretation.
 Loading...