

Page 1

Web: www.soniqav.com
Customer Hotline: 1300 765 663
Page 2
Please take the time to familiarize yourself with your new system before using it for the first time so that it
can bring you best performance over a long and trouble free service life.
Important recommendations
* Please keep these operating instructions in a safe place for future reference.
* Avoid installing the system in the locations described below:
Places exposed to direct sunlight or close to heat sources such as electric heaters.
Over other stereo system components that release excessive heat.
Poorly ventilated or dusty places.
Places exposed to constant vibration.
Damp places.
* Avoid obstructing ventilation openings.
Always use the switches and knobs as described in these instructions.
* Before powering up the system for the first time, ensure that the electric power cord is installed
correctly.
* Store your cassettes or CDs in a cool place to avoid heat damage.
Never attempt to remove screws or open the system's case. There are no user serviceable parts inside.
Always refer servicing to qualified service personnel.
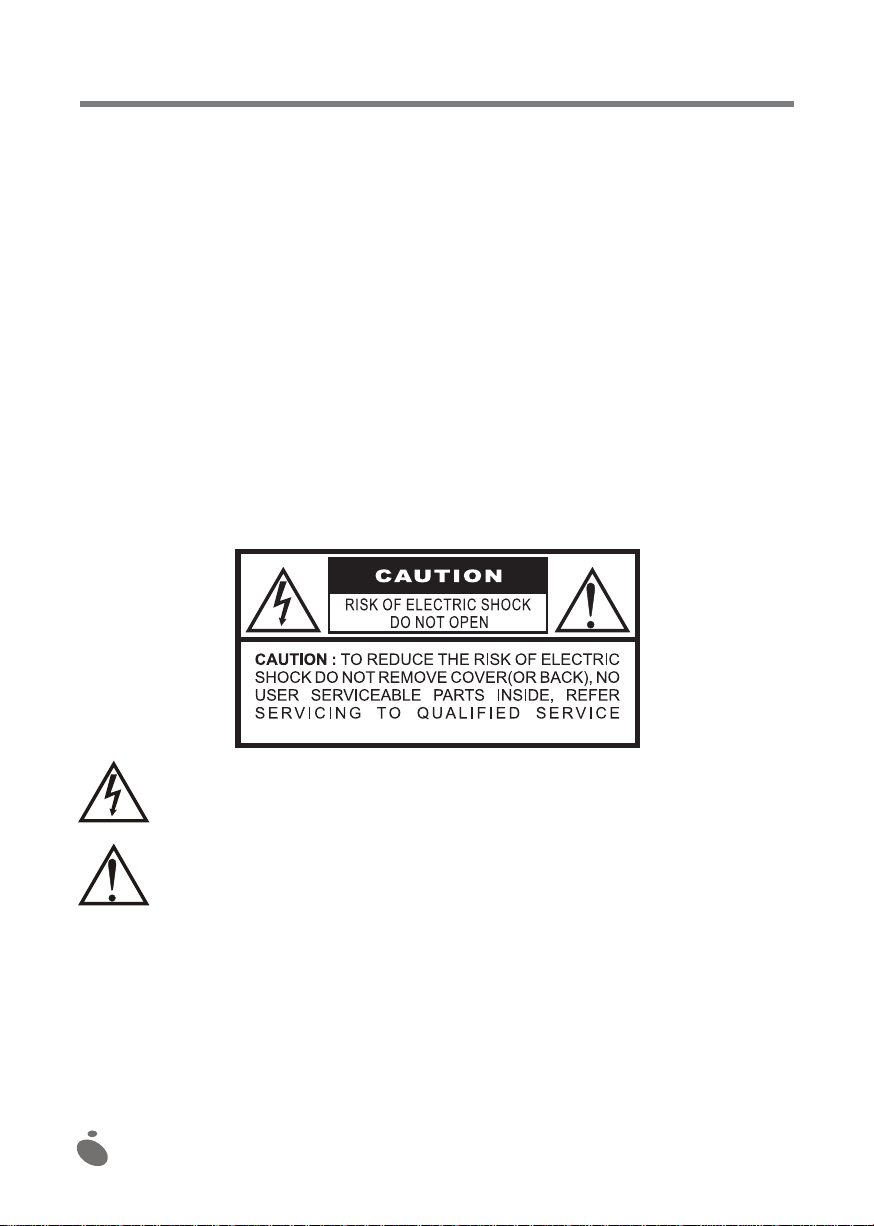
DANGER
RISK OF ELECTRIC SHOCK
DO NOT OPEN
WARNING: TO REDUCE THE RISK OF ELECTRIC
SHOCK, DO NOT REMOVE COVER (OR BACK). NO
USER SERVICEABLE PARTS INSIDE. REFER
SERVICING TO QUALIFIED SERVICE PERSON
DANGEROUS VOLTAGES
This system contains dangerous voltages of sufficient magnitude to present a risk of electric
shock
WARNING
This manual contains important operating and maintenance instructions. For your own
safety, you should always refer to this manual.
DANGER: TO AVOID ANY FIRE HAZARD OR RISK OF ELECTRIC SHOCK, NEVER EXPOSE THIS
SYSTEM TO DAMP CONDITIONS OR TO LIQUID PROJECTIONS.
Note:
This system will tend to heat up when used for long periods of time. This is a normal phenomenon and not
an indication of any problem affecting the system.
This CD player contains microprocessors that may be affected by electrical or outside interference. If the
CD player does not work properly, disconnect it from the mains power supply, then reconnect it.
1
Page 3
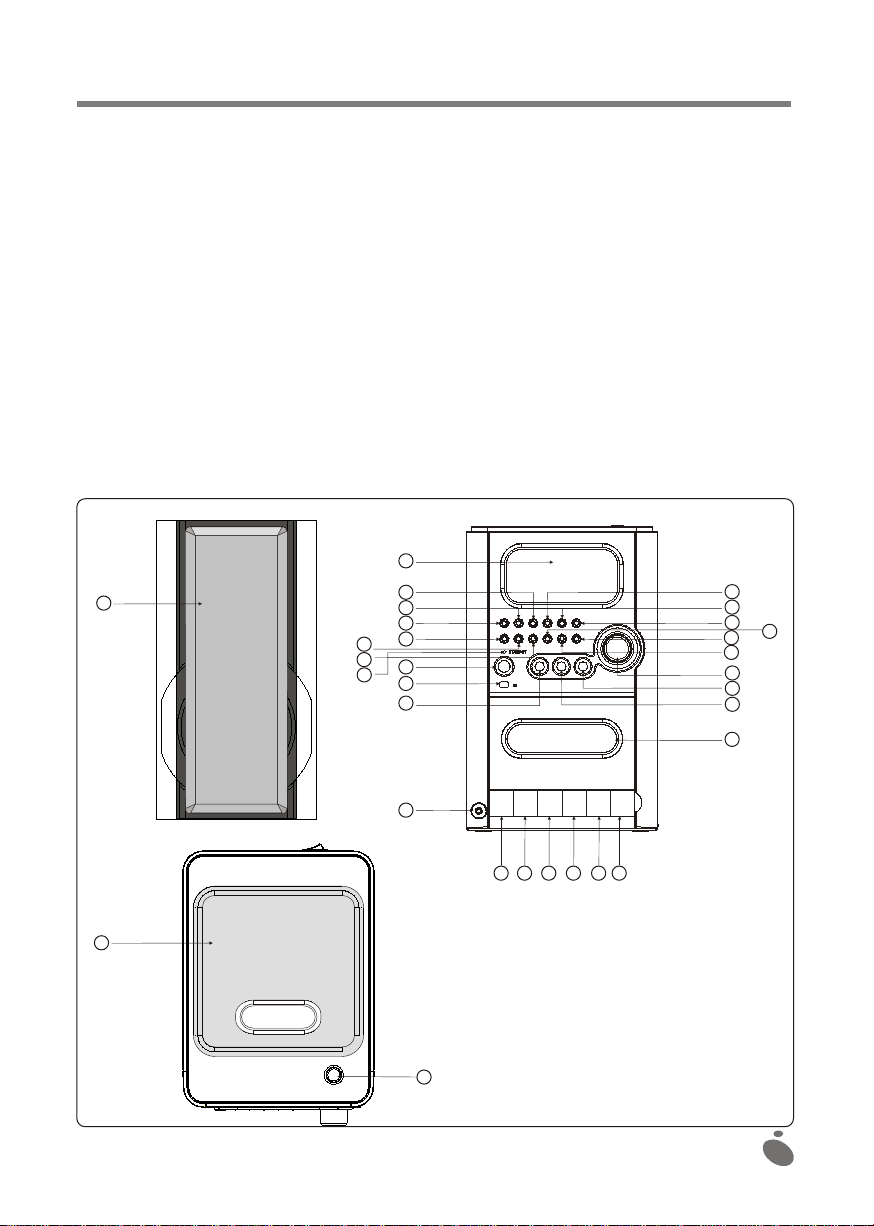
LAYOUT OF CONTROLS AND OTHER COMPONENTS
1. SPEAKER
2. CD TRAY
3. CD TRAY AUTOMATIC OPEN/CLOSE BUTTON
4. MULTIFUNCTION DISPLAY
5. RANDOM BUTTON
6. SLEEP/TIMER BUTTON
7. PRESET EQ BUTTON
8. MUTE BUTTON
9. SNOOZE BUTTON
10. MODE/TIME REMAIN BUTTON
11. ON/STANDBY INDICATOR LIGHT
12.
POWER/STANDBY BUTTON
13. INFRARED SENSOR
14. CD BUTTON
15. REPEAT/REVIEW MEMORY BUTTON
16. TUNING/SKIP/SEARCH UP BUTTON
1
9
10
11
17. PLAY PAUSE/PAUSE BUTTON
18. MEMORY/SET TIME BUTTON
19. STOP/BAND BUTTON
20. TUNING/SKIP/SEARCH DOWN BUTTON
21. VOLUME KNOB
22. TUNER BUTTON
23. TAPE BUTTON
24. HEADPHONE JACK
25. CASSETTE RECORD BUTTON
26. CASSETTE PLAY BUTTON
27. CASSETTE REWIND BUTTON
28. CASSETTE FAST FORWARD BUTTON
29. CASSETTE STOP/EJECT BUTTON
30. CASSETTE PAUSE BUTTON
31. CASSETTE DOOR
4
5
6
7
8
12
13
14
15
16
17
18
19
20
21
22
23
31
24
25 26 27 28 29 30
2
3
2
Page 4
LAYOUT OF CONTROLS AND OTHER COMPONENTS
32. CASSETTE KNOB DOOR
33. MEMORY BACKUP BATTERY COMPARTMENT COVER
34. FM ANTENNA
35. FM ANTENNA TERMINAL (75 OHM - OPTIONAL)
36. AM ANTENNA TERMINAL (OPTIONAL)
37. RESET BUTTON
32
38. SPEAKER TERMINALS
39. BEAT CUT/FM MONO/STEREO
40. MAIN SYSTEM POWER SWITCH
41. VOLTAGE SELECTOR (110/220 V - OPTIONAL)
42. MAINS POWER CORD
33
34
35
36
40
41
42
37
38
39
3
Page 5

REMOTE CONTROL
1. ON/STANDBY BUTTON
2. PRESET EQ BUTTON
3. TUNING/SEARCH DOWN BUTTON
4. FUNCTION SELECTOR(CD/RADIO/CASSETTE)
5. INTRO BUTTON
6. SLEEP BUTTON
7. TIMER BUTTON
8. MUTE BUTTON
9. STOP/BAND BUTTON
STANDBY-ON
1
2
3
4
5
6
7
8
EQ
FUNCTION
INTRO
TIMER
MUTE
STOP/
BAND
SKIP/SEARCH
MEMORY
C.-ADJ
SNOOZE
SLEEP
VOLUME
DOWN UP
PLAY/
PAUSE
REPEAT/
M-UP
10. PLAY/PAUSE BUTTON
11. TUNING/SKIP/SEARCH UP
BUTTON(FORWARD)
12.
MEMORY C.-ADJ BUTTON
13. REPEAT/MEMORY UP BUTTON
14. SNOOZE BUTTON
15. VOLUME DOWN BUTTON
16. VOLUME UP BUTTON
17. BATTERY COMPARTMENT COVER
9
10
11
12
13
14
15
16
17
4
Page 6

FITTING THE BATTERIES
INTO THE REMOTE CONTROLLER
Press down the battery compartment cover and
slide it open. Place the two LR6 (UM3/AA) batteries
into the battery compartment taking care to match
the "+" and "--" polarities shown in the compartment
and on the batteries. Refit the cover over the battery
compartment, pressing down on it slightly and pushing
it up until it clicks into place.
NOTES: Remove the batteries from the remote
control if you do not intend to use it for a prolonged period.
Never mix normal and rechargeable batteries.
When the batteries are worn out, the remote control will
no longer work. Replace them with new batteries.
CONNECTING THE SPEAKER CABLES TO THE TERMINALS
1. Connecting the speakers
Roll out the SPEAKER CABles and connect them to the SPEAKER TERMINALS. The red wire connects
to the red terminal and the black wire to the black terminal.
2. Connecting the mains power cord
Before using the system, connect the mains power cord to a wall outlet, then move the system's main
power button to the ON position.
OPERATING THE SYSTEM
When the system is connected to the mains power outlet, it is placed in Standby mode. You can press the
POWER button on the system (or on the remote control) to switch the system ON or OFF (Standby). To
completely power down the system, disconnect the mains power cord from the wall outlet.
SWITCHING ON/STANDBY
1. Press the system's POWER button (or that on the remote control) to switch the system on.
2. Select an audio source (CD, Tuner or Tape) by pressing the corresponding source button. The
appropriate indicator will come on.
3. Adjust the volume level using the VOLUME knob (or UP or DOWN buttons).
4. Select a preset equalization setting (Classic, Rock or Pop) using the PRESET EQ button on the
system (or the remote control).
5. Press the POWER button again to switch the system off.
CLOCK SETTING
With the function selector in the Standby position
1. Press the MEMORY/CLK. ADJ button until the 24 hour range time digits are displayed and blink.
2. Press the TUNING/SKIP/SEARCH (UP or DOWN) buttons to select a 24 or 12 hour display.
3. Press the MEMORY/CLK. ADJ button once again: the hour or minute digits blink. Press the
TUNING/SKIP/SEARCH (UP or DOWN) buttons to adjust the hour or minute settings.
4. Each of the settings can be validated as described above or they are aborted if no button is pressed
for ten seconds.
5
Page 7

TIMER SETTING
90 80 70 60 50 40 30 20 10
1. Once the clock has been set, press the TIMER button and hold it down for three seconds: "TIMER" is
shown on the display and it blinks.
2. In 24 hour display mode, "0:00" is displayed.
3. Press the MEMORY/C-ADJ button and hold it down for three seconds: the hour digits start to blink.
Set them by pressing the TUNING/SKIP/SEARCH (UP or DOWN) buttons.
4. Press the MEMORY/C-ADJ button once again: the minute digits start to blink. Set them by pressing
the TUNING/SKIP/SEARCH(UP or DOWN) buttons.
5. Press the REPEAT/MEMORY UP button to set the programmed start time (TIMER ON).
6. At the programmed time, the system will automatically switch on and play music and the "TIMER"
indication will blink.
7. One hour later, the system will switch off automatically.
SETTING THE SLEEP FUNCTION
1. If you would like to fall asleep listening to music, press the TIME/SLEEP button on the system
(or on the remote control).
2. You can set the Sleep function so that the Tuner or CD player continues to play for 90, 80, 70
minutes, or less, down to ten minutes, before the system automatically switches off.
SNOOZE FUNCTION (accessible by remote control)
1. To use the Snooze alarm function in the TIMER ON mode, press the SNOOZE button: the system
switches to STANDBY mode and "SNOOZE" is shown on the display.
2. Five minutes later, the system automatically starts, changing to the TIMER ON mode and starts to
play music, "TIMER" blinks on the display.
3. The system automatically switches off one hour later.
RADIO OPERATION
Press the TUNER button on the system (or on the remote control) to select the Tuner function.
1. Press the TUNER button: the frequency band is displayed.
2. Select the desired frequency band by pressing the STOP/BAND button.
Manual tuning
1. To tune in to weak stations, perform a manual search by continually pressing the
TUNING/SKIP/SEARCH (UP or DOWN) buttons until the correct frequency is displayed or until good
quality reception is obtained.
2. If you would like to select an FM stereo station, place the FM MODE selector in STEREO mode
First.
Once you have tuned into an FM stereo station, the indicator appears on the display
and you can listen to FM stereo programs. (To select the "FM MODE", act on the "BEAT CUT/FM
MONO/STEREO" switch located on the back of the system).
3. If you place the FM MODE selector in the MONO position, the FM STEREO indicator goes out and
the system returns to FM MONO mode program reception.
Automatic tuning
1. Press the TUNING/SKIP/SEARCH UP or DOWN) buttons for one second or more, then release the
button. The tuner will automatically search for the first station broadcasting a sufficiently strong signal.
2. Repeat the above procedure if you would like to select another station.
6
Page 8

Programming presets
You can also preset the stations of your choice and program up to ten AM stations and ten FM stations in
the system's memory. To store radio stations:
1. Press the STOP/BAND button on the system (or the remote control) to toggle between AM and FM
bands to make your selection.
2. Tune the receiver to the desired station.
3. Press the MEMORY/CLK. ADJ button.
4. Press the REPEAT/MEMORY UP button until the desired preset number is displayed.
5. Press the MEMORY/CLK. ADJ button once again to confirm your selection.
6. To program other stations in memory, repeat operations 2 to 5 above.
7. To change the station presets, repeat operations 2 to 5 above.
Notes:
1. Storing a new station in a previously used memory location will clear the station previously stored in
this location.
2. Any power break or unplugging the mains power cord will clear all of the presets stored in memory.
Perform the station preset procedures once again to store them in memory.
Selecting preset stations
1. Press the STOP/BAND button to select the required frequency band.
2. Press the REPEAT/MEMORY UP button to select the required preset number.
3. The memory location where the station is stored is displayed along with the corresponding radio
frequency.
FM antenna
An FM wire antenna is provided for better FM reception.
USING THE CASSETTE DECKPlaying a cassette
To play a cassette, press the button to open the cassette door.
Before playing, take up any slack in the cassette tape. To do this, use a pencil or pen. Simply insert the
pencil or pen through the center of the reel and turn it in order to take up any slack. Press the CASS.
STOP/EJECT button to open the cassette door.Insert the cassette into the compartment with the
opening in which the tape is exposed facing down and the full reel to the left, press the cassette all the
way in and close up the door. Always avoid touching the tape surface. Select "TAPE" on the function
selector and press the PLAY button. To stop play,
press the CASS. STOP/EJECT button again. To eject the cassette, press the CASS. STOP/EJECT
button once again.
Recording programs from the radio
Move the function selector to RADIO, select AM or FM by pressing the STOP/BAND button and tune the
receiver to the desired station (refer to the heading on using the radio). Insert the cassette into its
compartment and press the RECORD button. Press the CASS. STOP/EJECT button to stop recording.
You can use the CASS. PAUSE button to stop recording for short periods. Press the CASSETTE F.FWD
button to move to fast forward. Press the CASSETTE REWIND button to quickly rewind the tape.
Recording a CD
Move the function selector to CD. Select the tracks to be recorded. Insert a cassette into the
compartment and press the CASS. RECORD button. Press the CASS. STOP/EJECT button to stop
recording.
Listening to music using headphones
The system includes a headphone jack. To use the headphones, press the jack plug on the headphones
all the way into the jack.
7
Page 9

Automatic stop
When the cassette comes to its end in PLAY or RECORD modes, the built-in automatic stop system
ensures that the PLAY or RECORD buttons pressed down are released. This system works whether a
RADIO or CD program is being recorded. Only the Cassette function is automatically stopped, the
RADIO or CD player continues to operate.
Types of cassettes
Only use good quality IEC TYPE 1 cassettes for making recordings. The system can read other type of
cassettes, but it cannot make good quality recordings onto these more specialized tapes. The use of
C120 cassettes is not recommended with this tape deck.
Protecting recordings
Normally, everything present on the tape is automatically erased when a new recording is made over it.
You can however protect your recordings against accidental erasure by removing the
tabs located on the rear of the cassette.
When the cassette is held with the recorded side up and the
exposed tape facing forward, the corresponding protection tab is
the one located on the left rear of the cassette. All pre-recorded
cassettes are protected in this way against accidental erasure of
the commercial recordings that they contain. “Protected”
cassettes will not allow you to press the Record button. It you
attempt to make a recording and find it impossible to press this
button down, never force the mechanism for this may cause
damage to it. Ensure that a cassette has been loaded and that its
protection tab has not been removed. It is possible to record on a
cassette after its protection tabs have been removed by covering
the open slots with a piece of self adhesive tape.
SIDE A
A
Maintaining the cassette tape mechanism
Carefully clean the heads and the pinch roller/capstan assembly after every ten hours of use so as to
remove all traces of oxide deposits. Various maintenance products specifically designed for cassette
decks are available on the market.
The erase and record/play heads as well as the pinch roller surface are delicate components that must
absolutely not come into contact with metal objects such as screwdrivers. You will find it easier to clean
the complete assembly by pressing the PLAY button so as to raise the heads and the pressure roller into
clear sight. Never forget to press the CASS. STOP button after cleaning the mechanism. The pinch roller
may become damaged if the deck is left in play mode after powering down. Never attempt to lubricate
any of the parts in this system.
WARNING
Disconnect the system from the mains power outlet when it is not in use. Never expose it to rain or damp.
PLAYING A COMPACT DISC (CD)
1. To play a CD, start by pressing the CD OPEN/CLOSE button and the CD door will open automatically.
2. Place a CD into the compartment and press the CD OPEN/CLOSE button once again and the door
will close automatically.
Playing the entire disc
1. Playback will start when the PLAY/PAUSE button is pressed. Playback starts from the first track. The
display shows the current track number and the elapsed time since the start of the track.
8
Page 10

2. To stop playback, press the PLAY/PAUSE button. The elapsed time display starts to blink.
3. To resume playback, press the PLAY/PAUSE button once again.
4. To definitively stop playback, press the STOP/BAND button.
Selecting a different track during playback
1. Press the TUNING/SKIP/SEARCH (UP or DOWN) button on the system (or the remote control), until
the desired track number appears on the display.
2. Press the PLAY/PAUSE button to start playback.
Repeat play
1. While playing a CD, if you would like to repeat only one track, press the REPEAT/MEMORY UP
button on the system (or the remote control) once: the "REPEAT" indicator comes on and blinks.
2. If you would like to repeat all of the tracks on the disc, press the REPEAT/MEMORY UP button twice:
the "REPEAT" indicator comes on but does not blink.
3. To disable the repeat function, press the STOP/BAND button or press the REPEAT/MEMORY UP
button until the "REPEAT" indicator is cleared from the display.
Random play
1. Press the RANDOM button once and the "RANDOM" indicator will come on.
2. The tracks will be read in random order.
3. Press the STOP/BAND button to disable the random play mode.
INTRO PLAY(accessible from the remote control)
1. During the stop condition, pressing the INTRO button to start the intro playing.
After that the 10 seconds of each song will be played.
2. If the INTRO button is pressed again, the CD will change to the normal playing mode.
Stop play
1. Press the STOP/BAND button if you wish to stop playback. The number of tracks that can be played
from the disc are displayed.
2. Open the CD door to remove the CD.
Programming the CD player
By programming the CD player, you can play up to 20 tracks in the order of your choice (this is only
possible when the CD player is stopped).
1. Place the disc into the compartment prior to programming. Press the MEMORY/CLK. ADJ button.
2. The display shows MEMORY TRACK and P-01.
3. Press the TUNING/SKIP/SEARCH (UP or DOWN) button to select the first track to be
programmed.
4. Once the desired track appears on the display, press the MEMORY/CLK. ADJ button once again.
5. The display will show MEMORY TRACK and P-02.
6. Repeat this procedure to select other tracks on the disc to be programmed in memory.
7. In radio MODE, when the frequency is displayed, this button is used to activate the memory save
mode for five seconds.
Clearing a program
To clear a program:Press the MEMORY/CLK. ADJ button and then the STOP/BAND button in stop
mode or power down the system or open the CD door.
Note: If you create a new program, the current program will be deleted.MUTE (accessible from the
remote control)
1. If you press the MUTE button on the remote control, the corresponding indicator will come on
and the audio output will be temporarily cut.
2. Press the MUTE button again: the indicator goes off and the audio output resumes normally.
9
Page 11

USING THE MODE/REMAIN BUTTON
Press the MODE/REMAIN button to change the display as shown below.
1. In radio mode: Frequency display >> Time display >> Timer ON time display.
2. In CD mode:
(During playback) Elapsed play time display >> Remaining time display>> Clock
display >> Timer ON time. (While stopped) Total time >> Clock display >> Timer ON time.
PRESET EQ SETTING
Press the PRESET EQ button on the system (or the remote control) and the LCD will show the
selected equalization setting (CLASSIC or ROCK or POP).
CLASSIC ROCK POP
NORMAL
MEMORY BACKUP
Fit three 1.5 V AA (UM-3 / LR6) or equivalent batteries in the system's battery compartment. These
batteries are used to back up the microprocessor's settings memory.
RESETTING
If the display show unusual indications or if the buttons do not work properly, then press the Reset button
on the back of the system.
BEAT CUT/FM MODE (MONO/STEREO) SWITCH
If a beat can be heard during recording, move the BEAT CUT/FM MONO/STEREO switch on the back of
the system to the BEAT CUT position (in AM mode only).
NOTES ON COMPACT DISCS
1. Always use compact discs that bear the following logo.
2. Notes on handling discs
When removing the disc from its storage case and loading it into the player:
* Never touch the reflective surface (recorded side).
* Never affix any paper to the discs recorded surface or write anything on it.
* Never bend the disc.
3. Storage
* Always store the disc in its case.
* Never expose compact discs to direct sunlight or high temperatures, to excessive dampness or dust.
4. Cleaning a disc
* If the disc requires cleaning, remove any dust and fingerprints using a soft cloth.
* Always clean the disc by wiping from the center towards the outside edge.
10
Page 12

FROM THE CENTRE TO THE EDGE
* Never use benzene, thinners, cleaning fluids for analog (vinyl)
records or anti-static sprays.
* Always ensure that the CD door is closed correctly to avoid
contaminating the laser lens with dust.
Avoid touching the lens.
MULTIFUNCTION DISPLAY WINDOW
A. TRACK NUMBER INDICATOR
B. BAND INDICATOR
C. TRACK/TIME INDICATOR
E
F
A
B
SPECIFICATIONS
VOLTAGE/FREQUENCY : AC 230V ~ 50Hz
OUTPUT POWER LEVEL: 2 x 4.5 Watts RMS
SPEAKER DIMENSIONS: 133 (W) x 185 (D) x 250 (H) mm
D. STEREO MODE INDICATOR
E. PRESET EQ
F. ALARM REPEAT INDICATOR
C
RADIO SECTION
FREQUENCY RANGES: FM 87.5 - 108 MHz
AM 520 - 1710 kHz
D
CASSETTE SECTION
TAPE SPEED: 4.75 cm/sec.
FREQUENCY RESPONSE: 125 Hz 8 kHz
CD PLAYER SECTION
OPTICAL SENSOR: THREE-BEAM LASER
FREQUENCY RESPONSE: 100Hz 16kHz
11
Page 13

SPECIFICATIONS ARE SUBJECT TO CHANGE WITHOUT NOTICE.
SYMPTOM POSSIBLE CAUSE SOLUTION
No sound. Incorrect or loose connections.
Volume knob not turned up.
Check all of the connections
and correct them where
necessary. Turn the volume
knob up.
Bad radio reception. The built-in AM loop antenna is
not correctly positioned. The
FM wire antenna is not
correctly deployed and
positioned.
In AM mode only, change the
system's position and
orientation. Deploy the FM
wire antenna in the position that
offers best reception.
Cannot record to a cassette. The cassette's protection tab has
been broken off.
Replace the tab with a piece of
self adhesive tape.
The recorded sound is not
very clear when played.
The record/play head is dirty. Clean and demagnetize the
record/play head.
Excessive tape wow, flutter
or sound skips.
The capstan and pinch roller are
dirty.
Clean the capstan and the pinch
roller.
Incomplete tape erasure. The erase head is magnetically
charged.
Demagnetize the erase head.
Cannot read a CD. The disc is dirty. The disc is
upside down. The CD player is
in Pause.
Clean or replace the disc. Turn
it over so that the label faces
up. Release the Pause mode.
Cannot use the remote
control.
There is an obstacle blocking
the signal between the remote
control and the sensor on the
system. The batteries are too
weak.
Remove any obstacle. Replace
the batteries.
None of the functions work. The microprocessor has been
affected by outside electrical
interference.
Switch off the system for a few
minutes, then switch it back on
again.
Dripping warning:
"Never expose this system to dripping liquids or to splashing and never place any liquid filled object,
such as a vase for example, on top of this system".
Ventilation warning:
"Never interfere with the normal ventilation provided for this system when in normal use".
Troubleshooting:
If you encounter a problem with your system, first check the possible solutions described in the table
below before seeking help from a service center. If you cannot solve the problem by following these
instructions or if the system has suffered physical damage, contact a qualified person such as your
dealer, for servicing.
12
 Loading...