

Page 1

HOTLI NE
AUSTRALIA : 1300 765 663
NEW ZEALAND : 0800 100 236
2.1 Bluetooth Soundbar
MD120706-01
www.soniq.com.au
MB10-AU
Page 2
Instruction Manual
Safety Instructions
MB
Instruc tion Man ual
Thank you f or purch asing th e MB10 Mic ro syste m. We strongly suggest
that you st udy thes e operat ing inst ructio n carefu lly befo re attem pting
to operat e the unit , and that y ou note al l of the lis ted prec aution s.
CONTENT S
Safety In struct ion
Introdu ction
Functio n&Cont rols
Basic Ope ration
USB Opera tion
Bluetoo th Opera tion
FM Operat ion
Specifi cation s
Trou ble Shoo ting
Care & Main tenanc e
10
Page 2-3
Page 4
Page 5
Page 6-8
Page 8
Page 9
Page 10
Page 11
Page 11
Page 12
SAFETY INSTRUCTIONS
CAUTION : TO REDUCE THE RISK OF ELECTRIC SHOCK, DO NOT
REMOVE ANY COVER. NO U SER-SE RVICEABLE PARTS INSIDE,
REFER ANY SE RVICING TO QU ALIFIED SERV ICE PERS ONNEL.
IMPORTANT SAFETY INSTRUCTIONS
• Please re ad this ow ner s guid e.
• Please ta ke the tim e to follo w the inst ructio ns in this o wner’s guide
careful ly. It will help you set up and operate your system properly and
enjoy all o f its adva nced fea tures.
• Please sa ve this ow ner ’s guid e for futu re refer ence.
• The product label is located on the back of the product.
• This product must be used indoors. It is neither designed nor tested for
outdoor s, such as i n recrea tion veh icles, o r on boats .
• Heed all warnings - on the prod uct and in t he owner ’s g uide.
• Do not use th is appar atus nea r water or m oistur e. Do not us e this
product n ear a bath tub, was hbowl, k itchen s ink, and l aundry t ub, in a
wet basem ent, nea r a swimmi ng pool, o r anywhe re else th at water o r
moistur e is prese nt.
• Only use at tachme nts/ac cessor ies spec ified by t he manuf acture r.
• Unplug th is apparatus dur ing ligh tning st orms or wh en unuse d for
long peri ods of tim e - to preve nt damag e to this pr oduct.
• Refer all s ervici ng to qual ified se rvice pe rsonne l. Servi cing is re quired
when the ap paratu s has been d amaged i n any way: s uch as liq uid has
been spil led or objects hav e fallen i nto the ap paratu s; the app aratus
has been ex posed to r ain or moi sture, d oes not op erate no rmally, or
has been dr opped - Do n not atte mpt to ser vice thi s produc t yourse lf.
• Opening or removi ng cover s may expo se you to da ngerou s voltag es or
other haz ards.
• To prevent risk of fire or electric shock, avoid overloading wall outlets,
extensi on cords , or integ ral conv enienc e recept acles.
• Use proper power so urces - Pl ug the pro duct int o a proper p ower sou rce,
as descri bed in the o perati ng instr uction s or as mark ed on the pr oduct.
• The mains plug is used as the disconnect device, the disconnect device
shall rem ain read ily acce ssible .
'
1
2
Page 3
Safety Instructions
Introduction
SAFETY INSTRUCTIONS
This symb ol means t hat this u nit is dou ble insu lated. An e arth
connection is not r equire d.
WEEE marking
Disposa l of your ol d produc t
Your pr oduct is d esigne d and manu factur ed with hi gh
quality materia ls and com ponent s, which c an be recy cled
and reused. When th is cross ed out whe eled bin s ymbol
is attach ed to a prod uct it mea ns the pro duct is co vered
by the Euro pean Dir ective 2 002/96 /EC.
Please ma ke yours elf awar e of the loc al colle ction sy stem
for elect rical an d electr onic pro ducts.
Please act accord ing to you r local ru les and do n ot dispo se
of your old p roduct s with you r normal h ouseho ld waste .
The corre ct dispo sal of you r old prod uct will h elp
prevent potenti al negat ive cons equenc es for the
environment and h uman health.
This prod uct comp lies wit h Europe an low vol tage
(2006/9 5/EC)a nd elect romagn etic com patibi lity
(2004/1 08/EC) d irecti ves.
INTRODUCTION
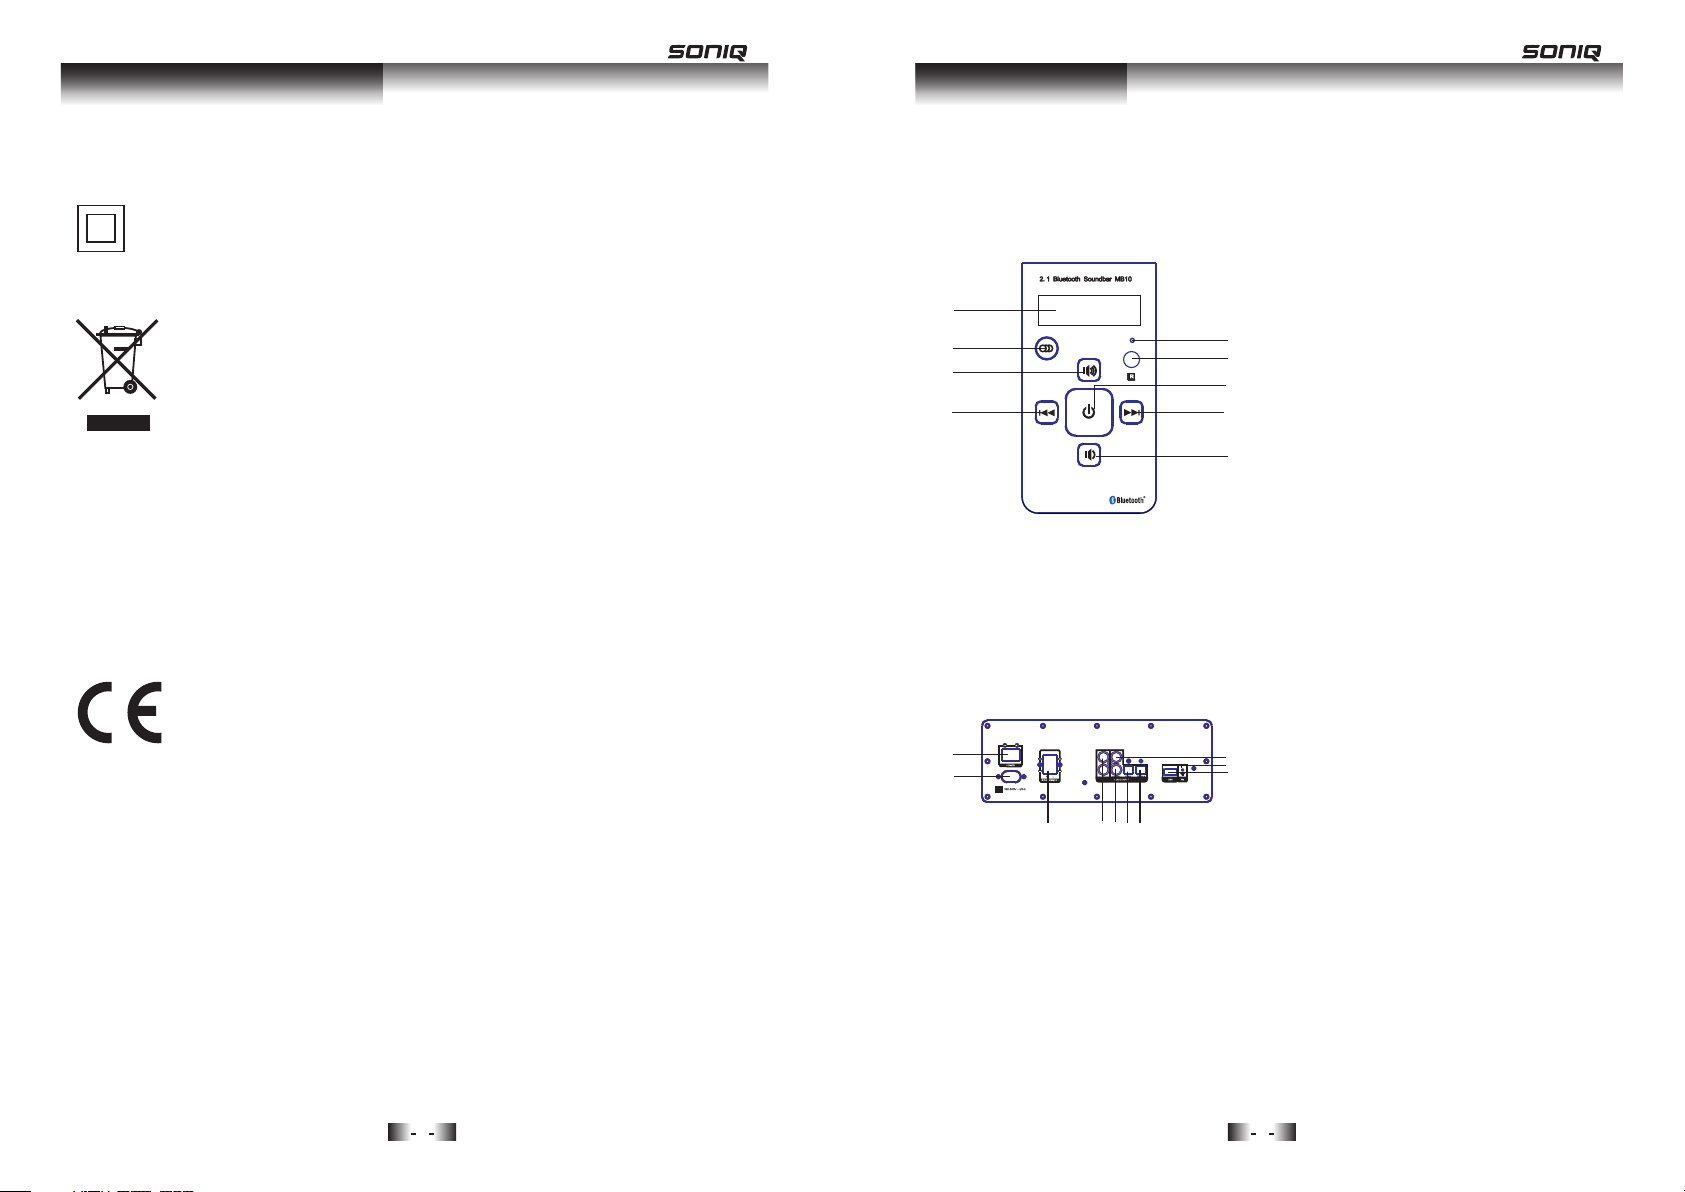
FUNCTIO NS & CONTR OLS
1
2
3
4
1
2
3
4 5
6
7
Front Pan el
DISP LAY SCRE EN
5
6
7
8
9
1.
2. SOU RCE B UTT ON
3. VOL UME +
4. PRE VIO US BU TTO N
5. IND ICATOR L IGH T
6. REM OTE C ONT ROL SEN SOR
7. STAN DBY BUT TO N
8. NEX T BUT TO N
9. VOL UME -
Rear Pane l
1. POW ER ON /OF F
2. POW ER SU PPLY INP UT
9
10
8
3. L/R S PEA KER O UTP UT
4. L/R AU DIO I NPU T
5. COA XIA L 2
6. OPT ICA L 1
7. OPT ICA L 2
8. USB P ORT
9. COA XIA L 1
10. FM I NTE RFAC E
3
4
Page 4

Functions & Controls
Basic Operation
FUNCTIONS & CONTROLS
1
2
3
4
5
6
7
8
9
10
11
24
22
23
20
19
18
16
17
15
13
14
12
21
Remote Co ntrol
1. MUTE
2. OPTICA L1
3. OPTICA L 2
4. FM
5. PAIR
6. BASS +
7. BASS -
8. TUNE +
9. TUNE -
10. PREVI OUS/CH -
11. NEXT/CH+
12. VOLUM E -
13. VOLUM E +
14. PLAY/PAUSE
15. SUBWO OFER -
16. SUBWO OFER +
17. TREBLE -
18. TREBLE +
19. USB
20. BLUETOOTH
21. COAXI AL 2
22. COAXI AL 1
23. AUX
24. STANDBY
BASIC OPERATION
PREPARATION
1. Before the unit is turned on, please check if all the connections are right
and safe. Then connect the main power.
2. Press the POWER ON/OFF button on the back panel to turn on the main
power.
STANDBY MODE
Press the button on the front panel to switch ON/OFF the Standby mode.
Note: Make sure that the unit is connected to the power source.
TONE FUNCTION
In play status, to select the Treble, Bass or Subwoofer adjusting mode,
press the TREBLE+/-, BASS+/- and SW+/- buttons to adjust the effect of
Treble, Bass or Subwoofer respectively.
VOLUME SETTING
Press the / buttons to turn the volume up or down.
MUTE BUTTON
If you press the MUTE button while playing, the sound output will be switch
off. Press the MUTE button again or the / buttons to resume the
previous volume level.
PLAY/PAUSE BUTTON
In play status, press the (PLAY/PAUSE) button to pause, press this button
again to continue playing.
Note: This function is unavailable in Radio, Audio, Coaxial and Optical Input
modes.
PREVIOUS AND NEXT
In play status, press the 9 button to go to the previous track; press the :
button to go to the next track.
Note: These buttons are unavailable in Audio Input mode.
5
6
Page 5

Basic Operation
Basic Operation
BASIC OPERATION
BLUETOOTH, USB or AUDIO BUTTONS
1. Press button on the remote control to enter the Bluetooth mode, then
connect the bluetooth device with this unit.
2. Press USB button on the remote control to enter the USB mode, then insert
the USB device to the unit.
3. Correctly connect audio facility (eg. PC) with this unit, then press AUX,
OPT1/2, or COAX1/2 buttons on the remote control to enjoy the external
audio input sources function.
4. Press the (SOURCE) button on the front panel to switch between
different modes: audio input, USB, bluetooth or other modes.
Connecting external audio source
You may hear the sound from other playback devices such as CD players,
DVD players, etc., through the soundbar.
There are different ways for audio input connection: OPTICAL 1 or 2,
COAXIAL 1 or 2 and AUX IN, to select the related modes by pressing the
corresponding buttons on the remote control or the (SOURCE) button
on the front panel.
By using the related mode, the unit should connect the external device to
the right audio input ports.
BASIC OPERATION
USB Operation
It is possible to listen to audio files using the USB interface of this unit.
1. Connect the USB device to this unit.
2. Press the USB button on the remote control to play the USB.
3. Press the 9 or : button to go to the previous or next audio files.
4. To exit the USB mode: Press the AUX or FM button, and switch to other
modes.
Note:
1. Depending on the amount of data and media speed, it may take longer for
system to read the contents of media device. In some cases, reading time
may be as long as 60 seconds. This is not a malfunction.
2. Even when they are in a supported format, some files may not play
depending on the content.
When make connection with OPTICAL or COAXIAL, you should make the
Digital Audio Output Setting on your DVD players or other audio devices.
There are two sound systems supported by these two channels. You could
select SPDIF/PCM and SPDIF/RAW, and to RAW only one multichannel
audio format - Dolby Digital(or AC-3) is supported.
Note: If yo u could no t hear aud io throu gh the sou ndbar, ch eck whet her
option PC M or RAW is selec ted on you r DVD players or other audio
devices; and DTS fo rmat dis c is not sup ported w hen RAW is selected.
7
8
Page 6

Bluetooth Operation
FM Operation
BLUETOOTH OPERATION
Connection operation
In order to listen to audio from your mobile phone or other bluetooth device,
you must first pair the devices with each other.
1. Press button on the remote control to enter the Bluetooth mode.
2. When the unit is on the BT mode, the blue light flashes with 1s frequency,
then the blue light flashes quickly.
3. Turn on your Bluetooth function on your device (MP3 or telephone), and
begin to search this unit. You should select the MB10 on your searched list.
Then confirm to pair your device with this unit. If prompted, input 0000 as
password.
4. When connects successfully, the blue light will remain lit. At this moment,
you could enjoy music via BT.
To pair with another device, first, disconnect your paired device, and turn off
the BT function on your device. Once disconnect, the blue light flashes slowly.
Press the PAIR button on the remote control, the blue light flashes quickly.
Then pair with the another device as the aforementioned 4 steps.
The unit will reconnect with the last paired device.
(The BT function of the device should be on, and the unit should be turned
off in normal way, not in a way of unplugging the power supply cable without
pressing the power on/off button.)
Incoming calls
When you receive an incoming call on your mobile phone, music audio will
automatically mute and you will hear the ring tones through the speakers.
After you have completed your phone call, the devices are reconnected with
each other. You may have to possibly restart the playback.
FM OPERATION
Enter FM Function
While in operating mode, press the FM button on the remote control to enter
FM mode.
Exit FM Mode
1. Press the USB button on the remote control to exit FM status, and switch to
USB mode.
2. Press the OPT1/2 or COAX1/2 buttons on the remote control to exit FM
status, and switch to the audio input mode.
3. Press the AUX button on the remote control to exit FM status, and switch to
Audio input mode.
Soundtrack
When the signal is strong enough, the station will be played in stereo, the
display shows a stereo signal "4". If the signal is not strong enough, you can
not see this icon.
Select Bands
1. The range of FM frequency is from 87.50MHz to 108.00 MHz.
2. Select the band by pressing Tune+/- button: press these buttons to adjust
the frequency up or down, the frequency is 0.05MHz.
3. Press the 9 or : button to switch the next or previous band.
4. Automatically search bands: press the PLAY/PAUSE button, the system
starts to search bands from low to high frequency automatically. The
searched band are saved automatically. There are up to 60 stations can
be saved. Press this button again to stop searching.
Note: Due to the different device manufacturers, models, and software
versions, a full functionality cannot be guaranteed.
9
Save Bands
1. Press the Tu+/- buttons to enter one frequency, 3 seconds later, the screen
will display St-XX, which means the station is saved in the current station.
2. If you want to save 99.30 MHZ in 09th cell, press 9 or : to the 09th station,
then press TU+/- button to scan to the 99.30 MHZ, seconds later, the St-09
displays on the screen and it means this station is saved in 09th cell.
10
Page 7

Specification
Care and Maintenance
SPECIFICATIONS
Input voltage:
Max. power consumption:
Tuner frequency range:
Inputs:
Remote control batteries:
Note: Specifications subject to change without prior notice. Weight and
dimensions are approximate.
Trouble Sh ooting
Power supply can not be turned on
Make sure that the power cord is fully inserted in the power outlet.
The remote control does not work
Battery is used up
The front end of the remote control is not aimed at the infrared reception
part of the player.
220-240V~50Hz
100W
FM 87.50 - 108.00MHz
USB - USB device
AUDIO - Audio input connection(2×RCA)
- Coaxial input 1,2
- Optical 1,2
Ant - FM aerial connection
2×AAA/LR03
CARE AND MAINTENANCE
To clean the MB10 Micro System
• Ensure th e unit is po wered off and unplugged from any electrical outlet.
• Wipe the ca se with a sl ightly m oist, li nt-fer e cloth.
• Do not use an y cleans er conta ining al cohol, a mmonia o r abrasi ves.
• Do not spra y an aeros ol at or nea r the radi o.
• Do not allow liquids to spill or objects to drop in to any ope nings.
• Always use original packaging if it is necessa ry to tran sport th e unit.
If this uni t is used in a d usty env ironme nt, it may b e necess ary to hav e
the unit se rviced a t your loc al deale r period ically.
It is not adv isable t o allow la rge depo sits of du st to accu mulate w ithin
the unit as i t may prev ent adeq uate coo ling. Si milarl y dust dep osits
which become damp can sometimes lea d to elect rical pr oblems m ay
cause sev ere dama ge to the de licate e lectro nics wit hin this u nit.
No sound
Make sure that the audio cable is connected correctly and securely to the
back of your unit and to the sound system.
Make sure that the sound system is set to the correct audio input.
Turn your unit off, then back on.
The unit does not work at all
The embedded microcomputer may have failed because of a lightning
strike, static, or other interference.
11
12
 Loading...