

Page 1
Page 2
1
M302SK
TURNTABLE WITH CD/MP3/CASSETTE PLAYER, PLL RADIO, AUX IN,
CLOCK ALARM, REMOTE CONTROL AND BUILT-IN SPEAKER
INSTRUCTION MANUAL
READ THIS INSTRUCTION MANUAL CAREFULLY BEFORE USE
Page 3
2
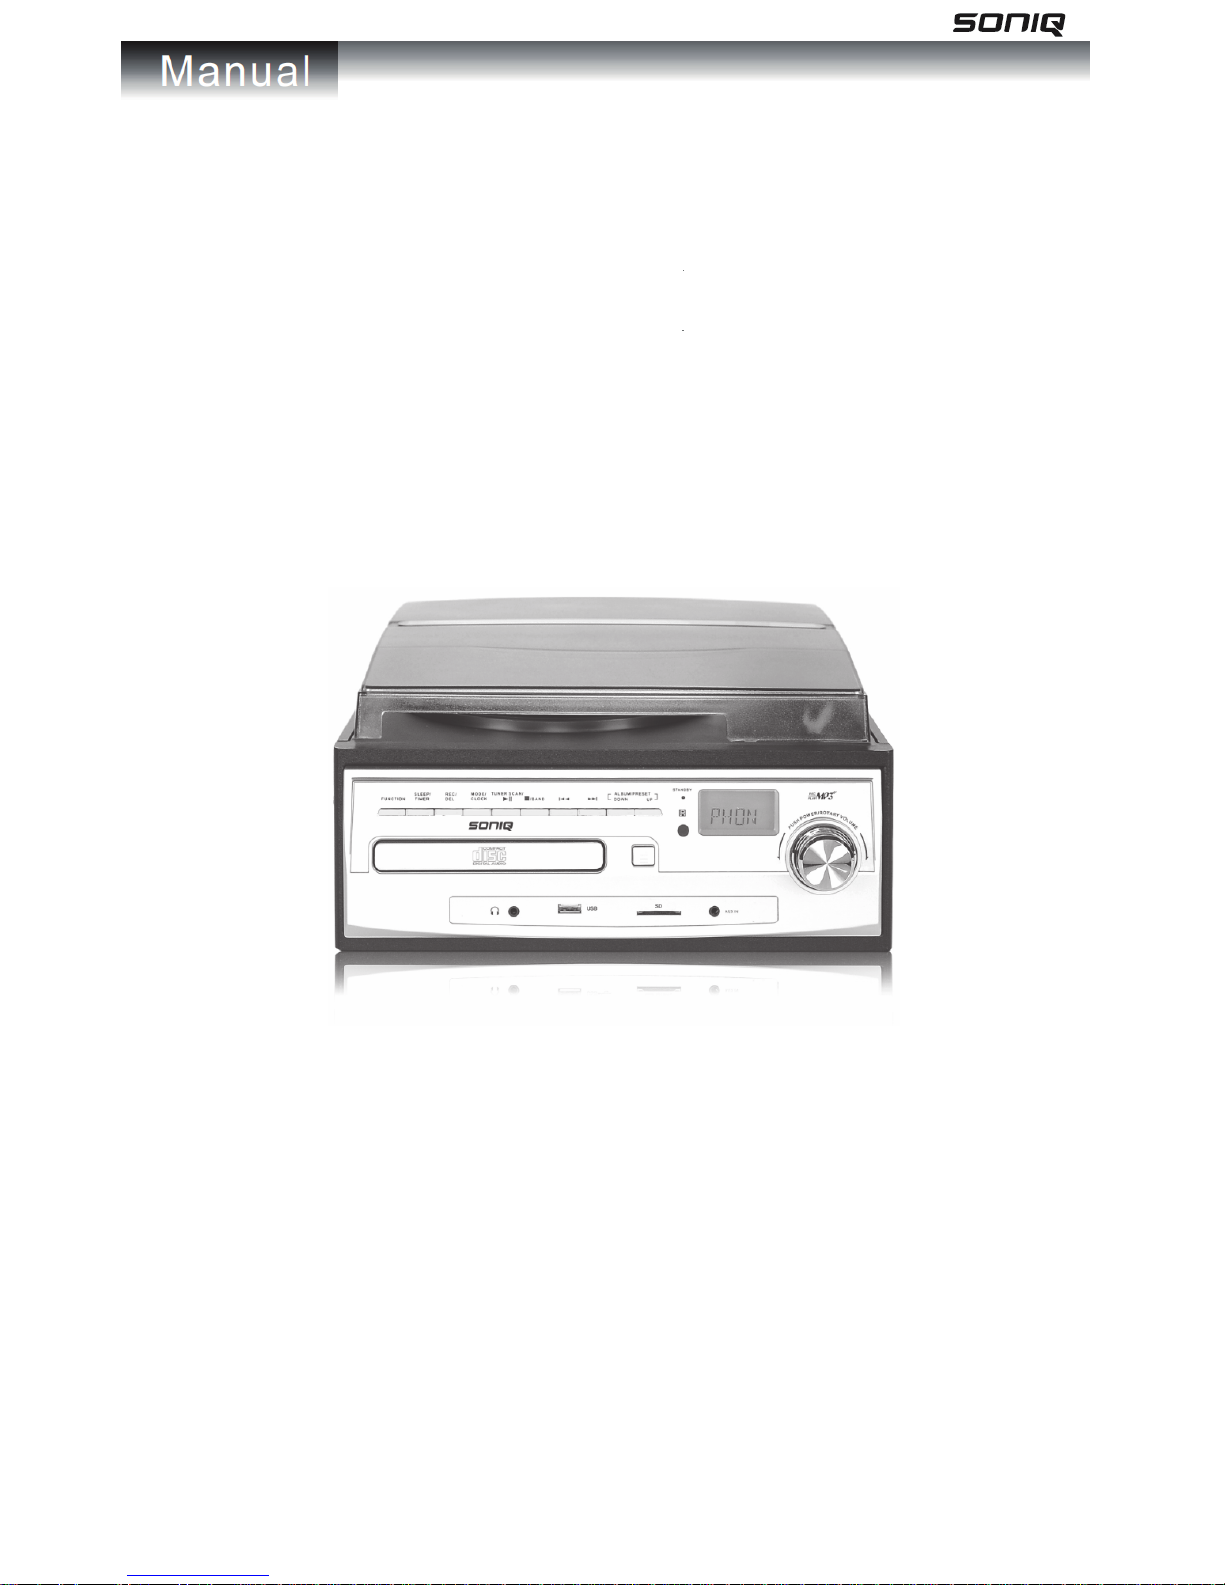
Product Features
- 33/45/78 RPM selectable turntable
- Automatic / manual stop turntable
- Belt driven system
- Programmable CD/MP3 player
- Slot-in cassette player
- Direct USB/SD encoding for CD, turntable, cassette, FM radio & aux in
- Aux in for connection of other device (eg. Cassette player & mobile phone)
- USB/SD slot for MP3 playback
- PLL radio with preset 20 AM & 30 FM stations
- Clock / Sleep / Timer function
- LCD display with blue
backlight
- RCA line-out
- Stereo built-in speaker
- External power adaptor, 45RPM adaptor & remote control
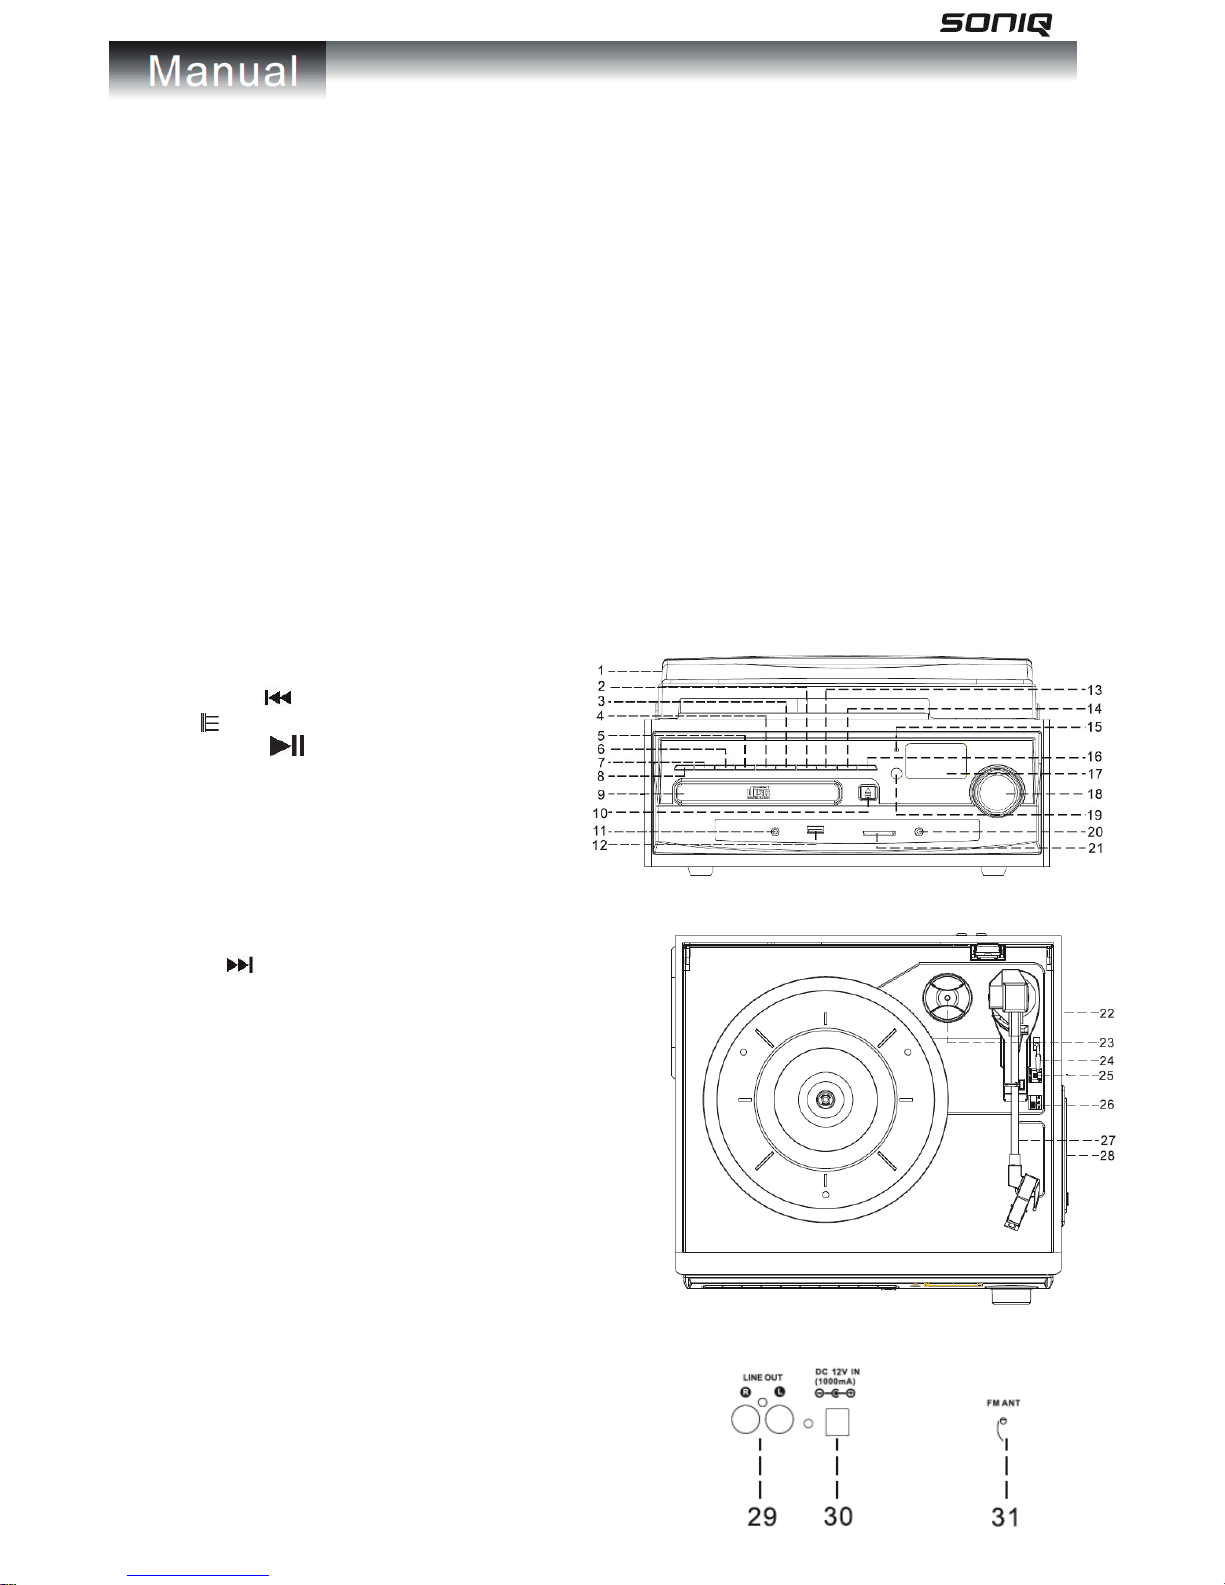
Location of Control
1) DUST COVER
2) SKIP DOWN
BUTTON
3) STOP
/ BAND BUTTON
4) PLAY/PAUSE
BUTTON
5) MODE / CLOCK
6) REC / DEL
7) SLEEP / TIMER
8) FUNCTION
9) CD DOOR
10) CD DOOR BUTTON
11) EARPHONE JACK
12) USB SOCKET
13) SKIP UP
BUTTON
14) ALBUM / PRESET DOWN
15) STANDBY INDICATOR
16) ALBUM / PRESET UP
17) LCD DISPLAY
18) POWER / VOLUME KNOB
19) REMOTE CONTROL RECEIVER
20) AUX IN JACK
21) SD/MMC CARD SLOT
22) CABINET
23) 45 RPM ADAPTOR
24) LIFT LEVER (FOR RECORD PLAY / PAUSE)
25) AUTO STOP ON/OFF BUTTON
26) 33/45/78 RPM SPEED SELECTOR
27) TONE ARM
28) CASSETTE PLAYER
29) LINE-OUT SOCKET
30) EXTERNAL POWER ADAPTOR
JACK
31) FM WIRE ANTENNA
Page 4
3
Caution:
Usage of controls or adjustments or performance of procedures other than those specified herein may result in
hazardous radiation exposure.
This unit should not be adjusted or repaired by anyone except qualified service personnel.
Warning:
- The apparatus shall not be exposed to dripping or splashing and that no objects filled with liquids, such
as vases, shall be placed on the apparatus.
- Batteries (battery pack or batteries installed) shall not be ex
posed to excessive heat such as sunshine,
fire or the like.
- The mains plugs or an appliance coupler is used as the disconnect device, and the disconnect device
shall remain readily operable.
Precautions for Use
Installation
• Unpack all parts and remove protective material.
• Do not connect the unit to the mains before checking the mains voltage and before all other connections have
been made.
• Do not cover any vents and make sure that there is
a space of several centimeters around the unit for ventilation.
Connection
1. Connect external power adaptor with EXTERNAL POWER JACK (30).
2. Push the POWER KNOB (18) to switch on the unit, STANDBY INDICATOR (15) will be off. If the backlight on the
LCD display lights up, it means the power supply is normal, now your system is ready for use.
Setting the Clock
1 When the STANDBY INDICATOR (15) light up, unit is in the standby mode.
2 During standby mode, select between 12h or 24h mode
: press and hold MODE button (5) for 3-5 seconds, 12h /
24h will be flashing. Press SKIP UP (13) or SKIP DOWN (2) button to select 12h / 24h mode. Press MODE button
(5) again to confirm.
3 Setting hour: press SKIP UP (13) or SKIP DOWN (2) button to select the correct hour, then press MODE button (5)
again to confirm.
4 Setting minute: after step 3 is completed, press SKIP UP (13) or SKIP DOWN (2) button to select the correct
minute, then press MODE button (5) again to con
firm.
Setting alarm
1. During standby mode, hold TIMER button (7) for 3-5 seconds. Setting alarm sequence is “alarm on time > alarm
off time > alarm mode > alarm volume”.
2. Setting alarm on time: “on” is lighting on the display
i. Setting hour: press SKIP UP (13) or SKIP DOWN (2) button to select the correct hour, then press
TIMER button (7) again to confirm.
ii. Setting minute: press SKIP UP (13) or SKIP DOWN (2) button to select the correct minute, then
pres
s TIMER button (7) again to confirm.
3. Setting alarm off time: “off” is lighting on the display:
i. Setting hour: press SKIP UP (13) or SKIP DOWN (2) button to select the correct hour, then press
TIMER button (7) again to confirm.
ii. Setting minute: press SKIP UP (13) or SKIP DOWN (2) button to select the correct minute, then
press TIMER button (7) again to confirm.
4. Setting alarm mode: “TUNE” is lighting up on the display:
i. Press SKIP UP (13) or SKIP DOWN (2) button to select the alarm mode.
ii. Sequence is TUNE > CD > USB > SD, press TIMER button (7) again to confirm.
5. Setting alarm volume: “v - ” is lighting up on the display:
i. Press SKIP UP (13) or SKIP DOWN (2) button to select the alarm volume, press TIMER button (7)
again to confirm.
6.
Setting alarm is completed, the display will show the setting again for user’s checking
7. “Clock” icon is flashing when alarm in active. “Clock” icon
lights up when alarm setting is stored but not in active
yet.
Page 5

4
8. Cancel alarm: During standby mode, when “Clock” icon is on, press TIMER button (7), “Clock” icon will be off.
Snooze function
Press “SNOOZE” button on the remote control when alarm in active, alarm will be silent for 10 minutes. After
10-minutue snooze interval, alarm will be active again. Snooze can be used for repeatedly within the 1-hour alarm
active interval.
Timer function
1. Push the POWER KNOB (18) till the STANDBY INDICATOR (15) light off. Unit is turning from standby mode to
operation mode.
2. When the unit is turned on, press SLEEP button (7) repeatedly to choose the sleep time minutes from
90>80>70…..>10 off.
3. Sleep time setting is stored when the “SLEEP” icon lights up on the display.
4. When the Sleep Time Minutes is over, unit will be switched to standby mode automatically.
Listening to Radio
Radio tuning
1. Press FUNCTION button (8) to select “TUNE” mode.
2. Select the desired band by RADIO BAND button (3)
(AM or FM).
3. Search for a station by pressing SKIP UP (13) or SKIP DOWN (2) button for 1-2 seconds, and then release.
4. The unit will start seeking automatically and stop when a radio station is found.
Manual preset radio stations
1. When the desired radio station is found, press MODE button (5), program number will be flashing.
2. Press PRESET UP (13) or PRESET DOWN (2) button to choose the program number for storing the desired radio
station.
3. Press MO
DE button (5) again to confirm, program number will stop to flash.
4. Perform as step 2 & 3 to preset more radio stations.
5. Press PRESET UP (13) or PRESET DOWN (2) to choose the preset radio stations.
6. The number of stations can be found and stored depends on the reception of different area and countries.
Auto preset radio stations
1. During radio mode, press the PLAY/PAUSE button (4), the unit will automatically scan the radio frequency. When
the clear signal i
s found, it will automatically store the radio station, starting from program 1.
2. The number of stations can be found and stored depends on the reception of different area and countries.
FM & FM-stereo reception
Press “FM ST.” button on the remote control to select FM mono or FM stereo mode. When stereo signal are weak,
it is preferable to receive the program in mono.
“ST” icon light up on the display to show FM stereo mode is receiving.
Hints for better reception
1. AM: there is a built-in AM bar antenna. If AM reception is weak, slightly rotating or re-positioning of the unit will
usually improve the AM reception.
2. FM : the receiver has a built-in FM wire antenna hanging at the rear cabinet. This wire should be totally unraveled
and extended for best reception.
FM & FM-stereo radio encoding
1. Press FUNCTION button (8) to select “TUNE” mode and select the desired band by RADIO BAND button (3) (AM
or FM).
2. Insert
memory device (USB drive, SD or MMC card).
3. Press the REC button (6), it will take 3-5 seconds to read memory device. Then USB or SD icon will be flashing.
4. Press SKIP UP
(13) or SKIP DOWN button (2) to select desired mode (USB or SD) for encoding. Then
press the REC button (6) again to confirm. And the system is starting the encoding mode after few seconds.
5. If only USB drive, SD or MMC card is inserted, step 4 can be skipped.
6. The USB or SD icon will be flashing on the display during encoding.
7. To finish encoding, press STOP
button (3) and display will show “END” and return to “TUNE” mode.
Page 6

5
Remark:-
- The recording speed is 1:1 and according to the actual playing time of FM or FM-ST radio
- The recording format is preset at – MP3 bit rate : 128 kbps
- During FM & FM-stereo radio encoding, radio frequency is fixed and cannot be tuned
Phono & Encoding
Noted:
- Remove the stylus protector.
- Be sure that the tone arm is being detached from the tone arm rest before
operating and re-secured again afterwards.
1. Press FUNCTION button (8) to select “PHON” on display.
2.
Set the SPEED SELECTOR (26) to the proper position depending on the record to be played.
3. Place the record on the platter, use the 45 RPM adaptor if required.
4. Push the LIFT LEVER (24) upward to raise the tone arm from the arm park, and then slowly
move it to the record side. The platter will start to rotate.
5. Put down the LIFT LEVER (24) to drop the tone arm and touch the record gently. Phono
playing starts now.
6. Adjust the volume to the desired level.
7. At the
end of record, the platter will automatically stop rotating. Push the LIFT LEVER (24)
upward to raise the tone arm and move it to the arm park, and then put down the LIFT LEVER (24).
8. To stop manually, lift the tone arm from the record and return it to the arm park.
Remark :
- Due to the variance format of record, auto-stop function may not be effective to all record.
- As some kind of record, the auto-stop area was out of the unit setting, so it will stop before
the last track finishes.
In this case, select the AUTO-STOP ON/OFF button (25) to “OFF” position, then it will run to the end of the record
but will not stop automatically (turn off the unit by power button or switch back the AUTO-STOP ON/OFF button
(25) to “ON” position to stop the platter rotate). Then put back the tone arm to the arm park.
Phono encoding
1. Press FUNCTION button (8) to select “PHON” on display and then insert memory device (USB drive, SD or
MM
C card).
2. Press the REC button (6), it will take 3-5 seconds to read memory device. Then USB or SD icon will be flashing.
3. Press SKIP UP
(13) or SKIP DOWN button (2) to select desired mode (USB or SD) for encoding. Then
press the REC button (6) again to confirm. And the system is starting the encoding mode after few seconds.
4. If only USB drive or SD/MMC card is inserted, step 3 can be skipped.
5. The USB or SD icon will be flashing on the display during encoding.
6. To finish encoding, press STOP
button (3) and display will show “END” and return to phono mode.
Remark:-
- The recording speed is 1:1 and according to the actual playing time of the phono
- The recording format is preset at – MP3 bit rate : 128kbps
Cassette Tape & Encoding
1. Press FUNCTION button (8) to select “TAPE” on display.
2. After inserting the cassette tape, the system will start playing automatically.
3. Adjust the volume to the desired level.
4. Press the “TAPE FAST FORWARD / EJECT BUTTON” at cassette player (28) half way during playing, the tape
will be advanced forward rapidly.
5. Slightly press the “TAPE FAST FORWARD / EJECT BUTTON” again to resume normal playing, the button will
resume to the outermost position.
Page 7

6
6. Press the “TAPE FAST FORWARD / EJECT” button completely, then the playing will be stopped and the
cassette tape will be ejected.
Remark : Make sure the direction is correct when inserting
the tape. To avoid damaging the tape, it is highly recommended
to take out the tape after listening.
Cassette tape encoding
1. Press FUNCTION button (8) to select “TAPE” on display and then insert memory device (USB drive, SD or MMC
card)
2. Press the REC button (6), it will take 3-5 seconds to
read memory device. Then USB or SD icon will be flashing.
3. Press SKIP UP
(13) or SKIP DOWN button (2) to select desired mode (USB or SD) for encoding. Then
press the REC button (6) again to confirm. And the system is starting the encoding mode after few seconds.
4. If only USB drive or SD/MMC card is inserted, step 3 can be skipped.
5. The USB or SD icon will be flashing on the display during encoding.
6. To finish encoding, press STOP
button (3) and display will show “END” and return to “TAPE” mode.
Remark:-
- The recording speed is 1:1 and according to the actual playing time of the tape.
- The recording format is preset at – MP3 bit rate : 128 kbps
Aux In Jack & Encoding
Press FUNCTION button (8) to select “AUX” on display, then connect the external audio device (such as CD player)
through the “AUX IN JACK” (20). Audio signal from the external audio device can be played through the system.
Aux in encoding
1. Press FUNCTION button (8) to select “AUX” on display, then insert memory device (USB drive, SD or MMC
card)
2. Press the REC button (6), it will take 3-5 seconds to read memory device. Then USB or SD icon will be flashing.
3.
Press SKIP UP (13) or SKIP DOWN button (2) to select desired mode (USB or SD) for encoding.
Then press the REC button (6) again to confirm. And the system is starting the encoding mode after few
seconds.
4. If only USB drive or SD/MMC card is inserted, step 3 can be skipped.
5. The USB or SD icon will be flashing on the display during encoding.
6. To finish encoding, press STOP
button (3) and display will show “END” and return to “AUX” mode.
Remark:-
- The recording speed is 1:1 and according to the actual playing time of the external audio device.
- The recording format is preset at – MP3 bit rate : 128 kbps
Page 8

7
Playback of MP3/WMA Song via USB Storage Media or Memory Card
Connecting
The system is able to decode and playback all MP3 / WMA file which stored in the memory media with USB
connecting port or SD/MMC memory card.
1.
Plug-in the USB plug with the face up & make sure it going into completely or insert the memory card in the
direction of the arrow as shown in the label on the underside of the memory card slot cover. Insert straight without
bending.
2.
Connecting the USB upside down or backwards could damage the audio system or the storage media (USB
thumb drive / SD/MMC card). Check to be sure the direction is correct before connection.
3.
Press FUNCTION button (8) to select “USB” or “CARD on display, then insert memory device (USB drive, SD or
MMC card).
4.
The system will start reading the storage media automatically after function selection, and display will show the
total number of MP3/WMA f
iles (eg. 016).
5.
Then the system will start audio playback from desired device (USB or SD/MMC) automatically.
Play / Pause button
- Press the PLAY/PAUSE button (4) once to halt playing, press it again to continue.
Stop button
- Press STOP button (3) to end up audio playback, then display will show the total number of MP3/WMA files.
And then user can press SKIP UP
(13) or SKIP DOWN (2) button to select file forward or backward.
Skip up
/ Skip down button
- During MP3/WMA playback, press SKIP UP (13) button once to play the next file. Press and hold SKIP
UP
button (13) continuously to speed up selecting forward.
- During MP3/WMA playback, press SKIP DOWN
(2) button once to play the previous file. Press and hold
SKIP DOWN
button (2) continuously to speed up selecting backward.
Folder searching
Press ALBUM DOWN (14) or ALBUM UP (16) button to search folder backward or forward.
Repeat function
During audio playback, press MODE button (5) once, single track will be played repeatedly. Press MODE button
(5) again, it will repeatedly play all tracks in the whole USB drive, SD or MMC card.
Remark
- If connect the system to MP3 player via the USB socket, due to variances in MP3 encoding format, some MP3
player may not be able to play via the USB socket. This is not a malfunction of the system.
- There are numerous USB and SD device producers. Solution and format are variable between each other.
Therefore, we do not guarantee this unit can support all USB and SD device from every brand.
- SD card can be supported up to 8GB.
Tracks programming
Tracks in USB/SD can be programmed for MP3/WMA file and play in any order. Before use, be sure the system is set
at stop mode before programming:
Page 9

8
1. Set at “USB” or “CARD” mode, then press STOP button (3).
2. Press MODE button (5), “MEM” will be flashing on LCD display. Moreover, it will indicate program number and
digits for track number to be programmed.
3. Select a desired track by pressing SKIP UP
(13) or SKIP DOWN (2) button. If folder selection is
required, pressing ALBUM DOWN (14) or ALBUM UP (16) button to search folder backward or forward.
4. Press MODE button (5) to confirm and store the track into memory.
5. Repeat steps 3 and 4 to enter additional tracks into the memory if necessary.
6. When all the desired tracks have been programmed, press PLAY/PAUSE
button (4) to play the tracks in
assigned order.
7. Press STOP
button (3) to stop playing of programmed tracks, press STOP button (3) again to cancel
programming.
Copying of MP3/WMA file
The system allows you to copy the file from USB to SD or SD to USB by 1 file, 1 folder or all files.
I) Copy 1 track
1. Insert the USB storage media or SD/MMC card, set in “USB” or “CARD” mode.
2. Press REC button (6) during the playback of the copying track, then “ONE” will be flashing on the display. Press
REC button (6) again to confirm.
3. The USB or SD icon will be flashing on the display. Copying is performing
now.
4. After completing of copy, unit will stop playback automatically.
5. Display will show “END” and back to USB or SD mode.
II) Copy 1 folder
1. Insert the USB storage media or SD/MMC card, set in “USB” or “CARD” mode.
2. Press ALBUM DOWN (14) or ALBUM UP (16) button to search desired folder for copying.
3. Press REC button (6), then “ONE” will be flashing on the display. Press SKIP UP
(13) / SKIP DOWN
(2) button to select “DIR” on the display. Press REC button (6) again to confirm.
4. USB or SD icon will be flashing on the display. Copying is performing now.
5. When the USB or SD icon stops flashing, it means that the folder copying is completed.
III) Copy all track
1. Insert the USB storage media or SD/MMC card, set in “USB” or “CARD” mode.
2. Press REC button (6), then “ONE” will be flashing on the display. Press SKIP UP
(13) / SKIP DOWN
(2) button to select “ALL” on the display. Press REC button (6) again to confirm.
4. USB or SD icon will be flashing on the display. Copying is performing now.
5. When the USB or SD icon will stop flashing, it means that all track copying is completed.
Remark:
- If press the REC button (6) during playback of USB or SD mode, the file will copy from USB to SD or SD to USB.
File Delete from USB / SD Card
The system is able to erase the file stored inside the USB drive or SD card by following:-
I) Delete 1 track
1. Press and hold DEL button (6) for 3-5 seconds during the playback of the desired track, then “ONE” will be
flashing on the display. Press DEL button (6) again to confirm.
2. “DEL” will be shown on the display.
3. “DEL” will disappear on the display, it means the track is deleted.
II) Delete 1 folder
1. Insert the USB storage media or SD/MMC card, set in “USB” or “CARD” mode & set at stop mode after unit
reading.
2. Press AL
BUM DOWN (14) or ALBUM UP (16) button to search desired folder for deleting.
3. Press and hold DEL button (6) for 3-5 seconds, “DEL” will show on the display. Press SKIP UP
(13) / SKIP
DOWN
(2) button to select “DIR” on the display. Press DEL button (6) again to confirm.
4. “DEL” will be shown on the display. After “DEL” disappears it means the desired folder is deleted.
Page 10

9
II) Delete all track
1. Insert the USB storage media or SD/MMC card, set in “USB” or “CARD” mode & set at stop mode after unit
reading.
2. Press and hold DEL button (6) for 3-5 seconds, then “ONE” will be flashing on the display. Press SKIP UP
(13) / SKIP DOWN
(2) button to select “ALL” on the display. Press DEL button (6) again to confirm.
3. USB or SD icon will be flashing on the display. Deleting is performing now.
4. When the USB or SD icon stops flashing, it means that all track copying is completed.
Remark : A
ll the files inside the USB storage media or SD card will be deleted completely after confirming to “DEL”
button.
Removing of USB / memory card
To remove the USB / memory card, turn off the power or switch the function mode to either CD, turntable, cassette,
aux or tuner first, then pulling out the USB / memory card from the socket directly.
Compact Disc (CD) Playback & Encoding
1. Press FUNCTION button (8) to “CD” mode.
2. Press CD DOOR button (10), CD DOOR (9) will be opened, put the CD in the tray and press CD DOOR button
(10) again, CD DOOR (9) will be closed.
3. The system will start reading the CD:
Play / Pause button
- Press the PLAY/PAUSE button (4) once to halt playing, press it again to continue.
Stop button
- Press the STOP button (3) to end up audio playback, then display will show the total number of tracks. And
then user can press SKIP UP
(13) or SKIP DOWN (2) button to select tracks.
Skip up
/ Skip down button
- During CD playback, press SKIP UP (13) button once to play the next track. Press and hold SKIP UP
(13) button continuously to speed up selecting forward.
- During CD playback, press SKIP DOWN
(2) button once to play the previous track. Press and hold SKIP
DOWN
(2) button continuously to speed up selecting backward.
-
Folder searching
Press ALBUM DOWN (14) or ALBUM UP (16) button to search folder backward or forward.
Repeat function
During audio playback, press MODE button (5) once, single track will be played repeatedly. Press MODE button
(5) again, it will repeatedly play all tracks in the whole CD.
Tracks programming
Up to 60 MP3 tracks & 30 CD audio format track can be programmed and played in any order. Before use, be sure the
system is set at stop mode before programming:
1. Press FUNCTION button (8) to “CD” and set at stop mode
2. Press the MODE button (5), “MEM” will be flashing on LCD display. Moreover, it will indicate program number
and digits for track number to be programmed.
3. Select a desired track by pressing SKIP UP
(13) or SKIP DOWN (2) button. For MP3/WMA disc,
pressing ALBUM DOWN (14) or ALBUM UP (16) button to search folder backward or forward.
4. Press the MODE (5) button to store the track into memory.
5. Repeat steps 3 and 4 to enter additional tracks into the memory if necessary.
6. When all the desired tracks have been programmed, press PLAY/PAUSE button (4) to play the tracks in
assigned order.
7. Press STOP
button (3) to stop playing of programmed tracks, press STOP button (3) again to cancel
programming.
Page 11

10
Copying of CD
The system allows you to copy the track from CD to USB or SD by 1 track, 1 folder or all files.
I) Copy 1 track
1. Insert the USB storage media or SD/MMC card, press FUNCTION button (8) to “CD” mode.
2. Press REC button (6) during the playback of the copying track from CD, then “ONE” will be flashing on the
display. Press REC button (6) again to confirm.
3. The USB or SD icon will be flashing on the display. Copying is performing now.
4. After completing of copy
, unit will stop playback automatically.
5. Display will show “END” and back to CD mode.
II) Copy 1 folder (for MP3/WMA disc only)
1. Insert the USB storage media or SD/MMC card, set in CD & stop mode after unit reading.
2. Press ALBUM DOWN (14) or ALBUM UP (16) button to search folder for copying.
3. Press REC button (2), then “ONE” will be flashing on the display. Press SKIP UP
(13) / SKIP DOWN
(2) button to select “DIR” on the display. Press REC button (6) again to confirm.
4. USB or SD icon will be flashing on the display. Copying is performing now.
5. When the USB or SD icon stops flashing, it means that the folder copying is completed.
III) Copy all track
1. Insert the USB storage media or SD/MMC card, press FUNCTION button (8) to “CD” mode.
2. Press REC button (6), then “ONE” will be flashing on the display. Press SKIP UP
(13) / SKIP DOWN
(2) button to select “ALL” on the display. Press REC
button (2) again to confirm.
4. USB or SD icon will be flashing on the display. Copying is performing now.
5. When the USB or SD icon stops flashing, it means that all track copying is completed.
Split Track Function for USB/SD Recording from Turntable/Cassette/Aux in
1) Manual split operation procedure: during USB/SD recording, the USB/SD icon will flash on the display. If a
new track is required, press MODE button (5) on the unit or remote control, display will show “TS”, then the unit
will stop recording momentarily and resume again. A new file will have been created on the USB/SD device
representing a new track.
2) Auto split operation procedure:
- Before USB/SD recording, press FUNCTION button (8) to select audio sou
rce, then press MODE button (5) on
the unit or remote control, display will show “T-ON”, which means the auto split function has activated. Then start
USB/SD recording, the unit can automatically detect the silent part between each track, and create a new file to move
on to start recording the next track.
- If not required: press MODE button (5) on the unit or remote control before USB/SD recording, display will show
“T-OF”, which means auto split has been deactivated.
- Note f
or auto split
1. Several seconds of the beginning of the next track may not be recorded, as the unit may take a few seconds to
create a new file on the USB/SD; and it can additionally be the case that some music producers intentionally add silent
sections within one track. As a result, this will very likely make the unit consider this silent part as the break between
tracks and create a new track on the recording.
2. During USB/SD recording from turntable & cass
ette, when the unit has detected any particular silent part, the
turntable and cassette player will stop momentarily. The turntable and cassette player will resume operation once the
USB/SD device has begun creating a new file to be recorded.
Earphone Jack & Line Out Socket
- This system can be connected with headphone or external amplifier / speaker by 3.5mm EARPHONE
JACK (11).
- This system can be connected with external device (eg. amplifier and speaker) by LINE-OUT SOCKET
(29) at rear cabinet.
Power Saving Feature:
To save energy, if there is no audio signal from CD / Turntable / Cassette / Aux in / USB / SD for a period of over 10
minutes, then the unit will automatically switch to standby mode.
Page 12

11
Remote Control
Battery installation
The infra-red transmitter requires 1 pc CR2025 lithium battery for operation.
Button description
1. STANDBY: Trigger between standby mode and operation mode.
2. PRESET/ALBUM DN: Perform same function as “ALBUM DOWN / PRESET DOWN” button
(14) on the unit.
3. PRESET/ALBUM UP: Perform same function as “ALBUM UP / PRESET UP” button (16) on the
unit.
4. TIMER / SLEEP: Perform same function as “SLEEP/TIMER” button (7)
on the unit.
5. MUTE: To mute audio playback.
6. OP/CL & SNOOZE: Open and close the CD door; SNOOZE function for alarm.
7. REC/DEL: Perform same function as “REC/DEL” button (6) on the unit.
8. FM ST.: Select between FM stereo and mono radio
9. FUNCT: Perform same function as “FUNCTION” button (8) on the unit.
10. MODE/CLOCK: Perform same function as “MODE/CLOCK” button (5) on the unit.
11.
(PLAY/PAUSE): Perform same function as “ PLAY/PAUSE” button (4) on the unit.
12.
(STOP)/BAND: Perform same function as “ STOP/BAND” button (3) on the unit.
13.
(SKIP DOWN ): Perform same function as “ SKIP DOWN” button (2) on the unit.
Besides, it can be used for radio frequency searching during tuner mode.
14.
(SKIP UP ): Perform same function as “ SKIP UP” button (13) on the unit. Besides, it
can be used for radio frequency searching during tuner mode.
15. VOLUME +/- : Control volume level.
Page 13

 Loading...