

Page 1
L60U11A-AU
MD 1108 02-01
60" FullHD LCDTV
with Touch Screen
Page 2
Connecting
Connecting HDMI signals
Connecting S-Video signals
Connecting Composite Video signals
Connecting COAXIAL signals
9-10
11-16
1. Software Introduction
2. Software Installation
3. Software Unload
...................................................................................33
4. Software Application
4.1. Running
4.2. Main Menu
4.3. Calibration
........................................................................................34
....................................................................................34
...............................................................................34-36
..........................................................................31
.......................................................................31-32
.......................................................................34-40
4.3.1. Basic Mode Calibrating
4.3.2. Custom Mode Calibrating
4.3.3. Senior Mode Calibrating
4.3.4. Electronic Key
4.4. Option
4.4.1. Info
.....................................................................................36-40
.................................................................................37-38
4.4.2. Configuration
4.4.3. Control
............................................................................39-40
4.5. Operation Function
5. FAQ
.................................................................................................40-43
6. Application of Checktool
Troubleshooting
Specifications
.....................................................................................45
....................................................................................46-47
Supported PC Input Signal
Specification
........................................................................................47
..........................................................35
.......................................................35
........................................................36
.......................................................................36
.......................................................................39
........................................................................40
......................................................................44
.....................................................................46
Menu Operation Guide
Source Selection
Vol+/Vol-(Volume control)
Menu operation
CHANNEL
PICTURE
SOUND
TIME
OPTION
LOCK
PVR Function
Media play Function
17-18
19-23
19-20
24-25
26-30
Page 3
Page 4
Page 5
Instruction ManualMain Unit
VGA
VGA
AUDIO
USB
Install ation Dis c
Touch Pen
Page 6
12
13
Naviga tio n keys
your pre fer enc e. In DTV mode, pr ess O K
to displ ay Ch ann el List.
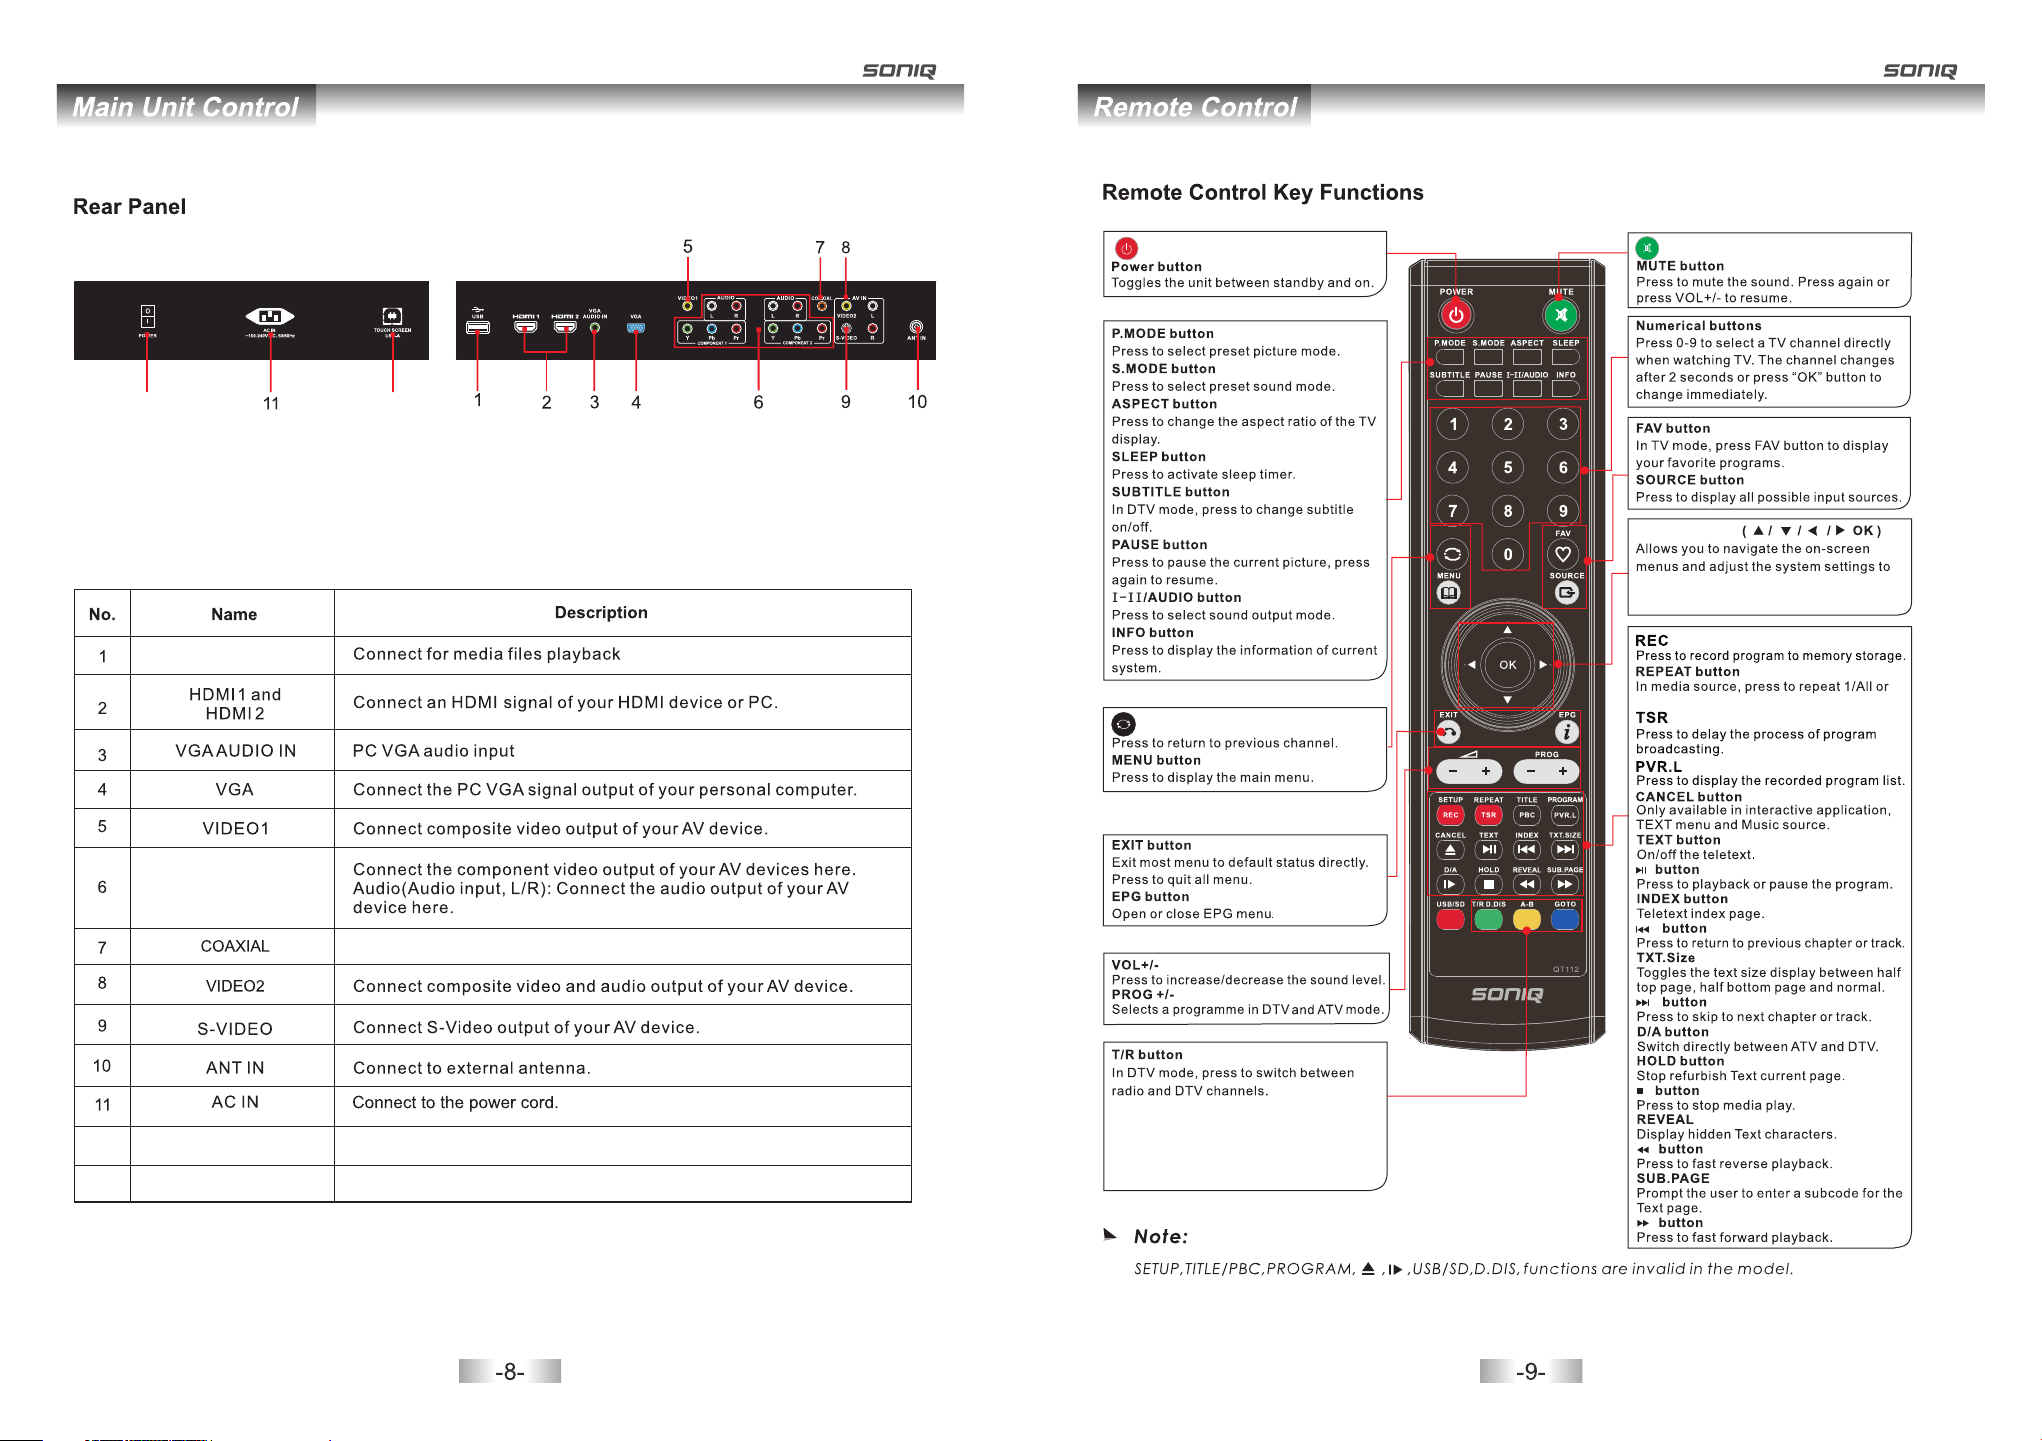
USB
COMPONENT1/
COMPONENT2
Coaxial Digital Au dio out put for D igita l Amplif ier.
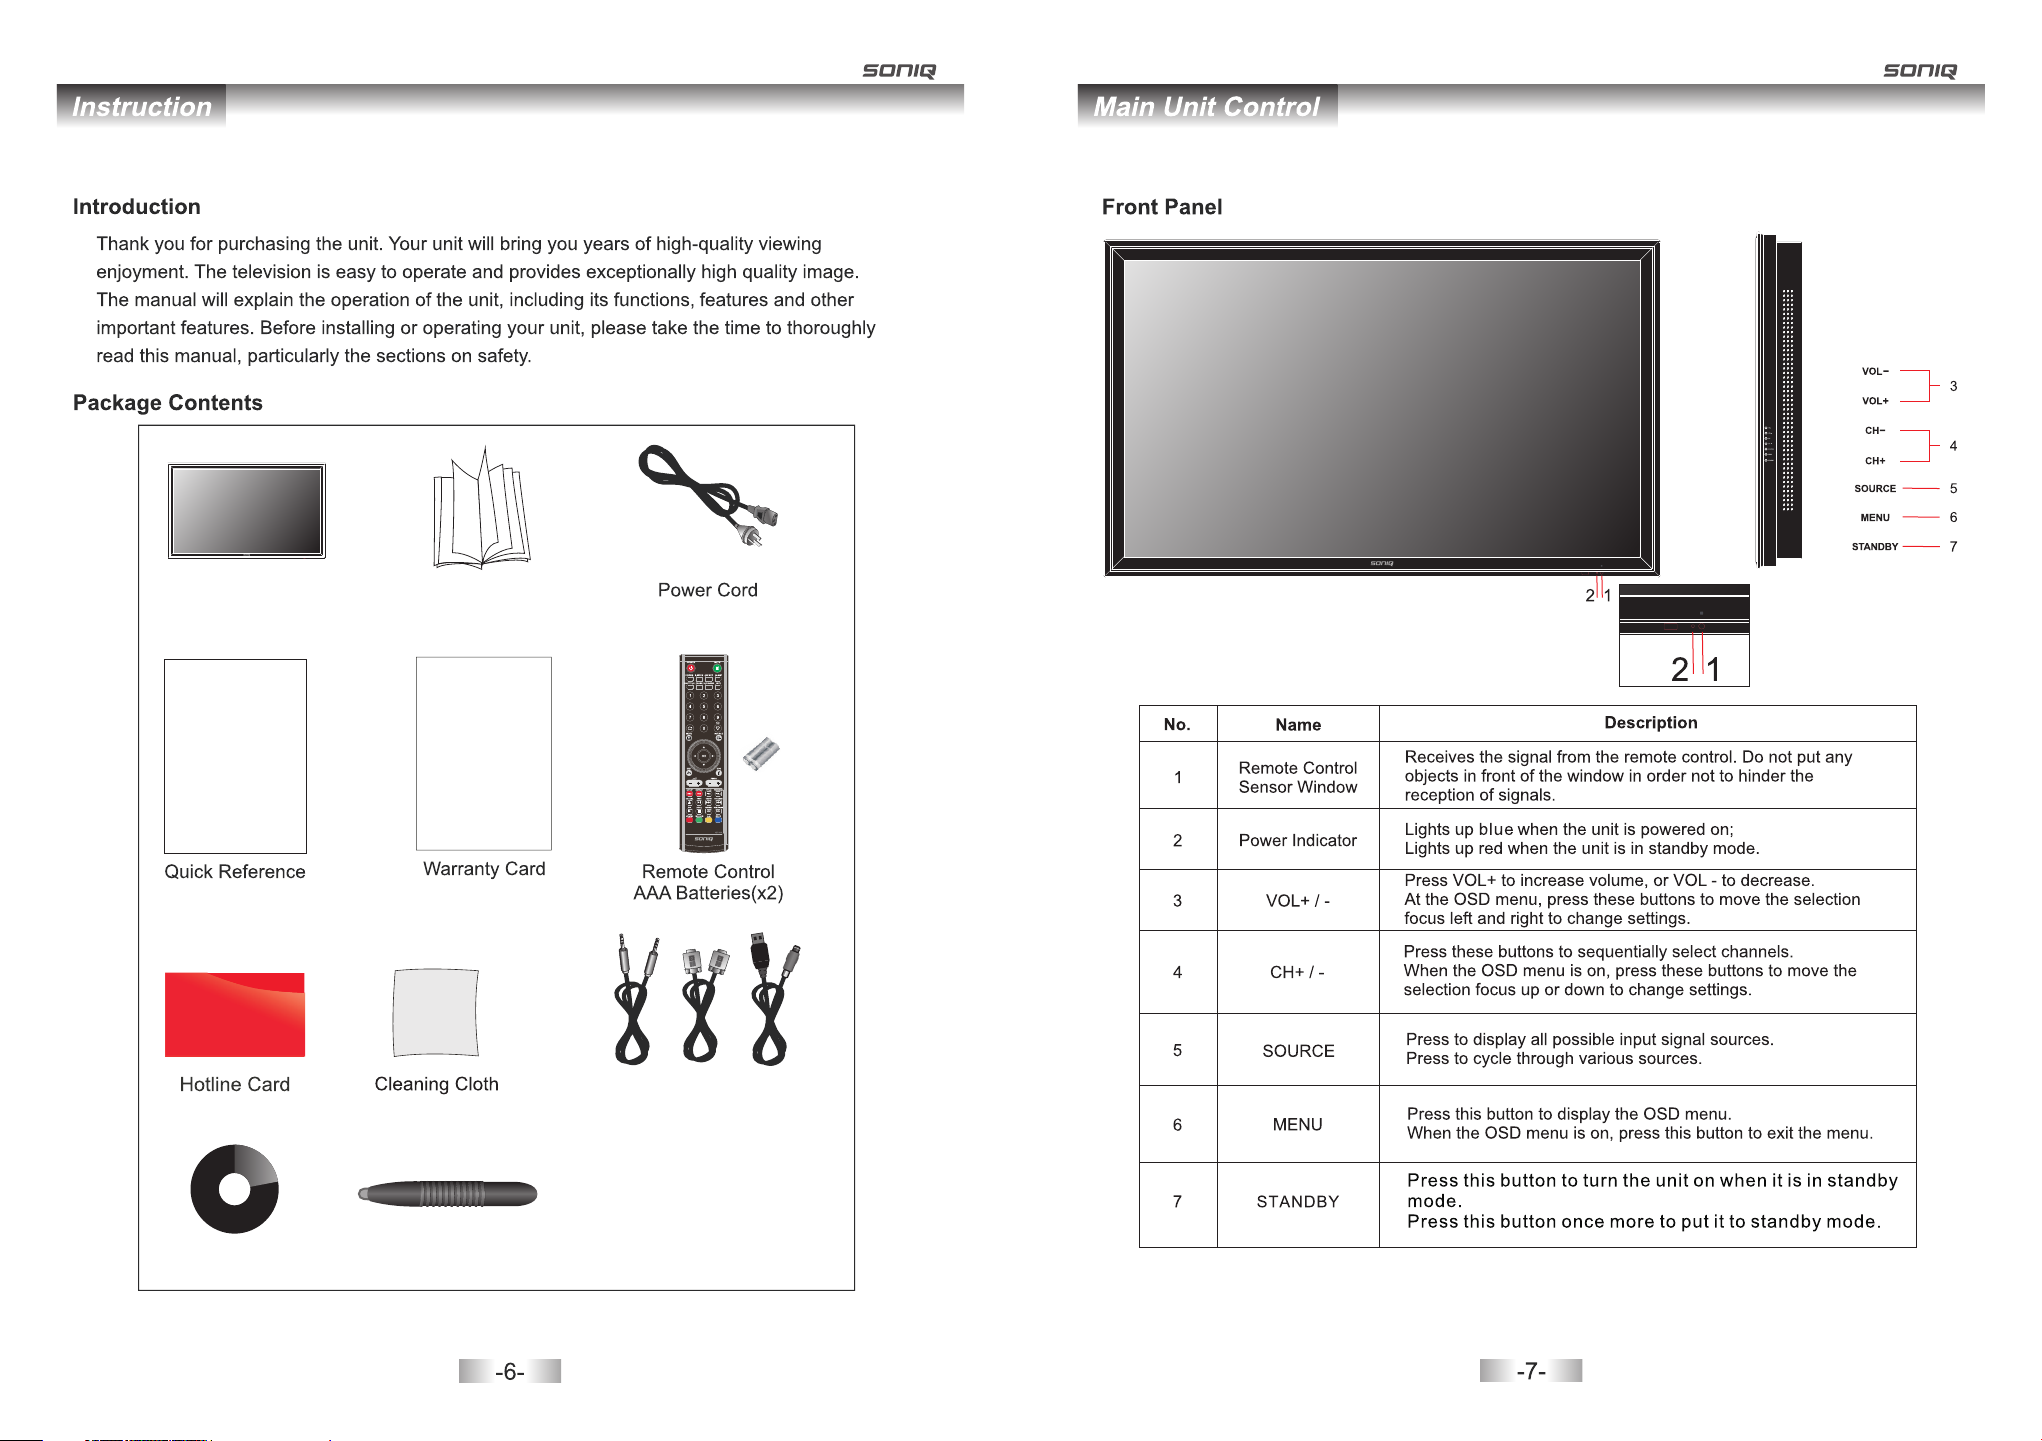
12 POWER Press to pow er on or off the unit .
13
TOU CH SC REE N
USB-A
Conne ct to PC with US B line.
and program re cordi ng.
A-B
Press to s ele ct A-s et, AB-set, Non e for
repeat f unc tio n.
GOTO
Press to s ele ct al l under Media mo de.
None.
Page 7
Page 8
Pb1
Pr1Y1
Page 9

Connect USB Device directly to the unit.
Page 10

1.Press S OURCE but ton to display the i nput sour ce list.
2.Press / o r SOURCE bu tton to select the i nput
YPbPr 1
YPbPr 2
source yo u want to.
3.Press “ OK” butto n to enter the input s ource.
4.Press “ EXIT” to qu it.
EPG: It is only available in DTV mode.
PROGRAMME GUIDE
31 Ma v 2011 14:34
800 SZTVM01 No Information
SZTVM02 No Information
801
802 SZTVM03 No Information
803 SZTVM04 No Information
Rec ord INF O Sch edule Re mind In dex
Up/ Down
Select
This func tion can be u sed only when the EP G informa tion is bro adcasted by digi tal broad casting
compani es.The EP G displays the pro gramme de tails for n ext 8 days.
Press / / / but ton to move the cursor,press O K button to s witch to current c hannel.
TIME
Record: P ress red ke y to display a Recor der windo w, from whic h you can set the time y ou want for
recordi ng.(ref er to the below pict ure)
RECORDER
Sel ect
800 SZTVM01
Sta rt Time
42 Mi nut
14 Ho ur
May M onth
31 Da te
End T ime
12 Mi nute
15 Ho ur
May M onth
31 Da te
Mod e AUTO
Bac k
- +
Page 11

Schedul e: Press ye llow key to browse t he progra m informa tion saved in the sc hedule li st, and press
yellow ke y or exit to re turn.
Schedule List 09:33 25th Dec De let e
Tim e Dat e Pro gra mme Title Channel Name
10:00 Sun, 25 Dec SP-THE SINGING CHRISTMAS TREE 7 7 Digital
CHANNEL MENU
Press MEN U button to e nter the CHANNEL page a s follows :
CHA NNEL
CHANNE L
CHA NNEL
CHANNE L
INFO:Pres s green key t o view the details o f the focus ed channel.
25 Dec 2005 09:00-10:00
A religio us pr ogr am. WS
Remind: P ress blue k ey to add a program ne eds to be rem inded, an d it will be switche d on time.
Index: Pr ess index k ey on the remote con trol to vie w the program list in 7 days.
Reminder setting
Sel ect
800 SZTVM01
44 Mi nute
14 Ho ur
May M onth
31 Da te
Onc e Mode
-
Bac k
+
- +
Note: Volume ad justing wi ll exit the “M UTE”stat us
Auto Tuning
DTV Manual Tuning
ATV Manual Tuning
Programme Edit
Signal Information
Bac k Sel ect
ATV Manual Tuning
Programme Edit
Signal Information
Software Update
Allow Update
Bac k Sel ect
A. Auto Tuning
1. Auto Tuning will be highlighte d once being turned to this page. P ress “OK” bu tton to enter.
2. Pres s / to select co untry, press “OK ” button to enter into the next ste p.
3. Pres s / to select th e living area you are located in( O nly available in Australia),then press
“OK” bu tton to ente r, and then use / t o choose the tuning type.
4. Pres s “OK” to star t auto search.
Cou ntry Se lecti on
Plea se sele ct your c ountr y
Coun try
Austr alia
NewZe aland
Back Selec t Back Selec t Back Selec t
B. DTV Manual
DTV Manua l Tuning
UHF CH 52
0--.--- Mhz
Press OK t o sea rch
Bad Norm al Go od
Tim e Zone S elec tion Cha nnel Tun ing
Time Zon e
Plea se choo se your c hanne l tunin g mode
Scan Ch annel
DTV+AT V
DTV
ATV
1.Press / t o highlig ht DTV Manual Tunin g, press“ OK”
button to e nter sub- menu.
2.Users c an select c hannel number by p ressing / , a nd
set frequ ency numb er by pressing num eric butt ons.
3.Press “ OK” to star t.
DTV ATV
MENU
SKIP
EXIT
You can operate a ll functi on by remote contr ol and mayb e partial function by the key o n panel.
The main me nu can be ope rated by “MENU”, “OK”and “E XIT” button.
“MENU” bu tton can op en the menu or exit to t he upper le vel menu. There are six mai n menu
pages in th e system: PICTURE,SOUN D,CHANN EL,TIME,LOCK,OPTION .
Press / / / but ton to select any item or adjus t some sett ings.
Press “OK ” button to c onfirm a selecti on.
Press”E XIT” butt on to exit the main me nu.
C. ATV Manual Tuning
ATV Manual Tuning
Stora ge To 1
-
Syste m BG
Curre nt CH 1
Searc h
Fine- Tune
Frequ ency 86 1.80 MHz
Save
+
Menu
1.Press / t o highlig ht ATV Manual Tuning, then pre ss
“OK” butt on to enter s ub-menu.
2.All the i tems in thi s displayed menu c an be adjus ted,
after all t he settin gs being done, pre ss / to highl ight
“Search ”,then pr ess / to start.
Page 12

Programme Edit
Press / to se lect Prog ram Edit, then pre ss OK butto n to enter sub-men u.
Programme Edit
7 7 Dig ital
70 7 HD D igita l
71 7 Di gital 1
72 7 Di gital 2
73 7 Di gital 3
77 7 Gu ide
1 C-0 2
2 C-0 4
3 S-0 4
4 C-0 8
Dele te
OK
Sele ct
Rena me
Move
DTV
DTV
DTV
DTV
DTV
DTV
ATV
ATV
ATV
ATV
FAV
Favo rite
Skip
Menu
1. Press re d button to d elete the select ed progra m.
2. Press ye llow butt on to change progr am order. Se lected
channel c an be moved b y using / , then press “OK”
for confi rm.
3. Press bl ue button t o skip the selecte d channel .
4. Press FAV on your rem ote control to add a channel to
the favor ite list.
5. Press gr een butto n to rename the curr ent chann el.
(Only ava ilable in ATV mode)
Signal Information
Press / to se lect Sign al Information , then pres s OK button to display signal d etails, i ncluding
channel n umber, net work name,modulation mo del,sig nal quality and si gnal stre ngth.
Signa l Inf ormation
Chann el 30
Netwo rk Se ven Networ k
Modul ati on 64QAM
Quali ty 99
Stren gth 5 4
Software Update
If there is n ew softwa re with broadcas ting sign al in DTV mod e, the TV set will u pdate sof tware.
Allow Update
Set the tim e of softwa re updatation, y ou can sele ct On or Off.
PICTURE MENU
1. Press ME NU button t o bring up the main me nu.
2. Then p ress / to ent er PICTURE page, i t will high light the f irst option, pre ss OK butto n to enter.
3. Pictur e Mode: Pre ss / to adjust the mod e by Standa rd, Dynamic, Mild, User. Con trast,
Brightn ess, Colo r, Sharpness can be a djusted o nly under u ser mode, Press “M enu” to ret urn to
the main me nu.
4. Color Temperatu re: Press / button to select Co ol, Stand ard, Warm and User. You can ad just
the Red, Gr een and Blu e in User mode.
5. Aspect Ra tio will be a vailable under DTV, an d you can cho ose Full, 4 :3,Auto Just Sca n.
6. Screen c an be avail able under PC mode.
7. Energy S aving: You ca n choose Middle, High, Off, Low, Stan dard in this section
8. Noise Re duction : Can be adjusted among Middl e, high, Off, Low.
PICTURE
PICTU RE
Picture Mode Standard
Color Temperature
Aspect Ratio
Screen
Energy saving
Bac k Sel ect
PICTURE
PICTU RE
Col or Temper ature
Aspect Ratio
Screen
Energy Saving
Noise Reduction
Bac k Sel ect
SOUND MENU
1. Press ME NU button t o display the main m enu.
2. Press / to e nter SOUN D page, it will high light the f irst option, then press OK bu tton to ent er
sub-men u.Press / t o adjust Sound Mod e. You can chan ge the valu e of Treble and Bass un der
user mode .
3. Press / to s elect Bal ance, then press O K button to e nter sub-menu. Press / to adj ust
4. Press / to s elect Auto Volume, then p ress OK but ton to select On or Off.
5. Press / t o select SP DIF Mode, then pre ss OK butto n to enter sub-men u, press / to s elect
PCM,Aut o and Off .
6. Press / to s elect Pow er On Music, then Pr ess OK butt on to select On or Off.
SOUND
SOUND
Sound Mode
Balance
Auto Volume
SPDIF Mode
Power On Music On
Bac k Sel ect
Page 13

TIME MENU
Press MEN U to displa y the main menu.
Use / to ente r TIME pa ge, it will highlight the fir st option .
TIM E
TIME
OPTION MENU
Press MEN U to displa y the main menu.
Press / to en ter OPTIO N page, it will high light the f irst option.
OPTION
Bac k
OPTIO N
OPTION
Bac k
OPTIO N
Off Time
On Time
Clock 02/Jun 15:55
Time Zone New South Wales/ACT
Auto Sleep
Bac k S elect
Off Time
TIM E
Off Time Every Day
Hour 0
Minute 0
Bac k S elect
- Press OK bu tton to ent er submenu.
Press / to ad just.
On Time
TIM E
Mode Select Once
Hour 12
Minute 1
Source AV 2
Volume 30
Bac k S elect
- Press / to se lect On Time , then press OK
button to e nter the su b-menu. Use / to adj ust.
- Clock: Di splay the c urrent system ti me .It's no t
Time Zone
availab le.
Press / but ton to sele ct Time Zone, then pr ess OK butt on to enter sub-me nu.
Tim e Zon e Selectio n
Time Zo ne
OSD Language English
PVR File System
OSD Time Out
OSD Transparency
Restore Factory Default
Bac k Sel ect
OSD Time Out Off
OSD Transparency
Restore Factory Default
Version Info
Blue Screen
Bac k Sel ect
OSD Language: Only English can be selected in the function.
PVR File System: Press OK button to enter the PVR File System, Users can check the information
of the US B device, or format the USB device.
OSD Time Out: Set OSD time out.
OSD Transparency: Adjust the transparency from Off to 100%.
Restore Factory Default: Operate this item to resume all the initial setting.
Version Info: Highlight this item,and then press “OK” button to check out the version information of
the system.
Blue Screen: Press OK to select On or Off.
LOCK MENU
Press MENU to bring up the OSD menu.
Use / to turn to LOCK page, it will highlight the first option ,then press OK button to enter the submenu.
LOCK
Bac k
LOCK
Please en ter pas sword
Lock System
Set Password
Block Program
Parental Guidance
Bac k Selec t
Cance lClear
You are requir ed to input
the password (default as 0000)
Back Sele ct
Auto Sleep
Press / but ton to sele ct Auto Sleep, then p ress OK but ton to select On or Off.
Sleep Timer
Press / but ton to sele ct Sleep Timer, then p ress OK but ton to enter sub-menu, and th en
press / but ton to adju st.
TIM E
Sleep Timer Off
Bac k S elect
Please enter ol d password
CancelClear
Set Passw ord: Pres s / to select Set Pass word, the n press OK button to e nter sub- menu to set
new passw ord.
Block Pro gram: Pre ss / to select Block P rogram, t hen press OK butto n to enter su b-menu,
press / to se lect the pr ogram you want to lo ck ,then pr ess green button on your remo te.(To
unlock th e program , input the passwo rd you set. )
Parent Gu idance: P arent can set age li mit level b y this function.
Page 14

PVR Function PVR Function
PVR File System
PVR funct ion is only a vailable for DTV, incl udes Reco rd, Timeshift and Playback f unction s. Record
include s in time rec ord and preserve record. In t ime recor d can be worked thro ugh REC key
immedia tely, an d preserve record needs to pr eserve be forehand.
Record an d Playbac k can be done at the same time. Time shift is an other function f or both rec ording
and playi ng.
The follo wing will e xplain in details.
Enter PVR f rom OPTIO N menu, as follows :
OPTION
OPTIO N
OSD Language English
PVR File System
OSD Time Out
OSD Transparency
Restore Factory Default
Bac k
Bac k Sel ect
Select Disk C:
Check P VR Fi le Sy ste m Sta rt
USB Dis k
Forma t
Tim e Shi ft Si ze
Speed
Free Re cor d Lim it 6 Hr.
OK
Select
Menu
Select Disk
Choose th e disk to sto re whatever cont ent recor ding, nor mally default as C :
Press / but ton to sele ct Start, then Pre ss OK butto n to enter the subme nu.
Select Disk C:
Check P VR Fi le Sy ste m Che cking
USB Dis k Pas s
Forma t
Tim e Shi ft Si ze All
Speed Chec kin g
Free Re cor d Lim it 6 Hr.
OK
Select
Pass
Menu
USB Disk
If not inse rting USB e quipment, it sho ws No Devic e; If USB equipment is insert ed, it show s USB2.0
or USB1.1 .
Format: S elect to fo rmat the disk.
Time Shift Size
Can't be ch osen.
Can be used a t Timeshif t space, the size is c hosen by cl ients whe n doing format.
Speed
Can't be ch osen. After Check PVR Fi le System , it shows the avail able spee d of USB.
If inspec tion fail ed, it shows FAIL, bu t if it is norm al, it shows SUCCESS
Select Disk C :
Che ck PVR Fi le Syst em SUCC ESS
USB D isk Pas s
For mat
Tim e Shif t Size Al l
Spe ed 9429 K B/s
Fre e Recor d Limit 6 H r.
OK
Sel ect
Pas s
Press format to display File Syste m Siz e
Men u
OK
File System S ize
PVR F ile Sys tem Type H i Spee d FS
PVR F ile Sys tem Siz e All
SD 13 041 Min
HD 37 26 Mins
Sel ect
Men u
Then Pres s OK button t o start format the d isk, then a w arning with “All data will be l ost” will b e
display ed to remin d the user to choose S tart or EXI T.
Press but ton to star t, button to exit.
Format disk
Warni ng! All data will be lost.
Start
EXIT
In Time Record Operation
Press REC b utton on th e remote control t o start rec ording the current progra mm, the rec ording
window wi ll be disap peared after few seconds an d a red trans parent icon with R EC charac ters will
be displa yed at the ri ght side of the scre en. Press H OLD button for stop.
It is avail able for re cording when the u nit is in Sta ndby mode .
PVR.L Operation
Press PVR .L bu tton to dis play the recorde d program l ist, select any of the items fo r watchin g.
Rec orded L ist Pro gram
DIS NEY ADVE NTURE S
DIS NEY ADVE NTURE S
DIS NEY ADVE NTURE S
DIS NEY ADVE NTURE S
GOO D CHEF BA O CHFF
GOO D CHEF BA O CHFF
GOO D CHEF BA O CHFF
GOO D CHEF BA O CHFF
GOO D CHEF BA O CHFF
Geo rge And Ma rtha
Delet e
OK
Sele ct
Menu
INFO
Inde x
Delete: P ress red bu tton to delete foc used prog ram.
INFO: Pre ss green bu tton to pop out prog ramme inf ormation.
Index: Pr ess to swit ch recording pro gram orde rs.
OK: Play fo cused pro gram.
Up/Down : Press / but ton to select prog ram.
Preserve Record Operation
Press EPG d irectly t o display the PROG RAMME GUI DE window, focus on your favor ite chann el
that you wa nt to recor d then press REC but ton at the re mote control to enter into th e RECORDE R
menu, and t hen you are r equired to set the r ecordin g time ther e.Press OK for con firm.
Timeshift
Press to de lay the pro cess of program br oadcast ing in DTV mo de.
Tim e Shift
[00:00 :03 /00 :00:00]
A B
20:13
Page 15

1/11MEDI A\Pho to\JP EG
Retur n Up Fold er QXQ mu sic
000111. jpg 06. mp3 100 24616 c.mp3
0521h angmu 09.jp g 0521h angmu l3.jp g 0521h angmu 15.jp g 08_gC 1WIvN Hu1UZ _0..
Sub Menu Select /Unse lect All
Resolu tion: 1 280x8 00
Size: 19 9 KByte s
Date: -- -- / -- / --
Time: -- : -- : - -
C:\M EDIA\ Photo \BMP 1/ 2
Retur n Up Fold er 1024 x768_ bmp.b mp 1440 x900. bmp
1600x 1200b .mp 213 12.bm p DTVLO GO_NE SX.bm p GRAY1. bmp
GRAY2. bmp unt itled .bmp un title d1.bm p untit led12 3.bmp
Sub Menu Select /Unse lect All
C:\M EDIA
Retu rn Up Fol der mov ie musi c
Phot o Text
Sub Menu Sele ct/Un selec t All
1/1
MEDI A Photo BM P 1/2
Retur n Up Fold er 1024 x768_ bmp.b mp 1440 x900. bmp
1600x 1200. bmp 21312 .bmp DT VLOGO _NESX .bmp GR AY1.bm p
GRAY2. bmp unt itled .bmp un title d1.bm p untit led12 3.bmp
Dele te copy p aste
Page 16

C:\M EDIA\ Movie \mkv
1/2
C: MED IA Music M P3
Retur n Up Fold er QXQ mu sic
03.mp 3 06.mp 3 10024 616c. mp3
113915 3940. mp3 1174 27066 2.mp3 117 75152 82805 .mp3 13 6erqi anyy.m p3
Sub Menu Select /Unse lect All
Album :
Title:
Blt Rat e: 128K
Artis t:
Sampl ing: 44 K
Year:
Slze: 3 924 KBy tes
1/1 5
Retur n
720p_ chd-m r&mrs -smi_
Paran ormal _Acti vity_ [- Sams ung.D emo.O ceani _ Shutt er_Is land_ [Divx _-[MV ].Hot cha-. Party Gi -
BigBu ckBun ny_10 8-[Di vx7]_ AAC5. 1_A_
Sub Menu Select /Unse lect All
Resolut ion: 19 20 x 1080
Audio Trac k: 1/2
Subtitl e: OFF
Program : -/0
Size: 519 585 KBy tes
Page 17

MEDI A\Text
1/1
Ret urn
chi nese tx t.txt
This bo ok by the w ww.wmt xt.co m(unk no
wn txt no vel dow nload s ite) fo r you to or
ganiz e produ ction
Downl oad fre e novel s more ex citin g,mor e
compl ete ver sion of t he nove r e-boo k dow
nload p lease v isit ww w.wmtx t.com
chapt er
Engl ish txt .txt
Sub Men u Sele ct/Un selec t All
Size: 3 5KByt es
Page 18

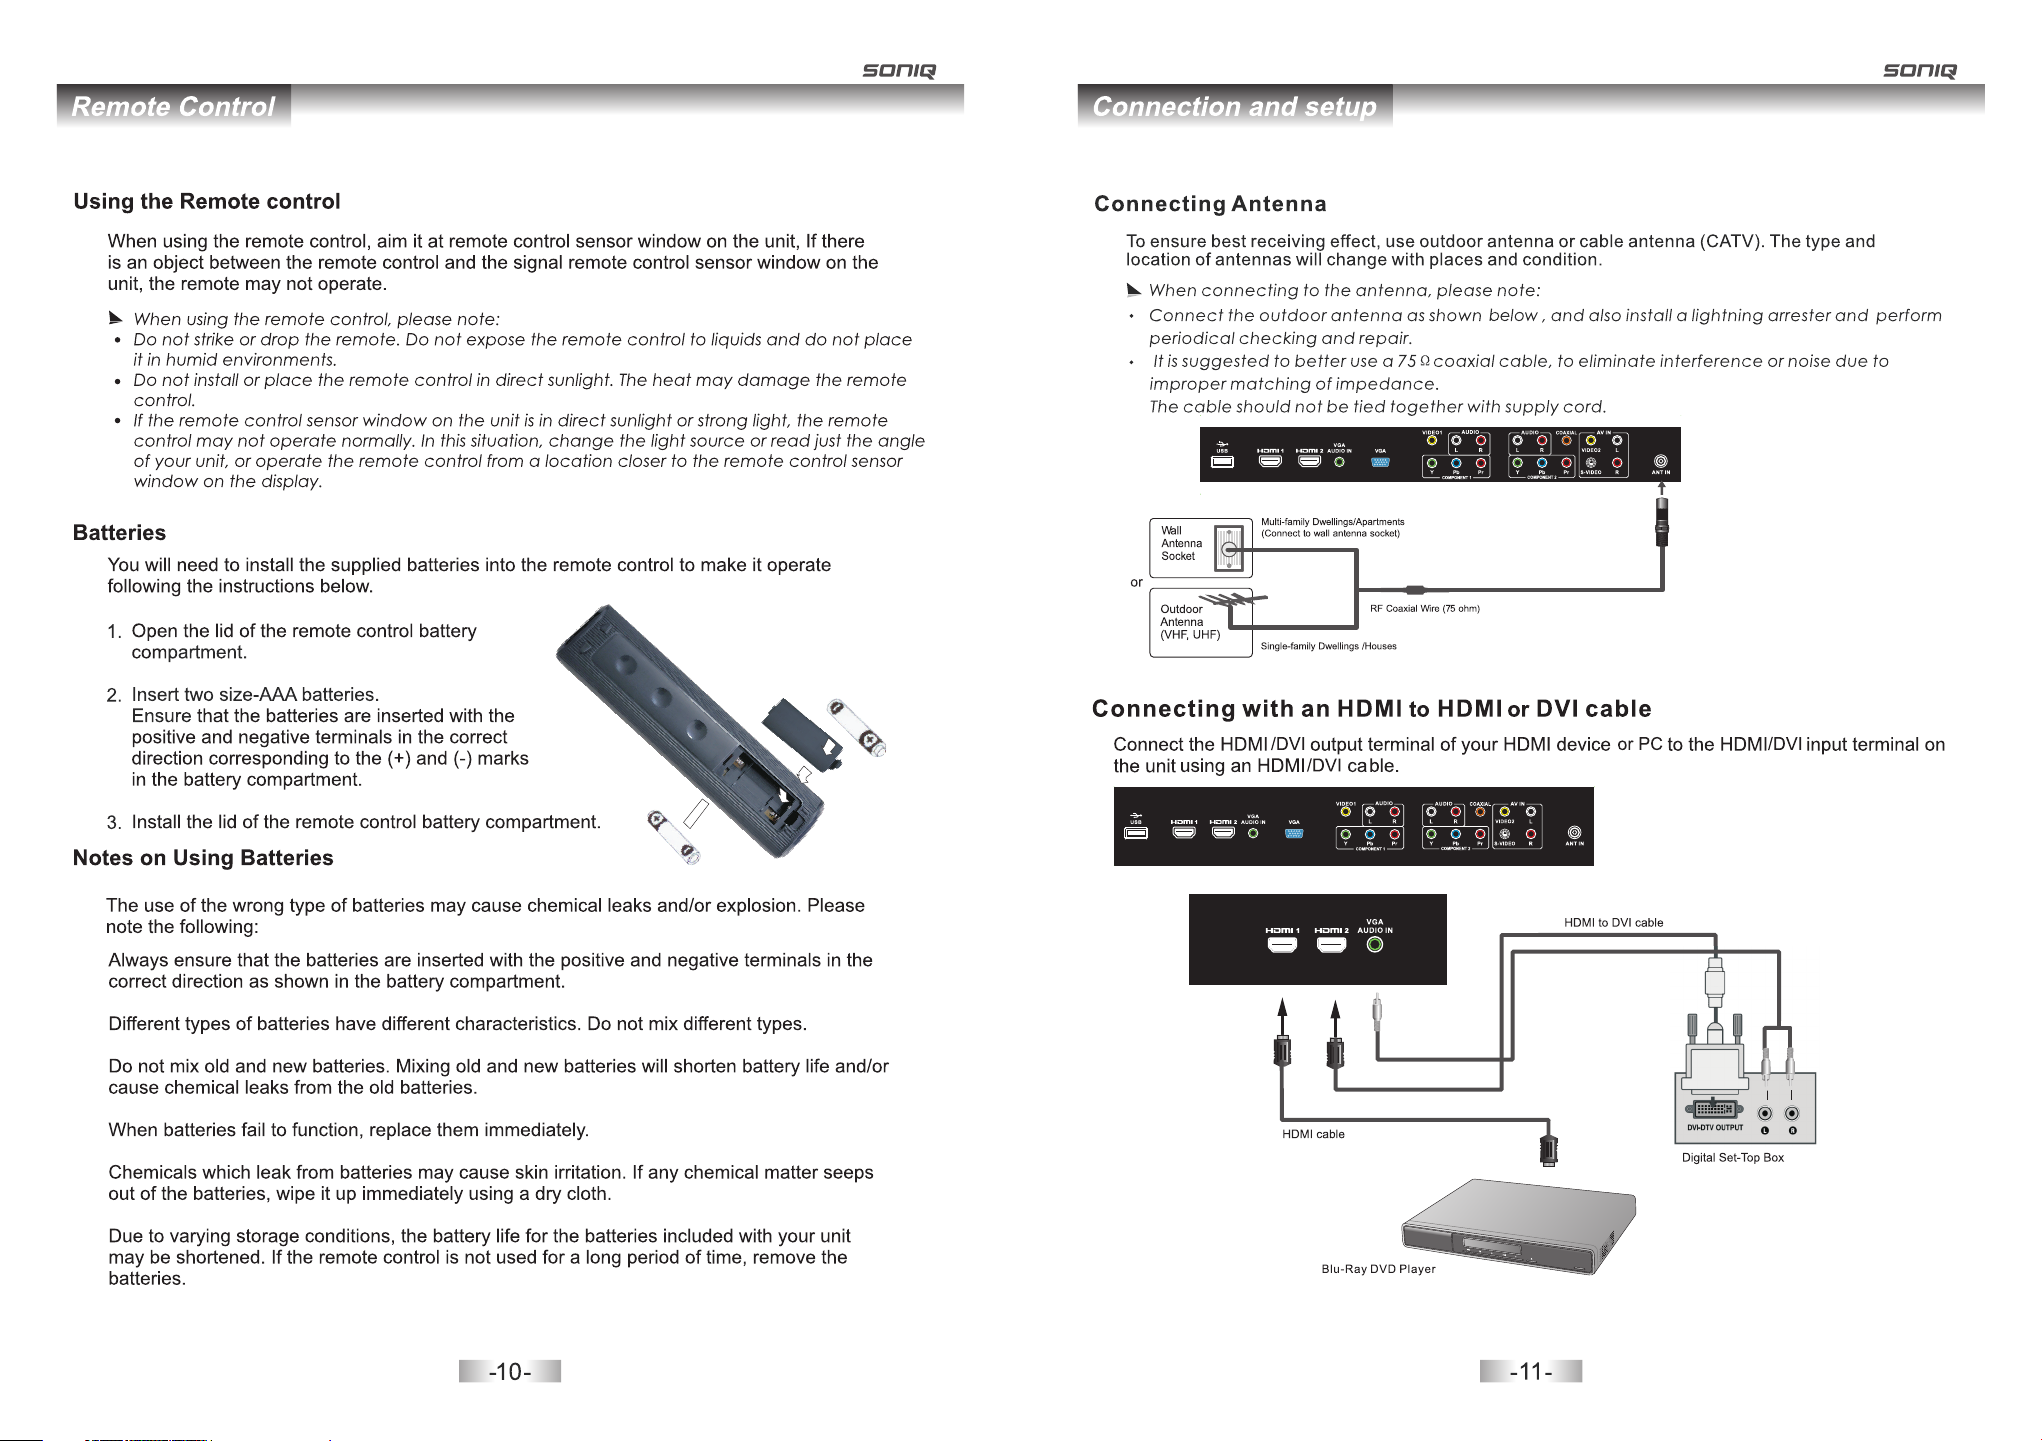
Software Installation
Software Unload
(3) Selec t destina tion folder. You can change it bas ed on your ow n requirement. Then cli ck “Next” :
(4) Click “ Next” all t he way down until a di alog box as b elow appe ars, and click “Fi nish”:
3. Software Unload
If Fitouc h program i s running, pleas e exit it fir st.
Open the "C ontrol Pa nel" of Windows op erating s ystem, cl ick "Add or Remove P rograms ", find
Fitouch , and then cl ick to uninstall i t, refer to t he following steps:
(1) Selec t “Remove ” and click “Next” :
(2) Click “ Yes” i n the dialo g below:
(5) Af ter the ins tallation, wat ch if there i s an icon in tray styl e appeari ng on the bot tom right of
the deskt op: if so, th at means install ation suc ceeds. ( note: blue one means t he device h as
been conn ected, gr ay one means the device has not b een conne cted.)
(3) Click “ Finish” a nd Fitouch is unin stalled ..
3332
Page 19

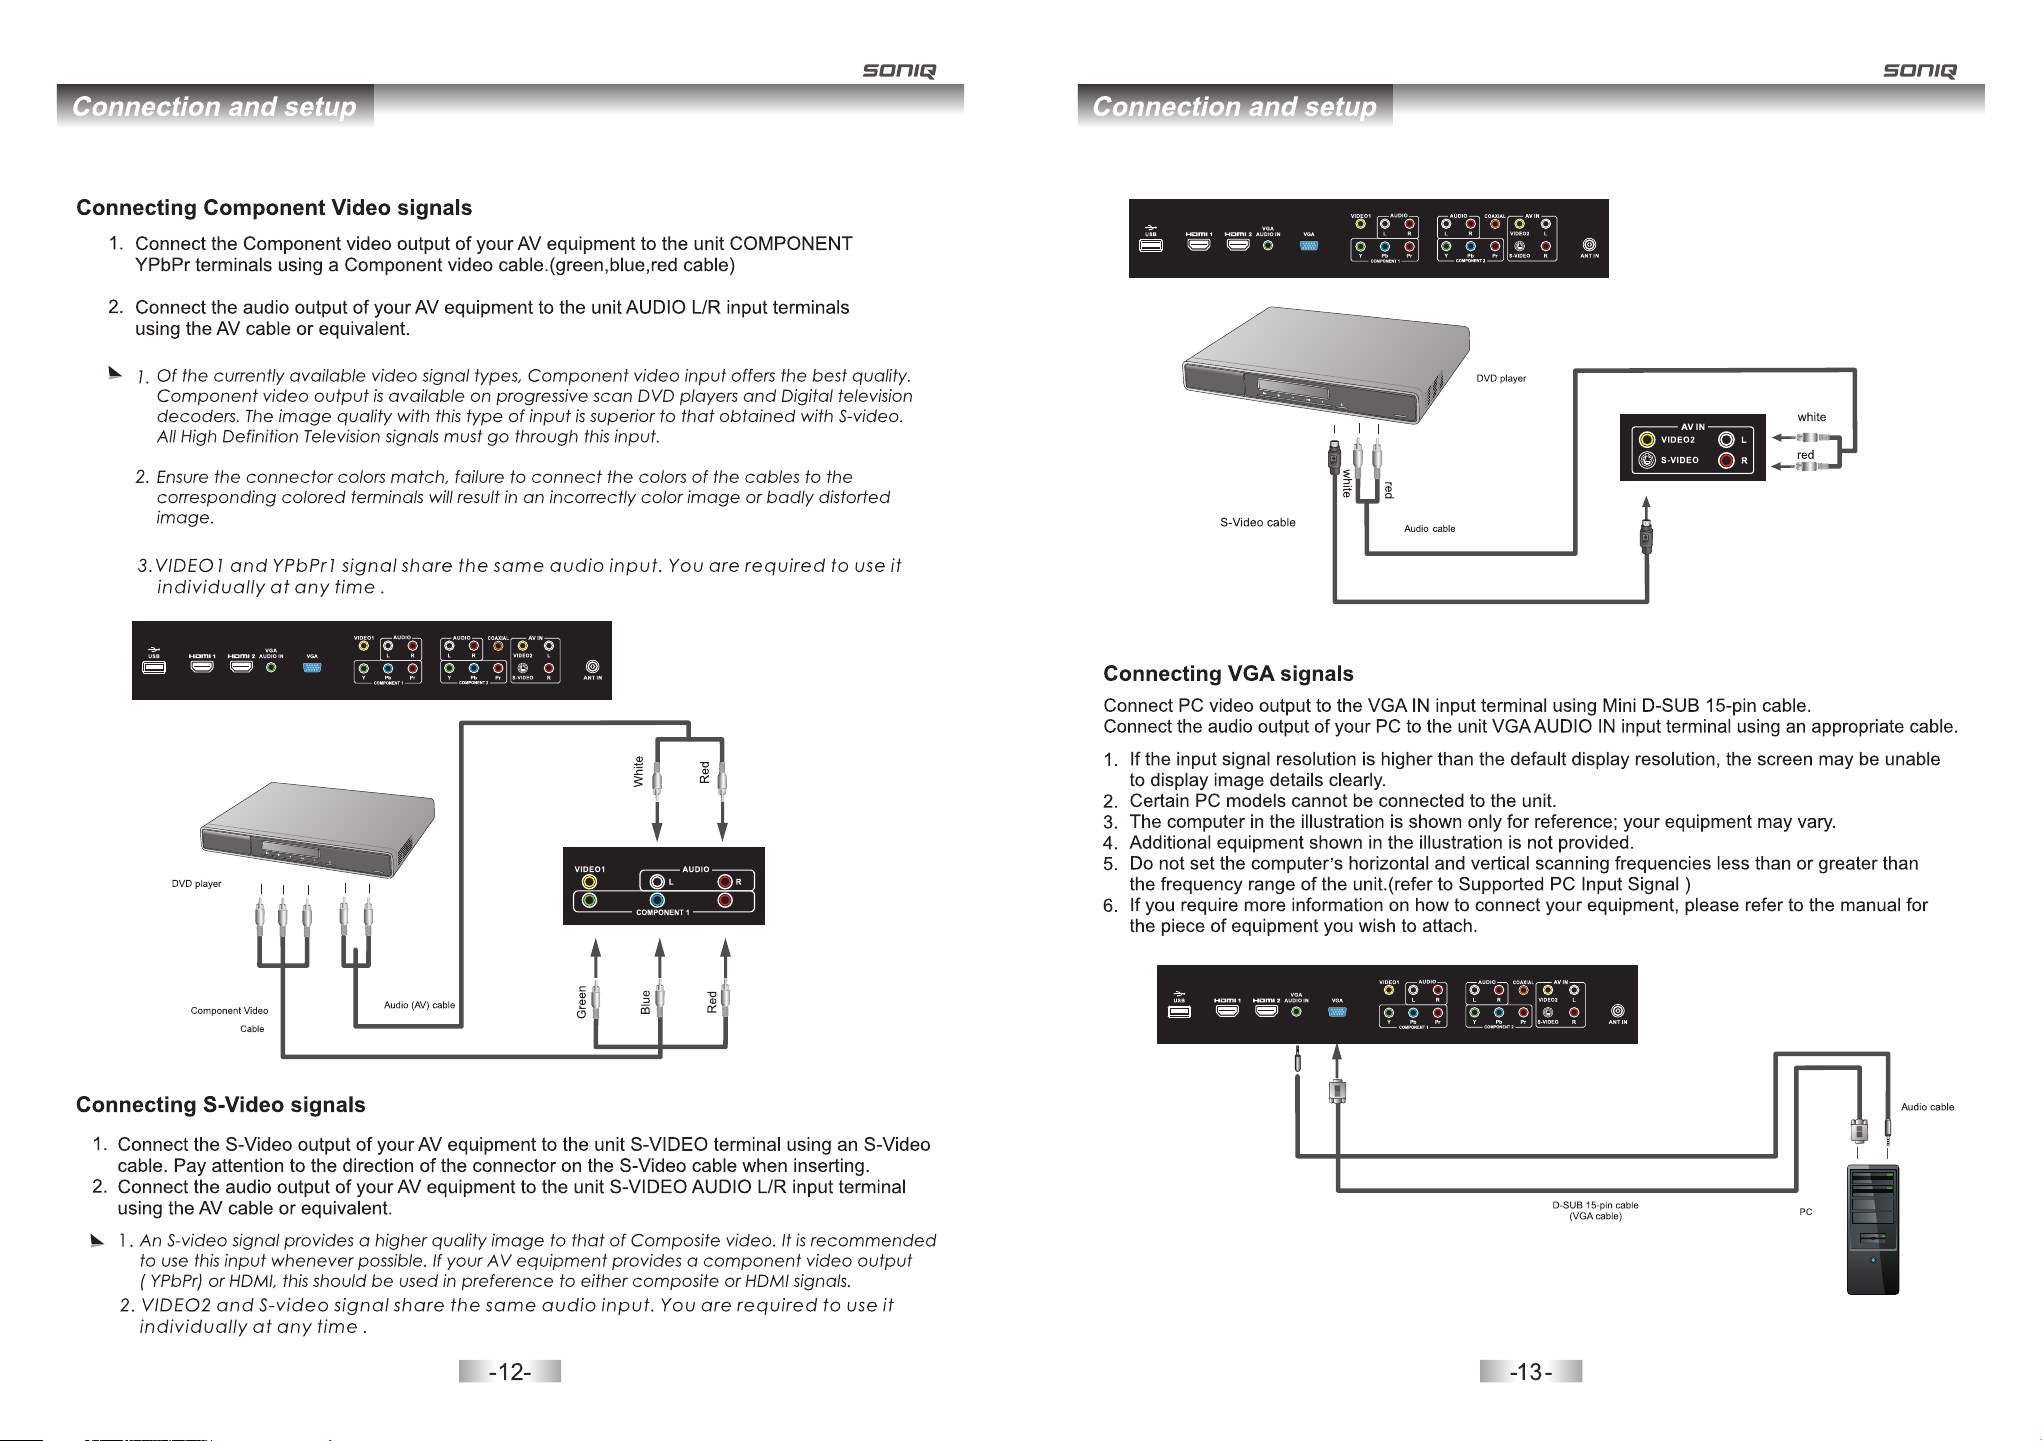
Software Application
Software Application
4. Software Application
4.1. Runn ing
(1) The s oftware w ill run automatically on bo ot-up und er the default mod e, you can fi nd the
tray-li ked icon on t he bottom right of t he deskto p.
(2) If you cl osed this s oftware by accid ent, you ca n find "Free Interactive Technolog y"
through e ntering "Start"->"Al l prgrams ", and then s elect" Fitouch " to run the pr ogram.
Default m ode: You can fi nd the shortcut of Fitouch" o n the Deskt op, directly dou ble
clickin g it will als o run the program.
4.2. Main M enu
Click “ ” tra y icon to dis play the main menu a s shown bel ow:
Functio ns are as fol lows:
(1) Langu age: Sele ct user interfac e languag e.
(2) Calib rate: Cal ibrate the scree n to ensure t he touch po sition
coincid e with the ac tual position on the screen .
(3) Optio n: Displa y the basic inform ation of to uch scree n. User can
configu re corres ponding parameters to ach ieve bett er effect
accordi ng to actua l demands. Meanw hile, use r can contr ol and
check the d evice thr ough Option.
(4) Ab out: Disp lay informatio n of Fitouc h software.
(5) Exit: C lose Fito uch software.
4.3.1. Ba sic Mode Ca librating
There are C ustom and S enior two option s in the dial og above. I f no option is selec ted,
then the de fault wil l be basic mode calibration .
The mode is o nly appli cable to the situation that o ne touch sc reen is connecte d.
“Calibra te Mode” in cludes “TouchPanel” and “Touc hBoard” . The difference betw een
them is tha t “TouchBoa rd” supports pos itionin g of non-re ctangular disp lay scree n,
“TouchPan el” only su pports positioning of rec tangula r display screen . For recta ngular
screen of t elevisi on, please selec t “TouchPan el”.
“Calibra te Locati on” includes “1” and “2”. “1” r epresen ts positioning i con will mo ve in
four corn ers of the sc reen; “2” repres ents posi tioning i con will move near t he centra l area
of the scre en. (Note : “1” is recommend ed in regul ar situat ion.)
After don e with sele cting, click “Ca librate ” and pop up th e following inte rface. Pl ease
touch the c enter of “ ” wi th touch pen or your f inger. (In t he process of positioning ,
the touch p en should b e hold vertical to touch surf ace and the p en head should be
coincid ed with the c enter of “ ”.
4.3. Cali bration
Click “Ca librate ” and a dialog as below pops up:
The positioning icon will move to the four corners of the screen, please touch them respectively.
4.3.2. Cu stom Mode C alibrating
It is custo m mode cali bration when “Cu stom” is se lected. It supports follo wing two
positio ning ways . Two touc h screens are requ ired for po sitioning in custom mode. I t not
support s positio ning if there is onl y one scree n.
(1) Doubl e Screen Sp licing
Double sc reen spli cing refers to dividing the s creen int o two parts. The s creen
display s in two moni tors respectiv ely, whi le the two mo nitors need to be eq uipped
with touc h screen. I n this way, it needs doing pos itionin g respectively, one is on th e
left side o f the scree n, and the other is on t he right si de of the screen.
(2) Exten ded Mode
Extende d mode refe rs to extending th e screen in to two part s: main screen and
expansi on screen , which correspond to two pie ces of moni tors. Similarl y, both tw o
monitor s need to be eq uipped with touch screen. I n this way, it does also posit ioning
twice sep arately, the first time on the main scr een, the se cond time on the exp ansion
screen.
3534
Page 20

Software Application
Software Application
4.3.3. Se nior Mode C alibrating
It is Senio r Calibra ting when “Senior” is selec ted.
In this mod e, user can c alibrate the scr een flexi bly based o n your own demands .
Should yo u have any pr oblem when calibrating th e screen in t his mode, please c ontact
our compa ny for tech nical support.
4.3.4. El ectroni c Key
Electro nic key can b e calibrated in th e
specifi ed area on th e screen. Design ated
area must b e shown on th e dialog box to
configu re, save an d calibrate.
4.4.1. In fo
“Basic” s hows info rmation of the con nected to uch scree n. Different t ouch scre en
numbers c an be chose n when several touch screen s are conne cted, in order to sh ow the
corresp onding in formation of tou ch screen . In “Basic ” dialog box, user c an switch t ouch
mode in “Ba sic” as fol lowing:
1.Singl e point to Mu lti-points: Cl ick “Sing le Point” a nd pop up a menu, then c lick “Mul tiPoints” t o switch to “ Multi-Points ” touch mod e.(Note: When the “Multi- Points in “ Feature”
shows “√”, th e “multi- Points touch mod e can be avai lable.)
2. Multi- Points to S ingle Point: Cli ck “Multi -Points ” to pop up a menu. Th en click “S ingle
Point” to s witch to si ngle point touch m ode.
TS02R02B021B
00003513
Multi
4.4. Opti on
Click “Op tion” to di splay the dialog a s follow:
TS02R02B021B
00003513
For Windo w 7 OS, if touc h screen support s Multi-P oints, user can set it to Multi -points
mode to exp erience t he effect of Multi-poin ts touchi ng.
Single Po int Mode: F ully substitut e the funct ion of mouse. There is no nee d to run
Fitouch i n this mode .
Multi-P oints Mod e: Enable user to re alize Mul ti-poin ts or multi-user i nteract ion on the
same scre en.
“Feature ” display s update informa tion of tou ch monito r. “√” means supporti ng, “×”
means not s upporti ng.
Multi-t ouch upgr ade: (Must have ap propria te author ity before upgra de.) Clic k “×” after
the multi -touch in “ Feature”, the di alog box sh own as belo w:
3736
Page 21

Software Application
TS02R02B021B
00003513
Click “Upgrade” and open the authorization document, then it can upgrade. (The correspond
authorization document is in the box.)
Software Application
4.4.2. Co nfigura tion
Upgrade
Configu ration su pplies Service Paramete rs for user t o select.
“Servic e Paramet er”(Right key part o nly can be ad justed in S ingle point mode )
Default s etting is r ecommended in th e configu ration of s ervice paramet er. User can
modify it i f necessa ry. Below are the introduc tions of ea ch parameter:
Right Key D elay Time: S et the time of achie ving righ t click.
Right Key S patial Tole rance: When the fi nger pres s on the scre en, there will be a
range of ji tter, whic h is acceptable. Th e jitter po ints are regarde d as same poi nt, in
order to ac hieve rig ht click.
Smooth Co effic ients: make sure the drawin g line will n ot dither largely.
User also c an upgrad e “Dual Splicing” in the same w ay.
4.4.3. Co ntrol
3938
Page 22

Software Application
FAQ
If situat ion like br eakpoint, line j ump or envi ronment c hange occurs, pl ease firs t make
sure ther e are no othe r debris and disto rtion and t hen selec t “Write Init” .
User can re start the d evice through “R estart” a ccordin g to practical dem ands.
“Check All” prov ides the functio n of inspec ting the parameter value of e very pair o f
light tub es, by whic h determine the wo rking sta te of light t ubes.
“Draw Test ” must be run i n Single Point mode. (Note: D ue to the siz e difference
between d isplay ar ea and touch area, there is a pos sibilit y that display poi nt is not
coincid ed with tou ch point.)
4.5. Oper ation Fun ction
After fin ishing ca libration and co nfigura tion, use r can realize such o peratio n as below:
Click-- ---Clic k on the screen targ et
Double Cl ick---- -- Click a target tw ice quick ly in succe ssion
Drag--- -Press th e target and drag
Right Cli ck----- press the target f or 2 to 3 secon ds
5. FAQ
(1)Why th e “Multi- Points” can't be u sed in touc h mode?
Confirm P C operati ng system is Windo ws 7. Multi - Points in Touch Mode can not ru n if your
operati ng system i s not Windows 7.
Enter “Co mputer Ma nagement”--- “ Device Ma nager”- --“Human Inter face Devi ce”---“USB
Human Inp ut Device ”, then right clic k on it, sele ct “Properties” and then en ter “Deta ils”. If
such info rmation ( vid-10c4) as sho wn below ap pears, re move the USB Human I nterfac e
Device an d wait for th e system reinsta llation .
(2) Why def ault sett ing is not Single Po int mode wh en exit Fitouch in “Multi-P oints”?
Exit Fito uch in “sin gle Point” mode, t he system w ill defau lt as “Single Poin t” mode;
Exit Fito uch in “Mul ti-Points”, the system will de fault as “M ulti-Points” m ode.
(3) Af ter pulli ng out and unplugg ing USB lin e, why the connection speed o f Fitouch s oftware is
slow?
This is con cerned wi th PC system. You can enter “Comp uter Mana gement” and chec k
whether t here is “HI D-compliant de vice” in “D evice Man ager”.
Note: the s peed of HID -compliant dev ice is rela ted to the co nnection time of F itouch.
(4) Why som e drawing t ools fail to run und er “Multi -points ” mode?
Some draw ing tools d o not support “Mul ti-Poin ts” mode, t herefore pleas e downloa d those
support ing “Mult i-Points” mode .
If you have s witched “ Single Point” mo de to “Mult i-point s” mode, you shoul d first cli ck any
drawing b utton in dr awing tools, and then click “ Brush” to p erform normal to uch.
(5) Why Fit ouch icon i s gray when runnin g the Fitou ch progra m?
Check the c onnecti on of USB line. Ente r “Device M anager” a nd find “Human Int erface
Device” , check whe ther there is “HID -compli ant devic e” (The Hardware I D in Detail s
contain s vid-10c 4 in its subcatego ry.)
Check the c onnecti on of USB line. Exit F itouch so ftware and rerun.
User shou ld make sur e that the Windows 7 O S support s “Multi- Points” touch. C urrentl y, only
the versi ons above W indows 7 Home Premium (incl uded) sup port “Multi-Po ints” tou ch.
(6) Why “Mu lti-poi nts” mode does not w ork after “ Single Po int” mode was swit ched to Mul ti-
points” m ode?
Please ex it Fitouc h and drawing tools. If it stil l fails to work, unplug USB lin e and plug it i n,
then run th e Fitouch a nd drawing softw are again .
(7) Af ter opera ting “Select Lan guage” an d “Restart” under “Multi- points” m ode, why can not
draw line u nder “Mul ti-points” mode?
After you o perated i n “Select Langua ge” and “Re start” un der “Multi-poi nts” mode , you
should fi rst click o ne of the drawing bu ttons in dr awing too ls, and then click “ Brush” to
perform n ormal dra wing.
4140
Page 23

FAQ
FAQ
(8) Under “ Multi-p oints” mode, why t he cursor i s not coinc ided with touch po int after “ Screen
Calibra tion”?
Enter “Co ntrol Pan el”---“Tablet PC S etting” ---“Dis play” and click on “ Reset”.
(9) How to ad just the se nsitivity of “Do uble Clic k” under “M ulti-Points” m ode?
Double cl ick the “Pe n and Gesture” ico n in the task bar and a dia log pops up:
Select “D ouble Cli ck” then click “Se ttings” ( or Double c lick on “Double Cl ick”). And e nter next
dialog:
Adjust “S peed” and “ Spatial Tolerance”. Then you can c lick the test figure on the rig ht
bottom to o bserve th e effect. After finished , click “OK ”.
(10) How to a djust Win dows 7 tablet inpu t panel?
Single Po int Mode:
“Start” ---“Acc essories”--- “Tablet PC” t o call up “Tabl et PC Input Panel” ( “click tw ice to
call up "Tabl et PC input p anel under single point mod e")
Click the k eyboard i con on the left top to s hift:
User can se lect one of t he two input metho ds to edit Office an d other software b ased on
your requ irement .
“Multi- P oints” mo de:
“Tablet Inp ut Panel” w ill pop up from the le ft side of sc reen. (No te: the visible re gion of
“Tablet Inp ut Panel” i s only about 2cm. Also when an ico n as below sh ows, you can click
it and ente r Tab let PC input panel.
You also can invo ke the “Tablet PC Input Pan el” follo wing the operation in singl e point
mode and mo use mode.
(11) Wha t softwar e support “Multi-Points ” mode in Win dows 7?
Under “Mu lti-poi nts” mode, user ca n perform o peratio ns like enlargin g, contra cting,
turning p ages in som e programs such as IE8, Wor d, Excel, P PT, PDF, etc.
Under “Mu lti-poi nts” mode, multi -points t ouching p resents its char m in a vivid, d etail way
when inte grated wi th the six kinds of ga mes in Micr osoft Touch Pack.
4342
Page 24

Application of Checktool
6. Application of Checktool
(1) Runni ng
Enter the d estinat ion folder of Fito uch and fin d the folde r named as “checkToo l”. Open th e
folder an d double cl ick “checktool.exe” to di splay the d ialog:
201 1-07 -06
Run Check tool, the re are “ DeviceInf o”, “Init ”, “CheckAll”, “CheckOn e”, “Chec kAllResult” in
the inter face.
If the devi ce is not con nected, the enti re select b uttons can not be selected an d VersionI nfo
shows Unk now. If the de vice is connecte d, Please s tart testing.
(2) Al l Infrare d Tubes Testing
Click “Ch eckAll” t o test all infrare d tubes' da ta. If there is no abnormal sit uation, Al l Light Info
display s all infra red tubes' data. If so, Check AllResa ult at the right sid e will show a c olumn of
“except ional lig ht”. This column displa ys the posi tion and data of abnormal inf rared tub es.
Then clic k “CheckE rror”, select “B oardNum ” and “Ligh tNum” in “CheckO ne”.
(3) Singl e Infrare d Tube Testing
This func tion is use d to detect one pair t ubes' sig nal stren gth of sending and r eceivin g and
analyze t heir work ing state. Click “ Cur” and th e IR contro l data will be displ ayed in
“CheckO neResau lt”; click “Next ”, “Pre”, t hen all broken infrared val ues will be d etected one
by one.
(4) Full Sc reen Test ing
Press F2 to d raw line on t he screen and perf orm full sc reen test . this function ca n detect an d
reveal th e maximum a rea touching informatio n so as to dete ct the problem of br oken line i n
certain a rea.
Note: Due t o the size of d isplay area is inc onsiste nt with tha t of touch area, dis play poin t may
not coinc ide with to uch point.
Press F2 to q uit the ful l screen inspect ion when in spectin g.
(5) Initi alizati on
This func tion is use d for factory sett ing test, w hen the initialization va lue of cert ain position is
0, it means t he infrar ed transmiting a nd receiv ing of the me ntioned positi on is abnor mal, so
reparin g is needed f or this position.
4544
Page 25

TV
Operating Voltage
Power Consumption
Video Format Supporting
Digital TV
Analog TV
Panel Spec
~100-240V AC,50/60Hz
430(Max),<1W(Standby)
COMPONENT
HDMI
Input Frequency
Channel Bandwidth
Video Decode
Audio
TV System
NICAM
Active Area
Contrast Ratio
Pixel Format
Luminance White
Color Depth
Expected Life Time
480i,480p,576i,576p,720p(50Hz/60Hz),
1080i(50Hz/60Hz),1080P(50Hz/60Hz)
480p,576p,720p(50Hz/60Hz),1080i(50Hz/60Hz).
1080p(24Hz/30Hz/50Hz/60Hz).
Australia
7MHz
1080i,720p,576p,576i
MPEG;AC3
PAL B/G;D/K;I
NICAM
Stereo
1329.12mm(H) X 7 47.63 mm(V)
60.0 inches(15 20mm) d iagon al
5000:1
1920 horiz. by 108 0 vert. p ixels , RGB stripe
arrangement ab out 60, 000 hou rs
500cd/m (Cente r 1 point ) (Typ.)
10bit(D), 1.06 B illon c olors
about 60,000 hou rs
Connection Interface
Audio Power
Unit Dimension
Weight
ANT IN
VIDEO input
S-VIDEO input
YPbPr input
VGA in put
HDMI/DVI input
USB input USBx1
8W+8W
1472(L)x122.5(W)x892(H)mm
Net:61.2 kgs; Gross:74.5 kgs
Rf×1
VIDEO×2
S-VIDEO×1
YPbPr×2
VGA×1
HDMI/DVI×2
Note:Wi th the cont inuous improve ment and so ftware up date of the system , on screen
display a nd actual o peration may be differe nt from the i nstrunction ma nual's.
4746
Page 26

Touch-screen Specification
Highe st speed:
The hig hest speed u p to 300 dots co ordinate s cond in
the wor ld can provi de users wit h a prompt res ponse and
perfe ct reappea ring of hand w riting. it i s the best cho ice
for int eractive w hiteboar d.
Fault -toleran t design:
The fea tured Faul t-tolera nt design ca n automati cally
detec t and reset wi thin 2 secon ds once the eq uipment
goes ab normally w ith high rel iability.
Various ada ptation:
With de sign of anti -glare, an ti-dust, a nti-stat ic,
anti- electrom agnetic in terferen ce. the prod uct can be
used fo r various en vironmen ts.
Suppo rt various O S:
The pro duct can sup port Opera ting Syste m linke wind ow,
Mac and L inux etc.
Long- life:
Propr ietary ant i-ray decl ine of circu it design effec tively
preve nt decline o f the produc t performa nce caused b y
optic al devices a ging.
Two touc h moces.
Two touc h modes of mou se and multi -touch can b e
switc hed accord ing to vario us OS and appl ication.
Multi -Touch:
The pro duct suppo rt multi-t ouch under W indows 7.
HID:
The pro duct is up to HI D standard . Users just p lug
and Pla y.
48
 Loading...