

Page 1
L42V12A -AU
Page 2
2-52-5
7-87-8
9-109-10
11-1311-13
11
11
12
12
13
13
14
14
11
66
6
6
7
8
9
Menu Operation Guide
Source Selection
Vol+/Vol-(Volume control)
Menu operation
CHANNEL
PICTURE
SOUND
TIME
OPTION
LOCK
PVR Function
Media play Function
15-17
15
16
16
17-18
19
19
20
21
21
22-23
24-28
29
31
Page 3
Page 4
Page 5
Page 6
Page 7
Screws : ST4 x14F(x7 , Black)
Page 8
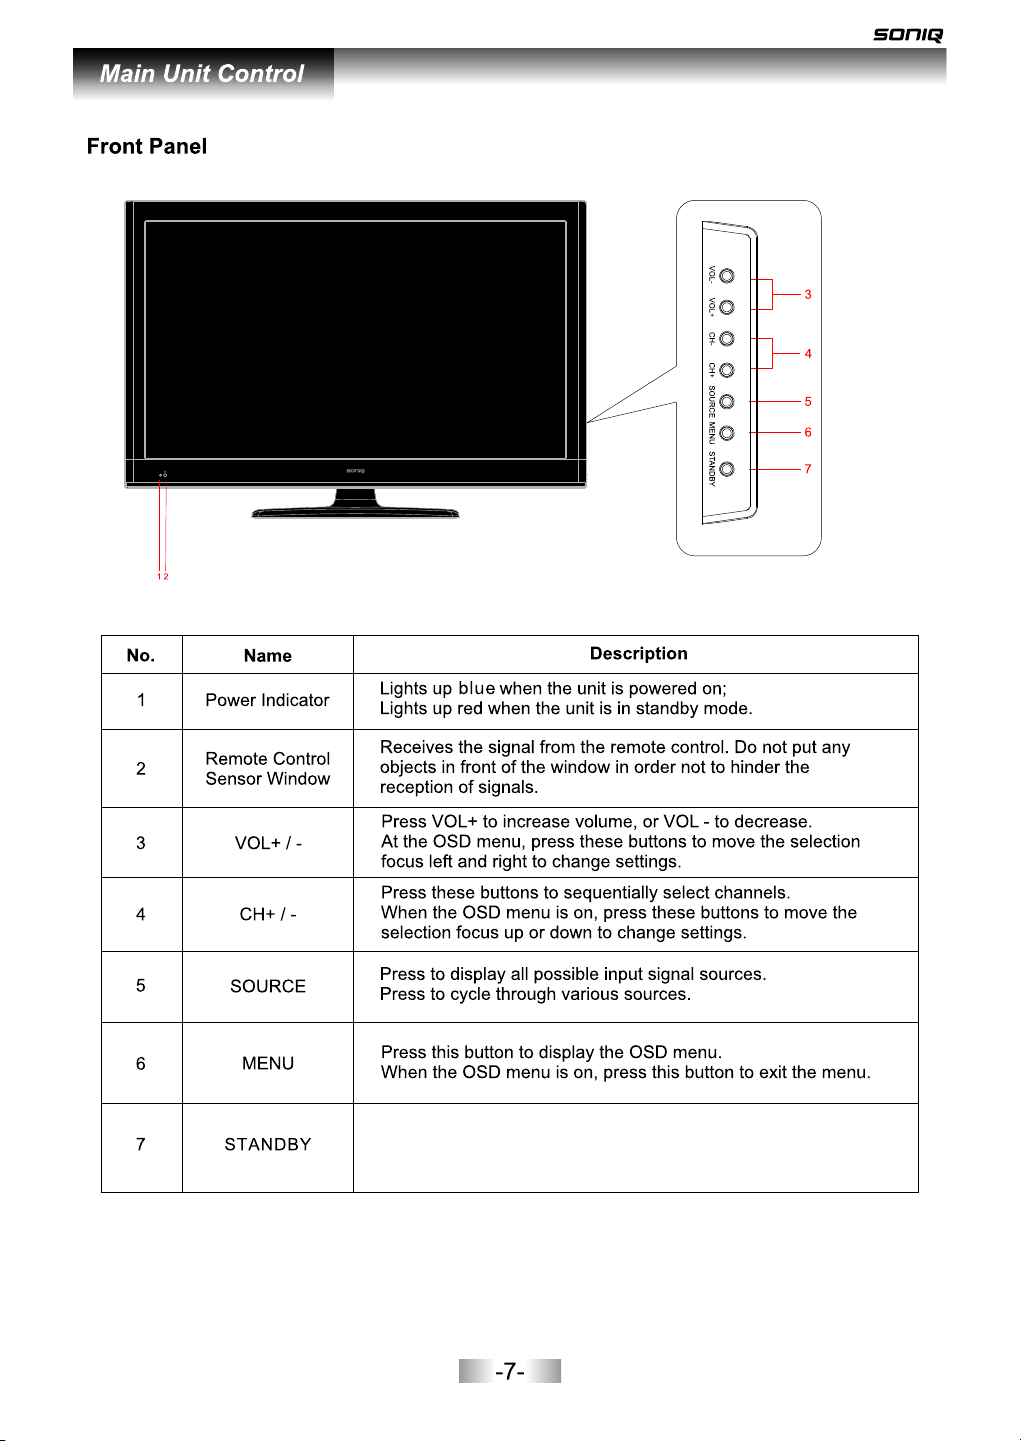
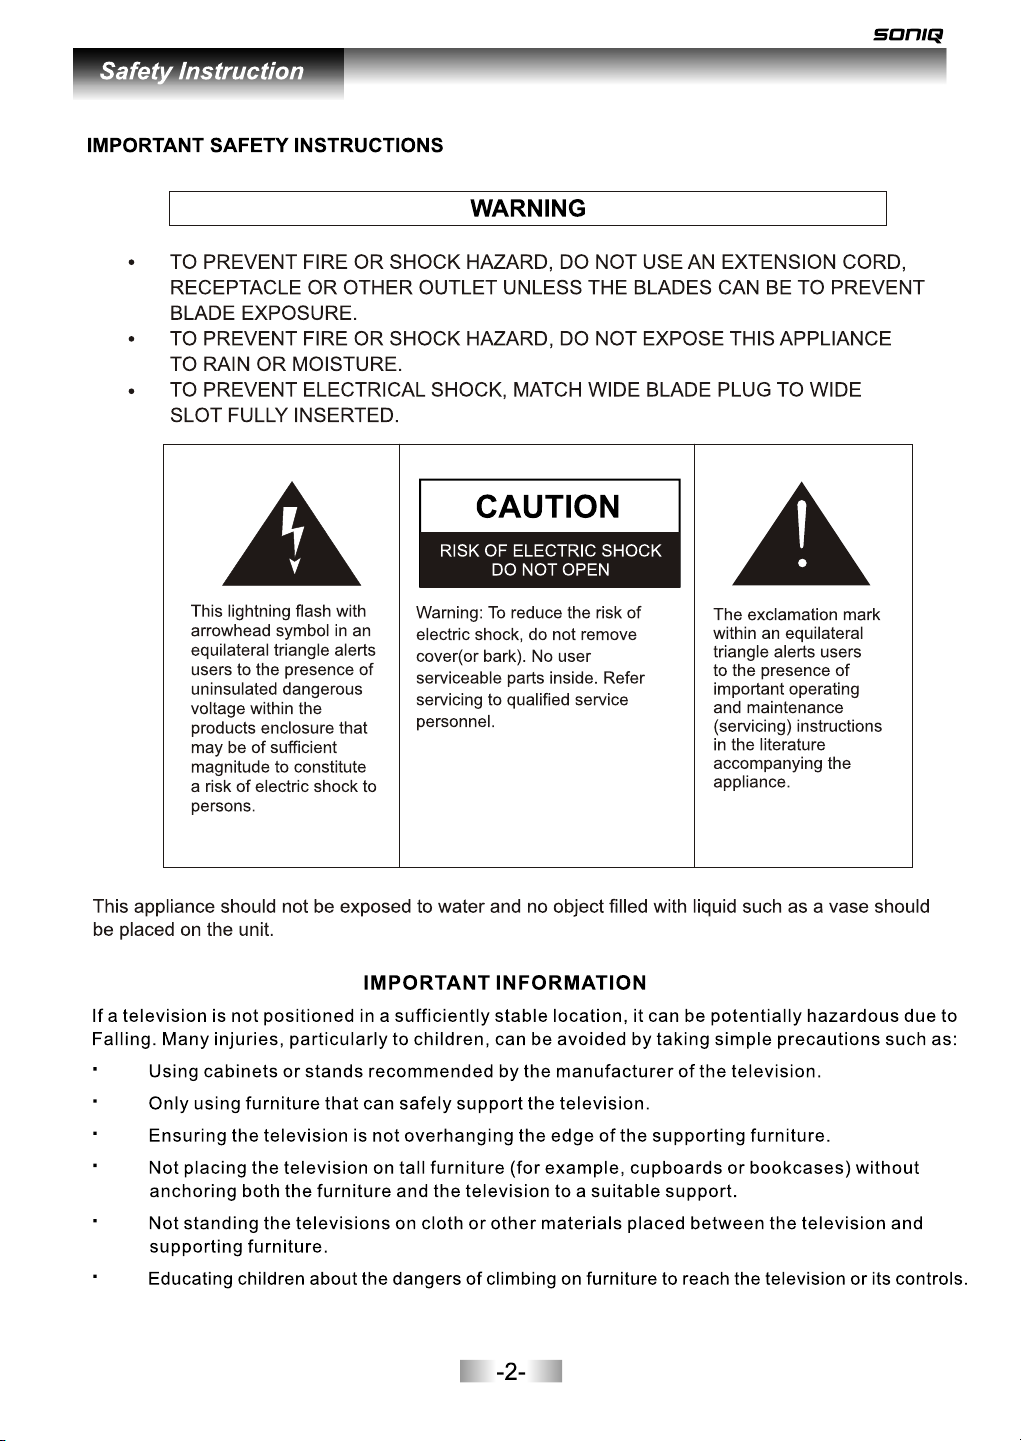
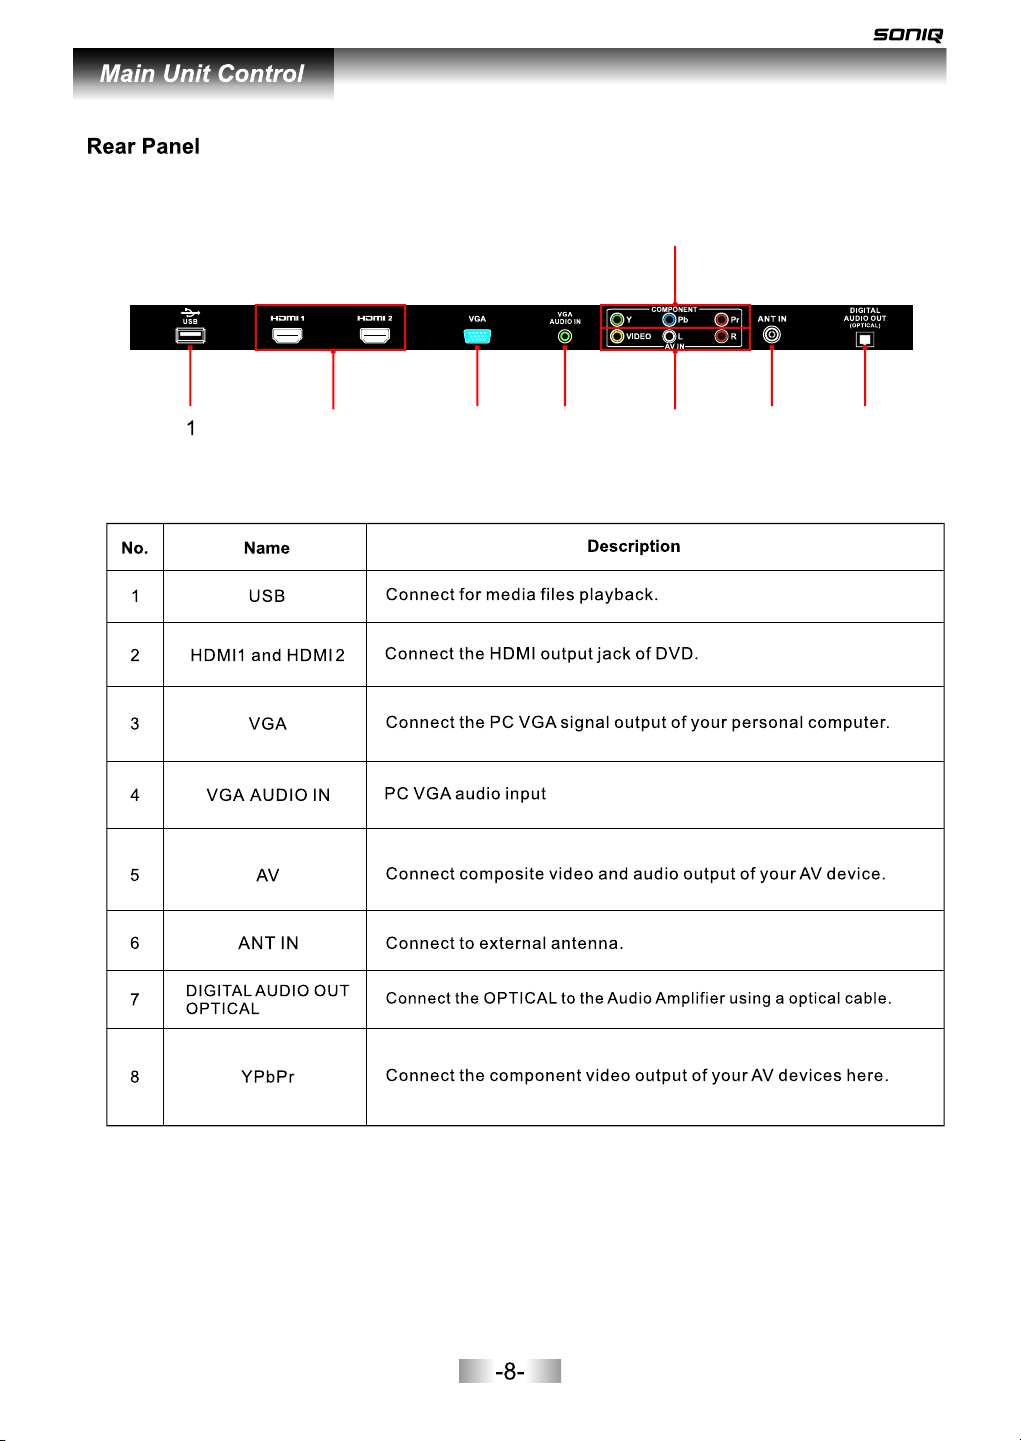
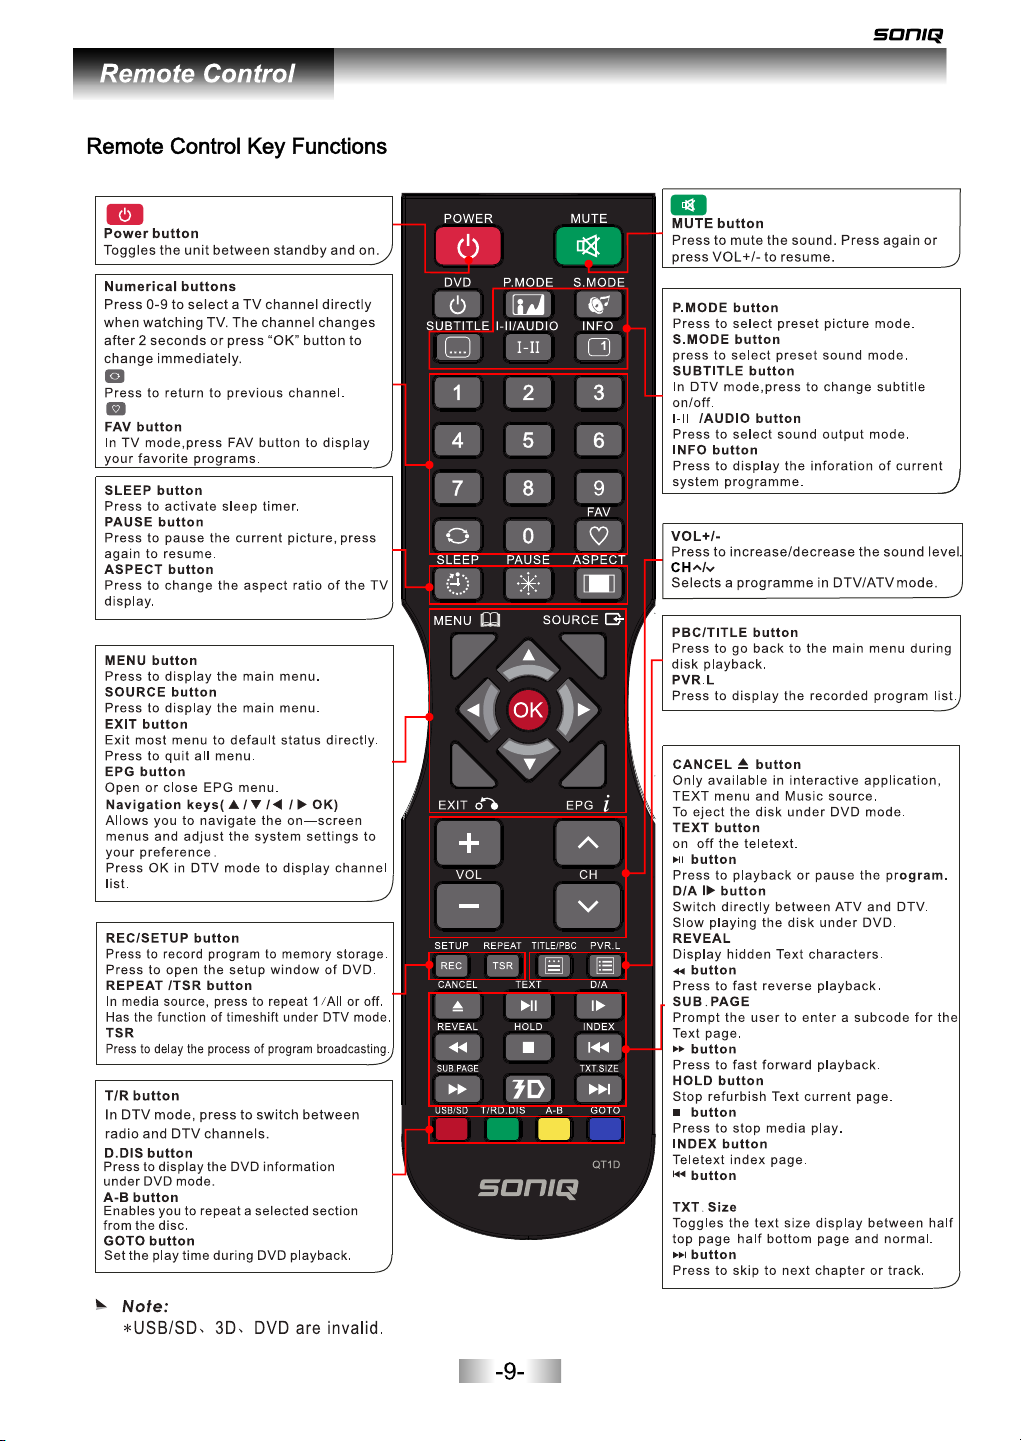
Press this button to turn the unit on when it is in standby mode.
Press this button once more to put it to standby mode.
Page 9
8
2
3
4
.
5
6
7
Page 10
/
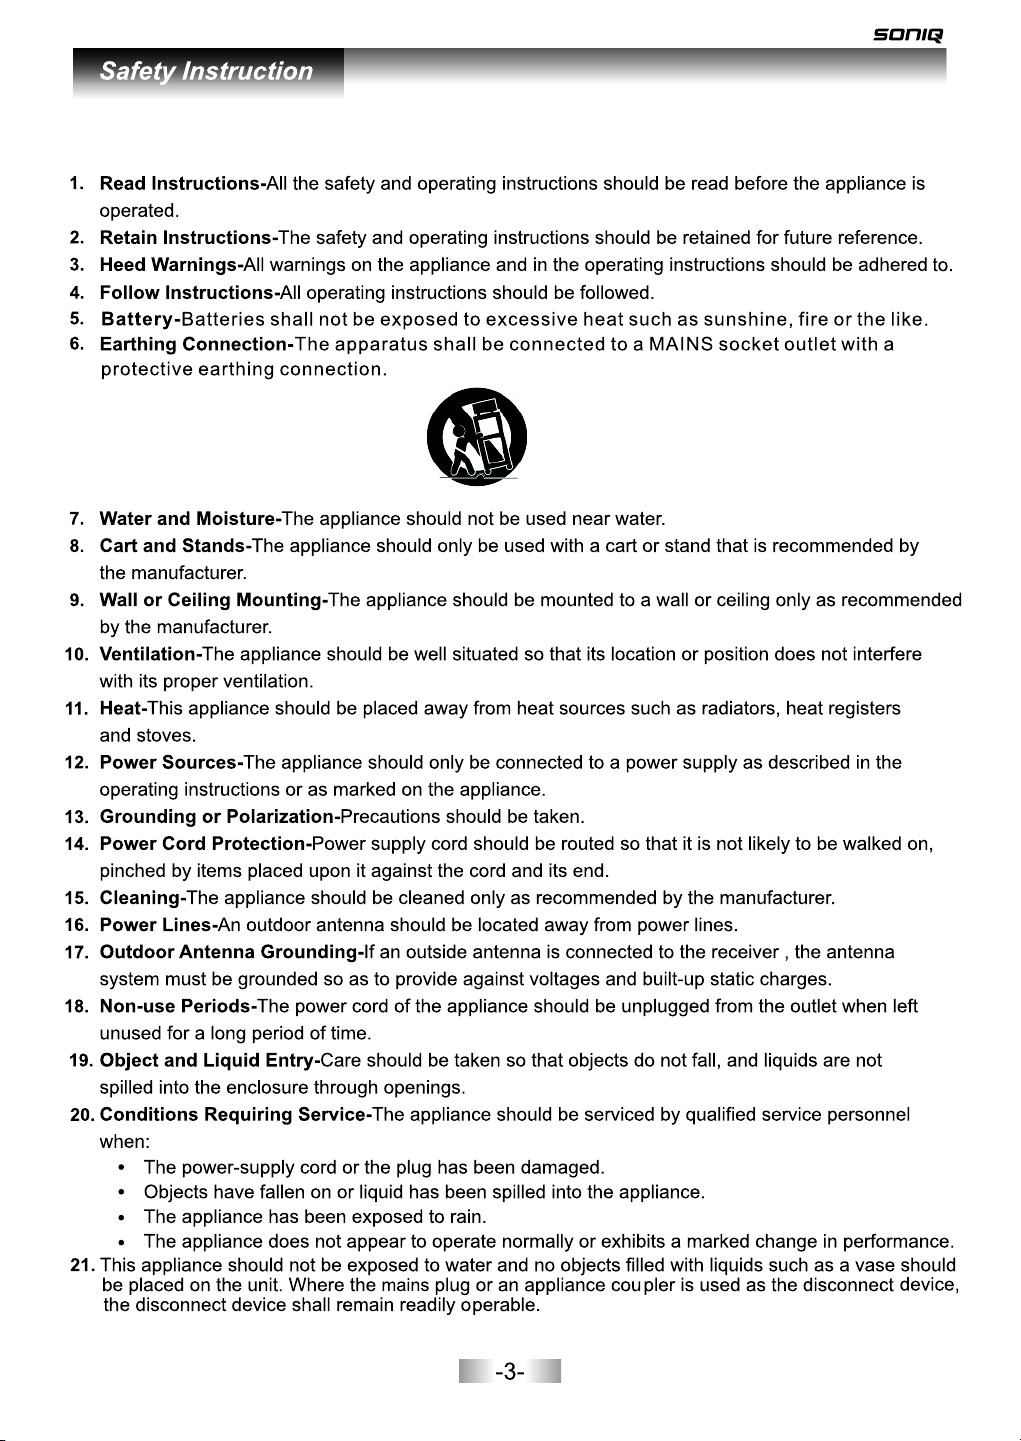
Press to r etur n to previo us cha pter or tra ck.
,
Page 11

-10-
Page 12

Page 13

Page 14

-13-
Page 15

-14-
Page 16

1.Press SOURCE button to display the input source list.
YPbPr
2.Press / or SOURCE b utton to sel ect the input
sourc e you want to.
3.Press “OK” button to enter the input source.
4.Press “EXIT” to q uit.
EPG: It is only available in DTV mode.
PROGRA MME G UIDE
31 Ma v 2011 14:34
800 SZTV M01 N o Info rma tion
801 SZTV M02 N o Info rma tion
802 SZTV M03 N o Info rma tion
803 SZTV M04 N o Info rma tion
Rec ord INF O Sch edule Re mind In dex
Up/ Down
Select
TIME
This fu nction can be used only when the EPG information is broadcasted by digital broadcasting
companies. The EPG displays the programme details for next 8 days.
Press / / / button to mov e the cursor, p ress OK butt on to switch t o current ch annel.
Record: Press red key to display a Recorder window, from which you can set the time you want for
recording.(refer to the below picture)
RECORD ER
Sel ect
800 SZTV M01
Sta rt Time
42 Mi nut
14 Ho ur
May M onth
31 Da te
End T ime
12 Mi nute
15 Ho ur
May M onth
31 Da te
Mod e AUTO
Bac k
- +
-15-
Page 17

Schedule: Press yellow key to browse the program information saved in the schedule list, and press
yellow key or exit to return.
Schedu le Li st 09: 33 25 th Dec Dele te
Tim e Date Prog ramme Titl e Channel N ame
10:00 Sun, 25 Dec SP-THE SINGING CHRISTMAS TREE 7 7 Digital
INFO: P ress green key to view the details of the focused channel.
25 Dec 200 5 09: 00-1 0:0 0
A religio us pro gram. WS
Remind: Press blue key to add a program needs to be reminded, and it will be switched on time.
Index: Press index key on the remote control to view the program list in 7 days.
Remind er se tting
Sel ect
800 SZTV M01
44 Mi nute
14 Ho ur
May M onth
31 Da te
Onc e Mode
Bac k
- +
-
+
Note: Vo lum e adj ust ing w ill e xit t he “M UTE ”st atu s.
You can operate all function by remote control and maybe partial function by the key on panel.
The main menu can be operated by “MENU”, “OK”and “EXIT” button.
“MENU” button can open the menu or exit to the upper level menu. There are six main menu
pages in the system: PICTURE, SOUND, CHANNEL, TIME, LOCK, OPTION.
Press / / / button to sel ect any item o r adjust som e settings .
Press “OK” button to confirm a selection.
Press”EXIT” button to exit th e main menu.
-16-
Page 18

CHANNEL MENU
Press MENU button to enter the CHANNEL page as follows:
CHA NNEL
CHANNE L
Auto Tuning
DTV Manual Tuning
ATV Manual Tuning
Programme Edit
Signal Information
Bac k Sel ect
A. Auto Tuning
1.Auto Tuning will be highlighted on entering this s cre en. P ress OK button to continue.
2.Pre ss to select c ountry, Press OK b utton to con tinue.
3.Pre ss to select y our locati on and press O K to continu e. Then use to choo se the
tunin g type.
4.Pre ss OK to start a uto search .
/
/ /
Cou ntry Se lecti on
Plea se sele ct your c ountr y
Coun try
Austr alia
NewZe aland
Back Selec t Back Selec t Back Selec t
B. DTV Manu al
DTV Manual Tuning
UHF CH 52
0--.--- Mhz
Pres s OK to sear ch
Bad Norm al Good
C. ATV Manual Tuning
ATV Manual Tuni ng
Storage To 1
-
System BG
Current CH 1
Search
Fine-Tune
Freque ncy 861. 80 M Hz
Save
+
Menu
Tim e Zone S elect ion Cha nnel Tun ing
Time Zon e
Plea se choo se your c hanne l tunin g mode
Scan Ch annel
DTV+ATV
DTV
ATV
1.Press / to highli ght DTV Manual Tuning, press“OK”
butto n to enter sub -menu.
2.Users can select channel number by pressing / , and
set fre quency number by pressing numeric buttons.
3.Press “OK” to sta rt.
1.Press / to highli ght ATV Ma nual Tuning, then press
“OK” bu tton to ente r sub-menu.
2.All the items in this displayed menu can be adjusted,
after a ll the setti ngs being done, press / to h ighlight
“Sear ch”,then press / to star t.
DTV ATV
MENU
SKIP
EXIT
-17-
Page 19

Programme Edit
Press / to select Pro gram Edit, t hen press OK b utton to ent er sub-menu.
Progr amme Edi t
7 7 Digi tal
70 7 HD Di gital
71 7 Di gital 1
72 7 Di gital 2
73 7 Di gital 3
77 7 Gui de
1 C-02
2 C-04
3 S-0 4
4 C-08
Delet e
OK
Sele ct
Rename
Move
DTV
DTV
DTV
DTV
DTV
DTV
ATV
ATV
ATV
ATV
FAV
Favori te
Skip
Menu
1. Press red button to delete the selected program.
2. Press yellow button to change program order. Selected
chann el can be moved by using / , the n press“OK”
for con firm.
3. Press blue button to skip the selected channel.
4. Press FAV on yo ur remote control to add a channel to
the fav orite list.
5. Press green button to rename the current channel.
(Only a vailable in ATV mode)
Signal Information
Press / to select Signal Information, then press OK button to display signal details, including
channel number, network name, modulation model, signal quality and signal stren gth.
Signal Information
Channel 30
Net wor k Seven Network
Modul ation 64QA M
Qual ity 99
Strengt h 54
-18-
Page 20

PICTURE MENU
1. Press MENU button to bring up the main menu.
2. Then press / to enter PIC TURE page, it will highlight the first option, press OK button to enter.
3. Picture Mode: Press / to adjus t the mode by St andard, Dynamic, Mild, User. Contrast,
Brigh tness, Color, Sharpness can be adjusted only under user mode, Press “Menu” to return to
the mai n menu.
4. Color Temperature: Press / button to s elect Cool, Standard, Warm and User. You can adjust
the Red , Green and Blue in User mode.
5. Aspect Ratio will be available under DTV, and you can choose Full, 4:3,Auto Just Scan.
6. Scre en can be available under PC mode.
7. Energy Saving: You can choose Middle, High, Low, Standard in this section.
8. Noise Reduction: Can be adjusted among Middle, high, Off, Low.
PICTUR E
PICTURE
Picture Mode Standard
Color Temperature
Aspect Ratio
Screen
Energy saving
Bac k Sel ect
PICTUR E
PICTURE
Col or Temper ature
Aspect Ratio
Screen
Energy Saving
Noise Reduction
Bac k Sel ect
SOUND MENU
1. Press MENU button to display the main menu.
2. Press / to enter SOU ND page, it wi ll highlight the first option, then press OK button to enter
sub-menu. Press / to adjust Sou nd Mode. You can change the value of Treble and Bass under
user mode.
3. Press / to select Ba lance, the n press OK but ton to enter sub-menu. Press / to adju st.
4. Press / to select Aut o Volume, the n press OK button to select On or Off.
5. Press / to select SP DIF Mode, th en press OK bu tton to ente r sub-menu, press / to sel ect
PCM, Au to and Off.
6. Press / to select Po wer On Music , then Press O K button to se lect On or Off.
SOUND
SOUND
Sound Mode
Balance
Auto Volume
SPDIF Mode
Power On Music On
Bac k Sel ect
-19-
Page 21

TIME MENU
Press MENU to display the main menu.
Use / to en ter TI ME page, it wi ll highlig ht the first option.
TIM E
TIME
Off Time
On Time
Clock 02/Jun 15:55
Time Zone New South Wales/ACT
Auto Sleep
Bac k S elect
Off Time
TIM E
Off Time Every Day
Hour 0
Minute 0
Bac k S elect
- Press OK button to en ter submenu.
Press / t o adjust.
On Time
TIM E
Mode Select Once
Hour 12
Minute 1
Source AV
Volume 30
Bac k S elect
- Press / to select On Tim e, then pres s OK
butto n to enter the sub-menu. Use / to adjust.
- Clock: Display the current system time .It's not
Time Zone
available.
Press / button to sel ect Time Zone, t hen press OK b utton to ent er sub-men u.
Tim e Zon e Selection
Time Zo ne
Back Sele ct
Auto Slee p
Press / button to sel ect Auto Sleep , then press O K button to se lect On or Off.
Sleep Timer
Press / button to sel ect Sleep Timer, then press OK button to enter sub-menu, and then
press / button to adj ust.
TIM E
Sleep Timer Off
Bac k S elect
-20-
Page 22

OPTION MENU
Press MENU to display the main menu.
Press / to enter OPTI ON page, it wi ll highlight the first option.
OPTION
Bac k
OPTION
OPTION
Bac k
OPTION
OSD Language English
PVR File System
OSD Time Out
OSD Transparency
Restore Factory Default
Bac k Sel ect
OSD Time Out Off
OSD Transparency
Restore Factory Default
Version Info
Blue Screen
Bac k Sel ect
OSD Langua ge: Only English can b e selected in the func tion.
PVR File Sys tem: Press OK button t o enter the PVR File Sys tem, Users can check t he information
of the USB dev ice, or format the USB d evice.
OSD Time Out: Set OSD time out.
OSD Transpa rency: the transp arency from Off to 100%.
Press / butt on to adjust
Restore Fa ctory Default: Ope rate this item to resu me all the initial set ting.
Version Inf o: Highlight this it em, and then press “OK ” button to check out th e version informat ion of
the system .
Blue Scree n: Press OK to select On o r Off.
LOCK MENU
Press MENU to bring up the OSD menu.
Use / to turn to LOC K page, it will highlight the first option ,then press OK button to enter the sub-menu.
LOCK
Bac k
LOCK
Pleas e enter passwor d
Lock System
Set Password
Block Program
Parental Guidance
You are required to input
the password (default as 0000)
Bac k Selec t
CancelClear
Please enter old password
Cance lClear
Set Password: Press / to select S et Passwor d, then press OK button to e nter sub-menu to set
new password.
Block Program: Press / to selec t Block Prog ram, then press OK button to enter sub-menu,
press / to select the p rogram you w ant to lock ,then press green button on your remote.(To
unlock the program, input the password you set.)
Parent Guidance : Parent can set age limit level by this function.
-21-
Page 23

PVR File System
PVR function is only available for DTV, includes Record, Timeshift and Playback functions. Record
includes in time record and preserve record. In time record can be worked through REC key
immediately, and preserve record needs to preserve beforehand.
Record and Playback can be done at the same time. Timeshift is another function for both recording
and playing.
The following will explain in details.
Enter PVR from OPTI ON menu, as fo llows:
OPTION
OPTION
OSD Language English
PVR File System
OSD Time Out
OSD Transparency
Restore Factory Default
Bac k
Bac k Sel ect
Selec t Disk C:
Check PVR Fil e Sys tem Start
USB Disk
Format(Ha rd Di sk Recommend ed)
Tim e Shift Size
Speed
Free Record L imi t 6 Hr.
OK
Sel ect
Menu
Select Disk
Choose the disk to store whatever content recording, normally default as C:
Press / button to sel ect Start, t hen Press OK b utton to ent er the sub-m enu.
Selec t Disk C:
Check PVR Fil e Sys tem Checking
USB Disk Pass
Format(Ha rd Di sk Recommend ed) P ass
Tim e Shift Size 512 MB
Speed 12970 KB/sFull HD Suppo rt
Free Record L imi t 6 Hr.
OK
Sel ect
Menu
USB Disk
If not in serting USB equipment, it shows No Device connection; If USB equipment is inserted, it
shows PVR initializing.
Time shift capacityTime shift capacity
The option can not be executed directly.
Time shift space can only be used after you format the memory input source.
Speed
Can't be chosen. After Check PVR File System, it shows the available speed of USB.
If insp ection failed, it shows FAIL, but if it is normal, it shows SUCCESS
Select D isk C:
Che ck PVR Fi le Syst em SUCC ESS
USB D isk Pas s
For mat Pas s
Tim e Shif t Size All
Spe ed 1290 6 KB/s
Fre e Recor d Limit 6 H r.
OK
Sel ect
Press fo rma t to displa y File Syst em Size
Men u
-22-
OK
File Sys tem Size
PVR F ile Sys tem Type H i Spee d FS
PVR F ile Sys tem Siz e All
SD 13 041 Min
HD 37 26 Mins
Sel ect
Men u
Page 24

Then Press OK button to start for mat the disk, then a warning with “All data will be lost” will be
displayed to remind the user to choose Start or EXIT.
Press button to sta rt, button t o exit.
Format disk
War nin g! All d ata will be lost.
Start
EXIT
In Time Record Operation
Press REC button on the remote control to start recording the current programme, the recording
window will be disappeared after few seconds and a red transparent icon with REC chara cters will
be displayed at the right side of the screen. Press HOLD button for stop.
It is ava ilable for recording when the unit is in Standby mode.
PVR.L Operation
Press PVR.L button to display the recorded program list, select any of the items for watching.
Recor ded Li st Prog ram
DISNEY ADVENTU RES
DISNEY ADVENTU RES
DISNEY ADVENTU RES
DISNEY ADVENTU RES
GOOD CHEF BAO CHFF
GOOD CHEF BAO CHFF
GOOD CHEF BAO CHFF
GOOD CHEF BAO CHFF
GOOD CHEF BAO CHFF
George And Mar tha
Delet e
OK
Select
INFO
Index
Menu
Delete: Press red button to delete focused program.
INFO: P ress green button to pop out programme information.
Index : Press to swi tch recording program orders.
OK: Play focused program.
Up/Down: Press / bu tton to sele ct program .
Preserve Record Operation
Press EPG directly to display the PROGRAMME GUIDE window, focus on your favorite channel
that yo u want to record then press REC button at the remote control to enter into the RECORDER
menu, and then you are required to set the recording time there. Press OK for confirm.
RECORD ER
Sel ect
800 SZTV M01
Sta rt Time
42 Mi nut
14 Ho ur
May M onth
31 Da te
End T ime
12 Mi nute
15 Ho ur
May M onth
31 Da te
Mod e AUTO
Bac k
-23-
- +
Page 25

PVR Recorder Schedule
Press yellow button on the remote control to display schedule list.
Schedu le Li st 09: 33 25 th Dec Dele te
Tim e Date Prog ramme Titl e Channel N ame
10:00 Sun, 25 Dec SP-THE SINGING CHRISTMAS TREE 7 7 Digital
Timeshift
Press TSR but ton to delay the process of program broadcasting in DTV mode.
Tim e Shif t
[00:00 :03/ 00:00:0 0]
A B
20:13
MEDIA Menu
Note: Before operating MEDIA menu, plug in USB device, then press SOURCE button to set the Input Source.
Press ▲/▼ button to select MEDIA in the Source menu, then press OK button to enter.
YPbPr
PHOTO Menu
Press ◄/► button to select PHOTO in the main menu, then press OK button to enter.
Press EXIT button to quit the menu.
Press ◄ / ► button to select drive disk, then press OK button to enter.
Press ◄ / ► button to select Return option to go back to previous menu.
C:\M EDIA
Retu rn Up Fol der mov ie musi c
Phot o Text
Sub Menu Select /Unse lect All
-24-
1/1
Page 26

When highlighting the option you select, picture can be previewed and information of the picture will appear.
Press ◄/► button to select the file you want in the file selecting menu, then press button to display
the picture.
1/11MEDI A\Pho to\JP EG
Retur n Up Fold er QXQ mu sic
000111. jpg 06. mp3 100 24616 c.mp3
0521h angmu 09.jp g 0521h angmu l3.jp g 0521h angmu 15.jp g 08_gC 1WIvN Hu1UZ _0..
Sub Menu Select/ Unsel ect All
Resolu tion: 1 280x8 00
Size: 19 9 KByte s
Date: -- -- / -- / --
Time: -- : -- : - -
Press ◄/► button, OK button to select several files(pressing the blue button underneath will select
all pictures, press it again if y ou do not wan t to select all ). Th en press b utt on, p ict ure s will display o ne by one .
C:\M EDIA\ Photo \BMP 1/ 2
Retur n Up Fold er 1024 x768_ bmp.b mp 1440 x900. bmp
1600x 1200b .mp 213 12.bm p DTVLO GO_NE SX.bm p GRAY1. bmp
GRAY2. bmp unt itled .bmp un title d1.bm p untit led12 3.bmp
Sub Menu Select/U nsele ct All
Press ▲/▼ button to enlarge or contract the image, ◄/► button rotate the image.
Press ◄/► button to select the file you want to delete, then press the red button on remote control to delete
the file. Copy and Paste can be operated under this interface.
MEDI A Photo BM P 1/2
Retur n Up Fold er 1024 x768_ bmp.b mp 1440 x900. bmp
1600x 1200. bmp 21312 .bmp DT VLOGO _NESX .bmp GR AY1.bm p
GRAY2. bmp unt itled .bmp un title d1.bm p untit led12 3.bmp
Dele te Copy P aste
Press EXIT button to quit the menu.
-25-
Page 27

MUSIC Menu
Press ◄/► button to select MUSIC in the main menu, then press OK button to enter.
Press EXIT button to quit the menu.
Press ◄/► button to select drive disk, then press OK button to enter.
Press ◄/► button to select Return option to go back to the previous menu.
When highlighting the option you selected, music can be previewed and information of the music.
C: MED IA Music M P3
Retur n Up Fold er QXQ mu sic
03.mp 3 06.mp 3 10024 616c. mp3
113915 3940. mp3 1174 27066 2.mp3 117 75152 82805 .mp3 13 6erqi anyy.m p3
Sub Menu Select/U nsele ct All
1/1 5
Album :
Title:
Blt Rat e: 128K
Artis t:
Sampl ing: 44 K
Year:
Slze: 3 924 KBy tes
Press button for playing music. Press GOTO button to set the time, and then it will play the music
from that point.
Press CANCEL button, music will play in Energy Saving Mode.
Press EXIT button to quit the menu.
-26-
Page 28

MOVIE Menu
Press / bu tton to sele ct MOVIE in th e main menu, t hen press OK b utton to ent er.
Press EXIT button to quit the menu.
Press / bu tton to sele ct the drive d isk you want , then press O K button to en ter.
Press / bu tton to sele ct Return op tion to go bac k to previou s menu.
When highlighting the option you selected, movie can be previewed and informatio n will appea r.
C:\M EDIA\ Movie \mkv
1/2
Retur n
720p_ chd-m r&mrs -smi_
BigBu ckBun ny_10 8-[Di vx7]_ AAC5. 1_A_
Paran ormal _Acti vity_ [- Sams ung.D emo.O ceani _ Shutt er_Is land_ [Divx _-[MV ].Hot cha-. Party Gi -
Sub Menu Select/U nsele ct All
Resoluti on: 19 20 x 1080
Audio Track : 1/2
Subtitle : OFF
Program: - /0
Size: 5195 85 KBy tes
Press bu tton to play t he selecte d movie.
Press bu tton, butt on, button , button and P icture Mod e button to op erate.
Press / bu tton to cont ract or enla rge the imag e.
If you wa nt to watch fo otage in movie repeatedly, press A-B button at the time it starts and press the
button again at the time it ends.
Press Exit button to quit the menu.
-27-
Page 29

TEXT Menu
Press / bu tton to sele ct TEXT in the m ain menu, th en press OK bu tton to ente r.
Press EXIT button to quit the menu.
Press / bu tton to sele ct the drive d isk you want , then press O K button to en ter.
Press / bu tton to sele ct Return op tion to go bac k to previou s menu.
When highlighting the option you selected, text can be previewed and information will appear .
Press bu tton to view t he selecte d text.
MEDI A\Text
Ret urn
chi nese tx t.txt
This bo ok by the w ww.wmt xt.co m(unk no
wn txt no vel dow nload s ite) fo r you to or
ganiz e produ ction
Downl oad fre e novel s more ex citin g,mor e
compl ete ver sion of t he nove r e-boo k dow
nload p lease v isit ww w.wmtx t.com
chapt er
Engl ish txt .txt
Sub Men u Select /Unse lect All
1/1
Size: 3 5KByt es
Press / bu tton to turn p ages, / butt on move to las t or next Text f ile.
Setti ng Background Music When Watching Pictures and Text.
1. Select a music file or more in MUSIC menu by pressing OK button, then exit the MUSIC menu.
2. Ente r the PHOTO or T EXT menu and d isplay the photo or text you want, and then press the
yello w button on the remote control to play the music. Press it again when you want to stop the
music .
-28-
Page 30

-29-
Page 31

-30-
Page 32

8W+8W
1240(L)x175(W)x770(H)mm
-31-
Page 33

MD1207 27- 01
 Loading...