

Page 1

L42V11A -AU
42" FullHD LCDTV
Page 2

Page 3
..................................................................................................................6
.................................................................................................................
..................................................................................................................7
...................................................................................................................8
.........................................................................................................9-10
....................................................................................................................10
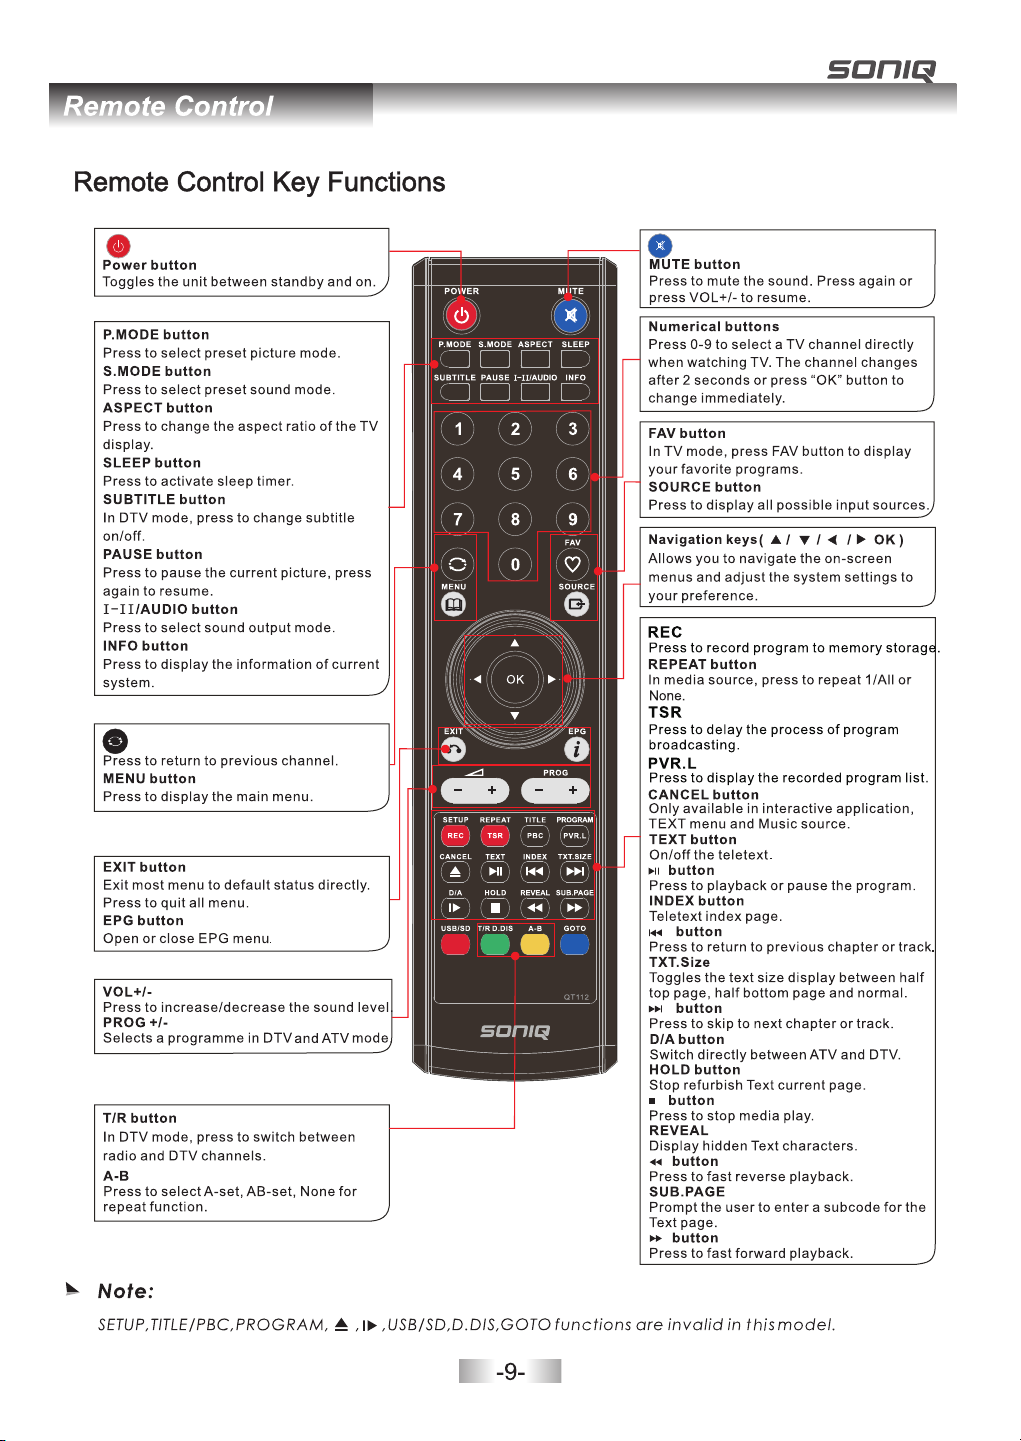
Menu Operation Guide
............................................................................................................16
....................................................................................................18-20
............................................................................................................20
...........................................................................................................21-22
......................................................................................................23-24
PVR
......................................................................................................................24-27
..........................................................................................................27-28
..............................................................................................................29
........................................................................................................29-30
..............................................................................................................31
..........................................................................................................31-32
.................................................................................................................32
............................................................................................................35
.........................................................................................................1
.....................................................................................................2-5
6
.......................................................................................................6
......................................................................................................7-8
.......................................................................................9
............................................................................................10
...........................................................................................10
..........................................................................................11-15
..................................................................................................11
...........................................................................................11
.......................................................................12
............................................................................................13
.......................................................................................14
.....................................................................................15
.....................................................................................15
............................................................................................16-28
...................................................................................................16-18
................................................................................................29-32
...............................................................................33-34
Page 4
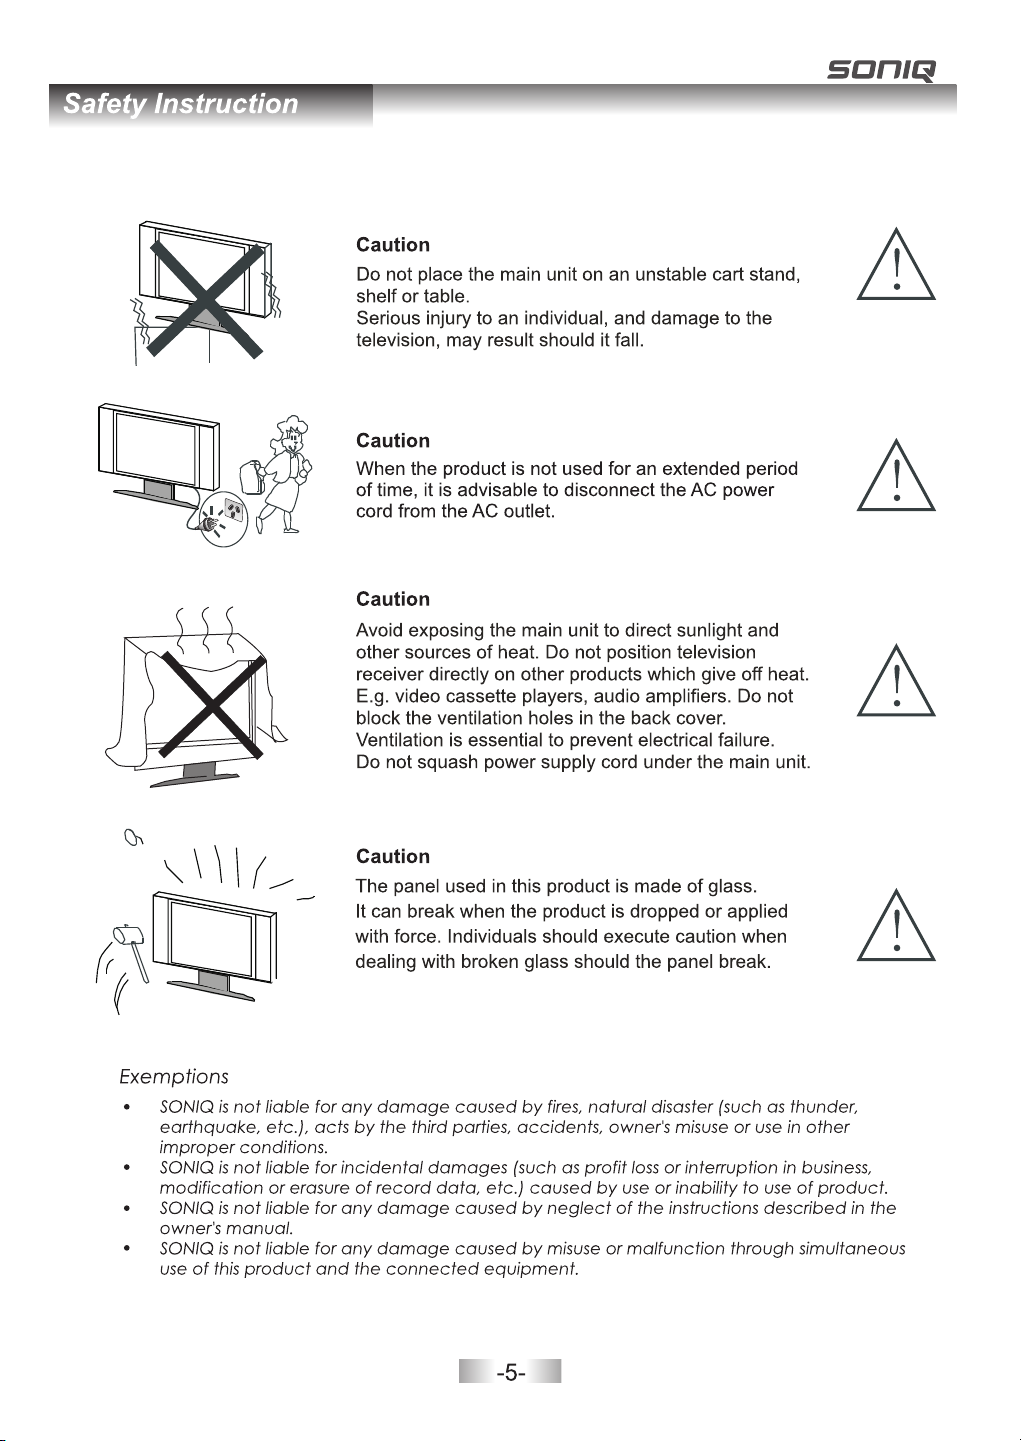
IMPORTANT INFORMATION
If a televisio n is no t positioned in a sufficien tly s table location, it c an be p otentially ha zar dou s due to
Falling. Man y inj uries, particula rly t o children, can b e avo ide d by taking simpl e pre cau tions such as:
· Using cab ine ts or s tands recomme nde d by th e manufacture r of th e television.
· Only usin g fur nit ure that can safe ly su pport the televisi on.
· Ensurin g the t ele vision is not ove rha ngi ng the edge of the su ppo rting furniture.
· Not placi ng th e tel evision on tall f urn itu re (for example , cup boards or bookcase s) wi thout
anchori ng bo th th e furniture and t he te lev ision to a suitab le su pport.
· Not stand ing t he te levisions on cl oth o r other materials pl ace d between the televi sio n and
support ing f urn iture.
· Educating children about the dangers of climbing on furniture to reach the television or its controls.
Page 5
Page 6
Page 7
Page 8
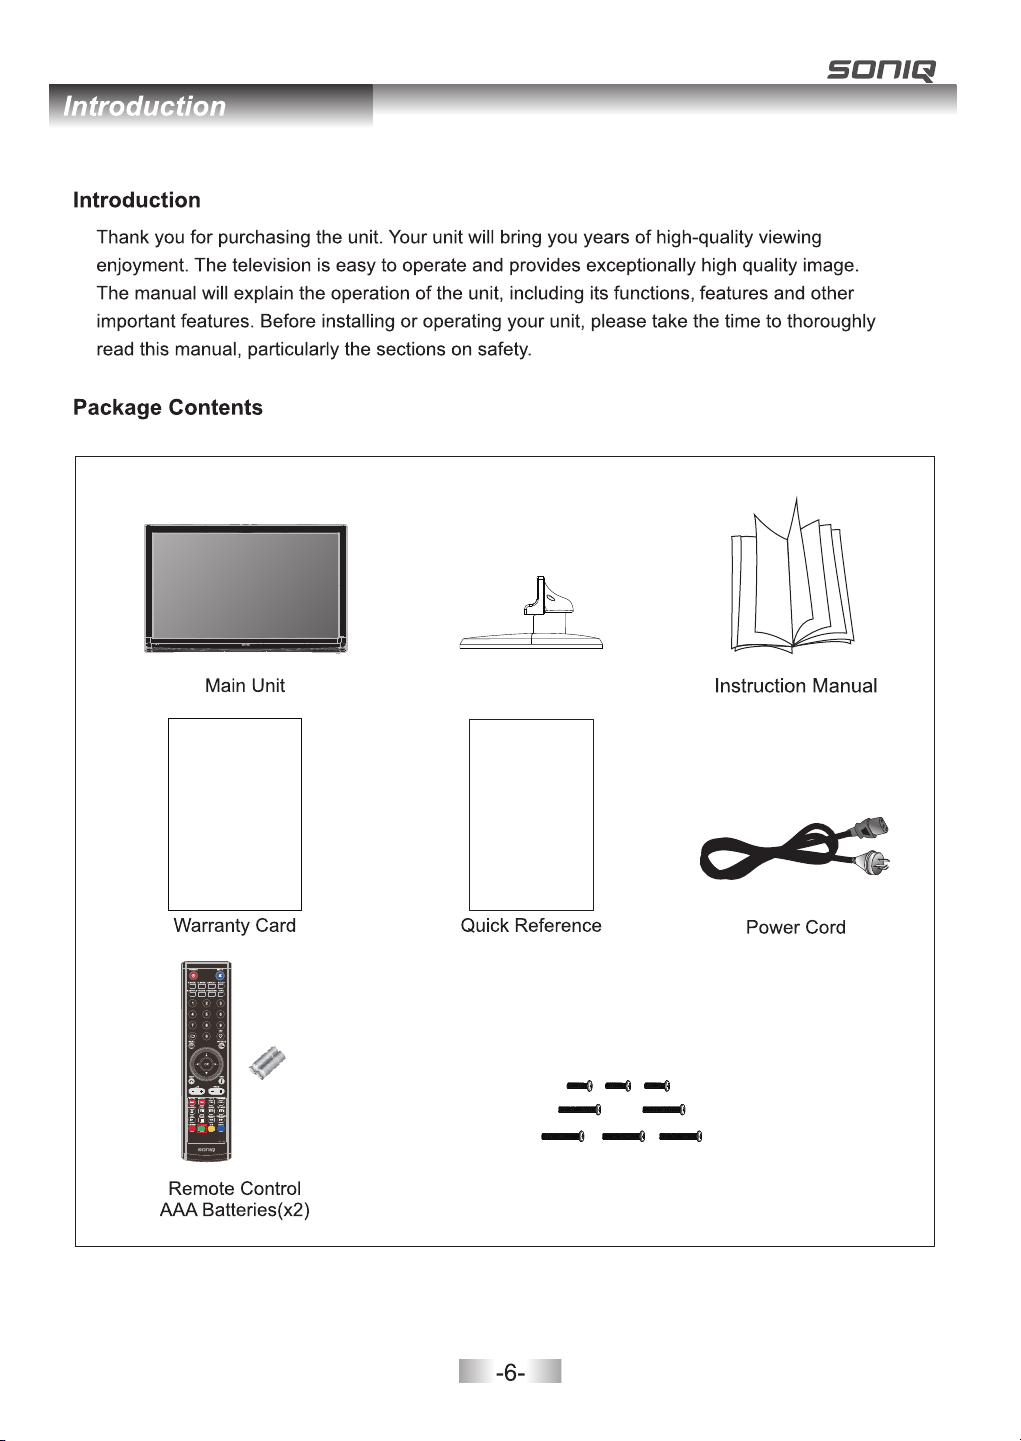
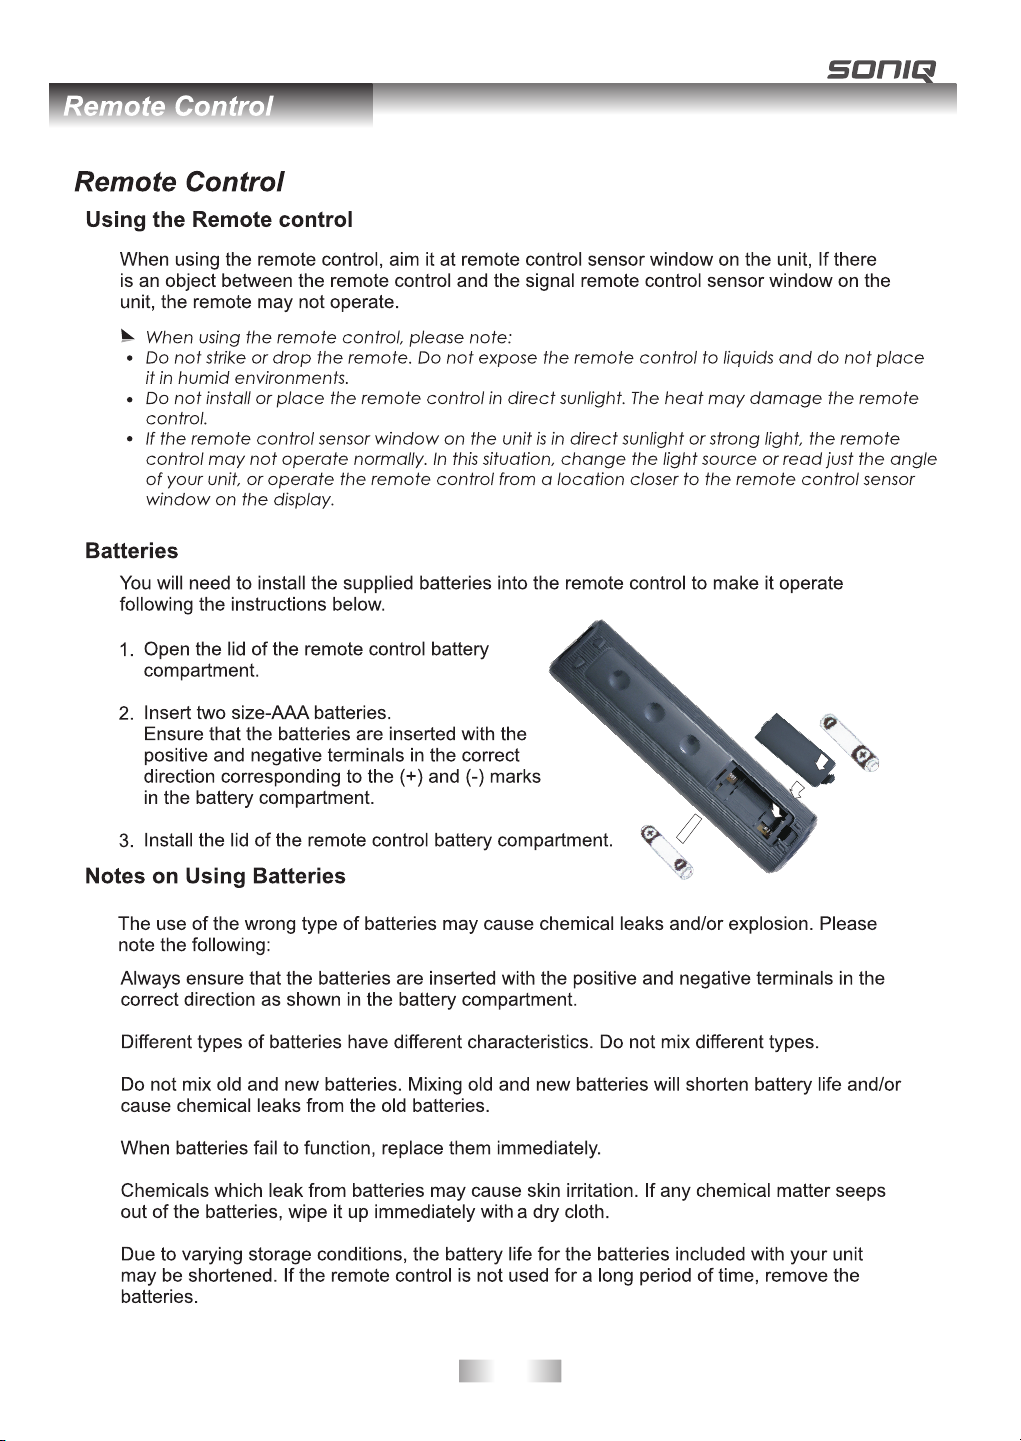
Stand
Scre ws: 4x15m m BA (X3,W hite,one o f them fo r spare)
Scre ws: 4x12m m BM(X5 ,Black,o ne of the m for spare)
Page 9
Page 10
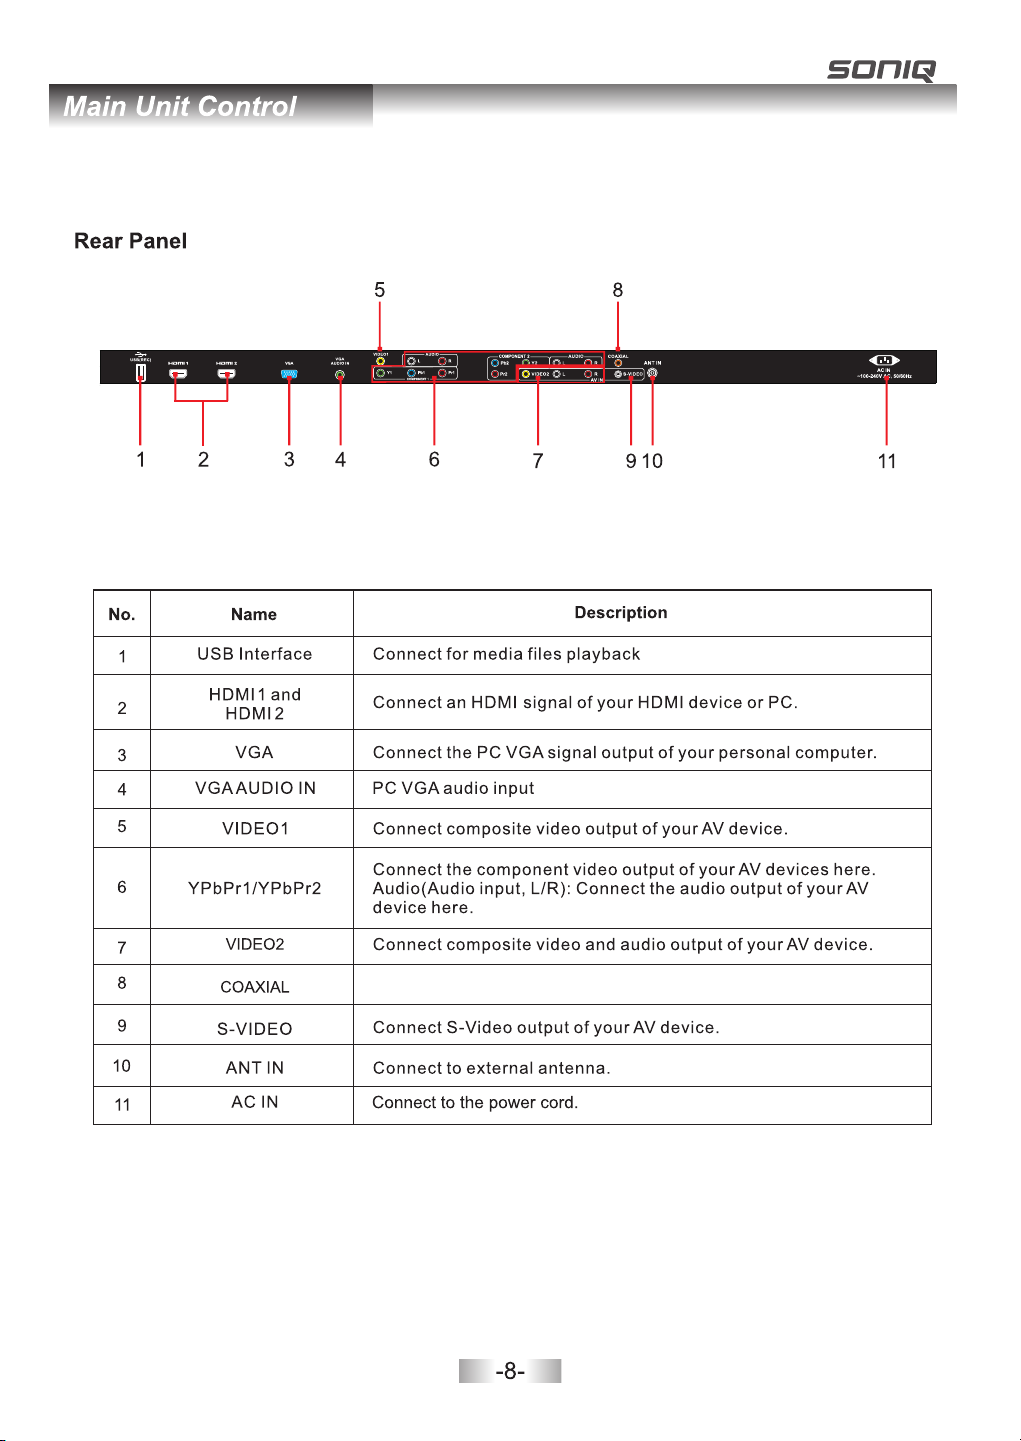
and pr ogram r ecord ing.
Coax ial Digita l Audio ou tput fo r Digital Amp lifie r.
Page 11
Page 12
-10-
Page 13

The an te nna eit he r can be co nn ected f or m ulti- fa mily dw el lings o r fo r singl e- famil y dw ellin gs .
Blu-r ay D VD Play er
-11-
Page 14

-12-
Page 15

Set-Top B ox
-13-
Page 16

to the in put of the Audio Amp lifier using a Coaxial ca ble.
Audio
-14-
Page 17

Inser t USB device dir ectly to the unit.
1.
2.
3.
4.
5.
6.
500mA
-15-
Page 18

DTV
ATV
AV1
AV2
S-Video
YPbPr1
YPbPr2
VGA
HDMI1
HDMI2
MEDIA
Off
-16-
Page 19

OK
s
VHF C H 6
INP UT FREQ. P ress OK t o searc h
Pres s to high light F reque ncy, then in put fre quenc y numbe r by pres sing nu meric b utton s,
pres s OK to sta rt.
s
1--- ---MHz
Press to select Frequen cy, press numeric buttons to input frequency number.
Then use to highlight Sea rch ,pr ess o r to st art .
-17-
Page 20

7 7 Digital
70 7 HD Digita l
71 7 Digital 1
72 7 Digital 2
73 7 Digital 3
77 7 Guide
1 C-02
2 S-15
3 C-04
4 E/29
Ren ame
DTV
DTV
DTV
DTV
DTV
DTV
ATV
ATV
ATV
ATV
then
Use Gr een but ton to re name the cur rent ch annel . (only a vaila ble und er ATV mode)
curr ent channe l
incl udi ng Chan nel No. , Network na me, Mod ulati on model, Si gnal qu ality and Si gnal st rengt h.
29
Netwo rk SBS Melbourne
Modul ation 64QAM
99
Strength
22
-18-
Page 21

Ene rgy Sav ing
Blue
-19-
Page 22

Select
Back Adjust
Scre en: Only av ailable u nder PC m od e.
Ener gy Saving
Pres s / bu tton to s elect Ene rgy Savin g, then Pre ss OK to en te r sub-m en u.
Pres s / bu tton to a djust.
SOUN D
SPDIF MODE
,
-20-
Page 23

Pres s / bu tton to s elect the o ption you w ant to adju st
Pres s OK to enter
-21-
Page 24

Press / button to select the living area where you are located,
WA GMT +8
NT GM T+ 9. 5 VIC GMT+1 0
SA GMT+9.5 QLD GM T+ 10
NSW/ACT G MT +10 TAS GM T+ 10
-22-
Page 25

Select
Back Adjust
PVR F ile Sys tem
Vers ion Inf o
Not av ail able in D TV.
PVR File System
Pres s OK to ent er the PVR Fi le Syst em. Use rs c an chec k the inf ormatio n of the US B devic e,
or for mat the U SB device .
-23-
Page 26

/60S / 70S / 80 S / 90S.
to sel ect
Versio n
Allo wing user t o check the i nformat ion of th e un it.
PVR function is only available for DTV,includes Record,Timeshift and Playback
function.Record includes in time record and preserve record. In-time record can
be worked through REC key immediately, and preserve record needs to preserve
before.
Record and Playback can be done at the same time, which means record
DTV and playing USB equipment at the same time.Timeshift is another function for
both recording and playing together.
The following would explain in details.
/
PVR File SystemPVR File System
Enter PVR from OPTION menu, as follows:
OK
-24-
Page 27

Select Disk Select Disk
Choose the disk to store whatever content recording, as follows,default as C:
USB DiskUSB Disk
If not inserting USB equipment, it shows Not Find Any USB Device; If inserting USB equipment, it shows Pass.
FormatFormat
Format the USB disk, create PVR file system format to the USB disk.
Time Shift SizeTime Shift Size
Can’t be chosen. After Check PVR File System,it means the USB passed Mstar Format
can be used at Timeshift space,the size is chosen by clients when doing format.
SpeedSpeed
Can’t be chosen. After Check PVR File System,it shows the USB available speed .
PVR File System Type
C
Hi Sp eed F.
ALL
All
8
Check PVR File System:
Check PVR File System:
T
Fre
Check storage equipment PVR File System is well established.
Default as Start,OK/Enter and to inspect the USB files system and speed,
the processiong shows Checking…;
When no inserting USB,or inspection failed, it shows FAIL;
When inserting USB but didn’t pass Mstar Format,enter Format menu;
When inserting USB but inspecting unnormal partition, it shows No Partition Found.
If inspection is normal, it shows SUCCESS;
Channel – Recorder List
Channel – Recorder List
pattern for reference the menu is as follows:
Key Random Record OperationKey Random Record Operation
·Insert the memory equipment to the unit.
·Press "REC" button to
disappeared after few seconds, and a red icon with REC characters will be displayed
start recording the current programm. The recording window will be
transparent
at the left side of the screen. Press HOLD button for stop.
·It is available for recording when the unit is in standby mode.
Pla y FB
9 Nin e Digit al
[00 :02:0 9]
FF Pre v. Nex t P ause Stop
(00 01216 MB)
REC
-25-
Page 28

PVR.L OperationPVR.L Operation
Press "PVR.L" button to display the recorded program list , select any of the items for watching.
Recorded List Programme
HI-5
DEL ETE
OK
INF O
IND EX
DELETE:Delete focused programme.
INFO:Pop out or close programme instruction.
INDEX:When no menu, press "PVR.L"; When it shows Recorded List menu,switch
recording programme orders.
OK:Play programme.focused
Up/Down:Up and Down to move Focus to select programme.
Preserve Record Operation
Press EPG directly to display the PROGRAMME GUIDE window, focuse on your favorite
channel that you want to record, then press REC button at the remote control to enter into
the RECORDER menu,and then you are required to set the recording time there,
press OK for confirm.
RECOR DE R
PROGR AM ME G UD E TIM E
04 Dec 12 :2 3
7 7 Digit al
70 7 HD Dig it al
71 7 Digi ta l 1
72 7 Digi ta l 2
73 7 Digi ta l 3
77 7 Guid e
Rec ord
GOOD CHEF BAD CHEF
GOOD CHEF BAD CHEF
GOOD CHEF BAD CHEF
GOOD CHEF BAD CHEF
GOOD CHEF BAD CHEF
GOOD CHEF BAD CHEF
INF O Sch edule
Rem ind
IND EX
7 7 Digit al
Start Ti me
00 Minu te
12 Hour
Dec Mon th
04 Date
End Time
30 Minu te
12 Hour
Dec Mon th
04 Date
Mode On ce
BAC K
-26-
Page 29

Press the green button(INFO) at the remote control to review the program information saved
in the list. Press the yellow button(Schedule) at the remote control to check the schedule list.
Sched ul e Li st 12:2 2 04 t h De c
Tim e Date Tit le Progr am me
12:24 -1 2: 26
12:25
Mon. 04 D ec
Mon. 04 D ec
Delet e
GOOD CHEF BAD CHEF
GOOD CHEF BAD CHEF
Chann el N am e
7 7 Digital
7 7 Digital
Press the blue button(Remind) to add current program to the list, and it will be switched on time.
Remin de r se tt ing
7 7 Digit al
00 Minu te
12 Hour
Dec Mon th
04 Date
Once Mo de
BAC K
Time Shift
Press to delay th e pro ces s of program.
[-0 0:01: 03/ ]00: 08:00
S
Pla y FB
FF Pre v. Nex t P ause Stop
03: 30
You ma y be requ ir ed to inp ut t he pass wo rd (def au lt as 000 0).
OK
-27-
Page 30

-28-
Page 31

MENU
-29-
Page 32

OK
-30-
Page 33

MENU butt on
MENU butt on
-31-
Page 34

MENU
-32-
Page 35

-33-
Page 36

INPUT
FORMAT
RGB-PC,HDMI/DVI-PC mode INPUT SPEC
VGA/HDMI/DVI 1/2 Input
Resolution
640×480 31.5 60
640×480
640×480
720×400
800×600
800×600 48.077 72.19
800×600 46.9
832×624
1024×768 48.4 60
1024×768 60
1152×870 68.68
1280×800 47.8 59.8
1280×960 60.0 60
1360×768
1280×1024
1440×900 55.9 55.9
1680×1050
1920×1080(RGB-PC)
1920×1080(HDMI-PC)
Horizontal frequency (KHz)
37.86
37.5
31.5
37.9
49.7
47.7
63.595
65.3
66.587
67.5 60
Vertical frequency (HZ)
VGA
72.809
75
70
60
75
75
75
75
60
60
60
59.93
VESA
VESA
VGA-T
VESA Guidelines
VESA
VESA
Mac
VESA Guidelines
VESA
Mac
——
VESA
VESA
VESA
VESA
——
VESA
VESA
-34-
Standard
Page 37

200
930. 24mm(H) X mm(V )
42.0 2 inches( 1067.31 mm) dia go nal
1000 :1
1920 1080
stripe arran gem ent
400 cd /m (Cente r 1 point) (Ty p.)
10bi t, 1. 06 Bill on colors
ANT IN
USB in put USBx 1
8W+8 W
1280(L)x190(W)x770(H)mm
17
20.4
523. 26
horiz. by vert. pi xel s RGB h orizontal
6
-35-
Page 38

MD110615-01
 Loading...