

Page 1
Page 2
SAFETY PRECAUTIONS
WARNING
- TO PREVENT FIRE OR SHOCK HAZARD, DO NOT USE THIS PLUG WITH AN EXTENSION CORD,
RECEPTACLE OR OTHER OUTLET UNLESS THE BLADES CAN BE FULLY INSERTED TO PRESENT
BLADE EXPOSURE.
- TO PREVENT FIRE OR SHOCK HAZARD. DO NOT EXPOSE THIS APPLIANCE TO RAIN OR MOISTURE.
- TO PREVENT ELECTRICAL SHOCK, MATCH WIDE BLADE PLUG TO WIDE SLOT FULLY INSERT.
CAUTION
RISK OF ELECTRIC SHOCK
DO NOT OPEN
This lightning flash with
arrowhead symbol, within an
equilateral triangle, is intended
to alert the user to the presence
of uninsulated “Dangerous
voltage” within the product’s
enclosure that may be of
sufficient magnitude to constitute
a risk.of electric shock to persons.
Warning: To reduce the risk of
electric shock, do not remove
cover (or back) no userserviceable parts inside. refer
Servicing to qualified service
personnel.
The exclamation point
within an equilateral triangle is
intended to alert the user to the
presence of important operating
and maintenance (servicing)
instructions in the literature
accompanying the appliance.
IMPORTANT SAFETY INSTRUCTIONS
1. Read these instructions.
2. Keep these instructions.
3. Heed all warnings.
4. Follow all instructions.
5. Do not use this apparatus near water.
6. Clean only with dry cloth.
7. Do not block any ventilation openings. Install in accordance with the manufacturer’s instructions.
8. Do not install near any heat sources such as radiators, heat registers, stoves, or other apparatus
(including amplifiers) that produce heat.
9. Do not defeat the safety purpose of the polarized or grounding type plug. A polarized plug has two
blades with one wider than the other. A grounding type plug has two blades and a third grounding prong.
The wide blade or the third prong are provided for your safety. If the provided plug does not fit into your
outlet, consult an electrician for replacement of the obsolete outlet.
10. Protect the power cord from being walked on or pinched particularly at the plugs, convenience
receptacles, and at the point where they exit from the apparatus.
11. Only use attachments/accessories specified by the manufacturer.
12. Unplug the apparatus during lightening sorts or when unused for long period of time.
13. Refer all servicing to qualified personnel. Servicing is required when the apparatus has been damaged
In any way,or plug is damaged, liquid has been spilled or objects have fallen into the apparatus, the
apparatus has been exposed to rain or moisture, does not operate normally, or has been dropped.
This appliance shall not be exposed to dripping or splashing water and that no object filled with liquids
such as vases shall be placed on apparatus.
The symbol for Class II (Double Insulation)
This symbol means that the unit complies with
European safety and electrical interference directives.
Page 3
SAFETY PRECAUTIONS
Page 4
CONTENTS
BASIC INFORMATION
Introduction
Terms
IIIustration of the Front Panel
IIIustration of the Rear Panel
IIIustration of the Vacuum Fluorescent Display
IIIustration of the Remote Control
How to Install and Use the Remote Control
Accessories
Basic Operations
SYSTEM CONNECTIONS
Connecting to the TV set
Connecting to the Ordinary Audio System
Connecting to the Amplifier with DTS or Dolby Digital Decoders
Connecting to the Amplifier with 5.1CH Audio Input
System Connection of Recording External Signals
Connection of Using Rear Panel Input Terminals
Connection of Using Front Panel Input Terminals
QUICK START RECORDING GUIDE
Summarization
Viewing the inputted Sorece
Selecting the Signal to View
How to Receive the TV Program
Manual Recording
One Touch Recording (OTR)
To Control the DV Camera Recorder by this Unit
Exiting Recording Mode
Playback USB
1
1
2
4
4
5
6
7
7
8
9
9
10
11
12
13
13
14
15
15
15
15
16
16
17
17
18
18
MANUAL RECORDING
Summarization
Operation Steps
TIMER TASK SETTING MODE
Operation Steps(continued)
EDIT A TITLE RECORDED
To Browse the Contents of the Disc and Select one Title to Play
Erasing a Title
Edit Title
Rename Title
Overwrite Title/Overwrite Disc
Summarization
Empty title
Entering the Editing Mode
Menu Explanation
Operation Steps
Selecting the Title/Chapter to be Edited
Insert Chapter Marker
Hiding / Unhiding Chapter
Changing the Index picture
Split Title
19
19
19
20
20
22
22
22
22
23
23
24
24
24
24
25
25
25
26
26
26
Page 5
CONTENTS
Exiting the Chapter Editing Mode
EDITING A DISC OF A DVD R or DVD RW±±
Summarization
Entering the Disc Operation Mode
Operations
Exiting the Operation mode
NORMAL PLAYBACK MODE
Entering the Playback Mode
Playback from the Menu Displayed
Playback from the Title Displayed
Ending Playback
Program and shuffle playback
Playback Process Control
Programming titles, chapters or tracks to play in a favourite order
Audio/Subtitle Selection
Angle Selection
PBC On/Off
T-Time/Tr-Time Selection
The Operations of Function Buttons
To Start Playing and Select Content to Play from Program List
Control Wipe Mode when Playing JPEG Disc
Control Zoom Mode when Playing JPEG Disc
Picture Rotating when Playing JPEG Disc
26
27
27
27
27
27
28
28
28
28
29
29
30
30
31
31
31
31
32
33
33
33
33
MENU INDEX FOR INITIAL SETUP
Operation Interface and General Steps
General Setup
Screen Save Setup
Progressive/Interlace Setup
Video Output Format Setup
Restore Factory Settings
Playback settings
TV Aspect Ratio
Speaker setting
Rating Level Setup
Digital Audio Output Setup
Aualog Audio Output Setup
Record Setup
Auto Chapter Marker Setup
Default Input Signal Sources Selection
Default Recording Quality Selection
Language Settings
OSD Language Setup
DVD Menu Language Setup
DVD Subtitle Language Setup
DVD Audio Language Setup
Channel Tuning
Audio Scan Channels
Modify Channel Information
Sort Channel Order
System Clock Setup
34
34
34
34
35
35
36
36
36
37
37
38
38
39
39
40
40
41
41
41
42
42
43
43
43
45
46
APPENDIX
Trouble Shooting guide
Specifications
Credits
47
47
48
49
Page 6

INTRODUCTION
Welcome!
BASIC INFORMATION
Your DVD recorder is ready to record DVD RW/DVD R and to play prerecorded DVD disc.
It is capable of recording great mass of AV input signals, such as TV programs, ordinary VCD or DVD
player’s signals, DV camcorder recordings, etc. You can quickly access your recordings in the Index
Picture Screen when playing recorded disc. The recordings you make on the Recorder will play on
some other DVD players and DVD-ROM drives.
Utilizing MPEG -II Real-Time encoding and decoding technology, being capable of directly recording
TV and external program sources on DVD R, DVD RW discs.
Recording your favorite video tapes into DVD
Built-in DV (i. LINK/1EEE1394) input jack enables fully digital high fidelity recording of digital video
camcorder signals.
Progressive scan outputs to produce stabler and clearer pictures without flicker.
Built-in 5.1CH Dolby Digital surround decoder, separating 5.1CH outputs, 2CH Dolby outputs, optical
and coaxial output for digital audio.
24 bit audio DAC to produce perfect acoustic fidelity.
Regular DVD playback function is capable of playing DVD, SVCD, VCD, CD, MP3, JPEG, DVD R±
and DVD RW discs.±
Single-side discs DVD R/DVD RW(4.7GB) allow 6 hours video recording.±±
Supports 4 recording modes: HQ, SP, EP, SLP.
OTR function enables one-touch recording, convenient select the length of recording time.
Manual/automatic insertion of chapter mark.
Chapter hiding, disc locking to the recorded discs (DVD RW) and renaming the titles are available±
Title index pictures of recorded disc (DVD RW) are freely selectable.±
Multi-dubbing, multi-angle, multi-subtitle for selection.
Built-in TV tuner with TV reception function enables automatic channels scanning.
AV terminal, S-Video on the front and rear panels, DV (i. LINK/1EEE1394) and antenna input
terminals, conveniently records various program sources.
Composite video, component/progressive-scan video output terminals and TV antenna output
Terminals, Enables connection with various TV sets.
Intelligent preset timing recording function enables 20 recording tasks.
±±
±±
1
Page 7

TERMS
Recording quality
BASIC INFORMATION
Depending on the compression degree, there are four recording qualities to DVD R/RW discs with
4.7GB (12CM single side)
SLP: general definition, a single-side DVD disc can record about six hours program.
EP: good definition, a single-side DVD disc can record about four hours program.
SP: better definition, a single-side DVD disc can record about two hours program.
HQ: best definition, a single-side DVD disc can record about one hour program.
±
Title
The combined chapters of a movie or music on a DVD; For a music piece on audio software, each
title is assigned a title number enabling you to locate the title you want.
Chapter
Sections of a movie or a music piece on a DVD that are smaller than titles. A title is composed
of several chapters. Each chapter is assigned a chapter number enabling you to locate the
chapter.
Track
Sections of a movie or a music piece on a CD-DA or VCD. Each track is assigned a track
number enabling you to locate the track you want.
2
Page 8
BASIC INFORMATION
TERMS (CONTINUED)
Multiple camera angles function
Certain DVD discs offer multiple camera angles function, When using such function, press the ANGLE
button to view the scenes at different camera angles.
Multiple dubbing languages function
Various dubbing languages are recorded in some DVD discs.
Multiple subtitles function
Multiple language subtitles are recorded in some DVD discs. Press the SUBTITLE button to select
different language subtitles.
Regional code
To protect intellectual property, the involved organizations partition the world into six regions,
each of which can only use the DVD player and DVD disc with the given regional code. The
illustration on the right shows symbols of the six regions. One DVD player with a given regional
code cannot play the disc with another regional code. The partition of regional codes is as follows:
1. Canada, USA;
2. Japan, Europe, South Africa, Middle East,
Egypt;
3. Southeast Asia, East Asia ;
4. Australia, New Zealand, Oceania, Central America, Mexico, Latin America, Caribbean Sea;
5. Russia, India, Africa, Korea, Mongolia;
6. China.
1 2
3
4
5
6
3
Page 9
BASIC INFORMATION
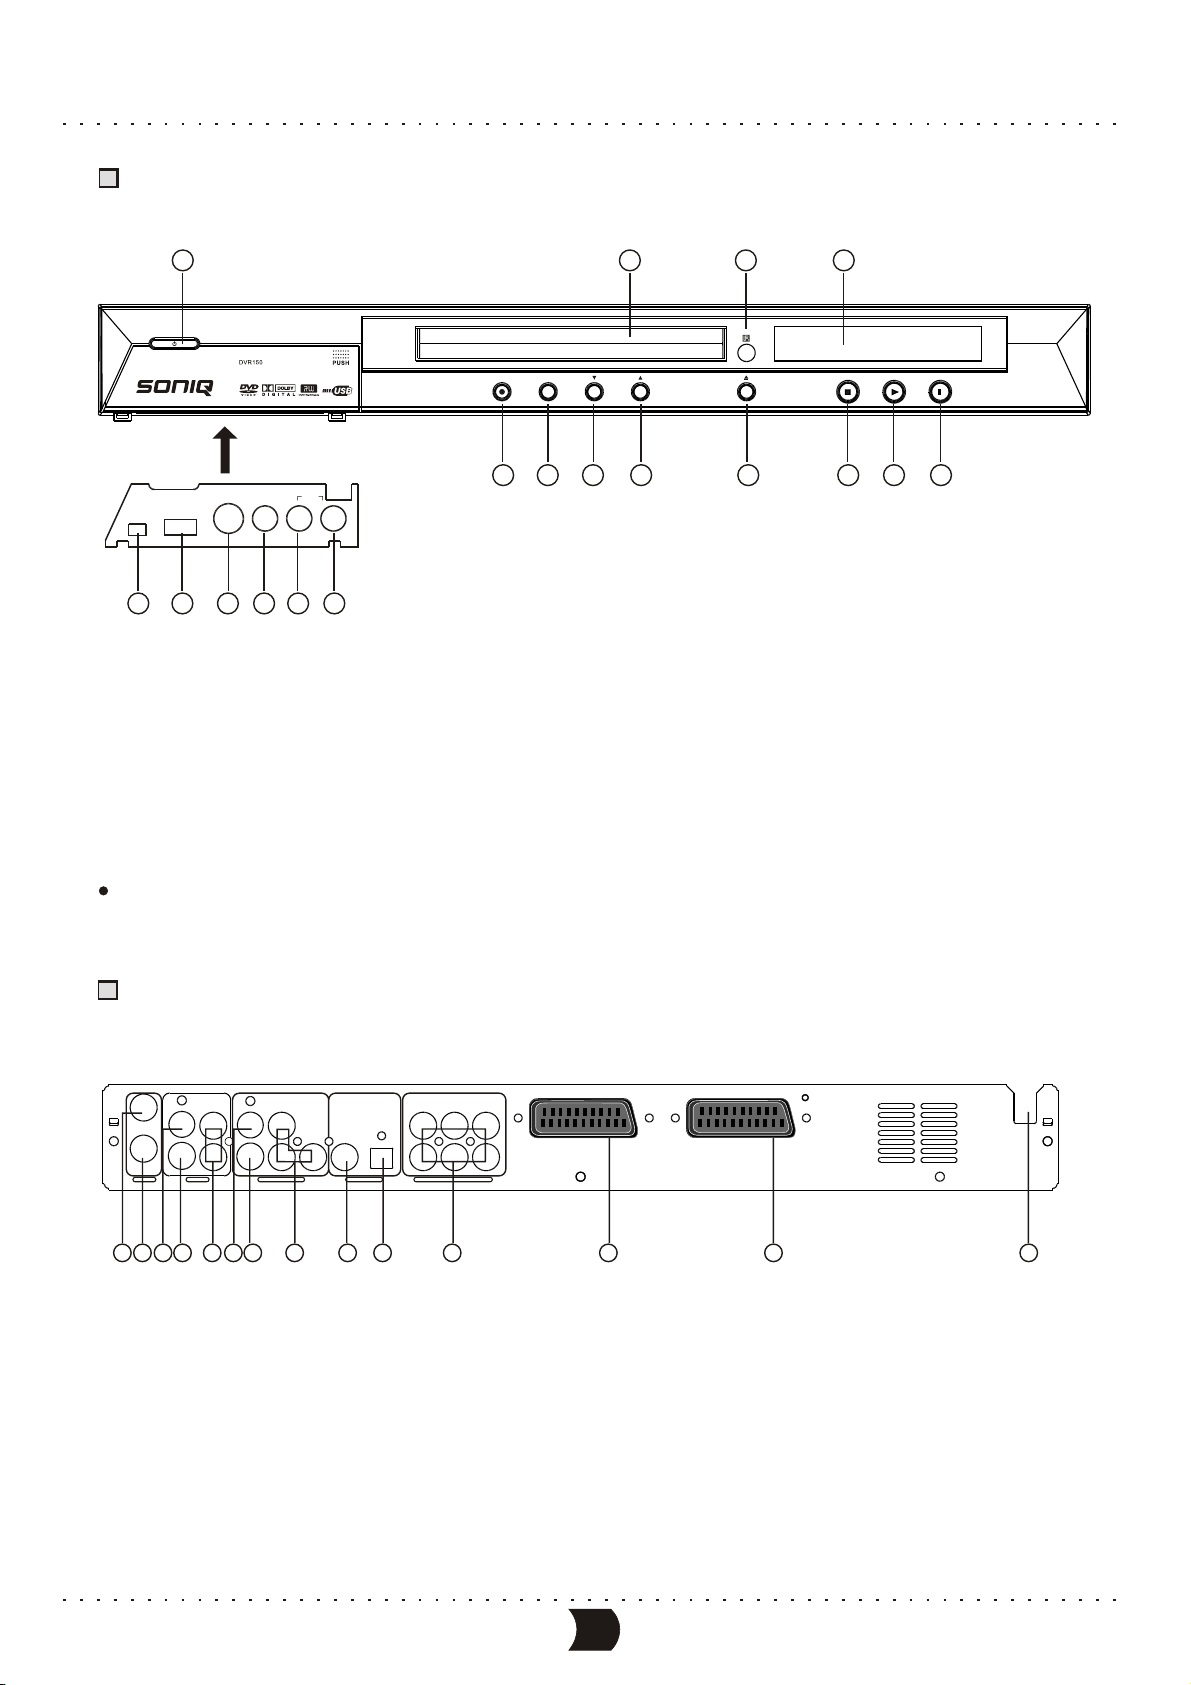
IIIustration of the Front Panel
1
VIDEOS-VIDEO
AUDIO
RIGHT
17
LEFT
18
DV IN
13
14
USB
15 16
1. Power switch button
2. Disc tray
3. Remote control sensor
4. Display
5.Record button
6. Source button
2
DVD RECORDER
CHANNELSOURCERECORD
6
5
8
7
7. Channel down button
8. Channel up button
9. Open/Close button
10. Stop button
11. Play button
12. Pause button
34
PLAY
STOP
9
10
PAUSE
11
12
13. DV input terminal
14. USB input terminal
15. Front S-video input terminal
16. Front Video input terminal
17. Left audio channel input terminal
18. Right audio channel input terminal
The function of buttons on front panel is the same as that of the corresponding ones on remote control.
IIIustration of the Rear Panel
AUDIO
LY FL
VIDEO
IN
IN
S-VIDEOOUT
TV
2
1
3
VIDEO
S-VIDEO
R
INPUT VIDEOOUTPUT
567
4
b Cr
C
8
COAXIAL
DIGITALOUT 5.1CHSURROUND AUDIOOUT
9
1. TV tuner input terminal
2. TV tuner output terminal
3. Rear video input terminal
4. Rear S-video input terminal
5. L/R channel audio input terminal
OPTICAL
10
CENTER
SUBWOOFER
RL
FR
RR
11
12
6. Composite video output terminal
7. S-video output terminal
8. Component video output terminal
9. Coaxial output terminal
10. Optical output terminal
SCART OUTSCART IN
13
14
11. 5.1CH output terminal
12. Scart input
13. Scart output
14. AC power cord
4
Page 10
BASIC INFORMATION
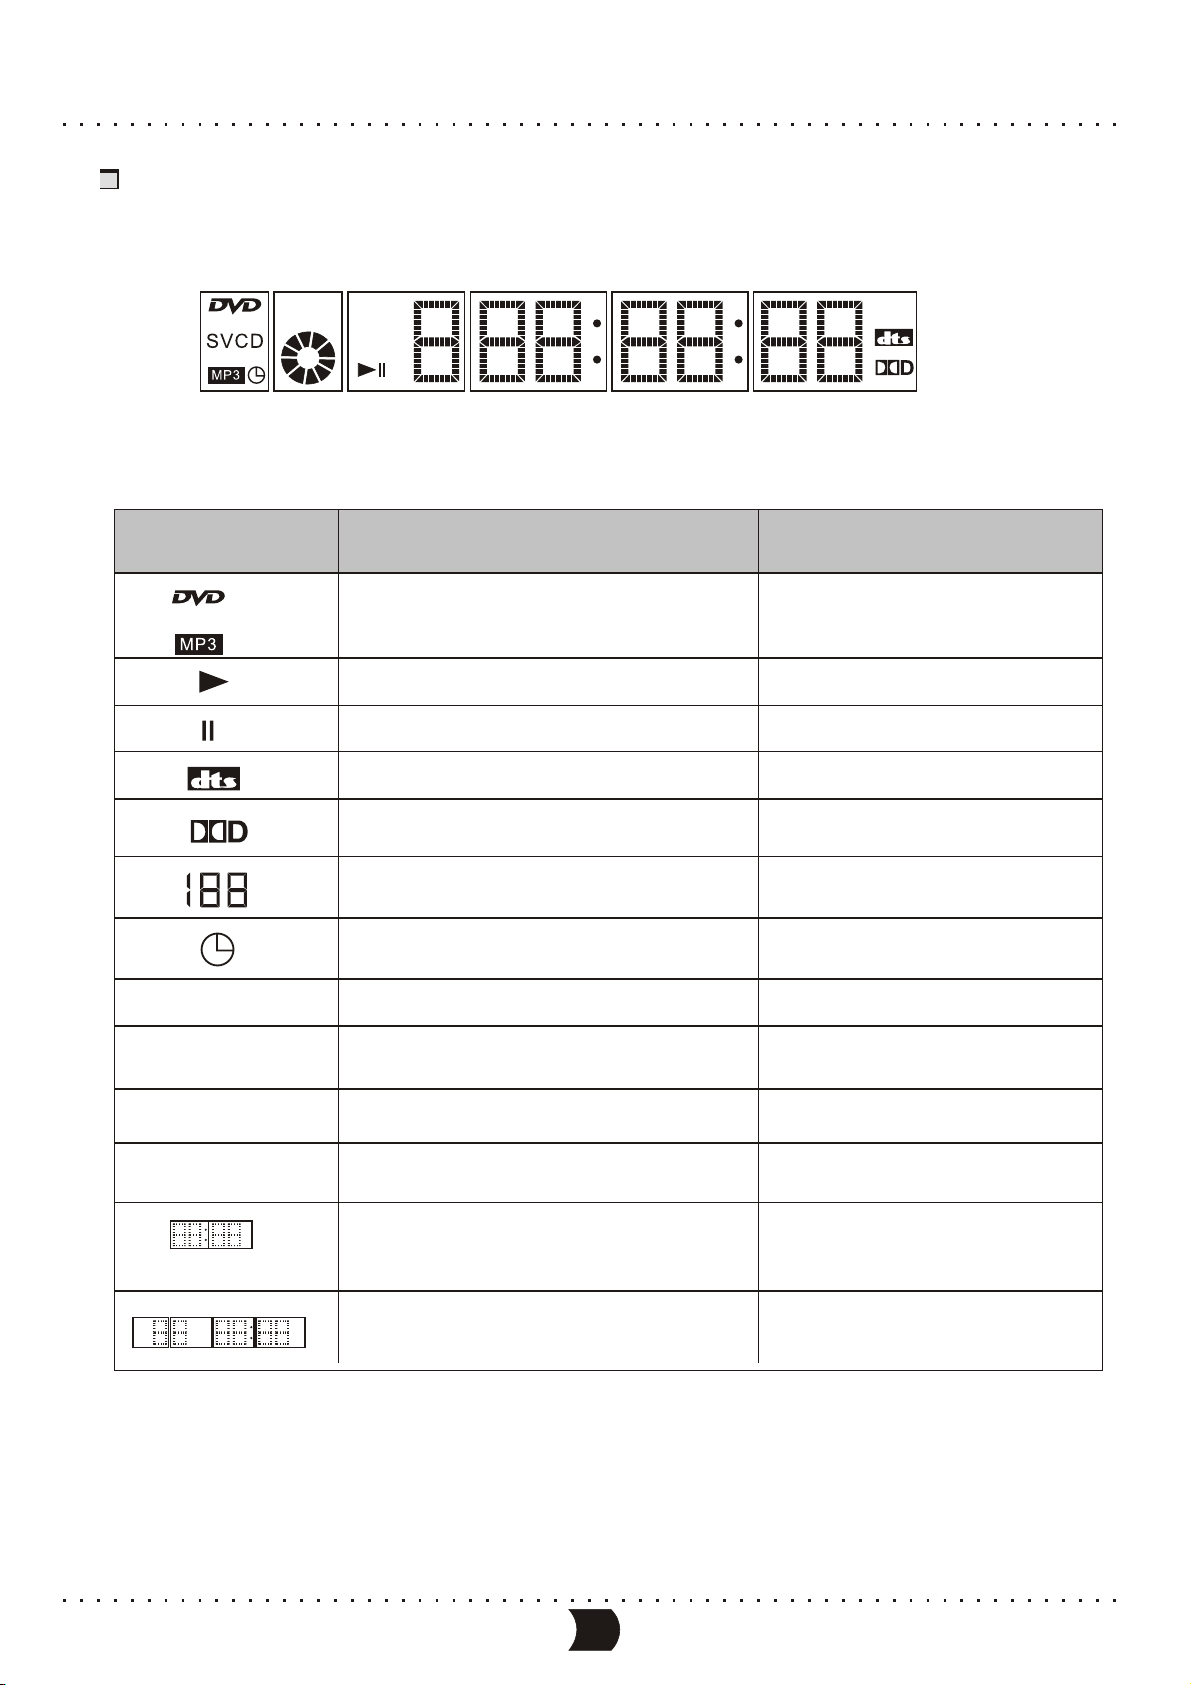
IIIustration of the Vacuum Fluorescent Display
TV TS REC
PBC
Below are the lighting VFD items and their corresponding definitions. These items may light up
accordingly depending on condition.
Lighting
VFD items
SVCD
CHANNEL
REC
PBC
Light on condition
When playing a disc of such type
When playing
When pausing
When playing DVD with DTS
When playing DVD with Dolby
digital sound
In which channel
When the system has one or more timer
recording tasks
When recording
Shows PBC during ON state
Remarks
Depending on disc type
TV
TS
When switch TV output
When switch SCART input
Show LOAD when reading the disc.
Shows NO DISC when no disc is loaded.
5
Page 11

BASIC INFORMATION
IIIustration of the Remote Control
1. Power button
2. Mute button
3. I/P button
4. Number (0~9) button
5. Audio button
6. Subtitle button
7. Setup button
8. Enter button
9. / / / button
10. Source button
11. Return button
12. Display button
13. Menu button
14. Volume down button
15. Volume up button
16. Program button
17. Random button
18. Play/Pause button
19. Stop button
20. Fast backward button
21. Fast forward button
22. Eject button
23. N/P button
24. Clear/Add button
25. Goto button
26. USB button
27. Angle button
28. Disc operation button
29. Record button
30. Edit button
31. Timer button
32. Title button
33. Channel down button
34. Channel up button
35. A-B button
36. Repeat button
37. Zoom button
38. Slow button
39. Next button
40. Prev button
2
3
4
5
6
7
8
9
10
11
12
13
14
15
16
17
18
19
20
21
1
MUTE
POWER
I/P
12
5
678
EJECT
N/P
3
4
GOTO CLEAR/ADD
90
SUBTITLE
AUDIO
SETUP
SOURCE RECORD
RETURN
DISPLAY
VOL
PROG
PLAY/PAUSE
REV
ANGLE USB
DISC OP
ENTER
EDIT
TIMER
MENU TITLE
CH
RAND REP A-B
ZOOMSLOWSTOP
FWD PREV NEXT
22
23
24
25
26
27
28
29
30
31
32
33
34
35
36
37
38
39
40
6
Page 12
BASIC INFORMATION
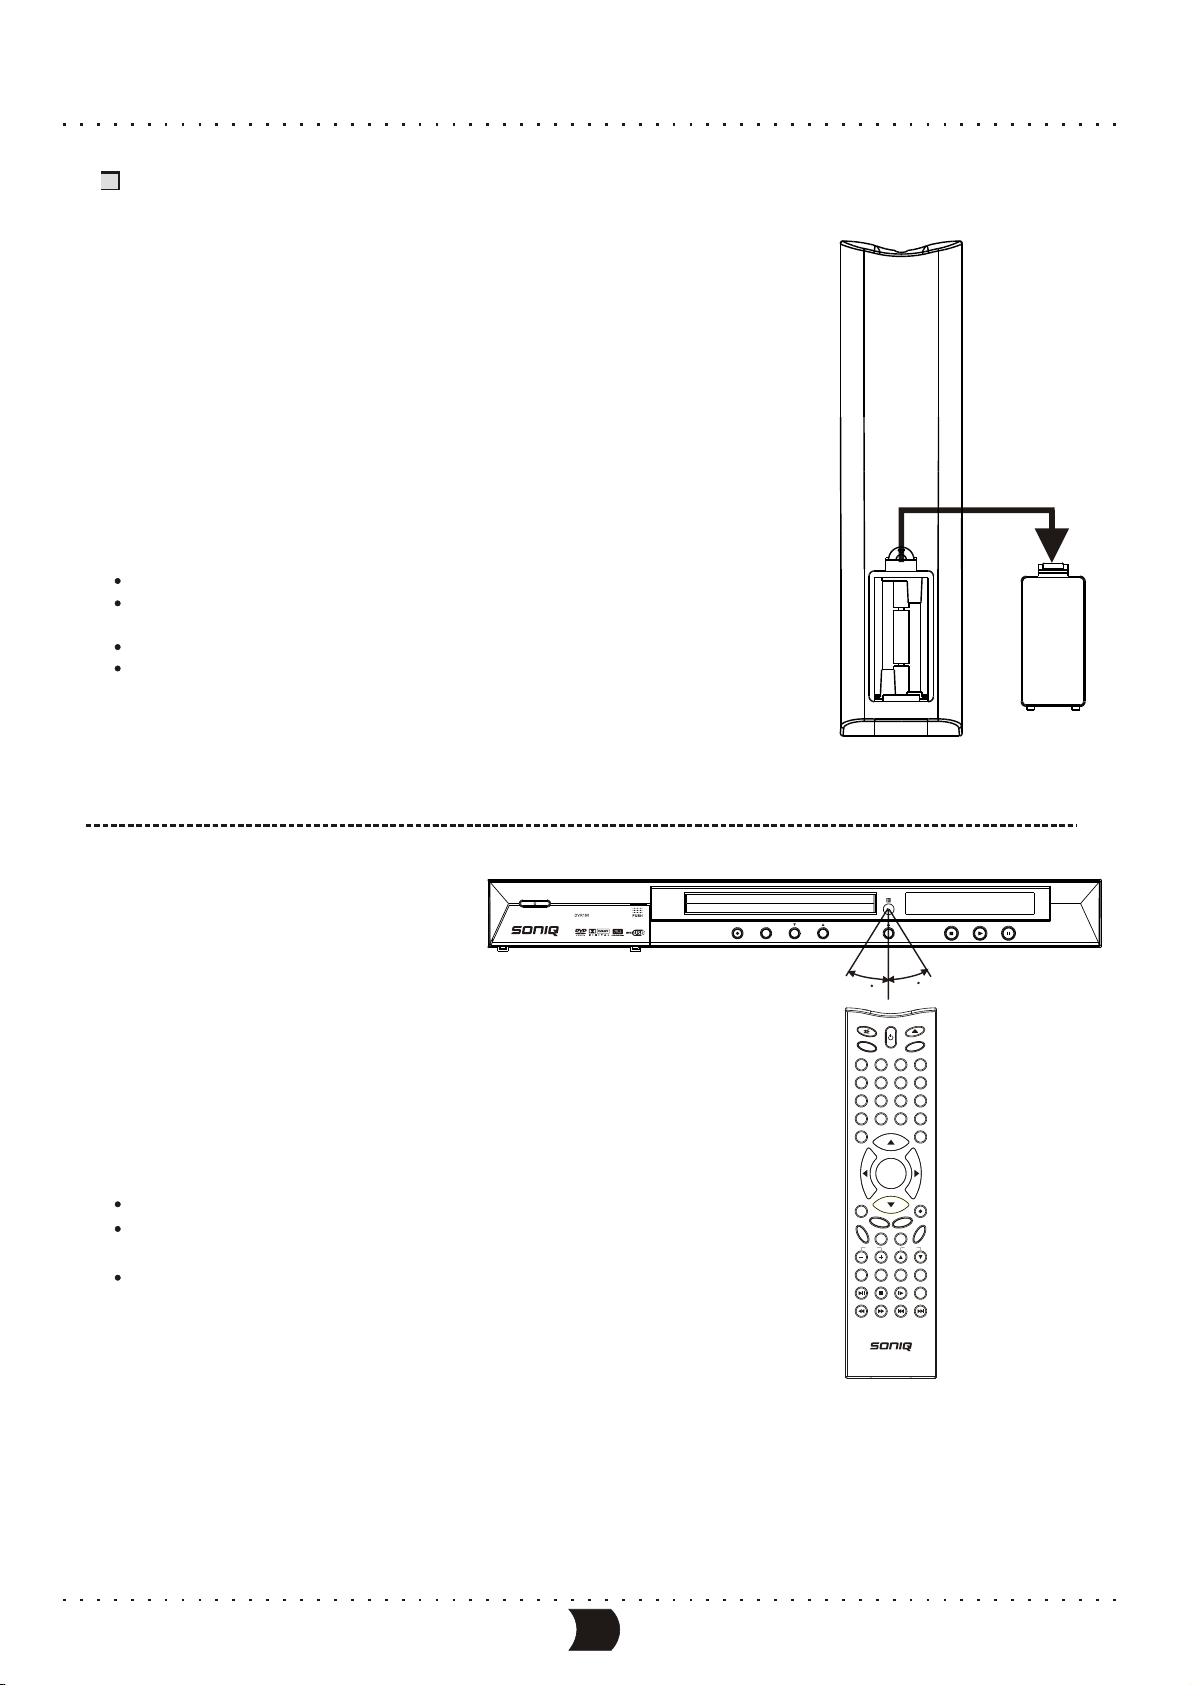
How to install and use the remote control
Battery Installation
Insert the batteries while observing the positive
(+) and Negative (-) polarities.
Service life of batteries
The batteries normally last for a year although this depends on the
operation and how often the remote control is used. If the remote control
unit fails to work even when it is operated near the player, replace the
batteries with new ones. Use size AAA UM-4 batteries (2 pieces).
Notes:
Do not use rechargeable (Ni-Cd) batteries.
Do not attempt to recharge, short circuit, disassemble, heat or throw the
batteries into fire.
Do not drop, step on the remote control.
Do not mix old and new batteries. If the remote control is not going to be
used for a long time, remove the batteries. Wipe away any electrolyte
leaking inside the remote control, and install new batteries.
Remote control operation range
The operation range of the remote control is no more
than 5m from and within about 60 degree wide in front
of the unit. The operating distance may vary according
to the brightness of the room.
Note:
Do not point bright lights to the remote control sensor.
Do not place objects between the remote control and
the remote control sensor.
Do not use this remote control together with the remote
control of any other equipment.
DVDRECORDER
CHANNELSOURCERECORD
30
30
MUTE
EJECT
POWER
I/P
N/P
3
12
5
6 7 8
GOTO CLEAR/ADD
90
AUDIO
SUBTITLE
ANGLE USB
SETUP
DISCOP
ENTER
SOURCE RECORD
RETURN
EDIT
DISPLAY
MENU TITLE
VOL CH
RAND REP A-B
PROG
PLAY/PAUSE
REV
FWD PREV NEXT
PLAY
PAUSE
STOP
4
TIMER
ZOOMSLOWSTOP
7
Page 13
BASIC INFORMATION
Basic operations
Mainly use the remote control to operate this unit. The function buttons on the front panel may also
fulfill part of the operations. The feedback information of the system is mainly displayed on the TV
screen, and part of the information is displayed on the VFD on the front panel.
The operating functions for this unit are classified into six modes:
PLAYBACK MODE, RECORDING MODE, EDITING MODE, DISC OPERATION MODE, SETUP MODE
and TIMER TASK SETTING MODE.
To switch mode , press: [PLAY] button, [SOURCE] button,[EDIT] button, [DISC OP] button,
[SETUP] button.
In playback, recording, editing and disc operation modes, system can be controlled by “control menu”.
In playback/recording mode, the menu can be displayed by [DISPLAY] button. First pressing the
[DISPLAY] button, a text information bar showing the current working information will appear, and
secondly pressing the button will display the control menu. The control menu will appear
automatically when you enter editing mode/disc operation mode. In the control menu, you can move
focus by cursor buttons to select a sub item to perform a corresponding function.
RECORD (DVD+RW)
This area shows current working mode
This area shows corresponding working information
Monitor Front S-VIDEO(No signal) SP
The text information bar when system is in recording mode
MODE
SOURCE
QUALITY
REC TO
TRICK
TITLE
CHAPTER
TIME
The control menu when system is in recording mode
New Title
Front S-VIDEO
SP
DVD-VIDEO
Stop
01/01
01
0:02:45/2:07:09
You can configure the system in setup mode. Pressing [SETUP] button can enter this mode, In setup
mode, the control menu is always shown. Pressing [SETUP] button again to exit.
Make a timer record task in timer task setting mode. Pressing [TIMER] button can enter this mode.
Pressing [TIMER] button in this mode can exit.
8
Page 14
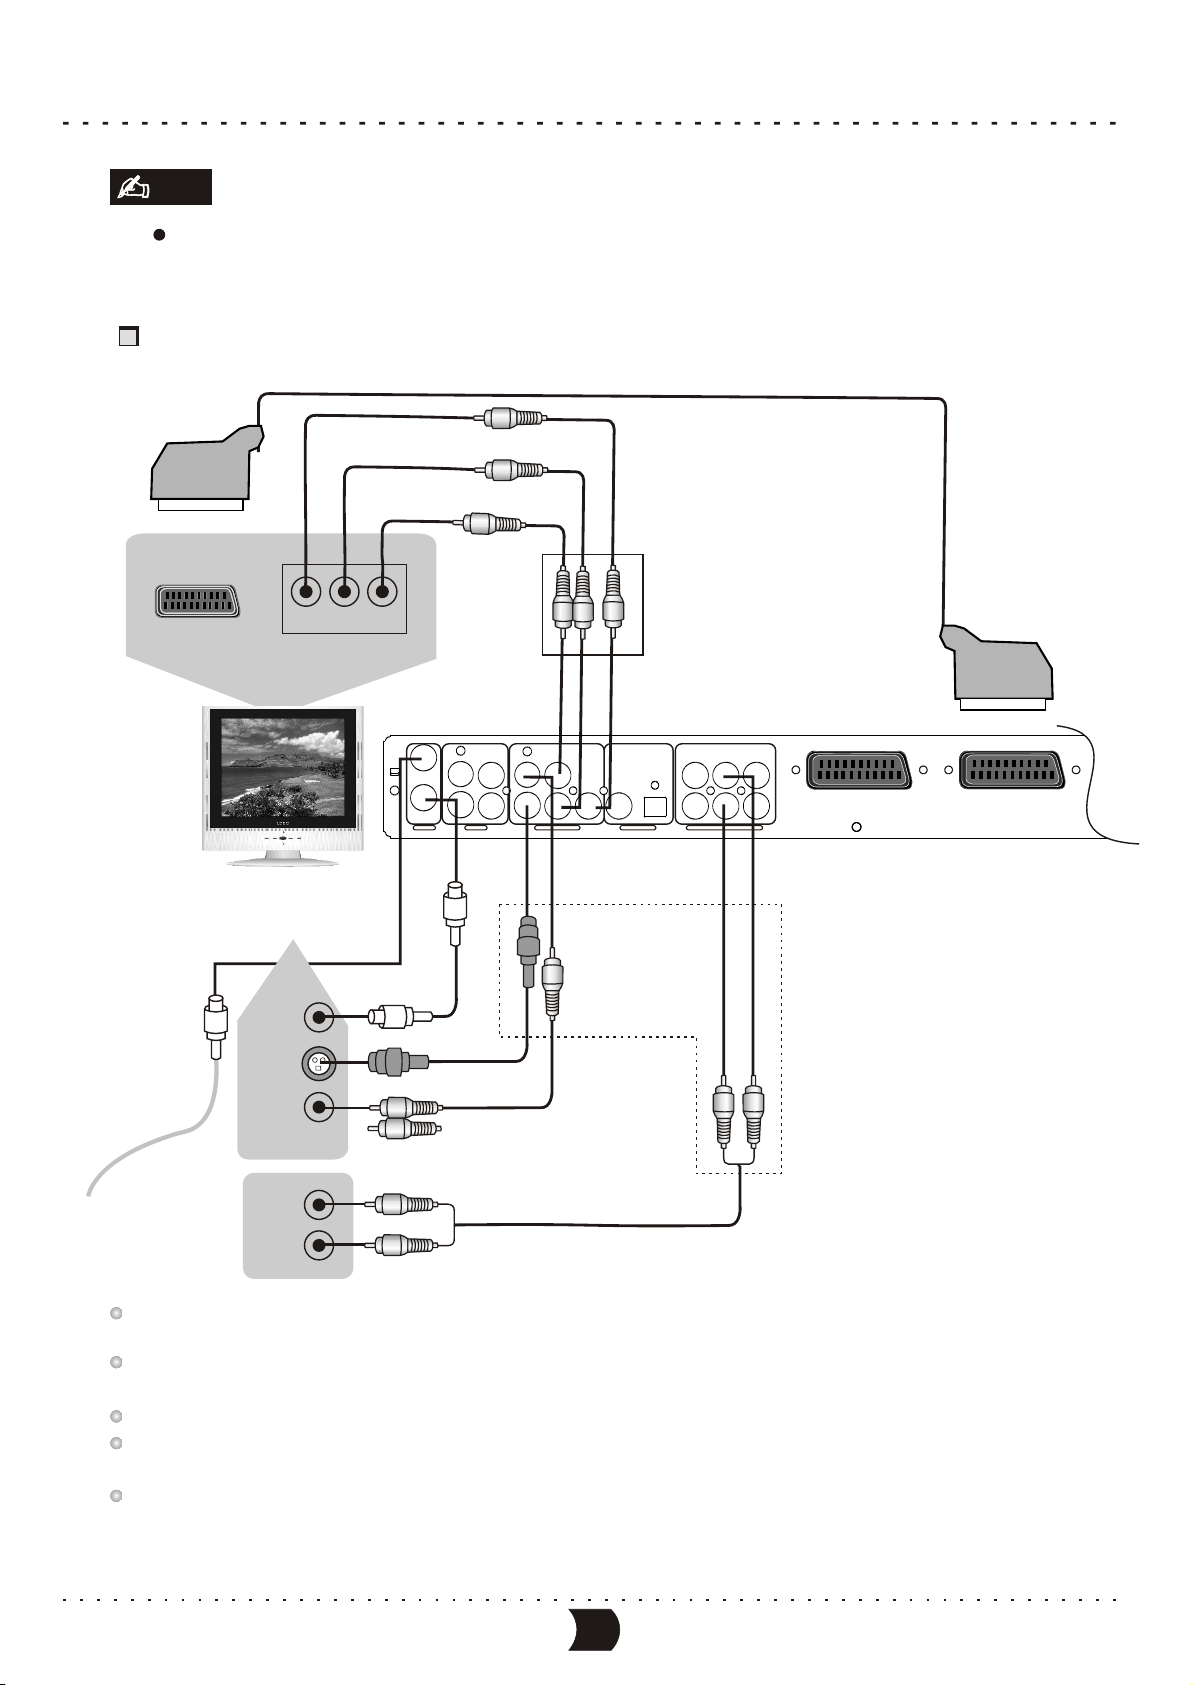
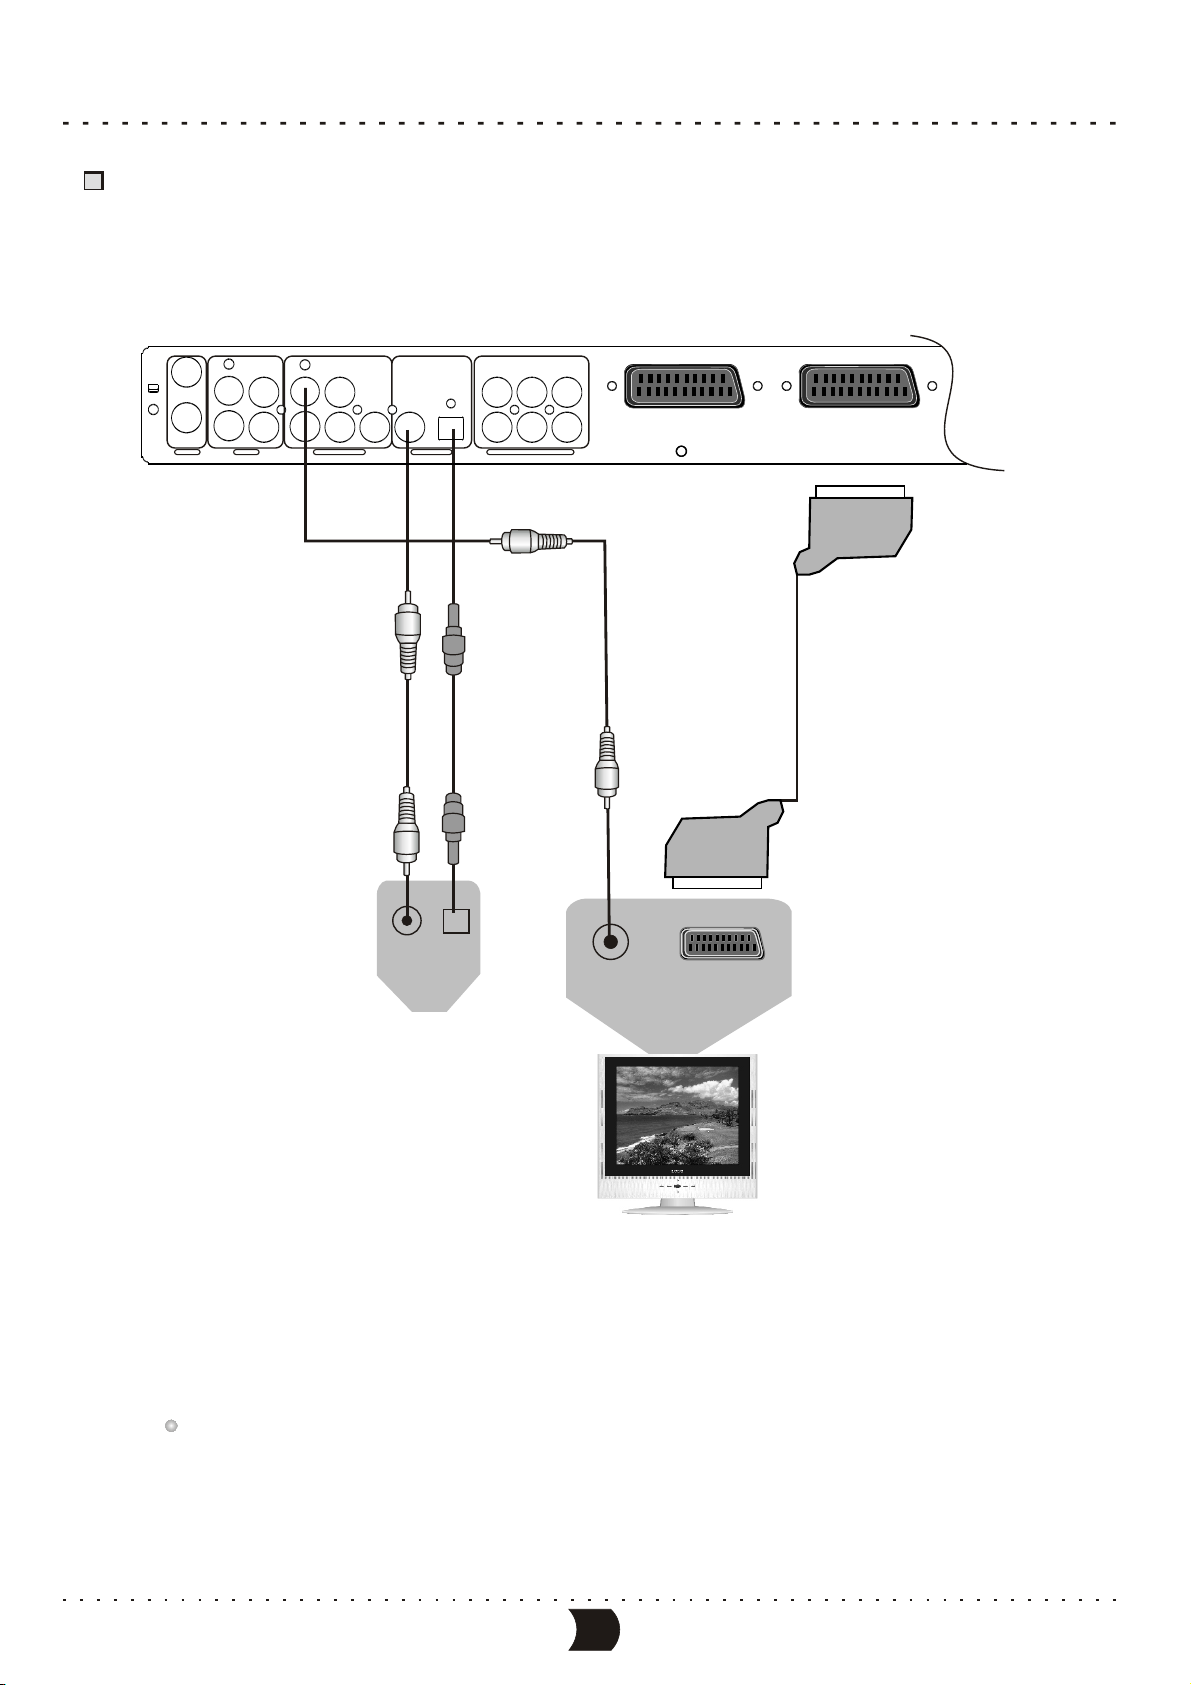
SYSTEM CONNECTIONS
Note
Note
Make sure that the player and other equipments are unplugged before connecting.
Connecting to the TV set
Component video output
21 pin Scart connector to 21 pin
Scart input on Television(option)
Scart /RGB input
Cr Cb Y
Component Video Input
TV IN
S-Video
Terminal
Video In
AUDIO
LY FL
VIDEO
IN
IN
TV
VIDEO
S-VIDEOOUT
S-VIDEO
R
INPUT VIDEOOUTPUT
Antennas Cable
75 TV Coaxial Cable
S-Video Cable
connect one of the two cable
Video Cable
b Cr
C
CENTER
OPTICAL
COAXIAL
SUBWOOFER
DIGITALOUT 5.1CHSURROUND AUDIOOUT
RL
FR
RR
SCART OUTSCART IN
Illustration of the Rear Panel
Output of this unit
Audio In
Audio Cable
This unit incorporates three video output: component video, S-video and composite video. You can connect
one of them according to your TV set’s input terminals.
Make sure that this unit outputs video by component video output terminals when you select the progressive scanning
function.
In terms of picture quality, component video is the best followed by S-video and composite video.
If the audio output is connected to a TV set, please connect L and R to the AUDIO INPUT terminals
in the same group as the VIDEO IN terminals in the TV set.
When you are not recording TV programs, you d
o not necessarily need to connect
the Antennas Cable and TV Coaxial
Cable to this unit.
9
Page 15
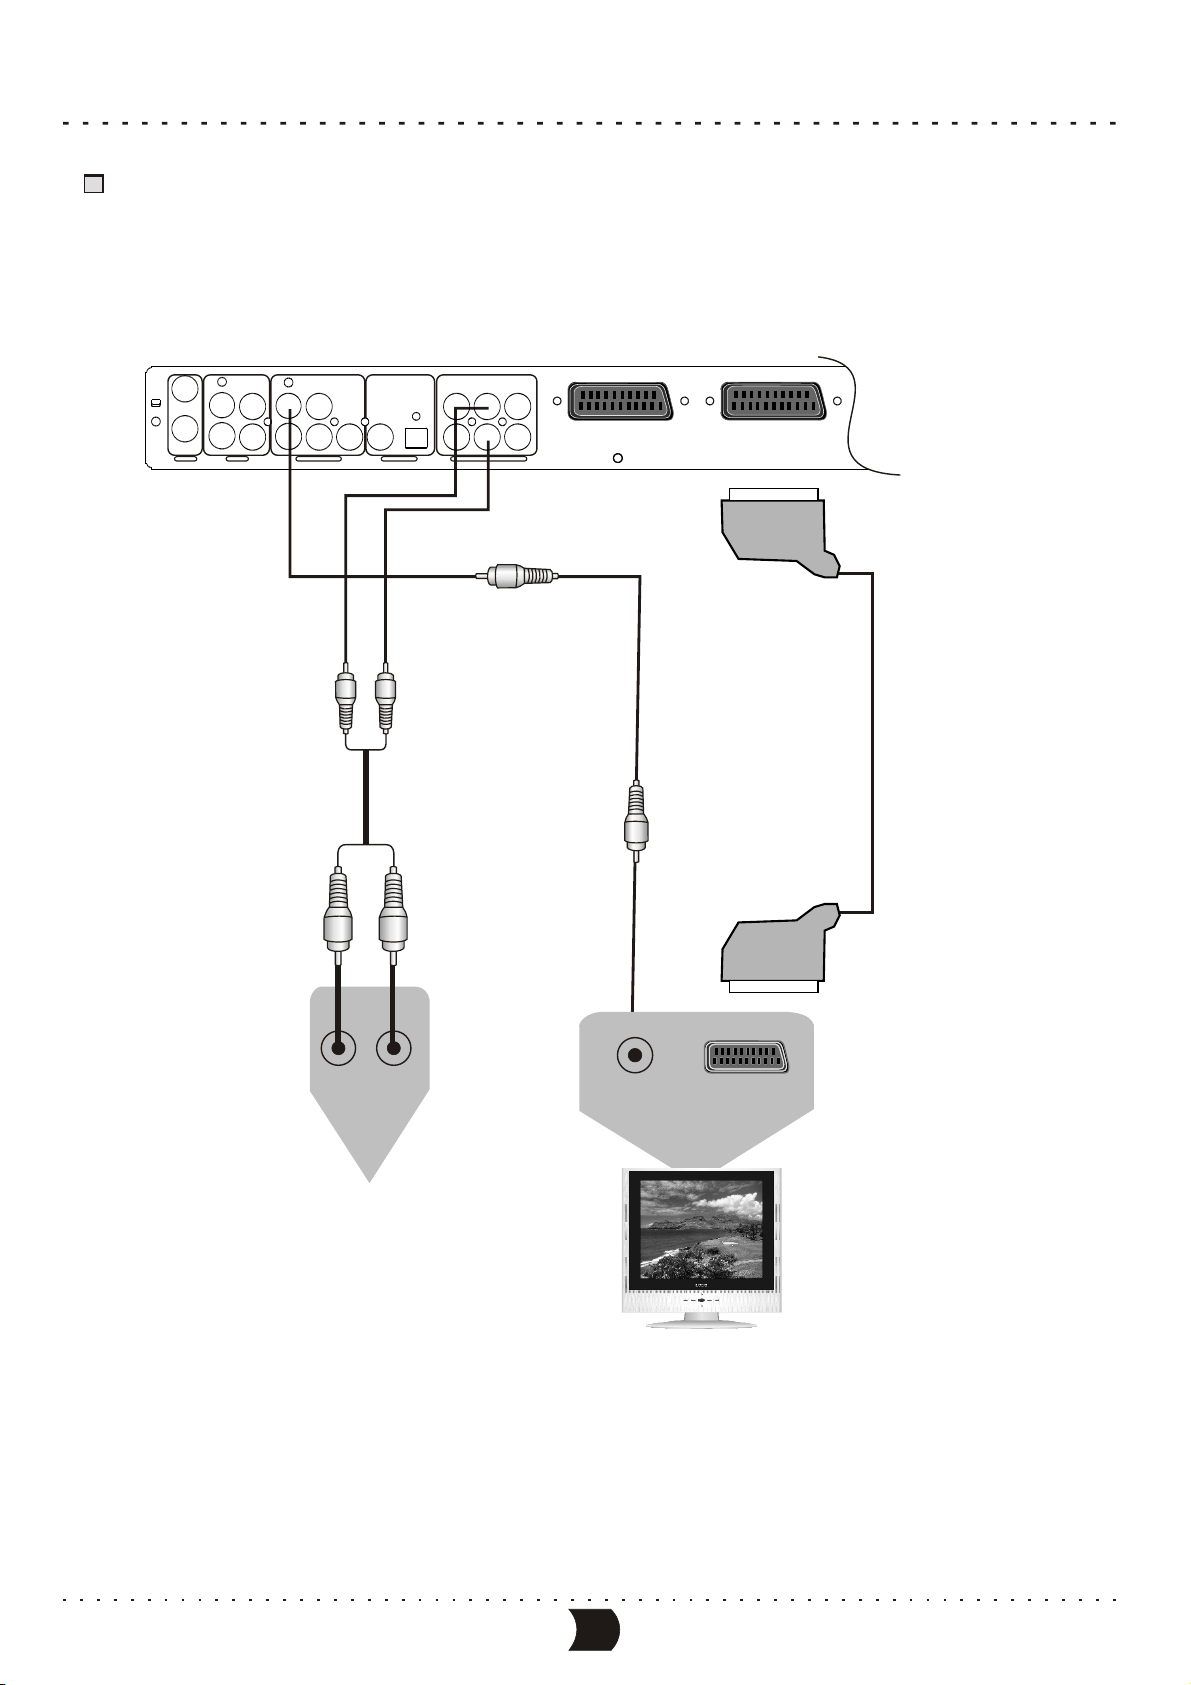
SYSTEM CONNECTIONS
Connecting to the Ordinarty Audio System
Illustration of the Rear Panel
VIDEO
IN
IN
S-VIDEOOUT
TV
INPUT VIDEOOUTPUT
AUDIO
L FL
VIDEO
COAXIAL
C
b Cr
S-VIDEO
R
DIGITALOUT 5.1CHSURROUND AUDIOOUT
OPTICAL
CENTER
SUBWOOFER
Audio Cable
RL
FR
RR
SCART IN SCART OUT
Scart input on Television(option)
21 pin Scart connector to 21 pin
Video Cable
Audio In
Amplifier
Video In
10
Scart /RGB input
Page 16
SYSTEM CONNECTIONS
Connecting to the Amplifier with DTS or Dolby Digital Decorders
Illustration of the Rear Panel
VIDEO
IN
IN
S-VIDEOOUT
TV
AUDIO
LY FL
VIDEO
OPTICAL
COAXIAL
b Cr
S-VIDEO
R
INPUT VIDEOOUTPUT
C
DIGITALOUT 5.1CHSURROUND AUDIO OUT
Connect One of the two Cable
Optical Cable
Coaxial Cable
CENTER
SUBWOOFER
RL
FR
RR
Video Cable
SCARTIN SCARTOUT
Scart input on Television(option)
21 pin Scart connector to 21 pin
Coaxial in optical in
Video In
Scart /RGB input
Amplifier with Dolby Digital
or DTS digital decorder
Please refer to “System setup - Playback settings- Digital audio out setup” for details.
11
Page 17
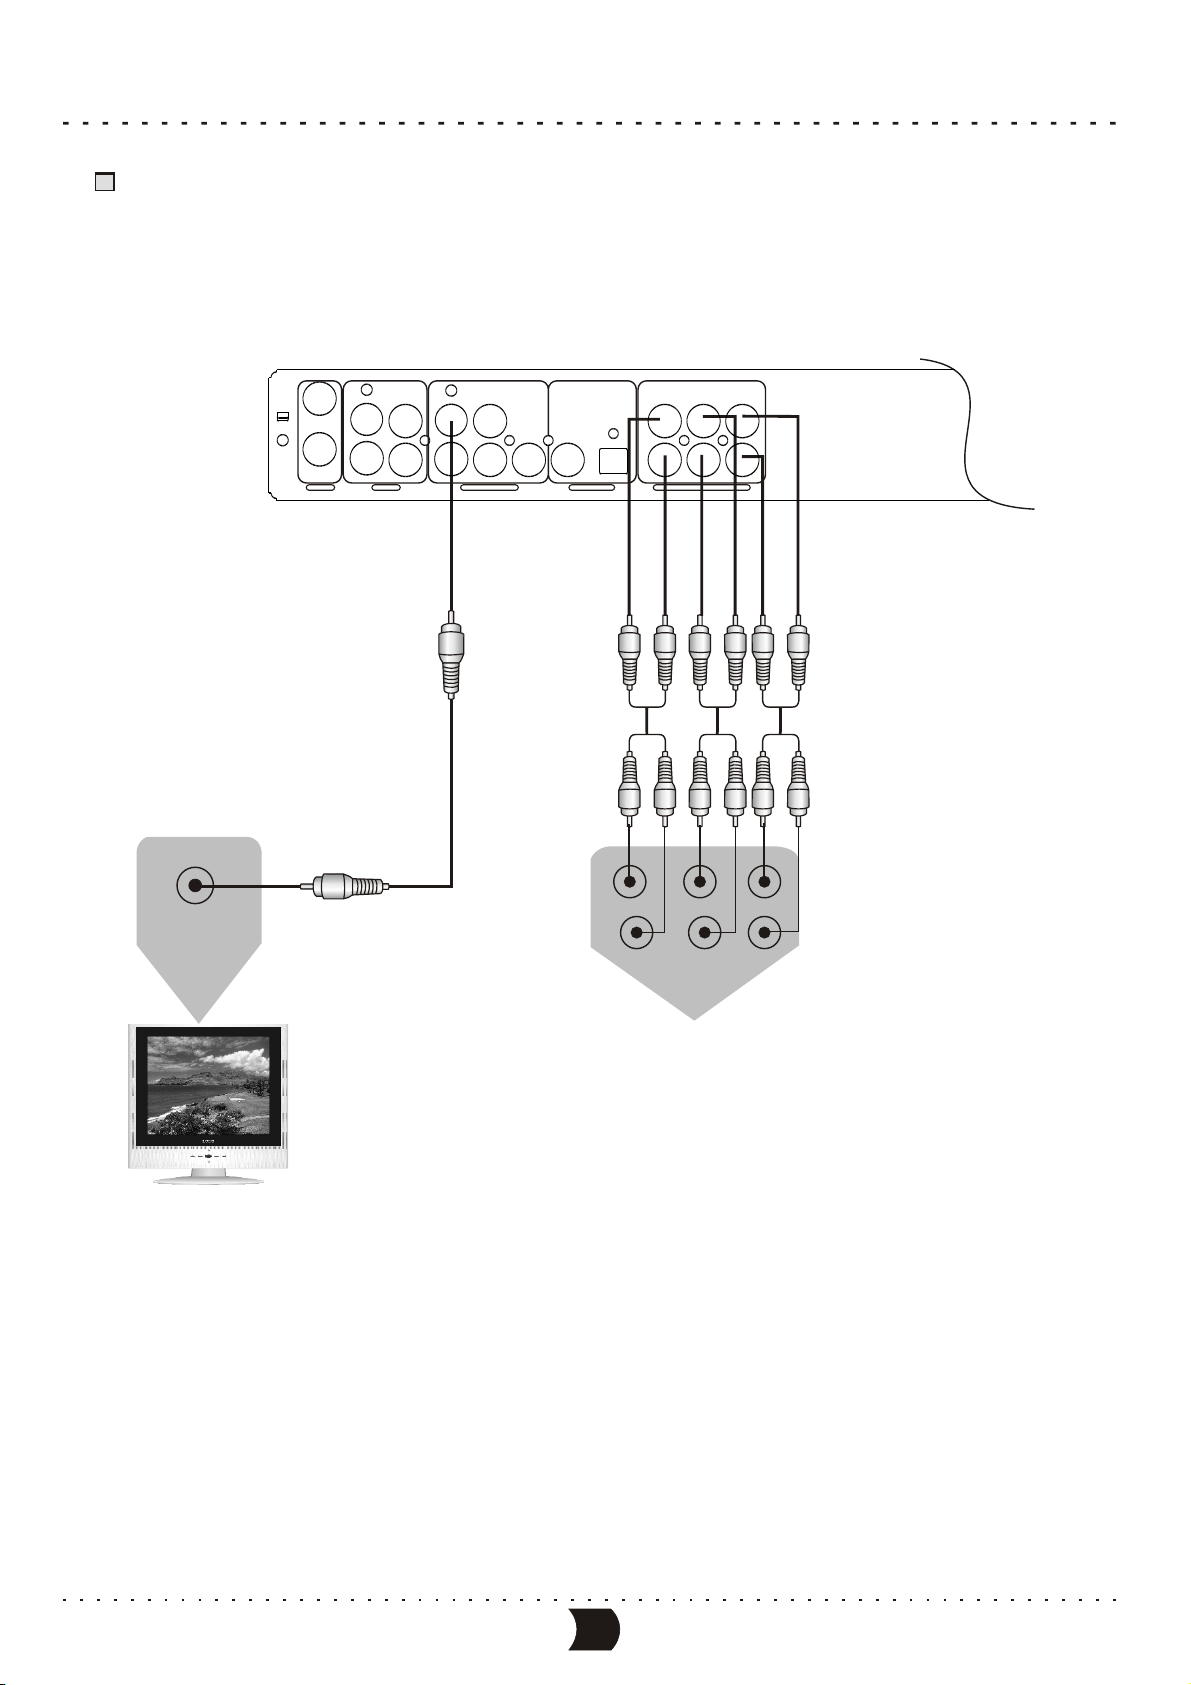
SYSTEM CONNECTIONS
Connecting to the Amplifier with 5.1CH Audio Input
The Rear Panel of this Unit
Video In
AUDIO
VIDEO
IN
IN
TV
LY FL
VIDEO
S-VIDEOOUT
INPUT VIDEOOUTPUT
S-VIDEO
R
C
b Cr
COAXIAL
DIGITALOUT 5.1CHSURROUND AUDIO OUT
OPTICAL
CENTER
CENTER
SUBWOOFER
FR
FRONTSUBWOOFER SURROUND
L
R
RL
RR
Amplifier with 5.1CH Audio Input
This unit is equipped with built-in Dolby Digital decoder (Dolby AC-3 decoder). Therefore, it does not necessarily need
amplifiers with Dolby Digital processor to play DVD discs recorded with Dolby Digital Surround. When this unit is connected
to amplifiers with 5.1CH audio input to play DVD discs recorded with Dolby Digital Surround, you can enjoy theater
effect at your home. Please set the Analog Audio Output to “5.1CH”. (Please refer to”System Setup-Analog Audio Output
Setup” for details).
12
Page 18

SYSTEM CONNECTIONS
System Connection of Recording External Signals
Connection of using rear panel input trminals
S-VIDEO
Monitoring Output
Connect One of the Two Cables
The Rear Panel of this Unit
AUDIO
VIDEO
IN
IN
TV
LY FL
S-VIDEOOUT
R
INPUT VIDEOOUTPUT
Yell ow
White
Red
VIDEO
S-VIDEO
C
b Cr
VIDEO
L
AUDIO
R
Yellow
CENTER
OPTICAL
COAXIAL
DIGITALOUT 5.1CHSURROUND AUDIO OUT
SUBWOOFER
IN
White
S-VIDEO
Scart /RGB input
21 pin Scart connector to 21 pin
Red
RL
FR
RR
Scart input on Television(option)
SCART IN SCART OUT
Connection Antennas
or Cable TV Signals
S-VIDEO
Yellow
White
VIDEO
OUT
Red
AUDIO
LR
S-VIDEO
External Source Signals
R-A/V Source
R-SV Source
TV Source
External Input Signals
13
Page 19

SYSTEM CONNECTIONS
System Connection of Recording External Signals
Connection of using front panel input terminals
S-VIDEO
Monitoring Output
The Front Panel of the Unit
VIDEOS-VIDEO
AUDIO
RIGHT
USB
DV IN
LEFT
Connect One of the Two Cables
Yell ow
White
Red
DVDRECORDER
PLAY
PAUSE
CHANNELSOURCERECORD
STOP
F-A/V Source
VIDEO
L
AUDIO
R
IN
S-VIDEO
White
Yellow
AUDIO
LY FL
VIDEO
IN
IN
TV
VIDEO
S-VIDEO
S-VIDEOOUT
R
INPUT VIDEOOUTPUT
b Cr
C
CENTER
OPTICAL
COAXIAL
SUBWOOFER
DIGITALOUT 5.1CHSURROUNDAUDIO OUT
The Rear Panel of the Unit
Red
RL
FR
RR
S-VIDEO
DV
S-VIDEO
Digital Video Camera Recorder
Yellow
White
Red
VIDEO
OUT
DVD/VCD Player
F-SV Soutce
DV Source
AUDIO
LR
External Input Signal
14
Page 20

QUICK START RECORDING GUIDE
Summarization
This unit has various external input signal terminals including S-video input, composite video input,
TV tuner input, DVD input, and stereo audio input. You may record using any of these video and
audio input signals.
Recordable discs compatible with this unit are DVD RW and DVD R. There are four recording
modes to be selected, including SLP (6 hours), EP (4 hours), SP(2 hours) and HQ (1 hour).
This unit also incorporates time recording function which you can prepare a recording schedule
before hand and it will record your desired programs according to the pre-set schedule.
Viewing the inputted source
After entering the record mode, the source signal will be shown on the TV screen.
With this function you can get a preview of the external signals
±±
Selecting the signal to view
1
Connect the system (please refer to “System
Connections-System Connection of recording
external signals”for details). Make sure the
source equipment works properly, and output the
signal intended for recording.
2
Turn on this unit, then press [SOURCE] button to
enter record mode.
3
Press [DISPLAY] button to display the record
control menu, then highlight the “SOURCE” item.
Next, press the [ENTER] button to access the source drop down list shown as the above figure
4
Select the desired source from the list, press [ENTER] button, and then the TV screen will show
the corresponding picture.
5
Pressing [SOURCE] button can expediently view the external signals one by one.
The sequence of selecting the external signal is shown in the following.
Playback MODE
TV INPUT
Front
CVBS
Front
S-VIDEO
RECORD (DVD+RW)
MODE
SOURCE
QUALITY
REC TO
TRICK
TITLE
CHAPTER
TIME
Rear
CVBS
New Title
Front S-VIDEO
SP
DVD-VIDEO
Stop
01/01
01
0:02:45/2:07:09
Record control menu
Rear
S-VIDEO
Front CVBS
Front S-VIDEO
Rear CVBS
Rear S-VIDEO
DV
The source drop down list
DV SCART
Please refer to “System Connections-System Connection of Recording External Signal ” for
the positions of the input signals sources on this unit.
15
Page 21

QUICK START RECORDING GUIDE
How to Receive the TV Program
1
According to the figure shown in section “System Connections- Connecting to TV set”, connect the system.
2
Connect the power plugs of the TV and this unit to the outlet.
3
Turn on this unit by pressing the [POWER] button, and switch the TV set to AV mode.
4
Press the [SETUP] button to enter the System Setup mode, and then perform the Channel Scanning and
Channel Fine Tuning according to the steps introduced in chapter “System Setup-Channel Turning” .
After finishing, please press [SETUP] button to exit setting mode.
Before receiving TV programs for the first time, you must do this step, the unit will save corresponding
information after you have done it.
5
Please press [SOURCE] button to enter the monitoring mode, and set “SOURCE” item to “TUNER”.
6
Press [CH+]/[CH-] to switch the TV program.
Manual Recording
The following figure shows the construction of the menu in recording mode. The last three items can not be
controlled in this mode. Please follow the following steps to finish a recording task.
New Title
Append title
Overwrite title
RECORD (DVD+RW)
MODE
SOURCE
QUALITY
REC TO
TRICK
TITLE
CHAPTER
TIME
The menu construction in recording mode
1
Load an unfinalized DVD R or unfull DVD R/RW disc.
2
Select the desired external signal source to be recorded by [SOURCE] button.
3
Press [DISPLAY] button to display the record control menu.
4
Refer to the menu construction figure, rightly set the values of “MODE” and “QUALITY”. You can
New Title
Front S-VIDEO
SP
DVD-VIDEO
Stop
01/01
01
0:02:45/2:07:09
±±
Overwrite disc
Front CVBS
Front S-VIDEO
Rear CVBS
Rear S-VIDEO
DV
SCART
Tuner
HQ
SP
EP
SLP
Stop
Pause
Record
Mode list of recording
source list
recording quality list
recording process control item list
refer to following contents to realize this step.
Highlight the desired menu item by cursor[ ], [ ] buttons, pop out the sub menu by [ ] or
[ENTER]button, and confirm by [SELECT] button.
Meanings of some values in the drop down lists are as following.
MODE
*
MODE
*
MODE
MODE
*
*
MODE
New title:Add a new title when recording.
Append title: Append the recording content to the current title, and does not add a new title.
Overwrite title: Overwrite the current title as the recording content, and the previous
recorded content of that title will be lost. During recording by this mode,
when meet the end of the title, the recording will auto stop on this menu.
Overwrite disc: Overwrite all the recorded content in the disc as new one on this menu.
16
Page 22

QUICK START RECORDING GUIDE
Manual Recording(CONTINUED)
SOURCE
* SOURCE
* SOURCE
* SOURCE
* SOURCE
* SOURCE
* SOURCE
* SOURCE
QUALITY
* QUALITY
* QUALITY
* QUALITY
* QUALITY
TRICK
* TRICK
* TRICK
* TRICK
5
Set “TRICK” item to “Record”, then press [ENTER] button to start recording.
By the “TRICK” item, you can pause or stop the current recording.
Front CVBS : Front panel composite video and audio inputs
Front S-VIDEO: Front panel S-video and audio inputs
Rear CVBS : Rear panel composite video and audio inputs
Rear S-VIDEO : Rear panel S-video and audio inputs
DV : Front panel DVD input
SCART: Rear panel SCART input
Tuner : Rear panel TV turner input
HQ : best definition, a single-side DVD disc can record about one hour program.
SP : better definition, a single-side DVD disc can record about two hours program.
EP: good definition, a single-side DVD disc can record about four hours program.
SLP : general definition, a single-side DVD disc can record about six hours program.
Stop: Stop the recording
Pause : Pause the recording
Record: Start recording
Note
The source value must match the port through which the external source signal is input.
One Touch Recording (OTR)
This function can make you set the end time of the recording. When the time is up, the recording
will stop automatically.
1
Enter the recording mode and start recording.
2
According to the desired time, press the [RECORD] button once or more.
Pressing [RECORD] button once, the length of the recording time will extend for 30 minutes. If it
exceeds the disc recordable time, the system will cancel OTR function and switch to nornal recording
mode.
If the OTR process is paused or stopped, the system will cancel the OTR.
To Control the DV Camera Recorder by this Unit
This unit may control the DV camera recorder through the 1394 serial interface, that is, when using
DV as input source, you may fulfill the operations of playback, pause, etc. To the DV through the
remote control of this unit.
1
Properly connect the DV (Please refer to “System Connection of Recording External Signals”for
details) and make it work normally. Then set the “Source” item in the control menu bar of this unit
to DV.
2
When pressing the [STOP] button, if this unit is in recording mode, the recording will stop and the
DV cannot be influenced: on the other hand, if the unit is not in recording mode, this unit can not be
influenced and the DV will stop.
This operation can make the recording control bar disappear.
17
Page 23

QUICK START RECORDING GUIDE
To Control the DV Camera Recorder by this Unit (CONTINUED)
3
Pressing the [PLAY] button does not influence the unit, but to make the DV switch to normal
playback.
4
When pressing [PAUSE] button, if this unit is in recording mode, the recording will pause
and the DV can not be influenced; on the other hand, if the unit is not in recording mode, it can not
be influenced and the DV will pause.
This operation can make the recording control bar disappear.
5
When pressing the [REV] button, the DV will play fast backward. If this unit is in recording
mode, the recording will pause
This operation can make the recording control bar disappear.
6
When pressing the [FWD] button, the DV will play fast forward. If this unit is in recording
mode, the recording will pause.
This operation can make the recording control bar disappear.
Note
Do not shake this unit or unplug it when recording.
A finalized DVD R disc cannot be used to record.
If you want to play the recorded disc in normal player, you should perform the operation
of Finalizing for unfinalized DVD . Please refer to “Disc Operation’ for details.
±
±R disc
Exiting Recording Mode
1
Press the [STOP] button to end recording.
2
Press the [SOURCE] button once or more times to exit this mode.
Playback USB
Connect USB cable to the USB slot on the unit's front panel. Press USB key, the unit will
search for the presence of the USB device. Once the USB device is located, wait until the
screen displays the content from the USB device. Then, you may choose to play the content
from the USB device. On stop state, you press USB, the system auto turn to TV input mode.
18
Page 24

MANUAL RECORDING
Summarization
This function can make this unit record automatically according to the preset requirements when the preset
time is coming. And it will resume the original mode after finishing the recording. To carry out this function.
You should set down a record schedule first and then finish the configuring of the system according to the
requirements on the schedule.
Programming a Recording Steps
1
Press the [TIMER] button to display the record schedule menu shown as the following figure.
This menu is composed of 8 notes, each of which stands for one record scheduler.
Highlighting any non-empty note by cursor buttons, and the pressing [ADD/CLEAR] button,
can delete it.
Record scheduler
.
Source
No
1
2
3
4
5
6
Quality
Date
Start
End
PDC
2
Highlight a note in “Record scheduler”, and press [ENTER] button, then the TV screen displays the
following dialogue window.
Performing the relative setting in this item
Editor window can make a record scheduler.
3
Setting the input source:
Item Editor
Source
Quality
Mode
Date
Start
End
PDC
OK
Front CVBS
SP
Once
01 / 01 / 00
01 : 48
02 : 18
OFF
The item Editor window
Cancel
Highlight “Source” item by sursor[ ], [ ] buttons, and press [ENTER] button to display the drop
down list, then select the right item from the list. At last, press [ENTER] button to confirm.
Please refer to “System Setup - Record
Item Editor
Settings - Default Input Signal Sources
Selection” for the values of the “Source”
item.
For example, if you want to record the
P003 TV program, you may set the value of
the Source item to P003.
Source
Quality
Mode
Date
Start
End
PDC
OK
Front CVBS
Front CVBS
Front S-VIDEO
Rear CVBS
01 / 01 / 00
Rear S-VIDEO
01 : 48
02 : 18
OFF
Cancel
19
Page 25

MANUAL RECORDING
Operation Steps (CONTINUED)
4
Setting the recording quality:
Highlight “Quality” item by [ ], [ ] buttons, press [ENTER]
button to display the drop down list, select the right value
from the list, then press [ENTER] button to confirm.
As for the recording quality, please refer to “Basic InformationTerms’ for details.
5
Setting recording date mode
You can perform this setting in the third row in the “Item Editor”. Move the cursor to select this
row and press [ENTER] button, then a list will pop up. It is shown as follows:
Item Editor
Source
Quality
Mode
Date
Start
End
PDC
OK
Front CVBS
SP
SLP
EP
01 / 01 / 00
SP
01 : 48
HQ
02 : 18
OFF
Cancel
* Weekly: record once per week
* Daily: record once per day
* Once: record at once a specified time
Item Editor
Source
Quality
Mode
Date
Start
End
PDC
OK
Front CVBS
SP
Once
Once
01 / 01 / 00
Daily
01 : 48
Weekly
02 : 18
OFF
Cancel
If your select “Once”, after confirming by [ENTER] button, press [ENTER] button again to
input the date in sequence of “month/ date/year”. Press [ENTER] button to confirm.
The date input window allows, you to
select a number by [ ]/ [ ] buttons,
and press [ ]/[ ] button to change it.
Item Editor
Source
Quality
Mode
Date
Start
End
PDC
OK
Front CVBS
SP
Once
01 / 01 / 00
01 : 48
02 : 18
OFF
Cancel
Date input window
If you select “Daily”, you only need to press [SELECT] button to confirm. The TV screen will
display the following figure.
Item Editor
When the start and end input window is in
input mode, you can select a number by [ ].
[ ] buttons, then press [ ]/[ ] button to
change it.
Source
Quality
Mode
Date
Start
End
PDC
OK
Front CVBS
SP
Daily
Everyday
01 : 48
02 : 18
OFF
Cancel
20
Page 26

MANUAL RECORDING
Operation Steps (CONTINUED)
If you select “Weekly”, after confirming by [ENTER] button,
press [ENTER] button again to display the weekday list.
Setting the start time of recording
6
Select the “Start” item by [ ], [ ] buttons in the “Item Editor”
and press [ENTER] button to switch to input mode, as shown
in the right figure. Input the time by number buttons, then
press [ENTER] button to confirm.
Item Editor
Source
Quality
Mode
Date
Start
End
PDC
OK
Front CVBS
SP
Weekly
Weedy
Once
Daily
Wednesday
Cancel
Highlighting a number by [ ], [ ] buttons, and then press[ ],
[ ] buttons to change the number.
7
Setting the finish time of recording.
When the finish time is reached, the recording will be over and
the unit will resume to the original mode before recording.
If the recording time (from start time to end time) is set too long,
an error message window will pop up. You need to set the Start
time and End time again.
8
After every parameter of time recording is set, highlight the “OK”
button in the “Item Editor”, and press [ENTER] button to finish the
Setup.
9
Set another timer recording task or press [TIMER] button to exit
the record schedule menu.
Then repeat the following of steps from to .
1 8
Note
Item Editor
Source
Quality
Mode
Date
Start
End
PDC
OK
Front CVBS
SP
Weekly
Saturday
01 : 48
02 : 18
OFF
The time input window
Item Editor
Source
Quality
Mode
Date
Start
End
PDC
OK
Front CVBS
SP
Weekly
Saturday
01 : 48
02 : 18
OFF
Cancel
Cancel
Before timer recording, you must set the system time & date (refer to “System Setup-System Clock Setup” for details)
properly, otherwise, this function introduced in this chapter will not be implemented
The system must be properly collocated to fulfill the schedule recording task.
Do not use the finalized DVD R disc.
±
The length of the recording time (from the start time to the end time) does not permit exceeding the length of the contents
that the used disc is able to record (It is connected with the record quality). The start time and the end time can not be
earlier than the current time of the system. Otherwise, it will be invalid.
If the setting is performed correctly, a message dialogue should appear 5 minutes before recording asking for confirmation.
If the recording conditions are satisfying, please highlight the “OK” button on the dialogue and press [ENTER] button to confirm.
If this dialogue is not changed, the system will take action to start recording automatically, After a moment, it will start recording.
If the system is in standby mode, it will automatically switch on and enter the recording mode in 2 minutes before recording,
and then start recording.
After the recording is finished, the system automatically resumes the original mode.
Cursor to “VPS/PDC”, press or to set it on or off.
What is “VPS/PDC”?
“VPS”(Video Programming System)/”PDC”(Programme Delivery Control) are used to control the start and duration of TV
channel recordings. If a TV programme starts earlier or ends later than was scheduled, the DVDrecorder will then turn on
and off at the correct time.
What do I need to know about”VPS/PDC”?
Usually the start time is the same as the VPS or PDC time. If a different “VPS/PDC time” is indicated, e.g.:”
20.15 (VPS/PDC 20.14)”, the VPS/PDC time “20.14” must be entered exactly to the minute during grogramming.
If you want to programme a time that is different from the VPS or PDC time, you must switch off VPS or PDC.
Only one TV program of a TV channel can be controlled using “VPS/PDC” at a time. If you want to record two or more TV
programmes on a TV channel using “VPS/PDC”, you will need to programme these as two separaterecordings.
Since the DVD recorder requires a certain lead time (for getting the disc up to speed and positioning the laser) before
recording can start, it is possible that the recorder will miss the first few seconds of a TV show recorded with VPS/PDC.
In the case, disable VPS/PDC and enter a start time one minute earlier.
21
Page 27

EDITING A TITLE RECORDED
After finish recording a DVD RW disc, you may play it with this unit. When loading disc, the TV screen
±
will display the following picture. Each little icon in the picture stands for a title, the words and numbers
indicate information of the title.
1. TITLE
Title name, and “Title” is the default name.
The date of recording this title.
The time of recording this title.
The record quality and length of the title.
The following descriptions will tell you what to do when
seeing this picture.
The starting picture screen when playing DVD R/RW disc recorded by this unit (Title list)
±
01/01/2000
03:25:02
SP 00:01:04
2. TITLE
01/01/2000
03:25:02
SP 00:03:42
3. TITLE
01/01/2000
03:25:02
SP 00:28:28
To browse the contents of the disc and select one title to play
1
Roll up and down the title list picture by [ ], [ ] buttons to browse all the titles.
2
Highlight a title icon you desire to play by [ ], [ ] buttons, the press [ENTER] button to play it.
3
During play, you can press [TITLE] button to switch the TV screen picture to Title List to select
another title to play.
Erasing a title
Highlight a title icon you want to delete in the Title
1
List picture and press [ ] button, then a menu will
pop up as shown in the right figure.
2
Highlight “Erase title” item, and press [ENTER]
button, then the system will erase this title.
Play title
Edit title
Rename title
Erase title
Overwrite title
Overwrite disc
Edit title
This operation can switch the system to edit mode.
The functions and operations for edit mode are
described at the next chapter.
1
Highlight a title icon you want to edit in the Title
List picture and press [ ] button, then a menu will
pop up as shown in the right figure.
2
Highlight “Edit title” item, and press [ENTER]
button, then the system will edit this title.
3
Then, refer to chapter “Editing Mode” to perform corresponding operations.
4
To exit, please press [EDIT] button first and wait a few seconds until system operation is finished,
then press [ ] button.
Play title
Edit title
Rename title
Erase title
Overwrite title
Overwrite disc
22
Page 28

EDITING A TITLE RECORDED
Rename title
Play title
Edit title
1
Highlight a title icon you want to rename in the
Title List and press [ ] button, then a menu will
pop up as shown in the right figure.
2
Highlight “Rename title” item, and press [ENTER]
Rename title
Erase title
Overwrite title
Overwrite disc
button, then a key board menu will pop up.
Title name:
1
2
TITLE
Clear
012
34 5
6
7
Exit
89
OK
ABCDEFGH I JK
LMNOPQRSTUV
Caps
()
BkSp
WXYZ
Spsce
3456789
?
-
:.
Delete
The operations of the controller in the keyboard menu are as follows:
1. Title Name Editing window
2. Characters area: select a certain key in this area by using cursor buttons, and then press the [ENTER]
button. The letter on the key will appear in the Title Name Editing window.
3. Space: black button by which you can insert a blank to title name.
4. Caps: selecting this key and pressing the [ENTER] button can switch the letters in the Characters area
between the capitalization and the common letter form.
5. BkSp: selecting this key and pressing the [ENTER] button can cancel the letter before the cursor
in the Title Name Editing window, meanwhile the cursor backs a space.
6. Delete: selecting this key and pressing the [ENTER] button can cancel the letter after the cursor
in the Title Name Editing window, meanwhile the cursor backs a space.
7. Clear: selecting this key and pressing the [ENTER] button can clear all the letters in the Title Name
Editing window.
8. Exit: selecting this key and pressing the [ENTER] button can exit this menu and keep the Title Index
name unchanged.
9. OK: selecting this key and pressing the [ENTER] button can exit this menu, meanwhile change the Title
Index to the one in title Name Editing window.
3
Type a new title name in the Title Name Editing window by the keyboard in the menu.
4
Select the “OK” key and press the [ENTER] button to fulfill the naming of the Title.
Overwrite title / Overwrite disc
“Overwrite title”and “Overwrite disc” are two kinds of record mode. If you have connected the
external signal to this unit, you can select one of them to perform recording.
1
Highlight a title icon you want to overwrite and press [ ] button to display the menu.
2
Highlight “Overwrite title” OK, “Overwrite disc” item, then press [ENTER] button to confirm.
Play title
Edit title
Rename title
Erase title
Overwrite title
Overwrite disc
Highlighting the “Overwrite title” item
Play title
Edit title
Rename title
Erase title
Overwrite title
Overwrite disc
Highlighting the “Overwrite disc” item
23
Page 29

EDITING A TITLE RECORDED
Empty title
Property
SLP capability is 4:13:19
RW
DVD RW±
Record a new title
Property
Press [ ]button, then a menu will pop up ad shown in the top figure.
1.Select the “Record a new title”,and press [ENTER] button, the TV will turn to input mode and waiting
for recording.
2. Select the “Property”,press [ENTER] button, then the current disc remain capability will display.
Press [RETURN] button to exit.
Entering the Editing Mode
EP capability is 2:47:59
SP capability is 1:27:31
HQ capability is 0:43:15
When DVD R/RW disc is loaded and the system is not in the mode of writing or erasing,
±
press the [EDIT] button to enter the edit mode and display the control menu.
Note
When “ ” appears while you press the [EDIT] button, it indicates that the DVD RW disc in the
loader has been write protected, or the system in current mode can not enter the editing mode. You
can perform disc operation to cancel the write-protect or exiting current mode.
±
Menu Explanation
The editing control menu is shown in the definition. The meaning of each item is as follows:
EDIT MODE
Title: 01/05
Chapter: 01/01
PLAY
Chapter marker
Hide chapter
Index picture
Split title
T-Elansed: 0:01:05
1
2
3
4
5
6
7
8
1. Title : the first two digits on the left is the current title number, and the right side shows
total number of titles in the disc.
2. Chapter :the first two digits on the left is the current chapter number, and the right side shows
total number of chapters in the disc.
3. Play : this item can perform : Play, Pause, Fast forward, Fast backward and Slow forward.
4. Chapter marker : separate or combine the chapters.
5. Hide/Unhide chapter : display or skip the chapter when playing it.
6. Index picture : change the index icon.
7. Split title : divide current title into 2 titles at current point.
8. T-Elapsed : showing the elapsed time.
24
Page 30

EDITING A TITLE RECORDED
Operation Steps
selecting the Title/Chapter to be Edited
1
Enter the editing mode.
2
Select the Title/Chapter item by using [ ], [ ] buttons in the editing control menu.
Selecting the Title/Chapter to be Edited (CONTINUED)
3
Press [ENTER] button to make the
Title/Chapter item in input mode.
4
Input the number of the Title/Chapter
to be edited by using number buttons,
and press [ENTER] button, then
the system starts to play the selected
title or the one which the selected
chapter belongs to repeatedly.
Insert Chapter Marker
In the edit control menu, move the cursor by [ ], [ ] buttons to highlight the “Chapter marker”
1
EDIT MODE
Title: 01/05
Chapter: 01/01
PLAY
Chapter marker
Hide chapter
Index picture
Split title
T-Elansed: 0:01:05
item, then press [ ] /[ENTER] button to display the value list shown as the following figure.
EDIT MODE
Title: 01/05
Chapter: 01/01
PLAY
Chapter marker
Hide chapter
Index picture
Split title
T-Elansed: 0:01:05
Inset marker
Delete marker
Delete all markers
The value list of the “Chapter marker” item
Select proper value from the list by [ ], [ ] buttons, and press [ENTER] button to confirm,
then the system will start separating or combining the current chapter.
If you select “Delete mark”, this chapter and the former chapter will be combined into one chapter.
If you select “Insert marker”, this chapter will be separated into two at the current location.
If you select “Delete all markers”, all chapters of the titles will be combined into one chapter.
Hiding / Unhiding Chapter
In the edit control menu, move the cursor by [ ], [ ] buttons to select the Chapter Hide/Unhide item.
Press the [ENTER] button to switch
the value of this item.
If the value is “Hide chapter”, this chapter
will not be skipped when playing in normal
mode.
If the value is “Unhide chapter”, this
chapter will be skipped when playing
in normal mode.
Note
This operation is invalid to DVD R.±
EDIT MODE
Title: 01/05
Chapter: 01/01
PLAY
Chapter marker
Hide chapter
Index picture
Split title
T-Elansed: 0:01:05
25
Page 31

EDITING A TITLE RECORDED
Changing the Index picture
When entering the DVD title menu (Press the [ENTER] button when playing), the title index will be
shown on the screen as a little icon, standing for a title (Please refer to “Playback Mode”). The
method of changing the title index is introduced in the following.
1
In the edit control menu, move the cursor by [ ], [ ] buttons to select the “Index picture”item.
2
Now, please watch the playing picture carefully, when meeting a picture you like, you can press
[ENTER] button and [EDIT] button again, the picture will replace that title icon.
EDIT MODE
Title: 01/05
Chapter: 01/01
PLAY
Chapter marker
Hide chapter
Index picture
Split title
T-Elansed: 0:01:05
Split title
1
Highlight the “Split title” item in edit control menu, shown as the following figure, then press
[ENTER] button.
The operation will divide current title into 2 titles at current point, and this will take a while.
EDIT MODE
Title: 01/05
Chapter: 01/01
PLAY
Chapter marker
Hide chapter
Index picture
Split title
T-Elansed: 0:01:05
Note
This operation is invalid to DVD R.±
Exiting the Editing Mode
1
Press the [EDIT] button to exit this mode.
The system will be operating for a while before exit.
26
Page 32

Summarization
Disc operations refer to certain functions about the disc in the loader, including viewing disc information,
finalizing a disc, erasing disc content, erasing the title, lock/unlock the disc and so on.
Entering Disc Operation Mode
If you load unfinalizing DVD R or DVD RW disc, you can enter this mode. There are two ways to enter this mode.±±
1
During play, you can enter this mode by pressing [DISC OP] button. After entering the mode, please
press [ ] button to display the control main menu, as shown in the following figures.
()
BkSp
Play
Unlock disc
?
-
:.
Delete
Clear
012
34 5
6
7
Exit
Play
PAL
DVD
EDIT
When playing unfinalizing DVD+R
2
Display Title List picture by the methods introduced at chapter “Playing and Processing the Disc Recorded
Rename disc
Finalize disc
Record a new title
PAL
DVD
EDIT
by this Unit”, and press [ ] button continuously until the icon appears, then press [ ] button.
Operations
Play: Highlight item “Play” in the menu, and then press [ENTER] button.
Rename disc:
Highlight item “Rename disc”, and press [ENTER] button, then
a keyboard menu will appear. You can rename
the disc through the methods introduced in chapter “Playing and
Processing the Disc Recorded by this Unit”.
Finalize disc/Make compatible:
“Finalize disc” is valid for DVD R disc, the disc can be played in normal DVD player, but can not
±
Play
Rename disc
Erase disc
Record a new title
Overwrite disc
Lock disc
When playing DVD+RW
PAL
DVD
EDIT
PAL
DVD
EDIT
When playing locked DVD+RW
Disc name:
MY DVD
ABCDEFGH I JK
LMNOPQRSTUV
WXYZ
Caps
Spsce
the key board menu by
which you can rename the disc
record new contents. Highlight item “Finalize disc” and press [ENTER] button, then a dialogue will
open shown as the right figure, please highlight “OK” key in the
dialogue, then press [ENTER] button to start this operation.
These operations will occupy some time, please wait for a few minutes.
Warring: this operation will finalize the
DVD+R disc in loader. If finalized, it can
not record new content any more. Are
you sure to continue?
Finalize disc
Yes No
89
OK
Lock disc: “Lock disc” is valid for DVD RW. This operation can protect the recorded contents from
±
being deleted. If you want to record new contents in the disc, you must unlock the disc. You can
highlight item “Lock disc” and press [ENTER] button to lock or unlock the disc. If the disc is locked,
this operation will unlock the disc, otherwise it will lock it.
Erase disc: This operation is only available for DVD RW disc. Highlight item “Erase disc” and press
±
[ENTER] button, then the system will start erasing disc contents. This operation will take a awhile.
When erasing, any other operations can not be proceeded, including standby. Once the operation
starts, it cannot be cancelled midway. Please do not unplug the unit midway. Otherwise, the disc will
be probably damaged.
Record a new title /Overwrite disc: These operations can perform recording function. “Record a new title”
can add a new title when recording, and “Overwrite disc” can overwrite all the contents in the disc .
You can highlight “Record a new title” or “Overwrite disc” item, and press [ENTER] button to start recording.
Exiting the Disc Operation Mode
1
Press [DISC OP] again to exit.
27
Page 33

NORMAL PLAYBACK MODE
Entering the Playback Mode
In the playback mode, this unit is works the same as a regular DVD player. The way to enter the
playback mode is as follows:
1
Connect this unit with the TV set (Refer to “System Connection” for details), turn on the TV set
and switch it to theAV input mode.
2
Plug in the unit, then press [POWER] button to turn it on.
3
Press [OPEN/CLOSE] button to open the disc tray.
4
Load the disc to be played as shown in the illustration.
When loading a disc, the smooth side should face down and the side with silk-screen should face up.
5
Press [OPEN/CLOSE] button to close the disc tray, then the system starts playing.
According to different discs, the system will probably enter the Title Selecting Playback mode or Menu
Playback mode. If this condition appears, the disc will not continue to play (please refer to the
following text).
6
If system is in other working mode, please press [PLAY] button to enter the playback mode.
7
If you press [PLAY] button, the TV screen displays “ ”. Please exit current working mode first,
and then press [PLAY] button again.
When writing or erasing, pressing [PLAY] button will be invalid.
If there is no disc in the loader or the disc is not supported by this unit and it has been damaged, in such
case, pressing [PLAY] button will be invalid.
Playback from the Menu Displayed
1
When playing a DVD disc, it will enter menu playing mode. The menus of different discs are
different. In general, you can select the playing language, set the subtitle language and so on by
that menu. To perform some operations, you only need to highlight the corresponding item by
cursor buttons and confirm by [ENTER] button.
2
When playing certain VCD disc, a list of tracks will appear on the menu. You can select a track by
number or cursor buttons, then press [ENTER] button to play the selected track.
3
During play, you can open the disc menu by pressing [MENU] button.
Playback from the Title Displayed
This operation is only available for DVD disc. During
play , if you want to select certain title to play, you can
press [TITLE] button. Then the screen will display the
title icons list, shown as the right figure. You can
highlight an icon , then press [ENTER] button to play it.
12
3
4
Note
The title menu for different DVD discs m ay be different ly.
Not all DVD discs support title menu. When title menu is not available, pressing
[TITLE] button will show invalid.
28
Page 34

NORMAL PLAYBACK MODE
Ending Playback
1
Press the [STOP] button.
This unit enters the pre-stop mode.
In this pre-stop mode, this unit automatically memorizes the pre-stop point. If you press [PLAY]
button, this unit will resume the playback from the pre-stop point (Playback starts from the
beginning of the pre-stopped track for MP3). If you press [STOP] button twice, this unit will enter
stop mode and the memory is cleared.
2
Press [OPEN/CLOSE] button to eject the tray.
3
Take the disc out.
4
Press [OPEN/CLOSE] button to retract the disc tray.
5
Press [POWER] button on the panel to end the operation.
Note
If the disc is badly damaged or loaded on the opposite side, “NO DISC” will display .
Program and Shuffle Playback
Press [DISPLAY] button twice to open the main control menu.
1
Highlight “MODE” item by [ ], [ ] buttons, and press [ENTER]/ [ ] button to display the drop down
2
list window shown as the right figure.
Select one item from the list, then press [ENTER] button to confirm.
3
1. NORMAL
2. A-B
3. C-RPT
4. T-RPT
5. D-RPT
6.TR-RPT
7. S-RPT
8. PROG
9. RANDOM
Sequence Playback
A-B Playback
Segment Repeat Playback
Title Repeat Playback
Disc Repeat Playback
Track Repeat Playback
Song Repeat Playback
Program Playback
Random Playback
DVD
MODE
TRICK
TITLE
CHAPTER
AUDIO
SUBTITLE
ANGLE
T-TIME
Normal
Play
03/08
04/19
01/01-ENG
01/01-ENG
01/01
00:13:02.01:15:17
Main control menu
The list may be different when playing different discs.
If you select “A-B Repeat” and “Program”, you shall perform the following steps.
If you select “A-B Repeat”, when pressing [ENTER] button, the menu
4
becomes the style shown as the right figure. You need to set the A point.
Press [ENTER] button to display Mode value list again and select
“A-B Repeat”. Now, please wait, and when meeting your desired point,
you can press [ENTER] button to set the B point.
During the moment, the main control menu will disappear. You
may as well press [DISPLAY] button to hide the menu.
5
If you select “Program” in step , the following list windows will pop up.
4
DVD
MODE
TRICK
TITLE
CHAPTER
AUDIO
SUBTITLE
ANGLE
T-TIME
Normal
A-B Repeat
Chapter Repeat
Title-Repeat
Disc Repeat
mode value list
Set A-
Play
03/08
04/19
01/01-ENG
01/01-ENG
01/01
00:13:02.01:15:17
Edit program play lilst
TITLE 01
TITLE
TITLE 02
TITLE 03
TITLE 04
TITLE 05
TITLE 06
Favorite/Program
Through this menu you can select you favorite contents to be played in desired sequence.
29
Page 35

NORMAL PLAYBACK MODE
Program and Shuffle Playback (CONTINUED)
You can control the two list windows by the following points.
* Move the cursor between left window and right window by [ ], [ ]buttons.
* Move the cursor up and down in one of the windows by [ ], [ ] buttons.
* Highlighting an item in left window, then pressing [CLEAR/ADD] button can added the item to right list window.
* Highlighting an item in right window, then pressing [CLEAR/ADD] button can delete the item.
* If the items of the left window is title, you can expand item by pressing [ENTER] button, shown as the following.
figure:
TITLE
TITLE 01
TITLE 02
TITLE 03
TITLE 04
TITLE 05
TITLE 06
TITLE 07
TITLE 08
TITLE 09
TITLE 10
6
Add your favorite contents to right window in your desired sequence according to the above description,
Press the [SELECT] button
Unfold the content of “TITLE 01”
Press the [SELECT] button
Go back to the provious window
CHAPTER OF TITLE
CHAPTER 01
CHAPTER 02
CHAPTER 03
CHAPTER 04
CHAPTER 05
CHAPTER 06
CHAPTER 07
CHAPTER 08
CHAPTER 09
CHAPTER 10
then move the cursor to the right window and press [ENTER] button to start program playback.
Playback Process Control
DVD
1
Press [DISPLAY] button twice to open the main control
menu.
2
Highlight “Trick mode” item by [ ], [ ] buttons, and press
[ENTER]/[ ] button to pop out the drop down list
window shown as the right figure.
Select one value in the list, then press [ENTER] button
3
to confirm.
The definitions of each item are shown below:
1
PLAY
2
STOP
3
PreSTOP
4
PAUSE
play
stop
prestop
pause
5
FastForward 2~32
6
FastBackward2~32
7
SlowForward1/2~1/16
Fast playback, the number shows the speed of the playback
Fast backward playback, the number shows the speed of the
Backward playback.
slow playback, the fraction shows the degree of slow playback
The list maybe different when playing different disc.
MODE
TRICK
TITLE
CHAPTER
AUDIO
SUBTITLE
ANGLE
T-TIME
Set A-
Play
03/08
04/19
01/01-ENG
01/01-ENG
01/01
00:13:02.01:15:17
Play
STOP
PreSTOP
PAUSE
FastForword’2
Programming Titles, Chapters or Tracks to Play in a Favourite Order
1
Press [DISPLAY] button twice to open the main control menu.
Highlight “Title”/“Chapter” / “Track”(for VCD/SVCD)item, and press [ENTER] button to enter
2
in input mode.
Enter your desired number by number buttons, and press [ENTER] button, then the system will
3
start playing the selected Title
/Chapter/Track.
The left part of the item value
is the number of currently playing
content; the right one is the total
number.
DVD
Set A-
MODE
Play
TRICK
TITLE mode
CHAPTER
SUBTITLE
03/08
04/19
AUDIO
01/01-ENG
01/01-ENG
ANGLE
01/01
T-TI ME
00:13:02.01:15:17
Highlight title item Highlight chapter item
30
DVD
MODE
TRICK
TITLE mode
CHAPTER
AUDIO
SUBTITLE
ANGLE
T-TI ME
Set A-
Play
03/08
04/19
01/01-ENG
01/01-ENG
01/01
00:13:02.01:15:17
VCD
Normal
MODE
Play
TRICK
TRACK
01/15
STEREO
AUDIO
PBC ON
PBC
TR-TIME
00:13:02.01:15:17
Highlight track item
when playing VCD/SVCD
Page 36

NORMAL PLAYBACK MODE
Audio/ Subtitle Selection
1
Press [DISPLAY] button twice to open the main
control menu.
2
Highlight “AUDIO”/ “SUBTITLE” item by [ ], [ ] buttons,
then press [ENTER]/[ ] button to open the drop down
list shown as the right figure:
3
Select one item from the list, and then press [ENTER] button
to confirm.
For DVD disc, the values of audio list will be DOLBY, DTS
and so on.
For VCD/SVCD, the values of audio list will be STEREO,
LEFT and RIGHT.
The settings of these items also can be done in DVD menu.
The initial value of the two items can be set in System Setup.
Angle Selection
1
Press [DISPLAY] button twice to open the main
control menu.
2
Highlight “ANGLE” item by [ ], [ ] buttons, and press
[ENTER] button to make it in input mode.
The right side of the numbers beside the icon is the total angle
number of this disc; the left is the current angle number.
3
Input theANGLE number you need by number buttons, and
press [ENTER] button to confirm.
PBC ON/OFF
Press [DISPLAY] button twice to display the main control
1
menu.
2
Highlight “PBC” item by [ ], [ ] buttons, and then press
[ENTER]/[ ] button to display the drop down list window
shown as the right figure.
3
Select “ON” or “OFF” from the list, and then press [ENTER]
button.
4
Pressing [MENU] button also can make the PBC on or off.
Note
The PBC function refers to the menu playback function of the VCD2.0 disc. When the PBC is
on, the TV screen displays a list of all tracks. You can select any track by number buttons on
the remote control, and press [ENTER] button to play from the selected track. During play, if
you want to play another track, you need to press [MENU] button to display the track list, and
select another track by number buttons and press [ENTER] button to confirm. When the PBC
is off the system plays the disc contents in sequence.
Not all VCD discs can perform PBC playback.
DVD
Set A-
MODE
Play
TRICK
TITLE mode
CHAPTER
AUDIO
SUBTITLE
ANGLE
T-TIME
TRICK
TITLE mode
CHAPTER
AUDIO
SUBTITLE
ANGLE
T-TIME
TRICK
TITLE mode
CHAPTER
AUDIO
SUBTITLE
ANGLE
T-TIME
VCD
MODE
TRICK
TRACK
AUDIO
TR-TIME
03/08
04/19
01/01-ENG
01/01-ENG
01/01
00:13:02.01:15:17
Highlight “AUDIO” item
DVD
Set A-
MODE
Play
03/08
04/19
01/01-ENG
01/01-ENG
01/01
00:13:02.01:15:17
Highlight “SUBTITLE” item
DVD
Set A-
MODE
Play
03/08
04/19
01/01-ENG
01/01-ENG
01/01
00:13:02.01:15:17
Normal
Play
01/15
STEREO
PBC ON
PBC
00:13:02.01:15:17
1. CHI DOLBY
2. ENG DTS
1. CHI
2. ENG
3. JAP
PBC ON
PBC OFF
T-Time /Tr-Time Selection
You can select a point to start playing
1
Press [DISPLAY] button twice to display the main control menu.
2
Highlight “T-Time” (For DVD) or “Tr-Time” (For VCD/SVCD)
item by [ ], [ ] buttons, and then press [ENTER]/[ ] button to
display the drop down list window shown as the right figure.
3
Select “Track” or “Disc” from the list, and then press [ENTER]
button.
The left part of the item values is the elapsed time of the title/track, the
right one is the remain time.
31
DVD
MODE
TRICK
TITLE mode
CHAPTER
AUDIO
SUBTITLE
ANGLE
T-TIME
Set A-
Play
03/08
04/19
01/01-ENG
01/01-ENG
01/01
00:13:02.01:15:17
Track
Disc
Page 37

NORMAL PLAYBACK MODE
The operations of Function Buttons
Most of the operations in playing mode can be done by menu or function buttons, some operations only can
be done by menu, and other operations only can be done by function buttons.
1
REPEAT button
Press [REPEAT] button repeatedly, and the playing mode will be circularly switched in the following
sequence:
Repeat playback
normal mode repeat chapter repeat title repeat disc
2
FW button
D
Press [FW ] button repeatedly, and the playing speed will be changed in the following sequence:
3
REV button
D
Forward playback
Backward playback
Press [REV] button repeatedly, and the backward playing speed will be changed in the following
sequence:
Note: when playing JPEG file, to press FWD/REV key can be zoom in and zoom out.
4
SKIP button
If you press the NEXT [ ] button on the remote control, the system goes forward into the
next chapter (to DVD) or track (to VCD) and begins playback.
If you press the PREV [ ] button on the remote control, the system goes backward into the
previous chapter (to DVD) or track (to VCD) and begins playback.
Note: when to playing last track in the program play, it can to beginning play at first track to continue play.
5
PLAY/PAUSE button
Pause playback.
When playing the valid disc, if you press [PLAY/PAUSE] button, the playback will pause.
If you press [PLAY/PAUSE] button, the system will enter normal playback.
Pressing the [PLAY/PAUSE] button the second time means normal playback when playing CDDA and MP3 disc.
6
VOL+/VOL-/MUTE button Volume control
If you press [MUTE] button, the system will and will not output audio.
If you press the [VOL+] button, the volume increases.
If you press the [VOL-] button, the volume decreases.
7
GOTO button Switching the mode of selection playing
In the playback mode, use [GOTO] button to highlight every Select item circularly in the playback
control menu. Then, you can input the corresponding values by using the remote control
with the method aforesaid.
The illustration below is the example of playing the DVD disc.
TITLE
Title Selection Chapter Selection
The illustration below is the example of playing the VCD disc.
D-TIME:
Press [GOTO] button is invalid to some discs.
--/--/--
Title Selection Track time Selection
CHAPTER
TR-TIME:
--/--/--
32
Page 38

NORMAL PLAYBACK MODE
Playing JPEG/MP3/CD Disc
When loading audio/file disc, the TV screen will display the disc content list and favourite/program list windows as shown in
the following figure. From this you can do selection playback or program playback.
1
Move the cursor to the left window by [ ] button.
Highlight your desired file or directory by [ ], [ ]
2
buttons, and then press [ENTER] button.
If the highlight item is file, the system will start playing it.
If the highlight item is directory, the system will expand
its contents.
In step , if you press [CLEAR/ADD] button, the highlight item will be added to the right list window,
2
then you can do program playback by the following steps.
3
Select your desired content from left list window by [ ], [ ] buttons and add it to right list window by
pressing [CLEAR/ADD] buttons.
4
Move the cursor to the right list window by [ ] button and press [ENTER] button, then the system
starts playing the contents of the right list window one by one.
Highlighting the item in right list window by [ ], [ ] buttons and pressing [CLEAR/ADD] button can delete it.
File Play Stop 0:00:00-0:00:00
FILE & DIRECTORY
...\
car
cat
city
fish
ship
flower
house
FAVORITE/PROGRAM
Control Wipe Mode when Playing JPEG Disc
In general, pictures will be saved in the disc as JPEG file format. When playing this disc, the pictures will appear
on the screen one by one. You can select the mode of picture switching.
1
After loading the disc, press [DISPLAY] button to display the playback control menu.
In the playback control menu, select the Control Wipe Mode item by
2
[ ], [ ] buttons, and then press [ENTER] button to display the wipe
mode list shown as the right figure.
3
Select the desired mode of the picture switching from the list by
[ ], [ ] buttons and then press [ENTER] button.
4
Press [ ] button to return to the previous menu.
Control Zoom Mode when Playing JPEG Disc
File play
TYPE
MODE
TRICK
WIPE
ZOOM
RO TATE
VIDEO
NORMAL
STOP
Top to do wn
FITSCREEN
CLOCKWISED
Top to down
Down to top
Left to right
Right to left
Extend center
This function can zoom in or zoom out the picture to facilitate your viewing.
1
After loading the disc, press [DISPLAY] button to display the playback control menu.
In the playback control menu, select the Control Zoom Mode item
2
by [ ], [ ] buttons, and then press [ENTER] button to display
the zoom mode list shown as the right figure.
3
Select the percentage of zoom from the list by [ ], [ ] buttons,
and then press [ENTER] button.
The value of “FITSCREEN” menus the full screen display.
4
Press [ ] button to return to the previous menu.
File play
TYPE
MODE
TRICK
WIPE
ZOOM
ROTATE
VIDEO
NORMAL
STOP
Top to do wn
FITSCREEN
CLOCKWISED
200%
400%
FITSCREEN
Picture Rotating when Playing JPEG Disc
This function can change the angle of placement of the picture on the screen.
1
After loading the disc, press [DISPLAY] button to display the playback control menu.
2
Select the Picture Rotating Select item in the playback control
menu by [ ], [ ] buttons, and then press [ENTER] button to
display the rotating value list shown as the right figure.
There are four kinds of rotating angles: 0 , 90 , 180 , 270 .
3
Select the desired angle from the list by [ ], [ ] buttons and
then press [ENTER] button.
4
Press [ ] button to return to the previous menu.
File play
TYPE
MODE
TRICK
WIPE
ZOOM
RO TATE
33
VIDEO
NORMAL
STOP
Top to do wn
FITSCREEN
CLOCKWISE 0
CLOCKWISE 0
CLOCKWISE 90
Page 39

MENU INDEX FOR INITIAL SETUP
Operation Interface and General Steps
This section introduces the operation interface and general steps of the system setup.
1
Press [SETUP] button to enter system setup mode. Then the TV screen displays the system setup
control menu, which is shown in the following:
If the system displays , it means the
system setup mode cannot be entered in
current mode, so please exit this mode first.
Definitions the icons are as follows:
1 General setup
2 Playback setup
3 Record setup
4 Language setup
5 Channel Scan
1
2
3
4
5
6
6 Date, Time setup
2
Select the desired item on the control bar by using [ ], [ ] buttons, and then press [ENTER]
button to enter the corresponding setup submenu.
3
In the submenu, operate the relative controllers by direct buttons and the [ENTER] button to
fulfill the corresponding setup.
4
Press the [RETURN] button to return to the previous menu, or press the [SETUP] button to exit.
SYSTEM SETUP - GENERAL
Screen saver
progressive/Interace
Country
Scart output
Video output format
Restore factory settings
ON
Interlace
Germany
YUV
PAL
OK
Note
The steps above are for your reference. Some setup may not need a certain step, or need more steps.
Please proceed the system setup in “stop” mode or no disc status, otherwise certain setup may not be
proceeded.
General setup
1
Enter the system setup mode.
2
Select the item “ ” in the system setup
control menu by [ ], [ ] buttons.
3
Press [ENTER] button to enter the general
setup submenu, which is shown as the right
figure.
Screen Saver Setup
The screen saver function appears on the screen
automatically, when video output signal has no change
(that is the image on the TV screen has no change) for a
awhile.
1
In the general setup menu, move the cursor to select
item “Screen saver” by [ ], [ ] buttons.
2
Press [
be displayed, which is shown as the right figure.
ENTER] button, then a pop-up list will
SYSTEM SETUP - GENERAL
Screen saver
progressive/Interace
Country
Scart output
Video output format
Restore factory settings
SYSTEM SETUP - GENERAL
Screen saver
progressive/Interace
Country
Scart output
Video output format
Restore factory settings
ON
Interlace
Germany
YUV
PAL
ON
ON
OFF
Germany
YUV
PAL
OK
OK
34
Page 40

MENU INDEX FOR INITIAL SETUP
Screen Saver Setup (CONTINUED)
3
Move the cursor up and down to select “ON” or “OFF” by [ ], [ ] buttons.
4
Press [ENTER] button to turn on or off the screen saver function.
Pressing any button can exit the screen saver mode after the screen saver picture appears.
Progressive / Interlace Setup
1
In the general setup menu, use [ ], [ ] buttons to select “Progressive / Interlace”
item and press [ENTER] button, then a list will appear.
2
Select “Progressive” or “interlace”.
3
Press [ENTER] button to fulfill the
Progressive / Interlace switch.
4
Pressing the [I/P] button can proceed
the Progressive / Interlace switch as well.
The value of this setting must Correspond with
the scanning mode of the TV, otherwise the TV
screen will display nothing.
If nothing is shown on the TV screen, you
may try to press the [I/P] button for 5 seconds.
I/P key is only valid in YUV.
SYSTEM SETUP - GENERAL
Screen saver
progressive/Interace
Country
Scart output
Video output format
Restore factory settings
ON
Interlace
Progressive
Interlace
YUV
PAL
OK
Video Output Format Setup
This unit has two video output system: PAL and NTSC. You can select one of them according to
your TV set specs.
1
Highlight “Video output format” in the general
setup menu and press [ENTER] button. A pop-up
menu will appear.
2
Select the proper option according to factual requirements.
3
Press [ENTER] button, then the system will switch the
output format to what you select right now.
You can also switch the TV output format by pressing the
[N/P] button.
Changing the output format may cause no picture on the TV screen. If this happens, you can press
[N/P] button to restore the output format.
SYSTEM SETUP - GENERAL
Screen saver
progressive/Interace
Country
Scart output
Video output format
Restore factory settings
ON
Interlace
Germany
YUV
PAL
NTSC
PAL
35
Page 41

MENU INDEX FOR INITIAL SETUP
Restore Factory Setting
1
Select “Restore factory settings” by [ ], [ ]
buttons in the general setup menu, then press
[ENTER] button, and the TV screen displays:
2
Highlight “OK” in the menu by [ ],[ ] buttons.
3
Press [ENTER] button to make all setup items restore the factory settings.
!
Restore factory settings
System will reset all the setup
items to the default value, OK
to confirm, Cancel to exit.
OK
When your unit is in abnormal working mode, it is probably due to wrong set up. Please
try the “Restore Factory Settings” operation to resume normal functioning.
Playback Settings
1
Display the system setup control menu.
2
Move the cursor up and down by[ ], [ ]
buttons to select “ ” item.
3
Press [ENTER] button to enter the
SYSTEM SETUP - GENERAL
TV aspect ratio
Rating level
Digital audio output
Analog audio output
Speaker setting
playback setup mode. The right figure
is the main menu of playback setup.
The main menu of playback setup
Cancel
Pan Scan
OFF
RAW
5.1 CH
OK
Note
This setup must be proceeded in No Disc or Tray Out status.
TV Aspect Ratio
1
In the playback setup menu, select item
“TV aspect ratio” by [ ], [ ] buttons,
press [ENTER] button and then the
value list will appear, which is shown
SYSTEM SETUP - GENERAL
TV aspect ratio
Rating level
Digital audio output
Analog audio output
Speaker setting
as the right figure.
2
Select the suitable value by [ ], [ ] buttons, and then press the [ENTER] button.
Definitions of each item are shown as follows:
* 16:9: Applicable to wide screen TV set.
* Pan Scan: Suitable for the common size TV set. When playing wide screen pictures, left and
right edges of the original pictures are cut off. The picture will be displayed to full screen.
* Letter Box: Suitable for the common size TV set. When playing wide screen pictures, black
banners will appear on the top and bottom of the TV set.
3
Press [RETURN] button to return to the previous menu and proceed other settings.
Pan Scan
16:9
Pan Scan
Letter Box
5.1 CH
OK
Note
If a disc is recorded in the aspect ratio of 4:3,
the ratio can only be 4:3, no matter which screen setting you select.
This setting should conform to the aspect ratio of the TV set.
36
Page 42

MENU INDEX FOR INITIAL SETUP
Speaker setting
1
In the playback setup menu, select “ Speaker setting” by [ ], [ ] buttons, and press [ENTER] button,
then the following screen will appear.
Speaker Setting
Front speaker
Center speaker
Surround speaker
Subwoofer
Dynamic range compressive
2
Select “Ok”by [ ], [ ] buttons and press [ENTER] button to confirm.
Small
Small
Small
TEST
Distance 4.5 M
Distance 4.5 M
Distance 4.5 M
Yes
Off
OK
Rating Level Setup
By setting this unit’s authorization rating and password, certain discs with control grade cannot be
played without inputting the password.
1
In the playback setup menu, move the cursor up
and down by pressing the [ ], [ ] buttons to
select the item “Rating level”, and then press
[ENTER] button. The TV screen displays:
2
Input the password and press [ENTER] button.
If the password is right, the TV screen displays the
window shown as the right figure.
The overiding password is 3308.
3
Select “Set rating level”, and press
[ENTER] button to display the pop-up list
which is shown as the right figure:
Enter Password
OK
Enter Password
OFF
New password
Enter Password
OFF
OFF
8: Adult
Cancel
OK
NEW
OK
NEW
4
Select the rating level by [ ], [ ] buttons and press [ENTER] button to confirm.
5
If you do not want to change the original password, highlight the “OK” in the menu through
cursor buttons and then press [ENTER] button.
37
Page 43

MENU INDEX FOR INITIAL SETUP
Rating Level Setup (CONTINUED)
6
To change the password, please highlight the “New Password” in the figure below and press
[ENTER] button.
New password
Confirm password
7
Select “New password” using the cursor buttons and input the new password by number buttons.
Select “Confirm password” using the cursor buttons and input this password again by number
8
buttons.
The input password in the “New password” must correspond with that in the “Confirm password”.
9
Highlight “OK” by cursor buttons and then press [ENTER] button.
After setting the rating level, when playing a disc with a rating level higher than what you have
p
reviously set, you must input the password.
If you forget the password, you may input the overriding password.
New Password
OK
Cancel
Digital Audio Output Setup
This unit has digital audio output jacks. you may enjoy high quality audio with an amplifier
with digital audio decoders.
1
Access the playback setup menu. Select item “Digital audio output” by [ ], [ ] buttons,
and then press [ENTER] button.A list will pop up:
SYSTEM SETUP - GENERAL
TV aspect ratio
Rating level
Digital audio output
Analog audio output
Speaker setting
2
Select the proper value by [ ], [ ] buttons and then press [ENTER] button.
Pan Scan
OFF
RAW
RAW
5.1 CH
LPCM
OK
Analog Audio Output Setup
This setting is used to select an analog audio output format between 2CH analog mix audio
output and Dolby 5.1CH analog output.
1
Select “Analog audio output” item by [ ], [ ] buttons, and press [ENTER] buttons,
then a pop-up list will appear:
2
Select the desired value by [ ], [ ]
buttons then press [ENTER] button
to confirm.
SYSTEM SETUP - GENERAL
TV aspect ratio
Rating level
Digital audio output
Analog audio output
Speaker setting
Pan Scan
OFF
RAW
5.1 CH
5.1CH
2CH
OK
38
Page 44

MENU INDEX FOR INITIAL SETUP
Record Setup
After setting, when recording, the values you set will become the default values of the
corresponding items.
1
In the system setup control menu, select item “ ” by [ ], [ ] buttons and then
press [ENTER] button to enter record setup menu. The screen displays:
SYSTEM SETUP - GENERAL
Auto chapter marker
Default source
Default quality
The record setup menu
OFF
Tuner
SP
Note
If the TV screen display when pressing [ ]/[ ] buttons, press [RETURN] or [ ] button
to activate the system setup control menu.
Auto Chapter Marker Setup
1
In the record setup menu, select item “Auto chapter marker” by [ ], [ ] buttons, and press [ENTER]
button. A pop-up menu will appear:
SYSTEM SETUP - GENERAL
Auto chapter marker
Default source
Default quality
2
Select the proper value by [ ], [ ] buttons, and then press [ENTER] button to confirm.
OFF
ON
OFF
SP
This setup is used to set whither or not to automatically activate the chapter marker when recording.
If you set this item to “ON”, the recorded contents will be automatically divided into chapters with the
same length.
39
Page 45

MENU INDEX FOR INITIAL SETUP
Default Input Signal Sources Selection
1
In the record setup menu, select “Default source” by [ ], [ ] buttons and press [ENTER] button,
then a pop-up menu will appear.
2
Select the desired value by [ ], [ ] buttons and then press [ENTER] button.
SYSTEM SETUP - GENERAL
Auto chapter marker
Default source
Default quality
OFF
Tuner
DV
SCART
Tuner
There are several groups of input source ports. Please refer to the “Basic InformationIllustration of the Front/Rear Panel” for their position on the unit.
Rear CVBS: Rear panel composite video and audio inputs.
*
Rear S-VIDEO: Rear panel S-video and audio inputs.
TUNER: Rear panel TV tuner input.
Front CVBS: Front panel composite video and audio inputs.
Front S-VIDEO: Front panel S-video and audio inputs.
DV: Front panel DV input.
SCART: Rear panel Scart input.
Default Recording Quality Selection
1
In the record setup menu, select
item “Default quality” by [ ], [ ]
buttons, press [ENTER]
button,then a list menu will appear.
2
Select the desired value by [ ], [ ] buttons, and then press [ENTER] button.
Please refer to the “TERMS” for the four recording qualities: HQ, SP, EP, SLP.
SYSTEM SETUP - GENERAL
Auto chapter marker
Default source
Default quality
40
OFF
Tuner
SP
HQ
SP
EP
SLP
Page 46

MENU INDEX FOR INITIAL SETUP
Language Settings
This unit is equipped with various operation interface languages for your selection.
1
Enter the system setup mode.
2
In the system setup control bar, move the cursor up and down by [ ], [ ] buttons. Select item
“ ”, and then press [ENTER] button to enter the language setup menu. The screen displays:
SYSTEM SETUP -RECORD
OSD language
Menu language
Subtitle language
Audio language
The language setup menu
English
English
OFF
Englihs
OSD Language Setup
1
In the language setup menu, select item “OSD language” by [ ], [ ] buttons, and press [ENTER]
button, then a list will pop up, which is shown as the following figure:
2
Select your desired language by [ ], [ ] buttons, and then press [ENTER] button to confirm
and the OSD language will change correspondingly.
SYSTEM SETUP -RECORD
OSD language
Menu language
Subtitle language
Audio language
English
English
French
Spanish
German
Englihs
DVD Menu Language Setup
1
In language setup menu, select item “Menu language” by [ ], [ ] buttons, and press [ENTER]
button, then a list will pop up, which is shown as the following figure.
2
Select your desired language by [ ],
[ ] buttons, and then press [ENTER]
button.
If you play the DVD discs that support
the selected language, the system will
adopt this language as the DVD menu
language.
SYSTEM SETUP -RECORD
OSD language
Menu language
Subtitle language
Audio language
Englihs
English
English
French
Spanish
German
If the disc does not support the selected
language, the system will use the language
supported by the disc.
41
Page 47

MENU INDEX FOR INITIAL SETUP
DVD Subtitle Language Setup
Some DVD discs have various subtitle languages and this setup is used to set the default
DVD subtitle language.
In the language setup menu, select item “Subtite language” by [ ], [ ] buttons, and press
1
[ENTER] button, then a list will pop up, which is shown as the following figure.
2
Select your desired language by [ ], [ ] buttons, and press [ENTER].
“OFF” means closing the subtitle output.
The system will select this setup language
as the DVD subtitle language. If the DVD
discs you select do not support this
language, this setup is invalid.
You may change the subtitle language
at random when playing. Please refer
to “Playback mode” for details.
SYSTEM SETUP -RECORD
OSD language
Menu language
Subtitle language
Audio language
English
English
OFF
OFF
English
French
DVD AUDIO Language Setup
In the language setup menu, select item “Audio language” by [ ], [ ] buttons, and press
1
[ENTER] button, then a list menu will pop up, which is shown as the following figure.
2
Select your desired language by [ ], [ ] buttons, and then press [ENTER] button.
The system will use the setup language
as the DVD output language. If the disc
does not support this setup, the setup is
invalid.
When playing DVD discs, you may change
the output language. Please refer to
“Playback Mode” for details.
SYSTEM SETUP -RECORD
OSD language
Menu language
Subtitle language
Audio language
English
English
OFF
English
English
French
Spanish
42
Page 48

MENU INDEX FOR INITIAL SETUP
Channel Tuning
This unit is equipped with a TV tuner, by which you can receive TV signals. Before receiving TV signals,
you must proceed tuning operation. The result of the operation will be saved and will not be lost after
this unit is switched off.
This operation can tune this unit automatically to receive the TV programs.
1
In the System Setup Control menu, highlight item “ ” by [ ], [ ] buttons.
2
Press [ENTER] button, then the SYSTEM SETUP-CHANNEL SCAN menu will appear, as shown
in the following figure.
SYSTEM SETUP -CHANNEL SCAN
Default TV System
Scan channels
Modify channel information
Sort channel order
Auto Scan Channels
1
Highlight item “Scan channels”, and press [ENTER] button to start channel scanning.
You can press [STOP] button to stop the scanning during the operation. If do so, the channel
information having been obtained during scanning can also be saved.
When scanning a channel, the TV will show the image of this channel’s program.
Note
Before the channel scan operation, you must connect the system properly to ensure the TV
signals can enter the system through the “TV TUNER” jack. Please refer to “System
connection-System Connection of Recording External Signals” for the connection illustration.
PAL B/G
SCAN
EDIT
SORT
Modify Channel Information
Here, you can name the channel after the corresponding program’s name or any other name you like,
sort the channel order to access the special channel easily, tune the channel finely and scan the
channel manually. You can manage the channels more easily, and make this unit receive the TV signal
better by these operations introduced in this section.
1
Highlight item “Modify channel information”in
“SYSTEM SETUP-CHANNEL SCAN” menu, and
press [ENTER] button, then the “Channel” menu
will appear, as shown in the right figure.
2
Select the desired channel to modify by pressing [CH+]/[CH-] button.
CHANNEL
Name
Scan mode
Frequency
Sound mode
Skip
Fine tune
OK
P001/CH001
Frequency
328.27MHz
PAL 1
ON
Cancel
43
Page 49

MENU INDEX FOR INITIAL SETUP
Modify Channel Information(CONTINUED)
3
Change the Channel name: Highlight the “Name” item, press [ENTER] button, and then the right
window of the same line will become input status shown as the following figure. Move the cursor
to a character by [ ], [ ] buttons, and then change the character by [ ], [ ] buttons. After
changing all the characters, press [ENTER] button to confirm.
CHANNEL
The changing sequence of the character when pressing
[ ] button is as following:
0,1,2,......9 A,B,C,.....Z a,b,c,.......z
When pressing [ ] button the sequence is reverse.
4
Change the Sound mode : You can change the sound mode.
The value of the Sound mode must match with the received TV signal. If it is not right, the
system will not receive the program’s audio signal.
5
Manual Scan channel:
Selecting channel number by pressing [CH+]/[CH-] buttons.
According to the demands of the local TV system, set items “TV system” by the methods
described in step .
4
Highlight “Frequency” item in the “Channel” menu by [ ], [ ] buttons, and press [ ], [ ]
button, then the system shall start scanning channels.
Name
Scan mode
Frequency
Sound mode
Skip
Fine tune
OK
CHANNEL
P001/CH001
Frequency
328.27MHz
PAL 1
NO
Cancel
If you press [ ] button, the system shall forward
scan channels from the current frequency.
If you press [ ] button, the system shall back ward
scan channels from the current frequency.
When encountering a channel with TV program, the
scanning will stop.
Name
Scan mode
Frequency
Sound mode
Skip
Fine tune
OK
P001/CH001
Frequency
328.27MHz
PAL 1
ON
Cancel
When the scanning stops, that is encountering a channel with TV program, press [ENTER]
button, then the TV program signal shall be correlated with the current channel number &
name, that is the current channel number & name represents this TV program.
6
Skip a channel: You can set item “Skip” and “Yes” to skip the channel.
If you do so, this channel will not be memorized by the unit.
7
Channel Fine Tuning: Highlight item “Fine Tune” in the “Channel Edit” menu. Then you can start fine
tuning the channel.
After channel scanning, some channels’ frequency may have not been adjusted correctly.
In this case, when viewing these channels, the image and sound may become fuzzy.
When this
happens, you are suggested to fine tune these channel’s frequency.
44
Page 50

MENU INDEX FOR INITIAL SETUP
Modify channel Information (CONTINUED)
Pressing [ ] button once to decrease the frequency.
Pressing [ ] button once to increase the frequency.
Sort Channel Order
1
Highlight item “Sort channel order”, and press
[ENTER] button, then a corresponding menu
will appear, as shown in the right figure.
If this unit has not scanned any program, the
“Sort channel order” menu will not display.
2
Highlight the desired channel in the left list
window by cursor buttons, and press
[ENTER] button, then the channel name
will appear in the right list window, shown
as the right figure.
CHANNEL SORT
P000 Ch000 Unskip
P001 Ch001 Unskip
P002 Ch002 Unskip
P003 Ch003 Unskip
P004 Ch004 Unskip
P005 Ch005 Unskip
P006 Ch006 Unskip
P007 Ch007 Unskip
P008 Ch008 Unskip
CHANNEL SORT
P000 Ch000 Unskip
P001 Ch001 Unskip
P002 Ch002 Unskip
P003 Ch003 Unskip
P004 Ch004 Unskip
P005 Ch005 Unskip
P006 Ch006 Unskip
P007 Ch007 Unskip
P008 Ch008 Unskip
P006 Ch006 Unskip
3
Move the channel name up and down by
[ ]/[ ] button to select the right position
where you want to insert this channel.
4
Press [ENTER] button to insert the channel
name to the selected position in the left list
window, as shown in the right figure.
5
Press [RETURN] button to return to the
previous menu and proceed other settings.
CHANNEL SORT
P010 Ch010 Unskip
P011 Ch011 Unskip
P012 Ch012 Unskip
P013 Ch013 Unskip
P014 Ch014 Unskip
P006 Ch006 Unskip
P015 Ch015 Unskip
P016 Ch016 Unskip
P017 Ch018 Unskip
After pressingthe
[SELECT] button, this channel
name is moved to this position.
P006 Ch006 Unskip
Before pressing the
[SELECT] button, the
channel name is in here.
45
Page 51

MNAU INDEX FOR INITIAL SETUP
System Clock Setup
1
Enter the system setup mode.
2
In the system setup control menu, move the
cursor to select item “ ” by [ ],[ ]
buttons, and then press [ENTER] button,
so the TV screen will display the time setup
window, which is shown as the right figure.
3
Select item “Date (mm/dd/yy)” and make
it in input mode. Highlight a number by [ ],
[ ] buttons, and change it by [ ], [ ] buttons.
After inputting the date by squence of
“month/date/year”, press [ENTER] to confirm.
SYSTEM SETUP -CLOCK
Date(mm/dd/yy)
Time(hh:mm:ss)
DivX(R) VOD
SYSTEM SETUP -CLOCK
Date(mm/dd/yy)
Time(hh:mm:ss)
DivX(R) VOD
01/01/00
12:17:14
OK
01/01/00
12:17:14
OK
4
Select item “Time (hh:mm:ss)” and make
it in input mode. Highlight a number or character by
[ ], [ ] buttons, and change it by [ ],[ ] buttons.
After inputting the time by squence of “ hh:mm:ss ”,
press [ENTER] to confirm.
The correct setup of system clock is the
precondition of time recording.
5
Select item “DivX(R) VOD” and press [ENTER]
button, so the TV screen will display the DivX
information. Press [ENTER] again, the Divx
information will disappear.
SYSTEM SETUP -CLOCK
Date(mm/dd/yy)
Time(hh:mm:ss)
DivX(R) VOD
SYSTEM SETUP -CLOCK
Date(mm/dd/yy)
Time(hh:mm:ss)
DivX(R) VOD
DivX(R) video on Derrand
Rogistration code is:
xxxxxxxx to learn
more visit
www.divx.com/vod
01/01/00
12:17:14
OK
01/01/00
12:17:14
OK
OK
46
Page 52

APPENDIX
TROUBLE SHOOTING GUIDE
When having problems with this unit, please check the chart below for a possible solution before
requesting servicing.
SYMPTOM CAUSE REMEDY
No power
No sound
No picture
No color
No disc
reading
Remote control
failure
Instantaneous
function failure
1. The power plug not connected
2. Power plug and socket not contact tightly
3. The power socket not switched on
1.Signals not properly connected
2.Discs wrapped or dirty
3.The unit in the mute status
1.Signals not properly connected
2. The TV set not properly adjusted
3.This video output system of this unit not
matching the TV scanning manner
1.TV system not right
2.TV set’s color saturation not properly
adjusted
3.Video output setting not right
1.No disc in the drive
2.Disc not properly placed
3.Condensation on the laser head
4.Not in the playback mode
5.Wrong disc format
6.Disc dirty
1.Remote control not pointing to the sensor window
2.Remote control more than 8 meters away from
the TV set
3.Remote control butteries’ voltage become low
4.Obstacles between remote control and the unit
1.Disc information not well stored
2.Wrong buttons pressed
3.Extermal static leakage into the cover
1.Connect the power plug into the wall outlet securely
2.Plug again or change another socket
3.Switch on the power socket
1.Connect signals securely
2.Clean and process the discs
3.Press the [MUTE] button again
1. Connect signals securely
2. Reset your TV sets AV/TV status
3. Press the [I/P] button
1.Press the [I/P] button to reset the system
2.Re-adjust the TV set’s saturation
3.Re-adjust video output settings
1.Load a disc
2.Reload the disc with the playback side facing down
3.Turn on the power for about 1 hour without a disc
before playing
4.Press the [PLAY] button
5.Load the discs
6.Carefully clean the disc with soft cloth outwards from
the center
1.Hold the remote control in proper position
2.Use the remote control nearer to the TV set
3.Replace the batteries
4.Remote obstacles
1.Wait for 5-10 seconds and this unit will restore
normal playback.
2.Press the right button
3.Restart playing after unplugging this unit for 1-2 minutes
Picture rolling
External signals
record failure
No monitoring
signal
Time recording
failure
Recording
abortion
1.TV system not suitable for the disc 1.Adjust the TV system
1.The system not properly connected
2.No disc or the disc not recordable
3.The disc finalized
4.No space left in the disc
1.The input source is not prepared well
2.The video output system not adequate
3.The actual input source and selected input
source not correspond
1.The disc not meet the requirements
2.Wrong time settings (system clock or
recording time)
3.The source not work property when
recording
4.Powered off
1.No space left in the recording disc
2.Too bad quality of the recording disc
1.Connect the system properly
2.Please a recordable disc
3.Replace the disc
4.Replace the recordable disc
1.Reset the signal sourcee
2.Switch video output system
3.Select proper input source
1.Reload new DVD R,DVD RW disc
2.Reset time recording settings
3.Ensure normal working of the source when recording
4.Switch the unit to the standby mode
1.Reload a blank disc
2.Use high quality recording disc
±±
47
Page 53

SPECIFICATIONS
APPENDIX
Playable discs
Recordable discs
Recording formats
Recording quality
Input
Output
DVD, DVD R/RW, SVCD, VCD, CD, MP3, JPEG±
DVD, DVD R/RW±
DVD (MPEG II)
SLP (Standard Long Play), SP(Standard Play)
EP(Extend Play), HQ(Perfect Quality).
Composite video input
S-video input(Y/C)
DV camera jack input(IEEE1394, I-Link)
R input
F
Analog audio input
Composite video output
S-video output(Y/C)
Component video output(Y, Cb, Cr)
2CH analog mix audio output
5.1CH analog output
Digital audio coaxial output
Digital audio optical output
Video
characteristics
Audio
characteristics
Output
Input
Output
Input
Composite video:
S-video:
Composite video:
S-video:
Audio amplitude 2.0 Vrms, 10k
AF response 20Hz~20HKz( 1dB)
Signal/nolse ratio 85dB
Audio distortion+noise -65dB(1KHz)
Audio amplitude 2.0Vrms
Impedance 10K
NTSC/PAL system
Video amplitude 1.0 0.2Vp-p, 75
Y output amplitude 1.0Vp-p, 75
C output amplitude 0.286Vp-p, 75
NTSC/PAL system
Video amplitude 1.0 0.2Vp-p, 75
Y input amplitude 1.0Vp-p, 75
C input amplitude 0.286Vp-p, 75
-0.2
+1.0
Operation
humidity
Relative humidity 15-75% (No condensation)
48
Page 54

APPENDIX
CREDITS
Manufactured under license from Dolby Laboratories. “Dolby” and
the double D symbol are trademarks of Dolby Laboratories. Confidential
unpublished works. 1992-1997 Dolby Laboratories, Inc. All rights reserved.
This product incorporates copyright protection technology that is by protected
method claims of certain U.S. Patents and other intellectual property rights
owned by Macrovision Corporation and other rights owners. Use of this
copyright protection technology must be authorized by Macrovidion Corporation,
and is intended for home and other limited viewing uses only unless otherwise
authorized by Macrovision Corporation. Reverse engineering or disassembly
in prohibited.
49
 Loading...