

Page 1
Page 2
Notices and Safety Instructions
- TO PREVENT FIRE OR SHOCK HAZARD, DO NOT USE THIS PLUG WITH AN EXTENSION CORD, RECEPTACLE
OR OTHER OUTLET UNLESS THE BLADES CAN BE FULLY INSERTED TO PRESENT BLADE EXPOSURE.
- TO PREVENT FIRE OR SHOCK HAZARD. DO NOT EXPOSE THIS APPLIANCE TO RAIN OR MOISTURE.
- TO PREVENT ELECTRICAL SHOCK, MATCH WIDE BLADE PLUG TO WIDE SLOT FULLY INSERT.
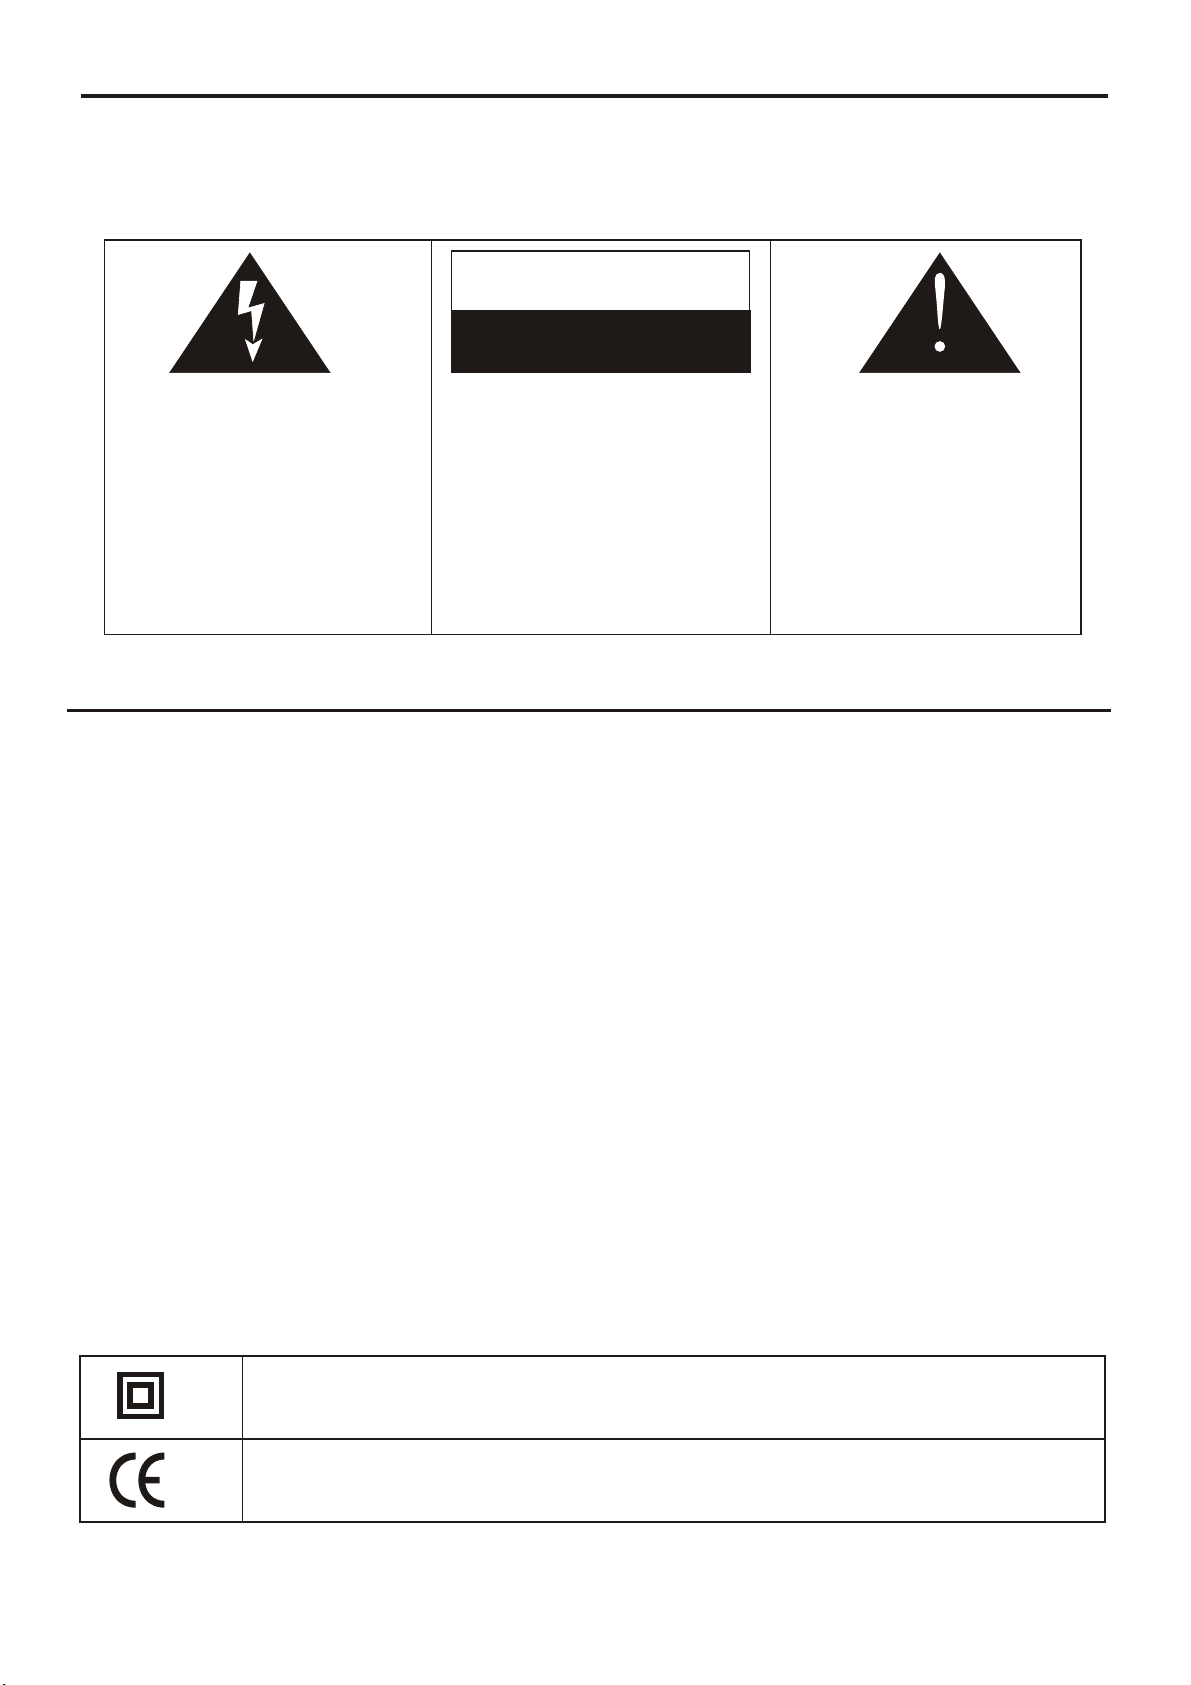
CAUTION
RISK OF ELECTRIC SHOCK
DO NOT OPEN
This lightning flash with arrow
head symbol, within an
equilateral triangle, is intended
to alert the user to the presence
of uninsulated “ Dangerous
voltage” within the product ’s
enclosure that may be of
sufficient magnitude to
constitute a risk of electric
shock to persons.
Warning: To reduce the risk of
electric shock, do not remove
cover (or back) no userserviceable parts inside.
Refer servicing to qualified
service personnel.
The exclamation point within
an equilateral triangle is
intended to the user to
the presence of Important
operating and maintenance
instructions in the literature
accompanying the appliance.
alert
IMPORTANT SAFETY INSTRUCTIONS
1. Read these instructions.
2. Keep these instructions.
3. Heed all warnings.
4. Follow all instructions.
5. Do not use this apparatus near water.
6. Clean only with dry cloth.
7. Do not block any ventilation openings. Install in accordance with the manufacturer’s instructions.
8. Do not install near any heat sources such as radiators, heat registers, stoves, or other apparatus
(including amplifiers) that produce heat.
9. Do not defeat the safety purpose of the polarized or grounding type plug. A polarized plug has
two blades with one wider than the other. A grounding type plug has two blades and a third
grounding prong.
The wide blade or the third prong are provided for your safety. If the provided plug does not fit
into your outlet, consult an electrician for replacement of the obsolete outlet.
10. Protect the power cord from being walked on or pinched particularly at the plugs, convenience
receptacles, and at the point where they exit from the apparatus.
11. Only use attachments/accessories specified by the manufacturer.
12. Unplug the apparatus during lightening sorts or when unused for long periods of time.
13. Refer all servicing to qualified personnel. Servicing is required when the apparatus has been
damaged in any way, suck as power supply cord or plug is damaged, liquid has been spilled or
objects have fallen into the apparatus, the apparatus has been exposed to rain or moisture, does
not operate normally, or has been dropped.
This appliance shall not be exposed to dripping or splashing water and that no object filled with
liquids such as vases shall be placed on apparatus
.
The symbol for Class II (Double Insulation)
This symbol means that the unit complies with
European safety and electrical interference directives.
- 1 -
Page 3
Notices and Safety Instructions
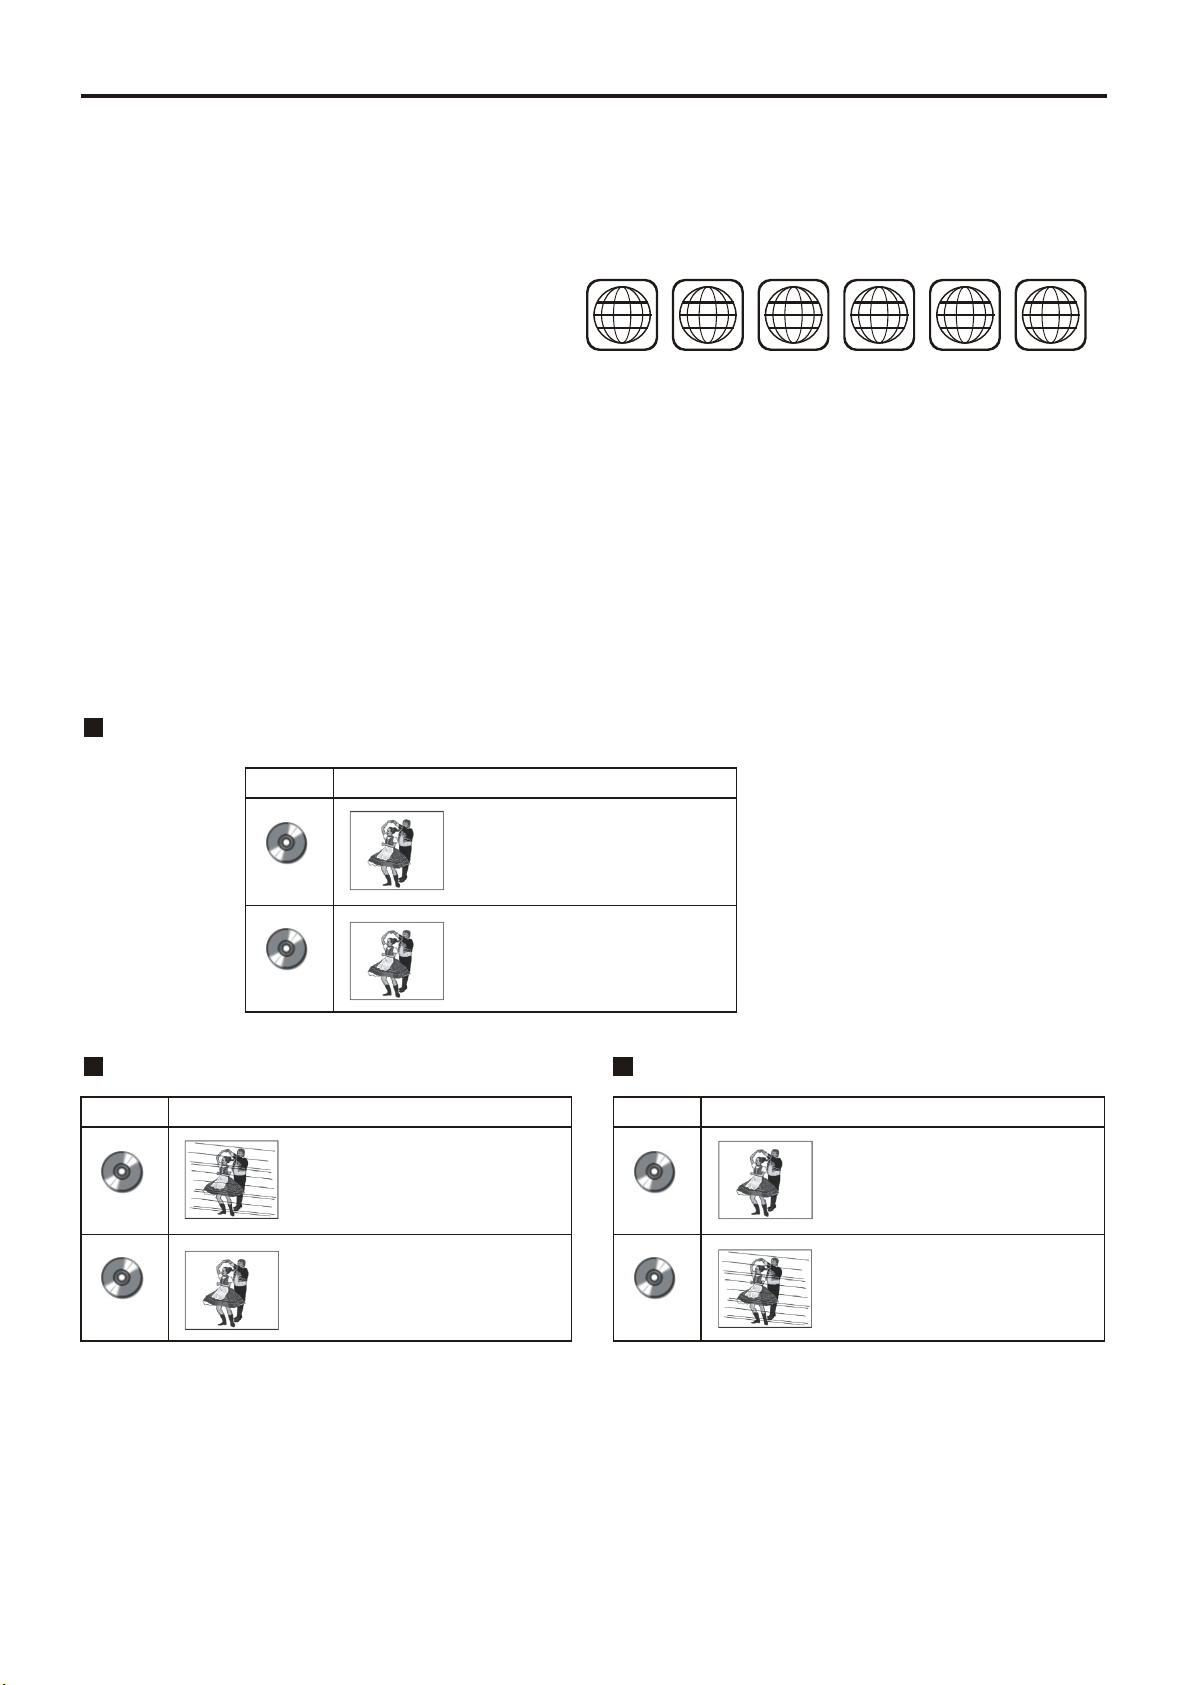
To protect intellectual property, the involved organizations partition the world into six regions,
each of which can only use the DVD player and DVD disc with the given regional code.
The illustration on the right shows symbols of the six regions. One DVD player with a given
regional code cannot play disc of another regional code. The partition of regional codes
is shown as follows:
1. Canada, USA;
1 2
2. Japan, Europe, South Africa, Middle East
3. Southeast Asia, East Asia
4. Australia, New Zealand, Oceania, Central America, Mexico, Latin America, Caribbean Sea;
5. Russia, India, Africa, Korea, Mongolia.
6. China.
3
4
5
6
TV connections for DVD discs recorded in PAL and NTSC systems
Generally, DVD discs are recorded in PAL or NTSC systems, please refer to the following table:
Connecting to the multi-system TV
DISC
PAL
TV MONITOR
Play in PAL system
Play in NTSC system
NTSC
Connecting to NTSC TV Connecting to PAL TV
DISC
PAL
NTSC
Progressive scan and Interlacing scan
In the past, because of the relative technology being immature, the TV set employed interlacing
scanning mode. That is, each picture is created by scanning twice, first the odd field and then the
even field. Therefore images are illegible and flickering. Nowadays, the top graded TV sets
generally have progressive scanning function, that is, each picture is created by scanning once,
and images are clear. This unit can provide two scanning modes.
TV MONITOR
No clear images are shown
on the screen.
Play in NTSC system
DISC
PAL
NTSC
TV MONITOR
Play in PAL system
No clear images are shown
on the screen.
- 2 -
Page 4

Important Safety Instructions
1. Read Instructions- All the safety and operating instructions should be read before the
appliance is operated.
2. Retain Instructions- The safety and operating instructions should be retained for future
Reference.
3. Hewed Warnings- All warnings on the appliance and in the operating instructions should
be adhered to.
4. Follow Instructions- All operating and use instructions should be followed.
5. Water and Moisture- The appliance should not be used near water.
6. Carts and Stands- The appliance should be used only with a cart or stand that is
recommended by the manufacturer.
7. Wall or Ceiling Mounting- The appliance should be mounted to a wall or ceiling only as
recommended by the manufacturer.
8. Ventilation- The appliance should be well situated that its location or position does not
interfere with its proper ventilation.
9. Heat- The appliance should be situated away from heat sources such as radiators, heat
registers, stoves that produce heat.
10. Power Sources- The appliance should be connected to a power supply only of the type
described in the operating instructions or as marked on the appliance.
11. Grounding or Polarization- Precautions should be taken.
12. Power- Cord Protection- Power supply cord should be routed so they are not likely to
be walked on or pinched by item placed upon or against them, pay plugs, and the point
where they exit from the appliance.
13. Cleaning- The appliance should be cleaned only by ways recommended by the manufacturer.
14. Power Lines-An outdoor antenna should be located away from power lines.
15. Outdoor Antenna Grounding- If an outside antenna is connected to the receiver, be
sure the antenna system is grounded so as to provide protection against voltage surges and to
build up static charges.
16. Non-use Periods- The power cord of the appliance should be unplugged from the
Outlet when left unused for a ling period of time.
17. Object and Liquid Entry- Care should be taken so that objects do not fall, and liquids
are not spilled, into the enclosure through openings.
18. Conditions Requiring Service- The Appliance should be serviced by qualified service
Personnel when:
A. The power-suppl cord or the plug has been damaged.
B. Objects have fallen or liquid has been spilled into the appliance.
C. The appliance has been exposed to rain.
D. The appliance does not appear to operate normally or exhibit a marked change in performance.
E. The appliance has been dropped or the enclosure is damaged.
- 3 -
Page 5

Important safety instructions
Copy Protecion
This product incorporates copyright protection technology that is protected by method claims
of certain U.S. patents and other intellectual property rights owned by Macrovision
Corporation and other rights owners. Use of this copyright technology must be authorised by
Macrovision Corporation, and is intended for home and other limited viewing uses only,
unless otherwise authorised by Macrovision Corporation. Reverse engineering or
disassembly is prohibited.
Assuring the Finest Performance
If the pick-up lens or disk drive gets dirty, the video quality will decrease.
Moisture Condensation
Condensation may form inside this player under following conditions:
• If warm air comes in contact with any cold parts inside the player;
• If the player is located in a room with high humidity; and
• If the player is exposed to sudden temperature changes from cold to hot.
When condensation forms inside the player, the player may not operate correctly.
If this occurs, leave the player at room temperature until the inside of the player becomes
dry and operational.
- 4 -
Page 6

Table of Contents
Notices and Safety Instructions
Important safety instructions
Setup
Features
Accessories
Disc Type and Characteristics
Description-Front Panel
Tour of the Remote Control
Using the Remote Control Unit
Connections
Connecting Headphones to the DVD
Connecting to an External Component (Input Select)
Connecting to a TV
Connecting to a Stereo Component
Connecting to TV Component
Digital Card Play Operation
1-2
3-4
6
7
8
9
10
11
12
13
14
15
17
18
Adapter directions
Using the AC adapter
Battery level display
Using the battery pack
Basic Functions
Playing a Disc
Using the Search & Skip Functions
Using the Function Menu
Using the Setup Menu
Using the Setup Menu
Setup the Language Menu
Setup the Video Menu
Setup the Audio Menu
Setup the Parental Menu
19
20
21
22
24
25
30
31
33
35
35
Reference
Cautionary Notes
Troubleshooting
37
39
- 5 -
Page 7

Features
Plays DVD discs and audio CDs
• CD-R/RW discs containing MP3/WMA files can be played.
20.32cm LCD display and built-in stereo speakers
• With the built-in 20.32cm LCD display and stereo speakers, you can enjoy a DVD movie
without requiring a separate TV.
Convenient 2-Way power supply
• You can use your DVD player virtually anywhere by using the supplied AC adapter indoors
and the battery pack outdoors.
Compact size/light-weight design
• Compact and lightweight design makes the player easy to carry.
High-resolution image
• High-resolution LCD screen pixels provides a clear picture.
AV input/output, coaxial digital output jack
1
• * Dolby Digital 5.1-CH audio and * DTS digital audio can be output through the coaxial
2
digital output jack. You can enjoy unsurpassed surround sound when a Dolby Digital/DTS
digital surround processor or amplifier is connect to this jack.
• You can connect a VCR or camcorder to your DVD player using the AV input/output jacks
or you can connect to a TV for a larger screen.
*1 Manufactured under license from Dolby Laboratories.“Dolby”, “Pro Logic”, and the
double-D symbol ( ) are trademarks of Dolby Laboratories. Confidential unpublished
works © 1992-1997. Dolby Laboratories. Inc. All rights reserved.
*2 “DTS” and “DTS Digital Out” are trademarks of Digital Theater Systems, Inc.
INPUT : For viewing a video from an external component such as a VCR, Camcorder etc..
- 6 -
Page 8
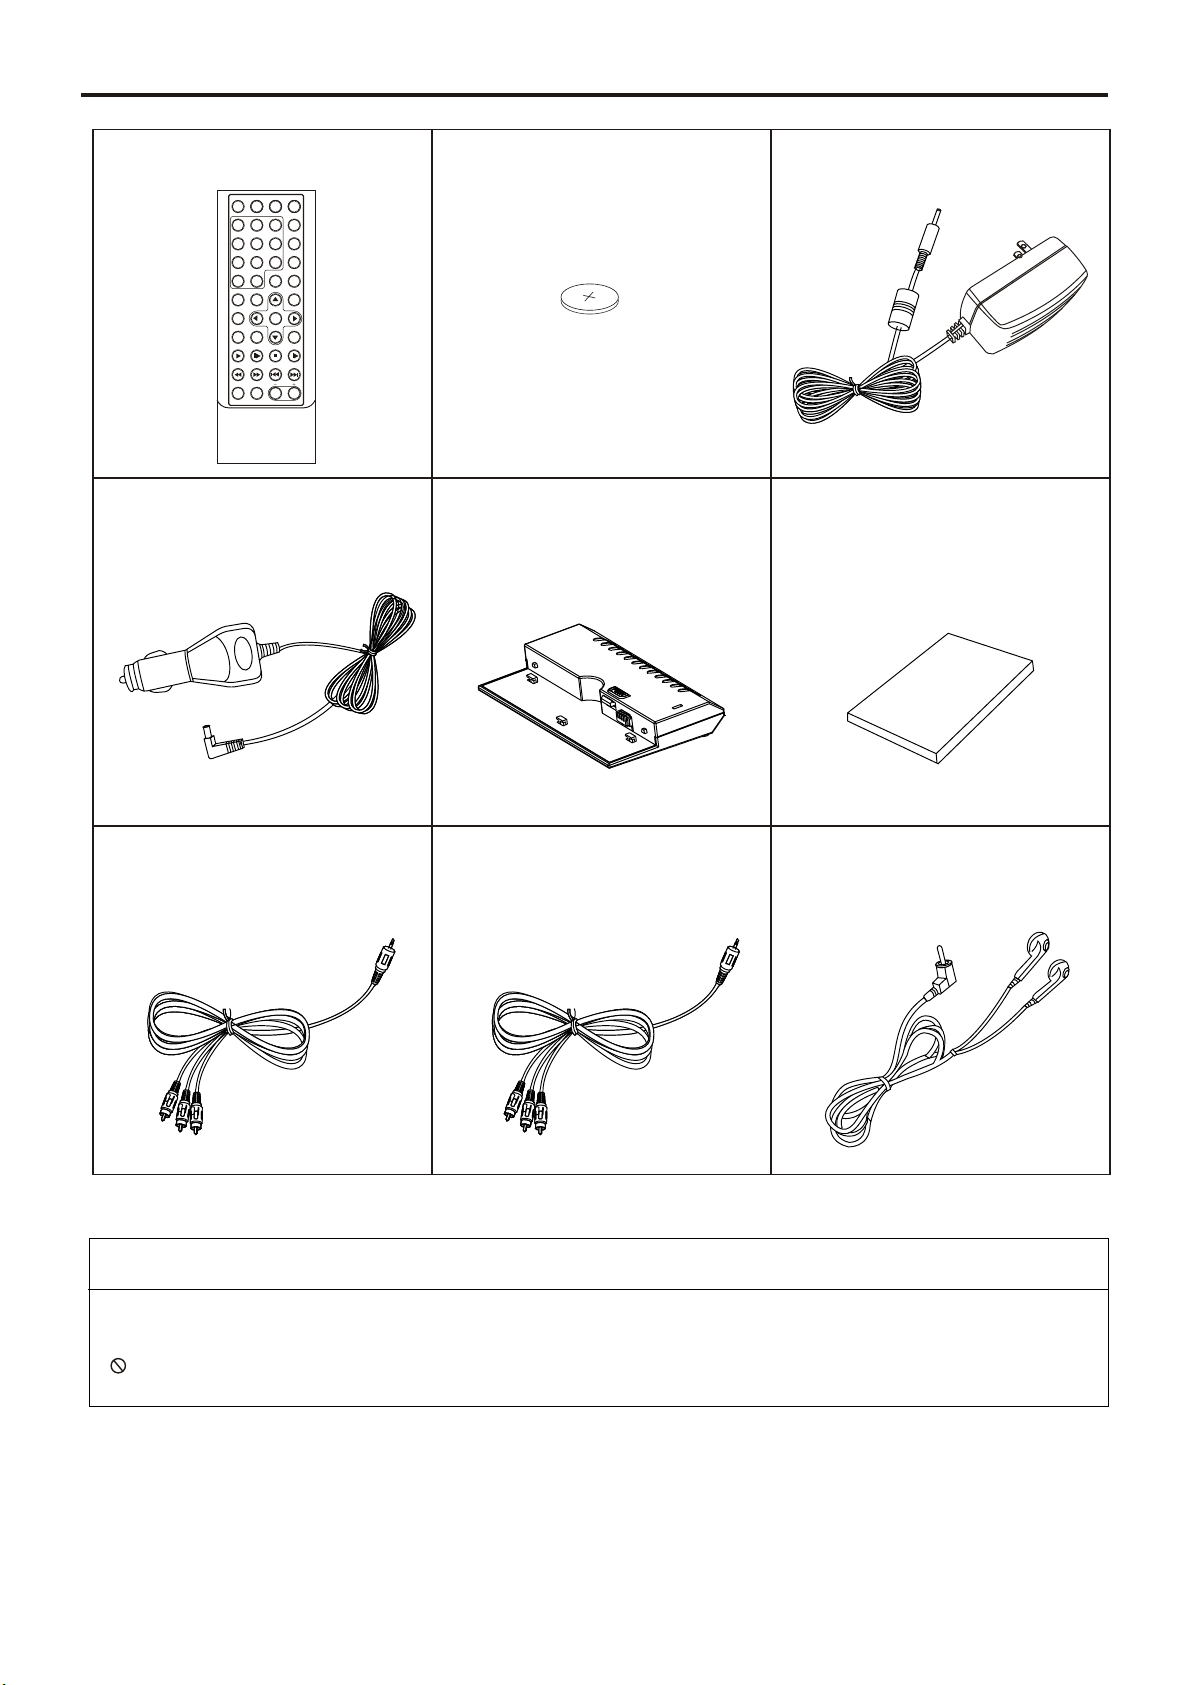
Accessories
Remote control
RETURN
MUTE
SEARCH
SOURCE
SUBTITLE
3
12
AUDIO
5
6
4
ANGLE
789
CLEAR
PROG
0 10+
VIDEO OUTPUT
LCD
SETUP
TITLE
ENTER
MENU/PBC
OSD ZOOM
PLAY
PAUSE/STEP
STOP SLOW
FB FF PREV NEXT
REPEAT A-B
VOL
Car Adapter
Lithium battery
(For Remote Control)
Battery pack
AC Adapter
Users Manual
Ma
nu
al
AV Cable
YUV Cable
Headphone
If disc features differ from the explanation in the manual
• Some functions or operations are disc-dependent and may not work in all cases.
Follow the instructions shown on the screen. This manual only covers basic disc operations.
• may appear during some operations. This mark indicates that the disc in use does not
currently support operations explained in this manual.
- 7 -
Page 9

Disc Type and Characteristics
This unit can play the following discs.
Disc Type
DVD videos with
appropriate region
number or ALL
Audio Cds
(PCM)
CD-Rs
CD-RWs
Contents
Digital Audio
+
Digital Video
(MPEG2)
Digital Audio
Digital Audio
Disc size
12Cm
8Cm
12Cm
8Cm
(CD Single)
12Cm
8Cm
(CD Single)
Maximum
playback time
Approx. 240minutes
(Single sided disc)
Approx. 480minutes
(Double sided disc)
Approx. 80minutes
(Single sided disc)
Approx. 160minutes
(Double sided disc)
Approx. 74minutes
Approx. 20minutes
Approx. 74minutes
Approx. 20minutes
Play Region Number
Both the DVD player and the discs are coded by region. These regional codes must match
in order for the disc to play. If the codes do not match, the disc will not play.
The Region Number for this player is described on the housing bottom of the player.
•
This unit uses PAL/NTSC color system, and cannot play DVD videos recorded in
any other color system (SECAM, etc).
• The LCD display does not support Closed Captions. However, you can view captions by
connecting this unit to a TV with the caption function.
- 8 -
Page 10
22
21
20
19
18
17
16
15
14
13
12
11
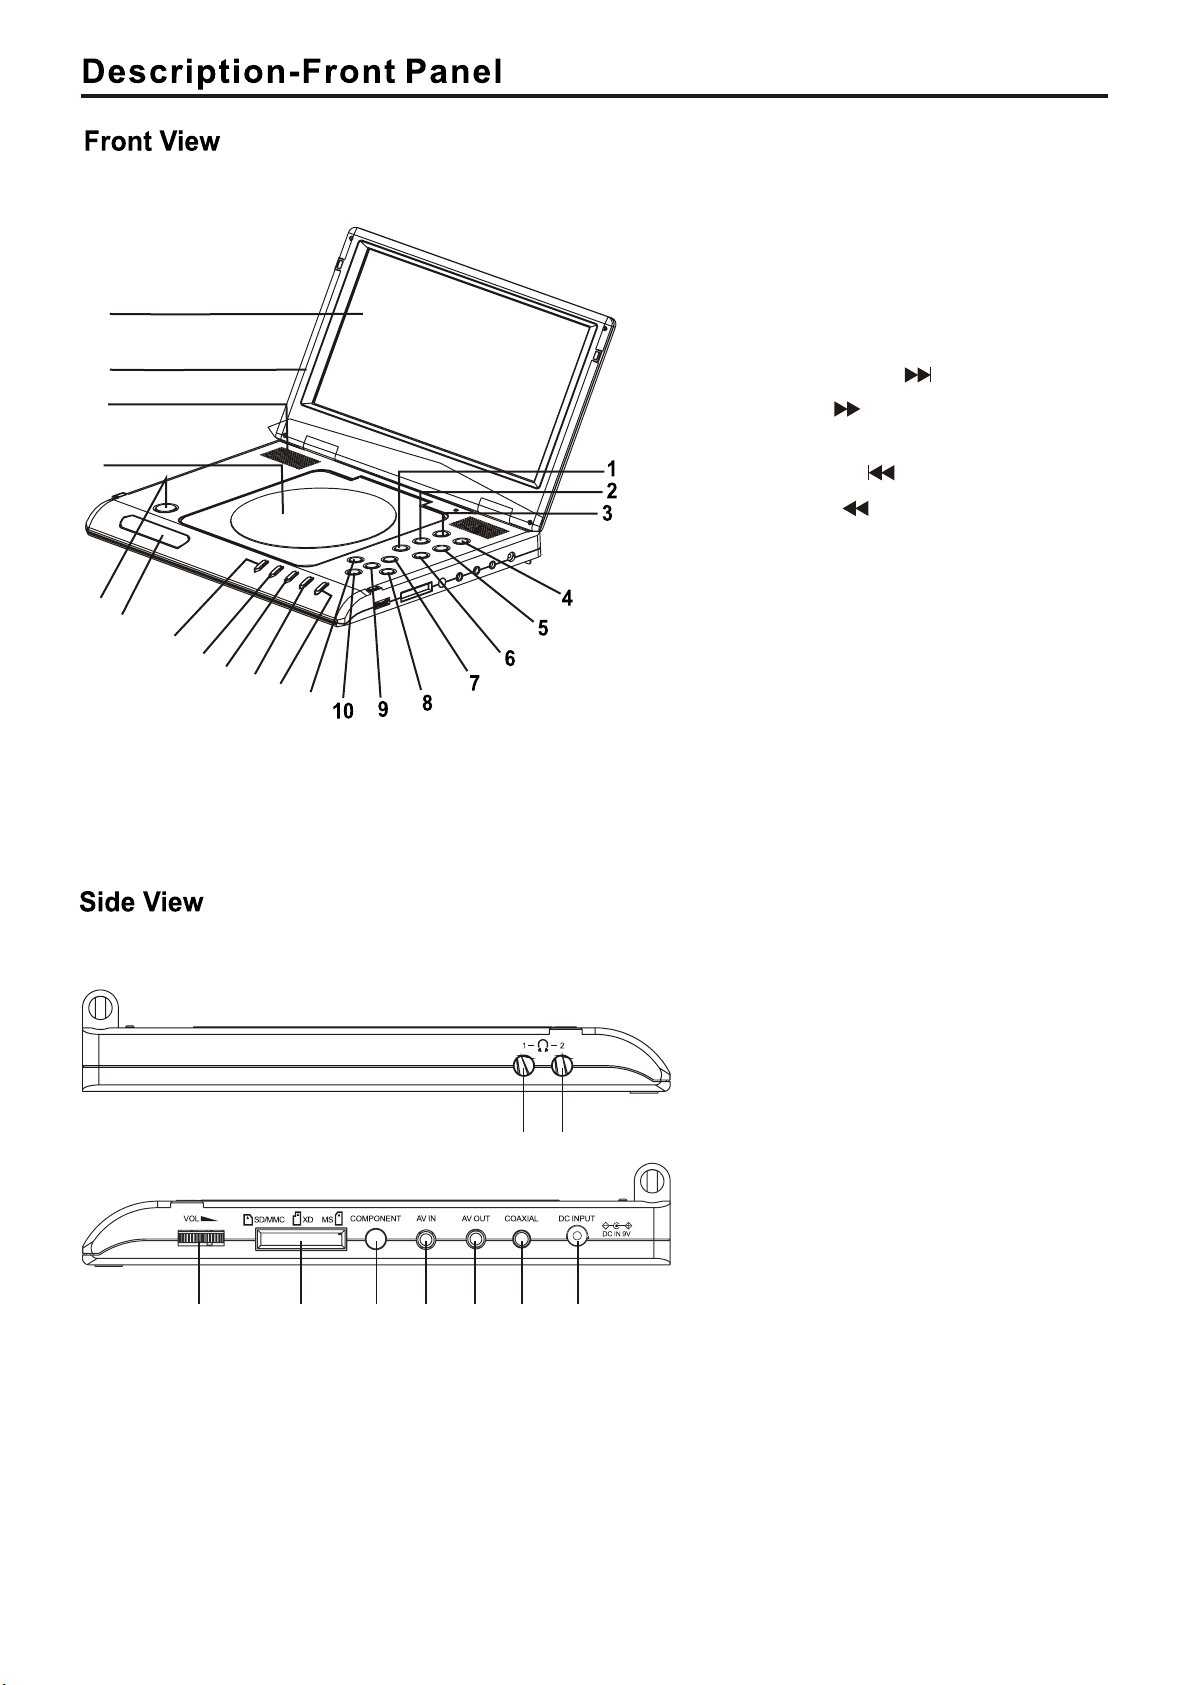
1.Title button
2.Menu button
3.Source button
4.Power button
5.LCD button
6.Setup button
7. ( )/Direction up
Previous button
8. /Direction right
FWD-SKIP( )
9.Enter button
10. ( )/Direction down
Next button
11. /Direction left
REV-SKIP( )
12.Angle button
13.Subtitle button
14.Audio button
15.Stop button
16.Play/pause button
17.Remote control sensor
18.Open/close button
19.DVD door
20.Speakers
21.TFT Display(10”TFT)
12
3456789
- 9 -
1.Headphone 1
2.Headphone 2
3.Volume
4.Multi Media card/SD/
/Memory stick
5.Component
6.AV Input
7.AV Output
8.Coaxial
9.DC input
Page 11
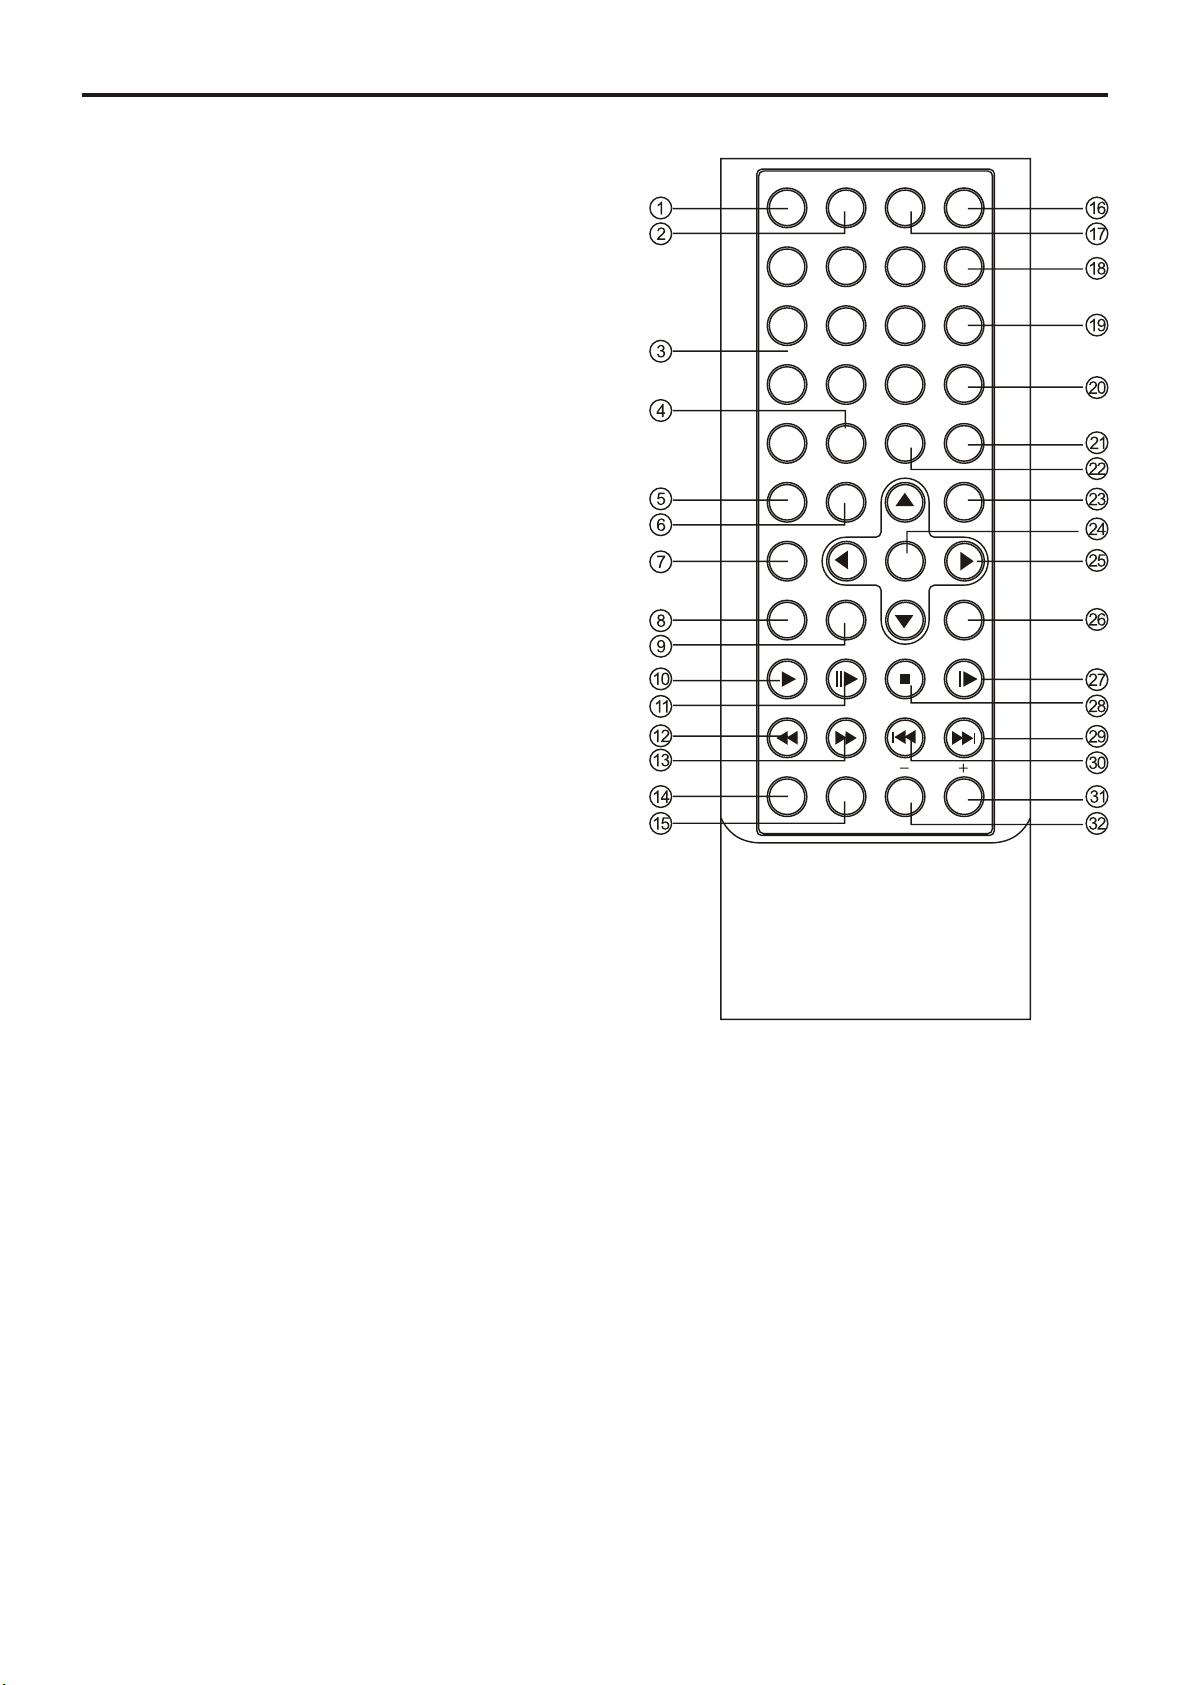
Tour of the Remote Contol
1. Return button
Return to the previous menu.
2. Mute button
3. Number (0-9) buttons
4. Number (10+) button
5. Video output button
6. LCD button
7. Title button
8. Menu/PBC button
Brings up the DVD setup menu.
9. OSD button
Display the current disc mode
10. Play button
11. Pause/Step button
12. Fast Backward button
13. Fast Forward button
14. Repeat button
To repeat play a title, chapter, track or disc.
15. A-B button
Use to mark a segment to repeat between A an B.
16. Source button
17. Search button
18. Subtitle button
19. Audio button
To access various audio functions on a disc
20. Angle button
To access various camera angles on a DVD
21. Programme button
22. Clear button
23. Setup button
24. Enter button
25. Direction buttons
This button functions as a toggle seitch
26. Zoom button
27. Slow button
28. Stop button
29. Next button
30. Previous button
31. Volume up button
32. Volume down button
RETURN
VIDEO OUTPUT
MENU/PBC
REPEAT A-B
MUTE
SEARCH
12
4
7
0 10+
LCD
TITLE
OSD ZOOM
PLAY
PAUSE/STEP
FB FF PREV NEXT
3
5
6
89
CLEAR
ENTER
STOP SLOW
VOL
SOURCE
SUBTITLE
AUDIO
ANGLE
PROG
SETUP
- 10 -
Page 12
Using the Remote Control Unit
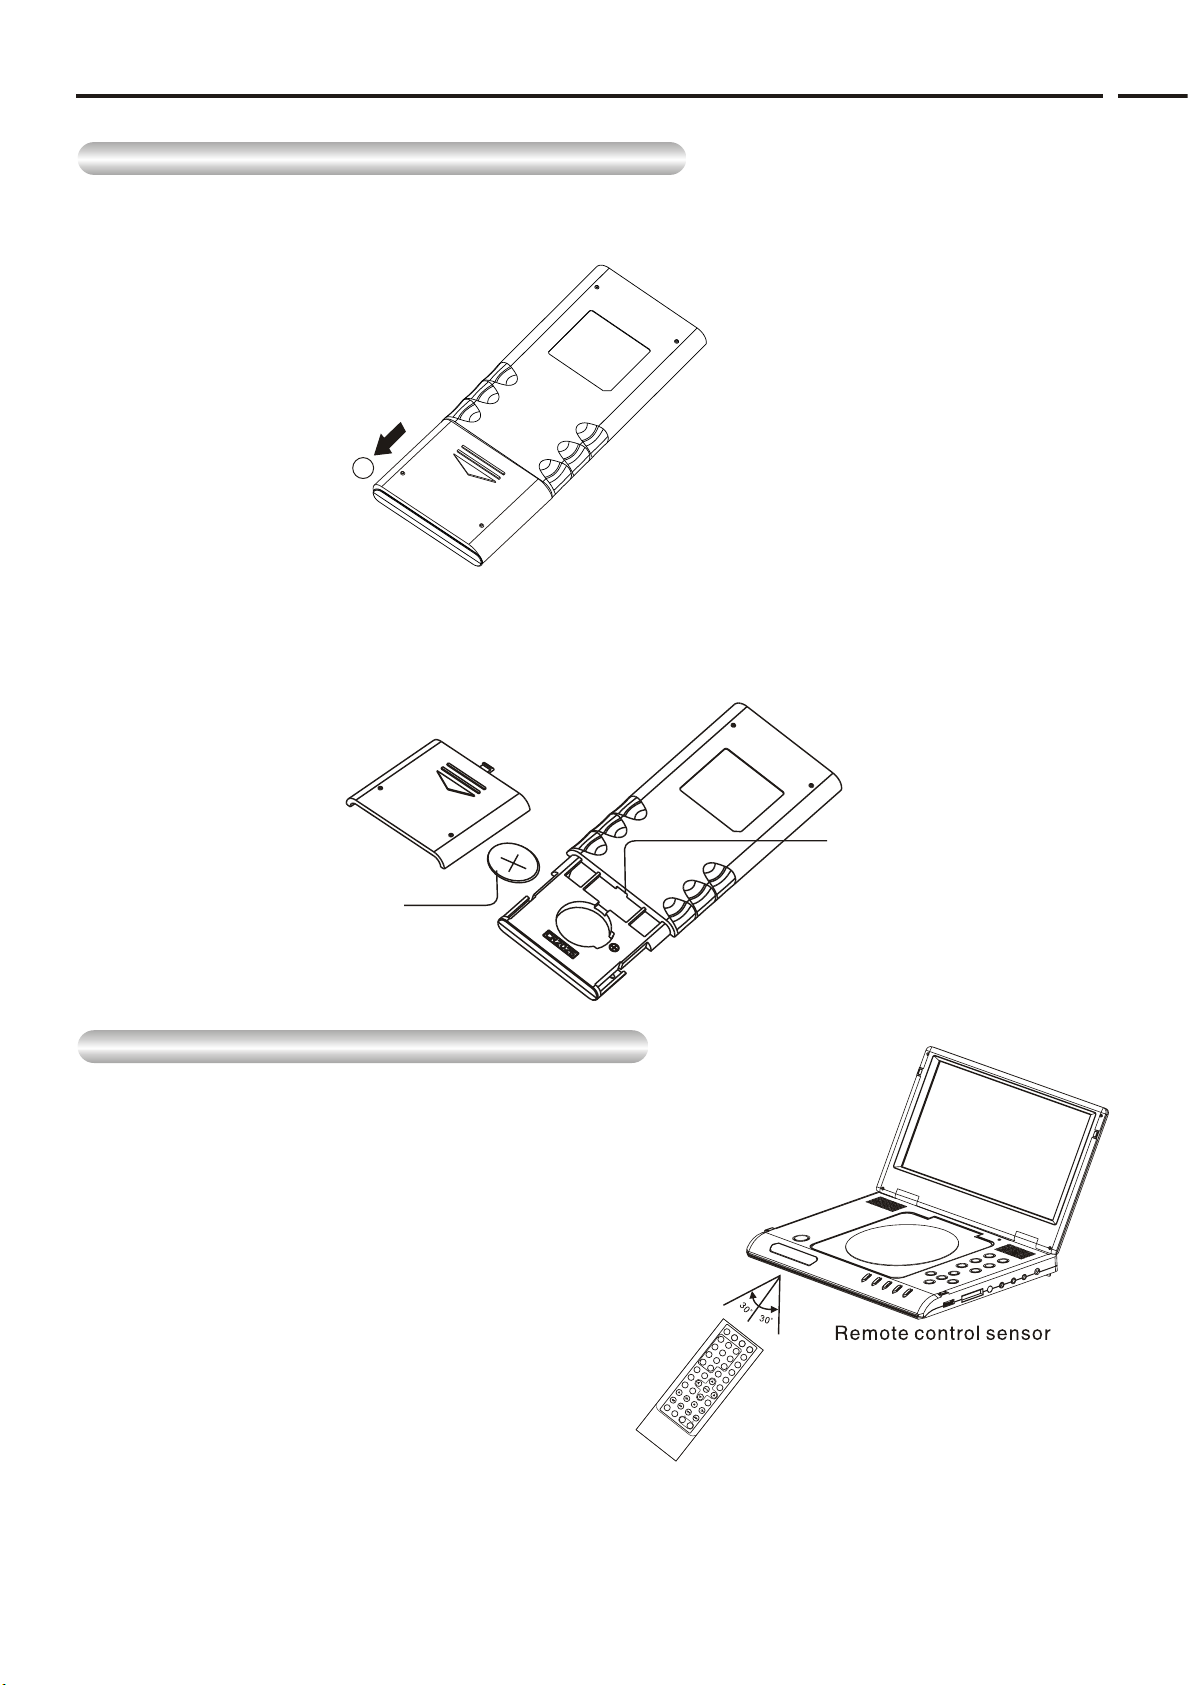
Installing the Battery inside the Remote Control
1.Remove the battery compartment in the direction of the arrow.
(Back of the remote control)
1
2.Place the battery inside the battery compartment and put the battery compartment cover
back on the remote.
Match the polarities (+ and -) on the battery with the marks in the battery compartment.
•
If the battery is inserted in the wrong direction, your remote control may not work correctly.
Lithium battery
Operating Range of Remote Control Unit
Important!
Do not subject the remote control unit to strong vibration or shock.
•
Keep the remote control unit free from moisture and water.
•
Caution
If the remote control unit does not work after battery
•
replacement, remove and re-insert the battery in about
5 minutes.
•
It may be difficult to operate the remote control unit if
the remote control sensor on the DVD player is
exposed to direct sunlight or strong artificial light.
Try operating away from such light sources.
•
Remove the battery when not planning to use the
remote control unit for a long period of time.
RE
T
U
RN
M
U
T
E
S
E
A
12
RCH
4
S
3
U
BTI
5
T
7
L
6
AU
8
D
IO
0
VIDEO
O
9
A
10
U
N
T
C
PU
GL
+
L
T
EA
E
L
C
RP
TITLE
D
R
O
G
M
ENU
SE
/PBC
T
U
P
O
SD
P
LA
Y
PAUSE
/S
F
T
BFF
E
Z
P
OO
ST
M
O
R
P
E
PE
A
S
T
LO
PREV
W
A
B
N
E
XT
VOL
Hole
SO
U
RC
E
E
- 11 -
Page 13
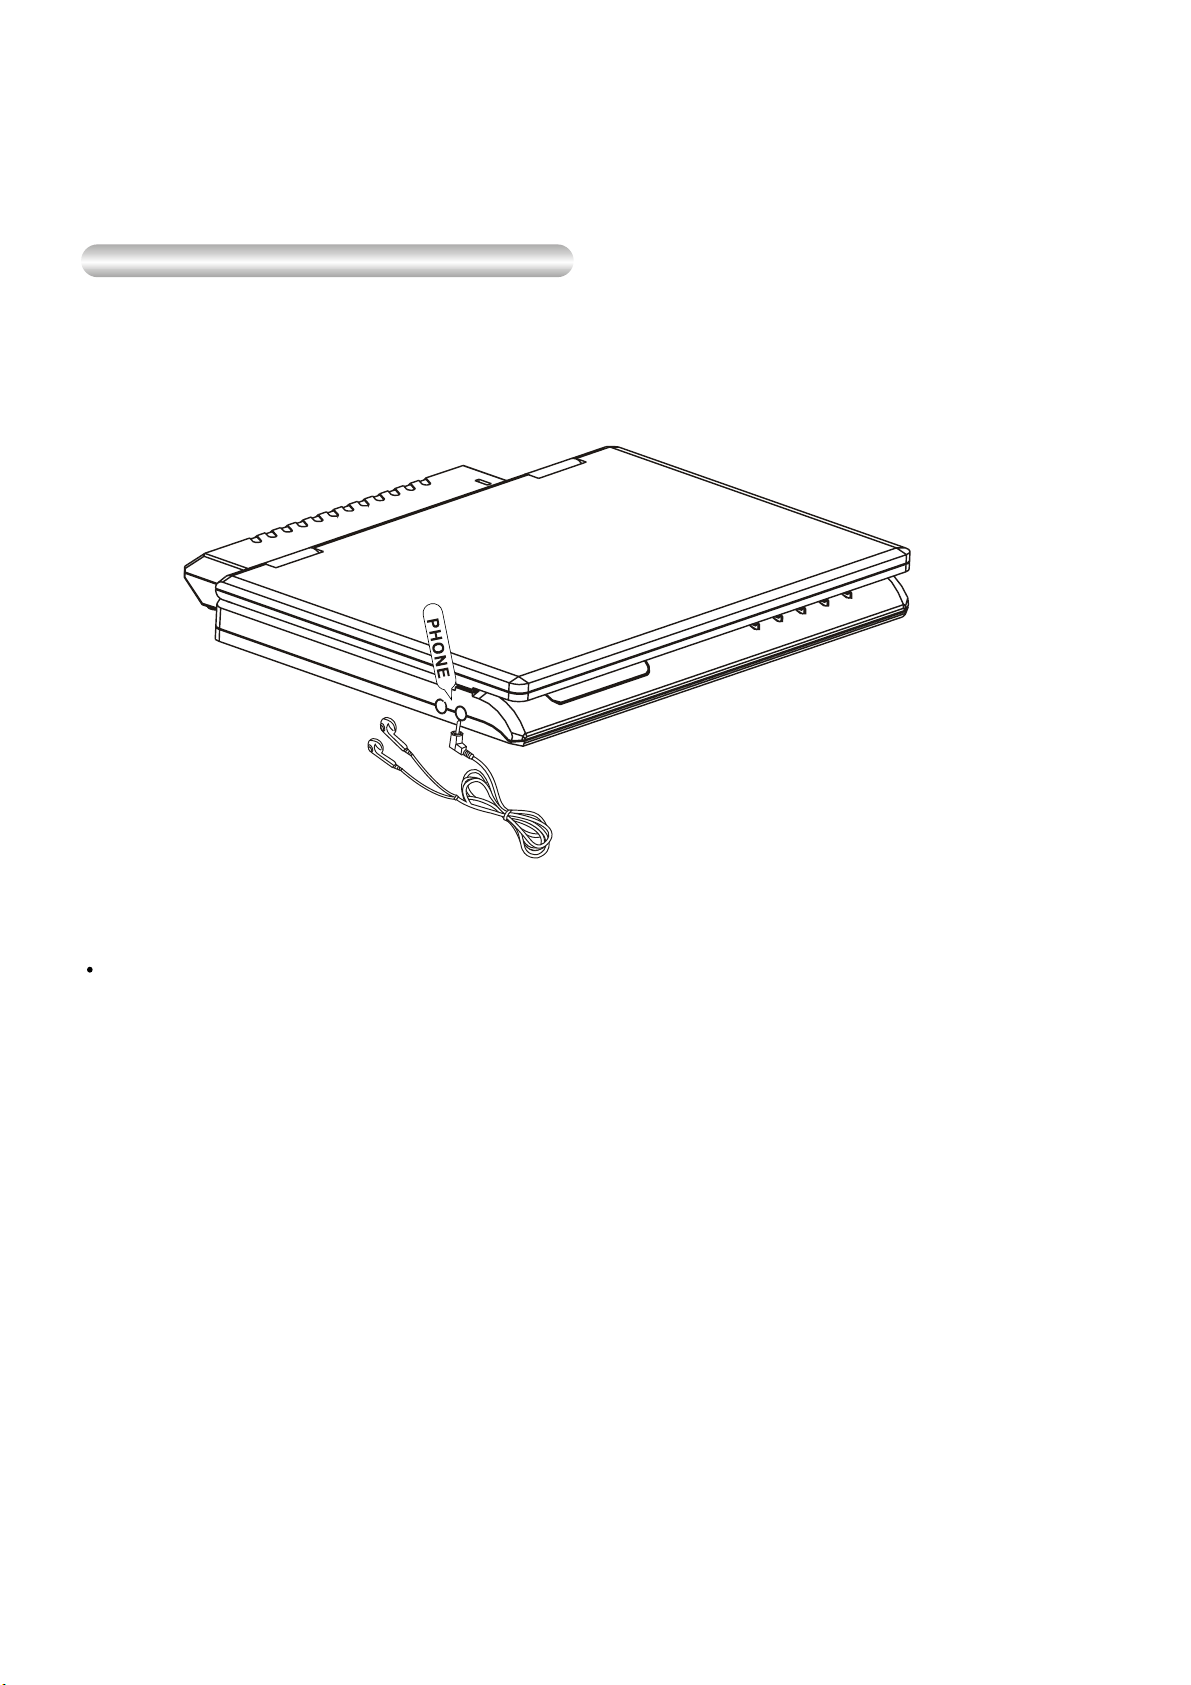
Connecting Headphones to the DVD
You can attach headphones with a stereo mini-jack plug to the
PHONES jack for private listening. There are two jacks available.
How to use headphones
1.Insert headphones into the 1 or 2 PHONES jack.
This jack is a stereo mini-jack
Important!
• Turn the headphone volume down to the minimum setting before connecting
Caution
• Once you connect headphones to the DVD, your DVD player’s speakers will be
disconnected.
2.Adjust the volume level by using the VOLUME control dial.
- 12 -
Page 14

Connecting to an External Component (Input Select)
You can enjoy video from your VCR or Camcorder on your DVD player.
When connecting to an external component
Important!
• Always turn off the DVD Player and other components before you connect any cables.
• Make sure switch to AV IN.
• Refer to owner’s manual of the components you are connecting for more information on
those particular components.
- 13 -
Page 15

Connecting to a TV
You can enjoy high-resolution video using a VIDEO cable when connecting your DVD player to a
TV equipped with a VIDEO input jack.
• Always turn off the DVD Player and TV before you connect any cables.
To view video with a TV
1.Turn on the TV.
2.Press the TV/VIDEO button on your TV to select the input from the DVD player.
3.Turn on the DVD player, and start playback.
Caution
• If you wish to view video on your TV only, close the display panel of your DVD player.
Playback will continue
• Turn volume control at main unit to minimum to cut of the speaker output.
- 14 -
Page 16

Connecting to a Stereo Component
COMPONENT
YUV Cable
Y
COMPONENT
CR
C
B
Jack/Plug Color:
Y Jack: Green
Cb Jack: Blue
Cr Jack: Red
1. Connect the Mini-plug of the component video cable to the COMPONENT jack of
the unit.
2. Connect the other three plugs to the corresponding component video or
progressive scan video input jacks of the TV.
- 15 -
Page 17

Connecting to a Stereo Component
When you connect the DVD player to an audio system, you can listen to higher quality sound.
2-CH Audio Playback
Jack/plug color:
Audio(Left): White
Audio(Right):Red
Video input: Yellow
Connect the supplied audio cable to the AUDIO connecter located on the right side of the
unit. The audio cable is identified by having a 3.5mm stereo (3 section) connector on one
end and red/white RCA connectors on the other end. Connect the red/white RCA
connectors to an audio input on your stereo receiver or TV. Consult your stereo receiver
or TV owner’s manual for further information.
- 16 -
Page 18

Connecting to TV Component
After the completion of above connections;
Digital connection to audio component without Dolby Digital decoder
• DVD Disc
When playing a Linear PCM Audio encoded disc, you must use the digital connection
method shown above
NOTE:
Only use an coaxial digital cable which has been designed for use with portable DVD.•
- 17 -
Page 19

Digital Card Play Operation
Digital card (SD/MMC/MS) can memory Mp3 songs and digital pictures.
How to select Digtal card to play
1. Turn on the power of this unit.
2. Insert SD/MMC/MS card and slide the card unit in clicks into place.
3. Press “SOURCE” button on the unit or on the remote control to switch: DVD/CARD.
SD/MMC/MS Card
How to play Digital card
1. Press “SOURCE” button on the remote control to switch:
Loading card...
2. When playing MP3 songs and digital pictures in Digital card, the unit features mute, repeat,
and zoom play. Operations are the same as MP3 operation.
NOTE:
Do not face the slot towards your face when inserting and removing cards. The slot mechanism
has a spring so the card may eject with force.
Please press STOP button if you want to pull out the Digital card.
- 18 -
Page 20

Using the AC adapter
Important!
• Always turn off the DVD player before connecting or disconnecting the AC cord.
• Be sure to use the supplied AC adapter. Using a different type of adapter may cause
malfunction or damage to the product.
• When the AC adapter is used for prolonged periods of time, the adapter may heat up.
This is normal and is not a cause for concern.
• When not using the adapter, unplug it from the wall outlet.
• Keep the AC adapter free from moisture, cold, and dust. Otherwise, this can result in
a risk of fire or electric shock.
Warning
• Only use the AC adapter supplied with this player.
• Be sure to unwind the AC adapter cable (DC output cable) before using, as electromagnetic
interference may cause problems with other devices.
- 19 -
Page 21

Using the AC adapter
Important!
Always turn off the DVD player when inserting or removing the AC adapter.
•
Before storing the battery pack, make sure it is completely drained.
•
Be sure to recharge the battery at least once every six months to ensure proper
•
battery life.
Caution
When charging or using the battery pack, it heats up.
•
This is normal and is not a cause for concern.
•
NOTE:
Connecting the battery pack to the AC Adapter;
You can recharge the battery pack in the DVD player by turning off the player and connecting
•
the AC adapter to the player.
DVD Continuous Playing Time with a Fully charged Battery pack (with speaker):
2 hours or above
DVD continuous playing time is a reference indicating the maximum playing time at average
•
speaker volume.
Battery level display
If the “battery low” appears, the DVD will turn off soon. Change the battery as soon as possible.
• The playing time is affected by environmental temperature and conditions.
The playing time becomes very short in a cold environment. The continuous playing times in the
operating instructions are measured using a fully charged battery pack at 77°F(25°C).
As the environmental temperature and conditions may differ when you actually use the DVD, the
remaining battery time may not be the same as the approximate continuous playing time given in
these instructions.
NOTE:
• When the operation time is noticeably shorter than normal, it is time to buy a new battery.
- 20 -
Page 22

Using the battery pack
Important!
• When inserting the battery pack, make sure that it is inserted correctly.
Otherwise, your DVD player may malfunction.
Charging the battery pack
Use the AC adapter (included) to charge the battery pack.
1. Connect the DC cord to the DC IN jack on the side of the DVD player ( ).
2. Plug the other end of the AC cord into an AC outlet ( ).
2
1
Power Charge Lamp
-Red LED will light while changing.
-When the battery pack is fully charged, LED will change to green and remain green.
To install the battery pack, locate the battery
pack back alignment lugs in the holes in the
back of Portable DVD Player (1) and gently
slide the battery pack until it clicks into place
(2) (see below).
To remove the battery pack, slide the
release button on the left of the
battery pack to the rear and hold while
gently sliding the battery pack in the
opposite direction to installation.
- 21 -
Page 23

Playing a Disc
Before Play
Press the POWER button.
When the slide AV IN/OUT switch to IN, the TFT display will be show “AV INPUT”.
When to playing in main unit mode, must take out AV INPUT cable cord. Otherwise,
you can hear there signal from external connect unit (when this unit is working).
Play
1.Press the OPEN button to open the disc lid.
• The disc lid opens up to around a 75-degree angle.
Do not attempt to open the lid to an angle beyond this range. The lid may be damaged.
2.Place a disc gently into the tray.
• You should hear and feel the disc snap firmly into place.
Caution
• Place a disc into the tray with the disc’s label facing up.
3.Close the disc lid and then press the part marked “PUSH” until it clicks shut.
4.Stopping Play
• Press the STOP ( ) button during play.
5.Pausing Play
Press the PAUSE ( ) button on the remote during play.
- Screen stops, no sound.
- To resume, press PLAY ( ) button once again.
- 22 -
Page 24

Playing a Disc
6.Step Motion Play
Press the PAUSE ( )button on the remote during play.
- Each time the button is pressed, a new frame will appear.
- No sound is heard during STEP mode.
- Press PLAY ( ) to resume normal play.
(You can only perform step motion play in the forward direction.)
NOTE: Some discs have no this function.
7.Slow Motion Play
Press the button on the remote during playback mode. By pressing the button, you can
select slow motion play for 1/ , 1/4 , 1/6 or 1/7 of normal speed.
- No sound is heard during slow mode.
- Press PLAY ( ) to resume normal play.
NOTE:
Some discs including MP3 disc have no such function.
Reverse slow motion play will not work.
2
RESUME function
When you stop the disc playing, the player can remembers where you stopped, so when you
press PLAY ( ) again, it will resume where you stopped. (unless the disc is removed or the
player is unplugged, or if you pressed the STOP ( ) button twice.)
Important!
• Make sure that the disc is correctly placed. Otherwise, the disc and/or the DVD player may be
damaged.
• If the disc is placed upside down in the disc tray or the region number of the DVD is not
supported, No Disc will appear on the screen.
NOTE:
• This icon indicates an invalid button press.
• Do not remove the disc until it is completely stopped.
• Press the POWER button for 1 second to power off.
- 23 -
Page 25

Using the Search & Skip Functions
During play, you can search quickly through a chapter or track or use the skip function to jump to the
next selection.
Fast Forward or Fast Backward
Press ( / ) button on the remote control during playback, the disc will be played in a status
of forward or reverse correspondingly. Forward or Reverse speed is relatively slow at first.
When press again, the speed becomes faster. The more times that you press the buttons, the
Faster forward or Reverse speed will be. There are 4 levels of speed available: x2,x4,x8 and x20.
To return to normal play, press PLAY button on the player or the remote control.
Searching through a Chapter or Track
During play, press the NEXT SKIP ( ) or BACK SKIP ( ) button.
• When playing a DVD, if you press the NEXT SKIP button, it moves to the next chapter.
If you press the BACK SKIP button, it moves to the previous chapter.
• When playing a CD, if you press the NEXT SKIP button, it moves to the next track.
If you press the BACK SKIP button, it moves to the previous track
Using the Zoom Button
Press ZOOM button on the remote control or portable during play or pause to zoom up the
current picture. There are 4 levels of zoom available (Q1, Q2, Q3, Q4).
When playing the picture CD, there are 6 levels of zoom available (Q1/4, Q1/2, Q4/3,
Q3/2, Q7/4,Q2).
This function depends on the disc type and its contents.
Using the Repeat A-B Function
Press A-B button during playback at the point where repeat play is to commence (A) then press
again at the point where repeat play is to be concluded (B). Repeat playback between point (A)
and point (B) starts. Press A-B button once more where LCD appears PRE OFF to return
to normal play.
- 24 -
Page 26

Using the Function Menu
Using the SUBTITLE Button
Press SUBTITLE button on remote control during playback.
Subtitle:
Subtitle:
appear that represents how many kind of language being selected.
Subtitle:
Note: This function is valid only for DVD discs with subtitle function. It is invalid for DVD disc with single
subtitle function.
Using the AUDIO Button
Some DVD disc contain audio commentaries and the audio track in different languages.
To access the different audio tracks, press the AUDIO button repeatedly
Note: See the DVD disc cover for a list of commentaries/audio language tracks.
When playing VCD, press the AUDIO key to choose one of the audio output states (L, R and Stereo).
[1] will be displayed on LCD monitor that means a kind of language. Press once more.
[2] appeared on LCD monitor means another kind of language and accordingly subtitles
[OFF] appears that goggle subtitle.
Using the ANGLE Button
Some Portable DVD player movies are filmed from various angles, which are included on the
DVD disc . Press the ANGLE button to cycle through the available angles.
Note: The function can only be used for discs on which scenes shot from multiple angle have been
recorded.
Using the SEARCH Button
In the play, you press SEARCH button on the remote control. You can search the disc
based on its structure/title/chapter/track as shown in the figure. Press SEARCH button,
a search menu will display. Use UP or DOWN button to select the search time/title/track/
chapter. The selected will be shown in highlight. Use number button to select the search
time/title/track/chapter, and press ENTER button to play. For example:
• Time search: To search 16 min 50 secretary: input 1,6,5 and 0.
To search 1 hr 14 min: input 1,1,4,0,0.
• Title /chapter search: To search title 1/ chapter 2: input 1 in the highlight title column,
move the cursor right to the highlight area and input 2.
Press CLEAR button to clear wrong input and proceed re-input when you input wrong.
Note:
• For some DVD discs which cannot be searched, invalid will be appear on TV screen.
• Input the time, track of the disc to search.
• Note: When play VCD 2.0 the PBC mode is ON.
- 25 -
Page 27

Using the Function Menu
Using the PROGRAM Button
The program function can be used to play your selected tracks(CD/VCD/MP3)or chapter
(DVD)in the order you desire. setp the disc and press the PORGRAMM button. The menu
will be display on TV screen.
Important:
Input the title numbers first and then the chapter numbers. Then press the DOWN button
of the direction buttons ( )to move cursor to another position and the same
procedure to set your preferred track or chapter. Use CLEAR button setting. Move the
cursor to CLEAR ALL and press ENTER button to clear all the entered digits. Move the
cursor to play program and press ENTER button to start playing the tracks or chapters that
you have set. Press the PROGRAM button directly to quit the program setting screen, then
press PLAY to return back to the normal play mode.
In this case, the program is not confirmed but entered tracks/chapters number will still be
saved in the program until the disc is taken out or the unit is turned off.
///
Using the Bookmark Function (DVD)
The Bookmark function lets you select parts of a DVD so that you can quickly find the section at
a later time.
1. During play, press the SEARCH button twice on the remote.
The Bookmark icons will be displayed.
Bookmark 1 --:--:-Bookmark 2 --:--:-Bookmark 3 --:--:--
2. Use the UP/DOWN buttons to move to the desired bookmark icon.
3. When you reach the scene you want to mark, press the ENTER button.
The icon will change to a number (1, 2, or 3).
4. Press the SEARCH button to turn off the display.
Note: MP3,MP4 are not applied this function.
Recalling a Marked Scene
1. During play, press the SEARCH button twiceon the remote.
2. Use the UP/DOWN buttons to select a marked scene.
3. Press the PLAY ( ) button to skip to the marked scene.
- 26 -
Page 28

Using the Function Menu
Clearing a Bookmark
1. During play, press the SEARCH button twice on the remote.
2. Use the UP/DOWN buttons to select the bookmark number you want to delete.
3. Press the CLEAR button to delete a bookmark number.
Press the SEARCH button to turn off display.
NOTE:
• Up to three scenes may be marked at a time.
• Depending on the disc, the Bookmark function may not work.
Using the MUTE Button
Press MUTE button during play, the player shows mute ( )and there is no audio output
(silence), press again to cancel MUTE.
Using the OSD Button
Press OSD button during play to show the disc’s relevant information on LCD screen
(such as playing time, total time, chapter number, playback status.)
Using the REPEAT Function
1. DVD
The repeat function will replay a specific chapter or title.
To repeat a chapter, press theREPEAT button once.’Repeat chapter’ will be displayed
on the LCD. The current chapter will be repeated when the end of the chapter is reached.
To repeat the title, press the REPEAT button twice. ‘Repeat title ’ will be display on the
LCD. The current title will be repeated from the beginning when the end of the title is
reached.
- 27 -
Page 29

Using the Function Menu
2. CD,VCD,MP3
To Repeat a Track
Use the skip button to commence playing the required track. Press the REPEAT button.
‘Repeat single’ will be briefly displayed on the LCD. The track will be repeated when the
end of the track is reached.
To Repeat All Track
Start playback and press REPEAT button twice. ‘Repeat All’ will be briefly displayed on
the LCD. The CD will return to the first track once the last track has finished playing.
Note: When play VCD 2.0, the PBC mode is OFF.
Using the MENU Button
Press MENU button on remote control when playing a disc, a list of titles on the disc
(depends on discs) will be displayed on LCD monitor. Use the direction or number button
to select your preferred items then press ENTER button to play as selected.
Using the PBC Button(Only VCD 2.0)
When playing VCD 2.0 press PBC button to display title menu use number key choice
and ENTER button to play music.
Note: Please refer to following pages for the detailed items and parameters in the setup
interface.
Using the RETURN Button(Only VCD)
For VCD 2.0, PBC m . Press RETURN button, it will return to menu
mode.
ode is available
Using the VOL Button
Press VOL+/- button to adjust the volume level for audio output.
- 28 -
Page 30

Using the Function Menu
Using the CLEAR Button
Setting program or searching requires an input number. Press CLEAR button to clear
the number when the input number is wrong.
Using the Number(0~9,10+) Button
By pressing the number(0~9) button, you can access directly to the desired track or
chapters while a disc is played. For track or chapter over 10, press (+10) and then (0-9)
button.
Using the LCD Button
Press LCD button on the panel, you can adjust the Brightness/Contrast/Color of video
with this setting to a desired level.
1. Brightness setting:
Press LCD button, the brightness information shows on the screen.
Use left( ) or right( ) buttons on the panel to choose the preferred brightness setting,
and then the panel will change to the selected setting.
2. Contrast setting:
Press LCD button second, the c information shows on the screen.
Use left( ) or right( ) buttons on the panel to choose the preferred contrast setting,
and then the panel will change to the selected setting.
3. color setting:
Press LCD button third, the information shows on the screen.
Use left( ) or right( ) buttons on the panel to choose the preferred color setting, and
then the panel will change to the selected setting.
To finish the setup operation
Press LCD again until the LCD setting information disappears.
ontrast
color
- 29 -
Page 31

MENU
LANGUAGE
SUBMENU OPTIONS DESCRIPTION
OSD Menu
Subtitle
Audio
English
English
Auto
Off
English
English On Screen Display
English Subtitle
Automatically Display Subtitle
Turn off the Subtitle
English audio language
VIDEO
AUDIO
DVD menu
External Subtitle
(MPEG4)
TV shape
TV System
View Mode
( )MPEG4
DIGITAL OUT
PASSWORD
English
English
Wester Europe
Center Europe
4:3
16:9
NTSC
PAL
Auto
FILL
Original
H FIT
W FIT
Fit to Screen
Pan Scan
PCM
RAW
Off
-----
Kid safe
English DVD menu
English subtitleMPEG4
Wester Europe subtitle MPEG4
Center Europe subtitle MPEG4
Set TV screen at 4:3
Set TV at screen 16:9
Output signal as NTSC
Output signal as PAL
Output signal as per default of disc
The picture fill the screen( distortion)
Default mode
Picture in high scan
Picture in wide scan
The picture fill the screen but cut the top &
bottom portion.
It is used for most normal television
broadcasts and it is the default setting.
Output AC 3 signal in PCM
Output raw AC 3 signal
Turn off digital output
Input number by users and confirmed by
ENTER button
Suitable for all ages.
RATING
RATING
Load factory
G
PG
PG-13
PG-R
R
NC-17
Adult
Reset
Suitable for general audiences.
Parental guidance recommended.
Parental guidance recommended. Unsuitable
for children under 13.
Restricted. unsuitable for young viewers.
Parental guidance recommended.
Restricted. Unsuitable for young viewers.
Adult theme or content. Unsuitable for
children under 17.
Adult content.
Return to Factory Setup
- 30 -
Page 32

Using the Setup Menu
General principles
The fully expanded menu for each of the items that you can set are shown on the follow
-ing pages.
Navigate to the item of interest with reference to the menu structure shown opposite,
and the appropriate menu in the following pages.
After making your selection (highlight the item) press theENTER key to set this selection.
Setup Start page
Language Video Audio Rating
When you enter the Setup mode the Setup start
page will be displayed. There are four categories:
Language, Video, Audio and Rating. Each has
one or more parameters to select from.
The currently selected(highlighted) category has
a lighter background. In the example shown,
Language is selected.
The first Setup menu to be described (OSD Menu)
will contain all stages of the setup procedure.
Refer to this when setting up any of the following
parameters.
Setup the Language menu
On Screen Display (OSD) Menu
The OSD language is the language used to display the on-screen information during
setup and in play mode. The default language is English.
The on-screen display language can be set to one of the seven options shown right .
As soon as a language is selected the menu will immediately change to that language.
• Use the CURSOR-LEFT and CURSOR-RIGHT buttons to highlight Language on the
Start page
• Press the ENTER button.
• The OSD current language is highlighted as shown.
• Press the ENTER button.
• The list of available languages is displayed.
Note that the available languages may be
different to those listed on the accompanying
illustration.
• Use the cursor up/down buttons to highlight
the desired language.
• Press the ENTER button.
• The selected language is used on screen.
• Press SETUP if you wish to exit Setup.
Language Video Audio Rating
OSD Menu
Subtitle
Audio
DVD Menu
Ext-Subtitle
English
English
English
English
English
English
- 31 -
Page 33

Using the Setup Menu
Subtitle
This is the language to be used to display subtitles
when they are turned on.
The subtitle language setup is very similar to the
procedure just described for the OSD Menu.
• Carry out the first three stages of the OSD
language procedure.
• Press the cursor-down button until the current
Subtitle language is highlighted.
• Follow the OSD language procedure as described
previously.
Select Off in the language list to disable subtitles (or On to enable them).
Select Auto to display subtitles if they are supplied on the disc being played.
Language Video Audio Rating
OSD Menu
Subtitle
Audio
DVD Menu
Ext-Subtitle
Language Video Audio Rating
English
English
English
English
English
English
Auto
Off
Audio
This allows you to set the language to be used to
play the DVD soundtrack (if the language is
supported on the DVD by the DVD creator).
Refer to the previous procedures and the Audio
language setup menu.
DVD Menu
This allows you to set the language to be used to
display the DVD program Menu (if the language
is supported on the DVD by the DVD producer).
Refer to the previous procedures and the DVD
Menu setup menu
OSD Menu
Subtitle
Audio
DVD Menu
Ext-Subtitle
Language Video Audio Rating
OSD Menu
Subtitle
Audio
DVD Menu
Ext-Subtitle
English
English
English
English
English
English
English
English
English
English
English
English
External Subtitle
This allows you to set the language to be used to
display the MPEG4 program Menu.
Refer to the previous procedures and the
External subtitle setup menu.
- 32 -
Language Video Audio Rating
OSD Menu
Subtitle
Audio
DVD Menu
Ext-Subtitle
English
English
English
English
English
English
Wester Europe
Center Europe
Page 34

Using the Setup Menu
Setup the Video menu
The Video function allows you to set up the DVD
according to the requirements and capabilities of
your TV set. The default language is16:9.
Language Audio RatingVideo
TV Shape
DVDs are designed to provide a variety of screen
aspect ratios.
TV shape
TV System
View Mode
Picture CD View
16:9
PAL
Original
Original
4:3
16:9
This menu enables you to select one of the two
aspect ratios:
• 4:3
• 16:9 (widescreen TV)
Select the most appropriate aspect ratio for the DVD being viewed.
4:3
4:3 is used for most normal television broadcasts and it is the default setting.
It has an aspect ratio of 4:3.
16:9
Choose this setting if you have a wide screen television.
Note: Depending on the aspect ratio of the DVD disc, e.g. 2.35:1, the movie may
still show black lines around the edge of the picture.This is normal and not a fault
with the DVD Player.
TV System
Unless you are familiar with the various forms of video signals, we recommend that you
keep the DVD player at its default setting ofPAL . The options are only briefly described
below.
This menu enables you to set the picture format
for your television.
The options available are:
• AUTO
• NTSC
• PAL
Select the video setting to suit.
Auto
This setting can be used if your television is capable of receiving both
PAL and NTSC formats.
NTSC
NTSC is the format is in USA.
PAL
PAL is the format used in the UK.
Language Audio RatingVideo
TV shape
TV System
View Mode
Picture CD View
16:9
PAL
Original
Original
PAL
NTSC
Auto
- 33 -
Page 35

Using the Setup Menu
Note: If NTSC is selected with a non-compatible television you may experience interference
or picture scrolling.
View Mode
Language Audio RatingVideo
This menu allows you to set the screen format of
the view mode.
The operation available are:
TV shape
TV System
View Mode
Picture CD View
FILL
The picture fill the screen( distortion)
Original
Default mode
H FIT
Picture in high scan
W FIT
Picture in wide scan
Fit to Screen
The picture fill the screen but not see the above and below(principal part largen)
Pan Scan
It is used for most normal television broadcasts and it is the default setting.
16:9
PAL
Fit to Screen
Original
FILL
Original
H FIT
W FIT
Fit to Screen
Pan Scan
Picture CD View
This menu allows you to set the picture format of
the picture CD view.
Original
Default mode
Fit to Screen
The picture fill the screen
Language Audio RatingVideo
TV shape
TV System
View Mode
Picture CD View
16:9
PAL
Original
Original
Original
Fit to Screen
- 34 -
Page 36

Using the Setup Menu
Setup the Audio menu
This menu allows you to set the format of the Digital Out signal.
This is the signal from the black
Language Video Rating Audio
RCA connector on the rear panel
of the DVD and labelled Coaxial.
There are two output options,
plus coaxial output off:
• PCM
Digital out
RAW
Off
PCM
RAW
Off
• RAW
• Off
PCM
Use the PCM setting when you have connected yourCoaxial digital output to the
Coaxial digital input on a receiver/amplifier that does not have Dolby Digital decoding.
Raw
Use the RAW setting when you have connected your Coaxial digital output to the
Coaxial digital input of an amplifier that has Dolby Digital decoding.
Setup the Rating menu
This facility enables you to set the following:
• Password
• Rating (of content)
• Restore factory settings (Load Factory)
Password
This menu enables you to change the Rating level after you enter a valid
four-digit password. By default, there is no password set.
• To set a password, use the
CURSOR buttons to highlight
Password on the Start Setup page.
• Press the ENTER button.
• The password change menu will be displayed
Language Video Audio Rating
Password
Rating
Load factory
----
8. Adult
Reset
with the password field selected as shown.
Note the unlocked‘padlock’ symbol alongside
the password field.
• Use the numeric buttons (0 - 9) to enter a memorable 4-digit
number. For security reasons, arrows appear instead of the entered numbers.
• The padlock symbol will appear locked.
- 35 -
Page 37

Using the Setup Menu
Rating
The Rating level can only be altered by entering a valid password as described above.
The Rating function allows you to control the content that is played on the player. It is
used to set a level above which DVDs with a higher rating will not play on this player.
Example. If you set a level of ‘PG 13’, any DVDs rated ‘PG R’ and above will not play.
There are eight rating levels as shown in the Rating setup menu.
A rating list is not displayed as with the other setup menus, instead the field scrolls
through the list shown with each press of theENTER button.
Note: If the password is ‘locked’ you cannot access the Rating field
To set a new Rating level:
• Use the cursor buttons to highlight the
Rating field.
• Repeatedly press theENTER button until
the required rating appears in the field.
• Move the cursor buttons to highlight the
Password field.
• Key in your password and press ENTER to
prevent access to the rating level.
The padlock will appear locked.
Language Video Audio Rating
Password
Rating
Load factory
----
8. Adult
Reset
1. Kid Safe
2. G
3. PG
4. PG-13
5. PG-R
6. R
7. NC-17
8. Adult
Load Factory (Reset)
This menu enables you to reset the functions of
the DVD player to the initial factory settings.
Note: It does not, however, reset either the
password or the parental control level.
• Use the cursor buttons to highlight the Reset
field.
• Press the ENTER button.
• The screen clears and the DVD screensaver is
displayed.
If there is a disc in the player, it will play if allowed by the set rating level.
Language Video Audio Rating
Password
Rating
Load factory
----
8. Adult
Reset
- 36 -
Page 38

Cautionary Notes
Cautions on Using the Player
• Avoid magnetic environments.
Using the player under strong fluorescent lighting, in a car, near a TV or magnetic object
may deteriorate recorded images.
• Be sure to remove the disc, turn off the player, and remove the battery pack after use.
• If used near a broadcast station or power transmission tower, the video may become
distorted due to interference.
• Do not drop the player or subject it to strong vibration or shock.
• Do not place the player near a lamp.
Heat from the incandesent light bulbs may cause deformation or malfunction.
• Always observe the rules regulating the use of electrical devices on airplanes.
• Do not expose this product to high temperature and humidity.
This product can be operated within temperature range of 50°F~86°F and humidity
range of 30%~80%.
Do not expose this product to direct sunlight or in a car with its windows closed.
Doing so may result in deformation of casing and circuitry as well as cause fire or
bodily injury.
• Do not let water, sand, dust, or other foreign objects in the player. Avoid using or
storing the player in a place where there is smoke, steam, or moisture.
Doing so may cause malfunction or mold on the pick-up lens. Keep the player in a well
-ventilated area.
• When using the player in cold environments, the color LCD screen may not be
visible immediately after the power is turned on.
This is not a malfunction. Do not operate the player in temperatures below 50°F.
• Be especially careful not to scratch the pick-up lens during loading/unloading of
the disc, or cleaning.
Doing so may result in malfunction.
- 37 -
Page 39

Cautionary Notes
When Moving the Player
• Be sure to remove the disc from the player before packing for moving.
It is recommended that you also remove the disc from the player and turn off the power
when not using the player.
Saving Power
• It is recommended that you turn off the power to the DVD player when not in use.
If you are not going to use it for prolonged period of time, unplug the power cord
from the wall outlet.
Maintenance of LCD Screen
• To keep the screen clean, turn off the power and then wipe with a soft cloth.
Cautions on Using Battery pack
Danger!
Always follow the safety information below when using the battery pack. Otherwise, a
short circuit, overheating, smoke, fire, or damage to the product may result.
1. Never disassemble or modify the battery pack in any way. Do not touch the terminal of
the battery pack with a metal object.
2. Do not let any metal object inside the battery pack.
3. Do not place the battery pack in direct sunlight, dashboard of a vehicle, or high
temperature.
4. Do not expose the battery pack to water, fire, or heat.
5. Always use the included AC adapter when charging the battery pack.
6. This battery pack is designed exclusively for your portable DVD player. Do not use it
with other devices.
- 38 -
Page 40

Troubleshooting
If your DVD player does not seem to be functioning properly, check the items below before you contact
an authorized service center.
Symptom
Power does not turn on or
suddenly turn off.
Battery pack is in place but
the power does not turn on
or suddenly turns off
Remote control does
not work
Check
• Make sure the AC power cord is securely plugged into an AC outlet.
• Turn the power off and then back on.
• Check that the battery pack is charged. If not, recharge it.
• Check that the battery is inserted in the “+” and “-” direction properly.
• The batteries may be dead. Replace them with new batteries.
• Check that the signal transmission is directed at the remote control sensor
on the DVD player.
• Remove the obstacle between the remote control unit and remote control
sensor.
• Check that the video and audio cables are securely connected.
• Check that the disc is a DVD (region number 1 or all), DVD-RW, AUDIO CD.
No picture or sound
No picture
No sound
No picture and sound
Distorted video or sound
While in the input mode,
no picture is output from
the external component
to the DVD player
• Do not use a disc that has scratches or dirt.
• Check that the label-side of the disc is facing up.
• The pick-up lens of the DVD player may be dirty. Contact the service center
for lens cleaning.
• Check that the TV channel is set to VIDEO or AV if viewing with a TV.
• Check that the LCD display is turned on.
• Check the volume setting. If set to zero, turn up volume level.
• Check that the headphones are plugged into the PHONES jack.
Speakers cannot be used with the headphones.
• Check that the DVD player is in the DVD mode and not in the INPUT mode.
• Use a disc without scratches or dents.
• Check that the video or audio cable is securely connected.
• Check that the DVD player is in the INPUT mode and not in the DVD mode.
- 39 -
Page 41

Troubleshooting
DVD
Battery
pack
operation
Symptom
Video does not appear with an
external component connected to
the DVD player
Battery pack does not charge
Power does not turn on
Power charge lamp does
not light (Battery pack does
not charge)
Check
• Check that the TV is set to VIDEO or AV.
• Check that the video or audio cable is securely connected.
• A hot battery pack may take longer to charge.
Wait until the battery pack is sufficiently cooled down.
• Replace with a fully charged battery pack or use the AC
adapter.
• Replace with a fully charged battery pack or use the AC
adapter.
If the DVD player is overheated and the battery pack’s internal
temperature goes up to a certain level, you will not be able to
charge the battery pack.
In this occurs, remove the battery pack. After the battery pack
has sufficiently cooled down, charging will begin automatically.
• Check that the temperature is within the range of 50°F~86°F.
Battery
pack
operation
Power charge lamp quickly
flashes Green
• Check that the DC cord of the AC adapter is plugged in correctly.
• Remove the DC cord from the battery pack and then re-plug.
If the battery pack is installed, remove the DC cord from the
battery pack before performing above procedure.
• Recharge a different power pack. If the same symptom
occurs, your AC adapter may be defective. If the second
battery pack charges without any problem, your first battery
pack may be defective or needs battery replacement.
- 40-
 Loading...