

Page 1
Page 2

Table of contents
Safety Information
Features
About disc
.................................................................................................................................. 5
.............................................................................................................................. 6
Before operation
Preparations before operation
Front Panel ........................................................................................................................... 10
Rear Panel ............................................................................................................................ 11
Names and Layout of Remote Controls ................................................................................ 12
Connections
Basic operations
Play Discs ............................................................................................................................. 14
Menu
...................................................................................................................................... 15
OSD ...................................................................................................................................... 15
Fast Play ............................................................................................................................... 15
Play/Pause ............................................................................................................................ 16
Select Audio Language ......................................................................................................... 16
Playing a desired scene
To skip scenes in a disc ........................................................................................................ 17
Directly moving to a desired title(DVD) ................................................................................. 17
Playing a disc containing MP3 files ....................................................................................... 18
Repeat Play .......................................................................................................................... 19
Select a Subtitle Language ................................................................................................... 20
Program................................................................................................................................. 21
Search.................................................................................................................................... 22
Setup ..................................................................................................................................... 22
Play discs in various ways
Select Angle .......................................................................................................................... 23
Zoom Play ............................................................................................................................. 23
Function setting
Others
.................................................................................................................................... 30
Troubleshooting .................................................................................................................... 30
Technical Specifications ....................................................................................................... 31
Divx
......................................................................................................................................... 32
................................................................................................................ 2
................................................................................................................... 8
.......................................................................................... 10
......................................................................................................................... 13
................................................................................................................. 14
.................................................................................................... 17
................................................................................................. 23
................................................................................................................... 24
Page 3
Safety Information
Please read the manual carefully before using this BD player, and keep it safe for future
reference.
Warning
TO REDUCE THE RISK OF ELECTRIC SHOCK, DO NOT REMOVE THE COVER (OR
BACK). NO USER - SERVICEABLE PARTS ARE INSIDE. REFER SERVICING TO
QUALIFIED SERVICE PERSONNEL.
Warning
In order to prevent the risk of fire or electric shock, do not expose the machine to rain
or any moisture. Do not open the case of the unit because of the risk of electric shock.
Repair work must be undertaken by qualified personnel.
Caution
If the player is moved from a cold to warm environment condensation may develop on the
lens of the laser. To ensure correct operation switch the unit off and leave it for one hour
before using.
Caution
This BD player has a laser system.
Please note that hazardous radiation leakage may be caused if the player is misused
in anyway. Do not defeat the safety interlocks.
Do not open the case of the player. The laser light will become visible when the case
is opened.
Warning
This player may malfunction if it is modified or repaired by unauthorized persons.
The player shall not be exposed to dripping or splashing and no objects filled with liquids,
such as vases, shall be placed on the product.
Must be shown how can operate the product via the MODE and Vol+ and Vol- button for
the unit complete the function.
CLASS 1 LASER PRODUCT
Page 4
Safety Information
This set has been designed and manufactured to assure
personal safety. Improper use can result in electric shock
or fire hazard. The safeguards incorporated in this unit will
protect you if you observe the following procedures for
installation, use and servicing. This unit is fully transistorize
and does not contain any parts that can be repaired by the
user.
1 READ INSRUCTIONS
All the safety and operating instructions should be
read before operating.
2 RETAIN INSTRUCTIONS
The safety and operating instructions should be
retained for future reference.
3 HEED WARNINGS
All warnings on the unit and in the operating
instructions should be adhered to.
4 FOLLOW INSTRUCTIONS
All operating and use instructions should be followed.
5 CLEANING
Unplug this unit from the wall outlet before cleaning.
Do not use liquid cleaners or aerosol cleaners. Use
a damp cloth for cleaning.
6 ATTACHMENTS/ACCESSORIES
Do not use attachments unless recommended by the
unit’s manufacturer as they may cause hazards.
Caution: Apparatus shall not be exposed to dripping
or splashing and no objects filled with liquids,
such as vases, shall be placed on the appratus.
7 WATER AND MOISTURE
Do not use this unit near water-for example, near a
bath tub, wash bowl, kitchen sink or laundry tub, in
a wet basement, or near a swimming pool.
8 PLACEMENT
Do not place this unit on an unstable cart, stand,
tripod, bracket, or table. The unit may fall, causing
serious injury to a child or adult as well as serious
damage to the unit. Use this
unit only with a cart, stand,
tripod, bracket, or table
recommended by the
manufacturer.
PORTABLE CART WARNING
(symbol provided by
RETAC)
8A
A unit and cart combination
should be moved with care. Quick stops, excessive
sorce, and uneven su rfaces may cause the video
product and cart combination to overturn.
9 VENTILATION
10 POWER SOURCES
11 GROUNDING OR POLARIZATION
12 POWER-CORD PROTECTION
13 LIGHTNING
Page 5
Safety Information
14 DISC TRAY
15 OVERLOADING
16 OBJECT AND LIQUID ENTRY
17 BURDEN
18 DISC
19 SERVICING
20 DAMAGE REQUIRING SERVICE
21 REPLACEMENT PARTS
22 SAFETY CHECK
23 HEAT
Page 6
Features
OUTSTANDING SOUND QUALITY
Dolby Digital system developed by Dolby Laboratories
features high quality surround sound which can be played
in DVD or CD disc at home, to reproduce high quality sound effects.
UNIQUE FUNCTIONS
Multi-angle and multi-language bring unique trick functions.
Parent lock makes it easy to control the content of discs.
SCREEN
Ordinary screen and wide screen (16:9) are available.
COMPATIBILITY
The unit can play DVD-video discs, and is compatible with CD, CD-R, CD-RW,
PIC-CD, MP3 discs also can do DVD-R, DVD+R, DVD-RW, DVD+RW of video
format.
ZOOM
It can enlarge pictures.
MULTI-FUNCTIONS
Fast forward, fast reverse, forward and reverse slow, frame play, repeat play and
program play.
TIME SEARCH
It can search a specific part on a disc, especially good for watching movies.
RESUME PLAY
It can memorize the position where the disc is stopped and resume playback.
VIDEO OUTPUT
Scart (RGB), Composite (Standard video), Component (Y,Pb,Pr), S-video.
AUDIO OUTPUT
Analog audio output, coaxial digital audio output, can be connected with
the approriate amplifier to enjoy high-quality sound effects.
USB
There is a USB port on the player. You can choose among USB and DISC.
Page 7
About Discs
PRINCIPLES FOR WRITING
This manual mainly introduces how to use buttons on the remote control.
You may operate the unit if the buttons to the unit have the same or similar
names as or to those on the remote control.
PLAYAB LE DISCS
DVD-video Regi on number 4
DVD-R/+R DVD video
DVD-RW/+RW DVD video
CD-R/ CD-RW Digital audio/ MP3/ JPEG format files
JPEG/MP3/MPEG4
Each file of JPEG : under 2M
NONE PLAYABLE DISCS
DVD-video
DVD-ROM Files for PC application / Data files
CD-ROM
DVD-RAM
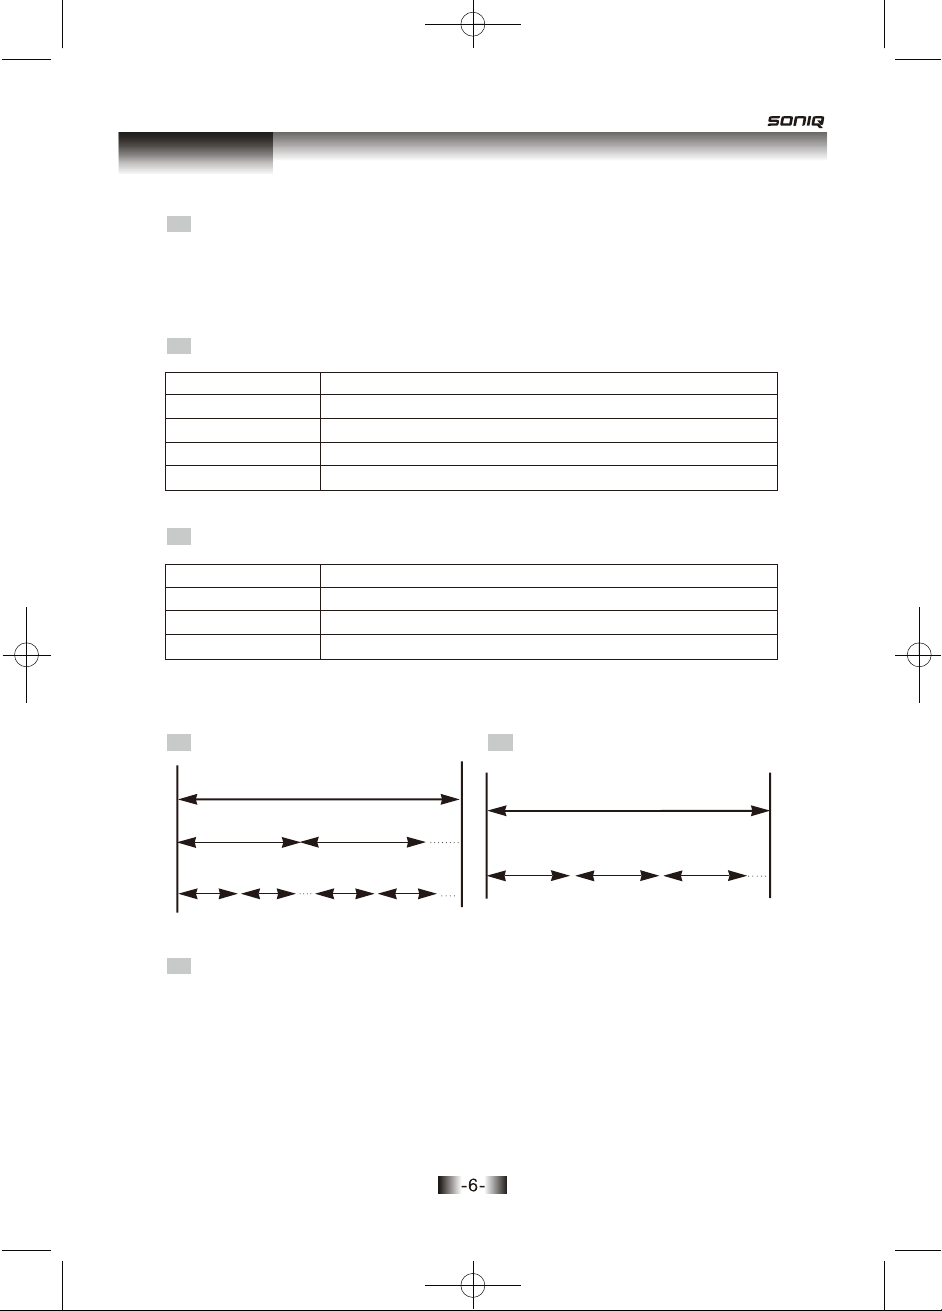
STRUCTURE OF DVD
Different region number
Files for PC application / Data files
All format
DISC
STRUCTURE OF CD
DISC
TITLE
CHAPTER
TRACK
TITLE
The images or music of a DVD are divied into some units, among which title is the
biggest one.
When playing a DVD, the movie is the title.
When playing a CD, the combined tracks make up the title.
Page 8
About Discs
CHAPTER
It is smaller than title among the units of a DVD. A title is made up of several
chapters , and each chapter has a number for search. But some discs may not
have numbered chapters.
TRACK
In a CD, each track has a number to enable search functions.
SCENE
The menu pictures, motion and motionless pictures of a CD can be divided into
some parts, these parts are scenes. Each scene has a number for search.
REGION MANAGEMENT INFORMATION
This unit is designed and manufactured to respond to the Region Management
information that is recorded on a DVD disc. The region number of this player is
“4”. If the region number described on the DVD discs does not correspond to the
Region number of this player, the player will not play this disc. This player will
play DVD discs made for “4” regions. Therefore, this player will play DVD discs
marked with labels containing the region number “4” .
4
(Region 4)
Page 9
Before operation
SCEURITY
• Before operation, check if the voltage of the unit is in line with the local voltage.
• Hold the plug to disconnect it from the mains outlet. Do not pull the power cord.
• When the plug of the unit is connected to the mains outlet, the unit will be still
connected to AC even if the power is turned off.
• Disconnect the plug as soon as liquid or objects enter the unit. The unit can not
be used until being checked by experts.
• Do not open the cabinet as laser rays employed by the unit may damage eyes.
Any servicing should be done by qualified service personnel.
PLACEMENT
• Put the unit where ventilation is good enough to prevent overheating.
• Never put the unit in direct sunlight or near heat sources.
• Put the unit in horizontally, never put any heavy object on the unit.
• To protect the pickup, do not put the unit where there is dust. If there
is dust on the pickup, use a cleaning disc to clean it. Paying particular
attention to the operating instructions of the cleaning disc.
CONDENSATION
Moisture will appear on the pickup lens in the following cases:
• The unit is suddenly moved from a cold place to a warm place.
• The unit is put in a room with a heater, or in cold air from an-conditioner.
• The unit is suddenly moved from a cold place to a warm place.
• Using the unit in a humid place. In these cases, the unit can not work.
Unload the disc and leave the unit on for about one hour to evaporate
the moisture.
CLEANING
• Use a soft cloth with a little neutral detergent to wipe the cabinet, panel and
controls.
Never use abrasive paper, polishing powder, solvent like alcohol or gasoline.
HANDLING DISC
• To keep the disc clean, do not touch the playsides of the disc.
• Do not attach paper or tape to the disc.
• Keep the disc away from direct sunlight or heat sources.
• Store the disc in a disc case after playback.
CLEANING DISC
• Before playback, wipe the disc outward from the centre with clean cloth.
• Do not use any type of solvent such as thinner, benzine, commercially
available cleaners or antistatic spray.
Page 10
Before operation
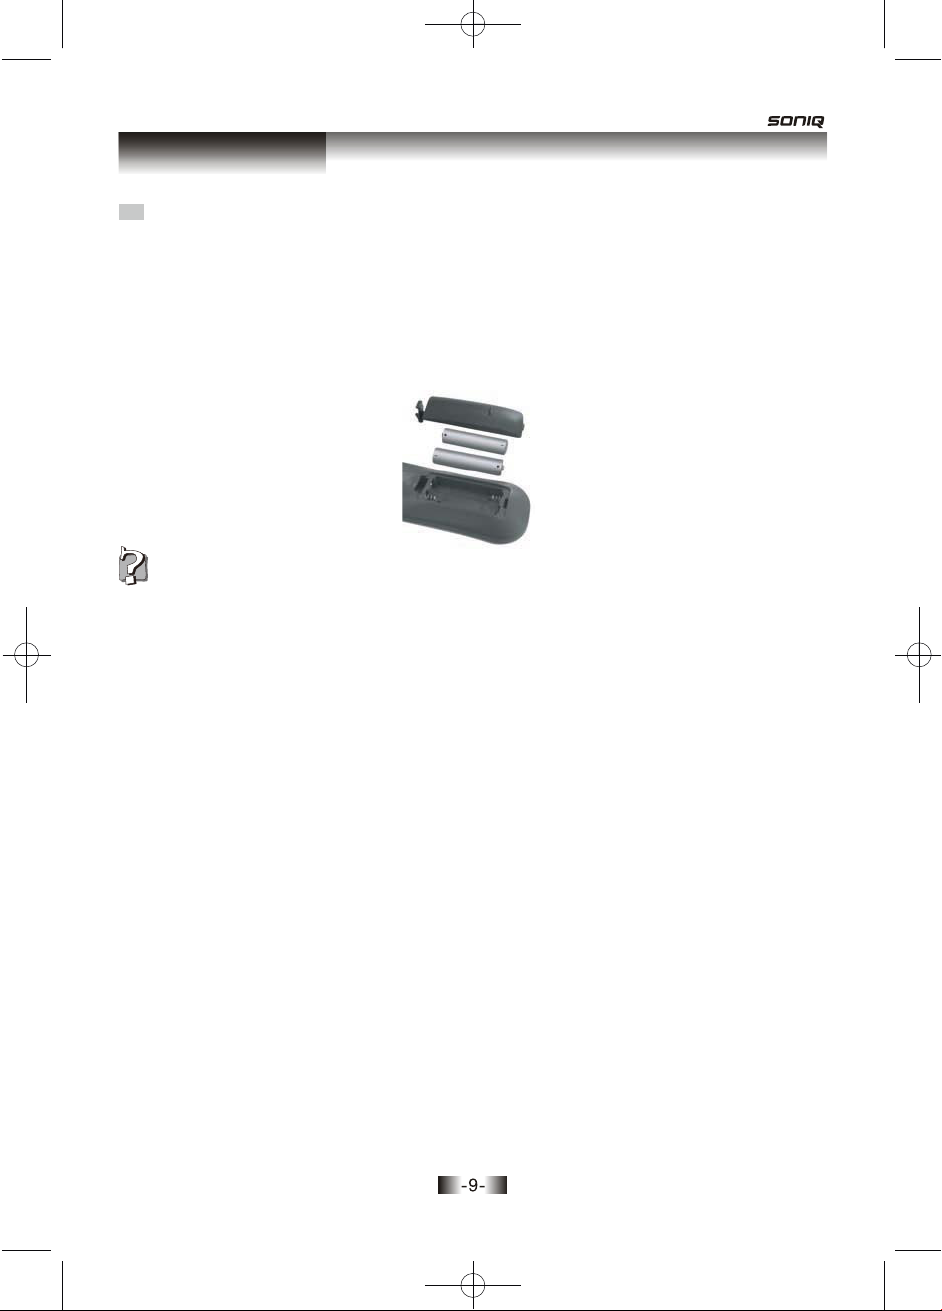
USE REMOTE CONTROL
1 Open the battery compartment.
2 Insert two AAA batteries, make sure to match "+" and "-" of the batteries to
the marks in the battery compartment.
3 Close the battery compartment.
4
Point the remote control at the remote sensor.
Note:
1.Batteries can last for about 6 months generally. Change the batteries if that does not work.
2.If the remote control is not used for a long time, remove the batteries to prevent battery
leakage.
3.-Do not mix old and new batteries.
4.-Do not mix alkaline, standard(carbon-zinc), or rechargeable (ni-cad, ni-mh. etc) batteries.
5.The batteries shall not be exposed to excessive heat such as sunshine, fire or the like.
6.Remove the battery cover on the rear of the remote control and remove the batteries.
These batteries must be disposed of at your local recycling point.
Page 11
Preparations Before Operation
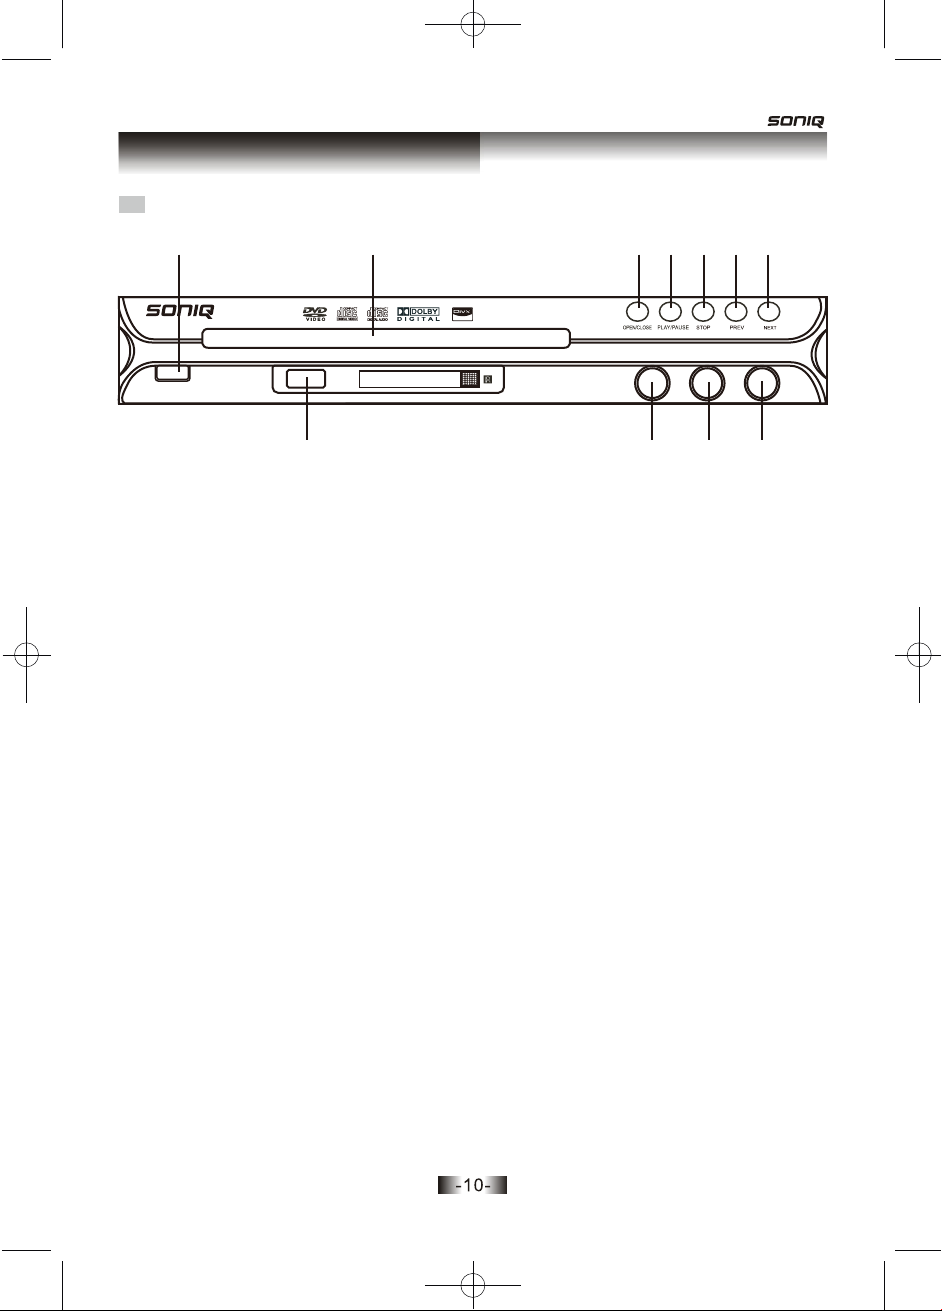
FRONT PANEL
31 2 4 5 6 7
ON/OFF
USB
- MIC VOL + MIC 1 MIC 2
98
10
1. ON/OFF
To switch the unit on or off when connected to AC power outlet.
2. DISC Tray
3. OPEN/CLOSE button
To open or close the disc tray.
4. PLAY/PAUSE
To play the loaded disc. Press this button to go to the preferred item when the
menu is displayed on the TV screen. Press this button again to pause current
playback.
5. STOP
6. PREV
To skip back from the current chapter or track.
7. NEXT
To skip forward to the next chapter or track.
11
8. USB port
9. - MIC VOL +
10. MIC 1
11. MIC 2
Page 12

Preparations Before Operation
REAR PANEL
1 2
3
4 5 6
1. COMPONENT (Y. Pb. Pr)
Connects to TV or monitor equipped with Component input. In order to achieve
a sharper and cleaner picture than when connected via VIDEO OUT (composite
video).
2. VIDEO OUT
Connects composite video signal to input AV or PHONO sockets of TV or monitor
to achieve high fidelity colour reproduction.
3. AUDIO OUT (L/R)
4. DIGITAL AUDIO COAXIAL OUT
Connects digital audio under play mode into an AV amplifier or receiver equipped
with digital audio decoder for you to enjoy the theatre-quality sound in your home.
5. S-VIDEO OUTPUT
Connects to TV or monitor equipped with S-VIDEO input. In order to achieve a
sharper and cleaner picture than when connected via VIDEO OUT (composite
video).
6. POWER Cord Socket
Note: When connect Y、Pb/Pr、Cb/Cr、S-V at the same time, the picture of S-V is partial
dark and the picture of Y、Pb/Pr、Cb/Cr、S-V is partial dark and yellow.
Page 13

Preparations Before Operation
NAMES AND LAYOT OF REMOTE CONTROLS
* After setting the mode by using SETUP menu (for example, NTSC select in NTSC
/PAL/AUTO setup), the setting is kept though you swith the unit off and turn it on.
V-MODE
OPEN/CLOSE
OSD
SUBTITLE
SEARCH
SETUP
ARROW KEYS
REPEAT
ZOOM
STEP
STOP
VOLUME CONTROL
ANGLE
MUTE
V-MODE
OSD
SEARCH
SETUP MENU
ZOOM REPEAT A-B RPT PROG
STEP
MUTE AUDIO
SUBTITLE
ENTER
ANGLE
TITLE
10+
USB
POWER
TITLE
NUMERIC BUTTONS
USB
MENU
ENTER
PROGRAM
A-B REPEAT
PLAY/PAUSE
FAST BACKWARD
FAST FORWARD
NEXT
PREVIOUS
AUDIO
Page 14

Connections
Turn off all equipments before operation.
The unit has many kinds of output modes like A/V output, S-VIDEO output and digital signal
output (COAXIAL). You may select as you need.
CONNECTED TO A TV AND AN AUDIO AMPLIFIER
Pb
Amplifier
TV
Manufactured under license from Dolby Laboratories."Dolby" and the double-D
symbol are trademarks of Dolby Laboratories. Confidential Unpublished works.
©1992-1997 Dolby Laboratories, Inc. All rights reserved.
"DTS" and "DTS Digital Out" are trademarks of Digital Theater Systems, Inc.
2 Speakers
Page 15

Basic Operatiions
PLAY DISCS
Press “ON/OFF” button on the TV and audio
1
system, Press “TV/VIDEO” button on the TV,
select VIDEO mode (TV).
Select S-VIDEO mode if using an S-VIDEO
connection.
Note:
N
The Step2 can be
cancelled if you
do not
connect it to the
amplifier.
Select the correct audio input on the amplifier.
2
• Each amplifier is different from another,
please refer to the manual for the amplifier.
(e.g.,connect the audio output of the DVD
player to the DVD audio input of an amplifier.)
Press “ON/OFF” button on the front panel to turn the unit on.
3
Press “OPEN/CLOSE” button to open the disc tray and insert the
4
disc with its label upward. Press “OPEN/CLOSE” button again to close
the disc tray. The unit begins to read the disc. The TV screen shows
the DVD menu and title menu.
TV/VIDEO
DVD/LD
• When playing a DVD, DVD menus and titles are displayed on TV
screen.
• In the case of CD, the disc plays in order of its track number.
Stop playback.
5
Press .
Press OPEN/CLOSE to remove the disc.
6
Page 16

Basic Operations
MENU
During DVD playback,press this button, the unit will directly back
to root menu.
OSD
During the playback,Press the OSD to show disc information, such as
disc type, total chapter, current play chapter and so on.
FAST PLAY
When playing disc, you may play it forward fast or reverse it fast to find
what you need.
Note:
PressPLAY toplay
normallywhen
playing
fast
.
Note:
ThemarkedFAS
PLAYspeedon
owner’smanual
andrealfastplay
anb
c
ferent
ngon
i
cyou
e
speed
dif
depend
whichdis
play.
1
time you press the button, the speed of
picture changes like the right sides.
T
2
Press to play forward fast. Each
Press to reverse the disc fast.
Each time you press the button, the
speed of picture changes like the
right sides.
OSD
1
FORWARD
FORWARD
2
3
FORWARD
4
FORWARD
5
PLAY
1
BACKWARD
BACKWARD
2
3
BACKWARD
4
BACKWARD
5
PLAY
X2
X4
X8
X20
X2
X4
X8
X20
15
Page 17

Basic Operations
PLAY/PAUSE
Note:
N
Press PLAY to
ay normally.
pl
Press the “PLAY/PAUSE” button during playback to pause playback.
SELECT AUDIO LANGUAGE
When playing a multi-language DVD, you can choose which language
to playback in.
Press the “AUDIO”button,
then select the language
you would like for playback.
2CHIN 2CH
AUDIO
Note:
N
1. Different discs have different languages.
2. You can press the “AUDIO” button to choose the language
you want when playing multi-language DVD discs.
Attention:
Please select the AUDIO language in the SETUP menu to keep the
setting!!!
rted
You can choose among USB, DISC by pressing
•Select the USB item, you can enjoy the media files in the
USB device.
USB
16
Page 18

Playing a desired scene
TO SKIP SCENES ON A DISC
Press to move to the next chapter (or track).
1
The current chapter (or track) moves to the next chapter (or track).
Press to move to previous chapter (or track).
2
The current chapter (or track) moves to the previous chapter (or
track) or the first scene of the
DIRECTLY MOVING TO A DESIRED TITLE (DVD)
some movie discs may contain multiple titles. If the disc has a movie title
menu recorded on it, the “TITLE” button can be used to select the movie
title. Details of operation may differ depending on the disc used.
Press the “TITLE”
1
A list of the titles on the disc is displayed.
Note:
N
You can selec
directlybyusin
the
t
e
g
Press the “ENTER” button after pressing the “ ” or number
2
buttons to select the desired title.
s.
The selected title now starts playing.
current chapter (or track).
17
Page 19

Playing a desired scene
PLAYING A DISC CONTAINING MP3 FILES
When a MP3 disc is loaded, the MP3
1
menu screen is displayed
automatically depending on the MP3
disc’s folder structure.
▲
▲
Using the “ ”
2
the folder you want to play (from the screen on the left), then
press the “ ENTER ” button.
This button allows you to see the file lists under the folder.
Using the
3
button and playback will start automatically. If you know the MP3 file number,
enter the MP3 file number using the numeric buttons on the remote
control
▲
“ ”
▲
.
▲
buttons to select
▲
▲
buttons to select an MP3 file. Press the “ ENTER ”
▲
▲
▲
Press on the remote control to choose the next file. Press
4
the remote control to choose the previous file.
If you know the MP3 file number, enter the MP3 file number using the
numeric buttons on the remote control
.
18
▲
▲
on
Page 20

Playing a Desired Scene
REPEAT PLAY
When play a disc, this function can be used to repeatedly
play a title, chapter or disc.
Note:
N
For the case of
VCD disc, repeat
playback starts
only in PBC OFF
mode.
Press “REPEAT” button, the screen shows orderly.
- DVD -
REPEAT : [CHAPTER]
REPEAT : [TITLE]
REPEAT: [ALL]
REPEAT : [OFF]
•Chapters : Current chapter will play repeatedly.
•Titles : Current title will play repeatedly.
ALL: The unit will repeat playback all contents.
•
• 1 : Current single will play repeatedly.
• OFF : Repeat playback will be cancelled.
REPEAT
- VCD-
REPEAT : [1]
REPEAT : [ALL]
REPEAT : [OFF]
19
Page 21

Playing a Desired Scene
SELECT A SUBTITLE LANGUAGE
When play a multi-subtitle DVD, you may select one subtitle to show it on the
screen.
Note:
1
N
1. For some discs,
subtitles cannot
be removed.
2. The subtitle function
is disc-dependent;
check the disc’s
box for subtitle
availability.
2
Keep pressing [SUBTITLE] button till
the user’s preferred language
appears.
If a DVD contains subtitle data,
pressing the [SUBTITLE] button
repeatedly switches between th
available subtitle languages.
To stop displaying subtitles:
Press SUBTITLE button until the screen shows "Subtitle Off".
e
---
[ 1 CHINESE]
SUBTITLE
20
Page 22

Playing a desired scene
PROGRAM
The function can be used to play selected chapter and titles in a desired sequences.
Press the PROG button when playing DVD, the following menu will appear as:
C C C
T T T
1 - -: - 2 - -: - -
3 - -: - -
4 - -: - -
PROGRAM
5 - -: - 6 - -: - -
7 - -: - -
8 - -: - -
9 - -: - 10
- -: - -
11
- -: - -
- -: - -
12
PL AY CL EAR
C
T
13 -- : -14
- -: - -
15
- -: - -
- -: - -
16
Press the PROG button when playing VCD/MP3/CD. the following menu will
appear as:
1 - -- -
2 - -- 3 - -- -
4 - -- -
PROGRAM
5 - -- 6 - -- -
7 - -- 8 - -- -
9 - - -10 - - --
11 - - --
12 - - --
PL AY CLE AR
13 -- - 14 - - --
15 - - --
16 - - --
Use the UP /DOWN button to highlight the desired title then use numeric buttons to
input the title what you want to play.
To play selected chapters, use the LEFT/RIGHT key to select the PLAY and press
PLAY button to start sequence playback.
To remove selections from the program list, highlight and select “Clear” to delete the
selected chapters.
21
Page 23

Playing a Desired Scene
SEARCH
For VCD/CD: During playback, press the "SEARCH" button to display the following
menu:
VCD:
CD:
Use the "LEFT/RIGHT" navigation buttons to select the 'track/ti
buttons, input the 'track/time' you want to play.
For DVD: During playback, press the "SEARCH" button to display the following menu:
DVD:
Use the "LEFT/RIGHT" navigation buttons to select the 'title/chapter/time'. Using the
numeric buttons, input the 'title/chapter/time' you want to play.
When finished, press the "ENTER" button. The player will automatically begin playing
the 'title/chapter/time' you have selected.
VCD
CD
DVD
TRK
TRK
TT
03/45
03/45
0 0/45 CH
00/02
00:00:00
00:00:00
me'. Using the numeric
00:00:00
STEP
During playback, press this button to step through the video in stages.
22
Page 24

Play discs in various ways
SELECT ANGLE
Some discs have multiple screen angles that you can select from.
Note:
N
Multi Anglefunction
is limitedto a DVD
disc supporting m
angle information.
Forexample: if watching a trainin motion. Youmay select to view the
train from the front, the left, or the right, without stopping playback.
i
ult
Keep pressing the “ANGLE” button untill
the preferred angle appears.
1/3
1/3 (select ANGLE1)
2/3 (select ANGLE2)
3/3 (select ANGLE
3)
ANGLE
ZOOM PLAY
This function can be used to enlarge the current video or image.
Press the "ZOOM" button when playing,
1
the screen displays:
ZOOM
Press the "UP/DOWN/LEFT/RIGHT ”
2
buttons to move the enlarged picture.
PLAY
▲
▲
4
▲
1
ZOOM 2
ZOOM 3
2
3
ZOOM 4
ZOOM: OFF
▲
23
Page 25

Function Setting
MENU SETTING
According to the recorded information and external equipment, set the following functions
for DVD to obtain the best playing status. Press the “SETUP” button to set the main menu.
SETUP
......
TV SYSTEM
SCREEN
SAVER
VIDEO
TV TYPE
PASSWORD
RATING
DEFAULT
NTSC
PAL
AUTO
ON
OFF
INTERLACE
PROGRESSIVE
S-VIDEO
4:3 PAN SCAN
4:3 LETTER BOX
16:9
----
1 KID SAFE
2 G
3 PG
4 PG13
5 PG-R
6 R
7 NC-17
8 ADULT
RESTORE
OSD
LANGUAGE
AUDIO LANG
SUBTITLE
LANG
MENU LANG
Divx[R] VOD
ENGLISH
SPANISH
FRENCH
ITALIAN
ENGLISH
SPANISH
FRENCH
ITALIAN
ENGLISH
SPANISH
FRENCH
ITALIAN
OFF
ENGLISH
SPANISH
FRENCH
ITALIAN
REGISTER CODE
AUDIO OUT
MIC SETUP
ECHO
MIC VOL
OFF
RAW
PCM
AUTO
OFF
8
6
4
2
OFF
8
6
4
2
OFF
24
Page 26

Function Setting
BASIC NAVIGATION
To navigate through the setting on the screen, use the direction buttons to scroll
through the list of settings. Use the “ENTER” button to select the highlighted function.
SETUP MENU
Press the “SETUP” button to enter the on screen display and to exit it at any time. In
each of the menus, selecting the MAIN PAGE (SETUP menu) will immediately return
you to the initial screen.
BRIGHTNESS
CONTRAST
HUE
SATURATION
+6
+4
+2
12
10
12
10
-2
-4
-6
12
10
8
6
4
2
0
8
6
4
2
0
0
8
6
4
2
0
DOWNMIX
LT/RT
...
STEREO
VSS
OP MODE
DYNAMIC
RANGE
DUAL MONO
.....
LINE OUT
STEREO
MONO L
MONO R
MIX MONO
FULL
6/8
4/8
2/8
OFF
SHARPNESS
8
6
4
2
0
25
Page 27

Function Setting
TV SYSTEM
You can select from NTSC, PAL, and AUTO.
• Select "NTSC" for an NTSC TV.
• Select "PAL" for a PAL TV.
• Select "AUTO" for a multi-system TV.
SCREEN SAVER
You can set the screen saver ON or OFF.
VIDEO
You can set the Video Output Mode to RGB,CVBS.
Remarks: This selection can only be made when the HD output resolution is set
at 480P/576P.
TV TYPE
4:3 PAN SCAN
1
This is selected when the player is
connected with a standard TV.
Wide-screen images are shown on the
screen, but with some parts cut
automatically.
4:3 LETTER BOX
2
This is selected when the player is
connected with a standard TV.
Wide-screen images are shown on screen,
with black bars on the top and bottom.
16:9
3
This is selected when the unit is
connected with a wide-screen TV.
PASSWORD
User can input 8888 to access and set rating levels.
RATING
Choose one of the 8 available levels to restrict playback of discs
that contain rating restrictions (for example, to prevent kids from
watching adult content).
26
Page 28

Function Setting
DEFAULT
This allows you to reset the unit to the factory default settings.
Note:
N
“OSD” means
“On Screen
Display”.
LANGUAGE
OSD LANGUAGE
When selecting a language, the screen shows the language you have
selected. For example, if you select ENGLISH, the OSD is in English.
AUDIO LANG
•
Selecting an Audio Language.
Set the audio language as your preferred language. If the audio
language set, is the same as the audio language on the disc, the
discwillautomaticallyplay theset language. Forexample: if English
is set andrecorded as theaudio language on the disc, it will play in
English.
SUBTITLE LANG
•
Selecting Subtitle Language.
Set the subtitle language as your preferred language. If the subtitle
language set, is the same as the subtitle language on the disc, the
disc will automatically play the set language. For example: if English
is set and recorded as the subtitle language on the disc, it will play
in English.
MENU LANG
•
Selecting Disc Menu Language.
Set the disc menu language as your preferred language. If the disc
menu language set, is the same as the disc menu language on the
disc, the disc will automatically play the set language. For example:
if Englishis set andrecordedas the disc menu language on thedisc,
the disc menu will be displayed in English.
27
Page 29

Function Setting
AUDIO OUT
•
OFF
•
RAW
Select this when the DVD player is connected with a power amplifier
through coaxial cable or optical cable. when a dolby digital DVD,
MPEG DVD is played, select this, the coaxial port or optical port
will output in the corresponding digital format (source code).
•
PCM
Select this when the DVD player is connected with a 2-channel
digital stereo amplifier through coaxial cable or optical cable.
BRIGHTNESS
Press UP/DOWN button to adjust the brightness level from 0 to 12.
CONTRAST
Press UP/DOWN button to adjust the contrast level from 0 to 12.
HUE
Press UP/DOWN button to adjust the hue level from -6 to 6.
SATURATION
Press UP/DOWN button to adjust the saturation level from 0 to 12.
SHARPNESS
Press UP/DOWN button to adjust the sharpness level from 0 to 8.
28
Page 30

Function Setting
DOWNMIX
Select Downmix mode to LT/RT, STEREO, VSS.
OP MODE
LINE OUT:It will be more suitable to choose this setting
for playing in the night time, for the output volume is low.
DYNAMIC RANGE
FULL
Set “ Off ” to view a program in the dynamic
range as recorded in disc. If you hear loud
sound softer and soft sound louder, set “Full”.
6/8
4/8
2/8
OFF
DUAL MONO
This is the output mode of the L and R signals of the set audio
output. If it is set to “MIXMONO”, the function only works when
the DVD being played is 2.0-channel.
•
STEREO
Choose this option, the audio output should be dummy stereo
signal.
•
MONO L
•
MONO R
•
MIX MONO
29
Page 31

Others
TROUBLESHOOTING
If you experience the following problems while using this
trouble shooting guide may be able to assist in resolving
the issue.
• NO SOUND
- Check if the player is connected securely.
- Make sure you operate the TV or amplifier correctly.
• NO IMAGE, IMAGE ROLLS AND NO COLOUR
- Check if the player is connected securely.
- Make sure you operate the TV correctly.
- Make sure you set the colour system correctly.
• BAD SOUND QUALITY
- Make sure the audio output mode is set correctly
- Make sure the audio connection between the p al yer amplifier
is correct.
• DISC CAN NOT BE PLAYED
- There is no disc in the player.
- Insert the disc on the disc tray properly with the label side up.
- Clean the disc.
-
Moisture has condensed in the player.
Remove the disc and leave the player. on for about one hour.
.
• REMOTE CONTROL DOES NOT WORK
- Remove barriers between the remote control and the player.
- Replace the batteries with new ones.
- Point the remote control at the remote control sensor of the p al yer.
• MPEG 4 PLAYBACK
- During MPEG4 / Divx playback, the Display will show "MP4".
But this device supports MPEG4 but not the file name ".mp4".
In which ".MP4 is the video format used on cell phone.
30
Page 32

Others
TECHNICAL SPECIFICATIONS
Laser
Video
Frequency response
Signal/noiseratio
Channel separation
Dynamic range
Analog
Output
Audio
Digital
Composite
Output
Video
S-video
Wavelength 650nm
NTSC/PAL/AUTO
20Hz ~ 20KHz (±3dB)
≥ 90dB
≥ 85dB ( 1kHz)
≥ 80dB ( 1kHz)
Output level: 2.0 + 0/-0.2Vrms
(Load impedance: 10k Ω)
Output level: 0.5 ± 0.1Vp-p
(Load impedance: 75 Ω)
Output level: 1.0 ± 0.1Vp-p
(Load impedance: 75 Ω, imbalance, negative polarity)
Output level: brightness (Luma) 1.0 ± 0.1Vp-p
chromaticity (Color) 0.286 ± 20%
(Load impedance: 75 Ω)
Component
Power
Notes: Design and specifications in this instruction manual are subjected to
change without prior notice, to improve the quality and function.
Y: 1Vp-p, Pb/Pr: 0.7Vp-p (Load impedance: 75 Ω)
AC 100-240V~50/60Hz 9W
31
Page 33

Divx
1
ABOUT DIVX VIDEO: ABOUT DIVX VIDEO: DIVX is a digital video
format created by DivX, Inc. This is an official DivX Certified device
that plays DivX video. Visit www.divx.com for more information and
software tools to convert your files into DivX video.
ABOUT DIVX VIDEO-ON-DEMAND: This DivX Certified device must
be registered in order to play DivX Video-on-Demand (VOD) content.
To generate the registration process and learn more about DivX VOD.
2
Pat. 7,295,673
32
Page 34

 Loading...