

Page 1

CSA30-AU
Pri nted in C hina
MD1 00518 -01
2.1 Speaker System
Page 2
-1-
The technical spe cif ica tio ns ar e subject to change
without notice.
congratula ti on s on y ou r pu rc ha se o f th is q ua li ty p ro duct.multimedia
speaker system s wi ll b ri ng a n ex ci ti ng n ew s on ic d im en si on to
computer games ,m us ic , mo vi es a nd m ul ti me dia presentations.
before install at io n, p le as e re ad t hi s ma nu al c ar efully to avoid
electrical sho ck , pe rs on al i nj ur y, and damage to th e pr od uc t.
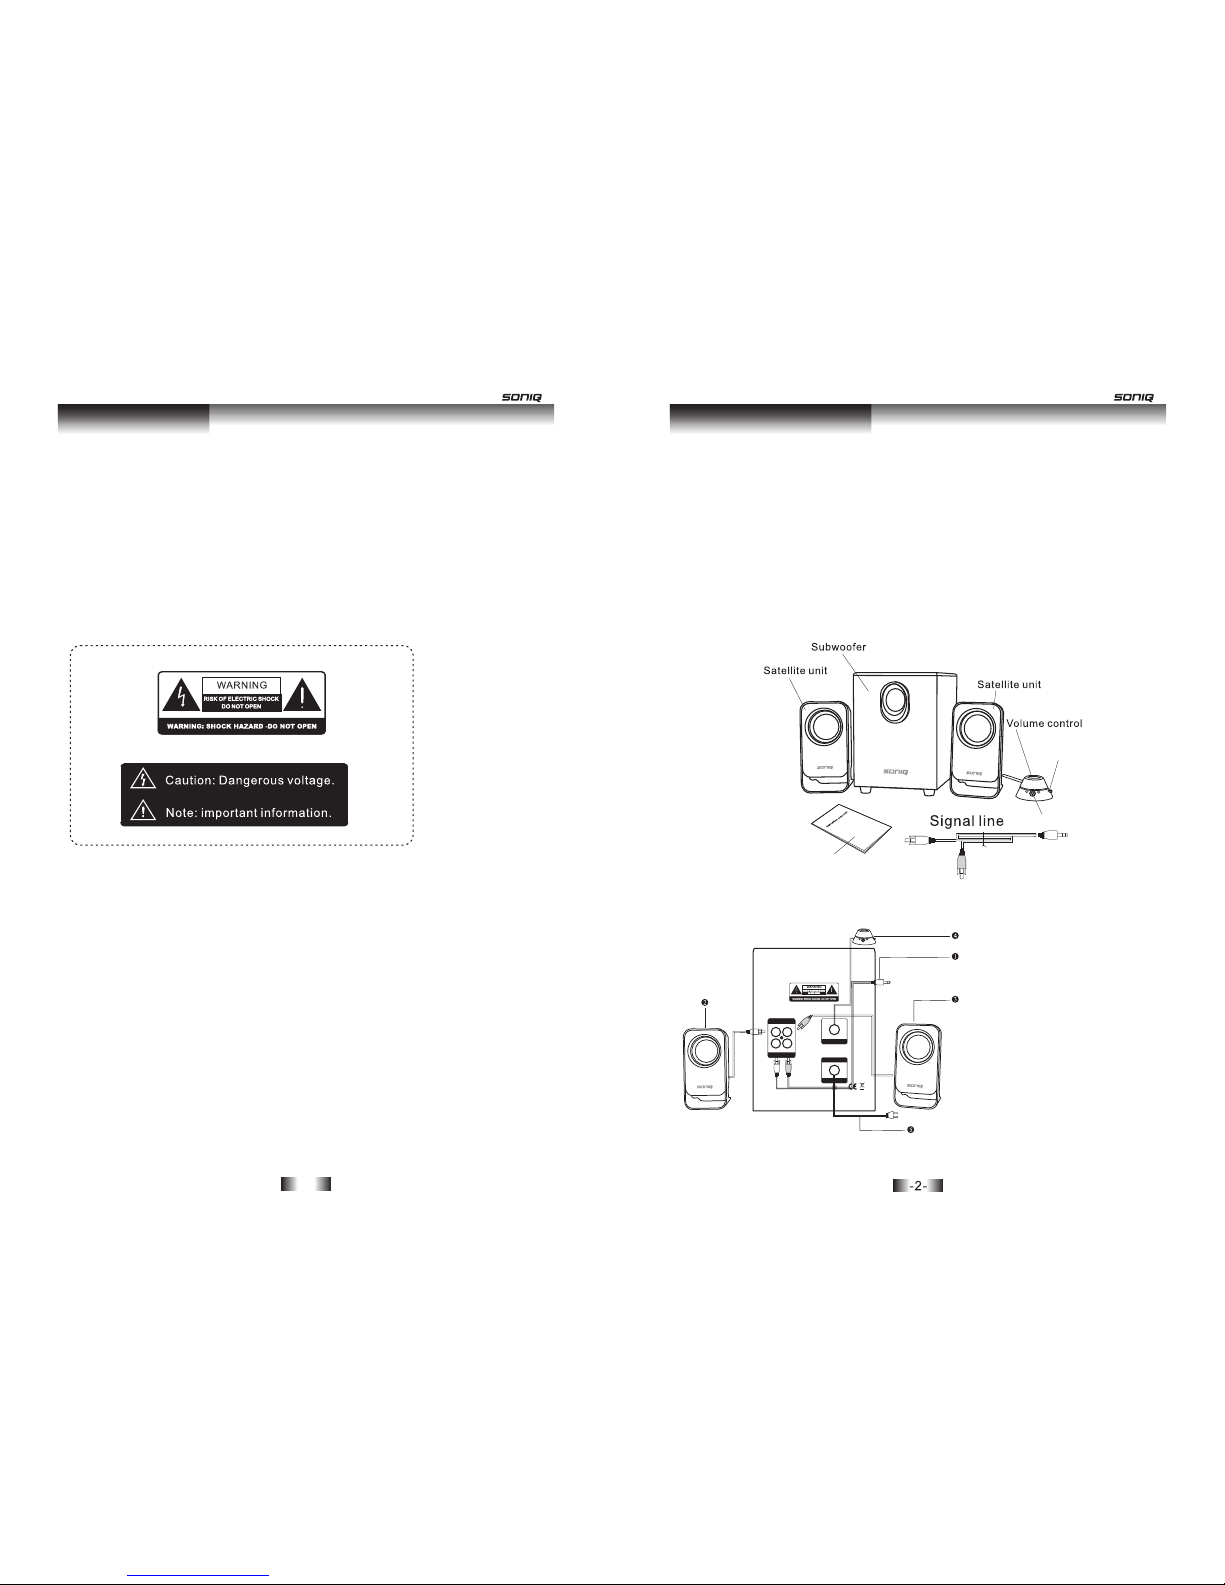
The following ite ms ar e inc lud ed in t his package:
1.Su bw oo fer
2.Two s at el lite unit s wi th w ire(red f or r ig ht and whit e fo r le ft)
3.Si gn al l ine(use d to c on nect PC or st er eo t o the subwo of er i nput)
4.In st ru ction man ua l( this book le t)
5.War ranty Car d
Plea se r ef er to figur e 1 an d be s ure you hav e al l th ese items .P le ase
cont ac t th e retaile r if a ny o f these ite ms a re m issing. Sa ve t his
manu al f or f uture ref er en ce.
Pow er
on/ off
Hea dphon e jack
Inst ru ct ion manua l
Layout of the back pa nel o f the s ubw oof er
1. Si gnal in put ter minal
(RC A plu g)
2. RC A plu g for lef t satel lite un it
3. RC A plu g for rig ht sate llite u nit
4. Vol ume con troll er and po wer
on/ off swi tc h
5. AC po wer cor d
Welcome
Insta llation G uide
CONTROLLER
AUDIO INPUT
SPK OUTPUT
L R
L R
240V~50Hz
POWER
Page 3

Set-u p Procedu re Technic al Specif ication
Make s ur e to t ur n of f yo ur c om puter or au di o eq ui pment. Turn do wn
all vo lu me c on tr ols befor e yo u st ar t se t-up proc ed ur e.
1. Con ne ct t he w ir e of the left s at el li te u nit into th e ja ck o n th e ba ck
pane l of t he s ub wo ofer mark ed L . (R ef er t o figure 2)
2. Con ne ct t he w ir e of the righ t sa te ll it e unit into t he j ac k on t he b ack
pane l of t he s ub wo ofer mark ed R . (R ef er t o figure 2)
3. Con ne ct t he to the L IN E OU T te rm in al o f th e PC or other
audi o eq ui pm en t (or the hea dp ho ne j ac k if a LINE OUT is
unav ai la bl e) , plug the ot he r en d of t he c able to the c or re sp on ding
inpu t ja ck o n th e ba ck panel of t he s ub wo of er. (Refer t o fi gu re 2 )
4. Con ne ct t he AC p ow er cord to an e le ct ri ca l outlet. P re ss t he p ow er
swit ch t o tu rn o n th e speaker s ys te m, a nd t urn your PC o n, t he n pl ay
musi c wi th t he a ud io equipm en t. Ad ju st t he volume c on tr ol , ba lance
cont ro l, t re bl e control , ba ss c on tr ol of the spe ak er s ys te m, along wi th
the co nt ro ls o f yo ur PC or ster eo s ys te m to y our likin g. You c ou ld n ow
be enj oy in g yo ur n ew Multim ed ia s pe ak er system .
sign al l in e
Tro ubl e shooting
Outp ut P ow er: Subwo of er :8W
Satell it e: 3W*2
Spea ke r un it: Subwo of er : 4"
S at el lite: 2.5 ”* 2
Impe da nc e: 4Ω
Freq ue nc y Respons e: S ub woofer: 8 0H z- 250Hz
Satell it e: 180Hz-1 8K Hz
Powe r so ur ce: AC220V, 50 Hz
Sign al -t o-noise r at io : ≥75DB
Diss oc ia tion: ≥40D B
Cont ro l: Vo lume, and P ow er o n/off
Dime ns io n:
Subw oo fe r:150*2 00 *2 15mm(Wx Dx H)
Sate ll it e: 85*82* 14 6m m(WxDxH )
Pack in g si ze: 235*2 05 *3 32mm(Wx Dx H)
Gros s we rg ht: 2.43K G
War nin gs an d Pre cau tions
 Loading...