

Page 1
B501-AU
3D Blu-ray Disc Player
Page 2
Page 3
Warnings and Precautions
• CAUTION: TO PREVENT ELECTRIC SHOCK,
MATCH WIDE BLADE OF PLUG TO WIDE SLOT,
FULLY INSERT.
• CAUTION: Improper controls or adjustments
• CAUTION: There is danger of explosion if battery is
incorrectly replaced. Replace only with the same or
equivalent type.
• WARNING: Do not place the unit on top of any soft,
porous, or sensitive surfaces to avoid damaging the
surface. Use a protective barrier between the unit and
surface to protect the surface.
• WARNING:
may cause interference regarding use of the remote. If
the unit is displaying erratic behavior, move away from
• WARNING: Shock hazard - Do Not Open.
• WARNING: There is a danger of explosion if you
attempt to charge standard Alkaline batteries in the unit.
Only use rechargeable NiMH batteries.
• WARNING: The remote control’s button cell battery
contains mercury. Do not put in the trash, instead recycle
or dispose of as hazardous waste.
Mains plug is used as disconnect device and it should
remain readily operable during intended use. In order
to disconnect the apparatus from the mains completely,
the mains plug should be disconnected from the mains
socket outlet completely.
Do not mix old and new batteries.
Do not mix alkaline, standard (carbon-zinc), or
rechargeable (ni-cad, ni-mh, etc) batteries.
WARNING:TO REDUCE THE RISK OF
ELECTRIC SHOCK, DO NOT REMOVE
COVER (OR BACK). NO USERSERVICEABLE PARTS INSIDE. REFER
SERVICINGTO QUALIFIED SERVICE
PERSONNEL.
an equilateral triangle, is intended to alert the user
to the presence of uninsulated "dangerous voltage"
within the product's enclosure that may be of
shock to persons.
The exclamation point within an equilateral triangle
is intended to alert the user to the presence of
important operating and maintenance (servicing)
instructions in the literature accompanying the
appliance.
This product utilizes a Class 1 laser to read
Compact Discs. This laser Compact Disc Player is
equipped with safety switches to avoid exposure
when the CD door is open and the safety interlocks
are defeated. Invisible laser radiation is present
when the CD Player’s lid is open and the system’s
interlock has failed or been defeated. It is very
important that you avoid direct exposure to the
laser beam at all times. Please do not attempt to
defeat or bypass the safety switches.
Important Safety Instructions
1.
Keep these Instructions.
2.
Heed all Warnings.
Follow all instructions.
3.
4.
Clean only with a dry cloth.
5.
Do not block any ventilation openings. Install in
accordance with the manufacturer’s instructions.
6.
Do not install near any heat sources such as radiators,
heat registers, stoves, or other apparatus (including
7.
Do not defeat the safety purpose of the polarized or
grounding - type plug. A polarized plug has two blades
with one wider than the other.A grounding type plug
has two blades and a third grounding prong. The wide
blade or the third prong are provided for your safety.
consult an electrician for replacement of the obsolete
outlet.
Protect the power cord from being walked on or
8.
pinched particularly at plugs, convenience receptacles,
and the point where they exit from the apparatus.
9.
Use only with a cart, stand, tripod,
manufacturer, or sold with the apparatus.
When a cart is used, use caution when
moving the cart/apparatus combination to
avoid injury from tip-over.
10. Unplug this apparatus during lightning storms or when
unused for long periods of time.
11.
Servicing is required when the apparatus has been
damaged in any way, such as power-supply cord or
plug is damaged, liquid has been spilled or objects
have fallen into the apparatus, the apparatus has been
exposed to rain or moisture, does not operate normally,
or has been dropped.
Additional Warnings
• The apparatus shall not be exposed to dripping or splashing and
apparatus.
• Main plug is used as disconnect device and it should remain readily
operable during intended use. In order to disconnect the apparatus
from the mains completely, the mains plug should be disconnected
form the mains socket outlet completely.
• Caution marking is located at the rear or back of the apparatus.
• The marking information is located at the rear or back of apparatus.
This symbol indicates that this product
incorporates double insulation between
hazardous mains voltage and user
accessible parts.
This product incorporates copyright protection technology that is protected
by U.S. patents and other intellectual property rights. Use of this copyright
protection technology must be authorized by Rovi Corporation, and is intended
for home and other limited viewing uses only unless otherwise authorized by
Rovi Corporation. Reverse engineering and disassembly are prohibited.
Page 4
Table of Contents
Warnings and Precautions . . . . . . . . . . . . . . . 1
•
Important Safety Instructions
• Additional Warnings
Blu-Ray DVD Player . . . . . . . . . . . . . . . . . 3
• Features
• Accessories
• Region Codes
Introduction . . . . . . . . . . . . . . . . . . 4
Connection . . . . . . . . . . . . . . . . . . . . 6
• Connect video cables
•
Connect audio cables
Player Setup . . . . . . . . . . . . . . . . . . 9
• Player Power
• Remote Battery Power
Blu-ray 3D, Blu-ray, DVD and CD . . . . . . . . . . . . . 10
• Loading a Disc
• Playing a Disc
• BD-Live™
• Enjoy Blu-ray 3D
• Display play Information
• Play Menu Settings
Setup/Home Menu . . . . . . . . . . . . . . . . . 12
• Accessing the S
• Basic Menu Operation
• Settings
• BD-Video Data Erase
• Playing or Viewing for USB Drive
• Ethernet Connection
• Systems and outputs
etup Menu
2 . . . . . . . . . . . . . . . . . stnetnoC fo elbaT
41 . . . . . . . . . . . . . . . . troP BSU dna tenrehtE
. . . . . . . Specifications
51 . . . . . . . . . . .
Page 5
Blu-Ray DVD Player
Features
•
3D Blu-ray player: 3D,BD,DVD,CD
•
Blu-Ray playback: 720p, 1080i, 1080p
•
LED display
•
PAL
•
HDMI output
•
Component video output
•
Composite video output
•
Digital coaxial output
•
RCA stereo audio output
•
USB port
•
AC power: built-in AC power cable
Once the Blu-ray system is operated abnormally,
it will behanged up due to the circuit protection.
Please unplug the power
cord and plug it in again
to start operation. Then, the system can be recovered
to normal working.
STANDBY button light changing the colour
from red to green will
be delayed about 10
seconds when turn on the Blu-ray player.
without notice.
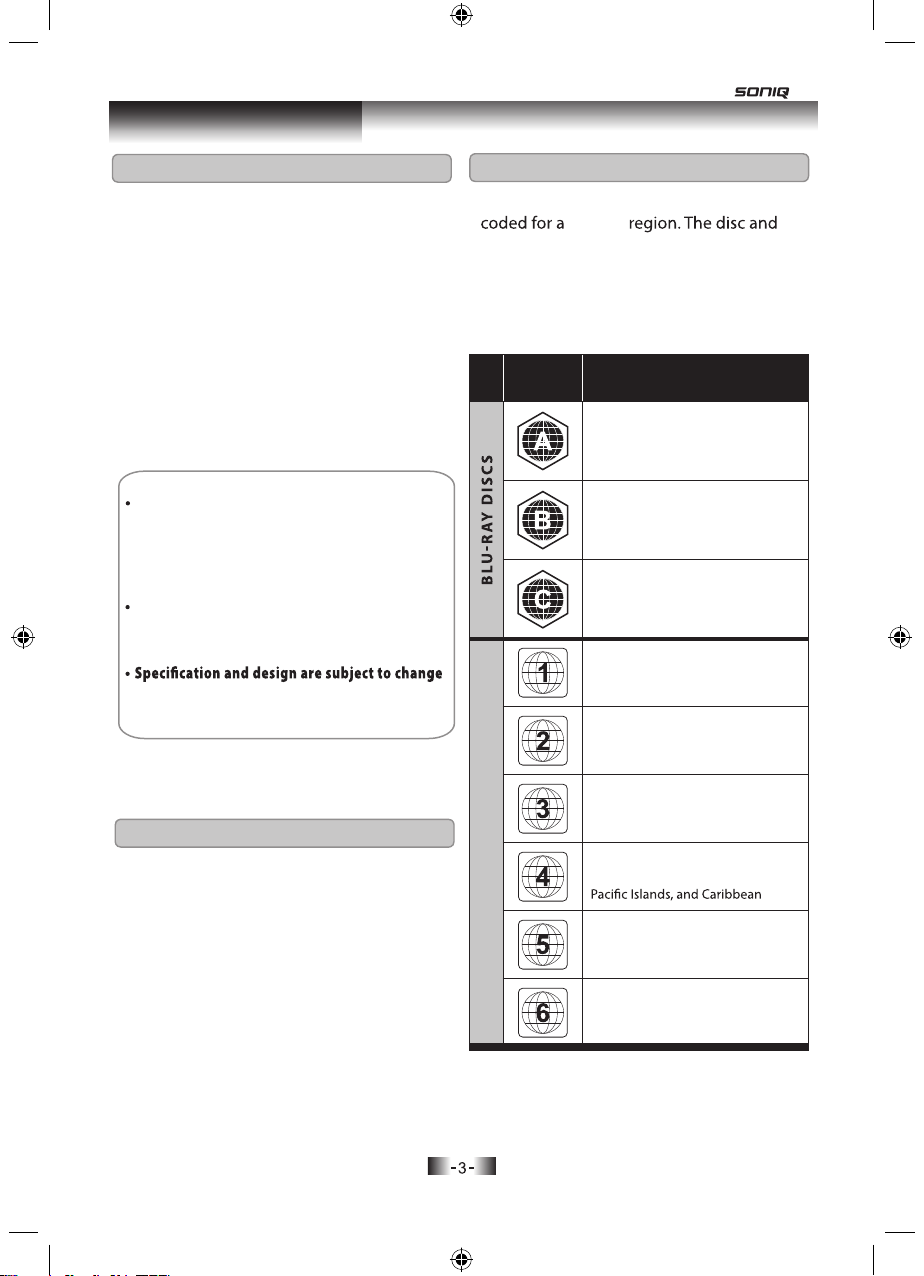
Region Codes
DVD and Blu-ray players and discs are
specif ic
player code must ma
tch in order for the
disc to play in that player.
The region code for this player is located on
the rear panel of the player.
Region
Code
Area/Country
North America, Central America,
South America, Korea, Japan,
Taiwan, Hong Kong, South East Asia
Europe, Greenland, French
territories, Middle East, Africa,
Australia, and New Zealand
India, China, Russia, Central Asia,
and South Asia
The U.S.A., U.S.A. territories, and
Canada
Europe, Japan, the Middle East,
Egypt, South Africa, Greenland
Included
• Remote control
•
1 RCA video/audio cable
•
User’s guide
Taiwan, Korea, the Philippines,
Indonesia, and Hong Kong
Mexico, South America, Central
DV D DI SCS
America, Australia, New Zealand,
Russia, Eastern Europe, India, North
Korea, Mongolia, and most of Africa
China
Page 6
Introduction
DISC DRAWER
POWER CORD
DISPLAY
OPEN/CLOSE
Press to open or close
the DISC DRAWER.
DIGITAL COAXIAL
AUDIO OUTPUT
Press to stop a loaded
disc during play.
PLAY
Press to play a
loaded disc.
COMPONENT VIDEO
OUTPUT
STOP
USB PORT
STANDBY
Press to turn the player
ETHERNET PORT
ETHERNET
HDMI OUTPUT
COAXIAL
DIGITAL OUT
Cb/Pb
Cr/Pr
Y
R
L
CVBS
AV OUT
RCA STEREO AUDIO
OUTPUT
COMPONENT
VIDEO OUT
COMPOSITE
OUTPUT
VIDEO
Page 7

Introduction
STANDBY
NUMBER KEYPAD
NUMBER KEYPAD
CLEAR
Press to clear number entered by the
Press to clear number entered by the
Press to BD/USB button choose among
FORWARD/REVERSE
Press to adjust the speed to play a
Reset HDMI output resolution to 480P
Press to access the setup menu.
Press to access the setup menu.
Press to access the play menu.
Press to play the loaded disc.
Press to play the loaded disc.
Press to pause a loaded disc during play.
Press to pause a loaded disc during play.
Press repeatedly to adjust the level of
Press repeatedly to adjust the level of
zoom on the loaded disc.
zoom on the loaded disc.
Press to switch between available audio
Press t
o switch between available audio
settings on the loaded disc.
settings on the loaded disc.
This button can realize the 30 seconds
CLEAR
number keypad.
number keypad.
BD/USB
BD or USB.
loaded disc.
HDMI
SETUP
SE
PLAY MENU
PLAY
AY
PAUSE
PAUSE
ZOOM
ZOOM
AUDIO
AUDIO
SKIP
back and forward.
CLEAR RETURN
BD/USB
HDMI
SETUP
ENTER
PLAY MENU
ZOOM
SEARCH
SKIP
PIP
AUDIO
QT154
POP-MENU
TITLE
TOP MENU
DISPLAY
A-B
OPEN/CLOSE
OPEN/CLOSE
Press to open and close the DISC DRAWER.
Press to open and close the DISC DRAWER.
RETURN (DVD ,CD only)
RETURN
Press to return to previous menus within
the DVD,CD menus.
PREV/NEXT
PREV/NEXT
Press to skip between chapters and tracks
Press to skip between chapters and tracks
on a loaded disc.
on a loaded disc.
POP-MENU/TITLE
Press to view the popup menu on
Press to view the popup menu on
supported discs. Press to return the title
supported discs. Press to return the title
menu.
menu.
ARROW /ENTER
ARROW /ENTER
TOP MENU
Press to access the top menu.
STOP
STOP
Press to stop the loaded disc during play.
Press to stop the loaded disc during play.
DISPLAY
Press to display the provided play status.
SEARCH
A-B
During the normal or fast motion playback.
Press A-B once and “A-” will appear on the
screen. This indicates the start of the loop to
be repeated. Press A-B again and “A-B” will
appear on the screen. It indicates the end
of the loop. Press A-B a third time to cancel
playback repeat.
PIP
Press to view multiple videos(picture in
picture) simultaneously on supported
DVD discs.
Color buttons (red, green, yellow, blue)
According to the content of the disc hint
operation.
5
Page 8

Connection
Connect video cables
Good Video Quality
Composite Video Output
Requires a RCA video cable (included)
COMPONENT
VIDEO OUT
COAXIAL
CrCbY
R
L
CVBS
DIGITAL OUT
ETHERNET
AVOUT
1. Plug the RCA video cable into the
COMPOSITE VIDEO OUTPUT on
the player and a composite video
input on a television.
TThe standarhe standard cd color for color for compompositosite e e etiso tisopmo pmoc rof rolo c rof roloc d c dh standarh standarT e etiso tisopmo pmoc rof rolo c rof roloc d c dh standarh standarT
video pvideo pororts is yts is yelloelloww.. .olle olley si st y si strorop oediv p oediv .olle olley si st y si strorop oediv p oediv
2. Adjust the connected television to
the input source used in step #1.
3. This will allow video from the
player to show on the connected
television.
TTo play audio fro play audio from the playom the player er To play audio fr re reyalp eht mo yalp eht morf oidua yalp oTo play audio fr re rep eht mo yalp eht mo layrf oidua yalp o
thrthrouough ygh your tour television, folloelevision, follow the w the ur tour ty hg y hguouorht rht o elevision, follo eht w e
ht wollof ,noisivele ollof ,noisivelet ruo t ruoy hg y hguouorht rht eht w eht wollof ,noisivele
instrucinstructions for Rtions for RCCA StA Sterereo Aeo Audio udio curtsni curtsni oiduA oe A oerereA StA StCR rof snoit R rof snoitcurtsni curtsni oiduA oe A oerereA StA StCR rof snoit R rof snoit
OOutpututput or D or Digital Cigital Coaxial Aoaxial Audio udio C latigi C latigiD ro D ro ut utut utO oidu oiduA laixao A laixaoC latigi C latigiD ro D ro ut utut utO oidu oiduA laixao A laixao
OOutpututput..ut utut utO .ut utut utO
Better Video Quality
Component Video Output
Requires a RCA component video
cable (not included)
COMPONENT
VIDEO OUT
COAXIAL
CrCbY
R
L
CVBS
DIGITAL OUT
ETHERNET
AVOUT
1. Plug the RCA component video
cable into the COMPONENT
VIDEO OUTPUT on the player and
a component video input on a
television.
The standard colors for component The standard colors for component The standard colors for component The standard colors for component The standard colors for component The standard colors for component The standard colors for component The standard colors for component The standard colors for component The standard colors for component
video ports are green, blue, and red. video ports are green, blue, and red. video ports are green, blue, and red. video ports are green, blue, and red. video ports are green, blue, and red. video ports are green, blue, and red. video ports are green, blue, and red. video ports are green, blue, and red. video ports are green, blue, and red. video ports are green, blue, and red.
2. Adjust the connected television to
the input source used in step #1.
3. This will allow video from the
player to show on the connected
television.
To play audio from the player through To play audio from the player through To play audio from the player through To play audio from the player through To play audio from the player through To play audio from the player through To play audio from the player through To play audio from the player through To play audio from the player through To play audio from the player through To play audio from the player through To play audio from the player through
your television, follow the instructions your television, follow the instructions your television, follow the instructions your television, follow the instructions your television, follow the instructions your television, follow the instructions your television, follow the instructions your television, follow the instructions your television, follow the instructions your television, follow the instructions your television, follow the instructions your television, follow the instructions
for RCA Stereo Audio Output or Digital for RCA Stereo Audio Output or Digital for RCA Stereo Audio Output or Digital for RCA Stereo Audio Output or Digital
for RCA Stereo Audio Output or Digital for RCA Stereo Audio Output or Digital for RCA Stereo Audio Output or Digital for RCA Stereo Audio Output or Digital for RCA Stereo Audio Output or Digital for RCA Stereo Audio Output or Digital for RCA Stereo Audio Output or Digital for RCA Stereo Audio Output or Digital
Coaxial Audio Output.Coaxial Audio Output.Coaxial Audio Output.Coaxial Audio Output.Coaxial Audio Output.Coaxial Audio Output.Coaxial Audio Output.Coaxial Audio Output.Coaxial Audio Output.Coaxial Audio Output.Coaxial Audio Output.Coaxial Audio Output.
6
Page 9

Connection
Best Video Quality
HDMI Output
Requires a HDMI cable (not included)
HDMI
HDMI
COMPONENT
VIDEO OUT
COAXIAL
CrCbY
R
L
CVBS
DIGITAL OUT
ETHERNET
AVOUT
1. Plug the HDMI cable into the
HDMI OUTPUT on the player and
an HDMI input on a television.
2. Adjust the connected television to
the input source used in step #1.
3. This will allow video and audio
from the player to play through the
connected television.
Connect audio cables
Good Audio Quality
RCA Stereo Audio Output
Requires a RCA stereo audio cable
(included)
VIDEO OUT
COMPONENT
COAXIAL
CrCbY
R
L
CVBS
DIGITAL OUT
ETHERNET
AVOUT
1. Plug the RCA stereo audio cable
into the RCA STEREO AUDIO
OUTPUT on the player and a RCA
stereo audio input on a television
or home theater system.
The standard color for RCA stereo The standard color for RCA stereo The standard color for RCA stereo The standard color for RCA stereo The standard color for RCA stereo The standard color for RCA stereo
audio ports is red and white.audio ports is red and white.audio ports is red and white.audio ports is red and white.audio ports is red and white.audio ports is red and white.
2. Adjust the connected television or
home theater system to the input
source used in step #1.
3. This will allow audio from the
player to play on the connected
television or home theater system.
To play video from the player To play video from the player To play video from the player To play video from the player To play video from the player To play video from the player
through your television, follow the through your television, follow the through your television, follow the through your television, follow the through your television, follow the through your television, follow the
instructions for Composite Video instructions for Composite Video instructions for Composite Video instructions for Composite Video instructions for Composite Video instructions for Composite Video
Output, Component Video Output, Output, Component Video Output, Output, Component Video Output, Output, Component Video Output, Output, Component Video Output, Output, Component Video Output,
or HDMI Output.or HDMI Output.or HDMI Output.or HDMI Output.or HDMI Output.or HDMI Output.
Page 10

Connection
Better Audio Quality
Coaxial Digital Audio Output
Requires a coaxial digital audio cable
(not included)
COMPONENT
VIDEO OUT
COAXIAL
CrCbY
R
L
CVBS
DIGITAL OUT
ETHERNET
AVOUT
1. Plug the coaxial digital audio
cable into the COAXIAL DIGITAL
AUDIO OUTPUT on the player and
a coaxial digital audio input on a
television or home theater system.
The standard color for coaxial digital The standard color for coaxial digital The standard color for coaxial digital The standard color for coaxial digital The standard color for coaxial digital The standard color for coaxial digital
audio ports is orange.audio ports is orange.audio ports is orange.audio ports is orange.audio ports is orange.audio ports is orange.
2. Adjust the connected television or
home theater system to the input
source used in step #1.
3. This will allow audio from the
player to play on the connected
television or home theater system.
To play video from the player To play video from the player To play video from the player To play video from the player To play video from the player To play video from the player
through your television, follow the through your television, follow the through your television, follow the through your television, follow the through your television, follow the through your television, follow the
instructions for Composite Video instructions for Composite Video instructions for Composite Video instructions for Composite Video instructions for Composite Video instructions for Composite Video
Output, Component Video Output, Output, Component Video Output, Output, Component Video Output, Output, Component Video Output, Output, Component Video Output, Output, Component Video Output,
or HDMI Output.or HDMI Output.or HDMI Output.or HDMI Output.or HDMI Output.or HDMI Output.
Attention:
Please unplug the unit from AC outlet before create or change any output
connection.
Page 11

Player Setup
Player Power
Plug the attached AC cord into a
standard AC power outlet to power the
unit.
Remote Battery Power
Requires 2, AAA size, batteries
Page 12

Blu-ray 3D, Blu-ray, DVD and CD
Loading a D
1. Press the STANDBY button to turn the
player on.
2. Press the OPEN/CLOSE button to open
the DISC DRAWER.
3. Load a disc in
label side facing up.
4. Press the OPEN/CLOSE button to close
the DISC DRAWER.
isc
to the DISC DRAWER,
Playing a Disc
1. Follow the instructions for Loading a
Disc.
After the disc is loaded, it will begin After the disc is loaded, it will begin After the disc is loaded, it will begin After the disc is loaded, it will begin After the disc is loaded, it will begin After the disc is loaded, it will begin
playing automatically.playing automatically.playing automatically.playing automatically.playing automatically.playing automatically.
2. If the disc doesn’t begin playing
automatically, press the PLAY button.
BD-Live™
BD-Live is an advanced Blu-ray disc feature
that allows you to view and download
additional content provided by the disc
manufacturer.
BD-Live features can be accessed through
the main menu of a loaded Blu-ray disc that
supports this feature.
BD-Live requires an internet connection and a BD-Live requires an internet connection and a BD-Live requires an internet connection and a BD-Live requires an internet connection and a
Blu-ray disc that supports this feature.Blu-ray disc that supports this feature.Blu-ray disc that supports this feature.Blu-ray disc that supports this feature.
BD-Live may sometimes require additional BD-Live may sometimes require additional BD-Live may sometimes require additional BD-Live may sometimes require additional
storage space. Connect a 2GB or larger storage space. Connect a 2GB or larger storage space. Connect a 2GB or larger storage space. Connect a 2GB or larger
USB thumb drive to the USB port if you are USB thumb drive to the USB port if you are USB thumb drive to the USB port if you are USB thumb drive to the USB port if you are
experiencing issues with BD-Live.experiencing issues with BD-Live.experiencing issues with BD-Live.experiencing issues with BD-Live.
Enjoy Blu-ray 3 D
Enjoy with a "Blu-ray3 D" sign of Blu-ray 3 D.
Prepare for Blu-ray 3D Disc. Play back.
1. Connect the 3D player with 3D compatible
TV via HDMI cable.
2. In the Setup Menu, set up 3D player and 3D
compatible TV format such as 16:9,4:3 etc.
3. Load Blu-ray 3D Disc. According to different
type of 3D Disc., the display/operation
maybe exist tiny difference, please refer to
the information for disc.
0
Page 13

Blu-ray 3D, Blu-ray, DVD and CD
continued
Display play information
Press "Display" button to turn on/off the
setup status. The play status may be
difference depending on disc type, For
example: when playing a DVD.
Play menu Settings
Press the PLAY MENU button on the remote
control, accessing Setup Menu, use Enter and
Arrow buttons to set up.
The "Play Set" menu will be different according
to the different format disc. When play 3D disc,
the menu appear like this as below.
Play set
Disc
• Signal Type
• Subtitle info
• Subtitle Style
• Angle
Play back
• Repeat
• 3D DEPTH
Video
• Picture
• Progressive
Audio
• Sound Effect
• Cinema Voice
Page 14

Setup/Home Menu
deunitnoc
Accessing the Setup Menu
1. Press the SETUP button to
access the setup menu.
Some options in the setup menu are Some options in the setup menu are Some options in the setup menu are Some options in the setup menu are Some options in the setup menu are
only available if the player is in full-only available if the player is in full-only available if the player is in full-only available if the player is in full-only available if the player is in fullstop mode. To enter full-stop mode, stop mode. To enter full-stop mode, stop mode. To enter full-stop mode, stop mode. To enter full-stop mode, stop mode. To enter full-stop mode,
press the press the press the press the press the STOP button on the remote button on the remote button on the remote button on the remote button on the remote
twice.twice.twice.twice.twice.
Basic Menu Operation
1. Press the ARROW buttons to
navigate the setup menu.
2. Press the ENTER button on the
remote to make selections within
the setup menu.
3. Press the SETUP button to
exit the setup menu.
Settings
General
Restore settings
Screen Saver (On or Off)
Video
TV Aspect
•
4:3 Pan & Scan
•
4:3 Letterbox
•
16:9
•
16:9 Full
HDMI
• Resolution (Auto、480i/576i、
480p/576p、720p、1080i、
1080p、1080p/24p)
• RGB Output Range (Standard or
Enhanced)
• Color Space (Auto、YcbCr4:4:4、
YcbCr4:2:2、RGB)
• High Bitrate Audio (Auto、On or Off)
Audio
Night Mode
(Auto、On or Off)
PCM Down Conversion (On or Off)
Digital Audio Output (PCM、Bitstream)
BD Click Sound (On or Off)
Language
Audio language
Subtitle language
Menu language
On-Screen Language
Parental
DVD - video Ratings
•
(0 - 8 )
BD- Video Age Limit
•
(No Limit)
Unlock player
•
(DVD & BD video unlock)
Temporary Unlock
•
(DVD & BD video unlock)
Change Password
Enter to set the parental control.
the password is 0000.
12
Page 15

Setup/Home Menu
contin ued
Network
LAN Settings
• IP/ DNS Setting (IP:Auto
DNS: Auto)
• Access Setting
Proxy Server Settings
• Initialize (Initialize)
• Proxy Address
• Proxy Port Number
BD-Live Access
• Permit
• Limit
• Prohibit
、
BD- Video Data Erase
Press the "SETUP" button to access the
SETUP menu and then press the navigation
key to choose "BD - Video Data Erase",
confirmed will appear as the following
interface:( You can choose "Start" or
"Cancel" according to need.)
BD -VIDEO DATA ERASE
BD-Video data Erase is selected. BD -Video data on the USB will be
erased. Do you want to proceed?
Start
Cancel
13
Page 16

Ethernet and USB Port
contin ued
Playing or Viewing for USB Drive
(not included)
1. Connect a USB drive to the USB
PORT on the front of the player.
port one way.or .or .or .or ......
USB/HDD can only read the format
of FAT or FAT32.
Format which can be played under
USB/HDD mode is MP3 or MPEG-4.
2. Press the BD / USB button
on the remote.
3. Use the ARROW buttons to select
the connected USB drive.
4. Press the ENTER button.
Ethernet Connection
This player allows you to connect to
network based services such as BD-Live™,
and receive software updates.
Requires an ethernet cable
(not included)
COMPONENT
VIDEO OUT
COAXIAL
CrCbY
R
L
CVBS
DIGITAL OUT
ETHERNET
AVOUT
OR
ROUTERMODEM
1. Plug the ethernet cable into the
ETHERNET PORT on the player
and an ethernet port on a router
or modem with an internet
connection.
After connecting the player to a After connecting the player to a After connecting the player to a After connecting the player to a After connecting the player to a After connecting the player to a
router or modem, the player will router or modem, the player will router or modem, the player will router or modem, the player will router or modem, the player will router or modem, the player will
automatically connect to the automatically connect to the automatically connect to the automatically connect to the automatically connect to the automatically connect to the
internet.internet.internet.internet.internet.internet.
You can access your network settings You can access your network settings You can access your network settings You can access your network settings You can access your network settings You can access your network settings
in the player’s setup menu.in the player’s setup menu.in the player’s setup menu.in the player’s setup menu.in the player’s setup menu.in the player’s setup menu.
BD-Live may sometimes require BD-Live may sometimes require BD-Live may sometimes require BD-Live may sometimes require BD-Live may sometimes require BD-Live may sometimes require
additional storage space. Connect additional storage space. Connect additional storage space. Connect additional storage space. Connect additional storage space. Connect additional storage space. Connect
a 2GB or larger USB thumb drive to a 2GB or larger USB thumb drive to a 2GB or larger USB thumb drive to a 2GB or larger USB thumb drive to a 2GB or larger USB thumb drive to a 2GB or larger USB thumb drive to
the USB port if you are experiencing the USB port if you are experiencing the USB port if you are experiencing the USB port if you are experiencing the USB port if you are experiencing the USB port if you are experiencing
issues with BD-Live. issues with BD-Live. issues with BD-Live
. issues with BD-Live. issues with BD-Live. issues with BD-Live.
5. Use the ARROW buttons to
navigate the connected USB and
press the ENTER button to make
selections, view photos, or play
music.
14
Page 17

Specifications
Systems and outputs
Media
VF signal system PAL
Video output Electric level output 1.0 Vp-p, Resistance: 75 Ω
Audio output Output level 2Vrms (1 kHz, 0 dB)
Audio
performance
HDMI Output Output format Auto, 480i/576i, 480/576p, 720p, 1080i,
Blu-ray 3D,
DVD+R/-R DL, CDR/CD-RW, Audio CD, Picture CD, MP3,MPEG-4
Output connector Pin jack (1 system)
Output connector Pin jack
Number of
connectors
Frequency response DVD (linear
S/N ratio 90 dB
Dynamic range 80 dB
Total harmonic
distortion
BD-R
OM, BD-RE, DVD-Video, DVD+R/+RW,
2.0 channel: 1 system
audio)
CD-Audio 20Hz to 20 kHz
0.1%
1080p
20 Hz to 22 kHz
(48 kHz sampling)
20 Hz to 44 kHz
(96 kHz sampling)
deunitnoc
DVD-R/-RW,
General
Power 100 V - 240 V ~ 50/60 Hz
Power consumption 15 W
Product dimensions 360 mm (L) x 230 mm (W) x 38 mm (H)
Operating temperature
Notes: Design and specifications in this instruction manual are subjected to change
without prior notice, to improve the quality and function.
5°C to 35°C
15
Page 18

Page 19

Page 20

MD111013-01
HOT LIN E
• AUS TRA LIA : 1300 76 5 663
•
NE W ZEA LAN D
: 080 0 100 236
 Loading...